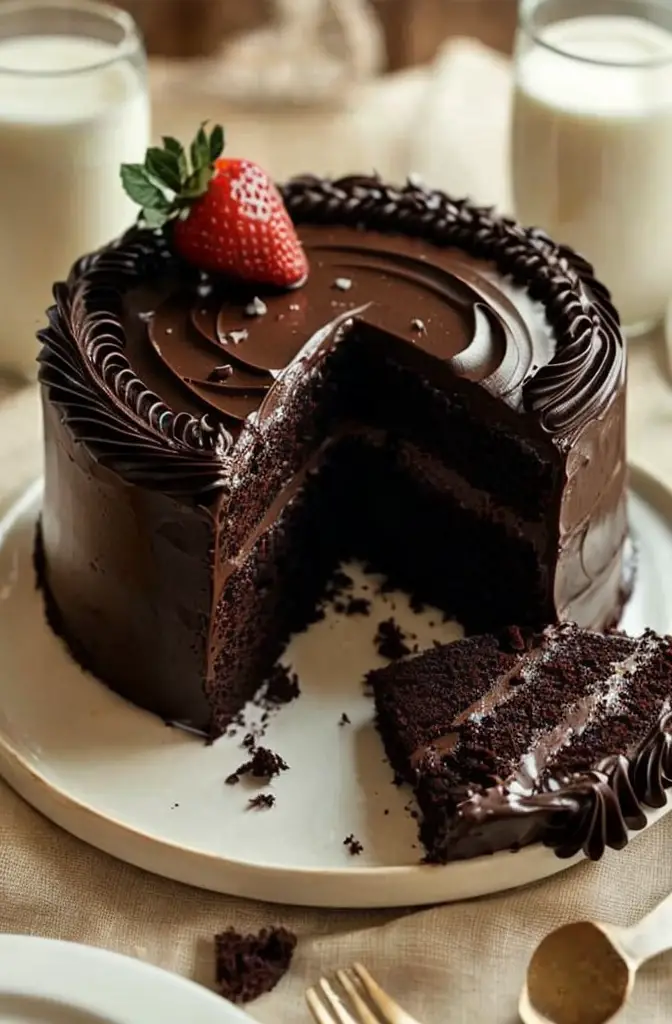
Black Forest Roll Cake – A Chocolate & Cherry Delight
Black Forest Roll Cake is a stunning dessert that beautifully combines layers of rich chocolate cake with luscious cherries and whipped cream. This delightful treat not only satisfies your sweet tooth but also showcases a beautiful presentation that is perfect for any celebration. Imagine rolling together moist chocolate cake, cherries, and whipped cream to create a delightful spiral that tastes as good as it looks. It’s a treat that evokes feelings of indulgence and joy, perfect for sharing with friends and family.
Each bite of this chocolate and cherry delight invites you into a world of flavor where the sweetness of cherries balances perfectly with the bittersweet cocoa. The whipped cream adds an element of lightness, ensuring that this dessert feels festive yet refined. As you prepare this roll cake, the enticing aroma of cocoa baking in the oven will fill your kitchen, creating an atmosphere of warmth and anticipation. This recipe will not only impress your guests but will also become a beloved favorite in your dessert repertoire.
Quick Recipe Highlights
- Flavor Profile: The rich chocolate pairs perfectly with tart cherries, creating a harmonious balance that is both sweet and slightly tangy.
- Texture: The cake is fluffy and light, while the filling adds a creamy element that melts in your mouth, providing a delightful contrast.
- Aroma: The enticing scent of baked cocoa lingers temptingly, making it hard to resist sneaking a taste before it’s ready to serve.
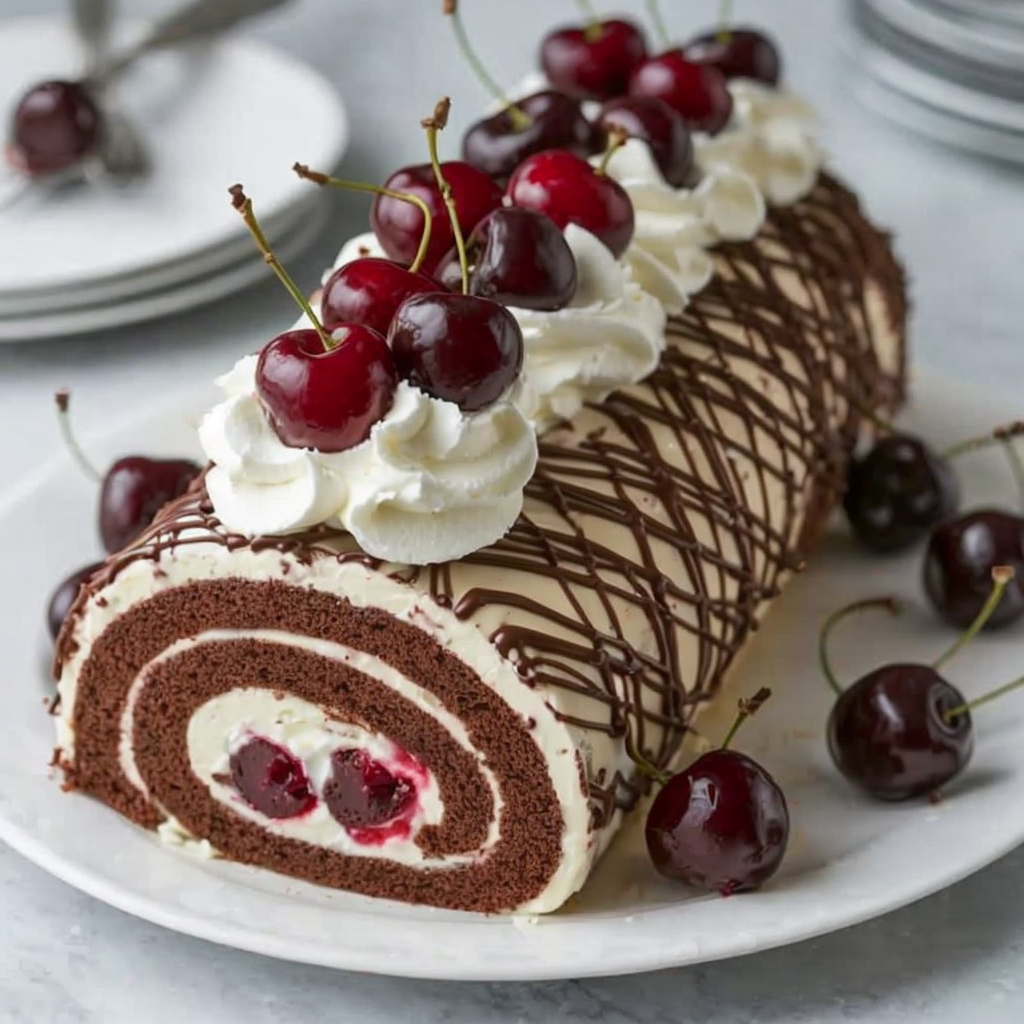
- Visual Appeal: Swirls of chocolate and vibrant red cherries create a visually striking dessert that is a feast for the eyes.
- Skill Level Needed: While the recipe requires some baking skills, it is approachable for both novice and experienced bakers.
- Special Equipment: A parchment-lined baking tray and an electric mixer facilitate the preparation of this cake.
Recipe Overview
- Difficulty Level: The Black Forest Roll Cake is considered moderate in difficulty due to the rolling process, which requires careful technique to ensure the cake doesn’t crack.
- Category: This decadent dessert falls under the category of cakes and is perfect for celebrations or special occasions.
- Cuisine: Originating from Germany, this recipe reflects traditional culinary influences that highlight chocolate and cherries as key ingredients.
- Cost: The approximate cost of ingredients can vary, but it is an affordable cake that won’t break the bank, equaling great value for a spectacular dessert.
- Season: Enjoy this delightful roll cake year-round, although it shines especially in summer when cherries are in season.
- Occasion: Ideal for birthdays, holidays, or any gathering where you want to impress your guests with a show-stopping dessert.
Why You’ll Love This Recipe
This Black Forest Roll Cake is not just visually stunning; it delivers an exceptional taste that will leave your guests craving more. The delightful combination of chocolate and cherries creates a mouthwatering experience that plays with flavors and textures. You’ll appreciate the precision of balancing the tartness of the cherries with the sweet chocolate frosting, which culminates in a memorable dessert that feels indulgent yet light.
Preparing this roll cake is also a fun and engaging process, making it perfect for baking enthusiasts who enjoy hands-on projects. As you layer the ingredients, you’ll appreciate the pleasure that comes from creating something beautiful that will impress your friends and family. With each step, from baking to rolling, you’ll be delighted by the transformation of simple ingredients into a delightful masterpiece.
From a nutritional standpoint, the Black Forest Roll Cake offers some advantages as well. Using fresh cherries contributes vitamins, antioxidants, and fiber, enriching this dessert beyond just indulgence. Coupled with the right portion sizes, it can fit comfortably into a balanced diet while still satisfying your sweet cravings.
When it comes to social gatherings, this roll cake serves as a conversational starter at any table. Its elegant presentation and exquisite taste make it a highlight for guests, fostering a sense of warmth and connection as everyone enjoys a piece together. Plus, the cost-effectiveness of creating a stunning dessert at home rather than purchasing one from a bakery makes it an accessible treat for all.
Last but not least, the recipe has great versatility. You can adjust its sweetness or tweak flavors to suit your preferences, leading to endless variations that can keep this dessert fresh and exciting each time you prepare it. Whether it’s substituting the cherries for other berries or playing with additional flavors, the Black Forest Roll Cake remains an adaptable classic.
Historical Background and Cultural Significance
The origins of the Black Forest Roll Cake trace back to Germany, a nation renowned for its rich chocolate desserts and celebratory cakes. Traditionally enjoyed in the Black Forest region, the cake beautifully encapsulates elements of local culture, where the bold flavors of chocolate intertwine with the region’s famous cherries. This dessert has evolved to symbolize festivities and is often associated with significant celebrations, adding to its cultural richness.
As this dessert gained popularity, it transcended geographical boundaries and became a beloved dish worldwide. The distinct layering and rolling technique signified a peak of creativity in pastry making, showing that even within traditional recipes, there exists room for evolution. It stands today as a prime example of how culture influences culinary traditions while allowing room for innovation.
The recipe has evolved, incorporating various flavor adaptations and presentation styles worldwide. Each region has taken its own spin, leading to delightful variations that still maintain the essence of the classic roll cake. In modern times, the Black Forest Roll Cake has made its way into countless homes, becoming a staple for many families and cherished during special occasions.
Different variations have also emerged, such as integrating liqueurs or other fruits to elevate the flavor profile. As baking styles continue to evolve, the classic Black Forest Roll Cake remains a foundation upon which many like-minded recipes are built, holding its legacy as a timeless cake that is both historic and beloved.
Ingredient Deep Dive
Chocolate: As a fundamental ingredient, chocolate is rich in flavor and history. It has been revered in culinary traditions for centuries, originating from the cacao tree, native to Central America. The health benefits of dark chocolate, particularly its antioxidants, contribute to heart health and overall well-being. When selecting chocolate, opt for high-quality brands with at least 70% cocoa content for a richer taste. Store chocolate in a cool, dry place to maximize its longevity, and consider substituting it with cacao powder for a lighter dessert.
Cherries: Cherries bring not only vibrant color but also a plethora of health benefits, being rich in vitamins C and A, antioxidants, and fiber. This stone fruit has historical significance in various cultures, often representing abundance and prosperity. When choosing cherries, look for firm, plump, and deep-colored fruits. If fresh cherries are unavailable, frozen options can also work well. Always store cherries in a refrigerator for freshness, and consider using dark sweet cherries for a richer flavor in the roll cake.
Whipped Cream: Whipped cream adds a light, airy texture that beautifully complements the richness of the chocolate. Its history dates back to the 16th century, becoming a popular staple in desserts around the world. The nutrition in whipped cream primarily consists of fats, making it a source of energy. For the best results, use heavy cream that can hold peaks and can be flavored with vanilla for added depth. Keep whipped cream refrigerated until use, and consider alternatives like coconut cream for a dairy-free version.
Sugar: As a sweetener, sugar plays an essential role in enhancing flavors and balancing the tartness of the cherries. Derived from sugar cane or sugar beets, it has a long history of use in cooking and baking. Sugar not only provides sweetness but also aids in texture and moisture retention in baked goods. Opt for granulated sugar for best results in this cake, and it’s advisable to store sugar in an airtight container to prevent clumping and moisture. Brown sugar can be used for a deeper flavor if desired.
Common Mistakes to Avoid
- Overmixing the batter: Incorporating too much air can lead to a dense cake. Mix just until combined for a light texture.
- Not lining the baking tray: A parchment paper lining is crucial for easy removal. Failing to do so may ruin the cake’s shape.
- Using old ingredients: Always check the expiration dates on your baking ingredients, especially baking powder and flour, to ensure freshness.
- Skipping the chilling step: Allowing the cake to cool completely before rolling is essential to prevent cracks and breakage.
- Rolling while warm: Always roll the cake while it’s still warm but not hot to maintain its structure and avoid tearing.
- Not measuring ingredients correctly: Accurate measurements are key in baking. Use a kitchen scale for precision if possible.
- Cooling on a wire rack: Cooling the cake directly on the pan can lead to condensation and unwanted moisture in the cake.
- Underestimating filling quantities: Ensure that you spread enough filling to enhance flavor without overwhelming the roll.
- Neglecting decoration: The final presentation is important, so take care to dust with powdered sugar or add cherries on top before serving.
- Serving too hot: Allow the roll to chill for proper slicing. A warm roll can crumble and ruin the presentation.
Essential Techniques
Rolling the Cake: Mastering the rolling technique is fundamental to creating a beautiful Black Forest Roll Cake. Start with a clean, floured kitchen towel to help guide the cake as you roll it. The key is to be gentle but firm, allowing the cake to follow its natural shape without forcing it. A common pitfall is applying too much pressure, which can cause cracks. Visual success cues include a tight, even spiral without tearing.
Making Whipped Cream: To create perfect whipped cream, start with chilled equipment and cream. This will help it whip faster and achieve a stable consistency. Gradually add sugar and flavoring while mixing at medium speed. A common mistake is over-whipping, which can lead to a grainy texture. Look for peaks that hold their shape without being too stiff.
Pro Tips for Perfect Black Forest Roll Cake
1. Use room temperature eggs to improve aeration in the batter for a lighter cake.
2. Ensure that your baking powder is fresh for optimal rising results.
3. Allow the cake to cool in the pan for a few minutes before transferring it to prevent sticking.
4. Lightly dust the towel with powdered sugar to prevent the cake from sticking when rolling.
5. Experiment with different fruits, like raspberries or strawberries, for a unique take on the classic recipe.
6. Always chill the finished cake before slicing to achieve clean, precise cuts.
7. To enhance flavor, consider adding a splash of cherry liqueur to the whipped cream.
8. Store any leftover cake in an airtight container to maintain moisture and flavor.
Variations and Adaptations
The Black Forest Roll Cake can be made with a variety of fruits, with seasonal adaptations making it a versatile dessert. In the fall, try replacing cherries with cranberries to create a tart and festive dessert that complements autumn flavors. For a unique twist, add spices like cinnamon or nutmeg to the chocolate batter for a warming depth suitable for the cooler months.
Dietary modifications are also easily achievable. For a gluten-free version, substitute all-purpose flour with gluten-free flour blends that are designed for baking. If you’re looking for a lower sugar alternative, consider using natural sweeteners, such as stevia or monk fruit, to create a healthier option that doesn’t sacrifice taste.
Flavor variations can be achieved by adding orange zest or almond extract to the batter for a citrusy twist. The use of different chocolate types can also significantly alter the flavor profile; try white chocolate frosting for a sweeter contrast to the cocoa.
Finally, explore modern presentation alternatives, such as serving in individual portions with layered jars or parfait-style, which can make for a visually appealing layout while maintaining the dessert’s rich flavors.
Serving and Presentation Guide
Plating this Black Forest Roll Cake elegantly can elevate your table setting. To serve, slice the roll into even sections, showcasing the beautiful spiral of chocolate and cherries. Use a sharp knife, dipped in hot water and wiped dry, to ensure clean cuts. For garnishing, a dusting of powdered sugar or a drizzle of chocolate sauce creates visual contrast and sophistication.
Traditional accompaniments include fresh cherries or a dollop of extra whipped cream on the side. For a modern twist, serve the roll slices on individual plates with a berry coulis drizzled alongside for added color and flavor. Temperature also plays a role; this cake is best served chilled, as it enhances the flavors and makes the textures more enjoyable.
Consider portion control by cutting smaller slices, especially if serving at a larger gathering. Guests often enjoy sampling multiple desserts, so smaller portions allow them to indulge without overindulging.
Wine and Beverage Pairing
For the perfect pairing with your Black Forest Roll Cake, consider a glass of light red wine, such as Pinot Noir. The wine’s fruity notes complement the cherries and rich chocolate effortlessly. If you prefer white wine, a sweet Riesling can also hold its own against the flavors in the cake.
For non-alcoholic alternatives, a sparkling cherry soda can enhance the sweet and tart flavors harmoniously. Pairing with coffee or espresso adds a delightful bitterness that contrasts beautifully with the cake’s sweetness. Ensure that beverages are served chilled or at the right temperature to beautifully complement the dessert.
Consider serving the cake alongside a refreshing herbal tea, such as chamomile or mint, as these can cleanse the palate and highlight the chocolate’s richness without overpowering the flavors.
Storage and Shelf Life
Proper storage is crucial for maintaining the freshness of your Black Forest Roll Cake. Keep the cake in an airtight container in the refrigerator to ensure it remains moist and flavorful. Properly stored, it typically lasts for about 3-4 days without losing quality.
Avoid leaving the cake at room temperature for extended periods, as this can lead to spoilage. If you’ve made a larger batch, consider freezing portions of the cake. Wrap slices individually in plastic wrap and place them in a freezer-safe bag, allowing the cake to be enjoyed months later while maintaining its integrity.
Signs of spoilage include a sour smell or significant changes in texture. For reheating, place slices in the microwave for a few seconds or serve chilled for the best experience. Consider refreshing the whipped cream topping just before serving to revive its peak texture.
Make Ahead Strategies
You can prepare various components of your Black Forest Roll Cake ahead of time to streamline your baking experience. For instance, bake the cake a day in advance, allowing it to cool completely before wrapping it in plastic wrap and storing it in the refrigerator. This step allows the flavors to marry, enhancing the overall taste.
You can also prepare the whipped cream and cherries in advance, keeping them refrigerated until it’s time to assemble the roll. Just before serving, roll the cake with the filling and add cherry topping for freshness. Always ensure that any elements stored separately are combined right before serving for optimal texture and flavor contrast.
When reheating any frozen portions, allow the cake to thaw in the refrigerator overnight instead of microwaving it. This helps maintain moisture and flavor integrity. Lastly, consider adding fresh garnishes like mint leaves just before serving for a vibrant, fresh touch.
Scaling Instructions
Scaling your Black Forest Roll Cake recipe up or down is quite straightforward with a few adjustments. If halving the recipe, use half the amount of each ingredient while maintaining the same mixing and baking techniques. Be aware that baking time may need to be adjusted slightly.
Doubling or tripling the recipe requires larger equipment, such as multiple baking trays or a larger mixing bowl. Additionally, ensure that you mix in larger batches for thorough consistency. Keep an eye on your baking time, as larger batches can affect cooking times; always check doneness by using the toothpick method.
When scaling, consider your storage options, as larger portions may require additional space in your refrigerator or freezer. Portion control becomes essential in these cases, ensuring each serving is beautifully presented and easy to manage.
Nutritional Deep Dive
Understanding the nutritional profile of the Black Forest Roll Cake can enhance your appreciation of this indulgent dessert. Each slice typically contains macros of carbohydrates, primarily from sugar and cherries, along with fat and protein from the whipped cream and eggs. This satisfying dessert can serve as an occasional treat within a balanced diet.
Micronutrient analysis reveals that cherries contribute essential vitamins, including vitamin C, which supports immune health and skin integrity. Moreover, dark chocolate contains minerals like iron and magnesium, offering additional health benefits. Balancing indulgence with moderation is key, recognizing that while this dessert is a celebratory dish, it can contribute positively to a healthier lifestyle.
For those mindful of dietary needs or weight management goals, considering portion sizes is critical. Smaller portions allow you to enjoy the flavors without excessive caloric intake, making it easier to fit dessert into a variety of meal plans. Each piece of the roll cake provides a pleasurable choice, reminding us of the importance of mindful indulgence.
Dietary Adaptations
To cater to various dietary preferences and restrictions, the Black Forest Roll Cake can be easily modified. A gluten-free version can be achieved by substituting the all-purpose flour with a gluten-free flour blend, ensuring a similar texture and flavor. This allows those who are gluten sensitive to enjoy this delicious dessert without compromise.
For those pursuing dairy-free options, substituting regular cream with coconut whipped cream or other non-dairy options can yield a delightful and creamy filling. Always check labels for hidden dairy products in baking ingredients as you adapt the recipe.
Vegans can enjoy this dessert too! Replacing eggs with flaxseed meal or aquafaba for an egg alternative maintains the cake’s structure. Adjusting sugar content to include natural sweeteners like maple syrup can suit those looking for a healthier twist while preserving the delicious flavors of the cake.
Low-carb and keto adaptations can be made by swapping regular flour and sugar with almond flour and erythritol, respectively. This allows for a more diet-friendly version, perfect for those managing carbohydrate intake while enjoying a harmonious dessert.
Troubleshooting Guide
Common challenges in making the Black Forest Roll Cake can be addressed with careful attention and practice. If the cake turns out too dry, consider adjusting your baking time, as overbaking can lead to moisture loss. Ensuring your oven temperature is accurately set can also make a significant difference.
If rolling the cake results in cracks, it may be too cool—try gently warming it before rolling, or roll it while slightly warm to maintain flexibility. Inconsistent flavor can arise from using insufficient or stale ingredients. Always ensure your baking supplies are fresh and properly measured.
For texture issues like a dense cake, check that you’ve whipped the eggs sufficiently to introduce adequate air before adding dry ingredients. Each step matters in creating that fluffy texture, so being mindful is crucial.
Lastly, if the cake fails to hold its shape upon slicing, ensure thorough chilling. A well-chilled cake becomes firmer and allows for cleaner, more appealing slices.
Recipe Success Stories
The Black Forest Roll Cake has been embraced by many home bakers, leading to numerous success stories that showcase creativity. One community member shared their delightful experience of adding an orange zest twist, which beautifully complemented the chocolate flavor and was a hit at their family gathering.
Photographic tips from readers reveal that enhancing presentation can be achieved simply by incorporating contrasting garnishes like mint leaves or edible flowers. This not only elevates the visual appeal but also serves as an invitation to take a bite.
Additionally, some bakers have successfully adapted this recipe to suit allergy-friendly diets, showcasing the versatility of the Black Forest Roll Cake. Many have shared special occasions where this dessert was the showstopper, with praise from friends and family alike on how delicious it was.
As more bakers try their hands at this classic recipe, the community continues to thrive, sharing variations and unique adaptations based on personal tastes. Each success story adds to the narrative of the Black Forest Roll Cake, proving it to be a timeless dessert that stands the test of time.
Frequently Asked Questions
A: Absolutely! You can bake the cake a day in advance and store it in the refrigerator. Just wait to roll it until you’re ready to serve, keeping the fresh filling intact.
Q: How do I prevent my roll cake from cracking?
A: The key to preventing cracks is to ensure your cake is rolled while still warm and to use a gentle but firm hand while rolling. Dusting the towel with powdered sugar can also help.
Q: What should I do if I don’t have fresh cherries?
A: If fresh cherries aren’t available, you can use frozen or canned cherries. Just be sure to drain canned cherries to avoid excess moisture in your cake.
Q: Can I use a store-bought cake for this recipe?
A: While it’s best to bake your own cake for the best texture, using a store-bought flat chocolate cake can speed up the process if you’re short on time.
Q: Is this dessert suitable for freezing?
A: Yes, you can freeze the Black Forest Roll Cake, but it’s best to wrap slices individually to preserve freshness. Thaw slowly in the refrigerator when you’re ready to enjoy.
Q: How do I make this cake gluten-free?
A: Substitute all-purpose flour with a gluten-free flour blend specifically meant for baking. Ensure that all other ingredients are also gluten-free.
Q: Is there a vegan option available for this recipe?
A: Yes! You can replace eggs with flaxseed meal mixed with water, and use coconut cream instead of traditional whipped cream for a vegan version.
Q: What can I use instead of whipped cream?
A: For a lighter alternative, you can make a whipped coconut cream that works well in this recipe and adds a unique flavor.
Q: How do I adjust the sweetness for personal preference?
A: You can reduce the sugar in the cake and whipped cream, or substitute with natural sweeteners like honey or maple syrup, keeping in mind to adjust for moisture content.
Q: Can I decorate my roll cake in a different way?
A: Definitely! Get creative with decorations by using chocolate shavings, nuts, or colorful edible flowers to enhance the cake’s appeal.
Additional Resources
For those looking to expand their baking repertoire, consider exploring related recipes such as Chocolate Swiss Roll or Cherry Cheesecake Bars that share similar flavors with the Black Forest Roll Cake. Technique guides focusing on effective rolling methods and cake decorating tips can also be valuable resources for improving your skills.
Understanding more about chocolate and cherry sourcing can enhance your baking experience, ensuring you select the best ingredients. Recommendations on essential kitchen equipment, such as stand mixers or specific baking trays, can also contribute to better outcomes in your baking pursuits. Seasonal variations, like incorporating pumpkin spice or cranberries during the holidays, allow for endless creativity in your dessert-making adventures.
Join the Conversation
We invite you to share your experiences, variations, and successes with the Black Forest Roll Cake! Engage with our community on social media to showcase your beautiful creations or to ask for tips and feedback. Readers are encouraged to submit their favorite photography tips taken from their own baking sessions; these can help you connect with fellow enthusiasts and spark inspiration.
Furthermore, recipe reviews are incredibly valuable—your feedback can assist fellow bakers in attempting this classic dessert. Share your adventurous variations, include substitutions you’ve tried, and inspire others to make their version of this delectable roll cake. Together, we can build a vibrant community of baking aficionados dedicated to celebrating desserts like the Black Forest Roll Cake.
The Recipe
Black Forest Roll Cake
Serves: 8 servings
Prep Time: 30 mins
Cook Time: 20 mins
Total Time: 50 mins
Kitchen Equipment Needed
- Baking tray
- Parchment paper
- Fine sieve
- Kitchen towel
- Sharp knife
Ingredients
- 3/4 cup all-purpose flour
- 1/2 cup cocoa powder
- 3 large eggs, room temperature
- 3/4 cup granulated sugar
- 1 teaspoon baking powder
- 1/4 teaspoon salt
- 1 cup heavy cream
- 1 cup cherries, pitted and halved
- Powdered sugar for dusting
Directions
- Preheat the oven to 350°F (175°C) and line a 15×10-inch baking tray with parchment paper.
- In a bowl, whisk together the flour, cocoa powder, baking powder, and salt.
- In another bowl, use an electric mixer to beat the eggs and sugar until thick and pale.
- Gently fold the dry ingredients into the egg mixture until just combined.
- Pour the batter into the prepared tray, spreading it evenly.
- Bake for 15-20 minutes, or until a toothpick comes out clean.
- Once baked, immediately turn the cake onto a kitchen towel dusted with powdered sugar.
- Remove the parchment paper and roll the cake gently with the towel. Let cool completely.
- In a separate bowl, whip the heavy cream until soft peaks form.
- Unroll the cooled cake, spread whipped cream evenly, and add cherries on top.
- Roll the cake back up, gently pressing to secure the filling.
- Dust with powdered sugar before slicing and serving.
Recipe Notes
- Keep it chilled until ready to serve for the best texture.
- Feel free to use different fruits as fillings or toppings for a fresh twist.
- Store leftovers in an airtight container in the fridge for up to 3 days.
- Customize the richness by adjusting the sugar or cream based on personal preference.