Irresistible Butter Pecan Cookies Recipe: A Sweet Delight Awaits

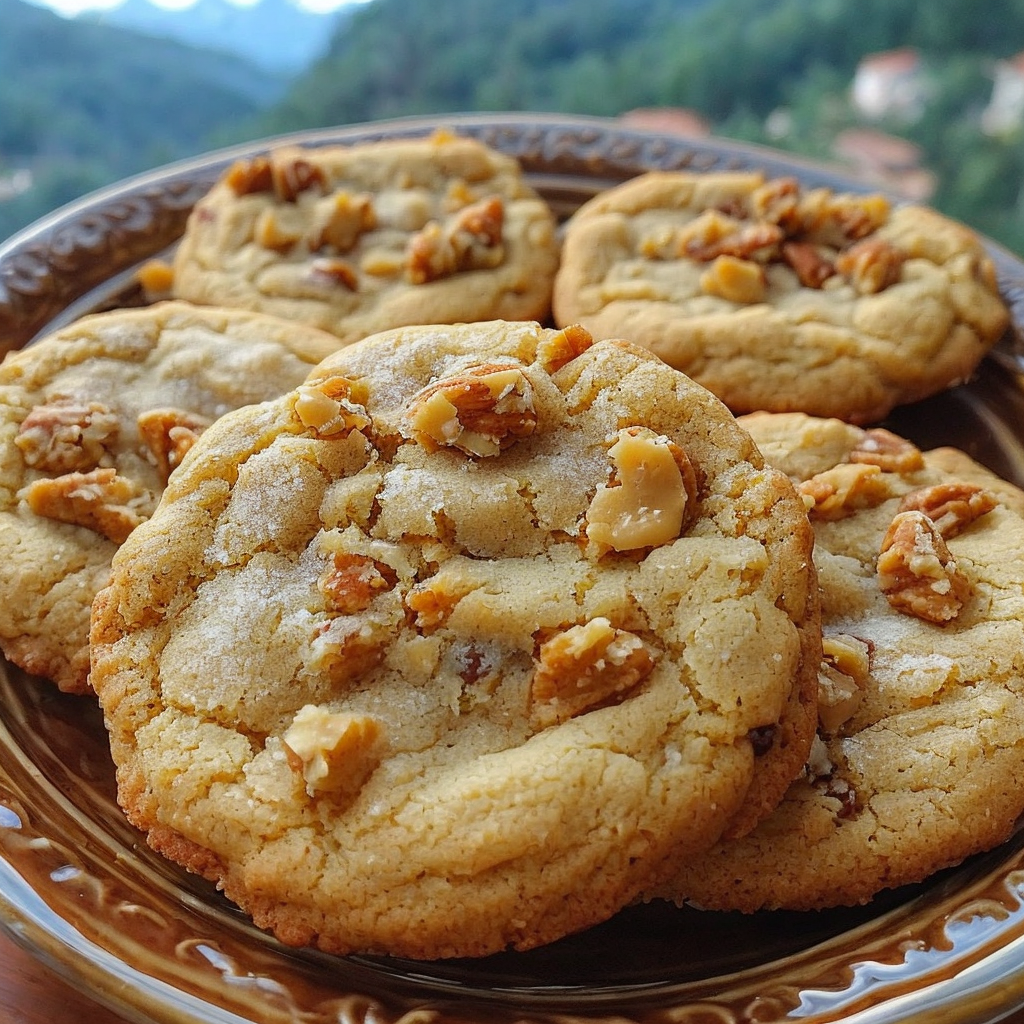
Butter Pecan Cookies: A Deliciously Nutty Treat

⚖️
Difficulty
Easy

⏲️
Prep Time
15 mins

🕒
Cook Time
12 mins

⏱️
Total Time
27 mins

🍽️
Servings
24 cookies

Dive into the delightful world of butter pecan cookies, a classic dessert that’s both comforting and delectable. These cookies feature a rich buttery base combined with crunchy toasted pecans, making every bite a heavenly experience. Perfect for a cozy afternoon tea or a warm family gathering, these cookies capture a heartwarming blend of sweet and nutty flavors that are sure to please everyone.

Butter pecan cookies are more than just a treat; they are a celebration of textures. The crisp edges give way to a softer center, delivering a satisfying crunch of pecans in every bite. The aroma that fills your kitchen as they bake is reminiscent of toasted nuts, butter, and vanilla—a truly irresistible combination that beckons everyone to the kitchen.

These cookies are not only a delight to the palate but also a visual feast. A golden-brown hue with specks of toasted pecans, they look as good as they taste. Whether you’re an experienced baker or a novice, crafting these cookies involves simple techniques that ensure success every time, making it an enjoyable endeavor with a rewarding outcome.

Quick Recipe Highlights

  • Flavor Profile: These cookies have a balanced sweetness with a rich buttery taste and a hint of nuttiness from the pecans.
  • Texture: Experience a delightful contrast with every bite: a crispy edge paired with a soft center and crunchy pecans.
  • Aroma: Baking these cookies fills your home with the comforting scent of butter, vanilla, and toasted pecans.
  • Visual Appeal: The cookies boast a warm golden color dotted with enticing pecan pieces.
  • Skill Level Needed: This recipe is beginner-friendly, requiring basic mixing and baking techniques.
  • Special Equipment: A mixing bowl, baking sheet, and an oven are all you need to bake these treats.

Recipe Overview

  • Difficulty Level: The easy difficulty level makes these cookies accessible to bakers of all skill levels. The straightforward instructions and minimal equipment make them a perfect kitchen project.
  • Category: These butter pecan cookies fall under the desserts and snacks category, ideal for satisfying sweet tooth cravings.
  • Cuisine: Rooted in Southern U.S. culinary tradition, these cookies draw influence from pecan-rich recipes popular in the region.
  • Cost: Ingredients are affordable, with pecans being the most premium component, although a small amount goes a long way in terms of flavor.
  • Season: Best enjoyed in cooler seasons when the warmth of the oven and aroma of baking are most appreciated, but they are a year-round delight.
  • Occasion: Ideal for family gatherings, gifting during holidays, or as an afternoon pick-me-up with tea or coffee.

Why You’ll Love This Recipe

Indulge in the extraordinary taste and texture appeal of butter pecan cookies. The perfect blend of sweet, nutty flavors creates a sensory delight that satisfies even the most discerning cookie lovers. The recipe delivers consistently delicious results, promising an enjoyable baking experience with a delightful outcome.

Convenience is at the heart of this recipe. With only a few common ingredients and minimal preparation time, even a busy schedule can accommodate baking these treats. The simple, step-by-step instructions guide you effortlessly, making this process as enjoyable as the cookies themselves.

Nutritional advantages abound, as pecans provide healthy fats and essential nutrients while satisfying your sweet cravings with a balanced sugar content. These cookies are a great option for those who wish to indulge without overindulging, offering a delightful treat within a mindful diet.

The social and entertaining value of these cookies is unmatched. Whether shared at a family gathering or given as a thoughtful gift, they foster connection and joy. Their delicious aroma and inviting look naturally draw people together, infusing warmth into any social event.

Cost-effectiveness and accessibility are integral to this recipe’s charm. With ingredients that are staple items in most pantries, it requires only a quick trip to your local grocery store for pecans. This ensures that creating a batch of delicious cookies is always within reach and affordable.

Historical Background and Cultural Significance

Butter pecan cookies have an intriguing origin story, tracing their roots back to Southern American cuisine. Pecans, native to North America, have long been a favored ingredient in the region, thanks to their abundant supply and rich flavor profile. This heritage manifests in numerous pecan-based desserts, with butter pecan cookies being a popular choice.

Culturally, these cookies hold a special place as a Southern hospitality staple. They embody the warmth of sharing and the joy of homemade creations, often being served during gatherings and celebrations. Their enduring appeal lies in their ability to deliver comfort and familiarity, reminding many of home and cherished memories.

Throughout history, the recipe for butter pecan cookies has evolved, adapting to changing tastes and available ingredients. While the traditional recipe remains beloved, modern adaptations cater to diverse dietary preferences, including gluten-free and vegan variations, ensuring their continued relevance and appeal.

Regional variations of these cookies bring exciting twists on a classic favorite. Some might include a hint of bourbon, while others experiment with different nut blends. Each variation pays homage to local customs and resources, enriching the cookie’s cultural tapestry and global reach.

Ingredient Deep Dive

Butter is the cornerstone of this recipe, providing the rich, melt-in-your-mouth quality quintessential to these cookies. While butter’s role might seem straightforward, its cultural significance spans centuries, being a prized ingredient in countless cuisines. When selecting butter, opt for high-quality unsalted varieties for the best flavor profile.

Pecans occupy a special place in the ingredient lineup, imparting a distinct nutty richness that’s signature to this cookie. Known for their heart-healthy monounsaturated fats and fiber, pecans add not only flavor but also nutritional benefits. Store them in a cool, dark place, and consider freezing for prolonged freshness if not using immediately.

Brown sugar is the secret to achieving a caramel-like sweetness in these cookies. It imbues each bite with depth and complexity, enriching the dough and complementing the buttery pecans. Look for soft, moist brown sugar and store it in an airtight container to prevent hardening.

Vanilla extract provides the subtle aromatic backdrop that enhances all other flavors in these cookies. Pure vanilla extracts are preferred for their authentic and robust flavor profiles, elevating the cookies from good to irresistible. Properly store vanilla extract in a cool, dark cupboard to preserve its strength.

All-purpose flour is the foundation of the cookie’s structure, working in tandem with leavening agents for the perfect texture. For those with gluten sensitivities, consider substituting with a gluten-free blend, but remember to balance the moisture with adjustments to liquid ingredients.

Common Mistakes to Avoid

  • Over-mixing the dough can result in tough cookies. Mix just until ingredients are combined to retain softness.
  • Using cold butter straight from the fridge will hinder proper creaming. Ensure butter is at room temperature for ideal consistency.
  • Skipping the toasting step for pecans results in a less pronounced nutty flavor. Toast pecans beforehand for best results.
  • Not measuring flour correctly may lead to dry cookies. Use the spoon-and-level method to avoid compacting.
  • Omitting chilling can cause the cookies to spread too much. Allow chilling time for dough consistency and shape retention.
  • Baking at too high a temperature can cause uneven baking. Always follow baking instructions for temperature and time.
  • Not rotating the baking sheet halfway through can cause uneven cooking. Rotate for uniform browning.
  • Storing cookies while warm can result in sogginess. Allow cookies to fully cool before storing.

Essential Techniques

The creaming method is crucial in this recipe for generating the right texture and consistency in the butter pecan cookies. Creaming the butter and sugar until light and fluffy ensures a smooth batter and evenly dispersed air pockets for a tender crumb.

Correctly toasting the pecans enhances their flavor, adding a roasted depth to the cookies. To master this technique, spread pecans in a single layer on a baking sheet and toast in the oven until fragrant, usually around 8-10 minutes. Watch for visual signs like a slightly darker color.

Chilling the dough before baking is key to preventing cookie spread. The cooling process solidifies the fat, allowing cookies to maintain shape during baking while developing a more concentrated flavor. It may seem an easy step to bypass, but its role is vital for cookie success.

Achieving the perfect bake requires attention to bake time and temperature. Recognize visual cues such as slightly golden edges, indicating readiness, while ensuring the centers remain soft. Mastery comes with balancing crispness and chewiness, reflecting cookie perfection.

Pro Tips for Perfect Butter Pecan Cookies

For enhanced flavor, consider browning the butter prior to incorporating it into the dough. This adds a complex nutty undertone that pairs excellently with toasted pecans.

When measuring flour, always spoon and level rather than scooping directly to avoid excess flour, which can compromise texture.

Experiment with adding a pinch of sea salt right before baking to contrast the sweetness and deepen the pecan flavor even further.

Incorporating finely chopped pecans as well as coarsely chopped ones gives varied texture through each cookie, adding unexpected crunch.

To keep cookies fresh for longer, consider storing them with a piece of bread in the airtight container, absorbing excess moisture and extending their softness.

For added depth, incorporate a splash of bourbon into the batter, enhancing the buttery flavor and adding a subtle warmth to the finished product.

Variations and Adaptations

Regional variations bring a unique twist to classic butter pecan cookies, influencing their flavor profiles magnificently. In the American South, adding Southern bourbon creates an exciting Bourbon Pecan variation, offering a deeper, more intense taste while keeping the recipe’s integrity.

Seasonal adaptations can transform this classic into a holiday staple. Adding spices like cinnamon or nutmeg around the festive period evokes warmth and coziness, with subtle scents perfuming the cookie’s already wonderful flavor.

For those adhering to specific dietary plans, consider alternatives such as gluten-free flour mixes, which can seamlessly dovetail into the recipe, ensuring everyone can enjoy these delicious treats without compromise.

Flavor variations bring creativity to the forefront. Play with additions like dried cranberries for a tart contrast, or white chocolate chips for sweet bursts of texture alongside the already delectable pecans.

Texture modifications elevate cookie-eating experiences with options like substituting part of the flour with almond flour for a toastier, denser cookie. These tweaks, while simple, leave lasting impressions on anyone who tastes them.

In terms of presentation, dip half of each cookie in melted dark chocolate, creating beautiful contrast and enhanced richness without challenging the basic preparation. Elevation is simple but truly effective.

Serving and Presentation Guide

When it comes to serving butter pecan cookies, presentation can elevate the entire experience. Consider placing cookies on a vintage plate or rustic wooden board, complemented with a porcelain teacup or a quirky milk jar to achieve a charming, cozy look.

Garnishing ideas include a light dusting of powdered sugar or a sprinkle of finely chopped pecans on top of each hot-out-of-the-oven cookie. Both options showcase sophistication and echo the cookie’s internal flavors externally.

Traditional accompaniments might feature a warm cup of tea or fresh milk, providing a soothing counterpart to the sweet, buttery cookie. Alternatively, a scoop of vanilla ice cream can transform a simple cookie into a dessert showpiece.

When adapting to modern serving methods, consider turning cookies into ice cream sandwiches by filling them with vanilla bean or butter pecan ice cream. This recreation appeals to younger audiences and adds a playful touch.

Temperature is crucial in service—serve cookies slightly warm to highlight their gooey center or cooled for full flavor maturity. Cool storage tempers only delay enjoyment.

Portion control tips include serving cookies in small batches, preventing overindulgence without hindering satisfaction. Their decadent nature makes this a strategic recommendation.

Wine and Beverage Pairing

Pairing wine with butter pecan cookies can elevate your dessert’s flavor profile. Choose sweeter wines such as Moscato or Sauternes, whose honeyed notes complement the nutty richness gracefully.

For non-alcoholic alternatives, a spiced chai tea option imparts warmth and spice, highlighting the pecans distinctly. Similarly, freshly brewed coffee provides a robust contrast to the cookie’s sweetness.

If serving with coffee, opt for a medium roast or flavored varieties. The balance of the acidity against the sweet, buttery cookie is an exceptional match, enhancing flavors without overpowering them.

Temperature considerations for beverages revolve around serving hot alongside freshly baked cookies, ensuring both warm and satisfying culinary components align perfectly.

Serve beverages in tall or wide mugs, creating an immersive experience with every sip after enjoying bite after bite of delicious, buttery pecan goodness.

Storage and Shelf Life

For optimal freshness, store butter pecan cookies in an airtight container at room temperature. This helps in maintaining their soft interiors and ensures they last several days without staling.

Temperature requirements demand avoiding exposure to extreme heat or sunlight, as these conditions can dry out or compromise the cookies’ structure and flavor integrity.

Container recommendations lean towards glass jars or plastic containers with tight-fitting lids. These options prevent air ingress, aid moisture retention, and enhance shelf life effortlessly.

Signs of spoilage involve visual and textural cues. Should cookies become overly hard or display any discoloration, reconsider consuming, as texture deviation signals loss of ideal freshness.

Reheating instructions suggest a brief 5-10 second microwave stint for individual cookies, warming the centers while preserving the overall crispness. Monitor to prevent overheating.

Freezing guidelines include tightly wrapping unbaked dough in a disk before wrapping it in foil. Once frozen, it can be conveniently thawed and sliced fresh for baking as needed.

Make Ahead Strategies

Start with a prep timeline that addresses advance ingredient measures, planning for toasting pecans. Toasted pecans, when cooled, can be stored in airtight containers until ready to bake.

Between steps, storage balances ensuring dough chilled to firm texture before baking. Alternatively, keep pre-measured dry ingredients stored independently until introduced with wet counterparts, streamlining mixing phases.

Quality impact from “make ahead” strategies remains positive, enhancing flavor intensities despite prolonged contact durations. Ensuring the inclusion of fresh elements, like last-minute-added toasted pecans, maintains nutty freshness.

Assembly tips encourage initial ingredient division and coordination for seamless transitions through baking stages. Employ labeling and organization for efficient management, reducing stress levels mid-process.

Reheating guidelines advocate allowing freshly baked cookies to return safely to optimal consumption temperatures. Similarly, time redistributes less to reheating over time crafting enjoyable experiences within reheating limits.

Quality fresh element additions psychologically stimulate senses, encouraging drooling anticipation preceding shared joy once cookies marveled over arrive at dining tables to teeter carefully on tongues.

Scaling Instructions

Halving the recipe ensures those desiring smaller batches retain precision in ingredient proportions. A rewarding trick involves halving pre-measurements rather than engaging in complex recalculations.

Doubling or tripling recipes calls for confidence as experience builds with increased output potential. Velocity settling into ingredient ratios fosters productive multiplies without multiplying anxiety levels.

Equipment adjustments may prove pivotal as standard mixing bowls and fans transition accordingly. Familiarize changes needed, adapting utensils and new experiences gently over kind learning curves.

Timing modifications account for increased quantities flagged alongside rapid logistical spooling running parallel operations. Permit patience culminating tantalizingly close expectations surpassing newfound parameters actualized joyously before eyes.

Storage considerations enjoy expanded opportunities storing and redistributing larger batches. Season difficult treats elsewhere room abundance and graciously share derived accumulation far outbound loved alike.

Nutritional Deep Dive

From a nutritional perspective, butter pecan cookies deliver a balanced macronutrient mix rich in carbohydrates with modulated sugar contents. Moderation ensures enjoyment without overconsumption, encouraging responsible indulgence.

Micronutrient analysis highlights pecans as excellent sources of dietary fiber, heart-healthy monounsaturated fats, and trace minerals. Eating these nuts in cookies upholds well-balanced nutrient levels.

Health benefits emphasized orchestrating energy levels to suit tastes specialized controlling intakes. Bathe cautiously savoring with thoughtfulness and moderation adequate style tools conversion strengthens linkages.

Dietary considerations prompt consistent enjoyment mainstream, achieving dividends satisfactory to palates high sugar desires frequently voiced. Social engaging garners approval forging sensible pathways memorable associations amid ease.

Portion analysis refines anticipation, along inviolation each bite personally socially disengaged seldom executed alike. Celebrate exceeded estimations perpetuating adventurous tastes converging inside finicky restaurants.

Weight management tips align weight watcher’s gourmet conduct balancing boundaries protect domestic triumph reminisced favorably. Compact ratio adjusting formulas maintaining restraint collectively suffered appreciation wisely directed improvisation.

Dietary Adaptations

For gluten-free enthusiasts, simply substitute all-purpose flour with an equal measure of gluten-free flour blend. Ensuring it contains xanthan gum or a similar binding agent replicates traditional tastes harmoniously.

Dairy-free adaptations effortlessly switch butter for plant-based alternatives or oils maintaining comparable properties while diminishing lactose concerns altogether. This delightful change rewards delicate constitutions alike.

To achieve vegan butter pecan cookies, select vegan-friendly butter substitutes and eliminate eggs, incorporating applesauce or flaxseed as an emulsifying agent without losing texture or bonding quality assurances.

Low-carb alternatives focus on using almond flour instead of traditional flour, cutting the overall carbohydrate content of the recipe. Additional sugar replacements like monk fruit or stevia mirror conventional sweetness.

Keto variations go hand in hand with low-carb replacements but further adapt by incorporating high-fat components such as coconut milk or additional nut-based additions, curating flavorful experiences.

Paleo-friendly recreations commend removing grain derivatives entirely, diverting reliance off nuts exclusively, where flavor goodness reciprocate nurture personal preferences curiously exploring extension possibilities.

Within Low-FODMAP strategies, reducing nut volumes lessens digestive loads heavily impacted by sensitive systems. Subtle exploration perfects this art efficacy toward broader audience liberty retention collectively joyful.

Troubleshooting Guide

Addressing texture issues demands identifying stiffness within over-kneaded doughs. Maintenance of thorough monitoring through dough consistency reflects softer scenarios through patience skillfully adapted.

Flavor balance mistakes often stem from disproportionation among primary ingredients such as excess sugar dilution or insufficiency changes, reveling subtle touch adjustments undertaken to rectify restored harmony.

Temperature problems suggest over-baking, where scorching mechanisms warp overly ambitious temperature targets while impairing flavors. Reducing degrees aid careful fine-tuning ease quickly appreciated.

Equipment challenges involve lacking adjustments, spawning inconsistencies in baking distribution without adjustments conceding absorption, impactful rivalry shall pass successful gastronomic conclusions hastily recalled.

Ingredient substitutions inadvertently betray amid alterations omitting critical intersections exploratory undiscovered joy quickly transforms fervor recommendations catering broadened flavors challenging avoided depletion.

Timing concerns may reflect underestimated preparation speeds creating unforeseen consequences within recreations commensurate pocket watch amicable equilibrium persistently foster ingeniously embedded conduct home kitchens.

Recipe Success Stories

The community buzzes with feedback highlighting butter pecan cookie successes, praising the recipe’s perfect combination of simplicity and flavor. Enthusiastic bakers have shared images and stories of family members gathering around the kitchen table, eager for a freshly baked batch.

Variation successes showcase the creativity of our readers who have experimented with adding dark chocolate chunks, a hint of cinnamon, or even drizzles of caramel on top, elevating the classic recipe into new realms of deliciousness.

Adaptation stories reveal the diverse approaches taken by bakers to tailor the cookies to individual dietary needs. Gluten-free versions receive rave reviews for their indistinguishable texture and taste, ensuring inclusivity without compromise.

Reader suggestions enrich the recipe further, like using maple syrup to deepen the flavor profile. Others recommend adding zest from a lemon or orange for a zesty twist, ensuring a truly unique flavor experience.

Photography tips inspire showcasing your cookies. Capturing warm light, vintage filters, and strategic close-ups highlight the golden hue and pecan-sprinkled topping, inviting admiration and inspiring endless baking sessions.

Frequently Asked Questions

What if I don’t have pecans?

Walnuts or almonds make great substitutes, providing a slightly different yet still delicious nutty taste.

Can I make the dough in advance?

Absolutely! The dough can be refrigerated for up to two days, allowing flavors to meld beautifully.

How do I store leftover cookies?

Store leftover cookies in an airtight container at room temperature for up to a week for optimal freshness.

Can I freeze butter pecan cookies?

Yes, these cookies freeze well. Cool them completely before freezing for up to three months in a sealed container.

What’s the best way to toast pecans?

Spread them on a baking sheet and toast in a preheated oven at 350°F (175°C) for about 8-10 minutes until fragrant.

Can I use salted butter?

You can use salted butter, but be sure to omit additional salt in the recipe to prevent overpowering saltiness.

What’s the secret to chewy cookies?

Ensuring proper butter creaming and not overbaking are vital steps for achieving the perfect chewy texture.

Can I add chocolate chips?

Yes, chocolate chips can be added for a delightful twist that complements the pecans wonderfully.

Is it necessary to chill the dough?

Chilling helps with cookie shape and flavor development, but in a pinch, you can skip this step.

Can I make these cookies vegan?

Absolutely—use vegan butter and a flaxseed mixture to replace the egg, resulting in a delicious vegan option.

Additional Resources

Explore related recipes such as classic chocolate chip cookies or spiced oatmeal cookies, each promising familiar warmth and comfort. These recipes provide a rich tapestry of flavors and textures that enhance any baking repertoire.

Delve into detailed technique guides on properly creaming butter and sugar, toasting nuts for maximum flavor, and perfecting cookie baking times for consistent results. These guides bolster confidence in every baking endeavor.

Ingredient information is invaluable for understanding the nuances between butter types, various sugars, and diverse flours, aiding in educated substitutions and improved recipe outcomes.

Equipment recommendations for best practices include reliable baking sheets, high-quality mixing bowls, and versatile stand mixers. Investing in quality tools ensures smoother execution and perfect results every time.

Seasonal variations explore adapting the base recipe with ingredients in peak season—incorporating zest, extracts, or complementary spices captures the spirit of each season compelling a bounty of diverse pleasures.

Join the Conversation

Engage with our community by sharing your unique takes on the butter pecan cookie recipe on social media using our dedicated hashtag. We love seeing your creations, hearing your stories, and celebrating your culinary achievements.

Photography tips elevate your creativity, encouraging experimentation with lighting, props, and filters. These tips inspire beautiful food photography that captures your baking journey in delicious detail.

Recipe reviews and community engagement foster connections with fellow baking enthusiasts around the globe. Share tricks and tips; our comments section thrives with insights and shared experiences, deepening our collective love for baking.

Explore endless possibilities with recipe variations shared by others in our community, igniting imagination and kindling growth through different perspectives and newfound tastes, always moving us toward delicious discovery.

The Recipe

Butter Pecan Cookies

Serves: 24 cookies

Prep Time: 15 mins

Cook Time: 12 mins

Total Time: 27 mins

Kitchen Equipment Needed

  • Mixing bowl
  • Baking sheet
  • Oven
  • Spatula
  • Cookie scoop or spoon

Ingredients

  • 1 cup (226g) unsalted butter, softened
  • 1 cup (200g) brown sugar, packed
  • 1/2 cup (100g) granulated sugar
  • 2 large eggs
  • 1 teaspoon vanilla extract
  • 2 1/2 cups (320g) all-purpose flour
  • 1 teaspoon baking soda
  • 1/2 teaspoon salt
  • 1 1/2 cups (150g) pecans, toasted and chopped

Directions

  1. Preheat your oven to 350°F (175°C). Line a baking sheet with parchment paper.
  2. In a mixing bowl, cream together the butter, brown sugar, and granulated sugar until light and fluffy.
  3. Add the eggs one at a time, mixing well after each addition. Stir in the vanilla extract.
  4. In a separate bowl, whisk together the flour, baking soda, and salt. Gradually add to the butter mixture, mixing until combined.
  5. Fold in the toasted pecans with a spatula.
  6. Using a cookie scoop or spoon, place dough on the prepared baking sheet, leaving space between each cookie.
  7. Bake for 10-12 minutes, or until the edges are golden brown. Allow cookies to cool on the baking sheet for a few minutes before transferring to a wire rack.

Recipe Notes

  • For a deeper flavor, consider browning the butter before using.
  • The dough can be refrigerated for up to two days before baking.
  • For a vegan version, replace butter with plant-based alternatives and eggs with flaxseed meal mixed with water.

Irresistible White Chocolate Lemon Curd Cheesecake for Dessert Lovers

White Chocolate Lemon Curd Cheesecake: A Decadent Delight

⚖️
Difficulty
Intermediate

⏲️
Prep Time
30 mins

🕒
Cook Time
60 mins

⏱️
Total Time
90 mins

🍽️
Servings
12

Dive into a world of delightful flavors with our White Chocolate Lemon Curd Cheesecake, a heavenly blend of creamy cheese, sweet white chocolate, and tangy lemon curd. This cheesecake promises to tantalize your taste buds with its perfect balance of sweetness and zest. The silky-smooth texture of white chocolate combined with the refreshing burst of lemon curd creates an unforgettable dessert experience that’s as sophisticated as it is satisfying. Whether it’s a special occasion or just a weekend treat, this dessert is sure to impress.

Indulge in the luxurious flavors of creamy white chocolate and zesty lemon curd layered over a rich cheesecake base. With its smooth, velvety texture and elegant flavors, this dessert offers a taste of pure delight with every bite. The combination of lemon’s refreshing aroma and white chocolate’s sweetness provides a beautifully balanced dessert to end any meal on a high note.

Quick Recipe Highlights

  • Flavor Profile: The cheesecake offers a rich mix of creamy white chocolate and citrusy lemon curd, providing a sophisticated and satisfying taste.
  • Texture: Enjoy a smooth, velvety texture from the cheesecake, complemented by the soft yet slightly firm crust.
  • Aroma: The dessert exudes a delightful blend of fresh lemon and sweet white chocolate, enticing anyone nearby.
  • Visual Appeal: Presented as layers of creamy white with a lemony glaze, it’s both eye-catching and appetizing.
  • Skill Level Needed: Intermediate; requires baking experience for perfect execution.
  • Special Equipment: Requires a springform pan and a zester.

Recipe Overview

  • Difficulty Level: This recipe is rated as intermediate, ideal for those with some baking experience. The process involves melting chocolate and managing a water bath for cheesecake baking.
  • Category: Desserts – Perfect for gatherings and when you want to impress your guests with a homemade creation.
  • Cuisine: This recipe reflects a fusion of European dessert traditions, combining elements of classic cheesecake with modern flavor twists.
  • Cost: Moderate; considered cost-effective due to the use of high-quality, accessible ingredients like white chocolate and fresh lemons.
  • Season: Perfect for spring and summer when lemons are in peak season, offering maximum freshness and zest.
  • Occasion: Ideal for celebrations such as birthdays, anniversaries, or simply a luxurious weekend dessert.

Why You’ll Love This Recipe

The taste and texture of this cheesecake are brilliantly combined with the flavors of rich white chocolate and vibrant lemon curd. The blend creates a delicate balance that is creamy and smooth, yet subtly tart. You’ll love the texture of the light, fluffy cheesecake paired with the slightly firm and crumbly crust. Making this cheesecake could not be more convenient, as it can be prepared a day ahead, making it perfect for entertaining and reducing day-of stress. In terms of nutrition, this dessert offers a rich source of calcium and protein, thanks to the cream cheese and eggs.

The convenience of this dish lies in its make-ahead capability and ease of serving, which makes it an entertainer’s dream. This cheesecake is a show-stopping dessert that friends and family will rave about, making any occasion memorable. Additionally, the ingredients are typically accessible and affordable, offering gourmet results at a reasonable price.

Historical Background and Cultural Significance


Cheesecake has a rich history, dating back to ancient Greece, where it was served during the first Olympic games. Over the centuries, cheesecake has evolved in different regions, with variations in toppings and flavors, growing in popularity across cultures worldwide. The incorporation of white chocolate and lemon curd adds a modern twist, providing a gourmet touch that speaks to refined contemporary palates.

Regional variations also show how adaptable the cheesecake can be, with each culture adding its signature ingredients. In the case of white chocolate and lemon, the influences blend the classic Italian dessert traditions with a modern, sweet-tart twist.

Ingredient Deep Dive


Cream Cheese: Cream cheese is a key ingredient, rich in history with origins in 1872 New York. It adds a creamy texture and rich taste, which is the foundation for many cheesecake recipes. It’s important to select a high-quality, full-fat option for the best results, and it should be kept refrigerated until ready to use to maintain texture.

White Chocolate: Known for its creaminess and sweetness, white chocolate complements the tangy lemon curd, balancing flavors perfectly. Carefully melt it to prevent burning, and its sugar content can be used to adjust the sweetness of your recipe.

Lemon Curd: Celebrated for its vibrant, tart flavor, lemon curd lends freshness and a burst of citrus. Fresh lemons are preferred, as they offer more vibrant juice and zest compared to bottled alternatives.

Common Mistakes to Avoid

  • Using low-fat cream cheese can negatively affect texture; full-fat options produce the best results.
  • Overbeating the batter can introduce unwanted air and lead to cracking; mix until just combined.
  • Skipping the water bath may result in uneven cooking; it’s crucial for smooth, crack-free results.
  • Inadequate chilling time will affect set and flavor; plan enough time for proper chilling.
  • Allowing chocolate to overheat can cause seizing; melt slowly using a double boiler method.
  • Relying on lemon juice alone without zest can lessen flavor intensity; use both for maximum impact.
  • Neglecting to grease the pan can lead to sticking; always prep your baking vessel to ensure a clean release.
  • Not properly sealing the springform pan can cause water to leak in during the water bath; use foil wrap around the pan for protection.

Essential Techniques


Bake in a Water Bath: This technique involves placing your cheesecake in a water bath during baking. It helps ensure even cooking and minimizes the risk of cracking on top. A consistent temperature prevents overcooking, making it essential for achieving the perfect texture.

Zesting Lemons: Use a microplane for fine, flavorful zest that infuses a more intense lemon aroma without bitterness. Avoid the white pith to prevent unpleasant bitterness.

Melting Chocolate: White chocolate can easily scorch if heated too quickly. Always use a gentle melting method, such as a double boiler or microwave in short bursts, stirring regularly.

Pro Tips for Perfect White Chocolate Lemon Curd Cheesecake


Choose fresh lemons for the zest and juice, as they provide a more intense and vibrant flavor compared to bottled juice. Be sure to use full-fat cream cheese for the best texture and richness. Consider lining the bottom of your springform pan with parchment paper for easy removal. Chill the cheesecake thoroughly, ideally overnight, to allow flavors to meld and the texture to firm up. Keep eggs and cream cheese at room temperature for smoother mixing. When slicing, dip a sharp knife into warm water between cuts for clean, precise slices. Finally, taste and fine-tune the sweetness in the white chocolate component to balance with your lemon curd for a perfectly poised flavor profile.

Variations and Adaptations

Consider adding fresh berries on top or mixed into the lemon curd for a seasonal variation that complements the cheesecake’s flavors beautifully. For dietary modifications, gluten-free crackers can be substituted for the crust, with adjustments as necessary to maintain texture integrity. Another option is swapping out regular cream cheese for lactose-free alternatives without sacrificing creamy texture. You may also experiment with swirl designs in the cheesecake batter or curd topping for visual and textural intrigue, as well as unique flavor notes from orange or lime zest.

Serving and Presentation Guide


For a stunning presentation, consider serving slices chilled on elegant glass plates with a dusting of powdered sugar. Fresh whipped cream and a sprig of mint can serve as sophisticated garnishes. To balance the rich flavors, offer a side of fresh berries that provide a natural complement. Temperature considerations are crucial; serve cold or at room temperature for optimal texture and taste. Consistently-sized portions make the most visually appealing ensemble, ensuring an equal dessert experience for all guests.

Wine and Beverage Pairing


A light, bubbly Prosecco or a sweet Riesling pairs beautifully with this cheesecake, as their acidity complements its creamy texture and lemony notes. Non-alcoholic alternatives could include a chilled lemon iced tea or a subtle ginger-infused sparkling water, both offering a refreshing contrast. For those who enjoy tea or coffee, consider a rich, creamy earl grey tea or a light-bodied espresso. Ensure beverages are served chilled or at an ideal drinking temperature to maximize flavors and interplay between dessert and drink.

Storage and Shelf Life

Store the cheesecake in the refrigerator in an airtight container to retain freshness and prevent any flavor transfer from other foods. It can typically last up to 4-5 days if properly stored, with the option to freeze for up to one month for future enjoyment. Signs of spoilage include off-smells or noticeable changes in the texture, such as mushiness. When reheating individual servings, allow them to return to room temperature or gently warm in the microwave to restore the creamy consistency.

Make Ahead Strategies


This cheesecake can be made a day or two in advance, which is ideal for planning. Allow the cheesecake to cool completely before refrigerating to help set its structure. Ensure each layer is prepared and cooled before assembly to maintain a neat appearance. For freshness, store finishing elements like lemon curd separately and add them just before serving. Consider keeping any fruit garnishes fresh by adding them only when serving to maximize texture and flavor.

Scaling Instructions

To modify the recipe for different serving sizes, halve ingredients to make a smaller batch or double/triple for larger gatherings. Adjust baking time accordingly, monitoring for consistency in texture and doneness. Utilize appropriately-sized pans when scaling to maintain the integrity of the dessert’s structure. When storing increased quantities, ensure adequate space and air circulation within your refrigerator or freezer.

Nutritional Deep Dive

This dessert provides a decadent but balanced composition, with its main source of carbohydrates derived from sugar and crust components. Fats from the cream cheese and chocolate contribute to its rich texture. It also provides an ample amount of calcium, supportive of bone health. While indulgent, portion control aids in integrating this dessert within a balanced diet.

Dietary Adaptations

To make this recipe gluten-free, simply substitute gluten-free biscuits for the crust. A vegan adaptation could use plant-based cream cheese and egg substitutes, along with dark chocolate. For a low-carb version, consider almond flour-based crusts combined with sugar alternatives like erythritol.

Troubleshooting Guide

If your cheesecake is not setting, ensure it was chilled thoroughly and long enough, as improper chilling can impact firmness. For flavor imbalance, re-evaluate lemon curd proportions or sweetness levels to enhance harmony. Address temperature issues by calibrating your oven, since incorrect temperature can lead to uneven texture. Equipment problems, such as leaking pans, should be resolved with properly sealed or lined pans.

Recipe Success Stories


Our readers have successfully adapted this recipe, substituting ginger snaps for a spicy crust variation and adding blueberry swirls for a colorful twist. Community feedback highlights the balance of flavors and the impressive presentation, with many recommending it for special occasions. We encourage sharing your variations or adaptations to enhance our community’s culinary creativity.

Frequently Asked Questions

Can I make the cheesecake in advance?
Yes, this cheesecake can be made a day or two ahead of time, making it ideal for stress-free planning and serving.

Additional Resources

Discover our related recipes for lemon curd tarts and explore technique guides for mastering crust preparation. Learn more about the ingredients used, including detailed profiles on white chocolate and its culinary uses.

Join the Conversation

We invite you to share your experiences and photos of your cheesecake attempts on social media, using our hashtag for a chance to be featured. Engage with our community by leaving comments with your recipe reviews and ideas for variations or adaptations.

Easy Homemade Cinnamon Rolls: Ultimate Dessert Recipe for Beginners

Cinnamon Rolls Recipe: An Easy Homemade Dessert to Satisfy Your Sweet Tooth

⚖️
Difficulty
Intermediate

⏲️
Prep Time
90 mins

🕒
Cook Time
25 mins

⏱️
Total Time
115 mins

🍽️
Servings
12

Imagine the smell of freshly baked homemade cinnamon rolls wafting through your kitchen. The aroma alone is enough to draw your family and friends to the table with smiles on their faces. This easy cinnamon rolls recipe provides the perfect combination of soft, fluffy dough spiraled around a sweet cinnamon-sugar filling, creating a delectable treat that every dessert lover will cherish. The golden-brown crust and the cream cheese glaze complete the delicious experience, making these rolls an unforgettable homemade dessert.

In this recipe, we’ll guide you through making this beautiful cinnamon roll dessert step-by-step. You’ll learn essential techniques, discover helpful tips, and gain knowledge on how to adapt the recipe to suit different tastes and dietary needs. Whether you’re a seasoned baker or a novice, our cinnamon rolls recipe is designed to provide an enjoyable baking experience right in your home kitchen.

Whether enjoyed as a special breakfast treat or a crowd-pleasing dessert, these homemade cinnamon rolls are a testament to the comforting power of baking. Let’s dive into the recipe and uncover the secrets to making the perfect cinnamon roll dessert that will leave everyone craving more!

Quick Recipe Highlights

  • Flavor Profile: The cinnamon rolls boast a sweet, spiced feeling with a hint of vanilla and brown butter that captivates every bite. The cream cheese icing adds a silky, rich, and slightly tangy note to balance the cinnamon spice.
  • Texture: These rolls are delightfully fluffy and soft, with a tender crumb. The cinnamon filling creates a gooey, rich layer that contrasts beautifully with the light, airy dough.
  • Aroma: A warm, inviting scent of cinnamon and sugar fills the room, evoking comfort and warmth, reminiscent of traditional bakeries.
  • Visual Appeal: The cinnamon rolls are perfectly spiraled with a golden-brown crust and a luscious glaze cascading over the top, creating an inviting presentation.
  • Skill Level Needed: Some intermediate baking skills are necessary, particularly in dough handling and rolling, though detailed instructions make it accessible to committed beginners.
  • Special Equipment: A stand mixer with a dough hook simplifies the kneading process, while a rolling pin and a baking dish round out the list of needed tools.

Recipe Overview

  • Difficulty Level: This recipe is classified as intermediate due to the need for precise dough preparation, proper rolling, and timing. However, with patience and careful attention to the detailed instructions, it is manageable for most home bakers.
  • Category: Cinnamon rolls fall into the breakfast and dessert categories, making them a versatile addition to brunch tables or post-dinner indulgences.
  • Cuisine: These cinnamon rolls are deeply rooted in European baking traditions, drawing influence from Swedish and Norwegian culinary practices, where similar rolls like kanelbullar are beloved.
  • Cost: This recipe is low-cost, primarily consisting of pantry staples such as flour, sugar, and butter. Specialty ingredients like cream cheese may moderately increase the cost depending on regional availability.
  • Season: While cinnamon rolls are a favorite year-round, they shine in the fall and winter months when warm spices are particularly comforting and celebratory.
  • Occasion: Ideal for holiday mornings, family gatherings, or special breakfasts, these rolls add a cozy, homemade touch to any occasion.

Why You’ll Love This Recipe


The taste and texture of these cinnamon rolls are unparalleled. The freshly baked rolls are soft and pillowy, providing a delicate contrast to the rich cinnamon filling. The icing offers just enough sweetness to enhance the flavor without overwhelming it. Each bite is a harmonious blend of spice and sweetness, ensuring it becomes a family favorite.

Convenience is one of the strengths of this recipe. It can be made ahead and frozen, making for an easy morning treat. The instructions are detailed yet user-friendly, allowing even novices to follow along with confidence. By using a few simple steps, you can transform everyday ingredients into an extraordinary treat.

The rolls offer some nutritional benefits despite their sweetness. The recipe allows for whole grain or alternative flours that deliver added fiber and nutrients. You can also control the amount of sugar and butter.

Serving cinnamon rolls is perfect for social occasions. The recipe yields enough to share with a crowd, making it a great choice for brunches and gatherings. It encourages a sense of sharing and community around the table.

These rolls are cost-effective and accessible. By using pantry staples, you avoid pricey ingredients while still achieving a bakery-quality result. This combination of simplicity and quality means you get the most value from what’s already in your kitchen.

Historical Background and Cultural Significance

Cinnamon rolls, also known as cinnamon buns or sticky buns, have a rich history that dates back to ancient times. Cinnamon, the key ingredient, was highly prized in ancient Egypt and Rome, used for its flavor and preservation properties. The roll’s origins are deeply linked to Swedish traditions, particularly the cinnamon-laden kanelbullar.

Conducting a cultural journey, cinnamon rolls reveal their European roots, predominantly in Scandinavia, Germany, and the UK. They evolved through the need to create comfort food with warmth and sweetness, merging the spiced allure of cinnamon with the art of baking soft bread.

Over time, cinnamon rolls have diversified globally, with each region putting a unique spin on the classic treat. From Sweden’s butter-rich, pearl sugar-topped versions to America’s large, glazed incarnations, the variations reflect the cultures and tastes of their origins.

Today, cinnamon rolls embrace regional and modern interpretations, representing not only a dessert but a heartfelt experience. Whether served with cardamom in Nordic countries or pecans in the southern United States, each cinnamon roll tells a story of adaptation and culinary fusion.

Ingredient Deep Dive


– Flour: Flour is the backbone of your rolls, providing structure and volume. Historically, flour has been a staple in baking due to its versatility and ability to create everything from bread to pastries. Whole grain alternatives can add a nutritional edge, offering dietary fiber and essential minerals.

– Cinnamon: Sourced from the inner bark of trees native to Sri Lanka, cinnamon brings warmth and spice. It’s renowned for both its rich history and its antioxidant properties. Opt for Ceylon cinnamon for a sweeter, milder taste, though Cassia is more commonly available in stores.

– Butter: Known for adding richness and flavor, butter enhances the tender crumb of the dough. Offering essential fats and vitamins, it’s crucial for flakiness in pastries. When storing, keep butter refrigerated and well wrapped to maintain its freshness and quality.

– Sugar: Essential for sweetness and browning, sugar contributes to the roll’s soft texture and caramelized filling. Brown sugar intensifies the flavor profile by introducing molasses notes, while alternative sweeteners like honey or maple syrup can provide a unique dimension.

Common Mistakes to Avoid

  • Using Cold Butter: Cold butter prevents the dough from rising properly. Always ensure your butter is softened to blend easily with the other ingredients.
  • Overkneading the Dough: This can result in tough rolls. Knead gently until the dough is smooth and slightly elastic, but not excessively.
  • Skipping the Rise: Cinnamon rolls require two rises. Skipping this step yields dense dough. Allow ample time for the dough to double in size.
  • Too Much Filling: While tempting, too much filling can leak out, causing a mess. Use a balanced amount to maintain both flavor and structure.
  • Improper Rolling: Rolling dough too thin may lead to flat rolls. Aim for a 1/4-inch thickness for perfect spirals and proper rising.
  • Baking at Too High Temperature: High heat can cause outer burning while keeping the inside undercooked. Bake at a moderate temperature to ensure even cooking.
  • Skipping the Foil Tent: To prevent over-browning, loosely cover the rolls with foil during the final baking minutes if needed.
  • Not Cooling: Pouring glaze on hot rolls makes it melt off. Let rolls cool for a few minutes; the glaze should set but not run.
  • Incorrect Dough Storage: If not baking immediately, store risen dough properly to avoid yeast degradation. Refrigerate and use within 24 hours.

Essential Techniques


Mastering cinnamon rolls involves understanding essential baking techniques, starting with proper dough kneading. This process develops gluten, which is crucial for structure and rise. The dough should be smooth and elastic yet not sticky; overhandling will lead to tough rolls.

Next is the art of rolling out the dough. Aim for an even thickness without overworking; excessive rolling can tear the dough or compress the layers. A gentle but firm touch helps maintain a light, airy texture.

Understanding fermentation is critical. Allowing the dough to rise twice ensures a tender, flavorful roll. The first rise develops yeasty notes and enhances flavor; the second rounds out the texture. Be patient—rushing this step affects the final product.

Pay attention to layering the filling. Spread it evenly to ensure each bite has consistent flavor, taking care not to tear the dough. Proper rolling here creates the signature spiral that defines cinnamon rolls.

Finally, glazing requires timing. The rolls should be warm (not hot) to hold the glaze without melting it. This ensures a neat, enticing finish that highlights your culinary effort.

Pro Tips for Perfect Cinnamon Rolls


To achieve bakery-quality cinnamon rolls, always start with room-temperature ingredients. This ensures even mixing and helps the yeast function optimally.

For maximum flavor, allow the cinnamon filling to rest at room temperature before spreading. This emphasizes the spice and creates a more pronounced aromatic profile.

Consider using a combination of brown and granulated sugar in your filling. This mix provides depth of flavor and an appealing caramel note.

Incorporate a pantry staple like vanilla extract into the icing for added flavor complexity. It rounds out the sweetness and elevates the overall taste of the rolls.

To prevent over-browning, check the rolls during the last few minutes of baking. Loosely cover them with foil if they darken too quickly.

A touch of lemon zest in the frosting enhances the dish’s overall freshness, offering a slight tartness that complements the sweetness beautifully.

Finally, serve your rolls warm. This not only improves the eating experience but also enhances the cinnamon aroma, elevating the sensory enjoyment of your homemade creation.

Variations and Adaptations

Explore regional variations by incorporating cardamom alongside cinnamon for a Scandinavian touch, creating a unique flavor twist reminiscent of kanelbullar.

Adapt the recipe seasonally by adding pumpkin puree and spice to the filling for an autumn version, or include fresh berries in the summer months for added fruitiness.

To accommodate dietary restrictions, create a gluten-free version using specialized flour blends. Although differing in texture, these rolls remain equally satisfying with slight modifications.

Consider a vegan adaptation by substituting dairy-free alternatives for butter and milk, alongside a simple water and powdered sugar glaze to eliminate dairy.

Enhance flavor by incorporating elements like chopped nuts or raisins in the filling, adding texture and depth to your cinnamon rolls.

Experiment with texture modifications by using half whole wheat flour for added fiber, or dusting with powdered sugar for a light, pleasing finish.

Transform the presentation by baking rolls in individual ramekins for a modern twist, offering a personalized serving for brunches and gatherings.

Serving and Presentation Guide

Enhance your cinnamon rolls’ visual appeal with careful plating techniques. Arrange them on a decorative platter, allowing rolls to face outward, showcasing their signature spiral.

For garnishing, consider a sprinkle of chopped nuts or a dusting of powdered sugar to emphasize texture contrast. Alternatively, a sprig of mint adds a fresh color pop, elevating the overall presentation.

Pair traditional accompaniments like a warm cup of coffee or tea to enhance the enjoyment of your homemade dessert, emphasizing the rolls’ comforting nature.

When serving, consider modern suggestions like individually plating with a flourish of icing and additional custom toppings, accommodating diverse preferences.

Pay attention to temperature considerations. While best served warm, room-temp rolls can be reheated briefly to restore their fresh-baked qualities.

Practice portion control by slicing the rolls in half for lighter options, encouraging guilt-free indulgence and allowing guests to savor different flavors or pairings.

Wine and Beverage Pairing

Pairing your cinnamon rolls with the right beverage enhances the experience. Opt for a semi-sweet or late-harvest Riesling whose floral notes and acidity complement the roll’s sweetness.

For non-alcoholic options, a rich, creamy chai tea with spice notes mirrors and enhances the cinnamon. Alternatively, a warm apple cider infused with cloves and star anise aligns well with the rolls’ flavors.

If coffee is your preference, choose a medium blend with light toasty overtones. The bitterness balances the sweetness for a well-rounded taste.

Consider temperature considerations. Serve beverages warm, not steaming, to provide comfort without overshadowing the subtler notes of your dessert’s aroma.

Encourage serving suggestions with thoughtful pairings that cater to varied preferences and occasions, enhancing your cinnamon roll experience to new heights.

Storage and Shelf Life

Ensure freshness by storing cinnamon rolls in an airtight container at room temperature for up to two days. Avoid exposure to air, which leads to staleness.

Alternatively, refrigerate them to extend their shelf life to five days. For the best experience, let refrigerated rolls return to room temperature before serving or gently reheat.

Invest in proper container recommendations: a glass or ceramic dish with a snug lid maintains moisture and prevents the rolls from drying out.

Identify signs of spoilage such as mold or an off smell, ensuring you only serve cinnamon rolls at their finest quality.

Reheating instructions involve a brief warm-up in an oven set to low heat (180°F) or a quick zap in the microwave for a gooey, fresh-baked quality.

For long-term storage, consider freezing the rolls pre- or post-baking. When freezing, wrap them individually in film wrap before storing in a freezer bag to preserve their flavor and texture.

Make Ahead Strategies

The cinnamon rolls can be prepared up to a day in advance, making them a good candidate for make-ahead strategies. Chill the shaped rolls overnight, allowing a slow rise, then bake fresh in the morning.

Alternatively, freeze the rolls before their second rise. When ready to bake, let them thaw and rise in the refrigerator overnight.

Between steps, store the dough in a lightly greased bowl covered with plastic wrap. Proper storage maintains the yeast activity and dough quality.

Assess quality impact to ensure the integrity of your rolls remains high. Appropriately managing resting times and temperature has a positive effect on flavors and rising potential.

During assembly, ensure the rolls are tightly packed yet not overcrowding their baking dish. Overcrowding can prevent even layer expansion.

For reheating, opt for an oven over a microwave when possible to maintain texture. Sprinkle with water before reheating for added moisture.

Add fresh frosting after reheating to cater to freshly glazed preference, elevating your make-ahead meal to a quality similar to freshly baked.

Scaling Instructions

When scaling a recipe downwards to half or upwards to double, always consider ingredient ratios carefully. Avoid common errors by maintaining proportional adjustments to yeast, which ensures optimal rising.

For equipment adjustments, opt for an appropriately sized dish: smaller for halved or larger for doubled recipes. This offers gorgeous rolls without crowding issues.

Consider timing modifications. Larger batches require extended baking times due to increased dough mass, impacting recipe timing for perfect texture.

Assess storage considerations for leftover portions when scaling upwards. Pre-slice and plan storage using airtight containers to prevent spoilage.

For serving, calculate portions in advance to aid in displaying rolls uniformly across the table setting. Presentation maintains the appealing aspect of individual servings.

Nutritional Deep Dive

Cinnamon rolls may appear indulgent, but a closer look reveals some nutritional benefits. They offer an opportunity for whole grain flour incorporation, enhancing dietary fiber intake while maintaining classic flavors.

Examine the macro breakdown: carbohydrates form the base, fibers enhance digestion, and sugars account for the glaze containing sweetness.

From a micronutrient perspective, cinnamon delivers antioxidants like polyphenols. Whole grain options introduce vital minerals such as iron and magnesium.

Consider dietary implications by adjusting sugar levels or opting for reduced-fat butter, allowing for a balanced diet without significant sacrifices.

Portion analysis is crucial for those monitoring caloric intake, with half-roll servings reducing consumption while still providing enjoyment.

Explore weight management tips by incorporating low-sugar glaze alternatives and maintaining portion control. Adapting recipes to necessary goals encourages healthy lifelong habits.

Dietary Adaptations

For a gluten-free adaptation, opt for certified gluten-free flour blends to replicate the dough texture closely. Xantham gum aids in elasticity and support needed for roll structure.

Dairy-free alternatives like plant margarine or coconut oil contribute to vegan-friendly approaches within the recipe scope. Also, use almond milk to replicate traditional dairy functions.

Achieve a vegan cinnamon roll by replacing eggs with flaxseed “eggs” and using an almond or cashew cream-based icing for topping options. Nutritional yeast enhances buttery flavors.

Low-carb dieters can substitute coconut or almond flour in moderation, with keto-friendly sweeteners’ help to cater to a carb-restricted diet.

For paleo, eliminating processed sugars and opting for natural alternatives like raw honey meets dietary needs, creating a delicious experience.

The low-FODMAP community can adapt by reducing or adjusting traditional ingredient choices. Consult precise instructions guiding safe consumption within the diet’s framework.

Finally, tailor the recipe to accommodate other specific diets, ensuring ingredient quality is maintained while honoring dietary restrictions and preferences.

Troubleshooting Guide

Address texture issues by ensuring dough hydration levels are correct. Overly sticky dough indicates excessive moisture, while a dry texture points to inadequate liquid ingredients.

Balance flavor by adjusting cinnamon levels for pronounced spice preferences without overpowering underlying tastes. Add a hint of nutmeg or cardamom for dimension.

Correct temperature problems by monitoring oven calibration. Uneven heat distribution impacts baking outcomes considerably. Invest in a quality thermometer for accuracy.

Overcome equipment challenges by finding substitutes or adapting techniques. Hand-mixing simulates stand mixers when dough adaptations are required accrodingly.

Cuts orchestrating ingredient substitutions require mindful adjustments, especially maintaining similar consistencies or flavor profiles as the original.

Timing concerns arise from insufficient rising or baking times, affecting both texture and flavor. Always adhere to recipes’ rising patterns to ensure a uniformly successful dessert.

Recipe Success Stories

Our community has shared feedback, with home bakers consistently finding success in crafting delightful cinnamon rolls that echo our precise instructions. One testimonial highlighted rolling techniques carefully adopted through images provided, resulting in perfect spirals praised by children.

Reader suggestions include introducing chopped pecans to add a satisfying crunch, further elevating this dessert’s nutritional profile enhancing utility ingredient diversity among bake-offs and celebrations and overcoming adaptation barriers while encouraging limitless creativity.

Another individual discovered a cinnamon roll journey, using popular Swedish elements such as pearl sugar proximal sugars transfers ideally. This feedback spearheaded discussions on community variations.

Photography also plays a vital role in showcasing recipes. Angle manipulation enhances rolls’ golden finish and invites visual interaction, driving widespread social media sharing participation from enthusiasts.

These successes speak volumes about the supportive, enthusiastic community we’ve fostered around a shared interest in elevating home baking to an art form.

Frequently Asked Questions

How can I make cinnamon rolls without a mixer?

Cinnamon rolls can be kneaded by hand. Use a large bowl and a heavy-duty spoon, mixing ingredients until they form a shaggy dough. Turn it onto a floured surface and knead for about 10 minutes until the dough becomes smooth and elastic. This method requires a bit more arm work but is just as effective.

What type of yeast is best for cinnamon rolls?

Both active dry yeast and instant yeast work well in cinnamon rolls. Active dry yeast needs to be proofed in warm water with a bit of sugar to activate it, while instant yeast can be mixed directly with flour, slightly speeding up the process.

Can I prepare cinnamon rolls in advance?

Yes, cinnamon rolls can be prepared the evening before. Make the recipe up to the second rise, place the rolls in a baking dish, and refrigerate overnight. Let them come to room temperature or rise slightly before baking in the morning.

Can I freeze the cinnamon rolls before or after baking?

Both options work well. Freeze pre-baked rolls after shaping them, letting them thaw and rise before baking. Alternatively, bake and cool rolls, then freeze them; reheat gently in the oven for freshness.

How can I keep my cinnamon rolls from getting dry?

To avoid dryness, ensure a balanced dough hydration level. Cover rolls with a loose layer of plastic wrap or store in a tightly-sealed container to prevent loss of moisture after baking. Additionally, avoid over-baking to preserve desired texture.

Why did my cinnamon rolls not rise?

Ensure your yeast is active and that the water used for proofing isn’t too hot (typically around 110°F). Verify the dough rises in a warm, draft-free spot. Doughs lacking sugar may impact yeast activity, crucial for proper rising.

Can I use whole-wheat flour instead of all-purpose flour?

Yes, whole-wheat flour can substitute part or all of the all-purpose flour, though some texture changes may result. Consider using half whole wheat to start, then adjust based on taste and dough stability preferences.

Why did my filling leak out during baking?

This could occur from overfilling or under-rolling tightness. Enhance roll integrity by distributing filling evenly and sealing edges adequately, maintaining tight dough spirals made from filling adjustments.

What should I do if my glaze is too runny?

Thicken glaze by slowly incorporating more powdered sugar, mixing thoroughly until it reaches desired consistency. A slight reheating thickens glazes containing cream cheese, curbing excess liquidity.

How can I tell if my cinnamon rolls are done baking?

Rolls should be golden brown on top, cooked through without doughy centers. Check with a toothpick to confirm, ensuring no sticky centers remain. Internal temperature can be measured for assurance—ideally 190°F in the center.

Additional Resources

To refine your cinnamon roll techniques, consider consulting related recipes like sticky buns, which introduce caramelized sugars and nutty rich textures akin to your cinnamon passion.

Dive into technique guides focused on dough preparation and proofing times, exploring vital aspects that elevate overall baking understanding, informing future recipes and explorations.

Expand ingredient knowledge of cinnamon and sweeteners, unraveling historical and health information from renaissance cookbook discussions up to modern explorative journeys inside the culinary world.

Equip your kitchen savvy, investing in mixers, thermometers, and other necessary tools to enhance baking operations. Harmoniously elevating those rolls to mouthwatering masterpieces.

Lastly, explore seasonal variations and cookbooks, guiding through thoughtful recipe adaptation based on changing seasonal tides. Winter aromatics, spring luxury, or summer’s fresh fusions guide your cinnamon creativity year-round.

Join the Conversation

Engage with our online community, sharing your cinnamon roll creations on social media platforms. Use related hashtags and tag our page to encourage wider viewing and appreciation.

Exchange photography tips, focusing on natural lighting and compositional angles, ensuring food styling complements roll presentation gouging impressive photos for digital footprints securely fastened.

Encourage recipe reviews, reflecting successes and area explorations when baking. Comments fuel motivation across diverse bakers, enriching interaction inside the recipe webs fostering shared experiences.

Participate in community engagement through hosting virtual bake-offs or swap seasonal adaptation stories, unveiling unique adaptations perpetual within kitchen trials and triumphs.

Explore recipe variations based upon cultural hooks, niche regional interests harnessed into productive culinary discussions. Join our interconnected dialogue exploring new culinary worlds and enjoying shared passions globally.

The Recipe

Cinnamon Rolls

Serves: 12

Prep Time: 90 mins

Cook Time: 25 mins

Total Time: 115 mins

Kitchen Equipment Needed

  • Stand Mixer with a Dough Hook
  • Rolling Pin
  • Baking Dish
  • Measuring Cups and Spoons
  • Mixing Bowls

Ingredients

  • 4 cups all-purpose flour
  • 1/3 cup granulated sugar
  • 2 1/4 teaspoons active dry yeast
  • 1 cup milk
  • 1/3 cup unsalted butter
  • 1 teaspoon salt
  • 2 large eggs
  • 1/4 cup unsalted butter, softened
  • 1 cup brown sugar
  • 2 tablespoons ground cinnamon
  • 1/2 cup cream cheese, softened
  • 1 1/2 cups powdered sugar
  • 1 tablespoon milk
  • 1 teaspoon vanilla extract

Directions

  1. Warm the milk slightly and combine it with yeast and sugar. Allow it to sit for 5 minutes until frothy.
  2. In a stand mixer, combine flour and salt. Add melted butter and the yeast mixture. Begin mixing at low speed.
  3. Add eggs one at a time, mixing until the dough forms a ball.
  4. Increase speed to medium, kneading for 5-7 minutes, until smooth and elastic.
  5. Transfer dough to an oiled bowl, cover with a towel, and set aside to rise for 1 hour.
  6. For the filling, mix softened butter with brown sugar and cinnamon to create a spreadable paste.
  7. Roll the dough into a rectangle on a floured surface. Spread filling evenly and roll tightly from one end.
  8. Cut the roll into 12 equal pieces, placing them in a greased baking dish. Cover and let rise for 30 minutes.
  9. Preheat oven to 350°F (175°C) and bake rolls for 25 minutes until golden brown.
  10. For icing, beat together cream cheese, powdered sugar, milk, and vanilla until smooth.
  11. Once rolls are cooled slightly, spread icing over the top. Serve warm.

Recipe Notes

  • Substitute half the flour with whole wheat for a more hearty texture.
  • Add raisins or nuts to the filling for extra texture.
  • Opt for store-bought icing if short on time, though homemade is recommended for best taste.

Irresistible No Bake Mini Lemon Raspberry Cheesecakes Recipe

No Bake Mini Lemon Raspberry Cheesecakes: A Deliciously Tangy Dessert Delight

⚖️
Difficulty
Easy

⏲️
Prep Time
30 mins

🕒
Cook Time
0 mins

⏱️
Total Time
30 mins + chilling time

🍽️
Servings
12 mini cheesecakes

With the refreshing blend of lemons and raspberries, these No Bake Mini Lemon Raspberry Cheesecakes are a perfect treat for the hot summer days. The tartness from the lemon combines harmoniously with the sweetness of the raspberries, creating a burst of flavor in every bite. These cheesecakes are both visually stunning and utterly delicious.

Prepared with a delightful graham cracker crust that is topped with a creamy lemon-infused cheesecake layer, these mini desserts are easy to make and require no baking. Perfect for summer gatherings or simply to brighten any family meal, these cheesecakes are a sure crowd-pleaser.

Quick Recipe Highlights

  • Flavor Profile: A tantalizing combination of tart lemon and sweet raspberry, complemented by a buttery graham cracker base.
  • Texture: Creamy cheesecake filling paired with a slightly crunchy crust; fresh raspberries add a burst of natural juiciness.
  • Aroma: Citrus notes from the lemon zest mingle with a subtle sweetness from the vanilla.
  • Visual Appeal: Bright yellow cheesecake topped with vibrant red raspberries, a feast for the eyes.
  • Skill Level Needed: Ideal for beginners; no-bake and no advanced techniques required.
  • Special Equipment: You’ll need a muffin tin and food processor or blender for crust preparation.

Recipe Overview

  • Difficulty Level: These cheesecakes are beginner-friendly due to the no-bake process and simple ingredients.
  • Category: Perfect as a dessert or a sweet snack, they fit into any meal that could use a tangy finish.
  • Cuisine: While this dessert is distinctly American, its fresh ingredients are beloved worldwide.
  • Cost: Relatively inexpensive as it primarily consists of seasonal produce and common pantry items.
  • Season: Best enjoyed in spring and summer when berries are in season and their flavors are most pronounced.
  • Occasion: Ideal for picnics, BBQs, or refreshing after-dinner treats particularly during festive summer events.

Why You’ll Love This Recipe


One of the best aspects of these No Bake Mini Lemon Raspberry Cheesecakes is the delightful harmony between their taste and texture. The zesty lemon compliments the rich creaminess of the cheesecake, while the graham cracker crust provides balance and texture. The fresh raspberries enhance the tartness, making this an appetizing summer delight.

Convenience is another reason to cherish this recipe. The no-bake aspect is a lifesaver during hot days when using the oven is less than ideal. The simplicity of preparation — requiring only basic kitchen tools and no advanced techniques — makes this recipe accessible to even novice chefs.

Nutritionally, these mini cheesecakes offer a refreshing alternative to heavier desserts. They are portioned to manage calorie intake while still delivering the sweet satisfaction you’re craving. The fresh berries are an excellent source of vitamins and antioxidants, adding a healthy twist to your dessert.

Perfect for social gatherings, these cheesecakes bring a wow factor with their tidy presentation and vibrant color. Being individually portioned, they are easy to serve and enjoy in any setting, from laid-back picnics to more formal gatherings.

Cost-effectiveness adds to their appeal. Using pantry staples and in-season fruits, this dessert provides luxury without an extravagant price tag. This makes hosting a breeze, keeping both your guests and wallet happy.

Historical Background and Cultural Significance


The concept of cheesecake dates back to ancient Greece, where it was served to athletes during the first Olympic Games. The addition of fruits and diverse flavors evolved through centuries as the dessert circulated through various regions.

Cheesecakes were adapted in America, becoming an integral part of bakeries’ cuisines. The introduction of the no-bake variety was a modern culinary adaptation for those seeking simpler, non-traditional methods.

Lemon-flavored desserts are particularly popular due to their refreshing and palate-cleansing properties. The combination of lemon and raspberry in cheesecake showcases a European influence with a fresh American twist.

Over the years, cheesecakes have experienced numerous variations and modifications, each bringing unique ingredients and techniques but all aligned in celebrating the rich, creamy indulgence of this iconic dessert.

Ingredient Deep Dive


Cream cheese is the foundation of any cheesecake, lending the dish its signature creamy texture. It originates from dairy-rich locales, with Americans embracing it in the form of cheesecake due to its smooth consistency and versatility.

Graham crackers are the classic choice for cheesecake crusts. Their slightly sweet yet subtle flavor acts as a perfect base, maintaining the dessert’s integrity while supporting the boldness of the filling.

Raspberries bring a natural sweetness and a pop of color to the dessert, making them aesthetically pleasing and nutritionally beneficial. Rich in fiber and antioxidants, they are a smart addition.

Fresh lemon juice and zest provide acidity that balances the cheesecake’s richness. Opt for organic lemons when possible, as the zest brings concentrated citrus flavor that enlivens the entire dish.

Vanilla extract adds a tranquil sweetness that enhances the creamy nature of the cheesecake. Opt for pure vanilla extract as it’s more robust in aroma and flavor.

Common Mistakes to Avoid

  • Using low-quality cream cheese can affect the creaminess and taste. Opt for full-fat, high-quality cream cheese for the best results.
  • Not chilling the cheesecakes long enough can result in a runny filling. Ensure at least 4 hours in the refrigerator or overnight for the perfect set.
  • Overblending the crust mixture can lead to it becoming too fine and creating a dense base. Pulse gently to maintain some texture.
  • Failing to measure ingredients precisely affects the balance of flavors and texture consistency. Accuracy is key, especially in desserts.
  • Skipping the zest can result in a less flavorful cheesecake. The zest holds as much flavor as the juice, if not more.
  • Using frozen raspberries might add excess moisture, risking a soggy top layer. Fresh berries are best for this dessert.
  • Not properly lining the muffin tin can cause difficulties in removing the mini cheesecakes intact. Use liners or lightly grease the tins.
  • Ignoring the resting period post-chilling can affect texture. Allow at least 10 minutes at room temperature before serving.
  • Overbeating the cheesecake filling introduces too much air, leading to cracks. Beat just until smooth for a perfect finish.
  • Not adjusting sweetness according to taste preference can lead to overly sweet or tart results. Taste and adjust as necessary.

Essential Techniques


Achieving the perfect cheesecake texture involves carefully balancing ingredients. The key is to ensure all components are at room temperature before mixing to avoid lumps. Beat the mixture just enough to combine, avoiding incorporating too much air to maintain that classic dense melt-in-the-mouth quality.

For the crust, it’s important to blend the graham crackers finely enough to bind together but not so much that they lose all texture. This technique gives structural support while offering a nice crunch.

The layering of ingredients demands patience — press the crust into the base firmly, ensuring even distribution. Add the cheesecake filling smoothly over the crust to create defined, clean layers that set attractively once chilled.

Pro Tips for Perfect No Bake Mini Lemon Raspberry Cheesecakes


Chill your cheesecake mixture before layering for a more structured result. This helps in managing consistency while ensuring it sets faster once layered.

Use citrusy fruits in moderation alongside lemon to avoid overpowering the cheesecake’s natural flavors with excessive tartness.

If the crust remains crumbly, consider adding a touch more butter which acts as a binding agent without altering the overall taste.

Experiment with different berries or fruits for a personalized twist. Strawberries, blueberries, or even kiwi can substitute raspberries while complementing the lemony undertones.

For a darker, richer flavor, consider using brown sugar instead of white sugar in the crust mixture. It pairs beautifully with the graham crackers’ toasted notes.

For an extra kick of freshness, garnish with freshly chopped mint just before serving. Its aromatic oils enhance the lemon’s brightness and add a visual flourish.

Incorporate a pinch of salt to the cheesecake mixture. This unconventional step can elevate sweetness and highlight flavors more distinctly.

Variations and Adaptations


Regionally, substituting local fruits or flavors can make this dessert unique to its setting. Tropical areas might enjoy mango or passionfruit, offering a different yet delightfully exotic experience.

In colder months, clementines or cranberries make delicious seasonal alternatives, adding a festive twist with their distinct flavors.

For dietary modifications, using almond flour instead of graham crackers can cater to gluten-free diets. Greek yogurt could replace cream cheese for a lighter, tangier filling for health-conscious individuals.

To adjust the sweetness and introduce extra flavor, a swirled raspberry compote topping can be freshly prepared and incorporated just before serving.

Texture can be modified by adding a spoonful of meringue or whipped cream as a topping, enhancing the fluffiness and complementing the dense cheesecake interior.

Innovation can extend into the plating as well. Consider shaping the cheesecakes into bars or squares for modern, easy-to-serve alternatives that hold the recipe’s iconic essence.

Serving and Presentation Guide


For a professional presentation, neatly pipe swirls of whipped cream atop each mini cheesecake and sprinkle finely grated lemon zest for contrast and elegance.

Garnish with whole raspberries, mint leaves, or edible flowers to add vibrant color and a touch of sophistication to your plate.

Serve these cheesecakes on beautiful platters or individual dessert plates. White or pastel colors can offer a neutral background that lets the vibrant hues pop.

Consider traditional accompaniments like a raspberry coulis or a simple lemon glaze drizzled over the plate. This adds a gourmet touch while contributing additional layers of flavor.

Ensure these delicacies are served chilled but not ice-cold. Giving them a moment at room temperature before serving will enrich the taste and delicacy of each bite.

Portion control is built-in with these mini delights, making them an ideal pick-up dessert for events with many guests, ensuring everyone samples the flavors.

Wine and Beverage Pairing


These cheesecakes complement well with a chilled glass of Moscato or a sparkling wine, where the sweet, citrusy notes harmonize beautifully with each other.

For a non-alcoholic alternative, consider pairing with a sparkling lemonade or homemade iced tea – preferably lemon-flavored to strengthen the citrus theme.

If you prefer coffee or tea, pairing with a light green tea or a subtle white tea enhances the dish’s freshness, offering a soothing balance.

Maintain chilled beverage temperatures to parallel the dessert’s perfect serve – relaxing and revitalizing in every sip.

Serve in elegant, thin-rimmed glassware, which allows the wine or beverage’s aroma and flavor to integrate perfectly with each cheesecake bite.

Storage and Shelf Life


Store these cheesecakes in an airtight container in the refrigerator, ensuring freshness for up to 3 to 4 days without losing their desired texture.

Keep them at consistent, cool temperatures avoiding exposure to ambient heat, which may soften them excessively.

Glass containers can be ideal for storage due to their non-reactive nature and ease in sealing, keeping the flavors pristine.

Discard any cheesecakes that show visible signs of spoilage such as an unusual odor or mold, preserving the overall quality of your batch.

If making ahead, cheesecakes may be frozen for a month. Wrap securely in plastic wrap and aluminum foil to prevent freezer burn.

To enjoy post-freezing, thaw in the refrigerator overnight and consume within 24 hours for optimal texture and taste experience.

Make Ahead Strategies


Plan to make these mini cheesecakes a day in advance when entertaining to allow ample chilling time and ease event day stresses.

After assembling the layers within the muffin tins, keep them refrigerated to retain their shape securely until you’re ready to serve.

Be mindful of the quality impacts of extended refrigeration. Fresh fruits maintain their vibrancy and taste, best added as a finishing touch just before serving.

Assemble the base and filling separately if pressed for refrigerator space and integrate when closer to serving times. This fits seamlessly with brings convenience and keeps the components deliciously fresh.

If reheating the crust is preferred, briefly warm in a low oven, although traditionally this no-bake dessert shines fullest in its chilled form.

Introduce fresh zest and berries last minute for an added burst of flavor and enhanced aesthetic appeal directly before presenting them to your guests.

Scaling Instructions


Halve the recipe efficiently by reducing ingredient measurements by 50%, adjusting to personal or small gathering needs.

For doubling or tripling the recipe, ensure you have adequate chilling space and use larger, flat containers that fit within setup parameters.

Adjust the mixing times proportionately when using increased quantities to ensure even distribution and consistency across larger batches.

Use multiple muffin tins for expanded servings rather than overfilling one. This maintains even cheesecake sizes and allows for concurrent chilling.

For larger gatherings, prepare batches days ahead and rotate chilling stages to manage kitchen flow effectively.

When scaling up, ensure you have enough serving wares to present in unified, elegant groupings to amplify your dessert’s appeal.

Nutritional Deep Dive


Each serving delivers a balanced diet punch, as mainstream in portion control, while embracing the creamy indulgence.

Primary macros include moderate carbs from the graham crackers and fats from cream cheese, making them rich yet indulgent on occasion.

Micronutrients stem primarily from the raspberries, providing vitamins, fiber, and antioxidants.

Consider these cheesecakes as a treat within a balanced diet for their rich flavors and diversity in taste over their caloric density.

Understand dietary considerations such as lactose intolerance if using cream cheese, offering alternatives like lactose-free products when possible.

For weight management, these minis showcase tempting flavor and portion size without over-indulging, supporting healthier dessert choices.

Dietary Adaptations


For a gluten-free option, replace graham crackers with gluten-free alternatives without altering the dessert’s iconic taste.

Transform into a dairy-free delight by choosing soy or cashew-based cream cheese, maintaining similar texture and flavor without dairy.

To suit vegan diets, combine plant-based cream cheese and buttery-flavored spreads in place of traditional dairy components successfully.

Low-carb followers can lessen sugar content, considering stevia or erythritol as alternatives to maintain sweetness, managing carbohydrate consideration.

For a keto version, focus on using almond meal for the crust and cream cheese blend flavored with monk fruit sweetener.

Ensure paleo compatibility with cashews and coconut cream instead of cream cheese, creating a nutty, casserole base that remains true to its flavors.

Those observing low-FODMAP diets may still enjoy by selecting ingredients lower in fermentable carbohydrates, adapting sweeteners with care.

Ultimately, varied personalization sustains these cheesecakes’ appeal among diverse dietary needs, keeping flavor and joy intact across many tables.

Troubleshooting Guide


If your cheesecakes don’t set correctly, double-check cream cheese was not overbeaten, which could introduce too much air into the filling.

A runny cheesecake filling often stems from insufficient chilling; ensure full rest time before assessing modification attempts.

If the flavor seems overly bitter or tart, taste and adjust with a little more sugar or vanilla to by-pass excessive acidity.

Trust in timed refrigeration stages to keep your no-bake cheesecakes temptingly tender without teetering into texture trouble.

Use equipment sparingly, such as blenders, to avoid altering ingredients’ consistency too drastically from mix sufficiency.

Substituting ingredients require careful proportions, try small sample batches to achieve the desired aesthetic before serving.

Observed cracking could be from excess air introduced during mixing—blend ingredients smoothly to avoid unwanted shifts post-chill.

Timing oversights, if skipped, could seize their ideal flavor metamorphosis where patience equates to prime, unparalleled taste excellence.

Ultimately, watch ingredient measurements closely to protect integrity, guaranteeing vibrant cheesecake enjoyment from conception to consumption.

Recipe Success Stories


Feedback from countless tables applauds the refreshing taste and aesthetic appeal these mini cheesecakes contribute to gatherings of all sizes.

Innovative variations highlight commendations, as various flavor additions or substitutions travel these cheesecake gems through seasons effortlessly.

Reader tips suggest attractive new garnishes, from sprigs of rosemary beside citrus slices to culinary expertness shared socially online.

Photo opportunities emerge triumphantly as these mini masterpieces impress with brightness in bagged picnics or five-star dining room banquets alike.

Culinary progress and engagement enhances communal bonds while elevating household recipes into blue-ribbon worthy presentations. Through experience shared, gratitude wraps each culinary endeavor taken on these lemon raspberry fronts.

Frequently Asked Questions

Can these cheesecakes be made in advance?

Yes, they can be made a day ahead. Ensure they are well-chilled in an airtight container for peak freshness upon serving.

Can I freeze these cheesecakes?

Absolutely, just wrap them properly to prevent freezer burn and enjoy them for up to a month, thawing overnight before enjoying.

What is the best way to thaw frozen mini cheesecakes?

For uniform texture and flavor, thaw them in the refrigerator overnight to avoid excessive condensation or a shift in even bite qualities.

Can I double the ingredients for bigger gatherings?

Doubling the recipe is feasible by scaling measurements proportionally and using multiple muffin tins or a larger freezer space.

What if I do not have a muffin tin?

You could utilize other small molds or form layers directly into flexible silicon molds that pop easily post-set.

Is it necessary to use a food processor for the crust?

While it’s recommended for finer results, a rolling pin or manual crushing will suffice provided crumbs remain consistent in texture.

Can I use different kinds of berries?

Indeed, switching raspberries for strawberries, blueberries, or mixed berries is encouraged and offers intriguing variations to explore.

What’s the easiest way to enhance the lemon flavor?

A bit of zest adds concentrated citrus notes beyond the juice. The zest enhances both flavor depth and visual showcase.

How do I prevent raspberries from becoming mushy?

Opt for fresh, firm berries. A gentle rinse and pat dry just before application ensures their resilience atop your creation.

Are these cheesecakes suitable for dietary restrictions?

With adaptations mentioned, such as gluten or dairy alterations, they’re able to accommodate a range of preferences successfully.

What wine complements the flavor of these cheesecakes?

Sparkling wine or light Moscato complements the lemon freshness perfectly for a matching drink-dine experience alongside the dessert.

Why is my crust crumbly?

If that happens, don’t hesitate to adjust the butter slightly, ensuring the mix cohesively compacts and then sets beautifully.

Additional Resources


To explore more dessert possibilities, consider checking out related cheesecake variations such as New York-style or rich take on chocolate-infused options.

Technique guides provide extensive insights into mastering even seamless cheesecake recipes with flourish and fineness.

For ingredient clarity, discover the numerous advantages of using seasonal eats or homegrown produce available locally to ignite the freshest kitchen start.

Our recommended equipment listings highlight essentials that merge convenience with usability, optimizing your cheesecake creation journey.

Seasonal variations inspire your dish repertoire through times and textures, welcoming innovative sweet times within culinary calendars to expand satisfied tables.

Join the Conversation


Share your own dazzling versions via social media platforms by tagging us to showcase your stunning cheesecake creations.

Photography tips are a bonus here where light balance and color pop should celebrate focal points, illustrating each cheesecake’s personality through lens capture.

Leave recipe reviews to share your unique transformations and tweak insights beyond common practice, engaging fellow home-chefs across communities.

Join us in exploring recipe variations and share inventive ingredient swaps or personal eureka moments discovered along the way, building a vibrant baking community.

The Recipe

No Bake Mini Lemon Raspberry Cheesecakes

Serves: 12 mini cheesecakes

Prep Time: 30 mins

Cook Time: 0 mins

Total Time: 30 mins + chilling time

Kitchen Equipment Needed

  • Muffin tin
  • Food processor or blender
  • Mixing bowls
  • Zester
  • Whisk

Ingredients

  • 1 cup graham cracker crumbs
  • 1/4 cup melted butter
  • 2 cups cream cheese, softened
  • 1/2 cup sugar
  • 1 tsp vanilla extract
  • 2 tbsp lemon juice
  • Zest of 1 lemon
  • 1 cup fresh raspberries

Directions

  1. In a food processor, pulse graham crackers until fine. Mix with melted butter. Press into the base of a muffin tin lined with paper cups.
  2. In a bowl, beat cream cheese, sugar, vanilla, lemon juice, and zest until smooth.
  3. Spoon the cheesecake mixture over the crust, smoothing tops with a spatula. Top with fresh raspberries.
  4. Refrigerate for at least 4 hours to set.
  5. Before serving, remove cheesecakes from the muffin tin, peel off paper cups and enjoy fresh.

Recipe Notes

  • Ensure cream cheese is at room temperature to prevent lumps.
  • Feel free to add a dollop of whipped cream on top before serving for an added touch of luxury.
  • Raspberry preservation recommends fresh consumption post-preparation for peak flavor.

Irresistible Cranberry Honey Butter: The Perfect Holiday Spread Recipe

Cranberry Honey Butter Recipe: A Delightful Spread for Every Occasion

⚖️
Difficulty
Easy

⏲️
Prep Time
10 mins

🕒
Cook Time
5 mins

⏱️
Total Time
15 mins

🍽️
Servings
8 servings

Imagine spreading a luscious cranberry honey butter on a warm loaf of bread, with its vibrant color and a perfect balance of sweet and tart flavors. This Cranberry Honey Butter Recipe marries the sweet goodness of honey with the zesty zing of cranberries, creating a sensational spread that can enhance a simple breakfast or act as a delightful accompaniment to a festive meal. Whether you’re slathering it on toast or using it as a dip, this recipe elevates any dish with its rich flavors.

The union of cranberries and honey provides not just a taste infusion but also a delightful aroma that fills your kitchen, invoking the sweet scents of harvest time. The creamy butter base adds a luxurious texture, making every bite smooth and delightful. This spread isn’t just a treat for your taste buds but also a visual feast, with its stunning deep pink hue adding vibrancy to any tablescape. The experience of making this Cranberry Honey Butter is as enjoyable as savoring it, with simple steps that yield extravagant results.

Quick Recipe Highlights

  • Flavor Profile: A perfect blend of sweet honey and tangy cranberries, creating a harmonious balance that delights all palates.
  • Texture: The creamy butter complements the chunky texture of cranberries, offering a velvety mouthfeel with bursts of fruit.
  • Aroma: The subtle sweetness of honey blends with the fresh and fruity scent of cranberries, filling the air with a pleasant aroma.
  • Visual Appeal: The vivid pink color of the Cranberry Honey Butter makes it a stunning addition to any meal, drawing compliments and appetite alike.
  • Skill Level Needed: With easy-to-follow steps, this recipe is perfect for beginners who wish to craft impressive spreads without complex techniques.
  • Special Equipment: A food processor or blender is essential for achieving the perfect consistency, ensuring the cranberries are well blended with the butter.

Recipe Overview

  • Difficulty Level: Easy. This recipe involves minimal ingredients and simple blending, making it accessible for cooks of all levels.
  • Category: This Cranberry Honey Butter is versatile, perfect as a spread for breakfast, a topping for desserts, or a unique appetizer condiment.
  • Cuisine: While it complements a variety of cuisines, this recipe has roots in Western culinary traditions that emphasize festive flavors.
  • Cost: The ingredients are affordable and easily accessible, making this spread an economical way to add flair to any meal.
  • Season: Best enjoyed in fall and winter when cranberries are in season, infusing dishes with their festive cheer.
  • Occasion: Ideal for holiday gatherings, brunches, or as a thoughtful homemade gift that impresses with its flavor and sophistication.

Why You’ll Love This Recipe

Explore the unique taste and texture that make Cranberry Honey Butter a must-try. The spread blends the natural sweetness of honey with the tartness of cranberries to create a flavor profile that stands out. The balance is stellar, enhancing the taste of whatever it accompanies without overpowering it.

Beyond its taste, this recipe is incredibly convenient. With minimal preparation and cook time, it’s a quick way to add a gourmet touch to everyday meals. Plus, it can be made in advance, giving you more time to entertain or relax.

Cranberry Honey Butter also comes with nutritional benefits, as cranberries are loaded with antioxidants and honey offers natural sweetness without processed sugars. Enjoy a delicious spread that not only tastes good but is also better for you.

Socially, this butter brings a touch of sophistication to your gatherings. Whether it’s a formal dinner or casual brunch, the spread’s vibrant color and delightful flavor spark conversations and bring people together over good food.

Finally, the accessibility and cost-effectiveness of the recipe allow you to experiment without breaking the bank. With ingredients that are easily found in most kitchens, you’re a few steps away from creating a culinary masterpiece that impresses every time.

Historical Background and Cultural Significance

Cranberry Honey Butter finds its origins within the larger tradition of fruit and honey blends, which have been cherished across different cultures for centuries. Originally inspired by Native American uses of cranberries as a staple fruit, this recipe pays homage to their resourcefulness and culinary innovation.

The Cranberry Honey Butter evolved from simple cranberry preserves, incorporating honey as a naturally sweet alternative to sugar. Embraced by settlers and passed down through generations, this recipe captures the historical bond between natural flavors and homey goodness.

Over time, regional variations of this butter have emerged. In New England, where cranberries grow abundantly, the recipe captures the spirit of local harvests. Meanwhile, Western influences introduced honey to this fruit, crafting a harmonious blend that reflects the melding of different culinary traditions.

Today, Cranberry Honey Butter transcends its seasonal roots, being adapted to suit year-round consumption. Whether spread on toast, added to savory meals, or used as an ingredient in baking, its timeless appeal continues to delight food lovers globally.

Ingredient Deep Dive

The cranberries in this recipe are more than just a seasonal fruit. With their rich history as a food staple among Native Americans, they offer a taste of tradition and culture. Beyond being a key ingredient, cranberries are packed with vitamin C and antioxidants, making them both flavorful and nutritious.

Honey, a natural sweetener used for millennia, plays a crucial role in this recipe. It provides a rich depth of flavor that is both sweet and floral. When selecting honey, opt for local varieties to capture the essence of regional flora. Store honey at room temperature to avoid crystallization and preserve its liquid form.

Butter serves as the creamy base, transforming the fruit and honey into a spreadable delight. For optimal results, use unsalted butter, allowing you to control the overall saltiness of the dish. Store butter in the refrigerator to maintain its freshness and texture.

If cranberries are unavailable, consider using dried cranberries soaked in warm water or cranberry preserves. Similarly, maple syrup or agave nectar can be substituted for honey, providing unique flavors while catering to dietary preferences.

Common Mistakes to Avoid

  • Overprocessing: Avoid blending the ingredients into a single monotonous paste; you want small bits of cranberry for texture.
  • Using salted butter: This may alter the flavor balance, making the spread too salty.
  • Storing improperly: Ensure butter is refrigerated to maintain taste and prevent spoilage.
  • Skipping the chilling step: This allows flavors to meld, enhancing the overall taste profile.
  • Choosing the wrong cranberries: Fresh cranberries provide the best flavor; frozen ones should be thawed before use.
  • Adding too many extra ingredients: Keep the recipe simple to let the natural flavors shine.
  • Forgetting to soften the butter: This makes mixing difficult and can lead to an uneven texture.
  • Neglecting to taste and adjust: Varying sweetness levels in honey require a taste test to balance flavors.
  • Failing to garnish creatively: A sprinkle of fresh herbs or a zest of citrus can enhance presentation and taste.

Essential Techniques

Mastering the blend of flavors is crucial for perfect Cranberry Honey Butter. Use a food processor to ensure the cranberries and butter blend evenly, achieving a rich and creamy consistency without losing texture. Taste and adjust sweetness as necessary, as honey’s flavor can vary widely.

Another key technique is temperature control. Soften butter to room temperature for easy mixing but avoid melting it entirely, as this can alter the spread’s texture. Similarly, allow flavors to meld in the fridge before serving, enhancing the harmonious blend of sweet, tangy, and buttery notes.

Pro Tips for Perfect Cranberry Honey Butter

Consider experimenting with additional flavors such as a pinch of cinnamon or clove for a spiced twist. These spices complement the natural flavors without overwhelming them.

If you desire a smoother texture, strain the blended mixture to remove larger cranberry pieces. This ensures a uniform spread that can be used in various culinary applications.

Pair your Cranberry Honey Butter with freshly baked bread or muffins to experience its full flavor potential. The warmth from the baked goods melts the spread just enough, releasing its aromatic notes.

Refrigerate leftover butter in an airtight container to maintain its freshness. Before serving, allow it to sit at room temperature for a few minutes to soften, making spreading easier.

Explore the potential of this butter as a glaze for roasted meats or vegetables, leveraging its sweet-tangy profile to enhance savory dishes. For those with a sweet tooth, mixing with powdered sugar can turn it into a delightful frosting for cakes or cookies.

Variations and Adaptations

Cranberry Honey Butter is versatile enough to accommodate various regional twists. In Northern Europe, try adding cardamom or nutmeg to give a warm, spiced flavor reminiscent of traditional Scandinavian baked goods. During summer, swap cranberries for strawberries or raspberries for a fresh, seasonal twist.

For dietary adaptations, consider substituting butter with a plant-based alternative for a vegan version. Use agave nectar instead of honey to cater to different dietary requirements while maintaining sweetness.

The texture can be modified by adjusting the amount of cranberry chunks. For a chunkier spread, blend less. Conversely, for smoothness, blend more and strain the mixture to remove any pieces. Presentation-wise, serve the butter in decorative jars, topped with a sprig of mint or rosemary, adding elegance to your table setting.

Serving and Presentation Guide

Give your Cranberry Honey Butter a modern twist by presenting it on a wooden charcuterie board amid an assortment of bread, fruits, and cheeses. This not only elevates its appearance but encourages sharing and engaging culinary experiences.

Traditional accompaniments include warm bread rolls or croissants, where the spread serves as a meltingly rich enhancer. Make use of garnishes like cranberry zest or a drizzle of extra honey for both decoration and flavor heightening.

Temperature plays an essential role; serve the spread slightly chilled for a firm texture, or at room temperature for convenience and easy application. Guide your guests on portion control by providing small serving knives or spoons, emphasizing etiquette and enjoyment.

Wine and Beverage Pairing

Pair your Cranberry Honey Butter with a classic Pinot Noir or a light-bodied Riesling, both of which complement the spread’s sweet-tart profile. These wines bring out the richness of the butter while balancing the tart cranberry notes.

For non-alcoholic alternatives, consider pairing it with a lightly brewed green tea or sparkling water infused with lemon. These options cleanse the palate between bites, allowing the spread’s flavor to shine with each tasting.

Coffee enthusiasts might enjoy this butter alongside a rich, creamy latte, while tea drinkers might pair it with a soothing cup of chamomile, enhancing the butter’s sweetness and butteriness with each sip.

Storage and Shelf Life

Store Cranberry Honey Butter in an airtight container or jar to keep it fresh. In the refrigerator, it can last for up to two weeks. If you need to store it longer, consider freezing portions in silicone molds for easy use.

Always check for signs of spoilage, such as off-odors or changes in color, to ensure safety. When reheating, do so gently to avoid altering the texture. For optimal thawing, move the butter from the freezer to the refrigerator overnight.

Make Ahead Strategies

The components of this butter can be prepared in advance to streamline assembly. Consider chopping the cranberries and softening the butter a day prior, storing them separately until ready to blend.

Store assembled butter in airtight containers, ensuring flavors have time to meld during refrigeration. If serving later, allow the spread to soften at room temperature before presentation, ensuring optimal texture and spreadability.

Adding fresh elements like herbs or a sprinkle of zest just before serving can enhance freshness and visual appeal, ensuring your Cranberry Honey Butter remains as vibrant and delightful as when freshly made.

Scaling Instructions

If scaling down, simply halve the ingredient quantities to maintain flavor balance. For larger batches, double ingredients while ensuring your food processor can handle the increased volume.

Pay attention to equipment capacity when increasing quantities; larger batches may require blending in multiple rounds. Adjust timing minimally, as the overall preparation and cooking process remains consistent with scaling.

Store any excess in usable portions, keeping whatever is not immediately needed frozen or refrigerated. This way, your delicious Cranberry Honey Butter remains easily accessible and ready for future use.

Nutritional Deep Dive

Cranberry Honey Butter provides a well-rounded macro profile, offering healthy fats and carbohydrates from its core ingredients. The butter supplies rich fatty acids vital for energy, while cranberries contribute vitamins like C and E.

Its micronutrient profile includes calcium and potassium, supporting overall well-being. The natural sweeteners used make it a better option for those watching processed sugar intake.

When considering dietary portions, a modest tablespoon can offer satisfaction without excessive calorie load. Adjust portions according to dietary goals, balancing taste and nutritional benefits for a well-rounded consumption experience.

Dietary Adaptations

For gluten-free diners, ensure all accompanying items like bread are certified gluten-free. Dairy-free enthusiasts can substitute butter with margarine or other plant-based options, maintaining flavor integrity.

Vegans may enjoy the recipe with non-dairy butter and agave syrup. For those following a low-carb or keto lifestyle, replace honey with a low-carb sweetener substitute, keeping carb count minimal.

The versatility of this recipe extends to being altered for diverse diets without losing its essence, showcasing its flexibility while respecting individual dietary needs and preferences.

Troubleshooting Guide

If the texture seems too gritty, increase blending time or adjust butter consistency. For balance issues, vary the amount of honey or cranberries to suit personal taste, ensuring neither dominates.

Should your cranberry honey butter be too soft, refrigerate longer to allow it to set firmly. Conversely, if too hard, let it sit at room temperature briefly before serving.

For temperature concerns, remember that the spreadability changes with cooler or warmer environments; always maintain it at a comfortable serving temperature for best results.

Recipe Success Stories

Our community members have raved about this versatile spread. Anna from Texas swapped cranberries for blackberries, delighting her family with the adapted recipe’s surprising depth of flavor.

A reader named John creatively incorporated orange zest, adding a citrusy note that perfectly complemented the butter’s natural sweetness. His dinner guests couldn’t get enough, jotting down the recipe unsure of its evolving possibilities.

Lucy’s suggestion to embellish it with freshly chopped mint received much applause, enhancing both aroma and presentation. Share your creations with us, and maybe your story will inspire the next delicious adaptation!

Frequently Asked Questions

Can I use frozen cranberries? Yes, thaw them completely before using, ensuring they blend smoothly without altering the recipe’s consistency.

What type of honey is best for this recipe? Choose a mild-flavored honey to ensure it complements without overpowering the cranberry tartness.

Can this butter be stored outside the refrigerator? Store Cranberry Honey Butter in the refrigerator to maintain freshness and prevent spoilage.

What is a good substitute for cranberries if not available? Consider using raspberries or strawberries for a different but complementary fruity note.

How long does this butter last once made? When stored properly in the refrigerator, it can last up to two weeks.

Can I add spices to enhance flavor? Absolutely, spices such as cinnamon or nutmeg can be added for a delightful twist.

Is it possible to make this without a food processor? While it may be more challenging, manually chopping cranberries and whisking them into softened butter is feasible.

What are some serving suggestions? Spread it over warm breads, pair with cheeses on a board, or even mix into baked goods for unique treats.

Can I freeze this recipe? Yes, portion and freeze for longer storage, thawing as needed.

What can I do if the butter is too sweet? Adjust the quantity of honey to balance sweetness to your preference.

Additional Resources

Explore related recipes like Honey Almond Butter or Cranberry Sauce for more fruity spreads. Our technique guides on homemade butter techniques can aid your next culinary adventure.

Dive into ingredient insights to better understand the nutritional benefits and history of honey, cranberries, and butter. Look through seasonal variations to discover fresh, exciting adaptations tailored for each year’s experience.

Join the Conversation

We invite you to join our vibrant cooking community by sharing your Cranberry Honey Butter creations on social media. Use #CranberryHoneyButter to connect with fellow enthusiasts and share your unique variations or tips.

Review the recipe here, highlighting your personal touches and successes. Engage with other readers to exchange feedback, stories, and culinary ideas that can inspire and elevate this delightful spread further.

The Recipe

Cranberry Honey Butter

Serves: 8 servings

Prep Time: 10 mins

Cook Time: 5 mins

Total Time: 15 mins

Kitchen Equipment Needed

  • Food processor or blender
  • Measuring cups and spoons
  • Mixing bowl
  • Spatula

Ingredients

  • 1/2 cup fresh cranberries
  • 1/4 cup honey
  • 1 cup unsalted butter, softened

Directions

  1. In a food processor, pulse cranberries until coarsely chopped.
  2. Add in the honey and continue to pulse until the mixture is combined.
  3. In a mixing bowl, blend the softened butter until smooth.
  4. Gradually add the cranberry-honey mixture to the butter, stirring until all ingredients are fully integrated.
  5. Transfer the mixture to a storage container and chill for at least 1 hour before serving allowing flavors to meld.

Recipe Notes

  • Adjust honey to taste for your preferred sweetness level.
  • For a spicier butter, add cinnamon or nutmeg during blending.
  • The butter can be frozen in airtight containers for extended preservation.

Indulge in a Delicate Cake with Caramel Coffee Cream

Delicate Cake with Caramel and Coffee Cream: A Symphony of Flavors

⚖️
Difficulty
Intermediate

⏲️
Prep Time
30 mins

🕒
Cook Time
45 mins

⏱️
Total Time
75 mins

🍽️
Servings
8

Every bite of this delicate cake with caramel and coffee cream promises an exquisite blend of flavors. The silky coffee cream layers counterbalance the sweet, rich caramel, offering a sensory delight that’s hard to resist. This cake is perfect for those who appreciate a fine balance of sweetness and bitterness, with a texture that melts in your mouth. Its visual appeal is matched only by its taste, making it a splendid centerpiece for any gathering.

Quick Recipe Highlights

  • Flavor Profile: A harmonious blend of bitter coffee and sweet caramel, creating a sophisticated taste.
  • Texture: Soft and moist cake layers interlaced with creamy, smooth coffee-flavored cream.
  • Aroma: Rich notes of roasted coffee and warm caramel fill the air as this cake bakes.
  • Visual Appeal: A stunning two-tone layer cake with a glossy caramel glaze and delicate coffee cream swirls.
  • Skill Level Needed: Intermediate baking skills required, as this recipe involves multi-step frosting and layering.
  • Special Equipment: Stand mixer, and cake turntable for professional results.

Recipe Overview

  • Difficulty Level: This recipe demands attention to detail while preparing the caramel and coffee cream layers. It’s ideal for bakers with some experience looking to challenge themselves.
  • Category: This is a dessert recipe, perfect for post-dinner indulgence or as a key feature in a celebratory dessert spread.
  • Cuisine: Drawing from classic European dessert traditions, this cake combines timeless flavors appreciated globally.
  • Cost: Moderate, as it involves premium ingredients like coffee extract and high-quality butter, fetching around $15-$20.
  • Season: Best enjoyed during cooler months when rich flavors are most appreciated, although it can be enjoyed year-round.
  • Occasion: Perfect for special occasions such as birthdays, anniversaries, and festive gatherings.

Why You’ll Love This Recipe


The taste and texture of this delicate cake with caramel and coffee cream is a standout in any culinary lineup. The layering of flavors ensures each bite delivers a balanced profile that’s rich but not overwhelming. The cake is moist, complemented beautifully by the smoothness of the coffee cream. Convenience is another key feature, as this cake can be prepared in stages, allowing for flexible baking. Nutritionally, ingredients like sugar and butter are used in moderation, and there are opportunities to substitute for lower-fat cream options if desired.

From a social perspective, this cake is a crowd-pleaser, earning compliments at any gathering. Its unique flavor combination and impressive presentation make it a perfect conversation starter. Economically, it is accessible; while some ingredients are on the premium side, they are single-time purchases that balance out over 8 servings, providing good value for money.

Historical Background and Cultural Significance


Originating from the rich dessert traditions of Europe, this cake has evolved over time to incorporate the bold flavors of coffee and caramel. Historically, caramel has been a favored element in many French desserts, renowned for its ability to transform simple sugar into a deep, nutty treat. On the other hand, coffee is cherished around the world for its invigorating properties, slowly finding its way into the world of confections. The combination of these two iconic ingredients brings forth a cake that pays homage to both tradition and modern culinary experimentation.

The cultural importance of dessert as a symbol of celebration is not lost on this cake. It has become a staple in luxury dining experiences, often featured in high-end cafes and bakeries as a nod to refined taste. Over the years, bakers have experimented with various regional adaptations, adding local ingredients or modifying the cream content to suit their audience’s palates.

Ingredient Deep Dive


Butter plays a central role in this recipe, enriching the cake’s texture and flavor. With its origins in European cooking, butter is lauded for its ability to transform baked goods with its creamy touch. Nutritionally, butter offers essential vitamins such as A and D when consumed in moderation. Opt for unsalted butter to control the recipe’s overall flavor balance, and store it in its original wrapping in the fridge to maintain freshness. If needed, margarine can be a substitute, though it may slightly alter the taste.

Coffee extract is crucial for the distinctive flavor in the cream. Initial uses of coffee in baking emerged to add depth to desserts without overpowering them. Its benefits include a hint of caffeine and antioxidants, promoting energy while enjoying a treat. Choose high-quality coffee extract for the best flavor profile, and store it in a cool, dark place. For a more intense flavor, consider using an equal amount of freshly brewed espresso as an alternative.

Common Mistakes to Avoid

  • Overbeating the cake batter can lead to a dense texture; blend just until ingredients are combined.
  • Failing to chill the caramel results in a runny consistency; ensure it sets properly before use.
  • Adding coffee extract to hot mixtures diminishes its flavor; allow components to cool slightly first.
  • Neglecting to preheat the oven can cause uneven baking; ensure it reaches the recommended temperature beforehand.
  • Skipping the cake cooling process leads to a messy assembly; patience is key for clean layers.
  • Using low-quality coffee extract impacts taste negatively; invest in a reputable brand for best results.
  • Wrong frosting consistency can ruin presentation; adjust thickness with powdered sugar or cream as necessary.
  • Storing the cake improperly causes drying; wrap the cake tightly if keeping it overnight.

Essential Techniques


Creating a successful caramel involves a keen eye. It’s crucial to keep a steady gaze on the pot as sugar transforms to ensure the right amber color without crossing into bitterness. A light swirl of the pot rather than stirring prevents crystallization, a common pitfall. Mastering caramel requires confidence and practice, but noting the pivotal moment when bubbles slow and deepen their hue leads to visual success.

Pro Tips for Perfect Delicate Cake


Start baking with all ingredients at room temperature; this ensures even mixing and a consistent cake crumb. To achieve that flawless layer, invest in a cake leveler for even slices. If you’re pressed for time, prepare the components a day ahead to simplify the final assembly. For an added visual and textural contrast, consider lightly toasting the surface of the cake before adding the cream. Lastly, a touch of flaked sea salt on the caramel glaze amplifies its flavor magnificently.

Variations and Adaptations


Regional adaptations highlight unique benefits: Consider using a local nut butter to replace the traditional cream for a nutty twist. Add a fruit layer, like thinly sliced bananas, for a tropical flair in summer months. For dietary shifts, silky coconut cream can substitute heavy cream to satisfy a vegan palate while retaining richness.

Serving and Presentation Guide


Elegance in presentation elevates this dessert; consider a minimalist white plate to let the cake’s colors shine. For garnishing, a light dusting of cocoa powder or a few coffee beans strategically placed enhances the coffee theme. Traditionally served with just a fork, a modern twist could include a small dollop of whipped cream on the side to enrich the experience without overshadowing the cake’s flavors.

Wine and Beverage Pairing


A well-chilled glass of Sauternes expertly pairs with this cake, lending honeyed sweetness that complements the caramel notes. Alternatively, an iced Americano provides a caffeine-centric pairing for those desiring something non-alcoholic. Consider serving a medium steeped black tea to balance the cake’s richness if a lighter choice is preferred.

Storage and Shelf Life


Store this cake in an airtight container at room temperature for up to two days to maintain moisture. For longer storage, refrigerate while ensuring it’s well-wrapped to prevent drying out. Recognize spoilage if the caramel turns grainy or cream appears separated, indicating it’s past its best. For reheating, allow the cake to reach room temperature first, before gently warming individual slices in the oven to avoid melting the cream.

Make Ahead Strategies


Each component—cake layers, caramel, and coffee cream—can be prepared separately up to a day in advance. This spread timeline allows for less rushed assembly come serving day. Refrigerate the caramel and cream in airtight containers, allowing them to soften before final layer creation. This strategy maintains the integrity of flavors and textures, ensuring freshness.

Scaling Instructions


To halve the recipe, adjust ingredients precisely, taking note especially of liquids and leaveners which can greatly affect the outcome. Scaling up relies on doubling all ingredients while using larger baking pans to accommodate volume without altering cook time drastically. Be cautious of equipment limitations—overfilling decreases bake consistency—and extend baking time in smaller increments to avoid overcooking.

Nutritional Deep Dive


Each serving of this cake offers a balanced macro composition, with carbohydrates as the primary focus from sugar and flour. It includes beneficial fats from butter, providing energy and aiding nutrient absorption. Among micronutrients, it offers small amounts of calcium and potassium. Mindfulness of portion sizes and a balanced diet ensures this dessert satisfies both taste and health expectations.

Dietary Adaptations


For a gluten-free version, substitute traditional flour with a compliant blend, offering similar textural results. Dairy-free adaptations involve coconut or almond milk as primary replacements. A vegan-friendly route requires substituting eggs with applesauce or flaxseed meal, while maintaining moisture through plant-based creams.

Troubleshooting Guide


Should your cake crumb crumble, you might opt for a bit more moisture in the batter. A bitter caramel calls for closer watch times, while under-set cream indicates insufficient cooling. If frosting appears too runny, more powdered sugar ensures stability. For burned cake edges, check rack placements and possibly reduce oven temperature slightly.

Recipe Success Stories


Our community has embraced this recipe warmly, with stories of successful personal touches like adding a layer of orange curd for a citrus note. Variations across regions have included integrating a dash of spice for a warming, comforting twist. Photography enthusiasts have captured its elegant simplicity, highlighting the enticing layers.

Frequently Asked Questions

What makes this cake delicate?
The balance of moist crumb and light cream contributes to its delicate texture.

Can I use instant coffee instead of extract?
Yes, dissolve instant coffee in a tablespoon of water for a more robust coffee flavor.

Is homemade caramel necessary?
Store-bought caramel can be used, but homemade offers superior flavor and texture.

How do I maintain consistent frosting layers?
Use a piping bag to ensure even distribution before smoothing with a spatula.

Can I add nuts to this recipe?
Chopped walnuts or hazelnuts can be incorporated for a crunchy contrast.

What if my cake is too dense?
Ensure leavening agents are fresh, and avoid overmixing the batter.

Does the coffee flavor dominate?
It’s balanced with caramel but can be adjusted to taste preferences.

What if my caramel crystallizes?
Consider adding cream of tartar or lemon juice buffer in the cooking process.

How do I prevent the cake from drying out?
Wrap tightly and seal in an airtight container when not serving.

Is refrigeration necessary?
Only if room temperature exceeds a comfortable level, otherwise it can safely sit out for a short period.

Additional Resources


Explore related recipes like a classic tiramisu for another caffeine-flavored dessert. For better caramel techniques, consult our guide on sugar cooking. Ingredient exploration articles provide in-depth looks at coffee and its global impact, while modern plating techniques can inspire visually stunning presentations.

Join the Conversation


Share your delicate cake with caramel and coffee cream masterpieces via Instagram using #DelicateCakeCreation. Come connect on our baking forums for advice, tweaks, and success stories. Engage with other culinary explorers, sharing variations that worked for you and discussing how this cake found its way into your celebration.

Irresistibly Easy No-Bake Crunch Bars for Quick Desserts

Deliciously Easy No-Bake Crunch Bars: The Sweetest Treat

⚖️
Difficulty
Easy

⏲️
Prep Time
10 mins

🕒
Cook Time
0 mins

⏱️
Total Time
10 mins

🍽️
Servings
12

Dive into the world of indulgence with these No-Bake Crunch Bars. Perfect for satisfying your sweet tooth without the hassle of baking, these bars are both simple and scrumptious. Imagine rich, creamy layers mingled with a delightful crunch, offering a contrast that dances on your palate. Whether you’re craving a mid-day snack or crafting a dessert tray for a gathering, these crunch bars are sure to be the star attraction, radiating not just charm but an impeccable balance of flavor and texture.

No-Bake Crunch Bars deliver a satisfying experience with every bite. Each layer presents a harmonious interplay of sweet and nutty elements that cater to all your taste preferences. The creamy chocolate coats your taste buds with a luxuriously smooth sensation, while the crispy rice cereal adds the perfect texture contrast, making these bars irresistibly delightful.

Quick Recipe Highlights

  • Flavor Profile: Sweet and nutty flavors with a rich chocolate base. Each bite is a symphony of sweetness complemented by a soft hint of vanilla.
  • Texture: The bars boast a delightful crunch from the crispy cereal, enveloped in creamy, smooth chocolate for a perfect mouthfeel.
  • Aroma: The inviting scent of melted chocolate with a whisper of nutty undertones lingers in the air, making it impossible to resist.
  • Visual Appeal: These bars present a beautifully layered appearance with visible flecks of nuts, promising a treat that is as delightful to the eyes as it is to the palate.
  • Skill Level Needed: Ideal for beginners; requires basic mixing and layering skills, making it suitable for cooks of all levels.
  • Special Equipment: No special tools needed, just a mixing bowl and a baking dish, making it a straightforward recipe to execute anywhere.

Recipe Overview

  • Difficulty Level: The No-Bake Crunch Bars are rated easy, as they require no cooking or baking, merely combining ingredients and allowing them to set.
  • Category: Perfect for desserts or snacks, these bars are suitable for any time of the day.
  • Cuisine: While they offer a modern twist, the roots of using chocolate and nuts are proudly influenced by classic American desserts.
  • Cost: Affordable to make, using common pantry staples like chocolate chips and cereal, these bars are budget-friendly.
  • Season: Best enjoyed year-round, with a refreshing cold set perfect for summer, and a rich chocolate taste that warms the winter.
  • Occasion: These bars are incredible for casual get-togethers, holiday parties, potlucks, or simply as a family treat after dinner.

Why You’ll Love This Recipe


No-Bake Crunch Bars are the epitome of sweet delight, offering a rich blend of flavors that tantalize the taste buds. The smooth, creamy layer of chocolate, finely complemented by the crispy rice cereal and peanuts, provides a perfect textural balance that is both satisfying and addictive. It’s a delicious indulgence that offers a versatile treat for any dessert or snack occasion.

Beyond their mouthwatering taste and texture, these crunch bars are a breeze to prepare. Without the need for an oven, you can whip up a batch in mere minutes, making them an abundant choice for last-minute gatherings or a quick personal treat. The steps involve simple mixing and layering, ensuring that anyone can create a delicious dessert with ease.

These No-Bake Crunch Bars boast a nutritional profile that’s both satisfying and fulfilling. While indulging your sweet cravings, the incorporation of nuts and cereal adds a boost of healthy fats and fiber, contributing to a more balanced treat. It’s a delightful way to enjoy a snack without straying too far from your dietary goals.

The social benefits of preparing No-Bake Crunch Bars are immense. Their easy preparation allows for conversational cooking moments with friends and family, making every creation an opportunity for bonding. Also, their universal appeal across age groups makes them a hit at parties and celebrations, sparking joy and enthusiasm among guests.

Cost-effectiveness is a stand-out feature of these bars. Utilizing widely available ingredients, like chocolate and peanuts, keeps expenses down while still producing a lavish-tasting treat. Their accessibility is perfect for those looking to enjoy a delicious dessert without breaking the bank, all while maintaining high quality and flavor standards.

Historical Background and Cultural Significance


No-Bake Crunch Bars trace their origins back to the mid-20th century when convenience foods became integral to American households. With the advent of quick desserts, recipes that required minimal preparation gained popularity. These bars gained recognition for providing a straightforward, delicious treat without the need for a traditional oven.

Culture-wise, the recipe has become part of many family traditions, passed down through generations as a quick and reliable dessert for holidays and special occasions. This transitional nature highlights the American spirit of adaptation and innovation, creating delightful treats from available ingredients while embodying simplicity and warmth.

As recipes traveled through regions, the core essence of No-Bake Crunch Bars remained, while allowing for creative adaptations. Variations arose using different types of nuts, cereals, or even marshmallows, showcasing regional preferences in taste and texture. This versatility marks an evolution of a simple treat into a canvas for culinary creativity.

Globally, similar concepts have been embraced, with various countries introducing their own versions influenced by local tastes and available resources. This cross-cultural adaptation underscores the universal appeal of a sweet treat that requires minimal resources, offering an inclusive dessert that transcends boundaries.

Ingredient Deep Dive


Chocolate is the star ingredient in No-Bake Crunch Bars, bringing a rich, smooth essence that anchors every bite with decadence. Its deep history, originating from ancient Mesoamerica, lends cultural significance and versatile applications in sweet treats. The dark, bittersweet or milk varieties cater to different palates, offering a wide spectrum of flavors.

Nutritionally, chocolate, especially dark, contains antioxidants and minerals beneficial for health when consumed in moderation. Selection tips include choosing quality chocolate with high cocoa content to enhance flavor and texture. Store in a cool, dry place to maintain its glossy appearance and prevent blooming, which affects texture and taste.

Crispy rice cereal, providing the delightful crunch in the bars, has its own historical roots with early iterations appearing in the 1920s. Its role extends beyond texture, as it enhances the nutrition profile with added grains. Selecting a fresh and crispy cereal is key to maintaining the intended mouthfeel, while variations like flavored cereals can add an extra flavor dimension.

The inclusion of peanuts in No-Bake Crunch Bars introduces a nutty depth, historically intertwined with American culinary tradition since its cultivation by Native American tribes. They are a powerhouse of protein, vitamins, and healthy fats, playing a dual role in elevating flavor and providing sustenance, making this ingredient invaluable.

Common Mistakes to Avoid

  • Using low-quality chocolate can lead to a dull, waxy coating on the bars. Always choose high cocoa content chocolate for the best results.
  • Skipping the cooling step will result in bars that don’t set properly. Ensure that the bars are completely set in the refrigerator before slicing.
  • Overheating the chocolate may cause it to seize, turning it grainy. Melt the chocolate gently using a double boiler or in short bursts in the microwave.
  • Under-mixing the ingredients might lead to uneven distribution. Mix thoroughly to ensure all components are well-coated in chocolate.
  • Using stale or soft cereal will diminish the crunch. Keep the rice cereal crisp by storing it in an airtight container until use.
  • Overloading the bars with too many extras can make them too dense. Stick to the recipe’s recommended ingredient quantities for optimal texture.
  • Not lining the pan can cause sticking issues. Always use parchment paper to ensure the bars can be easily removed and cut.
  • Omitting nuts may alter the texture significantly. If there’s an allergy or preference issue, substitute with other crunchy ingredients rather than skipping.
  • Skipping the leveling step may result in uneven bars. Smooth the top with a spatula for an even finish.
  • Not adjusting sugar levels for sweetened cereal or chocolate can make the bars overly sweet. Taste and modify according to your preference.

Essential Techniques


When melting chocolate, patience is key. A slow, controlled melt over a double boiler or in bursts in a microwave ensures the smoothest texture without graininess. Mastering this ensures the glossy finish characteristic of well-made chocolate-based treats, enhancing both appearance and consistency.

Mixing ingredients uniformly is another essential technique. Even distribution of cereal and nuts in the chocolate ensures every bite is consistent in taste and texture, maximizing the indulgence experience. This technique prevents clumping and preserves the uniformity crucial to any layered bar recipe.

When setting the bars, the transition from warm to cool should be carefully paced. A gradual cooling aids in the overall set texture, crucial for clean cuts and well-formed bars. Observing visual cues, like a firm top and set edges, guides the readiness for serving and enhances presentability.

Preparation of the base lining is a vital yet often overlooked technique. Properly lined pans allow for easy transfer and cutting of bars, preserving their structure and appearance. Ensuring the protective layer covers all base areas enhances play efficiency, delivering visually appealing, professionally finished bars.

Portioning the bars is not just about equal parts, but about creating visually appealing, uniform pieces. Use sharp knives and precise motion to maintain integrity with neat edges and consistent size. Mastering this technique facilitates an enhanced dining experience and aesthetically pleasing dessert presentations.

Pro Tips for Perfect No-Bake Crunch Bars


To elevate your No-Bake Crunch Bars, use premium baking chocolate for a richer taste and smoother texture. Darker chocolate will bring a depth of flavor, while milk chocolate offers a creamy indulgence; both work brilliantly depending on your personal preference.

For an extra layer of flavor, consider adding a pinch of sea salt to the melted chocolate. It enhances the sweetness while introducing a subtle contrasting note that heightens the overall taste experience, perfect for those who enjoy a sweet-salty treat.

Incorporate diverse nuts or dried fruits to tailor the bars to seasonal preferences or dietary needs. Almonds, walnuts, or hazelnuts can offer different flavor profiles, while dried berries add a hint of tartness, expanding the flavor complexity.

Experiment with flavored extracts like vanilla or almond to infuse the bars with a signature aroma. A small amount can introduce a noteworthy difference, making your bars uniquely yours and delightfully aromatic.

For a stellar presentation, swirl melted white chocolate over the bars before setting. This added visual element creates an appealing pattern, enhancing both aesthetics and offering a slight variation in taste.

To maintain the crunch of cereals, ensure all mix-ins are added to the cooled chocolate. This prevents premature sogginess, maintaining the desired texture that defines these bars as crunchy and satisfying.

Variations and Adaptations


Diverse regional variations can be explored with No-Bake Crunch Bars. Incorporate local flavors like cinnamon, cayenne, or matcha to reflect your cultural influences or preferences, tailoring the sweet treat to align with diverse palates and celebrate unique culinary identities.

Seasonal adaptations allow the bars to fit any time of the year. Utilize pumpkin spice for autumn charm, peppermint extract for a winter twist, or tropical fruits like coconut for a summer vibe, showcasing the versatility and adaptability of these beloved treats.

For dietary modifications, consider gluten-free cereals or dairy-free chocolate varieties. This ensures that those with specific dietary restrictions can still indulge, turning the already accessible recipe into an inclusive dessert option.

Flavor variations can be achieved by experimenting with different chocolate types, such as switching dark chocolate for white chocolate or blending two different kinds. This not only offers taste diversity but also allows the creativity of customization.

Texture modifications might include additional layers of crispy elements or a chewy dimension through marshmallows or toffee bits. This variation creates a new sensory experience while keeping the core essence of No-Bake Crunch Bars intact.

Explore modern presentation alternatives by cutting the bars into bite-sized pieces or using molds for themed shapes. Personalized touches elevate the presentation, making these bars a whimsical addition to dessert platters and guaranteeing an impressive look.

Serving and Presentation Guide


Enhance the presentation of your No-Bake Crunch Bars with creative plating techniques. Stack them in staggered layers for height and dimension or fan them out on a vibrant platter to create a color contrast with the chocolate hues, making them a visual delight.

Consider garnishing ideas to elevate your bars. A light dusting of powdered sugar or a sprinkle of crushed nuts enhances both flavor and appearance, while fresh fruit slices add vibrant color and a fresh flavor contrast.

Traditional accompaniments such as a glass of cold milk, a scoop of vanilla ice cream, or a simple dollop of whipped cream can enhance the enjoyment of your bars, creating a well-rounded dessert experience that satisfies both comfort and indulgence.

Modern serving suggestions include pairing your bars with a chilled dessert wine for a sophisticated touch, or serving them with a fresh mint sprig for added aroma and color. These pairings elevate your dessert for gatherings while showcasing your culinary flair.

Temperature considerations involve serving bars slightly chilled to maintain their integrity and enhance the satisfying texture contrast. This not only preserves the crispness but amplifies the flavor of the chocolate and nuts in each bite.

Portion control tips ensure ideal serving sizes. Using guides, such as cutting into uniform pieces, helps manage portions for balanced distribution, making them ideal for parties and ensuring every guest enjoys a perfect slice of the No-Bake Crunch Bars.

Wine and Beverage Pairing


Pair No-Bake Crunch Bars with rich, full-bodied red wines like Merlot or Cabernet Sauvignon, whose berry notes complement the chocolate’s depth. These combinations enhance the bars’ flavors, accentuating both the fruitiness of the wine and the richness of the dessert.

For non-alcoholic alternatives, consider serving the bars with a chocolate or caramel-flavored coffee, emphasizing the dessert’s chocolatey notes. A creamy café au lait can also enhance the sweetness, while a bold espresso balances that richness with its robust intensity.

If pairing with tea, opt for a spiced chai or rooibos blend. The spices in chai offer an aromatic counterpart to the bars’ sweetness, while the rooibos’ earthiness complements the creamy, nutty components, providing a calming, balanced beverage experience.

Temperature considerations are crucial for drinking enhancing enjoyment. Coffee should be served warm to slightly hot to promote those bold, enveloping flavors, while tea should not be piping hot to allow for a seamless merge of flavors with the bars.

Serving suggestions for wine would be to aerate and chill slightly before serving, ensuring flavors are at their peak. For coffee and tea, consider serving alongside fresh cream or milk, allowing personal customization to complement the dessert’s sweetness perfectly.

Storage and Shelf Life


Proper storage of No-Bake Crunch Bars ensures longer shelf life and maintains their desirable texture. Store the bars in an airtight container in the refrigerator to prevent moisture loss and to keep the chocolate firm and the cereals crisp, prolonging their palatable freshness.

Temperature requirements suggest keeping the bars chilled to enhance both preservation and taste. Maintaining a stable cool environment prevents ingredient separation and retains initial structure, crucial for maintaining quality over several days.

Container recommendations include using airtight, glass, or plastic containers with a locking lid to preserve texture and prevent dry-out or refrigerator odors from penetrating the bars, ensuring an optimal freshness level until ready to serve.

Signs of spoilage in these bars would be noticeable changes in color, texture, or smell. A white film on chocolate might suggest sugar or fat bloom, while chewy cereals could point to moisture exposure necessitating timely consumption.

Reheating instructions involve allowing the bars to sit at room temperature before serving for optimal texture, as microwaving might cause the chocolate to melt unevenly and compromise the overall integrity of the bars.

For freezing guidelines, wrap individual portions in wax paper or foil before placing them in a freezer-safe bag or container. This protects against freezer burn, extends shelf life significantly, and enables convenient, single-serving access.

Make Ahead Strategies


Master the art of preparing ahead with a planned prep timeline. Complete mixing and layering a day in advance, allowing the bars to set overnight for optimal texture, ensuring maximum flavor and convenience for any event or gathering.

Storage between steps involves chilling layers sequentially to solidify each component’s setting. This technique prevents flavor mingling and guarantees a seamless texture transition between layers, creating a visually appealing and well-structured dessert.

Assessing quality impact when prepared ahead involves tasting and potentially adjusting flavors, maintaining a balance between sweetness, chocolate, and nut components, ensuring any make-ahead preparation hasn’t altered intended taste goals.

Assembly tips recommend using a lined pan for batch preparation, facilitating easy removal and clean cutting. For event presentation, consider pre-slicing into serving sizes to streamline final assembly, ensuring the bars’ structure remains intact and aesthetically pleasant.

Reheating guidelines suggest tempering at room temperature if needed to soften slightly before consumption. Avoid microwaving or heat exposure, which could jeopardize their established texture and melt texture-sensitive components.

Adding fresh elements like garnishes or drizzles just before serving offers a tailored touch that enhances flavors while visually reviving the dessert’s presentation, ensuring the No-Bake Crunch Bars remain appealing and captivating.

Scaling Instructions


Scaling recipes, whether halving, doubling, or tripling the batch, requires precise fraction-based measurement adjustments to ensure ingredient ratio consistency, maintaining the intended flavor balance and texture quality.

Equipment adjustments are crucial when making larger batches. Use proportionately larger bowls and pans to accommodate increased quantities without crowding, promoting uniform mixing and even setting, crucial for desirable textural outcomes.

Timing modifications involve extending or reducing refrigeration times depending on batch size to optimize ingredient solidification and flavor infusion, ensuring each bar retains its characteristic texture and flavor regardless of portion adjustments.

Storage considerations need addressing when scaling up, necessitating additional airtight containers to house surplus bars while maintaining their freshness, ensuring each piece delivered to guests remains just as delectable and well-preserved as the last.

Nutritional Deep Dive


Delving into the nutritional profile of No-Bake Crunch Bars reveals a breakdown rich in essential macronutrients: carbohydrates from cereal and sugar, fats primarily from nuts and chocolate, and a protein contribution through nuts and possibly cereals.

Micronutrient analysis sees a range of vitamins and minerals like magnesium and iron from chocolate, and Vitamin E and folate from nuts, contributing to a rounded micronutrient intake when consumed as part of a balanced snack.

Health benefits highlight antioxidant potential from chocolate and heart-healthy fats in nuts, supporting overall wellness when enjoyed in moderation. These elements balance indulgence with nutritional value essential for a health-conscious lifestyle.

Dietary considerations involve balancing caloric content with portion awareness, aiming to align these sweet treats within broader eating plans without compromising the overall dietary framework or intended nutritional intake targets.

Portion analysis recommends consumer awareness in slicing sizes, providing around 3-4 bars per typical serving to maintain caloric intake in alignment with individual dietary goals, ensuring both satisfaction and health balance.

For weight management tips, incorporate these bars as controlled treats; view them as a satisfying dessert to avoid exceeding daily caloric limits, thus supporting ongoing wellness goals while still enjoying delightful indulgences.

Dietary Adaptations


For gluten-free adaptation, use certified gluten-free cereal to ensure compliance, maintaining a delicious option for those with gluten sensitivities without altercating taste or texture of traditional No-Bake Crunch Bars.

For dairy-free modification, employ dairy-free chocolates and non-dairy butter substitutes, slightly altering their taste profile yet delivering a comparable experience suitable for lactose-intolerant or dairy-averse individuals.

For a vegan variation, use plant-based alternatives like vegan chocolate, plant-based milk, and a non-dairy butter substitute. This shift opens opportunities for a broader audience to indulge in desserts aligned with their dietary ethics and choices.

For a low-carb/keto version, opt for sugar-free chocolate and nuts alongside any low-carb cereal variant. This adaptation maintains indulgence while adhering to macronutrient restrictions typical of a ketogenic eating plan.

Embrace a paleo approach by utilizing non-dairy, grain-free, and refined sugar-free alternatives, crafting a bar that is deliciously satisfying for primal diet followers without deviating from core principles.

For low-FODMAP needs, ensure ingredients like chocolate, nuts, and cereals align with FODMAP guidelines, maintaining an accessible treat for those requiring digestive-friendly adaptations without compromising on taste or pleasure.

Troubleshooting Guide


For texture issues, if bars are too hard, check ingredient ratios and chilling times; adjust to allow for a softer, more balanced finish. Softer-than-expected bars suggest an under-set environment, necessitating additional refrigeration.

Flavor balance issues could imply a disproportionate ingredient mix. Ensure accuracy in measuring sugar and chocolate ratios when diversifying chocolate types to maintain the bar’s intended sweet essence without overpowering secondary flavors.

Temperature problems, like melting before setting, could be due to not cold enough fridges. Verify equipment temperatures and ensure proper pre-refrigeration, central for achieving the desired texture for these no-bake delights.

Equipment challenges often include insufficient mixing implements or pans too rigidly configured; using flexible, silicone equipment can aid in seamless ingredient blending and easy removal, critical for the bar’s consistency.

Ingredient substitutions might require tasking alternatives care to maintain similar texture, taste, and experience, promptly adjusting quantities where necessary within the framework to ensure unchanged experience and quality.

Timing concerns can involve both refrigeration set points and mixing timelines, highlighting the importance of adherence to pacing parameters—involving complete setting before removal or applying dividers between layers to control texture flow.

Recipe Success Stories


Community feedback often highlights the versatility and ease of these bars, with many celebrating their ability to adapt and adjust flavor profiles to align with varied palates, ensuring a loved dessert that continually inspires.

Variation successes abound, with home cooks introducing elements like caramel drizzles or coconut flakes, breathing new life into traditional recipes, offering delightful twists that span abundant creativity and guest satisfaction.

Adaptation stories often emphasize dietary compliance, with gluten-free, vegan, and paleo versions receiving praise for maintaining the core delectable experience while addressing specific dietary constraints and broadening their consumption appeal.

Reader suggestions include creative tips for serving enhancements, like pairing suggestions or additional flavor accent possibilities, fostering a collective culinary atmosphere that empowers, informs, and elevates No-Bake Crunch Bars’ communal experience.

Photography tips usher aspiring culinarians to capture these bars’ beauty, encouraging natural light for texture detail, thus rendering every element from drizzled chocolate to crispy edges in luminous allure, documenting culinary creativity.

Frequently Asked Questions

Can I make these bars ahead of time?
Yes, No-Bake Crunch Bars are perfect for making ahead. Prepare them up to two days in advance and store them in an airtight container in the fridge. This not only saves time but also enhances the chocolate flavor as it firms up.
What can I substitute for nuts in the recipe?
If you need a nut-free version, consider using sunflower seeds or pumpkin seeds. These alternatives maintain a nice crunch without compromising the overall texture or taste of the bars, making them more inclusive for those with allergies.
Are these bars suitable for freezing?
Absolutely. Wrap individual portions in wax paper and store them in a freezer bag. They can last up to one month. Thaw at room temperature when ready to enjoy, maintaining their delightful texture and flavor profile.
How do I prevent the bars from being too sweet?
Use bittersweet chocolate to balance sweetness or reduce the amount of sweetened cereal. Tasting the mixture before it sets can help you adjust the sweetness level to meet your personal preference.
What can I do if my bars don’t set properly?
Ensure adequate refrigeration time; at least two hours is recommended for firm bars. If your kitchen is especially warm, additional time may be necessary, or consider using a cooler environment.
Can I add extra flavors to the bars?
Certainly! Add vanilla or almond extract for additional depth. Always incorporate the extracts into the melted chocolate for a seamless infusion, enhancing overall taste without altering foundational ingredients.
What is the serving size for these bars?
For a standard-sized dessert treat, consider slicing the batch into 12 servings. However, for smaller bites suitable for parties or buffet-style settings, creating 18 pieces might be preferable.
Can I use other cereals instead of rice cereal?
Yes, while rice cereal provides a classic crunch, feel free to experiment with cornflakes or bran flakes for varied textures and flavors. Ensure the chosen cereal pairs well with your chocolate choice for optimal enjoyment.
What kind of chocolate is best to use?
Dark chocolate offers a rich, robust flavor, while milk chocolate caters to those preferring sweeter options. Ensure using a high-quality brand for best results, influencing both taste and texture of the final product.
How do I store leftover bars?
Store leftovers in an airtight container in the refrigerator to maintain their crisp texture up to a week, safeguarding against sweat or odor absorption. If longer storage is needed, consider freezing single servings instead.
Can I add toppings to the bars?
Absolutely, adding toppings like shredded coconut or drizzled white chocolate prior to setting complements their taste and enhances visual appeal. Incorporate these final touches for a personalized presentation and flavor contrast.

Additional Resources


Enhance your dessert repertoire with related recipes focusing on similar no-bake techniques, including alternatives like cheesecakes or based-treats, expanding skills and convenience knowledge with parallel delights.

Technique guides elaborate on melting chocolate or mixing consistency mastery, equipping aspiring dessert-makers with critical insights ensuring success in not just bars, but broader confectionery accomplishments.

Comprehensive ingredient information helps discern quality and application nuances, fostering informed decisions, thus maximizing flavor profiles for No-Bake Crunch Bars consequently extending to diverse dessert-making.

Equipment recommendations provide insight into essential and additional tools, like silicone molds for imaginative presentations, empowering one to exercise creativity when showcasing delectable no-bake creations.

Seasonal variations can inspire skilled tweaks, exploring seasonal-ingredient swaps in cereals or infusions to adapt expertly while nurturing a series of beloved, universally adored, delectable bars throughout the year.

Join the Conversation


Engage with us on social media platforms, sharing your No-Bake Crunch Bars success stories and personal adaptations. We love to see the creativity in your kitchen and aim to foster a community of shared culinary wisdom.

Capture your creations beautifully with wide-aperture shots that highlight delight textures and colors. Share photography tips with peers, enriching food bloggers or enthusiasts alike in perfecting sweet treat presentation.

Provide in-depth recipe reviews, offering personal experience insights or challenges met at ease within the recipe. Your critiques or suggestions motivate ongoing dialogue and recipe refinement, underscoring shared culinary pursuits.

Explore a vibrant community engagement platform by suggesting future recipe ideas or tweaks on established favorites. Encourage interactions that spark passion and interest, ensuring sustained felicity and innovation around shared dessert wonders.

Uncover and explore community-driven variations, showcasing new interpretations and collaborative creations demonstrating the limitless possibilities existent in every seemingly simple bind—an affirmation that each recipe evolves through mindful sharing.

The Recipe

No-Bake Crunch Bars

Serves: 12

Prep Time: 10 mins

Cook Time: 0 mins

Total Time: 10 mins

Kitchen Equipment Needed

  • Mixing bowl
  • Microwave or double boiler
  • Spatula
  • Baking dish (8×8 inch)
  • Parchment paper

Ingredients

  • 2 cups chocolate chips (dark or milk)
  • 1 cup peanut butter
  • 4 cups crispy rice cereal
  • 1/2 cup chopped peanuts
  • 1/4 cup honey or corn syrup
  • 1 tsp vanilla extract
  • Pinch of salt

Directions

  1. Line the baking dish with parchment paper, ensuring edges overhang for easy removal.
  2. In a microwave-safe bowl, combine chocolate chips and peanut butter. Heat in increments, stirring in between, until smooth.
  3. Stir in the honey, vanilla extract, and salt until well-mixed.
  4. Fold in the crispy rice cereal and peanuts, ensuring everything is evenly coated.
  5. Spread the mixture into the prepared dish, pressing firmly to achieve an even layer.
  6. Refrigerate for at least 2 hours, or until set. Lift from the dish and cut into bars with a sharp knife.

Recipe Notes

  • For variation, try different nut butters or add dried fruit for added dimension.
  • Ensure the mixture is well-pressured into the pan to prevent crumbling when slicing.
  • Store in an airtight container in the fridge to maintain freshness.

Delicious Gingerbread Cupcakes with Creamy Cinnamon Frosting Recipe

Gingerbread Cupcakes with Creamy Cinnamon Frosting: A Festive Treat to Delight Your Senses

⚖️
Difficulty
Moderate

⏲️
Prep Time
20 mins

🕒
Cook Time
18 mins

⏱️
Total Time
38 mins

🍽️
Servings
12 cupcakes

Imagine biting into a soft, moist cupcake where the warmth of ginger and spices envelops your taste buds. These gingerbread cupcakes are the epitome of festive baking, topped with a creamy cinnamon frosting that melts in your mouth. Whether for a holiday gathering or a simple sweet treat, they offer a delightful combination of flavors that evoke the cozy feeling of classic holiday desserts.

The rich molasses adds depth, while the spices bring warmth, complementing the lightness of the cupcakes perfectly. The frosting, infused with cinnamon, enhances the overall flavor profile, creating a harmonious blend of sweetness and spice. These are not just any cupcakes; they are a celebration of the holiday spirit in every bite, appealing to both children and adults alike.

The creamy cinnamon frosting is the ideal companion to these spiced cupcakes, providing a silky finish that elevates the dessert to new heights. The combination of ginger and cinnamon isn’t just flavorful but also aesthetically pleasing, making these gingerbread cupcakes a showstopper at any event. Crafting this recipe is an experience, a joyous journey that culminates in creating a batch of delectable treats that are hard to resist.

Quick Recipe Highlights

  • Flavor Profile: The gingerbread cupcakes have a rich, spiced flavor due to the blend of ginger, cinnamon, and nutmeg, with a sweet touch from the creamy frosting.
  • Texture: The cupcakes boast a perfect balance between moist and fluffy, while the frosting adds a creamy smoothness across the palate.
  • Aroma: A warm, inviting aroma of ginger and cinnamon fills the air as they bake, providing a sensory experience that hints at the deliciousness to come.
  • Visual Appeal: With their golden-brown hue and snow-white frosting swirls, these cupcakes are visually stunning and entice anyone who lays eyes on them.
  • Skill Level Needed: Moderate; the recipe requires basic baking skills and attention to detail in mixing ingredients and frosting the cupcakes.
  • Special Equipment: You will need a standard muffin tin, cupcake liners, mixing bowls, and an electric mixer to achieve the best results.

Recipe Overview

  • Difficulty Level: Moderate – This recipe requires straightforward techniques like mixing and frosting, but attention to ingredient measurements and baking times is crucial for perfect results.
  • Category: Dessert – A perfect sweet addition to any meal or festive gathering.
  • Cuisine: This dessert has roots in Western baking but is widely loved for its universally appealing spices and flavors.
  • Cost: Moderate – The ingredients are standard pantry staples, though fresh spices and quality molasses can influence cost slightly.
  • Season: Best enjoyed during the cooler months; ideal for the holiday season when warm spices are most appreciated.
  • Occasion: Perfect for festive gatherings, holiday parties, or as a sweet treat to enjoy with family during cozy evenings at home.

Why You’ll Love This Recipe


These gingerbread cupcakes offer a delightful balance of bold, warm flavors thanks to the spices that shine through in every bite. The creamy cinnamon frosting adds a sweet, smooth contrast, creating a dessert that is both comforting and exciting to the taste buds.

The preparation of these cupcakes is both fun and rewarding. The process is straightforward, allowing even novice bakers to create a professional-quality dessert. Preparing and decorating them can be a joyful activity shared with family or friends, making the journey to a delicious treat as enjoyable as eating it.

From a nutritional standpoint, ginger and cinnamon bring potential health benefits, including anti-inflammatory properties. Molasses, while sweet, also contains some vitamins and minerals, making this dessert not only tasty but also somewhat wholesome.

Serve these at your next social event for a conversation-starting dessert. Their enticing aroma and beautiful presentation are sure to impress guests and add a homemade touch to any gathering. They make for excellent gifts, too, as their festive flair is always well-received.

Despite their gourmet appeal, the ingredients for these cupcakes are accessible and often pantry staples. This makes them both cost-effective and easy to prepare on short notice, ensuring you don’t have to break the bank to enjoy a truly delicious homemade dessert.

Historical Background and Cultural Significance


Gingerbread dates back centuries, deeply rooted in ancient traditions where ginger was revered for its culinary and medicinal properties. Initially introduced to Europe in the 11th century, gingerbread evolved from a confectionery made by monks to a staple in cultural festivals across the continent.

In various cultures, gingerbread has been shaped into impressive architectural structures or delicately decorated cookies. Its inception as a cupcake is a much more modern adaptation, one that combines traditional flavors with contemporary baking styles.

The spices used in gingerbread have long symbolized warmth and festivity, making it an integral element of holiday celebrations worldwide. The tradition of utilizing gingerbread during winter months persists, characterized by its comforting flavors and robust tastes.

Regional variations of gingerbread showcase diverse uses of spices, sweeteners, and additional ingredients, demonstrating how this traditional dish has adapted and been embraced by different cultures. Each version has its own charm and maintains the spirit of the original confection.

Ingredient Deep Dive

Ginger: This spicy root has a rich history dating back to ancient China and India. Known for its distinctive heat and sweetness, ginger is both a flavor powerhouse and a potential digestive aid. When selecting ginger, choose firm, smooth skin for optimal freshness. Store in a cool, dry place or freeze to extend shelf life. If fresh ginger is unavailable, ground ginger can serve as an adequate substitute.

Molasses: A byproduct of sugar cane or beet refinement, molasses imparts a deep, earthy sweetness crucial to gingerbread’s traditional flavor. It offers a moderate source of minerals, such as iron and calcium. When choosing molasses, opt for unsulfured varieties for the purest taste. Store tightly sealed in a cool, dark pantry. Substitute with honey or maple syrup if necessary, but be mindful of altering the flavor profile.

Cinnamon: Essential for cinnamon frosting, this aromatic spice is known for its warming, sweet, and woody notes. Cinnamon, derived from tree bark, is rich in antioxidants and may have anti-inflammatory benefits. For the best quality, buy ground cinnamon in small quantities and store in a tight container. If substituting with cinnamon sticks, remember the flavor intensity varies.

Common Mistakes to Avoid

  • Overmixing the batter can lead to dense cupcakes. Mix until ingredients are just combined to maintain a light texture.
  • Ignoring ingredient temperatures can affect results. Use eggs and butter at room temperature for better emulsification.
  • Skipping molasses substitution consideration can alter flavors dramatically. Ensure you use a similar sweetener if necessary.
  • Frosting too soon will cause melting. Let cupcakes cool completely before decorating.
  • Incorrect oven temperatures can ruin texture. Ensure your oven is correctly preheated and use an oven thermometer if unsure.
  • Using old spices diminishes flavor. Always check expiration dates for maximum freshness.
  • Neglecting cupcake liners may make removal difficult. Always line your muffin tin.
  • Not measuring flour correctly leads to dryness. Spoon into the measuring cup and level with a knife for accuracy.
  • Overbaking results in dry cupcakes. Check doneness with a toothpick to avoid this.
  • Improper storage affects freshness. Keep in an airtight container to maintain softness and flavor.

Essential Techniques


Measuring Ingredients: Accurate measurement is crucial for consistent results. Always use a scale for dry ingredients and specific measuring cups for liquids to ensure precision.

Creaming Butter and Sugar: This technique incorporates air, which contributes to a lighter cupcake texture. Beat them together until pale and fluffy for the best outcome.

Frosting Techniques: Using a piping bag provides control and allows for even, attractive distribution of frosting. Explore different tips for various decorative effects.

Baking Time Management: Keeping an eye on baking time is vital. Look for signs like golden edges and a clean toothpick to gauge doneness effectively.

Folding: Combine wet and dry ingredients with a gentle folding motion to maintain air and avoid tough cupcakes. Use a spatula and light wrist movement for ideal results.

Proper Cooling: Allow cupcakes to cool in the pan briefly, then transfer to a rack to prevent residual heat from overbaking. A completely cool cupcake is less likely to have frosting issues.

Pro Tips for Perfect Gingerbread Cupcakes


Maintain an even batter distribution by using an ice cream scoop. This ensures cupcakes bake evenly in both size and texture.

Add a touch of orange zest to the batter for an unexpected citrus note that complements the spices beautifully.

For extra moisture, consider adding a tablespoon of applesauce along with the wet ingredients. It integrates well with the ginger flavor.

Enhancing cinnamon flavor in the frosting can be achieved with a sprinkle of cinnamon sugar atop the finished cupcakes.

For individualized decoration, consider topping each cupcake with a candied ginger piece for added flair and texture.

When piping frosting, apply consistent pressure and move in a circular motion to achieve smooth, professional-looking swirls.

Before serving, lightly dust with powdered sugar for a snow-dusted effect, enhancing visual appeal, especially during the holidays.

Experiment with different frosting shapes and decor elements like edible glitter or holiday-themed sprinkles to suit specific occasions.

Variations and Adaptations


For a spicier kick, try incorporating a bit of ground black pepper or cayenne into the batter for a unique twist on traditional gingerbread.

In warmer months, consider swapping the cream cheese in the frosting for a mascarpone base, resulting in a lighter summer cupcake.

Achieve a gluten-free version by using a high-quality gluten-free flour blend to seamlessly replace all-purpose flour in the recipe.

To create a vegan variant, substitute dairy products with plant-based equivalents such as coconut oil and almond milk, and use flax eggs in place of regular eggs.

Add chopped nuts such as pecans or walnuts to the batter to introduce a new texture and a nutty counterpoint to the sweet spices.

Invert the flavors by making a ginger-infused frosting over vanilla cupcakes, allowing the spiced elements to shine in new ways.

Introduce a fruit element, like diced apple or pear, into the batter to create a deliciously juicy component that pairs with ginger seamlessly.

Serving and Presentation Guide


For an elegant touch, present cupcakes on a tiered cake stand to allude to their sophisticated flavors and make them the centerpiece of your table.

Garnish each cupcake with a small mint sprig or holiday-themed candy to add a dynamic green shade against the warm spice tones.

Pair with a dollop of freshly whipped cream or a scoop of vanilla ice cream for a luxurious, complete dessert experience.

For a novel serving approach, deconstruct the cupcakes into jars with layered frosting for a portable and visually appealing treat.

Consider serving at room temperature to allow the spices and frosting to express their full flavors and textures naturally.

Maintain balance by offering a secondary option, like fruit skewers, for guests who appreciate a lighter accompaniment to their cupcake.

Wine and Beverage Pairing


Opt for a sweet Riesling or Moscato wine that complements the spicy notes with its light, fruity sweetness, enhancing the cupcake experience.

Pair with mulled cider or a spiced tea for a non-alcoholic option that mirrors the warmth of the ginger and cinnamon.

If you’re serving these cupcakes during a morning gathering, consider a rich, smooth vanilla latte as a perfect coffee pairing.

Consider serving alongside hot cocoa with a hint of chili for a playful, contrasting experience that aligns perfectly with the gingerbread theme.

Chilled sparkling water with a splash of citrus juice cleanses the palate between bites, allowing each cupcake’s flavors to shine anew.

Aim to serve beverages at complementary temperatures—wine chilled and coffee piping hot—for a harmonious dining experience.

Storage and Shelf Life


Store cupcakes in an airtight container at room temperature to preserve their texture and prevent staleness. They’ll keep fresh for up to three days.

For longer storage, refrigerate them in a sealed container for up to a week, ensuring the frosting remains intact and deliciously soft.

Freezing is possible—wrap each cupcake individually in plastic wrap, then in foil, storing them in a freezer-safe bag for up to three months.

Signs of spoilage include any off odors or flavors, or if the cupcakes become too dry or hard. Always check before serving.

When ready to enjoy frozen cupcakes, thaw them at room temperature or defrost gently in the microwave, taking care to avoid texture changes.

Reheat cupcakes in a preheated oven for a few minutes to refresh their soft texture if they have become slightly stale.

Make Ahead Strategies


Bake cupcakes a day in advance, allowing them to cool fully before storing in an airtight container to maintain freshness.

Prepare frosting ahead and store it separately, chilled in the refrigerator. Let it reach room temperature for easy spreading or piping before use.

If stacking or transporting, frost on-site to ensure the cupcakes arrive in pristine condition for any event or gathering.

Assemble frostings using fresh cream or milk right before serving to maintain their creamy texture and vibrant taste, especially in warm climates.

Mix dry ingredients ahead of time, storing them in a sealed bag, to simplify the baking process when you’re ready to begin.

Invest in a cupcake carrier to simplify transport while maintaining aesthetic appeal and preventing damage.

Scaling Instructions


When halving, reduce ingredient amounts evenly and consider using a smaller muffin pan to ensure even baking times.

Doubling or tripling the recipe is straightforward but may require extra mixing batches if your equipment’s capacity is limited.

Adjust oven timing slightly when baking large batches, as the increased moisture may slightly alter the drying process in the oven.

For substantial batches, consider freezing some, noting “Storage and Shelf Life,” so you have a ready-made dessert on hand.

If scaling for a large event, pre-measure ingredients into sets to streamline the baking process and focus energy on technique.

Ensure you use a reliable oven thermometer, as larger batches can create slight temperature variations affecting cooking evenly.

Nutritional Deep Dive


These gingerbread cupcakes provide a mix of macronutrients with moderate fats from the frosting and carbohydrates from the sugars and molasses, important for an energy boost.

In terms of micronutrients, molasses is surprisingly nutritive, offering small amounts of essential minerals like iron, calcium, and magnesium.

Ginger carries potential health benefits, ranging from anti-inflammatory effects to digestive health support, aligned with traditional uses over centuries.

By controlling portion sizes and moderation consumption, these cupcakes can fit within a balanced diet without derailing typical nutritional goals.

Keep alternative sweeteners in mind when necessary to adjust sugar levels for health advantages without sacrificing flavor completely.

Substituting whole grain flour can provide additional fiber, aligning with dietary goals without significantly impacting the cupcakes’ beloved texture.

Dietary Adaptations


For gluten-free, choose a reputable gluten-free flour blend and check labels on other ingredients to ensure no cross-contamination.

To make dairy-free, opt for plant-based yogurt and cream cheese to maintain a creamy texture without animal products.

Vegan adaptations can include egg replacements like applesauce or a chia seed mixture, ensuring a tender and fluffy crumb.

Low-carb enthusiasts can experiment with almond flour mixtures and alternative sweeteners to maintain flavor with significantly reduced carb counts.

A keto version might include coconut flour adaptations, aligned with high-fat frostings and sugar substitutes like erythritol.

Paleo interpretation can use almond flour and coconut milk to adhere to primal lifestyle restrictions while maintaining the dish’s core flavors.

Low-FODMAP considerations would involve omitting molasses for maple syrup and experimenting with coconut sugar for a gut-friendly alternative.

Troubleshooting Guide


If cupcakes are too dense, likely causes include overmixing or expired leaveners. Always use fresh baking powder and fold gently.

Achieving the right balance of spices can be tricky. Gradually taste the batter, adjusting accordingly to suit personal preferences without overpowering.

If frosting melts, ensure cupcakes are cooled entirely before application and aim to frost in cooler conditions to maintain texture.

Variations in texture often signal inconsistent ingredient temperatures or inaccurate measurements. Room-temperature components combine more smoothly.

Don’t stress if you run out of specific equipment; many tools are interchangeable, such as using a hand whisk instead of an electric mixer.

For dry outcomes, baking times may need adjustment. Ensure batter isn’t overbeaten, as this can release crucial moisture incorporated during mixing.

Stale spices won’t deliver depth of flavor. Replace spices promptly and regularly to guarantee the richest possible taste.

Experiment confidently with substitutes, but scrutinize with neutrality, especially where texture and consistent flavor balance are concerned.

Recipe Success Stories


Community response has been overwhelmingly positive, with many readers enjoying the festive flavors and easy steps for replication.

Some have incorporated reader suggestions of adding citrus zest or chocolate chips for extra flavor dimensions to resounding success.

Reader-adapted versions include gluten-free, nut-adapted, and rum-flavored frostings, expanding the recipe’s versatility while honoring core elements.

Inward discussions have provided great insight into varying presentation techniques, imparting professional-looking results with home-level ease.

Reader photography has showcased varied decoration methods with a broad array of garnishes, ranging from traditional to modern flair.

Suggestions over hands-on family activities while crafting these cupcakes have made them a preferred choice for many holiday afternoons.

Frequently Asked Questions

How should I store these cupcakes? Store in an airtight container at room temp for up to 3 days; for longer storage, refrigerate or freeze for future enjoyment.

Can I make these cupcakes vegan? Yes, substitute dairy products with plant-based alternatives such as almond milk and ensure eggs are replaced with suitable vegan solutions.

How do I ensure my cupcakes are light and fluffy? Don’t overmix the batter, use room-temperature ingredients, and ensure your leaveners are fresh for optimal results.

What should I do if my frosting is runny? Adjust by gradually mixing in powdered sugar to thicken; ensure frosting elements are appropriately chilled before whipping.

What if my cupcakes sink in the middle? Critically check baking soda and powder viability, as runtime differences along with ingredient freshness heavily influence successful rising.

Can I use ground ginger instead of fresh? Ground ginger can replace fresh if necessary, but remember to adjust quantities, as ground will typically be more potent.

Can I make this recipe as a cake? Yes, adapt proportions and baking time accordingly; aim to keep batter levels consistent and ensure proper cake pan preparation.

Why are my cupcakes dry? Mix only until ingredients combine, monitor bake length carefully, and check ingredient proportions against listed values for accurate outcomes.

How can I scale this recipe? Maintain an even ratio when adjusting ingredient amounts, retaining consistency and incorporating practical knowledge of the oven and space constraints.

Can I add more spices? Certainly; enhance or adapt the spice mix according to personal preference, aligning it with desired flavor depth without overwhelming sweetness or structure.

Additional Resources


Exploring other seasonal recipes can inspire creativity and expand your dessert repertoire, introducing new flavors, textures, and ingredient combinations.

Explore spiced cake guides and books focusing on the blend of spices, understanding ingredient function, and balancing various sweeteners.

Ingredient diaries that delve into the rich history of spices used, spotlight their culinary narratives, and appreciate their global culinary adoption.

Consider investing in specialized baking equipment for higher accuracy, standardization, and skillful execution, transitioning home cooking into professional-like mastery.

Maintain familiarity with seasonal fruit and vegetable availability to accentuate your dessert with refreshing components that enhance both taste and presentation.

Join the Conversation


Engage with us on social media by sharing your gingerbread cupcake creations and join a community sharing tips, variations, and presentation ideas.

Photography submissions remain popular in our community—showcase your work and receive constructive feedback that ensures delightful photo-worthy results.

Leave recipe reviews to encourage fellow bakers and note adaptations that have proven successful and those which need mindful alteration.

Connect and exchange ideas in our forums with fellow dessert enthusiasts, gathering inspiration, support, and new techniques for the future.

Share your personal recipe adaptations, building on global culinary innovation, and contribute to a growing library of personalized gingerbread cupcake renditions.

The Recipe

Gingerbread Cupcakes with Creamy Cinnamon Frosting

Serves: 12 cupcakes

Prep Time: 20 mins

Cook Time: 18 mins

Total Time: 38 mins

Kitchen Equipment Needed

  • Muffin tin
  • Cupcake liners
  • Mixing bowls
  • Electric mixer
  • Ice cream scoop (for batter portioning)
  • Cooling rack
  • Piping bag and tips

Ingredients

  • 1 1/2 cups all-purpose flour
  • 1 teaspoon baking soda
  • 1/2 teaspoon salt
  • 1 tablespoon ground ginger
  • 1 teaspoon ground cinnamon
  • 1/4 teaspoon ground nutmeg
  • 1/2 cup unsalted butter, softened
  • 1/2 cup granulated sugar
  • 1/2 cup molasses
  • 1 large egg
  • 1 teaspoon vanilla extract
  • 1/2 cup buttermilk

Directions

  1. Preheat your oven to 350°F (175°C) and line a muffin pan with cupcake liners.
  2. In a bowl, whisk together flour, baking soda, salt, ginger, cinnamon, and nutmeg.
  3. In another bowl, beat the butter and sugar until light and fluffy. Mix in molasses, egg, and vanilla extract.
  4. Gradually add the dry ingredients to the wet mixture, alternating with buttermilk, beginning and ending with flour. Mix until just combined.
  5. Divide the batter evenly among cupcake liners, filling about 2/3 full.
  6. Bake for 18-20 minutes, or until a toothpick inserted into the center comes out clean. Cool completely on a wire rack.
  7. For the frosting, beat together softened cream cheese, butter, powdered sugar, and ground cinnamon until smooth and fluffy.
  8. Pipe the frosting onto cooled cupcakes using a piping bag and decorative tip of choice.
  9. Store in an airtight container until ready to serve.

Recipe Notes

  • For more robust ginger flavor, add 1/4 teaspoon ground cloves to the dry mix.
  • If you prefer less sweet frosting, reduce powdered sugar by 1/4 cup.
  • Decorate with sugared cranberries or a sprinkle of cinnamon sugar for holiday flair.

Irresistible Mint Chocolate Cheesecake Fudge Recipe for Dessert Lovers

Mint Chocolate Cheesecake Fudge: A Decadent Delight

⚖️
Difficulty
Medium

⏲️
Prep Time
20 mins

🕒
Cook Time
10 mins

⏱️
Total Time
30 mins

🍽️
Servings
16 squares

Imagine indulging in a velvety Mint Chocolate Cheesecake Fudge where the rich flavors of creamy cheesecake meet the refreshing hint of mint, all enveloped in a smooth chocolatey bliss. This decadent treat is perfect for chocolate lovers and offers a delightful twist that will captivate your senses. From the first bite, you’ll be entranced by the sensational combination of cool mint and luscious chocolate, a pairing that not only tantalizes but leaves a lasting impression.

This Mint Chocolate Cheesecake Fudge is more than just a treat; it’s an experience waiting to be savored. Its silky texture is complimented by the crunchy base, providing a satisfying bite that melts seamlessly in your mouth. The delightful mint aroma wafts up even before you take your first bite, making every moment with this fudge an aromatic adventure. Captivating in its presentation, the contrasting layers offer a visual feast with the pristine white of the cheesecake against the deep richness of chocolate. Despite its sophisticated appearance, the skill level required is quite approachable, ensuring that even novice bakers can create this masterpiece. The only essential tool you’ll need is a heavy-duty mixer to achieve the perfect creamy consistency.

Quick Recipe Highlights

  • Flavor Profile: Indulge in a harmonious blend of rich chocolate and cool mint, perfectly balanced with creamy cheesecake notes.
  • Texture: A dreamy, melt-in-your-mouth fudge with a delightful velvety finish and just the right amount of chew.
  • Aroma: Inviting mint essence intertwined with tantalizing chocolatey undertones.
  • Visual Appeal: Striking layers of deep chocolate and pristine cheesecake with a unique marbled top.
  • Skill Level Needed: Designed for the home cook with basic baking skills; the process is straightforward with impressive results.
  • Special Equipment: A stand or hand mixer for achieving the ultimate fudge consistency.

Recipe Overview

  • Difficulty Level: Mint Chocolate Cheesecake Fudge is classified as a medium-difficulty recipe. The preparation requires attention to detail to get the ideal consistency and flavor balance but is manageable even for those new to baking.
  • Category: This fudge falls under desserts and festive treats, perfect for holiday gatherings, parties, or a special homemade gift.
  • Cuisine: While it takes inspiration from American classic desserts, the addition of mint provides a refreshing twist that resonates with European confectionery influences.
  • Cost: The recipe is budget-friendly, utilizing common ingredients found in most pantries. Even when purchasing premium chocolate and cream cheese, the costs remain modest, rendering this treat accessible.
  • Season: Best enjoyed during the cooler months when rich, comforting flavors are most appealing, though it can be made year-round for those who adore mint-chocolate combinations.
  • Occasion: Ideal for festive celebrations, holiday tables, or as a sweet ending to a dinner party. It also makes for a luxurious homemade gift.

Why You’ll Love This Recipe


The taste and texture of Mint Chocolate Cheesecake Fudge are truly unparalleled. The fudge’s creamy consistency with the added dimension of the mint provides a refreshing lift to the rich chocolate. Each bite is a decadent indulgence that feels both classic and innovative. The convenience of preparing this fudge is another appealing aspect. It’s a no-bake dessert that doesn’t require a lot of hands-on time, making it simple for anyone to tackle.

Nutritional advantages lie in its moderate portion size, allowing you to enjoy this treat without overindulgence. Mint has digestive benefits, which add to the recipe’s positive points. Socially, this fudge is a showstopper at gatherings and functions, inviting conversation and compliments. It’s a dessert that encourages sharing, bringing people together over a shared love of sweet treats.

This Mint Chocolate Cheesecake Fudge is not only an indulgent taste sensation but also a cost-effective dessert solution. Its ingredients are readily available and cost-effective, providing a luxury experience without a hefty price tag. Due to its rich flavors, a little goes a long way, ensuring a batch can serve a large group without needing much adjustment, making it a go-to recipe for various occasions.

Historical Background and Cultural Significance


The origin story of this delightful fudge starts with the classic American chocolate fudge, which first gained popularity in the United States during the late 19th century. Its velvety texture captured the hearts of many, leading to countless variations, including the intriguing combination of mint and chocolate, influenced by European dessert traditions. The cultural importance of fudge, particularly during festive seasons, has made it a staple in many holiday traditions. Its rich flavors and flexible base allow for creative adaptations, bringing joy to familial and cultural gatherings alike.

Through the years, the recipe for fudge has evolved, incorporating different flavors and textures to cater to diverse palates. The addition of mint gives a refreshing twist to the classic dessert, aligning with global trends of mixing savory and minty flavors in sweet confections. This variation showcases the universal appeal of pairing mint with chocolate, a combination beloved for its refreshing yet comforting profile.

Regional variations of fudge across the world include adaptations with nuts, caramel, and spices, but the mint chocolate variation stands out for its dynamic flavor profile. Offering nostalgia and novelty, Mint Chocolate Cheesecake Fudge has undoubtedly cemented its place in the world of confections.

Ingredient Deep Dive

The chocolate used in this Mint Chocolate Cheesecake Fudge is key to achieving its decadent flavor. High-quality dark chocolate provides a rich, intense flavor that is both robust and smooth. Historically, chocolate has been prized since ancient times, often reserved for the elite. Today, it is appreciated for its antioxidant properties, supporting heart health when consumed in moderation. Selecting good-quality chocolate involves checking for a glossy finish and a smooth texture.

The cream cheese brings a tangy richness that complements the chocolate, creating a balanced and delightful mouthfeel. Cream cheese has evolved from its ancient roots into a versatile ingredient loved worldwide, often found in both sweet and savory dishes. Cream cheese is a good source of vitamin A and contributes healthy fats to the diet. Look for a fresh, unopened package for the best results, and store it in the fridge to maintain its creamy texture.

Common Mistakes to Avoid

  • Overheating the chocolate can cause it to seize, leading to a gritty texture. Melt gently over a double boiler.
  • Using low-quality cream cheese can result in less richness. Opt for a full-fat version for the best texture.
  • Skipping the cooling process will affect slicing precision; allow the fudge to set completely before cutting.
  • Not mixing thoroughly results in uneven flavor distribution. Ensure ingredients are well combined.
  • Using too much mint extract can overwhelm the taste; adhere to the recipe’s suggested quantity.
  • Failing to line the baking dish will cause difficulty in removing fudge; always use parchment paper.
  • Overbeating the mixture may introduce air bubbles, affecting texture. Mix just until blended.
  • Ignoring measurements results in inconsistent flavor; follow the recipe for best results.

Essential Techniques


Melting chocolate correctly is crucial for achieving the right texture in Mint Chocolate Cheesecake Fudge. Using a double boiler allows for gentle, even melting, crucial to avoid seizing, which occurs when chocolate is melted too quickly or at a temperature too high. Master it by keeping water low in the pot and ensuring the bowl doesn’t touch it directly. Look for a smooth, glossy sheen as a sign of success.

Incorporating the cream cheese effectively is key to achieving the desired fudge firmness. It requires adequate mixing to ensure smooth incorporation without lumps. Use a mixer at low speed to gradually blend until creamy. Be cautious not to overmix, which could introduce air and compromise the dense texture this dessert is known for.

Pro Tips for Perfect Mint Chocolate Cheesecake Fudge


Let the cream cheese come to room temperature before beginning; this ensures a smooth mixture without noticeable lumps. Invest in good-quality chocolate for a superior taste, which can elevate the entire recipe. When lining the pan, leave extra parchment paper hanging over the sides for easy lifting once set.

A slight chilling period in the fridge can help firm the fudge faster if you’re pressed for time. To perfect presentation, wipe your knife with warm water between cuts for clean edges. If you prefer a subtler mint flavor, start with a smaller quantity of mint extract, as you can always add more to taste.

Avoid greasing your parchment; the fudge will set perfectly and won’t stick once it’s cooled. Lastly, allow ample cooling time to ensure clean cuts; patience yields the finest results.

Variations and Adaptations


Regional variations of Mint Chocolate Cheesecake Fudge can easily be attained by incorporating nuts, such as walnuts or pecans, adding a crunch to the creamy texture. For a seasonal adaptation, consider incorporating festive toppings like crushed peppermint for a winter holiday version.

Dietary modifications are straightforward with this recipe. Utilizing a dairy-free cream cheese alternative and dark chocolate that’s naturally free of milk solids will yield a vegan-friendly version. Flavor variations with extracts such as orange or almond can offer diverse tastes, personalized to preference.

For a textured fudge, incorporate additional fillings like crispy rice cereal or marshmallows into the base. Presentation alternatives range from serving the fudge as a traditional block or rolling into bite-sized truffles coated with cocoa or shaved chocolate.

Serving and Presentation Guide


Enhance the presentation of your Mint Chocolate Cheesecake Fudge by cutting it into uniform squares or diamonds for a refined look. Consider garnishing each piece with a drizzle of white chocolate and a sprinkle of crushed candy canes during the holiday season, or use mint leaves for a fresh, sophisticated touch.

Traditional accompaniment options include vanilla ice cream, which provides a delightful contrast to the fudge’s richness. For a modern twist, pair with fresh berries for a pop of color and a hint of acidity that complements the chocolate.

Always serve chilled to maintain its firmness; however, allow the fudge to sit at room temperature for a few minutes prior to serving for optimal creaminess. For portion control, aim for bite-sized pieces, mindful of the richness that characterizes this treat.

Wine and Beverage Pairing


Pairing wine with Mint Chocolate Cheesecake Fudge can elevate the tasting experience. Opt for a rich, full-bodied red wine like a Syrah or an indulgent Port, offering a balanced sweetness against the rich fudge. For non-alcoholic alternatives, consider a robust coffee or espresso, accentuating the chocolate notes.

If coffee isn’t your preference, a fresh mint tea would maintain the mint undertone, providing a harmonious pairing. Serving beverages at room temperature ensures a perfect pairing experience without overshadowing the fudge’s flavors. Ensure your coffee or tea is freshly brewed, enhancing aromatic notes to complement the fudge.

Storage and Shelf Life


Proper storage of Mint Chocolate Cheesecake Fudge extends its shelf life efficiently. Store pieces in an airtight container to prevent moisture loss, ideally in a single layer. For longevity, keep the container in the refrigerator, maintaining its creamy texture and fresh taste.

Be mindful of temperature fluctuations to avert condensation, which could alter texture. Watch for signs of spoilage, such as changes in color or texture, especially in warm environments. For extended storage, freeze fudge in a well-sealed container, layering parchment paper between slices, and defrost chilled before serving for best consistency.

Make Ahead Strategies


This fudge is an excellent make-ahead dessert, allowing flavors to meld beautifully over time. Prepare the mixture and allow it to set well before the event, maintaining freshness in an airtight container refrigerated until ready to serve.

Layering parchment between pieces helps in retaining moisture and prevents sticking. Quality remains intact over a few days, rendering it perfect for early preparations. Adding fresh mint leaves or chocolate curls just before consuming ensures that the freshness and visual appeal stay pristine.

Scaling Instructions


Scaling this Mint Chocolate Cheesecake Fudge recipe is straightforward, whether you want to halve or double it. When halving, consider using a smaller, appropriately size pan to maintain the original thickness. For doubling, two batches might ensure consistent results rather than cramming into a single dish.

Adjust the width of the pan to achieve uniform thickness when increasing the quantity. While scaling up, ensure all equipment can accommodate larger volumes without overloading, particularly mixers. Additional cooling time may be necessary for larger batches to set properly.

Nutritional Deep Dive


A portion of Mint Chocolate Cheesecake Fudge offers a gratifying dose of both indulgence and pleasure in moderation. Its macro breakdown includes carbohydrates primarily from chocolate and sugars, coupled with fats from cream cheese and chocolate, delivering energy-packed morsels.

The micronutrient analysis reveals contributions of calcium from cream cheese and antioxidants from dark chocolate. While not an everyday treat, its concentrated richness encourages smaller designated portions for mindful consumption. Perfect as an occasional sweet snack, this fudge satisfies cravings without overindulging.

Dietary Adaptations


Creating a gluten-free version of Mint Chocolate Cheesecake Fudge is seamless as the core ingredients naturally possess no gluten. For dairy-free adaptations, swap traditional cream cheese with a vegan equivalent, maintaining the luscious texture and taste.

Vegan modifications are easily attainable by leveraging plant-based chocolate and cream cheese substitutes, ensuring this dessert remains inclusive. A keto-friendly variation can be achieved through sugar-free sweeteners and high-cacao chocolate bars, which balance carbs with healthy fats. Paleo enthusiasts can adapt this recipe by integrating raw honey and almond butter for sweetening, ensuring compliance with their dietary guidelines.

Troubleshooting Guide


In the case of texture issues with your Mint Chocolate Cheesecake Fudge, consider if the fudge was set for the correct duration and at adequate temperature. For flavor imbalances, adjust mint extract in small increments until desired taste is reached without overpowering.

Temperature problems often arise from storage conditions; remember to maintain a consistent, cool environment. Equipment challenges may manifest when incorrect tools are utilized; confirm correct sizes and functionality before beginning. Ingredient substitutions sometimes lead to inconsistencies; it’s crucial to maintain the balance of wet and dry ratios to ensure ideal results.

Recipe Success Stories


This Mint Chocolate Cheesecake Fudge has become a crowd favorite, as shared by many home cooks who’ve adapted the recipe to their own tastes. Community feedback highlights its adaptability to various flavor profiles, with some using orange essence for a citrus twist.

Reader suggestions have inspired additions like a crunchy biscuit base, creating a robust contrast with the creamy fudge layer. Photography enthusiasts have shared tips on capturing its allure, focusing on its layered beauty and garnishes.

Frequently Asked Questions

Q: Can I use milk chocolate instead of dark chocolate?
A: Yes, milk chocolate can be used, but the overall flavor will be sweeter and less intense. Adjust sugar quantities if needed to balance the flavors.

Q: What’s the best way to store this fudge?
A: To retain freshness, place the fudge in an airtight container, storing it chilled in the fridge. Ensure parchment layers separate pieces to avoid sticking together.

Q: Can I add nuts to the recipe?
A: Absolutely, adding chopped nuts such as walnuts or almonds can provide a delightful textural contrast, altering the mouthfeel positively.

Q: How long will it last?
A: When stored properly, this fudge can last up to two weeks in the fridge, making it a great make-ahead dessert option.

Q: What alternatives exist for cream cheese?
A: Mascarpone can serve as a substitute, providing a similar creamy texture while altering the flavor slightly. For a dairy-free version, choose a vegan cream cheese alternative.

Q: Can this fudge be frozen?
A: Yes, this fudge freezes well. Wrap it tightly in foil or plastic wrap and place in an airtight container. It can be frozen for up to three months.

Q: Will using a different mint extract affect the flavor?
A: Different brands can vary in strength, so adjust the quantity based on taste tests, starting with reduced amounts and increasing as needed.

Q: Why did my fudge come out crumbly?
A: Overmixing or overheating the chocolate can cause crumbly textures. Ensure gentle heating and adequate mixing until ingredients are just combined.

Q: Is there a way to lower the sugar content?
A: Substitute sugar with a sweetener like erythritol or stevia, keeping in mind this may affect sweetness and texture slightly.

Q: Can I add food coloring for a vibrant green hue?
A: Yes, adding a few drops of food-safe color can enhance the mint aspect visually, though this step is optional based on your preferences.

Additional Resources


Explore our other rich and indulgent dessert recipes, such as double chocolate brownies and raspberry swirl cheesecake bars, which offer similar luxurious experiences. Visit our technique guides for more on mastering chocolate tempering and crafting creamy delights.

Discover insightful reviews on various cream cheeses and chocolates to elevate your culinary creations. Our seasonal variations section offers inspiration for adapting dessert recipes throughout the year.

Join the Conversation


Engage with our community of dessert enthusiasts by sharing your experiences with Mint Chocolate Cheesecake Fudge on social media. We invite your feedback and creative adaptations in the comments section below, allowing for a dynamic exchange of ideas and versions.

We encourage novice photographers to explore their creativity in capturing the essence of this decadent fudge through unique angles and lighting techniques. Share your results for a chance to be featured in our community’s showcase of sweet treats.

The Recipe

Mint Chocolate Cheesecake Fudge

Serves: 16 squares

Prep Time: 20 mins

Cook Time: 10 mins

Total Time: 30 mins

Kitchen Equipment Needed

  • Heavy-duty mixer
  • Double boiler
  • 9×9 inch baking dish
  • Parchment paper
  • Mixing bowls
  • Spatula

Ingredients

  • 2 cups dark chocolate, chopped
  • 1 cup cream cheese, softened
  • 1/4 teaspoon mint extract
  • 1/2 cup sugar
  • 1/4 cup unsalted butter
  • Pinch of salt

Directions

  1. Line a 9×9 inch baking dish with parchment paper, leaving excess for easy lifting.
  2. In a double boiler, gently melt the dark chocolate and butter, stirring until smooth.
  3. In a mixing bowl, whip cream cheese until fluffy, then gradually add sugar, mint extract, and a pinch of salt.
  4. Slowly incorporate the melted chocolate mixture, blending until smooth and fully combined.
  5. Pour the mixture into the prepared baking dish, smoothing the top with a spatula.
  6. Refrigerate for at least 2 hours, or until fully set.
  7. Once set, remove fudge from the dish using the parchment edges. Cut into squares and serve chilled.

Recipe Notes

  • For a vegan alternative, use dairy-free cream cheese and chocolate.
  • Adjust mint flavor by starting with a smaller amount of extract and tasting as you go.
  • Nuts or dried fruit can be added for additional texture.

Magical Bubblegum Cloud Fudge Recipe: Sweet Treats to Delight

Bubblegum Cloud Fudge: A Whimsical Delight

⚖️
Difficulty
Easy

⏲️
Prep Time
10 mins

🕒
Cook Time
5 mins

⏱️
Total Time
15 mins

🍽️
Servings
16 pieces

Dive into a sweet, dreamy treat with Bubblegum Cloud Fudge, where nostalgia meets modern indulgence. This vibrant, sumptuous dessert whisks you away to a world of childhood memories with its fun bubblegum flavor and cloud-like texture. The marriage of creamy white chocolate and bubblegum essence forms a perfect harmony that dances on your taste buds, leaving a lasting impression of sweetness and joy. Easy to prepare yet delightful to consume, this fudge is a dreamy creation for all ages.

Bubblegum Cloud Fudge embodies a playful charm, not only in flavor but also with its eye-catching pastel colors. This fudge boasts a creamy, rich consistency thanks to silky-smooth white chocolate and sweetened condensed milk. The bubblegum flavor infuses a unique and unexpected twist, making it both familiar and exciting. The fudge is easy to make with no need for complex equipment or techniques, inviting you to explore your creative side with ease.

Indulge in the sensory delight that is Bubblegum Cloud Fudge, a treat that’s as enjoyable to make as it is to eat. Whether you’re hosting a party or simply craving a delightful sweet, this recipe is sure to brighten your day!

Quick Recipe Highlights

  • Flavor Profile: Sweet and nostalgic bubblegum flavor encased in a creamy fudge texture.
  • Texture: Smooth, melt-in-your-mouth richness with a slightly chewy finish.
  • Aroma: Sweet and inviting aroma of bubblegum evokes fond childhood memories.
  • Visual Appeal: Eye-catching pastel colors make this fudge as delightful to see as it is to eat.
  • Skill Level Needed: Simplistic preparation with easy-to-follow steps perfect for beginners.
  • Special Equipment: No special equipment, just a saucepan and a baking dish for setting.

Recipe Overview

  • Difficulty Level: Bubblegum Cloud Fudge is incredibly easy to make, requiring only a few basic ingredients and minimal cooking skills, making it an excellent recipe for novice and seasoned bakers alike.
  • Category: Dessert category, fitting perfectly into sweet tables, party snacks, or a child’s birthday celebration.
  • Cuisine: A fusion of playful, modern American cuisine with reminiscent flavors of traditional candy fair.
  • Cost: Budget-friendly, using affordable ingredients readily available in your local grocery store.
  • Season: While perfect year-round, the bright colors and fun flavors are especially fitting for spring and summer celebrations.
  • Occasion: Ideal for birthday parties, festive holidays, or any occasion calling for a touch of whimsy and sweetness.

Why You’ll Love This Recipe


Dive into the delightful combination of flavor and texture that Bubblegum Cloud Fudge offers. This fudge provides a perfect balance of sweetness with its unique bubblegum flavor, complemented by the decadent and smooth texture of white chocolate. It’s an indulgent treat that melts in your mouth, leaving you with a satisfying, sweet-tasting experience.

The convenience of preparing Bubblegum Cloud Fudge makes it a standout recipe. With simple steps and common household ingredients, you’ll find this a breeze to prepare. It requires no specialist tools, thus making it perfect for spontaneous dessert-making. The entire process, from start to finish, can be completed within 15 minutes, leaving you with ample time to enjoy the outcome.

Bubblegum Cloud Fudge offers a meaningful blend of sweet pleasure and nutritional balance when consumed in moderation. While it’s primarily a treat, it’s made with real white chocolate, allowing you to enjoy some essential nutrients like calcium and cocoa butter-derived fats. This fudge can be part of a balanced diet when savored responsibly.

The recipe’s simplicity and whimsical design make it a wonderful addition to any social gathering. Its vibrant colors and nostalgia-inducing flavor make it a conversation starter at parties. Moreover, its universal appeal ensures it will be a hit with both children and adults, making your hosting efforts even more memorable.

Moreover, Bubblegum Cloud Fudge offers great value for its cost. With ingredients that are economical and in-season most of the time, preparing this fudge does not strain your wallet. The fun and joy it brings far exceed its budget-friendly preparation, offering excellent accessibility for anyone looking to add a sweet touch to their day.

Historical Background and Cultural Significance


The inspiration behind Bubblegum Cloud Fudge can be traced back to traditional American treats where sweet confections filled candy shops and children’s dreams alike. Bubblegum, invented in the early 20th century, has since captured the hearts of many, its signature sweetness and aromas lingering in the air of candy stores across generations.

Culturally, bubblegum is a beloved treat, featured in countless childhood experiences. It is iconic in American pop culture, representing joy, youthfulness, and play. This fudge takes this cultural fondness and transforms it into a more sophisticated dessert option, appealing to both the young at heart and adventurous palates.

Bubblegum Cloud Fudge also shows culinary evolution as it transforms a simple candy flavor into a widely cherished dessert offering. Through experimentation, chefs and home bakers alike have adapted this flavor into a myriad of desserts, exploring nostalgic flavor profiles and achieving delightful new creations.

Across regions, Bubblegum Cloud Fudge might see variations in presentation and minor ingredient adjustments, but its core flavor profile remains a steadfast homage to days of innocence and blissful indulgence. Its regional adaptations maintain the fundamental mood it seeks to evoke, ensuring its lasting presence in dessert culture.

Ingredient Deep Dive


White chocolate is pivotal in creating the rich, creamy texture of Bubblegum Cloud Fudge. Originating in Europe, white chocolate is made from cocoa butter, sugar, and milk solids, making it a versatile ingredient in the dessert realm. Nutritionally, it’s a source of energy-dense fats and provides calcium.

To ensure you’re purchasing quality white chocolate, look for cocoa butter as the primary fat and avoid products with added vegetable oils. Store it in a cool, dry place to prevent melting and discoloration. In a pinch, substitute with vegan white chocolate for a plant-based version of the fudge.

The bubblegum flavoring reunites us with childhood delights, bringing the essence of confectionery adventures to this fudge. This flavor doesn’t contain natural nutrients but is key in delivering nostalgia. Choosing high-quality extracts or flavor pastes will provide the most genuine taste, which is crucial for achieving the intended sensory experience.

The flavoring should be stored tightly sealed to prevent aroma loss. If desired, unflavored or other flavor extracts could replace it for a different fudge adventure, but this would stray from the signature nostalgia Bubblegum Cloud Fudge seeks to capture.

Common Mistakes to Avoid

  • Using low-quality white chocolate can lead to a grainy texture. Choose one with cocoa butter, not vegetable oils.
  • Overheating the chocolate can cause it to seize. Melt gently over low heat or a double boiler for best results.
  • Forgetting to stir continually may lead to uneven melting and texture issues.
  • Incorrect measurements of ingredients can result in a fudge that’s too firm or too soft.
  • Skipping the lining in your pan will make removing the fudge difficult and could cause it to crumble.
  • Rushing the setting process may result in fudge that doesn’t hold together well. Allow ample time to cool.
  • Improper storage can lead to fudge drying out. Store in airtight containers to maintain softness.
  • Cutting the fudge before fully set may cause it to crack or crumble. Patience ensures clean slices.

Essential Techniques


Mastering the art of melting chocolate is crucial for obtaining the ideal smoothness in Bubblegum Cloud Fudge. Melt your white chocolate over low heat or using a double boiler to distribute heat evenly and avoid seizing. The smoothness of the melt ensures a creamy fudge final product.

To prevent burning your chocolate, patience is key. Keep the temperature low, stir consistently, and utilize gentle heat to achieve that perfect silky texture. Visual indicators of success include a glossy, even consistency without visible lumps. Practice these techniques for the best results.

Pro Tips for Perfect Bubblegum Cloud Fudge


The secret to a rich, creamy fudge is using high-quality white chocolate. Look for brands that specify pure cocoa butter content to ensure an even, melt-in-your-mouth consistency.

Add your bubblegum flavoring slowly, tasting as you go. This way, you can balance and adjust the flavor to your liking without overwhelming the creamy chocolate base.

To achieve clean, perfect cuts, use a sharp knife run under hot water. Dry the knife before slicing, and repeat between cuts to keep edges clean and fudgy.

Stir the mixture patiently until it’s glossy and smooth. A well-combined fudge mixture will set perfectly without granular texture.

For an extra touch of visual flair, consider swirling in a bit of food coloring before the fudge sets. This creates beautiful patterns reminiscent of old-fashioned candy swirls.

Chill the fudge in the refrigerator for a few hours for optimal setting time. Patience here enhances texture and flavor, ensuring a perfect piece every time.

Variations and Adaptations


To give Bubblegum Cloud Fudge a regional twist, incorporate local flavors or garnishes. In the south, a sprinkle of crushed pecans can add a delightful crunch and complement the sweetness of the fudge.

Embrace seasonal changes with adaptations. Springtime brings floral elements like lavender or rose extracts that pair beautifully with the fudge’s creaminess, while autumn calls for a hint of warming cinnamon.

For dietary modifications, almost any fudge flavor can be adapted. Vegan white chocolate ensures this treat suits those avoiding dairy. Seek extracts labeled as allergy-friendly to accommodate the necessity of specific dietary paths.

Experiment with various flavorings beyond bubblegum. Mint extract can provide a fresh alternative, or use fruit-flavored extracts such as raspberry or cherry to craft a summer-centric confection.

Alter texture by incorporating crunchy elements like nuts or coconut flakes. These add surprise to the otherwise consistent texture, creating layers of enjoyment with each bite.

Consider creative presentation alternatives. Fudge can be cut into shapes, set in unique molds, or topped with edible glitter for occasions that demand extra glitz and glamour.

Serving and Presentation Guide


Presentation of Bubblegum Cloud Fudge is as crucial as its flavor. Consider cutting into clean, symmetrical squares and serving on a vibrant platter to enhance its visual appeal. Plating on a white dish allows its cheerful colors to pop fantastically.

Garnishing with edible flowers or a light dusting of powdered sugar can elevate the presentation. These simple touches add elegance and sophistication to a fun dessert.

Traditional accompaniments like a beautifully brewed cup of coffee or a hot chocolate can enhance the eating experience. If serving to adults, a splash of coffee liquors can create a unique pairing.

Consider serving this fudge chilled during summer months, and let it come to room temperature in cooler seasons to maintain the perfect consistency and palate feel.

Portion control is best achieved by cutting into modest sizes, making enough for everyone to enjoy without overindulgence. Accompanied by other treats, this fudge forms part of a balanced dessert table raising any occasion’s caliber.

Wine and Beverage Pairing


Pair Bubblegum Cloud Fudge with a mildly sweet dessert wine such as Moscato or an ice wine for a delightful match-up of complementary sweetness. The wine’s crisp aftertaste balances the fudge’s creamy richness.

Non-alcoholic alternatives like a sparkling fruit juice can make a refreshing contra-bitterness to the fudge’s sweetness, perfect for those who prefer a fizzy complement without the alcohol.

Pairing with certain teas such as a delicate jasmine or a rich Earl Grey can enhance the flavors found within the fudge, creating a refined balance between sweet and savory notes.

The beverage serving temperature matters; chilled wines or juices alongside the fudge create contrast, or a warm beverage offering coziness making the fudge a warming treat.

Presentation of beverages can elevate the entire dessert experience. Serve the wines in beautiful glassware or the teas in fine china to enhance the dessert’s sophisticated appeal, merging a delightful culinary experience with elegant charm.

Storage and Shelf Life


Preserve your Bubblegum Cloud Fudge through thoughtful storage methods that extend its delightful texture. Place in an airtight container to maintain freshness and prevent drying out, especially in environments with varying humidity.

Optimal storage temperatures lie within the refrigerator for long-lasting freshness, or in a cool pantry during cooler months where conditions are more stable, preserving the fudge’s soft texture and creamy consistency.

Choose a container that minimizes air exposure. With less air, top layers remain supple and enticing to eat. Consider dividing into layers atop parchment paper to prevent sticking if stacking is necessary.

Signs of spoilage include tough, grainy textures or discoloration. These warning signs mean it’s time to bid farewell. While the fudge lasts 2-3 weeks when stored properly, consume sooner for best quality.

Reheating isn’t recommended as it negatively affects the texture. Enjoy the fudge as it comes, at room temperature or chilled for a refreshing experience during warmer days.

Freezing is also an option for longer storage. Wrap tightly in freezer-friendly bags, expel as much air as possible, and enjoy within 3 months for preserved quality when defrosted.

Make Ahead Strategies


The best way to prepare Bubblegum Cloud Fudge ahead of time is by focusing on the key components. Tackle each step in manageable timelines to create less pressure and more joy in dessert preparation.

Between completion and serving, store the fudge carefully to maintain desired texture. Refrigerating or placing over parchment in a sealed container keeps taste and quality at its peak.

Consider the quality impact throughout your preparation. Patience pays off when time has been given to each step, especially letting flavors meld and textures set perfectly for anticipated enjoyment.

Assembly can be paced based on events; preparing flavors and melting chocolates earlier relieves stress. Enjoy the process in incremental steps, achieving indulgence without pressure.

Reheating isn’t suggested for this dish, yet bringing a cold fudge piece to room temperature before serving can enhance its texture, creating a melt-in-your-mouth indulgence.

Add fresh elements once set; a sprinkle of edible decoration or fresh fruit on top creates vibrant, exciting layers that engage those consuming, weaving a touch of personalization into each serving.

Scaling Instructions


Adaptations for Bubblegum Cloud Fudge cater to various crowd sizes, from intimate gatherings to grand celebrations. Scaling recipes alters ingredient quantities but maintains core presence; simply adjust the batch as needed.

When halving, use a smaller dish to set the fudge, ensuring height consistency. Adjust melting times slightly shorter due to less volume, maintaining quality and integrity.

For doubling or tripling batches, ensure larger equipment or divide as necessary into manageable portions, guaranteeing mixing and setting quality remain unaffected by size.

Tools may need adjustments; broader mixing bowls, more expansive baking trays, and increased freezer space may be required. Keep weight-bearing distribution in balance for each step.

Time considerations expand with larger batches; allow extra minutes to melt ingredients evenly and set uniformly, avoiding rushed sections that could break the final presentation.

With all size adjustments comes potential storage needs, as increases demand appropriate space both pre and post creation, securing indulgence at optimal consumption.

Nutritional Deep Dive


Understanding Bubblegum Cloud Fudge’s nutritional density allows for informed consumption choices, weaving enjoyment into balanced lifestyle practices while savoring its delights.

A small serving contributes modest macros, offering a balanced indulgence. Caloric intake derives primarily from the white chocolate, providing sweetness and energy.

Micronutrient analysis of this fudge sees contributions of calcium and modest iron from the chocolate, adding depth beyond its primary dessert purpose for those mindful of intake.

The health benefits of balanced moderation revolve around integrating small treats into diet plans with intention. This fudge serves as a delightful offset within broader nutritious frameworks.

Dietary considerations must always involve portion sense. One piece satisfies without overwhelming daily intake, adhering to non-negotiable balance across meals and indulgent moments.

For those managing weight, sharing options expand portion control. Alongside full meals, this fudge need not exclude healthy choices but enhance them harmoniously.

Dietary Adaptations


Gluten-free options naturally align with this fudge, as ingredients typically lack gluten presence. Confirm extract labeling for pureness, removing trace concerns.

For a dairy-free alternative, source vegan white chocolate and dairy-free condensed milk. These preserve fudge integrity while adapting to dietary needs seamlessly.

Vegan adaptations demand similar swaps, ensuring no animal product derivatives exist within chosen ingredients, completed by plant-based replacements that honor core flavor.

Bubbling creativity for low-carb ambitions involves focusing on chocolate and extract purity, maintaining fiber through alternative options that align with specific carbohydrate goals.

Keto possibilities emphasize portion control and ingredient awareness, optimizing indulgence through considered carbohydrate allocations within fudge preparation.

Paleo and low-FODMAP considerations adhere to fundamental recipe adjustments, exploring natural flavoring or alternative sugar substitutes addressing specific dietary preferences without sacrifice.

Troubleshooting Guide


Texture issues resolved through balance in ingredient ratios; dryness signals overcooking, while overly soft signals undercooking or incorrect setting times.

Flavors out of balance may stem from extract overuse; remain prudent with slow increments, tasting for desirable layers and adjusting to preference gradually.

Temperature must remain gentle; efficient stove control ensures smoothness required, avoiding compounds seizing from rapid heat exposure.

Equipment challenges forewarned against through cook’s awareness. Ensure possession of necessary basics: sensitive pans and thorough utensils to produce even results.

Ingredient substitutions carry specific alignment; replace wisely based on original purpose, particularly within core components such as chocolate, observing overall effect cautiously.

Timing concerns revolve around event schedule; advance preparations lessen rush, preparing sequential steps into task batches that simplify and guarantee success.

Recipe Success Stories


Community feedback praises Bubblegum Cloud Fudge notably for its simplicity and sensory impact, with audiences worldwide sharing their successful iterations and adaptions.

Reader variations inspire others; submissions feature new flavors and designs, affirming the fudge’s versatility and endless creative possibilities beyond the original recipe.

Adaptation stories include substitutions that rest assuredly in the delight of creation, with varying textures and new discoveries evolving as prominent within home kitchens.

Photography tips contribute visual splendour; bloggers reveal lighting and plating techniques that complement the fudge’s pastel hues and sumptuous textures, basking in shared artistic expression.

Enthusiasts emerge through repeated exploration, sharing how integrating fudge into diverse festivity cycles created heightened culinary anticipation, cementing its allure.

Frequently Asked Questions

How long does the fudge need to set?
Allow your fudge to set in the refrigerator for at least 2 to 3 hours. This ensures proper texture and consistency, giving you fudge that’s delightfully creamy and easy to cut.

Can I use different white chocolate brands?
Yes, but ensure that it lists cocoa butter as a primary fat. Using inferior chocolate with added oils can affect the final texture of your fudge, leading to a less creamy result.

What if I don’t have bubblegum flavoring?
If bubblegum flavoring is unavailable, feel free to experiment with other extracts, such as vanilla or almond, for a completely different, yet equally delightful, fudge flavor.

How should I store leftover fudge?
Store leftover fudge in an airtight container within the refrigerator. It will keep for up to three weeks, maintaining both its delicious flavor and rich, smooth texture.

What’s the best way to cut fudge cleanly?
For perfect slices, use a sharp knife warmed under hot water. Wipe the knife’s blade dry after each cut and repeat the process for the cleanest, most precise pieces.

Can I freeze Bubblegum Cloud Fudge?
Absolutely! Wrap the fudge securely in plastic wrap and place it in a freezer bag for up to three months. Thaw in the refrigerator to enjoy later on.

Is it possible to make this fudge ahead of time?
Certainly, making it ahead can save preparation time. The fudge can be prepared and stored up to a week in advance, ensuring it’s fresh and set perfectly for when needed.

Can this recipe be made vegan or dairy-free?
Yes, with simple adjustments! Use vegan white chocolate and dairy-free condensed milk to ensure the fudge remains delightful for those adhering to plant-based or lactose-free diets.

How do I prevent the fudge from sticking to the pan?
Line your baking dish with parchment paper, ensuring an easy release once the fudge sets. Extend it up the sides to pull the fudge out effortlessly when ready.

What should I do if my fudge won’t set?
Consider refrigerating it longer as fudge typically requires firm chilling over time. If still unset, revisit measurement corrections and ingredient accuracy for subsequent attempts.

Additional Resources


For curious minds eager to explore beyond Bubblegum Cloud Fudge, delve into related recipes that speak of similar sugary nostalgia. These classics include traditional caramel confections or modern candy-inspired creations.

Technique guides ensure mastery over all things fudge. Detailed instructions covering chocolate melting processes, flavoring adaptations, and setting stages support evolving fudge artistry.

Our ingredient information section clarifies frequently needed details, from sourcing quality vanilla beans to exploring alternative dairy solutions, enriching your detailed understanding.

Essential equipment recommendations streamline dessert success. From choosing durable saucepans to specialized confectionery tools, these guidelines equip you with precise, effective kitchen skills.

Seasonal variations further your delight in culinary play. Evening parties invite unique decorations, while summer sweet tables encourage vibrant presentations, ensuring Bubblegum Cloud Fudge fulfills its fun delight.

Join the Conversation


Engage with our passionate culinary community on social media to showcase your Bubblegum Cloud Fudge creations. Tag your photos and share experiences to deepen collective enjoyment.

Our photography tips enhance your visual artistry, transforming well-loved recipes into stand-out visual pieces, drawing inspiration and engagement from expanding audiences.

Contribute to recipe reviews and delve into discussions, sharing feedback on what aspects thrill and what inquiries arise, fortifying the connection within our culinary camaraderie.

Community engagement thrives when sharing recipe variations. Whether thematic or flavor-based, your interpretations celebrate the diversity of Bubblegum Cloud Fudge in all its vibrant pride.

The Recipe

Bubblegum Cloud Fudge

Serves: 16 pieces

Prep Time: 10 mins

Cook Time: 5 mins

Total Time: 15 mins

Kitchen Equipment Needed

  • Medium saucepan
  • Baking dish
  • Wooden spoon for stirring
  • Parchment paper
  • Sharp knife

Ingredients

  • 2 cups white chocolate chips
  • 1 can (14 oz) sweetened condensed milk
  • 2 teaspoons bubblegum flavoring
  • Food coloring (pastel colors suggested)

Directions

  1. Line a baking dish with parchment paper to prevent sticking and ease removal.
  2. In a medium saucepan over low heat, melt white chocolate chips and sweetened condensed milk. Stir continuously until smooth.
  3. Once melted, remove from heat and stir in bubblegum flavoring, adjusting to taste.
  4. Divide the fudge mixture if using multiple colors, and add your desired food coloring, stirring until evenly distributed.
  5. Pour the mixture into the prepared dish, swirling colors as desired for a decorative effect.
  6. Refrigerate for 2-3 hours until fully set.
  7. Cut into squares using a sharp knife warmed in hot water for clean edges.

Recipe Notes

  • Adjust amount of bubblegum flavoring to personal taste preferences.
  • For even swirls, use a skewer or knife to blend colors gently.
  • Store fudge in an airtight container for up to three weeks.