Easy Breakfast Pigs in a Blanket with Flaky Crescent Rolls

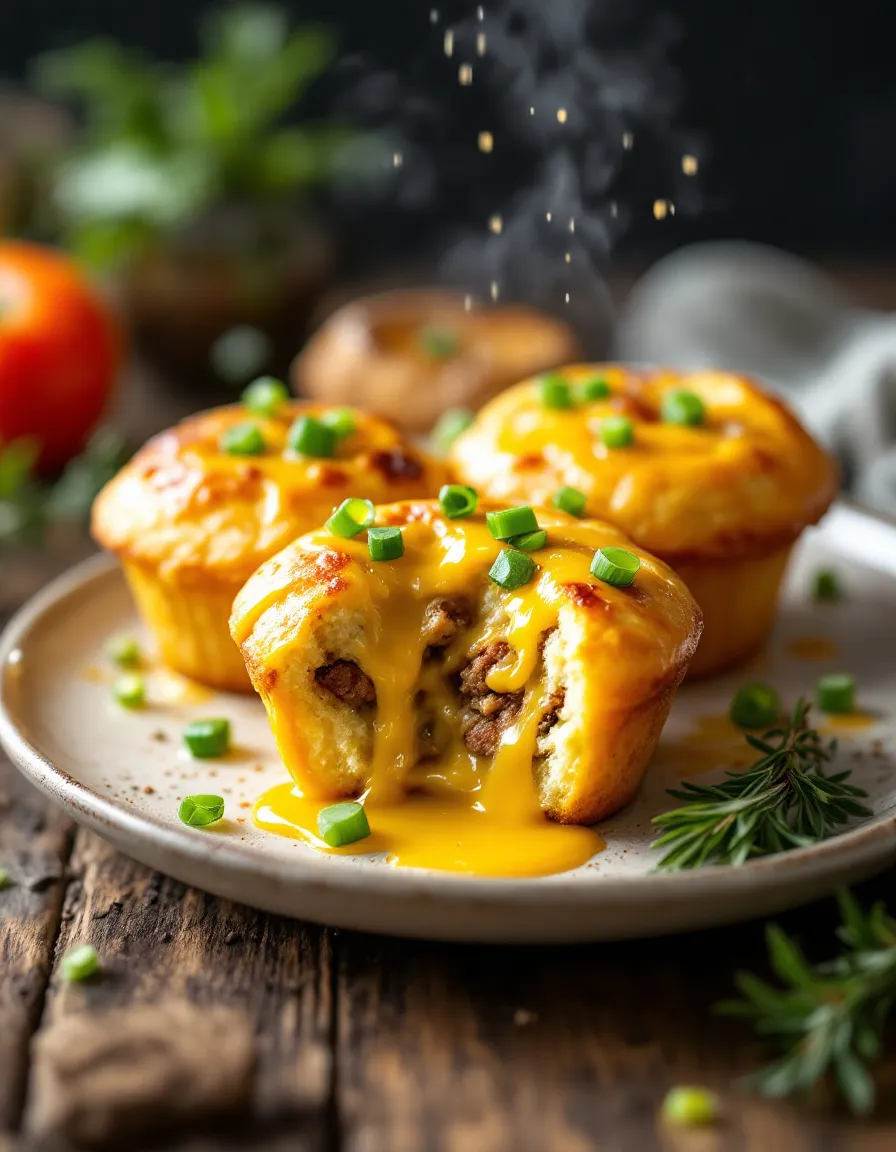
Breakfast Pigs in a Blanket: A Delicious Morning Treat

⚖️
Difficulty
Easy

⏲️
Prep Time
15 mins

🕒
Cook Time
20 mins

⏱️
Total Time
35 mins

🍽️
Servings
12 servings

Breakfast Pigs in a Blanket are the perfect way to kick-start your morning with a smile. Imagine waking up to the delightful aroma of crispy, golden pastry wrapping around juicy pork sausages, fresh from the oven. These portable breakfast treats are not only visually appealing but are also a creamy, savory delight that combines flaky texture with a satisfying snap from the sausage. Whether you’re serving them at a family brunch or enjoying a quick and indulgent morning snack, they are sure to satisfy your cravings.

This simple yet irresistible recipe requires minimal effort while delivering maximum flavor. Made with just a few key ingredients, these Breakfast Pigs in a Blanket offer a gourmet touch without the hassle. Once baked, they turn a beautiful shade of golden brown, with the sausage peeking out, just waiting to be dipped in ketchup or a tangy mustard. Perfect for busy mornings, these treats can be made ahead and heated up, making them a convenient choice that promises to become a repeat favorite.

Quick Recipe Highlights

  • Flavor Profile: Savory sausages wrapped in buttery, flaky dough create a delightful flavor explosion.
  • Texture: Enjoy the contrast of crunchy pastry with the juicy tenderness of the sausage.
  • Aroma: The delightful scent of baking pastry and sizzling sausage fills the air, enticing everyone to join the table.
  • Visual Appeal: Perfectly golden and inviting, these bites are as pleasing to the eye as they are to the palate.
  • Skill Level Needed: This recipe is straightforward enough for even novice cooks, making it an accessible option for everyone.
  • Special Equipment: You’ll need a baking sheet and parchment paper to create this tasty breakfast masterpiece.

Recipe Overview

  • Difficulty Level: The recipe is classified as easy, requiring just a few simple steps and minimal cooking techniques.
  • Category: Breakfast treat ideal for brunch, breakfast on-the-go, or even as appetizers at gatherings.
  • Cuisine: This recipe draws inspiration from classic American breakfast foods, combining influences from both pastry and sausage traditions.
  • Cost: Ingredients are budget-friendly, making it an economical choice for feeding a crowd.
  • Season: Breakfast Pigs in a Blanket are perfect for any time of year but are especially delightful during brunch seasons.
  • Occasion: Ideal for gatherings, brunch parties, and kids’ birthday celebrations, they suit a variety of events.

Why You’ll Love This Recipe

These Breakfast Pigs in a Blanket promise a mouthwatering flavor experience that combines the savory, hearty taste of breakfast sausage with the light, flaky pastry. Each bite offers a satisfying blend of textures—crispy on the outside thanks to the golden-brown dough, while the inside remains juicy and flavorful. The contrast of the warm pastry with the smoky sausage is simply irresistible.

Among the advantages of this recipe is its convenience. The preparation takes just 15 minutes, allowing you to whip up a delightful breakfast even on the busiest mornings. You can prepare them ahead of time, freezing the unbaked rolls and popping them into the oven whenever the mood strikes. This flexibility is perfect for meal prepping and makes mealtime stress-free.

Nutritionally, while these treats are indulgent, you can modify them to suit your dietary preferences by choosing turkey or plant-based sausages. This added element of health allows you to enjoy a delicious breakfast without compromising your well-being, making it a guilt-free indulgence.

Additionally, Breakfast Pigs in a Blanket are fantastic for entertaining. Their finger-friendly nature means they are an excellent choice for social gatherings—everyone can help themselves while mingling. Plus, they are easily customizable with various dips, ensuring that there’s something for every palate.

Lastly, the cost-effectiveness of this recipe cannot be understated. With only three ingredients and a total cost of just a few dollars, you can feed a crowd without breaking the bank. This makes it an appealing choice for any occasion, from casual family breakfasts to festive brunches.

Historical Background and Cultural Significance

The origins of Breakfast Pigs in a Blanket traces back to the beloved classic “pigs in a blanket,” which has been a staple dish in various cultures. Traditionally, this dish has roots in American cuisine, with variations found throughout Europe, particularly in the UK, where sausages wrapped in pastry have been popular for centuries.

Culturally, these savory rolls symbolize a casual approach to meals, emphasizing convenience and comfort. They represented resourcefulness, allowing cooks to make use of leftover sausage and pastry. The dish has evolved over time, finding its way onto breakfast tables, party platters, and children’s menus alike.

As home cooking saw a resurgence during the recent decades, recipes like Breakfast Pigs in a Blanket have enjoyed renewed popularity, particularly among families seeking balance between convenience and flavorful meals. This simple dish encapsulates the spirit of togetherness, often serving as a fun bonding experience for families cooking together.

Regional variations are plentiful, with interpretations ranging from using different kinds of sausage to experimenting with various doughs, including crescent rolls or even phyllo pastry. This adaptability underscores the cultural significance of the recipe, as home cooks from diverse backgrounds add their own spins, creating myriad interpretations while preserving the core concept.

Ingredient Deep Dive

  • Sausages: A breakfast staple with deep cultural roots, sausages have been a versatile choice throughout culinary history. They provide essential nutrients like protein and B vitamins, promoting energy and muscle repair. When selecting sausages, consider quality and fat content for flavor balance. They can be stored in the fridge for a few days; if not used, freeze them for later use. For substitutions, turkey or plant-based sausages work well.
  • Puff Pastry: Puff pastry, with its flaky layers, is a culinary marvel that dates back to 17th-century France. It adds texture and elegance to dishes. Nutritionally, it contains carbohydrates and fats, providing energy but should be consumed in moderation. Opt for frozen or homemade options for flexibility. When stored, keep it chilled; it can be rolled out or cut into shapes easily. For a healthier alternative, phyllo dough can be used.

Common Mistakes to Avoid

  • Not thawing the puff pastry completely can result in a tough texture.
  • Overcrowding the baking sheet can lead to uneven cooking and steaming rather than browning.
  • Using too high a temperature may burn the outside before the sausage is cooked through.
  • Not sealing the edges properly can cause the pastries to open during baking.
  • Neglecting to preheat the oven can result in longer cooking times and less desired texture.
  • Skipping the egg wash can lead to a less appealing color and shine on the pastry.
  • Not seasoning the sausage can lead to a bland flavor profile.
  • Using the wrong type of sausage can result in unexpected flavors and textures.
  • Forgetting to let the finished pigs rest before serving can lead to steam burn.
  • Using a dull knife to cut the pastry can cause squishing; use a sharp cutter instead.

Essential Techniques

Baking is an essential technique here; using the right temperature and timing ensures even cooking throughout. Preheat your oven, keeping an eye on visual cues such as golden color and puffed appearance for doneness. The heat must be consistent; investing in an oven thermometer may aid in optimal results.

Another vital technique is working with puff pastry. Keep it cold to maintain its flaky integrity during rolling and cutting. Lay it on a floured surface, and work quickly to prevent it from warming up. Look for visual indicators such as rising layers and a light, airy texture once baked.

Pro Tips for Perfect Breakfast Pigs in a Blanket

– For a unique twist, try using flavored sausage or adding herbs and spices to the pastry dough.
– Ensure your pastry is cold when wrapping, allowing for an airy texture during baking.
– Use a sharp knife for precise and clean cuts; this prevents squishing the pastry.
– Experiment with different types of dips to elevate your breakfast experience.
– Allow the wrapped sausages to chill briefly before baking to enhance puffiness during cooking.
– Brush on additional egg wash for a more polished and golden finish.
– If making ahead, par-bake the pigs for a few minutes, cool, and store before finishing baking on the day of serving.
– Add cheese into the mix for a creamy, savory center that completes the flavor.

Variations and Adaptations

For those wanting an East Asian twist, add a touch of hoisin sauce and serve with Asian dipping sauces. For seasonal adaptations, consider using pumpkin-spiced sausage in the fall to bring warming flavors to the dish.

Dietary modifications can include using gluten-free dough or turkey sausage for low-fat options. For flavor variations, incorporate spices such as garlic powder or smoked paprika into the pastry. Modifying texture can be achieved by using different dough types like crescent roll dough for a different crust.

When it comes to presentation alternatives, serve on a wooden board with an assortment of dips, garnished with fresh herbs for color and flavor contrast.

Serving and Presentation Guide

Plating these Breakfast Pigs in a Blanket can elevate the dining experience. Present them on a colorful platter, arranged in a fan shape or stacked for a layered look. Garnishing with fresh herbs or parsley adds a splash of color.

For traditional accompaniments, offer a selection of ketchup, mustard, and hot sauce on the side for added flavor. Temperature is vital; freshly baked pastries should be served warm, enhancing their flaky texture and savory flavor.

Consider portion control with a half or full serving approach, ensuring everyone can enjoy while encouraging seconds. Use small plates for self-serve styles during gatherings.

Wine and Beverage Pairing

Pairing beverages with Breakfast Pigs in a Blanket can enhance the breakfast experience. A crisp, bubbly Prosecco complements the richness of the pastry while cutting through the savory flavor of the sausage. Alternatively, a sparkling apple cider offers a non-alcoholic option that bridges the gap between sweet and savory.

Tea enthusiasts can turn to a subtle chai latte which brings warmth and spice to the table, balancing the hearty nature of the dish. Ensure beverages are served at optimal temperatures, encouraging guests to sip and savor with bites.

Storage and Shelf Life

For optimal storage, keep any leftovers in an airtight container in the fridge for up to three days. To extend their shelf life, consider freezing baked or unbaked rolls. Wrap them tightly with plastic wrap and then aluminum foil for extra protection.

Signs of spoilage include off-smells or changes in texture; these are good indicators to discard. If reheating, use an oven to retain crispiness, baking at 350°F for about 10 minutes. Remember, pastry can lose its qualities if reheated too many times, so enjoy fresh whenever possible.

Make Ahead Strategies

To prepare these delightful rolls ahead of time, you can assemble them the night before and keep them covered in the fridge until ready to bake. This plan saves time on busy mornings. For storage between steps, ensure the sausage and pastry are kept cold to maintain quality.

Assemble separate layers in advance and freeze them, which can help preserve flavor and texture. When ready to serve, simply bake them from frozen, adding a few extra minutes to the cooking time. Fresh components, like dips or garnishes, can be left until just before serving to maintain freshness and vibrant flavors.

Scaling Instructions

For smaller portions, simply halve the recipe, ensuring that you maintain balance in dough and sausage quantity for flavor consistency. If doubling or tripling, be mindful of oven space and rotate trays or batches for even baking.

Adjust equipment accordingly; larger ovens or multiple baking sheets may be necessary. Time modifications might also be required to ensure the fuller trays cook evenly. Store excess in airtight containers and re-bake as needed for easy meals.

Nutritional Deep Dive

A breakdown of macros in Breakfast Pigs in a Blanket reveals that a typical serving consists of protein, carbohydrates, and fats. The sausage provides essential protein and energizing fats, while the pastry contributes carbohydrates, making for an energizing breakfast.

Micronutrient analysis shows sausages rich in vitamins such as B12 and zinc, essential for metabolic health. For those watching their diet, adjusting portion size or opting for leaner sausages can contribute to weight management and health goals.

Consider tracking your nutritional intake if modifying. Utilizing lower-fat sausage and whole-grain pastry significantly contributes to a better overall nutritional profile.

Dietary Adaptations

For those following gluten-free diets, consider using gluten-free pastry alternatives. Ensure sausages are clearly marked gluten-free to prevent cross-contamination.

Dairy-free eaters can opt for plant-based sausages and skip any cheese fillings. Vegan adaptations can involve using plant-based sausage products and non-dairy wraps, ensuring inclusivity for all guests.

Keto and low-carb adaptations involve replacing the pastry with slab bacon or zucchini slices. This offers a hearty option while meeting dietary restrictions. Similar adjustments can be utilized for Paleo diets, focusing on whole food ingredients.

Troubleshooting Guide

If texture issues arise, particularly if pastries are soggy, ensure they are allowed to rest on a cooling rack, helping them crisp up. Flavor balance can be tweaked by adjusting the spices used in your sausage choice, allowing for savory nuances.

Temperature problems can be solved by double-checking oven settings and using an oven thermometer to ensure accuracy. If you encounter equipment issues, like a malfunctioning oven, swap dishes between racks to encourage even cooking.

Ingredient substitutions, such as using lower quality sausage, can significantly impact overall flavor; aim for good quality meats and seasonings to ensure quality standards.

Recipe Success Stories

Community feedback has been overwhelmingly positive, with families reporting successful brunch gatherings featuring Breakfast Pigs in a Blanket. Variations shared online include creative twists with cheese, herbs, and different dipping sauces.

Successes with adaptations show this recipe’s flexibility, encouraging personal touches that suit individual tastes. Readers suggest trying variations like buffalo chicken sausage or herbed pesto for an unforgettable burst of flavor.

Tips from the community include recommending baking in mini muffin tins to create bite-sized versions. This fun twist invites engagement and excitement at gatherings, particularly with younger audiences.

Frequently Asked Questions

Can I make these vegetarian?

Absolutely! You can substitute regular sausage with plant-based sausage to enjoy a delightful vegetarian option. Make sure to use the same wrapping technique, and bake as directed.

How do I store leftovers?

Leftovers can be stored in an airtight container in the refrigerator for up to three days. They can also be frozen, wrapped tightly, for future snacks or meals.

Can I use homemade pastry?

Yes! If you’re up for it, homemade pastry can add an extra layer of flavor, making your Breakfast Pigs in a Blanket truly special. Just follow the same wrapping method and baking time.

Is there a specific dip that goes well with these?

Ketchup and mustard are classic dips, but feel free to explore with BBQ sauce, honey mustard, or even spicy aioli for a gourmet twist.

Can I prepare these the night before?

Definitely! Assemble them and keep them sealed in the fridge overnight. Bake them fresh in the morning for a quick breakfast.

How can I make these spicier?

For added heat, choose spicy sausage or incorporate chopped jalapeños into the sausage mixture before wrapping.

What’s the best way to reheat leftovers?

To retain crispiness, reheat in the oven at 350°F for about 10 minutes. This method ensures they warm evenly without becoming soggy.

Can I use puff pastry sheets that are store-bought?

Store-bought puff pastry is perfect for this recipe! It’s convenient and significantly reduces prep time.

What size sausage should I use?

Mini sausages or regular breakfast sausages work well. Just ensure their size complements the pastry for the best outcome.

Are these suitable for meal prep?

Yes! Breakfast Pigs in a Blanket are very meal prep friendly. Just make, store, and bake as needed for a quick grab-and-go breakfast!

Additional Resources

If you enjoyed this recipe, be sure to check out our other breakfast favorites like Spanakopita Breakfast Cups or Savory Breakfast Tarts. These dishes use similar pastry techniques and are perfect for brunch gatherings.

Dive deeper into culinary knowing with our technique guides, exploring areas such as dough preparation and baking techniques. For those who love local ingredients, check our seasonal variations to match your recipe with your farmer’s market finds.

Explore our collection of useful kitchen equipment recommendations, including baking sheets and muffin tins, to ensure you have everything you need for a successful cooking experience.

Join the Conversation

We’d love to hear your thoughts on this recipe! Share your creations on social media and inspire others in the community to try these Breakfast Pigs in a Blanket. Don’t forget to tag us; your photography can shine a light on your cooking journey!

Whether you have feedback or unique variations, we encourage you to engage and contribute to the conversation. Each recipe crafted is best when shared. Let’s celebrate the joy of creating delightful meals together!

The Recipe

Breakfast Pigs in a Blanket

Serves: 12 servings

Prep Time: 15 mins

Cook Time: 20 mins

Total Time: 35 mins

Kitchen Equipment Needed

  • Baking sheet
  • Parchment paper
  • Knife
  • Whisk for egg wash
  • Rolling pin (if using homemade pastry)

Ingredients

  • 1 package of puff pastry (2 sheets)
  • 12 breakfast sausages
  • 1 egg (for egg wash)
  • Salt and pepper (to taste)

Directions

  1. Preheat the oven to 400°F (200°C) and line a baking sheet with parchment paper.
  2. Roll out the puff pastry on a floured surface. Cut the pastry into strips wide enough to wrap around each sausage.
  3. Wrap each sausage in a strip of pastry, ensuring to seal the ends properly.
  4. Place the wrapped sausages seam-side down on the prepared baking sheet.
  5. Whisk the egg and brush it over the tops of the pastries. Season with salt and pepper.
  6. Bake in the preheated oven for 20 minutes or until golden brown and puffed.
  7. Remove from the oven; let cool slightly before serving.

Recipe Notes

  • For a golden finish, ensure the egg wash is applied evenly.
  • Consider adding cheese into the pastry before wrapping for extra flavor.
  • If using frozen puff pastry, allow it to thaw in the refrigerator before use.

Best Brown Sugar Banana Pancakes – Fluffy and Delicious

Brown Sugar Banana Pancakes: Fluffy Delights for a Cozy Morning

⚖️
Difficulty
Easy

⏲️
Prep Time
10 mins

🕒
Cook Time
15 mins

⏱️
Total Time
25 mins

🍽️
Servings
4

If you’re searching for a breakfast that brings warmth and comfort to your mornings, look no further than these delightful Brown Sugar Banana Pancakes. Bursting with the sweet, caramel-like flavor of brown sugar and the rich taste of ripe bananas, these pancakes create an inviting aroma that fills your kitchen with a sense of home. Perfectly fluffy, each bite offers a satisfying sweetness that pairs beautifully with syrup or fresh fruit, making it an irresistible start to your day.

Imagine lifting a forkful of these pancakes, golden and warm off the griddle. Their soft texture and rich flavor make these Brown Sugar Banana Pancakes not just a meal, but a cherished moment that invites you to slow down and savor life. Whether you’re cooking for family or a leisurely brunch with friends, this recipe is sure to impress and delight, leaving your loved ones craving more.

Quick Recipe Highlights

  • Flavor Profile: The pancakes offer a sweet blend of caramel from the brown sugar and a fruity twist from the bananas.
  • Texture: Light and fluffy on the inside with a slightly crispy exterior, these pancakes are a breakfast dream.
  • Aroma: The warm scent of cooked bananas and melted brown sugar creates a cozy atmosphere.
  • Visual Appeal: Golden brown pancakes topped with fresh berries or syrup are not only delicious but also beautifully appetizing.
  • Skill Level Needed: This recipe is accessible to cooks of all levels, requiring just basic mixing and skillet skills.
  • Special Equipment: A large skillet or griddle is recommended, along with mixing bowls and measuring cups.

Recipe Overview

  • Difficulty Level: The recipe is easy to follow, making it perfect for beginner cooks or a fun activity with kids.
  • Category: Perfect for breakfast or brunch, these pancakes can also be a sweet snack or dessert option.
  • Cuisine: This recipe reflects home-cooked American breakfast traditions that have become a favorite worldwide.
  • Cost: The ingredients are budget-friendly, typically totaling under $10 for a batch serving four people.
  • Season: While delicious year-round, the banana flavor makes these pancakes especially great during the fall and winter months.
  • Occasion: Ideal for cozy family breakfasts, brunch gatherings, or as a special treat on weekends.

Why You’ll Love This Recipe

The combination of brown sugar and bananas creates a unique flavor that elevates your breakfast game. The sweetness from the brown sugar adds depth, while the banana introduces a rich, fruity note. Each pancake is fluffy yet satisfying, offering a perfect base for toppings like maple syrup or fresh fruit.

Conveniently quick to make, you can whip up a stack in under half an hour. The ingredients are simple and can often be found in most kitchens, allowing you to easily prepare this delightful meal when cravings strike.

From a nutritional perspective, bananas add potassium and essential vitamins, while the whole-grain flour can be swapped for healthier alternatives. This makes the pancakes not only delicious but more wholesome than standard pancakes, letting you enjoy breakfast with fewer guilt worries.

These pancakes are also a fantastic choice for social gatherings. They serve beautifully with assorted toppings, making them perfect for family brunches or friendly get-togethers where everyone can customize their meal.

Cost-effectively, this recipe is a winner, using basic pantry staples to create something special. With just a few ingredients, you can produce a delightful breakfast that feeds the whole family without breaking the bank.

Historical Background and Cultural Significance

Pancakes have a long-standing history, with origins dating back centuries. Traditional recipes have evolved in various cultures, but the concept of a warm, flat breakfast item exists across many societies. In America, pancakes became a staple meal, often linked with family gatherings and comfort food.

The inclusion of bananas is a more modern twist influenced by the popularity of tropical fruits. This combination reflects how traditional recipes continue to adapt, celebrating local ingredients and flavors to appeal to contemporary palates.

Over time, banana pancakes have become a beloved breakfast choice in many homes, especially as banana bread gained fame. The merging of the two recipes demonstrates culinary creativity and resourcefulness, allowing families to enjoy ripe bananas before they spoil unnecessarily.

Today, variations of banana pancakes can be found globally, with different cultures adding their ingredients, showcasing the versatility and enduring popularity of pancakes as a breakfast dish.

Ingredient Deep Dive

Bananas: Beyond their delightful flavor, bananas are a significant source of potassium, fiber, and vitamins C and B6. They play a crucial role in providing energy, making them an excellent option for breakfast. When selecting bananas, look for those with a few brown spots for optimal sweetness. Store them at room temperature, and if you have too many, consider freezing them for use in smoothies or baked goods.

Brown Sugar: This sugar is brown because it retains some molasses, adding moisture and a caramel-like flavor to recipes. Nutritionally, while it serves similar purposes as white sugar, it contains trace amounts of minerals. When using brown sugar, press it into measuring cups to ensure accuracy. Store it in an airtight container to keep it from hardening, and if you need a substitute, white sugar can be substituted with a little molasses for a similar taste.

Common Mistakes to Avoid

  • Overmixing the batter can lead to tough pancakes. Mix just until the dry ingredients are moistened.
  • Not allowing the skillet to heat properly can result in uneven cooking. Make sure it’s at medium heat before pouring the batter.
  • Using overly ripe bananas will lead to a mushy batter. Choose bananas that are just past their green stage for the best texture.
  • Not measuring flour accurately can throw off the pancake density. Use measuring cups correctly for consistent results.
  • Skipping the resting period allows the gluten to relax, contributing to fluffier pancakes.
  • Flipping pancakes too early can lead to a mess. Wait until bubbles form on the surface before turning.
  • Overcrowding the skillet can lower the temperature, causing pancakes to cook unevenly. Give them enough space.
  • Using cold batter on a hot skillet can lead to uneven cooking. Allow the batter to come closer to room temperature.
  • Not using enough cooking oil can cause sticking. Use a light coat of oil or butter to help with flipping.
  • Garnishing too soon can make toppings soggy. Wait for pancakes to cool slightly before adding syrup or fruits.

Essential Techniques

Mixing the Batter: Properly mixing your batter is vital for achieving the right pancake texture. Use a gentle folding motion to incorporate ingredients without overworking the batter. This helps maintain a light and fluffy quality.

Cooking Pancakes: Mastering your skillet’s temperature is crucial. A medium heat allows for proper cooking without burning. Always wait for bubbles to form on the surface before flipping, which indicates they are ready.

Pro Tips for Perfect Brown Sugar Banana Pancakes

1. Use fresh, ripe bananas for maximum sweetness and flavor. Singly small bananas can be mashed easily and incorporated well into the batter.
2. Mix your batter just until wet; lumps are okay for a fluffier texture.
3. Let your batter sit for about 5-10 minutes before cooking to promote air bubbles, enhancing lightness.
4. Keep your pancakes warm in the oven while cooking the rest of the batch at a low temperature.
5. Experiment with adding spices like cinnamon or nutmeg to enhance the overall flavor profile.
6. Swap some of the all-purpose flour with whole wheat flour for a healthier twist.
7. If using frozen bananas, thaw and drain excess liquid to avoid watery pancakes.
8. Don’t skip the oil or butter on your cooking surface; it prevents sticking and enhances flavor.

Variations and Adaptations

For a regional twist, try adding pecans or walnuts to the batter for additional crunch, reflecting Southern cooking traditions. Seasonal adaptations could include pumpkin purée in fall, creating a delightful pumpkin banana pancake during Halloween festivities.

For those on a gluten-free diet, consider using gluten-free flour blends, which will still yield fluffy pancakes. Dairy-free versions can simply replace milk with almond or oat milk, ensuring everyone can enjoy them.

In terms of flavor, you can explore adding chocolate chips, berry purées, or even peanut butter for a nutty addition, enhancing the classic banana pancake experience.

Texture modifications can be made by blending oats into the mix for a heartier feel, or serving pancakes with a fruit compote for a fresh twist on presentation.

Finally, presentation alternatives include stacking pancakes high with whipped cream and a sprinkle of raw cacao for a decadent brunch look, making them visually stunning and delicious.

Serving and Presentation Guide

For a beautiful presentation, stack pancakes high and drizzle with syrup or honey. Garnish with fresh sliced bananas, berries, or a light dusting of powdered sugar. Using a large, inviting plate allows for more dramatic plating – perfect for brunch!

To achieve an elegant touch, consider adding a sprig of mint to your pancake stack. Serving these pancakes warm enhances their comforting aroma and softness, making each bite a pleasurable experience.

Be mindful of portion control, especially if serving to children or during gatherings. Smaller stacks can provide all the flavor without overwhelming the plate, and you can offer variety with different toppings.

Wine and Beverage Pairing

A fruity Chardonnay pairs beautifully with Brown Sugar Banana Pancakes. The wine’s crisp acidity complements the natural sweetness of the bananas. For a richer experience, you might opt for a sweet dessert wine like Moscato.

If you prefer non-alcoholic drinks, consider pairing with a freshly brewed cup of coffee or chai tea. The spiced notes in chai tea can resonate well with the pancake flavors, creating a earthy balance.

Temperature matters especially when pairing with drinks, as a room-temperature beverage tends to harmonize well with warm pancakes. Serve with a refreshing fruit juice to complete the breakfast experience, providing a vibrant contrast to the sweetness of the pancakes.

Storage and Shelf Life

To store leftover pancakes, let them cool to room temperature before placing them in an airtight container in the fridge. They will typically last for 2-3 days but are best served fresh.

If you plan to keep them longer, pancakes freeze well! Wrap them in plastic wrap and place them in a freezer-safe bag for up to 3 months. To reheat, simply microwave them on low heat or toast them in a conventional oven, maintaining their fluffy texture.

Signs of spoilage include an off smell or unusual texture; always check these before consumption. For best results, avoid stacking pancakes directly on top of each other while storing to prevent them from becoming soggy.

Make Ahead Strategies

To save time, you can prepare the dry ingredients ahead of time, mixing flour, baking powder, baking soda, and brown sugar in a separate container. Store in an airtight jar until you’re ready to concoct your pancakes.

Another option is to pre-mash bananas and store them in the refrigerator to have them ready for mixing. This speeds up the pancake-making process, especially on busy mornings.

If you plan on making multiple servings, consider cooking the pancakes in advance and refrigerating them. This allows you to quickly reheat them for breakfast or brunch, maintaining convenience without compromising taste.

Scaling Instructions

Halving the recipe is simple; adjust the ingredients accordingly, ensuring you maintain the same ratios for flavor consistency. Doubling or tripling is also straightforward, though you may need a larger griddle or multiple pans to cook them all simultaneously.

Keep an eye on cooking times when scaling, as larger batches sometimes require slight adjustments in heat or time spent on the skillet to achieve that perfect golden brown color.

For proper storage considerations after scaling, use larger containers to hold the cooked pancakes, ensuring enough space to avoid them sticking together.

Nutritional Deep Dive

Brown Sugar Banana Pancakes are a wholesome breakfast choice when looking at macro breakdowns. Each serves a good source of carbohydrates from the bananas and flour while contributing a small amount of protein from eggs and milk products.

The addition of bananas brings essential vitamins and minerals, including vitamin C, vitamin B6, and potassium. This nutrient profile supports energy levels, making these pancakes an excellent option for a balanced breakfast.

For those considering dietary management, controlling portion sizes can help maintain a balanced intake without overeating. Pairing pancakes with protein-rich toppings such as Greek yogurt can help satisfy hunger levels further.

Dietary Adaptations

For those needing a gluten-free option, using a blend of gluten-free flours or almond flour can yield successful results. Be mindful of texture and hydration levels when making this adaptation.

Dairy-free individuals can easily swap milk for almond or oat milk while maintaining similar flavors and textures. For vegan versions, omit eggs altogether, using a flaxseed meal substitute to bind the ingredients together.

For a low-carb or keto-friendly approach, consider using almond flour or coconut flour instead of traditional all-purpose flour, allowing for suitable dietary choices while still enjoying pancakes.

Troubleshooting Guide

If you encounter a texture issue, consider adjusting your mixing technique or checking oven temperature if baking. An overly dense pancake can result from too much flour or not mixing the batter sufficiently.

For flavor balance concerns, add more vanilla extract or try emphasizing the sweetness with a bit more brown sugar or mashed banana, adjusting until you hit the right note.

Temperature problems can arise with skillet heat management. Keep in mind that a too low or high temperature will yield unevenly cooked pancakes. Monitor heat settings closely and adjust accordingly.

Recipe Success Stories

Many home cooks have discovered the joy of Brown Sugar Banana Pancakes, sharing successful adaptations online. Stories tell of flavorful varying toppings, like adding chocolate chips or fruits for unexpected twists that delighted their family and friends.

Photography tips are shared widely, with amateur chefs getting creative, stacking images of their pancakes, highlighting the beautiful textures and colors, inspiring others to recreate their masterpiece.

Community feedback often highlights how simple this recipe is, encouraging people to experiment with with the spices or to integrate local fruit toppings based on personal preference, enhancing the shared experience of making and enjoying pancakes together.

Frequently Asked Questions

How can I ensure my pancakes are fluffy? Mixing the batter minimally and allowing it to rest can significantly enhance the fluffiness of your pancakes. Another helpful tip is to use baking soda if your pancake batter is not acidic enough to create the necessary chemical reaction for rise.

Can I use frozen bananas? Yes, you can use frozen bananas, but be sure to thaw and drain them well to avoid excess moisture in your batter. They will be softer, making them easy to mash directly into the batter.

What can I substitute for brown sugar? If you don’t have brown sugar on hand, white sugar mixed with a small amount of molasses can create a similar taste and texture. Alternatively, coconut sugar can also work as a fine substitute.

How should I cook pancakes to avoid burning? Try to maintain a medium heating temperature on your skillet. If your pancakes are burning, the heat is likely too high. Adjust appropriately and keep a watchful eye on them while they cook.

Can I make the batter ahead of time? Yes, you can prepare the pancake batter in advance and refrigerate it. Using it within 24 hours is usually best to enjoy optimal flavors and freshness, though it can be kept for up to 48 hours.

Is there a way to make these pancakes healthier? Absolutely! You can use whole wheat flour or alternative flours like almond flour. Additionally, adding protein powder or Greek yogurt into the batter can boost the nutritional profile significantly.

How do I know when my pancakes are done cooking? Look for bubbles forming on the surface of the pancakes and check for golden brown edges. A gentle lift of the pancake will reveal a nicely browned underside; only then should you flip them over.

Can I freeze the pancakes? Yes, pancakes freeze well. After cooking, allow them to cool completely, then stack with parchment paper in between and store them in a freezer bag for up to three months for best quality.

What toppings go best with Brown Sugar Banana Pancakes? Fresh fruit, whipped cream, warm syrup, or even yogurt are fantastic choices. You can also try nut butter for an extra layer of flavor and texture!

Are these pancakes suitable for kids? Yes! These pancakes are kid-friendly, and you can even let them help with mixing and adding toppings, making it a fun family breakfast.

Additional Resources

For more delightful breakfast options, check out our other pancake recipes, such as fluffy blueberry pancakes or decadent chocolate chip pancakes! You can also find helpful technique guides on pancake flipping and cooking tips for achieving the perfect golden brown finish.

We also offer ingredient information and seasonal variations, such as using pumpkin in fall or fresh strawberries in spring, to tailor your breakfast experience throughout the year.

Join the Conversation

We encourage readers to share their experiences with Brown Sugar Banana Pancakes on our social media platforms! Post your delicious photographs and any variations you’ve tried. Community engagement allows everyone to learn from one another and celebrate cooking together. Take part by leaving reviews and suggestions for others – your tips might inspire someone else’s next pancake masterpiece!

The Recipe

Brown Sugar Banana Pancakes

Serves: 4

Prep Time: 10 mins

Cook Time: 15 mins

Total Time: 25 mins

Kitchen Equipment Needed

  • Large mixing bowl
  • Measuring cups and spoons
  • Whisk or fork
  • Large skillet or griddle
  • Spatula

Ingredients

  • 1 cup all-purpose flour
  • 2 tablespoons brown sugar
  • 1 teaspoon baking powder
  • 1/2 teaspoon baking soda
  • 1/4 teaspoon salt
  • 1 cup milk
  • 1 large egg
  • 1/2 cup mashed ripe bananas (about 1 large banana)
  • 2 tablespoons melted butter or oil (plus more for greasing)

Directions

  1. In a large mixing bowl, combine flour, brown sugar, baking powder, baking soda, and salt.
  2. In a separate bowl, whisk together milk, egg, mashed bananas, and melted butter.
  3. Pour the wet ingredients into the dry ingredients and stir gently until just combined; some lumps are okay.
  4. Let the batter sit for about 5-10 minutes to allow for air bubbles to form.
  5. Preheat a skillet or griddle over medium heat and grease lightly with butter or oil.
  6. Pour 1/4 cup of batter onto the skillet for each pancake and cook until bubbles appear on the surface, about 2-3 minutes.
  7. Flip and cook for another 1-2 minutes until golden brown. Repeat with remaining batter.
  8. Serve warm with your favorite toppings.

Recipe Notes

  • Can substitute almond milk or coconut milk for a dairy-free option.
  • For healthier pancakes, replace all-purpose flour with whole wheat or gluten-free flour.
  • Leftover pancakes can be stored in the fridge for up to 3 days or frozen for up to 3 months.

Best Hawaiian Roll French Toast – Soft, Sweet, and Fluffy

Delicious Hawaiian Roll French Toast: A Tropical Delight!

⚖️
Difficulty
Easy

⏲️
Prep Time
10 mins

🕒
Cook Time
15 mins

⏱️
Total Time
25 mins

🍽️
Servings
4 servings

French toast has long been a beloved breakfast classic, but adding Hawaiian rolls transforms it into a tropical paradise. The soft, pillowy texture of Hawaiian rolls, combined with the rich custard mixture creates a luxurious breakfast that transports your taste buds to the islands. Whether you’re serving it for a Sunday brunch or a special occasion, this Hawaiian Roll French Toast recipe is sure to impress family and friends alike.

Imagine the delightful aroma of cinnamon and vanilla wafting through your kitchen as the slices sizzle in the skillet. The golden brown edges draw you in, while the sweet, tender inside promises a melt-in-your-mouth experience. Topped with fresh fruit, maple syrup, and a dusting of powdered sugar, each bite of this Hawaiian Roll French Toast is a celebration of flavors, beckoning you to savor every moment.

Quick Recipe Highlights

  • Flavor Profile: A delightful blend of sweetness from the Hawaiian rolls, enhanced by the warm spices of cinnamon and nutmeg.
  • Texture: Soft and fluffy on the inside with a crisp, caramelized exterior for a satisfying bite.
  • Aroma: The sweet scent of vanilla mixed with buttery notes fills the air, making it irresistible.
  • Visual Appeal: The vibrant colors of fresh fruits and syrup create a stunning presentation on your breakfast table.
  • Skill Level Needed: Ideal for beginners, requiring minimal cooking techniques to achieve delicious results.
  • Special Equipment: A non-stick skillet or griddle is essential for achieving perfectly cooked French toast.

Recipe Overview

  • Difficulty Level: This Hawaiian Roll French Toast is easy to make, suitable for novice cooks, ensuring anyone can whip up a batch with ease.
  • Category: Perfectly fits into breakfast, brunch, or even dessert categories, making it versatile for any meal.
  • Cuisine: This recipe draws inspiration from traditional French toast while incorporating the sweet, tropical flavors of Hawaii.
  • Cost: Budget-friendly with minimal ingredients, the total cost for this recipe is around $10, depending on ingredient brands.
  • Season: Ideal for all seasons, but especially delightful in summer when fresh fruits are in abundance.
  • Occasion: Great for holiday breakfasts, family gatherings, or a simple weekend treat to celebrate mornings.

Why You’ll Love This Recipe

Indulging in Hawaiian Roll French Toast means experiencing a perfect symphony of taste and texture. The sweetness of the rolls paired with a creamy egg custard creates a satisfying combination that delights every bite. Whether you choose vibrant strawberries or ripe bananas as toppings, each adds a layer of freshness that enhances the overall flavor.

Preparation is a breeze, making this recipe ideal for busy mornings or leisurely weekend brunches. With just a handful of ingredients and simple steps, you can create a restaurant-quality breakfast in the comfort of your own home. This convenience allows everyone from busy parents to gourmet home chefs to enjoy a decadent meal without hassle.

Nutritionally, using Hawaiian rolls adds a touch of sweetness without the need for excessive added sugars. Each serving offers a good dose of carbohydrates for energy, while the addition of eggs provides protein that keeps you feeling full longer. Moreover, you can add fresh fruit for a vitamin boost, making this dish both delicious and nutritious.

Serving Hawaiian Roll French Toast to friends and family fosters connection and gathering. It’s a dish that inspires conversation and sharing, perfect for creating lasting memories around the breakfast table. Make it a tradition to enjoy together and watch as smiles light up everyone’s faces.

Finally, the cost-effectiveness of this recipe makes it accessible to anyone. With inexpensive ingredients and minimal prep, you can serve up a delightful breakfast feast without breaking the bank, proving that comfort and flavor can indeed be affordable.

Historical Background and Cultural Significance

The origins of French toast date back to ancient Roman times, when leftover bread was dipped in egg and fried. It has since evolved through various cultures, adapting to local ingredients and flavors. The addition of Hawaiian rolls brings a modern twist to this classic dish, reflecting the blending of culinary traditions that characterizes today’s food landscape.

Hawaiian rolls themselves, initially created by a Portuguese immigrant named Robert Taira, have become a staple in American kitchens. The sweet, soft rolls are beloved for their versatility and ability to complement a variety of dishes. Integrating these rolls into French toast not only showcases their unique flavor but also highlights their cultural journey in American cuisine.

Over the years, French toast recipes have evolved, incorporating sweet and savory elements depending on the region. The sweet Hawaiian roll variation has gained popularity among breakfast lovers, making a place in brunch menus across the United States. This evolution celebrates creativity in cooking and the joy of experimentation in the kitchen.

Regional variations also exist, where some blend spices, fruits, or local ingredients, each telling a story of the community’s palate. Hawaiian Roll French Toast is not merely a recipe; it symbolizes the fusion of cultures, reflecting the vibrant and diverse landscape of American breakfast fare.

Ingredient Deep Dive

Hawaiian rolls are a key ingredient, known for their sweet flavor and soft texture. Originally created in Hawaii, these rolls gain their unique taste from the combination of sugar, honey, and pineapple juice. Selecting fresh rolls is critical, as they should be soft and fluffy. Store them in a cool, dry place, ideally in an airtight container, to maintain freshness, and can be substituted with other sweet bread varieties if needed.

Eggs are another essential component, forming the custard that binds the French toast. They provide not only flavor but also protein and essential nutrients such as vitamin B12 and choline. Choose large, fresh eggs for the best results. Storing eggs in the refrigerator prolongs their shelf life, and for those with dietary restrictions, flax eggs serve as a suitable substitute.

Milk adds creaminess and richness to the custard mixture. Whole milk is recommended for a luxurious texture, but alternatives like almond or oat milk work well for those with lactose intolerance. When selecting milk, look for fresh, organic options for the healthiest choice. Properly store opened milk in the refrigerator and use it within a week.

Cinnamon is the spice that brings warmth and flavor depth to this dish. Often associated with comfort foods, it complements the sweetness of Hawaiian rolls beautifully. For the best flavor, opt for fresh cinnamon sticks or ground cinnamon stored in a cool, dark place. If unavailable, nutmeg can serve as a delicious alternative.

Maple syrup is the traditional accompaniment for French toast, lending natural sweetness. Grade A pure maple syrup enhances the dish, but honey or agave syrup can also work for those seeking alternatives. Store syrup in a cool, dark pantry, and it lasts for an extended time when properly sealed.

Common Mistakes to Avoid

  • Using stale Hawaiian rolls: Using stale bread can lead to a dry texture. Always use fresh rolls for the best results.
  • Not allowing bread to soak enough: Ensure that the rolls soak long enough in the custard to absorb the flavors.
  • Using too much heat: Cooking on high heat can burn the outside while leaving the inside uncooked. Use medium heat for even cooking.
  • Not greasing the skillet: Failing to grease the skillet can cause sticking, making flipping more difficult. Always use butter or oil.
  • Skipping the spices: The spices enhance the dish significantly. Don’t skip cinnamon or nutmeg for a well-rounded flavor.
  • Overcrowding the pan: Cooking too many slices at once can lower the pan’s temperature, affecting crisping. Work in batches as needed.
  • Not monitoring cooking time: Keep an eye on cooking time to avoid overcooking or burning the French toast.
  • Neglecting garnish: A beautiful garnish adds appeal. Don’t forget to top your French toast with fruits, syrup, or whipped cream.
  • Choosing the wrong syrup: Opt for pure maple syrup for the best flavor rather than artificially flavored syrups.
  • Underestimating preparation time: Allow enough time for both prep and cooking for a stress-free cooking experience.

Essential Techniques

Soaking bread in custard is crucial to the success of the dish. This technique ensures that the Hawaiian rolls absorb moisture and flavor, leading to a creamy, delicious center. To master this technique, gently press down on the bread when soaking to help it absorb the custard. Be cautious not to let the bread become overly soggy, as it may break apart during cooking.

Cooking at the right temperature is perhaps the most important technique when making French toast. A hot enough skillet allows for a beautifully caramelized exterior while ensuring the inside cooks through. You can test the heat by dropping a small amount of batter into the pan; if it sizzles and bubbles, you’re ready to cook. Adjust the heat as necessary, and always cover the pan to ensure even cooking.

Pro Tips for Perfect Hawaiian Roll French Toast

Choose fresh Hawaiian rolls for optimal flavor and texture. This is the foundation of your dish, so don’t skimp on quality. Ensure your rolls are soft and pliable for the best results.

For an added depth of flavor, consider infusing your custard with citrus zest or vanilla extract. This elevates the taste and aroma, creating a delightful experience for your senses.

Let the rolls soak in the custard mixture for at least five minutes before cooking. This ensures each slice is thoroughly flavored and moist throughout while maintaining a crisp exterior.

Use a combination of butter and oil for cooking. Butter adds flavor while oil helps to prevent burning, creating a beautiful golden crust on each slice.

Serve immediately after cooking for the best texture. French toast is best enjoyed warm and fresh, topped with your favorite garnishes.

Experiment with toppings beyond syrup; fresh fruit, whipped cream, or even yogurt can take your dish to the next level.

Finally, allow for room in your skillet. Cooking in batches ensures that every slice gets even heat and prevents overcrowding.

Variations and Adaptations

Explore regional variations of Hawaiian Roll French Toast by incorporating local flavors and ingredients. For instance, add coconut flakes for a tropical flair or drizzle with passion fruit syrup for an exotic touch.

Seasonal adaptations can also enhance the dish. In autumn, consider adding pumpkin spice to your custard for a festive fall twist. Spring can bring fresh berries and a hint of lemon for brightness.

For dietary modifications, try using gluten-free Hawaiian rolls or a dairy-free custard to accommodate various lifestyles. Almond or coconut milk pairs wonderfully with this recipe, maintaining the sweetness without compromising the flavor.

Flavor variations can include mixing in peanut butter or Nutella with the custard for a rich and indulgent treat. For nut lovers, a sprinkle of chopped nuts on top adds crunch and texture.

Try presentation alternatives to elevate your dish by stacking the French toast high and garnishing with edible flowers for Instagram-ready visuals. This not only makes the dish more appealing but also engages guests visually.

Serving and Presentation Guide

When plating your Hawaiian Roll French Toast, use a large, flat plate to allow space for garnishing. Stack two or three pieces on top of each other and lightly dust with powdered sugar for an elegant touch.

Garnishing can include a medley of fresh fruits like strawberries, blueberries, or kiwi, which adds both color and freshness to your dish while providing a nutritional boost. Consider a dollop of whipped cream or a drizzle of chocolate sauce for an extra decadent look.

Traditional accompaniments like crispy bacon or sausage complement the sweetness of French toast perfectly. They provide contrasting flavors and textures that enhance the overall meal experience.

Temperature is important; serve the French toast warm to maintain its soft and fluffy texture. If preparing in advance, keep it warm in a low oven until serving to ensure it’s delightfully inviting.

Finally, consider portion control by cutting the rolls into smaller pieces, allowing guests to sample various flavors while keeping their portions manageable. This approach encourages experimentation and sharing at the table.

Wine and Beverage Pairing

A light and fruity wine like Moscato pairs beautifully with Hawaiian Roll French Toast, enhancing the sweetness of the dish while balancing its richness. The effervescence of sparkling wine complements the fluffy texture and adds a festive touch.

For non-alcoholic alternatives, consider pairing this dish with fresh fruit juices such as orange or passion fruit. Their tangy and sweet profiles match well with the tropical elements of the French toast.

Coffee can also be a great companion; a light roast coffee with fruity notes works wonderfully. The caffeine perk provides a perfect morning boost without overshadowing the deliciousness of your meal.

Served iced or hot, teas like chai or earl grey, which have warm spice undertones, also harmonize with the flavors in Hawaiian Roll French Toast. Feel free to add a dash of milk or cream for a creamier experience.

Overall, consider the temperature of beverages; serving chilled drinks with warm dishes offers a delightful contrast that enhances the overall dining experience.

Storage and Shelf Life

To store leftover Hawaiian Roll French Toast, place it in an airtight container and refrigerate. This method preserves freshness for about 3 days. Reheat in an oven at 350°F (175°C) for about 10-15 minutes to restore its crisp exterior and softness.

For longer storage, freezing is an option. Place fully cooled French toast slices in a freezer-safe bag layering parchment paper between slices to prevent sticking. This method preserves its quality for about 2 months.

Keep an eye out for signs of spoilage such as unusual odors or changes in texture. If reheating, ensure that it is warmed through to avoid cold spots that could harbor bacteria.

To reheat from frozen, bake at 375°F (190°C) for 20-25 minutes or until heated through fully. For a quicker method, using the microwave is convenient but may result in a loss of crispness.

When thawing, avoid leaving it out at room temperature for extended periods. Instead, let it thaw overnight in the refrigerator before reheating for best results.

Make Ahead Strategies

For time efficiency, prep your Hawaiian Roll French Toast the night before by assembling the custard and soaking the rolls. Store in the refrigerator overnight, covered tightly, so flavors meld together.

Cutting and arranging your rolls in the baking dish saves time in the morning. Pour the custard over the rolls, allowing them to soak while you prepare coffee or set the table.

Quality is preserved in the overnight method, without compromising flavor. In the morning, simply pop them in the oven and enjoy the enticing aroma as it bakes.

Another make-ahead option is to freeze the soaked rolls after prepping. Portion them into individual servings and simply reheat them when ready to enjoy.

Optional fresh toppings can be prepared ahead of time too. Chopping and storing fruits in the fridge retains freshness and saves precious time just before serving.

Scaling Instructions

To halve the Hawaiian Roll French Toast recipe, simply reduce all ingredients and follow the same procedures for cooking time, ensuring perfect results. This is ideal for smaller gatherings or a quick breakfast for one or two.

Doubling or tripling the recipe requires having larger cooking equipment, such as a griddle or multiple pans. Ensure to adjust the cooking time as needed, depending on your pan’s capacity.

Timing modifications may also be necessary, as cooking larger batches may take longer. Keep the heat at medium to avoid burning while ensuring even cooking throughout each slice.

When scaling, think about ingredient storage. Improperly stored ingredients can spoil, which can affect the outcome of your dish. Always check the freshness.

Finally, have fun with scaling by introducing new flavor elements or toppings. Double the fruits or add a variety of different syrups to create a customized experience for every gathering.

Nutritional Deep Dive

When analyzing the macronutrient breakdown of Hawaiian Roll French Toast, you’ll find it’s an excellent source of carbohydrates, which provides the necessary energy to start your day. Each serving holds essential elements for balanced nutrition.

Micronutrient analysis reveals that the recipe can be enriched by adding fruits, providing vitamins such as Vitamin C and potassium. Incorporating berries not only enhances flavor but also boosts nutritional value significantly.

Regarding health benefits, the combination of eggs and Hawaiian rolls offers a satisfying meal that can help with muscle repair and recovery through protein. Adding fruit increases fiber content, which is essential for digestion.

Dietary considerations should be taken into account for those monitoring their nutritional intake. This French toast can be relatively high in sugars, especially when topped with syrup, so moderation is key for those on a sugar-regulated diet.

Portion analysis is essential; a typical serving contains a balanced mix of carbs and protein. This helps in managing hunger levels throughout the day, so pair it with a healthy side if you’re looking for a more robust meal.

Weight management tips include controlling portion sizes and modifying toppings. Use fresh fruit over syrup for lower calories, making this a more health-conscious choice without losing satisfaction.

Dietary Adaptations

For gluten-free options, substitute Hawaiian rolls with gluten-free bread varieties. Be sure to check the ingredients in your custard for gluten-containing items as well.

Dairy-free adaptations are easy by using almond milk or coconut milk in the custard. This keeps the recipe inclusive for those with lactose intolerance while preserving creaminess.

For vegan adaptations, replace eggs with a mixture of ground flaxseed and water or commercial egg substitutes. This ensures a delightful vegan version that retains moisture.

Low-carb and keto adaptations can be achieved by using low-carb bread options and reducing sugar in the custard. This caters to diet-conscious individuals looking for a tasty breakfast option.

Paleo dieters may also enjoy this recipe; simply swap traditional ingredients for almond flour bread and natural sweeteners like honey.

Low-FODMAP options are possible with specific bread varieties that comply. Be cautious with toppings, opting for lactose-free yogurt or syrup alternatives.

Troubleshooting Guide

If you encounter texture issues, consider adjusting the soaking time. If your French toast becomes too soggy, reduce the soaking time and properly adjust cooking temperature to achieve that desired crispness.

For flavor balance, ensure you’re using fresh spices and high-quality syrup. Experimenting with the ingredient proportions also helps to enhance overall taste without overpowering the bread’s natural sweetness.

Temperature problems can arise when your skillet is too hot or cold. Always preheat adequately before cooking and adjust the heat as necessary to ensure even cooking throughout.

If faced with equipment challenges, using a non-stick pan ensures minimal sticking. If you lack a griddle, work in batches while keeping the cooked pieces warming in an oven set at low heat.

Ingredient substitutions might not behave exactly like the originals. For instance, if using a substitute milk, be aware of potential changes in custard texture and flavor, necessitating adjustments in amounts.

Timing concerns can lead to rushed cooking. Avoid cutting corners by allowing enough time for preparation and cooking to avoid undercooked or burnt results.

Recipe Success Stories

Community feedback indicates that this Hawaiian Roll French Toast is becoming a favorite among families. Many readers appreciate the ease of preparation and the ability to customize toppings based on personal taste preferences.

Variation successes shine through when readers share unique spins on the recipe, like integrating chocolate chips for extra indulgence or adding a dollop of nut butter for a protein-packed breakfast.

Adaptation stories highlight how individuals adjust the recipe for dietary restrictions, showcasing the versatility of Hawaiian rolls and the custard mixture to cater to various needs.

Photography tips shared by the community reveal that plating with fresh fruits and drizzling maple syrup creates visually appealing dishes that look as good as they taste, boosting the dish’s desirability.

Reader suggestions often come with hints on ingredient quality, reinforcing that using fresh and high-quality ingredients truly enhances the flavors of the French toast and ensures the best experience.

Frequently Asked Questions

Can I use regular bread instead of Hawaiian rolls?

Absolutely! While Hawaiian rolls add a unique sweetness, you can use any type of bread for this French toast recipe. Just keep in mind that the flavor profile may differ slightly depending on the bread choice.

How can I make this dish gluten-free?

To make Hawaiian Roll French Toast gluten-free, substitute the Hawaiian rolls with gluten-free bread varieties. Ensure all other ingredients, such as spices and sweeteners, are gluten-free as well.

Can I prepare the custard ahead of time?

Yes! You can prepare the custard mixture a day in advance. Simply cover it and store it in the refrigerator until you’re ready to use it for soaking the rolls.

What are some delicious toppings to try?

Some popular toppings include fresh fruit, whipped cream, nuts, or chocolate drizzle. Maple syrup is traditional, but feel free to get creative with flavored syrups!

Is it possible to make a small batch?

Definitely! You can easily halve the recipe or adjust the number of rolls you’re using. This allows you to enjoy the dish without excess leftovers.

Can I freeze the leftovers?

Yes! Allow the French toast to cool completely, then wrap and store it in an airtight container in the freezer. It can be reheated in the oven when you’re ready to enjoy it again.

What if my French toast turns out soggy?

If your French toast is too soggy, it may be due to over-soaking. Next time, soak for a shorter period while ensuring that the bread absorbs enough custard without falling apart.

Can I make this dish dairy-free?

Yes! Simply replace the milk with a non-dairy alternative, such as almond, soy, or oat milk, and it will still produce a delicious custard for your French toast.

What is the best way to reheat leftover French toast?

The best way to reheat leftover French toast is to place it in the oven on a baking sheet at 350°F (175°C) for about 10-15 minutes until warmed through.

Can I add spices to the custard mixture?

Adding spices such as nutmeg or cardamom can elevate the flavor of your French toast significantly. Don’t hesitate to experiment with spices based on your preferences!

What occasions is Hawaiian Roll French Toast suitable for?

This French toast is ideal for various occasions including brunch parties, holiday breakfasts, or even as a dessert option after dinner. It’s versatile for any meal or celebration!

Additional Resources

For those interested in discovering related recipes, consider trying classic French toast variations, stuffed French toast, or even decadent dessert versions featuring cream or chocolate. Each provides a delightful twist but maintains that wonderful comfort food status.

Technique guides can deepen your culinary skills, covering everything from egg-based dish preparations to mastering the perfect custard. Enhancing your kitchen knowledge will ensure success and creativity in your cooking journey.

Ingredient information helps you understand the benefits and uses of different types of bread, dairy alternatives, and sweeteners. Learning about these components can inspire further experimentation with flavors and textures.

Equipment recommendations focus on essential kitchen tools for cooking French toast, from the best non-stick pans to versatile griddles. Having the right equipment simplifies cooking and enhances results.

For seasonal variations, consider adjusting your French toast recipes according to the ingredients available during specific times of the year. Utilizing seasonal fruits and spices can elevate your dish and inspire creativity.

Join the Conversation

We encourage you to share your culinary experiences and photography of your Hawaiian Roll French Toast creations on social media! By sharing your variations and tips, you inspire others and contribute to a vibrant cooking community.

Photography can play a crucial role in conveying the appeal of your dish. Focus on capturing vibrant colors and textures that highlight the freshness of the ingredients and the deliciousness of the preparation.

Leave reviews and feedback to help fellow cooks make informed choices. Sharing your experiences enhances the collective knowledge and encourages more collaboration in the kitchen.

Engage with our community by asking questions, discussing tips, and sharing your favorite adaptations. Your insights may spark inspiring ideas for others as they explore their culinary journeys.

Let’s create a wonderful community vibe around our love for cooking. Whether you’re a novice or seasoned chef, your input makes a meaningful difference in building a supportive space for recipe enthusiasts.

The Recipe

Hawaiian Roll French Toast

Serves: 4 servings

Prep Time: 10 mins

Cook Time: 15 mins

Total Time: 25 mins

Kitchen Equipment Needed

  • Non-stick skillet or griddle
  • Mixing bowl
  • Whisk
  • Spatula
  • Measuring cups and spoons

Ingredients

  • 8 Hawaiian rolls, sliced
  • 4 large eggs
  • 1 cup milk (or dairy alternative)
  • 1 teaspoon vanilla extract
  • 1 teaspoon cinnamon
  • ¼ teaspoon nutmeg
  • Butter or oil for cooking
  • Maple syrup for serving
  • Fresh fruits for garnish

Directions

  1. In a mixing bowl, whisk together eggs, milk, vanilla extract, cinnamon, and nutmeg until well combined.
  2. Dip each slice of Hawaiian rolls into the custard mixture, allowing them to soak for a few minutes.
  3. Heat a non-stick skillet over medium heat and add butter or oil to coat.
  4. Place soaked Hawaiian rolls in the skillet, cooking until golden brown on both sides, about 3-4 minutes per side.
  5. Remove from skillet and keep warm in the oven if necessary while you finish cooking the remaining slices.
  6. Serve warm with maple syrup and garnished with fresh fruits.

Recipe Notes

  • Adjust the spices to your preference for personalized flavor.
  • Feel free to add chocolate chips or nuts to the custard for extra indulgence.
  • Make a larger batch by doubling the ingredients easily to serve more guests.
  • For a twist, try using different types of bread for unique flavor experiences.

Easy Homemade Bagels – Soft, Chewy, and Delicious

Easy Homemade Bagels: A Simple Guide to Perfect Soft Bagels

⚖️
Difficulty
Easy

⏲️
Prep Time
15 mins

🕒
Cook Time
20 mins

⏱️
Total Time
35 mins

🍽️
Servings
12 bagels

There’s nothing quite like the warm, comforting aroma of freshly baked Easy Homemade Bagels wafting through your kitchen. This delightful recipe uses simple ingredients that you likely already have on hand to create soft, chewy bagels that are perfect for breakfast or a snack. Whether you enjoy them plain, topped with cream cheese, or with your favorite fillings, homemade bagels offer an unbeatable freshness that you simply can’t achieve with store-bought versions. The satisfaction of crafting these delicious rounds from scratch is a recipe for happiness!

Easy Homemade Bagels not only taste amazing but also engage your senses with their satisfying texture and enticing flavors. The golden crust gives way to a fluffy interior, inviting you to indulge with every bite. Adding toppings like sesame seeds, everything bagel seasoning, or poppy seeds allows you to customize your bagels according to your taste preferences or to suit the season. Best of all, this recipe is perfect for baking with family, creating a fun and interactive culinary experience that everyone can enjoy.

Quick Recipe Highlights

  • Flavor Profile: These bagels boast a slight sweetness with a soft, yeasty undertone and can be easily customized with various toppings.
  • Texture: Expect a satisfyingly chewy crust alongside a plush, airy inside that creates the ideal combination.
  • Aroma: The aroma is wonderfully inviting, blending the scents of fresh bread, slight sweetness, and any toppings used.
  • Visual Appeal: The golden-brown exterior and the option to sprinkle diverse toppings create a visually stunning treat.
  • Skill Level Needed: This recipe is easy enough for beginners but also satisfying for experienced bakers, offering adaptability for culinary exploration.
  • Special Equipment: A baking sheet, mixing bowls, and a pot for boiling are the only equipment you’ll need to create these amazing bagels!

Recipe Overview

  • Difficulty Level: This Easy Homemade Bagels recipe is designed to be beginner-friendly, requiring minimal baking expertise and allowing for a fun experience even for those new to the kitchen.
  • Category: Bagels are versatile and can be enjoyed as breakfast, brunch, or snacks, making them perfect for any meal of the day.
  • Cuisine: Originating from Jewish culinary traditions, bagels reflect a rich cultural history that emphasizes baking and communal sharing.
  • Cost: The ingredients for homemade bagels are affordable, allowing you to whip up a batch without breaking the bank.
  • Season: Bagels are delightful year-round, but fall and winter are especially great seasons when you’re craving comfort food.
  • Occasion: Perfect for family breakfasts, brunch gatherings, or even as homemade treats for friends, Easy Homemade Bagels fit any celebration!

Why You’ll Love This Recipe

First and foremost, the taste and texture of these Easy Homemade Bagels are unparalleled. Each bagel provides a wonderful balance of chewiness and fluffiness, enhanced by your chosen toppings or spreads. Whether you want a classic bagel with cream cheese or are looking to invent a unique sandwich, the possibilities are endless!

The convenience of this recipe is another major advantage. Quick to prepare and baked in under half an hour, these bagels fit perfectly into a busy morning routine or a cozy weekend breakfast. Getting your kitchen involved in the bagel-making process allows you to introduce wholesome habits into family life, making cooking together a cherished tradition.

From a nutritional standpoint, bagels can be a good source of carbohydrates, providing energy for your day. By using whole grain flours or experimenting with healthy toppings, you can make these bagels a more nutritious choice that suits your dietary needs or lifestyle preferences.

Hosting friends or family? These homemade bagels are perfect for entertaining. Offering customizable toppings and the delightful aroma filling your home, they can easily be a highlight of any gathering, allowing guests to get creative with their meals.

Historical Background and Cultural Significance

The origins of bagels can be traced back to the Jewish communities of Eastern Europe, where they were first made in Poland in the 17th century. Originally called “bajgiel,” the bagel was crafted as a special treat during celebrations and festivities, representing a symbol of community and love.

Over time, bagels transitioned from being a sophisticated delicacy to a staple food item, especially in urban areas. Their introduction into American culture occurred in the late 19th century with Jewish immigrant communities, leading to a growing bagel enthusiasm and ultimately spawning countless boutiques dedicated to this simple yet delicious bread.

As the recipe for bagels evolved, so too did the multitude of flavors and toppings available today. From the classic plain bagel to the beloved everything bagel, variations continue to delight taste buds around the world. This evolution emphasizes how cultural exchanges shape culinary traditions, bridging backgrounds and generations alike.

Regional variations all around the globe showcase bagels’ adaptability and their ability to blend into diverse culinary landscapes. Whether you encounter a New York-style boiled bagel or a unique ingredient inclusion like cheddar or jalapeño, you’re sure to find a bagel variety that resonates with your own taste adventures.

Ingredient Deep Dive

Flour: One of the key players in bagel making, flour is essential for structure. Choose high-protein bread flour for the best results, as it provides the gluten needed for chewy bagels. Look for fresh, unbleached flour for the best flavor and texture. Store in a cool dry place or airtight container away from moisture.

Yeast: Yeast is the magic behind the rise. Active dry yeast or instant yeast works perfectly for making bagels. Be sure to check the expiration date to ensure your yeast is still active before using it for your batch. Store in a cool, dark place or refrigerate for long-term use.

Water: The quality of water can influence your bagels. Using filtered water often helps in maintaining the consistency and flavor of the dough. Warm water (about 110°F) activates the yeast effectively. Store excess water in the refrigerator for future use, and always allow it to reach room temperature before using.

Salt: Essential for flavor enhancement, salt not only leads to better taste but also strengthens gluten structure. Use kosher or sea salt to avoid the excessive salty surprise from table salt. Store in a dry, cool area for longevity.

Sweeteners: Brown sugar or honey can be added to enrich the flavor profile of bagels. The sweetener affects both the taste and texture, leading to that subtle touch of sweetness in every bite. Store in a cool, dark location for optimal freshness.

Common Mistakes to Avoid

  • Not using enough flour can lead to a sticky dough that’s difficult to work with. Always measure accurately!
  • Overproofing the dough can result in flat bagels that don’t hold their shape. Keep an eye on the rise!
  • Skipping the boiling step reduces the authenticity and chewiness of your bagels.
  • Using water that’s too hot can kill the yeast, while water that’s too cold won’t activate it. Aim for a balance!
  • Neglecting to let the dough rest properly can lead to tough bagels. Patience is key to improving texture.
  • Not preheating the oven sufficiently can result in undercooked bagels. Make sure it’s hot before baking!
  • Skipping the toppings can lead to bland bagels. Experiment with seeds, spices, or grains for added flavor!
  • Storing them improperly can make them stale quickly – use airtight containers for short-term storage.
  • Not allowing them to cool before slicing can result in a gummy interior. Wait for that perfect slice.
  • Rushing the kneading process can lead to uneven dough. Take your time for the best results!

Essential Techniques

Kneading: Kneading the dough is crucial for developing gluten, which gives bagels their iconic texture. Aim for at least 10 minutes of kneading until the dough is smooth and elastic. Avoid over-kneading, as it can make the bagels tough. The ideal dough should be slightly tacky but not stuck to your hands.

Boiling: Boiling bagels before baking is key to achieving that sought-after chewy crust. Boil for about 30 seconds on each side. Visual cues include a slight puffiness and a glossy sheen when they emerge from the water.

Shaping: Properly shaping your bagels ensures they hold their form during baking. Roll the dough into smooth balls, then poke your finger through the center and stretch gently into a ring. Make sure the holes are wide enough, as they can shrink during cooking.

Pro Tips for Perfect Easy Homemade Bagels

1. Use parchment paper on your baking sheet for easy transfer and cleanup after baking.

2. Experiment with different toppings, such as everything seasoning, to personalize your bagels.

3. Allow the dough to rest longer for an even better texture.

4. For a chewier bagel, add a tablespoon of baking soda to the boiling water.

5. Brush with egg wash before baking for a shiny finish.

6. Let the bagels cool completely before slicing for the best texture.

7. If you’re short on time, let the dough rise in a warm oven for a quicker proofing.

8. Enjoy them fresh, but consider freezing bagels for delicious convenience on busy days.

Variations and Adaptations

For regional variations, consider trying a Montreal-style bagel known for being sweeter and denser, often boiled in honey-sweetened water before baking. Seasonal adaptations might include pumpkin spice bagels in the fall or cranberries and nuts for a festive twist during the holidays.

If you’re looking to make dietary modifications, gluten-free flour can replace traditional flour for those with gluten sensitivities. Vegan bagels can be made by substituting honey with maple syrup or agave nectar.

For flavor variations, consider adding garlic or onion powder into the dough for a savory twist. Alternatively, fold in fresh herbs or dried fruit to add even more character and taste.

When it comes to texture modifications, adding vital wheat gluten can enhance the chewiness of your bagels if you’re using all-purpose flour. Try adding seeds or oats for a heartier version, both visually appealing and delicious!

Regarding presentation alternatives, serve bagels with an assortment of spreads and toppings displayed beautifully on a platter to turn your bagels into a centerpiece for brunch or afternoon tea.

Serving and Presentation Guide

For an eye-catching presentation, consider using a tiered stand or a rustic wooden board to display your Easy Homemade Bagels along with exciting toppings and spreads. Garnishing with fresh herbs, slices of colorful vegetables, or even edible flowers can elevate the look of your spread.

Traditional accompaniments like cream cheese, salmon, and pickles are classics that please everyone. For modern serving suggestions, add avocado smash or hummus to your selection for a contemporary twist. Furthermore, ensuring the bagels are cut in half visually emphasizes the beautiful texture inside and the exciting escape of aromas upon slicing.

When it comes to temperature considerations, serve your bagels warm for maximum enjoyment. Ensure portion control by creating decent sections, so everyone can enjoy a taste without excessive leftovers.

Wine and Beverage Pairing

When pairing these Easy Homemade Bagels, consider a light-bodied white wine, such as Sauvignon Blanc, which complements the flavors without overpowering them. For those who prefer non-alcoholic options, a citrusy soda or iced tea pairs wonderfully to enhance the fresh flavors.

If you enjoy coffee, consider a smooth roast with notes of chocolate or caramel that harmonizes well with bagels. Match the temperature of your beverage with that of your bagels – warm drinks with warm bagels create a comforting, inviting experience.

Storage and Shelf Life

To store Easy Homemade Bagels, place them in a paper bag at room temperature for short-term storage. For extended freshness, wrap bagels individually in plastic wrap and store them in an airtight container. This method helps to prevent them from becoming stale.

Signs of spoilage to watch out for include an off odor, excessive hardness, or visible mold. If you do need to reheat, consider toasting them lightly or wrapping them in foil and placing them in a preheated oven for a few minutes. For freezing, tightly wrap each bagel and use them within three months for optimal quality.

Make Ahead Strategies

If you plan to make these Easy Homemade Bagels ahead of time, consider preparing the dough the night before. Allow it to rise in the refrigerator, then shape and boil them in the morning for optimal freshness.

For storage between steps, once boiled, you can freeze the bagels before baking. Just make sure you let them thaw and rise again before popping them in the oven. This method maintains a delightful freshness and texture while saving you time.

When reheating times come up, ensure they are warmed sufficiently throughout. Adding fresh elements like lettuce or sliced tomatoes can enhance flavor and freshness just before serving. Assemble toppings just before serving for the most delectable experience!

Scaling Instructions

To halve the Easy Homemade Bagels recipe, simply divide the ingredients by two and follow the same steps outlined. Ensure you still check for proper consistency in the dough for the best results.

If you need to double or triple the recipe, utilize larger mixing bowls and appropriately sized baking sheets to accommodate the increased quantity. You may need to extend cooking times accordingly if using multiple trays at once.

When modifying equipment adjustments, ensure you don’t overcrowd your baking sheets as this can prevent even cooking and affecting the overall quality of your bagels. Adjust timing only as needed and ensure they’re cooked to perfection!

Nutritional Deep Dive

In terms of macro breakdown, each Easy Homemade Bagel contains carbohydrates that act as a quick source of energy, along with a small amount of protein from the flour. Minimize oils and fats in toppings to keep bagels a healthier option.

Micronutrient analysis reveals that using whole grain flour boosts fiber, promoting digestive health, while adding toppings such as seeds increases nutritional value, adding healthy fats and essential vitamins.

This homemade recipe provides health benefits as compared to many commercially produced bagels, often containing additional preservatives and additives. Adjust portion size for weight management or to fit dietary needs.

Dietary Adaptations

For gluten-free adaptations, replace the regular flour with a gluten-free flour blend. Look for certified blends that are specifically made for baking to ensure good results without compromising the texture.

Dairy-free bagels can be created by using plant-based milk in the dough. Furthermore, for vegan options, replace honey with agave syrup or maple syrup, ensuring that all ingredients are plant-based.

Those on a low-carb or keto diet can substitute traditional flour for almond or coconut flour, but be mindful of adjusting liquid ratios to maintain the proper dough consistency.

Troubleshooting Guide

Texture issues typically arise from failure to knead enough or using the wrong type of flour. Ensure proper kneading and stick to bread flour which provides better gluten development.

Flavor balance can be tweaked by adjusting the amount of salt or sweetener; under-seasoning is common. Tinkering with toppings and spreads also helps achieve personal preferences.

Temperature problems often stem from an oven not being preheated adequately or varying oven temperatures. Keeping an oven thermometer can alleviate this common concern.

Recipe Success Stories

Our community has shared countless success with the Easy Homemade Bagels recipe. Many have enjoyed tweaking the base dough, resulting in lively discussions on social media about flavor experiments.

Variation successes abound, with some readers introducing herbs and spices directly into the dough, while others focus on creative topping combinations, leading to rave reviews from family and friends.

Sharing photographs of their culinary creations, readers highlight the joy and satisfaction that comes from baking their own bagels, fostering a sense of accomplishment.

Frequently Asked Questions

Can I use all-purpose flour instead of bread flour? Yes, all-purpose flour can be a substitute, but expect a slightly different texture as bread flour creates chewier bagels.

How do I store leftover bagels? Store them in an airtight container at room temperature or freeze them for longer shelf life.

Can I make bagels without yeast? Traditional bagels require yeast for leavening. However, you may try baking soda bagels for a quick alternative.

How can I add flavors to my dough? Consider infusing your dough with spices, herbs, or even grated cheese to create unique bagels right from the start!

What is the best way to reheat a bagel? Toasting them is the best way to keep them crispy and fresh. Alternatively, wrap in foil and place in a warm oven.

Can I make the dough in advance? Yes! Prepare the dough on the previous day, let it rise in the fridge overnight, then shape and boil it the next day.

What toppings are best for bagels? Popular options include cream cheese, smoked salmon, fresh vegetables, and various seed mixes to enhance the flavor.

How does boiling affect the bagel? Boiling creates the signature chewy texture and shiny crust, making it a critical step in bagel preparation.

Why do my bagels come out dense? Dense bagels may result from under-kneading the dough or from proofing it for too long.

Are there gluten-free options? Absolutely! Use a gluten-free flour blend specifically made for baking to achieve similar texture and taste.

Additional Resources

Explore related recipes for bagel sandwiches, cream cheese spreads, or other variations like stuffed bagels. Check out technique guides focusing on bread-making skills and ingredient information for all your baking needs. Investing in good kitchen equipment, like a sturdy baking sheet or mixing bowls, enhances your bagel-making experience.

Join the Conversation

We encourage readers to share their bagel-making adventures on social media! Whether it’s uploading beautiful photographs or sharing unique variations you’ve created, your participation enriches our community. Join the discussions, post suggestions, and enjoy the wonderful world of baking together!

The Recipe

Easy Homemade Bagels

Serves: 12 bagels

Prep Time: 15 mins

Cook Time: 20 mins

Total Time: 35 mins

Kitchen Equipment Needed

  • Baking sheet
  • Mixing bowls
  • Pot for boiling
  • Wooden spoon
  • Rolling pin (optional)

Ingredients

  • 4 cups bread flour
  • 1 ½ cups warm water (110°F)
  • 2 teaspoons instant yeast
  • 2 tablespoons honey
  • 2 teaspoons salt
  • For boiling: 1 tablespoon baking soda
  • Toppings: sesame seeds, everything seasoning, etc.

Directions

  1. In a mixing bowl, combine warm water, yeast, and honey; let sit for 5 minutes until foamy.
  2. Add flour and salt, mixing until a dough forms.
  3. Knead dough for about 10 minutes until smooth and elastic, then let rise in a warm place for 1 hour.
  4. Preheat oven to 425°F (220°C) and bring a pot of water to a boil.
  5. Divide the dough into 12 equal parts and shape each piece into a ball. Poke a hole through the center, stretching it to form a bagel shape.
  6. Boil each bagel for 30 seconds on each side in the boiling water with baking soda added.
  7. Transfer to a baking sheet lined with parchment paper, sprinkle with toppings if desired.
  8. Bake for 20 minutes until golden brown.

Recipe Notes

  • Feel free to let your bagels cool a bit before slicing to enhance their texture.
  • Experiment with different toppings to find your favorite flavor combinations.

Easy Blueberry Baked Oatmeal – Healthy & Delicious

Blueberry Baked Oatmeal: A Deliciously Wholesome Breakfast Delight

⚖️
Difficulty
Easy

⏲️
Prep Time
10 mins

🕒
Cook Time
30 mins

⏱️
Total Time
40 mins

🍽️
Servings
6 servings

Start your mornings on a wholesome note with our Blueberry Baked Oatmeal recipe! This dish not only satisfies your cravings but also boosts your energy levels with its nutritious ingredients. The delightful combination of hearty oats and sweet blueberries creates a beautifully balanced meal that is perfect for busy weekdays or leisurely weekend brunches.

Imagine waking up to the aroma of cinnamon-spiced oatmeal baking in the oven, filling your kitchen with warm, inviting scents. The first spoonful is a delight, combining creamy oatmeal with juicy bursts of fresh blueberries, topped with a sprinkle of crunchy nuts. Each bite is a harmony of flavors and textures, making this dish a favorite among families.

Quick Recipe Highlights

  • Flavor Profile: Sweet, fruity blueberries paired with the earthy goodness of oats and warming spices create an irresistible flavor medley.
  • Texture: A perfect combination of creamy base with bursting fruit contrasts the crispy topping, engaging all your senses.
  • Aroma: The enticing fragrances of baked oats, cinnamon, and fresh blueberries will awaken your senses as you prepare this dish.
  • Visual Appeal: This beautifully baked oatmeal showcases vibrant blue hues from the berries against a golden oat crust, making your breakfast table a feast for the eyes.
  • Skill Level Needed: This recipe is beginner-friendly, requiring no advanced cooking skills—just a willingness to mix and bake!
  • Special Equipment: All you need is a baking dish and some measuring cups to create this simple breakfast masterpiece.

Recipe Overview

  • Difficulty Level: This Blueberry Baked Oatmeal is simple to prepare, making it a great choice for novice cooks and those looking for a straightforward recipe.
  • Category: This dish falls under the breakfast category, but it’s also a great snack or dessert option when you crave something wholesome.
  • Cuisine: Baked oatmeal has roots in American cuisine, particularly popular in breakfast dishes across North America.
  • Cost: The estimated cost for this recipe is budget-friendly, typically ranging from $5 to $10, depending on ingredient choices.
  • Season: Blueberries are in season during the summer months, making this the ideal time to enjoy this fresh and fruity baked treat.
  • Occasion: Perfect for family breakfasts, meal prep for the week, or as a comforting addition to brunch gatherings with friends.

Why You’ll Love This Recipe

The combination of sweet blueberries and hearty oats makes Blueberry Baked Oatmeal not only appealing in taste but also in texture. Each spoonful provides a satisfying mix of creamy and chewy, guaranteeing that each bite is a delightful experience. The addition of nuts provides a lovely crunch, elevating the overall mouthfeel and making it a more substantial dish.

This recipe is convenient for busy mornings. You can prepare it in just 10 minutes and pop it in the oven—all while you finish your morning routine. Additionally, this dish is perfect for meal prepping, ensuring you have a hearty breakfast on hand for several days. Simply slice portions and heat them whenever you’re in a rush!

Nutritionally, this baked oatmeal is a powerhouse. Rich in fiber from the oats and antioxidants from the blueberries, it not only fuels your body but contributes to heart health as well. The combination provides steady energy release, helping you stay focused throughout the day.

When it comes to entertaining, Blueberry Baked Oatmeal shines. Serve it warm, with a sprinkle of maple syrup or a dollop of yogurt on top for added indulgence. Guests will appreciate this thoughtful and healthy offering that feels special yet is incredibly easy to prepare.

In terms of cost-effectiveness, this recipe is a win. Oats are inexpensive and pantry-friendly, while blueberries can often be purchased frozen, making it accessible year-round. With such simple ingredients, making a hearty breakfast doesn’t break the bank.

Historical Background and Cultural Significance

The origin of baked oatmeal can be traced back to American frontier families who sought nourishing and hearty breakfast options. This wholesome dish allowed families to make the most out of staple ingredients while providing a satisfying meal that kept them fueled for long days of work.

Within the American culinary tradition, baked oatmeal has gained popularity not just as a breakfast option but also illustrates the comfort food culture. As families increasingly seek nutritious yet satisfying meals, baked oatmeal has evolved into a beloved brunch dish served throughout the country.

The evolution of the recipe over the years has led to countless variations. While blueberries remain a favorite, cooks have started using different fruits, nuts, and spices to create unique flavor profiles and adapt it to seasonal ingredients.

Regional variations of baked oatmeal can be found across the United States, from adding pumpkin in the fall to including apples and cinnamon in winter, showcasing how diverse and adaptable this dish is to different tastes and occasions.

Ingredient Deep Dive

Oats: Oats are a cornerstone of many cultures, originating in the fertile regions of Europe. Nutritionally, oats are high in fiber, which aids digestion and promotes heart health. When selecting oats, look for whole rolled oats for the best texture and flavor. Store in a cool, dry place, and they generally last for months. If you’re out of oats, you can substitute with quinoa or other whole grains.

Blueberries: Blueberries are not only delicious but are also packed with antioxidants and vitamins C and K. These small berries are often referred to as a superfood due to their health benefits, including reducing the risk of chronic diseases. Always choose plump, firm berries and store them in the refrigerator to maintain freshness. If fresh blueberries are unavailable, frozen options work just as well!

Common Mistakes to Avoid

  • Not measuring oats correctly: Too many oats can result in a dry texture, while too few may cause it to be overly wet.
  • Using old or stale ingredients: Check the freshness of your oats and baking powder; stale dry goods impact the taste and texture.
  • Overmixing the batter: Mixing too vigorously can break down the oats and create a gummy texture instead of fluffy baked oatmeal.
  • Baking at the wrong temperature: Ensure your oven is preheated; baking at a lower temperature can lead to uneven cooking.
  • Not greasing the dish properly: Skipping this step can cause the oatmeal to stick, making it difficult to serve.
  • Using fruit that is not ripe or fresh: Overripe fruit can lead to an overly sweet or soupy consistency.
  • Ignoring the recommended cooling time: Letting it cool for a few minutes helps it set, making serving easier.
  • Not adjusting for personal taste: Feel free to add more or less sugar and spices according to your preference.

Essential Techniques

Baking your oatmeal is essential for achieving the desirable texture that makes this dish loved by so many. To master the baking technique, ensure your oven is preheated, and use the right size dish to allow for even cooking. Avoid opening the oven door too frequently, as this can lead to inconsistent baking.

Mixing the ingredients properly before baking is crucial for even flavor distribution. Use a gentle folding motion to combine the dry and wet ingredients; overmixing can lead to a dense texture. The goal is to have a cohesive batter without overly breaking down the oats.

Pro Tips for Perfect Blueberry Baked Oatmeal

For the best results, try soaking your oats in milk overnight to enhance their texture and flavor. This technique allows the oats to absorb moisture, creating a creamier end result.

If you’re using frozen blueberries, don’t thaw them completely before adding; mixing them in frozen helps retain their shape in the bake, preventing mushiness.

After baking, let the dish cool for a few minutes; this allows it to set and makes serving much easier, as it holds its shape better.

Consider adding a pinch of salt alongside your sweet ingredients to enhance the flavors of the dish. A hint of salt can elevate the overall taste of your baked oatmeal.

Experiment with different nuts or seeds in your topping for added texture and nutritional benefits. Almonds, walnuts, or even a sprinkle of chia seeds can add delightful crunch.

For those with a sweet tooth, drizzle some honey or maple syrup over the top before serving, elevating the sweetness and bringing out the flavors even more.

Variations and Adaptations

Regional variations of baked oatmeal can include traditional spices such as nutmeg or pumpkin spice for fall-inspired flavors. In the summer, substituting berries with peaches or strawberries can provide a refreshing twist.

Seasonal adaptations allow for creativity; swap out blueberries for cranberries in winter or sliced apples during the autumn months to enjoy what each season has to offer.

Dairy-free options are achievable by using almond milk or coconut milk, making it suitable for those with dietary restrictions without sacrificing flavor.

If you’re craving a different texture, consider adding in some cooked quinoa or millet to the mix for additional heartiness.

Garnishing your baked oatmeal with fresh herbs, like mint, can brighten the dish; a sprinkle of cinnamon on top just before serving can elevate its warming aroma.

Serving and Presentation Guide

Plating techniques for Blueberry Baked Oatmeal can be as simple as scooping warm portions into individual bowls. For extra flair, layer it with some yogurt or fresh fruit, artfully arranged on the side.

Garnishing ideas may include a dollop of whipped cream or a sprinkle of toasted coconut for added texture and visual interest. Don’t shy away from contrasting colors; vibrant blueberries mixed with creamy yogurt presents beautifully.

Traditional accompaniments include a drizzle of maple syrup or a sprinkle of powdered sugar for extra sweetness. Modern serving suggestions might involve pairing this dish with a fresh fruit salad or a light smoothie.

Temperature considerations are critical; serve your baked oatmeal warm, as the comforting heat enhances the experience. Reheating should be done gently to prevent drying out the oats.

Portion control tips also matter; consider serving in individual ramekins for a more personal touch and to control portions easily.

Wine and Beverage Pairing

While wine isn’t a common breakfast pairing, a light, fruity white wine could complement the sweet notes in this baked oatmeal if served during brunch. A bubbly Prosecco adds a festive touch without overpowering the flavors.

Non-alcoholic alternatives could include iced herbal teas or refreshing fruit-infused water for a light drink that enhances the meal without overshadowing it.

If you’re a coffee lover, pairing a smooth latte with your baked oatmeal can create a warm and cozy breakfast experience, especially in cold weather.

For serving suggestions, consider offering a variety of beverages, from fresh juices to flavored sparkling waters, allowing guests to customize their brunch experience.

Storage and Shelf Life

Proper storage methods for Blueberry Baked Oatmeal include keeping it in an airtight container in the fridge, where it will last for 3 to 5 days. If you have leftovers, they can be reheated in the microwave or oven for a quick meal.

Temperature requirements are important; ensure the dish is cooled completely before storing to prevent excess moisture. Use glass or BPA-free plastic containers, which are excellent for microwaving.

Signs of spoilage include off-smells, visible mold growths, or an undesirable texture, indicating that it should be discarded.

Reheating instructions consist of warming individual portions in the microwave for quick access or reheating in the oven to maintain texture. If reheating a larger batch, cover it with foil to prevent excessive browning.

Freezing guidelines suggest portioning the baked oatmeal into meal-sized servings. Wrap each piece in plastic wrap, followed by aluminum foil, to maintain freshness in the freezer for up to three months.

Make Ahead Strategies

For a successful make-ahead strategy, prepare the dry ingredients the night before. Combine oats, baking powder, and spices, and store them in an airtight container.

Storage between steps can include preparing the wet mixture and keeping it in the fridge overnight. This allows the flavors to meld and the oats to hydrate well, enhancing the flavor and texture.

Quality impact assessment reveals that preparing in advance can elevate the dish, as overnight soaking yields a creamier texture and deeper flavor.

Assembly tips involve mixing everything gently the following morning, pouring it into your baking dish, and popping it in the oven while you get ready for your day.

Reheating guidelines can include gently warming individual portions in the microwave or baking the entire dish at a lower temperature to prevent overcooking.

Fresh element additions, such as toppings, can be added right before serving to maintain their crispness and vibrant flavor contrast.

Scaling Instructions

Halving the recipe is straightforward; simply divide each ingredient by two and bake in a smaller dish or adjust cooking time accordingly.

Doubling or tripling the recipe is just as easy; however, ensure you have a larger baking dish or multi-container options for even cooking and portion control.

Equipment adjustments could be necessary; larger quantities may require more thorough mixing and longer baking times, so check for doneness mid-way through cooking.

Timing modifications can include slight increases for larger portions; monitor closely to avoid under or over-baking.

Storage considerations remain the same; all leftovers can be treated in the same manner, ensuring they are stored properly to maintain freshness.

Nutritional Deep Dive

The macro breakdown of a typical serving of Blueberry Baked Oatmeal includes carbohydrates primarily from the oats, a moderate protein level from the milk and optional nuts, with healthy fats from added ingredients like almond butter or seeds.

Micronutrient analysis shows that this dish provides a good amount of essential vitamins and minerals, including Vitamin B6, potassium, and antioxidants from blueberries, supporting overall health.

Health benefits are significant, especially with the fiber content promoting satiety and aiding digestion, while antioxidants contribute to combating oxidative stress.

Dietary considerations should take into account personal health goals; if you’re watching your sugar intake, consider reducing additional sweeteners, focusing on the natural sweetness of the fruit instead.

Portion analysis suggests serving size moderation is key; each serving can be tailored to fit personal caloric needs while still enjoying this wholesome breakfast.

Weight management tips include incorporating more nutrient-dense ingredients and serving with protein-rich accompaniments to create a balanced breakfast.

Dietary Adaptations

For gluten-free options, ensure your oats are certified gluten-free, as cross-contamination can occur with standard oats.

Dairy-free adaptations can be achieved by substituting regular milk with almond milk, soy milk, or any preferred non-dairy alternative, ensuring the same creamy consistency.

If you’re aiming for a vegan option, simply use plant milks and replace any eggs with flaxseed meal mixed with water for binding if necessary.

Low-carb and keto variations can involve substituting oats with coconut flour or almond flour to lower the carb content while still achieving a baked “oatmeal” texture.

Paleo adaptations allow for using natural sweeteners like honey or maple syrup, focusing on whole-food ingredients avoiding processed options.

Low-FODMAP modifications might involve limiting the serving size of oats or substituting with gluten-free grains, as some individuals may have sensitivities.

Troubleshooting Guide

Texture issues can arise if too much liquid is added; ensure to measure correctly. Conversely, if undercooked, you might need to return it to the oven for additional time.

Flavor balance is critical; if too bland, consider adjusting spices or adding a pinch of salt to enhance sweetness. Sweeteners should be tasted and adjusted as preferred.

Temperature problems may arise if your oven is not calibrated correctly; use an oven thermometer to ensure accurate baking temperatures.

Equipment challenges like using the wrong size pan can lead to uneven cooking; always stick to the recommended baking dish sizes for best results.

Ingredient substitutions can sometimes affect the outcome; check how substitutes might change the texture or flavor profile and adjust baking time accordingly.

Timing concerns include checking for doneness; if in doubt, use a toothpick inserted in the center to check if it comes out clean for a properly baked dish.

Recipe Success Stories

Readers have shared their success with this recipe, highlighting how their families have embraced the comforting flavors of Blueberry Baked Oatmeal. Many have noted how it became their go-to dish for holiday brunches.

Variations success stories include individuals who have tailored the recipe to fit dietary needs while still savoring the beloved flavors. Creativity with toppings, like a drizzle of nut butter, has been praised for adding an extra layer of satisfaction.

Adaptation stories tell of successful meal-prepping methods, where families would bake a larger batch and store it for easy breakfasts throughout the week.

Recipe reviews on social media have raved about the dish’s versatility, noting it’s great for serving to guests or enjoying on a cozy morning at home.

For those looking to enhance their photography, tips include highlighting the vibrant blueberries against the golden oats and using natural light to showcase the dish’s inviting appeal.

Frequently Asked Questions

Can I use frozen blueberries in this recipe?
Yes! Frozen blueberries work perfectly in this recipe. They keep their shape during baking and add a lovely burst of juice. There’s no need to thaw them; just fold them in straight from the freezer!

Can I make this vegan?
Absolutely! To make Blueberry Baked Oatmeal vegan, simply substitute regular milk with any plant-based milk and omit any eggs. You can also use flaxseed meal mixed with water as a binding agent if desired.

How do I store leftovers?
Store any leftovers in an airtight container in the refrigerator for up to 5 days. You can reheat individual portions in the microwave or in the oven until warmed through.

Can I double the recipe?
Yes, you can easily double this recipe. Just be sure to use a larger baking dish and slightly increase the baking time, checking for doneness before serving.

What can I substitute for oats?
If you’re looking for an alternative to oats, try using quinoa flakes or coconut flour. Both can offer a different yet delicious texture, though you’ll need to adjust the liquid amounts accordingly.

Can I add other fruits?
Definitely! Feel free to mix in other fruits like peaches, raspberries, or apples. Each fruit brings its own flavor and texture to the dish, creating exciting variations.

How can I make this low-sugar?
To reduce sugar content, cut down on any added sweeteners and rely more on the natural sweetness of the blueberries. You can also use unsweetened applesauce to enhance flavor without added sugar.

Can this be frozen?
Yes, Blueberry Baked Oatmeal can be frozen for up to three months. Just portion it out, wrap it tightly in plastic wrap or aluminum foil, and label for easy storage.

What type of nuts work best in this recipe?
Nuts like walnuts, almonds, or pecans can be great additions. They bring a delightful crunch and can complement the fruity flavors beautifully.

How do I make it gluten-free?
To make Blueberry Baked Oatmeal gluten-free, ensure that you are using oats labeled as gluten-free, as regular oats can often be cross-contaminated.

Additional Resources

If you enjoyed this recipe, you might also like our other wholesome breakfast options, such as Banana Peanut Butter Overnight Oats or Quinoa Breakfast Bowls. Both recipes focus on using simple, nourishing ingredients to kick start your day.

For technique guides, consider exploring how to properly bake and store granola for a delicious topping or snack option. Ingredients like nuts and seeds can add essential nutrition to your meals, making them more satisfying.

Understanding the nutritional benefits of ingredients is crucial; check out our ingredient information section for detailed insights into oats, fruits, and nuts, and how they can fit into a balanced diet.

If you’re gear shopping, we suggest looking into durable glass storage containers, ideal for meal prepping, as well as eggshell de-shelled tools for easier ingredient preparation.

Don’t forget to explore seasonal variations! In the fall, try adding pumpkin puree or warming spices to your baked oatmeal for a cozy twist; while fresh summer fruits can replace blueberries for a delightful change.

Join the Conversation

We’d love to hear about your experience with Blueberry Baked Oatmeal! Share your creations on social media and tag us; we love seeing how you put your spin on our recipes.

Feel free to post your beautiful photos, along with any variations you’ve tried; we appreciate your creativity and the new ideas you bring to the table!

Join our community of food enthusiasts by leaving feedback on this recipe or sharing tips on cooking techniques that work best for you.

We encourage recipe reviews and engaging conversations to inspire other home cooks. Let’s celebrate the joy of cooking together!

The Recipe

Blueberry Baked Oatmeal

Serves: 6 servings

Prep Time: 10 mins

Cook Time: 30 mins

Total Time: 40 mins

Kitchen Equipment Needed

  • Oven
  • Baking dish (9×13 inch recommended)
  • Mixing bowls
  • Measuring cups and spoons
  • Spatula

Ingredients

  • 2 cups rolled oats
  • 1 cup milk (dairy or plant-based)
  • 1/3 cup maple syrup (or honey)
  • 2 large eggs
  • 1 teaspoon baking powder
  • 1 teaspoon cinnamon
  • 1/2 teaspoon vanilla extract
  • 1 cup fresh or frozen blueberries
  • 1/4 cup chopped nuts (like walnuts or almonds)
  • Pinch of salt

Directions

  1. Preheat the oven to 350°F (175°C) and grease your baking dish.
  2. In a large mixing bowl, combine rolled oats, baking powder, salt, and cinnamon.
  3. In another bowl, whisk together the milk, eggs, maple syrup, and vanilla extract until well combined.
  4. Pour the wet ingredients into the dry ingredients and stir until just combined.
  5. Gently fold in the blueberries and nuts.
  6. Pour the mixture into the prepared baking dish and spread evenly.
  7. Bake for 30 minutes or until the oatmeal is set and lightly golden on top.
  8. Let cool for a few minutes before serving. Enjoy your wholesome Blueberry Baked Oatmeal!

Recipe Notes

  • For added flavor, consider mixing in some chopped apples along with the blueberries.
  • This dish can be stored in the refrigerator for up to 5 days, making it a perfect meal prep option.
  • Feel free to substitute other fruits based on seasonal availability.

Fluffy Japanese Souffle Pancakes – Easy Homemade Recipe

Japanese Souffle Pancakes: Fluffy Delights That Melt in Your Mouth

⚖️
Difficulty
Intermediate

⏲️
Prep Time
15 mins

🕒
Cook Time
25 mins

⏱️
Total Time
40 mins

🍽️
Servings
2 servings

Japanese Souffle Pancakes are a delightful twist on traditional pancake recipes, offering a unique fluffiness that captivates anyone lucky enough to indulge in them. These pancakes have gained popularity for their elevated texture and lightness, reminiscent of a soufflé, which is no surprise considering their namesake. When you take a bite, the delicate layers practically melt in your mouth, inviting you to savor every fluffy morsel.

The secret to these pancakes lies in the combination of whipped egg whites and the careful cooking method, resulting in a dish that’s not only a treat for the taste buds but also visually stunning. When plated with fresh berries, syrup, or a dusting of powdered sugar, these pancakes shine as a centerpiece for breakfast or brunch gatherings. If you’re looking to try something new in the kitchen that will impress friends and family, mastering the art of Japanese Souffle Pancakes is a rewarding challenge.

Quick Recipe Highlights

  • Flavor Profile: These pancakes are subtly sweet, allowing the flavors of accompanying toppings like maple syrup or whipped cream to shine through.
  • Texture: Light, airy, and fluffy, the souffle pancakes boast a cloud-like consistency that makes them incredibly enjoyable.
  • Aroma: The warm, sweet aroma of these pancakes as they cook fills the kitchen, creating an inviting atmosphere that draws everyone in.
  • Visual Appeal: Stacked high and often garnished with fruits and syrups, their fluffy appearance is as delightful to the eye as it is to the palate.
  • Skill Level Needed: While they require attention to detail, the process of whipping the egg whites and careful cooking can be mastered with practice.
  • Special Equipment: A non-stick skillet and a heatproof ring mold are essential for achieving the unique height of these pancakes.

Recipe Overview

  • Difficulty Level: Intermediate due to the need for precise techniques, such as whipping egg whites to the right consistency.
  • Category: Perfect for breakfast or brunch, these pancakes can easily be enjoyed as a dessert with sweet toppings.
  • Cuisine: A reflection of modern Japanese culinary trends, these pancakes represent the fusion of traditional methods with contemporary flair.
  • Cost: Relatively low-cost, making them accessible with basic ingredients like eggs, flour, and sugar.
  • Season: Enjoy these fluffy delights year-round, with seasonal fruit toppings for variety in presentation and taste.
  • Occasion: Ideal for special brunches, family gatherings, or even a cozy breakfast to start your weekend on the right note.

Why You’ll Love This Recipe

Each bite of Japanese Souffle Pancakes delivers a heavenly experience, as the texture is light and airy, contrasting beautifully with the sweet toppings. Unlike traditional pancakes, these boost a more refined mouthfeel, making them perfect for an elegant breakfast or a satisfying dessert. The opportunity to customize the toppings allows for a culinary adventure, as you can experiment with seasonal fruits, flavored syrups, or even flavored creams that perfectly complement the pancakes.

They are also convenient to prepare, with only a few ingredients needed—ideal for both beginner cooks and seasoned chefs. The process, while requiring a little more technique, is rewarding, as you watch the pancakes rise beautifully in your skillet. Additionally, the eye-catching presentation makes them a delightful addition to any brunch spread, ensuring they catch the attention of your guests.

From a nutritional standpoint, these pancakes can be enriched by using whole wheat flour or adding in nuts and seeds for added texture and health benefits. They offer a balanced start to the day, providing a mix of carbohydrates and proteins, especially with toppings like yogurt or fresh fruit.

When serving these pancakes at gatherings, their unique fluffy style encourages sharing and delight in the dining experience. Guests often rave about the unique flavor and texture, making them great conversation starters. Not only are they a delicious treat, but they also serve as a memorable culinary experience for those trying them for the first time.

Finally, the cost-effectiveness of making Japanese Souffle Pancakes means there’s no need to splurge on restaurant brunches. With simple ingredients found in your pantry, you can create an impressive dish that is sure to wow any crowd.

Historical Background and Cultural Significance

The origin of Japanese Souffle Pancakes can be traced to contemporary culinary innovation within Japan, particularly from popular dessert cafes that specialize in unique and visually stunning dishes. Emerging around the 2010s, these pancakes became a focus for food enthusiasts who value not just taste but also the aesthetic presentation of food.

Their cultural importance lies in how they embody the harmony that characterizes Japanese cuisine, where visual beauty and culinary craftsmanship go hand in hand. This concept illustrates the Japanese philosophy of aesthetics known as “Wabi-Sabi,” which finds beauty in imperfection and transience, highlighting the importance of each pancake’s delicate rise.

Over the years, the recipe for souffle pancakes has evolved, with various variations emerging, including different flavor infusions like matcha or seasonal fruit additions. Each adaptation pays homage to the original while expanding on the culinary possibilities, allowing home cooks to explore creativity in the kitchen.

Regionally, these pancakes are most popular in urban areas like Tokyo, where trendy cafes continually push the envelope of traditional pancake recipes. As they gain popularity worldwide, many find themselves attempting to recreate the fluffy texture and lightness that make these pancakes so special.

Ingredient Deep Dive

Eggs: Eggs are the star ingredient in Japanese Souffle Pancakes, providing structure and richness to the batter. The protein in eggs helps create the desired fluffiness through the whipped egg whites. When selecting eggs, look for fresh, organic options when available for the best flavor and quality. Store eggs in the refrigerator to maintain their freshness, and consider using them within a few weeks for optimal results.

Flour: The type of flour used contributes to the texture of the pancakes. Cake flour, which has a lower protein content than all-purpose flour, is ideal for achieving that light and airy consistency. When purchasing, check for finely milled options. Store flour in a cool, dry place to prevent spoilage, and it can often be kept for several months. If necessary, alternatives like gluten-free flour blends or whole wheat flour are possible substitutes, although they may alter the fluffiness.

Common Mistakes to Avoid

  • Not whipping egg whites enough: Failing to achieve stiff peaks can lead to pancakes that are dense instead of fluffy.
  • Using too high heat: Cooking the pancakes on too high a heat can burn the outside before the inside sets.
  • Neglecting to use a mold: Not using a heatproof ring allows the pancakes to spread out instead of rising vertically.
  • Inaccurate measurements: Baking is precise; using too much or too little flour can affect texture significantly.
  • Skipping the resting time: Letting the batter rest can help enhance leavening and improve overall rise.
  • Overmixing the batter: Gently folding the ingredients together preserves the air bubbles necessary for fluffiness.
  • Using cold ingredients: Eggs and milk should be at room temperature to help incorporate air better.
  • Not greasing the mold: Failing to grease the mold can make it difficult to remove the pancakes after cooking.

Essential Techniques

Whipping Egg Whites: This technique is crucial for achieving the light and airy texture of souffle pancakes. To master this, ensure all equipment is grease-free to maintain volume and use room-temperature egg whites for best results. Look for glossy, stiff peaks as the visual cue that they are whipped correctly.

Using a Heatproof Mold: Employing a heatproof mold allows pancakes to rise vertically, creating that signature airy look. To master this, properly grease the mold and use a nonstick skillet to prevent sticking. Monitor the cooking temperature closely, adjusting as needed to prevent burning the base of the pancake while waiting for the tops to set.

Pro Tips for Perfect Japanese Souffle Pancakes

1. Always use fresh eggs! They whip better and create a superior texture for your pancakes.
2. Experiment with flavors by adding vanilla extract or a hint of lemon zest to the batter for an aromatic twist.
3. Ensure that your skillet is preheated properly. A medium-low heat is ideal for allowing the pancakes to cook through without burning.
4. Gently shake or tap the mold once filled to help settle the batter and remove any air bubbles.
5. For extra fluffiness, try folding in a small amount of cornstarch with your flour; this helps lighten the batter.
6. Static bilayer your cooking process by using multiple molds at once, allowing for quicker prep without compromising results.
7. Serve immediately after cooking for the best taste and fluffiness, or keep warm in a low oven if necessary.
8. Don’t skip the toppings! Lightly sweetened whipped cream or a drizzle of syrup enhances the souffle pancakes beautifully.

Variations and Adaptations

If you want to explore variations, consider infusing seasonal flavors. For instance, incorporating pumpkin puree during the fall months can offer a festive alternative, spilling into the realm of pumpkin spice. You might also consider adding chocolate chips or matcha powder to the batter for delightful flavor twists.

In terms of dietary modifications, lighter ingredients such as almond milk or coconut flour can be used to create gluten-free or dairy-free versions of these pancakes. For the texture, adding oats can provide a heartier feel, along with a sprinkle of nuts for added crunch.

Presentation can also be adapted; consider layering pancake stacks with sliced fruits, a dollop of yogurt, or drizzled chocolate sauce for visual appeal. This not only enhances the flavors but also adds an extravagant flair suitable for any celebration.

Serving and Presentation Guide

For best results in serving, stack the pancakes slightly off-center for a casual but appealing look. Garnish with a light dusting of powdered sugar or edible flowers to elevate the presentation. Pair them with seasonal fruits like strawberries, blueberries, or kiwis to add color and flavor contrast.

Additionally, a dollop of whipped cream or a scoop of ice cream on top not only adds richness but also elevates the pancake visually. Temperature is important; serve the pancakes warm to retain their fluffy, melt-in-your-mouth appeal, and consider portion control tips by creating smaller stacks for elegance and control.

Wine and Beverage Pairing

When preparing a meal that includes Japanese Souffle Pancakes, consider pairing with fruity mimosas or sweet wines such as Riesling, which complement the sweetness of the pancakes while enhancing their flavors. For a non-alcoholic option, try serving with fresh fruit juices, such as orange or pomegranate juice, which provide acidity that balances the sweetness.

In cooler months, consider offering warm beverages like spiced apple cider or herbal teas, adding both comfort and a delightful aroma. When serving coffee, opt for lightly roasted blends that won’t overpower the dish, enhancing the overall breakfast experience.

Storage and Shelf Life

To store leftover Japanese Souffle Pancakes, allow them to cool completely, then place them in an airtight container in the refrigerator. Properly stored, they can last for up to three days. For longer storage, consider freezing them; just make sure to separate each pancake with parchment paper to avoid sticking.

Reheating is simple; you can place the pancakes in the microwave for about 30 seconds or until warmed through, or reheat in a toaster oven for a few minutes to regain some of their original fluffiness. Signs of spoilage include an off smell or any discoloration, so always check before consuming.

Make Ahead Strategies

If planning a brunch, you can prepare the batter ahead of time. However, whip the egg whites just before you are ready to cook to maintain the fluffiness. Mixing the dry ingredients in advance allows for quicker assembly when you’re ready to cook.

Storage between steps is crucial; if prepared batter is being held, keep it refrigerated, but avoid mixing in the egg whites until just before cooking to retain maximum height. When it comes to assembly tips for serving, layer ingredients and toppings in a hotel pan to create a stunning visual before plating.

Scaling Instructions

If you need to double the recipe for a larger crowd, utilize two heatproof molds to maintain evenly cooked pancakes and adjust cooking times slightly as needed. Ensure your skillet has enough space to fit the molds without crowding, which can lead to uneven cooking.

When halving the recipe, keep a close eye on your measurements as slight differences can affect texture. Adjust the cooking time and temperature accordingly, as smaller portions often need less time on the heat. Always remember to keep ingredient proportions consistent to retain the delightful souffle-like texture.

Nutritional Deep Dive

Examining the macro breakdown, these pancakes are primarily composed of carbohydrates and proteins from the flour and eggs. Each serving can contribute to your daily requirements but should be balanced with fruits or proteins to make a well-rounded meal.

Micronutrient analysis reveals that eggs provide essential vitamins such as B12 and D, while whole grain options can add fiber and additional nutrients. The health benefits increase by choosing cleaner ingredients, providing a delicious energy source to start your day.

A portion considers the serving size as a light breakfast or dessert, allowing for flexibility in your overall meal planning. Integrating these pancakes into a balanced diet promotes energy without excessive caloric load.

Dietary Adaptations

For a gluten-free version of Japanese Souffle Pancakes, simply replace all-purpose flour with a suitable gluten-free blend, ensuring the texture remains light. Dairy-free alternatives include almond or oat milk in place of regular milk, maintaining the pancakes’ fluffy quality.

Vegan adaptations can incorporate flax eggs in lieu of traditional eggs to bind ingredients while still achieving a light texture from whipped aquafaba. For those pursuing low-carb or keto diets, consider using almond flour and reducing added sugars.

Finally, catering to a paleo diet may simply require substituting in ingredients accepted by the lifestyle, such as using coconut flour, while adhering to natural sweeteners like honey or maple syrup to enhance flavor.

Troubleshooting Guide

If encountering texture issues, check whipping techniques; under-whipped egg whites lead to denser pancakes while over-folding can ruin the fluffiness. If pancakes are burning or cooking unevenly, adjust the cooking temperature down for a more controlled heat distribution.

Flavor balance can be a challenge; to avoid overly sweet pancakes, consider reducing added sugars or complementing them with tangy toppings like yogurt or a citrus syrup. If you experience equipment challenges with sticking, ensure proper greasing of pans and molds in advance.

Timing concerns often arise when multi-tasking; it’s essential to manage the cooking intervals adeptly to avoid having some pancakes undercooked while others are overdone. Practice and patience will help improve timing and overall consistency.

Recipe Success Stories

Community feedback often reveals excitement over their initial attempts at making Japanese Souffle Pancakes. Readers frequently express delight at mastering the fluffy texture, often sharing their photos on social media and inspiring others to try their rendition.

Variation successes come from experimenting with local ingredients, adapting recipes based on available fruits, or even dressing the pancakes with local syrups that enhance flavor. Photography tips are shared, showcasing the beauty of stacked pancakes that capture mouth-watering appeal in their presentations.

These stories foster community engagement as individuals share tips or adapt the recipe based on personal dietary needs, encouraging further experimentation. Many note that the pancakes are a hit at gatherings, further cementing their reputation as a delightful brunch option.

Frequently Asked Questions

Q: Can I make these pancakes ahead of time?

A: It’s best to enjoy Japanese Souffle Pancakes immediately after cooking to retain their fluffy texture. However, you can prepare the pancake batter the night before and refrigerate it; just whip the egg whites right before cooking for the best results.

Q: How do I ensure my pancakes don’t stick to the pan?

A: Properly greasing your skillet or using a non-stick pan is essential for preventing sticking. Additionally, using a heatproof mold will keep the pancakes from spreading out, allowing them to rise beautifully.

Q: Why are my pancakes dense?

A: If your pancakes turn out dense, it’s likely due to under-whipped egg whites or overmixing the batter. Make sure to whip the egg whites until they form stiff peaks and gently fold them into the batter to keep the air inside.

Q: Can I freeze leftover pancakes?

A: Yes, you can freeze leftover pancakes! Make sure they cool completely, then layer them between parchment paper and store them in an airtight container. They can last for about a month in the freezer.

Q: What toppings work well on souffle pancakes?

A: Toppings like fresh berries, whipped cream, maple syrup, or a dusting of powdered sugar are all delightful options. Feel free to get creative with flavors based on your preferences!

Q: Is it possible to make these pancakes gluten-free?

A: Absolutely! You can substitute all-purpose flour with a gluten-free flour blend. Just keep in mind that the texture may vary slightly from the traditional recipe.

Q: What should I do if I don’t have a heatproof mold?

A: If you lack a heatproof mold, form makeshift molds using aluminum foil. Just shape it to create a ring for the pancakes to rise in. Alternatively, use a small, deep round cookie cutter.

Q: How long should I cook the pancakes for?

A: Cook pancakes for about 4-5 minutes on one side before flipping. Wait until the surface is bubbly before trying to flip them to ensure they hold their shape.

Q: Can I flavor the batter?

A: Yes, absolutely! Feel free to add vanilla extract, citrus zest, or even matcha powder to give your pancakes a unique flavor that enhances the overall experience.

Q: Are Japanese Souffle Pancakes a healthy breakfast option?

A: While they can be enjoyed as a treat, their health aspects depend on the ingredients used. Integrating whole-grain flour or topping them with fruits adds nutrients and fiber to make them a more balanced option.

Additional Resources

Explore related recipes that celebrate the light and fluffy textures, such as traditional Japanese pancake creations or fusion desserts. Technique guides on whipping eggs or preparing infused syrups will help you enhance your culinary skills further.

Ingredient information can give you insights into choosing the best flour and eggs, while equipment recommendations will ensure you have the right tools for flawless pancakes. Seasonal variations can inspire unique adaptations based on fruits available throughout the year, allowing you to enjoy these pancakes in endless variations.

Join the Conversation

Engage with fellow cooks and food enthusiasts by sharing your own Japanese Souffle Pancake creations on social media. Capture stunning photos to showcase your success and encourage feedback and suggestions from others.

Your recipe reviews not only help others learn but create a community spirit around this delicious dish. Encourage others to innovate, and share how you’ve made these pancakes your own by adding seasonal ingredients or unique toppings.

The Recipe

Japanese Souffle Pancakes

Serves: 2 servings

Prep Time: 15 mins

Cook Time: 25 mins

Total Time: 40 mins

Kitchen Equipment Needed

  • Non-stick skillet
  • Heatproof ring mold
  • Mixing bowls
  • Electric mixer
  • Spatula

Ingredients

  • 2 large eggs, separated
  • 1 tablespoon granulated sugar
  • 1/2 teaspoon vanilla extract
  • 1/2 cup all-purpose flour
  • 1/4 cup milk
  • 1/2 teaspoon baking powder
  • Butter for cooking

Directions

  1. In a mixing bowl, whisk the egg yolks with milk, sugar, and vanilla until smooth.
  2. In another bowl, combine flour and baking powder, then add to the yolk mixture, mixing until just combined.
  3. In a separate bowl, whip the egg whites until stiff peaks form.
  4. Gently fold the whipped egg whites into the batter in three additions to maintain volume.
  5. Preheat the skillet on low heat, lightly greasing it with butter.
  6. Pour the batter into the heatproof ring molds and cover, cooking for about 4-5 minutes until the tops appear set.
  7. Flip the pancakes carefully and cook for an additional 4-5 minutes, removing the molds afterward.
  8. Serve warm with toppings of your choice.

Recipe Notes

  • For a gluten-free option, substitute all-purpose flour with a gluten-free blend.
  • Feel free to add a tablespoon of matcha powder for a green tea version.
  • These pancakes are best served fresh, but leftovers can be refrigerated for up to three days.

Easy Applesauce Muffins – Moist and Perfect for Breakfast

Delicious Applesauce Muffins: The Perfect Snack for Any Time

⚖️
Difficulty
Easy

⏲️
Prep Time
15 mins

🕒
Cook Time
20 mins

⏱️
Total Time
35 mins

🍽️
Servings
12 muffins

Welcome to the world of delightful applesauce muffins, where wholesome ingredients meet incredible taste! These muffins are not only simple to prepare but will also become your go-to snack, breakfast treat, or even a sweet addition to your lunchbox. With a hint of cinnamon and the natural sweetness from the applesauce, each muffin is a soft and moist masterpiece that is sure to please everyone in your home.

Imagine waking up in the morning to the warm scent of freshly baked muffins filling your kitchen. The rich aroma of apples and cinnamon wafting through the air is enough to get anyone out of bed. These easy applesauce muffins come together quickly and can be made in a variety of ways to suit your taste. Whether you’re serving them at a family gathering or enjoying them solo with your morning coffee, they’re perfect for any occasion.

Quick Recipe Highlights

  • Flavor Profile: These muffins are sweet and subtly spiced, with a delightful balance of apple flavor that keeps them light and enjoyable.
  • Texture: Expect a moist, tender crumb that you can sink your teeth into, making them a satisfying snack or breakfast option.
  • Aroma: The inviting scent of baked apples and warm spices like cinnamon will have your mouth watering from the moment they hit the oven.
  • Visual Appeal: Golden brown tops with a slightly cracked surface make these muffins visually enticing and irresistible.
  • Skill Level Needed: Perfect for novice bakers, this recipe requires minimal techniques and offers a chance to practice basic baking skills.
  • Special Equipment: All you need is a mixing bowl, a muffin tray, and a whisk to bring these delicious applesauce muffins to life!

Recipe Overview

  • Difficulty Level: This applesauce muffin recipe is straightforward, making it ideal for beginner bakers or those looking for a quick, delicious treat.
  • Category: These muffins fit into multiple categories, including snacks, breakfast foods, and even dessert, appealing to a wide range of palates.
  • Cuisine: Drawing from American culinary traditions, muffins have a rich history of being homemade comfort food that adapts well to seasonal ingredients.
  • Cost: With affordable ingredients like flour, applesauce, and sugar, these muffins are budget-friendly and delicious.
  • Season: Applesauce muffins shine year-round but are especially delightful in the fall, coinciding with apple-picking season.
  • Occasion: Perfect for school lunches, brunch gatherings, or as an after-school snack, they fit in beautifully at any event.

Why You’ll Love This Recipe

These applesauce muffins stand out because of their excellent taste and texture. The combination of moist, tender muffins with sweet applesauce provides a delightful experience you won’t soon forget. As you take a bite, the subtle notes of cinnamon elevate the apple flavor, making them a hit with kids and adults alike.

In terms of convenience, these muffins are easy to whip up, making them a great choice for busy mornings or spontaneous snack cravings. The process is straightforward, taking only 15 minutes for preparation and 20 minutes of baking, allowing you to enjoy homemade goodness without the hassle.

From a nutritional perspective, these muffins pack a punch. Made with whole ingredients, they can be a healthier alternative to store-bought snacks. Many of the ingredients are rich in vitamins and minerals, giving you peace of mind while you indulge.

Socially, these muffins are fantastic for sharing. They’re perfect for potlucks, gatherings, or simply enjoying with a friend over coffee. The inviting aroma during baking invites conversation, and everyone will want to know your secret!

Lastly, the cost-effectiveness of this recipe can’t be overlooked. Made with staple ingredients that are typically found in your pantry, you can bake a dozen muffins for less than you’d spend on a store-bought pack, making it an accessible choice for every home baker.

Historical Background and Cultural Significance

The tradition of muffin-making dates back centuries but has evolved into a staple of American baking culture. Typically enjoyed as part of a breakfast or snack, muffins were originally made with whatever ingredients were available, leading to variations like the beloved applesauce muffin.

Applesauce itself has roots in American settlements, where it was a way to preserve excess apples for later use. It became a common ingredient in baking, lending moisture and sweetness—essential for a perfect muffin. These muffins not only reflect a love for apples but also a resourcefulness in the kitchen.

Over the years, the recipe for applesauce muffins has adapted, seeing variations across regions. Some might add nuts or even vary the spices based on what’s locally available. The versatility is part of what makes this recipe so special, allowing for creativity at every turn.

Today, applesauce muffins have found their way into numerous cookbooks and household favorites, symbolizing comfort and homemade goodness. They resonate with both nostalgia and the joy of sharing something made from scratch.

Ingredient Deep Dive

Applesauce is the star of these muffins. Beyond adding wonderful flavor and moisture, it brings a wealth of health benefits, including being low in fat and high in fiber. When selecting applesauce, opt for unsweetened varieties for a healthier option without unnecessary sugars. Storage is straightforward; keep it refrigerated and it can last a few weeks.

Flour is the base of the muffin. Using all-purpose flour is common, but for even better health benefits, consider alternatives like whole wheat flour. Whole wheat provides more nutrients and fiber but may require a slight adjustment in liquid ratios. Store flour in an airtight container in a cool, dry place to maintain freshness, and it can last for months.

Common Mistakes to Avoid

  • Overmixing the batter – This can lead to tough muffins; mix just until combined.
  • Using cold ingredients – Bring your eggs and milk to room temperature for better mixing.
  • Not filling the muffin cups enough – Fill them about 2/3 full to avoid flat muffins.
  • Underbaking – Be sure to check for doneness with a toothpick to ensure they’re fully baked.
  • Not using paper liners or greasing the pan – This can lead to sticking and ruined muffins.
  • Changing the oven temperature – Always preheat your oven to ensure consistent baking.
  • Skipping the cooling time – Allowing muffins to cool in the pan can lead to sogginess.
  • Not measuring ingredients accurately – Baking is a science; be precise for the best results.

Essential Techniques

Mixing the batter properly is essential for muffin consistency. To master this, combine dry ingredients first, then add wet ingredients. Be careful not to overmix, as this can cause the muffins to become dense and tough. Aim for a lumpy texture for the best results.

Using the right baking technique is crucial as well. Fill your muffin tins to about two-thirds full to allow room for rising. Keep an eye on the baking time and use a toothpick to check for doneness. Muffins are perfectly baked when the toothpick comes out clean or with a few moist crumbs.

Pro Tips for Perfect Applesauce Muffins

1. Choose high-quality applesauce for the best flavor. Homemade or organic varieties elevate your muffins immensely.

2. Experiment with spices by adding nutmeg or ginger for unique flavor profiles.

3. Consider folding in mix-ins like chopped nuts or raisins before baking to enhance texture.

4. For added sweetness, sprinkle sugar on top before baking to create a nice crust.

5. If you’re short on time, prepare the batter the night before and refrigerate it, baking fresh muffins in the morning.

6. Ensure your ingredients are at room temperature to combine more effectively.

7. Store muffins in an airtight container to retain moisture and freshness.

8. For extra flavor, drizzle a simple glaze over the top after baking.

Variations and Adaptations

Consider regional variations, such as adding cranberries for a fall twist or incorporating pumpkin puree for seasonal flair. Adjust the spices based on the season or your personal preference for a customized touch.

In terms of dietary modifications, these muffins can easily adapt to gluten-free diets by using gluten-free flour alternatives. To meet vegan needs, substitute eggs with flaxseed meal and use plant-based milk instead.

For a lower-sugar variation, reduce the amount of sweetener and enhance flavor with ripe bananas or other mashed fruits. Texture modifications like incorporating rolled oats or coconut flakes can also provide a delightful chewiness.

Lastly, consider using different baking vessels, like a silicone muffin tray for unique shapes, or bake the batter in a loaf pan for a quick bread option. Each method offers its charm and presentation.

Serving and Presentation Guide

When serving your muffins, consider using a simple white plate or a rustic wooden board to enhance their presentation. Napping them with a light dusting of powdered sugar creates a charming, inviting look.

Garnishing ideas include topping with a small dollop of freshly whipped cream or a sprinkling of chopped nuts. This addition not only pleases the eye but also amplifies the flavor experience.

Traditional accompaniments could be a side of fruits or a warm beverage like herbal tea or coffee, making for a delightful snacking experience.

Temperature considerations are essential; muffins taste best warm from the oven. Serve them fresh, but if made in advance, briefly warm them in the microwave for a couple of seconds before enjoying.

For portion control, consider dividing your muffins into pairs for easy serving and sharing, encouraging a communal experience among friends and family.

Wine and Beverage Pairing

For a delightful pairing, consider serving these muffins with a crisp white wine, such as a sparkling Riesling, which complements the apple flavor. A light-bodied Chardonnay can also work wonderfully if you prefer a wine that’s a bit richer.

If alcohol isn’t your choice, consider non-alcoholic options like fresh apple cider, which can enhance the muffin’s apple essence. Herbal teas, especially those with cinnamon or chamomile, create a cozy pairing that’s comforting.

When enjoying for breakfast, a well-brewed cup of coffee complements the sweetness beautifully, making your morning routine feel special.

Storage and Shelf Life

To store your applesauce muffins, place them in an airtight container at room temperature. They generally last for about three days, remaining delicious and moist.

If you want to keep them longer, consider freezing them. Wrap each muffin tightly in plastic wrap, then place them in a freezer-safe bag. They can be frozen for up to three months and can be easily reheated in the microwave or oven for a fresh taste.

Signs of spoilage simply include mold or an off smell; always check your muffins before indulging. When reheating, ensure they are heated evenly to preserve moisture without drying them out.

Make Ahead Strategies

If you like to prep in advance, you can make your applesauce muffin batter up to one day ahead. Store it in the fridge, and then bake fresh muffins each morning.

For even easier preparation, consider portioning out the dry ingredients in one bowl, while the wet ingredients can be mixed in another—so when baking day comes, all you need to do is combine the two quickly.

After baking, muffins cool quicker if placed on a wire rack, preventing sogginess. If you prefer your muffins warm, slice them open and add a pat of butter right before eating for a comforting traditional touch.

Scaling Instructions

To halve the muffin recipe, simply divide all the ingredients by two, ensuring you adjust your baking time as necessary—check for doneness a few minutes early.

If you’re doubling or tripling the recipe for a larger gathering, make sure your mixing bowl is large enough to accommodate the increased volume, and consider baking in batches to ensure even cooking.

Cooking time may also require adjustments when baking multiple trays simultaneously; rotate them midway through baking to prevent uneven cooking.

Nutritional Deep Dive

These muffins provide a balanced macro breakdown with carbohydrates primarily from flour and applesauce. With each muffin offering a good source of dietary fiber, they are not only satisfying but helpful for digestion.

In terms of micronutrients, the muffins deliver vitamins A and C from apples, with the potential for added nutrients if whole grains are used. Consider balancing them with healthy fats or proteins in meals or snacks to create a holistic dietary approach.

Portion control plays a key role in weight management. One muffin can serve as a delightful, manageable treat without compromising your dietary goals. Pair with a source of protein to enhance fullness and nutritional value.

Dietary Adaptations

For a gluten-free adaptation, replace regular flour with a gluten-free flour blend designed for baking. Always check ingredient labels on your applesauce for hidden gluten.

Dairy-free diets can easily enjoy these muffins by using almond or oat milk instead of cow’s milk, plus using flax or chia seeds in place of eggs for a vegan alternative.

For those following low-carb or keto diets, consider using almond flour combined with sugar substitutes like erythritol for a healthier version, ensuring you keep the flavor intact.

Traditionalists can stick to the classic recipe, while others looking for a paleo or low-FODMAP approach can substitute applesauce with mashed bananas or suitable fruit purees.

Troubleshooting Guide

Watching out for texture issues? If your muffins turn out heavy, check to ensure you didn’t overmix and that your leavening agents are fresh for proper rising.

If flavor balance is off, consider adjusting the spices or sweetness based on personal preference; sometimes, a touch more applesauce can elevate the taste.

Temperature problems may arise; always confirm that your oven has reached the right preheat level to ensure consistent baking temperatures.

Should you face equipment challenges, ensure your muffin tray is of good quality and adjust baking time if using glass or stoneware for a different heat conduction.

When in doubt about ingredient substitutions, think about how flavors play together; replacements must complement the overall essence instead of overpowering it.

Recipe Success Stories

Many of our readers have shared their variations, from adding chocolate chips to swapping in pumpkin spice for the fall. Each addition breathed new life into the classic recipe!

Feedback from the community is overwhelmingly positive, with families enjoying the muffins as a nutritious way to start their day. Their success stories serve to inspire others to get baking.

Adaptation stories include moms who’ve used these muffins for school lunches, and readers’ suggestions often center around making these treats into mini muffins for portion control.

Photography tips abound with people posting their creations on social media. Catching that golden-brown top with a side of fruit or fresh coffee is often shared and inspires others to recreate the experience.

Frequently Asked Questions

Can I use other fruits in this muffin recipe?
Yes! Substitute applesauce with mashed bananas or pureed pears for a different flavor while keeping the moist texture intact.

What can I do if my muffins are too dense?
Overmixing the batter can lead to dense muffins. Ensure you mix until just combined and check your leavening agents for freshness.

How should I store my muffins?
Keep muffins in an airtight container at room temperature for up to three days or freeze them for longer storage.

Can I make these muffins vegan?
Absolutely! Substitute eggs with flaxseed meal and use plant-based milk for a delicious vegan option.

What ingredients can I add for variations?
You can add nuts, dried fruits, or chocolate chips for fun twists on the classic applesauce muffin.

Are applesauce muffins healthy?
When made with whole ingredients, they’re a healthier alternative to many commercially produced snacks and are rich in fiber.

How do I ensure even baking?
Rotate your muffin pan halfway through baking to ensure even cooking, especially when using multiple trays.

What is the best way to reheat them?
Microwave muffins for about 10-15 seconds to warm them slightly, preserving their soft texture.

Can I substitute sugar with honey or maple syrup?
Yes, but reduce the liquid content slightly if using liquid sweeteners and adjust the recipe to your taste.

Is there a gluten-free option?
Yes! Just substitute regular flour with a gluten-free flour blend, adjusting as necessary for texture.

Additional Resources

If this recipe inspires you, check out other related recipes like banana bread or carrot muffins for more delicious baked goods. Being familiar with baking basics like understanding ingredient functions can also enhance your skills in the kitchen.

For the best muffin-making experience, consider investing in high-quality baking sheets or mixing bowls that can handle various cooking tasks. Additionally, utilizing seasonal fruits for freshness can be beneficial and elevate your baked goods.

Join the Conversation

We’d love to hear your thoughts and experiences! Share your variations of applesauce muffins on social media, and tag us in your photos to inspire others in our baking community. Feel free to leave feedback or suggestions for new recipes you’d like to see.

Engage with fellow bakers through comments and share how you’ve adapted this classic recipe to make it your own, bringing freshness to an old favorite!

The Recipe

Applesauce Muffins

Serves: 12 muffins

Prep Time: 15 mins

Cook Time: 20 mins

Total Time: 35 mins

Kitchen Equipment Needed

  • Muffin tin
  • Baking paper liners (optional)
  • Mixing bowls
  • Whisk
  • Measuring cups and spoons

Ingredients

  • 1 ½ cups all-purpose flour
  • 1 cup applesauce
  • 1/2 cup sugar
  • 1/2 cup vegetable oil
  • 2 eggs
  • 1 teaspoon baking soda
  • 1 teaspoon baking powder
  • 1 teaspoon cinnamon
  • 1/2 teaspoon salt
  • 1 teaspoon vanilla extract

Directions

  1. Preheat your oven to 350°F (175°C) and prepare your muffin tin with liners or grease it lightly.
  2. In a bowl, mix together the flour, baking soda, baking powder, cinnamon, and salt.
  3. In another bowl, combine the applesauce, sugar, oil, and eggs. Whisk until smooth.
  4. Gently fold the dry ingredients into the wet ingredients until just combined.
  5. Spoon the batter into the prepared muffin tin, filling each cup about 2/3 full.
  6. Bake for 20 minutes or until a toothpick inserted into the center comes out clean.
  7. Allow to cool in the pan for 5 minutes before transferring to a wire rack.

Recipe Notes

  • For a sweeter muffin, add 1/4 cup of chocolate chips or dried fruits like raisins.
  • The muffins can be frozen for up to 3 months; reheat in the oven or microwave as needed.

Easy Sausage Breakfast Muffins – Perfect for Busy Mornings

Sausage Breakfast Muffins: A Hearty Start to Your Day!

⚖️
Difficulty
Easy

⏲️
Prep Time
15 mins

🕒
Cook Time
20 mins

⏱️
Total Time
35 mins

🍽️
Servings
12 muffins

Sausage Breakfast Muffins are the perfect way to kick-start your day with a burst of flavor and comfort. These scrumptious muffins are packed with savory sausage, fluffy eggs, and melty cheese, creating a delightful balance of protein and carbohydrates to fuel your morning. As you take a bite, you’ll experience the satisfying crunch of the golden muffin exterior, leading to a moist and flavorful interior, making every mouthful a pure delight. Whether you’re on the go or enjoying a leisurely brunch, these muffins are the satisfying solution your breakfast routine has been missing.

Not only are these muffins delicious, but they are also incredibly versatile. You can easily customize the ingredients based on your personal preferences or what you have on hand. Feel free to experiment with different types of cheese or add in some vegetables like spinach or bell peppers for a nutrient boost. These muffins can also be made in advance and stored in the fridge or freezer, making them an ideal make-ahead breakfast option for busy mornings, ensuring that you never have to skip the most important meal of the day.

Quick Recipe Highlights

  • Flavor Profile: The rich and savory taste of sausage perfectly complements the fluffy muffin, while the cheese adds a creamy texture.
  • Texture: A perfect combination of crispy tops and soft, flavorful centers that create an enjoyable mouthfeel with every bite.
  • Aroma: The tantalizing smell of baked sausage and melted cheese fills your kitchen, inviting everyone to the breakfast table.
  • Visual Appeal: These muffins have a lovely golden brown color, topped with melting cheese, making them visually tempting.
  • Skill Level Needed: Perfect for beginners and experienced cooks alike, making them accessible for everyone who wants to try.
  • Special Equipment: All you need are standard muffin tins and mixing bowls, keeping the equipment list simple.

Recipe Overview

  • Difficulty Level: The Sausage Breakfast Muffins are categorized as easy, allowing new cooks to successfully create a breakfast treat.
  • Category: Ideal for breakfast or brunch; these muffins can also be served as a snack at any time of the day.
  • Cuisine: With roots in American breakfast traditions, these muffins reflect a comfort food vibe typical of home-cooked morning meals.
  • Cost: With economical ingredients, each muffin costs only a fraction to prepare, making them a budget-friendly option.
  • Season: Enjoy these muffins year-round; they’re especially great in the colder months, providing warmth and comfort during breakfast.
  • Occasion: Perfect for casual breakfasts, brunch gatherings, or even holiday mornings where a special touch is desired.

Why You’ll Love This Recipe

If you’re looking for a satisfying breakfast that not only tastes amazing but is also easy to prepare, then these Sausage Breakfast Muffins are the answer. The delightful blend of savory sausage, eggs, and cheese provides a balanced meal that will keep you full and energized throughout your busy morning. The combination of textures—from crispy tops to soft interiors—adds an exciting element, making each muffin more than just a simple breakfast item.

Convenience is another key benefit of these muffins. They can be prepared quickly, allowing you to whip up a batch before school or work. Additionally, they offer the option to make-ahead and store. You can have nutritious breakfasts ready to go in minutes, simply needing to reheat in the microwave or oven. This is a great way to ensure your family is getting a wholesome breakfast, even on rushed mornings.

From a nutritional standpoint, these muffins are packed with protein from the sausage and eggs, along with cheese that adds calcium without the need for additional toppings. You can also sneak vegetables into the mix without anyone noticing, boosting the health factor and making it easier to meet daily veggie intake goals. With so many benefits, these muffins can easily become a household favorite.

Enjoying breakfast with friends and family is another wonderful aspect of these Sausage Breakfast Muffins. Whether you’re hosting a brunch or just want to share a special morning with loved ones, these muffins invite warmth and togetherness. They are perfect for social gatherings or potlucks, where they can be enjoyed by everyone. You might even find that your guests ask for the recipe!

In terms of cost-effectiveness, this recipe uses inexpensive ingredients that are easy to find in any grocery store. With each muffin costing mere cents to make, you could easily produce a large batch without breaking the bank. This makes them perfect for families or meal preppers looking to maximize value in their meals.

Historical Background and Cultural Significance

Sausage breakfast muffins have a charming history rooted in American breakfast traditions. The incorporation of sausage into breakfast dishes gained popularity in the 19th century when meats became more accessible and breakfast began to take a heavier, heartier route. Muffins, originally made as a light bread, blended into this trend by transforming into a more substantial meal component filled with proteins.

Culturally, breakfast muffins represent the diversity of American cuisine. They reflect a fusion of cultures, combining influences from European breakfast traditions and local ingredients. Over the decades, the introduction of convenience foods and food-processing technologies has allowed these muffins to evolve into a beloved grab-and-go snack option.

As families have become busier, the evolution of the sausage muffin reflects societal changes, adapting to modern-day needs for ready-to-eat meals. What was once a carefully prepared homemade dish has transformed into a quick baked item, and oftentimes, incorporates leftovers, showcasing practicality without sacrificing taste.

Regional variations can be observed as well, with southern influences often adding spices like cayenne or incorporating traditional ingredients like cheese grits into the muffin. Each version has its own distinct flavor and background, but the fundamental concept of a hearty breakfast muffin remains consistent, demonstrating the dish’s adaptability.

Ingredient Deep Dive

Sausage is the cornerstone of these breakfast muffins. Historically, sausage has been a popular protein source because it is flavorful, affordable, and versatile. Nutritionally, sausage provides a good amount of protein and fats, making it a satiating addition to any meal. When selecting sausage for your muffins, opt for fresh, locally sourced varieties if possible. Pay attention to spices and seasonings that complement your desired flavor profile, and consider storing any leftovers in the refrigerator for future meals.

Eggs are another essential ingredient, representing a staple protein source in many diets around the world. They are rich in vitamins and minerals, including B vitamins, iron, and even omega-3 fatty acids when sourced from cage-free or pasture-raised hens. Always choose high-quality eggs for the best results in flavor and nutrition. Store them in a cool, dry place, and for longer shelf life, keep them in the fridge to ensure freshness.

Cheese adds the necessary creaminess and flavor to the muffins. With various options available, from sharp cheddar to gooey mozzarella, you can customize your muffins to suit your palate. Cheese is also high in calcium and vitamin B12, and its rich texture enhances the overall appeal of the muffins. Opt for fresh cheese and check expiration dates when purchasing, and if you find yourself with extra cheese, consider freezing it for later use.

Common Mistakes to Avoid

  • Overmixing the batter: This can lead to dense muffins instead of light, fluffy ones. Mix just until combined to maintain texture.
  • Ignoring ingredient temperature: Using cold eggs or dairy can lead to uneven cooking. Let ingredients come to room temperature before mixing.
  • Not preheating the oven: Skipping this step can affect the rise and baking time of your muffins. Ensure your oven is fully heated for best results.
  • Filling muffin tins too full: Overfilling can cause muffins to overflow. Fill only about 2/3 to 3/4 full for optimal rise.
  • Not greasing or lining muffin tins: This can lead to sticking. Use paper liners or grease tins thoroughly before adding the batter.
  • Underbaking muffins: Always check for doneness using a toothpick. If it comes out wet, give them more time in the oven.
  • Skipping the resting time: Letting muffins cool slightly before removing from tins helps maintain their shape and texture.
  • Setting the baking temperature too high: Higher temperatures can lead to burnt tops and raw centers. Stick to recommended temps for even baking.

Essential Techniques

Creating the perfect muffin requires a few essential techniques, most notably the ‘muffin method.’ This involves mixing dry ingredients separately from wet, then combining them to promote a light texture. Master this by measuring accurately and mixing carefully, avoiding overmixing, which can cause toughness. The visual cue for success is when the batter is just combined without dry spots.

Another important technique is to allow the muffins to cool in their pans for a short time before transferring them to a cooling rack. This helps to stabilize their structure, preventing them from collapsing. Look for signs of a golden-brown top, indicating they are properly baked while maintaining moisture.

Lastly, understanding temperature control is crucial. Muffins should be baked at the right temperature for a perfect rise. Ensure your oven thermometer is accurate, as incorrect temperatures are a common pitfall. Visual cues include a dome shape and a firm top, indicating they have baked correctly.

Pro Tips for Perfect Sausage Breakfast Muffins

1. Use high-quality sausage for better flavor and try experimenting with spicy or herbed varieties for a unique twist.
2. Incorporate finely chopped vegetables like bell peppers or spinach for added nutrition and flavor depth.
3. If you prefer a lighter texture, separate the eggs and beat the egg whites until fluffy before folding them into the batter.
4. For a gourmet touch, add herbs like thyme or parsley directly into the mix or on top before baking.
5. Use parchment paper liners in muffin tins for easier removal and enhanced presentation at brunch.
6. Make a double batch and freeze leftovers for quick breakfasts; simply reheat them in the microwave or toaster oven.
7. Allow your muffins to cool completely before storing, as this prevents sogginess from trapped steam.
8. Serve warm with a dab of butter or your favorite condiment for added richness and flavor.

Variations and Adaptations

There are numerous regional variations of these sausage breakfast muffins. For instance, adding jalapeños can give them a southern kick, while incorporating herbs like dill can create a garden-fresh flavor profile. Seasonal adaptations, like including pumpkin puree in the mix during fall, can also provide a unique taste experience.

Health-conscious adaptations are also easy to achieve. You can substitute turkey or vegetarian sausage for a leaner option, or even incorporate gluten-free flour to cater to those with dietary restrictions. For vegan diets, replacing eggs with flaxseed meal and the sausage with plant-based alternatives keeps the essence intact.

Additionally, you can explore different flavors by experimenting with cheeses or adding spices such as cumin or paprika, taking your muffins to new culinary heights. Presentation plays a vital role as well; consider serving your muffins on a bed of mixed greens, adding a fresh touch that elevates the dish visually.

Serving and Presentation Guide

Presenting your Sausage Breakfast Muffins in an appealing way can enhance the breakfast experience. Start with a clean serving plate; you can arrange the muffins in a fan shape to showcase their delightful tops. A sprinkle of fresh herbs or parmesan can add a pop of color and flavor.

Garnishing is simple yet effective. Top each muffin with a dollop of sour cream or a slice of avocado for creaminess. Consider adding some sliced tomatoes or a small salad on the side for a fresh balance.

Offering traditional accompaniments like jams, jellies, or hot sauce provides options for guests and adds variety to the meal. If you prefer a modern twist, try presenting your muffins in a rustic basket lined with a cloth, creating an inviting and homey feel.

Temperature considerations are also important; serve the muffins warm, as they taste their best fresh from the oven. For portion control, serve muffins alongside other breakfast items such as fruit or yogurt to create a balanced meal without overwhelming servings.

Wine and Beverage Pairing

When it comes to beverages that pair well with Sausage Breakfast Muffins, consider a crisp white wine like Sauvignon Blanc, which complements the savory flavors without overpowering them. If you prefer sparkling, a light Prosecco works beautifully, enhancing the experience with its effervescent quality.

For non-alcoholic alternatives, freshly squeezed orange juice provides a refreshing citrus contrast that brightens the meal. Alternatively, a spiced chai or herbal tea can add warmth and comfort, making for a cozy morning treat.

If you’re feeling indulgent, opt for a bold cup of dark roast coffee, which pairs excellently with the muffins’ hearty flavors. Just ensure beverages are served at the right temperature; warm drinks balance well with the temperature of the muffins.

Storage and Shelf Life

To maximize the shelf life of your Sausage Breakfast Muffins, store them in an airtight container at room temperature for up to 3 days. For longer storage, transfer them to the fridge where they can last about a week. If freezing, wrap each muffin tightly in foil or plastic wrap and store them in a heavy-duty freezer bag for up to 3 months.

Signs of spoilage include an off-smell, visible mold, or a change in texture. Reheating is simple; you can use the microwave for a quick option or air fryer for a crunchy exterior.

When reheating, ensure they reach an internal temperature of 165°F to ensure safety and quality. Freezing is a great long-term solution, allowing you the convenience of having homemade muffins ready to go anytime.

Make Ahead Strategies

Making Sausage Breakfast Muffins ahead of time is simple and efficient. You can easily prepare the batter the evening before and store it in the refrigerator. This allows the flavors to meld overnight, enhancing the taste when baked.

Alternatively, bake a large batch, allow them to cool, and then individually wrap them for easy grab-and-go breakfasts. Consider portioning them into snack bags for quick accessibility during busy mornings.

Quality is key, so be sure to follow proper storage guidelines to maintain the muffins’ freshness. Include a note in your storage guide on which muffins you’ve frozen or refrigerated, allowing for quick meal decisions during the week.

If you want to freshen up the muffins just before serving, add a sprinkle of fresh herbs or a dollop of your favorite sauce right before enjoying. This adds a new life and flavor dimension to previously made muffins.

Scaling Instructions

Scaling the recipe up or down is straightforward. If you want to halve the recipe, simply divide all ingredient quantities by two. Consider the size of your muffin tins; if you’re producing fewer muffins, smaller tins can be a good choice to maintain ideal proportions.

When doubling or tripling the recipe, keep in mind the cooking time may vary slightly, so always use a toothpick to test for doneness. Larger quantities also require larger mixing bowls or possibly dividing into batches.

Equipment adjustments may also be necessary; using more than one muffin tin could help manage larger batches. Finally, ensure to adjust the storage methods appropriately, keeping environment stability as muffins should not cool down too rapidly.

Nutritional Deep Dive

Analyzing the nutritional content of these muffins, you’ll find they are rich in protein, primarily from the sausage and eggs, with a good balance of fats and carbohydrates. A typical muffin can contain around 200 calories, but it varies based on your specific ingredient choices.

Micronutrient-wise, these muffins offer essential vitamins and minerals, including B vitamins from the eggs, and iron and zinc from the sausage. Nutritional density increases if you add vegetables, improving fiber and vitamin profiles.

Health benefits include not only satiety from protein but also sustained energy from carbohydrate sources. Portion control is important; consider enjoying these muffins as part of a balanced breakfast along with fruit or a side of yogurt.

Weight management is supported through protein intake, which can help with cravings and keeping you full. By adjusting ingredient ratios and adding whole grains, you can tailor these muffins to better fit your dietary goals.

Dietary Adaptations

For gluten-free adaptations, swap regular flour with a gluten-free blend, ensuring you use certified gluten-free sausage to keep the entire dish compliant. For a dairy-free version, replace cheese with a nut-based alternative, ensuring to enhance flavors with spices.

If you’re looking for a vegan option, substitute eggs with a flaxseed mixture and use plant-based sausage. Any added vegetables or beans can further enhance nutrition and texture, making them hearty and filling.

Low-carb options are achievable by using almond flour instead of wheat flour and turkey sausage for lower carbohydrates. These muffins can also fit into a Keto diet if the right ingredients are selected, emphasizing protein and healthy fats.

Paleo dieters can enjoy these muffins by using almond or coconut flour and eliminating processed sausage, choosing fresh, organic meat instead. Customize these muffins easily by recipe modification depending on specific dietary needs.

Troubleshooting Guide

If you experience texture issues like dense muffins, ensure you haven’t overmixed the batter. Also, keep an eye on the baking times—too little time can leave them soggy and dense.

Flavor balance problems often arise from too much salt or spices. Adjusting the seasoning with fresh herbs or squeezing in lemon juice can enhance taste profiles positively.

Temperature problems such as undercooked muffins can be solved by lowering the oven temperature for even baking, as uneven heat can cause hot spots. Additionally, check oven calibration regularly for accuracy.

If you face challenges with equipment like muffin tins, consider using liners or greasing generously to prevent sticking. If you’ve run out of a key ingredient, innovative substitutions, like applesauce for eggs or mashed bananas, can maintain flavor and moisture.

Timing concerns typically derive from busy schedules; consider batch cooking on designated cooking days to alleviate time pressures during the week.

Recipe Success Stories

Community feedback on Sausage Breakfast Muffins often highlights how easy they are to prepare while still achieving a gourmet feel. Many cooks praise the flexibility in ingredients, allowing for various family preferences while maintaining a consistent level of deliciousness.

Readers have shared their variations, highlighting how the incorporation of seasonal veggies or different types of bread led to successful outcomes, inviting even picky eaters to the breakfast table.

Adaptation stories include families who transformed their muffin sessions into enjoyable bonding experiences, making them a monthly tradition where experimentation is encouraged, resulting in creative and exciting flavors.

Photography tips involve capturing freshness; taking shots of the muffins just as they come out of the oven showcases their golden tops and steamy interiors, making them harder to resist.

Frequently Asked Questions

1. Can I freeze these muffins? Yes, you can freeze them. Wrap each muffin tightly and store them in an airtight container or freezer bag. They last up to three months.

2. How long will the muffins last in the fridge? Sausage Breakfast Muffins can be stored in the refrigerator for about a week if kept in an airtight container.

3. Can I substitute the sausage? Absolutely! You can replace it with turkey sausage, vegetarian sausage, or even skip it entirely for a more veggie-focused muffin.

4. Do I have to use cheese? No, cheese is optional. You can omit it or replace it with a dairy-free alternative if you prefer.

5. How can I make these muffins healthier? Consider adding finely chopped vegetables, using whole-grain flour, or reducing the amount of cheese to boost the nutritional profile.

6. What can I serve with the muffins? These muffins pair well with fresh fruit, a side of yogurt, or even a light salad for a complete breakfast.

7. How do I know when the muffins are done? Insert a toothpick into the center; if it comes out clean or with a few crumbs, they’re ready.

8. Can I make these ahead of time? Yes, you can prep them a day in advance or even freeze them for quick breakfasts amidst a busy schedule.

9. What’s the best way to reheat them? You can reheat muffins in the oven or toaster oven at 350°F for about 10 minutes or in the microwave for 30 seconds to 1 minute.

10. Can I add herbs or spices? Definitely! Adding herbs can enhance flavor. Try basil, thyme, or Italian seasoning depending on your preference.

Additional Resources

To further enhance your breakfast repertoire, explore related recipes such as veggie breakfast muffins, mini quiches, or savory breakfast wraps. Technique guides on baking fundamentals can also help improve your overall baking skills, ensuring perfect results every time.

Understanding the ingredients used can also deepen your cooking experience, so consider learning about different types of whole grains or healthy fats. Equipment recommendations for quality muffin tins and mixing tools are vital for consistent results and ease of baking.

Seasonal variations in ingredients are essential; consider swapping seasonal produce into your muffin mix to keep things fresh and exciting throughout the year.

Join the Conversation

Join our community by sharing your experiences with Sausage Breakfast Muffins on social media. Use vibrant images to capture the creativity of your baking and engage with fellow food enthusiasts. Explore variations they have tried, sharing ideas and triumphs within the community.

Photography tips play a crucial role in showcasing your culinary creations effectively. Bright natural light often gives rich colors, and focusing on angle and depth can dramatically improve food visuals in social posts.

Encourage recipe reviews among peers to foster engagement and feedback, paving the way for collaborative recipe development and improvement.

Try to offer insights into your own twists or adaptations on the original recipe. This collaboration within the cooking community is invaluable and builds excitement around traditional recipes reimagined for modern tastes.

The Recipe

Sausage Breakfast Muffins

Serves: 12 muffins

Prep Time: 15 mins

Cook Time: 20 mins

Total Time: 35 mins

Kitchen Equipment Needed

  • Muffin tins
  • Mixing bowls
  • Measuring cups and spoons
  • Whisk
  • Spatula

Ingredients

  • 1 pound sausage
  • 2 cups all-purpose flour
  • 1 tablespoon baking powder
  • 1/2 teaspoon salt
  • 1/2 teaspoon black pepper
  • 3 large eggs
  • 1 cup milk
  • 1 cup shredded cheese (cheddar or your choice)

Directions

  1. Preheat the oven to 375°F (190°C). Grease or line muffin tins.
  2. Cook the sausage in a skillet over medium heat until browned; drain excess fat and let cool.
  3. In a mixing bowl, whisk together the flour, baking powder, salt, and pepper.
  4. In another bowl, beat the eggs and then stir in the milk.
  5. Add the egg mixture to the flour mixture, stirring until just combined.
  6. Fold in the cooked sausage and cheese until evenly distributed.
  7. Divide the batter among the prepared muffin tins, filling them 2/3 full.
  8. Bake for 20-25 minutes or until a toothpick inserted in the center comes out clean.
  9. Let cool in the pans for a few minutes before transferring to a wire rack.

Recipe Notes

  • Feel free to mix in vegetables like spinach or bell peppers for additional nutrition.
  • For a spicy kick, try using hot sausage or adding crushed red pepper.
  • These muffins freeze well; wrap them tightly and store for a quick breakfast option later.

Ultimate Tater Tot Breakfast Bowl with Sausage Gravy

Tater Tot Breakfast Bowl with Sausage Gravy: The Ultimate Morning Comfort

⚖️
Difficulty
Easy

⏲️
Prep Time
15 mins

🕒
Cook Time
30 mins

⏱️
Total Time
45 mins

🍽️
Servings
4

Start your day with a hearty Tater Tot Breakfast Bowl with Sausage Gravy that’s sure to impress your family and friends. This indulgent dish combines crispy golden tater tots, savory sausage gravy, and a sprinkle of cheese, creating a comforting and satisfying meal to fuel your morning. With its delightful blend of flavors, this breakfast bowl provides a perfect balance of richness and comfort, ultimately making your breakfast routine an unforgettable experience.

The tater tots give a satisfying crunch that contrasts beautifully with the creamy sausage gravy, making each bite a delightful adventure. Topped with a sprinkle of cheddar cheese and a dash of pepper for an added kick, this dish is not only visually appealing but also a feast for your taste buds. The simplicity and warmth of the ingredients evoke feelings of home, making it a perfect dish for family gatherings or lazy weekend brunches.

Quick Recipe Highlights

  • Flavor Profile: A rich combination of savory sausage and creamy gravy over crispy tater tots.
  • Texture: The dish features a contrast between the crunchy tater tots and the smooth gravy.
  • Aroma: An inviting aroma of sausage cooking with herbs and spices fills your kitchen.
  • Visual Appeal: A colorful presentation with golden tots, creamy gravy, and vibrant cheese makes this bowl visually striking.
  • Skill Level Needed: This dish requires basic cooking skills, making it accessible for home cooks at any level.
  • Special Equipment: A skillet for cooking gravy and an oven or air fryer for tater tots are essential.

Recipe Overview

  • Difficulty Level: This Tater Tot Breakfast Bowl is easy to make and perfect for beginner cooks or those looking for a quick breakfast option.
  • Category: This recipe fits perfectly in the breakfast category, but it can also serve as a comforting brunch item.
  • Cuisine: The Tater Tot Breakfast Bowl has American roots with a Southern twist due to the sausage gravy.
  • Cost: The ingredients are budget-friendly, making this a cost-effective family meal.
  • Season: This hearty breakfast is ideal for all seasons but feels especially comforting in the fall and winter months.
  • Occasion: A great option for weekend brunch, holiday gatherings, or any morning when you crave something fulfilling.

Why You’ll Love This Recipe

The appealing taste and texture of the Tater Tot Breakfast Bowl with Sausage Gravy will have you coming back for more. The crunchiness of the tater tots, combined with the creamy gravy and the rich flavors of sausage, creates a breakfast dish that comforts all your senses. It’s like a warm hug in bowl form, ideal for starting your day off right.

This breakfast bowl is incredibly convenient; it takes just 45 minutes to prepare from start to finish, making it an excellent choice for busy mornings or leisurely weekend brunches. With minimal cleanup involved, you can enjoy your meal without the hassle.

In addition to being delicious, this recipe provides nutritional benefits as well. The dish includes protein-rich sausage and the goodness of potatoes, which can keep you fueled and satisfied until lunch. Pair this with a side of fruit to add freshness and balance to your meal.

This recipe is perfect for socializing and entertaining guests, making it an excellent choice for brunch gatherings. Impress your friends and family with this deliciously simple dish; it’s sure to spark conversation and delight everyone at your table.

Moreover, the cost-effectiveness of the ingredients allows you to prepare this dish without breaking the bank. Using affordable staples, the Tater Tot Breakfast Bowl serves several hungry bellies, making it a great family meal option.

Historical Background and Cultural Significance

The Tater Tot Breakfast Bowl is rooted deeply in American culture, with tater tots being a nostalgic favorite that has graced school cafeterias and family gatherings for decades. Their invention dates back to the 1950s when they were created as a way to use leftover potato scraps. This makes they not only a comfort food but also a symbol of resourcefulness in American cooking.

Sausage gravy, on the other hand, hails from the Southern United States, where it is often served over biscuits. This heartiness represents the agricultural history of the region, where many families would farm their own ingredients. Combining these two elements leads to a dish that tells a story of both practicality and indulgence.

Over time, breakfast bowls have become a widespread trend, reflecting the evolving nature of breakfast dishes across America. People are always looking for new and exciting ways to enjoy traditional foods, and this recipe does just that by bringing classic flavors together in a new and delicious format.

Regional variations exist as well, with some people opting for different types of meats in their gravy or even using breakfast sausage made from turkey or chicken. The Tater Tot Breakfast Bowl is versatile, making it adaptable to many tastes and preferences while retaining its essential comfort food appeal.

Ingredient Deep Dive

Tater Tots

Tater tots have become an iconic American snack and side dish. These small cylindrical potato snacks originated from Idaho, the leading producer of potatoes in the United States. Made from grated or shredded potatoes, particularly popular among children and adults alike, tater tots offer crispy texture and convenience.

Nutritionally, tater tots provide carbohydrates and a small amount of fiber, especially when prepared with the skin. When choosing tater tots, look for options with fewer preservatives or consider making them from scratch for more control over ingredients. They can be stored in the freezer and last for several months, making them a great item for quick meals.

Sausage

This choice of meat in the recipe adds rich, savory flavors, making the dish utterly delicious. Breakfast sausage is often seasoned with sage and other spices, giving it a distinctive taste that complements the creaminess of the gravy. Sausage has a long history in American cuisine, particularly in Southern states where it is a breakfast staple.

Not only does sausage provide protein, but it also adds essential fats that can keep you satiated. When selecting sausage, look for quality options without fillers or preservatives. As far as storage goes, it’s important to refrigerate fresh sausage and consume it within a week or freeze it for later use.

Common Mistakes to Avoid

  • Not browning the sausage properly can result in a less flavorful gravy. Make sure to cook it until browned for the best taste.
  • Using frozen tater tots straight from the package without preheating the oven or air fryer can lead to sogginess.
  • Not seasoning the gravy adequately can result in a bland dish. Taste and adjust your seasoning for maximum flavor.
  • Overcooking the gravy can lead to a lumpy texture. Stir continuously and cook on low heat to maintain creaminess.
  • Neglecting to let the gravy cool slightly before serving can cause it to thicken. Serve immediately for the best consistency.
  • Skipping the cheese on top can diminish the dish’s flavor. A sprinkle of cheese adds richness and visual appeal.
  • Using low-quality ingredients can affect the overall taste; always opt for the best sausage and tater tots you can find.
  • Not tasting the dish before serving can lead to unbalanced flavors; adjust salt and pepper as needed.
  • Skipping a garnish like green onions for freshness can affect presentation; a pop of color adds visual appeal.
  • Not pairing it with any fruits or side dishes can lessen the overall meal experience; balance is key!

Essential Techniques

Making the Gravy

Mastering sausage gravy is essential for this recipe. It’s important because it brings a creamy element that binds the tater tots and meat together. Start by browning the sausage and creating a roux with flour before adding milk. Stir continuously to avoid lumps. Cook on low heat until it reaches the desired consistency, and test the flavor as you go.

Cooking Tater Tots

Whether baked or air-fried, properly cooking tater tots is critical for a crunchy texture. Preheat the oven or air fryer; this ensures even cooking. Cook them until golden brown, and don’t overcrowd the pan, which can lead to steaming rather than crisping. Check for a crispy outer layer and soft interior to master the texture.

Pro Tips for Perfect Tater Tot Breakfast Bowl

Always preheat your oven or air fryer for best results when cooking tater tots; this helps achieve that perfect crispy crust. Consider using both an oven and a skillet to get the best out of your tater tots and gravy.

Add in your favorite spices to the sausage gravy for a unique flavor profile. A pinch of cayenne pepper or paprika could really amp up the taste.

For an extra indulgent bowl, consider adding a fried egg on top of your tater tots – the runny yolk adds an incredible richness to the dish.

Look for high-quality ingredients. Better sausage means better gravy, while good tater tots can elevate your whole dish.

To enhance presentation, garnish with chopped herbs or green onions, bringing an added splash of color and freshness.

If your gravy thickens too much, simply stir in a splash of milk. This can help reach your desired consistency.

Enjoy the bowl immediately after serving. The longer it sits, the soggier the tater tots will become.

Don’t shy away from variations! Use different types of meats or even make this dish vegetarian by substituting the sausage with plant-based chorizo.

Variations and Adaptations

There are plenty of regional variations to the Tater Tot Breakfast Bowl. In some areas, you might find it served with a southern-style hot sauce to give an extra kick.

For a seasonal adaptation, add some pumpkin puree to the gravy in the fall for a delightful, autumnal flavor that pairs beautifully with the sausage.

If you’re looking for dietary modifications, consider using one of the many plant-based sausages available today as a great substitute for traditional sausage.

You can also play with flavors by including spices like cumin or smoked paprika to change the dish’s profile completely from classic to Tex-Mex.

Texture modifications like incorporating crispy, sautéed vegetables such as bell peppers or spinach can elevate the dish daily.

Serving and Presentation Guide

When it comes to plating, consider using a deep bowl to hold all the delicious elements of the Tater Tot Breakfast Bowl. This helps keep everything together while providing a rustic feel to the meal.

To garnish, a sprinkle of fresh chives or parsley adds a pop of color and freshness that contrasts beautifully with the golden tots and creamy gravy.

Traditional accompaniments such as sliced avocado or fresh fruit can balance out the richness of the dish, providing a refreshing touch.

For modern serving suggestions, create a mini buffet where guests can customize their bowls with extras like hot sauce, jalapeños, or assorted cheeses.

Temperature considerations are important for this dish; serve immediately after preparation while everything remains hot and crispy.

Portion control is crucial; depending on your audience, consider serving smaller individual portions for brunch crowds, allowing guests to sample various dishes.

Wine and Beverage Pairing

For a wine pairing, consider serving a light-bodied white wine, such as a Sauvignon Blanc. Its crisp acidity will complement the richness of the sausage gravy beautifully.

If you’re looking for non-alcoholic alternatives, fresh-squeezed orange juice is an excellent choice. Its sweetness balances the savory flavors while adding a fresh touch.

For coffee lovers, a rich, dark roast coffee could enhance the hearty elements of this breakfast bowl. The bold flavors work harmoniously with the dish.

When serving any beverage, consider temperature; chilled drinks should contrast well with the warm breakfast bowl for the best dining experience.

As for serving suggestions, consider offering guests a choice of beverages as they can customize their experience based on their preferences.

Storage and Shelf Life

To store any leftovers, let the dish cool completely before transferring it into an airtight container. Proper storage methods can maximize its shelf life for up to three days in the refrigerator.

Keep your Tater Tot Breakfast Bowl in a cool, dry environment. Reheating is easy—microwave or bake it in the oven until heated through.

Signs of spoilage include an off odor or visible mold. Discard any leftovers if you notice these signs for health safety.

For freezing, the texture may change slightly once thawed, so consider freezing the components separately, such as the gravy and tater tots.

Reheating is simple; if reheating from frozen, ensure that the dish is heated completely to ensure safety.

Make Ahead Strategies

To streamline your breakfast prep, consider making the gravy a day in advance. Store it in the refrigerator and simply reheat it before serving.

Prepare tater tots according to package instructions ahead of time and store them in the oven for a quick reheat right before serving.

Assess the quality impact; freshly prepared tater tots will always be crunchier than reheated ones, so it’s best to cook them last minute.

Assembly tips include organizing all ingredients in advance, allowing straightforward and quick assembly when it’s time to serve.

Focusing on fresh ingredient additions like toppings can elevate meals without extensive work; add fresh herbs or a dash of hot sauce right before serving.

Scaling Instructions

If you’re looking to halve the recipe, simply divide all ingredients by two, which works well without compromising flavor.

To double or triple the recipe, you might need to use a larger skillet or pot to accommodate sufficient cooking. Adjust timing as necessary based on quantities.

Equipment adjustments may involve multiple pans if cooking multiple batches, especially for gravy and tater tots.

Timing modifications depend on the cooking method; larger quantities may require longer cooking times, especially for the gravy to prevent lumps.

When considering storage, ensure that all components are well-separated to maintain freshness for future meals.

Nutritional Deep Dive

In terms of macro breakdown, this dish is balanced with protein from sausage, carbohydrates from tater tots, and fats from the gravy. This offers a hearty meal that provides energy for your day.

Micronutrient analysis reveals key vitamins and minerals, such as calcium from cheese and potassium from potatoes. These contribute to your overall dietary needs.

Health benefits range from satiety provided by protein and fats to the comfort that hearty breakfasts can deliver, boosting your morning motivation.

Dietary considerations should include the total caloric value; hearty dishes like this can help fuel days filled with physical activity.

For weight management tips, consider serving smaller portions combined with a fruit or vegetable side for balance; this helps manage caloric intake.

Dietary Adaptations

For a gluten-free version, swap out any flour in the gravy for cornstarch or gluten-free flour, making this dish accessible for more diets. Ensure tater tots used are also gluten-free.

If you need a dairy-free adaptation, substitute milk with almond or soy milk and omit cheese or replace it with a dairy-free alternative.

For a vegan option, utilize plant-based sausage and replace cream with coconut milk. This can provide a satisfying flavor while adhering to vegan guidelines.

Low-carb adaptations can include using cauliflower tots instead of tater tots, offering a great alternative for keto diets.

Paleo modifications could involve using ground turkey or other meats combined with fresh herbs, eliminating processed components.

For low-FODMAP diets, consider using lactose-free milk and ensure sausage is free of high-FODMAP ingredients.

Troubleshooting Guide

When addressing texture issues, ensure proper cooking times and temperatures for both tater tots and gravy. If your tots turn soggy, try using a higher heat setting in the oven.

Flavor balance can be difficult at times; if your gravy seems bland, season it with salt and a pinch of black pepper to elevate the taste.

Temperature problems might arise in reheating; ensure you thoroughly heat up the gravy and tots without overcooking to avoid curdling.

Ingredient substitutions may occasionally impact flavor; make sure to choose alternatives that complement the dish, such as swapping pork sausage for turkey.

Timing concerns when cooking in bulk can lead to sogginess; consider keeping tater tots and gravy separate until serving for optimal texture.

Recipe Success Stories

Community feedback is overwhelmingly positive; many readers share how their family enjoys this breakfast bowl and request it often. Others have enjoyed variations inspired by the original recipe, showcasing its versatility.

Readers have adapted the recipe to their tastes, experimenting with different toppings and seasonings, leading to new family favorites. These adaptations show the flexibility of this dish.

Photographic success stories have emerged on social media platforms, where home cooks proudly share their homemade Tater Tot Breakfast Bowl creations, reinforcing its popularity.

Advice and tips from fellow cooks highlight the importance of presentation and garnishing for a boujee brunch feel at home, which contributes to the recipe’s celebration.

Frequently Asked Questions

Can I freeze the Tater Tot Breakfast Bowl? Yes, both the gravy and the tater tots can be frozen separately or together. Make sure to cool them down completely before freezing.

What if I want to make this recipe vegetarian? You can substitute traditional sausage with plant-based sausage or mushrooms for a meat-free alternative.

How do I ensure my gravy doesn’t get lumpy? Start with a roux, and continuously stir as you add liquid to ensure a smooth consistency.

Can I make the Tater Tot Breakfast Bowl in advance? Yes, you can prepare the gravy ahead of time. Cook the tater tots fresh for the best texture.

What can I serve with this breakfast bowl? For balance, consider pairing with fresh fruit, coffee, or even a green salad for crunch.

Is there an alternative for tater tots? Yes, you can use sweet potato tots, hash browns, or even cauliflower tots for a healthier twist.

How spicy is the sausage gravy? The spice level depends on the sausage used; choose a mild or spicy sausage according to your preference.

Can I add vegetables to the breakfast bowl? Absolutely! Diced bell peppers, onions, or spinach can add flavor and nutrition.

What type of cheese works best? Cheddar cheese is most commonly used, but feel free to experiment with different types like pepper jack for extra flavor.

How do I make the gravy thicker? If your gravy is too thin, allow it to simmer longer or add a bit of cornstarch mixed with water for thickening.

Additional Resources

For more delicious recipes similar to the Tater Tot Breakfast Bowl, consider trying a breakfast casserole or loaded nachos for brunch gatherings. Technique guides on making gravies or baking crispy potatoes can enhance your skills and confidence in the kitchen.

Ingredient information about the benefits of potatoes can also help you appreciate the sweet and savory qualities they bring to dishes. Recommendations for kitchen equipment like high-quality skillets can make all the difference in your cooking experience.

Exploring seasonal variations allows you to take advantage of fresh ingredients that change with the seasons, ensuring your dishes are always at their best.

Join the Conversation

Share your Tater Tot Breakfast Bowl creations on social media using the hashtag #TaterTotBreakfastBowl to join our community of food lovers! We encourage you to share photos of your finished dish along with any unique twists you’ve added.

Your feedback and reviews can inspire others, leading to wider discussions about everyone’s favorite toppings or preferences in dish preparation.

Don’t hesitate to engage with our community by sharing your experiences, including recipe variations that made a delightful difference in flavor or texture.

Engagement is key, so feel free to ask for suggestions or tips from fellow cooks on improving this already fantastic recipe!

The Recipe

Tater Tot Breakfast Bowl with Sausage Gravy

Serves: 4

Prep Time: 15 mins

Cook Time: 30 mins

Total Time: 45 mins

Kitchen Equipment Needed

  • Skillet
  • Oven or air fryer
  • Measuring cups and spoons
  • Wooden spatula
  • Mixing bowl

Ingredients

  • 1 pound breakfast sausage
  • 1/4 cup all-purpose flour
  • 2 cups milk
  • 2 pounds frozen tater tots
  • 1 cup shredded cheddar cheese
  • Salt and pepper to taste
  • Optional: chopped parsley for garnish

Directions

  1. Cook the tater tots according to package instructions until golden brown and crispy.
  2. In a skillet over medium heat, brown the sausage, breaking it apart as it cooks.
  3. Once the sausage is brown, add the flour and stir, cooking for one minute to form a roux.
  4. Gradually add the milk, continuing to stir, and cook until the gravy thickens.
  5. Season the gravy with salt and pepper to taste, and remove from heat.
  6. To assemble, place a generous portion of tater tots in a bowl, top with sausage gravy, and sprinkle with cheese.
  7. Garnish with parsley if desired and serve hot.

Recipe Notes

  • For a spicier version, consider adding red pepper flakes to the gravy.
  • Feel free to use non-dairy milk if you’re looking to make the dish dairy-free.
  • For crispier tater tots, air fry them instead of baking.

Easy Baked Feta Eggs Recipe – Perfect for Breakfast

Baked Feta Eggs Recipe: A Delicious Brunch Delight

⚖️
Difficulty
Easy

⏲️
Prep Time
10 mins

🕒
Cook Time
25 mins

⏱️
Total Time
35 mins

🍽️
Servings
4

Baked Feta Eggs is an irresistible dish that blends rich and creamy feta cheese with perfectly cooked eggs, creating a mouthwatering experience that is perfect for brunch or any meal of the day. The combination of flavors and textures makes every bite a delightful surprise, where the salty tang of the feta meets the velvety richness of the eggs. This recipe is not only simple but also offers a gourmet dining experience at home with minimal effort.

As the dish bakes, the aroma wafts through the kitchen, enticing anyone nearby to take a sneak peek. Serving this this baked feta eggs recipe can elevate your dining experience, bringing warmth and satisfaction to any table. Its stunning presentation, bursting with color and topped with fresh herbs, ensures it’s as pleasing to the eyes as it is to the palate.

Quick Recipe Highlights

  • Flavor Profile: The dish features a harmonious blend of creamy feta, farm-fresh eggs, and fresh herbs. The savory feta adds a tangy bite, while the eggs bring a gentle, custardy richness.
  • Texture: Expect a lovely contrast between the crumbly feta and the soft, silky eggs. The baked feta forms a slightly crispy crust, adding an inviting texture.
  • Aroma: The aroma of this dish is heavenly, with notes of warming garlic, fresh herbs, and robust feta filling the air as it bakes.
  • Visual Appeal: This dish is visually captivating, with vibrant colors from the herbs and the rich hue of the baked eggs, making it a real centerpiece for any meal.
  • Skill Level Needed: This recipe is incredibly easy to make, perfect for beginner cooks and seasoned chefs alike, requiring just a few simple steps and minimal technique.
  • Special Equipment: All you need is a baking dish and an oven — no specialized equipment is required!

Recipe Overview

  • Difficulty Level: This dish is categorized as easy, making it accessible for even novice chefs. The straightforward approach allows anyone to impress with minimal stress.
  • Category: Baked Feta Eggs can serve as a delightful brunch option or a comforting breakfast. It’s perfect for leisurely weekend mornings or quick weekday breakfasts.
  • Cuisine: This recipe draws inspiration from Mediterranean flavors, particularly the delightful incorporation of feta cheese commonly found in Greek dishes.
  • Cost: The dish is budget-friendly, with the main ingredients being easily affordable, making it a great choice for delicious meals without breaking the bank.
  • Season: This recipe can be enjoyed year-round, but is especially nice in spring when fresh herbs are in abundance and can be used for added flavor.
  • Occasion: Perfect for brunch gatherings, holidays, or cozy family breakfasts, this dish is sure to please guests or loved ones alike.

Why You’ll Love This Recipe

The combination of taste and texture in Baked Feta Eggs is truly appealing. The creamy feta cheese melts beautifully into the baked eggs, creating a rich and decadent dish that feels indulgent without requiring complicated cooking techniques. Each bite offers a satisfying mouthfeel, making it a dish you will crave time and again. This is not just a recipe; it’s a comforting experience that will warm your heart and lift your spirits.

In addition to its delightful taste, the convenience of preparation is another reason to love this recipe. With minimal prep work involved, you can whip up this dish in under 10 minutes, and it requires no special skills. Everyone can enjoy a delicious homemade meal without spending hours in the kitchen, making it a go-to option for busy mornings.

The nutritional benefits shouldn’t be overlooked either. Eggs are a fantastic source of protein and healthy fats, while feta adds calcium and flavor without excess calories. Together, they create a well-rounded dish that keeps you satisfied throughout the day. Additionally, adding herbs not only enhances flavor but also packs in extra nutrients.

Socially, this dish is perfect for gathering friends and family. Baked Feta Eggs can be served straight from the oven to the table, inviting everyone to dig in together and share in the joy of good food. Imagine a brunch spread featuring this showstopper — it’s sure to be the highlight of any gathering.

Lastly, the cost-effectiveness of this recipe makes it even more attractive. With a handful of simple ingredients, you can create a meal that feels extravagant but is budget-friendly. It’s a stellar option for anyone looking to enjoy delicious home-cooked food without a hefty price tag.

Historical Background and Cultural Significance

Baked feta cheese has its roots in Mediterranean cuisine, especially within Greek culinary traditions. Feta originated in the region thousands of years ago, becoming a staple ingredient in many dishes. The use of feta with eggs melds two beloved components of Mediterranean diets into a delightful dish that showcases the rich flavors of the region.

Culturally, feta does more than just add flavor; it represents a way of life in Greece where fresh, simple ingredients come together in harmony. The tradition of using local cheeses and eggs in cooking has persisted throughout generations, reflecting the agricultural practices and communal values embodied in these recipes.

Over the years, the evolution of the dish can be noticed in the variety of methods and tweaks that home cooks add to the basic concept. From increasing the variety of spices to adapting the type of herbs used, each cook brings their own personality to the dish, making it unique yet familiar.

Regional variations of the Baked Feta Eggs can also be found across Mediterranean countries. Each region puts its own spin on the dish; for example, adding sparkling olives in Spain or incorporating red pepper flakes for added heat in Turkey. These adaptations celebrate local ingredients and customs, contributing to the dish’s international appeal.

Ingredient Deep Dive

Feta cheese is undoubtedly the heart of the Baked Feta Eggs recipe. This tangy, brined cheese has a rich history in Greek cuisine and is known for its crumbly texture. The accessibility of feta and its unique flavor make it an incredibly popular cheese worldwide. Nutritionally, feta is lower in fat than many cheeses, providing a flavorful addition to dishes without overwhelming calories. When selecting feta, opt for high-quality cheese from a reputable source for the best flavor.

Eggs are the primary protein source in this dish, known for their versatility and nutritional value. They are rich in proteins, vitamins, and essential amino acids. Fresh, organic eggs are recommended for the best taste and quality. Proper storage is key; always keep eggs in the refrigerator and check for freshness before use. For substitutions, consider egg whites or plant-based egg alternatives if you’re aiming for a lighter meal.

Fresh herbs like parsley, dill, or basil not only elevate the flavor profile but also add vibrant color to the dish. These herbs are often used in Mediterranean cooking and add depth and aroma while providing essential vitamins. Selecting fresh herbs often ensures maximum flavor, while dried herbs can be used in a pinch. Always store fresh herbs properly to maintain their flavor and consider seasonal variations for the best culinary experience.

Common Mistakes to Avoid

  • Using stale eggs: Always ensure your eggs are fresh for the best flavor and texture. Stale eggs can lead to undesirable outcomes in baking.
  • Overbaking: Keep an eye on the dish while it bakes. Overcooking can lead to rubbery eggs, while perfectly baked eggs will be fluffy and tender.
  • Not seasoning enough: Seasoning is key for flavor. Be sure to add enough salt to the dish, especially when using feta, which can be quite salty on its own.
  • Skipping the herbs: Fresh herbs enhance the dish’s flavor dramatically. Neglecting them will result in a one-dimensional taste.
  • Using low-quality feta: The cheese greatly impacts the final taste; ensure you choose high-quality feta for the best results.
  • Ignoring oven temperature: Make sure your oven is preheated adequately. An improperly heated oven can affect cooking times and outcomes.
  • Not adjusting for altitude: If cooking at high altitude, you may need to adjust cooking times and temperatures to achieve the same results.
  • Not monitoring while cooking: It’s important to keep an eye on the dish as it bakes to prevent burning and ensure it cooks evenly.
  • Skipping preheating the baking dish: Preheating the dish can help create a better texture for the baked feta and eggs, adding to the overall quality of the dish.

Essential Techniques

Achieving the perfect texture for your baked eggs is essential. To master this, start by whisking the eggs thoroughly before pouring them over the feta. This helps create a uniform texture throughout as they bake. Be on the lookout for a light golden color around the edges as a visual cue for doneness.

Another vital technique involves achieving the right temperature balance. Cooking the dish at the ideal temperature ensures that the eggs are set without becoming dry. Keep your oven temperature consistent and consider using an oven thermometer for accuracy, especially if you often encounter discrepancies with baking.

Incorporating the cheese is another key step. Crumbling the feta into smaller pieces allows it to melt and blend seamlessly with the eggs, enhancing flavor distribution. Ensure precise measurements and a light hand; too much feta could overpower the dish.

Utilizing fresh herbs is not just for aesthetics; their addition at the right moment can elevate the dish significantly. Adding them fresh just before serving ensures that they retain their vibrant flavor and aroma, while their vibrant colors enhance the dish’s presentation.

Pro Tips for Perfect Baked Feta Eggs

1. Use high-quality feta: Invest in the best feta cheese you can find for a more flavorful experience; it makes all the difference.
2. Experiment with herbs: Try different herbs to change the flavor profile and find your unique combination that best suits your taste.
3. Serve immediately: Baked Feta Eggs taste best fresh from the oven, so serve them hot for maximum enjoyment.
4. Pair with toast: A hearty piece of bread or toasted pita is ideal for scooping up the delicious eggs and feta.
5. Add veggies: Incorporating spinach, bell peppers, or tomatoes adds nutrition and vibrant colors to the dish.
6. Make it spicy: For those who enjoy a bit of a kick, adding red pepper flakes can elevate flavor and heat.
7. Adjust for dietary restrictions: Feel free to experiment with vegan cheese options if catering to specific dietary needs.
8. Presentation matters: Serve your dish in a colorful and inviting manner, garnishing with fresh herbs for a beautiful finish.

Variations and Adaptations

Baked Feta Eggs can be adapted to various regional cuisines. For a Mediterranean twist, incorporate olives or sun-dried tomatoes for an authentic flavor profile. Alternatively, try a Mexican version by adding jalapeños and garnishing with fresh cilantro for a slightly spicy option.

Incorporating seasonal adaptations is a great way to keep the recipe fresh. In spring, use asparagus or peas to add a pop of color and taste, while in fall, roasted pumpkin or squashes can provide earthiness and warmth.

For dietary modifications, make this dish vegan by swapping eggs with tofu and using a plant-based cheese alternative. Additionally, a low-carb version can be achieved by skipping the toast and opting for a salad garnish instead.

Flavor variations are endless — consider adding fragrant spices like cumin or smoked paprika for a robust twist. To change the dish’s texture, add crispy bacon or sautéed mushrooms to give it a savory crunch.

Presentation can also be altered by serving it in individual ramekins, each topped with a different herb mix or cheese. This creates a personalized touch and encourages guests to explore their flavors while dining.

Serving and Presentation Guide

Plating your Baked Feta Eggs correctly can enhance the dining experience significantly. Consider using a beautiful shallow baking dish to showcase the vibrant colors of the dish. Serve it directly from the oven for a rustic yet inviting feel.

Garnishing is an essential part of presentation. Sprinkling fresh herbs over the top not only adds brightness but encourages guests to dig in. A drizzle of olive oil can provide an attractive sheen and enhance flavors.

Traditionally, this dish pairs well with crusty bread or toasted pita that you can use for dipping or scooping. If you are looking for modern serving suggestions, consider accompanying it with a fresh arugula salad dressed in lemon vinaigrette to counterbalance the richness of the eggs and feta.

Temperature is key; serve the dish hot, fresh from the oven to retain the ideal texture of the eggs. As for portion control, individual servings can help maintain presentation quality and provide a delightful surprise as guests discover their servings.

Wine and Beverage Pairing

For wine enthusiasts, a crisp Sauvignon Blanc pairs beautifully with Baked Feta Eggs. Its acidity complements the creaminess of the feta while enhancing the flavors of fresh herbs. A light rosé can also work well, delivering a refreshing note to the palate.

If you prefer non-alcoholic options, consider serving the dish alongside a refreshing herbal iced tea. The fragrant notes of mint or chamomile will elevate your dining experience.

Coffee lovers can opt for a rich espresso; its robust flavors can highlight the dish’s savory components beautifully. If serving early in the day, a light, fruity mimosa may also add a celebratory touch to your brunch.

Mind the serving temperatures of your drinks, as chilled options balance the warm richness of Baked Feta Eggs and provide a refreshing contrast.

Storage and Shelf Life

Storing your Baked Feta Eggs properly is essential for maintaining freshness and flavor. Allow the dish to cool to room temperature before transferring it to an airtight container. It can be stored in the refrigerator for up to 3 days.

For optimal reheating, use an oven or a toaster oven to maintain texture integrity. Microwave reheating is possible but may result in a rubbery texture. Be sure to cover the dish if using a microwave to avoid drying it out.

Signs of spoilage include an unpleasant odor, discoloration, or changes in texture. Always trust your senses; if something doesn’t appear right, err on the side of caution.

Freezing is not generally recommended for this dish, as eggs can become watery upon thawing. However, if you choose to freeze, make sure to separate individual portions and consume the dish within 1-2 months for best taste.

Make Ahead Strategies

If you’re short on time, you can prepare several components ahead of time. For instance, crumbling the feta and chopping herbs can speed up the cooking process. Store each ingredient separately in airtight containers in the refrigerator until you’re ready to bake.

Assembling the dish is quick, needing only about 10 minutes to toss everything together before baking. Just remember to let everything come to room temperature if prepped earlier in the day.

The quality of each ingredient impacts the final product, so focus on using the freshest eggs and cheese possible to maintain flavor. If you worry about texture, avoid too many make-ahead steps that could compromise the final dish’s quality.

Reheating after assembly isn’t recommended, as the texture may suffer. Instead, bake the dish fresh when you’re ready to serve it for the best results. However, you can add fresh toppings right before serving for an additional layer of flavor.

Scaling Instructions

Scaling the recipe can be easy! If you want to halving the recipe, simply reduce the quantities of each ingredient by half, adjusting the baking time slightly if necessary, particularly if you scale down the portion size and pan.

Doubling or even tripling the recipe for a crowd is also straightforward. Just ensure you have a sufficiently large baking dish or divide the ingredients across multiple smaller dishes for even baking.

Equipment adjustments may be necessary when scaling, particularly with the size of the baking dish. Keep in mind that the cooking time may need to be adjusted; larger or deeper dishes may require longer cooking times, while small dishes may cook faster.

For storage considerations, consider how much of the dish you would like to keep as leftovers. Planning ahead means avoiding waste and ensuring maximum enjoyment for all your gatherings.

Nutritional Deep Dive

Analyzing the nutritional makeup of the Baked Feta Eggs reveals a balanced equation of proteins, fats, and carbohydrates. Each serving typically contains around 20 grams of protein, which is essential for muscle repair and overall health.

Micronutrient levels are also noteworthy, as the dish can provide significant amounts of calcium, vitamin A, and many B vitamins through the incorporation of eggs and feta cheese. This diversity makes it not only filling but also nourishing.

The health benefits of eggs are many; being a top source of choline, they support brain health, while feta offers healthy fats alongside its unique taste. Serving this dish as part of a varied diet can help in maintaining proper nutrition.

Considering portion sizes is crucial for weight management. Keep servings moderate and pair the dish with salads or lighter options for a more rounded meal, preventing overindulgence while still satisfying cravings.

Dietary Adaptations

Baked Feta Eggs can easily be modified to cater to different dietary needs. For a gluten-free version, simply ensure any accompaniments like bread are gluten-free and maintain the dish as is.

Dairy-free adaptations are also achievable; consider using dairy-free feta alternatives made from nuts or tofu to retain the delectable flavors while accommodating lactose intolerance.

For a vegan take, you can substitute the eggs with silken tofu, blending it to mimic egg texture, and further enhance with vegan cheese options.

Low-carb enthusiasts can skip any bread or traditional sides, opting for a fresh green salad or additional veggies for a satisfying meal without the carbs.

Keto and paleo diets can enjoy this dish as is, as it is naturally low in carbs while high in protein and healthy fats.

Troubleshooting Guide

If you find that your Baked Feta Eggs have a watery texture, this may be due to overcooking or the quality of eggs. Always check for doneness and remove the dish once the eggs set gently without being too firm.

Flavor balance issues often arise if you skimp on seasoning or use stale ingredients. Always taste test and adjust seasoning levels before cooking, and keep an eye out for the freshness of all components.

Temperature problems can occur if the oven isn’t properly preheated. Always ensure your oven is heated correctly before placing the dish inside to achieve even cooking.

If you face challenges with equipment damage or malfunctions, having a backup plan for oven timings can mitigate extensive delays in cooking.

Ingredient substitutions might lead to unexpected outcomes, especially when swapping proteins. Experiment carefully, adjusting flavors and cooking times as needed to achieve similar results.

Timing concerns can arise when preparing your dish. Adjust recipes and have everything prepped ahead of time to increase efficiency and prevent last-minute rushes in the kitchen.

Recipe Success Stories

Community feedback on Baked Feta Eggs has been overwhelmingly positive, with countless home cooks sharing their adaptations and experiences. Many enjoy experimenting with various herbs, sharing their delightful taste journeys on social media platforms.

Variation successes abound, with readers incorporating local ingredients into the recipe; whether it’s using smoked cheese or different seasonal vegetables, each story enriches the community and showcases the dish’s versatility.

Adaptation stories highlight how some have turned this dish into main courses or finger foods for gatherings, showcasing its flexibility beyond being a simple meal.

Photography tips and tricks have also been shared widely, emphasizing natural lighting and warm platings to convey the dish’s deliciousness through visuals, inspiring more cooks to try their hand at this lovely recipe.

Frequently Asked Questions

Can I make Baked Feta Eggs ahead of time?

While it’s best served fresh, you can prepare components like crumbled feta and chopped herbs ahead of time. Assembling and baking the dish just before serving ensures maximum flavor and perfect texture.

Can I substitute the feta cheese?

Yes, if you want a lactose-free option, you can use dairy-free feta or even a combination of creamy tofu and nutritional yeast for a similar flavor profile.

What can I serve with Baked Feta Eggs?

Baked Feta Eggs pair wonderfully with crusty bread, roasted vegetables, or a fresh salad. You can also serve it with avocado for added creaminess.

Is this dish suitable for a low-carb diet?

Absolutely! The Baked Feta Eggs are naturally low in carbs, making them an excellent choice for keto and paleo diets.

How do I know when it’s done cooking?

The dish is ready when the eggs are just set, and a light jiggle in the center is present. The edges should be slightly golden, and the feta fragrant.

Can I add additional toppings?

Indeed, toppings such as sautéed mushrooms, cherry tomatoes, or olives can elevate the dish. Just be mindful of moisture levels to maintain texture.

What type of herbs work best?

Fresh herbs like parsley, dill, or basil add wonderful flavors to the dish. Feel free to experiment and adjust according to your taste preferences.

Can I freeze the leftovers?

It’s not recommended to freeze the Baked Feta Eggs due to the change in egg texture. However, they can be stored in the refrigerator for about 3 days.

How can I make it vegetarian?

This dish is vegetarian by default, as it relies on eggs and cheese for protein. Just ensure your cheese choice aligns with vegetarian guidelines.

Will this dish work with different types of cheese?

Yes, while feta is traditional, other soft cheeses like goat cheese or cream cheese can also work beautifully if you prefer different flavors.

Additional Resources

If you’re interested in further exploring the world of Baked Feta Eggs, check out related recipes on our blog that utilize feta in unique ways. You can delve into technique guides for perfecting your baking skills, especially when it comes to egg dishes. Additionally, ingredient information on how to source the best-quality feta can enhance your culinary endeavors, alongside equipment recommendations to ensure efficient cooking.

Seasonal variations are also worth looking at, as pairing Baked Feta Eggs with seasonal ingredients can create new flavor combinations and delightful experiences.

Join the Conversation

We invite you to share your creations and experiences with Baked Feta Eggs on social media using our dedicated hashtag. Capture your photography adventures and engage with fellow food lovers in the community. Sharing recipe reviews and suggestions can cultivate connections and foster creativity in adapting this delightful dish. Join the conversation and inspire others to try their hand at making Baked Feta Eggs!

The Recipe

Baked Feta Eggs

Serves: 4

Prep Time: 10 mins

Cook Time: 25 mins

Total Time: 35 mins

Kitchen Equipment Needed

  • Oven-safe baking dish
  • Mixing bowl
  • Whisk or fork
  • Measuring cups and spoons
  • Serving spatula

Ingredients

  • 200g feta cheese, crumbled
  • 4 large eggs
  • 2 tbsp olive oil
  • 2 garlic cloves, minced
  • Fresh herbs (parsley, dill, or basil) for garnish
  • Salt and pepper to taste

Directions

  1. Preheat your oven to 190°C (375°F).
  2. In an oven-safe dish, spread crumbled feta evenly across the bottom.
  3. Drizzle olive oil over the feta and add minced garlic.
  4. Make four wells in the feta and carefully crack an egg into each well.
  5. Season with salt and pepper to taste.
  6. Bake for about 20-25 minutes or until the eggs are set but still slightly runny in the middle.
  7. Garnish with fresh herbs before serving.

Recipe Notes

  • Feel free to experiment with different vegetables in the dish, such as spinach or tomatoes.
  • This dish is best enjoyed fresh, but leftovers can be stored in an airtight container in the fridge for up to 3 days.
  • Adjust cooking time based on your preferred egg doneness.