Delightful Big Mama’s Cinnamon Roll Cake Recipe for Everyone

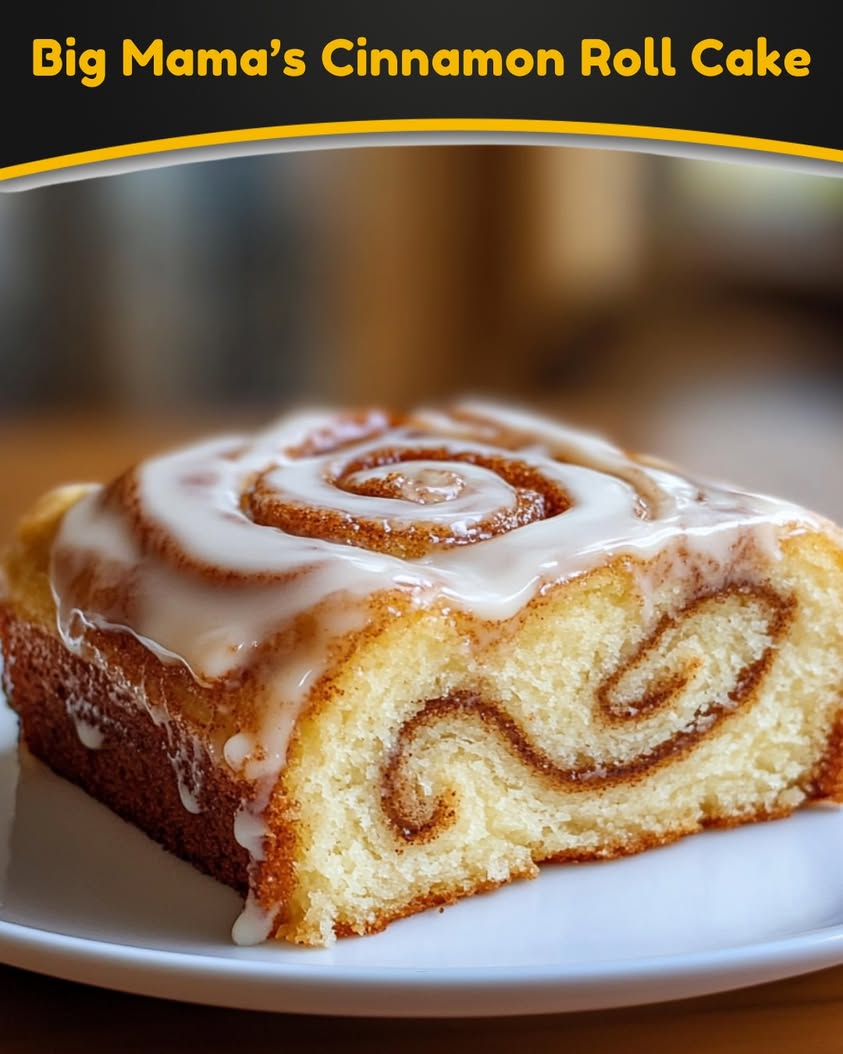
Big Mama’s Cinnamon Roll Cake: Indulge in Sweet Bliss!

⚖️
Difficulty
Easy

⏲️
Prep Time
15 mins

🕒
Cook Time
30 mins

⏱️
Total Time
45 mins

🍽️
Servings
12

Big Mama’s Cinnamon Roll Cake is a perfect treat combining the delightful flavors of cinnamon rolls into a moist, delicious cake. The sweet aroma of cinnamon fills your kitchen as it bakes, creating an inviting atmosphere that beckons friends and family to gather. This recipe captures the essence of nostalgia, reminiscent of Sunday brunches and family get-togethers where dessert is the star attraction.

What sets this cake apart is its rich, buttery texture combined with swirls of cinnamon sugar and a cream cheese glaze drizzled on top, making each bite a heavenly experience. The simplicity of the process allows you to enjoy your baking without the exhaustive efforts typically needed for traditional cinnamon rolls. Whether for a cozy family breakfast or a special gathering, this cake is guaranteed to make hearts and taste buds sing.

Quick Recipe Highlights

  • Flavor Profile: This cake features a harmonious blend of sweet and spicy flavors from the cinnamon, complimented by creamy notes from the glaze.
  • Texture: The cake is light and fluffy, with a luscious, gooey interior from the cinnamon filling that contrasts beautifully with the smooth glaze.
  • Aroma: The warm, inviting scent of cinnamon and baked cake creates a cozy ambiance in your home.
  • Visual Appeal: With its golden-brown top and a generous drizzle of cream cheese glaze, this cake is both inviting and beautiful.
  • Skill Level Needed: Perfect for novices and experienced bakers alike, this cake is easy to prepare and requires no special skills.
  • Special Equipment: A standard mixing bowl, a whisk, and a baking dish are all you need to create this indulgent treat.

Recipe Overview

  • Difficulty Level: This recipe is classified as easy, making it an ideal choice for beginners or those looking for a simple yet satisfying dessert.
  • Category: Big Mama’s Cinnamon Roll Cake falls into the dessert category, perfect for breakfast, brunch, or as a sweet snack.
  • Cuisine: This dish draws on classic American flavors, often enjoyed in Southern kitchens, highlighting a rich culinary tradition centered around comfort food.
  • Cost: The ingredients for this cake are affordable, making it a budget-friendly sweet treat for any occasion.
  • Season: This cake shines year-round but is especially delightful during fall and winter when cinnamon flavors are most appreciated.
  • Occasion: It’s a fitting centerpiece for birthdays, holiday celebrations, or simply an afternoon tea with friends.

Why You’ll Love This Recipe

Big Mama’s Cinnamon Roll Cake is not only a feast for the taste buds but also a celebration of comfort and nostalgia. The combination of sweet cinnamon sugar and soft cake creates an exciting taste experience that leaves you wanting more. The drizzle of cream cheese glaze adds a touch of sweetness that perfectly compliments the spiced notes, making it irresistibly delicious.

Convenience is key with this recipe. The straightforward method allows you to whip it up quickly without the need for extensive preparation, meaning you can spend more time with loved ones and enjoying the moment. Its no-fuss approach means that you can serve a stunning dessert that feels gourmet without the hustle of a time-consuming baking process.

From a nutritional perspective, this cake, while indulgent, serves as a treat to enhance your day. Made with simple ingredients, you can feel good about serving it to your family or bringing it to gatherings. Plus, sharing delightful homemade treats strengthens connections and creates cherished memories with friends and family.

Social gatherings blossom when you serve this cake. Its appealing aroma and inviting presentation make it a conversation starter. Create an inviting atmosphere that encourages people to gather, share stories, and enjoy good food.

Cost-effectiveness is another reason to love Big Mama’s Cinnamon Roll Cake. With inexpensive ingredients and a high yield, you can serve a crowd without straining your budget, ensuring that this dessert is a regular feature at your table.

Historical Background and Cultural Significance

The origins of cinnamon roll cake can be traced back to the beloved tradition of baking sweets in warm, comforting homes. This recipe pays homage to the classic cinnamon rolls of yesteryear, combining traditional flavors with modern convenience. Originating in various cultures, the cinnamon-spiced cakes are loved in many regions, particularly around festive seasons.

Culturally, cinnamon has long been associated with warmth and hospitality, often used in recipes meant to bring people together. Big Mama’s Cinnamon Roll Cake embodies this spirit, serving as a centerpiece in family gatherings and celebrations, symbolizing love and togetherness in every slice.

Over the years, the recipe has evolved as families adapt it to their own preferences. While traditional recipes called for labor-intensive rolling and shaping of dough, this cake simplifies the process while still preserving the core flavors that make cinnamon rolls a favorite.

Regional variations abound, showcasing how different cultures embrace the essence of cinnamon in their baking. From Southern households to Scandinavian traditions, each twist on the cinnamon roll tells a story of comfort and joy, and this cake is a delicious adaptation that continues that legacy.

Ingredient Deep Dive

The hallmark of Big Mama’s Cinnamon Roll Cake is, of course, the cinnamon. Historically revered for its rich flavor and aromatic qualities, cinnamon has made its way through ancient trade routes, becoming popular in various cuisines across the globe. Nutritionally, it boasts health benefits, including potential anti-inflammatory and antioxidant properties. When selecting cinnamon, opt for Ceylon cinnamon for its superior flavor, and be sure to store it in a cool, dark place for longevity. If unavailable, Vietnamese or Cassia cinnamon can be excellent alternatives, although their flavors will differ slightly.

Next is the crucial ingredient: flour. This key element provides the cake’s structure. Flour has been a staple in human diets for thousands of years, forming the basis of many baked goods. Whole wheat flour offers added nutrients compared to all-purpose flour and can be used to elevate the nutritional profile of the cake. For those with gluten sensitivities, gluten-free flour blends work wonderfully and can be matched with additional leavening agents to maintain cake integrity.

Lastly, the star of the glaze, cream cheese, adds richness to the cake. Cream cheese, a popular ingredient in baked goods, has its roots in American cuisine from the 19th century. Nutritionally, it provides a creamy texture in moderation. Look for softened cream cheese to ensure a smooth glaze blend; consider Neufchâtel as a lighter substitute without sacrificing taste. Keep cream cheese refrigerated and expect to use it within 10 days of opening for the best quality.

Common Mistakes to Avoid

  • Overmixing the batter: This can lead to a dense cake instead of a light and fluffy texture. Mix just until combined for the best results.
  • Skipping the cream cheese glaze: The glaze is essential for adding flavor and moisture. Never skip it, as it defines the whole dish.
  • Not measuring ingredients correctly: Precision is key in baking. Use a kitchen scale when possible for accuracy.
  • Using cold ingredients: Allow eggs and cream cheese to reach room temperature before mixing to ensure a smoother batter.
  • Baking at the wrong temperature: Always preheat your oven. Baking at an incorrect temperature can affect the cake’s rise and texture.
  • Not letting the cake cool: Allow the cake to cool completely before cutting to prevent it from falling apart.
  • Using stale spices: Ensure your cinnamon and baking powder are fresh for optimal flavor and rise.
  • Ignoring baking time: Every oven is different. Start checking for doneness a few minutes before the recommended baking time to avoid overbaking.
  • Skipping the swirl: This step adds texture and flavor. Don’t rush and ensure the filling is well incorporated.
  • Not having enough glaze: Make extra glaze if needed to ensure every slice gets that perfect drizzle.

Essential Techniques

One vital technique for Big Mama’s Cinnamon Roll Cake is the proper mixing of your batter. This is important because it determines the lightness of your cake. Start by creaming your butter and sugar until combined and fluffy, then gradually add your eggs and dry ingredients. Avoid overmixing, as this can lead to a dense texture rather than the soft cake you desire.

Another critical technique is the cinnamon swirl. To achieve this, spread the filling evenly over the batter before rolling it up. Use a spatula for an even layer to ensure that each slice reveals the beautiful swirls of cinnamon sugar. The visual appeal after baking is as much about aesthetics as it is about taste.

Pro Tips for Perfect Big Mama’s Cinnamon Roll Cake

1. Use high-quality cinnamon for the best flavor impact.
2. For a richer cake, substitute browned butter in place of regular butter for a nutty flavor.
3. If the glaze is too thick, add a dash of milk to reach desired pourability.
4. Make sure to rotate your cake halfway through baking for an even cook.
5. For added texture, consider folding in chopped nuts or chocolate chips into the batter.
6. If you prefer a spicier flavor, consider adding a pinch of nutmeg to the batter.
7. Chill your cream cheese before combining it with the other glaze ingredients for easier mixing.
8. Experiment with different extracts, like vanilla or almond, to create unique flavor variations.

Variations and Adaptations

This recipe can easily be adapted to incorporate seasonal flavors, such as pumpkin or apple butter during the fall. To create a pumpkin spice variation, simply substitute half of the liquid with pumpkin puree and add spices like nutmeg and ginger to the batter.

For a healthier twist, you can replace some of the all-purpose flour with almond or coconut flour. This will create a gluten-free version as well, appealing to various dietary needs.

Additionally, for those with sweet tooth cravings, experimenting with fillings can lead to delightful surprises. Consider trying a chocolate filling by adding cocoa powder to the filling mix or using fruit preserves for a fruity take.

Finally, serving suggestions can include pairing it with fresh berries or a scoop of vanilla ice cream for an indulgent dessert experience.

Serving and Presentation Guide

Plating techniques for Big Mama’s Cinnamon Roll Cake can turn a simple dessert into a show-stopping centerpiece. Slice the cake into even portions and arrange them on a large platter. Dust the cake lightly with powdered sugar for an elegant look and add sprigs of mint for a pop of color.

Garnishing ideas can include fresh fruit, such as strawberries or raspberries, to balance the sweetness of the cake. Serving fresh whipped cream on the side allows for a customizable dessert experience.

For traditional accompaniments, serving along with a hot cup of coffee or tea enhances the enjoyment of the flavors. Consider drizzling additional glaze over individual servings or adding a scoop of vanilla ice cream for a delightful contrast of temperatures.

When it comes to temperature, serving the cake slightly warm is recommended as it enhances the flavors. Portion control is another important aspect, especially for parties; consider slicing into smaller pieces for guests to enjoy without feeling guilty.

Wine and Beverage Pairing

Big Mama’s Cinnamon Roll Cake pairs beautifully with a variety of wines. A light, sweet dessert wine, such as a Riesling or Moscato, complements the sweetness of the cinnamon and cream cheese glaze, creating a harmonious balance with each sip.

For non-alcoholic alternatives, a vanilla chai tea can mirror the flavors of the cake, providing a warm and cozy pairing that enhances the overall experience.

Coffee lovers will delight in pairing this cake with a rich, dark roast coffee. The bold flavors of the coffee contrast nicely with the soft sweetness of the cake, creating a delightful combination.

When serving beverages, consider temperature; wines should be chilled, while coffee can be served hot. This allows for dynamic tastes with every bite and sip, enhancing your dining experience.

Storage and Shelf Life

To prolong the life of Big Mama’s Cinnamon Roll Cake, proper storage is crucial. Keeping it in an airtight container at room temperature for up to three days will maintain its deliciousness. For longer storage, refrigerate the cake for up to a week.

When storing cake, be sure it has fully cooled to prevent condensation, which can make the cake soggy. If you plan to keep it longer, freezing the cake is an option – wrap it tightly in plastic wrap and aluminum foil to preserve freshness. Frozen, it can last up to three months.

Signs of spoilage include unusual smells or mold appearing, which should prompt immediate disposal. Reheating in the microwave for a few seconds can freshen up the cake after storage.

If you decide to freeze your cake, ensure you let it thaw in the refrigerator before enjoying it to maintain the right texture and flavors.

Make Ahead Strategies

If you’re looking to enjoy Big Mama’s Cinnamon Roll Cake with minimal last-minute chef work, several make-ahead strategies can be employed. Prepare the cake batter one day in advance and store it in the refrigerator until you are ready to bake. This not only saves time but allows the flavors to meld beautifully.

You can also mix the cinnamon filling in advance. Keep it in a separate container in the fridge to streamline the process on baking day.

When you’re ready to bake, simply assemble the components and follow the recipe directions closely. Consider making extra glaze ahead of time, as it can be stored in an airtight container in the fridge for up to one week.

To maintain freshness, avoid frosting the entire cake until ready to serve, keeping the icing from soaking into the cake and preserving its moisture level.

Scaling Instructions

Scaling Big Mama’s Cinnamon Roll Cake for different serving sizes is straightforward. To halve the recipe, simply reduce all ingredients by half and use a smaller baking dish. Ensure that you also monitor the baking time closely, as it may be slightly less.

If you’re looking to double or triple the recipe for a larger gathering, adjust ingredients accordingly and consider using additional baking pans to avoid overcrowding in a single dish which can lead to uneven baking.

Equipment adjustments may be needed for larger quantities; be prepared for larger bowls and mixing tools. Timing modifications are crucial; with a larger cake or multiple cakes, ensure consistency by checking each for doneness individually.

For optimal storage, larger cakes will require larger containers, as well as adjusting cooling times before wrapping.

Nutritional Deep Dive

Analyzing the nutrition profile of Big Mama’s Cinnamon Roll Cake, you’ll find that it brings a delightful mix of macro and micronutrients as a dessert. With flour as the base, it provides carbohydrates for energy. To balance out the calories, consider moderating portion sizes to accommodate any dietary goals.

In terms of micronutrients, ingredients like cinnamon boast health benefits such as improved insulin sensitivity, while cream cheese and butter provide healthy fats. Depending on the ingredients used (i.e., whole wheat flour), this dessert can also provide additional fiber.

Assessing portion analysis, a standard slice should be roughly calculated to ensure balanced indulgence. Weight management tips include enjoying it mindfully and complementing the dessert with fruits or yogurt for added nutrients.

Dietary Adaptations

For those with dietary restrictions, various adaptations can transform Big Mama’s Cinnamon Roll Cake into a fitting treat for everyone. For a gluten-free version, substitute all-purpose flour with a 1:1 gluten-free flour blend ensuring optimal texture and flavor while accommodating gluten sensitivities.

To create a dairy-free option, replace the cream cheese with vegan cream cheese and use nut or coconut milk as a substitute for the milk. This will satisfy those seeking dairy-free desserts while maintaining the delightful taste of the cake.

For vegan adaptations, swap eggs with flaxseed meal or applesauce, ensuring moisture and binding are retained. This opens up a delectable treat for those adhering to plant-based diets.

Keto or low-carb desserts can be made by using almond flour and a sugar substitute to lower carbohydrate content while preserving flavor.

Troubleshooting Guide

If you find your cake too dense, check your mixing technique; overmixing is a common culprit. Always mix just until ingredients are combined.

Flavor imbalances can occur if the glaze is too sweet. Balance it by adding a pinch of salt or a splash of vanilla extract to elevate flavors.

Temperature problems can arise if the oven isn’t preheated properly. Investing in an oven thermometer can ensure accurate baking temperatures.

Equipment challenges, such as using the wrong size pan, can impact baking time and structure. Always familiarize yourself with your baking tools beforehand.

Timing concerns can result in underbaked or overbaked cake. Make sure to check for doneness with a toothpick inserted into the center – it should come out clean.

Using old or stale ingredients, especially baking powder, can affect your cake rises, leading to disappointing final products. Always check freshness dates before starting.

Recipe Success Stories

Community engagement around Big Mama’s Cinnamon Roll Cake is vibrant, with many readers sharing their successes and adaptations. Feedback has shown that people appreciate the moist texture and how accessible the recipe is for novice bakers, with several community members sharing photos of their own creations on social media platforms.

Readers have enjoyed suggesting variations, with some incorporating chocolate chips, while others have experimented with different flavored glazes, resulting in unique takes on the classic recipe.

Adaptation stories showcase the creative ways people personalize the cake; one reader substituted pumpkin puree for an autumn twist, which was met with rave reviews.

Photographers in the community have also taken to sharing tips on capturing the cake’s inviting texture and delicious icing, helping others to highlight their baking results.

Frequently Asked Questions

Can I freeze Big Mama’s Cinnamon Roll Cake?
Yes, you can freeze it! Ensure that you wrap the cake tightly for storage and it will last up to three months in the freezer. Thaw in the refrigerator before serving.

How long will the cake stay fresh?
When stored in an airtight container at room temperature, the cake will remain fresh for about three days. Refrigerating can extend its life to about a week.

Can I make this cake dairy-free?
Absolutely! Substitute the cream cheese with vegan cream cheese and the butter with a dairy-free alternative for a delicious dairy-free version.

Is it possible to make this cake gluten-free?
Yes, you can use a gluten-free flour blend in place of all-purpose flour to make the cake suitable for gluten-free diets.

What’s the best way to slice the cake?
Ensure the cake is completely cooled before slicing to maintain its structure and prevent crumbling.

Can I add extra flavors to the glaze?
Yes! Consider adding extracts like vanilla or almond to the glaze for an extra flavor boost.

What do I serve with this cake?
This cake pairs beautifully with coffee, tea, or even a scoop of vanilla ice cream for a delightful dessert experience.

How do I know when the cake is done baking?
The cake is ready when a toothpick inserted into the center comes out clean.

Can I use a different kind of sugar?
Yes! While granulated sugar is standard, you can use brown sugar for a deeper flavor profile.

How do I store leftovers?
Store leftover cake in an airtight container at room temperature or refrigerate it to keep it fresh and moist.

Additional Resources

For those who love baking, exploring related recipes can be a delightful endeavor. Check out other sweet breakfast treats, such as blueberry muffins or banana bread, to complement your brunch spread. Consider browsing technique guides for baking basics that can enhance your overall skills. Ingredient recommendations can help you discover the best brands for spices and baking essentials, ultimately leading to better results in your culinary journey.

Seasonal variations abound for this recipe; during the holiday season, consider creating a cranberry glaze to top the cake for a festive touch.

Join the Conversation

We love to hear your thoughts on Big Mama’s Cinnamon Roll Cake! Share your experiences, variations, and photography on social media with the hashtag #BigMamasCinnamonRollCake. Your feedback not only inspires others but also creates a community of baking enthusiasts eager to indulge in delicious moments. Engage with fellow bakers by leaving comments or suggestions, and let’s continue to celebrate our love for food together!

The Recipe

Big Mama’s Cinnamon Roll Cake

Serves: 12

Prep Time: 15 mins

Cook Time: 30 mins

Total Time: 45 mins

Kitchen Equipment Needed

  • Mixing bowl
  • Whisk
  • 9×13 inch baking pan
  • Spatula
  • Measuring cups and spoons

Ingredients

  • 2 cups all-purpose flour
  • 1 cup granulated sugar
  • 2 teaspoons baking powder
  • 1/2 teaspoon salt
  • 1 cup milk
  • 1/2 cup butter, melted
  • 2 large eggs
  • 1 tablespoon vanilla extract
  • 1 tablespoon ground cinnamon
  • 1/2 cup brown sugar
  • 1 cup cream cheese, softened
  • 2 cups powdered sugar

Directions

  1. Preheat your oven to 350°F (175°C).
  2. In a large mixing bowl, combine flour, sugar, baking powder, and salt.
  3. In a separate bowl, mix milk, melted butter, eggs, and vanilla extract.
  4. Pour the wet ingredients into the dry ingredients and stir until just combined.
  5. In a small bowl, mix brown sugar and cinnamon.
  6. Spread half of the batter in a greased baking pan, and sprinkle the cinnamon-sugar mixture over it.
  7. Top with the remaining batter, spreading evenly.
  8. Bake for 30 minutes, or until a toothpick comes out clean.
  9. For the glaze, mix cream cheese and powdered sugar until smooth, then drizzle over the cooled cake.

Recipe Notes

  • For a richer glaze, incorporate a teaspoon of vanilla extract.
  • Feel free to add nuts or chocolate chips to the batter for added texture.
  • Store leftovers in an airtight container to maintain freshness.

Delicious Traditional Manchester Tart Recipe: A Classic Delight

Traditional Manchester Tart: A Taste of British Culinary Heritage

⚖️
Difficulty
Medium

⏲️
Prep Time
30 mins

🕒
Cook Time
45 mins

⏱️
Total Time
75 mins

🍽️
Servings
8 Servings

The Traditional Manchester Tart is a delightful dessert that embodies the rich culinary heritage of Manchester, England. With its buttery pastry, creamy filling, and the indulgent sweetness of jam and coconut, this dessert is a nostalgic treat for many. The combination of textures and flavors—crisp pastry, smooth custard, and chewy coconut—creates a delightful experience that transports you straight to the heart of British baking tradition. Each bite brings warmth and comfort, making it a perfect dessert for gatherings or a special treat after dinner.

Historically, the Manchester Tart has roots dating back to the 19th century, making it a loved staple in many households. It is often associated with communal and family gatherings, celebrating not just food but cherished memories. Making this tart fills your kitchen with mouthwatering aromas, enticing the senses and inviting everyone to join in on the fun of baking. Whether enjoyed as a dessert at a birthday party or a comforting treat with tea, the Traditional Manchester Tart’s charm is undeniable.

Quick Recipe Highlights

  • Flavor Profile: The tart features a lush vanilla custard paired with a bright layer of raspberry or strawberry jam, offering a wonderful contrast between nutty and fruity flavors.
  • Texture: The buttery pastry provides a crisp base while the custard offers a smooth, creamy filling, topped with crunchy coconut for added chewiness.
  • Aroma: The enticing blend of vanilla, coconut, and fruity notes fills the air while baking, creating a comforting and inviting aroma.
  • Visual Appeal: The tart is visually stunning, with its golden-brown crust, vibrant fruit jam, and snowy topping of coconut that makes it an eye-catching dessert.
  • Skill Level Needed: This recipe is suitable for home bakers with some experience in pastry-making, though it is accessible to enthusiastic beginners too.
  • Special Equipment: A 9-inch tart pan is essential for this recipe, alongside basic baking tools like mixing bowls and a whisk.

Recipe Overview

  • Difficulty Level: This Traditional Manchester Tart balances simplicity with technique, making it approachable for those familiar with basic baking methods.
  • Category: This dessert falls under baked goods and sweets, perfect for enjoying with coffee or tea.
  • Cuisine: Rooted in British cuisine, the tart reflects local ingredients and culinary traditions, having been beloved across generations.
  • Cost: Estimated costs are quite reasonable, with basic kitchen staples like flour, butter, and eggs forming the backbone of the recipe.
  • Season: This delicious tart can be enjoyed year-round, but it is particularly popular in the spring and summer, when fresh fruits are abundant.
  • Occasion: Perfect for celebrations, family dinners, or casual afternoon tea, this tart is versatile for numerous occasions.

Why You’ll Love This Recipe

The Traditional Manchester Tart tantalizes the taste buds with its delectable blend of flavors. The creamy custard coated with a tangy fruit jam creates a harmony that delights at every bite. The addition of coconut adds a burst of tropical essence, making the taste experience even more exciting. Each component brings its unique touch, allowing the taster to explore layers of flavor and texture, creating an unforgettable dessert.

In addition to its delightful taste, the preparation of this tart offers the perfect combination of convenience and enjoyment. While the baking process takes some time, the steps are straightforward and allow for creative expression. The satisfaction derived from making this traditional recipe from scratch is unmatched, offering a rewarding baking experience that you can share with loved ones. Plus, it can be made ahead of time, making it a great option for stress-free entertaining.

Nutritionally, the ingredients in a Traditional Manchester Tart provide a mix of energy and flavor. While it is a dessert, using high-quality ingredients such as fresh eggs and butter ensures that every bite is a pure indulgence. The recipes allow for some flexibility in ingredients, encouraging you to substitute based on your preferences and dietary needs, enhancing accessibility for various lifestyles.

Socially, this dessert serves as a perfect centerpiece for gatherings. Whether shared at festive occasions or enjoyed during cozy family dinners, the tart encourages conversations and connection. Its delightful presentation and known history create a focal point, proudly serving as both a conversation starter and a shared experience among loved ones.

Lastly, budget-conscious bakers will appreciate the affordability of the Traditional Manchester Tart. Utilizing common pantry staples allows anyone to whip this indulgent dessert without breaking the bank. The accessibility of the ingredients combined with the ease of preparation makes this tart an attractive option for both novice and experienced bakers alike.

Historical Background and Cultural Significance

The origin of the Traditional Manchester Tart can be traced back to the industrial revolution in Britain, specifically in Manchester. During this period, many traditional recipes emerged as families sought to create delicious yet cost-effective meals suitable for growing households. The tart became a beloved treat as it could be easily made at home and enjoyed by the whole family.

Culturally, the Manchester Tart holds significant nostalgia for many. It often reminds people of Sunday dinners and community gatherings, representing warmth and togetherness. Additionally, schools and cafés frequently featured this dessert on their menus, further entrenching its status in British culinary tradition. Its ongoing popularity highlights the communal values of sharing good food, connecting generations through recipes passed down through families.

Over the years, the Traditional Manchester Tart has evolved, with various interpretations emerging across the country. Modern twists often replace traditional vanilla custard with different flavors or incorporate various fruit jams, showcasing the versatility of this beloved dessert. Despite these changes, the essence of the tart remains, keeping its historical roots firmly planted while allowing creativity in the kitchen.

Regionally, variations of the tart can be found outside Manchester, adapting to local tastes and ingredient availability. In some areas, the pastry might be topped with different fruits, while others might incorporate unique spices or flavorings. This adaptability ensures that the Manchester Tart remains relevant in contemporary baking despite its historical origins.

Ingredient Deep Dive

Flour: Flour serves as the foundation for the pastry crust, and the type used can influence the texture. All-purpose flour is suitable for a balanced pastry, while pastry flour offers a more tender crust due to lower protein content. Choosing high-quality organic flour can enhance the flavor and nutritional profile of your tart.

When selecting flour, look for brands that prioritize quality and freshness. Store your flour in a cool, dry place for optimal shelf life, and consider refrigerating it for longer-term storage. If you’re in need of a substitute, almond flour can be an alternative for a gluten-free crust, though it may alter the texture and flavor.

Butter: Butter adds richness and flavor to both the pastry and custard layers of the tart. It is crucial to use high-quality, unsalted butter, as this allows you to control the salt in your recipe more effectively. Butter also aids in creating a flaky texture when incorporated properly into the dough.

For storage, keep butter in the refrigerator, ideally wrapped tightly to prevent oxidation. If you’re considering a dairy-free option, coconut oil or vegan butter can provide a similar consistency, although they may affect the flavor profile of the finished dessert.

Coconut: Desiccated coconut adds texture and flavor to the topping of the tart, giving it a signature crunchy finish. It offers a tropical essence that pairs beautifully with the creamy custard and fruity jam. Beyond its delightful taste, coconut is rich in nutrients like fiber and healthy fats.

When purchasing coconut, look for unsweetened varieties to control the sugar content of your dessert. Store it in an airtight container in a cool, dry place to maintain its freshness. If desired, you can experiment with alternative toppings like crushed nuts or oats for a different flavor profile.

Jam: The choice of jam is vital in creating the perfect flavor balance in a Traditional Manchester Tart. Raspberry, strawberry, or apricot jams are popular due to their bright flavors, but you can also explore other fruit options to match your preference. High-quality jams made from real fruit will enhance the overall taste of your dessert.

Select a jam that is thick and spreadable, avoiding overly sweet or artificial products to ensure the integrity of your tart. Jams can generally be stored in the pantry, but once opened, they should be refrigerated. If you want a lower-sugar option, homemade fruit spreads can be an excellent alternative.

Eggs: Eggs are crucial for creating a rich custard filling in the Manchester Tart. They provide structure and stability to the custard while enriching its flavor. Fresh, organic eggs are recommended for the best results, ensuring a vibrant color and taste.

When selecting eggs, look for those that are free-range or organic for higher nutrient content. Store eggs in their original carton in the refrigerator to maintain freshness. For those with egg allergies, try using a custard powder or a recipe involving cornstarch as an alternative thickening agent.

Common Mistakes to Avoid

  • Overworking the Pastry Dough: One of the most common mistakes when making tart pastry is overworking the dough, which can lead to a tough texture. Instead, mix until just combined and handle the dough as little as possible.
  • Incorrect Oven Temperature: Baking at the wrong temperature can affect the tart’s texture and doneness. Ensure your oven is properly preheated to achieve an evenly baked crust and custard.
  • Using Cold Ingredients: For optimal texture, especially in pastry, ingredients like butter should be cold. However, for custard, room temperature eggs can help attain a smoother mixture, so balance is essential.
  • Forgetting to Blind Bake: Skipping the blind baking step can result in a soggy crust, making for an unappetizing tart. Always blind bake the pastry to ensure it holds its shape and achieves a desirable texture.
  • Not Letting the Tart Cool: Allow the tart to fully cool before slicing to ensure clean slices and maintain the integrity of the filling. Busting into a warm tart can turn it into a messy affair.
  • Choosing a Poor Quality Jam: The jam quality greatly influences the final flavor. Opting for cheap, overly sweet jams can diminish the dessert’s potential. Always choose high-quality fruit preserves.
  • Serving Too Soon: While the tart may look tempting right out of the oven, it’s best served cold or at room temperature for optimal flavor. Giving it time allows the custard to set well.
  • Not Following the Recipe: Baking requires precision, so when experimenting with variations, it is crucial to measure accurately and follow the recommended amounts for each ingredient.
  • Ignoring Ingredient Temperature: The temperature of ingredients can impact how they combine. For instance, room temperature eggs mix better into custards and custard-like fillings than cold eggs.
  • Neglecting to Use a Tart Pan: Using a regular pie dish instead of a tart pan can result in uneven baking and difficulty in removing the tart. A tart dish provides the guidance and shape for that picturesque presentation.

Essential Techniques

Blind Baking: Blind baking is a technique that involves pre-baking crusts before the filling is added. This step is essential for ensuring a crisp pastry and preventing a soggy bottom. To master blind baking, line your crust with parchment and fill it with pie weights or dry beans to keep it weighed down. Bake until the edges are lightly golden, then remove the weights to finish baking the base and achieve perfect doneness.

Custard Preparation: Creating a smooth custard filling is important for the success of a Traditional Manchester Tart. Start by whisking eggs and sugar until creamy, then gradually add warmed milk and flavorings. To avoid curdling, ensure that the milk isn’t boiling and gradually temper the eggs before combining. Look for a custard that coats the back of a spoon for a sign that it’s properly thickened.

Making a Flaky Pastry: Achieving a flaky pastry requires both technique and temperature. Use cold butter, and work quickly to incorporate it into your flour without melting it. Use a light hand to avoid overworking the dough and keep it chilled until ready to bake. Checking for a granular texture with visible bits of butter just before chilling the dough is a reliable indicator that it will turn out beautifully flaky.

Decanting the Tart: Once the tart is baked and cooled, properly decanting it involves using a sharp knife to gently loosen the edges before carefully lifting it from the tart pan. This step is important for showcasing your hard work and ensuring a pristine presentation. Always allow for cooling time to prevent any breakage during this process.

Pro Tips for Perfect Traditional Manchester Tart

  1. Use high-quality ingredients for the best flavor and texture; the quality of butter, eggs, and jam can drastically alter the outcome.
  2. Chill the pastry dough before rolling to help it maintain its shape during baking and prevent shrinkage.
  3. Experiment with flavor additions such as lemon zest in the custard for an extra refreshing note.
  4. Consider using a mixture of different jams to layer flavors, combining sweet and tart for a complex taste.
  5. Garnish with toasted coconut on top for a delightful crunch and a visual appeal that enhances presentation.
  6. Let your tart sit for a few hours—or even overnight—in the fridge to allow the flavors to meld perfectly.
  7. Pay attention to how the custard sets while baking; a gentle jiggle in the middle indicates it’s ready to come out of the oven.
  8. For added sweetness, serve with lightly whipped cream or a dusting of powdered sugar just before serving.

Variations and Adaptations

Regional Variations: While the Traditional Manchester Tart is iconic, different regions may feature unique adaptations. For instance, incorporating local fruits in place of traditional jams can create a fresh take on this recipe, reflecting seasonal produce availability.

Seasonal Adaptations: Modify this tart based on what fruits are in season. Using summer berries or autumn apples can bring new exciting flavors to the classic recipe while keeping it relevant throughout the year.

Dietary Modifications: Adjust the recipe to suit dietary preferences by substituting gluten-free flour for the crust or using almond milk for a dairy-free custard. These adaptations allow the Manchester Tart to reach a wider audience without compromising its essence.

Flavor Variations: Alter the custard to include different flavor infusions such as chocolate or coffee for a rich twist. These variations can appeal to different taste preferences while retaining the classic tart structure.

Texture Modifications: Experiment with the texture of the filling by incorporating ricotta or mascarpone cheese into the custard for a creamier experience, enhancing the richness while maintaining the underlying flavors.

Presentation Alternatives: Rather than serving as a whole tart, consider portioning into individual tartlets for a sophisticated modern presentation. These mini treats allow for creative garnishing and are perfect for events and gatherings.

Serving and Presentation Guide

To present your Traditional Manchester Tart beautifully, consider classic plating techniques that showcase its delightful layers. A simple yet elegant approach involves placing a slice on a simple, clean plate with a dollop of whipped cream or a scoop of vanilla ice cream next to it. Dusting the plate with a light sprinkle of powdered sugar can enhance the visual appeal, drawing attention to the tart’s vibrant colors.

Garnishing ideas can range from fresh berries to mint leaves, adding a pop of color that complements the tart’s iconic look. Traditional accompaniments like clotted cream or custard sauce can elevate the dessert, providing a creamy counterpoint to the tart’s texture. For a modern twist, consider plating with a drizzle of warm raspberry sauce or a fruit coulis for added sophistication.

While most enjoy this tart cold or at room temperature, consider serving it alongside a warm beverage, like freshly brewed tea or coffee, to create a comforting ambiance. For portion control, especially at larger gatherings, slicing into smaller wedges allows guests to sample without overindulging, making it easier to enjoy a variety of desserts.

Wine and Beverage Pairing

For an exquisite dining experience, pairing your Traditional Manchester Tart with the right wine can elevate the flavors beautifully. A medium-bodied dessert wine, such as a Muscat or a late-harvest Riesling, pairs well due to its natural sweetness, complementing the tart’s fruitiness.

If you prefer a non-alcoholic option, serving with iced tea or fruit-infused water can keep the flavors refreshing. Other warm beverages like chamomile or Earl Grey tea blend nicely with the dessert’s creamy qualities, making them ideal companions for an afternoon tea setting.

Don’t forget about coffee pairings! A light roast coffee can enhance the flavors of the tart, balancing its sweetness without overwhelming the palate. Serving these beverages at appropriate temperatures ensures that both tart and drink complement one another seamlessly.

Storage and Shelf Life

To ensure the best quality for your Traditional Manchester Tart, proper storage is crucial. Once cooled, cover the tart with plastic wrap or store it in an airtight container to maintain freshness. It’s best kept in the refrigerator, where it can last for up to 3-4 days.

For longer storage, consider freezing individual slices wrapped tightly in plastic wrap and placed in an airtight container. When stored this way, the tart can retain its quality for up to two months. To enjoy, simply thaw in the refrigerator overnight before serving.

Keep a watch out for signs of spoilage, such as changes in color or texture, particularly if it contains fruit fillings. If reheating, do so gently in a preheated oven to avoid overcooking the custard, ensuring it returns to its original creamy consistency.

Make Ahead Strategies

Preparing your Traditional Manchester Tart ahead of time can save stress on the day of serving. You can make the pastry shell and freeze it, allowing for flexibility in your baking schedule. Once cooled, store it until you’re ready to fill it with custard.

For added convenience, you can prepare the custard filling a day or two in advance, refrigerating it until you’re ready to assemble. Just ensure that the custard is properly chilled and sealed. When ready, reheat gently before filling the tart to ensure it blends smoothly.

Keep fresh elements in mind; while the tart holds up well with its fillings, consider adding garnishes like fresh fruit or whipped cream just before serving to enhance freshness and visual appeal.

Scaling Instructions

Scaling your Traditional Manchester Tart can be accomplished easily! For halving the recipe, adjust each ingredient proportionally to maintain flavor balance. Use a smaller tart pan to replicate the same height and fill.

Doubling or tripling the recipe is also feasible; just ensure you have sufficient baking pans and manage your oven space wisely. Baking times may vary slightly, so monitor carefully for doneness, especially with larger quantities.

When scaling up, consider the equipment size; a larger mixing bowl helps keep things organized during preparation. Keep in mind that while ingredient scaling is straightforward, baking time increases with larger volumes, so use visual cues as your guide throughout the process.

Nutritional Deep Dive

A Traditional Manchester Tart offers a pleasing combination of macronutrients. Carbohydrates predominantly come from the pastry and custard, providing quick energy. The butter and eggs contribute to the protein and fat content, yielding satisfying richness.

In terms of micronutrients, the tart offers essential vitamins and minerals, particularly from eggs and any fruit used as jam. Nutritional benefits include calcium from the dairy components and vitamins from fresh fruit options. For those mindful of diet, it’s worth noting portion sizes, as moderation allows indulgence in this delightful dessert without guilt.

Portion control is crucial for those managing weight; consider offering small slices to enjoy the flavors without overindulging. Furthermore, using high-quality, natural ingredients can enhance health benefits, making this traditional dessert a rewarding treat.

Dietary Adaptations

For a gluten-free version of the Traditional Manchester Tart, substitute regular flour with a gluten-free blend designed for baking. Opt for good-quality baking flour to ensure a tender crust without compromising on flavor.

Dairy-free adjustments can include using coconut cream and a plant-based butter alternative to achieve a similar creamy texture in the custard. This version retains the traditional flavor while catering to those with lactose intolerance.

Vegan adaptations involve using egg substitutes, such as flax eggs or commercial egg replacers, blended with plant-based milk for the custard. These alternatives can maintain the tart’s original essence while making it accessible for vegan diets. Other options to explore include low-carb variations that utilize almond flour or sugar substitutes for a keto-friendly dessert.

Troubleshooting Guide

Encountering challenges while crafting your Traditional Manchester Tart can be quite common. If your pastry shrinks, it may be a sign that the dough was overworked or not sufficiently chilled. Correct this by allowing it time to rest in the refrigerator before rolling out.

For a custard that won’t set, either undercooking it or not incorporating eggs properly can be the issue. To remedy this, ensure that you bake it until it’s just set, checking for a slight jiggle in the center as a sign of doneness.

When flavors don’t blend as desired, consider tweaking the balance of jam or custard flavors for a more pleasant taste. Additionally, if the tart becomes too sweet, try serving it with a tart fruit coulis or citrusy whipped cream on the side to counteract the sweetness and create balance.

If you’re facing crust issues, such as burning, watch your baking time carefully and adjust the oven temperature accordingly. A simple solution is to use a pie protector or ring to shield the edges from direct heat, ensuring an evenly baked tart.

Recipe Success Stories

Through shared experiences, home bakers often delight in creating the Traditional Manchester Tart. Community feedback consistently praises its nostalgia, with many recounting memories of family gatherings centered around this beloved dessert.

Variant successes abound, with creative adaptations highlighting unique flavor combinations or ingredient substitutions. One baker reported triumphantly transforming the tart into a mango version, successfully capturing the tropical essence while maintaining the classic structure.

Readers frequently share their own suggestions for variations, showcasing how the tart adapts to personal tastes, including shifting to a chocolate custard base. Baking enthusiasts find joy in these stories, fostering a community of creativity and inventive interpretations wherever they reside.

Photography tips from community members encourage visual storytelling, emphasizing the importance of light and angles to highlight the tart’s texture and colors. Capturing the moment a family gathers to slice into the tart is a significant element of sharing food and connecting through culinary creations.

Frequently Asked Questions

What makes a Traditional Manchester Tart different from other tarts?
The key distinction lies in the unique combination of a custard filling topped with jam and desiccated coconut, setting it apart from more common fruit tarts.

Can I use frozen fruit for my jam layer?
Yes, frozen fruit can be an excellent option for making your own jam or spread, just ensure you cook it down with sugar to reach the desired consistency.

Is it possible to prepare the tart a day in advance?
Absolutely! Making and chilling the tart the day before serving is encouraged, as it allows the flavors to meld beautifully.

How should I store leftover tart?
Leftover tart should be stored in the refrigerator in an airtight container, where it will keep well for 3-4 days.

Can I add a fruit layer below the custard?
While traditional recipes do not usually include this, feel free to experiment! Layering fruits with jam under the custard can add vibrant freshness.

Which fruits pair best with the Manchester Tart?
Common options are raspberry, strawberry, or apricot, though any fruity jam that isn’t overly sweet can work well.

Can the tart be frozen?
Yes, it freezes beautifully! Wrap it tightly and store for up to two months, thawing when you’re ready to enjoy.

What do I serve with the tart?
It pairs nicely with whipped cream or a light drizzle of custard, along with a cup of tea or coffee to balance the sweetness.

Will the coconut topping stay fresh?
When properly stored, the coconut layer can last as long as the tart itself, maintaining both flavor and texture.

Is there a specific pan needed for baking?
A 9-inch tart pan is ideal for achieving the desired depth and shape; however, alternatives such as pie dishes can also work.

Additional Resources

For those inspired by the Traditional Manchester Tart, exploring related recipes can enrich your baking repertoire. Consider trying other traditional British desserts such as Bakewell tart or Apple crumble that similarly showcase comforting flavors and textures.

Technique guides, particularly regarding pastry making and custard preparation, offer helpful tips for mastering beloved desserts. Ingredient information is another excellent resource, educating bakers on selecting organic or locally sourced produce for their recipes.

For equipment recommendations, select quality tart pans, mixing bowls, and essential utensils to enhance your baking experience. Lastly, exploring seasonal variations can inspire the use of fresh, local ingredients and allow you to adapt this cherished recipe year-round.

Join the Conversation

Engaging with fellow food enthusiasts through social media can cultivate new ideas and inspire a broader understanding of baking. Sharing photos of your Traditional Manchester Tart can spark discussions on recipe variations, further broadening your culinary journey.

Consider contributing by offering your photography tips, sharing insights into the preparation process, or discussing the emotional connections tied to this nostalgic dessert. Engaging in recipe reviews and feedback enriches the community’s cooking experience, linking bakers across different backgrounds and cultures through food.

Discussing variations encourages innovation, inviting others to experiment with flavors and presentation. Join the conversation and celebrate the joy of baking, one tart at a time!

The Recipe

Traditional Manchester Tart

Serves: 8

Prep Time: 30 mins

Cook Time: 45 mins

Total Time: 75 mins

Kitchen Equipment Needed

  • 9-inch tart pan
  • Mixing bowls
  • Whisk
  • Rolling pin
  • Parchment paper
  • Pie weights or dried beans

Ingredients

  • For the pastry:
    • 200g all-purpose flour
    • 150g unsalted butter, chilled and cubed
    • 50g powdered sugar
    • 1 egg yolk
    • 1-2 tablespoons cold water
  • For the custard:
    • 500ml whole milk
    • 100g granulated sugar
    • 4 large eggs
    • 1 vanilla pod or 1 teaspoon vanilla extract
    • 50g desiccated coconut, plus extra for topping
  • For the filling:
    • 250g fruit jam (raspberry or strawberry)

Directions

  1. Preheat your oven to 180°C (350°F).
  2. In a mixing bowl, combine flour and powdered sugar, then mix in chilled butter until the mixture resembles breadcrumbs.
  3. Add egg yolk and cold water; mix until the dough comes together. Chill for 30 minutes.
  4. Roll out the chilled dough on a floured surface. Line the tart pan with the dough, trimming any excess.
  5. Blind bake the crust for 15 minutes, then remove the weights and bake for another 10 minutes until golden.
  6. For the custard, heat milk with vanilla until warm. In a bowl, whisk together eggs and sugar, then slowly add the warm milk mixture.
  7. Pour the custard into the baked tart shell and bake for an additional 20-25 minutes, or until just set.
  8. Remove from the oven and allow to cool completely. Spread the jam evenly on top, followed by a sprinkle of desiccated coconut.
  9. Chill the tart in the refrigerator for a few hours or overnight before serving.

Recipe Notes

  • Feel free to substitute different fruit jams based on your preference.
  • Store any leftovers in an airtight container in the refrigerator to maintain quality.
  • You can add a zest of lemon or orange to the custard for additional flavor.

Indulge in Luscious Lemon Lime Cherry Pistachio Cheesecake Delight

Luscious Lemon Lime Cherry Pistachio Cheesecake: A Delightful Citrus-Indulgence

⚖️
Difficulty
Medium

⏲️
Prep Time
30 mins

🕒
Cook Time
60 mins

⏱️
Total Time
90 mins

🍽️
Servings
12 slices

This Luscious Lemon Lime Cherry Pistachio Cheesecake is an extraordinary dessert that brings together a medley of flavors that are nothing short of heavenly. The tartness of fresh lemon and lime combines with the sweetness of ripe cherries, while the unique crunch of pistachios adds a delightful texture. Each bite is a burst of freshness that will leave you longing for more. Perfect for warm weather gatherings or elegant dinner parties, this cheesecake not only tastes divine but also looks stunning.

As you prepare this cake, the bright citrus notes will invigorate your senses, and the subtle nutty aromatics will create a welcoming atmosphere. The balance of sweet and tart in this cheesecake makes it the perfect indulgence after a hearty meal, or simply as a treat during the day. Its creamy texture coupled with the crumbly crust elevates the dessert, making it a memorable finish to any occasion.

Quick Recipe Highlights

  • Flavor Profile: This cheesecake balances tart and sweet notes with zesty citrus, lush cherry, and nutty flavors.
  • Texture: The smooth, creamy cheesecake contrasts beautifully with a crunchy pistachio crust and cherry topping.
  • Aroma: The fragrant essences of lemon and lime mixed with the earthy scent of pistachios create an inviting aroma.
  • Visual Appeal: Stunning layers of white cheesecake, vibrant cherry topping, and scattered pistachios offer an eye-catching presentation.
  • Skill Level Needed: Although this dessert requires some culinary skill, it is manageable for enthusiastic home bakers.
  • Special Equipment: A springform pan and electric mixer are recommended for the best results.

Recipe Overview

  • Difficulty Level: Medium—requires attention to detail but is not overly complex.
  • Category: Dessert; perfect for celebrations and special occasions.
  • Cuisine: This recipe is inspired by classic American cheesecake with a twist of citrus flair.
  • Cost: Budget-friendly ingredients; cherries and pistachios may vary in price but are generally accessible.
  • Season: Best enjoyed in spring and summer when fresh cherries are in season.
  • Occasion: Ideal for birthdays, holidays, or simply as a special family gathering treat.

Why You’ll Love This Recipe

This Luscious Lemon Lime Cherry Pistachio Cheesecake is not just a dessert; it’s an experience. The taste profile is intricate yet beautifully balanced, making it a delightful treat for the palate. The creamy filling perfectly counteracts the tartness of the citrus and the sweetness of the cherries, creating a complex flavor that patrons love. Each forkful brings a satisfying mix of textures: from the smooth cheesecake filling to the crunchy pistachio base, you will be captivated.

Preparation of this cheesecake is straightforward, making it accessible for both seasoned bakers and beginners alike. You’ll find joy in preparing layers of flavors, blending the cheesecake mixture, and assembling the ingredient components. It allows for creativity as you can customize the flavors by adjusting the citrus levels or opting for different toppings.

Nutritionally, the use of fresh ingredients like lemons, limes, and cherries means you are incorporating vitamins and antioxidants into your treat. Pistachios add healthy fats and protein, making this dessert not just a whimsical indulgence but also sustenance in moderation.

Socially, serving such an exquisite cheesecake can elevate your hosting status. It becomes a conversation starter among guests, especially when they catch a glimpse of its vibrant colors and enticing layers. Whether it’s a dinner party or a holiday gathering, this dessert will foster connections and create lasting memories.

Lastly, the affordability and accessibility of ingredients make this recipe a great endeavor for home cooks. Instead of splurging on store-bought desserts, you can create a homemade masterpiece that rivals any bakery, celebrating your ability to impress family and friends with a personal touch.

Historical Background and Cultural Significance

The origins of cheesecake can be traced back to ancient Greece, where it was served to athletes at the first Olympic Games. Throughout the centuries, this delightful dessert has evolved significantly, adopting influences from various cultures. The introduction of cream cheese in the late 19th century transformed cheesecake into the rich and creamy delight we enjoy today.

Culturally, cheesecake is often associated with celebrations and special occasions. It represents comfort and indulgence, making it a popular choice for birthdays, anniversaries, and holiday gatherings. This Luscious Lemon Lime Cherry Pistachio Cheesecake offers a modern take on a time-honored favorite, allowing home bakers to connect with the tradition while adding personal flair.

The evolution of cheesecake recipes has led to numerous variations across different regions. From fruity toppings to chocolate swirls, the versatility of cheesecake allows for endless creativity. By incorporating seasonal fruits like cherries and zestful citrus, this recipe pays homage to the traditional cheesecake while embracing contemporary flavors.

Regional variations should also be noted, as different parts of the world have embraced their interpretations of cheesecake. Whether it’s Italian ricotta-based or the classic New York style, the core premise remains the same: a delicious, creamy dessert that is universally loved.

Ingredient Deep Dive

  • Pistachios: Rich in antioxidants and healthy fats, pistachios provide a satisfying crunch and boost the nutritional value of the cheesecake. When selecting pistachios, opt for raw or lightly roasted without salt to achieve the best flavor and health benefits. For storage, keep them in an airtight container in a cool, dry place to maintain freshness. If needed, you can substitute with walnuts or almonds, though the flavor will slightly vary.
  • Cream Cheese: The essential base for any cheesecake, cream cheese lends its rich, creamy texture and tangy flavor. Made from a blend of cream and milk, it serves as a fantastic canvas for other flavors. When choosing cream cheese, ensure it’s full-fat for that signature decadence. Store it in the refrigerator and consume it within a week after opening. If you’re lactose intolerant, there are lactose-free versions available that work well in this recipe.
  • Cherries: Fresh cherries add both sweetness and tartness, complementing the rich cheesecake. Packed with vitamins and antioxidants, they are a seasonal highlight during summer. While selecting cherries, look for plump and firm ones with vibrant skin. Store cherries in the refrigerator and consume them within a few days for optimum freshness. For a substitute, you could use frozen cherries or other berries if you can’t find fresh ones.
  • Lemon and Lime: These citrus fruits bring vibrant acidity that elevates the entire cheesecake flavor. Both are rich in vitamin C and antioxidants, making them a healthy addition. Choose firm fruits that feel heavy for their size. Store them at room temperature or in the fridge for longer shelf life. You can substitute lemon juice with lime juice and vice versa to create a mix of flavors.

Common Mistakes to Avoid

  • Not allowing your ingredients to reach room temperature before mixing can lead to a lumpy batter. Always let cream cheese and eggs sit out for about an hour before use.
  • Overmixing will incorporate too much air into the batter, leading to cracks as the cheesecake bakes. Mix just until combined.
  • Not using a water bath can result in uneven cooking and potential cracks. This method helps regulate baking temperature.
  • Skipping the refrigeration step post-baking can affect the cheesecake’s set. Allow it to chill for at least four hours, preferably overnight.
  • Using expired ingredients can lead to off flavors. Always check dates on dairy and produce items.
  • Not properly greasing the springform pan can cause the cheesecake to stick. Use non-stick spray or butter to ensure easy removal.
  • Poor temperature management during baking can lead to either undercooked or overcooked results. Use an internal thermometer; cheesecake should be around 150°F to 160°F when done.
  • Failing to adjust bake time for high-altitude cooking can lead to undercooked cheesecake. Research high-altitude adjustments for best results.
  • Not letting the cheesecake cool in the oven before removing it can cause rapid cooling and cracking. Gradually cool it at room temperature for about an hour before chilling.

Essential Techniques

Each technique in this recipe influences the final outcome and requires precision. The most critical technique is the **mixing** process. It is essential to combine ingredients gently to avoid air bubbles that lead to cracking. Use a rubber spatula for folding in ingredients, maintaining creamy consistency.

**Baking** is another vital technique. Utilizing a water bath keeps the environment moist, allowing the cheesecake to cook evenly and preventing the top from cracking. Ensure the water bath is adequately prepared by wrapping your springform pan in foil to avoid any water seepage.

**Chilling** the cheesecake is crucial for the texture to set properly. A well-chilled cheesecake is firm yet creamy, ensuring a pleasant mouthfeel. Allow it to cool completely in the oven after baking before moving it to the refrigerator.

Finally, **plating** the cheesecake with careful attention brings the sweet creation to life. Use a sharp knife to create perfect slices. For a decorative touch, topping with whipped cream or a sprig of mint adds visual appeal.

Pro Tips for Perfect Luscious Lemon Lime Cherry Pistachio Cheesecake

1. Always opt for high-quality ingredients. Using organic, fresh produce elevates the flavors significantly.
2. Make the cheesecake a day ahead to enhance the flavors as they can meld overnight for a richer taste.
3. Experiment by layering different toppings; consider adding dark chocolate drizzle or a citrus zest sprinkle for added flair.
4. Use parchment paper at the bottom of your springform pan for easier release after baking.
5. Avoid opening the oven door during baking; fluctuations in temperature can affect the set.
6. Letting the cheesecake slowly cool in the oven will help reduce the chance of cracks developing.
7. For a tropical twist, try adding coconut cream into the batter or topping.
8. Keep an eye on the bake times – every oven is different, so begin checking at least 10 minutes before the time specified.

Variations and Adaptations

You can easily adapt this Luscious Lemon Lime Cherry Pistachio Cheesecake by incorporating seasonal fruits for topping, such as blueberries or strawberries in the summer. For a fall twist, consider adding a layer of caramel sauce and a sprinkle of cinnamon to the cherry topping.

If you prefer a lighter version, swap the traditional cream cheese for Greek yogurt, creating a tangy low-fat cheesecake alternative. Additionally, gluten-free alternatives to the crust can be made by using almond flour and dates instead of traditional graham crackers.

For those who enjoy a richer flavor, infuse the cheesecake batter with flavored extracts like almond or vanilla for a complex taste. Experimenting with the textures, such as mixing in crushed pistachios within the cheesecake filling, can also provide an exciting surprise.

Finally, consider unique presentation options; using individual jars or glasses to serve individual cheesecakes can add flair and fun to your dessert display.

Serving and Presentation Guide

When it comes to serving this Luscious Lemon Lime Cherry Pistachio Cheesecake, presentation is key. Use a sharp knife dipped in hot water for perfectly clean slices, ensuring the vibrant cherry topping and lovely crust remain intact.

A dusting of powdered sugar on top can uplift the dessert, adding elegance. For garnish, consider fresh mint leaves or thin lemon and lime slices for a refreshing touch.

Serving temperature plays an essential role; cheesecake is best enjoyed slightly chillier than room temperature to enhance its creamy texture. Consider pairing it with whipped cream on the side or serving with a light drizzle of warm cherry compote to add warmth and flavor.

For added sophistication, present the cheesecake on a wooden platter or a decorative cake stand, allowing the layers to shine. Use small forks and palate-cleansing drinks such as citrus-infused water to create a cohesive and inviting dining experience.

Wine and Beverage Pairing

The right beverage can complement the vibrant flavors of the Luscious Lemon Lime Cherry Pistachio Cheesecake beautifully. For wine lovers, a sweet Riesling or a sparkling Prosecco pairs excellently, enhancing the dessert’s fruity notes and acidity.

For non-alcoholic options, consider serving iced green tea with a hint of mint or lemon soda, both of which harmonize with the cheesecake’s citrus flavors. A light-bodied beer, such as a wheat beer, can also create a refreshing contrast.

Additionally, if you’re a coffee enthusiast, opt for a smooth latte or cold brew to balance the dessert’s sweetness with a hint of bitterness. The key is to keep drinks light and refreshing, allowing the cheesecake to shine without overpowering it.

Storage and Shelf Life

When it comes to storing the Luscious Lemon Lime Cherry Pistachio Cheesecake, keeping it in good condition is paramount. The cheesecake should be tightly covered in plastic wrap or stored in an airtight container to maintain freshness. In the refrigerator, it can last up to 5-7 days.

If desired, you can freeze portions for longer storage. Wrap slices individually and place them in airtight freezer-safe bags. For the best flavor and consistency, consume frozen cheesecake within 2-3 months.

When reheating, pop the cheesecake in the refrigerator overnight to slowly thaw, or leave it at room temperature for a few hours. Avoid reheating in the microwave, as this can alter the texture. Instead, only serve chilled to savor its delightful creamy richness.

Signs of spoilage include an off smell or visible mold; thus, always practice caution and check before serving leftovers.

Make Ahead Strategies

One of the greatest advantages of the Luscious Lemon Lime Cherry Pistachio Cheesecake is its adaptability for meal prep. You can create the cheesecake up to a day before you plan to serve it. After cooling, simply wrap it well in plastic wrap and store it in the refrigerator.

For added convenience, you can make the crust a day in advance; just keep it wrapped tightly to prevent it from becoming soggy. Assemble the cheesecake and allow it to chill overnight for optimal flavor melding.

If you’re short on time on the day of serving, create components earlier, like the cherry topping or whipped cream, and refrigerate. This ensures you’ll spend minimal time in the kitchen when ready to serve.

Incorporating fresh elements, like adding cherries on top right before serving, can enhance the dessert’s visual appeal and flavor profile without compromising freshness.

Scaling Instructions

If you’re looking to scale this Luscious Lemon Lime Cherry Pistachio Cheesecake recipe, you have flexible options. For smaller gatherings, you can easily halve the recipe—use a 6-inch springform pan and adjust baking time.

To double or triple the recipe, use larger springform pans or bake in multiple batches. Adjust the cooking time accordingly, keeping a close eye on the cakes to prevent overbaking.

Ensure that you also use appropriate cooling areas, without overcrowding the refrigerator, as cheesecakes require space to cool evenly.

When scaling, note that larger cakes will often need additional refrigeration time to fully set, so factor this into your timeline.

Nutritional Deep Dive

Module a balanced examination of the nutritional profile for the Luscious Lemon Lime Cherry Pistachio Cheesecake. Carbohydrates primarily come from the crust and sugars, while the protein comes from both cream cheese and the addition of nuts.

The cheesecake contains healthy fats, mainly from pistachios, which provide essential nutrients that support heart health and reduce inflammation.

Vitamins come from the citrus fruits and cherries, which are packed with antioxidants aiding in immune function. It is essential to consider portion sizes for those monitoring caloric intake, especially since this cheesecake is rich and fulfilling.

For a healthier indulgence, you can modify the recipe to use low-fat cream cheese or reduce the sugar content while maintaining flavor balance. Tailoring ingredient selection allows for a dessert that aligns with dietary goals and preferences.

Dietary Adaptations

The Luscious Lemon Lime Cherry Pistachio Cheesecake can be adapted to suit various dietary needs. For a gluten-free version, simply replace the standard crust ingredients with almond flour mixed with coconut oil.

If you are after a dairy-free option, consider using cashew cream or a plant-based cream cheese alternative, ensuring that the flavors remain vibrant.

Vegetarians can easily enjoy this recipe, as no animal-based gelatins are needed.

For those on low-carb or keto diets, you might explore incorporating almond flour for the crust and erythritol instead of sugar for caloric management.

In addition, paleo-friendly adaptations can be made by substituting maple syrup for sugar and using coconut or almond flour for the crust.

Troubleshooting Guide

Should you encounter issues with your Luscious Lemon Lime Cherry Pistachio Cheesecake, this troubleshooting guide will assist you.

If the cheesecake cracks on top, it often indicates overbaking or sudden temperature changes; remember to cool slowly in the oven after baking.

An undercooked cheesecake will jiggle too much in the center, so always check that it reaches an internal temperature of at least 150°F for food safety.

If your cheesecake holds an off flavor, it could stem from expired ingredients; always check dairy and produce freshness. Inconsistent textures can arise from not mixing adequately or incorporating ingredients while too warm.

If you find ingredients difficult to combine, try warming cream cheese slightly or using an electric mixer for smooth consistency.

Finally, if flavors seem muted, consider balancing with more sweetness or acidity based on preferences, enhancing overall taste experiences.

Recipe Success Stories

Countless home bakers have shared their success stories after making this Luscious Lemon Lime Cherry Pistachio Cheesecake. Many have commented on the joy of surprising family and friends, showcasing a culinary creation that tastes as good as it looks.

Some bakers have become adept at personalized variations, using seasonal fruits or favorite nuts, and have shared these adaptations generously within the community, leading to creative experimentation.

Photography enthusiasts highlight the vibrant colors and aesthetic of the dessert in their food photography, leading to beautiful blog features and social media shares.

Readers appreciate the in-depth guidance provided, allowing them to navigate potential pitfalls without worry. The community actively engages in sharing tips, creating a network of support around perfecting this delightful cheesecake.

Frequently Asked Questions

Can I use frozen cherries instead of fresh ones?

Yes, frozen cherries can be used; just make sure to thaw and drain any excess liquid to avoid a watery cheesecake.

Can I make this cheesecake without a springform pan?

While a springform pan is recommended for easy removal, you can use a regular cake pan lined with parchment paper for easier removal.

How can I ensure my cheesecake doesn’t crack?

To prevent cracks, avoid overmixing, use a water bath, and allow the cheesecake to cool gradually after baking.

What’s the best way to serve this cheesecake?

The cheesecake is best served chilled, with fresh fruit or whipped cream on the side for added appeal.

Can I flavor the cheesecake differently?

Absolutely! You can experiment with different citrus fruits, chocolate, or nut flavors to create a unique variation.

How long can this cheesecake be stored?

In the refrigerator, the cheesecake can last up to 5-7 days if stored properly in airtight containers or wrapped well.

Is it necessary to use heavy cream in the recipe?

While heavy cream enhances richness, you can substitute it with milk or omit it for a lighter cheesecake if desired.

How can I defrost a cheesecake quickly?

The best way to defrost is to transfer it to the refrigerator overnight; however, if you’re in a hurry, room temperature thawing for about 1-2 hours works.

What if my cheesecake is too sweet?

If the cheesecake turns out too sweet, consider balancing it with a touch of lemon or lime juice to enhance tartness and counterbalance sweetness.

Can I make this cheesecake vegan?

Yes, you can use plant-based cream cheese alternatives and a vegan crust for a delicious vegan cheesecake option.

Additional Resources

For more delicious recipes and insights, consider exploring related dessert recipes like classic New York cheesecake, chocolate mousse cake, or fruit tarts. Readers can benefit from technique guides such as perfecting your pie crust, mastering whipped cream, and baking with fresh fruits.

Additionally, stay informed on ingredient information, particularly the health benefits of nuts, fruits, and dairy alternatives for healthier living practices. Recommendations for quality kitchen equipment, especially when working with baking and mixing techniques, can elevate your kitchen endeavors.

Join the Conversation

We invite you to share your experiences and adaptations of the Luscious Lemon Lime Cherry Pistachio Cheesecake with our community. Join us on social media by posting your beautiful cheesecake photos, reviews, or any creative spins you’ve taken on the recipe.

Engagement is encouraged as we learn from each other’s culinary journeys. Whether you’ve made version adjustments, discovered new techniques, or have questions, let’s keep the conversation going. Don’t forget to tag us so we can reconnect through the joy of baking!

The Recipe

Luscious Lemon Lime Cherry Pistachio Cheesecake

Serves: 12 slices

Prep Time: 30 mins

Cook Time: 60 mins

Total Time: 90 mins

Kitchen Equipment Needed

  • Springform pan (9-inch)
  • Electric mixer
  • Measuring cups and spoons
  • Rubber spatula
  • Mixing bowls
  • Food processor (for crust)

Ingredients

  • 1 ½ cups pistachios, shelled and crushed
  • 1 cup graham cracker crumbs
  • ½ cup unsalted butter, melted
  • 3 (8 oz) packages cream cheese, softened
  • 1 cup granulated sugar
  • 3 large eggs
  • 1 tablespoon lemon juice
  • 1 tablespoon lime juice
  • 1 teaspoon lemon zest
  • 1 teaspoon lime zest
  • ½ cup fresh cherries, pitted and chopped
  • Powdered sugar for dusting (optional)

Directions

  1. Preheat the oven to 325°F (160°C). Grease the springform pan with butter.
  2. In a food processor, combine crushed pistachios, graham cracker crumbs, and melted butter. Press into the bottom of the prepared pan.
  3. In a large mixing bowl, beat softened cream cheese with an electric mixer until smooth. Gradually add sugar, beating until combined.
  4. Add eggs one at a time, mixing gently after each addition. Stir in lemon juice, lime juice, and zests until smooth.
  5. Pour the cheesecake filling over the pistachio crust, spreading evenly. Drop cherries into the batter and lightly swirl them in.
  6. Bake for 60 minutes, until the center is slightly set but jiggles gently. Remove from the oven and allow it to cool.
  7. Cool the cheesecake in the oven with the door ajar to prevent cracks, then refrigerate for at least 4 hours or overnight.

Recipe Notes

  • Top with additional cherries and a dusting of powdered sugar before serving.
  • You can substitute other fruits for cherries, like blueberries or raspberries.
  • For a gluten-free option, replace graham crackers with almond flour and coconut oil.

Indulge in a No Bake Cookie Dough Cheesecake Delight

No Bake Cookie Dough Cheesecake: The Ultimate Dessert Treat

⚖️
Difficulty
Easy

⏲️
Prep Time
20 mins

🕒
Cook Time
0 mins

⏱️
Total Time
20 mins

🍽️
Servings
8 servings

Indulge in the creaminess of our No Bake Cookie Dough Cheesecake, a dessert that perfectly blends the lusciousness of cheesecake with the irresistible charm of edible cookie dough. This delightful treat is not only easy to make but is one that will have your taste buds dancing with every bite. Picture a thick, creamy layer of cheesecake nestled atop a decadent cookie dough base that satisfies your cravings for both a sweet and comforting dessert.

What makes this dessert truly special is its rich flavor profile featuring hints of vanilla, brown sugar, and chocolate chips, offering a nostalgic taste reminiscent of childhood cookie baking. The wonderful combination of textures creates a delightful experience; the smooth, creamy cheesecake contrasts beautifully with the soft, chewy cookie dough, making every spoonful feel like a treat. Enjoy this cheesecake chilled, making it the perfect sweet to savor during warm summer days or at any gathering.

Quick Recipe Highlights

  • Flavor Profile: The rich taste of brown sugar and chocolate chips pops through the creamy cheesecake, creating an indulgent dessert experience.
  • Texture: A contrast of ultra-smooth cheesecake and soft, chewy cookie dough makes for an exciting mouthfeel.
  • Aroma: Sweet, buttery notes of cookies baking infuse the air, elevating the anticipation for this delightful dessert.
  • Visual Appeal: Layered with a beautiful golden-brown cookie base and a luscious creamy top, this cheesecake is as stunning as it is delicious.
  • Skill Level Needed: Beginner-friendly, making it accessible for anyone to create an impressive dessert with minimal effort.
  • Special Equipment: A 9-inch springform pan is recommended for easy serving, along with basic mixing bowls and an electric mixer.

Recipe Overview

  • Difficulty Level: This No Bake Cookie Dough Cheesecake is easy to prepare with no complicated steps, making it perfect for novice bakers.
  • Category: This dessert fits perfectly within the “desserts” category, specially designed for sweet tooth lovers looking for an indulgent treat.
  • Cuisine: Rooted in American comfort food, this cheesecake takes the best elements of classic dessert favorites and combines them.
  • Cost: The ingredients are affordable, making this cheesecake a budget-friendly option for delicious home baking.
  • Season: A year-round favorite, particularly appealing in warm weather when a no-bake dessert is especially appreciated.
  • Occasion: Perfect for birthday parties, family gatherings, or casual get-togethers where you want to impress your guests.

Why You’ll Love This Recipe

The No Bake Cookie Dough Cheesecake delivers a unique combination of taste and texture that is sure to delight anyone who tries it. The smooth and creamy cheesecake layer melds perfectly with the sweet cookie dough base, creating a heavenly dessert experience. It not only satisfies your sweet cravings but also evokes nostalgic memories of baking cookies in the kitchen, bringing joy to every bite.

One of the best aspects of this cheesecake is its convenience. No baking is required, which means less time laboring in the kitchen and more time enjoying with friends and family. Simply mix the ingredients, assemble the layers, and let it chill. This makes it the perfect dessert to whip up on short notice or when you want to engage your kids in a fun cooking activity that results in a wonderful treat.

In addition to its tempting taste, this cheesecake also provides a lower-effort approach to dessert making. With just a handful of ingredients, you can create a show-stopping dessert that looks and tastes as if it came from a gourmet bakery. The recipe can also be modified easily based on personal preferences or what you have on hand, making it highly adaptive and user-friendly.

Socially, this No Bake Cookie Dough Cheesecake is a crowd-pleaser that encourages sharing and offers an opportunity for connection over food. It is ideal for gatherings, where friends and family can enjoy and bond over a delicious homemade dessert, sparking conversation and indulgence together.

Cost-effectiveness is another appealing factor. Using common pantry items, the recipe is not only budget-friendly but ensures you’re getting great value without compromising on flavor or quality. This means you can treat yourself or your loved ones without breaking the bank, making the cheesecake an accessible culinary delight.

Historical Background and Cultural Significance

The concept of cheesecake dates back to ancient Greece, where it was considered a source of energy and enjoyed during athletic competitions. As time progressed, the dessert evolved, integrating different ingredients and preparation methods, particularly in the United States where cream cheese became a staple. The No Bake variant highlights a modern approach to suit those looking for quick, easy dessert options without sacrificing taste.

Cookie dough, on the other hand, has its roots deep in American culture as a beloved treat often enjoyed by sneaking bites while preparing cookies. The combination of cheesecake and cookie dough embodies the delightful intersection of two enduring snacks, bringing a sense of nostalgia and whimsy to a more sophisticated dessert format that appeals to adults and children alike.

Over the years, dessert trends have evolved with the rise of no-bake recipes becoming extremely popular among busy home cooks. This innovation has made it easier for dessert lovers to create delightful experiences in their own kitchens without the need for an oven, facilitating an age where quick fixes meet timeless flavors.

Many regional variations exist for both cheesecake and cookie dough, reflecting local ingredients and tastes. The No Bake Cookie Dough Cheesecake capitalizes on this cultural melting pot by introducing a blend of textures and flavors inspired by traditional favorites, ultimately providing a dish that resonates with many while remaining uniquely satisfying.

Ingredient Deep Dive

Cream Cheese
Cream cheese plays a pivotal role in the No Bake Cookie Dough Cheesecake, providing its signature smooth texture and tangy flavor. Originating in the United States in the 19th century, it has become a staple in cheesecakes due to its creamy consistency. Nutritionally, cream cheese is a source of protein and calcium, although it is also high in fat. When selecting cream cheese, opt for full-fat for the best flavor and texture, and keep it refrigerated to maintain its freshness.

Sugar
Sugar is essential for sweetness in the No Bake Cookie Dough Cheesecake. It enhances the overall flavor profile, balancing the tanginess of the cream cheese. Since sugar is a common pantry item, look for granulated white sugar for the recipe. Keep sugar in a cool, dry place to maintain its quality. For healthier alternatives, consider using honey or maple syrup, but be cautious, as they may alter the texture slightly.

Chocolate Chips
Chocolate chips add an irresistible sweetness and delightful crunch to the cookie dough layer. Used primarily in American baking since the 1930s, they have become synonymous with cookies and desserts. Rich in antioxidants and trace minerals, chocolate also enhances mood, making it a favorite addition in sweets. When choosing chocolate chips, you can opt for semisweet, dark, or even white chocolate based on your flavor preference. Store chocolate chips in a cool, dark place to maintain their quality and avoid melting.

Common Mistakes to Avoid

  • Not allowing the cream cheese to soften: Failing to bring cream cheese to room temperature can lead to a lumpy cheesecake. Always soften before mixing for a smooth consistency.
  • Overmixing: While thorough mixing is essential, overmixing can incorporate too much air, leading to cracks in your cheesecake. Mix until just combined.
  • Skipping the chilling process: Do not rush the chilling step. The cheesecake needs adequate time to set properly, ensuring the best texture and flavor.
  • Choosing the wrong pan: Using a regular pie dish instead of a springform pan can make it difficult to remove the cheesecake without it falling apart.
  • Forgetting to adjust for humidity: If it’s a humid day, the cookie dough may not set properly. Consider refrigerating longer on such days.
  • Using too many chocolate chips: While chocolate enhances flavor, too many can alter texture. Stick to the recommended amount for optimal results.
  • Skipping the taste test: Always sample as you go to ensure the flavors are balanced and to make adjustments accordingly.
  • Neglecting decoration: A simple garnish can elevate the dessert’s presentation. Don’t skip out on adding toppings like extra cookie dough or chocolate drizzle!

Essential Techniques

Mixing Cream Cheese
Mixing cream cheese is critical in achieving a smooth and creamy cheesecake layer. It’s important to let it soften at room temperature so that it combines easily without lumps. Utilize a hand mixer or stand mixer on low speed initially, then increase to medium until fully incorporated. Avoid overmixing to prevent air bubbles from forming, which can lead to cracking during chilling. The visual cue for success is a uniform, creamy texture free of lumps.

Layering Ingredients
Layering the cheesecake and cookie dough mixtures is crucial for presentation and taste. Start with the cookie dough base, pressing it down firmly to create a solid foundation. When adding the cheesecake layer, use a spatula to spread evenly across the surface without disturbing the cookie dough layer beneath. This technique ensures both layers remain distinct, resulting in a visually appealing serving with contrasting textures.

Pro Tips for Perfect No Bake Cookie Dough Cheesecake

1. Use high-quality ingredients to ensure that every layer of flavor shines through and elevates the overall taste of your cheesecake.
2. Chill the cheesecake overnight for the best flavor and texture development, allowing the ingredients to meld beautifully.
3. Create a decorative topping with whipped cream and sprinkle additional chocolate chips for a stunning presentation that impresses guests.
4. Test the sweetness level with a taste test during preparation to determine if additional sugar is necessary based on preference.
5. Incorporate a pinch of salt in the cookie dough to enhance the overall flavor profile, balancing sweetness with a hint of savory.
6. Prepare the cheesecake a day in advance to save time on the day of serving, providing more time for celebrations and gatherings.
7. For a gluten-free variation, substitute traditional graham crackers with gluten-free alternatives without compromising flavor.
8. Experiment with flavors by adding extracts, such as almond or coconut, to bring new dimensions to this classic cheesecake recipe.

Variations and Adaptations

One delightful variation is to introduce seasonal flavors such as pumpkin puree and spices, transforming the traditional cookie dough cheesecake into a festive fall dessert. For a unique twist, try using flavored cookie dough like peanut butter or chocolate to create new taste combinations catering to different palates.

Additionally, dietary restrictions can easily be addressed. For a vegan version, use plant-based cream cheese and an eggless cookie dough recipe that replaces egg with an egg substitute. This adaptation ensures everyone can enjoy a slice, regardless of their dietary preferences.

Texture modifications can also be made by adding crushed nuts or graham cracker crumbs into the cookie dough layer, giving an extra crunch that complements the smooth cheesecake. Serving with an optional fruit coulis can add freshness and acidity, balancing the sweetness perfectly.

For presentation alternatives, consider serving the cheesecake in individual cups or jars for a delightful display at parties, making the dessert both fancy and easily portable.

Serving and Presentation Guide

Plating techniques play a crucial role in elevating the dessert experience. To serve, carefully release the springform pan and slice the cheesecake into equal portions using a hot, dry knife for clean edges. A sprinkle of finely chopped chocolate chips or a dollop of whipped cream adds a visually appealing touch.

Traditional accompaniments such as ice cream or chocolate sauce can complement the cheesecake, but modern serving suggestions also include pairing it with fresh berries for a pop of color and flavor contrast. Make sure to serve at optimal temperature by allowing the cheesecake to sit out for about 15 minutes before serving for that perfect, creamy texture.

Portion control can be maintained by using a standard cheesecake slicer to ensure even portions. This helps guests enjoy their dessert while controlling sweetness intake.

Wine and Beverage Pairing

When it comes to beverage pairing, consider a dessert wine like a late harvest Riesling, which complements the cheesecake’s sweetness and enhances the overall flavor experience. For a bold pairing, a sweet red wine such as Brachetto d’Acqui offers notes of berry that harmonize well with chocolate chips.

If you prefer non-alcoholic options, a perfectly brewed chai tea can provide a warm, spicy balance to the sweetness of the cheesecake. For those who enjoy coffee, an espresso served alongside the dessert enhances the flavors and provides a wonderful contrast to the sweetness.

Temperature considerations are key; serve chilled cheesecake with cooler beverages to maximize the refreshing dessert experience while balancing flavors effectively.

Storage and Shelf Life

Store your No Bake Cookie Dough Cheesecake in an airtight container in the refrigerator to maintain freshness. It will typically stay good for about 4 to 5 days but is best enjoyed within the first few days to savor the perfect texture and flavor.

If you want to extend its shelf life, consider freezing individual slices in plastic wrap followed by foil for best protection, which allows for up to 2 months of storage. Always label the package with the date for easy reference.

Signs of spoilage include an off odor, changes in color, or a watery texture. When reheating, allow to thaw in the refrigerator overnight for optimal taste, keeping freshness intact.

Make Ahead Strategies

Preparing the No Bake Cookie Dough Cheesecake in advance is a brilliant time-saver. To maximize efficiency, you can make the cookie dough and cheesecake filling a day ahead, storing them separately in the refrigerator. Assemble just before serving for the best presentation and freshness.

Consider freezing the cheesecake in advance which allows for flexibility. If you plan to serve it at a later date, thaw it in the refrigerator the day prior, keeping the integrity of the texture intact.

Fresh elements, like whipped cream or fruit toppings, can be added right before serving to ensure they stay vibrant and fresh. This makes for a stunning presentation while still allowing you to enjoy the luxurious flavors of the cheesecake.

Scaling Instructions

Just as delightful when scaled, you can easily halve the No Bake Cookie Dough Cheesecake recipe for smaller gatherings. This allows for experimentation without excess leftovers. To do so, adjust your ingredients accordingly, ensuring ratios remain consistent for texture and taste.

Doubling or tripling the recipe is also possible when hosting larger events. Ensure you have sufficient kitchen equipment and space to accommodate larger mixing bowls and pans; consider using more than one springform pan to manage volume easily.

Timing may need to be adjusted as the cheesecake will require longer to set when made in larger quantities. Keep a close eye on chilling times and test its firmness periodically for the best results.

Nutritional Deep Dive

A single serving of No Bake Cookie Dough Cheesecake provides a satisfying balance of macronutrients, primarily consisting of fats and carbohydrates. With the inclusion of protein from the cream cheese, this dessert helps meet daily protein needs in moderation.

Micronutrient wise, key vitamins such as A and B12 from the cream cheese deliver some nutritional benefits along with calcium contributing to bone health. However, it’s important to recognize that this cheesecake is still a dessert, and should be enjoyed as an occasional treat as part of a balanced diet.

For those monitoring their portions, being mindful of serving sizes is crucial. This cheesecake is rich and satisfying, making one slice a truly indulgent experience without overdoing calorie intake.

Weight management tips include balancing dessert with physical activity and ensuring nutritious meals are consumed throughout the day, allowing for a guilt-free dessert experience that aligns with a healthy lifestyle.

Dietary Adaptations

For individuals looking for gluten-free options, substituting traditional graham crackers with gluten-free almond flour or coconut flour can still yield a delicious crust without gluten. Ensure all other ingredients like chocolate chips are gluten-free as well.

Dairy-free versions can also be successes when using plant-based cream cheese alternatives and coconut condensed milk, creating a delightful dessert that excludes animal products.

If you’re vegan, a combination of coconut cream and agave syrup creates a rich topping that mirrors traditional whipped cream. Adjusting ingredients for those following a low-carb or keto diet can include using almond flour crusts and sugar alternatives without sacrificing flavor.

Seasonal adaptations can be made by integrating pumpkin or berry flavor profiles based on what’s available or preferred, ensuring versatility and creativity with each batch.

Troubleshooting Guide

If your cheesecake texture isn’t as smooth as desired, it’s likely due to improperly softened cream cheese. Ensure you leave it out for ample time before use to avoid lumps. If the cheesecake does not set as expected, it may require more chilling time—be patient and allow it to firm up properly.

Another common issue is flavor balance; if the cheesecake tastes overly sweet, adding a pinch of salt can help enhance flavor complexity, counteracting excessive sweetness. If chocolate flavor is lacking, incorporating higher-quality chocolate chips or adding cocoa powder can rectify this.

For those experiencing crust problems, such as it falling apart, ensure that the cookie dough base is pressed firmly into the pan and allow adequate chilling time before serving. This adherence helps maintain its structure for an elegant presentation.

Recipe Success Stories

Our community has shared numerous success stories regarding the No Bake Cookie Dough Cheesecake! Many readers have reported that it’s become a go-to dessert at family gatherings, with children and adults alike raving about its delicious flavors and appealing textures.

Adaptation stories often involve utilizing different types of chocolate or additional toppings, such as drizzled caramel or fresh fruits, which have excited our cooks to explore new variations each time they prepare it.

One reader shared that experimenting with different cookie dough flavors, such as peanut butter or snickerdoodle, provided their family with elevated experiences filled with delightful surprises.

Photography tips shared by users emphasize capturing the creamy layers and contrasting textures on display, highlighting how a well-presented cheesecake can be just as exciting to share on social media as it is to eat.

Frequently Asked Questions

1. How long do I need to chill the cheesecake?
Chilling the No Bake Cookie Dough Cheesecake for at least 4 hours is recommended, although it’s best to let it chill overnight for optimal flavor and consistency.

2. Can I use fat-free cream cheese?
You can use fat-free cream cheese, but it may affect the creaminess and texture of the cheesecake. Full-fat cream cheese delivers the richest flavor.

3. Is this cheesecake safe to eat without baking?
Yes, this No Bake Cookie Dough Cheesecake uses ingredients that are generally safe to consume raw, but be sure to use pasteurized products to minimize any risk.

4. How do I make the cheesecake less sweet?
If you prefer a less sweet cheesecake, reduce the added sugar slightly or incorporate a dash of salt to balance the sweetness without altering flavor greatly.

5. Can I freeze the cheesecake?
Yes, the No Bake Cookie Dough Cheesecake can be frozen. Wrap it tightly in plastic wrap and aluminum foil and store it for up to 2 months in the freezer.

6. What is the best way to cut the cheesecake?
Use a hot, dry knife to slice through the cheesecake smoothly; this prevents the crust from sticking and maintains clean edges.

7. Can I add fruit to the cheesecake?
Yes, fresh fruits like strawberries or raspberries can be delightful additions, either mixed in or used as a topping for added flavor.

8. How do I store leftovers?
Leftover cheesecake should be covered tightly and stored in the refrigerator for up to 5 days for the best taste and texture.

9. What’s the best pan to use for this recipe?
A 9-inch springform pan is recommended as it allows for easy removal and is perfect for layered desserts like cheesecake.

10. Can I use a different type of chocolate chip?
Absolutely! Feel free to experiment with milk, white, or dark chocolate chips based on your preference for a unique flavor experience.

Additional Resources

If you enjoyed making the No Bake Cookie Dough Cheesecake, consider exploring related recipes that emphasize classic dessert staples, such as traditional cheesecake variations or cookie-inspired desserts. Dive into technique guides for mastering cheesecake layers or filling ideas that can further enhance your baking skills.

For those curious about ingredient information, learn more about the significance of using high-quality chocolate and cream cheese, exploring tips on how to best store them. Equipment recommendations can also improve your baking experience, ensuring you have the right pans and mixers for effortless preparation.

Seasonal variations, tailored to different holidays or events, can inspire your next baking adventure. Transform your No Bake Cookie Dough Cheesecake into a festive delight that embodies seasonal flavors everyone will love.

Join the Conversation

We invite you to join our community by sharing your experiences with the No Bake Cookie Dough Cheesecake! Post your photos and variations on social media, tagging us to showcase your creativity. By leaving reviews and recommendations, you contribute to a collective cooking experience that inspires others.

Engage with fellow bakers by swapping tips and success stories, helping to create a vibrant community that embraces culinary adventures. We’d love to hear about your unique takes on this cheesecake and any modifications that made your creation even better!

The Recipe

No Bake Cookie Dough Cheesecake

Serves: 8 servings

Prep Time: 20 mins

Cook Time: 0 mins

Total Time: 20 mins

Kitchen Equipment Needed

  • 9-inch springform pan
  • Mixing bowls
  • Electric mixer
  • Spatula
  • Measuring cups and spoons

Ingredients

  • 2 (8 oz) packages cream cheese, softened
  • 1 cup granulated sugar
  • 1 tsp vanilla extract
  • 2 cups whipped cream or Cool Whip
  • 1 cup all-purpose flour (for edible cookie dough)
  • 1/2 cup brown sugar
  • 1/4 cup granulated sugar (for cookie dough)
  • 1/2 cup unsalted butter, softened
  • 1 cup semi-sweet chocolate chips

Directions

  1. In a mixing bowl, combine softened cream cheese, granulated sugar, and vanilla extract and mix until smooth.
  2. Fold in the whipped cream gently until well combined without losing air.
  3. In another bowl, mix softened butter with brown sugar and granulated sugar. Stir in flour and chocolate chips until a dough forms.
  4. Spread the cookie dough mixture evenly into the bottom of a greased springform pan, pressing firmly to create a solid layer.
  5. Pour the cheesecake filling over the cookie dough crust and spread evenly with a spatula.
  6. Cover and refrigerate for at least 4 hours or overnight to allow the cheesecake to set properly.
  7. Once set, release the springform pan and slice into portions to serve. Enjoy!

Recipe Notes

  • Feel free to substitute vanilla extract with almond extract for a different flavor profile.
  • Try adding other toppings, such as crushed Oreos, for a fun twist.
  • This recipe can be adapted to cater to gluten-free needs using gluten-free flour.

Delicious Peppermint Ice Cream Cake Recipe for Festive Celebrations

Peppermint Ice Cream Cake: A Festive Delight for Every Occasion

⚖️
Difficulty
Medium

⏲️
Prep Time
30 mins

🕒
Cook Time
10 mins

⏱️
Total Time
40 mins

🍽️
Servings
8 servings

The Peppermint Ice Cream Cake is the perfect treat to celebrate holidays or special occasions with friends and family. The cool and refreshing flavor of peppermint combined with smooth ice cream layers creates a delightful contrast, making every bite a sweet surprise. As you slice into the cake, you reveal the creamy, luscious layers studded with peppermint bliss that not only taste amazing but also capture the spirit of festive celebrations. It’s a show-stopping dessert that everyone will love!

This cake is not just a dessert; it’s an experience. Imagine the first scoop of silky ice cream mingling with the crunchy chocolate cookie crust, then finishing off with a hint of minty freshness. Each element of this Peppermint Ice Cream Cake is crafted to enchant your taste buds. Whether it’s for a holiday dinner or a summer BBQ, this cake is sure to impress and become a cherished recipe in your collection.

Quick Recipe Highlights

  • Flavor Profile: This Peppermint Ice Cream Cake features a rich chocolatey base complemented by the cool, refreshing flavor of peppermint. The combination of minty freshness and sweet cream will tantalize your taste buds.
  • Texture: The cake boasts a delightful mix of creamy, soft layers contrasted with a crunchy chocolate crust, providing a unique mouthfeel that makes each bite exciting.
  • Aroma: The fragrance of peppermint greets you with its uplifting notes, making it an irresistible choice for festive occasions.
  • Visual Appeal: Adorned with whipped cream and chocolate shavings, this cake is a stunning centerpiece, its layers visible through a clean slice, offering visual delight.
  • Skill Level Needed: This cake requires moderate baking skills, making it accessible for both novice and experienced bakers who are comfortable with layering and assembling desserts.
  • Special Equipment: You will need a springform pan for easy removal, and an electric mixer for creating creamy layers.

Recipe Overview

  • Difficulty Level: This recipe is rated as medium difficulty due to the layering and assembly techniques involved in creating the cake. However, with careful preparation and attention to detail, anyone can achieve excellent results.
  • Category: Perfect for dessert, this cake brings a festive twist to any meal, serving as an ideal sweet treat that pairs well with holiday gatherings or summer picnics.
  • Cuisine: This Peppermint Ice Cream Cake draws inspiration from classic American desserts, adapting traditional methods to give a modern, refreshing twist, making it a staple at celebrations.
  • Cost: The estimated cost of creating this delightful cake is moderate, mainly influenced by the quality of ice cream used and optional garnishes.
  • Season: While it’s perfect for winter holidays, this cake’s refreshing mint flavor makes it a crowd-pleaser year-round, particularly during warmer months.
  • Occasion: Ideal for birthdays, holidays, or any festive gathering, this cake can be the highlight of the dessert table.

Why You’ll Love This Recipe

Each spoonful of this Peppermint Ice Cream Cake delivers a burst of flavor that’s both comforting and refreshing. The juxtaposition of cool peppermint and rich chocolate resonates with the holiday spirit, creating a dessert that celebrates warmth and joyful gatherings.

The recipe is a cinch to prepare, requiring minimal cooking time and straightforward steps. Simply allow the ingredients to chill and layer them as directed—making this cake a convenient choice for busy home cooks looking for impressively delicious results without spending hours in the kitchen.

Nutritionally, this cake features delicious ingredients that allow you to indulge without complete guilt. The use of peppermint has been linked to digestive benefits, and when combined with high-quality ice cream, it offers a delightful treat that can be enjoyed in moderation.

This Peppermint Ice Cream Cake is not just a dessert, it fosters connections and creates memories. Sharing a slice is a wonderful way to bring people together, sparking conversations and smiles among family and friends, adding sweetness to every special moment.

Finally, considering the cost-effectiveness of this recipe, it remains friendly on your wallet. Utilizing store-bought ice cream is an economical choice and saves time without compromising flavor, allowing wonderful desserts to be accessible for everyone.

Historical Background and Cultural Significance

The origins of the Peppermint Ice Cream Cake can be traced to the beloved tradition of ice cream cakes, which have become a festive favorite in American cuisine. Its peppermint flavor is often associated with holidays, particularly Christmas, symbolizing sweetness and celebration.

Throughout the years, cakes featuring ice cream have evolved, transcending their simple beginnings to become a staple at birthday parties and gatherings. The merging of flavors like chocolate and peppermint reflects popular tastes that celebrate both richness and zest.

As different culinary cultures embrace this cake, varieties emerge, each adding a unique twist to the classic recipe—a reflection of personal creativity and local flavors across regions.

Modern-day interpretations maintain the spirit of this dessert, allowing home bakers to personalize their cakes with various toppings and flavor combinations, ensuring that the Peppermint Ice Cream Cake remains relevant in festive celebrations.

Ingredient Deep Dive

Peppermint: This cool herb has strong ties to culinary traditions, often used as a flavoring agent in desserts and teas. Nutritionally, peppermint is thought to aid digestion and add a refreshing element to dishes. When selecting, look for fresh leaves or high-quality extracts for robust flavor. Store fresh peppermint by wrapping it in a damp paper towel and placing it in the fridge, and for extracts, keep in a cool, dark place. If unavailable, consider using spearmint as a substitute for a sweeter flavor profile.

Ice Cream: Ice cream, with its rich history dating back centuries, is often a crowd favorite in desserts. It provides a creamy texture that complements the Peppermint Ice Cream Cake beautiful. Look for ice cream with a higher fat content for a better texture and taste experience. Store it in the coldest part of your freezer to maintain its consistency. Consider dairy-free options for those with dietary restrictions, and always check for allergens when choosing store-bought options.

Common Mistakes to Avoid

  • Using Low-Quality Ice Cream: It’s tempting to save money, but using low-quality ice cream can impact flavor and texture. Always opt for premium brands for the best results.
  • Not Allowing Layers to Set: Be sure to freeze each layer adequately before adding the next to achieve a stable structure and prevent blending during assembly.
  • Rushing the Assembly: Take your time while layering the cake; a rushed assembly can lead to uneven layers and a less attractive presentation.
  • Over-Mixing Ingredients: When preparing layers with whipped cream or other mixes, be cautious not to over-mix. This can lead to a grainy texture instead of a smooth finish.
  • Skipping the Garnish: Presentation matters! Don’t skip on garnishing; your Peppermint Ice Cream Cake will shine with a few whipped cream swirls or chocolate shavings on top.
  • Using Too Much Peppermint Extract: A little goes a long way. Too much peppermint can overpower the other flavors, leading to an unbalanced taste.
  • Serving Too Cold: Let the cake thaw for a few minutes before cutting, as it will be easier to slice and taste better at slightly warmer temperatures.
  • Not Covering When Freezing: Failing to cover your cake in the freezer can lead to ice crystals forming, impacting its creamy texture and taste.
  • Ignoring Storage Recommendations: Proper storage is crucial for maintaining flavor and texture. Make sure to follow the guidelines provided.
  • Not Adjusting for Altitude: If you live at a higher altitude, be mindful that ingredients may behave differently in your area, requiring slight adjustments to achieve the desired texture and taste.

Essential Techniques

Layering: Layering is vital for creating a visually stunning cake and a balanced flavor profile. To master this technique, ensure each layer is even and adheres well to its counterpart. Avoid overfilling, and allow time to set in the freezer.

Whipping Cream: The transformation from liquid cream to whipped perfection is crucial for lightness. Be vigilant; over-whipping can lead to a grainy texture. Watch for soft peaks for gentle incorporation into your layers, ensuring a smooth mouthfeel.

Pro Tips for Perfect Peppermint Ice Cream Cake

1. Choose a high-fat ice cream for creaminess, enhancing the dessert’s overall flavor and texture.

2. Chill your mixing bowls and beaters before whipping cream to help stabilize the cream while whipping.

3. Experiment with different peppermint variations like chocolate-mint ice cream for an additional flavor dimension.

4. Use a serrated knife to cut your frozen cake for clean, smooth slices.

5. Allow the cake to sit at room temperature for 5-10 minutes before serving for a better texture.

6. Plan your assembly process to ensure your layers freeze perfectly to avoid blending.

7. Consider layering with crushed candy canes for added texture and flavor.

8. Top with chocolate ganache for a luxurious finish and additional richness.

Variations and Adaptations

You can easily adapt this Peppermint Ice Cream Cake to suit seasonal preferences by incorporating flavors such as pumpkin or eggnog during fall and winter. These alternatives provide a festive touch while still preserving the essence of an ice cream cake.

For dietary modifications, consider replacing traditional ice cream with lactose-free or vegan options to make this dessert accessible for those with dietary restrictions without sacrificing flavor.

Flavor variations such as using different types of extracts or adding pureed fruits can also change the profile of your cake. For instance, a raspberry swirl can introduce a delightful contrast to the minty freshness.

Textural modifications could include adding a layer of or mixing in crushed cookies, nuts, or chocolate chips into the ice cream layers for extra crunch and surprises in each bite.

Presentation alternatives like using decorative molds or cake rings can help create unique shapes, making your dessert stand out for special occasions.

Serving and Presentation Guide

For a stunning presentation, consider using a cake stand that highlights the layers of your Peppermint Ice Cream Cake. Serve slices with whipped cream on top or chocolate shavings to enhance visual appeal.

Garnishing with fresh mint leaves not only adds a pop of color but also a fresh aroma that complements the dessert well. Explore traditional accompaniments like hot chocolate or spiced cider for warmth, or modern options such as champagne or sparkling soda for a refreshing pairing.

Temperature considerations are key; serve the cake at an optimal temperature where it’s firm yet creamy, enhancing the overall experience. Smaller portions also allow guests to savor the flavors without overwhelming sweetness.

Wine and Beverage Pairing

For a delightful wine pairing, consider a sweet dessert wine like Moscato that complements the mint flavor while balancing sweetness. Sparkling wines can also elevate the occasion, providing a refreshing complement to the cake.

Non-alcoholic alternatives such as peppermint-infused sparkling water or tea can also pair beautifully, allowing everyone to enjoy a festive beverage. For coffee lovers, a light roast with hints of chocolate rounds out the dessert experience flawlessly.

Storage and Shelf Life

Ensure your Peppermint Ice Cream Cake is tightly covered before storing in the freezer to prevent freezer burn and maintain its texture. Ideally, it can last up to two weeks when stored correctly. If storing leftovers, slice and wrap portions individually to ease serving later.

When observing your cake, watch for signs of spoilage, such as changes in texture or flavors, which can indicate it’s past its prime. For optimal flavor, ensure to serve the cake fresh and avoid prolonged exposure to warm temperatures.

Make Ahead Strategies

This Peppermint Ice Cream Cake is an excellent option for make-ahead preparations. You can assemble the cake a day or two prior to serving, allowing flavors to meld beautifully while ensuring a consistent texture.

Store each layer separately in the freezer until you are ready to layer them, then assemble as directed. Consider adding fresh elements like whipped cream or garnishes just before serving for the best quality and presentation.

Scaling Instructions

When scaling this Peppermint Ice Cream Cake recipe, consider adjusting serving sizes by halving or doubling the recipe as needed. For larger gatherings, using a 10-12 inch springform pan ensures everyone can indulge. Just remember to adjust the freezing time accordingly.

When decreasing the size, ensure all ingredient ratios remain the same to maintain flavor and texture integrity. If using smaller pans, keep a close eye on cooking times, as they may vary significantly based on depth.

Nutritional Deep Dive

The Peppermint Ice Cream Cake is rich in calories due to its ingredients but can be adjusted for healthier versions. The balance of sugar and cream offers energy, while the peppermint provides natural digestive benefits.

Consider analyzing portion sizes to manage caloric intake, especially if you enjoy multiple servings. Opting for lighter ice creams can significantly decrease calorie counts while maintaining deliciousness in flavors.

Dietary Adaptations

This recipe can be easily modified for various dietary considerations. For a gluten-free version, use gluten-free chocolate cookies for the crust. You can create a vegan adaptation using coconut cream and dairy-free ice cream without compromising taste.

Low-carb or keto-friendly adaptations can be achieved by using sugar substitutes in the crust and selecting low-carb ice cream options available on the market today.

For those following a paleo diet, consider making your crust with almond flour or walnuts and using honey as a sweetener to enhance flavor naturally.

Troubleshooting Guide

If your Peppermint Ice Cream Cake has texture issues, it may be due to not allowing layers to set properly. Always ensure each layer is frozen thoroughly before adding the next to avoid blending.

Flavor balance issues can occur if too much peppermint extract is used. If this happens, use sweeter ice cream layers to counteract the overwhelming mint flavor, ensuring a balanced sweetness.

If facing temperature problems, ensure proper thawing before serving. Allow the cake to rest for several minutes at room temperature to ensure it cuts easily without crumbling.

When encountering equipment challenges, using the right tools is essential. A serrated knife aids in cutting clean slices, while an offset spatula can help lift layers without mess.

Always have alternatives on hand for ingredient substitutions; for instance, if you run low on ice cream, consider using frozen yogurt as a backup for a lighter option.

Timing concerns often arise when preparing for holidays. Make a timeline for your preparation, allocating enough time for freezing between each assembly step to avoid last-minute stress.

Recipe Success Stories

Readers from around the community have shared their success stories making Peppermint Ice Cream Cake. Many have highlighted how the cake steals the show at family gatherings and holiday parties, becoming a cherished recipe.

Variations such as including crushed candy canes and flavored frostings have inspired others to add a personal touch, fostering creativity while maintaining the original flavor.

Photography tips have emerged, with bakers capturing stunning images to share their cakes on social media. This not only showcases their creations but inspires others to try their hand at making this festive dessert.

Frequently Asked Questions

Can I freeze the cake for longer than two weeks?
Yes, but it’s best to consume within two weeks for optimal flavor and texture. After that, it may start developing ice crystals and lose its creaminess.

What can I use in place of peppermint extract?
For those who prefer a milder mint flavor, spearmint extract or fresh mint can be excellent substitutes. You can also try using vanilla extract for a different aromatic profile.

Is it necessary to let the cake thaw before serving?
Yes, allowing the cake to sit at room temperature for 5-10 minutes before serving improves the texture and flavor experience, making it easier to slice.

Can I use other types of ice cream?
Absolutely! Vanilla, chocolate, or even fruit-flavored ice creams can be substituted while still creating a delicious Peppermint Ice Cream Cake.

How do I prevent freezer burn on the ice cream cake?
Wrap the cake tightly in plastic wrap or aluminum foil once it’s assembled to protect it from freezer burn during storage.

What tools do I need to make this cake?
You’ll need a springform pan, mixing bowls, an electric mixer, a paddle spatula, and a serrated knife for cutting.

Is it possible to make a smaller version of the cake?
Yes! You can halve the ingredients and use a smaller pan to create a mini version perfect for a smaller gathering.

Can I make the cake without a springform pan?
While a springform pan is ideal for easier removal, you can use a regular cake pan. Just ensure you line it well for easier removal.

What garnishes work best with the cake?
Whipped cream, chocolate shavings, and crushed candy canes all make fantastic garnishes that enhance the festive feel of the cake.

Can the recipe be adjusted for allergies?
Yes, there are many substitutes available. You can use nut butters for people with peanut allergies, non-dairy ice creams for dairy-only diets, and gluten-free cookies for those with gluten intolerance.

Additional Resources

For those interested in expanding their dessert repertoire, consider exploring recipes for other ice cream cakes, such as vanilla and strawberry varieties. Technique guides showcasing whip techniques or cake assembly tips can also help improve baking results.

Ingredient information on choosing the best quality ice creams and flavor extracts can ensure your Peppermint Ice Cream Cake dazzles with flavor while seasonal variations can inspire you to experiment with different flavor profiles throughout the year.

Join the Conversation

We’d love to see your creations! Share your Peppermint Ice Cream Cake photos on social media and tag us to join the fun. Most importantly, we invite you to leave your feedback on the recipe below, letting us know how it turned out for you and any adaptations you made.

Engage with our community as we exchange tips, share photos, and celebrate sweet moments created in our kitchens. Every story enhances the recipe’s legacy, making it a treasure for future bakers.

The Recipe

Peppermint Ice Cream Cake

Serves: 8 servings

Prep Time: 30 mins

Cook Time: 10 mins

Total Time: 40 mins

Kitchen Equipment Needed

  • Springform pan
  • Electric mixer
  • Mixing bowls
  • Spatula
  • Serrated knife

Ingredients

  • 2 cups chocolate wafer crumbs
  • 1/4 cup melted butter
  • 1 quart peppermint ice cream, softened
  • 1 quart vanilla ice cream, softened
  • 1 cup whipped cream
  • 1 teaspoon peppermint extract
  • Chocolate shavings, for garnish

Directions

  1. In a bowl, combine chocolate wafer crumbs and melted butter. Press mixture into the bottom of a greased springform pan to form a crust.
  2. Spread a layer of softened peppermint ice cream over the cookie crust, smoothing with a spatula. Freeze until firm.
  3. Top with a layer of softened vanilla ice cream, freezing again until firm.
  4. Whip the cream with peppermint extract, then layer on top of the vanilla ice cream and freeze.
  5. Once fully frozen, carefully remove from the springform pan. Decorate with chocolate shavings and serve.

Recipe Notes

  • For a crunchier texture, feel free to mix in crushed peppermint candies.
  • The layers can be customized with different flavors of ice cream as per your preference.
  • This cake freezes well, so you can make it ahead of time for special occasions.
  • Warm up the knife under hot water for easier cutting.

Discover the Tropical Delight of Jamaican Purple Rain Cocktail

Jamaican Purple Rain: A Tropical Delight for Your Taste Buds

⚖️
Difficulty
Easy

⏲️
Prep Time
15 mins

🕒
Cook Time
5 mins

⏱️
Total Time
20 mins

🍽️
Servings
4

Jamaican Purple Rain is more than just a refreshing drink; it’s a celebration in a glass that captures the essence of the Caribbean with its vibrant colors and tropical flavors. This easy-to-make beverage combines the zingy sweetness of ripe fruits with the cooling notes of coconut, creating a tropical oasis that transports you straight to the sandy shores of Jamaica. Whether you’re hosting a summer barbecue, planning a beach party, or simply looking to cool down after a long day, Jamaican Purple Rain is the perfect thirst-quencher that will leave your guests asking for more.

The enchanting hues of this drink are as captivating as its taste. A blend of fresh berries and coconut cream results in a drink that is visually stunning and incredibly enjoyable. Each sip offers a dance of flavors, from the tartness of the fruits to the smooth creaminess of the coconut, making it a refreshing option for any occasion. Once you’ve tasted the joy that a glass of Jamaican Purple Rain can bring, it will surely become a staple in your beverage rotation.

Quick Recipe Highlights

  • Flavor Profile: Experience the delightful combination of tangy berries balanced by creamy coconut goodness.
  • Texture: The smooth creaminess contrasts beautifully with the slight graininess of crushed ice, providing a refreshing mouthfeel.
  • Aroma: The aromatic notes of fresh fruits paired with the gentle scent of coconut create an irresistible invitation.
  • Visual Appeal: The deep purples and whites present a vibrant and tropical essence, making it a stunning addition to any table.
  • Skill Level Needed: This is an easy recipe that requires minimal culinary skills, making it accessible for everyone.
  • Special Equipment: All you need is a blender and some basic measuring tools, making preparation a breeze.

Recipe Overview

  • Difficulty Level: The Jamaican Purple Rain is characterized by its simplicity, making it an ideal choice for both novice and experienced cooks.
  • Category: This drink fits perfectly into the beverage category, specifically as a refreshing summer cocktail.
  • Cuisine: Rooted in Jamaican tradition, this recipe reflects the island’s vibrant culture and love for fresh, tropical flavors.
  • Cost: The ingredients for this delightful drink are affordable, with an approximate cost of less than $10 to serve four.
  • Season: Best enjoyed during the warmer months, Jamaican Purple Rain can also brighten up chilly days with a taste of summer.
  • Occasion: Perfect for parties, picnics, and casual gatherings, it can easily be made in batches to cater to larger groups.

Why You’ll Love This Recipe

The allure of Jamaican Purple Rain lies in its mesmerizing taste and texture. The initial burst of fruity acidity mingles effortlessly with the creaminess of coconut, creating a balanced flavor profile that is both invigorating and satisfying. The interplay between the bold berry flavors and the subtle sweetness of coconut provides a delightful treat for your taste buds.

Another reason to adore this recipe is its convenience. The blend can be prepared in just a few minutes, making it a quick option when you need a refreshing drink. Simply throw the ingredients into your blender, and within moments, you’ll have a vibrant beverage ready to serve. This recipe leaves ample room for creative expression, allowing you to adjust ingredients and proportions to suit your flavor preferences.

Nutritionally, Jamaican Purple Rain offers benefits from its natural fruit ingredients, such as antioxidants found in berries and healthy fats from coconut. This makes it not just a delicious treat, but also a refreshing option that contributes to your overall wellness. It’s a guilt-free indulgence that can be enjoyed without the worry of excessive calories.

Additionally, the social aspect of this drink is undeniable. Bringing people together over a shared love of tropical flavors fosters connections, whether you’re toasting at a celebration or simply enjoying it on a sunny afternoon. It’s a drink that encourages laughter and camaraderie, making your moments even more special.

Lastly, with its cost-effectiveness and accessibility, Jamaican Purple Rain uses simple, fresh ingredients that are easy to find at your local grocery store. With minimal investment, you can impress your friends and family with a drink that looks and tastes like a luxurious vacation in Jamaica.

Historical Background and Cultural Significance

Jamaican Purple Rain has an intriguing origin story that connects deeply with the island’s rich culture. The use of tropical fruits and coconut reflects not just Jamaican agriculture but also the influence of Caribbean culinary traditions that celebrate fresh local produce. These ingredients are often featured in local festivities, showcasing the importance of community and togetherness.

The cultural significance of this recipe extends beyond simply drinking a beverage; it’s a representation of Jamaica’s vibrant lifestyle. Historically, drinks with fruit infusions are commonly served at social gatherings, with families gathering to share stories and enjoy the fruits of their labor. This contributes to a sense of belonging and warmth, integral to Jamaican hospitality.

Over the years, the evolution of Jamaican Purple Rain has seen it transition from a traditional refreshment to a trendy drink enjoyed around the world. As global tastes embrace exotic flavors, this recipe has found its way onto cocktail menus in numerous islands and oceanside bars, adapting slightly while still maintaining its cultural roots.

Regional variations abound, showcasing how local tastes and available ingredients influence the base recipe. Each chef or home cook puts a personal spin on the Jamaican Purple Rain, infusing it with local fruits or flavors, from mangoes to passion fruits, creating deliciously unique interpretations that honor the original inspiration.

Ingredient Deep Dive

The primary ingredients in Jamaican Purple Rain are fresh berries, typically a mix of raspberries, blueberries, and strawberries. Berries have been celebrated historically for their health benefits, rich in vitamins, fibers, and antioxidants that combat oxidative stress. When selecting berries, opt for ripe, firm options that yield to gentle pressure, indicating freshness. Once home, store them unwashed in the refrigerator, as moisture can hasten spoilage.

Coconut, the second star of the drink, not only adds a creamy texture but also packs a nutritional punch with healthy fats purported to improve heart health. When choosing coconut milk, always look for unsweetened varieties to keep the sugar content in check. Fresh coconut can also be used but requires additional preparation. For storage, coconut milk can be kept sealed in the fridge for several days and is best used within a week of opening.

Common Mistakes to Avoid

  • Using overripe or damaged fruits can alter the flavor negatively; always choose fresh berries.
  • Not blending long enough may leave chunks, preventing a smooth texture; aim for a creamy consistency.
  • Ignoring the importance of balance between sweet and tart can result in an unappealing taste; adjust as needed carefully.
  • Using sweetened coconut products may overpower the natural flavors; stick to unsweetened varieties.
  • Neglecting to chill the ingredients beforehand might make the drink less refreshing; preparation is key.
  • Making too much at once can lead to waste; it’s best served fresh.
  • Skipping the garnishes might make for a less visually appealing drink; presentation matters.
  • Pouring the drink in a rush can cause it to separate; take your time for an even pour.
  • Not trying variations might limit your experience; feel free to add new fruits or flavors.
  • Overcomplicating the recipe can detract from the simplicity that makes it delightful; embrace its ease.

Essential Techniques

One of the key techniques in preparing Jamaican Purple Rain is mastering the blending process. The blender should be on high speed until all ingredients are fully incorporated. This ensures a creamy texture free from lumps. To avoid over-blending, watch for visual cues such as the mixture becoming fully homogeneous, indicating it is ready to serve.

Another important technique is the selection of the right serving glass. Typically, this drink is best served in clear, tall glasses that showcase its vibrant colors. Using a highball or cocktail glass can enhance the visual appeal while allowing room for ice. It’s essential to fill glasses with ice before pouring the drink to maintain its chilled temperature and prevent dilution.

Pro Tips for Perfect Jamaican Purple Rain

1. Always select ripe and fresh berries to ensure the best flavor and color.
2. Feel free to experiment with different types of fruit to create your own signature blend.
3. Pre-chill your coconut milk or cream for an extra refreshing experience.
4. For enhanced sweetness, agave syrup or honey can be added in small increments.
5. Consider freezing berries to use as ice cubes in the drink, ensuring it stays cold without watering down.
6. When blending, pulse the mixture first to combine ingredients before running on high speed.
7. A splash of lime juice can uplift the flavors, adding a tangy twist to the drink.
8. Garnishing with fresh mint or citrus slices makes for an eye-catching presentation.

Variations and Adaptations

Jamaican Purple Rain can easily be adapted to reflect seasonal changes, such as incorporating peaches or watermelon during the summer months. In the fall, consider adding apples or pears for a unique twist. To cater to different dietary needs, this drink can also be made vegan by simply using coconut products and opting for plant-based sweeteners.

Moreover, for those looking to infuse alcohol into this beverage, adding white rum can create a delightful adult version of Jamaican Purple Rain that is perfect for parties and celebrations. As flavors vary by region, feel free to incorporate local fruits or spices to put a unique spin on this Caribbean classic.

Serving and Presentation Guide

When it comes to serving Jamaican Purple Rain, presentation is key. Opt for tall, transparent glasses that allow the colorful layers of the drink to shine through. Consider a double-layer effect by blending the coconut cream separately and pouring it carefully for a beautiful layered look.

Using garnishes such as fresh mint leaves, a sprig of basil, or fruit slices can elevate the drink’s visual appeal. Not only does this enhance presentation, but it also adds an aromatic component to the drinking experience. For temperature control, serve the drink immediately after preparation, and consider pre-chilling the glasses for an optimal refreshing effect.

Wine and Beverage Pairing

For those who enjoy pairing their drinks, Jamaican Purple Rain can be complemented well with a light, fruity white wine, such as Sauvignon Blanc or Pinot Grigio. These wines offer crisp flavors that echo the fruitiness of the drink without overpowering it.

If you prefer non-alcoholic options, consider pairing with a zesty lemonade or a coconut water-based drink to maintain the tropical theme. Iced herbal teas, especially those infused with fruit flavors, also make an excellent pairing, enhancing the overall enjoyment.

Storage and Shelf Life

For optimal freshness, it is best to consume Jamaican Purple Rain immediately after preparation, as its vibrant flavors are at their peak. If you need to store it, keep it in an airtight container in the refrigerator for up to 24 hours. However, bear in mind that the texture may change, with separation occurring over time.

If you plan to freeze the beverage, consider freezing each component separately and blending them later for a fresher taste. When thawing, avoid microwave reheating, as the texture could alter significantly; instead, let it sit at room temperature or refrigerate until defrosted.

Make Ahead Strategies

To streamline your preparation process, you can make some components ahead of time. Prepare the berry mixture by blending it and storing it in the refrigerator for up to a few hours before serving. This allows you to simply add the coconut cream and mix right before you’re ready to serve.

If you prefer chilling your ingredients more quickly, consider pre-chilling the coconut milk. This ensures your drink is refreshingly cold without needing to blend in ice, which might dilute the flavors otherwise. For last-minute freshness, save any garnishes until just before serving to keep them crisp and vibrant.

Scaling Instructions

Scaling Jamaican Purple Rain for larger gatherings is easy. To double or triple the recipe, simply multiply the ingredient amounts by the desired number. Ensure you have enough capacity in your blender or break the mixing into smaller batches.

When decreasing the quantities, remember to taste and adjust, as flavor intensity may vary with smaller batches. Keep in mind serving glass sizes too—ensure you have ample glassware for your guests. Proper planning can help maintain the drink’s freshness and flavor integrity across different serving sizes.

Nutritional Deep Dive

Jamaican Purple Rain is relatively low in calories, making it a great option for those mindful of their intake. The primary ingredients—berries and coconut milk—offer a blend of vitamins and antioxidants, promoting overall health. The berries are rich in nutrients, such as Vitamin C and dietary fibers, while coconut milk provides healthy fats.

A serving typically contains a moderate level of carbohydrates primarily from the natural sugars of the fruits, but these can be adjusted by controlling the sweetness added. For those watching their fruit intake, measuring portion size can help manage overall energy consumption while still enjoying the flavors of this delightful drink.

Dietary Adaptations

Jamaican Purple Rain can easily cater to various dietary preferences. For gluten-free diets, all ingredients are naturally gluten-free, making this drink a safe choice. For those on a vegan diet, ensure you use plant-based sweeteners and skip any cream that isn’t dairy-free.

For keto or low-carb adaptations, consider using fewer fruits or substituting them with lower-carb fruits such as strawberries. When looking for a dairy-free option, materials such as almond or oat milk can replace coconut for a different flavor and texture profile without compromising on the deliciousness of the drink.

Troubleshooting Guide

If your Jamaican Purple Rain turns out too tart, consider balancing it with more coconut cream or adding a natural sweetener like agave. A too-thick texture can be solved by incorporating additional coconut milk or a bit of water to achieve the desired consistency.

If you’ve blended too long, resulting in the drink separating, try gently stirring or shaking it instead of re-blending. Meanwhile, for unexpected layers in flavor, retrace your ingredient steps, ensuring the components complement rather than overpower one another for a harmonious outcome.

Recipe Success Stories

Our readers have shared numerous successes while trying out this recipe, highlighting its versatility and ease. Community feedback often praises the balanced flavors, with many emphasizing the delightful presentation that has wowed guests at parties.

Those who have experimented with variations share delightful adaptations, from tropical fruit blends to incorporating local spices. Readers also share valuable photography tips to capture the drink’s stunning colors, showcasing their artistry in every glass and encouraging even more creativity within the community.

Frequently Asked Questions

1. Can I make Jamaican Purple Rain in advance?

While the drink is best enjoyed fresh, you can prepare the fruit mix ahead of time and keep it in the fridge. However, combine it with the coconut cream just before serving for the best texture and flavor.

2. What fruits can I substitute in this recipe?

You can substitute any berry with the ones you prefer or have on hand. Tropical fruits like mango and pineapple also add a refreshing twist.

3. Can I add alcohol to Jamaican Purple Rain?

Absolutely! White rum is a great addition that complements the tropical flavors beautifully. Adjust according to your personal preference.

4. Is this drink suitable for kids?

Yes! Jamaican Purple Rain is a colorful and nutritious drink that kids can enjoy, especially without the added alcohol. It’s a fun way to introduce them to fruity flavors.

5. How long will leftovers last?

It’s recommended to consume the drink within 24 hours for the best flavor and freshness. Store it in an airtight container in the refrigerator.

6. What can I pair with Jamaican Purple Rain?

This drink pairs wonderfully with light appetizers, seafood dishes, or tropical-themed meals. It can also be served alongside grilled favorites during summer gatherings.

7. Can I make it a slushy?

Yes! To achieve a slushy texture, blend ingredients with ice instead of using only chilled liquids. Adjust the amount of ice based on your desired consistency.

8. What is the best coconut product to use?

For the best flavor, use unsweetened coconut milk or coconut cream. You can experiment with different brands to see which you prefer.

9. Can this recipe be adapted for a low-carb diet?

Yes, you can reduce the amount of fruit or choose lower-carb fruits like strawberries. You can also use a sugar substitute if desired.

10. What are some creative ways to serve this drink?

Consider serving it in clear glassware with fruit garnish or placing it in a punch bowl for gatherings. You can also create layered drinks by carefully pouring different mixtures.

Additional Resources

For those who loved Jamaican Purple Rain, consider exploring related tropical recipes such as piña colada or mango mojito for a full Caribbean beverage experience. Check out both technique guides and ingredient information to deepen your culinary journey.

If you’re interested in matching cocktails with meals, explore seasonal variations and how each fruit-infused beverage can complement different flavors in food.

Join the Conversation

We invite you to share your experiences with Jamaican Purple Rain on social media! Tag us in your photography of this vibrant drink and share your variations or tips with the community. Every new story adds to the richness of our shared culinary journey, and we can’t wait to hear about your delicious adventures in making this remarkable beverage.

The Recipe

Jamaican Purple Rain

Serves: 4

Prep Time: 15 mins

Cook Time: 5 mins

Total Time: 20 mins

Kitchen Equipment Needed

  • Blender
  • Measuring cups and spoons
  • Serving glasses

Ingredients

  • 1 cup fresh raspberries
  • 1 cup fresh blueberries
  • 1 cup strawberries, hulled and sliced
  • 1 cup coconut milk
  • 2 tablespoons honey or agave syrup (optional)
  • Ice cubes
  • Fresh mint leaves for garnish (optional)

Directions

  1. Place the berries in a blender with coconut milk and honey or agave syrup if using.
  2. Add a handful of ice cubes to the blender.
  3. Blend on high speed until smooth and creamy.
  4. Serve immediately in chilled glasses, garnished with fresh mint leaves, if desired.
  5. Enjoy your refreshing Jamaican Purple Rain drink!

Recipe Notes

  • Feel free to adjust the sweetness according to your preference.
  • Experiment with different fruit combinations for a unique flavor.
  • For a fun twist, add a splash of rum to make it a cocktail.

Indulge in Berrylicious Strawberry Crunch Cheesecake Delight Today

Berrylicious Strawberry Crunch Cheesecake: A Sweet Sensation for Every Occasion

⚖️
Difficulty
Intermediate

⏲️
Prep Time
30 mins

🕒
Cook Time
60 mins

⏱️
Total Time
90 mins

🍽️
Servings
8 servings

The Berrylicious Strawberry Crunch Cheesecake is a delightful dessert that brings the enchanting flavors of fresh strawberries to the forefront. This luscious cheesecake combines a creamy, rich filling with a crispy crunch that will tantalize your taste buds. Imagine taking a bite and being greeted with the sweet, tangy taste of strawberries, paired perfectly with a velvety cheesecake that melts in your mouth. With every forkful, you’ll experience the delightful contrast of textures, making it not just a treat for the palate but also a feast for the senses.

This cheesecake is perfect for any occasion, from birthdays to summer picnics. Its vibrant pink hue from the strawberries makes it a stunning centerpiece on any dessert table. The combination of the strawberry and the buttery crunch creates a beautiful harmony that effortlessly elevates the experience of indulgence. Whether served with fresh strawberry slices on top or a drizzle of berry sauce, this cake is sure to impress your guests and become a cherished family favorite.

Quick Recipe Highlights

  • Flavor Profile: The cheesecake bursts with fresh strawberry sweetness, balanced with a hint of tartness from the fruit.
  • Texture: You’ll enjoy the smooth and creamy filling alongside the golden, crispy crust that provides a satisfying crunch.
  • Aroma: The aroma of buttery crust and sweet strawberries fills the air, creating an inviting atmosphere.
  • Visual Appeal: This dessert features a stunning pink hue complemented by the golden crunch, making it visually captivating.
  • Skill Level Needed: Suitable for those with intermediate baking skills, involving multiple steps that produce a show-stopping dessert.
  • Special Equipment: A springform pan is essential for achieving the perfect cheesecake presentation.

Recipe Overview

  • Difficulty Level: This recipe is classified as intermediate, requiring attention to detail in assembly and baking time.
  • Category: This dessert falls under cheesecake recipes, showcasing the versatility of incorporating various flavors.
  • Cuisine: The origins of cheesecake date back to ancient Greece, and this version embraces modern flavors with a fruity twist.
  • Cost: The ingredients for this cheesecake are budget-friendly, making it an accessible indulgence.
  • Season: This dessert is particularly popular in spring and summer when strawberries are at their peak freshness.
  • Occasion: Perfect for celebrations, holidays, and casual gatherings, this cheesecake will be a hit at any event.

Why You’ll Love This Recipe

The Berrylicious Strawberry Crunch Cheesecake is not just about taste; it’s about a beautifully balanced fusion of flavors and textures. The creamy cheesecake filling pairs splendidly with the sweet and slightly tart strawberries, creating a refreshing dessert that feels indulgent yet light. The addition of a crunchy layer introduces an element of surprise, making each slice a delightful journey of textures.

Convenience plays a key role in why this recipe shines. With straightforward steps and easily accessible ingredients, you can whip up this cheesecake without needing extensive baking experience. You’ll also find that making this dessert in advance is ideal, as it can rest in the fridge to allow the flavors to meld beautifully. This means less stress and more time to enjoy with your loved ones.

Another reason to embrace this cheesecake is its nutritional advantages. Strawberries are packed with antioxidants, vitamins, and minerals, providing health benefits alongside the indulgence. You can enjoy a slice, knowing you’re incorporating a delicious fruit into your diet, even while satisfying your sweet tooth.

Socially, this dessert brings people together. Whether hosting a family gathering or a backyard barbecue with friends, sharing a slice of this cheesecake sparks joy and creates memories. It’s a perfect conversation starter and a delicious way to end any meal.

Lastly, the cost-effectiveness of this recipe cannot be overlooked. With simple, budget-friendly ingredients, this cheesecake provides an impressive return on your investment, delivering big flavor and satisfaction without breaking the bank.

Historical Background and Cultural Significance

The origin of cheesecake can be traced back to ancient Greece, where it is believed that the first cheesecakes were made with simple ingredients like fresh cheese and honey. This delightful dessert has since evolved and adapted through various cultures over centuries. The modern cheesecake, particularly the New York style, has become renowned worldwide, and the incorporation of fruits like strawberries is a testament to its versatility.

Cheesecake holds cultural significance in many celebrations across the globe. In the U.S., it is often associated with birthdays and holiday gatherings, while in other cultures, it may feature prominently in festivals and family traditions. The flavor combinations and variations of cheesecake provide endless possibilities, allowing families to create their unique recipes passed down through generations.

The evolution of this dessert reflects culinary creativity and adaptability. From its simple origins to the multiple layers of flavor and texture we see today, cheesecake incorporates both tradition and contemporary tastes. The Berrylicious Strawberry Crunch Cheesecake is a perfect example, bridging classic cheesecake with trendy flavors and textures.

Regionally, variations of cheesecake can be found in many cultures. In Italy, for instance, the ricotta-based cheesecake offers a lighter texture, while Japanese versions utilize a unique soufflé method for an airy finish. Through these adaptations, cheesecake has showcased diverse culinary influences and continues to inspire bakers worldwide.

Ingredient Deep Dive

Fresh Strawberries: Strawberries are not just delicious; they are rich in vitamins C and K, fiber, and antioxidants. When selecting strawberries, look for bright, plump berries with a vibrant color and a sweet aroma. Store them in the refrigerator and consume them within a few days for the best freshness. For those needing substitutes, you can use other berries like raspberries or blueberries, though the flavor will differ slightly.

Cream Cheese: The heart of any cheesecake, cream cheese brings rich creaminess and tanginess to the dessert. Choose full-fat cream cheese for the best flavor and texture. When working with cream cheese, ensure it’s at room temperature to avoid lumps in your filling. If you’re looking for healthier options, consider using Greek yogurt, which provides similar creaminess with less fat.

Graham Crackers: The crumbly texture of graham crackers creates a satisfying base for the cheesecake. They are often blended with melted butter for a rich flavor. When choosing graham crackers, aim for those without artificial flavors or colors. If you’re looking for alternatives, digestive biscuits or even crushed Oreos can make excellent substitutes, adding their distinct taste.

Sugar: Sugar sweetens the cheesecake and balances the tanginess of the cream cheese. Granulated sugar is standard, but you can experiment with brown sugar for a deeper flavor. When measuring sugar, use the spoon-and-level method rather than scooping directly from the bag for accurate measurements. For those watching their sugar intake, consider using natural sweeteners like honey or maple syrup in moderation.

Butter: Butter adds richness and binds the crust components together. Use unsalted butter for better control over the saltiness of the dessert. When melting butter, do so gently to avoid separation. Alternatives like coconut oil or dairy-free spreads can be excellent substitutes for those who are vegan or lactose intolerant, though flavors may vary.

Common Mistakes to Avoid

  • Not allowing cream cheese to soften: Using cold cream cheese can lead to lumps in your filling. Always allow it to come to room temperature before mixing.
  • Overmixing the batter: Overmixing can introduce too much air, causing the cheesecake to crack. Mix just until smooth and combined.
  • Baking at too high a temperature: Cheesecakes should bake at a low temperature to avoid cracking. Ensure your oven temperature is accurate.
  • Skipping the water bath: A water bath helps regulate baking temperature and moisture, preventing cracks on the surface of the cheesecake.
  • Not chilling the cheesecake properly: Cheesecake needs to be cooled slowly to set correctly. Skipping refrigeration can lead to a soft, runny cake.
  • Baking for too long: Overbaking can result in a dry cheesecake. Keep an eye on it, removing it when slightly jiggly in the center.
  • Ignoring ingredient measurements: Accurate measurements are crucial for cheesecake success. Always use measuring cups and spoons for best results.
  • Not letting the cheesecake rest: Resting allows flavors to meld perfectly and improves the overall texture. Don’t rush this step.
  • Using expired ingredients: Always check expiration dates on perishables like cream cheese and eggs to ensure the best flavor.
  • Forgetting the crunch: Pay attention to the crust: it should be firm enough to hold the cheesecake but not overly hard or crumbly.

Essential Techniques

When making a cheesecake, mastering the technique of achieving a smooth batter is crucial. Begin by mixing your cream cheese thoroughly, ensuring it’s at room temperature to avoid lumps. Gradually add sugar and other ingredients while mixing on low speed, stopping to scrape down the sides of the bowl as needed. This technique ensures a silky, homogeneous batter crucial for a smooth cheesecake.

Baking a cheesecake in a water bath is another essential technique. The water bath helps maintain even baking temperature and adds moisture to prevent the cheesecake from drying out. To create a water bath, wrap your springform pan in foil to avoid leaks and place it in a larger baking dish filled with hot water. This method can significantly improve your cheesecake’s texture, leading to a creamy, melt-in-the-mouth experience.

Pro Tips for Perfect Berrylicious Strawberry Crunch Cheesecake

1. Make sure all ingredients are at room temperature before starting. This helps create a smoother batter and prevents lumps.
2. Use fresh strawberries for the best flavor and appearance. Avoid frozen strawberries, as they can release too much moisture during baking.
3. Be gentle when mixing the filling to avoid incorporating too much air, which can cause cracking during baking.
4. Always pre-bake your crust to enhance flavor and ensure it holds its shape when filled.
5. After baking, let the cheesecake cool gradually in the oven with the door slightly ajar. This helps prevent cracks from sudden temperature changes.
6. Allow the cheesecake to chill in the refrigerator for at least four hours, ideally overnight, before serving. This helps the flavors meld and improves the texture.
7. Consider using a food processor for crushing graham crackers for an evenly fine crust.
8. Experiment with different fruit toppings or sauces for personalization and variety.

Variations and Adaptations

One delightful variation of the Berrylicious Strawberry Crunch Cheesecake is to incorporate various seasonal fruits. For instance, during fall, using pumpkin in combination with cream cheese can add a festive twist, while berries in summer can provide a refreshing taste. Additionally, you can adapt the crust by trying different cookies, such as Oreos or gingersnaps, for a unique flavor profile.

For dietary modifications, consider a gluten-free version by using gluten-free graham crackers or blending almond flour with butter for the crust. If you are looking to lower the sugar content, you could replace part of the sugar with a natural sweetener like honey or maple syrup.

To switch up the flavor profile, you can also add spices like cinnamon or nutmeg to the filling. Incorporating lemon zest will not only enhance the flavor but also provide a refreshing twist to the cheesecake. For a decadent presentation, serve it with a drizzle of chocolate sauce or a dollop of whipped cream.

Serving and Presentation Guide

Plating your Berrylicious Strawberry Crunch Cheesecake beautifully can elevate the overall dining experience. Consider using a parchment paper lining for the bottom of your springform pan to achieve clean edges when slicing. Once plated, add a fresh strawberry slice or two on top for added color and appeal.

Garnishing is another opportunity to enhance your presentation. A sprinkle of crushed graham crackers around the cheesecake can echo the crust and provide a cohesive look. Drizzling homemade strawberry sauce or chocolate ganache can add a glossy finish and make the cheesecake irresistible.

When serving, ensure the cheesecake is chilled properly, as it enhances flavor and texture. Consider slicing it with a hot knife for cleaner cuts. This ensures your guests are treated to beautiful portions, allowing them to appreciate the layers of flavor and texture.

Wine and Beverage Pairing

When it comes to pairing beverages with the Berrylicious Strawberry Crunch Cheesecake, a light dessert wine, such as a Moscato or a Riesling, can beautifully complement the sweetness of the cheesecake. The fruity notes in these wines enhance the strawberry flavors while maintaining the overall balance.

For a non-alcoholic option, consider serving sparkling lemonade or sweet iced tea, which can be refreshing and offer a nice contrast to the creaminess of the cheesecake. If coffee lovers are at your gathering, a rich Americano or an iced coffee can provide a lovely pairing, enhancing the dessert experience with warmth and depth.

Temperature considerations are essential for both dessert and beverages. Serve the cheesecake chilled for the best texture while ensuring your beverages are served at the appropriate temperature; chilled bubbly or iced drinks work best on warm days.

Storage and Shelf Life

Proper storage is essential for maintaining the quality of your Berrylicious Strawberry Crunch Cheesecake. After it has chilled completely, cover it tightly with plastic wrap or aluminum foil to prevent it from absorbing odors from the refrigerator. The cheesecake can be stored in the fridge for up to five days, allowing you to enjoy this delicious dessert over several days.

For longer storage, consider freezing. Wrap the cheesecake tightly in plastic wrap and then in aluminum foil. It can last up to three months in the freezer. When you’re ready to enjoy it, allow it to thaw in the refrigerator overnight. Avoid thawing at room temperature to maintain its best texture.

Signs of spoilage include an off smell, discoloration, or any liquid pooling around the edges. It’s always best to check before consuming any leftovers.

Make Ahead Strategies

Making the Berrylicious Strawberry Crunch Cheesecake ahead of time can save you stress on the day of an event. You can prepare the cheesecake base and store it in the refrigerator for up to two days before baking. This allows the flavors to meld beautifully as it rests.

Additionally, you can prepare the crust in advance and store it in the fridge until you are ready to fill it with your cheesecake batter. This ensures that the crust is fresh and crisp when baked, providing a pleasant contrast to the creamy filling when served.

When storing the cheesecake, always keep it covered to prevent it from absorbing other odors in the fridge. For the best taste and quality, dairy products like cream cheese tend to have a limited shelf life, so be sure to use them before their expiration dates.

Scaling Instructions

If you need to adjust the servings for your Berrylicious Strawberry Crunch Cheesecake, scaling the recipe up or down is quite simple. To halve the recipe, use a 7-inch springform pan instead of the standard 9-inch one and reduce each ingredient accordingly.

For doubling or tripling, ensure that you have the proper size pan; larger cakes may require longer baking times. Monitor the cheesecake closely to prevent overbaking. If your oven has multiple racks, consider rotating the cheesecake halfway through baking for even cooking.

When scaling, it’s also crucial to adjust your timing slightly. Larger cheesecakes may need an extra 10-15 minutes in the oven, while smaller versions may require less. Always check for doneness to ensure the perfect cheesecake every time.

Nutritional Deep Dive

The Berrylicious Strawberry Crunch Cheesecake can be an indulgent treat, but it also provides nutritional benefits, especially from the strawberries. Strawberries are not only delicious but are high in essential vitamins and minerals. A single serving of this cheesecake offers a good amount of vitamin C, which supports immune health, and antioxidants, which help combat oxidative stress in the body.

When considering macronutrient breakdown, a typical slice of cheesecake provides a balanced portion of carbohydrates, fats, and proteins. While it is higher in sugar, the fruit content brings some natural sweetness, lowering the need for excessive added sugars. For those mindful of calories, consider enjoying smaller portions without sacrificing flavor.

Dietary considerations are essential. This cheesecake can be modified with lower-fat cream cheese or yogurt alternatives to reduce calories and fat content while still retaining its delightful creaminess. For those managing weight, practice portion control to enjoy this dessert guilt-free.

Dietary Adaptations

This Berrylicious Strawberry Crunch Cheesecake can be adapted to suit various dietary needs. For a gluten-free version, substitute traditional graham crackers with gluten-free counterparts or use almond flour for the crust. Make sure to confirm that all ingredients, including baking powder, are gluten-free.

For those who need a dairy-free or vegan cheesecake, replace cream cheese with cashew cream or a dairy-free cream cheese alternative. Use plant-based sweeteners and substitutes to maintain the cheesecake’s texture and flavor while ensuring it meets dietary restrictions.

If you’re following a low-carb or ketogenic diet, consider using almond flour for the crust and a sugar-free sweetener like erythritol or monk fruit to reduce carbohydrate content without sacrificing flavor.

For a low-FODMAP version, refrain from using traditional lactose-filled dairy and explore suitable alternatives. An understanding of ingredient adaptations can ensure everyone enjoys this delicious cheesecake at your table.

Troubleshooting Guide

One common issue with cheesecakes is a cracked surface. This often results from baking at too high a temperature or not using a water bath. To remedy this, ensure your oven temperature is accurate and consider baking your cheesecake in a water bath to provide moisture.

Another frequent concern is a soggy crust, which can happen if the crust isn’t pre-baked or if the filling is too heavy. Make sure to bake the crust before adding the filling, and avoid overloading your cheesecake with wet ingredients. You can also let it cool completely before slicing to stabilize the layers.

If your cheesecake is too dense, this may stem from overmixing or baking too long. Next time, mix just until combined and keep a watchful eye on the baking time, opting for a shorter duration to retain the creamy goodness.

For flavor imbalances, under-sweetening is a prevalent challenge. Adjust your sugar levels next time, and opt for a higher-quality vanilla extract to enhance the dish’s flavor profile.

Recipe Success Stories

Our readers have shared heartwarming stories of success when making the Berrylicious Strawberry Crunch Cheesecake. Many have commented on how easy the recipe is to follow, making it a favorite for gatherings and family celebrations. Readers have reported that their friends and family rave about the flavor and presentation, often asking for seconds.

Those who have opted to make variations are thrilled with the results. Recipes transformed into lemon berry cheesecakes or seasonal pumpkin delights have garnered excellent feedback, showcasing the versatility of the cheesecake base.

The beautiful photographs shared by readers across social media platforms display pristine layers and vibrant strawberry hues, further encouraging others to try the recipe. These personal touches inspire creativity and encourage others to experiment with adaptations, making it a community affair.

Many have also highlighted the delight of sharing their cheesecakes at parties, with several readers stating it quickly became the centerpiece dessert that everyone eagerly awaits at potlucks or gatherings.

Frequently Asked Questions

Can I use frozen strawberries instead of fresh?
While fresh strawberries are ideal for this recipe due to their flavor and texture, frozen strawberries can be used if thawed and drained. However, they may not provide the same vibrant look and fresh taste.
Can I make this cheesecake without a springform pan?
If you don’t have a springform pan, you can use a standard round cake pan lined with parchment paper. Just be careful when removing the cheesecake as it may not slide out as easily.
How can I prevent my cheesecake from cracking?
To prevent cracks, ensure you use a water bath, avoid overmixing, and bake at a low temperature. Allowing the cheesecake to cool gradually can also help maintain its structure.
Can this cheesecake be made in advance?
Absolutely! The cheesecake can be made up to two days in advance and stored in the refrigerator. It’s often better when prepared ahead, allowing flavors to meld.
How should I store leftovers?
Store any leftover cheesecake in the refrigerator, tightly wrapped in plastic or foil, for up to five days. Freezing is also an option for longer storage.
What can I do if my cheesecake is too soft?
If your cheesecake is too soft, it may not have cooled long enough. Be sure to chill it in the fridge for at least four hours or overnight to allow it to set properly.
Can I substitute ingredients for the crust?
Yes! You can use different types of cookies or crushed nuts for the crust. Consider using Oreos, vanilla wafers, or even gluten-free options as a base.
How long can I freeze my cheesecake?
Cheesecake can be frozen for up to three months. Just ensure it’s well-wrapped to prevent freezer burn and that it’s thawed in the refrigerator before serving.
Is it necessary to use a water bath?
While it’s not absolutely necessary, a water bath creates a moist environment that helps prevent cracking and ensures even baking, enhancing the ultimate texture of your cheesecake.
Can I add other flavors to the cheesecake?
Absolutely! You can customize the flavor by adding extracts such as vanilla, almond, or even citrus zests to enhance the taste profile of your cheesecake.

Additional Resources

If you’re looking to explore more delicious desserts, check out our collection of cheesecake recipes that range from classic New York-style to decadent chocolate versions. Additionally, consider reviewing technique guides on perfecting your cheesecake batter, achieving optimal baking techniques, and mastering crust preparation for the best results every time.

For those interested in ingredient information, our detailed resource section provides insights into selecting the best strawberries, understanding the differences in cream cheese types, and tips on choosing high-quality baking ingredients. Seasonal variations and recipe modifications are also available to inspire your creativity, making it easy to recreate this Berrylicious Strawberry Crunch Cheesecake with exciting twists.

Join the Conversation

We invite you to join our growing community of baking enthusiasts! Share your Berrylicious Strawberry Crunch Cheesecake experiences with us on social media, using our hashtag for a chance to be featured. Don’t hesitate to post your beautiful photographs, highlighting any variations you made and your tips for success.

We love receiving your feedback and stories on how this recipe turned out for you. Cook, bake, and share your variations, and let’s inspire each other to create mouthwatering desserts. Engage with others in the community to swap tips, techniques, and baking adventures as we all strive to perfect our cheesecake-making skills!

The Recipe

Berrylicious Strawberry Crunch Cheesecake

Serves: 8

Prep Time: 30 mins

Cook Time: 60 mins

Total Time: 90 mins

Kitchen Equipment Needed

  • 9-inch springform pan
  • Mixing bowls
  • Hand mixer or stand mixer
  • Measuring cups and spoons
  • Food processor (for crust)

Ingredients

  • 1 ½ cups graham cracker crumbs
  • ½ cup unsalted butter, melted
  • 2 cups cream cheese, softened
  • 1 cup granulated sugar
  • 3 large eggs
  • 1 teaspoon vanilla extract
  • 2 cups fresh strawberries, pureed
  • ½ cup crushed strawberries, for topping

Directions

  1. Preheat the oven to 325°F (160°C).
  2. In a bowl, mix graham cracker crumbs with melted butter until combined. Press into the bottom of the springform pan to form the crust.
  3. Bake the crust for 10 minutes, then let it cool.
  4. In a mixing bowl, blend cream cheese until smooth. Gradually add granulated sugar, mixing well.
  5. Add the eggs one at a time, mixing slowly after each addition. Stir in vanilla extract and the pureed strawberries.
  6. Pour the filling over the cooled crust. Bake for about 60 minutes or until set in the middle.
  7. Allow to cool completely before refrigerating for at least 4 hours.
  8. Top with crushed strawberries before serving, if desired.

Recipe Notes

  • For a thicker crust, use more graham crumbs.
  • Feel free to experiment with different fruit purees.
  • Use a water bath while baking for a creamier texture.

Delicious Cowboy Cookies Recipe: Chewy Treats for Everyone

Cowboy Cookies: A Sweet Adventure Awaits

⚖️
Difficulty
Intermediate

⏲️
Prep Time
15 mins

🕒
Cook Time
10 mins

⏱️
Total Time
25 mins

🍽️
Servings
24 cookies

Cowboy cookies are the perfect blend of hearty and sweet, bringing you a taste of the rugged frontier with every bite. These delightful cookies combine the classic flavors of chocolate, oats, and nuts, creating a uniquely satisfying dessert that’s as adventurous as its name suggests. With each crunchy morsel, you’ll experience an explosion of textures and sweetness that will make you smile. Whether enjoyed by the campfire or at home, these cookies are destined to become a favorite that your family will revere!

The beauty of cowboy cookies lies not just in their taste, but in their heartwarming memories. Originating from the rugged U.S. West, they were originally crafted to be hearty enough to sustain cowboys on long treks. The addition of oats provides a soulful fiber, while the nuts and chocolate represent the bounty of the land. This recipe captivates your taste buds and evokes the spirit of adventure, nostalgia, making you feel connected to the open ranges and the thrill of the wild West!

Quick Recipe Highlights

  • Flavor Profile: A delightful combination of sweet chocolate, nutty undertones, and the wholesome flavors of oats and coconut.
  • Texture: A perfect balance of chewy and crunchy, with crispy edges and a soft, moist center.
  • Aroma: The warm, inviting scent of baked cookies complemented by the rich aroma of chocolate and toasted nuts fills the kitchen.
  • Visual Appeal: Beautifully golden-brown with speckles of chocolate and nuts, these cookies are as pleasing to the eye as they are to the palate.
  • Skill Level Needed: Intermediate; these cookies require a few techniques but are easy for any home baker to master.
  • Special Equipment: A standard oven, mixing bowls, a baking sheet, and parchment paper is all that you need.

Recipe Overview

  • Difficulty Level: The recipe is rated as intermediate, needing some comfort with mixing and baking, but accessible for enthusiastic bakers.
  • Category: These cookies can be enjoyed as a dessert, snack, or even a breakfast treat, making them versatile across any meal occasion.
  • Cuisine: Cowboy cookies harken back to old-school American frontier traditions, combining influences from traditional baking with hearty ingredients.
  • Cost: The ingredients for cowboy cookies are fairly economical, averaging around $8-$10 for a batch that yields about 24 cookies.
  • Season: Perfect for any season but especially in winter and fall when warm cookies provide comfort and cheer.
  • Occasion: Ideal for picnics, bake sales, or simply as a delightful afternoon treat, these cookies are ready for any gathering.

Why You’ll Love This Recipe

Cowboy cookies not only enchant the palate with their wonderful taste profile, but their texture creates an unforgettable eating experience. The chewy oats combined with crispy nuts and melting chocolate deliver layers of flavor and texture that are nothing short of divine. Each bite invites you to savor the contrasts—crunchy against soft, sweet against nutty—and together they craft an exceptional treat that is both comforting and satisfying.

The convenience of this recipe allows for an effortless preparation process, making it a go-to choice for busy bakers and novice chefs alike. With just a few mixing bowls and a baking sheet, you can whip together a batch of these delicious cookies in no time. Plus, they keep wonderfully, so you can bake in advance and enjoy them for days, which is especially handy during gatherings or holiday events.

Nutritionally, cowboy cookies offer some benefits over standard cookies, thanks to their inclusion of oats and nuts. Oats are a fantastic source of fiber, which can help keep you full longer, and the nuts provide healthy fats, protein, and vitamins. It’s a snack that feels indulgent yet has some reassuring nutritional elements, ensuring that you can delight in a treat while prioritizing your health.

Cowboy cookies are also a social treat, perfect for sharing with friends and family. They are great for any gathering, from casual picnics to more formal events. Their rustic charm prompts conversations, creating an inviting atmosphere wherever they are served. They evoke warmth and nostalgia, making them a delightful addition to your recipe repertoire.

Finally, the cost-effectiveness of cowboy cookies stands out. With basic pantry ingredients, you can create a generous amount of cookies that are far cheaper than store-bought alternatives. You can invest in high-quality ingredients or customize them with fruits, chocolates, or nuts to suit your taste without breaking the bank.

Historical Background and Cultural Significance

Cowboy cookies originate from the heart of American frontier history, a time when sustenance was essential for survival. These cookies were born from a unique blend of practicality and indulgence, created by those who needed a portable, energy-rich snack. They symbolize the hearty, no-nonsense spirit of the cowboys who roamed the open plains, offering a simple yet delightful comfort food.

As American culture evolved, so did the significance of cowboy cookies, becoming a cherished staple in homes across the country. They became part of tradition during gatherings, where families came together to share food, stories, and memories. Today, they represent a connection to the past, grounding those who enjoy them in the rich tapestry of American cooking.

The evolution of cowboy cookies has seen the addition of various ingredients over the years, adapting them to suit regional tastes and availability. From the traditional chocolate chip to the modern inclusion of nuts and dried fruits, each variation tells its own story, demonstrating how this beloved cookie has changed and adapted.

Regional variations have also added depth to the cultural significance of cowboy cookies. In some areas, bakers may incorporate local ingredients, display different textures, or emphasize unique flavor profiles that pay homage to their origins. This showcases the versatility of cowboy cookies, proving that while they’re rooted in history, they continue to inspire creativity and experimentation in kitchens everywhere.

Ingredient Deep Dive

Oats

Oats have a rich history as a staple grain, resilient to harsh climates and a dietary necessity for many cultures. They are not only filling but provide substantial health benefits, such as lowering cholesterol and improving digestion. When selecting oats for your cookies, look for old-fashioned rolled oats for the best texture. Store them in an airtight container to maintain freshness.

Chocolate Chips

Originating from the chocolate craze of the early 20th century, chocolate chips have become a beloved component of many desserts. Not only do they add sweetness, but dark chocolate offers antioxidants and potential heart benefits. When selecting chocolate, choose high-quality dark or semi-sweet variations for more flavor. Keep them cool, ideally in a sealed container, to prevent clumping.

Nuts

Nuts bring not only crunch but a plethora of nutrients, including healthy fats, protein, and essential minerals. They can vary greatly in flavor and texture; walnut is often favored in cowboy cookies. When selecting nuts, ensure they are fresh and not rancid, opting for raw or lightly salted varieties. Store nuts in a cool place or the refrigerator for maximum freshness.

Brown Sugar

Brown sugar’s molasses content gives depth to the sweetness and adds moisture to baked goods. It’s a versatile ingredient, perfect for adding flavor to cookies. When measuring, ensure it’s packed tightly in the cup for accurate amounts. It should be stored in an airtight container to prevent hardening.

Coconut Flakes

Coconut flakes originated in tropical regions and provide a unique sweetness and texture to desserts. Rich in fiber and adding a chewy bite, they elevate cowboy cookies to another level. Ensure you choose unsweetened flakes to control the sugar levels, and store them in a cool, dry place to retain their freshness.

Common Mistakes to Avoid

  • Using quick oats instead of rolled oats results in a mushy texture; always opt for rolled oats for best results.
  • Overmixing the dough can cause cookies to turn tough, so mix just until combined.
  • Not chilling the dough can lead to cookies spreading too much, losing their shape during baking.
  • Skipping the baking sheet lining can make removal difficult and lead to sticking; always line with parchment paper.
  • Not measuring ingredients accurately can throw off the balance, so always use the correct measuring cups for dry and wet ingredients.
  • Using expired baking soda or powder can yield cookies that don’t rise properly; always check the freshness of these ingredients.
  • Overbaking can result in dry cookies; watch closely and remove them when they are lightly golden.
  • Ignoring the cooling time can prevent the cookies from setting correctly, leading to a crumblier texture.
  • Substituting ingredients without considering moisture content can affect the final texture and taste; be mindful of replacements.
  • Not allowing cookies to fully cool before storing can lead to sogginess due to trapped steam; let them cool completely.

Essential Techniques

Prepping the dough involves mixing the dry and wet ingredients separately before combining them to ensure an even distribution of flavors and textures. This method ensures your cookies don’t end up too dense or dry. Make sure to cream the butter and sugars well, which helps aerate the mix for a lighter texture.

Baking the cookies evenly is crucial, so rotate the tray halfway through the baking process. This ensures that both the front and back of the tray receive equal heat, preventing uneven baking. Visual cues such as a lightly golden color around the edges will indicate that your cookies are done but may need a minute or two to firm up off the heat.

Pro Tips for Perfect Cowboy Cookies

To achieve the perfect cowboy cookies, use room temperature ingredients. This aids in easier mixing and ensures a uniform dough consistency throughout. For a deeper flavor, consider toasting the nuts before adding them to the mix; this amplifies their nuttiness and crunch.

Experiment with different chocolate types. Mixing milk chocolate with dark chocolate chips can create a unique flavor profile that balances sweetness with richness. If you desire a touch of saltiness, sprinkle coarse sea salt on top before baking or just after they come out of the oven; this creates a delightful contrast to the sweetness.

Chill the dough for at least 30 minutes before baking for a firmer texture that makes scooping easier. If you prefer chewy cookies, aim for slightly underbaked ones; they will continue to cook on the baking sheet as they cool, leading to the ideal balance of chewy and crispy.

Using a cookie scoop for portioning helps create uniform cookies that bake evenly. Finally, store leftovers in a sealed container with a slice of bread to keep them soft; the bread will absorb moisture, preventing them from becoming hard and stale.

Variations and Adaptations

Consider making regional variations such as adding dried fruits like cranberries or cherries, which can provide a lovely tartness to contrast the sweetness. For seasonal adaptations, try incorporating pumpkin spice during the fall or mint extract and mint chocolate chips during the holidays for a festive flair.

If you’re opting for dietary modifications, gluten-free alternatives can easily be achieved by using almond flour or a certified gluten-free flour blend. For vegans, replace eggs with flaxseed meal mixed with water or a commercial egg replacement.

Flavor variations are endless; experiment with butterscotch or peanut butter chips instead of chocolate for a new twist. Adjusting texture can also be fun—add pretzels for a salty crunch or shredded coconut for chewiness. For presentations, consider stacking the cookies with layers of parchment paper for a rustic look or drizzling melted chocolate on top for visual appeal.

Serving and Presentation Guide

For an inviting plate presentation, arrange cookies in a staggered manner, allowing small gaps between them to showcase their textures. Garnishing with fresh mint leaves or sprigs can lend a decorative touch and introduce a refreshing aroma. Consider pairing with a glass of cold milk, which resonates with classic cookie nostalgia, or serve warm alongside a scoop of ice cream for a decadent dessert experience.

Temperature considerations play a pivotal role in enjoying your cookies. Serve them slightly warm to enhance the gooey chocolate texture or let them cool for a firm bite. For portion control, utilize a cookie scoop for consistent sizing so guests can indulge without the temptation to eat too many at once.

For breakfast presentations, crumble cookies over yogurt or oatmeal, adding fruit for a nutritious start. Plating in mason jars can create an appealing layered dessert, and serving them during a gathering with accompanying ice cream toppings can elevate the experience.

Wine and Beverage Pairing

For the perfect wine pairing, consider a rich red wine like Merlot or a dessert wine like Port, which complements the sweetness of the chocolate and nuts in the cookies. These wines can enhance the flavor profile, providing a luxurious experience.

If you prefer non-alcoholic alternatives, a creamy vanilla milkshake highlights the cookies’ texture beautifully. Tea lovers will enjoy pairing these cookies with chai or Earl Grey for a warm, comforting experience that blends perfectly with the cowboy cookie flavors.

If opting for coffee, a dark roast or espresso emphasizes the chocolate richness, providing a satisfying contrast. Serve these beverages warm or chilled based on your preference for a flavorful pairing that indulges your senses and complements the cookies.

Storage and Shelf Life

Storing your cowboy cookies properly ensures they maintain their delightful taste and texture. Keep them in an airtight container at room temperature for up to one week. If you’d like to extend their shelf life, consider refrigerating them—but be aware that this may change their texture to be firmer than fresh-out-of-the-oven cookies.

Signs of spoilage include changes in texture (becoming hardened or overly soft) or any off-smelling aromas. For reheating, pop them in the microwave for a few seconds or in a preheated oven to regain their warm, gooey state.

If you’d like to freeze your cookies, arrange them in a single layer on a baking sheet until solid, then transfer them to a freezer bag. This method helps prevent them from sticking together and allows you to grab just as many as you desire later. Properly stored, they can last up to three months in the freezer.

Make Ahead Strategies

To enjoy fresh cowboy cookies without the hassle, prepare the dough in advance and store it in the fridge for up to three days. This allows flavors to meld and can enhance the cookie’s overall taste.

You can also mix and scoop the cookies, placing them on a baking sheet covered with plastic wrap, and freeze them before baking. When you’re ready, simply bake from frozen, adding a couple extra minutes to the baking time for perfect cookies every time.

When planning for a gathering, consider preparing the dough and letting it sit overnight; this will deepen the flavors. For an additional layer of freshness, you can add nuts, chocolate chips, or spices closer to baking time.

If you intend to serve them a few days later, bake batches in advance, allowing them to cool completely before storing in an airtight container. This ensures they’ll still have the delicious flavor everyone loves when it’s time to enjoy them.

Scaling Instructions

Scaling the recipe is straightforward. To halve the batch, simply divide each ingredient by two to maintain the same ratios, making it a great option for smaller gatherings. If you’re doubling or tripling the recipe, be mindful of using larger bowls and baking sheets that can accommodate increased volume.

Timing modifications should also be considered, as larger batches may require slightly longer baking or cooling times. Always check for doneness by looking for the golden edges and while they’re lively in the center.

For storage, ensure your containers are appropriately sized for the total number of cookies you’ve baked. For the best quality, use more than one container if necessary to prevent them from becoming stale too quickly. Making batch-sized adjustments also allows for variety in flavors and add-ins.

Nutritional Deep Dive

Cowboy cookies are typically packed with carbohydrates, fats, and protein. A macro breakdown per cookie may include approximately 150 calories, with a combination of about 7 grams of fat, 20 grams of carbohydrates, and 2 grams of protein. These cookies provide a quick energy boost thanks to their rich sugar and fat content.

Micronutrient analysis reveals that the oats help contribute fiber, which is valuable for digestive health. Nuts add essential minerals such as magnesium, vitamin E, and B-vitamins, enhancing overall nutritional value.

For health benefits, they provide a satisfying sweet treat that can curb cravings without overindulgence. The healthy fats from nuts can contribute to heart health, while dark chocolate offers potential antioxidant benefits. A careful assessment of portion control can further manage caloric intake, allowing you to enjoy these cookies as part of a balanced diet.

Dietary considerations are essential as well; these cookies can fit into various lifestyles without feeling like a typical guilty pleasure. Evaluating overall health goals when consuming treats allows for mindful indulgence.

Dietary Adaptations

To create gluten-free cowboy cookies, substitute regular flour with almond or gluten-free all-purpose flour, ensuring equal weight for similar texture and taste. These adaptations increase accessibility for those with dietary restrictions.

For a dairy-free version, you can replace butter with coconut oil or vegan butter alternatives, making it suitable for a wider audience.

Incorporating vegan options is easy; substitute the eggs with a chia seed mix or applesauce to bind the ingredients without compromising texture.

Low-carb or keto adaptations can also be achieved by replacing sugar with erythritol or stevia for a sugar-free treat that still satisfies.

Paleo followers can swap the flour for almond flour and use natural sweeteners like honey or maple syrup. Customizing the recipe encourages flexibility, allowing it to cater to various dietary lifestyles.

Troubleshooting Guide

If you encounter texture issues, such as cookies being too crumbly or dry, consider checking ingredient ratios, particularly your flour and fat content. You may need to adjust the moisture by adding a teaspoon of milk or water to the dough.

For flavor balance, if the cookies are overly sweet, you may want to slightly reduce the sugar in the next batch or add a pinch of salt to enhance other flavors.

Temperature problems during baking can arise if your oven’s calibration is off. Always check with an oven thermometer to ensure accuracy, and adjust baking times accordingly to prevent under or overbaking.

Common equipment challenges include not utilizing the right bakeware; dark pans may lead to uneven baking. Use light-colored stoneware or insulated baking sheets for a more consistent result.

If substitutions lead to issues, always start small when replacing ingredients. For instance, overly swap flour types, measure by weight to ensure accuracy.

Timing concerns can often lead to disappointing results. Set timers for testing cookie doneness, and if you’re ever in doubt, underbake slightly; cookies will firm up on the sheet after removal.

Recipe Success Stories

Community feedback often highlights how cowboy cookies resonate with nostalgia, prompting those who made them as children to revisit the beloved recipe for a sense of comfort. Bakers fondly recall how their mothers or grandmothers would whip them up; recreating this tradition has become a sentimental approach for families.

Variation successes abound, with bakers experimenting with different flavors that resonate with their personal tastes. It’s common to hear about delicious adaptations, like adding white chocolate or peanut butter chips, which individuals swear by for a signature twist that becomes local lore.

Reader suggestions often inspire community engagement as they share their unique adaptations, creating a lively exchange of ideas. Photography tips flood in, with followers showcasing their favorite cookie poses alongside cups of steaming coffee, building a vibrant exchange on visual presentation.

For those capturing their baking on social media, encouraging them to tag you can create a warm sense of community. Celebrating their successes with cookies can result in motivation to bake more, fueling their cooking journey, and spreading joy—from your recipe to their kitchen.

Frequently Asked Questions

Can I freeze cowboy cookie dough?

Yes! You can freeze the dough by scooping it onto a baking sheet and freezing until solid, then placing them in a freezer-safe bag. When you’re ready to bake, just add a couple of extra minutes to the baking time.

What’s the best way to store baked cookies?

Store baked cowboy cookies in an airtight container at room temperature for up to a week. You can also use a slice of bread in the container to keep them soft longer.

Can I use other types of flour?

Yes, you can substitute all-purpose flour with gluten-free flour, almond flour, or even coconut flour for variations. Be aware that ratios may need to be adjusted based on the flour type.

Are these cookies nut-free?

Cowboy cookies traditionally have nuts, but you can easily adapt the recipe by omitting them or replacing them with seeds or more oats for a nut-free version.

Can I make these cookies vegan?

Absolutely! Replace the eggs with a banana, flaxseed meal, or applesauce. Use vegan butter or coconut oil to substitute regular butter.

How do I make them chewier?

For chewier cookies, try using more brown sugar than granulated sugar, and ensure you do not overbake them. Remove them from the oven when they are slightly underdone.

What’s the best chocolate to use?

For rich flavor, opt for dark chocolate chips or chunks, but feel free to mix in milk chocolate or white chocolate for a sweeter side!

Can I add dried fruits?

Yes! Adding dried fruits like cranberries or raisins adds an enjoyable chew and fruity flavor that complements the richness of the cookies.

How thick should I scoop the cookies?

Scoop about 2 tablespoons of dough for each cookie for the best thickness. This allows for a well-balanced size that bakes evenly throughout.

What substitutions can I make for allergies?

If you’re allergic to eggs, substitute with flaxseed meal or applesauce, and if you’re gluten sensitive, opt for gluten-free flour blends.

Additional Resources

For those looking to expand their cookie repertoire, consider exploring our related recipes, including oatmeal raisin cookies and chocolate chip variations that offer delightful twists on beloved classics.

Delve into technique guides that go in-depth on baking basics, such as how to properly cream butter and sugar for fluffy cookies, which is crucial for maintaining the right texture and flavor balance.

For ingredient information, we provide detailed profiles on pantry staples and alternative options for various dietary choices, helping you navigate substitutions and enhancements in recipes.

Finally, check out our equipment recommendations—baking sheets, measuring cups, and mixers—all essential for creating bakery-quality treats in your home kitchen. Armed with these resources, you’ll become a cowboy cookie connoisseur in no time!

Join the Conversation

We encourage you to share your baking adventures and any variations you’ve made with cowboy cookies. Consider snapping some photos and tagging us on your social media platforms to inspire fellow bakers.

We’re keen to hear your recipe reviews and experiences! Engaging with our baking community enhances the joy of sharing these treats and continues to create new histories with beloved family recipes.

Explore ideas, tips, and more as you dive into your cowboy cookie creations. Every cookie bakers’ journey shapes individual stories that connect us through the love of food. Let’s keep the delicious conversation alive with cowboy cookies!

The Recipe

Cowboy Cookies

Serves: 24 cookies

Prep Time: 15 mins

Cook Time: 10 mins

Total Time: 25 mins

Kitchen Equipment Needed

  • Baking sheets
  • Mixing bowls
  • Measuring cups and spoons
  • Cookie scoop
  • Parchment paper

Ingredients

  • 1 cup butter, softened
  • 1 cup brown sugar
  • 1/2 cup granulated sugar
  • 2 large eggs
  • 2 teaspoons vanilla extract
  • 2 cups all-purpose flour
  • 1 teaspoon baking soda
  • 1/2 teaspoon salt
  • 3 cups rolled oats
  • 1 cup chocolate chips
  • 1 cup chopped nuts (walnuts or pecans)
  • 1 cup coconut flakes (optional)

Directions

  1. Preheat the oven to 350°F (175°C) and line baking sheets with parchment paper.
  2. In a large mixing bowl, cream together the softened butter, brown sugar, and granulated sugar until light and fluffy.
  3. Add the eggs one at a time, beating well after each addition; then mix in the vanilla extract.
  4. In a separate bowl, whisk together the flour, baking soda, and salt.
  5. Gradually add the dry ingredients to the wet ingredients, mixing until just combined.
  6. Fold in rolled oats, chocolate chips, nuts, and coconut flakes if using.
  7. Scoop dough by tablespoonfuls onto prepared baking sheets, spacing them 2 inches apart.
  8. Bake for 10-12 minutes or until golden around the edges but still soft in the center.
  9. Cool on the baking sheets for about 5 minutes before transferring to a wire rack to cool completely.

Recipe Notes

  • To enhance flavor, consider toasting the nuts before adding them to the dough.
  • For extra chewy cookies, underbake them slightly and store in an airtight container with a slice of bread.
  • Feel free to adjust the mix-ins based on your preferences; raisins or dried berries can be a delicious addition!

Ultimate Breakfast Grilled Cheese with Gooey Melted Cheese

Breakfast Grilled Cheese: The Ultimate Morning Delight

⚖️
Difficulty
Easy

⏲️
Prep Time
10 mins

🕒
Cook Time
15 mins

⏱️
Total Time
25 mins

🍽️
Servings
2

Discover a twist on your classic breakfast with our delightful Breakfast Grilled Cheese. This quick and easy recipe combines gooey melted cheese, crispy bread, and your favorite breakfast fixings, delivering a perfect start to your day. Imagine biting into a warm sandwich, where flavors burst forth, and aromas fill your kitchen, inviting everyone to the table. Whether you prefer traditional cheddar or a gourmet blend, this recipe is endlessly adaptable to suit your tastes and preferences.

Imagine a breakfast that not only nourishes but also excites your palate. This Breakfast Grilled Cheese is a comforting choice that balances richness and flavor complexity. The simple ingredients come together seamlessly to create a meal that’s both satisfying and invigorating. Perfect for busy mornings or leisurely weekends, this grilled cheese promises to offer an explosion of flavors that will leave you craving more!

Quick Recipe Highlights

  • Flavor Profile: The combination of savory cheese with a crispy exterior is incredibly satisfying, making it a breakfast favorite.
  • Texture: Each bite offers a perfect contrast of crispy bread and creamy, melted cheese.
  • Aroma: The rich aroma of toasting bread with melting cheese creates a welcoming breakfast atmosphere.
  • Visual Appeal: Golden-brown, ooey-gooey perfection makes this grilled cheese visually mouthwatering.
  • Skill Level Needed: This recipe is accessible for all skill levels, perfect for beginner cooks and seasoned chefs alike.
  • Special Equipment: A non-stick skillet or griddle is all you need for this simple yet delicious breakfast.

Recipe Overview

  • Difficulty Level: This Breakfast Grilled Cheese is an easy recipe, requiring minimal cooking techniques, making it perfect for any level of chef.
  • Category: Breakfast comfort food, ideal for satisfying cravings in the morning.
  • Cuisine: This recipe incorporates elements of classic American cuisine but can be customized with global influences.
  • Cost: This meal is budget-friendly, with rough ingredient costs of $5-10 depending on the cheese and bread you choose.
  • Season: Although perfect any time of the year, it shines during the cooler months when comfort food is most inviting.
  • Occasion: Ideal for brunch, family get-togethers, or a cozy breakfast before a busy day.

Why You’ll Love This Recipe

The combination of taste and texture in this Breakfast Grilled Cheese will delight your senses. The crispy, golden-brown exterior gives way to a melty, warm interior filled with your choice of cheese—each bite providing comfort and satisfaction. Pairing classic cheddar with sautéed vegetables or eggs brings an unexpected complexity to familiar flavors, making each sandwich unique.

Convenience is another reason to love this recipe. With just a few ingredients and minimal prep time, you can whip up a delicious breakfast that anyone will love. This recipe is flexible and can accommodate whatever you have on hand, allowing you to get creative with your meal. You can even switch up the cheese for a fun twist without added stress!

Nutritionally, this Breakfast Grilled Cheese can be enhanced with ingredients like spinach, tomatoes, or avocados to add vitamins, minerals, and healthy fats. You’re not just filling your tummy; you’re nourishing your body with delicious flavors while also fulfilling cravings in a wholesome way.

Social gatherings become more enjoyable with a dish like this grilled cheese. Friends and family will appreciate the warmth and comfort this sandwich provides, making it a great focal point for any brunch spread. It’s easy to pair with a variety of beverages, ensuring that everyone feels at home and satisfied.

Lastly, creating a delicious Breakfast Grilled Cheese is cost-effective. You can tailor it to your budget by selecting affordable, common ingredients. Investing in higher-quality cheese or artisan bread may elevate the dish without breaking the bank, embracing both quality and comfort at once.

Historical Background and Cultural Significance

Grilled cheese sandwiches have a simple yet rich history in American cuisine, first appearing in the early 20th century when sliced bread and affordable cheese became widely available. Initially a humble meal for working-class families, it took on a cultural resonance during the Great Depression as a filling and cost-effective food source.

Culturally, the grilled cheese has transformed into a comfort food staple, beloved across generations. Its adaptability allows it to serve as a canvas for culinary creativity, morphing into gourmet versions across various regions. From classic American diners to modern gastropubs, the grilled cheese remains a definitive representation of warming foods.

Over time, the evolution of the grilled cheese has seen it incorporate an array of international influences, from adding jalapeños for a spicy kick to using gourmet cheeses like brie, influencing its status in contemporary dining. Many chefs now craft unique iterations, elevating the standard grilled cheese to exciting culinary heights.

Regional variations abound, with some places favoring thick slices of bread and loaded fillings, while others prefer to keep it classic and straightforward. This illustrates how one simple dish can adapt and thrive in diverse culinary landscapes, showcasing creativity and culture.

Ingredient Deep Dive

Cheese

Cheese is the star ingredient in any breakfast grilled cheese, contributing richness and flavor. Cheddar cheese is a classic choice due to its flavor profile and melting qualities, but other varieties like gouda, mozzarella, or even pepper jack can be just as delightful. When choosing cheese, look for fresh, high-quality options for the best flavor.

Nutritionally, cheese is an excellent source of protein and calcium, making it a beneficial addition to your diet. However, it can also be high in saturated fat and sodium, so moderation is key. Store cheese in a cool, dry place, ideally in its original packaging or an airtight container to maintain freshness. For those seeking alternatives, nut-based cheeses or vegan cheese products have come to the forefront of dietary substitutions, catering to various preferences.

Bread

The type of bread can make or break your breakfast grilled cheese. Sourdough and whole grain are popular choices, adding unique flavors and textures. When selecting bread, opting for a firm loaf that will hold its structure when grilled is essential. Additionally, fresh bread will enhance the overall taste and ensure a satisfying crunch.

Bread offers more than just bulk; it’s a source of carbohydrates that fuel your body and provide energy, especially essential in the morning. Store bread in a cool, dry place or freeze it for longer shelf life. When considering substitutions, gluten-free bread is widely available and works well in this recipe, catering to diverse dietary needs.

Common Mistakes to Avoid

  • Using too much heat: Cooking on high heat can burn the bread before the cheese has melted inside. Always start on medium-low heat for an even cook.
  • Not pre-heating the skillet: A cold skillet will lead to uneven cooking and a soggy sandwich. Always preheat for a perfect golden-brown finish.
  • Using cold ingredients: Starting with cold cheese or butter can affect melting and browning. Let ingredients sit at room temperature before cooking.
  • Neglecting to butter the bread: Skipping this step can lead to a dry sandwich. A well-buttered exterior ensures crispiness and flavor.
  • Overstuffing the sandwich: Too many fillings can make it hard to grill efficiently. Stick to a modest amount to ensure even cooking.
  • Failing to cover the pan: If you want to ensure the cheese melts thoroughly, consider covering the pan with a lid to trap heat.
  • Not letting it rest: Allow your grilled cheese to rest for a minute after cooking; it helps the cheese set slightly and makes cutting easier.
  • Forgetting seasoning: A pinch of salt or a sprinkle of pepper enhances flavors immensely, so don’t skip this essential step!

Essential Techniques

Grilling the Sandwich

Grilling is a vital technique in preparing the perfect Breakfast Grilled Cheese. Ensuring the skillet is preheated and well-buttered ensures that you get that delicious golden-brown crust. Mastering this technique involves patience; allow the sandwich to cook slowly and check it frequently to avoid burning. Visual cues to look for are golden edges and melting cheese.

Cheese Melting

Properly melting cheese is crucial for achieving that gooey perfection. Using cheeses with good melting properties, like cheddar or mozzarella, is key. To master this technique, ensure a lower heat to allow cheese to melt completely without burning the bread. Gauge readiness by assessing if the cheese is visibly gooey and pulling away from the bread when cut.

Pro Tips for Perfect Breakfast Grilled Cheese

1. **Experiment with Cheese:** Use a combination of cheeses for depth of flavor, mixing sharp cheddar with creamier varieties for a more complex taste.
2. **Add Extra Ingredients:** Incorporate cooked bacon, sautéed spinach, or avocado slices for added richness and nutrition without overwhelming the sandwich.
3. **Toast Your Bread:** For an upgraded texture, lightly toast your bread before grilling for an extra layer of crunch.
4. **Use a Panini Press:** If available, using a panini press offers even cooking and can be easier for multiple sandwiches at once.
5. **Check for Doneness:** Press the sandwich lightly with a spatula while cooking; if it springs back, it’s likely perfectly cooked.
6. **Variations for Kids:** Get creative with fun shapes or themed sandwiches that are more appealing to kids, making mealtime enjoyable.
7. **Keep It Warm:** If making multiple sandwiches, keep cooked ones on a plate in a warm oven to maintain temperature until serving.
8. **Presentation Matters:** Serve with a side of fresh fruit or vegetables to elevate the meal visually and nutritionally.

Variations and Adaptations

Explore regional variations by incorporating local cheeses or ingredients from various cultures. For instance, adding green chiles for a Southwestern flare or using brie with cranberries for a gourmet twist can transform your sandwich experience.

Adapt your breakfast grilled cheese based on seasonal ingredients; fresh tomatoes in summer or roasted pumpkins in autumn can greatly enhance flavor profiles. Dietary modifications are also effortless by choosing gluten-free bread or vegan cheeses, making this dish accessible for everyone.

Flavor variations could include herbed actions, such as basil or pesto spread, which adds a refreshing herbal note to the classic grilled cheese. Texture modifications, like adding nuts or seeds into certain fillings, can provide unexpected crunch and sophistication.

Presentation alternatives can further enhance your dish by serving on a charcuterie board with dips or sauces, adding an inviting touch that encourages sharing and enjoyment.

Serving and Presentation Guide

Serve your Breakfast Grilled Cheese on a rustic cutting board for a homey feel, or elevate the presentation by using a sleek plate and garnishing with fresh herbs. An accompanying salad or fresh fruit provides color and freshness, making your breakfast visually appealing and balanced.

Consider adding a drizzle of honey or a dollop of chutney on the side for a sweet contrast. Temperature is vital; serve immediately while still hot, as this maximizes the experience of gooey cheese against crispy bread. Portion control is also important; cut sandwiches into quarters for sharing or serving at brunch.

Wine and Beverage Pairing

Pairing your Breakfast Grilled Cheese with wine might seem unconventional, but a chilled Chardonnay or a sparkling Rosé can beautifully complement the richness of the cheese. For those who prefer non-alcoholic options, a tart lemonade or an iced coffee can provide a refreshing balance.

If opting for tea, choose a light herbal blend, such as chamomile or mint, enhancing the overall breakfast tranquility. When serving beverages, ensure they are at the appropriate temperature for optimum enjoyment, allowing guests to explore flavors that elevate their meal.

Storage and Shelf Life

To prolong the life of your Breakfast Grilled Cheese, store leftovers in an airtight container in the fridge to maintain freshness. Ideal storage methods include wrapping the sandwich in foil or keeping it in a dedicated lunch box. Ensure that your fridge temperature is at or below 40°F to prevent spoilage.

When reheating, use a skillet over medium heat to maintain texture, avoiding the microwave that can make the bread soggy. Grilled cheese sandwiches can generally last up to three days in the refrigerator, and freezing is an option as well—wrap them tightly and freeze for future enjoyment.

Make Ahead Strategies

To make mornings stress-free, prepare your ingredients the night before. Pre-slice cheese and bread and store them in separate containers. You can even assemble the sandwiches and store them in the refrigerator; just make sure to sandwich wax or parchment paper between layers to keep them from sticking.

Quality does come into play when reheating; consider using a toaster oven to retain that fresh-out-of-the-skillet taste. Adding fresh elements, such as leafy greens or sliced tomatoes, right before eating ensures the meal feels vibrant and fresh.

Scaling Instructions

If you need to adjust the recipe for a smaller or larger crew, scaling it up or down can be done easily. When halving the recipe, simply divide all ingredients by two while keeping cooking times the same. Doubling or tripling will yield ample servings, perfect for parties or gatherings.

Adjusting equipment may be necessary; if multiple sandwiches are being made, consider using a griddle or electric skillet to manage larger quantities efficiently. Timing may change slightly based on how many sandwiches are cooked simultaneously, so keep a close eye to ensure perfect results for each.

Nutritional Deep Dive

Breakfast Grilled Cheese supplies a macro balance of protein, fats, and carbs, creating a hearty meal. The protein from cheese supports muscle recovery, while carbohydrates from bread provide sustained energy for your day ahead.

Micronutrient analysis includes calcium and vitamins that vary based on cheese used; for instance, cheddar contributes vitamin A and riboflavin. Health benefits derived from moderation in consumption can prevent energy slumps while still satisfying your hunger.

When considering dietary preferences, portion management is paramount; one sandwich provides a perfect balance of nutrients without excess calories, fitting into many balanced diets, while still allowing room for fruits or a side salad.

Dietary Adaptations

For a gluten-free option, use specialty gluten-free bread without sacrificing taste or texture. Dairy-free individuals can substitute with plant-based cheeses or spreads, ensuring flavorful satisfaction without traditional allergens.

Vegans can enjoy this breakfast by opting for tofu-based cheeses, offering a rich mouthfeel while adhering to dietary choices. A low-carb adaptation could utilize zucchini or cauliflower bread, transforming this classic recipe into a keto-appropriate meal.

Other specific diets, such as paleo or low-FODMAP, can also be accommodated easily through ingredient substitutions, ensuring everyone can delight in this breakfast staple.

Troubleshooting Guide

If your sandwich lacks texture, ensure you are using the right type of bread and adhering to the cooking times recommended. Burnt bread often results from cooking over too high a heat, so adjusting your setting can solve this problem.

Flavor balance may sometimes skew too strong; in this situation, increase the flavor profile of ingredients, such as adding garlic powder or herbs for a refreshing contrast. Issues regarding equipment challenges may arise, particularly with a non-stick skillet that is not properly seasoned.

Ingredient substitutions can lead to unforeseen results; always stick to well-tested replacements to avoid texture issues, especially in baking or sautéing. If timing concerns emerge due to multitasking in the kitchen, staying organized and prepared will allow for minimal disruptions to the cooking process.

Recipe Success Stories

Community feedback highlights the joy this Breakfast Grilled Cheese brings to families across various events. Readers have shared their personal twists and successes, showcasing the versatility of ingredients while maintaining the core of the recipe.

Variations suggested by readers have proven fruitful; one family added apple slices for a delightful sweet and savory combination that surprised and delighted all at the breakfast table. Many enthusiasts appreciate photographing their creations, encouraging an online sharing community where experiences and adaptations flourish.

This recipe resonated well with diverse culinary backgrounds; individuals have incorporated cultural aspects that transformed the grilled cheese into a delightful fusion experience. Continual engagement through comments and discussions further fuels the evolution of this beloved dish.

Frequently Asked Questions

Can I use gluten-free bread?

Yes, gluten-free bread can be substituted easily in this recipe. It generally requires a similar cooking method, but ensure you watch it closely as some gluten-free varieties may take less time to grill.

What cheese melts best for grilled cheese?

Cheeses such as cheddar, mozzarella, and Gruyère are popular choices due to their excellent melting properties, providing that gooey texture we all love in a grilled cheese.

Can I add vegetables to my grilled cheese?

Absolutely! Adding sautéed spinach, tomatoes, or bell peppers enhances flavor and nutrition without compromising the integrity of the sandwich.

How do I keep my grilled cheese from getting soggy?

Ensure that your bread is toasted beforehand, and use a moderate amount of fillings to keep it from becoming too heavy. Cooking on medium-low heat allows everything to melt together perfectly without excess moisture.

Can I make this recipe vegan?

Yes! You can easily switch to vegan cheese and plant-based butter to create a vegan-friendly version that maintains all of the deliciousness of the original.

What type of bread should I choose?

Opt for sturdy breads like sourdough, whole grain, or ciabatta to support the fillings while providing a satisfying crunch when grilled.

How long can I store leftovers?

Leftovers can be stored in an airtight container in the fridge for up to three days. Reheat them on a skillet to keep them crispy.

Is this recipe suitable for kids?

Yes! The Breakfast Grilled Cheese is a great way to entice kids to eat. Feel free to customize it with ingredients they enjoy for added appeal.

Can I freeze grilled cheese sandwiches?

Yes, you can freeze grilled cheese sandwiches. Wrap them tightly in foil or plastic wrap and store in the freezer for up to three months. Reheat directly from the freezer.

What dips pair well with a grilled cheese?

Tomato soup is a classic pairing, but feel free to try aioli or even a savory salsa for a refreshing dip option.

Additional Resources

If you loved this Breakfast Grilled Cheese, you might enjoy exploring related recipes like gourmet grilled sandwiches or savory breakfast quiches. For cooking techniques, check out guides on toasting bread to perfection or selecting the right cheese for melting.

Ingredient information is also crucial; tap into resources that cover the nutritional values of various cheeses and potential health benefits. If you’re looking for equipment recommendations, consider investing in quality non-stick skillets or sandwich presses ideal for creating perfect grilled cheese sandwiches every time.

Join the Conversation

We would love to hear about your own Breakfast Grilled Cheese experiences! Share your recipe variations and photos on social media, tagging us to connect with like-minded food enthusiasts.

Your recipe reviews inspire others to try new ingredients or techniques, fostering a community of culinary exploration. Engaging in discussions also helps us create more delicious content tailored to your tastes and preferences.

Together, we can transform this classic into endless adaptations and inspiring meals that everyone can cherish and enjoy.

The Recipe

Breakfast Grilled Cheese

Serves: 2

Prep Time: 10 mins

Cook Time: 15 mins

Total Time: 25 mins

Kitchen Equipment Needed

  • Skillet or griddle
  • Spatula
  • Knife for slicing
  • Measuring cups/spoons
  • Cutting board

Ingredients

  • 4 slices of bread (sourdough or your choice)
  • 4 slices of cheese (cheddar, mozzarella, or your favorite cheese)
  • 2 tablespoons of butter
  • Optional: cooked bacon, avocado, or your favorite breakfast ingredients

Directions

  1. Butter one side of each slice of bread.
  2. On a skillet over medium heat, place two slices of bread butter-side down.
  3. Add two slices of cheese on top of each bread slice.
  4. If desired, add any additional fillings such as cooked bacon or avocado.
  5. Place two more slices of bread on top, butter-side up.
  6. Cook for about 3-5 minutes on one side until golden brown.
  7. Flip carefully and cook for another 3-5 minutes until both sides are crispy and cheese is melted.
  8. Remove from heat, let cool for a minute, then slice and serve.

Recipe Notes

  • For a gourmet twist, experiment with different cheeses or the addition of herbs.
  • Keep it simple by focusing on classic combinations or get adventurous with ingredients!
  • Always monitor cooking time closely to avoid burning the bread.

Delicious Orange Creamsicle Cake Recipe for Sweet Summer Days

Delightful Orange Creamsicle Cake: A Sweet Treat for Any Occasion

⚖️
Difficulty
Medium

⏲️
Prep Time
30 mins

🕒
Cook Time
25 mins

⏱️
Total Time
55 mins

🍽️
Servings
12 servings

Indulging in a slice of Orange Creamsicle Cake is like taking a joyful trip down memory lane, filled with vibrant citrus flavors and a beautifully moist crumb. This cake perfectly encapsulates the nostalgic taste of summer with its bright orange zest and creamy frosting. The interplay of tangy and sweet notes makes it a delightful dessert that appeals to both young and old, bringing warmth and happiness to any gathering. Whether you are celebrating a birthday, picnic, or just a sunny day at home, this cake is certain to make every moment a little sweeter.

Not only does the Orange Creamsicle Cake capture the essence of its namesake ice cream treat, but it also provides a textural experience that is hard to resist. The light, airy sponge combined with a luscious orange-infused frosting creates a delightful mouthfeel that beckons you to take yet another bite. As the flavors meld, the aromatic notes of orange fill the air, evoking a sense of summer bliss. This cake truly shines in its visual presentation, showcasing a radiant orange hue that makes it a striking centerpiece for your dessert table.

Quick Recipe Highlights

  • Flavor Profile: This cake features a delightful balance of sweet and citrusy flavors that evoke the classic flavors of an orange creamsicle.
  • Texture: The cake is light and fluffy, while the frosting adds a smooth, creamy finish that enhances each bite.
  • Aroma: A fragrant burst of fresh orange zest creates an enticing aroma that will fill your kitchen while baking.
  • Visual Appeal: The lively orange color and creamy frosting make this cake not just delicious but also a feast for the eyes.
  • Skill Level Needed: With moderate baking skills, this recipe can be mastered even by those who are new to baking cakes.
  • Special Equipment: You will need basic baking tools including mixing bowls, a whisk, and a cake pan.

Recipe Overview

  • Difficulty Level: Medium, this recipe requires precise measuring and mixing techniques, but is achievable for home bakers.
  • Category: Dessert; perfect for parties, potlucks, or a sweet ending to any meal.
  • Cuisine: This cake draws inspiration from American dessert traditions that celebrate citrus fruits.
  • Cost: Reasonably priced, most ingredients are staples found in a standard kitchen.
  • Season: Best enjoyed in the warmer months when fresh oranges are at their peak.
  • Occasion: Ideal for birthday celebrations, summer picnics, or casual family gatherings.

Why You’ll Love This Recipe

The taste and texture of the Orange Creamsicle Cake come together to create a truly delightful dessert experience. With each forkful, you’ll experience the bright citrus flavor harmonizing perfectly with the soft and fluffy cake. This combination creates a refreshing cake option that is both satisfying and light, making it an excellent choice for warmer weather when you crave something sweet yet not overly heavy.

Convenience is at the heart of this recipe. It requires minimal prep time and only a few ingredients, which means you can whip it up relatively quickly. The simplicity of the steps allows even novice bakers to enjoy the success of creating a stunning cake without feeling overwhelmed. Plus, this cake can be made ahead of time, ensuring you’re well prepared for your guests.

Nutritionally, while cake is usually a treat, the use of natural orange juice and zest offers a boost of vitamin C, adding a bit of healthiness to this indulgence. Moreover, using fresh ingredients rather than artificial ones means that you control the sweetness and flavor intensity. It’s a dessert you can feel good about sharing.

When it comes to entertaining, the Orange Creamsicle Cake is not only delicious but also visually appealing, providing an impressive finale to any meal. Friends and family will be delighted when you serve this stunning cake, which serves as a conversation starter at gatherings. It’s a dessert that invites sharing and creates warm memories.

Lastly, the cost-effectiveness of this recipe makes it a win-win. The ingredients are generally affordable and easy to find, allowing you to create a gourmet bakery-style cake at home without breaking the bank. This accessibility encourages everyone, from baking novices to seasoned chefs, to give this recipe a try.

Historical Background and Cultural Significance

The origins of the Orange Creamsicle Cake can be traced back to the classic combination of orange and cream flavors that became popular in the United States in the early 20th century. This flavor profile is inspired by the beloved frozen treat, which evokes nostalgic memories for many. The cake offers a delightful way to celebrate these flavors in a new format while maintaining their iconic essence.

Culturally, the association of orange flavors with summertime is deeply ingrained in American food traditions. The bright, zesty taste of oranges has long symbolized warmth, happiness, and festive moments. The Orange Creamsicle Cake serves as a celebration of these themes, making it a perfect addition to gatherings that embrace sunny occasions.

Over time, recipes for this cake have evolved, incorporating various baking techniques and enhancements. The basic flavors remain, but modern interpretations have experimented with different frostings, fillings, and even layering techniques. This evolution shows how traditional recipes can adapt while staying true to their roots.

Regional variations of orange-flavored desserts are also noteworthy, from Florida’s famous oranges to California’s citrusy bounty. Each region brings its twist to the classic flavor, illustrating how cultural influences and local ingredients shape our culinary landscape.

Ingredient Deep Dive

**Oranges:** This main ingredient is not only a rich source of vitamin C but also adds natural sweetness and a refreshing flavor. When selecting oranges for this recipe, opt for those that are firm and heavy for their size, showing freshness and juiciness. Store them in a cool, dry place, and consider using organic oranges to avoid pesticides.

**All-purpose flour:** A staple in baking, all-purpose flour provides the structure needed for the cake. Different types of flour, such as cake flour, can be substituted for a lighter texture. It’s important to measure your flour correctly, as too much can lead to a dense cake. Store flour in an airtight container to maintain freshness.

**Eggs:** They play a crucial role in the cake’s structure and moisture content. Fresh eggs yield better results, contributing to a lighter cake. Look for eggs with clean, uncracked shells and store them in the refrigerator for optimal freshness. For those concerned about dietary restrictions, egg substitutes can be used effectively in baking.

Common Mistakes to Avoid

  • Overmixing the batter can lead to a tough cake. Mix just until combined for a light texture.
  • Not measuring ingredients accurately can throw off the balance, resulting in an undesirable texture or taste. Use proper measuring tools and techniques.
  • Opening the oven door too early can cause the cake to collapse. Give it time to rise before checking.
  • Using stale or improperly stored ingredients can compromise the flavor. Always use fresh and high-quality ingredients.
  • Frosting the cake while it’s still warm can melt the frosting. Allow the cake to cool completely before decorating.
  • Not greasing the pan adequately can lead to sticking. Ensure you prepare the pan well before pouring in the batter.
  • Skipping the zesting step can rob the cake of that essential orange flavor, as it adds depth and brightness.
  • Using the wrong type of frosting can overpower the orange flavor. Opt for a cream cheese or whipped frosting that complements the cake.

Essential Techniques

**Creaming Butter and Sugar:** This technique is essential for incorporating air into the batter, resulting in a fluffy cake. Start with soft butter for ease of mixing. Cream until the mixture is light and fluffy, which typically takes about 3-5 minutes. Pay attention to the texture; it should become pale and smooth.

**Folding in Ingredients:** When integrating dry ingredients into wet mixes, use a gentle folding motion to avoid deflating the batter. This technique preserves air bubbles formed during creaming, which is key to a light cake. Use a spatula and communicate with the batter, ensuring it is evenly mixed without overworking it.

Pro Tips for Perfect Orange Creamsicle Cake

– Use fresh, seasonal oranges for the best flavor; their juice and zest can elevate your cake dramatically.
– Let the cake layers cool completely before frosting them to maintain the structure and prevent melting.
– Consider using buttermilk instead of regular milk for added moisture and a subtle tang.
– Enhance your frosting with a splash of orange extract for a more pronounced orange flavor.
– To prevent browning on the top, cover the cake with aluminum foil halfway through baking.
– For added texture, sprinkle crushed orange-flavored candies in the frosting or within the cake layers.
– Experiment with various frosting styles such as piped designs for a decorative touch that also adds sophistication.
– Allow the cake to chill in the refrigerator for a few hours before serving for optimum flavor melding.

Variations and Adaptations

You can easily put a twist on the classic Orange Creamsicle Cake by incorporating a citrus medley, adding lemon or lime juice and zest for a more complex flavor profile. Seasonal adaptations could include utilizing grapefruit or tangerines for a unique taste experience that reflects local availability.

For those with dietary restrictions, there are numerous modifications possible. Making it gluten-free is simple with the right blends, and for lactose-intolerant individuals, consider using coconut cream or dairy-free options in the frosting. Vegan variations can be achieved by substituting the eggs with flaxseed meal or applesauce, and the milk with non-dairy alternatives.

Other variations could include experimenting with the frosting; consider using a chocolate ganache or a rich whipped cream. Texture modifications, such as adding a layer of orange curd or a crunchy element like toasted nuts, can take this cake to the next level. Lastly, changing the presentation with edible flowers or vibrant fruit slices can create an eye-catching display.

Serving and Presentation Guide

Plating the Orange Creamsicle Cake is an opportunity to showcase its beauty. Use a large, clean cake stand for an elegant display, and consider serving it on colorful plates that complement its warmth. Garnishing with fresh orange slices and mint leaves adds a pop of color, while a drizzle of orange syrup can enhance presentation.

Accompany the cake with traditional accompaniments, such as a scoop of vanilla ice cream or a dollop of whipped cream to balance the citrus flavor. For modern serving suggestions, create individual servings by slicing the cake into square pieces and adding a decorative garnish on each plate.

Temperature is essential; serving the cake chilled ensures that the frosting maintains its shape and flavor. Portion control can also play a role; consider smaller slices for gatherings to allow everyone to taste and enjoy without overindulging.

Wine and Beverage Pairing

When it comes to wine pairings, consider a light, fruity white wine such as a Riesling or Pinot Grigio. Their natural sweetness and acidity complement the cake’s flavors beautifully. If you prefer a sparkling option, a Prosecco can add a festive touch and elevate the dessert experience.

For those looking for non-alcoholic alternatives, a freshly squeezed orange juice or an iced herbal tea would serve as refreshing complements that enhance the citrus notes of the cake. If you desire a coffee or tea pairing, consider serving a lighter roast coffee that balances sweetness without overpowering the tangy flavors.

Temperature is key when serving beverages alongside the cake. Ensure wines are chilled, while brewed coffee or tea is served hot, creating a pleasant contrast to the cake’s cold frosting.

Storage and Shelf Life

When it comes to storage, keeping the Orange Creamsicle Cake fresh requires a few considerations. Store it in an airtight container at room temperature for up to two days. If you need to preserve it for longer, refrigerate it to extend its shelf life; it can last up to a week in the fridge.

Cake can also be frozen for long-term enjoyment. Wrap it tightly in plastic wrap, followed by aluminum foil, before placing it in the freezer. Properly stored, it can last for about three months. To serve, thaw the cake in the refrigerator overnight, allowing it to retain moisture without becoming soggy.

Signs of spoilage include mold or a sour smell, which indicates it has gone bad and should not be consumed. Reheating the cake isn’t necessary, but if desired, a low-temperature oven can restore some freshness without drying it out.

Make Ahead Strategies

To enjoy the Orange Creamsicle Cake without last-minute stress, consider preparing certain elements ahead of time. Bake the cake layers a day in advance, allowing them to cool completely before wrapping them in plastic wrap and storing them. The frosting can also be made ahead and kept in the refrigerator.

When you’re ready to serve, simply frost the cake and let it chill in the fridge for a couple of hours, allowing the flavors to meld beautifully. Quality is not compromised with this method; it can even enhance the cake’s taste.

For the freshest experience, consider adding fresh garnishes like berries or mint just before serving. This maintains their vibrant colors and flavors, making your cake visually appealing and delicious.

Scaling Instructions

If you wish to make a smaller or larger version of the Orange Creamsicle Cake, scaling the recipe is straightforward. Halving the recipe will result in an excellent 6-serving cake, making it perfect for intimate gatherings. Just adjust the baking time accordingly; check the cake for doneness a few minutes earlier than the original time.

On the other hand, if you’re doubling or tripling the recipe for a larger crowd, ensure you have appropriate-sized baking pans. You may need to bake in batches to ensure even cooking. Keep in mind that increased quantities can slightly affect baking times, so keep a close eye on your cake.

When scaling, it’s also important to adjust your mixing tools and space accordingly. A larger mixer or multiple bowls can make the preparation process smoother and more efficient.

Nutritional Deep Dive

This delightful dessert can be enjoyed as an occasional treat with a satisfying nutritional profile. In one serving, you’ll find a mix of macronutrients primarily contributed through flour, sugar, butter, and eggs. Each slice delivers a good source of carbohydrates, alongside small amounts of protein and fats, essential for energy.

Additionally, the cake incorporates fresh oranges, which provide a significant dose of vitamin C and antioxidants. These micronutrients can support immune function and overall health. However, keep in mind that it is still a dessert and should be enjoyed in moderation.

For those mindful of dietary considerations, knowing the portion size is crucial. Smaller portions can help manage caloric intake while still satisfying sweet cravings. This approach can be particularly helpful for maintaining weight and balancing nutritional goals.

Dietary Adaptations

Creating a gluten-free version of the Orange Creamsicle Cake can be accomplished by swapping out all-purpose flour for a gluten-free blend. Many brands offer good substitutes that can bake just like traditional flour, ensuring that everyone can enjoy this delicious cake.

Dairy-free adaptations are also feasible; use coconut cream or almond cream instead of regular frosting and substitute regular milk with almond milk or another plant-based option. Vegan options are easily achieved by replacing eggs with flax eggs, using apple sauce, or commercial egg substitutes.

For those following a low-carb or keto diet, almond flour can be used in place of regular flour, along with a sugar alternative like erythritol. This adaptation allows you to enjoy the flavors without the high carb content.

Other specific diets, such as paleo or low-FODMAP, may require adjustments predominantly focused on sweeteners and flour types, promoting a healthier dessert choice while still complementing dietary restrictions.

Troubleshooting Guide

Texture issues may arise if the cake is too dense; this could result from overmixing the batter or using incorrect flour to liquid ratios. Ensure you mix just until combined to keep it light and airy.

Flavor balance can be an issue if the cake turns out too sweet, which might result from excess sugar. Consider reducing sugar in the cake or enhancing the citrus component to offset sweetness.

Temperature problems can happen if the oven is not preheated correctly or if it’s opened too soon during baking. Always preheat the oven and avoid checking the cake until it’s nearly finished baking.

Equipment challenges can include using the wrong baking pans, which may affect cooking time and result in uneven baking. Ensure appropriate pan sizes and shapes as specified in the recipe.

Ingredient substitutions might not always yield successful results. Familiarize yourself with how certain ingredients react in baking to avoid unforeseen issues. For instance, while you can swap butter for oil, the flavor and texture will differ significantly.

Timing concerns, such as undercooked centers, should prompt you to monitor the cake closely, and conduct the toothpick test in the center for accuracy. Adjust baking times as necessary based on your oven’s specifics.

Recipe Success Stories

Community feedback highlights the Orange Creamsicle Cake as a crowd-pleaser, with many readers celebrating its nostalgic flavors reminiscent of childhood. Adaptation success stories include variations that incorporate other fruits, providing exciting twists on the classic recipe.

Readers have shared their personal touches, such as adding sprinkles or changing the frosting styles to suit different occasions. Many also appreciate the clear instructions that empower them to recreate the cake perfectly every time.

Photography tips from the community encourage natural lighting and colorful backgrounds to enhance the bright orange hues of the cake in images. Sharing these visuals creates excitement around this delightful dessert and inspires more bakers to try it out.

Frequently Asked Questions

Can I use bottled orange juice instead of fresh?

While bottled orange juice can be convenient, fresh juice yields a brighter flavor that enhances the cake. Freshly squeezed oranges provide better zest and aroma, enriching the overall taste.

How do I ensure my cake comes out moist?

To maintain moisture, avoid overbaking the cake. Check for doneness a few minutes before the suggested time, and consider adding a simple syrup made from orange juice to the cake layers for extra moisture.

Can I make this cake gluten-free?

Yes, you can use a gluten-free flour blend in place of all-purpose flour. Ensure that the blend includes xanthan gum or a similar binding agent for the best results.

How should I store leftovers?

Leftover cake should be stored in an airtight container at room temperature for up to two days. You can refrigerate it for longer storage, up to a week. For extended storage, wrap it and freeze it.

What is the best way to frost the cake?

Make sure your cake is completely cool before frosting to prevent melting. A spatula works well for spreading the frosting evenly, and for decorative touches, use a piping bag.

Can I freeze the cake?

Yes, you can freeze the cake. Wrap it tightly in plastic wrap followed by aluminum foil, and it can last for about three months in the freezer. Thaw in the refrigerator before serving.

Is it possible to make this cake ahead of time?

Absolutely! You can bake the cake layers a day in advance and frost them just before serving. This makes it perfect for parties or special occasions.

What can I substitute for butter in the frosting?

For a dairy-free option, use coconut cream or a dairy-free butter alternative. For a lighter frosting, consider using whipped cream or a flavor-infused cream cheese substitute.

How can I enhance the orange flavor?

Add extra orange zest or a splash of orange extract to the frosting and batter. This will amplify the citrus flavor without overpowering the cake.

Can I turn this into cupcakes?

Yes, this recipe can easily be modified for cupcakes. Fill cupcake liners with batter and bake for about 20 minutes, checking for doneness with a toothpick.

Additional Resources

Explore related recipes that celebrate citrus flavors, such as lemon-poppy seed muffins or grapefruit tart. Delve into technique guides that highlight cake-baking tips, especially focusing on proper mixing and baking times. Learn more about ingredient information to deepen your knowledge of how they interact in baking.

For those looking to upgrade their kitchen tools, discover equipment recommendations specifically for baking cakes, like quality mixing bowls and cake pans that ensure success. Seasonal variations can provide inspiration, especially as other fruits come into play in your baking adventures.

Join the Conversation

We invite you to share your experiences online! Connect with us on social media to share your photos and adaptations. Recipe reviews help foster community engagement, and we love to hear how you’ve made this recipe your own.

Don’t hesitate to leave comments on your successes, edible variations, or even troubleshooting questions; we’re here to help. Every baking journey shapes our community, and each contribution adds to our growing resource of delicious recipes!

The Recipe

Orange Creamsicle Cake

Serves: 12 servings

Prep Time: 30 mins

Cook Time: 25 mins

Total Time: 55 mins

Kitchen Equipment Needed

  • Mixing bowls
  • Whisk
  • Measuring cups and spoons
  • 9-inch round cake pans
  • Spatula
  • Cooling racks

Ingredients

  • 2 cups all-purpose flour
  • 1 ½ cups granulated sugar
  • ½ cup unsalted butter, softened
  • 1 cup fresh orange juice
  • Zest of 2 oranges
  • 3 large eggs
  • 2 tsp baking powder
  • 1 tsp baking soda
  • ½ tsp salt
  • 1 cup cream cheese, softened
  • 2 cups powdered sugar
  • 1 tsp vanilla extract

Directions

  1. Preheat the oven to 350°F (175°C). Grease and flour the cake pans.
  2. In a mixing bowl, cream together the butter and granulated sugar until light and fluffy.
  3. Add in the eggs one at a time, mixing until fully incorporated.
  4. Mix in the fresh orange juice and zest.
  5. In another bowl, whisk the flour, baking powder, baking soda, and salt together.
  6. Gradually add the dry ingredients to the wet mixture, mixing gently until just combined.
  7. Pour the batter equally into prepared cake pans and smooth the tops.
  8. Bake for 25-30 minutes, or until a toothpick inserted into the center comes out clean.
  9. Let the cakes cool in the pans for 10 minutes before transferring to cooling racks.
  10. For the frosting, beat cream cheese and vanilla until creamy; gradually add powdered sugar, mixing until smooth.
  11. Once the cakes are completely cool, frost the top of one layer, stack with the other layer, and frost the top and sides of the cake.
  12. Garnish with more orange zest or slices if desired. Enjoy!

Recipe Notes

  • For a lighter frosting, you may add whipped cream to the cream cheese mixture.
  • Feel free to experiment with flavoring the frosting using orange extract for a bolder taste.
  • Consider adding a simple syrup (made from equal parts sugar and water) to the cake layers for added moisture.
  • If making cupcakes, reduce the baking time to about 20 minutes.