Indulge your sweet tooth with our delicious and irresistible dessert recipes! Whether you’re craving decadent chocolate treats, fruity delights, or creamy, dreamy confections, we have something for every occasion.
From classic cakes and homemade cookies to no-bake desserts, rich cheesecakes, and festive holiday treats, our recipes are perfect for special celebrations or everyday sweet cravings.
Need something quick? Try our easy, fuss-free desserts that come together in no time. Whether you love warm baked goods, refreshing frozen sweets, or nostalgic comfort desserts, these recipes are sure to bring a little extra joy to your day! 🍰🍫🍪
Indulge Your Sweet Tooth with a Layered Chocolate Delight Recipe
Layered Chocolate Delight: A Decadent Indulgence
⚖️
Difficulty
Intermediate
⏲️
Prep Time
25 mins
🕒
Cook Time
5 mins
⏱️
Total Time
30 mins
🍽️
Servings
8
Indulge in our irresistible Layered Chocolate Delight recipe that brings the rich flavors of chocolate together in an easy yet elegant dessert. This layered masterpiece is composed of a smooth chocolate custard, a light and airy whipped topping, and a delightful chocolate cookie crust. Perfect for chocolate lovers, this dessert is bound to become a family favorite. Whether it’s a special occasion or an ordinary day, the Layered Chocolate Delight is sure to impress with its decadent taste that satisfies any sweet craving.
Quick Recipe Highlights
Flavor Profile: This dessert offers a harmonious blend of rich chocolate, creamy custard, and a slight bitterness from the cookie base, resulting in a perfectly balanced treat.
Texture: Enjoy the smoothness of the custard paired with the soft, fluffy whipped topping contrasted by the crunchy cookie crust.
Aroma: The inviting scent of chocolate permeates each layer, creating a mouthwatering aroma that fills the kitchen.
Visual Appeal: Layers are beautifully defined, showcasing light and dark contrasts that are visually stunning and inviting.
Skill Level Needed: Suitable for intermediate bakers, as it requires careful layering and patience to achieve the perfect texture.
Special Equipment: A springform pan is essential to construct the layers and reveal an impressive presentation.
Recipe Overview
Difficulty Level: Intermediate. The process involves creating multiple layers requiring precision to ensure each layer is distinct without blending together.
Category: Dessert, perfect for an after-dinner treat or as the highlight of a dessert table.
Cuisine: A fusion of American dessert styles with a nod to classic French custard techniques, offering a sophisticated taste experience.
Cost: While premium chocolate might add to the cost, the overall expense is moderate, making it accessible for most occasions.
Season: Ideally suited for year-round enjoyment, but especially comforting during cooler months with its rich, warming flavors.
Occasion: Ideal for family gatherings, dinner parties, or any celebration where a show-stopping dessert is needed.
Why You’ll Love This Recipe
Experience the unparalleled taste of our Layered Chocolate Delight, where each spoonful delivers a burst of rich chocolate flavor combined with creamy textures. The dish successfully marries velvety chocolate custard, fluffy whipped topping, and a crisp cookie crust, offering a satisfying mouthfeel that appeals to all palates. Additionally, this dessert is straightforward to prepare, with most of the time spent on assembly rather than hands-on work—making it achievable for home cooks seeking a touch of indulgence without extensive effort.
Historical Background and Cultural Significance
Chocolate desserts have a storied history steeped in cultural tradition and beloved worldwide. The European influence, evident in the decadent layers of custard and whipped topping, trace back to early 20th-century recipes when chocolate became a culinary staple. The Layered Chocolate Delight merges these historic aspects with modern American interpretations of layered desserts, creating an innovative dish that still respects traditional flavor profiles.
Ingredient Deep Dive
Chocolate is the star of this recipe, requiring a careful selection to ensure rich flavor and smooth texture. Opt for high-quality cocoa powder and real chocolate to maximize the dessert’s depth. Fresh cream and vanilla play supporting roles, enhancing the custard’s richness and creating a whipped topping that’s light yet flavorful.
Common Mistakes to Avoid
Using low-quality chocolate: This can result in a less flavorful dessert.
Overmixing the whipped cream: This mistake can cause the topping to collapse.
Rushing the layering: Allow each layer to cool before adding the next to prevent blending.
Essential Techniques
Layering is key to perfecting this recipe. Carefully spoon each layer to maintain the structure and ensure each component stays distinct and visually appealing.
Pro Tips for Perfect Layered Chocolate Delight
Use room temperature ingredients to ensure even mixing and prevent the custard from seizing.
Variations and Adaptations
Experiment with seasonal fruits as garnish or introduce a hint of liqueur for an adult twist.
Serving and Presentation Guide
Utilize a sharp knife for clean slices and maintain the dessert’s elegant layers on the plate. Sprinkle cocoa powder or shaved chocolate for an enhanced visual appeal.
Wine and Beverage Pairing
Complement this dessert with a bold red wine like a Cabernet Sauvignon or a robust coffee variant. These selections emphasize the chocolate’s deep flavors without overpowering the delicate balance of the custard and whipped topping.
Storage and Shelf Life
Keep refrigerated until serving to maintain the dessert’s integrity. Consume within three days for optimal freshness and flavor.
Make Ahead Strategies
Construct layers a day before your event to allow for convenient serving. This strategy also enhances the melding of flavors.
Scaling Instructions
Adjust ingredient measurements for larger gatherings without altering the fundamental layering techniques or baking times.
Nutritional Deep Dive
Despite its indulgent nature, this dessert offers moderate portions of essential nutrients from real dairy and high-quality cocoa, making it a smarter sweet-choice.
Dietary Adaptations
A gluten-free cookie base can accommodate gluten sensitivities, without compromising the dessert’s textural delight.
Troubleshooting Guide
Ensure custard is fully cooled before layering to prevent it from melting through the whipped topping, which can lead to structural issues.
Recipe Success Stories
Many home bakers have praised the Layered Chocolate Delight for its blend of simplicity and sophistication, often noting how it becomes a family favorite at first bite.
Frequently Asked Questions
How can I prevent the crust from becoming soggy?
Make sure to let your crust cool completely before adding the custard layer.
Additional Resources
For those interested in expanding their chocolate dessert repertoire, consider exploring our related recipes such as Chocolate Mousse and Chocolate Fondant, each offering unique techniques and flavors.
Join the Conversation
Engage with our vibrant community of dessert enthusiasts on social media. Share your own Layered Chocolate Delight creations and gain inspiration from fellow bakers around the world.
The Recipe
Layered Chocolate Delight
Serves: 8
Prep Time: 25 mins
Cook Time: 5 mins
Total Time: 30 mins
Kitchen Equipment Needed
Springform Pan
Mixing Bowls
Electric Mixer
Spatula
Measuring Cups
Ingredients
1 1/2 cups chocolate cookie crumbs
1/2 cup unsalted butter, melted
2 cups heavy cream
1 cup milk
4 oz bittersweet chocolate, chopped
1 tbsp cocoa powder
1/4 cup sugar
1 tsp vanilla extract
Directions
Preheat the oven to 350°F (175°C). In a mixing bowl, combine the chocolate cookie crumbs with melted butter. Press the mixture into the bottom of a springform pan to create the crust. Bake for 5 minutes, then let cool.
In a saucepan, heat milk on low and add the chopped chocolate, stirring until melted and smooth. Remove from heat and let cool slightly.
In a separate bowl, whip the heavy cream with sugar and vanilla until soft peaks form.
Fold cocoa powder into whipped cream gently to create the top fluffy layer.
Pour the cooled chocolate mixture over the crust, followed by the whipped cream layer. Smooth the top with a spatula.
Refrigerate for at least 2 hours before serving for best texture and flavor integration.
Recipe Notes
Ensure the chocolate mixture is completely cool before layering it to prevent melting the whipped topping.
For additional flavor, consider adding a layer of chopped nuts over the chocolate mixture.
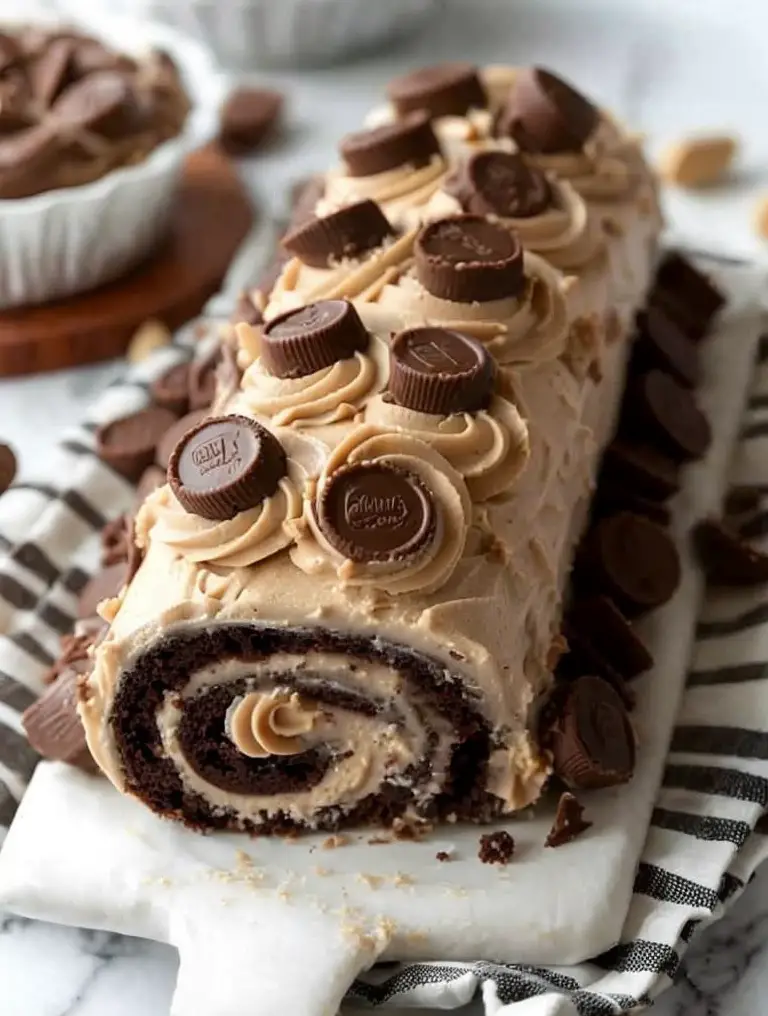
Indulge in Delicious Chocolate Chip Cookie Dough Ice Cream Cake
Chocolate Chip Cookie Dough Ice Cream Cake is the perfect treat for any dessert lover. Combining the rich, delectable taste of chocolate chip cookie dough with the refreshing coolness of ice cream, this cake is both satisfying and indulgent. The contrasting textures of creamy ice cream and crunchy cookie bits, alongside smooth chocolate ganache, offer a delightful sensory experience. Whether you’re celebrating a birthday, hosting a summer barbecue, or simply enjoying an afternoon delight, this ice cream cake will thrill your taste buds.
Quick Recipe Highlights
Flavor Profile: Captures the classic taste of chocolate chip cookies in every bite, enhanced by the creamy goodness of vanilla ice cream. Slight hints of vanilla and butter enrich the flavor experience.
Texture: A delightful mix of smooth ice cream with chunks of chewy cookie dough and crunchy chocolate chips, topped with a thick layer of chocolate ganache.
Aroma: The sweet scent of vanilla and chocolate greet your senses with each slice, creating an irresistible allure.
Visual Appeal: Layers of rich color contrast beautifully—the golden hue of cookie dough set against a creamy white layer of ice cream and dark chocolate topping.
Skill Level Needed: Requires basic assembly skills, but patience for freezing times is essential.
Special Equipment: Springform pan, mixer, and offset spatula for smooth layering.
Recipe Overview
Difficulty Level: Intermediate. While the steps are straightforward, precision in layering and patience during freezing stages are key.
Category: Dessert. This sweet indulgence fits perfectly as a post-meal treat or celebration centerpiece.
Cuisine: A fusion of American classics—ice cream cake and chocolate chip cookie dough.
Cost: Moderate. Ingredients are readily available but buying quality ice cream and chocolate adds comfort to the dessert.
Season: Best enjoyed in warm weather months, especially spring and summer when cool, refreshing desserts are in demand.
Occasion: Perfect for birthdays, family gatherings, or any festive occasion where you want to impress with a homemade dessert.
Why You’ll Love This Recipe
If you’re wondering why this Chocolate Chip Cookie Dough Ice Cream Cake deserves a place on your dessert table, consider the rich culinary experience it offers. The taste is a heavenly combination of two beloved treats: the buttery crunch of chocolate chip cookies and the smooth richness of ice cream. The texture varies with each bite, offering a satisfying crunch, a chewy contrast from the cookie dough, and the creaminess of ice cream.
Preparation is a breeze thanks to a straightforward assembly process. While it requires patience with freezing times, the actual hands-on work is minimal, making it a convenient choice for those who love homemade desserts without a time-consuming ordeal. Nutritional advantages may not be its primary selling point, given its indulgent nature, but knowing that all ingredients are handpicked ensures no hidden preservatives.
This dessert is a social icebreaker—perfect for parties, it sparks conversation and evokes nostalgia for simpler, fun times. Sharing a slice means sharing a memory. Moreover, it’s a cost-effective choice when considering the serving size—providing ample portions without an extravagant budget. The ingredients are accessible, ensuring anyone with basic grocery access can recreate this masterpiece.
Historical Background and Cultural Significance
The origin of ice cream cake can be traced back to the Victorian era, when “Bombes” were fashionable—moulded mixtures of ice cream and fruit. Over the years, these transformed into the layered aesthetic we know today. The combination with cookie dough is a modern twist, paying homage to classic American desserts while delivering a novel culinary experience.
Chocolate chip cookies, invented in the 1930s by Ruth Wakefield, have become a cornerstone of American dessert culture. The inclusion of cookie dough in desserts is more recent, emerging from a trend of adding indulgent, raw components to elevate simple sweets. Regional variations sometimes incorporate other cookie types or even brownie bases to diversify the texture.
Evolution in the ice cream industry, introducing numerous flavors and textures, has allowed for such creative cakes to develop. Modern interpretations readily incorporate cultural preferences, pushing the boundaries of the traditional cake.
Ingredient Deep Dive
The star of this dessert—the chocolate chip cookie dough—is as rich in history as it is in flavor. Embedded in American culture, it offers a comforting, nostalgic flavor profile loved by all ages. Nutritionally, whole ingredients like butter and eggs offer richness, though indulgence should be mindful.
Vanilla ice cream provides the creamy base and complements the cookie’s sweetness with its subtle flavor. Opt for high-quality brands or homemade for the best results. Storage is key—keep your ice cream at a stable, cold temperature to maintain consistency and avoid ice crystals.
Dark chocolate for the ganache should be rich yet balanced in bitterness. A good quality chocolate enhances the entire cake’s taste profile without overpowering it. Look for even color and a lack of bloom on the chocolate surface when purchasing.
Common Mistakes to Avoid
Rushing the freezing process. Allow sufficient time for the ice cream to set for defined layers.
Using low-quality chocolate, which can affect the entire flavor balance.
Overmixing cookie dough, leading to tough cookies instead of the desired chewy texture.
Skipping the use of parchment paper in the pan. This ensures a smooth release of the cake.
Underestimating the need for a well-set ganache to avoid a runny mess.
Freezing ice cream too hard, making it difficult to spread. Allow it to soften slightly before use.
Using a dull knife to cut the cake leads to squishing rather than slicing cleanly.
Neglecting to properly clean tools in-between to prevent flavor contamination.
Failing to level the cake during assembly, causing an unsteady final product.
Essential Techniques
The art of layering an impeccable dessert like this lies in precision. Start by softening ice cream to outfit layers without melting—this ensures smooth spreadability and neat edges. Master the ganache by using a double boiler for even melting, resulting in a glossy, pourable consistency.
Freezing the cake with intervals allows each layer to set, preventing mishaps in structure when cutting. Each layer should freeze solid before the next is introduced, preserving the distinctness of each component. Opt for a sharp, warm knife for even slicing and to prevent the layers from merging due to pressure.
Pro Tips for Perfect Chocolate Chip Cookie Dough Ice Cream Cake
To achieve the ultimate texture, mix your cookie dough just long enough to combine ingredients. Overmixing can result in texture changes. For the ganache, allow it to cool before pouring over the ice cream to prevent melting or breaking the surface.
Line your pan with parchment paper to facilitate smooth removal and to maintain the cake’s shape. When smoothing ice cream layers, dip your spatula in hot water to prevent sticking.
If time allows, let the cake thaw slightly before serving to enhance its flavor profile and soften the texture for the perfect bite. Avoid using pre-packed cookie dough; homemade dough offers the best taste and authenticity.
Variations and Adaptations
Regional variations can be achieved using local cookie types, such as shortbread in Scottish-inspired versions. For seasonal adaptations, consider incorporating fruit compotes or syrups for freshness.
For those with dietary restrictions, consider using gluten-free oat flour for the cookie dough or dairy-free ice creams available in the market. Vegan alternatives can be made using coconut milk-based ice creams and eggless cookie dough recipes to cater to plant-based diets.
Likewise, switch up flavors with different ice cream bases like strawberry or mint for contrast, or add nuts and fudge for added texture. Adding edible flowers or colorful sprinkles can transform it visually, making it perfect for themed gatherings.
Serving and Presentation Guide
An ideal serving approach involves slicing the cake using a warm knife for seamless pieces. Layer each slice on a chilled dessert plate to maintain its structure. Consider garnishing with fresh mint or a drizzle of chocolate syrup.
Classical accompaniments such as a dollop of whipped cream enhance the richness and offer a modern twist. Ensure portions are balanced; aim for approximately an inch-thick slice per serving to ensure even distribution of each element.
Wine and Beverage Pairing
Pairing this dessert with a late-harvest Riesling or a rich port wine enhances its sweetness while balancing with a hint of acidity. For non-alcoholic options, consider a cold-brewed chai tea with its spices to contrast the sweetness.
Coffee complements the richness, so an espresso or latte works well, providing a new dimension to the dessert without dominating its flavors. It’s best served slightly colder than room temperature to allow the flavors to unfold greatest impact.
Storage and Shelf Life
Preserve the freshness of your chocolate chip cookie dough ice cream cake by storing it in a tightly sealed container in the freezer. Ensure it’s wrapped to minimize exposure to air, which can cause freezer burn.
Store at a stable, cold temperature to maintain the cake’s integrity. Signs of spoilage include a crunchy, icy texture or a muted taste profile. For optimal enjoyment, allow a brief period of thawing before serving.
Make Ahead Strategies
Advance preparation involves creating cookie dough and ice cream layers ahead, storing them separately in airtight containers. Assemble the cake when ready, ensuring each layer is well-frozen for optimal results.
Strategically freeze between layers for ease and precision, resulting in an even, visually appealing dessert. Incorporate fresh elements like whipped cream only before serving to maintain their vibrancy.
Scaling Instructions
To halve the recipe, adjust ingredients proportionately, keeping scaling in mind for cooking times and equipment size. For larger gatherings, doubling is convenient if space and tools allow.
Equipment adjustments, such as larger pans, as well as timing extensions for freezing should be considered with increased quantities. Larger batches may require deeper freezes to maintain structure during transportation or when set out over time.
Nutritional Deep Dive
This indulgent dessert is high in carbohydrates and fats, with nutrients depending heavily on ingredient quality. Using high-fat ice cream provides more richness, alongside added benefits from real dairy over alternatives.
Portion control is crucial due to calorie density, making it perfect as an occasional treat rather than a staple. Adjust flavors and textures for a macro-focused diet by incorporating nuts or seeds for added protein.
Dietary Adaptations
To adapt for gluten-free diets, substitute oat or almond flour into the cookie dough recipe. Use dairy-free ice cream variants for lactose intolerance, or create vegan modifications with plant-based alternatives like coconut milk.
Lower carbohydrate versions might include using sugar-free sweeteners and keto-friendly flours such as almond or coconut. For a paleo adaptation, all-natural ingredients such as coconut flour and honey provide a wholesome alternative.
Troubleshooting Guide
Encountered textural issues? Ensure all cookie dough elements are properly chilled, preventing melting or bleeding colors in layers. Flavor balance is achievable with a careful mix of quality chocolate and premium vanilla.
Freezing technique challenges can be mitigated by using modern chilling solutions with even temperatures, such as blast chillers. Ingredient substitutions should maintain quality and a similar texture, ensuring recipe balance remains ideal.
Timing concerns often stem from impatience during freezing phases. Follow each step diligently to maintain recipe integrity and achieve the desired final result.
Recipe Success Stories
Feedback from our community emphasizes the delight of combining childhood favorites into one dessert. Successful reader adaptations include adding caramel swirls or altering the flavors with espresso powder for a mocha twist.
Unique presentations shared feature themes and decorations ranging from festive to formal, showcasing the cake’s versatility. Culinary photographers offer tips to highlight beautiful layers—reflection pieces on the ganache, complimentary tableware, and lighting setups accentuating the creaminess.
Frequently Asked Questions
Can I use store-bought cookie dough?
Yes, store-bought dough can be a time-saving alternative, but homemade dough allows for better control over ingredients and taste nuances.
Is there a way to make this cake without a springform pan?
You can use an aluminum baking pan lined with parchment paper for similar results, though achieving the same level of neatness may be more challenging.
Can this cake be made in advance and frozen for longer periods?
Absolutely. Properly wrapped, this cake can last in the freezer for several weeks, although the freshest flavors are achieved when consumed within the first few days.
How do I prevent the ice cream from melting during assembly?
Assembling in stages within a chilled environment and working quickly with softened, but not melted, ice cream can mitigate melting risks.
Additional Resources
Explore more with related recipes that push the texture boundaries, inspiration through culinary technique guides, or delve deeper into flavor science for personalized dessert creation. Discover high-quality equipment that enhances your culinary journey or advice on seasonal product selection for year-round perfection.
Join the Conversation
Engage with our warm community through social media channels, sharing your photographic renditions of this dessert. Participate in discussions, offering feedback or personal tweaks while staying informed about flavor trends and executing thematic dinner parties revolving around this crowd favorite.
The Recipe
Chocolate Chip Cookie Dough Ice Cream Cake
Serves: 10
Prep Time: 20 mins
Cook Time: 0 mins
Total Time: 240 mins
Kitchen Equipment Needed
Springform pan
Mixer
Offset spatula
Parchment paper
Ingredients
1 cup all-purpose flour
½ teaspoon baking soda
½ teaspoon salt
½ cup unsalted butter, softened
½ cup packed brown sugar
¼ cup granulated sugar
1 teaspoon vanilla extract
1 cup chocolate chips
2 quarts vanilla ice cream
1 cup heavy cream
1 cup dark chocolate chips for ganache
Directions
Prepare the cookie dough: Mix butter, sugars, and vanilla in a bowl. Add flour, baking soda, and salt, mixing until combined. Stir in chocolate chips.
Press dough into the lined springform pan, creating an even base. Freeze for 30 minutes.
Spread softened vanilla ice cream over the dough evenly; freeze until solid.
For the ganache: Heat cream until simmering. Pour over chocolate chips and whisk until smooth. Cool slightly before spreading evenly over the frozen ice cream layer.
Freeze cake for at least 3 hours or overnight. Serve with optional toppings as desired.
Recipe Notes
Substitute semi-sweet chocolate for dark ganache for a lighter taste.
Add nuts to the cookie dough for additional texture.
Ensure ice cream is slightly softened for smooth spreading.
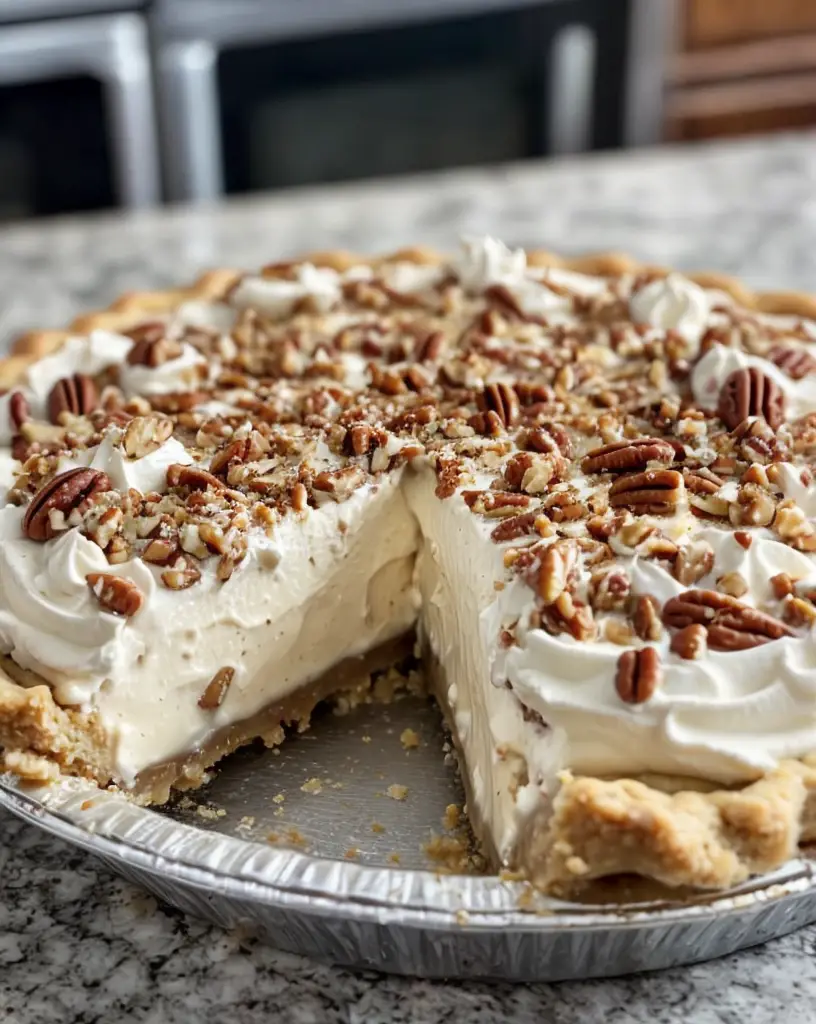
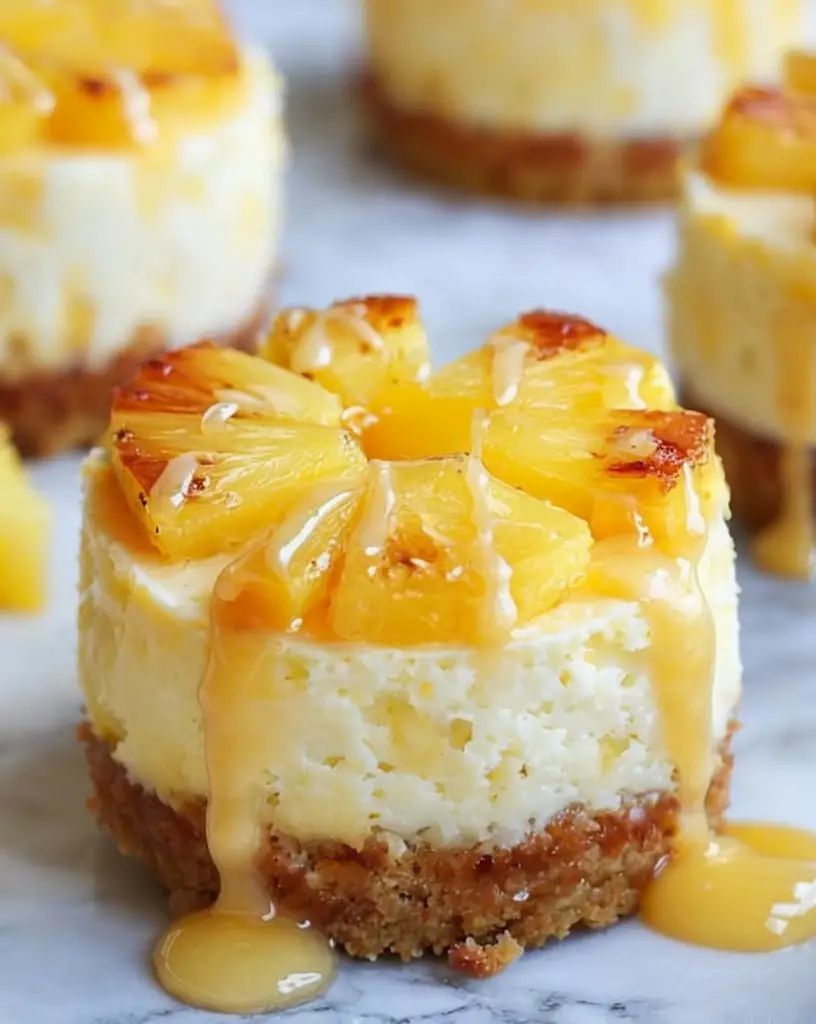
Indulge in Irresistible Pecan Cream Pie: A Delicious Dessert Delight
Pecan Cream Pie: The Unforgettable Dessert Delight
⚖️
Difficulty
Medium
⏲️
Prep Time
30 mins
🕒
Cook Time
45 mins
⏱️
Total Time
75 mins
🍽️
Servings
8-10
The Pecan Cream Pie is the perfect blend of creamy richness and nutty pecan flavor that will make your taste buds sing. Ideal for family gatherings or festive occasions, this delightful dessert is as beautiful to behold as it is delicious to eat. With its buttery crust and velvety filling, it’s bound to become a favorite in your kitchen and a showstopper at any dinner table.
Imagine slicing into a pie where every forkful provides a luscious contrast between the smooth, creamy filling and the crunchy, toasted pecans. This dessert not only caters to your sweet tooth but also promises an unforgettable taste experience that will transport you to the heart of Southern comfort food.
There’s something magical about the aroma of Pecan Cream Pie baking in the oven. The fragrant notes of toasted pecans and a hint of vanilla fill the air, promising warmth and nostalgia. Whether it’s a post-dinner treat or the star of your holiday table, this pie is sure to please.
Quick Recipe Highlights
Flavor Profile: A harmonious blend of nutty pecans and a rich, creamy filling with subtle hints of vanilla.
Texture: Perfectly balanced with a smooth filling contrasted by crunchy pecan pieces.
Aroma: Heavenly fragrance of toasted pecans intertwined with the sweet scent of vanilla and caramelized sugar.
Visual Appeal: A stunning presentation with a golden-brown crust and a richly colored pecan topping.
Skill Level Needed: Requires intermediate baking skills, suitable for those who are comfortable working with pie dough.
Special Equipment: Requires a 9-inch pie dish and an electric mixer for best results.
Recipe Overview
Difficulty Level: The pie involves making a creamy filling and handling pie dough, making it of medium difficulty. It’s perfect for bakers looking to challenge themselves just a bit.
Category: This is a dessert recipe, ideal for serving after the main course.
Cuisine: It belongs to Southern American cuisine, famous for its rich flavors and comforting desserts.
Cost: Approximate cost is moderate, considering the ingredients like pecans and cream.
Season: Best enjoyed during fall and winter, but its sweetness makes it a year-round favorite.
Occasion: Perfect for Thanksgiving, Christmas, birthdays, or any hearty family gathering.
Why You’ll Love This Recipe
This Pecan Cream Pie is a celebration of flavors and textures that will thrill your taste buds. The combination of smooth, luscious cream filling and crunchy pecans provides a delightful contrast, making each bite a memorable experience. The hint of vanilla enhances its flavor, adding depth and complexity that will make dessert lovers rejoice.
Preparation is simple yet rewarding. The recipe involves making a straightforward pie crust and a rich filling, both of which are easy to follow even for those not overly confident in the kitchen. By breaking down the process into manageable steps, it promises an impressive dessert with minimal hassle.
Despite its decadent taste, Pecan Cream Pie offers surprising nutritional benefits. Pecans are packed with antioxidants and healthy fats, while the cream provides essential vitamins and minerals. It’s a dessert that you can enjoy with the knowledge that it’s not only delicious but also nourishing in moderation.
Perfect for entertaining, Pecan Cream Pie is a crowd-pleaser that can be prepared ahead of time. Its sophisticated look and irresistible taste make it a talking point at gatherings. It’s a pie that’s meant to be shared, bringing smiles and delighted sighs to the faces of those lucky enough to enjoy it.
Cost-effective and made from easily accessible ingredients, this pie offers luxury without a hefty price tag. Make use of pantry staples like sugar, eggs, and dairy, combined with pecans, for an indulgent treat without breaking the bank.
Historical Background and Cultural Significance
The origins of the Pecan Cream Pie can be traced back to the South, where pecans are abundant and often used in cooking and baking. This pie has evolved from traditional pecan pie recipes, incorporating cream to provide a unique twist on a beloved classic.
Throughout history, Pecan Cream Pie has held a place as a comforting dessert passed down through generations. Its cultural significance is steeped in Southern traditions, where it’s often served during holidays and celebrations to bring families together.
The evolution of this pie reflects the adaptability of home cooks and bakers, who have added their spin on the classic to enhance its flavor and presentation. This has resulted in various versions, each offering a slightly different take while retaining its essential pecan goodness.
Regional variations of the Pecan Cream Pie abound, each offering a local twist that showcases the region’s unique flavors. Yet, no matter where you go, the core elements—smooth cream filling and crunchy pecans—remain constants that connect people to this delightful dessert.
Ingredient Deep Dive
Pecans are the star of this pie, providing a distinct nutty flavor and satisfying crunch. Rich in healthy fats and antioxidants, pecans are a powerhouse ingredient that adds both texture and nutritional benefits. When selecting pecans, look for plump, unblemished nuts, and store them in an airtight container in a cool place to maintain freshness.
Cream is another key ingredient, lending the pie its luxurious, velvety texture. Using high-quality heavy cream is essential for achieving the best results. It should be stored in the refrigerator and used within its expiry date. For substitutions, consider coconut cream for a non-dairy alternative.
Common Mistakes to Avoid
Overbaking can result in a dry and cracked filling. Keep an eye on the pie and remove it from the oven when the filling is just set.
Using low-fat substitutes may compromise the creaminess of the filling.
Skipping the toasting of pecans can result in a lackluster final flavor.
Not chilling the pie dough adequately can lead to a crust that shrinks in the oven.
Overmixing the filling can incorporate too much air, leading to undesired texture.
Adding eggs too quickly may cause them to scramble. Incorporate slowly into other ingredients.
Inadequate chilling before serving can result in a filling that doesn’t hold its shape.
Using stale pecans can overpower the pie with an unpleasant, rancid taste.
Essential Techniques
Making the perfect pie crust is a technique that requires practice. Chilling the ingredients—including the flour and butter—helps create a flakier crust. A light hand in mixing prevents the butter from over-softening, which is crucial for success.
Properly incorporating the cream filling ensures a smooth, consistent texture. This requires careful mixing to avoid over-aeration and gentle folding to combine the components uniformly. Visual cues like a glossy, homogenous filling indicate readiness for baking.
Pro Tips for Perfect Pecan Cream Pie
For extra depth of flavor, try adding a splash of bourbon or rum to the filling. This small addition can enhance the richness of the cream and pecans.
Use a pie shield or aluminum foil to protect the edges of the crust from over-browning during baking. This ensures the crust remains golden and beautifully crisp.
To enhance the nuttiness of the pie, lightly toast the pecans beforehand. This will draw out the oils and intensify their natural flavor.
Let the pie cool completely before serving to allow the filling to set properly. Patience here will prevent a runny slice on the dessert plate.
Consider pairing the pie with a dollop of whipped cream or a scoop of vanilla ice cream to accentuate its creamy filling.
If you notice any air bubbles in the filling as it sets, gently tap the pie dish on the counter to release them. This ensures a consistent texture throughout.
Variations and Adaptations
Southern pecans are traditional, but other regions might prefer adding chocolate chips or a drizzle of caramel for extra sweetness and richness.
Adapting to the seasons, you can incorporate spices like cinnamon, nutmeg, or cloves during fall, adding warmth and complexity to the pie.
For a gluten-free adaptation, use a gluten-free flour blend for the crust. Various flour blends on the market can replicate the traditional pastry texture.
Experiment with different nuts or seeds as toppings or additions to introduce varied textures. Walnuts, macadamias, or even sunflower seeds offer interesting alternatives.
Add a twist on texture by playing with the crust. A graham cracker crust can offer a different mouthfeel and additional sweet flavor.
For a unique presentation, bake it as mini tartlets for individual servings. This adaptation works well for parties or buffets, allowing for portion control and easier serving.
Serving and Presentation Guide
Plating your Pecan Cream Pie with a touch of flair can elevate its appeal. Serve on a classic ceramic pie dish, then slice carefully and use a cake server for neat presentation.
Adding a sprinkle of powdered sugar can enhance its visual charm, offering a snowy contrast to the golden-brown pie.
Garnishing with whole or halved pecans arranged in artistic patterns on top adds sophistication and visual interest.
If you’re serving the pie with accompaniments, consider a side of fresh whipped cream or crème fraîche to balance the sweetness with tangy creaminess.
The pie is ideally served at room temperature, but you can warm slices slightly if desired. This enhances the aroma and creates a comforting dessert experience.
Portion control is made simple with pre-scored slices, ensuring even and symmetrical serving sizes that avoid waste while satisfying guests.
Wine and Beverage Pairing
The caramel and nutty flavors of Pecan Cream Pie pair beautifully with dessert wines like a late-harvest Riesling or a rich Port. Their sweetness complements the pie without overpowering it.
For non-alcoholic options, consider serving it alongside a glass of iced sweet tea, which echoes Southern charm with its refreshing contrast.
Coffee is a classic partner, particularly a rich, dark roast that features chocolate notes. It cuts through the pie’s richness and provides a perfect after-meal balance.
If offering tea, a cinnamon spice blend adds warmth and enhances the nutty, sweet flavors of the pie. The spiced notes complement the pie’s complexity.
Ensure beverages are served at their ideal temperatures—for wine, slightly chilled, and coffee piping hot—to enhance the Pecan Cream Pie tasting experience.
Storage and Shelf Life
Store the Pecan Cream Pie covered in the refrigerator to maintain its freshness. Use plastic wrap or an airtight container to prevent drying out and protect flavors.
Ideally, serve the pie within three days for optimal taste and texture. After this period, the filling may begin to weep, and the crust can soften.
If freezing, wrap the pie tightly in foil, then place it in a freezer-safe bag or container to avoid freezer burn. Doing so can extend its shelf life for up to two months.
Watch for signs of spoilage like off-smells, a sour taste, or mold. These indicate the pie is no longer fit for consumption.
To reheat slices, place them on a baking sheet in a preheated oven at 350°F for 5-10 minutes, or microwave in short bursts until just warm.
For an emergency thaw, allow the pie to sit at room temperature for several hours or overnight, then pop it into the oven to restore its firmness and warmth.
Make Ahead Strategies
The crust can be made up to a day in advance, saving time during final assembly. Chilling it in the fridge will help maintain its flakiness.
Store finished components separately to maintain their integrity; refrigerate the cream filling and cover with plastic wrap to prevent forming a skin.
Assemble the pie a few hours before serving to allow the flavors to meld. Avoid overfilling the crust to prevent overflow during baking.
When reheating, do so gently, allowing flavors to retain their depth without drying out the filling or crust.
Introduce fresh elements, like decorative pecan halves, just before presenting the pie to keep them crisp and visually appealing.
Arrange your preparation timeline by prioritizing longer tasks earlier (such as chilling the dough) to ensure a smooth pie-making process.
Scaling Instructions
Halve the recipe for smaller gatherings, adjusting ingredient measurements precisely to maintain balance in flavors and textures.
For a larger group, doubling the recipe involves using two pie trays or a larger one, extending cooking time moderately to ensure thorough baking.
Consider using a stand mixer for larger batches to ensure thorough mixing without overworking the dough or filling.
Change the baking time as necessary when adjusting the pie size. Monitor key visual and sensory signs of doneness like crust color and filling firmness.
Keep storage space in mind with increased quantities, as more pies may require additional refrigeration or freezer space.
Nutritional Deep Dive
The macro profile of Pecan Cream Pie includes healthy fats from pecans, offering satiety and richness. Pecans also contribute protein and dietary fiber.
In terms of micronutrients, you’ll find vital vitamins and minerals such as vitamin E and magnesium in pecans, beneficial for heart health and metabolism.
This dessert can contribute to a balanced diet when consumed in moderation, providing energy and satisfaction.
Dietary considerations include lactose, as traditional recipes use dairy cream, but alternatives are available for those with sensitivities.
Portion control is key, with a single slice (about one-eighth of the pie) offering sufficient calorie intake to balance with other meals.
Nutritional benefits extend to essential fats and antioxidants, supporting overall health when enjoyed as part of an active lifestyle.
Dietary Adaptations
For a gluten-free version, substitute the crust with gluten-free flour blends, ensuring the use of xantham gum for elasticity.
To make it dairy-free, replace cream with coconut cream or almond cream, maintaining richness and flavor without lactose.
Vegan adaptations require using egg replacements like flaxseeds or chia seeds and plant-based milk alternatives for smooth filling consistency.
For low-carb needs, adjust sugar to a suitable substitute like erythritol and select nut flour for the crust to minimize carbohydrates.
Keto enthusiasts can swap the crust with a mixture of almond flour and butter, maintaining taste while adhering to dietary restrictions.
Low-FODMAP followers should monitor cream choices, picking lactose-free options to ensure digestive comfort.
Lastly, offer other specific diets a pie without common allergens by opting for basic ingredient modifications respecting dietary guidelines.
Troubleshooting Guide
Issues of texture, such as a runny or too-firm filling, can often be addressed by proper cooling times and ingredient measurements.
Balancing flavors might require incremental additions of vanilla or salt following taste assessments, improving depth without overpowering taste.
Temperature-related concerns often derive from incorrect oven calibration—use an oven thermometer to ensure precision during baking.
For equipment troubles, such as dough stickiness, chilling tools beforehand can assist in mitigating difficulty.
Ingredient substitutions need close monitoring to prevent altering the dish’s core qualities; trials of small test batches help achieve ideal consistency.
Timing worries, such as setting time, demand patience; leaving overnight in the fridge can often remedy less-than-perfect set fillings.
Recipe Success Stories
Reader stories often recount how Pecan Cream Pie brought joy to celebrations, inspiring variations enriched with beloved family traditions.
Many adaptations include caramel drizzles or chocolate swirls, reflecting personal tastes and creative instincts that enhance the pie’s allure.
Suggestions from the community have led to tips for easier crust baking and alternative nut options, showcasing global inspirations.
Feedback shares the pie’s photographic appeal, advising garnishes and sweet-topped finishes that capture its beauty in images.
Encouragement from others fosters culinary adventures, with shared experiences leading to delightful Pecan Cream Pie transformations.
Frequently Asked Questions
How do I know when the pie is fully baked? Monitor for a golden-brown crust and a mostly set, slightly jiggly center—a sign of a perfect bake.
Can I use store-bought crust? Yes, though homemade crust is recommended for best flavor and texture. Store-bought options save time and still offer good results.
What is the best method to toast pecans? Spread them on a baking sheet and toast in a 350°F oven for about 5-7 minutes, watching closely to prevent burning.
How do I prevent the pie from being too runny? Ensure proper cooking times and ingredient measurements—some added cornstarch can also assist in thickening.
What substitutes work for a non-dairy cream option? Coconut cream or almond milk cream are great alternatives that maintain similar textures.
Can the pie be frozen after baking? Yes, ensure it cools completely before wrapping properly, storing it safely for up to two months.
How can I ensure my filling is smooth? Mixing gradually and avoiding excessive air incorporation keep the filling from becoming grainy.
What can I pair this pie with for a complete dessert? A fellow Southerner recommends iced tea for a delightful pairing, blending sweetness with refreshment.
How to avoid a soggy crust? Bake the crust thoroughly before adding filling, and ensure dry ingredient bases to prevent moisture absorption.
Where do pecans get their flavor richness? The natural oils within pecans broaden their taste profile, especially intensified through slight toasting.
Additional Resources
Explore related dessert recipes such as traditional pecan pies or cream tarts interested in expanding the nutty and creamy culinary journey.
Technique guides outline essential baking processes like perfect pie crusts, helping novice bakers gain confidence for a seamless experience.
Ingredient information offers deep dives into pecans, showcasing their nutritional benefits and magical conversion from raw to toasted wonders.
Equipment recommendations, include essential pie-baking utensils that ease the complexity of preparation, such as dough mixing bowls or pie weights.
Seasonal variations suggest ingredient modifications reflective of fall spices, guiding the infusion of autumnal warmth into classic creations.
Join the Conversation
Engage via social media, sharing your Pecan Cream Pie’s glowing visuals and unique adaptations with our vibrant community who appreciates your culinary creativity.
Spotlight your baking prowess through detailed photography tips for showcasing the pie’s rich textures and evocative colors.
Contribute personal reviews and connect with fellow readers, comparing notes and experiences to collectively improve upon our beloved recipe.
Community engagement grows flavorful conversations, featuring points of shared inspiration that lead to transformative pie-baking stories.
Personalize your pie with theme-based variations, from seasonal ingredients to region-specific takes—each contribution enriches our culinary tapestry.
The Recipe
Pecan Cream Pie
Serves: 8-10
Prep Time: 30 mins
Cook Time: 45 mins
Total Time: 75 mins
Kitchen Equipment Needed
9-inch pie dish
Electric mixer
Mixing bowls
Baking sheet
Wire whisk
Parchment paper
Rolling pin
Ingredients
1 unbaked 9-inch pie crust
1 cup pecan halves
1 cup heavy cream
3/4 cup packed brown sugar
1/4 cup cornstarch
1/4 teaspoon salt
3 large egg yolks
2 tablespoons butter
1 teaspoon vanilla extract
Directions
Preheat the oven to 350°F (175°C).
Roll out the pie crust and place it in the pie dish. Trim and crimp the edges.
Line the crust with parchment paper and fill with pie weights. Bake for 10-15 minutes to set the crust. Remove weights and cool.
Spread pecans on the baking sheet and toast in the oven for 5-7 minutes until fragrant. Let cool.
In a medium saucepan, combine cream, brown sugar, cornstarch, and salt over medium heat. Stir constantly until the mixture thickens.
In a separate bowl, lightly beat egg yolks. Gradually whisk in a small amount of the hot cream mixture to temper then return the entire mixture to the saucepan.
Cook on low heat, stirring until thickened to a custard-like consistency. Remove from heat and stir in butter and vanilla.
Pour the filling into the prepared crust, smoothing the surface, and top with toasted pecans.
Chill for at least 4 hours or until firm before serving.
Recipe Notes
Substitute half-and-half for heavy cream for a lighter version.
Add a touch of cinnamon to the crust for added warmth.
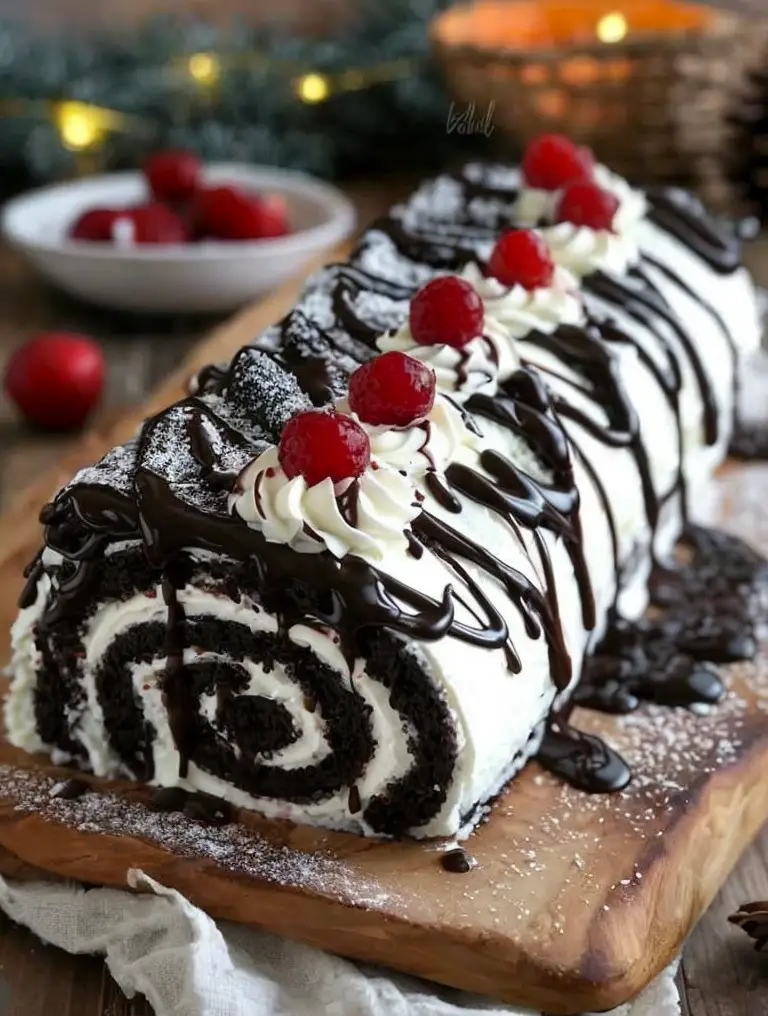
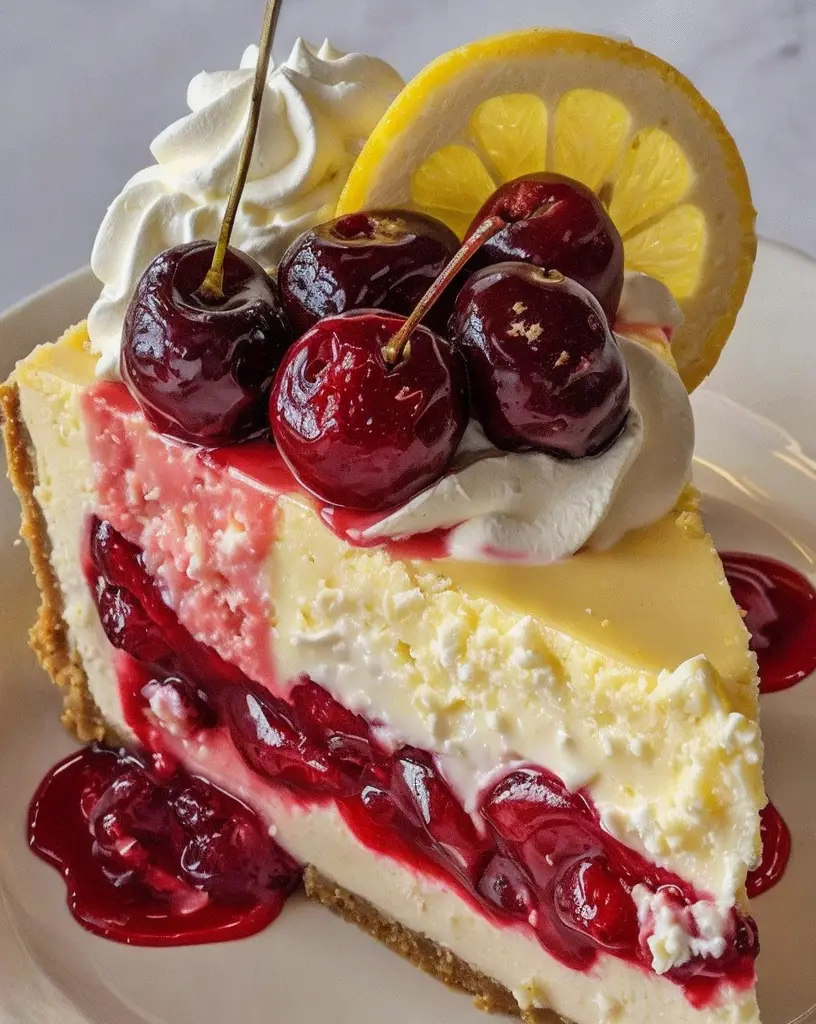
Indulge in Decadence with This Heavenly Black Forest Roll Recipe
Heavenly Black Forest Roll: A German Delight
⚖️
Difficulty
Medium
⏲️
Prep Time
30 mins
🕒
Cook Time
20 mins
⏱️
Total Time
50 mins
🍽️
Servings
8
Imagine the rich taste of dark chocolate mingling with the juicy sweetness of cherries, all enveloped in a light and airy sponge cake. The Heavenly Black Forest Roll, inspired by the classic German Schwarzwälder Kirschtorte, is a symphony of textures and flavors that is bound to captivate your senses. This exquisite dessert is perfect for special occasions or whenever you want to indulge in a decadent treat.
The aroma of freshly whipped cream, combined with the distinct scent of Kirsch liqueur, elevates this roulade to an unforgettable culinary experience. The visual presentation, with its elegant roll swirled with layers of cream and cherries, makes it a show-stopping centerpiece at any gathering. Though it requires some skill to master, the results are truly rewarding, transforming simple ingredients into a stunning dessert.
Quick Recipe Highlights
Flavor Profile: A delicate balance of bittersweet chocolate and tangy cherries with a hint of Kirsch.
Texture: Soft sponge with creamy and fruity layers that melt in your mouth.
Aroma: Enticing blend of sweet cherries and rich chocolate with airy whipped cream notes.
Visual Appeal: Striking swirl of black and white layers speckled with vibrant cherry halves.
Skill Level Needed: Intermediate-level baking and rolling skills.
Special Equipment: Requires a jelly roll pan and an offset spatula.
Recipe Overview
Difficulty Level: This medium difficulty dessert involves baking, rolling, and careful layer assembly, providing a rewarding challenge for intermediate bakers.
Category: This delightful dessert is perfect for tea parties, festive occasions, and dessert tables.
Cuisine: A classic treat rooted in German baking traditions, enriched with fresh cream and fruit.
Cost: Affordable when cherries are in season or use canned alternatives to maintain budget-friendly convenience.
Season: Best enjoyed during cherry season, though canned cherries allow for year-round indulgence.
Occasion: Ideal for birthdays, anniversaries, or holiday celebrations where elegance and presentation are key.
Why You’ll Love This Recipe
The Heavenly Black Forest Roll tantalizes taste buds with its harmonious blend of flavors and textures. The chocolate sponge’s subtle bitterness is complemented by the cherries’ sweet juiciness, providing a delightful taste journey. Each bite is a burst of creamy, fruity, and chocolaty goodness, ensuring satisfaction for any dessert lover.
The convenience of this roll makes it a perfect choice for entertaining. It can be prepared ahead of time, allowing the flavors to meld beautifully. With a total time of under an hour, it’s remarkably time-efficient for such an impressive result. Its visual appeal is sure to dazzle guests, while its intricate flavor profile ensures everyone reaches for a second slice.
This dessert is not only indulgent but also offers some nutritional benefits. Cherries provide antioxidants, while the whipped cream offers calcium and healthy fats. This balance makes it a worthwhile treat when enjoyed in moderation. The use of fresh fruit can be highlighted, particularly in a world increasingly conscious of whole food benefits.
Social gatherings are made more special with a dessert that’s as beautiful as it is delicious. It’s a conversation starter, and its classic yet approachable nature makes it a universally loved choice. Sharing this culinary delight with friends and family not only elevates the occasion but also creates lasting memories.
The cost-effectiveness of this recipe makes it accessible for any home baker. With core ingredients like chocolate, cream, and cherries often available throughout the year at reasonable prices, and kitchen staples utilized effectively, this dessert delivers luxury without the expense of fine dining.
Historical Background and Cultural Significance
The Black Forest Roll traces its roots to southern Germany’s Black Forest region, home to the iconic cherry-and-chocolate cake named Schwarzwälder Kirschtorte. This culinary gem was originally inspired by the region’s Kirschwasser, a cherry-based liquor used in the cake. Over time, variations of the dessert, including roulades, gained popularity for their ease of preparation and elegant presentation.
Culturally, the Black Forest cake has become synonymous with festive celebrations in Germany. Its popularity spread globally, with each country adapting it to local tastes and available ingredients. While the Kirsch spirit remains a classic touch, variations with other fruit liqueurs or without alcohol cater to diverse palates.
The evolution from cake to roll is a testament to the dessert’s adaptability. The roll format offers a unique presentation and an exciting experience when slicing through its layered beauty. This adaptation has further cemented the recipe’s status as a beloved confection, inviting both traditionalists and modernists to enjoy its timeless allure.
Regional variations are plentiful, as local ingredients influence preparation. In some areas, extra spices or distinctive nuts are added, while others prefer their rollers lighter or more densely packed with fruit. These variations celebrate culinary creativity while maintaining the essence of the original Black Forest cake.
Ingredient Deep Dive
Cherries hold significant cultural importance, especially in European desserts. Known for their sweet and slightly tart flavor, they are essential in crafting the distinctive profile of a Black Forest dessert. High in vitamin C and antioxidants, cherries contribute both taste and nutritional value, enhancing any dish.
Selection tip: Opt for deep, vibrant cherries for maximum flavor impact. For preservation, they should be stored in the refrigerator and consumed within days of purchase. When using canned cherries, ensure they are of high quality, without additional sugar that might overpower the dessert.
Chocolate, pivotal in achieving the rich base of this roll, carries its own historical weight. A source of indulgence for centuries, its versatile flavor transitions seamlessly from bittersweet depths to gentle sweetness, driven by the type used. Couverture or high cocoa percentage chocolate is ideal for this recipe.
Storage recommendation: Keep chocolate in a cool, dry place to prevent blooming (white coating). If substitutions are needed, consider using cocoa powder or a blend of different chocolate varieties to maintain depth while adjusting sweetness to taste.
Common Mistakes to Avoid
Overmixing the batter can lead to a dense sponge rather than one that is light and airy. Beat just until the ingredients are combined.
Skipping the cooling step before rolling can cause cracks and breakage in the cake. Allow the roll to cool slightly with a damp cloth.
Using watery whipped cream will make the layers soggy. Ensure the cream is whipped to stiff peaks for optimal texture.
Rolling the cake too tightly can compress the layers and squeeze out the filling. Roll gently to maintain an even swirl.
Omitting the Kirsch diminishes the authentic Black Forest flavor. If needed, use a non-alcoholic cherry syrup to retain some depth.
Underestimating the ingredient measurements can yield unexpected results. Always measure accurately for best results.
Storing at warm temperatures may cause cream spoilage. Keep refrigerated and serve cold.
Transferring the roll without parchment can result in sticking. Always use the parchment for seamless transition.
Neglecting to grease the jelly roll pan may cause the cake to stick, even with parchment. A light spray ensures effortless release.
Not allowing the roll to rest before slicing might result in uneven layers. A resting period helps the flavors blend and stabilize.
Essential Techniques
Mastering the art of sponge rolling is crucial for this dessert’s success. An evenly spread batter ensures a uniform texture, while correct timing for folding in mixtures allows for the ideal rise and softness. Visual cues include a golden hue and slight springiness to the touch, indicating readiness. Precision in each step yields a stunning roll.
Cream whipping demands attention as well. Aim to achieve stiff peaks without crossing into overdone territory, which can turn creamy indulgence into a firm obstacle. Key visual cues involve peaks that hold their shape firmly but remain smooth, inviting, and airy. Consistency here translates into consistent slice appeal.
Pro Tips for Perfect Heavenly Black Forest Roll
Pre-measure and organize your ingredients before starting to streamline the preparation process.
Always use room temperature eggs for a fluffier sponge.
For a more intense cherry flavor, soak the cherries in Kirsch overnight.
Stabilize your whipped cream with a bit of gelatin for perfect texture retention.
Chill the rolling pin before rolling out the sponge cake to keep everything cool and firm.
Dust the completed roll with cocoa powder for a dramatic presentation touch.
If you’re unable to find fresh cherries, consider rehydrating dried ones with Kirsch as a flavorful substitute.
Let the rolled cake rest in the fridge for at least an hour to blend flavors harmoniously.
Variations and Adaptations
Regional variations abound, with each interpretation celebrating local taste and produce. In some European countries, the roll might include nuts, like toasted hazelnuts or almonds, for added texture. In contrast, an American twist might replace the Kirsch with bourbon, adding warmth to the cherry mixture.
Seasonal adaptations can transform this dessert to fit different times of the year. Use seasonal fruits, such as raspberries or blackberries, during off-months to produce a roll rich in flavor variation while maintaining the dessert’s visual and taste appeal.
Dietary modifications can be easily integrated into this recipe. For a gluten-free version, substitute wheat flour with a blend of almond and coconut flour, ensuring the same light texture while accommodating dietary preferences. Similarly, dairy-free whipping cream offers a satisfying lactose-free alternative.
For those seeking bolder flavors, incorporate additional fineries such as espresso powder into the chocolate mix or infuse the whipped cream with vanilla bean for a nuanced take on the classic recipe. These minor edits result in majorly enhanced flavor profiles.
Heighten texture complexity by introducing layers of marzipan or cocoa nibs. These surprises offer contrast within the dessert, adding interest and a fresh bite to each spoonful. Presentation can also depart from the classic roll to individual roulade servings, perfectly portioned for intimate gatherings.
Serving and Presentation Guide
To plate your Black Forest Roll, utilize a long, sharp knife to achieve clean slices, revealing the enticing inner swirl. Position each piece strategically on the serving plate to highlight the layers. A light dusting of powdered sugar adds elegance without overpowering the delicate sweetness.
Garnishing can elevate the dessert from delightful to divine. Fresh cherries, whole or halved, provide a pop of color. Alternatively, a light drizzle of melted chocolate or strategically placed chocolate shavings adds visual depth. For a festive flare, edible flowers provide artistry and freshness.
Traditionally, the roll pairs beautifully with a dollop of thick cream or even ice cream, adding creamy contrast to its airy bite. Modern servings might opt for a simple berry coulis, adding a touch of tang to complement the cake’s earthiness.
Temperature considerations ensure maximum sensory enjoyment. Serve slightly chilled or at room temperature to accentuate the cream’s silkiness against the sponge’s delicate structure. Avoid serving directly from the fridge, which can cause a cold block of cream to dominate each bite.
When considering portion control, remember this roll is rich and flavorful, so smaller slices are more satisfying. Cut uniformly to ensure visual pleasure and fairness at the dessert table, allowing everyone to partake in its indulgent offerings.
Wine and Beverage Pairing
A full-bodied red wine, like a German Spätburgunder (Pinot Noir), complements the cherries’ tang and chocolate’s richness adeptly. Alternatively, a lighter sparkling wine can cleanse the palate between luscious bites, accentuating each flavor profile.
Non-alcoholic alternatives, including a cherry-based mocktail or a refreshing berry-infused sparkling water, maintain the dessert’s elegant aura while keeping the experience suitable for all ages. Sparkling mineral water offers a simple but effective palate refresher.
Pair with coffee or black tea, particularly those with a hint of fruit or floral notes, if seeking a bitter counterbalance. Their complimentary profiles accentuate the roll’s complexity without competing for attention, making them an excellent invitation for lingering conversations post-meal.
Temperature considerations extend to beverage selection. Ensure drinks enhance without overpowering the dessert’s flavor, keeping them at room temperature or slightly chilled. This harmony lets all elements of the meal come to light naturally.
Serving suggestions should remain open to personal taste. Encourage guests to sample various pairings to find harmonies aligning with their preferences, enriching their enjoyment of each carefully crafted slice.
Storage and Shelf Life
Proper storage prolongs the dessert’s shelf life, keeping it fresh and flavorful for up to three days. Store in an airtight container, preferably a shallow one to maintain shape and prevent crushing. Ensure refrigeration for both freshness and safety.
Temperature requirements demand cool but not freezing environments, as excessive cold can alter the sponge’s texture and solidify the cream. Avoid placing near items with strong odors, as the cake can absorb these, compromising the intended taste.
Container recommendations include glass or BPA-free plastics that seal tightly. If possible, layer parchment between slices to avoid sticking. An extra layer of plastic wrap around the entire roll provides additional protection.
Signs of spoilage include an off smell, discoloration, or a souring of the cream. At the first hint of any of these indicators, reconsider serving to maintain both quality and safety. When in doubt, remember the golden rule: when in doubt, throw it out.
Reheating instructions should be reserved for the whipped cream alone, as the rest is ideally served cold. If necessary, make fresh cream to replace any deflated or overly soft layers that may result from prolonged refrigeration. High-quality cream whips up quickly and provides that necessary freshness.
Freezing guidelines should reflect the need for tightly sealed layers, keeping each component from dulling. Freezing in slices, individually wrapped, preserves texture better, allowing impromptu indulgence without needing a full defrost.
Make Ahead Strategies
Organizing a prep timeline ensures effortless execution on the day of serving. Bake the sponge and prepare the cherries beforehand, reserving whipped cream assembly for closer to serving time, ensuring sharp lines and textures.
Storage between steps allows the flavors of pre-prepared components like cherries to deepen and speakers in. Protect delicate elements, ensuring no moisture or aromas from other foods reduce their quality when assembling.
Quality impact assessment reassures that flavor and texture build as they sit, allowing the sponge to absorb cherry juices. Plan enough time for resting, letting the ensemble harmoniously blend to perfection.
Assembly tips center around aligning ingredients strategically to aid smooth rolling. An even spread keeps the roll balanced, facilitating pleasing results. Chilling individual elements beforehand aides in a uniform finish.
Reheating guidelines for whipped cream involve using a few tablespoons of reserved cream to revive consistency while folding gently, retaining texture. The enjoyment of fresh cream makes a crucial difference.
Fresh element additions like fruit just before serving add vibrancy while also preventing bleed into the roll during cooling. Garnish for impact rather than diffusion helps maintain overall taste and quality.
Scaling Instructions
Halving the recipe provides perfect intimate occasions scaling, maintaining integrity while adjusting for fewer guests. Reduce ingredient quantity accurately to ensure flavor balance remains unchanged.
Doubling or tripling requires a larger work surface for rolling while maintaining the same procedures. Note that cook times may slightly vary depending on increased mass but generally remain stable.
Equipment adjustments, primarily jelly roll pans or additional bowls, facilitate larger scale production. Alternative cooling racks and surfaces may be requist for simultaneous preparation.
Timing modifications allow extended baking times to compensate for increased batter widths, but given the nature of the roll cake, this can remain flexible depending on conditions at home.
Storage considerations address the need for additional airtight containers or refrigeration space. Prepared parchment layering contributes to continued freshness even with amplified quantity.
Nutritional Deep Dive
A macro breakdown reveals a dessert that offers balanced carb and fat content, with protein mainly from cream. Understanding portions helps users appreciate indulgence without undue guilt.
Micronutrient analysis spotlights potential benefits, including vitamin C from cherries and calcium from cream. This dessert can serve as a surprise source of key nutrients when carefully calculated.
Health benefits stem particularly from antioxidant-rich cherries. Awareness of these components adds insight into creating a guilt-relieving but still luxurious indulgence dessert.
Dietary considerations support choosing non-canned, lower-sugar cherries to enhance health benefits while allowing integrative options like dairy substitutes for broader appeal.
Portion analysis helps clarify expected servings, while chef notes can guide users on how additional toppings or elements contribute to dietary impacts.
Weight management tips offer perspective on integrating this dessert into a balanced diet, allowing for splurges without driving excess, maintaining a harmony between pleasure and responsibility.
Dietary Adaptations
Adapting to gluten-free desserts might initially seem challenging; however, achieving this rolls finished elegance is simple enough, involving flour substitutes ensuring similar textures without intolerance issues.
Dairy-free alternatives create further accessibility, using plant-based creams that whip comparably when chilled and handled gently. Careful substitution targets both taste continuity and consistency.
Vegan renditions replace eggs with equivalents like aquafaba and plant-based whipped toppings. Dark chocolate suitable for vegan diets ensures continuity in flavor delivery while remaining inclusively engineered.
A low-carb option includes reducing or substituting sugar with alternative sweeteners and potentially exploring nut flour alternatives, diversifying texture without compromising taste integrity.
Keto dieters might appreciate the indulgence through distinct modifications, including coconut flour systems or stevia sweeteners, introducing compatible elements while retaining the base dessert expectations inherent to traditional recipes.
Paleo approaches require alignment of natural ingredients, favoring whole fruits instead of chunks and ensuring chocolate is unsweetened. This adaption can balance histological representativeness with enjoyable adaptation.
Low-FODMAP components carefully adjust specific ingredients to reference potential allergens while mimicking intended textures, allowing diversity in dietary needs through thoughtful execution details.
Other specific diets can similarly adopt these adaptative principles, guiding around key elements while retaining the overall framework, ensuring all diners share in the successful stacked indulgence brought about through this enchanting Black Forest Roll.
Flavor balance concerns might arise from under-stirring or omittance in flavor boosters like Kirsch, vanilla extract, or salt. Ensure even incorporation from baking through to whipped cream synergy.
Temperature problems demand attention, whether ingredients are too warm for intended structure, risking deflation during assembly, or utilizing preparatory chilling without slipping floridity proof.
Equipment challenges suggest using oil-sprayed parchment always and pan regularity for consistency. Ownership of paso-like misconfusion often stems from unequal distribution in ingredients.
Ingredient substitutions necessitate a watchful eye; not all carry equal weight or hydration, each conversion requiring accurate math and reconfiguration suit substitutive qualities.
Timing concerns in baking reflect oven idiosyncrasies, needing anticipated response shifts repeated trial and error adjustments for optimal target accuracy, familiarizing yourself with totals frequently to suit.
Recipe Success Stories
Community feedback unveils this dessert’s exuberant reception among audiences, who relished in its flavorful indulgence, with special commendations on aesthetic elegance maintained throughout.
Variation successes include flavors from orange-infused syrup adapting vibrance in added nuances grounds within zest submissions originating across forums universally revered delicious clusters.
Adaptation stories ranged geographically inclined, many respondents sharing preferred boom approaches or revisiting dry cherry biscuits enveloped between cakes during juicer shortage seasons.
Reader suggestions spanned an unreal range; discussions about tipping weight balances regarding dust applications sparked ideas regarding seasonal thefts whipped front essay asked for.
Photography tips shared consistently from backgrounds to the inevitable transition crafted through diligent practice enforced during optimal lighting conditions unfiltered genuine create effortless scenic exchanges.
Frequently Asked Questions
Can I substitute fresh cherries with canned ones? Canned cherries work well, especially if fresh ones are out of season. Make sure they are pitted and drained to avoid soggy layers.
What type of chocolate should I use? Opt for high-quality dark or semi-sweet chocolate with a cocoa percentage of around 60-70% for best results.
Do I really need a jelly roll pan? Yes, a jelly roll pan provides the ideal depth and dimensions for evenly baking the cake and rolling it without breaking.
Why is my whipped cream deflated? Ensure your cream is chilled and whipped to stiff peaks. Overbeating or using overly warm cream can lead to separation.
How do I prevent the sponge from cracking? Roll the sponge while it’s warm, using parchment paper to assist, and allow it to cool in the rolled-up shape.
What can I use to substitute Kirsch? Try cherry syrup or juice if you wish to avoid alcohol, maintaining that signature cherry flavor.
How should I store leftovers? Store the roll wrapped in plastic or in an airtight container in the fridge for up to three days.
Can I make the roll in advance? Yes, prepare and store the roll without cream, adding cream and cherries before serving for optimal texture.
What’s the best way to cut clean slices? Use a sharp mandolin serrated knife, wiping after each cut, to reveal distinct layers.
Is the roll suitable for freezing? Yes, wrap slices tightly in plastic and foil to freeze for up to a month. Thaw overnight in the fridge.
Should I sweeten stabilized cream differently? Add sugar during whipping to taste. Stabilization doesn’t impact sweetness preference directly.
Must the chocolate be melted? Incorporate gently melted chocolate preferred for filling flavor consistency rather than inclusion directly.
Additional Resources
Explore related recipes like our decadent Chocolate Swiss Roll and guide towards homemade whipped cream perfection for free-formed learning on essential dessert skills improvement.
Delve into advanced rolling techniques, unlocking essential charm in this potentially tricky discipline through tutorials breaking broad strokes alongside resolute practice-building confidence.
Discover intriguing swaps or playful experimentation regarding ingredients, proffering comprehensive significant-dialogue guidance into successful suggestions responsive to contemporary dietary requirements complement educational inquiry.
Equip yourself with key kitchen kit fancies objective improvements optimize workspace by investigating specially designed tools facilitating transformative processes similarly contributing critical adjustments fledging enthusiasts find fruitful.
Seasonal variation comprehension unlocks new connections extending surpassed routines; additional explorations balance yield synergy from emerging frameworks reality shared through several shared collective narratives.
Join the Conversation
Engage with us across social platforms to showcase your adaptations with this delightful roll, tagging us to share any innovative twists! Photograph and post your creation from every angle to highlight its impressive layers.
Leave reviews and suggestions for fellow bakers interested in tackling the Heavenly Black Forest Roll. Our community thrives on feedback and collaborative improvement, pushing culinary boundaries together.
Participate in the rich dialogue by exploring recipe variations tried by others. Exchange adaptation successes to network with passionate cooks across vast and newly inclusive open doors for discovery.
Encourage collective momentum by immersing yourself fully into perspectives shared abroad, mirroring foundational close-knit relationships formed through our evolving exchanges.
Preheat the oven to 350°F (175°C). Grease a jelly roll pan and line it with parchment paper.
In a bowl, sift together the flour and cocoa powder. Set aside.
In a separate bowl, whisk the eggs and sugar until pale and thickened. Fold in the flour mixture gently.
Add the melted butter and vanilla to the batter, folding until just combined.
Pour the batter into the prepared pan, spreading evenly. Bake for 10-12 minutes.
Let the cake cool slightly in the pan before turning it onto a towel dusted with powdered sugar.
Gently peel off the parchment. Roll the cake in the towel and allow it to cool completely.
Meanwhile, whip the cream to stiff peaks. Stir in Kirsch or cherry syrup gently.
Unroll the cooled cake and spread with half the whipped cream. Place cherries evenly across.
Re-roll the cake and spread the remaining cream on top. Garnish with chocolate shavings.
Refrigerate the roll for at least an hour before serving, to let the flavors meld together.
Recipe Notes
Chill the mixing bowl before whipping the cream for best results.
If using canned cherries, ensure they are thoroughly dried before use to prevent a soggy cake.
Switch up the flavor by adding a hint of espresso powder to the cocoa-flour mixture.
Serve slices with whole cherries or fresh mint leaves for extra flair.
Irresistible Homemade Butter Pecan Cake with Cream Cheese Icing Recipe
Homemade Butter Pecan Cake Recipe with Cream Cheese Icing: A Delectable Delight
⚖️
Difficulty
Intermediate
⏲️
Prep Time
30 mins
🕒
Cook Time
40 mins
⏱️
Total Time
1 hr 10 mins
🍽️
Servings
12
Indulge in the rich, nutty goodness of our homemade butter pecan cake recipe, topped with the smooth and tangy cream cheese icing. This cake captivates your senses, offering a delightful balance of flavors and textures that make it a perfect choice for special occasions or a weekday treat. The combination of toasted pecans and creamy frosting is likely to win over even the most discerning dessert lovers.
The butter pecan cake is a culinary masterpiece, with a moist, tender crumb thanks to the perfect ratio of butter and pecans. As you sink your teeth into the first slice, the creamy cheese icing adds a tangy sweet layer, creating an irresistible fusion that will leave you and your guests reaching for seconds. Given its irresistible combination of flavors and textures, this dessert is more than just a cake; it’s a celebration on a plate.
This recipe is designed with convenience in mind, allowing you to easily prepare an impressive dessert that doesn’t just satisfy but delights with every bite. Perfect for all seasons, this butter pecan cake recipe is sure to become a staple in your repertoire, cherished by family and friends alike.
Quick Recipe Highlights
Flavor Profile: The cake offers a rich, buttery flavor, enhanced by the nuttiness of toasted pecans balanced exquisitely with the creamy sweetness of the cream cheese icing.
Texture: Expect a moist, tender crumb with a complimentary creamy icing, offering a satisfying textural contrast.
Aroma: As it bakes, the cake emanates a warm, inviting aroma of butter and nuts, filling your kitchen with an enticing fragrance.
Visual Appeal: This cake is a feast for the eyes with its golden-brown finish and cream cheese topping, embellished with chopped pecans.
Skill Level Needed: Intermediate baking skills are required, including familiarity with basic cake-baking techniques.
Special Equipment: Use a stand mixer for ease and precision, and two 9-inch cake pans for the desired layered effect.
Recipe Overview
Difficulty Level: Rated intermediate due to techniques like creaming butter and folding in dry ingredients, requiring some baking experience.
Category: Best categorized as a dessert or a special-occasion cake, suitable for both casual and formal gatherings.
Cuisine: Incorporates classic American dessert elements, with southern influences evident in the butter pecan flavors.
Cost: Moderate total cost due to ingredients like pecans and cream cheese, but well worth the investment for the flavor payoff.
Season: Perfect year-round, but the nutty profile is especially fitting for fall and winter seasons.
Occasion: Ideal for birthdays, holidays, and any gathering where you aim to impress with your baking skills.
Why You’ll Love This Recipe
Immerse yourself in the irresistible taste and texture of this butter pecan cake. The rich blend of butter and pecans provides a deep, satisfying taste that pairs beautifully with the cream cheese icing’s acidity, creating a perfectly balanced dessert. The cake’s tender crumb offers a delightful mouthfeel, while the icing adds a layer of creaminess that enhances every bite.
This recipe offers significant convenience in preparation. The steps are straightforward and achievable within a short time, allowing you to deliver a stunning dessert with minimal fuss. Whether for a spontaneous gathering or planned event, the cake’s appeal remains undiminished.
Nutritionally, the cake offers a good balance of macro and micronutrients, particularly when prepared with fresh, quality ingredients. The pecans are a source of healthy fats, while the cream cheese provides protein, making it a more balanced indulgence.
The cake shines in social settings, making it a perfect centerpiece for gatherings. Its universal appeal ensures it will be enjoyed by a wide range of palates, and its visual attractiveness makes it a conversation starter.
Cost-wise, while some ingredients are premium, their quality ensures the recipe’s outcome is a step above, providing an excellent return on investment. Its rich flavors and luxurious textures provide a decadent experience without excess expense.
Historical Background and Cultural Significance
Originating in the Southern United States, the butter pecan cake is deeply rooted in the culinary traditions of the region. Known for its use of local nuts and dairy, this cake reflects a heritage of rich, flavorful ingredients that signify southern comfort food traditions.
Culturally, the cake is synonymous with celebrations and gatherings, where food plays an integral role in community and familial bonding. Its warming flavors make it a staple in holiday feasts, offering a sense of nostalgia and homeliness.
Over time, the butter pecan cake has evolved, with variations emerging across different regions. However, its essential components — butter, pecans, and a creamy topping — remain constants, preserving the essence of its traditional roots.
The pecan itself, as a fruit native to North America, particularly the southern states, imbues the cake with a regional authenticity. The incorporation of cream cheese icing, a modern twist, demonstrates the recipe’s adaptability while maintaining its cultural integrity.
Ingredient Deep Dive
Butter is crucial in this cake for its role in developing flavor and providing moisture. Its use can be traced back through culinary history as a staple in both sweet and savory dishes, offering richness and depth to baked goods. It’s vital to use unsalted butter for control over the final taste.
Pecans add a distinctive nutty flavor to the cake and are symbolic of Southern cuisine, often associated with hospitality and warmth. They are rich in healthy fats and antioxidants, making them a nutritional powerhouse. Select fresh, whole pecans for the best flavor and store them in a cool, dry place to prevent rancidity. Toasting the pecans before using enhances their flavor and adds a delightful texture.
Cream cheese, the star of the icing, provides a tangy counterpoint to the sweet cake. Known for its versatility in both savory and sweet applications, it offers smoothness and body to the icing. It’s best to use full-fat cream cheese for optimal texture and flavor impact.
All-purpose flour forms the cake’s structure. Opt for unbleached flour for a purer taste, stored in a cool, dry place to maintain freshness. Ensure accurate measurements to avoid texture issues, and consider substituting a small amount with cake flour for a finer crumb.
Eggs are key for binding the batter, offering structure while retaining moisture. They should be at room temperature for best results, and if unavailable, can be substituted with appropriate egg replacement products for those with dietary restrictions.
Brown sugar adds moisture and a hint of molasses to the cake, complementing the butter’s richness. It’s a critical ingredient for achieving the cake’s depth of flavor. Store brown sugar in an airtight container to prevent hardening, and occasionally mix with a splash of water to maintain its texture.
Common Mistakes to Avoid
Overmixing the batter: This can lead to a dense cake. Mix until just combined to maintain a light, airy texture.
Incorrect butter temperature: Ensure the butter is room temperature. Cold butter won’t cream properly, affecting the cake’s consistency.
Skimping on pecans: The flavor of pecans is central to the cake’s profile. Use enough to taste their distinctive nuttiness.
Improper layer leveling: Uneven layers can cause imbalance. Level each cake layer before icing for stability.
Rushing the cooling process: Allow cakes to cool completely before icing to avoid melting and sliding.
Not toasting the pecans: Raw pecans lack intensity. Toast them lightly to enhance the cake’s overall flavor.
Incorrect oven temperature: Use an oven thermometer to ensure the correct baking temperature, preventing under or overbaked cakes.
Heavy icing application: Too much icing can overwhelm the cake’s delicate balance. Apply evenly and tastefully.
Overbeating the icing: Overwhipping can create grainy icing. Beat until smooth and creamy.
Skipping ingredient sifting: Sift dry ingredients to avoid lumps and ensure uniform mixing.
Essential Techniques
Creaming butter and sugar is critical for incorporating air into the cake, ensuring a fluffy and tender crumb. Ensure your butter is softened, and beat until light and pale for best results.
Folding in dry ingredients is crucial to avoid overworking the batter. Gently incorporate using a spatula, turning the bowl as you fold to preserve the batter’s airiness.
Properly toasting pecans enhances their natural flavors. Spread pecans on a baking sheet and toast at a low temperature until fragrant, ensuring even toasting without burning.
Leveling cake layers ensures stability when assembling. Use a serrated knife to trim the tops, maintaining a flat surface for uniform icing.
Creating smooth cream cheese icing requires attention to butter and cream cheese softness, incorporating confectioner’s sugar gradually to prevent lumps.
Pro Tips for Perfect Homemade Butter Pecan Cake
Use a high-quality vanilla extract for the most flavorful results, enhancing the cake’s subtle flavors with an aromatic depth.
Chill the cake layers before assembling. This makes handling easier and minimizes crumb mess during icing.
For enhanced pecan flavor, infuse your butter with toasted pecans ahead of preparation, straining before use to capture a deep nutty essence.
To preserve freshness, wrap cooled cake layers individually before assembly, ensuring maximum moisture retention.
Add a hint of sea salt to the cream cheese icing for a sophisticated balance that elevates the cake’s sweetness.
Experiment with other nut varieties such as walnuts or almonds to give this classic butter pecan cake your unique twist.
Variations and Adaptations
Consider regional variations by incorporating local flavors like maple syrup or bourbon for added complexity.
Adapt for seasons by mixing in seasonal fruits like apple slices or figs into the batter for a refreshing change.
For dietary considerations, explore gluten-free flour blends, adjusting leavening agents as needed for similar results.
Play with flavor variations by introducing spices such as cinnamon or nutmeg, adding warmth and depth to your cake.
Experiment with texture modifications by using whipped cream or mascarpone in place of cream cheese for a lighter icing.
Enhance presentation by topping the cake with caramel drizzle or chocolate shavings, providing an aesthetic and flavorful touch.
Serving and Presentation Guide
Plating techniques such as creating individual slices with a dollop of extra icing on the side add sophistication to your presentation.
Garnish ideas including toasted pecan halves or fresh mint leaves elevate the cake’s visual and taste appeal.
Traditional accompaniments like a scoop of vanilla ice cream can further enhance the dessert experience.
Modern serving suggestions involve deconstructing the cake into elegant miniatures for individual enjoyment.
Temperature considerations include serving slightly chilled for a refreshing mouthfeel, especially in warm climates.
Portion control tips suggest serving moderate slices, encouraging savoring the rich flavors rather than overindulging.
Wine and Beverage Pairing
Choose a dessert wine like a spiced Zinfandel, accentuating the butter pecan’s natural flavors.
For non-alcoholic alternatives, consider a robust flavored coffee or spiced chai, offering a balance to the cake’s richness.
Explore pairings with herbal teas, particularly vanilla or cinnamon blends, complementing the cake’s flavor notes.
Ensure beverages are served at an ideal temperature – wine nicely chilled, coffee hot, to enhance the sensory experience.
Offer serving suggestions such as using distinctive glassware or mugs to enrich the visual appeal when presenting your beverages.
Storage and Shelf Life
Store leftover cake in an airtight container at room temperature for up to three days, retaining its moist texture.
Refrigerating helps extend shelf life, though be mindful that chilling may slightly alter the texture.
Use a cake dome for best presentation, preventing drying while keeping the cake visible and appealing.
Signs of spoilage include any off-flavor or texture change, particularly on the cake’s surface or icing.
For freezing, wrap slices individually, protecting their structure and allowing easy defrosting when needed.
Reheating instructions include allowing cake slices to reach room temperature naturally, avoiding microwaving which might alter texture.
Make Ahead Strategies
Prepare cake layers a day in advance, storing in the refrigerator to streamline final assembly on serving day.
Store between steps using parchment paper or plastic wrap, maintaining moisture during extended storage periods.
Assess quality impact if refrigerating or freezing; keep avoid extended periods which may impact overall quality.
Follow assembly tips like using chilled icing for firmer structure and ease during final decoration efforts.
For reheating, bring cake to room temperature, ensuring flavors are lively and the icing stable.
Enhance fresh elements just before serving, such as adding garnishing for maximal visual and flavor appeal.
Scaling Instructions
Halving the recipe involves reducing each ingredient proportionately, with careful attention to the eggs, considering beat and division.
Double or triple scaling needs appropriate equipment like multiple cake pans and space considerations for extra batter.
Timing modifications for baking should be monitored closely to avoid overcrowding or imbalanced temperature control.
Storage considerations surge as larger cakes require more space, considering airtight containers for freshness.
Nutritional Deep Dive
Explore the cake’s macro breakdown, with fats predominantly from butter and pecans, complemented by protein in dairy components.
Identify micronutrient analysis, where pecans contribute to healthy mineral and vitamin content, enriching the cake’s nutritional profile.
Discuss health benefits by recognizing the wholesome ingredients providing energy, alongside essential fatty acids.
Consider dietary aspects including calorie content, offering advice on serving sizes maintaining dietary management goals.
Highlight portion control with suggested serving sizes aligning with nutritional goals, promoting mindful enjoyment.
For weight management tips, understand balance and moderation, particularly when including such indulgent desserts.
Dietary Adaptations
For gluten-free adaptation, select the appropriate blend of quality gluten-free flours, ensuring leavening is adequately adjusted.
Consider dairy-free options by using plant-based butter and cream cheese alternatives, retaining texture and moistness.
Vegan modifications include egg substitutions like aquafaba or apple sauce, ensuring cohesiveness within your batter.
Adapt for low-carb by exploring almond flour and xylitol, maintaining the cake’s essential flavor and appeal.
For paleo adherence, focus on naturally derived alternatives, maintaining integrity through refined-free sugars and oils.
Troubleshooting Guide
Address texture issues by ensuring precise ingredient measurement, coordinating baking time precisely to maintain moisture.
Solve flavor balance problems by adjusting pecan to vanilla sweetness, using salt or spices effectively for rich yet balanced taste.
Explore temperature pitfalls like incorrect butter melting points, ensuring the perfect blend for creaming without separation.
Discuss equipment challenges, such as uneven oven heat distribution, exploring alternatives like rotating pans for evenness.
Understand ingredient substitution impacts, ensuring alternative options provide consistency alongside ethical or allergen considerations.
Timing concerns are best managed by preparing mise en place, coordinating steps efficiently for timely, balanced results.
Recipe Success Stories
Celebrate community feedback showcasing variations, flavor enhancements, and seasonal adaptations that extend recipe appeal.
Share reader suggestions like ingredient swaps or narrative shares, allowing immersive engagement with the recipe’s cultural essence.
Include photography tips to capture the cake’s beauty and highlight its appeal, aiding in visual presentation and online sharing.
Frequently Asked Questions
Does this cake freeze well?
Yes, the cake freezes excellently when wrapped tightly in a double layer of plastic wrap to preserve moisture.
Can I use a different nut variety?
Yes, walnuts or hazelnuts can be used, though pecans are traditional for authentic flavor.
What if my cream cheese icing is too runny?
Chill it briefly and add more confectioner’s sugar to thicken without impacting flavor subtleties.
How do I avoid overmixing the batter?
Mix until just combined, observing visual clues like uniform texture and minimal flour streaks.
What’s the best way to toast pecans?
Use a preheated oven, spreading pecans evenly on a sheet, monitoring for even golden brown coloring.
Why does my cake sink in the middle?
This usually indicates undercooking or incorrect oven temperature. Ensure the cake is baked through using a toothpick test.
How can I substitute for eggs?
Egg substitutes like yogurt, applesauce, or commercial egg replacers can be used, with proportional adjustments.
What should I do if my cake is too dry?
Ensure accurate flour measurement or incorporate syrup between layers to boost moisture.
Can I make this cake gluten-free?
Yes, using a suitable gluten-free all-purpose blend ensures similar tender texture and flavor.
Is there a dairy-free cream cheese alternative?
Opt for nut-based alternatives or commercially available dairy-free cream cheese for a consistent, creamy texture.
How can I ensure even frosting layers?
Use an offset spatula and rotate the cake as you apply frosting, ensuring a smooth and even finish.
Additional Resources
Explore related recipes like pecan pie or other layered cakes that share component synergy.
Delve into technique guides emphasizing cake leveling, icing application, and decoration for a perfect finish.
Engage with ingredient information, uncovering alternatives and substitutions that customize the cake to dietary or personal preferences.
Consider equipment recommendations for baking consistency, like sturdy stand mixers or levelers ensuring results perfection.
Interpret seasonal variations, integrating fresh-produced themes or holiday motifs reflecting personal styling preferences.
Join the Conversation
Join culinary discussions on social media platforms by sharing your butter pecan cake creations, tagging enthusiasts for broader engagement.
Experiment with photography tips, capturing cake colors and textures, fostering more interest in its preparation.
Exchange recipe reviews amongst peers to refine techniques and approach, cultivating a sachet of culinary rewarding variations.
Embrace community engagement forums, amplifying ideas, and exploring collective creation initiatives or culinary twists.
Encourage creative recipe adaptations, sharing inventive iterations or family secret inclusions within your culinary circle.
The Recipe
Homemade Butter Pecan Cake
Serves: 12
Prep Time: 30 mins
Cook Time: 40 mins
Total Time: 1 hr 10 mins
Kitchen Equipment Needed
Stand mixer or hand mixer
9-inch cake pans (2)
Rubber spatula
Offset spatula
Cooling rack
Parchment paper
Ingredients
1 cup unsalted butter, softened
1 cup chopped pecans, toasted
1 1/2 cups granulated sugar
4 large eggs
1 tablespoon pure vanilla extract
2 cups all-purpose flour
1 tablespoon baking powder
1/2 teaspoon salt
1 cup buttermilk
8 oz cream cheese, softened
1/4 cup unsalted butter, softened
4 cups confectioner’s sugar
1 teaspoon vanilla extract
Directions
Preheat the oven to 350°F (175°C). Grease and flour two 9-inch round cake pans and line the bottoms with parchment paper.
In a medium skillet, toast pecans over medium heat until fragrant. Set aside to cool.
Cream the butter and sugar in a stand mixer until light and fluffy. Add eggs, one at a time, blending well after each addition. Stir in vanilla extract.
In a separate bowl, whisk together flour, baking powder, and salt. Alternate adding flour mixture and buttermilk to the creamed mixture, beginning and ending with the flour.
Fold in toasted pecans. Divide batter evenly between pans and smooth the tops with a spatula.
Bake cakes for 30-35 minutes or until a toothpick inserted in the center comes out clean. Cool in pans for 10 minutes, then turn onto wire racks to cool completely.
For the icing, blend softened cream cheese and butter until smooth. Gradually add confectioner’s sugar, mixing until creamy. Stir in vanilla extract.
Frost the completely cooled cake layers as desired, sprinkling some pecans on top if desired.
Recipe Notes
Ensure thorough cooling before icing to avoid melting and slipping.
For a nut-free option, omit pecans and add extra vanilla.
Indulge in Homemade Bliss with Grandma’s Chocolate Comfort Cookies
My Grandma’s Chocolate Comfort Cookies: A Taste of Nostalgia
⚖️
Difficulty
Easy
⏲️
Prep Time
15 mins
🕒
Cook Time
10 mins
⏱️
Total Time
25 mins
🍽️
Servings
24 cookies
My Grandma’s Chocolate Comfort Cookies are more than just a delightful dessert; they are a cherished family tradition. With each bite, you will find a heavenly blend of rich chocolate and melt-in-your-mouth texture that is sure to transport you back to cozy afternoons spent baking in grandma’s kitchen. There’s nothing quite like the smell of freshly baked cookies wafting through the home, enveloping you in a comforting hug of sweetness and love.
These cookies boast a perfect balance of flavor and texture, making them a favorite treat for all ages. The delightful crunch on the outside gives way to a soft, gooey center that pairs wonderfully with a glass of cold milk. Ideal for any occasion, My Grandma’s Chocolate Comfort Cookies are a testament to the timeless appeal of homemade goodies.
Whether you are looking to indulge your own sweet tooth or share a memorable moment with loved ones, this recipe will not disappoint. Each cookie is a little piece of nostalgia that whispers childhood memories and the warmth of family gatherings. It’s time to rediscover the joy of baking with this irresistible recipe.
Quick Recipe Highlights
Flavor Profile: My Grandma’s Chocolate Comfort Cookies combine rich cocoa flavors with a subtle hint of vanilla, offering sweetness with an indulgent depth.
Texture: These cookies have a delightful crunch on the outside while remaining soft and chewy in the center, creating a perfect balance of textures.
Aroma: The enticing aroma of chocolate and freshly baked cookies fills the kitchen, promising comfort and warmth with every batch.
Visual Appeal: Golden brown edges with a slightly cracked top, these cookies have a homemade look that is as inviting as it is appetizing.
Skill Level Needed: This easy recipe requires basic baking skills, making it perfect for novice bakers or those short on time.
Special Equipment: A standard baking sheet and an oven are all that is required to bring these cookies to life, ensuring quick and fuss-free preparation.
Recipe Overview
Difficulty Level: This recipe is easy to follow, making it ideal for both novice bakers and seasoned cooks looking to whip up a quick batch of cookies.
Category: My Grandma’s Chocolate Comfort Cookies fall under the categories of dessert and snack, perfect for any time of day.
Cuisine: This classic cookie recipe is a staple of American baking traditions, showcasing simple yet beloved flavors.
Cost: With a low-cost ingredient list, these cookies are budget-friendly and accessible, making them perfect for any baking occasion.
Season: While these cookies can be enjoyed year-round, they are particularly comforting during the cooler months, when the warmth of an oven is most welcome.
Occasion: Ideal for family gatherings, cozy nights in, or as a delightful gift, these cookies make any occasion special with their timeless charm.
Why You’ll Love This Recipe
Taste and texture are the standout features of My Grandma’s Chocolate Comfort Cookies. The perfect blend of crunchy exteriors and chewy centers make them a delightful treat for the senses. The rich cocoa flavor pairs effortlessly with a hint of vanilla, bringing a well-rounded sweetness that’s sure to please any chocolate lover.
Beyond their irresistible taste, these cookies are incredibly convenient to prepare. Requiring just 15 minutes of prep time and another 10 in the oven, they are as easy as they are delicious. This makes them a go-to recipe for those days when you want a quick homemade treat without the fuss.
The nutritional advantages of these cookies, although subtle, include moderation. With each cookie serving as a delightful treat, they can fit into a balanced diet that includes occasional indulgences. Plus, the use of high-quality cocoa offers a small boost of antioxidants, making them a slightly less guilty pleasure.
In terms of social appeal, these cookies are a crowd-pleaser at any gathering, be it a relaxed afternoon tea or a holiday party. Their ability to evoke nostalgia and create new memories makes them a wonderful addition to any social or family gathering.
Cost-effectiveness is one of the best parts of this recipe. The ingredients are straightforward and likely already available in your pantry. This affordability makes them accessible to everyone, ensuring that anyone can enjoy the simple pleasure of baking and sharing homemade cookies.
Historical Background and Cultural Significance
This recipe is grounded in family heritage, passed down through generations. The origin story is filled with tales of kitchen adventures and family gatherings, where baking these cookies was a cherished tradition. Such recipes are more than just instructions; they are a way to preserve and celebrate family history.
Culturally, cookies like these have become a symbol of American comfort food. They represent more than just ingredients mixed together—they embody memories, family connections, and the shared moments around a kitchen table. Their cultural importance lies in their ability to bring people together, one cookie at a time.
Over the years, this recipe has evolved, adapting to modern kitchen conveniences while retaining its classic appeal. The essence of the original has remained intact, ensuring that each batch retains the love and care of the original creation while being adaptable for new tastes and preferences.
While the core recipe remains unchanged, regional variations have popped up, reflecting local tastes and ingredient availability. Whether it’s adding nuts or using different types of chocolate, these variations only enhance their universal appeal, allowing families everywhere to enjoy a taste of nostalgia with their own unique twist.
Ingredient Deep Dive
Flour is a staple ingredient in baking, providing structure to the cookies. It’s fascinating how this simple component, a global pantry staple, has shaped numerous culinary traditions. Opt for all-purpose flour for this recipe, or substitute with whole grain for a nutritious twist, storing in a cool, dry place to maintain its quality.
Cocoa powder is the star of the chocolate cookies, packing a delicious punch of flavor. Historically a luxury item, cocoa has come a long way in becoming an accessible ingredient. For the richest taste, choose unsweetened cocoa powder, storing it in an airtight container to maintain its flavor profile.
Butter adds richness and flavor while contributing to the cookies’ tender crumb. Select high-quality butter for the best taste, with unsalted giving you control over the cookie’s salt content. Store butter in the refrigerator to keep it fresh and ready for any baking adventure.
Sugar plays a dual role, sweetening and caramelizing to create that exquisite golden-brown color. Granulated sugar offers consistency, while brown sugar adds a deeper, molasses-like flavor, perfect for achieving that chewy texture. Storing sugar in a dry container keeps it free-flowing and clump-free.
Eggs are a crucial ingredient, acting as a binding agent while adding moisture and richness. Their nutritional benefits include essential proteins and fats, making them indispensable. Ensure your eggs are fresh for the best results, storing them in the fridge until baking time.
Common Mistakes to Avoid
Avoid overmixing the dough, which can lead to tough cookies. Mix just until the ingredients are combined.
Using cold butter can lead to uneven texture. Ensure your butter is at room temperature before beginning.
Measuring flour incorrectly can affect the cookie’s structure. Always spoon and level the flour for accurate measurement.
Skipping the preheat can result in uneven baking. Make sure your oven is fully preheated before baking.
Using old baking powder can lead to flat cookies. Always check expiration dates before baking.
Overbaking will make them dry. They should appear slightly underdone when removed from the oven, as they’ll continue cooking on the pan.
Not rotating the pan halfway can result in unevenly baked cookies. Rotate for even heat distribution.
Using dark or nonstick pans can cause over-browning. Light-colored baking sheets work best for even results.
Opening the oven frequently can affect baking time. Keep the oven door closed as much as possible.
Ignoring proper storage can lead to stale cookies. Store in an airtight container for maximum freshness.
Essential Techniques
Mastering the creaming technique is crucial, as it adds air to the butter and sugar, contributing to the texture. Ensure both ingredients are at room temperature and beat them until light and fluffy, preventing dense cookies. Look for a pale, well-blended mixture as your visual cue.
The folding technique is essential for incorporating flour without deflating the dough. Use a spatula to gently fold the flour into the wet mixture, preventing overmixing and ensuring a tender texture. Fold until just combined to retain lightness in the final cookies.
Knowing when the cookies are done is critical. They should appear slightly underbaked in the center when removed from the oven, as residual heat will finish the process. Look for set edges and a soft center for perfectly baked cookies.
Cooling the cookies is not just a waiting game—it’s essential for setting the structure and achieving the desired texture. Allow them to cool on the baking sheet for a few minutes before transferring to a rack, preventing excessive breakage or sogginess.
Pro Tips for Perfect Chocolate Comfort Cookies
Chill the dough for at least 30 minutes before baking. This helps control spread and enhances the flavor, leading to beautifully shaped cookies.
Experiment with flavor by adding a pinch of espresso powder. It intensifies the chocolate flavor without being overpowering, adding depth to your cookies.
Keep cookies fresh longer by storing them with a slice of bread in the container. The bread will absorb moisture, preventing the cookies from becoming stale too quickly.
For varied textures, mix in different types of chocolate chips such as dark or white chocolate. This adds a delightful surprise in each bite.
Use parchment paper or a silicone baking mat to line your baking sheets. This not only prevents sticking but also promotes even baking and easy cleanup.
Allow cookies to cool on the sheet for a few minutes before transferring them to a wire rack. This helps set their structure, minimizing breakage and enhancing texture.
Variations and Adaptations
Regional variations can include adding nuts or spices, like cinnamon or nutmeg, for a holiday twist. Adapting this way makes the cookies feel festive and slightly different without straying too far from the original.
For seasonal adaptations, consider using dried fruits like cranberries during the winter holidays or adding orange zest for a light, summery twist. Changing up ingredients keeps the recipe fresh throughout the year.
Dietary modifications are possible by replacing butter with a plant-based spread for vegan cookies or using gluten-free flour blends. These adjustments make the recipe accessible to those with dietary restrictions.
Flavor variations can be explored by adding different extracts such as almond or peppermint. It personalizes the recipe for different tastes or special occasions, allowing for creativity in baking.
Texture modifications are achievable by adjusting sugar types, like using light versus dark brown sugar, which impacts chewiness. Experimenting this way tailors the cookies to your preferred texture.
Presentation alternatives include drizzling melted chocolate over cooled cookies or topping with a sprinkle of sea salt. Such small touches elevate the cookies’ appearance and add a gourmet flair.
Serving and Presentation Guide
For plating techniques, consider arranging the cookies in concentric circles or stacking them in uneven piles for a rustic look. This creates a visually appealing display for serving.
Garnishing ideas include dusting with powdered sugar for added sweetness or sprinkling with cocoa powder for a rich, chocolatey aroma, enhancing both taste and appearance.
Traditional accompaniments might be a glass of cold milk or hot cocoa, ideal for balancing the rich flavors with a refreshing drink, creating a cozy and satisfying pairing.
Modern serving suggestions could involve pairing these cookies with a scoop of vanilla ice cream or a dollop of whipped cream, enhancing their indulgence for a dessert experience.
Temperature considerations play a role in flavor perception; serve cookies warm for a soft, melting center or at room temperature for a chewy texture.
Portion control tips include serving smaller cookies on a shared platter for parties or individually wrapping them for takeaway favors, offering flexibility in presentation.
Wine and Beverage Pairing
For a wine pairing, consider a sweet dessert wine like an elegantly rich port or a fruity Zinfandel, which complements the chocolate notes without overpowering them, enhancing the overall tasting experience.
Non-alcoholic alternatives include serving with chai tea, which offers a spicy contrast to the sweetness, or a rich hot chocolate for a decadent chocolate-on-chocolate experience.
For coffee lovers, pairing with a robust espresso or a creamy cappuccino can highlight the cocoa flavors while offering a contrasting bitterness to balance the sweetness.
Serve beverages at an appropriately warm temperature, ensuring they enhance rather than overwhelm the cookies’ flavors, providing a warm, comforting experience.
For creative serving suggestions, consider using a cookie as a garnish for a hot drink, dipping partially in chocolate, or serving alongside a custom drink creation for unique presentation.
Storage and Shelf Life
For storage methods, consider airtight containers to preserve freshness, ensuring the cookies remain soft and delicious. This also prevents flavor absorption from other foods.
Optimal temperature requirements include room temperature for immediate consumption or refrigerated if keeping for an extended period, allowing flexibility in storage.
Container recommendations include glass jars or plastic storage boxes, ideally with a moisture-absorbing material like a kitchen towel to keep them at peak quality.
Be aware of signs of spoilage, such as abnormal taste, texture changes, or unpleasant odors; this helps ensure the cookies are enjoyed at their best.
Reheating instructions involve a brief microwave or oven warm-up to restore softness. Avoid overheating as this can alter texture, diminishing the cookies’ delightful chewiness.
Freezing guidelines suggest pre-freezing individual cookies on a tray before placing them in a bag or container to prevent sticking, allowing for easy access as needed.
Make Ahead Strategies
A prep timeline could involve mixing the dough in advance, allowing flavors to develop overnight in the refrigerator. This also aids in time management for busy schedules.
For storage between steps, keep the dough wrapped in plastic or in sealed containers, reducing air exposure to maintain its quality until baking.
Assess the quality impact between fresh and stored dough, noting that chilled dough often enhances the final flavor and consistency, offering insights for planning.
Assembly tips include portioning dough into cookie-sized scoops before chilling, simplifying the baking process, and ensuring consistent cookie sizes for even cooking.
Reheating guidelines should focus on a gentle process, like warming a few at a time to avoid burning, helping maintain the originally desired texture and flavor.
Fresh element additions can involve adding toppings such as chocolate drizzle post-baking or when serving, introducing new flavors without altering the core recipe.
Scaling Instructions
To halve the recipe, simply adjust ingredient quantities while maintaining proportionate ratios to preserve taste and quality, enabling smaller batches for less crowd.
Doubling or tripling requires careful measurement, especially of leavening agents, to prevent imbalance. Consider using larger bowls and additional pans for even distribution.
Equipment adjustments may include using multiple baking sheets and larger mixing equipment, optimizing the workflow for efficient and straightforward scaling.
Timing modifications need attention; adjust oven time slightly when baking larger or smaller batches to prevent under or overcooking based on quantity changes.
Storage considerations reflect larger batches, perhaps using bulk containers or multiple storage strategies, ensuring freshness and ease of access to enhanced quantities.
Nutritional Deep Dive
The macro breakdown emphasizes carbohydrates from flour and sugars, with fats coming primarily from butter, painting a picture of energy sources within your cookies.
Micronutrient analysis might focus on trace vitamins and minerals from ingredients like cocoa, offering a small but appreciated source of antioxidants.
From a health perspective, these cookies should be enjoyed as a treat within a balanced diet, aligning with energy intake and dessert preferences.
Dietary considerations highlight the potential for allergen inclusion, suggesting substituting ingredients as needed for those requiring specific dietary adherence.
Portion analysis reveals each cookie as a manageable, satisfying treat, aligning within dessert portioning guidelines for maintaining balanced intake throughout a meal.
Weight management tips involve moderation and mindful enjoyment, recognizing these cookies as part of occasional indulgence that supports a positive relationship with food.
Dietary Adaptations
For gluten-free adaptations, replace all-purpose flour with a reliable gluten-free blend, checking for cross-contamination, allowing those with gluten sensitivity to indulge safely.
Making My Grandma’s Chocolate Comfort Cookies dairy-free involves swapping butter with plant-based alternatives like margarine or coconut oil, pledging inclusivity for all diets.
Vegan modifications require egg replacements such as flaxseed or commercial egg substitutes, aligning with cruelty-free and plant-based diet ethics to retain beloved flavors.
Low-carb plans might explore using almond flour and sugar substitutes, like erythritol or stevia, to maintain flavor sans carbohydrates, fitting into personal dietary goals.
Keto alternatives need attention, using low-carb ingredient swaps and balanced macros to fit within ketogenic guidelines, while still invoking pleasure from traditional flavors.
Paleo solutions include focusing on natural sweeteners, and whole food ingredients, embodying a diet closer to ancestral eating patterns for enthusiastic adopters.
Low-FODMAP directions center around selecting suitable ingredients that conform to digestive limitations, providing baked options for those managing gut health effectively.
Troubleshooting Guide
Handling texture issues could involve adjusting the ratio of wet to dry ingredients, allowing fine-tuning towards achieving desired crisps or sponginess in cookies.
Flavor balance concerns might be alleviated by experimenting with salt or sugar quantities, revisiting flavors to strike the seamless taste experience aimed for.
Tackling temperature problems advises monitoring oven settings meticulously or recalibrating for accurate measurements, improving consistency in baking outcomes.
Equipment challenges can encourage investment in quality tools or improvising with available resources, promoting seamless execution throughout the kitchen.
Ingredient substitutions frequently arise; focusing on maintaining proportional equivalents aids smooth transitions without compromising the essence of the recipe.
Timing concerns recommend clock precision and kitchen attentiveness, refining the knack of baking times and feasibly rounding the heat spectrum for satisfaction.
Recipe Success Stories
Community feedback has lauded My Grandma’s Chocolate Comfort Cookies for their simplicity and nostalgic appeal. Readers have shared heartwarming reviews of family bonding moments, creating memories just as cherished as the cookies themselves.
Variation successes have been noteworthy—readers have modified the recipe with unique mix-ins like crushed peppermint or dehydrated fruit, adding personal flair to the timeless classic.
Adaptation stories abound with individuals sharing how dietary changes have allowed everyone at the table to enjoy these cookies, demonstrating the versatility and broad appeal of this recipe.
Reader suggestions include using high-quality dark chocolate for an intense flavor or experimenting with zest for a touch of citrusy freshness, offering invaluable insights into culinary exploration.
Photography tips have been shared by the community, highlighting the visual appeal of these cookies when arranged on rustic platters or accompanied by fresh flowers, enhancing presentation.
Frequently Asked Questions
Can I prepare the dough ahead of time?
Yes, the dough can be made a day in advance. Store it in the refrigerator and allow it to reach room temperature before baking for the best results.
What is the best way to store leftover cookies?
Store leftover cookies in an airtight container at room temperature. To keep them extra fresh, add a slice of bread to the container.
Can I freeze these cookies?
Absolutely! Freeze cookies in a single layer before moving them to a freezer bag. Thaw at room temperature when ready to eat.
What is a good substitution for butter?
You can use margarine or coconut oil as a substitute for butter. Ensure equivalents for moisture and flavor balance.
Can I make these gluten-free?
Yes, simply use a gluten-free flour blend instead of all-purpose flour. It’s a straightforward adjustment to accommodate gluten-free diets.
Do I have to chill the dough?
Chilling isn’t mandatory but highly recommended to reduce spread and enhance flavors. Thirty minutes is sufficient to see noticeable benefits.
Why are my cookies too flat?
This might happen if your butter is too warm. Ensure chilled or firm butter for greater control over spreading when baking.
Is it okay to add nuts?
Yes, adding nuts can provide crunchy texture and additional flavor. Consider walnuts or pecans as compatible options.
How do I know when they are done baking?
Look for cookies with set edges and slightly soft centers. They should still appear slightly underbaked when removed from the oven for a moist center.
Can I double the recipe?
Absolutely! Maintain ingredient ratios to ensure quality results, and prepare additional baking sheets for efficiency.
Additional Resources
For more amazing recipes, explore our chocolate desserts section, which includes brownies, cakes, and more indulgent delights. Each recipe offers a unique take on the chocolate lover’s dream.
Technique guides are available for mastering baking basics, such as creaming methods and proper ingredient measurements—perfect companions for budding bakers.
Dive into ingredient information concerning chocolate varieties and sourcing, helping you choose the best quality for rich, flavorful results in all baking endeavors.
Equipment recommendations extend to the best baking sheets and mixing tools, promoting seamless kitchen experiences for beginners and seasoned chefs alike.
Seasonal variations guide readers through adapting their baking practices to match the time of year, embracing local ingredients and cultural festivities through flavors.
Join the Conversation
We invite you to share your own experiences with My Grandma’s Chocolate Comfort Cookies. Engage with us on social media by using #ChocolateComfortCookies, and let us see your creations.
Photography tips are available for achieving aesthetically appealing shots, complete with lighting, plating, and ambiance ideas to transform a simple cookie photo into an evocative visual story.
Recipe reviews are welcomed and appreciated. Your feedback helps us refine our recipes and brings the communal spirit of shared cooking to life on our platform.
Community engagement is key to our philosophy. Join our baking circle to exchange ideas, adapt recipes, and spread joy through the experience of creating and sharing homemade goodness.
Experiment with your own variations and post your creative takes and suggestions, enriching the community with authentic, personalized touches that showcase their ingenuity.
The Recipe
My Grandma’s Chocolate Comfort Cookies
Serves: 24 cookies
Prep Time: 15 mins
Cook Time: 10 mins
Total Time: 25 mins
Kitchen Equipment Needed
Baking sheet
Mixing bowl
Measuring cups and spoons
Spatula
Electric mixer (optional)
Wire cooling rack
Ingredients
1 cup unsalted butter, room temperature
1 cup granulated sugar
1 cup packed brown sugar
2 large eggs
2 teaspoons vanilla extract
3 cups all-purpose flour
1 teaspoon baking soda
1/2 teaspoon baking powder
1/2 teaspoon salt
2 cups semisweet chocolate chips
Directions
Preheat your oven to 350°F (175°C) and line a baking sheet with parchment paper.
In a mixing bowl, cream together butter and sugars until light and fluffy.
Beat in eggs one at a time, then stir in the vanilla extract.
In another bowl, combine flour, baking soda, baking powder, and salt. Gradually stir into the creamed mixture.
Fold in the chocolate chips, ensuring they are evenly distributed.
Drop rounded tablespoons of dough onto the prepared baking sheet, spacing them apart to allow for spreading.
Bake in the preheated oven for 8-10 minutes or until the edges are golden, and the center is set.
Remove from oven and let cool on the baking sheet for 5 minutes before transferring to a wire rack to cool completely.
Recipe Notes
For extra flavor, consider adding 1 teaspoon of instant espresso powder to the dry ingredients.
You can swap chocolate chips with chunks for a more rustic cookie experience.
If you prefer softer cookies, slightly reduce baking time by a minute or two.
Irresistible Mini Pineapple Upside-Down Cheesecakes for Delightful Treats
Mini Pineapple Upside-Down Cheesecakes: A Bite-Sized Delight
⚖️
Difficulty
Easy
⏲️
Prep Time
15 mins
🕒
Cook Time
25 mins
⏱️
Total Time
40 mins
🍽️
Servings
12
Satisfy your sweet tooth with these delectable Mini Pineapple Upside-Down Cheesecakes. Combining the rich creaminess of cheesecake with the tropical allure of pineapple, this dessert will transport your taste buds to a sunny paradise. Whether you’re a dessert aficionado or just starting to explore baking, this recipe guarantees success with its charming presentation and delightful flavors.
In every bite, you’ll experience a marvelous fusion of caramelized pineapples on a buttery graham cracker base, topped with a velvety cheesecake layer. The juiciness of the pineapple enhances the richness of the cheesecake, offering an irresistible treat perfect for any occasion.
Quick Recipe Highlights
Flavor Profile: The sweet pineapple mingles with the creamy cheesecake for a perfect balance of tart and sweet.
Texture: A delightful mix of juicy, creamy, and crumbly textures creates a harmonious mouthfeel.
Aroma: The alluring scent of freshly baked cheesecake and caramelized sugar will fill your kitchen.
Visual Appeal: These mini delights feature a beautiful golden hue with a glossy, upside-down topping.
Skill Level Needed: Simple techniques suitable for beginners with stunning results.
Special Equipment: A standard muffin tin for perfect portion sizes.
Recipe Overview
Difficulty Level: With straightforward steps and basic ingredients, this easy recipe is beginner-friendly.
Category: Perfect as a dessert or a sweet treat for parties and gatherings.
Cuisine: While rooted in American dessert traditions, it carries influences from the classic pineapple upside-down cake.
Cost: An affordable dessert, using common pantry staples and fresh pineapple.
Season: Best enjoyed in the summer when pineapples are at their peak sweet-tart balance.
Occasion: Ideal for casual get-togethers or as a stunning end to a dinner party.
Why You’ll Love This Recipe
Indulging in Mini Pineapple Upside-Down Cheesecakes brings a perfect blend of taste and texture to your palate. The contrasting elements — smooth cheesecake and juicy pineapple — create a sensory experience that’s both refreshing and decadent.
This recipe’s convenience shines through in its simplicity. The short preparation time and minimal kitchen equipment mean you can whip up these cheesecakes without fuss, making them ideal for unexpected guests or busy schedules.
Nutritionally, this dessert offers a balance of indulgence and natural sweetness. By utilizing fresh pineapple, you add a dose of vitamin C to your dessert enjoyment. Swapping heavier ingredients in traditional cheesecakes for lighter options can reduce caloric intake while maintaining flavor.
Socially, these mini cheesecakes are conversational pieces that add charm to social gatherings. Their individual servings make them perfect for sharing, and the elegant presentation will impress your guests.
Finally, this recipe’s cost-effectiveness means you can create an upscale dessert at a fraction of the cost of purchasing pre-made options. Ingredients are accessible from most grocery stores, ensuring easy procurement and preparation.
Historical Background and Cultural Significance
The origin of the pineapple upside-down cake dates back to the early 1900s when canned pineapple became widely available. This led to a variety of creative uses, including the now iconic dessert. Over time, as cheesecake rose in popularity, inventive bakers began combining these beloved desserts.
Culturally, the pineapple upside-down cake represented the height of home baking sophistication in America, often appearing at potlucks and community gatherings. Its vibrant presentation and lush flavors made it a perennial favorite.
This recipe has evolved significantly, with the cheesecake variation offering a refined take on the original concept. The fusion of creamy cheesecake with tropical pineapple enhances the traditional dessert, bringing it to a more modern audience.
Regional variations can be found globally, with each emphasizing local tastes. In tropical regions, fresh pineapple is a staple, while temperate areas might adapt using seasonal fruits or syrup-soaked canned versions.
Ingredient Deep Dive
Pineapple serves as the star, celebrated for its juicy, tart sweetness. Historically significant in tropical regions, pineapples symbolize hospitality and luxury. Rich in vitamin C and antioxidants, they enhance both the flavor and nutrition of this dessert. Select ripe, vibrant fruit, and store them at room temperature until they reach peak ripeness.
Cheese in cheesecakes owes its cultural origins to Ancient Greece, where it was a revered food for the Olympics participants. Modern adaptations use cream cheese for its rich texture and tang. When selecting, choose full-fat varieties for optimal texture, and store it in the refrigerator, maintaining a cold chain to prevent spoilage.
To substitute graham crackers, you can use digestive biscuits or Oreo crumbs. Store perishables like cheese in airtight containers, and substitute pineapples with apples or peaches for variations.
Common Mistakes to Avoid
Overmixing the cheesecake batter can lead to a dense texture. Mix just until combined to maintain creaminess.
Neglecting to preheat the oven can result in uneven baking. Ensure your oven reaches the correct temperature before starting.
Using cold cream cheese will lead to a lumpy batter. Allow cheese to soften at room temperature.
Failing to grease the tin adequately may cause sticking. Use non-stick spray or butter to ensure release.
Skipping cooling time might cause the cheesecake to crumple. Let them cool gradually to set perfectly.
Undercooking or overcooking can affect the taste. Use a toothpick to check doneness accurately.
Overfilling baking cups can cause overflow. Fill each cup just to the rim for even portions.
Improper ingredient measurements can disrupt texture balance. Accurately measure each item to ensure consistency.
Essential Techniques
Achieving the perfect cheesecake batter is crucial for a smooth texture. Mixing at a low speed prevents air bubbles that cause cracking. Mastering this technique involves gentle folding and watching for a homogenous mixture with no lumps.
Caramelizing pineapple right involves cooking it until golden brown without burning. The sugars in pineapple will gradually caramelize, creating a deeper flavor. Watch for deepening color and a fragrant aroma as cues for readiness.
Creating a perfect crust involves pressing the graham cracker mixture firmly. Use a flat-bottomed glass for even pressure to ensure a compact base that holds its shape. Avoid leaving the base too loose, which can crumble upon serving.
Pro Tips for Perfect Mini Pineapple Upside-Down Cheesecakes
Before beginning, make sure all ingredients are at room temperature for a seamless mixing process. This will result in a smoother batter and flawless consistency.
For a more vibrant flavor, consider adding a dash of vanilla extract to the cheesecake mixture. This complements the sweetness of the pineapple beautifully.
If fresh pineapple isn’t available, drained canned pineapples can be a handy substitute, maintaining flavor without compromising texture.
Enhance the visual appeal by finely chopping maraschino cherries and incorporating them into the top layer. This creates an attractive, colorful garnish.
Ensure your instant-read thermometer is nearby to check the internal temperature. Cheesecakes should read 150°F for ideal doneness.
To add a delightful acidic contrast, garnish with a dollop of whipped cream, offering a textural balance and visual contrast.
Variations and Adaptations
Regional variations can incorporate tropical fruit blends such as mango or papaya, offering a different aromatic complexity.
For a seasonal touch, exchange pineapple with fresh pears or apples during autumn festivity baking to align with available produce.
To cater to specific dietary needs, the recipe can be adapted by using gluten-free graham crackers without sacrificing texture.
Embrace unexpected flavor experiments like adding a pinch of cinnamon or nutmeg to introduce a warm, spicy note.
For a more substantive texture modification, mix in crushed nuts like pecans or walnuts into the crust for added crunch.
Presentation-wise, these desserts shine individually plated, atop doilies or dessert plates, drizzled with extra caramel sauce for an upscale appearance.
Serving and Presentation Guide
Master the art of effortless plating by using mini dessert stands to highlight each cheesecake. This elevates the presentation and adds a touch of sophistication to your table settings.
For garnishing, a few sprigs of mint will add a splash of color and fragrant aroma that complements the pineapple infusion.
Serve with traditional accompaniments such as tropical fruit salads or light sorbets between each cheesecake for a balanced taste palette.
Experiment with modern serving styles by featuring the mini cheesecakes alongside cacao nibs or edible flowers for contemporary appeal.
When serving, maintain them slightly chilled for optimal taste, as warmth might affect the structure.
Remember to account for portion control to avoid indulgence; one or two per person offer a satisfying and delightful dessert experience.
Wine and Beverage Pairing
Pair these mini pineapple delights with a chilled glass of Moscato, which will complement the sweetness without overpowering the dessert’s nuances.
Non-alcoholic alternatives include sparkling water with lemon slices for a crisp, refreshing contrast to the dessert’s richness.
Coffee aficionados can savor an espresso alongside, its intensity complementing the cheesecake’s luscious, smooth texture.
Ensure beverage temperatures are spot-on; chilled Moscato at around 45°F maintains its refreshing nature, pairing seamlessly with each bite.
Serve these cheesecakes with a hint of tropical flair by offering coconut milk iced coffee as an innovative beverage choice that mirrors the dessert’s flavors.
Storage and Shelf Life
Proper storage involves refrigerating the cheesecakes in an airtight container to maintain freshness and prevent moisture loss.
Keep them chilled between 35-40°F in the refrigerator; this keeps the cheesecake intact and flavors blended harmoniously.
Use glass or plastic containers with secure lids to maintain optimal conditions, avoiding unwanted flavors or odors from the fridge.
Signs of spoilage may include discoloration or off odors, indicating it’s time to discard the old batch.
Reheating is unnecessary for these miniature treats; serve them straight from the fridge to appreciate their silky texture.
Freeze any extras by wrapping individually in plastic and storing in a freezer-safe bag, extending their life up to two months.
Make Ahead Strategies
Strategize your prep timeline by layering components the day before serving, allowing the flavors to meld wonderfully.
Store the baked base separately, topping with fresh cheesecake mix before chilling, maintaining maximum freshness.
Assess and balance quality impacts, refining cooking times or temperature settings if making in advance.
Prioritize careful assembly by ensuring pineapple slices are symmetrically placed for consistent baking and visual uniformity.
Though reheating isn’t required, adding fresh whipped topping or fruit garnishes right before serving enhances presentation.
Infuse freshness by sprinkling fresh citrus zest or thinly sliced pineapples before guest arrivals, adding vibrancy to the cheesecakes.
Scaling Instructions
When halving the recipe, reduce ingredient quantities proportionally, mindful of the impact on flavor concentration and baking times.
To double, utilize larger muffin tins or multiple pans to accommodate increased batter volume, making scaling more effective.
Equipment adjustments, such as larger mixers or additional tins, enhance efficiency without physical strain from mishandling volume.
Monitor timing modifications carefully, as larger batches may require additional cook and cool periods to ensure consistent outcomes.
Scaling for storage necessitates containers that support bulk prep, focusing on air-tightness to uphold freshness and prevent moisture loss.
Nutritional Deep Dive
Dive into the macro breakdown to reveal a balanced ratio of fats, carbohydrates, and proteins in this delectable dessert.
Micronutrients, such as the vitamin C found in pineapples, contribute to immune support and antioxidant benefits.
Highlight the health benefits associated with cheesecake’s fundamental ingredient, cream cheese, including calcium and protein content.
For dietary considerations, focus on portion analysis to maintain a balance between enjoying sweet treats and nurturing well-being.
Weight management tips include savoring in moderation and choosing smaller quantities or substitute ingredients like low-fat cheese.
Promote conscious guidance around indulgence, focusing on smaller servings that deliver the same flavorful punch without excess calories.
Dietary Adaptations
For those seeking gluten-free options, utilize certified GF graham crackers or almond meal for a redefined crust element.
Dairy-free enthusiasts can select lactose-free cream cheese or coconut-based substitutes without losing the characteristic creamy quality.
Those following vegan diets will appreciate plant-based soft cheese options combined with egg replacements for binding.
For low-carb adaptations, swap traditional sweetened elements with sugar alternatives, reducing overall carbohydrate intake.
Keto adjustments involve embracing almond flour for crusts and unrefined sweetener blends to comply with diet restrictions.
Paleo followers can substitute dairy and sweetened components with coconut-based or cinnamon-dusted nut variations for compatibility.
Low-FODMAP dieters will find successes in ingredient adjustments, sparingly utilizing sweetener alternatives and compliant lactose-free dairy.
Troubleshooting Guide
Address texture issues by monitoring batter consistency, ensuring ingredients are well-integrated yet not over-mixed, which can alter density.
Balance flavors by adjusting sugar content relative to cheesecakes’ tang, experimenting with less sugar or natural alternatives.
Maintain temperature stability during baking to prevent over or under-browning, crucial for uniform results.
Overcome equipment challenges by improvising tools, like using green beans reload on constraint pans and resource limitations.
Experiment with ingredients like lactose-free or almond-based cheese should dairy shortages or substitutions arise.
Tackle timing concerns through strategic prep layouts, arranging ingredient organization ahead of the baking process.
Recipe Success Stories
Readers have shared incredible adaptations, showcasing variations incorporating delightful berry toppings for colorful enhancements.
Community feedback has consistently rated high, noting the efficiency and presentation appeal, even in professional catering settings.
Countless variation successes remind us of the versatility and adaptability of this dessert to suit personal preferences.
Photographic tips submitted by enthusiasts recommend various angles capturing the visual essence of pineapple-topped cheesecakes.
Reader suggestions highlight innovative approaches to garnishing, incorporating everything from herbs to chocolate shards.
Frequently Asked Questions
Can I use other fruits instead of pineapple?
Yes, you can experiment with fruits like peaches or mangoes, depending on the season and personal preference.
How long do these cheesecakes last in the fridge?
Properly stored in an airtight container, they will remain fresh for up to five days.
What is the best cheese for these cheesecakes?
Full-fat cream cheese is ideal for achieving the desired creamy consistency and flavor profile.
Can I freeze these mini cheesecakes?
Absolutely, they freeze well. Wrap each in plastic wrap and store in a freezer bag for up to two months.
What can I use for a dairy-free version?
Substitute cream cheese with a vegan or lactose-free alternative to cater to dairy-free diets.
Are these cheesecakes suitable for a keto diet?
With low-carb adaptations like almond flour for crusts, they can fit within a keto framework.
What adjustments are necessary for high altitude?
You may need to decrease the baking time slightly and monitor closely to avoid overcooking.
How do I prevent the cheesecake from cracking?
Mix ingredients gently and avoid overbaking to maintain a crack-free, smooth surface.
What is the best way to serve these cheesecakes?
Serve them chilled, garnished with fresh fruit or whipped cream for added flair.
Should I grease the muffin tin?
Yes, using a non-stick cooking spray ensures easy release and clean presentation.
Additional Resources
Explore related recipes that embrace tropical flavors, complementing the Mini Pineapple Upside-Down Cheesecakes.
Technique guides available on our site cover the nuances of cheesecake baking, aiding in mastering your own creations.
Ingredient information provides insights into alternative options for varying dietary needs and personal preferences.
Our curated recommendations highlight equipment innovations, enhancing efficiency and effectiveness in your kitchen endeavors.
Seasonal variations emphasize the versatility of this cheesecake, aligning flavor profiles with available produce year-round.
Join the Conversation
Engage with fellow bakers on social media by sharing your culinary achievements, capturing the essence of these mini delights.
Share photography tips by experimenting with lighting and backgrounds to bring out the vibrant colors and textures of your creation.
Submit recipe reviews to offer insight and inspire others, contributing your unique adaptations and success strategies.
Become part of our community, joining discussions about variations that reflect local flavors or uncover innovative dietary adaptations.
Explore limitless possibilities in recipe variations, each inspired by personal interpretations and welcoming our readers’ creativity.
The Recipe
Mini Pineapple Upside-Down Cheesecakes
Serves: 12
Prep Time: 15 mins
Cook Time: 25 mins
Total Time: 40 mins
Kitchen Equipment Needed
Muffin tin
Mixing bowls
Spatula
Hand mixer
Baking sheet
Ingredients
1 1/2 cups graham cracker crumbs
1/4 cup melted butter
1/4 cup brown sugar
1 can (20 oz) pineapple slices, drained and patted dry
12 maraschino cherries
2 (8 oz) packages cream cheese, softened
1/2 cup sugar
1 tsp vanilla extract
2 large eggs
Directions
Preheat the oven to 325°F (165°C) and grease a 12-cup muffin tin generously.
In a bowl, combine the graham cracker crumbs and melted butter. Press evenly into the bottom of each muffin cup.
Arrange a pineapple slice at the bottom of each cup, placing a cherry in the center of each slice.
In another bowl, beat the cream cheese until smooth. Gradually add sugar and vanilla, mixing well.
Add eggs one at a time, beating on low speed just until incorporated.
Spoon the cheesecake mixture evenly over the pineapple layers in the muffin cups.
Bake for 23-25 minutes or until the centers are set. Cool completely before removing from the tin.
Refrigerate for at least two hours before serving for best results.
Recipe Notes
Ensure cream cheese is at room temperature for a smooth batter.
Chill before serving to help the flavors meld.
Experiment with additional toppings like whipped cream or nuts.
Indulge Your Sweet Tooth with This Peanut Butter Cup Cake Roll
Peanut Butter Cup Cake Roll: A Delectable Delight
⚖️
Difficulty
Moderate
⏲️
Prep Time
30 mins
🕒
Cook Time
15 mins
⏱️
Total Time
45 mins
🍽️
Servings
8
If you’re a fan of peanut butter and chocolate, then this Peanut Butter Cup Cake Roll is destined to become your new favorite dessert. This cake roll combines the rich, velvety texture of a chocolate sponge cake with a creamy peanut butter filling. Each slice is a symphony of flavors and textures, delivering a perfect balance of sweet and savory. Whether you’re preparing it for a birthday celebration or a casual get-together, this cake is as easy to make as it is delicious.
The art of the cake roll may seem daunting, but with our detailed instructions, you’ll be a pro in no time. Imagine cutting through a spiraled slice, unveiling the luscious layers of peanut butter cream enveloped by a moist and airy cake. Not only is this Peanut Butter Cup Cake Roll a feast for the palate, but it also pleases the eyes with its elegant presentation, making it an ideal choice for impressing your guests.
Quick Recipe Highlights
Flavor Profile: The combination of bold chocolate and creamy peanut butter provides a delightful and comforting taste experience.
Texture: Each bite is marked by the fluffiness of the sponge cake contrasted with the smoothness of the peanut butter filling.
Aroma: The cake exudes a warming scent of cocoa mixed with the nutty fragrance of peanut butter, irresistible to anyone nearby.
Visual Appeal: A beautiful spiral of golden brown and chocolate hues, perfect for an Instagram-worthy dessert table.
Skill Level Needed: Suitable for bakers with intermediate skills but accessible for ambitious beginners following step-by-step guidance.
Special Equipment: A jelly roll pan and parchment paper are essential for achieving the perfect roll without cracks.
Recipe Overview
Difficulty Level: Mastering the art of rolling the cake does take a bit of practice, but patience and care will yield fantastic results.
Category: Fits perfectly within the realm of celebratory desserts and casual indulgence.
Cuisine: This recipe pulls from classic American dessert traditions, known for its love of rich, comforting flavors.
Cost: A moderate cost recipe as it utilizes pantry staples with the main splurge being peanut butter cups.
Season: Best enjoyed year-round, this cake roll shines as a comforting winter dessert or a summer barbecue finale.
Occasion: Whether it’s a birthday party, holiday gathering, or simply a weekend treat, this recipe adds joy to any occasion.
Why You’ll Love This Recipe
The exquisite taste of this Peanut Butter Cup Cake Roll is sure to capture your heart. The contrast between decadent chocolate and savory peanut butter is a flavor combination celebrated for its timeless allure. Every mouthful delivers a rich and creamy experience that creates an unforgettable taste sensation—it’s everything a peanut butter lover dreams of.
Convenience is a hallmark of this recipe. Despite its elegant presentation, the preparation is surprisingly straightforward. With our easy-to-follow steps, you can create a professional-looking dessert in the comfort of your own kitchen. Plus, the ingredients are simple and readily available at any local grocery store.
This delightful dessert is not only indulgent but also offers comforting satisfaction. The nutritional benefits of peanuts include a good source of protein and healthy fats, making this dessert a more fulfilling choice. Of course, moderation is key, but enjoying a slice of this cake can be part of a balanced lifestyle.
Sharing the Peanut Butter Cup Cake Roll at gatherings can bring a smile to the faces of family and friends. Its stunning presentation makes it a table centerpiece, and it’s an ideal conversation starter. This cake is bound to be the highlight of any party, winning over both chocolate aficionados and casual sweet-tooths alike.
Cost-effectiveness and accessibility make this recipe a must-try for any dessert enthusiast. While the flavors are complex, the method and ingredients aren’t burdensome on your wallet. Even with a modest budget, you can create a dessert that tastes and looks like it came from a high-end bakery.
Historical Background and Cultural Significance
The concept of the cake roll, or Swiss roll, originated in Central Europe, making its way to America in the 19th century. The fusion of this technique with classic American flavors like peanut butter and chocolate is a testament to culinary innovation and cultural blending.
Peanut butter has been a staple in American kitchens since the early 20th century, symbolizing comfort and simplicity. Its integration into desserts like this cake roll highlights its versatility and enduring appeal in America’s culinary landscape.
Over the decades, the peanut butter cup cake roll has evolved to include various riffs and adjustments, yet it never strays far from its roots. However, regional twists and personal touches continue to keep this classic exciting and relevant to modern palates.
In different parts of the United States, this recipe has seen unique adaptations, often based on locally-sourced ingredients and personal preferences. Each variation adds an exciting spin to the original, making every cake roll a personal and satisfying creation.
Ingredient Deep Dive
Peanut butter, the star ingredient, is not just a taste sensation but a nutritional powerhouse. Its rich history dates back to ancient civilizations where peanuts were cultivated for their nutrient-rich seeds. Today, it’s a beloved staple in American households, prized for its energy-boosting properties.
Nutritionally, peanut butter is a source of protein and healthy fats, making it a satisfying addition to any dessert. Selecting a smooth, natural peanut butter provides the best consistency for the cake roll’s filling, as it offers creaminess without added sugar or preservatives.
Storage is key to maintaining the freshness and quality of peanut butter. It should be kept in a cool, dry place and always sealed tightly. If separation occurs, simply stirring will restore its creamy texture. If substituting, almond or cashew butter can provide a different but equally delicious flavor profile.
Chocolate, the other protagonist of this recipe, has been cherished since ancient Mesoamerican cultures, celebrated for its luxurious taste and mood-lifting properties. It’s no wonder this ingredient is a universal symbol of indulgence and comfort.
When choosing chocolate for the cake roll, opt for high-quality cocoa powder and semi-sweet chocolate to balance the sweetness of the peanut butter. Both should be stored in a cool, dry place, away from direct sunlight. If needed, you can swap semi-sweet for dark chocolate to enhance the cake’s depth of flavor.
Common Mistakes to Avoid
Overbaking the cake can lead to cracks when rolling. Ensure to check for doneness with a toothpick while still keeping it slightly moist.
Rolling the cake while too hot or too cold can break it. Wait until it is warm to the touch before carefully rolling with parchment paper.
Skipping the parchment paper can result in a cake that sticks and breaks. Always line your pan for easy removal and rolling.
Using crunchy peanut butter can disrupt the creamy texure. Stick to smooth peanut butter for a consistent, velvety filling.
Filling the roll too late may result in a dry texture. Spread the filling when the cake is at optimal temperature for perfect moisture absorption.
Inaccurately measuring flour leads to a dense cake. Fluff up flour before scooping to ensure accurate measurements.
Substituting ingredients without knowledge may global balance. If alternatives are necessary, evaluate their impact on both texture and flavor.
Ignoring cooling before serving can ruin presentation. Let your cake roll chill thoroughly for clean and neat slicing.
Essential Techniques
Mastering the roll is crucial for success. This technique allows you to create that signature spiral, a hallmark of cake rolls. Be prepared to practice with patience to get it just right. Roll the warm cake gently with parchment paper; this initial roll prevents cracking and builds muscle memory for the final presentation.
Proper spreading technique ensures even distribution of the peanut butter filling. This is important to achieve uniform texture and balanced flavor density throughout the cake. Use an offset spatula for a smooth, seamless layer that won’t mound or break.
When baking the sponge cake, timing and temperature are key. Avoid overbaking by monitoring closely. The cake should spring back when lightly touched and not pull from the sides of the pan excessively. These visual cues guide you to the perfect bake.
Ensuring even cooling before spreading the filling prevents unwanted melting and clumping. The right temperature provides a supportive base for the filling, maintaining its structure. Skipping this step can result in a runny or inconsistent texture.
Pro Tips for Perfect Peanut Butter Cup Cake Roll
For a non-stick baking process, line your jelly roll pan with parchment paper, ensuring overhangs for easier removal. This can prevent frustration with sticking and ripping.
Experiment with chocolate types for variation. Try a richer dark chocolate for a bolder flavor that stands out against the creamy peanut butter.
Avoid refrigerating too long before serving to maintain moistness. A quick refrigeration should suffice to set the filling without drying the sponge.
For an elegant touch, sift a light dusting of cocoa powder over the finished roll before presentation. This adds a touch of sophistication and aroma.
Allow the cake roll to rest before slicing, as this helps the flavors meld and the texture settle, minimizing messiness and ensuring clean, tight rolls.
Firmly wrap leftovers in plastic wrap to preserve moistness. This is important for retaining freshness over a couple of days without losing texture integrity.
Variations and Adaptations
Regional variations include adding a jam-inspired layer for a delightful twist on the classic flavor. Raspberry or strawberry blends well with the peanut butter for a unique taste experience.
To adapt for different seasons, incorporate ingredients that reflect the time of year. In winter, a dash of cinnamon adds warmth, while a hint of citrus zest brightens summer presentations.
Dietary modifications are accessible with various nut butters, gluten-free flour blends, and dairy-free creams, tailoring the dessert to various preferences and dietary needs.
Flavor variations can be achieved through adding a touch of vanilla extract or a splash of espresso powder to enhance chocolate depth without clashing with dominant flavors.
To alter texture, include crushed peanuts within the filling for a bit of crunch. This not only adds contrast but also complements the smoothness of the rest.
For a unique presentation, consider slicing the prepared roll into smaller rounds and arranging them in a layered pattern to emphasize the spiral effect, serving as perfect individual treats.
Serving and Presentation Guide
To perfect your plating, aim for slices that are clean and uniform. Utilize a warm serrated knife to cut slices without dragging, maintaining a pristine appearance.
Garnish ideas include sprinkling chopped peanut butter cups or drizzling a glossy chocolate sauce across the top, which both enhances flavor and visual intrigue.
Traditional accompaniments such as a cup of strong coffee or a scoop of vanilla bean ice cream can enhance the richness and provide a wonderful balance to the dish.
Modern serving suggestions might involve using individualized plated desserts, perfect for a formal dinner setting, where presentation takes center stage.
Consider the cake’s temperature for optimal enjoyment. Allowing it to reach room temperature before serving maximizes moisture and flavor release.
Portion control is important to fully appreciate the dessert’s richness without overwhelming the palate. Aim for modest slices to let each bite shine.
Wine and Beverage Pairing
A rich Port wine complements the chocolate and peanut butter, offering a luxurious mouthfeel that deepens the dessert experience with each sip.
For non-alcoholic choices, a spiced chai tea can augment the flavors, infusing an undertone of aromatic spices that parallels the complexity of the cake roll.
Coffee, with its naturally robust flavor, pairs seamlessly with this dessert—just be sure to choose a blend with nutty, chocolatey notes to match the cake’s profiles.
Consider serving your wine or beverage slightly chilled to contrast with the dessert’s richness, enhancing the full flavor spectrum during the tasting experience.
Presentation can be elevated by using crystal stemware for wine or sophisticated mugs for coffee, adding an element of class to the dessert course.
Storage and Shelf Life
Secure your cake roll by wrapping it in plastic wrap or placing it in an airtight container to keep it fresh for up to three days at a cool room temperature.
Avoid exposing the cake to temperature fluctuations as this could affect both texture and taste. A constant, cool environment is ideal for storage.
Choose containers that don’t compress the cake, preserving its shape and integrity. Specialty cake storage containers or flat-bottomed ones are recommended.
Watch for signs of spoilage, such as changes in texture, unusual moisture, or off-putting smells. These indicate that the cake is past its prime for consumption.
Reheating should be gentle, if needed. Only a slight warming, avoiding drastic temperature changes, maintains its freshness and structural composition.
For longer storage, consider slicing and individually wrapping pieces for freezing. This method promotes easier thawing for future individual servings.
Make Ahead Strategies
Start with preparing the sponge batter in advance, storing it covered in the refrigerator for a day to streamline final assembly.
To maintain freshness between steps, store rolled sponge in parchment within the fridge, preventing unnecessary drying before the final roll with filling.
Assess the impact of storage on quality by opting for fresh ingredients in each separate element, assembling when all components are ready to guarantee fullness in flavor.
Master proper filling assembly by spreading evenly yet quickly to avoid hardening or thickening of the filling as it sits.
Reheat based on need by gently warming in a low-temperature oven rather than a microwave, which may cause uneven heating and texture degradation.
Integrate fresh garnishes or dusting of confectioner’s sugar just before serving to reignite visual appeal without impacting flavor or texture negatively.
Scaling Instructions
To halve the recipe, adjust ingredient measurements accordingly and use a smaller baking pan to maintain the sponge’s thickness proportional with adjusted quantities.
Doubling or tripling involves careful scaling of all components, especially the filling, to ensure maintained flavor throughout the increased amount of sponge.
Equipment like larger baking pans may be required to accommodate more batter, along with expanded workspace for rolling and assembly without crowding efforts.
Timing modifications should include prolonged baking or cooling times proportionate to the increased ingredient volumes to ensure each component is cooked optimally.
Consider larger or additional storage solutions if creating more for future consumption, maintaining freshness if not served immediately.
Nutritional Deep Dive
Macro breakdown reveals balanced levels of carbohydrates and proteins with moderate fat content, offering a rewarding treat within mindful consumption.
Micronutrients included are particularly noted in the filling’s peanut butter, providing vitamin E and magnesium, thereby contributing to its nutritional appeal.
Health benefits may be observed in the satiating qualities derived from the protein and fiber content, encouraging reduced follow-up snacking.
For those observing dietary guidelines, portion sizes and ingredient sources are noted, such as opting postively where possible for organic or low-sugar variations.
Understanding the recipe’s structure assists in making calculated choices regarding indulgence versus nutritional impact, empowering more educated dessert decisions.
Maintain weight management through enjoying this dessert within a balanced meal plan, acknowledging the potential richness of ingredients and conscious serving size.
Dietary Adaptations
For a gluten-free transformation, use gluten-free baking flour blends that offer similar texture without sacrificing cake structure or mouthfeel.
Switch a dairy-free component such as coconut cream in the filling for instances where lactose poses dietary concerns, retaining similar consistency and richness.
Explore vegan alternatives through egg replacements and non-dairy spreads, adjusting processes slightly to assure consistency without animal products.
Adapt low-carb goals by minimizing sugar content and opting for natural sweeteners along with almond flour substitution for lower glycemic impact.
Keto adjustments can follow similar practices to low-carb, choosing quality fats and minimizing carbohydrate-rich elements where possible.
Paleo-inspired variants may utilize almond flour bases, natural sweeteners, and premium nut spreads, ensuring respect for the dietary framework priorities.
Strong focus on low-FODMAP versions encourages cautious ingredient scrutiny while still permitting pleasurable dessert experiences through strategic alterations.
For other specific dietary concerns, consider less common ingredient inclusions or omissions with a mindful approach to maintain enjoyment without limiting core appeal.
Troubleshooting Guide
Understand texture issues by evaluating baking time and moisture levels; a balance ensures the cake either stays moist or dries out inadvertently.
Flavor balance can be fine-tuned by adjusting filling ingredients, leaning on personal sweetness or richness preferences within the familiar recipe framework.
Temperature problems addressed prompt timely assembly and correct baking location considerations to avoid cooking inconsistencies.
Overcome equipment challenges by fortifying the importance of non-stick supplies and properly-sized pans, offering equal distribution and fewer baking mishaps.
Ingredient substitutions recognized remove complexity, ensuring alternatives focus on maintaining the original flavor, texture, or compound effect without altering intention.
Timing concerns highlight the role of proper cooling intervals, underscoring their impact on the final roll success in both structural and filling applications.
Recipe Success Stories
Community feedback frequently applauds the winning combination of flavors, crediting easy adaptability for regional taste twists established within personal kitchens.
Variation successes stem from shared reader evaluations, showcasing unique uses like incorporating seasonal fruit syrups or personalized pastry cream tweaks influenced by cultural instincts.
Adaptation stories thrive as more inventive substitutions appear, encouraging others to explore boundaries with filling alterations or crust developments tailored to favored palates.
Reader suggestions frequently lead to enhancement opportunities and improvisation within the recipe itself, elevating universal recognition for flexibility accommodating diverse groups.
Photographic tips situate naturally amongst success stories, presenting insight into capturing each detail that rolls beautifully and deliciously in visual keepsakes shared widely online.
Frequently Asked Questions
1. Can I make this peanut butter cup cake roll gluten-free?
Yes, substitute the all-purpose flour with a gluten-free blend to maintain the same texture while keeping it gluten-free.
2. What’s the best way to prevent the cake from cracking when I roll it?
Rolling the cake in parchment paper while warm ensures flexibility and aids in maintaining a smooth roll without cracking.
3. How early can I prepare this cake before an event?
The cake can be made up to three days in advance when wrapped properly, preserving freshness for the occasion.
4. Can I use crunchy peanut butter instead of smooth?
While possible, smooth peanut butter is recommended to keep the filling texture creamy for best results.
5. How should leftover cake be stored?
Wrap it tightly in plastic wrap or store in an airtight container to retain moisture and texture at room temperature or refrigerated.
6. Is it possible to use white chocolate instead?
Yes, white chocolate offers a sweeter, vanilla-forward variant that shifts the flavor profile while retaining pairing compatibility with peanut butter.
7. How thick should I roll the cake?
Aim for thin width, rolling tightly to ensure multiple thickness spirals capture evenly distributed fillings within each cross-sectional slice.
8. What other filling can I use besides peanut butter?
Cream cheese frosting or fruit spreads offer creative alternatives adequately pairing with the original chocolate sponge concept.
9. Should I use salted or unsalted butter?
Unsalted butter is ideal for those controlling salt levels, with optional salt additions considered to taste within recipe components.
10. Can I freeze slices for later use?
Absolutely! Freeze individual slices with parchment separators for easy, single-serve thawing while maintaining quality control over time.
Additional Resources
Examine related recipes such as chocolate logs or roulades, gaining insight into mastering rolling techniques for dessert versatility.
Access technique guides focusing on mastering essential tasks like cake rolling and chocolate ganache for professional-grade finishes.
Explore ingredient information sessions for core recipe components like premium cocoa or alternative nut megabutter innovation, connecting culinary theory with practice.
Discover equipment recommendations simplifying kitchen experiences via small investments that garner significant outcome improvement.
Uncover seasonal variations or adaptations within the larger dessert spectrum, illustrating fusion inspirations drawn from globally diverse traditions.
Join the Conversation
Share your creations on social media using hashtags or tagging pages for collective appreciation and peer interaction, sparking fresh idea exchanges.
Gain valuable photography tips to highlight the dessert’s visual allure and engage viewers with techniques designed to capture and draw culinary admirers.
Engage in recipe reviews to add depth and insight, offering practical considerations or confirming excellence in the recipe’s execution.
Delve into community engagement, seeking exchanges that complement your cake project’s enhancements or share pleasure within kitchen creativity portfolios.
Experience recipe variations highlighted by exploring uncovered dialogues around budding trends or long-standing acclaim, bridging culinary community connections in delightful support.
The Recipe
Peanut Butter Cup Cake Roll
Serves: 8
Prep Time: 30 mins
Cook Time: 15 mins
Total Time: 45 mins
Kitchen Equipment Needed
Jelly roll pan
Parchment paper
Offset spatula
Mixing bowls
Electric mixer
Serrated knife
Ingredients
3/4 cup all-purpose flour
1/4 cup cocoa powder
1 tsp baking soda
1/4 tsp salt
4 large eggs
1 cup granulated sugar
1/2 cup smooth peanut butter
1/2 cup whipping cream
1 cup chopped mini peanut butter cups
Directions
Preheat the oven to 350°F (175°C). Line a jelly roll pan with parchment paper.
In a bowl, sift together flour, cocoa powder, baking soda, and salt. Set aside.
In another bowl, beat eggs and sugar together with an electric mixer until thick and pale.
Gradually fold in dry ingredients until just combined.
Spread the batter evenly into the prepared pan and bake for 12-15 minutes.
Upon immediate removal, transfer onto a clean, lightly sugared cloth and gently roll the cake. Allow cooling.
To make the filling, whip peanut butter and cream until fluffy. Incorporate chopped peanut butter cups.
Unroll the cooled cake, spread with filling, and reroll. Wrap in parchment and refrigerate for at least an hour.
Recipe Notes
Ensure even cooling before spreading the filling to avoid runniness.
Maintain tight rolling for defined, visually distinct spiral effects.
For a more intense flavor, incorporate a dash of espresso powder into the cake batter.
Irresistible Cherry Lemon Cheesecake Recipe: A Zesty Dessert Delight
Cherry Lemon Cheesecake: A Decadent Delight
⚖️
Difficulty
Moderate
⏲️
Prep Time
30 mins
🕒
Cook Time
60 mins
⏱️
Total Time
90 mins
🍽️
Servings
12
Indulge in the smooth, creamy luxury of this Cherry Lemon Cheesecake, an exquisite dessert that blends the vibrant zest of lemon with the rich succulence of cherries. Perfect for any occasion, this cheesecake is a refreshing twist that will leave your taste buds tingling. Whether it’s a family gathering or a romantic dinner, the Cherry Lemon Cheesecake shines with its unique flavor profile, making it a must-try for dessert enthusiasts. The harmonious blend of sweet cherries and tart lemon creates an unforgettable culinary experience.
Quick Recipe Highlights
Flavor Profile: The cheesecake beautifully balances the tartness of lemon with the sweetness of cherries, offering a vibrant yet creamy taste.
Texture: A flawlessly smooth filling over a crunchy biscuit crust, with juicy cherries adding a delightful contrast.
Aroma: Fresh citrus notes mingle with sweet hints of cherries, creating a fragrant dessert bouquet.
Visual Appeal: The cheesecake’s golden crust and creamy top, adorned with glossy cherries, create an eye-catching centerpiece.
Skill Level Needed: Requires moderate skill in baking and working with gelatin for the perfect set texture.
Special Equipment: A springform pan and electric mixer ensure optimal results.
Recipe Overview
Difficulty Level: Moderate due to the multi-step preparation and precision required for baking and setting a cheesecake.
Category: A rich dessert perfect for dinner parties or special occasions.
Cuisine: A modern twist on classic American cheesecake with hints of Mediterranean citrus influence.
Cost: Moderate, considering fresh fruit and quality dairy products are essential.
Season: Best enjoyed in late spring and summer when cherries are at their peak.
Occasion: Ideal for birthdays, holidays, or any event where you want to impress guests with a luxurious dessert.
Why You’ll Love This Recipe
Experience the vibrant taste and texture of our Cherry Lemon Cheesecake, which offers a seamless blend of tangy lemon and sweet cherries. The cheesecake’s lush creaminess is complemented by a crunchy biscuit crust, creating a delicious harmony with every bite. It’s a sophisticated yet easy-to-prepare dessert that turns any occasion into a special event with its delectable balance of flavors.
The Cherry Lemon Cheesecake is not only delicious but also convenient to make. With a simple yet impressive presentation, it impresses without the need for complicated steps. The ingredients are readily available, and the recipe provides the opportunity to refresh your dessert repertoire with minimal effort.
Alongside its irresistible taste, the cheesecake delivers a range of nutritional benefits. The cherries are rich in antioxidants, while the creamy lemon offers vitamin C. This recipe ensures indulgence with healthier elements, making it a guilt-free dessert choice.
Socially, the cheesecake is a conversation starter. Its unique blend of cherry and lemon flavors sets it apart, allowing it to shine at gatherings and celebrations. Your guests will appreciate the unique flavor profile while you create lasting memories.
Economically, the Cherry Lemon Cheesecake is cost-effective. With numerous servings and common ingredients, it proves an affordable luxury. Instead of purchasing an expensive dessert from a bakery, crafting your own masterpiece saves money while delivering gourmet quality.
Historical Background and Cultural Significance
Cheesecakes have been an indulgent treat for centuries, with roots tracing back to ancient Greece. The introduction of cream cheese in America revolutionized the dish, adding the richness we associate with it today. This Cherry Lemon Cheesecake is a modern interpretation, integrating the historical reverence for cheesecake with a fresh twist.
In many cultures, cheesecake is more than a dessert; it’s a symbol of celebration and luxury. Our version, with its refreshing citrus and cherry notes, respects the dessert’s cultural significance while offering a contemporary take that honors tradition.
Over time, cheesecake recipes have evolved to reflect available ingredients and culinary trends. The Cherry Lemon Cheesecake highlights modern palates’ preference for bold, natural flavors, showcasing the adaptability and enduring appeal of this classic confection.
Different regions have put their spin on the cheesecake, influencing the creation of our recipe. The tangy lemon and cherry toppings showcase European and American influences, bringing together a dessert beloved worldwide.
Ingredient Deep Dive
Cream cheese is the heart of any good cheesecake, offering a rich, creamy texture. Its development in the late 19th century revolutionized desserts, providing the silky base we enjoy today in cheesecakes across cultures. It’s essential to choose full-fat cream cheese for the best consistency, ensuring a luxurious mouthfeel.
Lemons, integral to the cheesecake’s refreshing taste, bring both a bright flavor and a boost of vitamin C. When selecting, look for lemons with firm skin and a vibrant yellow hue, indicating juiciness. Proper storage keeps them fresh; refrigerated in a crisper drawer or a paper bag.
Cherries infuse the cheesecake with natural sweetness and antioxidants. Fresh cherries are ideal, so choose vibrant, plump fruit for the best flavor. If fresh ones aren’t available, frozen cherries can be a reliable substitute, retaining most of their juicy essence during baking.
Common Mistakes to Avoid
Overmixing the batter can incorporate too much air, leading to cracks on the surface as it bakes. Mix just until combined for a smooth top.
Skipping the water bath when baking often results in uneven cooking, affecting texture. The steam creates a gentle, even heat, crucial for perfect results.
Using low-fat cream cheese compromises the cheesecake’s creamy texture, as fat is essential to achieving the desired consistency.
Not allowing enough chilling time will leave the cheesecake unset and difficult to slice, undermining presentation and texture.
Baking at too high a temperature can cause unsightly browning and cracks. Always follow recommended temperature guidelines carefully.
Incorrect crust-to-filling ratio may result in a soggy base. Ensure your crust is balanced in thickness with the creamy filling for optimal texture.
Using all lemon zest and no juice can make the flavor too bitter. A blend of juice and zest provides a balanced citrus note.
Rushing the cooling process might lead to structural issues. Gradual cooling in the oven, then at room temperature, helps achieve a set, stable cheesecake.
Essential Techniques
Gradually incorporating eggs into the cream cheese mixture ensures a silky texture. This technique prevents the batter from breaking, which can lead to a grainy filling. It’s essential to add eggs one at a time on low speed, fully blending each before adding the next.
Baking with a water bath regulates temperature and stops cracks from forming. Wrapping the springform pan with foil keeps water out and ensures the cheesecake cooks evenly. Always monitor the water level, adding more if necessary during baking.
Chilling time is crucial for setting the cheesecake. It should rest for at least four hours or overnight for the best results. Proper setting ensures easy slicing and a perfect plate presentation, a testament to the baker’s skill.
Pro Tips for Perfect Cherry Lemon Cheesecake
Allowing all ingredients to reach room temperature before use helps them blend smoothly, reducing the risk of a lumpy batter. Start by setting out your cream cheese, eggs, and even lemons to reach optimal mixing conditions.
For an extra creamy filling, prevent overbaking by removing the cheesecake when the center jiggles slightly. Residual heat will continue cooking, ensuring perfect doneness without cracks.
Ensure your biscuit crust is well-packed. Using a flat-bottomed glass or smooth bottle helps achieve an even, compact layer that provides a sturdy base and great texture contrast to the creamy filling.
The key to a stunning glaze is to simmer cherry juice with some cornstarch until thickened, then cool slightly before pouring over the set cheesecake. This prevents the topping from becoming runny and enhances the glossy, professional finish.
Introducing a hint of vanilla into the cream cheese batter can elevate flavors, complementing the lemon and emphasizing the natural sweetness of the cherries.
Variations and Adaptations
Experiment by substituting raspberries or blackberries for cherries, adjusting sugar to balance tartness. The lemon base’s flexibility pairs well with various seasonal fruits, letting you enjoy the cheesecake year-round.
For a winter twist, add a hint of ginger or cinnamon to the crust mix. These warm spices complement the lemon’s brightness, creating a cozy aroma perfect for holiday gatherings.
Make it vegan by swapping cream cheese with a plant-based alternative and using a cashew or almond milk base. Ensure gelatin substitutes like agar are correctly incorporated for a smooth, set filling.
Add white chocolate shavings atop the cheesecake for a decadent touch. This variation enhances sweetness and adds a glamorous, festive garnish perfect for celebrations.
Alter the classic presentation by turning it into mini cheesecakes using muffin trays. The individual servings are perfect for parties and ensure equal portion control.
Serving and Presentation Guide
For picture-perfect presentation, serve each slice with a glossy cherry on top and a fresh mint leaf for contrast. The vibrant colors of the cheesecake are complemented by the natural hues of the garnish.
Slices are best served chilled with a warm dessert fork for easy cutting through the dense, creamy layer. A chilled dessert plate accentuates the refreshing quality of the cheesecake.
Pair with a dollop of lightly whipped cream dusted with lemon zest. The extra creaminess complements the cheesecake’s tartness, adding depth and balance to each serving.
Modernize the presentation by serving on elegant slate boards for a rustic touch. Edge plates with thin lemon and cherry slices for extra flair in plating.
Wine and Beverage Pairing
A chilled glass of Moscato or a light Riesling complements the cheesecake’s sweetness, while the hints of floral notes match the cherry sweetness.
Non-drinkers or juice lovers can enjoy the cheesecake with a blend of cherry or cranberry juice with a splash of soda, offering a refreshing non-alcoholic alternative.
Lemon verbena or chamomile tea provides a gentle herbal backdrop, enhancing the dessert’s delicate lemon flavor without overpowering it.
Serve beverages slightly colder than room temperature to counterbalance the cheesecake’s creamy richness, creating an overall harmonized dessert experience.
Storage and Shelf Life
Refrigerate the cheesecake covered with plastic wrap to prevent moisture loss and flavor absorption from other foods. A properly stored cheesecake can last up to five days in the fridge.
If freezing is desired, wrap the cheesecake tightly in aluminum foil or plastic wrap, then a freezer bag to prevent freezer burn. For the best quality, consume within two months.
Inspect for signs of spoilage, such as off smells, before consuming. Proper handling ensures it remains a delicious treat for days to come.
For reheating, let frozen slices thaw in the fridge overnight. Avoid room temperature defrosting for food safety and maintaining texture.
Make Ahead Strategies
Plan your prep by completing the crust and filling stages the day before serving. Store them separately if you prefer added toppings to be as fresh as possible.
Before garnishing with cherries, ensure the cheesecake has set entirely overnight for a seamless top layer. This prep timeline boosts flavor, ensuring a well-infused, balanced taste by the time it’s served.
Consider preparing extra batches of the crust in advance and freezing them to streamline future cheesecake endeavors, minimizing prep and mess.
Scaling Instructions
To halve the recipe, divide all ingredients by two, maintaining accuracy for flavors and textures, crucial for achieving the same delicious results.
Doubling the recipe requires ensuring ample oven and refrigerator space to accommodate larger equipment or multiple pans.
Changes in ingredients may alter cooking times slightly, so keep an eye on visual cues of doneness like the cheesecake’s jiggle and cooling process, crucial for scaling success.
Heavy-duty mixers and larger bowls are recommended when scaling up to prevent overcrowding and ensure even blending.
Nutritional Deep Dive
The Cherry Lemon Cheesecake is a balanced indulgence, offering calories from cream cheese and sugar. Each slice delivers a dose of calcium and quick energy carbohydrates.
Cherries add fiber and antioxidants, while lemons offer vitamin C, contributing to overall health benefits. The crust’s use of whole-grain crackers can further increase fiber if chosen wisely.
With sensible portioning, this dessert fits within varied dietary goals. Mindful consumption supports weight management while indulging in occasional treats.
Control sugar and fat by choosing moderation or ingredient swaps for reduced calorie content without losing essential flavors.
Dietary Adaptations
Gluten-free enthusiasts can replace the traditional crust with almond flour or gluten-free biscuits, ensuring an all-inclusive dessert option.
For a dairy-free approach, use plant-based creams and dairy replacements for cream cheese, offering a cheesecake that meets these dietary needs.
To convert to a vegan dessert, employ nuts and soy-based alternatives for a creamy result, adapting solid ingredients like eggs with arrowroot powder as a binding agent.
Softened tight carbohydrate intakes using almond flour crusts and alternate sweeteners like stevia for lower carb versions.
Troubleshooting Guide
If the texture is too grainy, ensure cream cheese is at room temperature and blended until smooth but not overmixed. Correct technique results in the desired luscious quality.
A flavor imbalance can often mean too much lemon or not enough sugar. Taste-test filling before baking, adjusting according to preference for the perfect harmony.
Oven hot spots may require repositioning the cheesecake during baking to avoid over-browning and surface cracking, ensuring an even cook and desirable visual results.
Avoid excessive ingredient substitutions without checking compatibility; some swaps affect binding, requiring adjustments to methods or measurements for successful adaptation.
If timing is an issue, adjust preparation stages to suit your schedule without sacrificing cooling and setting stages, crucial to achieving the signature cheesecake texture.
Recipe Success Stories
Community feedback praises the Cherry Lemon Cheesecake for its striking flavor combination and versatile serving suggestions, often featured in personal and professional celebratory events.
Readers enjoy adapting this recipe with local fruits, sharing stunning creations that showcase seasonal bounty, adding to the recipe’s versatility.
Variation successes include inclusion of herbs like mint or basil in garnishing, introducing aromatic contrasts that broaden the flavor profile while maintaining classic cheesecake essence.
Photography tips from contributors include using fresh fruit arrangements for contrast and brightness, capturing the dessert’s appeal in even casual snapshots.
Frequently Asked Questions
Can I substitute the cherries with another fruit? Yes, most berries and stone fruits work beautifully, just balance sugar levels to maintain the recipe’s sweet-tart flavor profile.
How do I prevent my cheesecake from cracking? Use a water bath, don’t overmix the batter, and avoid opening the oven door during baking to maintain temperature consistency.
Is it possible to freeze the cheesecake? Absolutely, wrap it well and consume it within two months for the best taste and texture.
What if I don’t have a springform pan? Use a deep cake pan lined with parchment for easier removal. Be careful when transferring out of the dish.
Can this recipe be made sugar-free? Substitute sugar with non-caloric sweeteners like erythritol, adjusting to taste as these sweeteners have varying sweetness levels.
What’s the secret to a perfect cherry topping? Simmer cherries in juice with a bit of sugar and cornstarch until thickened smoothly, then cool slightly for a glossy finish.
Is there a no-bake version of this cheesecake? Modify the filling with increased gelatin and no-bake crust adjustments, then chill until set for a simpler preparation.
How can I make it look professional? Top with a mirror glazing technique or fruit arrangements to elevate presentation; chill thoroughly for the cleanest cuts.
Can I use lemon essence instead of fresh lemon? While essence can work in a pinch, the fresh zest and juice are vital for authentic citrus flavor and aroma.
What’s the best way to incorporate gelatin? Bloom in a cool liquid first, then dissolve fully in warmth; mix seamlessly with the filling for a smooth, set cheesecake.
How long should I chill the cake before serving? Aim for a minimum of four hours, overnight if possible, to ensure proper setting and flavor melding.
Why is my crust soggy? A thick, undercooked crust can lead to this; ensure an even bake and cooling before adding the filling to maintain texture integrity.
Additional Resources
For more dessert inspiration, explore our series of indulgent cheesecake variations focusing on flavor exploration and technique mastering. Check out our detailed guide on gelatin handling, preventing common pitfalls for a perfectly set dessert every time.
Delve into our seasonal fruit guides for tips on selecting and incorporating different berries into your sweet creations, ensuring fresh, vibrant taste throughout the year. Discover equipment must-haves for the serious dessert enthusiast, from simple molds to essential handling tools.
Join the conversation by sharing your own Cherry Lemon Cheesecake experience in our community. We welcome photos and stories of your baking adventure. Use our hashtag to connect with fellow bakers, exchanging tips and reviewing your favorite variations. Your take on this recipe may inspire the next home baker!
The Recipe
Cherry Lemon Cheesecake
Serves: 12
Prep Time: 30 mins
Cook Time: 60 mins
Total Time: 90 mins
Kitchen Equipment Needed
Springform pan
Electric mixer
Mixing bowls
Measuring cups and spoons
Spatula
Oven
Ingredients
1 1/2 cups graham cracker crumbs
1/4 cup melted butter
3 packages (8 oz each) cream cheese, softened
1 cup granulated sugar
3 tablespoons all-purpose flour
1 teaspoon vanilla extract
1/4 cup lemon juice
Zest of 1 lemon
3 large eggs
1 cup fresh or frozen cherries
1 tablespoon cornstarch
Directions
Preheat your oven to 325°F (163°C).
In a bowl, mix graham cracker crumbs with melted butter. Press onto the bottom of a springform pan to form the crust.
In a large mixing bowl, beat cream cheese until smooth. Gradually add in sugar, flour, and vanilla extract.
Mix in lemon juice and zest, followed by one egg at a time, ensuring each is fully integrated before adding the next.
Pour mixture over the crust in the springform pan and smooth the top.
Bake for 55-60 minutes or until center is set but still wobbles slightly. Cool in the oven with door ajar.
In a saucepan, combine cherries and cornstarch. Cook over medium heat until thickened, then cool.
Once cheesecake is cooled, pour cherry topping evenly over the surface.
Chill in the fridge for at least 4 hours or overnight before serving.
Recipe Notes
For a nutty touch, mix 1/4 cup crushed nuts with the crust.
Adjust sugar to taste depending on the sweetness of your fruit.
If fresh cherries aren’t available, pitted tart cherries in juice can be used.
Deliciously Refreshing Best Grape Salad Recipe for Every Occasion
Best Grape Salad: A Refreshing and Delicious Delight
⚖️
Difficulty
Easy
⏲️
Prep Time
10 mins
🕒
Cook Time
0 mins
⏱️
Total Time
10 mins
🍽️
Servings
6
The Best Grape Salad is a wonderfully refreshing dish that combines the crisp sweetness of grapes with creamy, tangy dressing and a delightful crunch of toasted pecans. This culinary masterpiece is not only quick and easy to prepare but also boasts a vibrant visual appeal that’s sure to impress guests at any gathering. Whether you’re serving it as a side dish or a light dessert, this grape salad is a versatile must-have in your recipe collection.
This grape salad recipe is perfect for any occasion, whether it’s a family picnic, a holiday feast, or a midweek dinner treat. The combination of juicy grapes, creamy dressing, and a hint of tang make it an irresistible addition to any meal. With just a handful of ingredients, you can whip up this delectable salad in no time, allowing you to spend less time in the kitchen and more time enjoying the company of loved ones. Elevate your dish with vibrant red or green grapes to create a symphony of colors that will catch everyone’s eye.
Quick Recipe Highlights
Flavor Profile: The Best Grape Salad offers a perfect balance of sweetness from the grapes and a tangy creaminess from the dressing.
Texture: This salad delights with juicy, plump grapes enveloped in a smooth, creamy sauce, topped with the satisfying crunch of pecans.
Aroma: Experience a refreshing scent of ripe grapes mixed with the rich aroma of toasted pecans and a hint of vanilla.
Visual Appeal: Featuring the vibrant hues of red and green grapes alongside the creamy dressing, this salad is a feast for the eyes.
Skill Level Needed: Minimal culinary skills are required, making it an excellent choice for beginners and experienced cooks alike.
Special Equipment: No specialized equipment is needed, just a mixing bowl and a spoon to combine ingredients effortlessly.
Recipe Overview
Difficulty Level: The simplicity of this recipe makes it perfect for chefs of all levels, requiring only basic mixing skills.
Category: This delightful dish fits seamlessly into categories such as salads, side dishes, or even desserts thanks to its sweet and creamy elements.
Cuisine: This could be enjoyed in any cuisine as a sweet side dish, hinting at influences from classic American home cooking with its use of cream cheese.
Cost: Affordable yet luscious, this recipe makes use of common and readily available ingredients.
Season: Perfect in every season, but particularly refreshing in spring and summer as a cool, juicy treat.
Occasion: Ideal for brunches, potlucks, family gatherings, or as a sweet conclusion to an outdoor barbecue.
Why You’ll Love This Recipe
The Best Grape Salad is adored for its unique blend of texture and taste. With a creamy dressing that perfectly complements the natural sweetness of the grapes, every bite offers a harmonious blend of flavors and a delightful crunch from toasted pecans. The convenience of preparing this salad, requiring only 10 minutes, ensures you have a quick-to-make crowd-pleaser on hand, perfect for those last-minute gatherings or a casual family dinner.
Unlock the nutritional benefits of this salad, with grapes serving as a source of essential vitamins, minerals, and antioxidants. The simple cream cheese-based dressing adds a rich calcium source while pecans offer healthy fats and proteins, transforming the dish into a balanced side that caters to both taste and well-being. Impress guests at social events with this salad’s stunning presentation, offering a visually appealing centerpiece for your dining table.
Not only is this dish cost-effective due to its minimal ingredient list, but it also provides accessibility through its use of pantry staples. Enjoy the flexibility of this recipe by adapting it to suit various dietary needs, ensuring everyone has the opportunity to relish this delightful dish without compromising flavor or satisfaction.
Historical Background and Cultural Significance
The allure of the grape stretches back thousands of years, where it featured prominently in the diets and traditions of ancient cultures. Known for their use in cooking, winemaking, and even religious rites, grapes have always been valued for their versatility and flavor. Over the centuries, the fruit’s popularity spread, and it began to appear in an array of sweet dishes, exemplified in refreshing recipes like grape salad.
Delighting countless families with its tangy-sweet character, grape salad showcases how traditional ingredients can be combined in innovative ways. This dish captures the essence of fusion by pairing the classic flavors of cream cheese and nuts with fresh fruit, creating a taste that bridges different cultures and palates. Enjoyed from homes to high-end restaurants, grape salad remains a beloved choice due to its refreshing simplicity and nutritional value.
Define personal variations by experimenting with regional ingredients while maintaining the core elements that define this dish. Explore substituting different nuts, incorporating various grape types, and adjusting the sweetness of the dressing, reflecting the adaptability that accounts for grape salad’s enduring charm.
Ingredient Deep Dive
The star of this recipe is, of course, the grape, a fruit celebrated for its historical significance and delicate sweetness. Originally hailing from regions in the Mediterranean and Central Europe, grapes have thrived across diverse climates, making them a versatile and accessible ingredient worldwide. Rich in vitamin K and C, as well as antioxidants, grapes not only imbue the salad with flavor but also provide numerous health benefits. When selecting grapes, opt for those that are firm, plump, and deeply colored for optimal freshness. To extend their shelf life, store grapes in their original packaging in the coldest part of your fridge.
Pecans provide a crucial textural contrast, lending a subtle buttery taste and crunch to the salad. Native to North America, pecans were a staple food for indigenous people, eventually spreading worldwide. Packed with fiber, vitamins, and healthy fats, pecans bring both flavor and nutrition to the table. Choose pecans that are clean and firm; store them in an airtight container in a cool, dry place to preserve their quality. Substitute other nuts like walnuts or almonds to achieve varied flavors or accommodate dietary restrictions.
Common Mistakes to Avoid
Using overly ripe grapes can make the salad mushy. Always use firm and plump grapes for the best texture.
Overdressing the salad can overpower the delicate grape flavor. Start with less dressing and add more to taste as needed.
Not mixing the dressing thoroughly can result in uneven flavor distribution. Ensure all components are well-combined for a cohesive taste.
Forgetting to chill the salad before serving can reduce its refreshing quality. Refrigerate for at least an hour, allowing flavors to meld.
Using pre-shelled pecans without toasting results in lost flavor depth. Toast pecans briefly for additional richness.
Skipping the washing of grapes can result in a loss of freshness or unwanted residues. Clean grapes thoroughly before use.
Not cutting grapes in half can lead to inconsistent texture and bite-size. Halve grapes for an evenly balanced salad experience.
Adding the pecans too early can cause them to lose crunch. Stir them in just before serving to maintain their texture.
Essential Techniques
Mastering the dressing is crucial for the Best Grape Salad. Mixing cream cheese until smooth ensures a creamy texture that evenly coats the grapes. Add sugar gradually, tasting as you go, to achieve just the right amount of sweetness without overpowering the natural flavors of the grapes. The toasting of pecans is a vital step not to overlook. A brief toast brings out the nutty flavor, enriching the salad’s overall taste profile. Always give pecans time to cool before mixing them into the salad to preserve the crunch.
Pro Tips for Perfect Best Grape Salad
To create a vibrant visual impact, combine both red and green grapes, adding a pop of color to your dish. Achieve an ultra-creamy dressing by softening cream cheese to room temperature before mixing. Personalize sweetness levels by adjusting the amount of sugar or incorporating honey for a natural alternative. Enhance the crunch by topping the salad with additional pecans or introducing other nuts like almonds. Keep the salad fresh for longer by storing it in an airtight container in the refrigerator. For a gourmet touch, consider topping with a sprinkle of cinnamon or nutmeg before serving.
Variations and Adaptations
Adjust this recipe for regional tastes by incorporating specialty nuts, such as macadamias in tropical locales. Enjoy a seasonal touch by adding fresh, in-season berries such as blueberries or strawberries for a summery twist. Tailor the salad to accommodate dietary needs, such as utilizing dairy-free cheese options for lactose intolerance or replacing sugar with a low-calorie sweetener. Enhance the flavor profile by experimenting with different vinegars or citrus zest, offering an exciting twist to the base recipe.
Serving and Presentation Guide
Serve this salad in a clear, shallow dish to showcase its vivid colors while maintaining an elegant presentation. Garnish with a few whole grapes and a sprinkle of toasted nuts for decorative appeal. Pair the grape salad with a light main dish, such as grilled chicken or fish, to complement its refreshing qualities. Ensure ideal temperature by chilling the salad until it’s time to serve, so it maintains its crisp, invigorating vibe.
Wine and Beverage Pairing
Find the perfect complement with a light, crisp white wine like Sauvignon Blanc or Pinot Grigio, known for their fruity undertones that harmonize beautifully with the salad’s sweet and tangy elements. For those who prefer non-alcoholic options, a sparkling water with hints of citrus or a light lemonade are excellent choices, enhancing the salad’s refreshing quality.
Storage and Shelf Life
Store this salad in an airtight container in the refrigerator for optimal freshness. To ensure peak taste and texture, consume within two days of preparation. Observe for signs of spoilage, such as mushy texture or off-odor, especially when stored longer than two days. Pecans may soften over time; consider reserving some for topping immediately before serving.
Make Ahead Strategies
You can prepare this salad in advance, but add the toasted pecans just before serving to maintain their crunch. Assemble most of the components, excluding nuts, and store them in the refrigerator until ready to enjoy. Before serving, thoroughly mix the salad to ensure even distribution of dressing and topping.
Scaling Instructions
This recipe is versatile for any serving size. Double or triple the grape salad by preparing batch after batch rather than mixing a large quantity at once for maximum ingredient integration. Equipment typically remains consistent, but larger mixing bowls may be needed. Adjust chilling time in proportion to the salad volume to ensure everything is properly chilled.
Nutritional Deep Dive
The Best Grape Salad is both a flavorful and nutritious dish. Grapes bring an abundance of antioxidants, known for supporting cardiovascular health, whereas cream cheese contributes a decadent amount of calcium. Pecans supply healthy fats and fiber, promoting digestive wellness. Analyzing the salad’s macronutrient profile reveals a balance ideal for everyday enjoyment, provided that serving sizes are moderated to fit personal dietary goals.
Dietary Adaptations
For gluten-free adaptations, this recipe naturally fits most gluten-free diets without adjustments. To accommodate vegan preferences, substitute cream cheese with a plant-based version while maintaining an almond or cashew-based creaminess. With careful ingredient management, this salad can also serve as a delectable side for keto or low-carb plans.
Troubleshooting Guide
Address common texture concerns by ensuring grapes are fresh and firm before preparation. Tackle flavor imbalance by incrementally adjusting sugar to taste preference and monitoring vanilla extract levels to avoid overconsumption. Monitor temperature issues; quickly chill salad after assembly for peak freshness.
Recipe Success Stories
Readers have added personal touches like shredded coconut or dried cranberries for an added flavor dimension, demonstrating the adaptability of this dish. As community members prepare this salad, they share stunning photography showcasing improved plating and artistic presentation, proving you don’t have to be a professional chef to create gourmet-looking meals.
Frequently Asked Questions
Can I use other types of grapes? Yes, experimenting with different grape varieties can introduce new flavor profiles, so feel free to choose your favorites.
How do I prevent my pecans from getting soggy? Add pecans just before serving to ensure they retain their crunch.
Is it possible to freeze this salad? Freezing is not recommended, as it would alter the texture of the grapes.
Can I substitute the cream cheese with another base? Yogurt or a dairy-free alternative can be used for a lighter consistency.
How do I store leftovers? Keep refrigerated in an airtight container, ideally consumed within two days for best freshness.
Are there alternative sweeteners I can use? Honey or maple syrup serve as tasty and natural alternatives to sugar.
What’s a suitable serving size? A standard serving is about one cup, with the option to adjust based on your meal context.
Additional Resources
Explore other delightful salad recipes in the same flavor family, such as ambrosia or fruit salad, for more fruity indulgences. Delve into ingredient guides detailing grape types and nutritional values for informed decision-making on selection. Discover up-to-date kitchen equipment reviews and find the best tools to streamline your preparation experience.
Join the Conversation
Share your own Best Grape Salad creations on social media, showcasing your unique take on this delicious dish. Invite friends and family to contribute their thoughts through comments or reviews, fostering a greater sense of culinary community. Document your journey with this recipe, noting any variations and adaptations and forming a collective narrative of creativity and exploration.
The Recipe
Best Grape Salad
Serves: 6
Prep Time: 10 mins
Cook Time: 0 mins
Total Time: 10 mins
Kitchen Equipment Needed
Mixing bowl
Spoon
Knife
Cutting board
Ingredients
2 cups of red grapes, halved
2 cups of green grapes, halved
8 oz cream cheese, softened
1/2 cup sugar
1 cup toasted pecans, chopped
1 tsp vanilla extract
Directions
In a mixing bowl, combine cream cheese and sugar until smooth and creamy.
Add the vanilla extract and mix until fully incorporated.
Gently fold in the halved grapes, ensuring they’re evenly coated.
Stir in chopped pecans just before serving.
Chill in the refrigerator for at least an hour before serving for optimal flavor melding.
Recipe Notes
For added flavor, try incorporating a sprinkle of cinnamon or nutmeg.
Substitute pecans with walnuts or almonds if desired.
Adjust the amount of sugar based on sweetness preference.
Hi I'm Emy
I’m passionate about sharing a diverse collection of sweet and savory recipes that I’ve meticulously tested and perfected in my own kitchen.