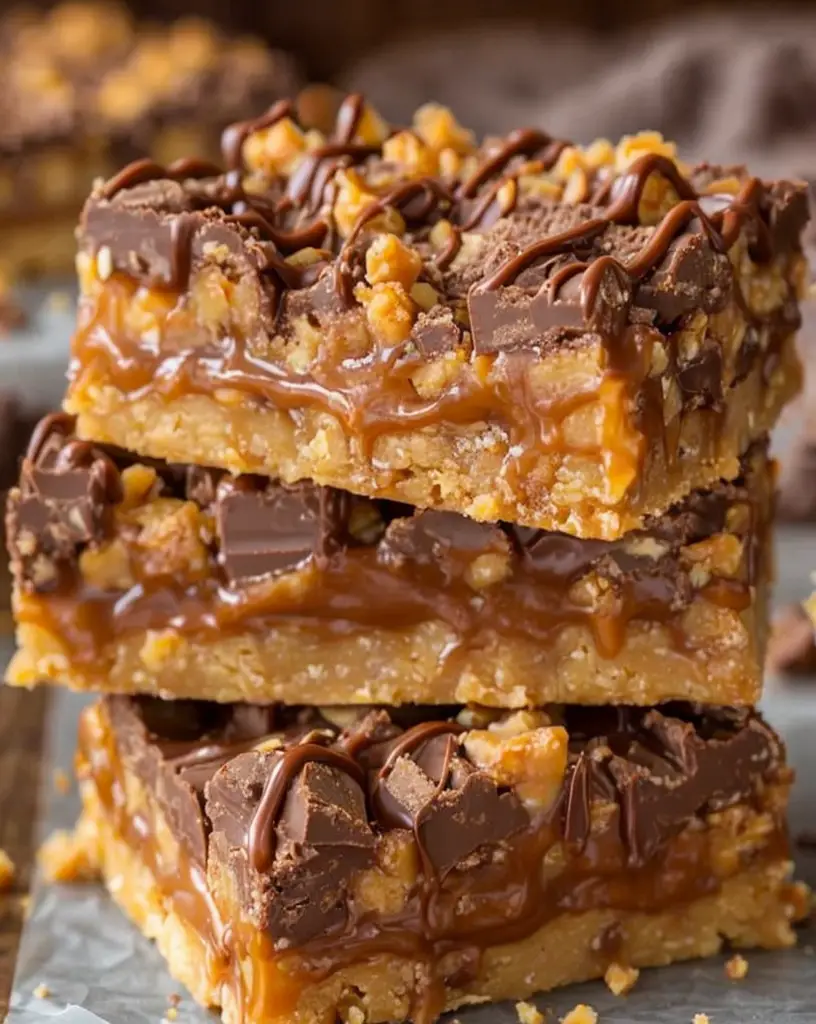
Delicious Keto LCHF Almond Cookies: Easy Low-Carb Recipe

KETO LCHF Almond Cookies: A Deliciously Low-Carb Treat

⚖️
Difficulty
Easy

⏲️
Prep Time
10 mins

🕒
Cook Time
15 mins

⏱️
Total Time
25 mins

🍽️
Servings
24 cookies

Indulge in the delightful world of KETO LCHF Almond Cookies, a perfect balance of taste and health for anyone on a low-carb diet. These cookies are not just a treat; they’re a testament to what can be created without the excess sugars and carbs that often plague traditional baking. Biting into a cookie brings an explosion of nutty flavor paired with the rich sweetness of almond extract, making for a heavenly experience with every nibble. The flavor is beautifully complemented by a subtle crunch that satisfies both the palate and the soul.

Whether you’re navigating a KETO lifestyle or simply want a healthier snack option, these cookies fit the bill flawlessly. Their crumbly yet moist texture strikes a perfect balance, leaving you feeling satisfied without the sugar crash. Plus, they’re incredibly easy to prepare with minimal ingredients, making them an ideal choice for both novice bakers and seasoned chefs looking for a quick, low-carb dessert. Dive into this delicious recipe that not only pleases your taste buds but also falls in line with your dietary goals.

Quick Recipe Highlights

  • Flavor Profile: Nutty, sweet, and pleasantly fragrant, these cookies provide a satisfying treat without the carbs.
  • Texture: Crispy on the outside with a tender bite, these cookies melt in your mouth while also providing a satisfying crunch.
  • Aroma: The delightful scent of toasted almonds mingles with the warmth of vanilla, creating an inviting kitchen atmosphere.
  • Visual Appeal: Golden-brown and perfectly round, these cookies are as beautiful as they are delicious. Topped with flaked almonds, they offer an appealing rustic charm.
  • Skill Level Needed: Suitable for all levels, making it perfect for a family baking project or a quick solo endeavor.
  • Special Equipment: All you need is a mixing bowl, baking sheet, and parchment paper—no fancy gadgets required!

Recipe Overview

  • Difficulty Level: These KETO LCHF Almond Cookies are categorized as easy due to their straightforward steps requiring minimal preparation and baking experience.
  • Category: These cookies serve as a delightful dessert, snack, or even a quick breakfast option for those seeking low-carb alternatives.
  • Cuisine: Rooted in low-carb dietary traditions, this recipe showcases the versatility of almond flour in creating satisfying, guilt-free desserts.
  • Cost: With almonds and basic pantry items as the main ingredients, this cookie recipe is budget-friendly and wallet-conscious.
  • Season: Perfect for any season, but especially delightful with a warm cup of tea or coffee during the colder months.
  • Occasion: Ideal for gatherings, holiday parties, or simply as a tasty treat for yourself or your family.

Why You’ll Love This Recipe

The taste and texture of KETO LCHF Almond Cookies are simply irresistible. The natural nuttiness of almonds brings a depth of flavor that enhances every bite, while the sweetness from low-carb sweeteners means you can enjoy them guilt-free. Each cookie has a light crunch that gives way to a soft center, perfectly satisfying to both cookie lovers and health enthusiasts.

Preparing these cookies is incredibly convenient. With just a handful of ingredients and minimal prep time, you can whip up a batch quickly. They are perfect for meal prep, allowing you to have a healthy snack readily available. Their simple mix-and-bake process makes them a go-to treat for any busy day.

Not only do these cookies satisfy your cravings, but they also offer nutritional advantages. Packed with healthy fats and protein from almonds, they fit seamlessly into low-carb and ketogenic diets. Almonds are also rich in Vitamin E, magnesium, and fiber, promoting overall health and wellness while catering to your sweet cravings.

They also hold great social and entertaining value. Whether serving friends or family, you’ll be the star of the gathering by offering a delicious cookie that everyone can enjoy. They pair wonderfully with coffee or tea, elevating your hosting game with minimal effort.

Cost-effectiveness is a significant factor with these cookies. With easily accessible ingredients that are typically available in bulk, you can make numerous batches without breaking the bank. The incredible satisfaction and taste you get from these KETO LCHF Almond Cookies far exceed the cost involved.

Historical Background and Cultural Significance

The origin of almond cookies can be traced back to ancient times in various cultures, highlighting almonds’ historical significance as a staple nut in many cuisines. As the popularity of low-carb diets surged, particularly among health enthusiasts and those looking to manage their weight, recipes like KETO LCHF Almond Cookies began to emerge, bridging traditional flavors with modern dietary needs.

Almonds have long been linked to health benefits across cultures. Historically significant for their nutrient density, almonds have been associated with longevity and vitality. This cultural importance has paved the way for their modern usage in baking, particularly in cookie recipes that aim to be healthier and more beneficial, such as these low-carb cookies.

Over time, recipes for almond cookies have evolved, especially in response to increased dietary knowledge and preferences. Traditional recipes, often laden with sugar and wheat flour, have transformed into healthier alternatives that maintain the spirit of the original while aligning with contemporary dietary trends, such as KETO and LCHF.

Regional variations can also be found, with many cultures incorporating local flavors and ingredients. The versatility of almond flour allows for creativity in recipe formulation, resulting in diverse cookie styles that still honor the nut’s distinct flavor.

Ingredient Deep Dive

Almond Flour: Almond flour is a crucial ingredient in KETO LCHF Almond Cookies, providing a gluten-free alternative to traditional flour. Rich in nutrients, almond flour is celebrated for its low carbohydrate content and high protein levels, making it a popular choice among those following low-carb and ketogenic diets. When selecting almond flour, look for finely ground options to ensure a tender texture in your cookies. Proper storage in an airtight container in a cool, dark place will ensure freshness for longer periods.

Sweetener: The choice of sweetener can significantly alter the flavor profile of your almond cookies. Many opt for erythritol or stevia, both of which are popular in low-carb baking. These sweeteners provide the sweetness we crave without the glycemic impact of sugar. When substituting, it’s essential to understand each one’s sweetness level compared to sugar to maintain the desired flavor in your cookies. Store any leftover sweetener in a cool, dry place to preserve its integrity.

Common Mistakes to Avoid

  • Overmixing the dough can lead to tough cookies. Mix just until combined for a tender texture.
  • Using improperly measured almond flour can affect the consistency. Always spoon and level your flour for accuracy.
  • Not allowing cookies to cool on the baking sheet can result in them falling apart. Let them set for a few minutes before transferring to a wire rack.
  • Using too much sweetener can overpower the delicate almond flavor. Adjust according to taste preference.
  • Skipping the parchment paper might result in sticking. Always line your baking sheet for easy removal.
  • Not preheating the oven can lead to uneven baking. Ensure your oven is hot before placing the cookies inside.
  • Overbaking can make the cookies dry. Keep an eye on them, as they continue to cook slightly once out of the oven.
  • Using cold ingredients can hinder proper mixing. Ensure eggs and butter are at room temperature for a smooth mixture.
  • Not cooling the cookies properly can lead to a soggy bottom. Allow adequate time for cooling to retain texture.
  • Storing cookies improperly may affect freshness. Keep them in an airtight container for optimal shelf life.

Essential Techniques

Mastering the art of mixing is crucial in baking cookies. Proper mixing technique ensures that the ingredients are well-combined without overworking the dough. Aim for a smooth consistency without any lumps—this prevents the cookies from becoming tough. A good visual cue is the dough holding together without crumbling.

Another essential skill is understanding oven temperatures. Each oven can behave differently, and calibration is key to perfect baking. An accurate oven thermometer can prevent baked goods from undercooking or overcooking, ensuring that your KETO LCHF Almond Cookies emerge perfectly golden every time.

Pro Tips for Perfect KETO LCHF Almond Cookies

1. Always measure your almond flour accurately using a spoon and leveling method for consistent results.

2. Freeze dough for later use. Roll into logs, wrap tightly, and store in the freezer for a quick cookie treat.

3. Experiment with different extracts like coconut or lemon to create unique flavors while keeping the base low-carb.

4. Use a cookie scoop for uniform shaping to ensure even baking across all cookies.

5. Add in sugar-free chocolate chips for a fun twist on the original recipe.

6. For a chewy texture, don’t overbake; pull them out while they are still slightly soft in the center.

7. Dust with powdered sweetener just before serving for an elegant presentation.

8. Make mini cookies to serve at parties—everyone loves bite-sized treats!

Variations and Adaptations

Experimenting with KETO LCHF Almond Cookies can yield delightful transformations. For instance, you can add spices like cinnamon or nutmeg to infuse them with seasonal flavors. Dark chocolate chips can be incorporated for chocolate lovers, providing richness with a hint of sweetness—all while keeping the carbs in check.

For those who enjoy fruity flavors, consider folding in dried unsweetened cranberries or blueberries. These additions complement the almond flavor beautifully while adding a pop of color and a nutritional boost.

Texture modifications can also enhance your cookies; try incorporating ground flaxseed for added fiber or chopped nuts for added crunch. Adjusting these elements can transform each batch into something uniquely your own.

If gluten-free modifications are needed, be sure to substitute any other necessary ingredients. Almond flour often pairs excellently with coconut flour for various experiments, allowing for delightful flavor combinations.

Serving and Presentation Guide

When it comes to serving KETO LCHF Almond Cookies, presentation is key. Opt for a beautiful cake stand or a rustic wooden platter to showcase your cookies. Dust the tops with a light sprinkling of powdered erythritol for a visually appealing touch that enhances their elegance.

Garnishing with whole almonds or drizzling melted sugar-free chocolate on top can bring an extra flair to your display. Consider serving them alongside a small card explaining that they are KETO-friendly; this can spark conversation and interest with guests.

For a modern serving suggestion, pair the cookies with a rich, dark cup of coffee or a refreshing herbal tea, enhancing the experience. Remember that these cookies maintain best texture when served at room temperature; keep that in mind during your serving process.

Wine and Beverage Pairing

Pairing KETO LCHF Almond Cookies with a lightly oaked Chardonnay can beautifully balance the nutty flavors, bringing out the sweetness of the cookies. The creaminess of the wine complements the rich texture while its acidity cuts through the sweetness perfectly.

If you prefer non-alcoholic options, a sparkling water infused with lemon or rosemary can refreshingly contrast with the almond flavors, making it an excellent pairing for a spring gathering.

For coffee lovers, a robust espresso creates a delightful contrast, enhancing the sweetness of the cookies overall. Enjoy experimenting with different beverages to find your perfect match.

Storage and Shelf Life

Properly storing your KETO LCHF Almond Cookies will maintain their freshness. Store them in an airtight container at room temperature for up to one week. If you wish to prolong their shelf life, consider freezing them; they can last up to three months in a freezer-safe bag or container.

To freeze, ensure the cookies are completely cooled, then layer them between wax paper in a container to prevent sticking. When ready to enjoy, allow them to thaw on the counter, and they will retain their delightful texture.

Check for signs of spoilage, such as off smells or changes in texture, especially if stored for extended periods. Reheating in the oven briefly can also help restore their original texture if they feel soft after thawing.

Make Ahead Strategies

Making KETO LCHF Almond Cookies ahead of time is a great strategy for busy weeks. You can prepare the dough and refrigerate it for up to three days before baking. This allows flavors to meld together beautifully while saving time on the actual baking day.

If making these cookies for an event, consider baking them the day before. This allows them to set properly and ensures fresh cookies on the day of the occasion. Just remember to store them in an airtight container to preserve their delightful texture and taste.

Additionally, you can pre-chop any nuts or prepare your ingredients ahead of time, streamlining the process even further. Taking these steps can inspire you to bake low-carb cookies more often without sacrificing time or quality.

Scaling Instructions

If you need to halve or double the KETO LCHF Almond Cookies recipe, adjustments are straightforward. Simply divide or multiply each ingredient accordingly, keeping ratios consistent. For example, if doubling, be mindful that the bake time may slightly vary, so keep a close eye on the cookies.

Equipment may also need adjusting as larger batches may require multiple baking sheets. If you’re doubling the since, wider space may prevent them from sticking together during baking.

Always consider storage requirements when scaling up a recipe; ensure enough space to contain your freshly baked cookies without compromising their quality.

Nutritional Deep Dive

Each KETO LCHF Almond Cookie is a powerhouse of nutrients. On a macro-level, they provide healthy fats from almonds, essential proteins, and fiber, making them satisfying and less likely to lead to hunger soon after consumption. This cookie provides a smart choice for a nutrient-dense snack.

Micronutritionally, almonds are a fantastic source of Vitamin E, magnesium, and antioxidants, contributing to heart health and overall well-being. Additionally, they are low in carbohydrates, making them a preferred choice for those adhering to low-carb and ketogenic diets.

Consider portion analysis when enjoying these cookies as even low-carb treats can add up if consumed in excess. Maintaining mindful eating practices can help with weight management while indulging in delicious KETO LCHF Almond Cookies.

Dietary Adaptations

These KETO LCHF Almond Cookies can easily accommodate various dietary needs. For those following a gluten-free diet, almond flour makes this cookie an effortless choice without compromising flavor or texture.

Dairy-free adaptations can also be achieved by substituting any butter with coconut oil or a dairy-free margarine. This keeps the cookies equally moist and delicious while catering to different dietary restrictions.

For vegan variations, replace eggs with flaxseed meal or chia seeds combined with water to replicate binding effects without animal products.

Low-carb, KETO, paleo, and even low-FODMAP diets can find a place within this cookie recipe, as it naturally leans towards clean, wholesome ingredients that celebrate nutrient density.

Troubleshooting Guide

If you encounter texture issues, such as being too crumbly or difficult to shape, ensure your almond flour is of high quality and properly measured. Adjusting the fat content slightly can help achieve the desired dough consistency.

Flavor balance can also present a challenge. If your cookies taste too bland, consider adding a pinch of salt or altering your sweetener to achieve a more flavorful profile.

Temperature problems often arise, leading to undercooked or overcooked cookies. Investing in an oven thermometer can ensure accurate readings, providing perfectly baked treats every time.

Common equipment challenges arise with cookie sheets that may warp during baking. Investing in high-quality, heavy pans can mitigate these issues, ensuring your cookies bake evenly and beautifully.

Recipe Success Stories

The KETO community consistently shares success stories featuring these almond cookies, with praise surrounding their nutty flavor and delightful crunch. Many readers have adapted the recipe to include various nut butters, resulting in personalized flavors that still maintain the original’s essence while accommodating personal preferences.

Share your baking experiences with the community to inspire others to indulge in these delicious treats. No two experiences should be the same!

Readers have suggested adding vanilla or experimenting with different nut flours for diverse culinary adventures. These suggestions not only highlight the adaptability of almond cookies but also foster creativity in the kitchen.

Frequently Asked Questions

Can I use different nut flours? Yes, experimenting with other nut flours such as hazelnut or coconut flour can add unique flavors, but adjustments in measurements may be required due to different absorbency levels.

How many carbs are in each cookie? The carb count largely depends on the sweetener used, but on average, each cookie contains about 1-2 grams of net carbs, making them a low-carb treat!

Can I substitute the sweetener? Absolutely! Just be cautious with sweetness levels, as each sweetener varies in potency. Taste as you go for the best results.

What if I run out of almond flour? You might be able to use sunflower seed flour or a blend of coconut flour and other nut flours, but be prepared for changes in texture and flavor.

How do I make these cookies chocolate-flavored? Simply incorporate unsweetened cocoa powder into the dough along with the almond flour, adjusting sweetness as needed.

Can I make these cookies vegan? Yes! Substitute eggs with flaxseed meal mixed with water or chia seeds to replicate binding effects without using animal products.

How should I store leftover cookies? Store in an airtight container at room temperature for up to a week, or freeze for longer storage. Thaw on the counter when ready to enjoy.

Why did my cookies spread too much? This can happen if the oven temperature is not hot enough or if the dough was too soft. Ensure your dough is firm before baking and that the oven is properly preheated.

Can I add other ingredients like nuts or chocolate chips? Yes! Feel free to mix in sugar-free chocolate chips, chopped nuts, or even dried fruits to add variety to your cookies.

How long do they take to bake? Baking typically takes about 12-15 minutes depending on the oven and desired crunchiness, so keep an eye on them towards the end!

Additional Resources

Explore related recipes that enhance your low-carb lifestyle, from decadent desserts to savory snacks. Understanding foundational baking techniques will also elevate your cooking skills, allowing you to create various delightful treats. Ingredient-specific guides provide details on the health benefits and culinary uses of almond flour, ensuring you’re knowledgeable about what you bake with.

Additionally, don’t forget to check out equipment recommendations that enhance your baking experiences, from quality mixing bowls to optimal baking sheets. Seasonal variations in flavors can also bring excitement to your cookie-making endeavors.

Join the Conversation

Share your baking creations on social media, tagging friends or family who might find pleasure in trying out KETO LCHF Almond Cookies. Photography tips can help you capture the delightful beauty of your baked goods, making every post share-worthy. Engaging with fellow bakers and sharing experiences encourages a sense of community and inspires more baking adventures!

Let your creativity shine through in variations, and gather feedback from friends and family to enhance future batches. Your voice matters in the baking community and can inspire others to experiment with such delicious low-carb options.

The Recipe

KETO LCHF Almond Cookies

Serves: 24 cookies

Prep Time: 10 mins

Cook Time: 15 mins

Total Time: 25 mins

Kitchen Equipment Needed

  • Mixing bowl
  • Baking sheet
  • Parchment paper
  • Cookie scoop
  • Wire rack

Ingredients

  • 2 cups almond flour
  • 1/2 cup erythritol or sweetener of choice
  • 1/4 cup butter, softened
  • 1 large egg
  • 1 teaspoon almond extract
  • 1/2 teaspoon baking powder
  • Pinch of salt

Directions

  1. Preheat your oven to 350°F (175°C) and line a baking sheet with parchment paper.
  2. In a mixing bowl, cream together the softened butter and sweetener until smooth.
  3. Add the egg, almond extract, and mix until well combined.
  4. Gradually incorporate almond flour, baking powder, and salt until a dough forms.
  5. Using a cookie scoop, drop rounded tablespoons of dough onto the prepared baking sheet.
  6. Bake for 12-15 minutes or until the edges are golden brown.
  7. Remove from oven and allow to cool on the baking sheet for a few minutes before transferring to a wire rack.

Recipe Notes

  • For a chocolate variation, substitute half the almond flour with unsweetened cocoa powder.
  • Add chopped nuts or sugar-free chocolate chips for extra texture and flavor.
  • Store in an airtight container at room temperature for up to a week or freeze for longer storage.

Delicious Super Easy Cream Pie: A No-Fuss Recipe You’ll Love

Super Easy Cream Pie: A Delightful Dessert for Everyone

⚖️
Difficulty
Easy

⏲️
Prep Time
15 mins

🕒
Cook Time
5 mins

⏱️
Total Time
20 mins

🍽️
Servings
8

Looking for a crowd-pleaser that doesn’t require hours in the kitchen? Look no further! This Super Easy Cream Pie is the perfect solution for your dessert cravings. The creamy filling combined with a buttery crust creates a harmonious blend of flavors, making it an irresistible treat for family gatherings, potlucks, or any special occasion. Imagine the delight of cutting into a pie, revealing a silky, smooth filling that beckons to be enjoyed with each slice—this is what this dessert offers.

This recipe is designed for everyone, whether you’re an experienced baker or a novice in the kitchen. Its simplicity and quick preparation time mean that you can have a delicious homemade dessert ready in no time. The flavor profile of the cream pie is rich yet balanced, offering a taste that is reminiscent of classic desserts while still being modern and approachable. With just a few ingredients, this dessert showcases the wonderful harmony of sweetness and creaminess that will leave your guests wanting more.

Quick Recipe Highlights

  • Flavor Profile: A delightful combination of sweet and creamy with hints of vanilla that dance on your palate.
  • Texture: A smooth and silky filling set in a crisp, flaky crust that creates a satisfying bite.
  • Aroma: Inviting and warm notes of vanilla and buttery goodness fill the kitchen as the pie sets.
  • Visual Appeal: The creamy filling topped with a dollop of whipped cream presents beautifully, drawing guests in.
  • Skill Level Needed: Perfect for beginners, with minimal techniques required making for a stress-free experience.
  • Special Equipment: You’ll need a mixing bowl, pie dish, and whisks to whip the filling to perfection.

Recipe Overview

  • Difficulty Level: This recipe is classified as easy, making it perfect for beginners or those short on time. Simply mix, pour, and chill—no complicated steps to worry about!
  • Category: As a dessert, this pie is versatile enough to fit into various meal categories, whether served after dinner or at a festive gathering.
  • Cuisine: This cream pie embodies classic American comfort food, beloved across the nation for its luscious flavor and simplicity.
  • Cost: This recipe is budget-friendly, with common ingredients that won’t break the bank—ideal for those planning gatherings without sacrificing taste.
  • Season: Enjoyed year-round, the creamy textures and flavors of this pie make it welcome on any table, be it summer BBQs or cozy winter evenings.
  • Occasion: Perfect for birthdays, holiday celebrations, or casual family dinners, this pie takes any occasion to the next level.

Why You’ll Love This Recipe

First and foremost, the taste and texture appeal of this Super Easy Cream Pie will leave a lasting impression. The creamy filling is delightful on your tongue, contrasted beautifully by the crunch of a freshly baked pie crust. You won’t just taste the love that goes into making it; you’ll also enjoy the satisfaction of creating a dessert that’s sure to impress.

Convenience and preparation are another notable feature. With just a few steps and simple ingredients, anyone can whip it up and store it in the refrigerator until serving time. This ease of preparation makes it a go-to option for those entertained on a whim, providing a homemade feel without sourcing complicated ingredients or techniques.

Nutritionally, this pie also offers some benefits. While it’s certainly a treat, using quality ingredients can help maximize flavor while keeping things balanced. You can opt for fresh dairy products and even incorporate light versions of your ingredients to yield a lighter dessert experience.

As a social and entertaining dish, it’s perfect for gatherings. The pie serves beautifully, allowing everyone to enjoy their piece while complimenting you on its taste. Sharing food brings people together, and this pie is just the thing to spark conversations and happy memories.

Finally, this recipe’s budget-friendly approach ensures that you can create a delicious dessert without overspending, which is a win for everyone. You buy standard pantry items and can easily source fresh ingredients locally.

Historical Background and Cultural Significance

The origin of cream pies can be traced back to 19th-century America, evolving as home bakers experimented with custards and various fillings. The simplicity of creating a cream pie made it a popular choice for families wanting to showcase their baking skills.

Culturally, cream pies represent comfort in many American households, often gracing tables during festive occasions. Generations have handed down variations and techniques, making it a cherished part of communal recipes across the nation.

This recipe has evolved over the years, initially showcasing flavors like coconut or chocolate, giving rise to a plethora of cream pie varieties that are staples in bakeries today. Each iteration tells a story of its creator and highlights personal tastes.

Regionally, cream pies may show preference for particular flavors based on availability of ingredients. For instance, chocolate cream pies are a classic, but many households may boast their unique fruit-based cream variations influenced by local produce.

Ingredient Deep Dive

First, let’s talk about the pie crust. Traditionally made from flour, butter, and a touch of salt, the pie crust is fundamental to achieving that flaky texture that complements the creamy filling. Its significance is rooted in its versatility—a well-made crust can elevate any filling.

When selecting a crust, look for those made with natural ingredients. Homemade pie crusts can often be stored in the freezer, providing freshness. If you’re short on time, pre-made options work well but may lack the rich flavor and texture of homemade.

Another main ingredient is heavy cream, foundational in creating that luscious filling. It brings richness and body to the pie, providing a creamy mouthfeel that everyone loves. It’s also a versatile ingredient that can be used in various culinary applications.

When buying heavy cream, opt for organic if possible for the purest taste. Ensure to store it in the coldest part of your refrigerator for maximum freshness, as its quality can significantly affect the final dish.

Common Mistakes to Avoid

  • Not chilling the filling properly: It’s essential to chill your filling before pouring it into the crust; otherwise, it may not set properly.
  • Using room temperature ingredients in the filling: Start with chilled heavy cream to achieve maximum volume and fluffiness when whipped.
  • Overmixing the filling: Mixing too aggressively can lead to a dense filling. Gently fold in your ingredients for best results.
  • Skipping ingredient measurements: Accuracy is crucial in baking, so following measurements will give you the best outcome.
  • Not blind baking the crust: Ensure your crust is pre-baked to prevent a soggy bottom, which can ruin your beautifully creamy filling.
  • Forgetting to let the pie cool: Allow the pie to chill for a few hours before slicing for the best texture and flavor.
  • Not using vanilla extract: Skimping on flavoring ingredients can lead to a bland filling. Use pure vanilla extract for the best taste.
  • Ignoring food safety: Be cautious with dairy and egg products, always checking expiration dates and ensuring proper storage.
  • Overcrowding the pie with toppings: While toppings can enhance flavor, too much can overwhelm the delicate filling.
  • Not preparing extra ingredients: Always have additional whipped cream or garnishes ready to elevate presentation.

Essential Techniques

First, mastering the art of pie crust is vital. A good crust is what separates an average dessert from an excellent one. The key is to keep your butter cold and to work the dough minimally; overworking can lead to a tough crust instead of a flaky one.

Another essential technique is whipping cream. Start with chilled equipment—the bowl and beaters must be cold to ensure the cream whips effectively. Gradually add sugar and vanilla while whipping to get to soft peaks, avoiding overwhipped, grainy textures.

Pro Tips for Perfect Super Easy Cream Pie

1. Use high-quality ingredients for the best flavor; organic heavy cream makes a noticeable difference.

2. Chill your utensils and bowls when whipping cream to achieve better volume and texture.

3. Experiment with different flavorings in the filling, such as almond or citrus zest, to add depth.

4. For a special touch, consider drizzling melted chocolate or caramel sauce atop the pie before serving.

5. Use a food processor for the pie crust to achieve a finer texture more easily.

6. Always cover the pie with plastic wrap when refrigerating to prevent it from absorbing odors.

7. If in a hurry, consider using store-bought whipped topping instead of homemade whipped cream.

8. Always let your pie sit for several hours before slicing; this helps in achieving cleaner cuts.

Variations and Adaptations

Regional variations of the cream pie can include flavored custards—like key lime or coconut—that add a unique twist to the traditional recipe. Adding fruits such as berries can enhance both flavor and presentation.

Seasonal adaptations allow you to swap ingredients based on what’s fresh or available. Consider the addition of pumpkin puree for a fall-themed version of your cream pie.

Dietary modifications could involve replacing heavy cream with coconut cream for a dairy-free option. You can also experiment with gluten-free crusts to accommodate dietary restrictions while preserving flavor.

Flavor variations can include adding extracts like root beer or peppermint to the filling or incorporating spices for unique tastes. This versatility ensures that everyone can enjoy a slice that suits their preferences.

Texture modifications, such as incorporating layers of chocolate ganache or fruit preserves between filling and crust, can elevate your pie into a gourmet creation without a great deal of additional effort.

Finally, consider presentation alternatives, such as single-serving jars, for an attractive twist to serving your cream pie, making it perfect for parties or gatherings.

Serving and Presentation Guide

For plating, aim for clean cuts that showcase the layers of pie. Use a serrated knife and serve slices on chilled plates to maintain the pie’s temperature. Consider using spatulas for lifting out slices without disrupting the pie’s structure.

Garnishing ideas might include freshly whipped cream, chocolate shavings, or fruit slices, which can add not only flavor but visual appeal to each serving. Chocolate or fruit sauces can also be drizzled on the plate for artistic effects.

Traditional accompaniments: Cream pie pairs well with a scoop of vanilla ice cream or a cup of freshly brewed coffee, enhancing the dessert experience.

Modern serving suggestions can feature mini pies or tartlets for personal portions, adding a delightful touch to a buffet or casual gathering. This gives each guest their own slice of heaven!

Temperature considerations are vital; serve cream pie chilled, as warm filling can cause the crust to become soggy. Allow for a short softening period after being in the refrigerator to enhance the flavor.

Portion control tips include using a ruler to mark portions before cutting; this is especially useful for large gatherings where uniformity matters.

Wine and Beverage Pairing

When it comes to wine pairings, a sweet dessert wine like Moscato complements the creaminess of the pie beautifully, while the acidity helps balance the richness.

For non-alcoholic alternatives, fresh lemonade with a hint of mint can provide a refreshing counterbalance to the pie’s sweet flavors.

If coffee or tea is preferred, consider serving it alongside a slice of pie for warmth and flavor contrast. A lightly roasted coffee can enhance the creamy pie experience.

Ensure beverages are served at appropriate temperatures, with wines chilled and hot drinks brewed fresh, enhancing the overall dining experience.

Storage and Shelf Life

Store your cream pie in the refrigerator, covered to maintain freshness and prevent odor absorption, up to 3 days after making. Avoid keeping it at room temperature for more than two hours to ensure safety.

For freezing, it’s best to freeze the crust and filling separately, then assemble when ready to serve. A well-wrapped pie can be stored in the freezer for up to one month but is recommended to enjoy within two weeks for best quality.

Signs of spoilage include an off smell, discoloration of filling, or a gummy texture in the crust. Always inspect before serving to avoid food safety concerns.

When reheating, if necessary, a quick thaw in the refrigerator will ensure the pie maintains its texture and flavor profile. Avoid microwaving directly, as it could affect the crust quality adversely.

Make Ahead Strategies

Prepare the crust one day in advance; wrap it well and store it in the fridge. This simple strategy saves time and ensures your crust is ready for filling. The same can be done for the filling, which can be made the day before to allow flavors to meld.

Storage between steps is key; keep the pie covered during the chilling phase to maintain its integrity and hygiene. Be mindful of how long each component is stored; the fresher your ingredients, the better your final pie.

Perform a quality impact assessment when you prepare ingredients ahead of time; for instance, make sure the cream is still fresh for the best outcome.

During assembly, layer in the whipped cream and any toppings that may wilt or spoil; add these elements just before serving for a fresh touch.

Fresh element additions can bring vibrancy to your pie—consider adding zest or fruits right before serving, enhancing the flavor and appearance.

Scaling Instructions

For halving the recipe, simply divide each ingredient’s measurements by two while keeping the same cooking times and temperatures, ensuring even distribution of flavors in your cream pie.

Doubling or tripling the recipe is equally straightforward. Just ensure that your mixing bowls are large enough to accommodate increased quantities and adjust baking time as necessary. Adjust the chilling time accordingly as more volume may take longer to set.

Equipment adjustments, such as using larger pie tins or multiple smaller tins, can make production easier when preparing for larger gatherings.

Timing modifications should incorporate additional resting time for larger recorded servings, ensuring all elements have developed their full flavor profile.

Storage considerations will likewise adapt based on volume; multiple pies will require clearing out refrigerator space ahead of time to keep things organized and manageable.

Nutritional Deep Dive

Understanding the macro breakdown of each serving is essential for those tracking nutritional intake. A slice of this cream pie typically contains carbohydrates primarily derived from the crust and sugar, with healthy fats from the cream contributing to its richness.

A micronutrient analysis reveals modest contributions from the ingredients; while this pie is predominantly a dessert, it contains calcium from dairy that could support bone health when consumed in moderation.

As for health benefits, enjoying dessert in moderation can provide joy and enhance the overall experience of meals. A slice of cream pie isn’t just sustenance; it provides comfort and pleasure.

Dietary considerations come into play for those with restrictions; adjusting components where needed can still allow the enjoyment of this dessert without compromising dietary needs.

Portion analysis helps in understanding serving sizes, allowing for responsible enjoyment. Consider cutting smaller slices to share or try alongside healthier snacks.

Weight management tips advocate for savoring a smaller piece paired with fruits or nuts to balance indulgence with wholesome choices, ensuring one enjoys life and maintains dietary goals.

Dietary Adaptations

For gluten-free adaptations, consider using almond flour or gluten-free flour blends to create the crust; this will cater to those with sensitivities while maintaining flavor.

To make the pie dairy-free, substitute heavy cream with coconut cream or cashew cream, allowing for a rich texture without traditional dairy products.

The recipe can also be modified for a vegan diet by using plant-based whipped toppings and replacing eggs with flaxseed or chia seeds as binding agents.

Low-carb variations could involve using almond flour for the crust and incorporating sugar substitutes in the filling to minimize carbohydrates.

Keto modifications would also benefit from similar changes; consider using a combination of almond and coconut flour for a sturdier crust without excessive carbs.

Paleo adaptations focus on whole food ingredients, eliminating refined sugars and flours to create a wholesome dessert experience.

If you’re considering low-FODMAP options, ensure to pick low-lactose dairy or plant-based alternatives to align with dietary restrictions.

Other specific diets can also be accommodated by exploring ingredient substitutions that suit individual health needs while preserving the essence of delicious dessert.

Troubleshooting Guide

Common texture issues can arise if the filling is over-whipped, leading to a grainy mouthfeel instead of the desired smoothness. Always beat until soft peaks form for a light finish.

If flavor balance is off, consider adjusting sugar levels; too much can overwhelm sweetness. A touch of acidity, like a squeeze of lemon, can elevate the overall flavor.

Temperature problems like a warm pie can lead to a soggy crust. Ensure pie is well-chilled before serving to maximize crispness and flavor.

Equipment challenges may arise if your bowl isn’t chilled when whipping the cream; keep your mixing bowl in the fridge for best results.

Ingredient substitutions could lead to unexpected results if ratios are off; follow guidelines carefully and utilize trusted substitutions for similar flavor profiles.

Timing concerns often stem from under-chilling. Always allow ample time for the pie to set properly, preventing a runny filling during serving.

Recipe Success Stories

Community feedback has overwhelmingly praised this Super Easy Cream Pie for its consistent results and delightful flavors. Many bakers have shared images showcasing their own versions, highlighting the pie’s versatility.

Variation successes detail how easy it is to add personalized touches. Readers often report creating variations with pumpkin pie spice or fruit fillings to cater to audience preferences.

Adaptation stories come from home cooks who have scaled the recipe for larger gatherings, appreciating its reliability and ease, ensuring that every guest leaves satisfied.

Reader suggestions often entail simple yet effective tweaks to the original recipe, enhancing less common flavors that still fit within the essence of the cream pie.

Photography tips shared by readers illustrate the visual attractiveness of this pie, encouraging others to present their culinary creations in appealing ways.

Frequently Asked Questions

Q: Can I use a different flavor for the filling?

A: Absolutely! Feel free to experiment with different flavors like chocolate, banana, or even seasonal fruit purees to personalize your cream pie.

Q: How can I prevent a soggy crust?

A: Blind baking the crust—pre-baking it before filling—is crucial to keeping the crust flaky and crisp. Ensure it’s fully cooled before adding the filling.

Q: Is this recipe suitable for freezing?

A: Yes, it can be frozen after being firmly set. It’s best to freeze the filling and crust separately and then assemble before serving.

Q: How long will the pie last in the refrigerator?

A: The pie can last up to 3 days in the refrigerator when properly stored. Cover it to prevent it from absorbing odors from the fridge.

Q: What should I do if my cream doesn’t whip?

A: Ensure your cream and equipment are cold and that you’re using heavy cream. If it still doesn’t whip, it may be past its use-by date.

Q: Can I make this pie dairy-free?

A: Yes! Substitute heavy cream with coconut cream or any nondairy cream to make delicious non-dairy versions of your cream pie.

Q: Can I add fruit to the filling?

A: Certainly! Fresh fruit purees or slices can elevate your pie. Just be mindful of the added moisture that can affect the set.

Q: What’s the best way to garnish this pie?

A: Classic whipped cream and chocolate curls are a perfect finish. Fresh berries add a lovely touch of color and flavor too!

Q: What can I do if my filling is runny?

A: If your filling doesn’t set, return it to the stove to thicken together with a touch of cornstarch or ensure you use heavy cream right from cold.

Q: Can I make this in advance?

A: Yes! You can prepare the pie ahead of time, simply store it in the refrigerator to let the flavors meld overnight.

Q: How do I avoid over-mixing the filling?

A: Take care to fold in the whipped cream gently until just incorporated; this tender handling will maintain volume and texture.

Additional Resources

Explore related recipes on the site that highlight various pie styles—like fruit pies and savory options. These recipes complement the creamy texture of pie and offer balanced menus.

Consult technique guides for mastering pie-making, including crust techniques, and proper filling handling that can be beneficial for newer bakers.

Ingredient information provides insights on selecting the best fresh ingredients, including how to differentiate between quality dairy products, ideal for any recipe.

For equipment recommendations, check listings that highlight essential tools that make baking easier, ensuring successful outcomes.

Seasonal variations also add freshness to your baking repertoire; look for fruity sticks or spice mixes that reflect the time of year and delight your palate.

Join the Conversation

We invite our readers to share their experiences! Post photographs of your pie creations and celebrate your baking success on social media platforms.

Join in recipe reviews to provide feedback or suggestions. Your input helps enhance our community and encourages others to try their hand at baking.

Engage with us about your variations or adaptations, encouraging others to experiment with their flavors and techniques while honoring their culinary creativity.

Don’t hesitate to share your photography tips for capturing the beauty of your dessert; we love to see how our recipes come to life in your kitchens!

The Recipe

Super Easy Cream Pie

Serves: 8

Prep Time: 15 mins

Cook Time: 5 mins

Total Time: 20 mins

Kitchen Equipment Needed

  • Mixing bowl
  • Whisk
  • Pie dish
  • Measuring cups and spoons
  • Plastic wrap

Ingredients

  • 1 pre-made pie crust
  • 2 cups heavy cream
  • 1/2 cup sugar
  • 1 teaspoon vanilla extract
  • Pinch of salt

Directions

  1. Begin by preparing your pie crust according to package instructions and set aside to cool.
  2. In a mixing bowl, combine heavy cream, sugar, vanilla extract, and salt.
  3. Using a whisk, whip the mixture until soft peaks form, be careful not to over-whip.
  4. Pour the whipped mixture into the cooled pie crust, smoothing the top with a spatula.
  5. Cover with plastic wrap and refrigerate for at least 2 hours to set properly.
  6. Once set, slice and serve with your favorite toppings, such as whipped cream or fruit.

Recipe Notes

  • For added flavor, experiment with different extracts like almond or citrus.
  • Store any leftovers in the refrigerator for up to 3 days.
  • Feel free to top the pie with chocolate shavings or berries for an appealing presentation.

Delicious Strawberry Crunch Cheesecake Recipe You Must Try Today

Delicious Strawberry Crunch Cheesecake: A Delightful Dessert Delight

⚖️
Difficulty
Moderate

⏲️
Prep Time
30 mins

🕒
Cook Time
60 mins

⏱️
Total Time
90 mins

🍽️
Servings
8 slices

Indulge in the creamy, fruity bliss of our Strawberry Crunch Cheesecake, a dessert that brings together the rich, velvety texture of cheesecake with a delightful crunch. This recipe features layers of luscious strawberries and a crumbly topping that transforms the classic cheesecake into an extraordinary treat. With every bite, you’ll experience the perfect balance of sweetness and tartness, making it a delightful choice for any occasion.

Picture yourself serving this stunning cheesecake at your next gathering, where its vibrant colors and captivating aroma are sure to impress. The combination of smooth cream cheese and fresh strawberries creates a mouthwatering sensation, while the crunchy topping adds an irresistible contrast that elevates each slice. The simplicity of this recipe belies its visual and culinary appeal, ensuring that it stands out on any dessert table.

Quick Recipe Highlights

  • Flavor Profile: This cheesecake features a delightful blend of rich creaminess with the bright, sweet flavor of fresh strawberries, making it a refreshing treat.
  • Texture: With a creamy filling, a hint of fluffiness, and a satisfying crunchy topping, the contrasting textures create a mouthwatering experience.
  • Aroma: The sweet aroma of baked strawberries mingles with the rich scent of cream cheese, creating an inviting atmosphere for dessert lovers.
  • Visual Appeal: The vibrant red of the strawberries against the pale cheesecake is visually stunning, making it a beautiful centerpiece at any gathering.
  • Skill Level Needed: This cheesecake requires basic baking skills, making it perfect for both novice bakers and experienced chefs alike.
  • Special Equipment: A springform pan is essential for achieving the perfect cheesecake shape and ease of serving.

Recipe Overview

  • Difficulty Level: The moderate difficulty of this Strawberry Crunch Cheesecake involves a combination of baking techniques, but the steps are straightforward and manageable.
  • Category: This dessert falls under the category of cheesecake, specifically a fruity variation that captures the essence of spring and summer desserts.
  • Cuisine: Inspired by classic American desserts, this cheesecake incorporates the freshness of strawberries, a popular choice in many culinary traditions.
  • Cost: The basic ingredients for this cheesecake are affordable, with strawberries being the most significant expense, especially if fresh.
  • Season: Best enjoyed during spring and summer when strawberries are in season and at their sweetest, this cheesecake is perfect for warm weather gatherings.
  • Occasion: Ideal for celebrations, birthdays, and potlucks, the Strawberry Crunch Cheesecake serves as a delightful ending to any festive meal.

Why You’ll Love This Recipe

The Strawberry Crunch Cheesecake stands out due to its irresistible taste and texture appeal. The creamy filling perfectly complements the sweetness of fresh strawberries, while the crunchy topping adds flair. This dessert promises satisfaction that will leave your guests asking for seconds.

Convenience is another delightful feature. The preparation involves simple steps that yield stunning results, making this cheesecake manageable for bakers of all skill levels. Plus, it’s a great make-ahead dessert, allowing you to impress without last-minute stress.

Nutritionally, strawberries provide essential vitamins, antioxidants, and fiber, making this dessert a bit healthier than many others. So, you can indulge guilt-free! Additionally, the cheesecake offers ways to adapt for various dietary preferences, such as gluten-free or vegan variations.

Socially, the Strawberry Crunch Cheesecake is a dessert that brings people together. Its visual appeal is a conversation starter, and sharing delicious food creates bonds, making it a perfect choice for gatherings.

Finally, the affordability of the ingredients ensures accessibility for everyone. You can whip up this delightful dessert without breaking the bank, allowing you to share joy with family and friends through homemade goodness.

Historical Background and Cultural Significance

The origins of cheesecake date back to ancient Greece, where it was served at the first Olympic Games as a source of energy. Over centuries, the recipe evolved, transitioning from simple cheese mixtures to the beloved cheesecake variations we know today.

In America, cheesecake gained immense popularity in the 19th century, influenced by European immigrants who brought their recipes. Today, the versatility of cheesecake allows countless adaptations, including the addition of seasonal fruits like strawberries, integrating local flavors into the dessert.

The evolution of the recipe reflects the changing culinary landscape, with cheesecakes embracing contemporary ingredients and techniques. Seasonal influences and local produce play a vital role in cheesecakes across different regions, showcasing variations that celebrate unique cultural twists.

Regionally, the love for strawberries in America makes the Strawberry Crunch Cheesecake a beloved favorite, especially during summer months. This cheesecake serves as a symbol of nostalgia, reminding us of picnics, barbecues, and family gatherings, connecting generations through shared culinary experiences.

Ingredient Deep Dive

Strawberries: Strawberries have a rich history, beloved since ancient times for their unique sweetness and vibrant color. They’re packed with vitamins C and K, and high in antioxidants, contributing to heart health and improved skin. When selecting strawberries, look for bright red, plump fruit with a fragrant aroma. Store them in the refrigerator for up to a week, and you can freeze excess strawberries for later use.

Cream Cheese: Cream cheese is a crucial ingredient in cheesecakes, contributing to the creamy texture and rich flavor. This ingredient has roots in American dairy production, originating in the 19th century. Cream cheese is also a source of calcium and protein, enhancing the nutritional profile of desserts. When purchasing, opt for full-fat for the best results and store it in the refrigerator, using it within a couple of weeks after opening.

Common Mistakes to Avoid

  • Overmixing the batter can lead to cracks in the cheesecake. To achieve the perfect texture, mix until just combined.
  • Not using room temperature ingredients can cause lumpy batter and uneven cooking, so allow cream cheese and eggs to reach room temp beforehand.
  • Baking the cheesecake too long will result in a dry texture; be sure to check doneness with a slight jiggle in the center.
  • Underestimating the chilling time can ruin the structure, so allow the cheesecake at least four hours to set properly.
  • Skipping the water bath can lead to cracked tops. Wrapping the pan with foil while baking helps maintain moisture and temperature.
  • Using low-quality chocolate for the topping can diminish flavor; always choose high-quality chocolate or berry toppings.
  • Not preparing for serving can lead to a mess. Use a hot knife for cleaner slices and an attractive presentation.
  • Forgetting to line the bottom of the springform pan can make removal difficult. Always use parchment paper for smoother lifting.
  • Forgetting to taste before baking can lead to an unbalanced flavor; always check sweetness levels with your strawberries.
  • Not allowing for the cooling period can spoil the texture; let the cheesecake cool to room temperature before refrigerating.

Essential Techniques

Baking in a Water Bath: Baking your cheesecake in a water bath helps to regulate temperature and moisture. It’s crucial for preventing cracks and achieving a smooth, creamy texture. To master this technique, wrap the springform pan in foil to prevent leaks and place it in a larger pan filled with hot water.

Proper Cooling: Allowing the cheesecake to cool slowly in the oven with the door ajar will help prevent cracks by avoiding sudden temperature changes. After baking, let it cool gradually for at least an hour before transferring to the refrigerator. This cooling method ensures an even texture and beautiful appearance.

Pro Tips for Perfect Strawberry Crunch Cheesecake

1. Always preheat your oven to ensure consistent baking temperatures, which is key for even cooking.
2. Choose ripe strawberries for the best flavor; avoid overripe fruit which can affect overall sweetness.
3. Incorporating a bit of lemon zest with the filling enhances the fresh strawberry flavor beautifully.
4. Refrigerate the cheesecake overnight for the best taste and restrained firmness.
5. Consider experimenting with graham cracker alternatives for the crust to add variety and flavor.
6. For added texture and flair, sprinkle crushed nuts or coconut on top before serving.
7. Use quality vanilla extract for an enhanced depth of flavor in the cheesecake.
8. Feel free to drizzle a homemade berry sauce over slices for an elegant presentation.

Variations and Adaptations

Substituting different fruits can create exciting new flavors for your cheesecake. For example, using blueberries or raspberries instead of strawberries provides a slightly tart twist.

Depending on the season, you can modify the cheesecake toppings to match available fruits or even use chocolate ganache for a decadent touch in colder months.

For dietary considerations, you can create a gluten-free version by using almond flour instead of graham cracker crumbs for the crust or opting for dairy-free cream cheese alternatives.

Experimenting with spices such as cinnamon or nutmeg can also elevate the flavor profile of your cheesecake, adding warmth and complexity.

Creative presentation alternatives can include layering sliced strawberries on top or forming a berry compote for a burst of color and taste.

Serving and Presentation Guide

Plating your Strawberry Crunch Cheesecake beautifully elevates the dessert. Use a slice remover to gently lift portions and present them on individual plates.

For garnishing, consider adding a sprig of mint or a dusting of powdered sugar for a refined touch. You might also decorate with additional sliced strawberries on the side or drizzle a berry sauce for added flavor.

Traditional accompaniments like whipped cream or vanilla ice cream pair exceptionally well, adding richness to the fruity cheesecake.

Serving temperature is crucial; allow the cheesecake to sit out for 10-15 minutes before serving, as it’s most flavorful when slightly softened.

Portion control can enhance the dining experience, especially with rich desserts. Cut smaller slices to allow guests to enjoy without feeling overwhelmed.

Wine and Beverage Pairing

Pairing your Strawberry Crunch Cheesecake with the right beverage can enhance the dessert experience. A sweet dessert wine, like a late harvest Riesling, complements the fruity flavors without overpowering them.

Alternatively, a sparkling rosé offers a refreshing contrast to the richness of the cheesecake, providing a balanced sip between bites.

For non-alcoholic options, a chilled hibiscus tea with a hint of lemon can add a lovely tartness that mirrors the strawberry notes.

Temperature is key; serve wines chilled and consider slight warming of hot beverages for a cozy pairing.

Incorporating a refreshing iced tea, lightly sweetened or with fresh mint, serves as an excellent alternative for warmer days.

Storage and Shelf Life

To maintain the decadent taste and texture, store your Strawberry Crunch Cheesecake in the refrigerator, ideally in an airtight container. This dessert keeps well for up to five days, ensuring you can enjoy leftovers.

If freezing, wrap the cheesecake in plastic wrap and then foil to prevent freezer burn. It can be frozen for up to three months without losing its delightful quality.

Signs of spoilage include changes in texture, an off smell, or mold formation; always inspect before enjoying stored cheesecake.

When reheating, allow gradual thawing in the refrigerator before serving to preserve consistency and flavor.

Frozen portions can be enjoyed cold or at room temperature, offering flexibility for serving.

Make Ahead Strategies

If you’re planning for a gathering, this Strawberry Crunch Cheesecake can be made a day in advance, allowing for perfect chilling time.

Store the cheesecake in the fridge overnight covered to avoid drying out or gathering unwanted odors. If preparing several days ahead, consider freezing and thawing in the fridge 24 hours before serving.

During preparation, you can prepare the crust and filling separately, storing the crust at room temperature, and the filling in the refrigerator until you’re ready to assemble.

For optimal freshness, add fresh strawberries or toppings just before serving to ensure fruits maintain their texture and flavor.

Reheating or serving fresh cheesecakes is easier and enhances the eating experience; avoid clutter before your gathering by organizing serving plates in advance.

Scaling Instructions

When scaling the Strawberry Crunch Cheesecake recipe, halving or doubling ingredients is straightforward. Keep ratios consistent for the best outcomes, particularly for the crust and filling.

For larger gatherings, consider using a larger springform pan or multiple smaller ones to ensure even baking. Ensure adjustments to cooking times based on the thickness of your cheesecake.

Monitor baking time closely, as changes can impact texture and doneness; the cheesecake should remain slightly jiggly in the center when done.

If you’re like to save portions, remember to adjust packaging sizes for freezing or serving; pack into appropriate sizes for convenience.

When planning to make multiple variations or flavors, prepare the base mixture and divide it into separate bowls to add fruit or flavorings individually.

Nutritional Deep Dive

The Strawberry Crunch Cheesecake contains a balanced macro breakdown: about 20g of fat, 30g of carbs, and 5g of protein per slice. The creamy richness from the cream cheese contributes to its fat content.

Micronutrient analysis shows it’s a source of vitamin C from strawberries, calcium from cream cheese, and beneficial antioxidants, making it an indulgence with health perks.

In moderate portions, this cheesecake aligns well with various dietary needs, but keep an eye on added sugars, especially for health-conscious consumers.

For weight management tips, consider savoring smaller portions, allowing the flavors to linger without excess calories.

Incorporating more whole ingredients and minimizing added sugars could enhance the overall nutritional profile while maintaining sweetness.

Dietary Adaptations

For those needing gluten-free desserts, replace graham crackers with almond flour or gluten-free cookie crumbs to maintain the crust’s integrity.

A dairy-free version can be achieved using vegan cream cheese and nut-based toppings to blend flavors without sacrificing texture.

For a vegan option, consider aquafaba in place of eggs in the filling, yielding a light and airy cheesecake without animal products.

Lower-carb or keto diets can utilize almond flour to create a suitable crust while minimizing sugar in the filling by using natural sweeteners like stevia.

Adaptations for paleo diets often encourage using natural sweeteners and whole food ingredients, focusing on unprocessed components.

Understanding these dietary modifications allows more people to enjoy the delightful experience of cheesecake while adhering to their personal preferences or restrictions.

Troubleshooting Guide

If your cheesecake has cracks, it could be due to rapid temperature changes; ensure your oven temperature is consistent, and cool the cheesecake slowly.

For texture issues, like a grainy or overly dense cheesecake, ensure cream cheese is at room temperature before mixing and don’t overmix ingredients.

Flavor balance problems can arise from too many or too few strawberries. Always taste the filling before baking to adjust sweetness or acidity as necessary.

If you’re encountering problems with ingredient substitutions, test out small batches to find suitable replacements that maintain the desired flavor and texture.

Timing concerns often arise; prepare for extended chilling and baking time due to variation in oven performance and ingredient temperatures.

Keeping a close eye on doneness is crucial; cakes should jiggle slightly in the center when finished rather than appearing solid.

Recipe Success Stories

Community feedback on this Strawberry Crunch Cheesecake has been overwhelmingly positive, with many raving about its lightness and burst of flavor. User stories often highlight successful adaptations and substitutions, inspiring others to try their variations.

Readers have noted how well the dessert holds up for gatherings, sharing photos that showcase their creative presentations and proud achievements.

Feedback regarding the ease of the recipe has encouraged novice bakers to venture into cheesecake-making, boosting confidence and kitchen skills.

Social media sharing has become a trend, with stunning photography capturing the vibrant beauty of this cheesecake, encouraging further engagement within cooking communities.

This dessert has transformed into a favorite for potlucks and family celebrations, consistently eliciting requests for the recipe and variations from attendees.

Frequently Asked Questions

Can I use frozen strawberries in this recipe? Yes, frozen strawberries can be used, but make sure to thaw and drain excess liquid to prevent a watery filling.

How do I know when my cheesecake is done baking? A cheesecake is done when the edges are set, but there’s a slight jiggle in the center. It will continue to firm as it cools.

Can I make this cheesecake ahead of time? Absolutely! This cheesecake can be made a day in advance or frozen for longer storage, ensuring it’s ready for your gathering.

What can I use if I don’t have a springform pan? You can use a regular pie pan, but be sure to line it well for easier removal after baking.

How can I fix a cracked cheesecake? To fix a crack, consider topping it with fresh strawberries or a fruit glaze to hide imperfections while adding flavor.

Is this recipe suitable for diabetics? The strawberry cheesecake can be adapted by using sugar substitutes and whole grain crusts, making it more diabetic-friendly.

How long can I store the cheesecake in the fridge? The cheesecake can last up to five days in the refrigerator. Keep it well covered to maintain freshness.

Can I swap cream cheese for Greek yogurt? Using Greek yogurt will change the texture and taste but can produce a lighter version of the cheesecake.

What are the best toppings for this cheesecake? Fresh whipped cream, fruit compote, or drizzled chocolate all complement the cheesecake superbly while enhancing its beauty.

Can I make mini cheesecakes with this recipe? Yes, you can use muffin tins to create mini cheesecakes. Adjust baking time accordingly to ensure they set properly.

Additional Resources

If you enjoyed this Strawberry Crunch Cheesecake, check out related recipes such as Chocolate Raspberry Cheesecake or Classic New York Cheesecake for new twists on popular desserts.

For mastering cheesecakes further, explore technique guides that delve into baking, cooling, and slicing with finesse.

Ingredient information, including seasonal produce lists, can help inspire you to make the most of what’s fresh and available for your desserts.

Consider investing in equipment recommendations for successful baking, as high-quality pans and mixers can significantly impact results.

Seasonal variations can offer exciting ideas, such as incorporating pumpkin for autumn or citrus fruits for festive winter desserts.

Join the Conversation

We’d love to see your Strawberry Crunch Cheesecake creations! Share your photos on social media, and don’t forget to tag us.

Photography tips can enhance your dessert snaps, ensuring you capture the beautiful colors and textures of your cheesecake perfectly.

Leave a review to help other bakers discover the joys of this recipe, sharing any variations or tips you found helpful.

Engage with our community by sharing your feedback, adaptations, or even failure stories, as every experience contributes to our collective growth in the kitchen.

Explore different recipe variations and let us know your favorites, as we’re excited to see how you make this cheesecake your own!

The Recipe

Strawberry Crunch Cheesecake

Serves: 8 slices

Prep Time: 30 mins

Cook Time: 60 mins

Total Time: 90 mins

Kitchen Equipment Needed

  • Springform pan
  • Mixing bowl
  • Electric mixer
  • Spatula
  • Measuring cups and spoons
  • Paring knife for slicing
  • Small saucepan (for berry sauce optional)

Ingredients

  • 1.5 cups graham cracker crumbs
  • 1/2 cup unsalted butter, melted
  • 1/4 cup sugar
  • 3 (8 oz) packages cream cheese, softened
  • 1 cup sugar (for cheesecake filling)
  • 3 large eggs
  • 2 teaspoons vanilla extract
  • 2 cups fresh strawberries, pureed and hulled
  • 1 cup strawberries, sliced for topping
  • 1 cup crushed nuts or crunchy topping (optional)

Directions

  1. Preheat your oven to 325°F (160°C). Prepare a springform pan by lining the bottom with parchment paper.
  2. In a mixing bowl, combine the graham cracker crumbs, melted butter, and sugar until evenly moistened. Press the mixture firmly into the bottom of the prepared pan.
  3. In a separate bowl, beat the cream cheese until smooth. Gradually add 1 cup sugar, continuing to mix until well combined.
  4. Add the eggs one at a time, mixing well after each addition. Stir in the vanilla extract and pureed strawberries.
  5. Pour the cream cheese mixture over the crust in the springform pan. Smooth the top with a spatula.
  6. Bake in the preheated oven for about 60 minutes or until the edges are set, and the center still slightly jiggles.
  7. Remove the cheesecake from the oven and allow it to cool to room temperature in the pan. Then refrigerate for at least 4 hours or overnight for best results.
  8. Before serving, top with sliced strawberries and optional crushed nuts for garnish. Slice and enjoy!

Recipe Notes

  • Feel free to adjust the sweetness to your liking, particularly when using fresh or frozen strawberries.
  • If desired, you can add a layer of strawberry glaze or chocolate ganache on top for added flavor.
  • Make sure to release the springform pan gently to preserve the shape of the cheesecake when removing it.
  • Consider doubling the recipe for larger gatherings and using a larger pan accordingly.

Delicious No-Bake Coconut Pecan Praline Cookies for Everyone

No-Bake Coconut Pecan Praline Cookies: A Deliciously Easy Treat

⚖️
Difficulty
Easy

⏲️
Prep Time
15 mins

🕒
Cook Time
0 mins

⏱️
Total Time
15 mins

🍽️
Servings
24 cookies

The allure of No-Bake Coconut Pecan Praline Cookies lies in their simple preparation and delightful combination of flavors. These cookies are a fantastic way to indulge your sweet tooth without any baking involved. Imagine the taste of crunchy pecans, sweet coconut, and a rich, creamy base all melded together to create a bite-sized treat that is perfect for any occasion. Whether you’re whipping them up for a holiday gathering, a special celebration, or just a cozy night in, these cookies are sure to impress.

In addition to their irresistible flavor, No-Bake Coconut Pecan Praline Cookies also offer a delightful texture experience. Each bite provides a satisfying crunch from the pecans and a chewy, sticky sweetness from the coconut. The creamy base creates a comforting mouthfeel that balances perfectly with the crunchy toppings. Plus, these cookies are incredibly quick to make—no oven required! Just mix the ingredients and let them set, making them ideal for anyone who wants a quick and delicious dessert.

Quick Recipe Highlights

  • Flavor Profile: Rich and sweet with caramel-like notes from the pecans, complemented by a chewy coconut texture.
  • Texture: A perfect blend of crunchy and chewy, making them great for savoring.
  • Aroma: A sweet, nutty aroma that wafts through your kitchen as these cookies set.
  • Visual Appeal: Golden-brown from the gorgeous pecans, speckled with white coconut flakes.
  • Skill Level Needed: Requires minimal skill, perfect for beginners or children to assist in the kitchen.
  • Special Equipment: No special equipment required—just a mixing bowl and a baking sheet lined with parchment paper.

Recipe Overview

  • Difficulty Level: These No-Bake Coconut Pecan Praline Cookies are incredibly easy to make, involving no cooking or baking techniques. They require simple mixing and preparation, making them suitable for all skill levels.
  • Category: This recipe falls under the dessert category, ideal for satisfyling sweet cravings after meals or as an afternoon snack.
  • Cuisine: Influenced by Southern dessert traditions, these cookies embrace the flavors common in southern cooking, especially the use of peanuts and coconuts.
  • Cost: The ingredients are affordable, with costs varying, but generally, you can expect to make this treat on a budget.
  • Season: These cookies are perfect year-round, but especially enjoyable during the warmer months when you don’t want to heat up your kitchen.
  • Occasion: Ideal for parties, potlucks, or as a sweet treat for gatherings with family and friends.

Why You’ll Love This Recipe

These No-Bake Coconut Pecan Praline Cookies offer a taste and texture that will excite your palate. The combination of crunchy pecans and sweet coconut creates a delightful treat that is both satisfying and indulgent. The richness of the ingredients melds beautifully, delivering a cookie that feels luxurious yet is quick to prepare.

Convenience is another great reason to love this recipe. With just a few key ingredients mixed together, these cookies require no baking time, allowing you to whip them up in a matter of minutes. After mixing, simply let them set, and you’ll have a delicious treat ready to be devoured, no fuss needed.

Nutritionally, these cookies provide a balance of flavors and textures without excess calories. Pecans are rich in healthy fats and proteins, while coconut offers fiber. This makes them a more wholesome option compared to many traditional baked goods that are often filled with sugar and unhealthy fats.

These cookies also make a great addition to social gatherings. Their decadent appearance and delightful flavor are guaranteed to capture attention and impress your guests, making you the star of any event. They invite sharing and conversation, creating memorable moments around the table.

Lastly, the cost-effectiveness of this recipe is a significant plus. You can indulge in these tasty treats without breaking the bank, and many ingredients might already be staples in your pantry. This allows you to enjoy delicious homemade cookies at a fraction of the cost of store-bought options.

Historical Background and Cultural Significance

The origins of No-Bake Coconut Pecan Praline Cookies can be traced back to Southern kitchens in the United States, where pecans and coconut are often celebrated ingredients. Both components symbolize comfort and tradition in Southern cooking. Pecans, a native American nut, have been a staple ingredient in the South for centuries, often featured in desserts.

Culturally, these cookies hold a special place in culinary traditions, especially during festive seasons. They are often enjoyed during holidays and gatherings, serving as a sweet treat to bring friends and family together. The practice of making no-bake cookies has also been embraced in households for their simplicity and ease, allowing busy families to enjoy sweet treats with minimal effort.

As time has passed, the recipe for No-Bake Coconut Pecan Cookies has evolved, with home cooks adding their unique twists or ingredients, like chocolate or additional spices, to adapt to personal tastes. This evolution reflects a broader trend in baking culture that emphasizes creativity and personal expression.

Regional variations have sprung up too, with some areas incorporating local flavors or added ingredients. For instance, tropical regions might enhance the recipe with fruits such as mango or pineapple, adding a refreshing twist to the traditional flavors.

Ingredient Deep Dive

– **Pecans**: Pecans are often associated with Southern cooking and celebrate the harvest season in many regions. They are full of healthy fats, vitamin E, and antioxidants. When selecting pecans, look for fresh, plump nuts that have a rich aroma. Store them in a cool, dry place to maintain their freshness, and consider using them within a few months to avoid rancidity. If you don’t have pecans, walnuts or almonds can serve as great substitutes.

– **Coconut**: Coconut has long been celebrated in various cuisines around the world, from tropical desserts to savory dishes. It contains beneficial medium-chain triglycerides (MCTs), making it a sought-after ingredient for health-conscious cooks. When choosing coconut, ensure you select unsweetened shredded coconut for a more natural flavor. Store it in an airtight container to prolong freshness. If you’re looking for alternatives, you can use other nuts or seeds to achieve a different flavor profile.

Common Mistakes to Avoid

  • Not measuring ingredients accurately can lead to an unbalanced flavor. Always use measuring cups and spoons for precision.
  • Forgetting to chill the mixture can result in cookies that don’t hold their shape. Be sure to allow adequate setting time in the refrigerator.
  • Using sweetened coconut can make the cookies overly sweet. Stick to unsweetened shredded coconut for a balanced flavor.
  • Not using parchment paper can result in cookies that stick to the baking sheet. Always line your tray for easy removal.
  • Overmixing the ingredients can lead to a dense texture. Mix just until combined for the best results.
  • Using stale nuts can affect the flavor dramatically. Always opt for fresh nuts and store them properly.
  • Not letting the cookies cool completely will make them too sticky and hard to lift. Patience is key when setting them.
  • Skipping flavor additions like vanilla extract can take away from the overall taste depth. Always consider adding a splash for enhancement.

Essential Techniques

– **Mixing**: Proper mixing is crucial as it ensures that all the ingredients are well combined. Overmixing can lead to dense cookies, while undermixing can leave lumps of unincorporated ingredients. A folding technique can help in achieving a light and airy texture.

– **Setting**: Allowing the cookies ample time to set in the fridge is essential for proper texture. Setting helps them firm up, making them easier to slice and serve. Look for a firm but slightly sticky texture as a sign that they’ve set correctly.

Pro Tips for Perfect No-Bake Coconut Pecan Praline Cookies

1. Consider toasting the pecans before mixing for a deeper flavor and crunchiness. Just be sure to let them cool before adding to the mixture.

2. For extra flavor, adding a pinch of salt can elevate the sweetness and balance the flavor.

3. Use a cookie scoop for even portions, ensuring they are all uniform in size and cook evenly.

4. If you prefer a chewier cookie, slightly increase the amount of coconut in the mix.

5. For a gourmet touch, drizzle melted chocolate over the finished cookies after they have set.

6. Store the cookies in the refrigerator between layers of parchment paper to prevent sticking.

7. Experiment with different nut types or additions, like dried fruits for a unique twist.

8. Leaving the mixture slightly crumbly before forming can create a textured crumb in the finished cookie.

Variations and Adaptations

If you’re looking for a twist, consider adding seasonal flavors like pumpkin spice in the fall or peppermint during the winter holidays. Adjusting the base mixture by incorporating different ingredients like almond or peanut butter can give a unique flavor. For a vegan adaptation, use coconut oil instead of any dairy-based ingredients.

If you’re aiming for a keto-friendly version, substitute regular sweeteners with a sugar-free alternative. For added texture, consider incorporating chia seeds or flaxseeds into the mixture for added nutrition. You can also try sprinkling extra coconut flakes on top for a decorative touch, or creating themed shapes according to seasonal occasions.

Serving and Presentation Guide

To beautifully present your No-Bake Coconut Pecan Praline Cookies, consider using a tiered dessert stand for height and visual interest at gatherings. Garnishing with a sprinkle of extra shredded coconut or nuts can add an appealing contrast and a fresh look.

Traditional accompaniments like a scoop of vanilla ice cream or whipped cream serve well alongside these cookies for added indulgence. Alternatively, a fresh fruit salad can offer a refreshing counterpoint to the sweetness of the cookies.

Consider serving them on decorative plates, and if desired, drizzle a chocolate sauce before serving to enhance the presentation. Always remember to serve them chilled to maintain their texture and flavor integrity.

Wine and Beverage Pairing

For drink pairings, consider a sweet dessert wine like a Moscato or a light white wine to complement the flavors of coconut and pecans beautifully. The refreshing crispness of a Prosecco also pairs well, balancing the sweetness of the cookies.

For non-alcoholic alternatives, try pairing with a creamy coconut milkshake or iced coffee for a refreshing treat. A chai latte can also be delightful, as the warm spices can mesh perfectly with the flavor of the cookies.

When serving with tea, consider a light herbal tea, such as chamomile or peppermint, to keep the palate refreshed between bites.

Storage and Shelf Life

No-Bake Coconut Pecan Praline Cookies can be stored in an airtight container in the refrigerator. When stored correctly, they can last up to a week. For longer storage, consider wrapping them in plastic wrap before placing them in an airtight container.

Ensure they are fully cooled and firm before storing to maintain their texture and prevent sticking. Avoid leaving them at room temperature for extended periods, as they may become too soft.

If planning to keep them for longer, consider freezing the cookies. Layer them with parchment paper in an airtight container for up to three months. When ready to enjoy, simply thaw them in the refrigerator.

Make Ahead Strategies

To save time, consider preparing the No-Bake Coconut Pecan Praline Cookie mixture a day in advance. After mixing, store it in the refrigerator until you’re ready to shape and set the cookies.

You can also keep formed cookies in the fridge for up to a week before they need to be served, which makes them an excellent option for parties. If you plan on traveling with them, let them set in the container you’ll transport them in to minimize handling.

When reheating, avoid using a microwave as that can alter the texture. Instead, let them come to room temperature before serving. Additionally, consider adding fresh toppings or drizzles just before serving to maintain a fresh and appealing look.

Scaling Instructions

Scaling this No-Bake Coconut Pecan Praline Cookie recipe is straightforward. To halve the recipe, simply divide all ingredients by two, adjusting the setting time if needed. If doubling or tripling, ensure you have a larger mixing bowl to accommodate the increased volume.

Adjust cooking or setting time to allow for larger quantities; they may need a little longer due to a thicker mixture. When scaling, be mindful of the container size used for storage and ensure it’s suitable for the total number of cookies you’re making.

Keep in mind the proportions of the ingredients to maintain the flavor integrity, especially if experimenting with additional ingredients or substitutions. If making larger batches, consider rotating them in the refrigerator for efficient chilling.

Nutritional Deep Dive

When enjoying your No-Bake Coconut Pecan Praline Cookies, it’s helpful to understand their nutritional composition. Each cookie provides a good source of healthy fats due to the pecans, which also offer protein and fiber.

These cookies are naturally high in sugar from the coconut and any additional sweeteners used. Understanding portion control is essential, especially if monitoring sugar intake.

The inclusion of coconut provides some micronutrients, including manganese and copper, essential for metabolism and heart health. Additionally, pecans contribute a wealth of antioxidants, supporting overall health and wellness.

Mindful consumption can suit weight management strategies, as the wholesome ingredients in moderation can be satisfying, aiding in curbing cravings for less nutritious options.

Dietary Adaptations

For gluten-free options, use gluten-free ingredients to ensure the cookies remain safe for individuals with gluten sensitivities. Dairy-free adaptations can be achieved by using coconut oil or dairy-free ingredients instead of traditional dairy products.

If vegan, make sure to select sweeteners that do not contain animal products. Low-carb or keto-friendly versions can utilize sugar substitutes like erythritol to keep carbs low while maintaining sweetness.

Those following a paleo or Whole30 diet should ensure each ingredient aligns with their dietary restrictions. There are also low-FODMAP adjustments if sensitive to certain sugars found in traditional sweeteners.

Exploring these variations opens the door for more people to enjoy the recipe without compromising dietary preferences.

Troubleshooting Guide

For texture issues, if the cookies are too crumbly or too sticky, assess your ingredient ratios; adding a little more coconut can help bind them.

Flavor balancing problems can often be fixed with a touch of salt, which elevates sweetness. If the mixture has a strong coconut taste, consider incorporating more pecans for a balanced profile.

Temperature challenges occur when cookies do not set correctly. Ensure they are stored properly in the refrigerator before serving. If cookies melt too quickly upon serving, try adjusting the fridge time before creating them.

If you encounter equipment challenges, make sure your measuring tools are accurate to avoid under or over-mixing ingredients. Timing concerns often arise; letting the cookies sit longer can help them solidify better.

Recipe Success Stories

Community feedback often highlights the ease of preparation, making these cookies a favorite among busy families. Variations abound, with readers delighted in trying different nuts and flavorings, sharing their adaptations with the community.

Many have successfully incorporated these cookies into special occasions, citing them as a hit among both adults and children alike. Visual appeal also stands out, as families share photos on social media of their beautifully presented cookies.

Readers have shared suggestions for additional ingredients, fostering an encouraging culture of creativity and experimentation. Photography tips have also circulated, enhancing people’s ability to showcase their culinary accomplishments.

Frequently Asked Questions

Can I use sweetened coconut in this recipe?
While sweetened coconut is technically usable, it may overpower the flavors of the cookies. Unsweetened coconut is recommended for a more balanced sweetness.

How long do these cookies last?
When stored properly in an airtight container, No-Bake Coconut Pecan Praline Cookies can last up to a week in the refrigerator and up to three months in the freezer.

Are these cookies gluten-free?
Yes, this recipe is naturally gluten-free provided you use gluten-free ingredients. Always check label for potential cross-contamination.

Can I substitute other nuts?
Absolutely! If you don’t have pecans on hand, feel free to use any type of nut you prefer, such as walnuts or cashews.

What is the best way to store these cookies?
Store in an airtight container in the fridge, separating each layer with parchment paper to prevent sticking.

How do I make these cookies vegan?
Ensure all ingredients are plant-based; utilize vegan alternatives for any dairy products that may be included.

Can I freeze these cookies?
Yes! They freeze beautifully and keep well for up to three months, making them a great make-ahead option.

How do I serve these cookies?
Serve chilled or at room temperature, and consider garnishing them with extra coconut or nuts for a decorative touch.

Can I adjust the sweetness?
Yes, feel free to add or reduce the sweetener to suit your preference. Monitor the mixture’s consistency as you adjust.

What equipment do I need for this recipe?
You will need a mixing bowl, measuring cups and spoons, and a baking sheet lined with parchment paper.

Additional Resources

For more delightful no-bake recipes, check our blog for variations and alternatives. Technique guides are available for mastering the art of no-bake desserts, providing tips on mixing, setting, and garnishing.

Ingredient information resources give deeper insights into each component, helping you make better selections when cooking or baking. Equipment recommendations list essential tools to simplify your food prep experience.

Lastly, seasonal variations are provided to keep your cooking fresh, bringing new flavors to the table, perfect for celebrating holidays or special events.

Join the Conversation

We would love to hear your experience with No-Bake Coconut Pecan Praline Cookies! Share your photos on social media and connect with our community for photography tips and recipe reviews.

Discuss your favorite variations with others and engage in recipe brainstorming, expanding flavor possibilities together. Participation in this culinary journey can lead to creative new versions and cherished community connections.

The Recipe

No-Bake Coconut Pecan Praline Cookies

Serves: 24 cookies

Prep Time: 15 mins

Cook Time: 0 mins

Total Time: 15 mins

Kitchen Equipment Needed

  • Mixing bowl
  • Measuring cups and spoons
  • Baking sheet
  • Parchment paper

Ingredients

  • 1 cup chopped pecans
  • 1 cup unsweetened shredded coconut
  • 1/2 cup creamy peanut butter
  • 1/2 cup honey or maple syrup
  • 1 teaspoon vanilla extract

Directions

  1. In a mixing bowl, combine the chopped pecans and shredded coconut.
  2. In a separate bowl, mix peanut butter, honey (or maple syrup), and vanilla extract until smooth.
  3. Combine the wet and dry ingredients, mixing well until evenly coated.
  4. Using a scoop or spoon, drop rounded tablespoons onto a prepared baking sheet lined with parchment paper.
  5. Refrigerate for at least 1 hour until set.
  6. Enjoy chilled or at room temperature!

Recipe Notes

  • Feel free to swap in any nuts or add chocolate chips for extra flavor.
  • For added sweetness, sprinkle some cinnamon into the mixture.
  • These cookies can be stored in an airtight container for a week or frozen for up to 3 months.

Indulge in Heavenly Banana Cake with Cream Cheese Frosting

Heavenly Banana Cake with Cream Cheese Frosting: A Sweet Slice of Bliss

⚖️
Difficulty
Medium

⏲️
Prep Time
20 mins

🕒
Cook Time
30 mins

⏱️
Total Time
50 mins

🍽️
Servings
12

Banana cake is a delightful dessert that brings comfort and joy in every bite. Packed with ripe bananas, this heavenly banana cake pairs beautifully with velvety cream cheese frosting, creating a balance of flavors that dances on your palate. From the first forkful, you’ll be enchanted by the moist crumb and the rich, sweet undertones of banana, making it a perfect choice for birthdays, potlucks, or any day that calls for a sweet treat.

This Heavenly Banana Cake is more than just dessert; it’s a deeply comforting dish that evokes nostalgia. Many of us have fond memories of baking banana bread or cake with family, and this recipe takes those beloved flavors to new heights. As the cake bakes, your kitchen will be filled with the warm, inviting aroma of caramelizing bananas, promising deliciousness. Each slice reveals its luscious cream cheese frosting, making it an eye-catching centerpiece that is as delightful to look at as it is to eat.

Quick Recipe Highlights

  • Flavor Profile: This cake showcases the rich sweetness of ripe bananas complemented by the tangy creaminess of the frosting. Each bite is a heavenly indulgence.
  • Texture: The cake itself is incredibly moist and fluffy, while the cream cheese frosting adds a smooth, creamy layer that contrasts beautifully.
  • Aroma: Expect an enticing aroma of baked bananas and a hint of vanilla that will make your mouth water as it bakes.
  • Visual Appeal: The beautiful golden color of the cake topped with a generous swirl of creamy frosting creates an inviting presentation.
  • Skill Level Needed: This is a medium-difficulty recipe, ideal for home bakers who are comfortable with basic mixing and baking techniques.
  • Special Equipment: You will need standard baking equipment such as mixing bowls, measuring cups, a spatula, and a cake pan.

Recipe Overview

  • Difficulty Level: This Heavenly Banana Cake recipe is classified as medium in difficulty, perfect for bakers who are familiar with mixing and baking practices.
  • Category: This recipe fits beautifully into the dessert category, particularly for sweet cakes or celebration desserts.
  • Cuisine: While banana cake is enjoyed in many cultures, this version draws from American baking traditions, emphasizing the use of bananas as a key ingredient.
  • Cost: This cake is budget-friendly, using modestly priced ingredients like bananas, flour, and sugar, making it accessible for any home cook.
  • Season: Ripe bananas are available all year round, but this cake is especially popular in the late summer and fall when bananas are perfectly sweet.
  • Occasion: Perfect for birthdays, family gatherings, or casual get-togethers, this cake will impress guests at any occasion.

Why You’ll Love This Recipe

The taste and texture of this cake will win over anyone who tries it. The combination of sweet, ripe bananas creates a moist, flavorful cake that is anything but ordinary. The frosting adds just the right amount of tang and sweetness, creating a luxurious feel that elevates your everyday dessert to a special occasion treat. You will find that each forkful delivers comfort, making it irresistible!

Convenience is another major selling point of this recipe. With simple ingredients and straightforward instructions, this banana cake can easily be whipped up in no time. The batter comes together quickly, allowing you to focus on the fun part: frosting and decorating the cake. Its quick preparation relative to the payoff makes it a go-to recipe for busy bakers who still want to create something incredible.

Nutritionally, bananas are a great source of potassium and vitamins, adding a slight health benefit to this indulgent cake. The addition of cream cheese offers some calcium and protein, making this delicious dessert a little more balanced. While desserts are meant to be enjoyed, this cake does provide some nutritional value that can make you feel less guilty about indulging.

When hosting gatherings or parties, this Heavenly Banana Cake will surely be a crowd-pleaser. It’s large enough to feed a group, making it an ideal choice for sharing. The delightful flavors and striking presentation will impress your guests, and their smiles of delight will make it all worthwhile.

Cost-effectiveness is always a plus when cooking, and this recipe uses simple, common ingredients that won’t break the bank. With bananas as your star ingredient, you’re making a delicious cake that makes the most of inexpensive components. It’s an accessible recipe for any home baker looking to satisfy a sweet tooth without overspending.

Historical Background and Cultural Significance

Banana cake has interesting origins tracing back to times when overripe bananas were often mashed and incorporated into batter to reduce waste. This method transformed what was once a simple fruit into a delectable dessert. Many cultures have their versions, with each adding a unique spin on texture and flavor, leading to various adaptations of the banana cake.

The cultural significance of banana cake differs around the world. In many households, banana cake is a beloved family recipe passed down through generations. It’s not just a cake; it’s a symbol of affection, homemade love, and memories baked into each slice. Its appeal spans various cuisines, showcasing how ingredients like bananas can connect us through shared desserts.

As the years went by, the evolution of this recipe saw the introduction of various frostings and additional flavorings, such as nuts, chocolate, or spices, like cinnamon and nutmeg. As the banana cake became popular, many home bakers began enhancing the flavors, transitioning it into a more versatile dessert that can fit many occasions, from formal gatherings to casual dinners.

Regional variations of banana cake exist, with some cultures opting for a denser bread-like form while others create lighter, fluffier cakes. Each version reflects local tastes and preferences, highlighting how a simple banana can shine in numerous culinary contexts while bringing friends and families together.

Ingredient Deep Dive

  • Bananas

    Bananas have a rich history, believed to have originated in Southeast Asia. Their sweetness and versatility have made them a staple in many diets worldwide. Nutritionally, bananas are high in potassium, vitamin C, and dietary fiber. When selecting bananas for baking, look for those with a few brown spots, which indicate ripeness and sweetness. Store ripe bananas at room temperature, and when they start to brown too much, transfer them to the refrigerator to slow down ripening. If fresh bananas are not available, frozen bananas can be used as a perfect substitute for baking.

  • All-Purpose Flour

    All-purpose flour is a foundational ingredient in baking, used for everything from bread to cakes. It’s milled from wheat and can vary between protein content but is suitable for a variety of recipes. Nutritionally, flour provides carbohydrates that are essential for energy. When selecting flour, choose a brand that you trust for consistent results, and store it in a cool, dry place to extend its shelf life. If you want to make this cake gluten-free, alternatives like almond flour or coconut flour can be excellent substitutes but may require adjustments in the recipe.

  • Cream Cheese

    Cream cheese has been a popular ingredient in desserts since the 18th century. It creates a rich and tangy frosting that contrasts beautifully with the sweetness of banana cake. Cream cheese is high in calcium, making it an excellent choice for those needing nutritional value. When selecting cream cheese, make sure you choose a full-fat version for the best texture. Store it in the refrigerator, and once opened, consume it within two weeks. If you’re looking for a healthier alternative, you can replace cream cheese with Greek yogurt mixed with a bit of powdered sugar to mimic the taste.

Common Mistakes to Avoid

  • Using underripe bananas: Underripe bananas can result in a less sweet, dense cake. Opt for fully ripe bananas for optimal flavor.
  • Overmixing the batter: Overmixing can lead to tough cake. Mix just until ingredients are combined for a tender texture.
  • Not measuring accurately: Baking is a science. Use a kitchen scale or measuring cups for precision to avoid discrepancies in texture.
  • Not preheating the oven: A preheated oven ensures consistent baking and helps the cake rise properly. Always check your oven’s accuracy.
  • Skipping the cooling stage: Letting the cake cool before frosting allows the frosting to set and prevents melting. Always cool cakes on a wire rack.
  • Frosting too early: Frosting a warm cake can cause the frosting to melt. Wait until the cake is completely cool before applying frosting.
  • Omitting flavorings: Vanilla extract and other flavorings enhance the overall taste. Don’t skip these important ingredients!
  • Using cold cream cheese: Cold cream cheese can be hard to blend smoothly. Bring it to room temperature for easy mixing.
  • Not adjusting for altitude: If you live at high elevations, adjustments in baking may be necessary due to lower air pressure.
  • Ignoring ingredient substitutions: Substituting ingredients can alter the taste or texture. Research alternatives to understand how they will affect the recipe.

Essential Techniques

– **Creaming Butter and Sugar**: This technique is crucial for creating a light and airy cake. The process incorporates air into the batter and establishes a tender crumb. To master this, ensure your butter is softened to room temperature and cream until the mixture is pale and fluffy. Avoid over-creaming, which can result in excessive air pockets and dryness.

– **Folding Techniques**: When incorporating banana puree or whipped cream into the batter, use a gentle folding motion to maintain airiness. This is vital for a light cake. Use a spatula and move through the batter without deflating it.

– **Checking for Doneness**: Ensure your cake is properly baked by using a toothpick inserted into the center; it should come out clean or with a few crumbs. If it comes out wet, bake for a few additional minutes.

– **Maintaining Temperature**: Always allow ingredients to reach room temperature before baking. This helps emulsify fats and gives you a smooth, consistent batter. Having eggs, butter, and cream cheese at room temperature will significantly improve your cake’s texture.

Pro Tips for Perfect Heavenly Banana Cake

– Use very ripe bananas for the best sweetness and flavor.
– For added texture, fold in chopped walnuts or chocolate chips into the batter.
– Experiment with spices like cinnamon or nutmeg for an added depth of flavor.
– If you prefer a layered cake, double the recipe and stack with frosting and fresh fruit between the layers.
– Keep the cake refrigerated if not served immediately to preserve freshness.
– Allow the frosting to come to room temperature before serving for a creamy texture.
– Garnish each slice with banana slices for added visual appeal.
– For a lighter frosting, use whipped cream cheese and reduce sugar for a less dense topping.

Variations and Adaptations

– **Regional Variations**: Some cultures incorporate coconut or vanilla extract into their batter, offering unique sights and flavors for the cake.
– **Seasonal Adaptations**: In fall, try adding pumpkin spice to the batter for a seasonal twist that complements the banana flavors beautifully.
– **Dietary Modifications**: Gluten-free bakers can substitute regular flour with a gluten-free blend. Ensure that it has a binding agent, such as xantham gum.
– **Flavor Variations**: Incorporate ripe, mashed strawberries or blueberries along with bananas for a fruity explosion.
– **Texture Modifications**: For a denser cake, try using whole wheat flour, which can add nuttiness.
– **Presentation Alternatives**: Decorate with toasted coconut flakes or crushed nuts on top of your frosting for a beautiful finish.

Serving and Presentation Guide

To plate your Heavenly Banana Cake beautifully, opt for a white or pastel-colored plate to contrast the deep yellow hues of the cake. Use a serrated knife to create clean slices, ensuring the frosting does not smear. Garnishing with fresh banana slices or a dusting of powdered sugar can elevate the visual presentation. For an elegant touch, serve with a scoop of vanilla ice cream or a dollop of whipped cream on the side. Serve at room temperature for the best experience in flavor and texture.

Wine and Beverage Pairing

When it comes to pairing beverages with your Heavenly Banana Cake, opt for a light-bodied dessert wine such as Moscato or a sweet Riesling that complements the tropical flavors perfectly. For non-alcoholic options, consider pairing with a refreshing iced tea or coconut lemonade. If you’re a coffee lover, a medium roast brewed coffee will enhance the cake’s sweetness and depth. Always serve these beverages chilled for a refreshing experience.

Storage and Shelf Life

To maximize the freshness of your Heavenly Banana Cake, store it in an airtight container at room temperature for up to four days. If you need to keep it longer, refrigeration is an option, extending its life up to a week. When refrigerating, wrap the cake properly with plastic wrap to prevent it from drying out. Signs of spoilage include an off smell or mold growth. For longer storage, consider freezing slices in an airtight container for up to three months. To enjoy, simply thaw in the refrigerator overnight.

Make Ahead Strategies

This cake can be prepared in several stages. Bake the cake a day in advance and keep it tightly wrapped. Frost it on the day of serving for best results. Alternatively, you can prepare the frosting ahead of time and store it in the refrigerator for up to five days before use. Consider making a double batch to enjoy on another occasion. Just ensure you allow the frosting to come back to room temperature before applying it to the cake.

Scaling Instructions

Should you wish to halve this recipe, simply divide all ingredient quantities by two and use a smaller cake pan. Conversely, if you’re feeling ambitious, doubling or tripling the recipe can be done easily; just make sure to increase your bake time accordingly. Always monitor the cake closely during baking, as larger quantities might require slight adjustments to timing. Ensure that if you’re using larger baking pans, they fit comfortably in your oven, allowing for even heat distribution.

Nutritional Deep Dive

The Heavenly Banana Cake provides a delicious balance of macronutrients, including carbohydrates from the bananas and flour, proteins from the cream cheese, and fats from additional ingredients. Each slice packs a punch of vitamins, particularly due to the potassium content from bananas and the calcium from cream cheese. Consider moderation in serving size, especially for weight management. If you’re trying to manage your caloric intake, pairing this dessert with a fruit salad can further enhance nutritional benefits while satisfying your sweet cravings.

Dietary Adaptations

For those needing dietary adaptations, this recipe can easily cater to various needs. To make it gluten-free, substitute all-purpose flour with a 1:1 gluten-free blend. You may also use almond milk or coconut milk instead of whole milk in the frosting for a dairy-free option. For a vegan adaptational option, use flax eggs in place of regular eggs and a dairy-free cream cheese alternative. Low-carb and keto versions can utilize almond flour combined with erythritol as a sugar substitute to make a delicious alternative without sacrificing flavor.

Troubleshooting Guide

If your cake comes out too dense, it may be due to overmixing the batter or using bananas that are not ripe enough. To fix texture issues in the future, ensure ingredients are at room temperature and do not overmix. If you find the flavor lacking, you could enhance it with spices or extracts. Should your frosting melt off the cake, ensure it’s completely cooled before icing. Always check your oven temperature to avoid baking issues. Adjust timing based on your equipment, as some ovens bake faster than others.

Recipe Success Stories

Community feedback on this Heavenly Banana Cake has been overwhelmingly positive. Many readers have shared their success with variations, such as adding chocolate chips or nuts. Adaptation stories often include families passing the recipe down through generations, reiterating how comfort food like this cake can bring people together. Photography tips abound as bakers showcase their creations online, highlighting the beautiful presentation of their cakes. Sharing recipe reviews encourages a sense of community among home bakers, driving home the charm of making this delightful dessert.

Frequently Asked Questions

Can I use frozen bananas for this recipe?

Yes, frozen bananas are a great substitute for fresh ones. Just make sure to thaw and mash them thoroughly before adding to the batter.

How should I store leftover cake?

To store leftover cake, keep it in an airtight container at room temperature for up to four days or refrigerate for up to a week.

What can I use instead of cream cheese for the frosting?

A good alternative to cream cheese could be mascarpone cheese or a dairy-free cream cheese substitute for those with dietary restrictions.

Can I make this cake in advance?

Yes! You can bake the cake a day ahead of time and frost it on the day you plan to serve it for optimal freshness.

What kind of flour can I use for gluten-free cake?

You can use a gluten-free all-purpose flour blend, but be sure to include a binding agent like xanthan gum if your mix does not contain it.

How can I tell when the cake is done baking?

Insert a toothpick in the center of the cake; if it comes out clean or with a few moist crumbs, your cake is done.

What are the best bananas to use?

The best bananas for this cake are those that are overripe with plenty of brown spots, as they provide maximum sweetness and moisture.

Can I add nuts to my batter?

Absolutely! Chopped walnuts or pecans can be added to the batter for a delightful crunch and flavor enhancement.

Is this cake suitable for freezing?

Yes, this cake can be frozen. Wrap slices in plastic wrap, then in foil and keep frozen for up to three months.

How can I enhance the flavor of my cake?

You can add vanilla extract or spices like cinnamon and nutmeg to elevate the taste profile of your banana cake.

Additional Resources

Explore related recipes that complement your Heavenly Banana Cake! Consider trying a classic chocolate chip cookie or a refreshing fruit salad for dessert. Delve into technique guides on baking fundamentals, such as mastering the art of frosting and cake decorating. Familiarize yourself with seasonal ingredients for inspiration, and check out equipment recommendations like cake pans and mixers to enhance your baking experience further.

Join the Conversation

We invite you to share your experiences and photos of your Heavenly Banana Cake creations! Engage with us on social media by tagging our handle, and don’t forget to leave a review. As you explore variations of the recipe, share your unique adaptations to help inspire other bakers. Create a community of recipe sharing and conversation; after all, food is meant to be enjoyed together!

The Recipe

Heavenly Banana Cake

Serves: 12

Prep Time: 20 mins

Cook Time: 30 mins

Total Time: 50 mins

Kitchen Equipment Needed

  • Mixing bowls
  • Measuring cups and spoons
  • Spatula
  • 9×13 inch cake pan
  • Cooling rack
  • Electric mixer (optional)

Ingredients

  • 3 ripe bananas, mashed
  • 1 ½ cups all-purpose flour
  • 1 cup granulated sugar
  • ½ cup unsalted butter, softened
  • 2 large eggs
  • 1 tsp baking soda
  • ½ tsp salt
  • 1 tsp vanilla extract
  • 8 oz cream cheese, softened
  • 4 cups powdered sugar
  • 1 tbsp milk (for thinning the frosting, if needed)

Directions

  1. Preheat the oven to 350°F (175°C) and grease your cake pan.
  2. In a mixing bowl, cream the softened butter and sugar together until fluffy.
  3. Add eggs one at a time, mixing well after each addition, then stir in the mashed bananas and vanilla.
  4. In another bowl, whisk together the flour, baking soda, and salt.
  5. Gradually add the dry ingredients to the wet mixture until just combined.
  6. Pour the batter into the prepared cake pan and smooth out the top.
  7. Bake for 30 minutes or until a toothpick comes out clean. Let cool completely.
  8. For frosting, beat the softened cream cheese and gradually add powdered sugar until smooth and creamy. If needed, add milk for desired consistency.
  9. Once the cake is cool, frost the top generously with cream cheese frosting and decorate as desired.

Recipe Notes

  • Feel free to add nuts or chocolate chips to the batter for extra flavor.
  • This cake pairs beautifully with fresh fruits or a scoop of ice cream.

Delightful Pineapple Mousse Cheesecake Recipe for a Refreshing Treat

Refreshing Pineapple Mousse Cheesecake: A Tropical Delight

⚖️
Difficulty
Medium

⏲️
Prep Time
30 mins

🕒
Cook Time
15 mins

⏱️
Total Time
45 mins

🍽️
Servings
8 servings

If you’re looking for a dessert that captures the essence of summer while bringing tropical bliss to your table, the Refreshing Pineapple Mousse Cheesecake is the perfect choice. This delightful recipe features a rich and creamy mousse layered atop a crisp, buttery crust, all accentuated by the vibrant flavor of fresh pineapples. Each bite transports you to a sunny paradise, making it an ideal treat for picnics, parties, or simply to satisfy your sweet tooth.

The combination of smooth cheesecake with the lightness of pineapple mousse creates an indulgent yet refreshing dessert that appeals to all palates. The use of fresh pineapples not only lends a gorgeous tropical flavor but also adds a beautiful color that makes the cheesecake visually inviting. Whether you’re serving this at a special occasion or enjoying it on a sunny afternoon, this dessert is bound to impress with its sophisticated taste and presentation.

Quick Recipe Highlights

  • Flavor Profile: A delightful harmony of sweet and tart flavors from the fresh pineapple, balanced with the creamy richness of the cheesecake.
  • Texture: The light and airy mousse contrasts beautifully with the dense, buttery base, creating an exciting mouthfeel.
  • Aroma: The sweet aroma of ripened pineapple mingles with the toasted notes of the crust to create an enticing scent.
  • Visual Appeal: A gorgeous golden hue from the pineapple mousse on a crisp, brown crust makes for an eye-catching dessert.
  • Skill Level Needed: Requires some baking skills, but achievable with attention to detail and patience.
  • Special Equipment: A springform pan is essential for easy removal and presentation.

Recipe Overview

  • Difficulty Level: This recipe is rated as medium difficulty and involves making the crust, preparing the mousse, and layering the two. With careful follow-through, it’s easy to master.
  • Category: Dessert—perfect for any meal, this cheesecake provides a sweet finish to lunch or dinner.
  • Cuisine: Drawing on tropical influences, this cheesecake is inspired by classic American desserts with a twist of island flare.
  • Cost: Ingredients like cream cheese, fresh pineapple, and graham crackers are reasonably priced, making this an economical choice for an impressive dessert.
  • Season: Best enjoyed during the warmer months when pineapples are in season, brightening up summer gatherings.
  • Occasion: An excellent choice for birthdays, summer barbecues, or beach-themed parties, adding a festive touch to any menu.

Why You’ll Love This Recipe

The Refreshing Pineapple Mousse Cheesecake presents an extraordinary balance of taste and texture that enchants dessert lovers. The airy mousse blends beautifully with a rich cheesecake base, making it both satisfying and light. The fresh pineapple elevates the whole experience, providing a burst of tropical flavor with every forkful. The dessert’s visual charm will draw guests in, while the special mix of flavors keeps them coming back for more.

Convenience and preparation also play a significant role in the appeal of this cheesecake. Most of the steps can be done ahead of time—allowing the mousse and crust to chill before assembly. You can even prepare the entire cheesecake a day in advance, making it an excellent option for busy hosts. The simplicity of the ingredients promotes accessibility without compromising on taste or presentation.

From a nutritional standpoint, the use of fresh pineapples offers a variety of vitamins and antioxidants, contributing to a more health-conscious dessert option. The creamy texture of the cheese provides calcium and protein, allowing you to enjoy a sweet treat that is both delicious and somewhat wholesome.

Social gatherings become all the more special when you serve this refreshing cheesecake. Its appealing layers and tropical essence make it a star dessert at parties and family functions. The versatility of the recipe means it fits seamlessly into various menus, making it easy to pair with savory dishes.

Ultimately, the cost-effectiveness of this refreshing dessert ensures that you can treat your loved ones without breaking the bank. With common ingredients easily found at your local store, you can whip up this incredible cheesecake and impress family and friends without spending a fortune.

Historical Background and Cultural Significance

The origins of cheesecake date back to Ancient Greece, where it was often served to athletes during the Olympic Games. The delightful blend of cheese, sugar, and eggs provided sustenance and energy. Over the centuries, cheesecakes transformed, and with the arrival of European settlers in America, variations emerged, including the popular New York-style cheesecake. Incorporating pineapple brings a unique twist that showcases the influence of tropical fruits in American cuisine, especially in states like Hawaii.

Pineapple has long been seen as a symbol of hospitality, infusing a sense of warmth and cheer into gatherings. Its use in desserts gained popularity in the mid-20th century, especially in America, where fruit-based desserts became trendy. This cheesecake not only reflects that cultural significance but also adds a modern twist, making it appealing to diverse taste buds.

The recipe has evolved significantly, allowing for various adaptations, including the incorporation of gelatin to achieve that light mousse-like texture. Many bakers experiment with different fruit flavors, but the bright, sweet-sour taste of pineapple remains a perennial favorite that appeals to the masses.

Regional variations can be immense, from traditional baked versions to no-bake recipes that offer ease of preparation. Various toppings and crust options can further modify individual recipes, giving each family their unique take on this classic dessert.

Ingredient Deep Dive

Graham Crackers

Graham crackers are a staple in American baking, primarily known for their use in crusts for desserts. They were originally invented by Sylvester Graham in the early 19th century as part of a health reform movement. Nutritionally, they provide a good source of carbohydrates while being relatively low in fat. When selecting graham crackers, choose those without high fructose corn syrup or artificial flavors for the best results. Store opened packages in a sealed container to maintain freshness, and substitute with crushed cookies or oatmeal if necessary.

Pineapple

Pineapple carries cultural significance as a tropical fruit representing hospitality and warmth, often featured in celebrations. Nutritionally, pineapples are rich in vitamin C and manganese, providing significant health benefits. Fresh pineapples should be fragrant, yielding slightly when pressed. To store, keep them at room temperature until ripe, then refrigerate for up to five days. If you need a substitute, you can use canned pineapple, but ensure it’s packed in juice rather than syrup to maintain a healthier profile.

Common Mistakes to Avoid

  • Overmixing the Cheese Mixture: Overmixing can lead to a dense cheesecake rather than a light, airy texture. Mix until just combined.
  • Pineapple Preparation: Be sure to remove excess moisture from the pineapples; otherwise, it can make the cheesecake soggy.
  • Crust Too Thick: A thick crust may overpower the light mousse. Aim for a balanced layer that supports but doesn’t dominate.
  • Skipping Chilling Time: Allow sufficient chilling time to set the mousse properly; skipping this step will result in a runny texture.
  • Not Adjusting Baking Time: Keep an eye on baking times; different ovens vary and affect how well the cheesecake sets.
  • Using Warm Ingredients: Cold ingredients can lead to grainy textures, so bring cream cheese and other dairy products to room temperature first.
  • Overcomplicated Flavors: While it’s tempting to add lots of toppings, keeping it simple enhances the pineapple flavor.
  • Failure to Grease the Pan: If the springform pan isn’t properly greased, it may result in a difficult removal process.
  • Ingredient Quality: Using low-quality ingredients, like imitation vanilla, can result in poor flavor—always opt for fresh, quality products.
  • Ignoring Visual Cues: Pay attention to the texture of the cheesecake as it bakes; it should jiggle slightly but not be liquid when done.

Essential Techniques

Making a Graham Cracker Crust

Creating a graham cracker crust is essential for cheesecake success, providing a firm and flavorful base. To master this, crush the graham crackers into fine crumbs until they resemble sand. Combine with melted butter and sugar, then press firmly into the bottom of your pan. A common pitfall is not compressing the crust enough; use the bottom of a measuring cup for even results. Bake until slightly golden for added flavor and structure.

Preparing the Pineapple Mousse

The preparation of the mousse is crucial for achieving that light and airy texture. Start by whipping the heavy cream to soft peaks and folding it gently into the pineapple mixture. Be careful not to deflate the whipped cream, as this will affect the final texture. Visual cues include a luscious, fluffy consistency that holds its shape. If the mousse seems too runny, consider incorporating a stabilizer such as gelatin to help it set properly.

Pro Tips for Perfect Refreshing Pineapple Mousse Cheesecake

1. Use fresh, ripe pineapples for the richest flavor and optimal sweetness.
2. Chill the mousse for at least one hour before layering it on the crust for a better texture.
3. Consider adding a splash of rum or coconut extract for a Caribbean twist.
4. Always taste and adjust sweetness; some will prefer it sweeter or less sweet.
5. Garnish with toasted coconut flakes for a lovely texture and additional flavor.
6. Serve well-chilled to ensure the best taste and texture; this dessert is refreshing when cold.
7. If using canned pineapples, ensure they’re well-drained before using them to prevent excess moisture.
8. Experiment with different types of cookies for the crust, like Nilla wafers or shortbread, for unique flavors.

Variations and Adaptations

For lunch gatherings or casual dinners, consider a no-bake variation by blending the cream cheese without baking the crust. For seasonal adaptations, try substituting fresh strawberries or mangoes when pineapples aren’t in season. If dietary restrictions require modifications, a gluten-free crust can be made using almond flour and coconut oil. Flavor variances can be introduced with a layer of passion fruit or raspberry puree for added tartness. Textural changes could include a crispy granola topping instead of a traditional crust or mousse, adding a delightful crunch to the dessert.

Serving and Presentation Guide

When serving the Refreshing Pineapple Mousse Cheesecake, aesthetic presentation is key. Use a clean knife to cut distinct slices, ensuring a polished look. Garnish each slice with slivers of fresh pineapple and a sprig of mint for a refreshing touch. For modern serving suggestions, place individual portions in mason jars for a fun twist. Ensure the cheesecake is well-chilled before serving to enhance the flavors. When portioning, keep in mind that this dessert is rich, so smaller servings may be more satisfying.

Wine and Beverage Pairing

Pair this delightful cheesecake with a crisp white wine like Sauvignon Blanc, which complements the pineapple’s acidity beautifully. If you prefer a non-alcoholic option, a sparkling water infused with lime offers a refreshing balance without overpowering the dish. For coffee lovers, opt for a light roast coffee or iced latte to create a delightful contrast to the sweetness of the cheesecake.

Storage and Shelf Life

To store the Refreshing Pineapple Mousse Cheesecake, cover it tightly with plastic wrap and place it in the refrigerator, where it will last for up to four days. For best results, enjoy the cheesecake within the first 24 to 48 hours for optimal freshness and taste. If you need to freeze leftovers, wrap individual slices in plastic and store them in an airtight container. They will keep for about two months; thaw in the refrigerator before serving.

Make Ahead Strategies

This cheesecake can be made ahead of time, making it ideal for busy schedules. You can prepare the crust and mousse a day or two ahead, allowing them to chill properly. Store the crust at room temperature and the mousse in the refrigerator until you’re ready to assemble. To maintain quality, do not layer the mousse and crust until a few hours before serving, ensuring the best texture and taste when enjoyed fresh.

Scaling Instructions

Scaling this recipe is easy and adaptable to your needs. If you’d like to halve it, reduce the ingredients by 50%, being mindful of the baking time for the crust. When doubling or tripling, confirm that your mixing bowl is large enough and adjust cook times accordingly. If you’re making larger quantities, consider using a larger springform pan or dividing the mix into individual serving dishes for flexibility.

Nutritional Deep Dive

The nutritional breakdown of this dessert is appealing, with a mix of macros that include carbs from the crust and essential fats from the cream cheese. Analyzing micronutrients reveals vitamin C from the pineapple, which boosts the immune system, along with calcium in the cream cheese. Consideration of portions is key, as one slice delivers a rich flavor while remaining moderate in calories compared to more decadent desserts. Weight management becomes achievable with balanced consumption of this refreshing treat.

Dietary Adaptations

For a gluten-free version, use gluten-free graham crackers or almond flour for the crust. If you’re seeking a dairy-free option, use a vegan cream cheese alternative combined with coconut cream for the mousse. For those following a low-carb or keto diet, opt for almond flour and erythritol as substitutes to lower the carbohydrate content while maintaining delicious flavor. Other adaptations may include a vegan approach utilizing soaked cashews for the base or a paleo version by swapping refined sugars for natural sweeteners.

Troubleshooting Guide

If your cheesecake is too runny, this is often due to excess moisture from the pineapple; ensure to strain canned or ripe pineapples. If the crust crumbles when sliced, recheck the butter-to-crumb ratio for proper binding. Flavor balance issues can arise if too much pineapple is added, so tasting throughout the process helps adjust sweetness. If the mousse does not set, revisiting the chilling time should correct this. Timing is crucial, so keep an eye on the clock to avoid overbaking or allowing the mousse to sit too long.

Recipe Success Stories

Community feedback about the Refreshing Pineapple Mousse Cheesecake highlights its reputation as a crowd-pleaser at gatherings. Variations shared by readers include the addition of coconut cream, which enhances tropical notes, while others mention successful adaptations to make it gluten-free. Many have praised the recipe for its ease, often recommending it as a go-to for beginners. The vibrant colors of the dessert often result in stunning photographs shared on social media, inspiring more home bakers to try their hand at this delightful treat.

Frequently Asked Questions

Can I use canned pineapple instead of fresh?

Yes, canned pineapple can be used as a substitute. However, ensure it is packed in juice and drained well to avoid excess moisture in the cheesecake.

How long can I store the cheesecake?

The dessert can be refrigerated for up to four days. For longer storage, wrap and freeze individual slices for up to two months.

What can I substitute for cream cheese?

For a dairy-free alternative, try using vegan cream cheese or blended silken tofu for a similar texture.

Can I make this cheesecake gluten-free?

Absolutely! Use gluten-free graham crackers or almond flour for the crust to make it gluten-free.

Is there a way to reduce the sugar content?

You can lower the sugar by using natural sweeteners, like honey or agave, to taste. Adjusting the amount of added sugar can help maintain flavor balance.

What’s the best way to cut the cheesecake?

For clean cuts, run a sharp knife under hot water before slicing and wipe it clean between cuts for polished presentation.

Do I need to bake the crust?

Yes, baking the crust for a few minutes helps to set it and enhances its flavor. Be sure to let it cool before adding the mousse.

Can I add other fruits to this recipe?

Yes, you can incorporate other fruits like strawberries or mangoes for different flavor profiles. Just remember to adjust sweetness to match the fruit.

How do I know when the cheesecake is done?

The cheesecake should jiggle slightly in the center when done but not look liquid or overcooked. Allow it to set properly in the refrigerator.

Will this cheesecake melt if left out?

Yes, as a mousse cheesecake, it is best served chilled. Avoid leaving it out for long periods in warm environments to prevent melting.

Additional Resources

For those wanting to explore more tropical-inspired dishes, consider checking related recipes such as passion fruit tart or coconut cream pie. Technique guides on making perfect cheesecakes or mastering whipped creams can further enhance your baking skills. Investigate equipment recommendations for springform pans and stand mixers that can simplify the cheesecake-making process. Seasonal variations can also inspire you to incorporate fresh, local fruits into your desserts for every season.

Join the Conversation

We encourage our readers to share their photos and experiences with the Refreshing Pineapple Mousse Cheesecake on social media. Join the community to exchange recipe tips, variations, and insights! Your feedback is invaluable, and we’d love to hear how you made this recipe your own. Don’t hesitate to leave a review and inspire future bakers to enjoy this charming dish!

The Recipe

Refreshing Pineapple Mousse Cheesecake

Serves: 8 servings

Prep Time: 30 mins

Cook Time: 15 mins

Total Time: 45 mins

Kitchen Equipment Needed

  • Springform pan
  • Mixing bowls
  • Electric mixer
  • Measuring cups and spoons
  • Rubber spatula
  • Sharp knife

Ingredients

  • 1 ½ cups graham cracker crumbs
  • ½ cup unsalted butter, melted
  • ¼ cup granulated sugar
  • 2 (8oz) packages cream cheese, softened
  • 1 cup powdered sugar
  • 1 cup fresh pineapple puree
  • 1 teaspoon vanilla extract
  • 1 cup heavy whipping cream
  • Fresh pineapple slices for garnish
  • Mint leaves for garnish

Directions

  1. Preheat the oven to 350°F (175°C).
  2. In a bowl, mix graham cracker crumbs, melted butter, and sugar until evenly combined.
  3. Press the mixture into the bottom of a springform pan and bake for 8-10 minutes until set. Cool completely.
  4. In a separate bowl, beat cream cheese with powdered sugar and vanilla until smooth.
  5. Add pineapple puree and mix until fully combined.
  6. In another bowl, whip the heavy cream to soft peaks, then fold gently into the cream cheese mixture.
  7. Spread the pineapple mousse over the cooled crust and refrigerate for at least 2 hours to set.
  8. Once set, remove from the springform pan and garnish with fresh pineapple slices and mint leaves before serving.

Recipe Notes

  • For an added crunch, consider sprinkling toasted coconut flakes on top before serving.
  • Feel free to experiment with flavors; adding coconut extract can enhance the tropical vibe.
  • Make sure all refrigerator items are at room temperature for smoother mixing.

Indulge in a Luxurious German Chocolate Poke Cake Recipe

Luxurious German Chocolate Poke Cake: A Decadent Indulgence

⚖️
Difficulty
Easy

⏲️
Prep Time
20 mins

🕒
Cook Time
30 mins

⏱️
Total Time
50 mins

🍽️
Servings
12

German Chocolate Poke Cake is the perfect dessert for any occasion—immensely rich, sinfully chocolatey, and absolutely delightful. With layers of moist chocolate cake filled with a creamy coconut pecan frosting, this cake dazzles both the eyes and the taste buds. The technique of poking holes into the cake allows the sweet milk and frosting to seep deep inside, ensuring each luscious bite is bursting with flavor.

The contrast of the silky chocolate cake and the crunchy pecans, paired with the sweet, rich coconut, creates an incredible flavor profile that is sure to please any chocolate lover. This cake not only satisfies the sweet tooth but also serves as a showstopper at gatherings, making it an ideal centerpiece for birthdays, anniversaries, and holiday feasts.

Quick Recipe Highlights

  • Flavor Profile: This poke cake features a harmonious blend of rich chocolate cake paired with a sweet coconut-pecan frosting, creating a delightful sweetness balanced by nuttiness.
  • Texture: The cake is incredibly moist, while the frosting adds a velvety creaminess punctuated by the crunch of pecans.
  • Aroma: The aromatic notes of toasted coconut and chocolate waft through the air, inviting everyone to take a bite.
  • Visual Appeal: The cake is visually stunning, with a glossy frosting contrasting beautifully against the deep chocolate tones, garnished with coconut and pecans.
  • Skill Level Needed: Ideal for beginners, this recipe is easy to follow with minimal techniques required.
  • Special Equipment: A standard baking dish and a simple mixing bowl are all you need to whip up this delicious dessert.

Recipe Overview

  • Difficulty Level: This recipe is easy to execute, making it perfect for both novice and experienced bakers. The step-by-step instructions guide you through the process with confidence.
  • Category: This luxurious dessert fits perfectly in the cake category, ideal for celebrations or as a weekend treat.
  • Cuisine: Influenced by German traditions, this cake showcases the love for rich ingredients, particularly chocolate and coconut, which are central to German chocolate cake recipes.
  • Cost: The ingredients for this recipe are reasonably priced, making it accessible for home cooks without breaking the bank.
  • Season: This cake is perfect for any time of the year, especially during festive seasons when indulgence is celebrated.
  • Occasion: Perfect for birthday parties, family gatherings, or potlucks, the German Chocolate Poke Cake brings joy to any occasion.

Why You’ll Love This Recipe

German Chocolate Poke Cake offers an exceptional balance of taste and texture. The rich chocolate flavor combined with the creamy and sweet coconut topping tantalizes the taste buds. Each bite melts in your mouth, delivering a harmony of sweetness and nuttiness. It’s a dessert for the senses that will leave you wanting more.

The convenience of this poke cake lies in its simplicity and minimal preparation time. It requires just a handful of ingredients and can be made ahead of time, giving you more time to enjoy your event or special occasion. With easy step-by-step instructions, even beginner cooks can replicate this cake with success.

Nutritionally, the ingredients like coconut and nuts offer health benefits, including healthy fats and proteins. While this cake is indulgent, it does provide some nutrients compared to other overly sweet options.

When it comes to social gatherings, this cake shines. The irresistible aroma wafting through the home creates an inviting atmosphere. It acts as a conversation starter, and its visual appeal makes it an exciting treat to share with friends and family.

Additionally, the affordability of this recipe makes it accessible to everyone. Utilizing common pantry items and easily found ingredients means that anyone can bask in the luxurious delight of a homemade German Chocolate Poke Cake.

Historical Background and Cultural Significance

The German Chocolate Poke Cake finds its roots in traditional German chocolate cakes, which were not even originating from Germany but rather named after an American named Samuel German, who developed a dark-baking chocolate for the Baker’s Chocolate Company in 1852. Over time, this chocolate became especially popular in dessert recipes.

Culturally, the connection to German chocolate cake represents rich culinary traditions; the love for chocolate and pecans originated in the southern regions of the United States where pecans flourished. These ingredients highlight regional influences, making the cake a beloved choice across America.

This poke cake has evolved from the classic layered cakes, incorporating the poke cake method that became popular in the mid-20th century. The idea of using holes to infuse flavors into a cake adds a unique twist to the original recipes, showcasing creativity in baking.

Regional variations of this recipe have emerged, with some opting to use different frostings or flavors, but the classic combination of chocolate, coconut, and pecans remains the most celebrated.

Ingredient Deep Dive

Chocolate is an essential ingredient in the German Chocolate Poke Cake, offering rich flavor and moisture. Its cultural significance is tied to the history of chocolate making and culinary traditions. Nutritionally, chocolate provides antioxidants and can promote heart health. When selecting chocolate for baking, look for high-quality dark chocolate with a minimum of 60% cocoa for the best flavor. Store it in a cool, dry place for optimal shelf life, and for substitutions, cocoa powder can work well in a pinch.

Coconut is another star player in this recipe. Its sweetness and chewy texture complement the chocolate beautifully. Culturally, coconut is often associated with tropical regions; it adds a unique flavor profile to various desserts. Nutritional benefits include fiber and healthy fats, supporting digestive health. Select unsweetened shredded coconut for the best flavor. Proper storage in an airtight container keeps coconut fresh, while sweetened varieties can be substituted according to taste preferences.

Pecans provide a delightful crunch that rounds out the flavor profile of this cake. They hold cultural significance in Southern cooking, often used in pies and candies. Nutritionally, pecans are rich in healthy fats and vitamins. When buying pecans, choose those that are unbroken and smell fresh. They should be stored in a cool, dark place to prevent rancidity, and you can substitute with walnuts or almonds if desired.

Common Mistakes to Avoid

  • Overmixing the batter: This can lead to a tough cake. Mix just until the dry ingredients are moistened.
  • Not allowing the cake to cool properly: Rushing this step can cause the cake to fall apart when poking holes. Let it cool for at least 30 minutes.
  • Using warm frosting: Ensure your frosting is cool and begins to thicken before applying it on the cake to maximize flavor infusion.
  • Improper measuring: Use a kitchen scale for more accurate measurements, especially for dry ingredients.
  • Skipping the chilling time: Allow the cake to sit in the fridge for several hours after frosting to set the flavors.
  • Using low-quality chocolate: Quality chocolate significantly impacts the flavor. Always opt for good-quality chocolate for the best results.
  • Not poking enough holes: A few gentle pokes won’t extract the full flavor; ensure to distribute holes evenly across the cake.
  • Forgetting to adjust baking time for different oven types: Oven temperatures can vary, so always check for doneness with a toothpick.
  • Using sweetened coconut instead of unsweetened: This can make the frosting overly sweet and alter the flavor balance.
  • Neglecting to rotate the pan while baking: This helps achieve even cooking, especially in ovens with hot spots.

Essential Techniques

When baking a poke cake, understanding the poke method is essential. This technique infuses flavors deeply into the cake, enhancing taste. To master this, use the handle of a wooden spoon or a fork to create evenly spaced holes across the entire cake while it’s still warm. Avoid pushing too hard to maintain the cake’s structure.

Making the frosting is another critical technique. To achieve a creamy texture, start with softened butter and cream it until fluffy, gradually adding other ingredients. Mixing pleasantly results in a smooth icing that blends well with the cake. Keep an eye on consistency; it should be spreadable but not runny.

Pro Tips for Perfect Luxurious German Chocolate Poke Cake

– Always ensure your ingredients are at room temperature for a smoother batter, leading to a more even baking result.
– Consider using buttermilk instead of regular milk for a softer crumb and richer flavor.
– For an extra touch, lightly toast the pecans before adding them to the frosting; this enhances their flavor considerably.
– Refrigerate the cake overnight for the best infusion of flavors from the frosting into the cake.
– Save some pecans and coconut for garnish after frosting the cake; it makes for a stunning presentation.
– Keep a close eye on the baking time, as ovens can vary greatly; a toothpick should come out clean when inserted in the center.
– Explore flavored extracts like almond or vanilla for an added depth to your frosting.
– Use a spatula to spread frosting onto the sides of the cake for a professional finish with an even coating.

Variations and Adaptations

For a regional variation, consider infusing coffee flavor into the cake batter. Coffee complements the chocolate beautifully and adds a depth of flavor. You can also try incorporating almond flavoring or different nuts, such as walnuts or hazelnuts, into the frosting for a unique twist.

Seasonal adaptations might involve adding pumpkin spice or apple-cinnamon flavors in the fall, creating a delightful autumn-themed cake that incorporates seasonal fruits.

Dietary modifications could include using gluten-free flour for those with gluten sensitivities or replacing eggs with flaxseed meal for a vegan version while maintaining the cake’s texture and flavor profile.

When it comes to flavor variations, experiment with different types of chocolate—dark, semi-sweet, or even white chocolate could bring new life to this classic poke cake recipe.

For texture modifications, consider adding a layer of crunchy cookie crumbs to the cake to provide an unexpected pop and a delightful contrast.

Finally, presentation alternatives like serving in individual cups or jars can make this cake a boutique dessert for events, allowing for a more personalized experience for each guest.

Serving and Presentation Guide

To enhance the presentation of your German Chocolate Poke Cake, consider using a cake stand to elevate the dessert and attract attention at the table. When plating, slice the cake into even portions to ensure each piece showcases the beautiful layers of chocolate, coconut, and pecans.

Garnishing with extra toasted coconut and pecan pieces on top will make the cake visually stunning. You can also drizzle some chocolate sauce over the top for an added layer of decadence.

Traditional accompaniments could include a scoop of vanilla ice cream alongside each slice, bringing a creamy balance to the rich flavors of the cake.

For a modern serving suggestion, consider presenting the cake on a marble board, emphasizing a rustic yet elegant aesthetic. Serving the cake slightly chilled can enhance the flavors and provide a refreshing element.

Lastly, practicing portion control is important, especially with such rich desserts; a standard slice is often enough to satisfy a sweet tooth while leaving room for other treats.

Wine and Beverage Pairing

When it comes to wine pairings, a rich Merlot complements the deep chocolate flavors in the cake, enhancing the overall tasting experience. Alternatively, a sweet port wine can also match the sweetness and provide a delightful contrast.

For non-alcoholic options, a rich iced coffee or chocolate milk can serve as a perfect accompaniment, providing a refreshing lift to balance the sweetness of the cake.

If you enjoy a warm beverage, pairing your cake with a cup of freshly brewed chai tea can bring warmth and spice that contrasts beautifully with the cake’s sweet profile.

Always remember to serve these beverages warm or chilled according to their nature; this attention will elevate the entire dining experience with your luxurious German Chocolate Poke Cake.

Storage and Shelf Life

Proper storage is key to maintaining the freshness of your German Chocolate Poke Cake. It can be covered and stored in the refrigerator for up to 5 days. Keep it in an airtight container to prevent it from absorbing other odors in the fridge.

For longer storage, consider freezing the cake. Slice it before freezing for easy servings later; wrap pieces tightly in plastic wrap, then in aluminum foil to maintain freshness. When stored properly, frozen cake can last up to 2 months.

Signs of spoilage to watch out for include an off smell or visible mold growth. When reheating, it’s best to let the slices come to room temperature before warming them slightly in the microwave for 10-15 seconds.

Make Ahead Strategies

To streamline preparation, you can make this poke cake a day in advance. Bake the cake, allow it to cool, and then prepare the frosting to apply right before serving. This ensures that the flavors meld perfectly overnight.

If you plan on making the frosting ahead of time, store it in the refrigerator, and remember to bring it back to room temperature before spreading on the cake for a smooth finish.

Assemble the cake just before your event for the freshest taste. This is particularly important if you’re adding any garnishes like toasted coconut, as they can become soggy if added too early.

To maintain quality, avoid separating layers for more than a day, especially after applying the frosting—keeping everything together helps the cake retain its moisture and flavors.

Scaling Instructions

Scaling your German Chocolate Poke Cake is easy! For halving the recipe, simply divide each ingredient by two, but keep an eye on baking time, as it may decrease slightly.

If doubling or tripling the recipe, ensure that you have a sufficiently large baking dish to accommodate the extra volume. It’s best to bake in batches rather than overloading a single pan, which can lead to uneven cooking.

Timing adjustments are also crucial. Increasing the batch size may require more baking time, so always use a toothpick to test doneness regardless of the recipe quantity.

Additionally, if storing larger portions, ensure that your fridge or freezer can accommodate the expanded batches without overcrowding.

Nutritional Deep Dive

The German Chocolate Poke Cake contains macronutrients, primarily enriched with carbohydrates from the flour and sugars, proteins from the eggs and pecans, and fats sourced from the butter and coconut. This combination makes it a calorie-dense treat.

From a micronutrient perspective, the cake provides several vitamins and minerals, particularly vitamin E from pecans and essential minerals from cocoa. The inclusion of coconut also adds dietary fiber, promoting digestive health.

When considering its health benefits, moderation is essential. The cake can fit into a balanced diet if enjoyed as an occasional treat rather than a daily indulgence. Proper portioning helps enjoy the flavors without exceeding daily caloric limits.

Weight management tips include balancing slices of cake with nutritious meals throughout the day to accommodate occasional indulgence, as well as incorporating physical activity into your routine to offset calorie intake.

Dietary Adaptations

For a gluten-free version, substitute all-purpose flour with a gluten-free blend, ensuring it’s formulated for baking. This allows you to maintain the cake’s structure without compromising flavor.

To make the cake dairy-free, replace butter with coconut oil or vegan margarine and use almond or oat milk instead of regular milk. Ensure the chocolate is dairy-free as well to keep it suitable for vegans.

If you’re following a low-carb or keto diet, opt for almond flour instead of regular flour, and use low- or sugar-free sweeteners to substitute the sugar present in the recipe.

Paleo enthusiasts can make the cake by using coconut flour and honey instead of traditional sugar, promoting natural ingredients while retaining the dessert’s original flavor profile.

Exploring low-FODMAP ingredients can create a suitable version for those with sensitivities by sticking to gluten-free measures and avoiding high-FODMAP syrups in the frosting.

Troubleshooting Guide

Texture issues may arise when the cake is overbaked or too dry, resulting in a crumbly consistency. Always check with a toothpick for doneness, and if overbaked, try drenching the cake with a milk soak to revive moisture.

Flavor balance might lean too sweet or too bland if the right balance of sugars and chocolate is not obtained. Tasting the batter before baking can help you assess sweetness levels, allowing you to adjust accordingly.

If temperature problems occur, such as the cake not baking evenly, verify your oven’s accuracy with a thermometer and rotate the cake halfway through baking for uniform heat distribution.

Equipment challenges, like using a non-stick pan, can sometimes lead to sticking issues. To prevent this, use parchment paper and baking spray to ensure easy removal.

Ingredient substitutions should always be proportionally equal; using different types of flour or sweeteners can drastically change the final product if incorrect measurements are used.

Timing concerns can affect the outcome, especially if cakes are not cooled properly before poking holes. Make sure cooling times are respected to allow the cake to set correctly.

Recipe Success Stories

Community feedback has been overwhelmingly positive, with many praising the easy-to-follow instructions that lead to delectable results. Readers often share how they personalized their cakes, demonstrating creativity and encouraging others to do the same.

Variations such as adding espresso to the cake batter or experimenting with different frostings showcase the recipe’s versatility. Other bakers share how they’ve used this cake as a base for further dessert experiments, leading to exciting outcomes.

Adaptation stories highlight how those with dietary restrictions successfully altered ingredients and created variations of the original recipe without sacrificing flavor, inspiring a broader audience to try their hand at baking.

Photography tips shared by readers emphasize the importance of natural light when capturing the beauty of the cake, encouraging others to take their time to get that perfect shot for social media.

Frequently Asked Questions

Can I make this cake ahead of time? Yes, you can prepare the cake a day in advance. It is actually recommended to allow the flavors to meld overnight in the refrigerator for optimal taste.

What can I use instead of pecans? If you don’t have pecans on hand, walnuts or almonds make great alternatives. You can also omit nuts entirely for a nut-free version.

How can I store leftovers? Store any leftover cake in an airtight container in the refrigerator for up to five days, or freeze for up to two months wrapped tightly in plastic wrap.

Is it possible to make this cake vegan? Yes, you can substitute eggs with flaxseed meal mixed with water, and use dairy-free chocolate and alternative milk to ensure it’s vegan-friendly.

Can I freeze the cake? Yes! Freeze slices wrapped tightly in plastic wrap and foil; it will keep for about two months without loss of quality.

Can I use boxed cake mix for this recipe? Absolutely! You can simplify this by using a chocolate cake mix, and follow the poke method as instructed.

How do I know when the cake is done? A toothpick inserted into the center should come out clean, signaling that the cake is fully baked.

Can I add fruit to the recipe? Incorporating fruits like bananas or raspberries as layers would introduce pleasant acidity that balances the sweetness of the chocolate cake.

What should I do if I mistakenly overbake the cake? If your cake turns out dry, consider drenching it in a simple syrup to add back moisture and enhance flavor.

What is the best way to serve the cake? Serve slices chilled with a dollop of whipped cream or a scoop of vanilla ice cream for the perfect dessert experience.

Additional Resources

To further enhance your baking skills, consider exploring related recipes like classic chocolate cake or coconut cream pie, which share similar traits to the German Chocolate Poke Cake.

Finding technique guides for baking fundamentals can help develop your cooking expertise while providing beneficial insights for cake making, such as creaming techniques and proper mixing methods.

For ingredient information, consulting resources related to chocolate and coconut can deepen your understanding of these crucial ingredients used within this recipe, their origins, and how to select the best available options.

Equipment recommendations can also be valuable—investing in a good quality baking pan and mixing tools will make baking a breeze and enhance your overall results.

Lastly, experimenting with seasonal variations presents an excellent opportunity to introduce new flavors, like pumpkin or peppermint, that could contribute unique touches to this classic recipe.

Join the Conversation

Engage with others who share your passion for baking by sharing your experiences on social media. Post your cake photos and encourage feedback from your community to foster connection.

Photographing your cake is essential; focus on natural lighting to capture the luscious textures and vibrant colors. Don’t forget to tag us with your creations to inspire others to try this delightful recipe.

Reviews and suggestions from fellow bakers contribute to a strong community, promoting discussions on variations or techniques that further enrich the baking experience.

Lastly, invite your friends and family to share their favorite adaptations and personal twists on this recipe, creating a collaborative environment where everyone can enjoy delicious results.

The Recipe

Luxurious German Chocolate Poke Cake

Serves: 12

Prep Time: 20 mins

Cook Time: 30 mins

Total Time: 50 mins

Kitchen Equipment Needed

  • 9×13 inch baking pan
  • Mixing bowls
  • Electric mixer
  • Measuring cups and spoons
  • Toothpick

Ingredients

  • 1 box chocolate cake mix (plus ingredients specified on the box)
  • 1 can sweetened condensed milk
  • 1 cup shredded coconut
  • 1 cup chopped pecans
  • 1 cup heavy cream
  • 1/2 cup cocoa powder
  • 1/2 cup powdered sugar
  • 1 teaspoon vanilla extract

Directions

  1. Preheat your oven according to the instructions on the cake mix box.
  2. Grease the baking pan and prepare the chocolate cake batter according to package instructions.
  3. Bake the cake until a toothpick comes out clean, and allow it to cool for about 30 minutes.
  4. Use a fork or a skewer to poke holes all over the surface of the cooled cake.
  5. For the filling, mix the sweetened condensed milk with cocoa powder in a bowl.
  6. Pour the mixture carefully over the poked cake, allowing it to seep into the holes.
  7. In a separate bowl, whip the heavy cream with powdered sugar and vanilla until soft peaks form.
  8. Fold in the shredded coconut and chopped pecans into the whipped cream mixture.
  9. Spread the coconut-pecan mixture over the top of the cake, covering it evenly.
  10. Chill the cake for at least 2 hours before serving for the best flavor infusion.

Recipe Notes

  • Feel free to adjust sweetness by using less or more sweetened condensed milk based on your preference.
  • You can substitute the heavy cream with coconut cream for a richer coconut flavor.
  • Leftovers can be stored in the refrigerator for up to 5 days.

Deliciously Decadent German Chocolate Cupcakes You Must Try

Irresistible German Chocolate Cupcakes: A Decadent Treat

⚖️
Difficulty
Medium

⏲️
Prep Time
20 mins

🕒
Cook Time
20 mins

⏱️
Total Time
40 mins

🍽️
Servings
12 cupcakes

The Irresistible German Chocolate Cupcakes encapsulate the rich and complex flavor profile that is celebrated in traditional German chocolate cake. Each cupcake is a delicate balance of velvety chocolate cake topped with a heavenly coconut-pecan frosting that brings an inviting sweetness, making them the perfect indulgence for special occasions or everyday treats. The cupcakes’ luscious appearance is sure to entice anyone who lays eyes on them, promising a decadent experience with every bite.

These delightful cupcakes honor the original German chocolate cake’s heritage, infusing it with a modern twist that appeals to chocolate lovers everywhere. Imagine the aroma of fresh chocolate intertwined with the nutty scent of toasted pecans and the sweetness of coconut wafting through your kitchen, creating an atmosphere of warmth and comfort. Each bite reveals a soft, moist cake layered with a creamy topping that is both distinguished and comforting.

Quick Recipe Highlights

  • Flavor Profile: These cupcakes offer a rich, chocolatey base contrasted with a sweet, nutty topping.
  • Texture: The cupcakes are moist and fluffy, complemented by a crunchy, creamy frosting.
  • Aroma: A delightful blend of dark chocolate, toasted coconut, and buttery pecans fills the air.
  • Visual Appeal: The rich brown cupcake with a light-colored frosting makes for an eye-catching dessert.
  • Skill Level Needed: Requires basic baking skills, making it accessible to beginner bakers.
  • Special Equipment: You’ll need a cupcake pan and muffin liners to achieve the perfect shape.

Recipe Overview

  • Difficulty Level: This recipe is categorized as medium, perfect for those looking to enhance their baking skills without being overwhelming.
  • Category: These cupcakes fit well within dessert or snack categories, making them suitable for any time of day.
  • Cuisine: Originating from the German chocolate cake tradition, these cupcakes have a unique place in American baking culture.
  • Cost: The cost is relatively moderate, with common ingredients available at most grocery stores.
  • Season: While these cupcakes can be enjoyed year-round, they’re particularly popular during holidays and celebrations.
  • Occasion: Ideal for birthday parties, gatherings, or just a special treat for yourself at home.

Why You’ll Love This Recipe

Making Irresistible German Chocolate Cupcakes means indulging in rich chocolate flavor paired with the sweetness of coconut and the crunch of pecans, delivering an unforgettable dessert experience. Each bite reveals the perfect harmony between the moist, chocolate cake and the creamy frosting, reminiscent of classic German chocolate cake but in a convenient cupcake form. These delightful treats promise to satisfy anyone’s sweet tooth, making them an excellent choice for dessert lovers of all ages.

In terms of convenience, these cupcakes are relatively easy to prepare. They require standard baking techniques such as mixing, baking, and frosting, making them a perfect project for budding bakers. You can whip them up in under an hour, allowing for an immediate celebration of flavor and texture. The preparation is straightforward, with clear steps and minimal equipment required, ensuring a pleasant baking experience.

Nutritionally, you’ll find that these cupcakes can be part of a balanced diet when enjoyed in moderation. The ingredients include coconut, which provides healthy fats, and pecans, rich in nutrients like magnesium and antioxidants. While they do contain sugar, serving sizes can be adjusted to keep indulgence in check without sacrificing flavor.

The social aspect of this cupcake recipe is significant as well. They are an excellent conversation starter at gatherings, with everyone eager to enjoy these delightful treats. Their elegance and rich flavor ensure they can be served at formal and casual events, making them a versatile dessert suitable for any occasion.

Cost-effectiveness is another highlight of this recipe. With affordable ingredients and the ability to yield multiple servings, these cupcakes can cater to large groups without breaking the bank. Plus, making them at home can often be healthier and tastier than purchasing store-bought alternatives.

Historical Background and Cultural Significance

The origin of German chocolate cake can be traced back to a recipe published in 1852 by a man named Samuel German, who developed a dark-baking chocolate for a Dallas-based company. Over time, this chocolate became the cornerstone of what we now recognize as German chocolate cake, a creation that later evolved into the beloved dessert we know today. The unique pairing of ingredients represents a fusion of American and German culinary traditions.

Culturally, German chocolate cake has grown in prominence across the United States, becoming a staple dessert especially at celebrations such as birthdays and holidays. Its emergence in the post-war era allowed it to take its place on American dining tables, symbolizing home baking and comfort food. As such, these Irresistible German Chocolate Cupcakes embody the nostalgia and warmth that comes with family gatherings, bringing people together through shared enjoyment of delicious food.

The evolution of the recipe emphasizes not just the richness of the original cake but also the adaptability of desserts in contemporary baking. The transition to cupcake form allows for easy portioning, making it accessible for casual dining and parties. These cupcakes have thus emerged as a popular option for modern baking enthusiasts as they combine the classic charm of their predecessor with the convenience of cupcakes.

Regional variations of German chocolate cake include differing frostings and flavor profiles that different areas often adopt, reflecting local tastes and traditions. However, the quintessential combination of chocolate, coconut, and pecans remains the heart of the recipe, making these cupcakes a delightful tribute to its roots.

Ingredient Deep Dive

Flour plays a vital role in baking as it provides structure to the cupcakes. All-purpose flour is commonly used due to its versatility. Opt for freshly milled flour for the best results, as it enhances the overall texture of the cake. Store flour in an airtight container in a cool, dry place to maintain its freshness, and consider substituting with whole wheat or gluten-free blends to cater to dietary needs.

Cocoa powder is essential for achieving that rich chocolate flavor. Dutch-process cocoa offers a smoother taste, while natural cocoa provides a more intense chocolate kick. When selecting cocoa powder, look for high-quality brands that specify the type of processing, and store it in a cool, dry place to prevent clumping.

Coconut, used in the frosting, provides sweetness and texture. There are variations of coconut, including sweetened and unsweetened, both of which can be used depending on your preference. By choosing organic coconut, you can ensure a more pronounced natural flavor. Store coconut in a cool environment, and it can typically last up to six months in the pantry.

Pecans, the nutty star of the frosting, add crunch and richness. Purchasing raw pecans and toasting them at home brings out their natural oils and flavors, enhancing the overall taste of the cupcakes. Ensure pecans are fresh and smell nutty, as stale nuts can adversely affect your baked goods. Properly store them in the refrigerator or freezer to prolong their shelf life.

Common Mistakes to Avoid

  • Overmixing the batter can lead to dense cupcakes; mix just until combined for a light texture.
  • Not measuring ingredients accurately can impact the final product; always use a kitchen scale for precision.
  • Skipping the preheat step can result in uneven baking; make sure your oven is at the correct temperature before placing the cupcakes in.
  • Using cold ingredients straight from the fridge can change the texture; ensure eggs and dairy are at room temperature.
  • Not allowing the cupcakes to cool completely before frosting can cause the frosting to melt, ruining presentation.
  • Using too much frosting can overpower the cupcakes; aim for a balanced ratio between cake and frosting.
  • Forgetting to line the cupcake pan with liners can lead to sticking; use good-quality liners for easy removal.
  • Choosing low-quality chocolate can result in a less appealing taste; opt for high-quality chocolate to achieve rich flavors.
  • Not tasting the frosting before applying it can lead to imbalance; ensure the sweetness and flavors are to your liking.
  • Ignoring the need to adjust baking times for different ovens can lead to dry cupcakes; keep an eye on them as they bake.

Essential Techniques

Mastering the art of cupcake baking starts with the creaming method, which involves beating softened butter with sugar to incorporate air for a light texture. This technique is essential as it affects the rise and overall density of your cupcakes. To master it, mix on medium speed until the mixture is fluffy and pale, ensuring to scrape down the sides of the bowl for uniform mixing.

Another crucial technique is the proper folding of dry ingredients into the wet mixture. This should be done gently to prevent overdeveloping the gluten, which can lead to tough cupcakes. Look for visible pockets of flour as you fold and stop mixing as soon as there are no dry streaks left, maintaining that light, tender crumb.

Pro Tips for Perfect Irresistible German Chocolate Cupcakes

– Ensure your ingredients are at room temperature for optimal mixing.
– Experiment with adding a pinch of espresso powder to enhance the chocolate flavor.
– Top with additional toasted pecans after frosting for added crunch and visual appeal.
– Use a piping bag to frost for a professional look.
– Cool cupcakes in the pan for a few minutes before transferring to a wire rack.
– Don’t skip the cooling time before frosting; it prevents melting.
– Make extra frosting for decoration or to serve on the side.
– Store cupcakes in an airtight container for maximum freshness.

Variations and Adaptations

You might consider regional variations of these cupcakes, such as adding a layer of raspberry or cherry filling to enhance the flavor profile. Seasonal adaptations could involve swapping out the frosting for a pumpkin spice or peppermint variation during the holidays. For dietary modifications, you can create gluten-free cupcakes with a gluten-free baking blend or use dairy-free butter for a vegan-friendly version.

Explore flavor variations by adding spices like cinnamon or cardamom to the batter for a unique twist, or try infusing the frosting with liqueurs for an adult version. For texture modifications, consider adding chocolate chips or chunks into the batter for added richness, while presentation alternatives can include different frosting designs or edible glitter for festive occasions.

Serving and Presentation Guide

Plating techniques for these cupcakes involve placing them on a decorative stand or tiered platter to create an inviting display. Garnishing with a sprinkle of grated chocolate, coconut flakes, or extra chopped pecans can enhance the visual appeal. Traditional accompaniments could include coffee or tea, providing a comforting beverage choice to accompany the sweetness.

Modern serving suggestions might include pairing with a scoop of vanilla ice cream or whipped cream to balance the richness of the cupcake. Temperature considerations are key; serve cupcakes at room temperature for the best texture. For portion control, consider using mini liners to create smaller bites or adjust the size of the cupcakes according to your gathering.

Wine and Beverage Pairing

For wine pairings, consider serving these cupcakes with a nice port or a sweet Riesling that can complement the rich chocolate flavors. Sparkling water with a splash of lime can offer a refreshing contrast without the sweetness. Coffee, particularly an espresso or dark roast, pairs wonderfully with the chocolate and enhances the overall experience.

When serving tea, opt for rich black tea varieties such as Earl Grey, which can balance the sweetness of the frosting. Make sure all beverages are served at appropriate temperatures; chilled wines and warm beverages bring out the best in both flavors and aromas.

Storage and Shelf Life

To preserve these delightful cupcakes, store them in an airtight container at room temperature for up to three days. If you need to keep them longer, refrigerate them for up to a week, ensuring they are well-sealed to avoid drying out. For extended storage, consider freezing the un-frosted cupcakes for up to three months.

When reheating, allow cupcakes to come to room temperature naturally. Frosted cupcakes can be frozen, but it’s recommended to frost them after thawing for the best texture. Additionally, always check for signs of spoilage, such as an off smell or unusual texture, before serving.

Make Ahead Strategies

For a stress-free baking experience, consider preparing the cupcake batter a day in advance and refrigerating it. You can also make the frosting ahead of time and keep it in the fridge, allowing for easy assembly on the day of serving. The cupcakes can be baked and cooled, then frozen, ready for frosting later.

To assess quality impact, ensure cupcakes are wrapped tightly to prevent freezer burn. When assembling, bring all components to room temperature for optimal freshness and flavor. Focus on adding fresh elements, like a sprinkle of toasted coconut, right before serving to maintain their appeal.

Scaling Instructions

If you need to adjust serving sizes, halving the recipe can easily yield a smaller batch while keeping the flavor intact. When doubling or tripling, ensure you have adequate space and equipment, such as larger mixing bowls and pans, to handle increased volumes. Be mindful of timing, as larger batches may require additional baking time.

When scaling, consider any adjustments in ingredient ratios, particularly for baking powder or baking soda to ensure proper leavening. Store additional cupcakes in a sealed container and follow proper storage guidelines to maximize flavor and texture.

Nutritional Deep Dive

Examining the nutritional content, these cupcakes are relatively high in calories due to the sugar and butter, but when enjoyed in moderation, they can be part of a balanced diet. A typical cupcake contains essential macronutrients, including carbohydrates for energy and proteins from eggs and nuts.

Micronutrient analysis reveals beneficial elements from the pecans and coconut, including vitamins E and B, magnesium, and fiber. Balancing indulgence with nutritional awareness helps maintain a healthy lifestyle, particularly when considering appropriate portion sizes—cutting each cupcake into two for smaller servings can create a lighter treat.

In terms of weight management tips, consider practicing mindful eating while savoring the flavor and texture of each bite. This can make a single cupcake feel more satisfying, allowing you to enjoy treats without overindulgence.

Dietary Adaptations

For gluten-free options, substitute regular flour with a gluten-free mix that includes xanthan gum to achieve the right texture. Dairy-free versions can easily replace butter with coconut or avocado oil while using non-dairy milk for moistness. Vegan adaptations could involve using flax eggs as a binder instead of traditional eggs.

Low-carb enthusiasts might also explore using almond flour with sugar alternatives to suit dietary preferences. The keto version would reduce sugar while introducing sugar substitutes, making it possible to enjoy without guilt. Other specific diets can adapt ingredients based on their parameters, ensuring that everyone can indulge in these delicious cupcakes.

Troubleshooting Guide

For texture issues, ensure that you’re correctly measuring your ingredients; too much flour can lead to dense cupcakes. If your cupcakes don’t rise as expected, check that your baking powder is fresh and active, as expired leavening agents can affect performance.

Flavor balance often comes from not tasting your frosting before applying it. Adjusting sugar levels in the frosting is key; always test a small amount first. If you experience temperature problems in your oven, it might be beneficial to use an oven thermometer to ensure accurate readings.

Handling equipment challenges may require adjustments based on the type of cupcake pan you use; some conduct heat differently. For ingredient substitutions, stick to similar ratios for accurate results; this will prevent discrepancies in texture or flavor. Lastly, timing concerns during baking can quickly turn perfect cupcakes into dry ones; always keep an eye on the clock.

Recipe Success Stories

Throughout the community, there have been numerous rave reviews from bakers who have recreated these Irresistible German Chocolate Cupcakes. Many have noted the balanced flavors and delightful textures, with several readers sharing their photos showcasing the cupcakes at different events.

Adaptation stories indicate successful variations using fruit fillings or alternative frostings, leading to unique flavors that have also become cherished recipes. Photography tips shared by readers emphasize capturing the rich textures and colors for social media, increasing engagement and inspiring others to try the recipe.

Engagement within the community has proliferated as bakers swap tips and personal touches, creating a sense of camaraderie through shared experiences in the kitchen. These successes underline the adaptability and joy these cupcakes bring to home bakers across all skill levels.

Frequently Asked Questions

Can I make the cupcakes in advance?

Absolutely! You can bake the cupcakes ahead of time and freeze them without frosting. Just allow them to cool completely, wrap in plastic, and store in an airtight container for up to three months. Frost and serve when you’re ready!

How do I store leftover cupcakes?

Store leftover cupcakes in an airtight container at room temperature for 2-3 days. If you need to keep them longer, refrigerate them for up to a week.

Can I substitute coconut in the frosting?

Yes, if you’re not a fan of coconut, you can use other toppings like crushed nuts, chocolate shavings, or a parchment paper piping technique for a different flavor while maintaining the traditional look.

What can I use instead of pecans?

You can substitute pecans with walnuts or almonds if you’re looking for a different nut flavor or texture. Each alternative will offer its unique taste and crunch.

Is there a vegan version of this recipe?

Yes, you can create a vegan version by using flax eggs, coconut oil, and non-dairy milk instead of traditional ingredients. Enjoying the rich flavors without animal products is entirely possible!

How do I make the frosting perfectly creamy?

Ensure your butter is at room temperature before mixing, and beat it with the sugar until light and fluffy. Gradually add the coconut and pecans, mixing well for a smooth consistency.

Can I make these cupcakes gluten-free?

Yes! Simply replace the all-purpose flour with a gluten-free blend. Ensure it’s a blend that includes xanthan gum for proper structure and texture.

How can I make smaller batch sizes?

You can halve the recipe to achieve a smaller batch size. Adjusting the measurements proportionally will ensure the same delicious results.

What’s the best way to frost the cupcakes?

Using a piping bag fitted with a star tip is ideal for an elegant look. You can also spread frosting using a knife for a rustic presentation. Don’t forget to add your favorite garnishes!

How can I enhance the chocolate flavor?

For a richer chocolate taste, add espresso powder to the batter—it amplifies the chocolate without adding a coffee flavor. Using high-quality cocoa powder also enhances overall flavor.

Additional Resources

To further explore your baking adventures, check out related recipes such as classic chocolate cupcakes, vanilla buttercream frosting, and German chocolate cake for variations. Dive into technique guides emphasizing frosting, cake decorating, and using high-quality ingredients that can elevate your baked goods.

If you’re interested in diving deeper into specific ingredients, consider researching proper flour types, cocoa quality, and sweeteners. Investing in kitchen equipment that supports your baking, like silicone mats for even baking or piping tools, can also benefit your creations. Don’t forget to explore seasonal variations and recipes that highlight fresh ingredients for specific times of the year.

Join the Conversation

Engaging with social media platforms can help you share your baking successes with friends and family while connecting with a broader community of baking enthusiasts. Use hashtags related to cupcakes and share your photographs and variations.

Participate in recipe reviews and provide feedback on your experiences to help others. Collaborate on community blogs that celebrate recipe variations, and take part in local baking challenges to inspire your culinary creativity. Each interaction can lead to new ideas and unforgettable baking experiences, enriching your journey in the kitchen.

The Recipe

Irresistible German Chocolate Cupcakes

Serves: 12 cupcakes

Prep Time: 20 mins

Cook Time: 20 mins

Total Time: 40 mins

Kitchen Equipment Needed

  • Cupcake pan
  • Muffin liners
  • Mixing bowls
  • Electric mixer
  • Piping bag (optional)

Ingredients

  • 1 3/4 cups all-purpose flour
  • 3/4 cup cocoa powder
  • 1 cup sugar
  • 1/2 cup brown sugar
  • 1 tsp baking powder
  • 1 tsp baking soda
  • 1/2 tsp salt
  • 1 cup buttermilk
  • 1/2 cup vegetable oil
  • 2 large eggs
  • 2 tsp vanilla extract
  • 1 cup shredded coconut
  • 1 cup chopped pecans
  • 1/2 cup butter (for frosting)
  • 2 cups powdered sugar (for frosting)

Directions

  1. Preheat your oven to 350°F (175°C) and line a cupcake pan with liners.
  2. In a mixing bowl, combine flour, cocoa powder, sugar, brown sugar, baking powder, baking soda, and salt.
  3. In another bowl, whisk together buttermilk, vegetable oil, eggs, and vanilla extract until smooth.
  4. Gradually add the wet ingredients to the dry ingredients, stirring until just combined.
  5. Fill the cupcake liners about two-thirds full with batter and bake for 20 minutes or until a toothpick inserted comes out clean.
  6. In a separate bowl, cream the butter with powdered sugar until smooth.
  7. Fold in coconut and pecans to create the frosting.
  8. Let the cupcakes cool completely before frosting them with the coconut-pecan frosting.
  9. Top with additional nuts if desired and serve!

Recipe Notes

  • Store cupcakes in an airtight container for freshness.
  • If desired, substitute the frosting with chocolate buttercream for a different flavor.

Irresistible Sweet Cinnamon Banana Bread with Snickerdoodle Twist

Sweet Cinnamon Banana Bread with a Snickerdoodle Twist: A Deliciously Unique Treat

⚖️
Difficulty
Easy

⏲️
Prep Time
15 mins

🕒
Cook Time
60 mins

⏱️
Total Time
75 mins

🍽️
Servings
8 servings

Sweet Cinnamon Banana Bread with a Snickerdoodle Twist is a delightful twist on a classic favorite. Imagine thick slices of moist banana bread enriched with warm cinnamon and topped with a delightful snickerdoodle-inspired coating. This mouthwatering banana bread is perfect for breakfast, snacks, or dessert, and its comforting aroma fills the kitchen, inviting family and friends to gather around.

This recipe combines the familiar sweetness of ripe bananas with the cozy spice of cinnamon and a sugary crust that takes it to the next level of deliciousness. The Snickerdoodle twist adds a crunchy texture and an unforgettable flavor that elevates your ordinary banana bread into something truly spectacular. Each bite is a warm hug, making it an ideal treat to share during the cooler months or at festive gatherings.

Quick Recipe Highlights

  • Flavor Profile: This banana bread balances the natural sweetness of bananas with the warmth of cinnamon and sugar, creating a flavor sensation that’s both comforting and satisfying.
  • Texture: The inside is soft and moist, while the outside boasts a slightly crispy and crumbly layer, reminiscent of classic snickerdoodle cookies.
  • Aroma: The smell of cinnamon mixed with baked bananas fills the air, creating an inviting atmosphere that’s hard to resist.
  • Visual Appeal: With a golden-brown crust and cinnamon-sugar dusting, this banana bread is as beautiful as it is delicious.
  • Skill Level Needed: This recipe is perfect for beginner bakers, providing an easy yet rewarding baking experience.
  • Special Equipment: You will need a mixing bowl, a loaf pan, and an oven to create this tasty treat.

Recipe Overview

  • Difficulty Level: The Sweet Cinnamon Banana Bread with a Snickerdoodle Twist is categorized as easy, making it accessible for all skill levels. The straightforward steps require minimal culinary experience, ensuring that anyone can enjoy baking this delicious loaf.
  • Category: This recipe belongs to the breakfast and dessert categories, as it can be enjoyed during breakfast or as a sweet treat at any time of the day.
  • Cuisine: Banana bread has its roots in American cuisine, but this recipe infuses it with the beloved flavors of snickerdoodle cookies, showcasing a blend of culinary influences.
  • Cost: The ingredients are budget-friendly, making this recipe affordable without compromising on taste.
  • Season: While banana bread can be enjoyed year-round, it truly shines during the fall and winter months, when warm spices are particularly comforting.
  • Occasion: Perfect for family gatherings, brunches, or as a thoughtful gift for friends, this banana bread is versatile for any occasion.

Why You’ll Love This Recipe

The taste and texture appeal of Sweet Cinnamon Banana Bread with a Snickerdoodle Twist will have you coming back for more. The moist banana bread layered with cinnamon sugar offers a delightful chewiness that is simply irresistible. The combination of flavors elevates this treat, ensuring it is not just another loaf of bread but a gourmet experience.

Convenience and preparation benefits are another reason to love this recipe. With only a few simple steps, you can whip this up relatively quickly, making it a fantastic option for last-minute gatherings or cravings. Plus, it remains delicious for several days, allowing you to enjoy it at your leisure.

From a nutritional angle, banana bread provides a source of potassium and other essential nutrients found in ripe bananas. Although this recipe includes added sugars and butter, the presence of bananas contributes to a feeling of satiety, making it a fulfilling snack.

Socially speaking, this banana bread is a crowd-pleaser. Its inviting aroma captivates guests, making it a delightful centerpiece for brunch, coffee get-togethers, or dessert tables. Sharing a slice creates cherished moments with friends and family.

Lastly, the cost-effectiveness and accessibility of the ingredients make this recipe an everyday treat. With items most cooks already have in their pantry, there’s no need for a special shopping trip. Just grab those overripe bananas and transform them into something spectacular!

Historical Background and Cultural Significance

Banana bread originated during the Great Depression as a way to use up overripe bananas, preventing waste while maximizing flavor. This simple recipe quickly gained popularity due to its delicious results and ease of preparation. Over time, banana bread has evolved into a beloved staple in American baking, with countless variations emerging, including the revered snickerdoodle twist.

Culturally, banana bread represents resourcefulness and creativity in the kitchen. Families often pass down their own recipes, each adding personal touches that reflect their unique stories and traditions. This fostering of familial bonds is what makes banana bread a timeless favorite.

The evolution of banana bread encompasses various regional interpretations. From nut-studded varieties to decadent chocolate chip additions, each iteration showcases local tastes and ingredient availability.

Regional variations can be found everywhere, including tropical locales where bakers might add coconut or other fruity elements commonly found in those areas. These adaptations further illustrate how banana bread has transcended borders and embraced diversity.

Ingredient Deep Dive

Ripe Bananas: Rich in potassium and essential vitamins, ripe bananas are the star of this bread. They provide natural sweetness and moisture. When choosing bananas, look for those that are heavily speckled with brown spots; they are at their peak flavor. To store, place them on the counter, and avoid refrigerating them. If overripe, consider freezing them for future baking uses.

All-purpose Flour: This staple ingredient gives the bread its structure. While you can experiment with alternatives like whole wheat or gluten-free flour, it can change the final texture. Store flour in a cool, dry place, and keep it in an airtight container to ensure freshness.

Sugar: Both granulated and brown sugar play crucial roles in flavoring. While granulated sugar adds sweetness, brown sugar introduces moisture and depth. Always choose high-quality sugar and store it away from moisture. For substitutions, coconut sugar or honey can be used, but results may vary slightly.

Cinnamon: This warm spice enhances both flavor and aroma, making it integral to the snickerdoodle essence of this recipe. Fresh ground cinnamon tends to deliver more robust flavor than pre-ground. Keep your spices in a cool, dark place for optimal freshness, and consider experimenting with other spices like nutmeg for a uniquely spiced experience.

Butter: Adds richness and flavor while keeping the bread moist. Ensure your butter is softened for easy mixing, which will improve the texture of the loaf. For storage, keep butter sealed in the fridge or freezer for longer-lasting use.

Egg: Acts as a binder that helps maintain the loaf’s structure. Always use fresh eggs, stored in the refrigerator. For vegan adaptations, consider using flax eggs as a substitute, which can work well in this recipe.

Common Mistakes to Avoid

  • Not using overripe bananas: The sweetness and moisture of ripe bananas are key. Underripe bananas can lead to a denser loaf.
  • Overmixing the batter: This can create a tough texture; mix until just combined for a light banana bread.
  • Incorrect oven temperature: Ensuring accuracy in oven temperature matters for even baking. Use an oven thermometer if unsure.
  • Using cold ingredients: Allow eggs and butter to come to room temperature for better incorporation.
  • Not greasing the pan sufficiently: This can lead to sticking; ensure the pan is well-greased or lined with parchment.
  • Skipping the cinnamon-sugar topping: This critical step adds flavor; don’t leave it out for lackluster results.
  • Blindly following baking durations: Always check for doneness with a toothpick, as oven performance can vary.
  • Storing improperly post-baking: Avoid stale leftovers by wrapping the bread tightly in plastic wrap or foil once cooled.
  • Not tasting and adjusting: Don’t hesitate to tweak sugar levels according to taste—everyone has different preferences!
  • Not letting the bread cool: Waiting allows flavors to set and eases slicing without crumbling.

Essential Techniques

Understanding the importance of mixing the ingredients correctly is crucial in creating the perfect batter. Combine wet and dry ingredients separately before mixing them to ensure consistent texture. Avoiding overmixing is key; this prevents activating too much gluten, which can result in a dense loaf.

Measuring ingredients accurately is essential for success. Use a digital scale for precise measurements of flour and sugar. Avoid scooping flour directly from the container as this can lead to compacting and offer incorrect amounts.

Cooling the loaf after baking is an often-overlooked technique. Allowing the banana bread to cool in the pan for a few minutes before transferring it to a wire rack ensures it remains intact and retains moisture. Proper cooling enhances both texture and flavor.

Monitoring baking time closely is important. Rather than relying solely on a timer, check for a golden-brown exterior and insert a toothpick in the center. If it comes out clean or with a few moist crumbs, it’s done!

Pro Tips for Perfect Sweet Cinnamon Banana Bread with a Snickerdoodle Twist

To ensure your banana bread turns out perfectly every time, consider these pro tips: Always use room temperature eggs and butter to blend seamlessly into the batter, resulting in a lighter loaf. Additionally, try to weigh your bananas after peeling for more accurate measures, as different sizes can vary greatly.

Consider incorporating nuts or chocolate chips for added texture and flavor variety, but avoid overloading the batter as it can disrupt cooking times. Be sure to rotate the loaf halfway through the baking process for even coloration and cooking, especially if your oven has hot spots.

After baking, keep the leftover bread in an airtight container; it maintains moisture and flavor longer. For an extra treat, reheat slices with a pat of butter on top until warm and gooey before serving.

Lastly, allow the banana bread to rest overnight before cutting into it—the flavors improve significantly, resulting in a more balanced taste.

Variations and Adaptations

For those looking to mix things up, try regional variations such as adding pecans or walnuts for crunch or using maple syrup in place of sugar for a unique twist. Seasonal adaptations can also include integrating pumpkin spice during the fall months for a festive version.

Dietary modifications can be easily made for gluten-free or dairy-free options. Substitute all-purpose flour with almond or coconut flour and replace butter with coconut oil. For vegan alternatives, flaxseed mixed with water can replace eggs, maintaining the loaf’s structure without the animal products.

You can also change flavor profiles by adding spices like cardamom or allspice, contributing an aromatic depth to your bread. Lastly, consider new presentation alternatives—slice the loaf and serve it with a dollop of freshly whipped cream or a sprinkle of powdered sugar to delight your guests visually.

Serving and Presentation Guide

When serving your Sweet Cinnamon Banana Bread with a Snickerdoodle Twist, presentation is key. Slice the bread into even, thick pieces to showcase its interior and the beautiful cinnamon-sugar topping. A wooden or decorative cutting board adds rustic charm to the display.

Garnish with fresh seasonal fruits like berries or slices of citrus, which bring a color contrast and freshness to the table. If desired, adding a drizzle of caramel or a light dusting of powdered sugar enhances the visual appeal.

Serving temperature can also elevate the experience; consider warming each slice slightly in the oven or microwave for a deliciously cozy serving moment. Offering whipped cream on the side creates a lovely pairing for those who enjoy creamy toppings, bringing together flavors seamlessly.

Lastly, maintain portion control by presenting individual slices on small dessert plates, allowing guests to serve themselves without overwhelming their appetites.

Wine and Beverage Pairing

Pairing beverages with Sweet Cinnamon Banana Bread can enhance its flavors. For an alcoholic option, consider a light wine such as a Riesling or Moscato. Their sweetness and crispness complement the flavor profile beautifully, enhancing the banana and cinnamon notes.

For non-alcoholic options, a spiced chai tea or a rich hot chocolate brings warmth and complements the cozy spices found in the bread. If you’re a coffee lover, consider serving it alongside a medium roast brewed coffee—the nutty flavors will enhance the bread’s taste.

When serving, temperature balance is essential; ensure the drinks are either served chilled or hot to match the warmth of the banana bread for an ideal pairing.

Storage and Shelf Life

Proper storage of Sweet Cinnamon Banana Bread is vital for maintaining its freshness. Keep the bread at room temperature in an airtight container for up to four days. If you have leftovers that are lingering longer, consider freezing slices, which can last up to three months.

To freeze bread, wrap it tightly in plastic wrap and then foil to protect against freezer burn. For reheating, simply microwave individual slices for several seconds or place them in a preheated oven at 350°F until warmed through.

Always keep an eye out for signs of spoilage—if the bread appears dry, darkening, or has an off smell, it’s best to discard it. Enjoying the bread while it is fresh provides the best taste experience.

Make Ahead Strategies

Make ahead strategies can ease your baking hustle. Prepare dry ingredients ahead and store them together in a zip-top bag. Combine wet ingredients shortly before baking to maintain optimal freshness.

If you’re planning for next-day events, bake an extra loaf and freeze it as mentioned earlier. This allows you to pull it out and have it ready to serve without the hassle the day of.

To keep the flavor intact, avoid frosting or adding toppings until just before serving. This ensures freshness while allowing the bread to shine in its delicious simplicity.

Scaling Instructions

Scaling the Sweet Cinnamon Banana Bread recipe is straightforward. If you want to halve it, simply adjust the ingredient amounts accordingly, maintaining the same baking temperature and time, checking for doneness closer to the end.

For larger gatherings, doubling or tripling the recipe works well, but consider spacing out the loaves on different racks in the oven to prevent uneven cooking. Always monitor baking time, as larger quantities may need a few extra minutes.

Make sure you have appropriately sized pans as well; using larger pans may require additional time to cook through completely.

Nutritional Deep Dive

Sweet Cinnamon Banana Bread provides a hearty balance of macronutrients, primarily coming from healthy fats, carbohydrates, and a moderate protein count. The bananas offer natural sugars and fiber, supporting digestive health and providing sustained energy.

When analyzing micronutrients, bananas contribute essential potassium, vitamin C, and vitamin B6, while cinnamon brings antioxidants and anti-inflammatory properties.

For those concerned about dietary considerations, be mindful of portion sizes. Each slice packs a flavorful punch; moderation is key when enjoying this delightful treat without overindulging.

This banana bread offers a perfect blend to satisfy sweet cravings while maintaining a fulfilling presence in your diet—making it a fantastic option for weight management when enjoyed wisely.

Dietary Adaptations

This recipe allows for various dietary adaptations. If you’re gluten-free, replacing all-purpose flour with almond or gluten-free baking blends can yield delicious results while still delivering on flavor.

For vegan adaptations, follow the earlier suggested flax egg method, replacing butter with coconut oil, and using non-dairy milk for added richness.

Dairy-free individuals can simply swap out dairy for plant-based alternatives while still enjoying the flavors of the beloved banana bread.

Low-carb and keto variations are possible with coconut flour and sugar substitutes, providing a sweet treat without the added carbs.

Lastly, each of these adaptations maintains the core essence of the Sweet Cinnamon Banana Bread while accommodating diverse dietary preferences.

Troubleshooting Guide

If your banana bread turns out too dense, it’s likely due to overmixing; ensure you mix just until combined for best results. If it’s too dry, you may have baked it too long or used overly ripe bananas, which can affect moisture levels.

For a lack of flavor, double-check your spice measurements; fresh spices can make a big difference. If you find the top is browning too quickly, loosely cover it with aluminum foil while baking.

If your bread sinks in the middle, it could be due to overmixing or an incorrect oven temperature. Always check the accuracy of your oven to avoid such issues—an oven thermometer can help!

For unpleasant texture, ensure you’re measuring flour correctly and not ignoring the cooling process post-baking, as it can affect how the bread sets.

Recipe Success Stories

Community feedback for the Sweet Cinnamon Banana Bread with a Snickerdoodle Twist has been overwhelmingly positive, and it’s not uncommon to hear about family recipe adaptations becoming personal favorites. Readers have shared their successes in varying spice blends and incorporating their favorite nuts, praising how these additions enhance the flavors.

Many also describe the joy of baking this recipe with children, turning it into a family tradition. Variations such as adding chocolate chips or substituting flavors have led to intriguing new takes on this classic, igniting the creativity of home bakers everywhere.

Photography tips also describe how capturing the warm, golden ambiance of freshly baked banana bread can lead to mouthwatering posts on social media, inspiring others to try their hand at this simple yet delicious recipe.

Frequently Asked Questions

1. Can I use frozen bananas for this recipe?
Yes! Frozen bananas work well for banana bread. Just be sure to defrost them, drain excess moisture, and mash them before mixing into the batter. This can also add a greater sweetness and moisture to your loaf.

2. How do I know when the banana bread is done?
A toothpick inserted into the center of the bread should come out clean or with just a few moist crumbs. If it comes out wet, give it additional baking time, checking every 5 minutes.

3. Can I convert this into muffins?
Absolutely! Use a muffin tin and reduce the baking time to 20-25 minutes. Keep an eye on them to achieve that perfect fluffy texture.

4. How do I store leftover banana bread?
Wrap it tightly in plastic wrap and store at room temperature for up to four days. For longer storage, freeze individual slices in plastic wrap and foil.

5. Can I add nuts or chocolate chips?
Yes, feel free to add nuts or chocolate chips according to your taste. Just be sure not to overload the batter, as they can affect baking time.

6. What can I use instead of butter?
Coconut oil or applesauce can work as butter substitutes for a healthier option. This change will slightly alter the flavor and texture, but can still yield delicious results.

7. Can I make this bread dairy-free?
Yes, use non-dairy milk and coconut oil in place of butter. This adaptation keeps the bread moist and flavorful.

8. Is there a way to lower the sugar content?
Consider using ripe bananas, which contain natural sugars, or substituting with alternatives like honey or maple syrup. Just be cautious with ratios as they vary in sweetness.

9. How can I make this recipe low-carb?
Swap all-purpose flour for almond flour and replace sugar with erythritol or other low-carb sweeteners for a keto-friendly version.

10. Can this recipe be made ahead of time?
While fresh-baked bread is best, you can prepare the batter in advance and bake it later. Alternatively, fully bake and freeze the bread for later enjoyment.

Additional Resources

For related recipes, consider checking out variations like classic banana bread, chocolate chip banana bread, and healthy banana bread options. Each offers a delicious twist on the core concept while using similar techniques.

Become familiar with technique guides on mixing, measuring, and baking essentials to further enhance your baking skills. Exploring ingredient information for optimal freshness and substitutes ensures you’re always prepared regardless of what you have on hand.

Finally, consider investing in essential kitchen equipment that can streamline your baking efforts and ensure success with this recipe and others.

Join the Conversation

Share your Sweet Cinnamon Banana Bread experiences on social media to connect with fellow baking enthusiasts. Posting photos of your results can inspire others to try their hand at baking—tagging in community groups encourages engagement and feedback.

Offer and explore photography tips and preferences to capture this loaf’s beauty effectively, as well as share valuable recipe reviews that benefit others. Encouraging discussions around this recipe allows for creative adaptation and individual culinary expression, leading to diverse interpretations of a beloved classic.

The Recipe

Sweet Cinnamon Banana Bread with a Snickerdoodle Twist

Serves: 8 servings

Prep Time: 15 mins

Cook Time: 60 mins

Total Time: 75 mins

Kitchen Equipment Needed

  • Mixing bowl
  • Loaf pan
  • Measuring cups and spoons
  • Oven
  • Whisk
  • Rubber spatula

Ingredients

  • 3 large ripe bananas, mashed
  • 1/2 cup unsalted butter, melted
  • 3/4 cup granulated sugar
  • 1/4 cup brown sugar, packed
  • 2 large eggs, room temperature
  • 1 teaspoon vanilla extract
  • 1 1/2 cups all-purpose flour
  • 1 teaspoon baking powder
  • 1/2 teaspoon baking soda
  • 1 teaspoon cinnamon
  • 1/4 teaspoon salt
  • 1/4 cup granulated sugar (for topping)
  • 1 teaspoon cinnamon (for topping)

Directions

  1. Preheat the oven to 350°F (175°C). Grease and flour a 9×5-inch loaf pan.
  2. In a mixing bowl, combine the melted butter, mashed bananas, granulated sugar, brown sugar, eggs, and vanilla extract. Mix until well combined.
  3. In another bowl, whisk together the flour, baking powder, baking soda, cinnamon, and salt.
  4. Gradually add dry ingredients to the banana mixture, stirring until just combined—avoid overmixing.
  5. Pour the batter into the prepared loaf pan.
  6. In a small bowl, mix the sugar and cinnamon for the topping. Sprinkle evenly over the batter.
  7. Bake for 60 minutes, or until a toothpick inserted in the center comes out clean.
  8. Let cool in the pan for 10 minutes, then transfer to a wire rack to cool completely.

Recipe Notes

  • Store leftovers in an airtight container at room temperature for up to four days.
  • This bread can be frozen for up to three months; wrap tightly in plastic wrap followed by foil.
  • For a sweeter loaf, increase the sugar by a couple of tablespoons.
  • Feel free to customize with your favorite add-ins like nuts or chocolate chips.

Delicious No Bake Pineapple Coconut Bars for Easy Summer Snacking

No Bake Pineapple Coconut Bars: A Tropical Delight

⚖️
Difficulty
Easy

⏲️
Prep Time
15 mins

🕒
Cook Time
0 mins

⏱️
Total Time
15 mins

🍽️
Servings
16 bars

Indulge in the tropical flavors of our No Bake Pineapple Coconut Bars! This delightful treat perfectly marries the sweetness of fresh pineapple with the creamy richness of coconut, creating a symphony of delightful flavors in every bite. Ideal for warm days, these bars make for a perfect snack or dessert that doesn’t require an oven—allowing the delicious taste of summer to come alive any day of the year.

These No Bake Pineapple Coconut Bars are not just delicious; they are also easy to whip up and require minimal preparation. With just a handful of ingredients, you can create a dessert that’s refreshing, satisfying, and utterly irresistible. Picture yourself at a sunny beach, savoring these bars, and with each mouthful, you’ll be whisked away to paradise. Let’s dive right into the recipe to enjoy these tropical treats!

Quick Recipe Highlights

  • Flavor Profile: The vibrant sweetness of ripe pineapples blends beautifully with the creamy, nutty notes of coconut, giving these bars a well-rounded tropical flavor.
  • Texture: The bars have a chewy yet crumbly texture that holds together beautifully, enhanced by the crunchiness of shredded coconut.
  • Aroma: A delightful tropical aroma wafts from these bars as you slice into them, making them incredibly enticing for both your taste buds and your senses.
  • Visual Appeal: With their bright yellow color from pineapple and the speckled white of coconut, these bars look as delightful as they taste, making them perfect for any occasion.
  • Skill Level Needed: This recipe is beginner-friendly, requiring no baking skills, making it a great choice for novice bakers.
  • Special Equipment: You only need a mixing bowl and a baking dish to prepare these delicious no-bake bars.

Recipe Overview

  • Difficulty Level: This recipe is incredibly easy, making it accessible to anyone, regardless of cooking experience.
  • Category: These bars are perfect as a snack, dessert, or even as a light breakfast option on busy mornings.
  • Cuisine: This recipe is inspired by tropical cuisine, commonly associated with warm, sunny locales, and embodies the essence of island living.
  • Cost: The ingredients are affordable, with an approximate cost of around $10 to make a generous batch of bars.
  • Season: Best enjoyed in the spring and summer months when tropical fruits are at their peak, but they can be savored year-round.
  • Occasion: Perfect for picnics, potlucks, or just as a delightful treat for family gatherings.

Why You’ll Love This Recipe

The No Bake Pineapple Coconut Bars are not only delicious but provide a wonderful taste and texture appeal. The sweetness of the pineapple hits your palate immediately, followed by the rich and creamy flavor of coconut, making for a harmonious blend that leaves you wanting more. The chewiness from the oats gives a satisfying bite while the coconut adds a delightful crunch, providing a unique mouthfeel designed for pleasure.

One of the biggest advantages of this recipe is its convenience. With just a mix-and-press method, you can have these bars ready to chill in mere minutes. There’s no scorching stove, no complicated techniques, just simple preparation that allows you to focus on flavor rather than fussiness. This ease of preparation means you can enjoy these bars even on your busiest days!

Nutritionally, the combination of coconut and pineapple offers a wealth of benefits. Pineapple is rich in vitamins, particularly vitamin C, which boosts your immune system while helping your body absorb iron. Coconut contributes healthy fats and fiber, promoting digestion and providing sustained energy. Together, they form a wholesome treat that’s both flavorful and healthy.

When it comes to entertaining, these No Bake Pineapple Coconut Bars are a hit! They’re easy to serve, look stunning on a platter, and can please a crowd without the need for elaborate preparation. Just cut them into bars, and you have an eye-catching, delicious treat that your guests will love.

Cost-effectiveness is another significant factor, as this recipe is quite budget-friendly. The ingredients are common pantry items and tropical fruits that are often on sale during their peak seasons. Enjoy a scrumptious, healthy dessert without breaking the bank!

Historical Background and Cultural Significance

The origin of pineapple and coconut desserts dates back centuries to tropical regions where these fruits thrive. Coconuts have long held cultural significance in many Pacific Island societies, where they symbolize sustenance and wealth. Pineapples, often regarded as a sign of hospitality, have been a key ingredient in traditional tropical desserts.

In many cultures, these fruits are celebrated in festivals and gatherings, representing abundance and joy. The combination of pineapple and coconut in desserts often symbolizes the fun and relaxation associated with beach life, bringing with it the essence of summer regardless of the actual season.

Over time, the recipe for No Bake Pineapple Coconut Bars has evolved from traditional preparations into modern variations suited for quick and easy preparation. While classic desserts may have involved complicated processes, today’s recipes encourage creativity and simplicity.

Different regions have introduced their unique twists to the basic recipe, showcasing local ingredients and preferences. For instance, some cultures might incorporate additional tropical fruits, while others may experiment with nuts and other flavorings to enhance the bars’ taste even further.

Ingredient Deep Dive

Pineapple: Pineapples are not only a delicious tropical fruit but are also culturally significant, often symbolizing hospitality and welcome. Nutritionally, they are packed with vitamin C and bromelain, an enzyme that aids in digestion. When selecting a pineapple, look for a fragrant scent and firm skin, indicating ripeness. Store whole pineapples at room temperature, and once cut, refrigerate in an airtight container.

Coconut: The coconut is a remarkable fruit with a rich history in tropical regions worldwide. Coconut is an excellent source of healthy fats, fiber, and several essential minerals. When buying shredded coconut, check for freshness and unsweetened varieties if you’re looking to control sugar intake. Store in an airtight container in a cool, dark place to maintain its flavor, and consider using fresh coconut for a more vibrant taste in your bars.

Common Mistakes to Avoid

  • Using overly ripe pineapple can make the bars too watery, compromising the texture. Always select solid pineapples.
  • Not chilling the bars long enough may result in a crumbly texture. Allow ample time for them to set in the fridge.
  • Overmixing the ingredients can lead to a dense consistency. Mix just until combined for the best results.
  • Substituting unsweetened coconut for sweetened can alter the flavor profile significantly, so be cautious with your substitutions.
  • Forgetting to line the baking dish with parchment paper can make removing the bars difficult, so always prepare your pan before starting.
  • Not cutting the bars with a sharp knife may result in uneven shapes; use a warm knife for clean edges.
  • Storing the bars at room temperature can lead to a mushy texture; be sure to keep them refrigerated.
  • Using too much liquid sweetener can result in overly sticky bars, so balance it well with dry ingredients.
  • Skipping the oat layer could make the bars less filling, so don’t skip important ingredients.
  • Not allowing the bars to rest before serving can impact the overall flavor; patience is key!

Essential Techniques

Mixing: Proper mixing is crucial to ensure all ingredients are evenly distributed, leading to balanced flavor and texture in your No Bake Pineapple Coconut Bars. To master this, use a spatula to fold the ingredients gently without overmixing. The goal is just to combine them until no dry ingredients remain visible. Common pitfalls include mixing too aggressively, leading to a dense final product. A gentle folding technique will prevent this and help maintain a light texture.

Pressing the Mixture: Pressing the mixture firmly is essential for ensuring your bars hold their shape once cut. Use the back of a measuring cup or your fingers to compact the mixture evenly into the pan. Visual cues such as slight compression and a flat surface will indicate success. A common mistake is not applying enough pressure, resulting in crumbly bars that fall apart. Take your time with this step for the best outcome!

Pro Tips for Perfect No Bake Pineapple Coconut Bars

– Ensure your ingredients are at room temperature for better mixing and flavor integration.
– Use fresh pineapple for a more vibrant and lush flavor that is worth the effort.
– Consider adding a pinch of salt to balance the sweetness of the bars and enhance the flavors.
– Swap regular oats for gluten-free oats to cater to dietary needs without sacrificing taste.
– For a touch of indulgence, drizzle melted dark chocolate over the bars before serving.
– Experiment with a scoop of vanilla or coconut yogurt on the side for added creaminess and flavor.
– Always allow the bars to chill for at least 2 hours to fully set before slicing.
– Use a pizza cutter for quick and efficient slicing of your cooled bars.

Variations and Adaptations

Try experimenting with different flavor profiles by incorporating various fruits like mango or kiwi for a unique twist. Seasonal adaptations could include using pumpkin puree in the fall or citrus zest during winter for a refreshing contrast.

For dietary modifications, consider making these bars vegan by using maple syrup instead of honey. Low-carb variations can be achieved by substituting granola with nut flour. If you enjoy different textures, add chopped nuts or seeds to create a delightful crunch. Presentation can also be varied by layering the bars with alternative fruit purees for a striking visual effect.

Serving and Presentation Guide

Plating your No Bake Pineapple Coconut Bars can enhance their appeal. For an elegant presentation, cut the bars into neat squares and arrange them on a colorful platter. Garnish with fresh pineapple slices, shredded coconut, or mint leaves for a burst of color. Serve them chilled alongside a dollop of whipped cream or coconut yogurt for a delightful pairing.

Consider temperature when serving; these bars are best served cold, which keeps them firm and refreshing. For portion control, cut small, bite-sized portions, making them perfect for sharing at gatherings.

Wine and Beverage Pairing

Pair your No Bake Pineapple Coconut Bars with a chilled glass of Moscato or Riesling for a fruity complement that enhances the tropical flavors. If you prefer non-alcoholic options, a sparkling coconut water or a pineapple-based smoothie would pair beautifully. If you’re a coffee lover, try a light iced coffee or vanilla latte to balance the sweetness of the bars.

Storage and Shelf Life

To maintain the freshness of your No Bake Pineapple Coconut Bars, store them in an airtight container in the refrigerator. They typically last up to one week, but quality is best within the first few days when they’re most flavorful. Ensure they are kept chilled, as they can become mushy if left at room temperature for extended periods.

For longer storage, consider freezing the bars. Wrap them tightly in plastic wrap and aluminum foil to prevent freezer burn. Thaw them in the refrigerator before serving.

Make Ahead Strategies

To streamline preparation, consider making your No Bake Pineapple Coconut Bars a day in advance. This allows the flavors to meld and the bars to set perfectly. Assemble the mixture and store it in the refrigerator until you’re ready to press it into the pan.

If you’re preparing other elements for your gathering, store the bars between steps in the fridge to maintain quality. For optimal freshness, look to add any toppings or garnishes just before serving.

Scaling Instructions

This recipe can be easily scaled to meet your needs. To halve it, adjust the quantities of each ingredient accordingly, and you may also want to use a smaller dish for pressing. If wanting to double or triple the recipe, ensure you have a large enough mixing bowl and consider using multiple pans to accommodate the quantity.

When scaling, keep an eye on the setting time—the larger the batch, the longer it may require in the refrigerator. Always store leftovers according to the storage guidelines provided.

Nutritional Deep Dive

The No Bake Pineapple Coconut Bars are balanced in macros, delivering around 150 calories per serving. They are a wholesome treat with proteins from the nuts and healthy fats from the coconut, contributing to a filling snack. Additionally, they provide significant vitamins from the fresh pineapple, pairing well with the overall nutritious profile.

For those mindful of their dietary goals, controlling portion sizes becomes essential. These bars offer a satisfying sweetness that can curb sugar cravings without compromising health.

Dietary Adaptations

Making these No Bake Pineapple Coconut Bars gluten-free is straightforward; simply use gluten-free oats. For a dairy-free version, ensure the coconut or additional ingredients used do not contain dairy.

Vegan adaptations can include replacing honey with maple syrup or agave nectar. Low-carb or keto options may involve substituting traditional sweeteners with stevia or erythritol while using nut flours instead of oats.

For those following a paleo diet, omit any processed sweeteners and focus on using clean, whole ingredients. This flexibility makes the bars accessible for a variety of dietary preferences and needs.

Troubleshooting Guide

Common texture issues may arise if the bars feel too soft upon slicing. This often results from insufficient chilling time; ensure they rest in the fridge long enough to set completely.

Flavor balance can be adjusted if the bars taste overly sweet; one way to enhance flavor without additional sweetness is by adding a pinch of salt or a splash of citrus juice to brighten up the taste.

If you face temperature problems, always ensure your ingredients are fused at room temperature before mixing; cold ingredients can cause clumping.

Equipment challenges arise if you don’t have a proper baking dish; substitute any loaf or square pan according to your preferred shape.

When swapping ingredients due to availability, be cautious with ratios to avoid altering the desired outcome dramatically. Timing concerns can affect setting; ensure you’re mindful of the time allocated for chilling in the fridge.

Recipe Success Stories

Community feedback has consistently praised the No Bake Pineapple Coconut Bars for their irresistible taste and simple preparation method. Many readers have celebrated the versatility of this recipe, sharing adaptations that led to unique flavor profiles, such as adding chocolate or nut butters.

Adaptation stories from the community have highlighted successful substitutions, where individuals crafted nut-free or lower-sugar versions without sacrificing flavor. Others have shared stunning photographs of their finished bars, showcasing how visually appealing these treats can be.

Recipe reviews often note the rave-worthy responses received from guests at gatherings, reinforcing the bars’ success among family and friends. Readers repeatedly comment on the joy of making these bars, turning a simple recipe into a beloved family tradition.

Frequently Asked Questions

Can I use canned pineapple for this recipe?
Yes, you can use canned pineapple, but be sure to drain it well to avoid excess moisture that could make the bars soggy. Fresh pineapple is typically preferred for the best flavor.

How long will these bars last in the refrigerator?
When stored properly in an airtight container, the bars will last for about one week in the refrigerator. Their texture is best within the first few days.

Can I substitute the coconut in this recipe?
Absolutely! While coconut adds a unique flavor, you can substitute it with nuts or seeds. Simply adjust the quantities to maintain texture.

Is there a way to make these bars gluten-free?
Yes, to make these bars gluten-free, use gluten-free oats instead of regular oats. This adjustment ensures that you can still enjoy these treats without gluten.

What can I do if the bars are too sticky?
If the mixture is too sticky, try adding a little more oats or coconut to absorb the excess moisture. Chilling them longer can also help firm them up.

Can I freeze these bars?
Yes, you can freeze the bars for up to two months. Ensure they are wrapped tightly in plastic wrap and aluminum foil to prevent freezer burn.

How do I know when the bars are set?
The bars should feel firm to the touch and hold their shape when cut. If they’re too soft, give them more time in the fridge to set properly.

Can I use alternative sweeteners in this recipe?
Definitely! You can substitute honey with maple syrup, agave nectar, or stevia, just be mindful of adjusting the quantities as needed.

What should I do if I don’t have a mixing bowl?
If you don’t have a mixing bowl, a large pot or any container suitable for mixing can be used. Just ensure it has enough space to stir the ingredients well.

Can I make these bars without oats?
While oats are a crucial part of the texture, you can experiment with using nut flour or ground almonds to create a base, though this alters the flavor and consistency.

Additional Resources

If you loved these No Bake Pineapple Coconut Bars, check out other tropical-inspired recipes on our blog for a variety of delicious treats. We also offer technique guides on making the best no-bake desserts and ingredient information focusing on tropical fruits. For those interested, our equipment recommendations section has everything you need for easy and successful baking, ensuring you’re prepared for any recipe.

Join the Conversation

We’d love to hear your thoughts on this No Bake Pineapple Coconut Bars recipe! Share your photos, variations, and feedback on social media, and connect with fellow food enthusiasts. Feel free to leave reviews or engage in discussions about your favorite tropical recipes, exchanging tips and experiences in the kitchen.

The Recipe

No Bake Pineapple Coconut Bars

Serves: 16 bars

Prep Time: 15 mins

Cook Time: 0 mins

Total Time: 15 mins

Kitchen Equipment Needed

  • Mixing bowl
  • Baking dish (8×8 inch)
  • Spatula or spoon
  • Knife for slicing
  • Parchment paper

Ingredients

  • 1 cup finely chopped fresh pineapple
  • 1 cup shredded unsweetened coconut
  • 1 cup rolled oats
  • 1/3 cup honey or maple syrup
  • 1/4 cup coconut oil melted
  • 1 tsp vanilla extract

Directions

  1. In a mixing bowl, combine finely chopped pineapple, shredded coconut, rolled oats, honey (or maple syrup), melted coconut oil, and vanilla extract.
  2. Mix until fully combined and the mixture holds together when pressed.
  3. Prepare an 8×8 inch baking dish by lining it with parchment paper.
  4. Transfer the mixture into the dish, pressing it evenly into all corners using a spatula.
  5. Cover the dish and refrigerate for at least 2 hours until set.
  6. Remove from refrigerator, lift out of the dish using the parchment paper, and slice into bars.
  7. Enjoy immediately or store in an airtight container in the refrigerator.

Recipe Notes

  • For added texture, consider mixing in some chopped nuts or seeds.
  • Feel free to drizzle melted chocolate on top for an indulgent touch.
  • Bars can be frozen if you’re looking to enjoy them later; just ensure they are well-wrapped.