Delicious Mini Biscoff Cheesecakes: Bite-Sized Bliss
Indulge in the sweetness of Mini Biscoff Cheesecakes, where creamy, rich flavors collide with the warm, spiced notes of Biscoff cookies. These delightful treats are perfect for any occasion, offering a unique twist on traditional cheesecake. Each mini cheesecake is a harmonious blend of velvety cream cheese, luscious caramel, and the iconic taste of Biscoff, all nestled in a buttery cookie crust. Whether served at a party or enjoyed as an evening treat, these cheesecakes will surely captivate your taste buds.
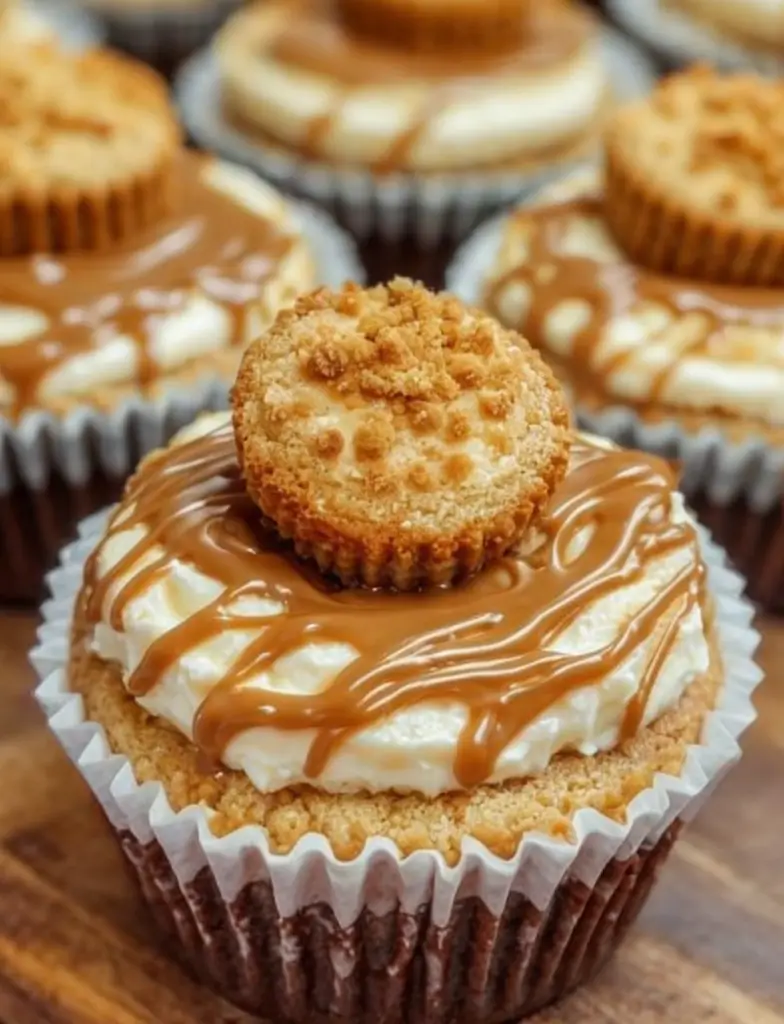
Imagine sinking your spoon into these delightful little desserts and tasting the creamy filling that melts in your mouth. The crust provides a satisfying crunch that perfectly complements the smooth cheesecake, making every bite a delightful contrast of textures. The aroma of caramelized sugar combined with the spicy notes of cinnamon fills the air, inviting everyone to indulge. These Mini Biscoff Cheesecakes are more than just dessert; they’re a miniature experience of joy and satisfaction.
Quick Recipe Highlights
- Flavor Profile: Mini Biscoff Cheesecakes boast a unique combination of creamy, sweet cheesecake and caramel notes with a hint of spiciness from the Biscoff cookies.
- Texture: The cheesecakes feature a smooth and creamy filling set against a crunchy and buttery cookie crust, providing a delightful mouthfeel.
- Aroma: They offer a heavenly aroma of caramel with subtle hints of cinnamon and brown sugar that will fill your kitchen as they bake.
- Visual Appeal: These mini cheesecakes are visually stunning, with golden caramel swirls on top and perfectly baked crust edges, creating an irresistible presentation.
- Skill Level Needed: This recipe is suitable for those with moderate baking skills, as it requires attention to detail and some patience during preparation and assembly.
- Special Equipment: You will need a muffin tin and cupcake liners to create the mini cheesecakes, along with a mixing bowl and an electric mixer for the filling.
Recipe Overview
- Difficulty Level: Although classified as moderate, this recipe is manageable for most bakers, making it a great choice for those who want to expand their baking repertoire.
- Category: These mini cheesecakes fall into the dessert category, perfect for gatherings, celebrations, or simply satisfying your sweet tooth.
- Cuisine: This recipe embraces a modern twist on classic American desserts, incorporating the renowned European Biscoff flavor that adds an elegant touch.
- Cost: With an average estimated cost of around $15, these delightful treats are budget-friendly while still delivering gourmet taste.
- Season: Enjoy these cheesecakes year-round, but they shine during festive gatherings, holidays, and special occasions.
- Occasion: Ideal for parties, potlucks, or as a sweet finishing touch to dinners, these Mini Biscoff Cheesecakes are suitable for any event.
Why You’ll Love This Recipe
The taste and texture of Mini Biscoff Cheesecakes is enough to make anyone swoon. With a creamy texture that seems to float on your tongue, combined with the subtle crunch from the Biscoff crust, each bite is a delightful experience. The balance of sweetness and spice strikes the perfect note, appealing to those who love rich desserts without being overwhelmingly sweet.
One of the most significant advantages of this recipe is its convenience. The preparation time is relatively short, allowing you to whip up a batch quickly, yet the cheesecakes taste as if they’ve been laboriously crafted over hours. Additionally, they can be easily made ahead of time, making them a perfect choice for busy hostesses or those who simply want to prepare for an upcoming gathering in advance.
Nutritionally, these mini cheesecakes provide the joy of indulgence without the guilt. While they feature cream cheese, you can opt for reduced-fat versions or incorporate Greek yogurt for added protein, making them a more wholesome dessert option. The presence of Biscoff cookies also adds a unique element, a treat that feels special and indulgent.
Hosting friends or family? These Mini Biscoff Cheesecakes serve as an eye-catching and unique dessert that guests will rave about. They offer the chance for fun, engaging conversations and Instagrammable moments. Their individual serving portions mean everyone can enjoy their own decadent experience alongside other desserts without feeling guilty for taking seconds.
Cost-effectiveness is one of the many appealing aspects of this recipe. With a small list of ingredients and simple instructions, you can create a beautiful dessert that feels luxurious without breaking the bank. Each cheesecake serves as a small, affordable treat that tastes far more sophisticated than it costs. This sweetness is exactly what any home baker looks for when crafting special dessert creations.
Historical Background and Cultural Significance
Cheesecakes have a long and rich history dating back to ancient Greece, where the earliest known recipe can be traced to around 2000 B.C. This creamy and indulgent dessert evolved over centuries, crossing borders and adapting to various cultures. The classic American cheesecake, with its rich cream cheese filling, came into popularity in the 20th century and has since spawned numerous variations, including the beloved Mini Biscoff Cheesecakes.
The cultural significance of cheesecake goes beyond flavors; it represents celebration and community. Traditionally served at gatherings and special occasions, cheesecakes signify indulgence and hospitality. The introduction of Biscoff cookies into this classic dessert brings an international flair, reflecting an appreciation for diverse flavors and culinary traditions, particularly from Belgium, where Biscoff originated.
Over the years, the cheesecake recipe has evolved and adapted to different preferences, resulting in mini interpretations like the Mini Biscoff Cheesecakes. This adaptation allows for easy portioning and individual servings, making it a popular choice for gatherings where guests appreciate personal desserts. The original depth of flavor remains intact, achieving a perfect balance of creamy and crunchy delights.
Regional variations have emerged with each culture adding its touch, such as introducing tropical fruits, chocolate ganache, or alternative crusts. The Mini Biscoff Cheesecake highlights this adaptability, incorporating a much-loved European cookie to create a modern classic that appeals to both traditionalists and adventurous foodies alike.
Ingredient Deep Dive
Biscoff cookies are a defining ingredient of this recipe. Originating from Belgium, these caramelized biscuits feature a unique texture that’s both crunchy and crumbly. Their warming spice notes, predominantly cinnamon, enhance the flavor profile of these mini cheesecakes by adding an aromatic complexity. Nutritionally, Biscoff cookies contain fewer calories than traditional cookies, making them an excellent choice for lighter desserts. When selecting Biscoff, choose fresh packages to ensure proper texture and flavor for the crust. Store unopened packages in a cool, dry place and consider crumbling extra cookies to use as a garnish.
The second pivotal ingredient is cream cheese. This smooth and tangy dairy product serves as the cheesecake’s primary filling and symbolizes creaminess. Cream cheese brings richness to this dessert and acts as a fantastic canvas for flavor. It contains significant amounts of protein, calcium, and vitamins A and B12. Opt for full-fat or low-fat varieties based on dietary preferences. When storing cream cheese, remember to keep it well-covered in the refrigerator and used within a few weeks of opening for best flavors. Substituting with Greek yogurt can add a protein boost while shifting the flavor profile slightly, making it a healthier alternative.
Common Mistakes to Avoid
- Overmixing the Cream Cheese: Overmixing can incorporate too much air, leading to cracks during baking. Mix until just combined for a smooth texture.
- Not Soften Cream Cheese: Cold cream cheese doesn’t blend well, resulting in lumps. Always let it sit at room temperature before mixing.
- Skipping the Cooling Process: Allowing cheesecakes to cool gradually prevents cracking. Rushing this step can compromise the final look and texture.
- Overbaking the Cheesecakes: Overbaking leads to a dried-out texture. Keep a close eye on baking time and remove them when just set.
- Using Subpar Ingredients: The flavor of this dessert hinges on high-quality ingredients. Avoid generic brands and opt for premium cream cheese and cookies.
- Misjudging the Baking Temperature: Even a small discrepancy in temperature can affect baking results. Use an oven thermometer for accuracy.
- Incorrectly Filling the Muffin Tin: Overfilling can cause the cheesecakes to overflow. Use a small ice cream scoop for even portions.
- Not Chilling Before Serving: Chilling mini cheesecakes enhances their flavors and ensures the best texture. Room-temperature cheesecakes won’t be as delightful.
- Skipping the Cupcake Liners: Without liners, cheesecakes can be difficult to remove. Always line the tin to prevent sticking.
- Neglecting to Test Doneness: Relying purely on baking time can lead to errors. Use a toothpick to check; it should come out clean when the cheesecakes are done.
Essential Techniques
One essential technique is to ensure your ingredients are at room temperature. This step is critical as it allows for better incorporation and a smoother final product. When ingredients are too cold, they won’t blend well, leading to lumps. To master this, take the cream cheese out of the fridge an hour before you plan to start mixing.
Baking in a water bath is another technique that can greatly improve the texture of your mini cheesecakes. Placing the muffin tin in a water bath allows for gradual and even baking, reducing the chances of cracking. To achieve this, wrap the muffin tin with aluminum foil and place it inside a larger dish filled with hot water during baking.
Pro Tips for Perfect Mini Biscoff Cheesecakes
1. **Chill Before Serving:** Allow the cheesecakes to chill in the fridge for at least four hours for the best flavor and texture before serving.
2. **Garnish Creatively:** Top with whipped cream, drizzled caramel, or crushed Biscoff cookies to elevate the presentation and enhance flavors.
3. **Ensure Even Baking:** Rotate the muffin tin halfway through the baking time to ensure even baking, especially if your oven has hot spots.
4. **Use Heavy Duty Liner:** Opt for heavy-duty cupcake liners for easier removal and to prevent the cheesecake from sticking.
5. **Taste Test:** Don’t skip tasting the filling before baking. This allows you to adjust sugar levels as needed to match your preference.
6. **Avoid Direct Heat:** If possible, use an oven thermometer to check the temperature to avoid direct heat, which can lead to cracking.
7. **Preheat Thoroughly:** Preheat the oven for at least 20 minutes to reach the desired baking temperature consistently for the smoothest results.
8. **Keep Extras:** Store any leftover cheesecakes in an airtight container in the fridge to prolong their shelf life while maintaining flavor.
Variations and Adaptations
While the classic Mini Biscoff Cheesecake is heavenly on its own, regional variations can enhance its appeal. For instance, incorporating seasonal pumpkin puree during fall adds a delicious twist, transforming Creamy Biscoff Cheesecakes into a festive treat. Alternatively, during summer, adding fresh berries as a topping can provide a refreshing berry-flavored variation.
For those with dietary restrictions, gluten-free Biscoff cookies are available, allowing anyone to enjoy these treats without guilt. You can also modify the texture by experimenting with different crusts, such as chocolate graham crackers or almond flour, resulting in unique flavor profiles.
If you want to surprise your guests, consider flavor variations such as adding a hint of espresso to the cheesecake filling or swirling in some Nutella for a delightful chocolatey finish. The possibilities are endless, making this recipe versatile for different tastes.
Presentation can also be adapted; instead of using muffin tins, you could serve the cheesecake in mini mason jars for a charming rustic look. This not only changes the visual appeal but also enhances the interactive experience for guests.
Serving and Presentation Guide
The key to serving Mini Biscoff Cheesecakes lies in thoughtful presentation. Start by gently removing each cheesecake from its liner and placing it on a chilled plate. For an elegant touch, dust with powdered sugar or drizzle some caramel sauce on top before serving.
Garnishing ideas include fresh mint leaves or seasonal fruits that not only add color but also provide contrasting flavors. Traditional accompaniments can include a scoop of vanilla ice cream for a delightful temperature contrast.
Modern serving suggestions include creating mini dessert charcuterie boards where various dessert options are presented together, allowing guests to mix and match. Pay attention to temperature settings when serving; these cheesecakes are best served chilled.
Finally, don’t forget portion control; smaller servings are forward-thinking, especially for events with multiple dessert offerings. Providing small forks or spoons creates a friendly and accessible dessert experience for your guests.
Wine and Beverage Pairing
Pairing wines with Mini Biscoff Cheesecakes can elevate the dessert experience significantly. A sweet dessert wine like Riesling or a late-harvest Sauvignon Blanc complements the sweetness of the cheesecake and amplifies the caramel undertones of the Biscoff cookies.
If you prefer non-alcoholic options, consider pairing with creamy chai or spiced apple cider, as their warming spices harmonize beautifully with the cheesecake’s flavors. For coffee lovers, a rich espresso or a smooth cappuccino can create a delightful contrast to the sweet and creamy textures.
Temperature is crucial when serving desserts alongside beverages. The cheesecakes should be served chilled, while the wine may be slightly cooler than room temperature. Try to create balance; if the dessert is rich, choose a lighter drink that won’t overwhelm the palate.
Storage and Shelf Life
To ensure the best quality, store Mini Biscoff Cheesecakes in an airtight container in the refrigerator, where they will stay fresh for up to five days. Make sure they are properly chilled before sealing the container to avoid condensation that may lead to sogginess.
If you wish to keep them for longer, consider freezing them. Wrap each cheesecake individually in plastic wrap and place them in a freezer-safe container. They can be frozen for up to three months. When ready to enjoy, thaw in the refrigerator overnight rather than at room temperature to maintain texture and flavor.
Signs of spoilage include a sour smell or changes in texture. If any cheesecakes appear to have formed ice crystals or freezer burn, it’s best to discard them. If reheating is necessary, do so gently to avoid compromising the delicious creaminess.
Make Ahead Strategies
One of the best strategies for making Mini Biscoff Cheesecakes is to prepare them the day before your event. Assemble the cheesecakes and let them cool in the refrigerator overnight to allow the flavors to meld beautifully and provide a smoother texture. This method saves time and ensures they are perfectly chilled for serving.
Storage between steps is essential, especially in warmer weather. Keep the cheesecake filling chilled while you prepare the crust to prevent it from becoming too soft. For assembling, filling the crusts can be done an hour ahead, and they should be refrigerated until ready to serve.
Consider fresh element additions right before serving. Toppings like whipped cream or fresh fruit create a delightful finishing touch and maintain their freshness longer than other components when added ahead of time.
Scaling Instructions
If you want to halve the recipe, simply divide all ingredient measurements by two. This approach works well for those who wish to make fewer servings without sacrificing quality or flavor.
Doubling or tripling the recipe is also easy. Ensure you have enough muffin tins and bakers in your kitchen. Keep track of baking times as they may slightly change with increased volume of batter.
For larger gatherings, consider using larger cake pans, but remember that the bake time will vary based on the thickness of the cake. Additionally, ensure proper storage considerations; use extra fridge space for bigger batches and plan your chilling times accordingly.
Nutritional Deep Dive
Examining the macros of Mini Biscoff Cheesecakes reveals a balance of carbohydrates, proteins, and fats. Each cheesecake averages around 220 calories, making it a satisfying yet manageable indulgence. With 10g of protein per serving from the cream cheese, it offers a nutritional boost compared to other desserts.
Micronutrient analysis shows they provide calcium, vitamin A, and essential fats, supporting overall health in moderation. These cheesecakes fit well within a balanced diet, allowing for enjoyment without significant guilt.
For dietary considerations, focusing on portion control is crucial. Reducing serving sizes can help manage calorie intake while still enjoying desserts. If you’re conscious of weight management, pairing with fruit can offer additional fiber and nutrients while keeping the indulgence satisfying.
Dietary Adaptations
Making these Mini Biscoff Cheesecakes gluten-free is simple by using gluten-free Biscoff cookies or alternative cookie brands that provide similar flavors. Adjusting the crust to use almond flour also works for paleo diets.
Dairy-free versions can emerge using cashew cream blended into a smooth consistency to mimic the creaminess of cream cheese. This adaptation maintains the flavor profile while ensuring inclusivity for vegan lifestyles.
For those on low-carb diets, experimenting with sugar-free cookies can reduce carbohydrates significantly, while using low-carb sweeteners to maintain sweetness in the batter offers a satisfying solution.
The keto diet can also work with these cheesecakes by minimizing the sugar content and opting for nut-based crusts, creating delicious bites without excess carbs.
Troubleshooting Guide
Texture issues often arise when cream cheese is not softened adequately, leading to gummy or lumpy cheesecakes. Ensure cream cheese is at room temperature to avoid this. If your cheesecakes are overly dense, it may be due to overmixing; ensure you incorporate ingredients just until combined.
For flavor balance, adjust sweetness as per your preference; tasting the mixture before baking allows you to correct it. If they taste bland, a touch of vanilla extract can enhance the flavor.
Oven temperature problems may lead to uneven baking or cracks; utilize an oven thermometer for precision and adjust cooking times accordingly.
Ingredient substitutions may also affect your final results; stay loyal to the main recipe to ensure success, especially when changing crucial components like cream cheese for firmer-textured alternatives.
Recipe Success Stories
Community feedback highlights how these Mini Biscoff Cheesecakes have become a hit at family gatherings. One reader noted how their friends couldn’t stop complimenting the unique Biscoff flavor, leading to recipe requests.
Variation successes have emerged, with some having experimented with chocolate and berry additions. These adaptations have turned into family traditions, shared and cherished over time.
Readers often dive into substitution stories, sharing recommendations based on dietary restrictions. Many have found ways to replace sugar and flour seamlessly, enhancing their overall dessert experience.
Photography tips shared by successful bakers reveal how a simple high-contrast plate can enhance the visual appeal of the cheesecakes, leading to mouthwatering social media posts!
Frequently Asked Questions
Can I use different flavored cookies for the crust?
Absolutely! While Biscoff cookies offer a unique flavor, feel free to experiment with chocolate graham, vanilla wafers, or even gluten-free options for a personalized touch.
How long can I store these cheesecakes?
Mini Biscoff Cheesecakes can be stored in the refrigerator for up to five days. For longer storage, consider freezing them for about three months.
Can I make these without eggs?
Yes! You can substitute eggs with flax eggs or applesauce to keep the recipe egg-free. The texture may vary slightly, but they will still be delicious.
What’s the best way to thaw frozen cheesecakes?
The best method of thawing frozen cheesecakes is in the refrigerator overnight. This will maintain their creamy consistency without compromising flavor.
Can I make a full-sized cheesecake instead of mini ones?
Yes, you can indeed convert this recipe into a full-sized cheesecake by adjusting the baking time in a springform pan. Keep an eye on the baking process for best results.
What can I use instead of Biscoff cookies?
If Biscoff cookies are unavailable, ginger snaps or speculoos cookies could work as a good alternative, offering similar flavors and textures.
How do I ensure they won’t crack while baking?
To prevent cracking, avoid overmixing the batter and allow the cheesecakes to cool gradually. A water bath can also help maintain moisture during baking.
Can I customize the flavor of the filling?
Of course! You can add extracts, candies, or even fruit purees to the cheesecake filling for added variety and flavor enhancements.
Are these cheesecakes suitable for freezing?
Yes, just make sure to wrap individual cheesecakes properly in plastic wrap before placing them in a freezer-safe container for best results.
How can I make these dairy-free?
For a dairy-free version, substitute cream cheese with cashew cream or a commercial vegan cream cheese alternative to still enjoy creamy goodness.
Additional Resources
Explore related recipes such as Mini Chocolate Cheesecakes or Pumpkin Spice Cheesecakes for additional indulgences that will complement your dessert table. Learning about essential baking techniques can also enhance your skills; consider techniques like creating flavored ganaches or mastering quick cheesecakes without baking.
Ingredient information about Biscoff cookies will guide your shopping to ensure you find the best quality products, enhancing your baking creations. Equipment recommendations for baking can save you time and effort, ensuring you have all the necessary tools for future recipes.
If you’re looking for seasonal variations, our blog also includes tips on crafting holiday-themed desserts, integrating seasonal flavors into your baking repertoire.
Join the Conversation
We invite you to join our community on social media and share your experiences making Mini Biscoff Cheesecakes! Whether it’s showcasing your beautiful photos or sharing variations you’ve tried, we love to see how you make it your own.
Engage with us through recipe reviews and feedback to help others discover this delightful treat, or suggest your takes on the recipe. Let’s create a vibrant cooking community where we can inspire and learn from each other!
The Recipe
Mini Biscoff Cheesecakes
Serves: 12 servings
Prep Time: 20 mins
Cook Time: 30 mins
Total Time: 50 mins
Kitchen Equipment Needed
- Muffin tin
- Cupcake liners
- Mixing bowl
- Electric mixer
- Spatula
- Measuring cups and spoons
Ingredients
- 24 Biscoff cookies, crushed (for crust)
- 1/2 cup unsalted butter, melted (for crust)
- 16 oz cream cheese, softened
- 1/2 cup granulated sugar
- 1/4 cup sour cream
- 2 large eggs
- 1 tsp vanilla extract
- 1/3 cup Biscoff spread (for filling)
- Additional Biscoff cookies for garnish (optional)
Directions
- Preheat the oven to 325°F (163°C) and line a muffin tin with cupcake liners.
- In a mixing bowl, combine crushed Biscoff cookies and melted butter until well combined.
- Press the mixture into the bottom of each cupcake liner to form the crust.
- In another bowl, beat the cream cheese and sugar together until smooth and creamy.
- Add sour cream, eggs, and vanilla extract, mixing until just combined.
- Fold in Biscoff spread until evenly distributed in the batter.
- Pour the cheesecake batter over the prepared crust in each cupcake liner, filling each halfway.
- Bake for 25-30 minutes or until set and slightly jiggly in the center.
- Remove from the oven and let cool completely before refrigerating for at least 4 hours.
Recipe Notes
- For best results, allow the cheesecakes to chill overnight before serving.
- Feel free to top with whipped cream and crumbled Biscoff cookies before serving for extra flavor and texture.
- If using a full-sized cheesecake pan, baking time may need adjustment; check periodically after 40 minutes.