Irresistible Praline Upside-Down Pumpkin Cake: A Fall Favorite!
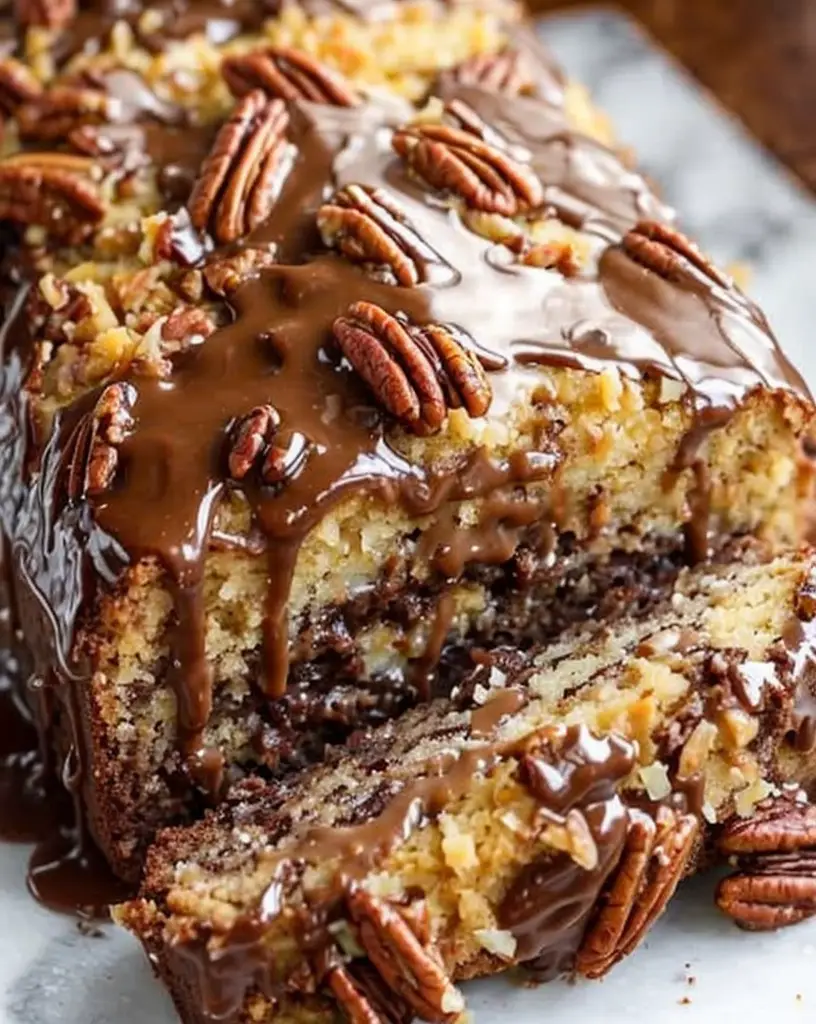
Pumpkin season brings an abundance of warmth and comfort, and what better way to celebrate it than with a delightful Praline Upside-Down Pumpkin Cake? This recipe features fluffy pumpkin cake layered with a gooey praline topping that caramelizes beautifully as it bakes. Imagine slicing into this moist cake only to unveil the luscious praline layer adorned with toasted pecans, creating a sweet crunch that perfectly complements the tender pumpkin. This cake is not just a treat for the taste buds; it’s a glorious centerpiece that will invite compliments and warm conversations at your dining table.
With fall spices embracing the essence of pumpkin, this cake transports you to a cozy café atmosphere with each bite. Perfectly spiced, it’s ideal for celebrating harvest gatherings, holiday festivities, or simply enjoying as an afternoon indulgence with a cup of coffee. Plus, the upside-down presentation adds a charming rustic touch, making it an extraordinary addition to your dessert repertoire.
Quick Recipe Highlights
- Flavor Profile: A harmonious blend of pumpkin, warm spices like cinnamon and nutmeg, and rich caramel undertones from the praline.
- Texture: Light and fluffy cake balanced with a dense, caramelized topping that offers a satisfying crunch.
- Aroma: The enchanting aroma of baked pumpkin mingled with toasted pecans and sweet caramel fills your kitchen.
- Visual Appeal: Each slice reveals a beautiful amber glaze and golden-brown pecans that draw the eye and tempt the palate.
- Skill Level Needed: Medium. While not overly complex, it requires attention to detail in both the cake and topping preparation.
- Special Equipment: A 9-inch round cake pan, mixing bowls, and an electric mixer for smooth batter.
Recipe Overview
- Difficulty Level: This Praline Upside-Down Pumpkin Cake offers a moderate challenge, perfect for bakers with some experience. The coordination of making the praline topping and ensuring the cake rises properly can be tricky but rewarding.
- Category: A splendid dessert suitable for holidays, family gatherings, and even casual get-togethers.
- Cuisine: This cake embodies American baking tradition, celebrating the rich harvest flavors synonymous with autumn.
- Cost: The ingredients are reasonably priced, making it accessible for most home cooks without compromising on quality.
- Season: Best enjoyed during the fall when pumpkins abound, but delicious any time of year.
- Occasion: Ideal for Thanksgiving, Christmas celebrations, birthday parties, or even as a sweet finish for a cozy dinner.
Why You’ll Love This Recipe
This Praline Upside-Down Pumpkin Cake is a delightful blend of taste and texture, making it a memorable dessert. The sweetness from the praline topping combined with pumpkin’s natural flavors creates a harmonious balance that is both comforting and inviting. Each bite offers an irresistible combination of tender cake and crunchy topping, perfect for satisfying any sweet tooth.
Beyond its flavor, the convenience of preparation adds to its charm. Many of the ingredients are pantry staples, allowing you to whip it up with minimal fuss. This cake can be made in advance, making it a stress-free choice for entertaining. Moreover, this cake is incredibly versatile; it can be enjoyed warm out of the oven or served cold, always retaining its delicious flavors.
Nutritionally, pumpkin provides a wealth of health benefits, being rich in vitamins A and C and fiber. It’s a great way to sneak more vegetables into desserts without sacrificing taste. The nuts in the praline add healthy fats, taking this cake from a guilty pleasure to a treat you can feel good about enjoying.
Serving this cake at gatherings brings a sense of joy. It serves as a conversation starter, with guests eager to share their pie and cake stories as they savor the flavors. The delightful appearance and aroma make it a perfect centerpiece for any festive table.
Lastly, the cost-effectiveness of this recipe stands out. Using common ingredients, this cake is affordable without skimping on taste. It delivers a luscious dessert experience, allowing you to impress guests without breaking the bank.
Historical Background and Cultural Significance
The origins of the Praline Upside-Down Pumpkin Cake can be traced back to traditional Southern cooking, where both pralines and pumpkin-based desserts hold a special place in regional cuisine. Pralines, with their roots in French confectionery, were adapted in the American South, evolving into a beloved component of many desserts. Pumpkin, a staple in American harvest meals, especially during fall, beautifully complements the rich, sweet flavors of pralines.
Culturally, pumpkin desserts symbolize the abundant harvest season, often featured in Thanksgiving celebrations. This cake embodies the spirit of gratitude and sharing, making it ideal for festive gatherings. Over time, variations have emerged, with families often adding personal twists to the classic recipes, ensuring that the essence of home and tradition remains in each bite.
The evolution of this recipe reflects a blend of culinary influences. From the introduction of pumpkin spice to the creative use of nuts in desserts, it showcases how traditional recipes can be adapted to modern tastes while retaining their roots. Many families now share stories of how their versions of this cake have become cherished family traditions.
Regional variations of pumpkin desserts can also be found across the United States. Some areas prefer denser, more cake-like versions, while others lean towards fluffier, lighter cakes. The Praline Upside-Down Pumpkin Cake incorporates diverse influences, making it a unifying dessert during key seasonal celebrations.
Ingredient Deep Dive
Pumpkin is the star of this cake, and it carries significant historical weight. It’s deeply rooted in American culture, celebrated during the harvest season and prominently featured in numerous fall recipes. Nutritionally, pumpkin is an excellent source of vitamin A, vitamin C, antioxidants, and fiber, making it powerfully beneficial for digestive health and immunity.
When selecting pumpkin for this recipe, opt for canned pure pumpkin for convenience, ensuring it’s 100% pure without additives. If using fresh pumpkin, choose a sugar pumpkin, which has a sweeter and denser flesh ideal for baking. When stored, keep it in a cool, dark place, and once opened, transfer any remaining canned pumpkin to an airtight container and refrigerate.
Pecans are another key ingredient, valued for their rich flavor and nutritional profile. These nuts are not only delicious but also packed with healthy fats and antioxidants, promoting heart health. If possible, opt for raw pecans when making this cake for the best texture and flavor. Always inspect nuts before purchasing to ensure they are fresh and free of noise or rancidity.
In terms of storage, store pecans in a cool, dry place, ideally in an airtight container, to prevent them from going stale. If you have leftovers, it’s best to refrigerate or freeze them to maintain their quality over time. Pecans can also be easily substituted with walnuts or almonds if you prefer a different nutty flavor.
Common Mistakes to Avoid
- Overmixing the batter: This can lead to tough cake. Mix just until the ingredients are combined to ensure a light texture.
- Using the wrong type of pumpkin: Opt for pure pumpkin or sugar pumpkins. Avoid using pumpkin pie filling, which contains additional sugars and spices.
- Not properly measuring ingredients: Use the correct measuring cups for dry and liquid ingredients to ensure accuracy in your ratios.
- Skipping the praline topping: The topping adds essential flavor and texture; don’t overlook this step for the best results.
- Using cold ingredients: Ensure your eggs and other refrigerated ingredients are at room temperature for better mixing and texture.
- Baking at the wrong temperature: Always preheat your oven and check with a thermometer to maintain an even baking temperature.
- Neglecting to grease the pan: Proper greasing is crucial to avoid sticking when it’s time to invert the cake.
- Rushing cooling time: Let the cake cool in the pan before inverting to prevent it from breaking apart.
- Using stale nuts: Always check for freshness to ensure the best flavor and texture in your praline topping.
- Not checking for doneness: Use a toothpick inserted in the center; it should come out clean when the cake is fully baked.
Essential Techniques
In baking the Praline Upside-Down Pumpkin Cake, mastering the art of creating the perfect praline topping is essential. This technique elevates the cake, adding both flavor and visual appeal. The key is to cook the sugar in a heavy-bottom pan until it dissolves and turns a rich golden brown, then stir in unsalted butter and pecans. Achieving the right temperature is crucial, as undercooking will result in a syrupy topping, while overcooking can lead to a bitter flavor.
Additionally, ensuring that the pumpkin cake is mixed properly is important for a light and airy texture. The goal is to integrate the ingredients without overmixing, which activates the gluten in the flour and can result in a dense cake. Pay attention to visual cues; a properly mixed batter should be smooth and homogeneous, with no lumps.
Pro Tips for Perfect Praline Upside-Down Pumpkin Cake
Start by ensuring that all your ingredients are at room temperature; this helps in achieving a uniform batter. When preparing the praline topping, be vigilant; sugars can quickly transition from perfectly caramelized to burnt if unattended. As an extra layer of flavor, consider toasting your pecans before adding them to the mixture – this amplifies their nutty essence.
To prevent your cake from collapsing, avoid opening the oven door during the first 20 minutes of baking. Once your cake has sufficiently puffed, you can check for doneness. When inverting your cake, it’s best to do it while still warm to help the praline layer release easily without breaking.
If you’re looking to infuse more flavors, think about adding spices such as ginger or cloves to the cake batter for an extra kick. Lastly, consider serving with a dollop of whipped cream or a scoop of vanilla ice cream to elevate the dessert experience even further.
Variations and Adaptations
Creating variations of the Praline Upside-Down Pumpkin Cake can be a fun way to experiment with flavors and textures. For those who enjoy a deeper flavor profile, try incorporating spices such as cardamom or allspice along with the traditional cinnamon and nutmeg. Additionally, consider adding chocolate chips to the pumpkin batter for a sweet twist.
Seasonal adaptations can spice up the recipe as well. In winter, you might incorporate cranberries into the batter, providing a tart contrast that complements the sweetness of the praline. If hedging toward a more tropical flavor, mix in some ripe mashed bananas or coconut flakes for a delightful change.
For dietary modifications, vegans can swap out eggs and dairy with substitutes like flaxseed meal and almond milk. People following gluten-free diets can utilize a gluten-free flour blend to make this cake accessible for everyone while still preserving its deliciousness.
Texture modifications can also be achieved by incorporating a layer of cream cheese frosting on top instead of the praline, offering a rich and tangy experience. Alternatively, consider making mini versions of the cake in muffin tins for a fun, portable dessert.
Serving and Presentation Guide
When it comes to serving the Praline Upside-Down Pumpkin Cake, presentation is key. Consider using a cake stand for an elegant display, ensuring that everyone can see the gooey praline topping. A light dusting of powdered sugar or a drizzle of caramel can add a touch of sophistication.
Garnishing with fresh herbs, such as mint leaves or a sprinkle of cinnamon, can also enhance the visual appeal and add a fresh element to the dessert. Pair the cake slices with traditional accompaniments, including whipped cream or vanilla ice cream, which can elevate the dining experience even further.
Temperature considerations should not be overlooked; this cake is delicious warm but also holds up well at room temperature. If served cold, consider microwaving individual slices for a few seconds just before serving to release the flavors. Portion control is wise when serving at gatherings; aim for slices that are about an inch thick to ensure everyone can enjoy at least a taste.
Wine and Beverage Pairing
Pairing your Praline Upside-Down Pumpkin Cake with the right beverages can enhance the overall experience. A sweet dessert wine, such as a late-harvest Riesling or a Moscato, complements the cake’s caramel and pumpkin flavors beautifully. The sweetness of these wines balances the richness of the praline topping, making for a harmonious pairing.
For a non-alcoholic option, consider serving a spiced apple cider or a pumpkin spice latte, both of which tie in nicely with the autumnal themes of the cake. If coffee is preferred, go for a dark roast with chocolate notes that mirror the dessert’s flavors.
Always consider the temperature of the beverages; for wine, chilling is recommended, while coffee should be served hot. Offering a selection of drinks can cater to different preferences and enhance the enjoyment of this delightful cake.
Storage and Shelf Life
Storing your Praline Upside-Down Pumpkin Cake properly ensures it maintains its deliciousness over time. Allow the cake to cool completely before covering it with plastic wrap or aluminum foil to prevent it from drying out. Alternatively, keep the cake in an airtight container at room temperature for up to three days.
For longer storage, consider refrigerating the cake, in which case it can last about a week. Ensure that it’s well covered to avoid absorbing odors from the fridge. If you want to preserve the cake for an even longer period, freezing is an excellent option. Wrap individual slices in plastic wrap followed by aluminum foil to maximize freshness and prevent freezer burn, allowing the cake to last for up to three months.
Signs of spoilage include visible mold or an off smell. If you’ve kept the cake for longer than recommended or if it shows any signs of staleness, it’s best to err on the side of caution and dispose of it. When it’s time to enjoy frozen cake, thaw it in the refrigerator overnight before serving, and if desired, warm individual slices in the microwave for a comforting treat.
Make Ahead Strategies
Planning ahead with the Praline Upside-Down Pumpkin Cake makes hosting and entertaining much simpler. You can prepare the cake batter one day in advance. Simply mix the ingredients together, cover tightly, and refrigerate until you’re ready to bake. This not only saves time but allows the flavors to meld beautifully.
If you’re preparing the praline topping ahead of time, store it separately in an airtight container. Just before serving, reheat it gently to ensure it loosens when poured over the cooled pumpkin cake.
In terms of quality, the cake can be fully assembled and baked the day prior to your event. Once cooled, store it as mentioned earlier, but add the praline topping just before serving to maintain its crunchy texture. Adding fresh elements, such as whipped cream or nuts, right before serving enhances the cake’s appeal and freshness.
Scaling Instructions
Scaling this Praline Upside-Down Pumpkin Cake for gatherings is simple, thanks to its adaptable nature. If you want to halve the recipe, simply cut all the ingredient measurements in half, maintaining the same cooking time, but start checking for doneness a few minutes earlier.
Doubling or tripling the recipe is another great option, especially for larger gatherings. For a double batch, consider using a larger pan or two standard 9-inch pans to ensure even baking. Be mindful that a larger quantity may also require a bit longer in the oven, so watch the cake closely and check for doneness with a toothpick.
Adjusting your equipment according to the size of the batch is crucial. Large recipe quantities might require a commercial-sized mixing bowl for proper mixing and a larger oven for baking multiple pans. Always consider the use of multiple racks to bake several cakes simultaneously for efficiency.
When it comes to storage considerations, larger cakes can be more challenging. Make sure you have enough space in your fridge or freezer, and ensure they’re properly wrapped to prevent drying out. Leftovers from larger batches can be divided into portions for easy serving later on.
Nutritional Deep Dive
Analyzing the nutrition of the Praline Upside-Down Pumpkin Cake reveals a delightful balance of flavors and health benefits. On average, a single serving contains approximately 250 calories, with macronutrients comprising roughly 8 grams of protein, 12 grams of fat, and 30 grams of carbohydrates. The inclusion of pumpkin contributes significant dietary fiber, aiding in digestive health and promoting satiety.
In terms of micronutrients, this cake offers a solid amount of vitamin A, thanks to the pumpkin, which supports eye health, as well as vitamin C that strengthens the immune system. The pecans additionally provide healthy fats and antioxidants, beneficial for heart health.
When considering dietary restrictions, portion analysis is vital. For those monitoring caloric intake, options for smaller portions can allow enjoyment of this cake without overindulgence. Weight management can be supported by balancing the cake with healthier meals or being mindful of portion sizes particularly during special occasions.
Overall, while this cake is a delightful treat, it still offers preferable nutritional attributes that make it suitable for indulgent occasions that can fit into various dietary patterns when consumed in moderation.
Dietary Adaptations
Adapting the Praline Upside-Down Pumpkin Cake for different dietary needs can make this delightful dessert accessible to everyone. For a gluten-free version, use a gluten-free flour blend in place of all-purpose flour. Many blends do well without compromising the cake’s texture when properly measured.
Dairy-free participants can rejoice by substituting cow’s milk with almond, soy, or coconut milk, and by using non-dairy butter spread in the praline topping. Optionally, aquafaba – the liquid from canned chickpeas – can be used instead of eggs for a vegan take without losing moisture or flavor.
Keto and low-carb enthusiasts can use almond flour instead of standard flour and sugar substitutes like erythritol or stevia in the praline layer, ensuring that it remains delicious but lower in carbohydrates. Likewise, for those following a paleo lifestyle, raw honey or maple syrup makes an excellent sweetener.
If you are considering a lower-FODMAP option, be sure to limit high-FODMAP ingredients, focusing on pumpkin and nuts, while choosing suitable alternatives to the cake flour. Lastly, any nut allergies can be accommodated by replacing pecans with seeds like sunflower or pumpkin seeds, still offering a great texture to the cake.
Troubleshooting Guide
When making the Praline Upside-Down Pumpkin Cake, you might encounter a few common hurdles, but each has a straightforward solution. If your cake comes out too dense, ensure not to overmix the batter. Stir gently until the ingredients are just combined.
If the praline topping crystallizes instead of remaining a glossy liquid, check the sugar temperature while cooking; it should be melted and golden but not burnt. If you notice an unbalanced flavor with too much sweetness, balancing it with a dollop of unsweetened whipped cream can help round it out.
Should your cake sink in the center after baking, it may have been underbaked. Always check with a toothpick for doneness toward the end of the cooking time. Overbaking can lead to a dry texture, so aim for just firm edges and a slightly soft center.
Lastly, if your cake refuses to release from the pan, let it cool for a few minutes before attempting to invert it. Carefully running a knife around the edges can also help to loosen it before flipping.
Recipe Success Stories
Readers have expressed their joy and satisfaction with the Praline Upside-Down Pumpkin Cake, noting how it became a family favorite. Many have shared personal stories of successfully baking this cake for Thanksgiving gatherings, turning it into a cherished tradition in their homes.
Several bakers have also provided feedback about experimenting with different nuts in the praline topping, finding that walnuts or even pecans worked wonderfully, allowing for slight variations while maintaining the core recipe’s integrity. Other success stories include attempts at increasing the spice levels, infusing the cake with additional warmth and depth that resonated well with family and friends.
With each success, community members have shared tips on photography and presenting the cake, emphasizing the importance of good lighting and angles to capture the cake’s captivating layers. The stories highlight the cake not only as a recipe but as a medium for storytelling, teaching, and bonding over shared experiences in the kitchen.
Frequently Asked Questions
Can I use fresh pumpkin instead of canned?
Yes, you can use fresh pumpkin! Simply cook and puree the pumpkin until smooth. A sugar pumpkin is recommended for the best taste and texture.
Can this cake be made ahead of time?
Absolutely! You can bake the cake a day in advance and store it covered at room temperature. Reheat the praline topping before serving for best results.
How do I know when my cake is done?
The cake is done when a toothpick inserted in the center comes out clean or with a few moist crumbs. Be careful not to overbake.
What can I use instead of pecans?
If you have nut allergies or prefer a different flavor, you can substitute pecans with walnuts, almonds, or even sunflower seeds.
Can I freeze leftovers?
Yes, this cake freezes well! Wrap individual slices tightly in plastic wrap and aluminum foil, then store them in the freezer for up to three months.
Is it possible to modify the sweetness of the cake?
Definitely! You can adjust the sugar amount in the batter or use sugar substitutes for lower-sugar versions. Just be mindful of the moisture content.
What’s the best way to serve this cake?
This cake is delicious served warm or at room temperature. Consider adding a dollop of whipped cream or a scoop of vanilla ice cream for extra indulgence.
Can I make this gluten-free?
Yes, simply use a gluten-free flour blend in place of regular flour to accommodate gluten-free diets while keeping the flavor intact.
Can I add chocolate to the cake?
Absolutely! Adding chocolate chips to the batter or using cocoa powder in moderation can create a chocolate-pumpkin fusion that everyone will love.
How should I store the cake?
Store the cake in an airtight container at room temperature for up to three days, or refrigerate for up to a week. Be sure it’s covered well!
Additional Resources
For those who adore the flavors of autumn, consider exploring other seasonal recipes, such as spiced apple pie or maple pecan tart. Technique guides on baking fundamentals can enhance your skills, from mixing cake batter properly to mastering the praline topping. You could also check ingredient information on various pumpkins and their ideal uses in baking.
Additionally, exploring equipment recommendations can help you choose the best tools for your baking adventures. Don’t forget about seasonal variations of traditional meals that complement this cake, ensuring a complete autumn feast.
Join the Conversation
We’d love to hear your thoughts and experiences with the Praline Upside-Down Pumpkin Cake! Share your photos and variations on social media, engaging with fellow bakers as you showcase this beautiful dessert. Joining the community enriches our cooking journeys, providing support, sharing tips, and celebrating our collective love for baking. Whether it’s a warm compliment or a recommended tweak, we welcome every interaction.
The Recipe
Praline Upside-Down Pumpkin Cake
Serves: 8 servings
Prep Time: 20 mins
Cook Time: 40 mins
Total Time: 1 hour
Kitchen Equipment Needed
- 9-inch round cake pan
- Mixing bowls
- Electric mixer
- Rubber spatula
- Toothpick for testing doneness
Ingredients
- 1 cup canned pumpkin
- 1 cup granulated sugar
- ½ cup brown sugar
- ¾ cup vegetable oil
- 3 large eggs
- 1 ½ cups all-purpose flour
- 1 tsp baking powder
- 1 tsp baking soda
- 2 tsp pumpkin pie spice
- ½ tsp salt
- 1 ½ cups pecans, chopped
- ½ cup unsalted butter
- ½ cup light brown sugar (for praline topping)
Directions
- Preheat your oven to 350°F (175°C). Grease the cake pan with butter and set aside.
- In a mixing bowl, combine the pumpkin, granulated sugar, brown sugar, and oil. Mix until smooth.
- Add in the eggs one at a time, mixing well after each addition.
- In another bowl, whisk together the flour, baking powder, baking soda, pumpkin pie spice, and salt.
- Gradually add the dry ingredients to the wet mixture, folding gently until just combined.
- In a saucepan, melt the butter over medium heat. Stir in the brown sugar and pecans until bubbling and combined, about 3 minutes.
- Pour the praline mixture evenly into the bottom of the prepared cake pan.
- Pour the pumpkin cake batter on top of the praline layer. Smooth the top with a spatula.
- Bake for 40 minutes or until a toothpick inserted into the center comes out clean.
- Let the cake cool for 10-15 minutes before carefully inverting onto a serving plate. Serve warm or at room temperature.
Recipe Notes
- Store any leftovers in an airtight container at room temperature for up to three days.
- This cake freezes well; just wrap slices individually before freezing.
- Feel free to add chocolate chips or dried cranberries for a twist!