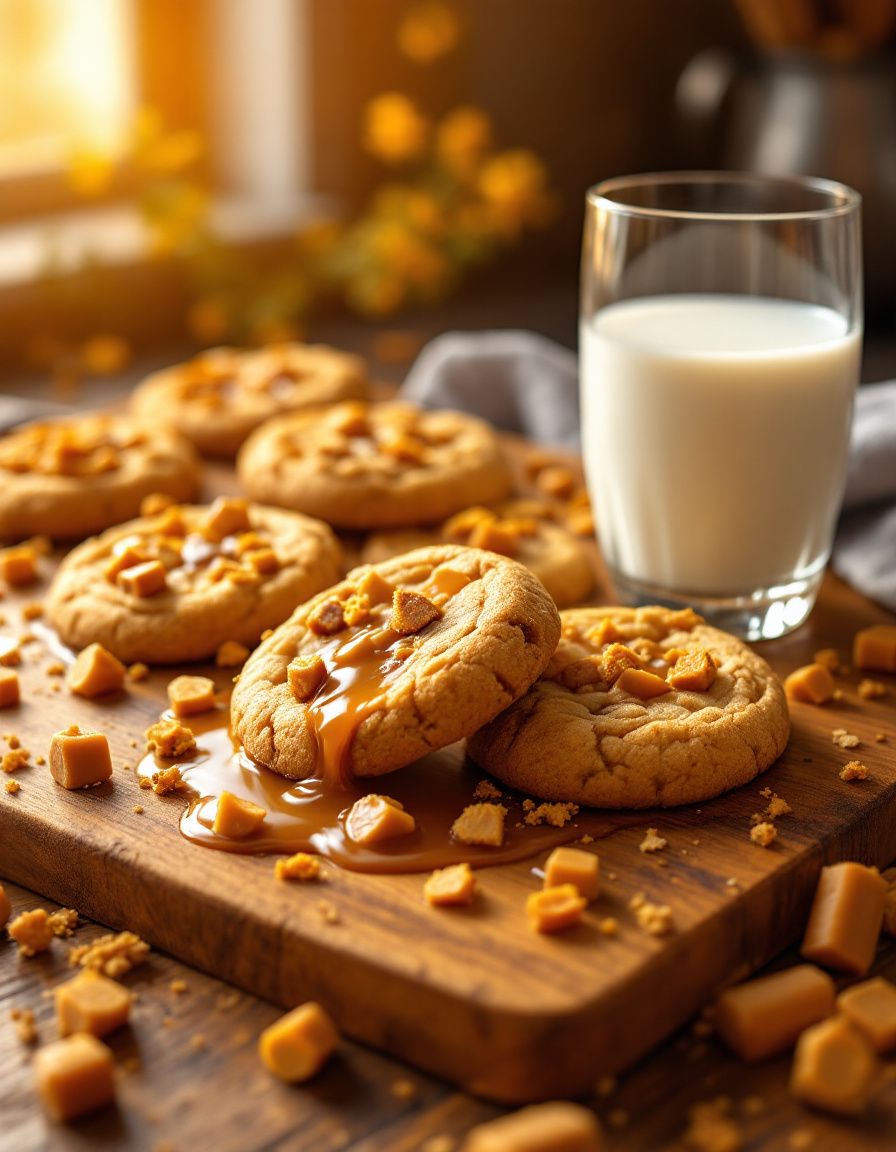
Deliciously Easy Vanilla Pecan Pralines Candy Recipe You’ll Love

Easy Vanilla Pecan Pralines Candy Recipe: Sweet and Nutty Delight

⚖️
Difficulty
Easy

⏲️
Prep Time
10 mins

🕒
Cook Time
15 mins

⏱️
Total Time
25 mins

🍽️
Servings
24 pieces

Indulge yourself in the delightful world of candy making with this Easy Vanilla Pecan Pralines Candy Recipe! These delectable treats combine the rich, buttery flavors of caramel with the crunchy texture of pecans, creating a sweet confection that’s perfect for any occasion. Whether you’re looking to impress guests at a gathering, surprise loved ones with a homemade gift, or simply satisfy your own sweet tooth, these pralines will not disappoint.

What makes these vanilla pecan pralines especially appealing is their simplicity. With just a handful of ingredients, you can whip up a batch in no time. The smell of vanilla wafting through your kitchen as the sugar caramelizes is enough to set the perfect mood for your candy making adventure. Plus, the end result is a beautiful glossy finish that hints at the delicious flavor waiting to be enjoyed.

Quick Recipe Highlights

  • Flavor Profile: Rich and buttery with a hint of vanilla, complemented by the nutty crunch of pecans.
  • Texture: Smooth and creamy center encased in a crispy shell, providing the perfect bite.
  • Aroma: Sweet vanilla combined with the nutty warmth of toasted pecans creates a heavenly scent.
  • Visual Appeal: Golden-brown candy pieces that shine with a lovely glaze, making them visually stunning.
  • Skill Level Needed: Beginner-friendly, no special skills required beyond basic stovetop cooking.
  • Special Equipment: A heavy-bottomed pot and a candy thermometer for precision cooking.

Recipe Overview

  • Difficulty Level: This recipe is classified as easy, ideal for newcomers to candy making as it requires minimal techniques.
  • Category: Pralines fall into the dessert category, specifically as candy, making them a perfect sweet treat.
  • Cuisine: Rooted in Southern cuisine, these pralines have a rich history steeped in Southern hospitality and tradition.
  • Cost: This recipe is budget-friendly, with ingredients that are often staples in most kitchens.
  • Season: Perfect for year-round treats, especially around the holidays when sweet confections are in high demand.
  • Occasion: Ideal for parties, holidays, or as a delightful addition to gift baskets.

Why You’ll Love This Recipe

You will adore the delightful taste and sinful texture of these Easy Vanilla Pecan Pralines. Each bite delivers an explosion of sweet creaminess paired with the satisfying crunch of pecans. The combination of caramelized sugar and nuts is not only delicious but also reminiscent of classic Southern desserts that comfort and satisfy.

The convenience of this recipe is remarkable. With just 25 minutes from start to finish, you can have fresh homemade candy ready to enjoy. Perfect for a last-minute gift or snack cravings, you’ll find yourself reaching for this recipe time and time again. Additionally, it’s a great opportunity to involve family or friends in a fun kitchen activity.

Nutritionally, while pralines are definitely a treat, pecans provide healthy fats and beneficial nutrients that enhance the overall profile of this candy. This means you can indulge with a little less guilt!

These pralines are fantastic for entertaining, bringing a homemade touch that store-bought candies can’t match. There’s something special about sharing a sweet that you created yourself, making them a great conversation starter at gatherings.

Cost-effectiveness is another highlight. With simple ingredients that are affordable and widely available, you can whip up a generous batch without breaking the bank.

Historical Background and Cultural Significance

The origins of pralines can be traced back to 17th century France, where they were created by a chef for the Duke of Plessis-Praslin, hence the name. Over time, this sweet treat made its way to Louisiana, where it evolved into the Southern staple we know today. Southern pralines typically contain pecans and have a distinctive creamy texture, often associated with warm and welcoming gatherings.

Southern culture is rich with food history, and pralines hold a special place in that tradition. They are often made during the holidays or for special occasions, symbolizing hospitality and generosity. It’s not uncommon to see these sweet treats being passed around during family gatherings or celebrations, reinforcing connections among loved ones.

Through the years, the recipe has undergone several transformations, with adaptations incorporating various nuts and flavors, but the classic pecan praline remains a beloved favorite. Regions across the Southern United States put their own twist on it, making for delightful variations in taste and texture.

Today, pralines are more than just a candy; they are a beloved cultural icon that represents the warmth of Southern hospitality. They are often handmade and given as gifts, showcasing the love and care that goes into confectionery crafting.

Ingredient Deep Dive

Pecans: Pecans are a staple in Southern cooking, known for their buttery flavor and crunchy texture. These nuts not only enhance the taste of pralines, but they provide numerous health benefits, including heart-healthy fats, vitamins, and minerals. When selecting pecans, look for fresh, unshelled nuts to ensure maximum flavor. Store them in an airtight container in a cool place to maintain freshness.

Vanilla Extract: This essential ingredient brings depth and aroma to the pralines. Vanilla has a rich history, being prized for its unique flavor profile. It serves not only as a flavor enhancer but also holds potential health benefits due to its antioxidant properties. Opt for pure vanilla extract rather than imitation for the best flavor, and store it in a cool, dark place to preserve its potency.

Sugar: Sugar is the key component that allows pralines to develop their signature caramel taste. While it offers little in terms of nutrition, its role in candy making is irreplaceable. Choose granulated sugar for this recipe and store it in an airtight container in a dry area to avoid clumping.

Butter: The use of butter in praline recipes adds a creamy richness essential to their flavor. Unsalted butter is typically recommended for better control over the saltiness of your treat. It should be kept refrigerated and used before its expiration to ensure your pralines have the best texture and taste.

Common Mistakes to Avoid

  • Not measuring ingredients accurately can lead to inconsistencies in texture and flavor; always use a reliable scale or measuring cups.
  • Cooking sugar too quickly can cause it to burn; use medium heat and be patient for the best caramelization.
  • Not stirring often enough can create hot spots, leading to uneven cooking; continuous stirring helps create a smooth consistency.
  • Using old nuts can ruin the flavor; always check for freshness before use.
  • Not preparing your workspace ahead can lead to mistakes; gather all tools and ingredients before you start cooking.
  • Underestimating cooling time can result in a sticky mess; allow your pralines to set completely before moving them.
  • Overcrowding the pan can affect how pralines cool and set; make sure there is enough space between each candy.
  • Ignoring the visual cues can lead to failure; watch for the color change in the sugar to know when to stop cooking.

Essential Techniques

Temperature Control: Mastering sugar’s temperature is crucial for proper caramelization. Use a candy thermometer to monitor the sugar as it cooks, aiming for the soft-ball stage (around 240°F) for ideal results. Watch for bubble size to change, signaling it’s nearing the correct temperature.

Stirring Technique: Stir the mixture continuously and gently while the sugar dissolves to ensure even heat distribution, avoiding any burnt areas. Use a wooden spoon or heat-resistant spatula to carefully scrape the bottom of the pot to prevent sticking.

Cooling Properly: Allow the pralines to cool undisturbed so they can firm up properly. If you rush this step, the pralines may not achieve the right texture and may remain too sticky.

Pro Tips for Perfect Easy Vanilla Pecan Pralines

1. For a richer flavor, toast the pecans beforehand to enhance their nuttiness before adding them to the mixture.
2. Consider using a silicone baking mat or parchment paper for easy removal and cleanup when cooling the pralines.
3. If you prefer a sweeter touch, add a pinch of sea salt on top of the pralines before they harden.
4. Experiment with different flavored extracts like almond or maple for unique twists on the classic recipe.
5. Work quickly once the mixture is ready to ensure it doesn’t start to set before you form the pralines.
6. If your pralines are a bit too soft after cooling, simply pop them in the fridge for a short period to firm up.
7. When storing, place parchment paper between layers to prevent the pralines from sticking to each other.
8. Use a cookie scoop for uniformity when forming the pralines to ensure even cooking and presentation.

Variations and Adaptations

You can give this Easy Vanilla Pecan Pralines a twist by exploring regional variations, such as incorporating different nuts like almonds or walnuts for unique flavor profiles. Seasonally, consider adding dried fruits or festive spices like cinnamon during the winter holidays to embrace the festive spirit.

Dietary modifications can also be made for special diets. If you need gluten-free options, these pralines are naturally gluten-free. For a vegan version, substitute the butter with coconut oil and ensure all other ingredients comply with vegan standards.

If you’re interested in flavor variations, try adding a splash of bourbon or rum for a boozy kick that pairs well with the sweetness of the candy. Texture modifications such as adding crispy rice cereal can give your pralines a fun crunch and enhance the overall mouthfeel.

Presentation alternatives abound as well. Consider drizzling melted chocolate over the cooled pralines for an elevated look that’s sure to impress guests, or serve them on a decorative platter garnished with fresh fruits and herbs.

Serving and Presentation Guide

Plating your Easy Vanilla Pecan Pralines can elevate their appeal. Consider arranging them on a colorful platter or in decorative candy cups to create an inviting display. For gatherings, give a modern touch by serving them alongside a selection of cheeses that complement their sweetness.

Garnishing ideas include using edible flowers or fresh mint leaves for a burst of color and freshness. Traditional accompaniments like coffee or tea provide a warm pairing that enhances the pralines’ flavors.

Temperature considerations are important; serve the pralines at room temperature to maintain their perfect texture. For portion control, consider cutting larger pralines into bite-sized pieces, making them great for sharing and enjoying without overwhelming guests.

Wine and Beverage Pairing

When it comes to wine pairings, consider a sweet dessert wine, such as a late-harvest Riesling or a Tawny Port, which can beautifully complement the flavors of pecans and caramel. If you prefer non-alcoholic alternatives, a rich hot chocolate could work wonders alongside these pralines.

For coffee or tea pairings, a medium-bodied roast coffee provides a delightful balance to the sweetness. Chai tea adds warmth with its spices, which contrasts perfectly with the rich pralines, creating a harmonious flavor experience.

Serving suggestions include having these drinks prepped in advance to create a fully enjoyed experience for your guests, ensuring each bite of praline is paired with just the right sip.

Storage and Shelf Life

To store your Easy Vanilla Pecan Pralines, keep them in an airtight container at room temperature. They can last for about 1-2 weeks when stored properly. Avoid storing them in a humid environment as this can affect their texture and cause them to sticky.

For extended shelf life, consider refrigerating the pralines, which should ideally last up to a month. When freezing, ensure they are placed in an airtight bag with as little air as possible, allowing them to be preserved for up to 3 months.

Signs of spoilage include a change in texture or off smells; always check your sweets before indulging. If reheating is necessary, do so briefly in the microwave to slightly soften them without compromising the texture.

Make Ahead Strategies

For optimal planning, prepare your Easy Vanilla Pecan Pralines a day or two before you need them. Simply store them in a cool, dry place in an airtight container. This will not only save time but also allow flavors to meld beautifully.

If you have several steps in mind, like toasting nuts or making the syrup, you can do these in advance and store the components separately in the refrigerator until you are ready to mix and set them.

Assess the impact on quality when making ahead; pralines generally maintain their flavor and texture well when made in advance. For assembly, ensure to prepare your workspace and tools ahead of time to streamline the final steps of making these delightful treats.

Scaling Instructions

When halving the Easy Vanilla Pecan Pralines recipe, simply divide all ingredients by two. Cooking time might be slightly shorter, so monitor closely as you approach the target temperature.

Doubling or tripling the recipe requires a larger pot than you might use for smaller batches. Be sure to adjust cooking times accordingly, as larger quantities may take longer to reach the desired temperature.

Proper storage considerations are crucial for large batches; have enough containers ready to avoid overcrowding them, which can affect their shape and firmness.

Nutritional Deep Dive

In terms of macros, a serving of these Easy Vanilla Pecan Pralines contains a nice balance of fats, carbs, and a moderate amount of protein from the pecans. This classic candy can be enjoyed as an occasional treat without derailing healthy eating habits.

Micronutrient analysis shows that pecans are rich in Vitamin E, magnesium, and antioxidants, offering various health benefits, including heart health support. While indulgent, moderate consumption can allow you to enjoy sweet treats while still focusing on overall wellness.

Consideration of portion sizes is essential; enjoying a couple of pralines is sufficient to satisfy cravings without overindulging. Tips for weight management include enjoying these candies mindfully and balancing them with healthy meals.

Dietary Adaptations

For gluten-free adaptations, this Easy Vanilla Pecan Pralines recipe is naturally gluten-free as all primary ingredients are safe. To accommodate dairy concerns, replace butter with coconut oil, while ensuring other ingredients comply with specific dietary requirements.

Vegan versions can be made using maple syrup as a sweetener along with nut-based butter. For those following keto, consider using sugar substitutes like erythritol to reduce the carbohydrate content without sacrificing flavor.

Paleo enthusiasts will appreciate how easy it is to substitute traditional sugar with raw honey or coconut sugar, maintaining the essence of pralines while adhering to paleo-friendly guidelines.

Troubleshooting Guide

In the case of texture issues, if pralines become too soft, they likely didn’t cook long enough. Simply allow them to cook slightly longer next time to achieve that perfect set. If they become too hard, decrease the cooking time until you find the ideal balance.

Flavor balance can often be fixed by adjusting sweetener levels next time. If they turn out too sweet, ensure to add a pinch of salt next time to counteract excessive sweetness.

Temperature problems can be resolved by using a candy thermometer; when the correct soft-ball stage is reached, you’ll achieve a favorable consistency.

Equipment challenges can arise if you don’t have a heavy-bottomed pan; make sure to use the proper cookware to prevent sugar from burning or sticking. Always check your tools before starting to ensure you are set up for success.

Ingredient substitutions might alter the recipe slightly; if introducing alternatives, test in smaller batches to gauge the overall effect on flavor and texture.

Timing concerns often relate to cooling times; ensure you allow adequate time for cooling and setting to retain the original texture of your pralines.

Recipe Success Stories

Readers have shared their experiences making Easy Vanilla Pecan Pralines, noting the sheer joy of creating them as gifts. Many have remarked on variations, such as integrating chocolate, yielding a delightful surprise for recipients.

Success stories often highlight how these pralines have become firm holiday favorites among family and friends. Adaptations inspired by readers’ suggestions added unique flavors, showcasing the versatility of this recipe.

Photography tips shared by the community also inspire others to capture their cooking journeys, documenting each step to engage with other home cooks.

Many community members emphasize the joy of sharing a homemade treat; this recipe has brought people together, fostering a sense of community and love through the art of candy making.

Frequently Asked Questions

Can I make these pralines nut-free?

Removing the nuts entirely from this Easy Vanilla Pecan Pralines recipe would alter the overall texture and flavor. However, you could consider substitutions like crispy rice or sunflower seeds for a unique twist without nuts.

How do I store leftover pralines?

Store any leftover pralines in an airtight container at room temperature. If you want them to last longer, refrigerate or freeze them with parchment paper between layers to prevent sticking.

Can I use other nuts instead of pecans?

Absolutely! This recipe can work with other nuts like almonds, walnuts, or hazelnuts. Just keep in mind that each nut might impart a different flavor profile and texture.

How long do these pralines last?

When stored in an airtight container, they can last up to 1-2 weeks at room temperature, and longer in the refrigerator. Freezing can extend their shelf life up to 3 months.

Is it necessary to use a candy thermometer?

While not strictly necessary, using a candy thermometer ensures precise cooking temperatures, greatly improving the chances of achieving the perfect praline consistency. Without it, the sugar may burn or not develop the proper texture.

Can I flavor the pralines differently?

Yes! Along with vanilla, try flavoring your pralines with almond extract, coconut, or even a splash of bourbon for a twist on the classic recipe.

What if my pralines don’t set?

If your pralines remain too soft after cooling, it’s usually a sign they didn’t cook long enough. Try cooking them slightly longer next time to reach the right temperature and texture.

Can I double the recipe?

Yes, you can easily double the recipe. Just ensure you use a larger pot to accommodate the increased volume, and keep an eye on cooking times, which may vary slightly.

Are these pralines gluten-free?

The Easy Vanilla Pecan Pralines recipe is naturally gluten-free, making them suitable for those with gluten sensitivities or celiac disease. Just ensure all ingredients used comply with gluten-free standards.

What’s the best way to serve pralines?

Serve your pralines on a beautiful platter or in candy cups, possibly with a selection of beverages that complement the sweet, nutty flavors. Consider garnishing to enhance visual appeal!

Additional Resources

For those who enjoyed this Easy Vanilla Pecan Pralines recipe, consider exploring related dessert recipes that feature nuts or caramel, such as pecan pie or almond roca.

Technique guides focusing on candy making can help you master various confections, while ingredient information assists in choosing the best nuts or sweeteners for your needs.

Equipment recommendations might include investing in a reliable candy thermometer or silicone baking mats, which can greatly enhance your candy-making experience.

Furthermore, seasonal variations such as holiday-themed recipes can inspire delightful adaptations, ensuring you have the sweetest treats year-round.

Join the Conversation

We invite you to share your experience with this Easy Vanilla Pecan Pralines recipe on social media! Engage with others by posting photos and variations that you’ve tried.

Join the community by leaving reviews and comments, helping fellow home cooks learn from your successes and unique experiences in crafting this sweet treat.

Share your photography tips, as beautiful visuals can inspire more people to appreciate the art of candy making. Don’t forget to share your stories and variations as you embark on your culinary adventure with these delightful pralines!

The Recipe

Easy Vanilla Pecan Pralines

Serves: 24 pieces

Prep Time: 10 mins

Cook Time: 15 mins

Total Time: 25 mins

Kitchen Equipment Needed

  • Heavy-bottomed pot
  • Candy thermometer
  • Wooden spoon
  • Silicone spatula
  • Parchment paper or silicone baking mat

Ingredients

  • 1 cup granulated sugar
  • 1/2 cup heavy cream
  • 1/4 cup unsalted butter
  • 1 tsp pure vanilla extract
  • 2 cups pecans, chopped

Directions

  1. In a heavy-bottomed pot, combine sugar, heavy cream, and butter over medium heat. Stir constantly until the mixture boils.
  2. Continue to cook, without stirring, until the mixture reaches 240°F on a candy thermometer.
  3. Remove from heat and quickly stir in vanilla extract and chopped pecans.
  4. Using a spoon or scoop, drop spoonfuls of the mixture onto a parchment-lined baking sheet.
  5. Let the pralines cool completely at room temperature before serving or storing.

Recipe Notes

  • To make vegan, substitute butter with coconut oil and ensure all other ingredients are compliant.
  • Add a pinch of salt to balance sweetness if desired.
  • Store leftovers in an airtight container, separated by layers of parchment paper.

Delicious Boston Cream Pie Cupcakes for Every Occasion

Irresistible Boston Cream Pie Cupcakes: A Decadent Treat for Any Celebration

⚖️
Difficulty
Medium

⏲️
Prep Time
30 mins

🕒
Cook Time
20 mins

⏱️
Total Time
50 mins

🍽️
Servings
12 Cupcakes

Boston Cream Pie Cupcakes are a delightful twist on a classic dessert that takes the flavors of traditional Boston Cream Pie and reimagines them into individual cupcakes. The moist vanilla cupcake base is filled with a velvety custard, topped with a rich chocolate ganache, creating a perfect balance of flavors that will tantalize your taste buds. These irresistible treats are perfect for any celebration—birthdays, picnics, or simply a sweet indulgence after a long day.

Imagine biting into a soft, fluffy cupcake, discovering the smooth, creamy filling inside that melts in your mouth as the chocolate glaze adds a luscious finish. This visually appealing dessert not only satisfies your cravings but also brings joy to your gatherings. With a bit of patience and precision, you can create these show-stopping cupcakes that will leave a lasting impression.

Quick Recipe Highlights

  • Flavor Profile: A harmonious blend of sweet vanilla, rich custard, and indulgent chocolate.
  • Texture: Light and fluffy cupcakes with a creamy filling and a glossy chocolate layer.
  • Aroma: A divine scent of freshly baked vanilla combined with sweet chocolate notes.
  • Visual Appeal: Beautifully topped with glossy chocolate ganache, these cupcakes are a feast for the eyes.
  • Skill Level Needed: A moderate skill level is needed, mainly for the filling and ganache preparation.
  • Special Equipment: You will need a cupcake tin, piping bags, and a whisk to achieve the best results.

Recipe Overview

  • Difficulty Level: These cupcakes require a moderate skill level, making them suitable for home bakers who enjoy a challenge but are not yet professionals.
  • Category: This recipe falls under desserts and sweet treats, perfect for any occasion.
  • Cuisine: Originating from American cuisine, Boston Cream Pie has roots in New England and reflects the rich culinary history of the region.
  • Cost: The approximate cost for this recipe ranges from $10 to $15, depending on ingredient quality.
  • Season: These cupcakes are perfect year-round but are especially enjoyed during warmer months when fresh gatherings occur.
  • Occasion: Ideal for birthdays, celebrations, or as a delightful treat for any sweet tooth craving.

Why You’ll Love This Recipe

Taste and texture appeal: The combination of rich chocolate, creamy custard, and fluffy vanilla cake creates an unforgettable taste experience. Each bite delivers a burst of flavor, making these cupcakes a favorite among dessert lovers. The contrast between the soft cake and the creamy filling satisfies all your cravings for sweetness.

Convenience and preparation benefits: These cupcakes are surprisingly easy to make compared to their impressive results. You can prepare the components ahead of time, making them convenient for party planning, and they also transport well, making them perfect for picnics and gatherings.

Nutritional advantages: While these cupcakes are a treat, they can be part of a balanced diet when enjoyed in moderation. They provide satisfaction and energy, allowing you to enjoy life’s sweet moments without guilt.

Social and entertaining value: Boston Cream Pie Cupcakes are a statement dessert that can elevate any occasion. Their fun and unique presentation encourages sharing and conversation, making them perfect for celebrations or casual get-togethers with friends.

Cost-effectiveness and accessibility: With simple ingredients available at most grocery stores, this recipe is not only affordable but also accessible to many home bakers. Plus, the ability to make a dozen cupcakes in one batch means you can feed a crowd without breaking the bank.

Historical Background and Cultural Significance

The origin of Boston Cream Pie dates back to the 19th century, believed to have been created at the Parker House Hotel in Boston. Although the name suggests it’s a pie, it is actually a cake filled with custard and topped with chocolate. Its creation represents the city’s rich culinary heritage and its vibrant food scene that draws from various cultures.

Boston Cream Pie holds cultural importance as it reflects the American spirit of innovation in confections. Over time, it has evolved into a symbol of dessert elegance, often served at special occasions and celebrations. This unique dessert represents a blend of simplicity and sophistication, mirroring the characteristics of Boston itself.

As culinary traditions evolved, so did the interpretations of the Boston Cream Pie, leading to variations such as the current cupcake version. This evolution demonstrates how comfort food can adapt and grow while still retaining its core flavors, keeping the dessert relevant and loved by generations.

Regionally, Boston Cream Pie has inspired countless adaptations, with each region putting its unique twist on the flavors and presentation. Variations found across the United States have made it a treat enjoyed far beyond its Bostonian roots.

Ingredient Deep Dive

Vanilla extract, a key ingredient in this recipe, has a long history in baking, often used to enhance other flavors. Vital for many baked goods, it adds warmth and depth. Nutrition-wise, vanilla is known for its anti-inflammatory properties and can improve mood. When selecting, choose pure vanilla extract over synthetic options for the best flavor; store in a cool, dark place to preserve potency.

Chocolate plays a crucial role in this recipe. A staple in desserts, it has a rich history dating back to ancient Mesoamerican cultures. High-quality dark chocolate offers antioxidants and may promote heart health. Opt for chocolate with at least 60% cocoa for the ganache; keep it in a cool area to maintain its texture and flavor. Consider alternatives like carob for different flavor profiles.

Common Mistakes to Avoid

  • Overmixing the batter: This can lead to dense cupcakes, so mix just until combined to keep them light and fluffy.
  • Not filling the cupcakes enough: Make sure to leave enough space for custard filling, or they may overflow during baking.
  • Using cold ingredients: Bring eggs and milk to room temperature for a smoother batter and better rise.
  • Skipping the cooling step: Allowing cupcakes to cool completely before filling is crucial to prevent the filling from melting.
  • Using too much ganache: Overdoing the chocolate can overshadow the vanilla flavor; balance is key.
  • Improper storage: Keep the filled cupcakes in the fridge for freshness, but allow them to come to room temp before serving for the best flavor.
  • Not tasting the custard: Always taste and adjust the sweetness of the custard for a balanced filling.
  • Ignoring baking time: Each oven is different, so start checking for doneness a few minutes early.

Essential Techniques

Whipping cream: This technique is important for achieving a light and airy texture for your frosting or filling. To master it, ensure your cream and bowl are chilled, and whip until soft peaks form without over-whipping, which can lead to a buttery texture. Look for peaks that hold their shape but still have body for the best results.

Filling cupcakes: A simple yet crucial step where precision matters. Use a piping bag to fill the cupcakes with custard after they’re cooled. The tip of the bag should be inserted into the cupcake to avoid making a mess and to control the filling amount, ensuring a well-balanced treat. When done correctly, the filling should slightly mound at the top without spilling over.

Pro Tips for Perfect Boston Cream Pie Cupcakes

1. Use fresh ingredients for the best flavor. Fresh eggs and top-quality vanilla extract enhance the taste of your cupcakes.

2. Preheat your oven for accurate baking times; an oven thermometer can help ensure your cakes bake evenly.

3. Pipe the ganache on quickly to prevent it from hardening too much; it should still be pourable when applied.

4. Allow ganache to set at room temperature, which firms it up beautifully without refrigeration.

5. Decorate with chocolate shavings or a light dusting of powdered sugar for an elegant finish.

6. Experiment with different fillings such as fruit preserves for a refreshing twist on the classic.

7. Batch your recipes for parties or gatherings to ensure everyone gets to experience this delightful treat.

8. To save time, consider making the custard and ganache a day ahead; this allows the flavors to meld beautifully.

Variations and Adaptations

Try different flavors of cupcakes like chocolate or even lemon for a seasonal twist. Adapt the filling by infusing the custard with spices like cardamom or flavors such as orange zest. You can also create a gluten-free version by substituting all-purpose flour with gluten-free flour blends, ensuring all baking powder is gluten-free as well.

Seasonal adaptations can include pumpkin spice flavors in the fall or peppermint extract in the winter for a festive touch. Moreover, for a healthier option, consider using a sugar substitute in the filling and frosting to cut down calories without sacrificing sweetness.

For an extra crunch, consider adding chopped nuts or toffee bits to the ganache. This variation offers a delightful textural contrast alongside the soft cupcake and creamy filling.

Serving and Presentation Guide

Plating can enhance the appeal of your Boston Cream Pie Cupcakes. Use a simple white plate to make the chocolate ganache pop, or arrange them on a tiered stand for a beautiful display at events. Garnish with fresh berries or edible flowers to add a splash of color and elevate the cupcake’s visual appeal.

When serving, consider presenting them alongside a dollop of whipped cream or a scoop of vanilla ice cream for extra indulgence. Ensure the cupcakes are at room temperature when served to maximize their flavors and textures.

Wine and Beverage Pairing

Pair these delightful cupcakes with a rich dessert wine like a late harvest Riesling or Sauternes to complement the sweet chocolate and creamy filling. For a non-alcoholic option, consider a cold brew coffee with a splash of cream to balance the sweetness.

If you’re a tea lover, a strong black tea steeped with a hint of vanilla can enhance the cupcake experience beautifully. Make sure to serve all beverages at the appropriate temperature to enjoy an optimal pairing.

Storage and Shelf Life

Store your Boston Cream Pie Cupcakes in an airtight container in the refrigerator to keep them fresh for up to 4-5 days. If you want to freeze them, do so before filling; wrap tightly individually to avoid freezer burn. Thaw them in the refrigerator overnight for optimal quality.

Signs of spoilage include any change in smell or visible mold. Reheat filled cupcakes in the microwave for a few seconds if they seem too cold; just be cautious to avoid overheating the custard.

Make Ahead Strategies

Plan ahead by making the cupcake base and custard filling a day in advance. Store the cupcakes at room temperature and the custard in the fridge. Assemble them the day of your event to keep them fresh and maintain the best taste and texture.

Consider preparing ganache the day before as well; this will not only save you time but also fuller flavor as it sets. When assembling, ensure that both cupcakes and filling are at similar temperatures to avoid sogginess.

Scaling Instructions

If you need more cupcakes, doubling or tripling this recipe is straightforward. Just be mindful of your mixing bowl size and baking time, as larger batches may require adjusting baking times slightly. Ensure all your ingredients are proportionately measured for consistent results.

If you only need to make half the batch, simply divide the ingredients evenly. Saving the batter or already filled cupcakes for later can be effective with correct storage techniques, just remember that baking time may decrease slightly as the size of your batch changes.

Nutritional Deep Dive

A typical Boston Cream Pie Cupcake contains a balanced mix of macronutrients from flour, sugar, and butter, making them a treat best enjoyed in moderation. They provide approximately 200 calories per cupcake depending on the portion size and ingredients used, making them a delightful sweet indulgence.

Micronutrient analysis shows that ingredients like eggs and milk provide valuable vitamins and minerals, contributing to overall daily nutritional needs. When considering health benefits, it’s important to enjoy these cupcakes as an occasional treat, ensuring that portions are controlled while indulging your sweet cravings.

Dietary Adaptations

For a gluten-free version, simply replace all-purpose flour with gluten-free flour blends available in stores. Ensure to use gluten-free baking powder as well for the best results.

Dairy-free options can be achieved by substituting butter with coconut oil and using almond or soy milk in the custard filling, ensuring that chocolate and vanilla extracts are also dairy-free. For those following a vegan diet, try using flaxseed meal instead of eggs and aquafaba for whipping to achieve the best volume in the cupcakes.

Troubleshooting Guide

If your cupcakes turn out too dry or dense, you may be overmixing the batter. Remember to mix until just combined and always check for doneness a couple of minutes early to avoid overbaking.

Should your ganache separate, try whisking in a little hot cream or water to bring it back together. For flaky frosting, under-whipped cream is often the cause, so ensure to achieve the right peaks while whipping.

Recipe Success Stories

Countless bakers share their experiences of making Boston Cream Pie Cupcakes, praising the luscious flavors and delightful textural contrast. Readers have successfully adapted the recipe to include seasonal ingredients like pumpkin, making it a festive treat.

Many family gatherings have been brightened by this dessert, with guests frequently asking for the recipe. The easy-to-follow instructions and delicious results keep enthusiasts inspired to experiment and share their own variations in topping and filling.

Frequently Asked Questions

Can I use boxed cake mix for this recipe? Yes, you can absolutely use a boxed cake mix for quick preparation. Just follow the package instructions for baking cupcakes and then fill them with the custard.

What’s the best way to store leftovers? Store leftover cupcakes in an airtight container in the fridge for up to 4-5 days. Allow them to come to room temperature before serving.

Can I freeze these cupcakes? Yes, before filling them, you can freeze the cupcakes. Just wrap them individually and freeze for up to three months.

How do I make the custard thicker? To make a thicker custard, increase the cornstarch slightly in the recipe or cook it longer until it reaches your desired consistency.

Is there a non-dairy alternative for the ganache? Yes, you can use coconut cream and dairy-free chocolate for a delicious non-dairy ganache alternative.

How do I prepare the chocolate ganache? Simply heat cream until it just begins to bubble, then pour over chopped chocolate and let it sit for a few moments before stirring until smooth.

Can I add flavors to the custard? Absolutely! You can infuse your custard with different flavors, such as vanilla bean, coffee, or citrus zest for a fun twist.

What if I don’t have a piping bag? You can use a zip-top bag with the corner snipped off as a makeshift piping bag to fill the cupcakes.

Can I substitute the filling with something else? Yes, feel free to try other fillings like whipped cream, fruit preserves, or flavored curds to customize your cupcakes.

What type of flour should I use for best results? All-purpose flour is recommended for a classic texture, but you can also experiment with cake flour for a lighter cupcake.

Additional Resources

Explore related recipes that incorporate similar flavors, such as chocolate mousse or vanilla pudding. For bakers looking to refine their technique, consider guides on making custards or mastering ganache.

Keep an eye out for ingredient information on baking essentials that can improve your overall baking experience. Don’t forget to check out seasonal variations that highlight fresh, local produce to inspire your baking throughout the year.

Join the Conversation

We invite you to share your Boston Cream Pie Cupcake experiences on social media. Tag us in your photos, and let us know how you’ve made this recipe your own. Your feedback and suggestions help our community grow stronger as we share in the love of baking.

Consider leaving a review or comment on this post if you’ve tried the recipe, as your insights may inspire others to dive into their cupcake-making adventure.

The Recipe

Irresistible Boston Cream Pie Cupcakes

Serves: 12 Cupcakes

Prep Time: 30 mins

Cook Time: 20 mins

Total Time: 50 mins

Kitchen Equipment Needed

  • Cupcake tin
  • Cupcake liners
  • Mixing bowls
  • Whisk
  • Piping bags
  • Small saucepan
  • Measuring cups and spoons
  • Cooling rack

Ingredients

  • 1 ½ cups all-purpose flour
  • 1 cup granulated sugar
  • ½ cup unsalted butter, softened
  • 3 large eggs
  • ½ cup whole milk
  • 2 tsp baking powder
  • 1 tsp vanilla extract
  • ¼ tsp salt
  • 1 cup vanilla pudding mix (instant)
  • 2 cups heavy cream
  • 8 oz dark chocolate, chopped
  • ½ cup heavy cream (for ganache)

Directions

  1. Preheat your oven to 350°F (175°C) and line the cupcake tin with liners.
  2. In a large bowl, beat together the butter and sugar until fluffy. Add the eggs one at a time, mixing well after each addition.
  3. In a separate bowl, whisk together the flour, baking powder, and salt. Gradually add this dry mixture to the wet ingredients, alternating with milk and vanilla until just combined.
  4. Fill each cupcake liner 2/3 full with batter. Bake for 20 minutes or until a toothpick comes out clean. Allow to cool completely.
  5. For the filling, prepare the vanilla pudding according to package instructions, and let it cool.
  6. Once the cupcakes are cooled, use a piping bag to fill each cupcake with the pudding.
  7. To make the ganache, heat ½ cup of heavy cream in a saucepan until simmering, then pour over the chopped chocolate. Let sit for a few minutes before stirring until smooth.
  8. Dip the top of each filled cupcake in the ganache and allow it to set on a cooling rack.
  9. Serve at room temperature and enjoy your delightful Boston Cream Pie Cupcakes!

Recipe Notes

  • For a chocolate ganache, use milk chocolate for a sweeter flavor.
  • Consider adding berry compote for a fruity spin on the filling!
  • Make sure to adjust the sweetness of the custard to your preference.
  • Store any leftovers in the fridge for up to 4-5 days.

Delicious Easy Lemon Zucchini Bread Recipe for Your Kitchen

Easy Lemon Zucchini Bread: A Refreshing Twist on a Classic Favorite

⚖️
Difficulty
Easy

⏲️
Prep Time
15 mins

🕒
Cook Time
45 mins

⏱️
Total Time
60 mins

🍽️
Servings
8 slices

Are you looking for a light and delicious treat that perfectly captures the essence of summer? Look no further than this Easy Lemon Zucchini Bread! Bursting with citrus flavor and enhanced by the subtle earthiness of zucchini, this quick bread is not only simple to make but also incredibly satisfying. Perfect for breakfast, a snack, or dessert, each slice offers a refreshing twist that will elevate your taste buds and keep you coming back for more.

The combination of bright lemon and tender zucchini creates a balance of sweetness and moisture, ensuring every bite is deliciously satisfying. With minimal preparation and simple ingredients, you’ll find this recipe to be a fantastic addition to your baking repertoire. It’s ideal for using up those extra zucchinis from your garden or farmer’s market while delighting your family and friends with a home-baked treat that they’ll rave about. Let’s get started on this delightful lemon zucchini bread!

Quick Recipe Highlights

  • Flavor Profile: This Easy Lemon Zucchini Bread features a vibrant citrus flavor, with a hint of sweetness and the distinct taste of fresh zucchini.
  • Texture: The texture is moist and tender due to the grated zucchini, providing a delightful contrast to the crispy edges.
  • Aroma: The warm, inviting aroma of lemon zest and baking bread creates a wonderful sensory experience.
  • Visual Appeal: With its light yellow hue and beautiful golden crust, this bread is as pleasing to the eyes as it is to the palate.
  • Skill Level Needed: This recipe is perfect for beginner bakers, requiring only basic mixing and baking techniques.
  • Special Equipment: A standard loaf pan, mixing bowls, and a whisk or mixer are all you’ll need to whip up this delightful bread.

Recipe Overview

  • Difficulty Level: Easy to intermediate, this recipe involves simple ingredient mixing and baking techniques, making it accessible for everyone.
  • Category: This lemon zucchini bread fits perfectly in the dessert or breakfast category, providing sweetness without being overly indulgent.
  • Cuisine: While primarily inspired by American baking traditions, the use of zucchini offers a nod to Mediterranean cuisine where vegetables are commonly incorporated into dishes.
  • Cost: The cost of ingredients is minimal, typically totaling around $5-$10, depending on your location and seasonal prices.
  • Season: This bread is best enjoyed during the late summer and early fall when zucchinis are plentiful and in season.
  • Occasion: Ideal for brunches, picnics, or as a light treat with tea, this bread is versatile for any social gathering.

Why You’ll Love This Recipe

This Easy Lemon Zucchini Bread is not just about taste; the delightful fusion of flavors and textures creates a memorable experience. The addition of zucchini not only makes the bread healthier by adding fiber but also enhances the moisture, ensuring a tender crumb. You’ll adore the tangy lemon zest that wakes up the senses, making each bite feel refreshing and vibrant, perfect for any time of day.

Another great feature of this recipe is its convenience. With only a handful of ingredients and minimal prep time, you can have a delicious homemade loaf in just over an hour. Preparing this lemon zucchini bread is a great way to engage family and friends in the kitchen, making it a fun and interactive experience while teaching them the joys of baking.

From a nutritional standpoint, this lemon zucchini bread offers several health benefits. Zucchini is low in calories and high in vitamins A, C, and potassium. Combined with the fiber from whole wheat flour (if you choose to use it), this baking option is a delicious way to incorporate more vegetables into your diet without sacrificing taste.

When it comes to social situations, this bread is a fantastic conversation starter! Its unique combination of flavors piques interest, and sharing it with family and friends allows for wonderful bonding moments. Whether at a brunch gathering or a cozy coffee date, this dish will certainly take the spotlight.

Finally, the cost-effectiveness of this recipe cannot be overlooked. With readily available ingredients and low preparation costs, it’s an easy way to provide delicious treats without breaking the bank. This makes it accessible to everyone, from seasoned bakers to those just beginning their culinary journey.

Historical Background and Cultural Significance

The origin of zucchini bread can be traced back to the 1970s when zucchini was widely grown in gardens across America. As gardeners began looking for ways to use their overabundance of this versatile vegetable, creative recipes like zucchini bread emerged. This easy-to-bake recipe quickly gained popularity as a creative means of incorporating vegetables into sweet treats.

Culturally, zucchini bread fits into a broader trend of “sneaking” vegetables into typically indulgent foods, catering to health-conscious consumers who still wish to indulge in baked goods. This innovative way of baking aligns with the growing emphasis on healthy eating, enabling home cooks to create delicious desserts while reducing waste from excess produce.

The recipe for zucchini bread has evolved over the years, with various styles and flavor additions gaining traction. From classic recipes to additions like walnuts or chocolate chips, the evolution reflects a blend of both tradition and modern culinary experimentation, appealing to a wide array of palates.

Ingredient Deep Dive

Zucchini: A staple in many gardens, zucchini is rich in vitamins and minerals, particularly vitamin C and potassium. Selecting zucchinis that are firm and small to medium in size is optimal, as larger zucchinis may be watery and lack flavor. They store best in a cool, dry place or refrigerated. For baking, shredded zucchini can be easily substituted with other summer squashes if zucchini is not available.

Lemon: Fresh lemons add a bright flavor and aroma to any recipe, especially in baking. High in vitamin C, lemons support immune health and add a refreshing tang. When selecting lemons, look for those that are heavy for their size with a vibrant yellow color. Store them at room temperature or refrigerate for longer shelf life. Alternatively, lemon zest can be substituted with other citrus fruit zest to obtain similar flavors.

Common Mistakes to Avoid

  • Using soggy zucchini: Grate zucchini and squeeze out excess moisture to prevent a soggy bread.
  • Not measuring accurately: Use measuring cups or a kitchen scale for precise ingredient amounts to ensure consistency.
  • Overmixing the batter: Mix just until combined to avoid a dense loaf; overmixing activates gluten, leading to an undesirable texture.
  • Ignoring oven temperature: An accurate oven temperature is crucial for even baking; invest in an oven thermometer to verify accuracy.
  • Using too much lemon juice/zest: Balance the amount of acidity by measuring carefully to prevent overpowering the bread’s flavor.
  • Not letting the bread cool: Allowing the bread to cool in the pan can cause it to stick; properly cool on a wire rack.
  • Baking in a cold oven: Preheat the oven to ensure proper rise and texture.
  • Not greasing the loaf pan: To prevent sticking, use a non-stick spray or line with parchment paper before baking.

Essential Techniques

Grating Zucchini: Grating zucchini is important for even distribution within the bread, enhancing moisture without bulk. Use the grating side of a box grater or a food processor for efficiency. Aim for medium-sized shreds to integrate seamlessly into the batter. Avoid using a blender or food processor to puree it, as that will alter the texture.

Mixing Techniques: Properly mixing the ingredients is crucial for achieving a light texture. Start by combining dry ingredients separately before adding them to the wet mixture. Stir gently to maintain air bubbles in the batter for an airy rise. Be mindful not to overmix, as this can develop gluten and lead to a dense loaf.

Pro Tips for Perfect Easy Lemon Zucchini Bread

1. Use fresh, seasonal zucchini for the best flavor and moisture. The fresher the produce, the better your bread will taste.

2. Experiment with spices like cinnamon or nutmeg for added warmth and complexity in flavor.

3. Add nuts or chocolate chips for a delightful texture contrast; just reduce the amount of flour slightly to accommodate.

4. Always taste your batter before baking; this allows you to adjust sweetness or acidity before it’s set in the oven.

5. For an extra zing, add a lemon glaze over the top after baking; combine powdered sugar and lemon juice for a quick drizzle.

6. Store leftovers in an airtight container at room temperature to maintain freshness; enjoy within a few days for the best quality.

7. Consider making mini loaves for sharing as gifts; they’re perfect for personalizing or for festive occasions.

8. Don’t rush the cooling process! Give your bread time to set after baking to achieve the perfect texture and ease of slicing.

Variations and Adaptations

Regional Variations: Different regions may use locally available produce or flavors, such as incorporating herbs like rosemary for a unique twist.

Seasonal Adaptations: In the fall, consider adding pumpkin puree instead of zucchini for a seasonal flavor boost.

Dietary Modifications: To make this bread gluten-free, substitute with a gluten-free flour blend. Experiment with almond or coconut flour for a nutty flavor.

Flavor Variations: Incorporate blueberries or cranberries for a fruity addition or consider adding poppy seeds for a classic touch.

Texture Modifications: To add crunch, consider folding in toasted walnuts or pecans just before pouring the batter into the loaf pan.

Presentation Alternatives: Serve with a side of yogurt or whipped cream for a luxurious touch; garnish with lemon slices for a fun, decorative element.

Serving and Presentation Guide

For a beautiful presentation, serve this Easy Lemon Zucchini Bread on a cutting board with a serrated knife for easy slicing. You can garnish with fresh lemon zest or sprigs of fresh mint to enhance the visual appeal. For an added touch, dust lightly with powdered sugar for a sophisticated look or serve with a dollop of whipped cream or yogurt for additional flavor.

Serve the bread warm or at room temperature; it’s delightful paired with a cup of tea, iced tea, or lemonade. When hosting, consider slicing and plating individual portions for guests, providing a more polished presentation idea.

Wine and Beverage Pairing

For a delightful pairing, opt for a crisp Pinot Grigio or Sauvignon Blanc, both of which complement the citrusy notes in the bread. If you prefer non-alcoholic options, a refreshing glass of sparkling water with lemon or herbal iced tea are excellent companions. Coffee lovers may enjoy a light roast coffee, which contrasts beautifully with the sweet flavors of the lemon zucchini bread.

Storage and Shelf Life

Store your Easy Lemon Zucchini Bread in an airtight container at room temperature for up to 3-4 days. If you want to keep it longer, consider freezing it. Wrap the cooled loaf tightly in plastic wrap and then place it in a zip-top freezer bag, where it can last up to 3 months. When ready to enjoy, thaw overnight in the refrigerator and bring to room temperature before serving. If the bread appears dry upon thawing, a quick warm-up in the microwave can help restore moisture.

Make Ahead Strategies

You can prepare the batter a day in advance; simply refrigerate it until you are ready to bake. For even more convenience, slice the bread beforehand and store it in an airtight container, perfect for quick breakfasts on busy mornings. When making ahead, be cautious with the zucchini; it may release additional moisture if left sitting too long, so adjust flour amounts slightly if needed.

Scaling Instructions

To halve the recipe, simply reduce all ingredients by half, making adjustments for personal preference on flavors or textures. If you choose to double or triple, ensure you have a larger mixing bowl and possibly two loaf pans. Monitor baking times, as larger or multiple loaves may require additional baking time; check for doneness with a toothpick before removing from the oven!

Nutritional Deep Dive

This Easy Lemon Zucchini Bread is surprisingly nutritious given its delightful taste. One slice typically contains around 150 calories, with healthy fats from added nuts (if used) and fiber from zucchini helping promote digestive health. The vitamin content from lemon and zucchini contributes to your daily intake, making this bread a wholesome choice.

Dietary Adaptations

This recipe can be easily adapted for those following gluten-free diets by substituting all-purpose flour with a gluten-free blend. For anyone avoiding dairy, consider using almond or oat milk in place of regular milk and substitute coconut oil for butter. Vegans can enjoy a plant-based version by replacing eggs with a flaxseed egg or other egg alternatives.

Troubleshooting Guide

If you find your bread too dry, it may have been overbaked or used dried zucchini. To fix it next time, keep an eye on baking time and check for doneness early. In case the bread has a bland flavor, consider increasing the lemon juice or zest or adding spices to enhance the taste. If you get overheating or burning on the sides, lower the oven temperature slightly and longer bake times.

Recipe Success Stories

Community feedback around this recipe often highlights its simplicity and delightful flavor. Many bakers share their variations – from incorporating chocolate chips to making mini loaves for gifts. Adaptation stories frequently show this zucchini bread fitting perfectly into themed gatherings, optimizing ingredient use at home, and encouraging creative collaborations among family and friends.

Frequently Asked Questions

Can I store lemon zucchini bread in the fridge? Yes, while it’s best stored at room temperature, refrigerating it can extend shelf life slightly. Be sure to seal it tightly to prevent it from drying out.

How do I know when the bread is done baking? Insert a toothpick in the center; if it comes out clean or with a few moist crumbs, the bread is ready. If wet batter clings to the toothpick, bake it a little longer.

Can I use frozen zucchini in the recipe? While fresh zucchini is recommended, thawed frozen zucchini can work in a pinch. Just make sure to drain the excess moisture before using.

What can I do with leftover zucchini bread? Leftover bread can be toasted for breakfast, used as a base for French toast, or transformed into a delicious bread pudding.

Can I add nuts to this recipe? Absolutely! Adding chopped walnuts or pecans can provide a wonderful crunch and enhance the flavor profile.

What is the best way to freeze zucchini bread? Wrap it tightly in plastic wrap and place it in a freezer bag. Label with the date and freeze for up to three months for optimal freshness.

Can I use another fruit instead of lemons? Yes, you can substitute lemon for orange zest or other citrus fruits for a slightly different flavor.

How many calories are in a slice of zucchini bread? A typical slice contains around 150 calories, but this can vary based on specific ingredient choices.

Is there a vegan version for this recipe? Yes, you can substitute the eggs with flaxseed eggs or banana for a vegan-friendly alternative.

What should I serve with zucchini bread? This bread pairs well with a side of yogurt, whipped cream, or fresh fruit for a delightful treat.

Additional Resources

For those looking to explore more plant-based and vegetable-rich recipes, check out other zucchini-centered dishes. Inviting alternatives such as zucchini fritters or stuffed zucchini boats can inspire creativity in the kitchen. Additionally, technical guides on mastering baking and helpful ingredient substitutions are excellent resources for new cooks!

Join the Conversation

We love to hear your thoughts and experiences with this Easy Lemon Zucchini Bread! Share your photos and variations on social media, connect with fellow baking enthusiasts, and leave your reviews. Engaging with the community allows for a shared experience as we celebrate creativity and the joy of baking together!

The Recipe

Easy Lemon Zucchini Bread

Serves: 8 slices

Prep Time: 15 mins

Cook Time: 45 mins

Total Time: 60 mins

Kitchen Equipment Needed

  • Loaf Pan
  • Mixing Bowls
  • Whisk or Electric Mixer
  • Grater
  • Parchment Paper (optional)

Ingredients

  • 1 cup all-purpose flour
  • 1 cup grated zucchini (drained)
  • 1/2 cup sugar
  • 1/4 cup lemon juice
  • 1/4 cup vegetable oil
  • 2 large eggs
  • 1 tsp baking soda
  • 1/2 tsp salt
  • 1 tsp lemon zest
  • 1/2 tsp cinnamon (optional)

Directions

  1. Preheat your oven to 350°F (175°C) and grease a loaf pan or line it with parchment paper.
  2. In a large mixing bowl, combine the grated zucchini, lemon juice, and eggs; mix well.
  3. In a separate bowl, whisk together the flour, sugar, baking soda, salt, cinnamon, and lemon zest.
  4. Gradually add the dry ingredients to the wet mixture and stir until just combined; don’t overmix.
  5. Pour the batter into the prepared loaf pan and smooth the top with a spatula.
  6. Bake for 45-50 minutes or until a toothpick inserted in the center comes out clean.
  7. Let it cool in the pan for 10 minutes, then remove and cool completely on a wire rack.

Recipe Notes

  • Feel free to add nuts, chocolate chips, or dried fruits to the batter for added flavor and texture!
  • For a sweeter bread, you may adjust the sugar content to your liking.
  • This recipe can be easily multiplied to make additional loaves for gifting or sharing.

Indulge in a Decadent German Chocolate Coconut Pecan Roll Cake

Decadent German Chocolate Coconut Pecan Roll Cake: A Sweet Indulgence

⚖️
Difficulty
Intermediate

⏲️
Prep Time
25 mins

🕒
Cook Time
30 mins

⏱️
Total Time
55 mins

🍽️
Servings
12 servings

Indulge your sweet tooth with this Decadent German Chocolate Coconut Pecan Roll Cake! Featuring layers of rich chocolate cake swirled with a luscious coconut and pecan frosting, this dessert unites traditional flavors from German Chocolate Cake with a modern, roll cake twist. The balance of nutty, sweet, and chocolatey notes creates a harmonious symphony for your tastebuds, making it an irresistible treat for any occasion.

This cake not only pleases the palate but also delights the eyes with its elegant presentation. Each slice reveals a beautiful ribbon of frosting that makes it an impressive addition to holidays, birthdays, or casual gatherings. With every bite, you’ll taste the care that went into crafting this delightful dessert, evoking feelings of comfort and satisfaction that only a well-made cake can achieve.

Quick Recipe Highlights

  • Flavor Profile: The Decadent German Chocolate Coconut Pecan Roll Cake offers a rich blend of chocolate, toasted coconut, and crunchy pecans, making it a dessert lover’s dream.
  • Texture: Expect a moist chocolate cake that perfectly contrasts with the creamy and chewy coconut-pecan frosting, leaving you with a delightful mouthfeel.
  • Aroma: The cake exudes a warm, inviting aroma of chocolate mingled with the nutty scent of toasted coconut and pecans, elevating the experience.
  • Visual Appeal: With its layered look and inviting colors, this cake is a showstopper, making every slice an artwork in itself.
  • Skill Level Needed: Intermediate baking skills are needed, including a basic understanding of cake rolling techniques and frosting application.
  • Special Equipment: You will need a baking sheet, parchment paper, and a clean kitchen towel to help with the rolling technique.

Recipe Overview

  • Difficulty Level: This cake requires an intermediate level of baking expertise, primarily due to the rolling technique needed for the cake.
  • Category: This dessert fits into the category of cakes and is perfect for celebrations or special gatherings.
  • Cuisine: Originating from Germany, this dish incorporates traditional elements from German chocolate cake, which has become popular worldwide.
  • Cost: The ingredients are accessible and relatively affordable, making this indulgence manageable for home bakers.
  • Season: The warm, rich flavors make this cake ideal for fall and winter celebrations but can be enjoyed year-round.
  • Occasion: Perfect for birthdays, holidays, or simply as a charming afternoon treat, this cake suits many occasions beautifully.

Why You’ll Love This Recipe

The Decadent German Chocolate Coconut Pecan Roll Cake boasts an irresistible taste that balances rich chocolate and sweet coconut. Each slice brings a delightful texture with the moistness of the cake paired with the crunch of pecans. This combination not only offers a satisfying dessert experience but also warms hearts and creates memories during celebrations.

Preparation is straightforward with clear instructions, making it both friendly for home bakers who want to impress loved ones without taking hours in the kitchen. Plus, stepping up your baking skills to learn how to roll cakes adds to your culinary repertoire.

Nutritionally, this cake brings some wholesome ingredients like pecans and coconut, providing healthy fats and fiber. While indulgent, it can be viewed as a treat that still brings some positive elements to your dessert table.

Socially, cakes like this encourage gatherings and provide a centerpiece that invites guests to enjoy and share stories over delicious food. It’s not just a dessert; it’s a reason to connect.

Lastly, the accessibility of the ingredients ensures that this cake can be made without breaking the bank, making it a charming yet economical choice for home bakers of all levels.

Historical Background and Cultural Significance

The origins of German Chocolate Cake are traced back to a specific type of dark-baking chocolate developed in 1852 by a man named Samuel German. The name “German” in the cake actually refers to this chocolate and is distinct from the country. Over time, the cake evolved into various forms, often featuring rich frostings made of coconut and pecans.

Cultural importance lies in how this cake has become a staple in American celebrations, particularly in the southern United States. Its unique blend of flavors and textures has won the hearts of many and has given rise to numerous variations, including the roll cake version.

As recipes developed, more variations emerged, often adapting to local tastes and available ingredients. The evolution of the roll cake format from the traditional layered cake offers a new take on a classic that continues to honor its roots.

Regional variations play an essential role in its popularity, as people across states and cities have crafted their unique takes on this dessert, ensuring its legacy lives on through generations while bridging cultures through food.

Ingredient Deep Dive

Chocolate Cake: The foundational element of this cake, chocolate adds richness and depth. Dark chocolate offers antioxidants and is also a mood booster, making it a beloved ingredient in many cultures. When selecting chocolate for baking, opt for high-quality brands that offer smooth melting capabilities. Proper storage includes keeping it in a cool, dark place to maintain freshness.

Coconut: Toasted coconut contributes a delightful texture and flavor that complements chocolate. Historically significant in numerous cuisines, it is rich in fiber and healthy fats. When choosing coconut, look for unsweetened flakes for a more natural flavor. Always store coconut in an airtight container to maximize shelf life.

Pecans: Pecan nuts add a delicious crunch and nutty flavor, deepening the cake’s impact. Known for their heart-healthy benefits, pecans can be a great addition to various dishes. Purchasing fresh pecans can significantly enhance your dish; always check for a rich aroma and firm texture. Store nuts in a cool, dry place to maintain freshness.

Common Mistakes to Avoid

  • Overmixing the batter can lead to a dense cake. Mix just until combined, allowing the cake to remain light and fluffy.
  • Not rolling the cake while it’s warm may cause cracks. Roll immediately after baking to prevent this issue.
  • Allowing the cake to cool completely before frosting can lead to a crumbly texture. Frost while it’s still slightly warm for the best results.
  • Using low-quality chocolate can affect the flavor. Always choose high-quality ingredients for a more decadent experience.
  • Forgetting to sift the flour can lead to a dense cake. Ensuring proper aeration is crucial for a light texture.
  • Not measuring ingredients accurately can throw off the ratios. Using a kitchen scale for precision is advisable.
  • Skipping to grease the baking sheet can result in difficult removal. Always line and grease pans to ensure easy release.
  • Failing to toast pecans leads to missing out on their full flavor. Toasting enhances their nutty profile.
  • Cooling the cake upside down can help prevent shrinkage, but be cautious in this technique to avoid damaging the cake.
  • Neglecting to check oven temperature can cause inconsistencies; invest in an oven thermometer for reliable baking results.

Essential Techniques

Understanding how to properly roll a cake is an essential technique that determines the success of this recipe. It’s crucial because this is how the cake takes on the delicious filling while maintaining a beautiful presentation. Start by rolling the cake with the parchment paper to avoid sticking, and be gentle to ensure you don’t crack the cake.

Another important aspect is creating the frosting. Achieving the perfect consistency is vital; it should be spreadable yet hold its shape. Ensure that your ingredients are at room temperature to make mixing easier and to prevent the frosting from being too runny or too thick.

Pro Tips for Perfect Decadent German Chocolate Coconut Pecan Roll Cake

One important tip is to ensure your eggs are at room temperature. This helps create a lighter and fluffier cake batter, resulting in an airy texture when baked. Additionally, always preheat your oven ahead of time; this ensures your cake bakes uniformly.

Consider varying your cake flour with a gluten-free alternative if accommodating dietary needs; it can help everyone enjoy this delightful treat. Also, don’t skip the toasting of coconut and pecans, as this enhances their flavor and adds a delectable crunch.

Experiment with different flavorings such as maple or almond extract for added depth in the frosting. Lastly, remember presentation can elevate even a simple dish; consider garnishing your cake with toasted coconut and chopped pecans for an extra touch of elegance.

Variations and Adaptations

For regional variations, consider adding local spices such as cinnamon or nutmeg to enhance the cake’s flavor. Seasonal adaptations could include incorporating pumpkin or apples during fall for a seasonal twist.

Dietary modifications could involve swapping regular flour for almond flour or introducing a sugar substitute for a low-sugar version. You might also consider flavor variations by using different types of chocolate, such as white or milk chocolate, to change the taste profile.

Texture modifications could mean adding more coconut for chewiness or tweaking the baking time for specific textures. For presentation alternatives, try serving with fresh fruit or a drizzle of custard for added flair.

Serving and Presentation Guide

When plating your Decadent German Chocolate Coconut Pecan Roll Cake, consider using a clean white plate to allow the cake’s sumptuous colors to stand out. To garnish, sprinkle additional toasted coconut and drizzle dark chocolate for a luxurious touch.

Traditional accompaniments like vanilla ice cream or whipped cream elevate the dessert experience further. If serving at a more casual gathering, consider simple serving suggestions; cut slices on a wooden board for a rustic approach.

Temperature considerations are key; serve the cake at room temperature for the best flavor profile, and ensure leftovers are properly stored if any remain. Portion control tips suggest slicing the cake into equal pieces for easy sharing and to keep servings consistent.

Wine and Beverage Pairing

Pair your Decadent German Chocolate Coconut Pecan Roll Cake with a glass of rich port wine to complement the flavors beautifully. The sweetness of the port enhances the chocolate notes, making each sip a delightful experience.

Non-alcoholic alternatives like a creamy coconut milkshake or sweetened iced tea can also stand up to the flavors of the cake. Coffee lovers may enjoy a bold espresso which balances the richness of the cake while complementing its textures.

Temperature considerations are important; serve your beverages at optimal temperatures to enhance your dining experience. A warm latte alongside the cake can create a comforting combination.

Storage and Shelf Life

Store leftover Decadent German Chocolate Coconut Pecan Roll Cake in an airtight container at room temperature for up to three days. For longer storage, consider refrigeration, which can extend its life to about a week, but note that this may affect its texture.

The ideal container recommendations include cake domes or food storage containers that seal well to prevent drying out. Always check for signs of spoilage, like an off scent or mold, before consuming leftovers.

If you’ve made too much, freezing is another option—wrap the cake tightly in plastic wrap and place it inside a freezer bag. Properly stored, it can last up to three months in the freezer, and when ready to enjoy, thaw it in the refrigerator overnight, then bring to room temperature before serving.

Make Ahead Strategies

To prep your Decadent German Chocolate Coconut Pecan Roll Cake ahead of time, consider baking the chocolate cake at least a day in advance. Allow it to cool completely, then wrap it tightly in plastic wrap to maintain moisture and flavor.

The frosting can also be made ahead and stored in the refrigerator for several days. Be sure to bring it back to room temperature and re-whip before spreading on the cake.

For assembly, consider preparing ingredients and tools the night before, including toasting the coconut and pecans, so you can quickly put everything together when you’re ready to serve.

Don’t forget to assess the quality impact; letting the cake sit overnight allows flavors to meld beautifully, enhancing the overall taste. Lastly, consider adding fresh elements like whipped cream or fruit just before serving for a vibrant touch.

Scaling Instructions

To halve the recipe, simply divide all ingredients and follow the same method, ensuring you maintain the baking time as best as you can. Alternatively, doubling or tripling the recipe requires careful attention to your equipment—larger cake pans or multiple batches may be needed to maintain quality.

Timing modifications can be essential; cakes may take longer to bake in larger quantities. Always check for doneness by inserting a toothpick, and adjust your timings accordingly.

Consider the storage implications too; more cake may require extra pantry space or larger containers to keep it fresh for future enjoyment.

Nutritional Deep Dive

Analyzing the macros, you’ll find that each slice of the Decadent German Chocolate Coconut Pecan Roll Cake contains a blend of carbohydrates, healthy fats, and proteins, providing a satisfying treat while also contributing to daily nutritional needs.

Micronutrient analysis reveals that the fats from coconut and pecans contribute essential vitamins like E and B vitamins. This cake is also rich in antioxidants from the chocolate, which can support heart health.

Consider health benefits, as pecans offer omega-3 fatty acids, aiding in managing cholesterol levels, while coconut can offer benefits like promoting metabolism and digestive health.

For those monitoring dietary considerations, taking note of portion sizes can help manage calorie intake without sacrificing flavor. Enjoyed in moderation, this cake can fit into a balanced lifestyle.

Dietary Adaptations

To adapt the Decadent German Chocolate Coconut Pecan Roll Cake for gluten-free options, use almond flour or a gluten-free cake mix that can support the light texture required for the roll.

For dairy-free diets, substitute butter with coconut oil or a plant-based butter alternative; ensure chocolate is dairy-free as well for a seamless adaptation.

Plant-based eaters may also consider vegan egg substitutes when adjusting the recipe, such as applesauce or aquafaba, which can serve as an effective binder and moisture source.

Low-carb adaptations can involve using a sugar substitute or reducing the amount of coconut to fit a lower carb lifestyle while maintaining delightful flavors.

Troubleshooting Guide

If you encounter texture issues, like a dry cake, it may be a result of overbaking or inaccurate oven temperature. Always monitor baking times closely and check for doneness a few minutes early.

Flavor balance can sometimes be off; if your cake seems too sweet, consider adjusting frosting sugar content or adding a hint of salt to enhance flavors.

Temperature problems arise when a cool cake is used for rolling; ensure your cake is slightly warm to help prevent cracking.

Equipment challenges can include improper mixing tools; consider using an electric mixer for more consistent batter results instead of hand mixing.

If ingredient substitutions lead to timing concerns, allow for adjustments. For instance, different flours may bake at different rates, requiring altered baking times.

Recipe Success Stories

Community feedback on the Decadent German Chocolate Coconut Pecan Roll Cake has been overwhelmingly positive, with many bakers praising its approachable complexity. Users have shared their variations, including different frostings and flavor combinations, which often receive glowing reviews.

There are countless adaptation success stories, from those choosing to incorporate a variety of nuts to enhance the added crunch to those who prefer lightening the cake by reducing sugar content without compromising flavor.

Photography tips shared within community forums suggest showcasing this cake with fresh fruit or a colorful slice can elevate presentations, making it a sought-after dish on social media.

Readers often report that their first attempt at this cake inspired confidence, leading them to experiment further with other baking recipes, bridging into new baking adventures.

Frequently Asked Questions

Can I make the cake ahead of time?

Absolutely! The chocolate cake can be baked a day in advance, allowing for even deeper flavors. Store it tightly wrapped in plastic wrap until you’re ready to frost and serve.

What can I substitute for eggs?

You can use applesauce, mashed bananas, or aquafaba as excellent egg replacements. Each substitute will add moisture and bind the ingredients, maintaining the cake’s texture.

How do I store leftovers?

Leftover cake can be stored in an airtight container at room temperature for up to three days or in the fridge for up to a week. If freezing, wrap tightly in plastic wrap and place in a freezer bag for up to three months.

Can I use a different type of chocolate?

Yes! You can easily swap dark chocolate for milk or even white chocolate, but remember this will alter the flavor and sweetness level of the cake.

What if my cake cracks when rolling?

If your cake cracks, it may have cooled too much before rolling. Always roll it while it’s still warm, which helps maintain flexibility and reduces cracking.

Is it possible to make this recipe vegan?

Certainly! Substitute dairy ingredients with plant-based versions, and replace eggs with suitable alternatives like flax eggs or additional applesauce.

Can I add other flavors to the frosting?

Absolutely! Adding extracts like vanilla or almond can enhance the flavor, providing a rich contrast to the chocolate cake.

What size baking sheet do I need?

A standard 15×10 inch baking sheet works best for this recipe to ensure even baking and proper rolling. Make sure the sides are at least 1 inch high.

How can I prevent my cake from sticking?

Using parchment paper and greasing the baking sheet will help prevent sticking. Allow it to cool briefly before removing from the pan.

What’s the best way to serve this cake?

Serve the cake at room temperature, paired with whipped cream or a scoop of vanilla ice cream for an extra treat!

Can I adjust this recipe for smaller servings?

Yes, simply halve the recipe and adjust baking times for smaller portions. It’s an easy way to enjoy this cake without leftovers!

Additional Resources

For those interested in exploring more delicious recipes, consider browsing related cake recipes that offer similar flavor profiles or techniques. There are also helpful technique guides that dive into the art of cake rolling and maintaining texture.

Ingredient information is widely available for learning about the best types of chocolate, coconut, and pecans to use for optimal results, along with detailed nutritional profiles.

Equipment recommendations abound, providing tips on acquiring essential baking tools that can simplify the process. Seasonal variations and recipes for integrating fruits or spices into your baking offer fresh ways to celebrate with flavor changes.

Join the Conversation

We love hearing from our readers! Share your own experiences and adaptations of the Decadent German Chocolate Coconut Pecan Roll Cake. Your suggestions and reviews enrich our community and inspire others to try their hands at this delightful recipe.

Engage with us on social media where you can share your homemade photos, ask questions, or simply connect with fellow baking enthusiasts. Our community values creativity, and we encourage you to showcase your unique presentations and storytelling for this treat.

Don’t hesitate to ask for baking tips or share your own to inspire others on their baking journey. Every recipe has a story, and we want to hear yours!

The Recipe

Decadent German Chocolate Coconut Pecan Roll Cake

Serves: 12

Prep Time: 25 mins

Cook Time: 30 mins

Total Time: 55 mins

Kitchen Equipment Needed

  • 15×10 inch baking sheet
  • Parchment paper
  • Electric mixer
  • Spatula
  • Food processor (optional for nuts)

Ingredients

  • 1 cup all-purpose flour
  • 2 cups granulated sugar
  • 1/2 cup unsweetened cocoa powder
  • 1 teaspoon baking powder
  • 1/2 teaspoon salt
  • 5 large eggs
  • 1/2 cup milk
  • 1 cup finely shredded coconut
  • 1 cup chopped pecans
  • 1 cup unsweetened chocolate, melted
  • 1 teaspoon vanilla extract

Directions

  1. Preheat the oven to 350°F (175°C). Line the baking sheet with parchment paper and grease it lightly.
  2. In a large bowl, sift together the flour, cocoa powder, baking powder, and salt.
  3. In a separate bowl, beat the eggs and sugar until thick and pale. Gradually mix in the melted chocolate and vanilla.
  4. Combine the dry ingredients with the wet mixture until just combined. Fold in the milk, pecans, and coconut.
  5. Spread the batter evenly into the prepared baking sheet. Bake for 30 minutes or until a toothpick comes out clean.
  6. Once baked, immediately roll the cake with the parchment paper while it’s warm, and let it cool completely.
  7. Prepare the frosting by mixing powdered sugar, coconut, and pecans. Spread generously on the unrolled cake before re-rolling it.
  8. Slice and serve with additional coconut and pecans sprinkled on top.

Recipe Notes

  • Feel free to experiment with different types of nuts or extracts.
  • Can be frozen for up to 3 months.
  • Store airtight at room temperature for up to 3 days.

Deliciously Easy No-Bake Lemon Tart Recipe for Everyone

Velvety No-Bake Lemon Tart Recipe: A Refreshing Delight for Any Occasion

⚖️
Difficulty
Easy

⏲️
Prep Time
20 mins

🕒
Cook Time
0 mins

⏱️
Total Time
20 mins

🍽️
Servings
8-10

Indulge in the delicious and refreshing taste of our Velvety No-Bake Lemon Tart, perfect for any occasion. This tart captures the essence of zesty lemons combined with a creamy filling to create a delightful dessert that will impress your family and friends. Not only is it easy to make, but it also requires no baking, making it a perfect choice for warm weather or when you want a sweet treat without turning on the oven.

The bright, citrus notes of lemon provide an invigorating flavor that dances on your palate, while the sweet, buttery crust adds a satisfying crunch. Each bite of this no-bake lemon tart brings a beautiful balance of flavors, ensuring that every forkful is a treat. With its eye-catching presentation and delightful taste, this dessert is sure to become a favorite that you’ll return to time and again.

Quick Recipe Highlights

  • Flavor Profile: A vibrant combination of sweet and tangy lemon that refreshes the senses.
  • Texture: The creamy filling melts in your mouth, complemented by a crunchy, buttery crust.
  • Aroma: Imagine the fragrant scent of fresh lemons wafting through your kitchen, bringing a sunny brightness.
  • Visual Appeal: This tart showcases a stunning golden-yellow filling that looks inviting atop a crisp, golden crust.
  • Skill Level Needed: Suitable for beginners and those looking for a quick yet impressive dessert to whip up.
  • Special Equipment: A tart pan or pie dish and a mixing bowl are all you need to achieve this delightful dessert.

Recipe Overview

  • Difficulty Level: This Velvety No-Bake Lemon Tart is classified as easy, making it accessible for anyone from novice cooks to experienced bakers.
  • Category: It falls under the dessert category and is an excellent choice for summer picnics, holiday gatherings, or casual weeknight treats.
  • Cuisine: Inspired by classic French desserts, this tart embodies a blend of culinary traditions with its rich, creamy filling and buttery crust.
  • Cost: The ingredients for this tart are generally affordable, making it a budget-friendly dessert option.
  • Season: Lemon tart is best enjoyed during spring and summer when fresh citrus is abundant, though it can be made year-round.
  • Occasion: Perfect for everything from birthday celebrations to casual dinners, this tart is a versatile dessert for any gathering.

Why You’ll Love This Recipe

This Velvety No-Bake Lemon Tart is more than just a dessert; it’s a celebration of flavors and a treat for all senses. The delightful tartness of fresh lemons creates a bright and invigorating flavor, while the creamy filling offers a smooth contrast to the crunchy crust. Together, they make a harmonious pairing that leaves everyone wanting more.

Not only is this recipe easy to prepare, but it also allows for minimal kitchen cleanup. Simply combine the ingredients, pour them into the crust, and let it set in the fridge. With no baking required, you can whip this up even on the warmest days, leaving your kitchen cool and comfortable.

Nutritionally speaking, incorporating fresh lemons adds a boost of Vitamin C, which supports your immune system while also providing a refreshing taste. Additionally, the ingredients in this tart are generally simple and wholesome, allowing for a satisfying indulgence that doesn’t weigh you down.

Serving this lemon tart is also a wonderful way to impress your guests. Imagine a gathering where you unveil this stunning dessert, and watch as your friends and family are charmed by its beauty and taste. It’s a perfect centerpiece for any table, lending an air of elegance to casual or festive occasions.

Cost-effectiveness is a huge plus; with just a few staple ingredients, you can create a dessert that looks and tastes gourmet. Whether it’s a cozy dinner at home or a larger celebration, this Velvety No-Bake Lemon Tart will not only satisfy sweet cravings but also keep your budget in check.

Historical Background and Cultural Significance

The origins of lemon tart can be traced back to French culinary traditions, where the balance of tart and sweet flavors was highly celebrated. Over the centuries, the classic lemon tart evolved, becoming a favorite across various cultures. Many regions have their own variations, adding local ingredients to create unique interpretations.

In France, lemon tart is known as “tarte au citron,” commonly enjoyed in patisseries. This dessert is a symbol of French culinary artistry, showcasing the importance of fresh, high-quality ingredients. Its popularity has led to numerous adaptations, each carrying its own cultural touch while keeping the beloved lemon flavor intact.

As time passed, the no-bake version of lemon tart gained traction, appealing to those desiring a quicker, more accessible dessert option. Its rise in popularity reflects a shift towards simpler cooking methods without sacrificing taste and presentation. Today, it’s celebrated not only in casual home kitchens but also on the menus of fine dining establishments.

Regional variations abound, with some cultures combining local fruits, herbs, or spices into the basic lemon tart recipe, enhancing its appeal and adding depth to the flavor profile. This adaptability has helped the lemon tart maintain its status as a timeless dessert enjoyed all over the world.

Ingredient Deep Dive

Lemon is the star of this Velvety No-Bake Lemon Tart. This vibrant fruit is not only famous for its refreshing flavor but also packed with health benefits. Rich in Vitamin C and antioxidants, lemons support immune health and promote skin vitality. When selecting lemons, look for ones that are bright yellow and firm, indicating freshness.

The crust of this tart typically features graham crackers or digestive biscuits. These ingredients provide a sweet, crunchy texture that complements the creamy filling. Whole-grain versions can also be used for a healthier option, offering more fiber and nutrients. Store any leftover crust in an airtight container to maintain its crispness for future use.

Cream cheese is another key ingredient, contributing to the rich and velvety texture of the filling. This surface pleaser can be found in low-fat versions too, offering a great alternative without compromising flavor. For those with lactose intolerance, dairy-free cream cheese can also serve as a suitable substitute, allowing everyone to enjoy this delightful dessert.

Lastly, sweetened condensed milk plays a crucial role in achieving the tart’s delicious sweetness while also aiding in setting the filling. This pantry staple is economical and can be kept for long periods. It can also be substituted with coconut cream for a dairy-free option that enhances the tropical notes of the tart.

Common Mistakes to Avoid

  • Overmixing the filling can lead to a runny consistency. Mix just until combined for a perfect texture.
  • Using old or out-of-season lemons can result in a less vibrant flavor; always opt for fresh, juicy lemons.
  • Not chilling the tart long enough can prevent it from setting properly. Make sure to refrigerate for at least a few hours.
  • Forgetting to line the tart pan can make removing the tart difficult; always use parchment paper for easy extraction.
  • Rushing the crust assembly can lead to crumbliness; ensure the butter is evenly distributed for a cohesive texture.
  • Ignoring the need for a taste test can result in an unbalanced flavor; always adjust the sweetness or tartness to your preference.
  • Baking the crust instead of refrigerating can cause it to become too hard; follow the no-bake instructions for the right texture.
  • Neglecting to garnish or decorate can lead to a less appealing presentation; use slices of lemon or whipped cream for an elegant touch.
  • Using too much liquid can make the filling too runny; measure carefully to ensure the right consistency.
  • Skipping the rest time after mixing the filling can prevent flavors from melding; let it sit before pouring it into the cooled crust.

Essential Techniques

Achieving the perfect crust requires mastering the technique of combining dry ingredients with melted butter. This process is crucial for ensuring that the crust holds together well once chilled. To master it, start by finely crushing the biscuits to avoid large chunks and mix evenly with melted butter until you achieve a sandy consistency before pressing it firmly into the pan.

The filling needs to be well-mixed but not overwhipped. Start by blending the cream cheese until smooth before gradually adding the sweetened condensed milk and lemon juice. This gradual mixing helps achieve a creamy texture without incorporating too much air, which would lead to fluffiness rather than the desired velvety consistency.

Setting the tart properly is another important step. After pouring the filling into the crust, cover it with plastic wrap and place it in the fridge. This chilling period ensures that the filling firms up, creating a tangy yet smooth tart that holds its shape when sliced.

Lastly, proper garnishing can elevate the presentation of the tart. Delicately arranged lemon slices or a dollop of whipped cream can greatly enhance the visual appeal. Learning how to arrange garnishes attractively can make a significant difference in how inviting your dessert appears to guests.

Pro Tips for Perfect Velvety No-Bake Lemon Tart

1. Always use room temperature cream cheese to ensure an easier and smoother blending process, avoiding lumps in your filling.
2. For added flavor, consider zesting the lemons before juicing them; this will enhance the lemony aroma and taste in the tart.
3. Experiment with flavored extracts, such as vanilla or almond, to provide an interesting twist to the traditional lemon flavor.
4. To prevent soggy crust, let the crust set in the fridge for about 30 minutes before adding the filling.
5. When slicing the tart, use a warm knife to create clean cuts; simply run the knife under hot water and wipe it dry before cutting.
6. If you want a lighter tart, substitute half of the cream cheese with Greek yogurt for added protein and tanginess.
7. Don’t hesitate to decorate the top with fruits or edible flowers, making the presentation even more stunning.
8. Be sure to check the tart after chilling for the first couple of hours; if it’s too soft, let it chill for an additional hour or so.

Variations and Adaptations

For those looking to mix it up, consider adding different flavor variations to this classic recipe. A berry-infused lemon tart could incorporate raspberry or blueberry purée swirled into the filling for a pop of color and flavor. Seasonal adaptations, like incorporating fresh strawberries in the summer or spiced pumpkin for fall gatherings, keep this tart relevant year-round.

Dietary modifications offer additional opportunities for creativity. Vegan substitutes can be made using cashew cream instead of cream cheese and maple syrup for sweetness. Gluten-free versions can easily be achieved by using gluten-free biscuits for the crust, allowing everyone to enjoy a slice.

For a textural twist, consider adding crushed nuts or toasted coconut to the base for a richer, more complex flavor profile. Presentation alternatives include serving the tart in individual cups rather than a pie dish for a fun and modern take. Each of these variations can be tailored to specific tastes or dietary needs, making this no-bake lemon tart a deliciously flexible recipe.

Serving and Presentation Guide

For an elegant presentation, slice the Velvety No-Bake Lemon Tart into even portions using a warm knife. Place each slice on a chilled dessert plate for an inviting display. Garnish with a sprig of mint or thinly sliced lemon for a pop of color that enhances the tart’s visual appeal.

Consider serving the tart alongside a dollop of freshly whipped cream or a scoop of lemon sorbet for added texture and flavor contrast. These accompaniments not only elevate the dish but also allow guests to customize their dessert experience.

Temperature is essential; ensure the tart is served chilled to maintain the creaminess of the filling while being refreshing. For portion control, consider cutting smaller slices, especially if serving at a buffet or a large gathering, allowing guests to sample various desserts.

Lastly, consider beautiful garnishing ideas, such as creating a light dusting of powdered sugar over the top for a frosted appearance, or drizzle with a raspberry coulis that provides a vibrant color contrast to the yellow tart.

Wine and Beverage Pairing

Pairing your Velvety No-Bake Lemon Tart with the right beverages can enhance the overall dining experience. A crisp, refreshing white wine, such as Sauvignon Blanc, complements the tart’s citrus flavors perfectly. The acidity of the wine mirrors the tartness of the lemons, creating a harmonious balance on the palate.

For non-alcoholic options, consider serving the tart with a zesty iced tea, perhaps infused with fresh mint and lemon slices to tie in with the dessert’s flavors. A sparkling lemonade, either homemade or store-bought, also makes for an excellent pairing that enhances the lemony notes of the tart.

For coffee lovers, a smooth espresso or a lightly flavored latte can provide a lovely contrast to the sweetness of the tart. The bitterness of the coffee pairs beautifully with the creamy filling, creating a delightful after-dinner experience.

Serving temperature is also key; be sure to chill the tart well and serve the beverages cold to create a refreshing contrast.

Storage and Shelf Life

To maximize the freshness of your Velvety No-Bake Lemon Tart, store it in an airtight container in the refrigerator. Make sure to consume it within 3-5 days for the best quality and flavor. Keeping it properly covered will also prevent it from absorbing any unwanted odors from other foods in your fridge.

If you’re looking to prepare the tart in advance, you can also freeze it. For freezing, wrap the tart well in plastic wrap followed by aluminum foil to prevent freezer burn. Enjoy it within 1-2 months for optimal taste.

When it comes to signs of spoilage, be vigilant about any off odors or changes in texture. If the filling appears watery or has separated, it may be best to discard it. For leftovers, if the tart looks and smells fresh, you can consider reheating or thawing it based on your preference for serving.

Freezing individual slices can also be an effective way to preserve the tart, allowing for easy grab-and-go dessert options whenever cravings strike!

Make Ahead Strategies

One of the most delightful aspects of the Velvety No-Bake Lemon Tart is its ability to be prepared ahead of time. Start by making the crust and filling a day in advance, allowing the tart to chill overnight. This not only enhances the flavor but also ensures that the filling sets perfectly for a slice that holds its shape.

Storing individual components can also be beneficial; prepare the crust in advance and keep it in the fridge before adding the filling. This strategy allows you to combine things without fear of damaging the texture of the crust.

For the best quality, avoid adding any fresh garnish until just before serving. This will preserve the appearance of the tart and ensure that any herbs or fruits remain fresh and vibrant.

Lastly, consider assembling mini tarts in individual cups ahead of time for gatherings—this way, you can entertain guests without the last-minute rush. By organizing your prep, you’ll enjoy a stress-free and delightful dessert experience.

Scaling Instructions

Scaling your Velvety No-Bake Lemon Tart recipe can be simple and rewarding, especially when catering to larger groups. Halving the recipe is straightforward; just adjust the ingredient measurements accordingly, making sure to use proportions to match the crust and filling ratio.

Doubling or tripling the recipe is equally easy; ensure you have a sufficiently large pan to accommodate the increased filling. You may also consider using multiple smaller pans for easy serving and to present an assortment of flavors.

Timing adjustments are key when scaling. Keep in mind that larger tarts may need a bit more chilling time to set thoroughly. Similarly, if you’re baking multiple smaller tarts simultaneously, monitor them closely since smaller portions often require less time to chill.

Finally, always consider storage options. Large batches can take up significant fridge space, so plan ahead on how to store and serve them effectively once made.

Nutritional Deep Dive

The nutritional profile of the Velvety No-Bake Lemon Tart can vary depending on ingredient choices, but generally, its macros consist of carbohydrates primarily from the crust and sugars, alongside fats from the cream cheese. A standard slice may contain approximately 250-300 calories, which is typical for desserts.

Micronutrient analysis shows that the tart is rich in Vitamin C thanks to the lemons, offering immune support and antioxidant effects. Cream cheese also contributes calcium and protein, providing some nutritional benefits, though moderation is key due to its fat content.

For health-conscious individuals, consider using low-fat cream cheese and reducing sugar to lessen calorie intake. Keeping an eye on portion sizes is essential, especially if you’re indulging in richer variations of the tart.

Lastly, weight management becomes manageable with this dessert when consumed in moderation. Pairing it with seasonal fruit or light beverages can create a balanced plate.

Dietary Adaptations

For guests requiring gluten-free options, simply swap out traditional graham crackers with gluten-free biscuits to create an equally delicious crust. Ensure that all additional ingredients are also verified gluten-free to avoid any cross-contamination.

If you’re catering to vegan guests, replace cream cheese with a plant-based alternative and use coconut cream to ensure that the filling maintains its rich, creamy texture. Using agave or maple syrup can also substitute for sweetened condensed milk, offering a delightful flavor without dairy.

Low-carb adaptations can easily be achieved with a sugar substitute and by using almond flour for the crust. This modification allows those following keto or paleo diets to indulge in the tart without the carb overload.

Lastly, consider creating a low-FODMAP version by replacing standard sweeteners with those regarded as low-FODMAP-friendly, ensuring that everyone can enjoy this tasty treat, no matter their dietary needs.

Troubleshooting Guide

If your Velvety No-Bake Lemon Tart’s filling turns out too runny, this is often the result of not allowing it enough time to chill. Ensure to refrigerate it for a minimum of 4 hours to allow it to set properly before serving.

Should the crust crumble when slicing, it’s likely that it wasn’t pressed firmly enough into the pan or used overly dry biscuits. To remedy this, ensure a consistent mixture of butter and biscuit crumbs, pressing it down securely before filling.

For an overly tart flavor, balance it by blending in a little more sweetened condensed milk or consider adding a drizzle of honey or simple syrup over individual slices before serving.

If the tart appears browning or too soft on the edges after being chilled, excessive mixing or using old ingredients may be culprits. Ensure to troubleshoot with fresh ingredients, and reduce mixing time for cream cheese.

Lastly, for crackling while cutting, using a warm knife as mentioned before can help achieve smooth, clean slices without compromising the tart’s aesthetics.

Recipe Success Stories

Readers have shared numerous success stories after trying our Velvety No-Bake Lemon Tart recipe. Many have praised its simplicity, noting how it became a family favorite within just a few servings. Adaptations made by fellow cooks, such as adding fresh berries to the filling, have sparked delightful conversations around tables lined with sweet treats.

One home cook shared how they brought this lemon tart to a gathering, receiving rave reviews for its refreshing flavor that was especially appreciated on a warm day. Others have explored using local fruits in combination with lemon, creating a unique twist that matched their regional ingredients.

Photography tips have also been shared among the community, with users showcasing stunning images of their garnished lemon tarts—where sprigs of mint and edible flowers added that extra touch of elegance.

Feedback often emphasizes the ease of preparing the tart, encouraging others to try their hand at creating this delicious dessert, proving that its charm lies in its accessibility to all skill levels.

Frequently Asked Questions

Can I make this lemon tart in advance?

Absolutely! This tart is perfect for making ahead. Prepare it a day in advance and store it in the fridge until you’re ready to serve. This allows the flavors to meld beautifully and ensures it’s perfectly set.

What can I use as a substitute for sweetened condensed milk?

You can replace sweetened condensed milk with a mixture of coconut cream and a sweetener like maple syrup or honey. This alternative keeps the richness while offering a different flavor profile.

What if I can’t find fresh lemons?

If fresh lemons are unavailable, consider using bottled lemon juice. However, fresh lemons provide a much brighter flavor, so it’s best to use fresh when possible. You may also explore using other citrus like limes or oranges as substitutes.

Can I freeze the Velvety No-Bake Lemon Tart?

Yes, this tart freezes well. Just wrap it tightly in plastic wrap and aluminum foil, and store it in the freezer. Thaw it in the refrigerator overnight before serving for the best texture.

How long does the lemon tart stay good in the fridge?

This tart can be kept in the fridge for up to 3-5 days. Make sure to store it in an airtight container to preserve its freshness and avoid absorbing other smells.

Can I use a different crust for the tart?

Definitely! While a graham cracker crust is traditional, you can use other types of cookies or make a nut-based crust for a gluten-free option. Experiment with what you enjoy!

What’s the best way to serve the lemon tart?

Serve the lemon tart chilled, topped with whipped cream, fresh fruit, or a light dusting of powdered sugar for an elegant presentation. You could also accompany it with iced tea or a refreshing cocktail.

How can I adjust the sweetness of the tart?

After blending your ingredients, taste the filling before pouring it into the crust. You can always add more sweetened condensed milk, honey, or your preferred sweetener to achieve your desired sweetness.

Is there a vegan version of this recipe?

Yes! You can easily make a vegan version of the Velvety No-Bake Lemon Tart using plant-based cream cheese and coconut cream. Substitute sweetened condensed milk with a blend of coconut cream and a vegan sweetener.

What other flavor variations can I try?

Feel free to experiment with different flavors! Adding berries, chocolate, or even herbs like rosemary can create exciting flavor combinations. Mixing in lemon zest can also enhance the lemony flavor while adding texture.

Additional Resources

If you’re eager to dive deeper into the world of no-bake desserts, consider exploring related recipes that highlight other flavors. Additionally, technique guides outlining pastry skills and dessert presentations can be helpful resources.

Ingredient guides detailing the benefits of wholesome components, such as the nutritional value of citrus, can enhance your understanding of what goes into your dishes. Finally, recommendations for equipment that makes dessert preparation easier can elevate your cooking experience, ensuring you’re well-equipped to handle delicious recipes.

Join the Conversation

We’d love to hear about your experiences with the Velvety No-Bake Lemon Tart! Please share your thoughts and review the recipe on social media. Engaging with fellow dessert enthusiasts can offer new insights, tips, and even friendly competition in the kitchen.

Encouragement to share photographs of your brightly-colored tarts adds a personal touch to the community that surrounds this recipe. From flavor variations to presentation ideas, your contributions can inspire others to embark on their baking adventures, continuing the tradition of sharing delicious culinary experiences.

The Recipe

Velvety No-Bake Lemon Tart

Serves: 8-10

Prep Time: 20 mins

Cook Time: 0 mins

Total Time: 20 mins

Kitchen Equipment Needed

  • Tart pan or pie dish
  • Mixing bowl
  • Whisk
  • Spatula
  • Measuring cups and spoons

Ingredients

  • 1 ½ cups graham cracker crumbs
  • ½ cup unsalted butter, melted
  • 8 oz cream cheese, softened
  • 1 cup sweetened condensed milk
  • ½ cup fresh lemon juice
  • 2 teaspoons lemon zest

Directions

  1. In a mixing bowl, combine graham cracker crumbs and melted butter. Press firmly into the base of the tart pan to form the crust. Chill in the refrigerator for 30 minutes.
  2. In another bowl, beat cream cheese until smooth. Gradually mix in sweetened condensed milk until well blended.
  3. Add fresh lemon juice and zest to the mixture, stirring until smooth and fully combined.
  4. Pour the filling into the chilled crust and smooth the top with a spatula.
  5. Cover the tart and refrigerate for at least 4 hours or until fully set.
  6. Once set, garnish with sliced lemons or whipped cream before serving. Cut into slices and enjoy!

Recipe Notes

  • Substitute graham crackers with gluten-free options for a gluten-free crust.
  • Swap sweetened condensed milk with coconut cream for a dairy-free version.
  • Add fresh berries for a twist on the traditional filling.
  • Let the tart set longer if the filling is too soft for your liking.

Delicious Caramel Apple Muffins with Walnuts and Drizzle

Delicious Caramel Apple Muffins Recipe: A Sweet Treat for Any Occasion

⚖️
Difficulty
Moderate

⏲️
Prep Time
15 mins

🕒
Cook Time
20 mins

⏱️
Total Time
35 mins

🍽️
Servings
12 muffins

Caramel apple muffins are the perfect autumn treat that combines the flavors of sweet caramel and tart apples in a soft, fluffy muffin. With a delightful crunch from the walnuts and a rich caramel drizzle on top, these muffins aren’t just a pleasure to eat; they’re a feast for the senses. Imagine the aroma of fresh baked goods wafting through your kitchen as you prep this recipe—it’s the kind of smell that draws everyone in and makes them feel right at home.

These muffins are ideal for breakfast, an afternoon snack, or even a comforting dessert. Each bite reveals a moist apple-filled muffin accented with the crunch of walnuts, making it a true crowd-pleaser. Plus, the caramel drizzle adds an irresistible sweetness that brings the whole experience together. You’ll love how easy it is to make them and how delightful they are to share with family and friends.

Quick Recipe Highlights

  • Flavor Profile: Sweet caramel paired with tart apple creates a harmonious balance that’s irresistible.
  • Texture: Soft and fluffy muffins with a slight crunch from chopped walnuts.
  • Aroma: The warm scent of baked apples and caramel fills the air during baking.
  • Visual Appeal: Golden-brown tops drizzled with glossy caramel make for a stunning presentation.
  • Skill Level Needed: Requires basic baking skills with a few simple steps—perfect for beginners!
  • Special Equipment: Standard baking tools including muffin tins and mixing bowls are all you need.

Recipe Overview

  • Difficulty Level: Moderate; this recipe involves mixing ingredients and requires proper baking time to achieve the perfect muffin texture.
  • Category: These caramel apple muffins fit perfectly into breakfast or dessert categories.
  • Cuisine: A delightful combination of American and autumnal flavors comes through, celebrating seasonal ingredients.
  • Cost: An economical treat, with common ingredients that won’t break the bank.
  • Season: Best enjoyed during fall, when apples are in season and the desire for warm treats is at its peak.
  • Occasion: Perfect for brunches, holiday gatherings, or simply an afternoon indulgence.

Why You’ll Love This Recipe

This caramel apple muffin recipe is a wonderful combination of taste and texture that will never go out of style. The sweet, sticky caramel accentuates the apples’ natural sweetness, perfectly balancing flavors that everyone will enjoy. Each muffin is tender yet hearty, thanks to the addition of walnuts that provide a satisfying crunch.

Not only is this recipe simple and convenient to prepare, but it can also be easily customized based on your preferences. Need to use up those extra apples? This is the perfect opportunity. You can also make the batter in advance and bake them when you’re ready to savor the warm, delectable aroma wafting from your oven.

These muffins also offer some nutritional advantages. Apples are full of fiber, while walnuts provide healthy omega-3 fatty acids. Together, they create a more balanced snack option that can keep your energy levels up throughout the day.

Making these muffins is a wonderful, engaging activity to share with family or friends. Whether you’re hosting a casual get-together or snuggled up with a good book, these muffins set the perfect mood. Plus, they make excellent gifts for neighbors or loved ones during the holiday season!

Cost-effectiveness is another great reason to love this recipe. The ingredients are usually inexpensive and readily available, meaning you can whip up a batch without a hefty grocery bill.

Historical Background and Cultural Significance

The tradition of baking with apples and caramel goes back many centuries, with roots in various culinary practices across the globe. Apples have long been a symbol of autumn in many cultures, often celebrated during harvest festivals. The idea of combining sweet caramel with apples likely evolved as chefs sought to enhance the natural flavors of seasonal produce.

In the U.S., apples are not just an everyday fruit but are part of significant cultural events, such as apple picking in orchards. These outings are a cherished activity for families every fall. Caramel as an ingredient adds a level of indulgence to recipes that reflects a more contemporary approach to dessert making.

The evolution of the caramel apple muffin specifically showcases how traditional flavors adapt into modern baking. It’s a wonderful blend between quick, easy treats and favorite nostalgic tastes that generations cherish. Regional variations can be found, with some incorporating spices like cinnamon or nutmeg to invoke even more warmth.

As time goes on, these muffins have become popular not only in homes but also in cafés and bakeries, often taking center stage during seasonal menus. Their popularity highlights the universal love for combining the best of what the fall harvest has to offer.

Ingredient Deep Dive

Apples
Apples have a long-standing cultural significance as a symbol of health and knowledge. Their history dates back thousands of years and is featured in numerous folklore and tales. Nutritionally, they are rich in dietary fiber and vitamin C, making them beneficial for digestion and immune health.

When selecting apples for baking, look for firmer varieties such as Granny Smith or Honeycrisp for their taste and texture during cooking. Store them in a cool, dry place, and always wash thoroughly before use. If you need to substitute, you can use pears or other firm fruits.

Walnuts
Walnuts are a popular ingredient in many cuisines around the world, celebrated for their rich flavor and nutritional benefits. They provide healthy fats, protein, and antioxidants, making them an excellent choice for baking.

When choosing walnuts for this recipe, select fresh, unsalted nuts. Store them in an airtight container to prevent them from going rancid. If allergies are a concern, pecans or almonds can serve as great substitutes while maintaining similar textures.

Common Mistakes to Avoid

  • Overmixing the batter: This can lead to tough muffins instead of fluffy ones. Mix the dry and wet ingredients just until combined.
  • Using too much flour: Scoop the flour into the measuring cup rather than scooping directly from the container to prevent packing down.
  • Not preheating the oven: Ensure your oven is hot enough before baking to help muffins rise properly.
  • Ignoring ingredient temperature: Room temperature ingredients blend better and create a smoother batter.
  • Not sifting the flour: This adds air, resulting in lighter and fluffier muffins.
  • Skipping the caramel drizzle: The drizzle enhances flavor—it shouldn’t be omitted; it’s part of the magic!
  • Underbaking or overbaking: Keep a close eye on baking time; muffins should be golden brown but not dry.
  • Not letting muffins cool: Allow them to cool for a few minutes in the pan before transferring to a wire rack to help form the perfect texture.

Essential Techniques

Mixing the batter
Proper mixing is crucial for achieving the right texture in your muffins. Gentle folding of ingredients helps maintain the fluffiness. Overmixing can develop the gluten, resulting in denser muffins. Look for a lumpy batter rather than a smooth one for best results.

Testing for doneness
To ensure your muffins are perfectly baked, use a toothpick to test for doneness. Insert it into the center; if it comes out clean or with just a few crumbs, they are done. This technique prevents the disappointment of undercooked muffins.

Pro Tips for Perfect Caramel Apple Muffins

1. Use a combination of apples for more complex flavors—mix tart and sweet varieties for depth.
2. Toast walnuts lightly before adding them to the batter to enhance their nutty flavor.
3. Drizzle caramel sauce while the muffins are still warm for better adhesion.
4. Experiment with spices like cinnamon or nutmeg to add warmth and complexity to the flavor.
5. Freeze any extra muffins for an easy grab-and-go snack throughout the week.
6. For an extra touch, sprinkle sea salt on top of the caramel for a sweet-salty contrast.
7. Use silicone muffin liners for easy removal post-baking.
8. Fill muffin tins only up to the 2/3 mark to prevent overflow.

Variations and Adaptations

These caramel apple muffins can easily accommodate a variety of tastes and dietary needs. Consider adding dried cranberries or raisins for a chewy surprise. To enhance the autumnal flavors, incorporate pumpkin spice into the mix.

For those who wish to keep it seasonal, try substituting fresh berries in the summer for a lighter taste. Gluten-free flour can be used for a gluten-free option without sacrificing texture.

If you’re looking for a healthier twist, substitute half of the sugar with mashed bananas or unsweetened applesauce. For a richer flavor, consider adding dark chocolate chips or a cream cheese filling.

Different nuts may also enhance texture, such as pecans or even toasted sunflower seeds for those with nut allergies. The presentation can be varied by serving them in a tiered cupcake stand for more visual height or using decorative muffin wrappers for added charm.

Serving and Presentation Guide

Serve your muffins warm or at room temperature to best enjoy their flavor. Plating can be accomplished simply on a rustic wooden board or with a colorful cloth underneath for a cozy feel.

A dip of melted caramel sauce on the side can add an interactive element, letting diners decide how much they want. For garnish, sprinkle chopped walnuts or drizzle additional caramel on top for visual contrast.

For a modern twist, consider presenting with a dollop of whipped cream or a scoop of vanilla ice cream for indulgence. Temperature-wise, serving them warm right out of the oven enhances flavor and texture, so keep that in mind during gatherings.

When it comes to portion control, consider creating smaller muffins or offering them alongside other light snacks for a brunched occasion.

Wine and Beverage Pairing

Pairing your warm caramel apple muffins with a glass of light Chardonnay can elevate your dining experience. Its crisp acidity complements the sweetness of the muffins beautifully.

For non-alcoholic options, consider serving with fresh apple cider or a spiced chai latte to accentuate autumn flavors. A rich, dark roast coffee also pairs pleasantly and balances the sweetness of the caramel.

When serving, ensure drinks are served at the appropriate temperatures: chilled beverages in cool glassware and warm drinks in sturdy mugs to evoke that cozy vibe.

Storage and Shelf Life

Store your caramel apple muffins in an airtight container at room temperature for up to three days. They can also be refrigerated for a week if you prefer them chilled.

For longer storage, consider freezing them. Wrap each muffin tightly in plastic wrap, then place them in a freezer-safe bag. They will keep well for up to three months. When ready to enjoy, simply thaw at room temperature or reheat briefly in the microwave.

Signs of spoilage include discoloration or a sour smell, indicating it’s best to discard them. When reheating, a few seconds in the microwave can bring back their moist texture, but do avoid overdoing it, which can lead to rubbery muffins.

Make Ahead Strategies

You can prepare the muffin batter the night before, storing it in the refrigerator to save time. Just be sure to stir it gently before baking, as the ingredients may settle.

Another strategy is to bake the muffins a day in advance and store them in an airtight container, making them ready for your gathering. Just remember to add the caramel drizzle before serving to keep it fresh.

Add fresh elements, such as whipped cream or chocolate shavings, right before serving, ensuring that they’re appealing and delicious.

Scaling Instructions

If you’d like to halve this recipe, simply divide all ingredient quantities by two. This is a great approach if you’re baking for smaller groups.

When doubling or tripling, consider using multiple muffin tins and stay attentive to baking times—larger quantities may require extra time.

Keep in mind the size of your mixing bowl as well; scaling up may demand a more spacious option to blend ingredients properly. Adjust your storage plans as well, ensuring that baked goods are still kept airtight to maximize freshness.

Nutritional Deep Dive

Each muffin serves as a hearty source of energy, with a macro breakdown of carbohydrates from the apples and flour, proteins from the walnuts, and fats from the oil. The apples also contribute essential vitamins.

Micronutrient analysis indicates a fair amount of vitamin A and C, as well as dietary fiber, aiding digestion and contributing to overall health. The muffins can serve as a snack option that aligns well with a balanced diet.

If you’re mindful of your portions, each muffin can easily fit into a weight management plan without straying away from indulgence. Enjoying it alongside a healthy beverage can further enhance its nutritional completeness.

Dietary Adaptations

For a gluten-free option, replace all-purpose flour with a 1:1 gluten-free substitute, ensuring all other ingredients are certified gluten-free.

Dairy-free recipes can use plant-based milk and a dairy-free alternative for caramel to accommodate lactose intolerance.

If needed, vegan substitutions can replace eggs with flax eggs or chia seeds, allowing the muffins to retain their texture and moisture.

For dietary considerations such as low-carb or keto, substitute flour with almond flour and adjust sugar content accordingly using sugar substitutes.

Each of these adaptations allows for flexible consumption without compromising on taste or texture.

Troubleshooting Guide

If you find your muffins are too dense, consider checking your baking time and ensuring ingredients are not overmixed.

A lack of flavor often stems from low-quality carrots or insufficient spices; always choose fresh produce for best results.

Temperature issues may arise if your oven isn’t properly preheated. Using an oven thermometer can help ensure accuracy.

If you encounter ingredient substitutions, make sure to match the moisture content—too dry can lead to crumbly muffins, while too moist can produce soggy results.

Timing concerns can be tricky; set timers to avoid overbaking or underbaking based on muffin size. Practice makes perfect when adjusting for various batches.

Recipe Success Stories

Our readers have shared heartwarming stories about their favorite caramel apple muffins. Many have enjoyed baking them with family during the fall season, creating cherished memories around the kitchen table.

Several have noted how successful the recipe is for school bake sales, praising its flavor and moist texture—always a hit among kids and parents alike.

Kitchen tips shared by readers include using various types of apples, which have resulted in delightful surprises regarding flavor combinations.

Numerous community members have shared their adaptation stories, showcasing how small changes to the recipe can lead to tailored results specific to their families’ tastes.

Photography tips also come from enthusiastic bakers who love the presentation of these muffins, often taking candid shots for social media to share their success.

Frequently Asked Questions

Can I freeze caramel apple muffins?

Yes, you can freeze the muffins! Just wrap them in plastic wrap and store them in an airtight container. They can last for up to three months in the freezer. When you’re ready to enjoy them, simply thaw them at room temperature or reheat them in the microwave.

What type of apples are best for this recipe?

For the best flavor, choose firm varieties like Granny Smith, Honeycrisp, or Fuji apples. They hold up well in baking and provide a nice tartness that balances the sweetness of the caramel.

How do I prevent my muffins from sticking to the tin?

To prevent sticking, make sure to thoroughly grease your muffin tin or use muffin liners. Silicone liners are particularly helpful for easy removal and less cleanup.

Can I use a different nut?

Absolutely! If you have allergies or prefer another flavor, feel free to substitute walnuts with pecans, almonds, or even sunflower seeds for a delightful crunch.

What’s the best way to store leftover muffins?

Store your leftover muffins in an airtight container at room temperature for up to three days. For longer storage, refrigerate or freeze, wrapping them well to maintain freshness.

Can I make these muffins vegan?

Yes, you can easily adapt this recipe to be vegan by substituting eggs with flax eggs (1 tablespoon of flaxseed meal mixed with 2.5 tablespoons of water per egg) and using plant-based milk and dairy-free caramel.

How can I make these muffins healthier?

To make them healthier, consider reducing the sugar, using whole wheat flour, or substituting half the oil with unsweetened applesauce. Adding chia seeds or oatmeal can also enhance their nutritional profile.

Can I double this recipe?

Yes, you can double the recipe! Just ensure that you have adequate mixing space and multiple muffin tins as needed. Keep an eye on baking time, as larger batches may require a slight increase.

Is it necessary to add caramel sauce?

While caramel sauce adds a delightful sweetness and visual appeal, it’s not mandatory. You can enjoy the muffins plain or topped with a dusting of powdered sugar for a less sweet alternative.

How do I prevent overbaking?

To prevent overbaking, check your muffins a few minutes before the recommended bake time by inserting a toothpick. If it comes out clean, they’re done!

Additional Resources

For more delicious recipes similar to caramel apple muffins, check out our other seasonal treats such as pumpkin spice muffins or cinnamon roll cupcakes. We also provide technique guides on baking fundamentals that can elevate your home cooking.

Explore ingredient information to learn the various apples available and how they impact flavor, plus equipment recommendations for the best kitchen tools.

If you’re looking for seasonal variations, keep an eye out for recipes that utilize fresh fruits and spices as the seasons change.

Join the Conversation

We invite you to share your thoughts and any modifications you’ve made to the caramel apple muffins recipe! Connect with us on social media by sharing your photos and tagging us—we love seeing your baking triumphs!

Leave us a review to share your experience so we can continue improving our community recipes.

If you’ve made variations or have favorite pairings that work well, we’d love to hear those ideas, too. Engaging in this community strengthens our love for cooking and exploring new flavors together.

The Recipe

Caramel Apple Muffins

Serves: 12 muffins

Prep Time: 15 mins

Cook Time: 20 mins

Total Time: 35 mins

Kitchen Equipment Needed

  • Muffin tin
  • Mixing bowls
  • Whisk
  • Spatula
  • Measuring cups and spoons

Ingredients

  • 1 1/2 cups all-purpose flour
  • 1 cup granulated sugar
  • 2 teaspoons baking powder
  • 1/2 teaspoon salt
  • 1 teaspoon cinnamon
  • 1/2 cup unsalted butter, melted
  • 1/2 cup milk
  • 1 large egg
  • 1 cup chopped apples (about 2 medium apples)
  • 1/2 cup chopped walnuts
  • Caramel sauce for drizzling

Directions

  1. Preheat the oven to 350°F (175°C) and grease the muffin tin or line with muffin liners.
  2. In a large bowl, whisk together the flour, sugar, baking powder, salt, and cinnamon.
  3. In a separate bowl, mix the melted butter, milk, and egg until well combined.
  4. Pour the wet ingredients into the dry ingredients and stir until just combined.
  5. Gently fold in the chopped apples and walnuts.
  6. Scoop the batter into the prepared muffin tin, filling each cup about 2/3 full.
  7. Bake for 20-25 minutes, or until a toothpick inserted in the center comes out clean.
  8. Allow to cool in the pan for 5 minutes, then transfer to a wire rack to cool completely.
  9. Drizzle caramel sauce over the muffins just before serving.

Recipe Notes

  • Store leftovers in an airtight container for up to three days at room temperature.
  • Substitute walnuts with other nuts or omit them for nut-free muffins.
  • For a dairy-free recipe, replace butter with coconut oil and use plant-based milk.

Indulge in Decadent German Chocolate Pecan Pound Cake Bliss

Decadent German Chocolate Pecan Pound Cake: A Sweet Indulgence for Every Occasion

⚖️
Difficulty
Medium

⏲️
Prep Time
25 mins

🕒
Cook Time
60 mins

⏱️
Total Time
85 mins

🍽️
Servings
12 slices

Are you ready to indulge in a dessert that embodies rich flavors and delightful textures? This Decadent German Chocolate Pecan Pound Cake is a true celebration of sweet culinary art, combining the deep, nutty flavors of German chocolate with crunchy pecans to create a treat that will captivate your taste buds. Every bite offers a blend of chocolatey sweetness and buttery richness that makes it perfect for gatherings or simply as a delightful afternoon treat. You’ll find that this cake doesn’t just satisfy your sweet tooth but also provides a luxurious experience that you won’t forget anytime soon!

This irresistible pound cake, with its moist and dense crumb, strikes the perfect balance between rich cocoa flavors and the crunch of toasted pecans. The deeply aromatic scent of freshly baked chocolate envelops your kitchen, enhancing the atmosphere with warmth and inviting memories of family gatherings. Whether enjoyed with a cup of coffee or served as a stunning centerpiece for an occasion, this cake is sure to win hearts and palates alike.

Quick Recipe Highlights

  • Flavor Profile: A harmonious mix of sweet chocolate, toasted pecans, and a touch of vanilla.
  • Texture: Moist and dense with a rich crumb, complemented by the crunch of pecans.
  • Aroma: The inviting scent of chocolate and butter fills the air as it bakes.
  • Visual Appeal: Beautifully garnished with chocolate curls and toasted pecans, it’s a sight to behold.
  • Skill Level Needed: While labeled as medium difficulty, it is achievable for novice bakers willing to follow instructions.
  • Special Equipment: Standard baking equipment plus a good quality bundt pan for the best result.

Recipe Overview

  • Difficulty Level: This recipe is considered medium due to the need for proper mixing techniques and baking times to achieve the desired texture.
  • Category: This cake fits perfectly as a dessert that can stand out at any celebration, from birthdays to holiday gatherings.
  • Cuisine: Rooted in German traditions but adapted by American bakers, it showcases the love for chocolate and nuts in baking.
  • Cost: With ingredients like German chocolate and pecans, the approximate cost for this recipe is moderate, yet worth every penny for a special treat.
  • Season: This cake shines year-round, but it feels particularly fitting during festive seasons when chocolate desserts are in high demand.
  • Occasion: Ideal for family celebrations, office parties, or as a comforting dessert at home to share with loved ones.

Why You’ll Love This Recipe

This Decadent German Chocolate Pecan Pound Cake is designed to please both the palate and the eye. The interplay of textures, with the velvety softness of the cake complemented by the crunchy pecans, creates a delightful experience with every bite. The rich chocolate flavor, characteristic of German chocolate, invites a touch of indulgence, making it a standout dessert for any occasion. Each slice serves as a reminder of the joy found in baking and sharing delicious treats with those you care about.

Convenience is another reason to love this recipe. It requires standard kitchen tools and ingredients that can easily be found at your local grocery store. The preparation is straightforward, making it a fantastic choice for both novice and seasoned bakers. Additionally, the cake stays fresh for days when stored properly, allowing you to enjoy it over time.

From a nutritional perspective, this cake features quality chocolate and pecans, which provide beneficial nutrients, including healthy fats, antioxidants, and minerals. While indulgent, it can be a part of a balanced diet when enjoyed in moderation, allowing you to savor the sweetness without guilt.

Social gatherings are made sweeter with this cake at the center. It sparks conversations, brings smiles, and invites nostalgia as people share memories connected to chocolate desserts. Whether you are hosting a birthday party or a casual get-together, this cake is a showstopper that enhances the overall atmosphere.

Cost-effectiveness is evident since this recipe yields multiple servings, making it a great value. Preparing a homemade pound cake is often more economical compared to purchasing elaborate desserts from bakeries. Plus, you’ll have the satisfaction of creating a dessert that is both delicious and memorable.

Historical Background and Cultural Significance

The origins of German chocolate cake can be traced back to a recipe developed by a British expat named Samuel German in 1852. His dark-baking chocolate, known as “Baker’s German’s Sweet Chocolate,” laid the groundwork for what would evolve into the German chocolate cake we know today. While the original recipe was intended for a layered cake, American bakers eventually adapted it into various forms, including the timeless pound cake.

Culturally, German chocolate cake holds a special place in American dessert traditions, especially in the Southern states. It has been a beloved treat at family gatherings and celebrations for generations. The combination of chocolate and pecans echoes the rich agricultural heritage of the South where both ingredients thrive. It symbolizes comfort and indulgence, often evoking feelings of nostalgia among those who grew up enjoying it.

Over the years, the recipe has transformed, giving rise to numerous interpretations. From elaborate layer cakes to simpler pound cakes, bakers have embraced creativity while respecting the origins of German chocolate. Each variation offers a unique taste while paying homage to the original concept of this iconic dessert.

Regional variations can be found, showcasing local ingredients and baking traditions. For instance, some recipes incorporate coconut, adding an additional layer of texture and flavor. Others might replace pecans with local nuts, making it a delightful reflection of the community it originates from.

Ingredient Deep Dive

German Chocolate: This unique chocolate is sweeter than standard dark chocolate, offering distinct flavors derived from the beans used. It has a rich history that dates back to 19th century America and is known for adding moisture and softness to baked goods. When selecting German chocolate, aim for high-quality brands for the best flavor. Store it in a cool dry place, and consider using it in other baked goods for a delicious twist.

Pecans: Pecans have long been celebrated in Southern cuisine and stand out not only for their flavor but also for their nutritional profile, which includes healthy fats, fiber, and essential vitamins. When choosing pecans, ensure they are fresh and ideally, lightly toasted to enhance their nutty taste. Storing them in airtight containers in a cool environment can prolong their freshness, and they can easily be swapped with other nuts if you’re looking for variety.

Common Mistakes to Avoid

  • Overmixing the batter can lead to a dense texture; mix just until combined.
  • Not properly measuring ingredients may alter the cake’s overall balance; use a kitchen scale for accuracy.
  • Skipping the step of greasing and flouring the pan can result in sticking; take this step seriously.
  • Underbaking or overbaking can affect texture; ensure you do the toothpick test to confirm doneness.
  • Not allowing the cake to cool before removing it from the pan can cause breakage; patience is key.
  • Using room temperature ingredients improperly can lead to an uneven batter; always follow temperature recommendations.
  • Neglecting to toast the pecans may result in a lack of depth in flavor; toasting enhances their nutty essence.
  • Inconsistent oven temperatures may skew baking time; use an oven thermometer to maintain correct baking conditions.
  • Not following the recipe step-by-step can lead to unexpected results; adhere to the method for best outcomes.
  • Using old baking soda or powder may compromise the rise; always check the freshness of your leavening agents.

Essential Techniques

Proper Creaming of Butter and Sugar: This technique is critical for achieving the right texture. Begin with room temperature butter and sugar and cream them together until light and fluffy. This process incorporates air, which helps to create a soft and tender cake. Avoid overcreaming, as it can lead to too much air incorporation, resulting in collapse during baking.

Layering Ingredients: When adding dry ingredients to the wet mixture, do so gradually. This method allows for uniform incorporation and minimizes clumping. Begin by alternating between flour and liquid additions, starting and ending with flour. Mixing gently after each addition promotes a tender crumb without overdeveloping gluten.

Pro Tips for Perfect Decadent German Chocolate Pecan Pound Cake

1. **Always Preheat Your Oven:** Make sure your oven is preheated to the proper temperature to ensure even baking throughout.
2. **Use Quality Ingredients:** Invest in high-quality chocolate and fresh pecans for a richer flavor in your cake.
3. **Opt for Room Temperature Ingredients:** Allow butter, eggs, and milk to come to room temperature to achieve better emulsion and texture.
4. **Do Not Rush Cooling:** Let the cake cool completely in the pan before inverting; this helps preserve its shape.
5. **Experiment with Flavors:** Feel free to add a dash of espresso powder to intensify the chocolate flavor in the cake.
6. **Try Different Nuts:** While pecans create a delightful texture, consider using walnuts or hazelnuts for a different taste experience.
7. **Add a Glaze:** Drizzle the cooled cake with a chocolate or caramel glaze for an extra layer of sweetness.
8. **Garnish Thoughtfully:** Use shaved chocolate or additional toasted nuts to elevate presentation and texture.

Variations and Adaptations

If you’re looking to switch things up, consider adding seasonal flavors such as fresh citrus zest for a light, bright contrast in the rich cake. You can also adapt the recipe to include different nuts or even dried fruits like cherries or cranberries for a unique twist. For vegan adaptations, substitute the eggs with flax eggs and use plant-based butter and milk for a delicious dairy-free version.

For texture modifications, try adding a layer of cream cheese frosting between the layers if you choose to make a layered version of this cake for added creaminess. The overall presentation can also be enhanced with fresh fruit arrangements or edible flowers, making it look as delightful as it tastes.

Serving and Presentation Guide

Plating your Decadent German Chocolate Pecan Pound Cake can be as simple or elaborate as you wish. For a rustic look, serve it directly from the bundt pan with a light dusting of powdered sugar. For a more elegant feel, slice the cake on a decorative platter and garnish with fresh berries or a chocolate ganache drizzle. To enhance visual appeal, consider adding candied pecans around the base or top of the cake.

Temperature plays a crucial role in enjoying your cake; serve slightly warm or at room temperature for optimal flavor release. Portioning can be done with a serrated knife for clean, even slices, ensuring guests receive equal servings of this indulgent treat.

Wine and Beverage Pairing

When it comes to pairing beverages with this decadent dessert, a rich red wine like Cabernet Sauvignon complements the chocolate flavors beautifully. Alternatively, a sweet dessert wine such as Port can amplify the sweetness, making it a fitting choice for special occasions.

For non-alcoholic options, a robust coffee or creamy chai tea can enhance the flavors of the cake. If choosing to serve with tea, opt for a black tea with hints of spice to balance the richness of the chocolate.

Storage and Shelf Life

To store your Decadent German Chocolate Pecan Pound Cake, wrap it tightly in plastic wrap or aluminum foil to keep it fresh for up to a week at room temperature. If you need to store it longer, consider freezing the cake; wrapped securely, it can last up to three months in the freezer.

For thawing, simply remove it from the freezer and let it sit at room temperature for several hours. Be mindful of signs of spoilage, such as off smells or visible mold, which indicate that it’s best to discard rather than consume.

Make Ahead Strategies

If entertaining, consider baking the cake a day or two in advance. It stores well, and some find that the flavors deepen over time. You can prepare the cake, let it cool completely, and then wrap it tightly in plastic wrap to keep it fresh until the day of serving.

When baking in advance, it’s helpful to keep frosting or ganache separate until just before serving to maintain texture. Always revisit the cake before serving to check if extra garnishes or accompaniments are desired.

Scaling Instructions

Scaling this Decadent German Chocolate Pecan Pound Cake is straightforward. If halving the recipe, a smaller bundt pan may be required, and the baking time will likely decrease. Conversely, if you decide to double or triple the recipe, ensure that you have the correct size of baking pans to accommodate the batter.

Watch the baking time closely and perform a toothpick test to ensure that the cake is baked through without being dry. Adjust storage accordingly if planning to make larger quantities as they may need more space in your refrigerator or freezer.

Nutritional Deep Dive

Examine the macros of this Decadent German Chocolate Pecan Pound Cake to help manage portion sizes effectively. A single slice offers a satisfying balance of carbohydrates from the sugar and flour base, with healthy fats coming from the pecans and butter.

In terms of micronutrients, this cake provides beneficial vitamins and minerals, including magnesium, phosphorus, and antioxidants from the cocoa and nuts. When enjoying this treat, consider its caloric content versus nutritional benefits, indulging in moderation for an enjoyable experience.

Dietary Adaptations

There are several adaptations available for this recipe to cater to different dietary needs. For a gluten-free option, substitute all-purpose flour with a gluten-free blend, ensuring other ingredients are also free from gluten.

For a vegan twist, replace eggs with flaxseed meal or commercial egg replacers and opt for dairy-free alternatives for butter and milk. Low-carb lifestyles may benefit from using almond flour and erythritol instead of traditional sugars. Meanwhile, those on a paleo diet can enjoy similar adaptations with natural sweeteners and nut-based flours.

Troubleshooting Guide

If your cake comes out dense, it may be due to overmixing or incorrect ingredient temperatures. Ensure that you follow the creaming process carefully and use room temp ingredients for optimal texture. If your cake is too dry, check your baking time; the toothpick test is key to ensuring perfection.

Should you find an uneven rise, consider the placement of the cake in the oven; it should not be too close to the heating elements. For flavor imbalances, try adding a pinch of sea salt or additional vanilla to enhance the cake’s overall profile.

Recipe Success Stories

Our readers have shared glowing feedback about their experiences making this Decadent German Chocolate Pecan Pound Cake. Community members have noted the ease of following the recipe, often remarking on the cake’s perfect balance of sweetness and richness that makes it a guest favorite.

Variations have come into play, with some readers incorporating their favorite ingredients like coconut or caramel, creating unique adaptations that remain true to the original concept. Photography has also been a highlight, with many showcasing their beautifully decorated cakes on social media, inspiring others to bake.

Frequently Asked Questions

Can I use dark chocolate instead of German chocolate?

While dark chocolate can be substituted, it will change the overall sweetness and flavor profile. German chocolate’s unique qualities add a sweetness that complements the cake well.

What is the best way to store leftovers?

Wrap the cake tightly in plastic wrap or store it in an airtight container to keep it fresh. It can be stored at room temperature or in the refrigerator for several days.

Can this cake be frozen?

Yes, this cake freezes well. Wrap it securely in plastic wrap and aluminum foil. It can be frozen for up to three months.

How do I enhance the chocolate flavor?

Add a teaspoon of instant espresso powder to the batter for an enriched chocolate flavor without making the cake taste like coffee.

Is it necessary to toast the pecans?

Toasting pecans enhances their flavor and adds a delightful crunch to the cake, making it a recommended step.

What can be used in place of eggs for a vegan version?

For each egg, you can use one tablespoon of flaxseed meal mixed with three tablespoons of water as a substitute for a vegan cake.

Can I make this cake as a layered cake?

Absolutely! You can bake the batter in multiple round pans to create layers and frost it with your choice of frosting.

What do I do if my cake sinks in the middle?

A sinking cake often results from underbaking or overmixing. Ensure the cake is fully baked before removal and avoid excessive mixing after adding dry ingredients.

Can I add chocolate chips to the batter?

Yes! Adding chocolate chips can enhance the chocolate flavor and provide delightful bursts of chocolate in every slice.

What’s the ideal temperature to serve the cake?

This cake is best served at room temperature, which allows the flavors to fully develop and the texture to shine.

Additional Resources

If you’re inspired by this Decadent German Chocolate Pecan Pound Cake, consider exploring related recipes like classic chocolate cake, pecan pie, or even nut-filled brownies. Deepen your baking knowledge with technique guides on creaming butter or mastering oil-based cakes.

For more insight, look into ingredient specifics such as a deep dive on types of chocolate or the health benefits of various nuts. Equipment recommendations can help refine your baking tools for future successes, making your baking journey even more rewarding.

Join the Conversation

We love hearing your thoughts on this Decadent German Chocolate Pecan Pound Cake! Share your own experiences, suggest variations, and engage with fellow bakers on our social media platforms. Don’t forget to tag us in your photos showcasing your creations. Your feedback and suggestions help build a community of enthusiastic bakers eager to share their culinary adventures.

The Recipe

Decadent German Chocolate Pecan Pound Cake

Serves: 12 slices

Prep Time: 25 mins

Cook Time: 60 mins

Total Time: 85 mins

Kitchen Equipment Needed

  • Bundt pan
  • Mixing bowls
  • Electric mixer
  • Measuring cups and spoons
  • Rubber spatula
  • Cooling rack

Ingredients

  • 2 cups all-purpose flour
  • 1 teaspoon baking powder
  • 1/2 teaspoon baking soda
  • 1/4 teaspoon salt
  • 1 cup unsalted butter, softened
  • 2 cups granulated sugar
  • 4 large eggs
  • 1 teaspoon vanilla extract
  • 1 cup German chocolate, melted
  • 1 cup pecans, chopped and toasted
  • 1/2 cup buttermilk

Directions

  1. Preheat your oven to 350°F (175°C). Grease and flour a bundt pan.
  2. In a medium bowl, whisk together flour, baking powder, baking soda, and salt; set aside.
  3. In a large mixing bowl, cream together softened butter and sugar until light and fluffy.
  4. Add eggs one at a time, mixing well after each addition. Stir in vanilla and melted chocolate.
  5. Gradually add dry ingredients to the wet mixture, alternating with buttermilk; stir in pecans.
  6. Pour the batter into the prepared bundt pan and smooth the top.
  7. Bake in the preheated oven for 60-65 minutes, or until a toothpick inserted comes out clean.
  8. Allow to cool in the pan for 10 minutes, then invert onto a wire rack to cool completely.

Recipe Notes

  • For an extra treat, drizzle chocolate ganache over the cooled cake.
  • This cake can be made ahead and freezes well for future enjoyment.
  • Feel free to substitute walnuts for pecans if desired.

Deliciously Gooey Pecan Pie Cookies: A Sweet Twist on Tradition

Gooey Pecan Pie Cookies Recipe: A Sweet Treat for Any Occasion!

⚖️
Difficulty
Medium

⏲️
Prep Time
15 mins

🕒
Cook Time
20 mins

⏱️
Total Time
35 mins

🍽️
Servings
24 cookies

Pecan Pie Cookies are a delightful twist on the classic dessert, merging the rich, gooey filling of traditional pecan pie with the convenience of bite-sized cookies. These treats are perfect for holiday gatherings or anytime you’re craving something sweet and comforting. Imagine sinking your teeth into a soft, buttery cookie that oozes with a luscious pecan pie filling. The combination of sweet caramel notes from the filling and the nutty crunch of pecans creates an indulgent experience that will leave everyone reaching for more.

Not only are these Gooey Pecan Pie Cookies simple to make, but they also offer a wonderful flavor profile that highlights the warmth of cinnamon and nutmeg, paired beautifully with toasty pecans. The smell of baking cookies will waft through your kitchen, inviting family and friends to indulge in these tasty bites. Their beautiful golden color, glistening with syrupy sweet goodness, makes them a stunning addition to any dessert platter.

Quick Recipe Highlights

  • Flavor Profile: These cookies combine sweet and savory elements, creating a delightful harmony of caramel, nutty pecans, and a hint of warmth from spices.
  • Texture: Each bite offers a soft cookie base with a gooey and chewy pecan filling, providing a satisfying contrast that is utterly delicious.
  • Aroma: The inviting scent of baked dough mixed with warm pecan and caramel notes will fill your home, making it hard to resist.
  • Visual Appeal: With their golden-brown edges and glossy pecan topping, these cookies are as pleasing to the eyes as they are to the palate.
  • Skill Level Needed: These cookies are medium-level in difficulty, requiring basic baking skills but rewarding you with impressive results.
  • Special Equipment: You will need standard baking tools such as a mixing bowl, baking sheets, and measuring cups for best results.

Recipe Overview

  • Difficulty Level: The medium difficulty arises from preparing the cookie dough and filling, but with clear instructions, anyone can master these treats.
  • Category: These cookies make a great dessert and are suitable for both casual snacks and formal events.
  • Cuisine: Rooted in Southern cuisine, pecan pie has been an American tradition, and this recipe puts a fun twist on its classic appeal.
  • Cost: This recipe uses budget-friendly ingredients, making it cost-effective for families and gatherings.
  • Season: Ideal for fall and winter, these cookies are perfect during Thanksgiving and Christmas when pecans are in season and holiday baking is in full swing.
  • Occasion: Perfect for holiday parties, potlucks, or as a sweet gift to impress your friends and family.

Why You’ll Love This Recipe

Cooking these Gooey Pecan Pie Cookies allows you to enjoy a nostalgic dessert in an easy-to-manage format. Each bite highlights the creamy gooeyness of the filling along with the crunch of the pecans, ensuring that every mouthful is packed with flavor. They’re not overly sweet and strike a perfect balance, making them irresistible and a go-to treat for anyone who loves pecan pie.

The convenience of these cookies can’t be overlooked. They can be prepared in under an hour and can easily be made ahead of time for parties or gatherings. Once made, these cookies can be stored away, allowing for easy snacking or dessert offerings without much fuss. This makes them a fantastic choice for busy bakers who still want to impress.

Nutritionally, pecans are a source of healthy fats and are loaded with antioxidants, which makes these cookies not just a treat but also a guilt-free option when consumed in moderation. You get to enjoy a delightful dessert without compromising on health, as the natural ingredients bring a wholesome aspect to this sweet delight.

Socially, these cookies are bound to be a hit at any gathering. Whether you serve them at a family reunion or share them with friends over coffee, they are the kind of treat that sparks conversation and brings joy. The combination of flavor, aroma, and presentation creates a joyous experience that everyone will appreciate.

Lastly, their cost-effectiveness makes these cookies accessible to everyone. Most of the ingredients are pantry staples, permitting anyone to whip up a batch regardless of their cooking budget. This accessibility makes them a beloved recipe that can be adapted to various occasions without breaking the bank.

Historical Background and Cultural Significance

Pecan pie’s origins can be traced back to early Native American tribes, who utilized the pecan nut in their diets. The beloved nut became a staple in Southern cooking, evolving into the iconic pecan pie that many cherish today. The Gooey Pecan Pie Cookies are a modern adaptation that reflects today’s busy lifestyles, allowing fans of pecan pie to enjoy its taste without the lengthy preparation that traditional pies require.

Culturally, pecans are more than just a delicious nut; they’re symbolic in Southern heritage. Pecan trees were first cultivated in the U.S. in the 18th century, and the tree has become synonymous with Southern hospitality. Serving pecan pie and now, cookies, is a way to express love and generosity, tying them closely to family gatherings and celebrations.

As recipes have evolved over the years, so too has the pecan pie. From local variations to twists on traditional recipes, each region has put its flair into creating pies, and now cookies. The transition from pie slices to bite-sized cookies has made this dessert much more shareable and approachable.

Various regional adaptations of the pecan pie influenced the creation of these cookies. Some variations incorporate chocolate chips or bourbon, which adds a dynamic twist to the deep-rooted flavors that many associate with pecan desserts, demonstrating the flexibility of this beloved culinary tradition.

Ingredient Deep Dive

Pecans

Pecans are a quintessential ingredient in this recipe, bringing a nutty flavor that perfectly complements the sweetness of the filling. Historically, pecans have been celebrated in Southern cuisine and feature prominently in various desserts. Nutritionally, they offer healthy fats, proteins, and a variety of vitamins and minerals, making them a powerhouse ingredient.

When selecting pecans, look for ones that are firm and plump with a rich aroma. Store them in a cool, dry place, or in the refrigerator for extended freshness. A great substitute for pecans in this recipe could be walnuts or hazelnuts, although they will impart a different flavor profile.

Butter

Butter provides the fat content necessary for tender cookies, imparting a rich flavor. Its significance in American baking cannot be overstated, as it binds the cookie dough and enhances overall texture. Using high-quality unsalted butter ensures a balanced flavor without excess sodium, which is crucial for this recipe.

To select butter, freshness is key. Choose blocks instead of pre-packaged options when available, and store them in the refrigerator or freezer for longer shelf life. Margarine can serve as a suitable substitute if necessary, although it may alter the taste slightly.

Brown Sugar

Brown sugar is instrumental in achieving the gooey, caramel-like texture and sweetness of the cookie filling. The molasses content in brown sugar adds depth and richness to the flavor, making these cookies incredibly appealing. Its history is tied closely to American sweets, evolving from cane sugar production.

When using brown sugar, make sure it is packed firmly in your measuring cup for accurate results. Store it in an airtight container to prevent it from hardening. If you need a substitute, a mix of white sugar and molasses can replicate brown sugar fairly closely.

Flour

Flour is the backbone of any cookie, providing structure and stability. All-purpose flour is ideal for this recipe as it absorbs moisture and creates a desirable crumb. Its popularity in baking stems from its versatility across various recipes and baking traditions.

Look for flour that is finely milled for the best texture, and store it in a cool, dry place to prevent spoilage. If gluten is a concern for you, consider using a gluten-free blend designed for cookie recipes which will allow you to enjoy these delicious treats without compromise.

Common Mistakes to Avoid

  • Overmixing the Dough: When you overmix cookie dough, you risk creating tough cookies instead of a tender crumb. Mix just until the ingredients are combined to avoid this issue.
  • Not Preheating the Oven: Skipping the preheating step can cause cookies to bake unevenly. Always ensure your oven is at the correct temperature before baking your cookies for best results.
  • Using Cold Ingredients: Using cold butter or eggs can affect the mixing process and the integrity of the final cookie. Make sure your ingredients are at room temperature for optimal incorporation.
  • Improperly Measuring Ingredients: Accurate measuring is crucial in baking. Use the spoon-and-level method for flour and always use a kitchen scale for precision when required.
  • Neglecting to Chill the Dough: If your cookie dough is too warm when baked, it can spread excessively. Chill the dough in the refrigerator for at least 30 minutes before baking.
  • Not Allowing Cookies to Cool: Letting cookies cool on the baking sheet can lead to a soggy bottom. Transfer cookies to a wire rack for uniform cooling to maintain their texture.
  • Using Old Nuts: Stale nuts can ruin the overall flavor of your cookies. Always check the freshness of your pecans before using them in this recipe.
  • Skipping the Pecan Topping: The pecan topping is not just for decoration; it adds essential texture and flavor to the cookies. Don’t skip this step!
  • Underbaking: For optimal gooeyness, make sure to bake the cookies until they are just golden around the edges. Undercooked cookies will result in a doughy center that lacks proper texture.
  • Ignoring Home Environment: Environmental factors like humidity can affect cookie dough consistency. Be ready to make minor adjustments based on how the dough feels during preparation.

Essential Techniques

Proper Mixing Techniques

It’s important to mix cookie dough correctly to achieve the right texture. Using an electric mixer can help fully incorporate ingredients without overmixing. Start at a low speed to prevent flour from flying out and gradually increase to blend until just combined.

Visual cues for success include a smooth, cohesive dough that doesn’t stick to the sides of the bowl. If the dough appears crumbly, a little milk can bring it together, but be careful not to make it too wet.

Chilling the Dough

Chilling cookie dough is crucial for the final result. It helps solidify the fats, leading to a thicker, chewier cookie that holds its shape during baking. Wrap the dough in plastic wrap and refrigerate for at least 30 minutes.

You’ll know the dough is ready when it feels firm to the touch. Chilling for too long can make it difficult to work with, so don’t let it sit for longer than recommended.

Cooling the Cookies

Allowing cookies to cool properly ensures they maintain their structure. After baking, let them set on the cookie sheet for a few minutes before transferring them to a cooling rack. This step allows the residual heat to finish cooking the cookies without overbaking.

The perfect cooling cue is to see the edges firm up while the centers remain slightly soft; this ensures gooeyness without being raw.

Pro Tips for Perfect Gooey Pecan Pie Cookies

1. Use fresh pecans for enhanced flavor; lightly toasting them can amplify their nutty richness even more.
2. Consider adding a pinch of sea salt on top after baking for a delightful sweet-salty contrast.
3. For an extra indulgent treat, drizzle melted chocolate over the cooled cookies for a decadent finish.
4. Store leftover cookies in an airtight container at room temperature for up to a week for the best freshness.
5. Experiment with different spices like espresso powder or vanilla extract to give your filling an added depth of flavor.
6. Try substituting some of the flour with oat flour for a unique flavor and added texture.
7. Don’t skip the chill time; it truly makes a difference in the final texture of your cookies.
8. Make a double batch and freeze half the dough for a quick treat anytime!

Variations and Adaptations

For a regional variation, try incorporating maple syrup in place of some brown sugar for a hint of subtle warmth and sweetness. Additionally, during the spring and summer, introducing citrus zest, like lemon or orange, can brighten the flavors and provide a refreshing twist.

Seasonal adaptations can also be made by adding cranberries or white chocolate chips for a festive touch during the holidays. For those on a diet, consider substituting brown sugar with coconut sugar for a lower glycemic index alternative without sacrificing sweetness.

Texturally, if you prefer a crunchier cookie, add shredded coconut or replace half of the pecans with crispy rice cereal for a satisfying bite. To enhance presentation, consider serving cookies with dollops of whipped cream or vanilla ice cream alongside.

Serving and Presentation Guide

Presentation is key when serving your Gooey Pecan Pie Cookies. Arrange cookies on a tiered serving platter or cake stand to create an impressive display. For a personal touch, sprinkle powdered sugar over the top for a beautiful dusting.

Garnishing with chocolate shavings, crushed nuts, or caramel drizzle can elevate the visual appeal and add an extra layer of flavor. For a modern serving suggestion, stack three cookies high and serve them with a scoop of ice cream, turning them into an indulgent dessert.

When considering temperature, these cookies are best served slightly warm, fresh from the oven. However, they are also delightful at room temperature, making them versatile for any gathering. Portion control is essential; consider serving them alongside glasses of milk or coffee for an enjoyable afternoon snack.

Wine and Beverage Pairing

Pair these Gooey Pecan Pie Cookies with dessert wines such as a late-harvest Riesling or a sweet Muscat for a delightful balance. The fruity notes in these wines complement the rich pecan filling beautifully, enhancing your tasting experience.

For non-alcoholic options, consider serving them with freshly brewed coffee or a spiced chai latte that pairs well with the warm spices in the cookies. A cool glass of milk also works wonderfully to bring out residual sweetness.

When serving wine, ensure it is chilled appropriately to enhance flavors, and for coffee, serve hot but not so that it overshadows the delicate taste of the pecan pie cookies.

Storage and Shelf Life

For optimal freshness, store your Gooey Pecan Pie Cookies in an airtight container at room temperature. They can typically last up to a week if kept sealed; however, for peak quality, it’s best to consume them within the first few days.

If you need to store them longer, you can place the cookies in the freezer. Wrap them tightly in plastic wrap, followed by foil, to prevent freezer burn, where they can last up to three months. To thaw, leave them at room temperature or pop them in the microwave for a few seconds.

Signs of spoilage include any visible mold or an off smell. If you notice either, it’s best to discard the cookies. Reheating can breathe new life into older cookies; place them in a preheated oven for a couple of minutes to regain their chewy texture.

Make Ahead Strategies

If you’re planning for a gathering, preparing the cookie dough a day in advance can save time. Simply wrap the dough tightly in plastic wrap and refrigerate. This allows the flavors to meld, creating an even tastier cookie.

Consider baking half the batch and reserving the rest of the dough in the freezer for later use. You can thaw it overnight in the fridge before baking on the same day you plan to enjoy them. This is a great way to have fresh cookies on hand without the extra effort.

When baking ahead, feel free to add a finishing touch of whipped cream or a drizzle of chocolate just before serving for an impressive presentation. Keep in mind that cooking times may differ for chilled or frozen dough and adjust accordingly for perfect results.

Scaling Instructions

If you need to halve the recipe for a smaller gathering, all measurements can be easily adjusted by simply dividing amounts by two. Remember to keep an eye on baking times, as smaller batches may require less time in the oven for perfect results.

For larger gatherings, doubling or even tripling the recipe is straightforward. Just ensure you have sufficient baking sheets and oven space. You may need to bake batches separately if your oven cannot accommodate all trays at once.

Consider the size of your mixing bowl and adjust your technique if scaling considerably. Utilize larger bowls or mixing vessels, and be mindful of how the dough texture may change with larger quantities.

Also, factor in the storage needs for larger batches, ensuring you have adequate containers to keep each batch fresh between uses.

Nutritional Deep Dive

The nutritional profile of Gooey Pecan Pie Cookies includes a balance of macronutrients: carbohydrates from flour and sugars, fats from butter and nuts, and some protein from pecans. Each cookie is a sweet indulgence but can be enjoyed in moderation as part of a balanced diet.

Micronutrient content varies depending on added ingredients, but pecans are rich in vitamin E and minerals such as magnesium, offering heart-health benefits. Each serving contributes to essential nutrient intake while satisfying dessert cravings.

For those monitoring dietary needs, consider the portion size; each cookie, while delicious, should be enjoyed with mindfulness due to its calorie density. Balancing cookies with other healthy options like fruits or nuts can help manage overall calorie consumption.

Dietary Adaptations

Gluten-free adaptations can be made by substituting wheat flour with a 1:1 gluten-free blend, maintaining the desired structure while allowing those with gluten sensitivities to enjoy these cookies.

Dairy-free options can also be achieved by replacing butter with coconut oil or a vegan butter substitute, ensuring everyone in your circle can enjoy the delicious flavors without concern.

For a vegan rendition, use flax eggs instead of regular eggs and follow the dairy substitutions mentioned. Coconut or almond milk can serve as a delightful addition to enhance the texture without compromising flavor.

Keto dieters can swap the brown sugar for erythritol or another suitable sweetener, and use almond flour instead of traditional flour, creating a low-carb version of these cookies while keeping them a tasty treat.

Troubleshooting Guide

If your cookies end up too dry, it could be due to overbaking or using too much flour. Always check your cookies a minute or two before the suggested baking time to prevent this issue.

For an unbalanced flavor, consider adjusting the amount of sugar or spices in your filling; a pinch of salt can often enhance overall flavor if sweetness becomes overpowering.

Temperature inconsistencies in baking can arise from incorrect oven calibration; investing in an oven thermometer can help ensure your oven heats correctly for precision baking.

If your cookies spread excessively during baking, ensure your dough is sufficiently chilled, and avoid overmixing ingredients, which can lead to a loss of structure.

If you find your filled cookies are not gooey enough, consider increasing cooking time slightly while keeping a close eye on them to maintain that desired texture.

Recipe Success Stories

Many bakers have shared their successful twists on the Gooey Pecan Pie Cookies, adding everything from chocolate chips to extra spices, demonstrating the versatility of this delightful recipe.

Community feedback has been overwhelmingly positive, with readers praising the simple instructions and impressive flavor; several have noted how these cookies have become a staple at their family gatherings.

Some readers have encouraged adaptations like substituting maple syrup for brown sugar to create a unique flavor twist, showcasing the recipe’s flexibility.

Photography tips shared by readers indicate that showcasing the gooey center can draw in eager bakers, encouraging more trials in perfecting this beloved recipe.

Overall, the sense of community amongst bakers trying out these recipes contributes to a growing love for sweets that bring nostalgia and joy.

Frequently Asked Questions

1. Can I make these cookies gluten-free?

Yes! You can substitute the all-purpose flour with a gluten-free flour blend. Make sure it is designed for baking to achieve the best results.

2. How should I store leftover cookies?

Store leftover cookies in an airtight container at room temperature. If you need to keep them longer, consider freezing them for up to three months.

3. Can I use different nuts?

Absolutely! While pecans are traditional, walnuts or even hazelnuts can be used as alternatives for a different flavor profile.

4. How do I know when my cookies are done baking?

Your cookies are finished when the edges are golden, but the centers remain slightly soft. They will continue to set as they cool.

5. Can these cookies be made ahead of time?

Yes! You can prepare the dough a day in advance or freeze dough balls for baking fresh cookies whenever you’d like.

6. Do I need to chill the dough?

Chilling the dough is recommended to help maintain shape and ensure the cookies don’t spread too much while baking.

7. What can I substitute for eggs?

You can use flaxseed meal mixed with water as a vegan substitute for eggs. Typically, 1 tablespoon of flaxseed meal mixed with 2.5 tablespoons of water equals one egg.

8. Can I add chocolate to my cookies?

Yes! Adding chocolate chips or chunks can complement the nutty flavor perfectly while adding an indulgent twist to the cookies.

9. How long do these cookies keep their freshness?

These cookies are best enjoyed within the first week for optimum freshness, but they can last much longer if stored properly in an airtight container.

10. Can I make these cookies bite-sized?

Sure! You can adjust the size of the scoops to create smaller cookies. Just be mindful of adjusting the baking time accordingly.

11. What drinks pair well with these cookies?

Dessert wines, coffee, or hot chocolate all pair beautifully with Gooey Pecan Pie Cookies, enhancing their sweet flavor profile.

12. Is it okay to overmix the dough?

Overmixing can lead to tough cookies. Mix the dough only until the ingredients are combined for a tender result.

Additional Resources

For those looking to expand their baking skills, consider checking out additional recipes that highlight pecans, such as traditional pecan pie or pecan pralines, for a full range of pecan-flavored treats.

You may also want to explore technique guides focused on mixing methods, baking temperatures, and ingredient substitutions for more successful baking outcomes.

Learning about ingredient specifics can help you choose the best options for your recipes, allowing you to optimize flavor and nutrition in your baking projects.

Lastly, seasonal variations to your favorites can keep your baking fresh and exciting, especially for those who love to try new takes on classic dishes throughout the year.

Join the Conversation

We invite you to share your experiences and variations with Gooey Pecan Pie Cookies on social media! Use hashtags to connect with fellow bakers and showcase your delicious creations.

Photography plays a big role in sharing food experiences; don’t be shy about posting your cookie pictures! Sharing tips and tricks with the community not only helps others but can also provide inspiration for your next baking project.

Community engagement is key; participate in recipe reviews or discussions to enhance your baking skills and connect with others who enjoy making and sharing sweet treats.

Scroll up to the recipe section and try these delightful cookies today!

The Recipe

Gooey Pecan Pie Cookies

Serves: 24 cookies

Prep Time: 15 mins

Cook Time: 20 mins

Total Time: 35 mins

Kitchen Equipment Needed

  • Baking sheets
  • Mixing bowls
  • Measuring cups and spoons
  • Electric mixer
  • Cooling rack

Ingredients

  • 1 cup unsalted butter, softened
  • 2 cups brown sugar, packed
  • 3 cups all-purpose flour
  • 3 large eggs
  • 2 cups pecans, chopped
  • 1 teaspoon vanilla extract
  • 1/2 teaspoon cinnamon
  • 1/2 teaspoon nutmeg
  • 1/4 teaspoon salt

Directions

  1. Preheat the oven to 350°F (175°C) and line baking sheets with parchment paper.
  2. In a mixing bowl, cream together softened butter and brown sugar until light and fluffy.
  3. Add eggs one at a time, mixing well after each addition, then stir in vanilla extract.
  4. In another bowl, whisk together flour, cinnamon, nutmeg, and salt.
  5. Gradually beat the flour mixture into the butter mixture until just combined.
  6. Fold in chopped pecans until evenly distributed throughout the dough.
  7. Drop dough by tablespoonfuls onto the prepared baking sheets, spacing them about 2 inches apart.
  8. Bake for 15-20 minutes, or until the edges are golden brown and the centers are set.
  9. Remove from the oven and let cookies cool on the sheets for 5 minutes before transferring to a wire rack to cool completely.

Recipe Notes

  • For extra gooey cookies, try adding a bit of corn syrup into the filling mixture.
  • These cookies can also be frozen before baking; just scoop them onto a tray and freeze until solid, then transfer them to a freezer bag.
  • Add chocolate chips for a double treat if you’re looking for something even more indulgent.

Delicious Sopapilla Cheesecake Bars Recipe for Sweet Indulgence

Sopapilla Cheesecake Bars: A Sweet Delight with a Twist

⚖️
Difficulty
Easy

⏲️
Prep Time
15 mins

🕒
Cook Time
30 mins

⏱️
Total Time
45 mins

🍽️
Servings
12 Bars

Sopapilla Cheesecake Bars are a delightful fusion of traditional Mexican flavors and classic cheesecake goodness. This recipe captures the essence of sopapillas—fluffy, sweet pastries—combined with a creamy cheesecake filling. The experience begins with the warm aroma of vanilla and cinnamon wafting through your kitchen, enticing everyone to gather around. The contrast between the buttery, flaky crust and the rich, velvety filling creates a mouthwatering treat that is perfect for any occasion.

Serving these bars warm is recommended, as the gooey filling oozes slightly when cut, revealing its enticing goodness. Each bite offers a sweet symphony, where velvety cream cheese meets a hint of cinnamon and sugar, leaving a deliciously comforting aftertaste that will have your guests coming back for more. These Sopapilla Cheesecake Bars are not just a dessert; they are a slice of happiness, making them a perfect addition to family gatherings, holidays, or simply as a sweet indulgence after dinner.

Quick Recipe Highlights

  • Flavor Profile: A delightful blend of sweet cinnamon and rich cream cheese creates a comforting dessert that feels indulgent yet familiar.
  • Texture: The buttery, flaky crust contrasts beautifully with the creamy center, making each bite a perfect balance of texture.
  • Aroma: Expect warm notes of cinnamon and sugar that fill your kitchen, inviting everyone to enjoy these bars.
  • Visual Appeal: The golden, slightly caramelized top gives way to a creamy filling, making these bars as beautiful as they are delicious.
  • Skill Level Needed: This recipe is easy enough for beginners, requiring minimal skills but yielding impressive results.
  • Special Equipment: Springform pan or baking dish is ideal for creating the perfect layered structure.

Recipe Overview

  • Difficulty Level: This Sopapilla Cheesecake Bars recipe is easy to follow. Even novice bakers can achieve delicious results, making it an accessible choice for anyone looking to sweeten their day.
  • Category: These bars are perfect for dessert, snacks, or even as a delightful breakfast treat, showcasing their versatility.
  • Cuisine: Inspired by Mexican cuisine, these bars blend traditional flavors with classic dessert elements, making them a unique offering.
  • Cost: The ingredients are affordable, making this recipe a budget-friendly choice for gatherings or everyday treats.
  • Season: Enjoy these bars year-round, but they’re particularly delightful during the fall and winter months when warm desserts are especially comforting.
  • Occasion: Great for festive occasions, family gatherings, or even a simple weeknight dessert, these bars are sure to please!

Why You’ll Love This Recipe

Sopapilla Cheesecake Bars bring together the best of both worlds—the comforting flavor of sopapillas and the creaminess of a cheesecake. The taste is incredibly satisfying; the sweetness is perfectly balanced with the hint of cinnamon, creating an irresistible flavor that will enchant your taste buds. The luxurious texture of the cheesecake filling is complemented by the light, airy crust, making each bite an experience worth savoring.

Convenience plays a key role in this recipe. With just a few simple steps, you can prepare a stunning dessert that requires minimal kitchen time. The ability to serve this dish warm or make it ahead of time adds to its appeal, making it an excellent choice for busy hosts. Whether you’re entertaining guests or treating yourself, these bars deliver with flavor without demanding too much effort.

Additionally, the nutritional aspects of this dessert shouldn’t be overlooked. While it is a treat, it includes cream cheese, which offers some protein and calcium. When prepared thoughtfully, within dietary limits, it can be a satisfying indulgence that doesn’t derail a balanced eating plan.

Socially, these bars can be a centerpiece of conversation around the table. Serving them at parties encourages sharing and connecting, as guests marvel at the delightful combination of textures and flavors. Each bite can spark stories and memories, making them a hit at any gathering.

Finally, these Sopapilla Cheesecake Bars are not only delicious but also cost-effective. Using common pantry ingredients, they are affordable to make, allowing you to create an impressive dessert without breaking the bank. This accessibility makes them an appealing choice for anyone looking to satisfy their sweet tooth.

Historical Background and Cultural Significance

Sopapillas have a rich history rooted in traditional Mexican cuisine, where they have long been enjoyed as a sweet treat. Originating from the Spanish “sopapilla,” these pastries were traditionally fried and served with honey. Over time, these delightful pastries made their way into American dessert culture, particularly in the southwestern United States, giving rise to numerous variations, including this cheesecake bar adaptation.

Culturally, sopapillas hold significance as they embody the warmth and hospitality typical of Mexican gatherings. These treats are often served during festive occasions and celebrations, symbolizing abundance and joy. The evolution of the classic sopapilla into a cheesecake bar reflects the adaptability of traditional recipes to modern tastes and preferences, bridging culinary worlds.

As the recipe for Sopapilla Cheesecake Bars has evolved, it has gained immense popularity among dessert lovers. Families have embraced this sweet treat for its unique flavor and texture while keeping the essence of its sopapilla roots intact. This delicious crossover makes it a standout dessert in modern kitchens.

Regionally, variations of sopapillas can include different fillings or toppings, displaying the diversity of flavors found in Mexican cuisine. As communities adapt recipes to suit local ingredients and tastes, Sopapilla Cheesecake Bars exemplify how culinary traditions can evolve while maintaining a connection to their origins.

Ingredient Deep Dive

  • Cream Cheese: A staple in cheesecakes, cream cheese adds richness and depth to Sopapilla Cheesecake Bars. It is on the sweeter side, which balances beautifully with the cinnamon and sugar. Nutritionally, cream cheese provides protein and calcium, making it a satisfying ingredient in desserts. When selecting cream cheese, look for full-fat versions for a creamier texture. For storage, keep it refrigerated and use it before the expiration date; it can also be frozen for longer preservation. If you’re looking for alternatives, Neufchâtel cheese or a dairy-free cream cheese can substitute effectively, but the flavor might slightly differ.
  • Sugar: Sugar is essential for sweetness and adds to the overall flavor profile of the bars. Both granulated sugar and powdered sugar play roles in enhancing taste and finish. Nutritionally, sugar should be consumed in moderation, but it does provide quick energy. When selecting sugar, opt for organic options if possible, as they are less processed. Store sugar in a cool, dry place. Substitutes like honey or maple syrup can alter the flavor profile but can be used to reduce refined sugar intake.
  • Butter: Butter serves as a key component in the crust, giving it a rich flavor and flaky texture. The use of unsalted butter is recommended to better control the overall saltiness in the recipe. Butter also contributes important fat-soluble vitamins, but it’s important to moderate intake due to its saturated fat content. Look for high-quality, grass-fed butter for the best flavor and health benefits. Store it in the refrigerator or freezer, and remember that it can be easily substituted with margarine or a plant-based alternative if needed.
  • Cinnamon: A warm spice that adds depth and complexity to the flavor of Sopapilla Cheesecake Bars, cinnamon is rich in antioxidants and has anti-inflammatory properties. When purchasing cinnamon, choose Ceylon or true cinnamon for superior flavor and health benefits. Store it in a cool, dark place to preserve its freshness. If you’re seeking flavor variations, consider using nutmeg or pumpkin spice as alternatives to the traditional cinnamon flavor profile.
  • Vanilla Extract: The aromatic addition of vanilla elevates the dessert, rounding out the flavor experience. It provides a sweet and warm essence, making it a staple in many dessert recipes. When selecting vanilla extract, opt for pure vanilla rather than imitation for better taste. It can be stored in a pantry but should be kept away from light to maintain its quality. For variations, consider almond extract to impart a unique flavor twist.

Common Mistakes to Avoid

  • Not softening cream cheese: Always allow cream cheese to come to room temperature before mixing. This ensures a smoother texture and avoids lumps in the filling.
  • Overmixing: When combining ingredients, mix just until combined to avoid a tough texture. Overmixing can incorporate too much air, leading to cracks when baked.
  • Skipping flour: Use flour in the crust preparation to create structure and prevent excess greasiness. Not using flour can result in a soggy base.
  • Not preheating the oven: Make sure the oven is preheated to the appropriate temperature. Baking in a too-cold oven can lead to uneven cooking.
  • Cutting too soon: Allow the bars to cool completely before slicing. Slicing while they’re warm can cause the filling to spill out and ruin the presentation.
  • Using too much sugar: While sweetness is key, too much sugar can overpower the other flavors and affect the texture. Measure carefully!
  • Covering while cooling: Avoid covering the bars while they cool, as it can trap steam and make the crust soggy.
  • Not adjusting oven racks: Ensure that your baking pan is in the center of the oven to allow even cooking and browning.
  • Skipping the garnish: A sprinkle of powdered sugar or cinnamon on top adds a lovely finishing touch—don’t skip this simple step for enhanced appeal!
  • Using metal pans without adjustments: If using metal pans, reduce the cooking time slightly, as they conduct heat better than glass or ceramic.

Essential Techniques

Creaming: This technique is crucial for achieving a smooth, fluffy cream cheese filling. Start by beating softened butter and sugar together until light and fluffy. This traps air and creates a lighter texture in your final bars. Be mindful not to overmix, as this can lead to a denser texture. Look for a creamy consistency with no lumps for best results.

Layering: Layering ingredients properly is essential for the structure of Sopapilla Cheesecake Bars. Start by pressing the dough into the bottom of the pan evenly, ensuring the base supports the filling without sinking. Next, spread the cream cheese filling gently to avoid disturbing the crust. Observing these layers will contribute to a beautiful final product.

Baking: Baking at the correct temperature is vital. Ensure your oven is preheated, and use the middle rack to allow even heat distribution. Watch for visual cues; the edges should be golden brown, and the center should be slightly set but still soft for that creamy texture. Overbaking can lead to dry bars, so check a few minutes early!

Cooling: Cooling the bars at room temperature before refrigerating allows the flavors to meld and the texture to stabilize. This prevents condensation that can ruin the crust. Allowing them to cool completely makes slicing easier and keeps the layers intact, so be patient!

Pro Tips for Perfect Sopapilla Cheesecake Bars

1. Use room temperature ingredients: Let your cream cheese, eggs, and butter come to room temperature before mixing. This helps achieve a smoother texture and better consistency in your bars.

2. Don’t overbake: Keep an eye during the last few minutes of baking. The cheesecake should be set but still slightly jiggle in the center for the perfect creamy texture.

3. Incorporate flavor variations: Add lemon zest for a hint of brightness or a dash of espresso powder for a coffee-infused twist.

4. Experiment with toppings: Top with fresh berries, whipped cream, or a drizzle of honey for added flavor and aesthetic appeal.

5. Use quality ingredients: Opt for high-quality cream cheese and butter for a richer taste and creamy texture.

6. Make it in advance: These bars can be prepared a day ahead; they actually taste better after chilling overnight, allowing the flavors to meld.

7. Ensure even slicing: Use a sharp, hot knife for cutting the bars into even pieces, mirroring the bars’ beautiful layered structure.

8. Store properly: Wrap the remaining bars tightly in plastic wrap before refrigerating to maintain freshness and flavor.

Variations and Adaptations

For seasonal variations, consider incorporating pumpkin puree into the cheesecake filling for a fall twist or fresh strawberries in the summer. These fruit additions not only offer vibrant color but also enhance the flavor profile of the bars.

For dietary modifications, consider creating gluten-free crust using almond flour or gluten-free flour mixtures. Substituting dairy-free cream cheese allows for a completely dairy-free dessert option without sacrificing flavor.

If you’re looking to experiment with flavor variations, add a hint of coconut extract or pecans to the crust for an extra layer of deliciousness. Adjusting the sugar levels can help cater to lower-calorie needs while still delivering on taste.

For texture modifications, consider adding a layer of chocolate ganache or a nuts topping to amplify the dessert’s richness. Each of these adaptations can create a unique experience while honoring the core of Sopapilla Cheesecake Bars.

Serving and Presentation Guide

When plating your Sopapilla Cheesecake Bars, ensure that they are beautifully arranged on a serving dish, perhaps garnished with a dusting of powdered sugar and fresh mint leaves for a pop of color. This elevates the visual appeal and entices guests even more.

Garnishing with a drizzle of caramel or chocolate sauce can enhance both flavor and presentation. Consider serving alongside a scoop of vanilla ice cream to complement the sweetness and richness of the bars.

Temperature considerations are also key; serve these bars lukewarm or at room temperature to maximize the creamy texture and flavor. When portioning, aim for uniformity to provide a pleasing aesthetic and ensure everyone gets a fair share of this delicious dessert.

Wine and Beverage Pairing

A light, sweet Riesling or a Moscato makes an excellent pairing with Sopapilla Cheesecake Bars, enhancing their creamy sweetness. Alternatively, a rich coffee, such as a dark roast or espresso, complements the dessert’s flavors beautifully.

If you’re seeking non-alcoholic options, consider a refreshing iced tea with hints of lemon or a cinnamon-infused apple cider that echoes the spices of the bars. These beverage pairings can elevate the overall dining experience and create memorable moments.

Storage and Shelf Life

Store Sopapilla Cheesecake Bars in an airtight container in your refrigerator. They will maintain their best flavor and texture for about 5 days. A layer of plastic wrap can also help to keep them fresher for longer.

If you want to store them for an extended period, freezing is an option. Wrap the bars tightly in plastic wrap followed by aluminum foil, and they can be kept in the freezer for up to 3 months. Thaw them in the refrigerator before serving to maintain the best quality.

Observe signs of spoilage, such as unusual odors or discoloration, which indicate it’s time to dispose of your bars. Additionally, when reheating, do so gently in the microwave or oven to avoid drying them out.

Make Ahead Strategies

You can efficiently prepare Sopapilla Cheesecake Bars in advance by making the crust and filling a day prior. Store each component separately in the refrigerator until you’re ready to assemble and bake.

Between steps, allow any cooled elements to stay covered to maintain freshness, ensuring optimal flavor when you’re ready to combine and bake. Post-baking, let them cool completely before refrigerating for improved texture when served.

When reheating, consider adding fresh elements, such as whipped cream or fruits, to enhance flavor and presentation, ensuring the bars taste freshly made even after a few days.

Scaling Instructions

To halve the Sopapilla Cheesecake Bars recipe, simply divide each ingredient by two while maintaining the baking time. This adjustment works well for smaller gatherings or if you want to try different variations without excess leftovers.

If doubling or tripling the recipe, be prepared for a bit longer cooking time. Ensure you adjust the pan size accordingly; larger baking dishes often require a longer bake time, while smaller pans may call for reduced time. Keep an eye out for visual cues to ensure perfectly baked bars!

When scaling, remember to use accordingly sized kitchen equipment, such as larger mixing bowls or pans, to accommodate the increased volume of ingredients, ensuring even mixing and baking.

Nutritional Deep Dive

These bars typically break down macronutrients into 23g of carbohydrates, 8g of fat, and 4g of protein per serving. This substantial carbohydrate content is due to the sugar and crust, providing quick energy while still being manageable in moderation.

Micronutrient-wise, the bars can offer calcium from cream cheese and potassium from added fruits. They can fit into various dietary considerations, allowing room for indulgence as a treat rather than a daily staple.

With the right portion analysis, Sopapilla Cheesecake Bars can be a part of a balanced diet. Moderation is key to enjoying these rich bars while keeping your nutritional goals in mind. For those mindful of their intake, this dessert can make an enjoyable occasional treat.

Dietary Adaptations

For gluten-free variations, substitute all-purpose flour in the crust with a gluten-free blend. Numerous products on the market are formulated specifically for baking, allowing you to achieve a similar texture.

If you’re aiming for a dairy-free option, use a blend of dairy-free cream cheese and coconut milk for the filling. These substitutions still yield delicious results while catering to dietary restrictions.

To make these bars vegan, replace eggs with flaxseed meal or applesauce as a binding agent and ensure all other ingredients are plant-based. Both adaptations keep the rich flavor intact while accommodating those with specific dietary needs.

Troubleshooting Guide

Texture issues often arise when the cream cheese is not properly softened. Ensure it has reached room temperature before mixing. If the bars turn out too wet, ensure they are adequately cooled in the refrigerator before serving.

Flavor balance can be a concern, particularly with too much cinnamon or sugar. Allow the ingredients to blend harmoniously during mixing; if noticed afterward, adjust with a pinch of salt to round out the flavor.

Temperature problems during baking can lead to uneven results. Make sure your oven is properly calibrated—if baked too hot or not hot enough, adjust oven settings accordingly for future batches.

If using substitutions, keep an eye on moisture content; different ingredients can lead to variations in hydration, which can affect the final bars. Experiment and document adjustments for future trials.

Recipe Success Stories

Readers often share their excitement about how this recipe has become a family favorite. Many appreciate how easy it is to customize to personal taste, adding their unique twists to the classic preparation.

Adaptations have led to successful variations, from adding fruit fillings to experimenting with different flavored fillings, creating unique treats that have delighted friends and family alike. Posts often highlight photos showcasing these beautiful desserts, making them visually appealing.

Suggestions from readers frequently include tips to make the bars even easier, such as using parchment paper to line the baking pan for easier removal. These insights bring the community together, fostering creativity in the kitchen.

Frequently Asked Questions

Can I freeze Sopapilla Cheesecake Bars? Yes, you can freeze them once completely cooled. Wrap tightly in plastic wrap and aluminum foil and freeze for up to 3 months.

How long do leftovers last in the fridge? Leftover bars can be stored in the refrigerator for up to 5 days in an airtight container.

Can I use low-fat cream cheese? Yes, but keep in mind that using low-fat cream cheese may alter the texture slightly, making it less creamy.

What can I serve alongside these bars? They are delicious on their own, but you can serve them with whipped cream, fresh fruits, or a drizzle of chocolate sauce for added taste.

Can I make the filling ahead of time? Yes, you can prepare the filling a day ahead. Just store it in the refrigerator until you’re ready to use it.

Is it necessary to use vanilla extract? While it’s not strictly necessary, vanilla adds depth of flavor that enhances the overall taste of the bars.

What should I do if the crust is too crumbly? If your crust crumbles, try adding a tablespoon of water or milk to help bind it together better.

Can I double the recipe without adjustments? Yes, you can double the recipe; just be mindful of baking time, as it may take a bit longer.

Are these bars suitable for parties? Absolutely! They are a crowd-pleaser and easy to cut into individual servings, making them perfect for gatherings.

What is the best way to cut these bars? Use a sharp knife and wipe it clean between cuts for clean edges and a tidy presentation.

Additional Resources

Explore other delectable dessert recipes to complement your baking repertoire. From traditional Mexican desserts to contemporary takes on classic sweets, there’s a treasure trove of recipes to try.

Check out technique guides which cover the essential skills needed for successful baking, such as mixing methods and understanding ingredient interactions. Understanding these techniques can elevate future baking endeavors.

Further ingredient information can help you connect with the flavors and nutritional profiles of what you cook, enabling thoughtful substitutions to cater to dietary preferences.

Join the Conversation

We encourage readers to share their experiences, adaptations, and reviews to foster a vibrant cooking community. Engage with us on social media platforms to showcase your beautiful Sopapilla Cheesecake Bars and discuss photos, tips, and tricks.

Don’t forget to leave your feedback and suggestions below! We love hearing your success stories and any variations you’ve created, as well as your photography tips to capture these beautiful treats in all their glory. Join us in celebrating the joy of cooking through this delightful dessert!

The Recipe

Sopapilla Cheesecake Bars

Serves: 12 Bars

Prep Time: 15 mins

Cook Time: 30 mins

Total Time: 45 mins

Kitchen Equipment Needed

  • 9×13 inch baking dish
  • Mixing bowls
  • Electric mixer
  • Spoon or spatula
  • Measuring cups and spoons
  • Whisk

Ingredients

  • 2 cans of crescent roll dough
  • 2 packages (8 oz each) cream cheese, softened
  • 1 cup granulated sugar
  • 1 teaspoon vanilla extract
  • 1 teaspoon ground cinnamon
  • ½ cup unsalted butter, melted
  • 1 cup powdered sugar (for dusting)

Directions

  1. Preheat the oven to 350°F (175°C).
  2. In a mixing bowl, blend together the softened cream cheese, sugar, vanilla extract, and cinnamon until smooth.
  3. Roll out one can of crescent roll dough in the bottom of a greased 9×13 inch baking dish.
  4. Spread the cream cheese mixture over the dough evenly.
  5. Roll out the second can of crescent roll dough and lay it over the cream cheese filling.
  6. Brush the melted butter over the top, and sprinkle with cinnamon and sugar.
  7. Bake in the preheated oven for 25-30 minutes or until golden brown.
  8. Allow to cool before slicing into bars and dust with powdered sugar before serving.

Recipe Notes

  • Feel free to adjust sweetness by modifying the sugar measurements to your taste.
  • Add a layer of chocolate or fruit for added flavor variations.
  • Store bars in the refrigerator for optimal freshness.

Delicious Peach Upside-Down Mini Cakes for Summer Celebrations

Irresistible Peach Upside-Down Mini Cakes: A Sweet Summer Delight

⚖️
Difficulty
Easy

⏲️
Prep Time
15 mins

🕒
Cook Time
20 mins

⏱️
Total Time
35 mins

🍽️
Servings
8 mini cakes

Peach upside-down mini cakes are the perfect treat for summer gatherings, bringing a delightful twist to your dessert table. With the sweetness of ripe peaches caramelized on top of fluffy vanilla cake, these mini cakes not only charm the eyes but also tantalize your taste buds. They are simply irresistible and ideal for any occasion, whether it’s a family barbecue or a casual picnic.

This recipe showcases the beautiful balance of textures and flavors—each bite offers a tender crumb paired with the juicy, syrupy peaches on top, creating an explosion of summer flavors. As you pull these cakes out of the oven, the aroma of sweet peaches mingling with vanilla will have everyone eagerly waiting to indulge in this delightful treat.

Quick Recipe Highlights

  • Flavor Profile: Sweet peaches combined with light vanilla cake create a harmonious burst of summer flavors that will delight your palate.
  • Texture: Each mini cake has a soft, moist texture with a slightly crisp top from the caramelized peaches, delivering a perfect bite every time.
  • Aroma: The irresistible scent of baked peaches mingling with vanilla and buttery notes will fill your kitchen, beckoning everyone to the dessert table.
  • Visual Appeal: These mini cakes are visually stunning, with the bright yellow and orange of the peaches creating an eye-catching presentation.
  • Skill Level Needed: This recipe is easy to follow, making it perfect for novice bakers while still impressive for experienced cooks.
  • Special Equipment: You will need a muffin tin or individual cake molds to create these charming little treats.

Recipe Overview

  • Difficulty Level: These mini cakes are easy enough for beginner bakers, requiring just a few basic techniques like mixing and baking.
  • Category: This peach upside-down cake falls under desserts, specifically cakes, and is perfect for summer celebrations.
  • Cuisine: Rooted in classic American baking, the upside-down cake uses locally-sourced fruit, echoing the culinary tradition of seasonal cooking.
  • Cost: This recipe is budget-friendly, requiring common pantry ingredients along with fresh peaches which can be found at local markets in summer.
  • Season: Best enjoyed during peach season (late spring to early summer), when these fruits are at their juiciest and sweetest.
  • Occasion: These mini cakes make a great addition to barbecues, birthday parties, or any summer festivity where a sweet touch will brighten the day.

Why You’ll Love This Recipe

The taste and texture of these irresistible peach upside-down mini cakes are sure to win over any audience. The bright, sunny flavor of the peaches complements the soft, airy cake, creating a cake that feels as light as it is indulgent. The caramelization of the peaches produces a delightful contrast to the vanilla base, ensuring each bite is a celebration of flavor.

The convenience of this recipe makes it a must-try for summer gatherings. With only a short prep and cook time, you can whip up these delicious mini cakes quickly. They’re easily made ahead, which means you can spend more time enjoying the company of friends and family while still serving a exquisite dessert.

Nutritionally, peaches are loaded with vitamins A and C, fiber, and antioxidants, making these mini cakes a sweeter yet healthier option compared to other desserts. The use of fresh fruit not only enhances flavor but also provides some nutritional benefits that make each bite guilt-free.

The social aspect of sharing these delightful mini cakes is undeniable. Their unique presentation and charming size make them an inviting treat for guests, sparking conversations and smiles. Whether served at a gathering or brought to a potluck, these cakes can create memorable experiences.

Lastly, the cost-effectiveness of this recipe should not be overlooked. With simple ingredients that are easily accessible, you can create an impressive dessert without breaking the bank. Plus, the ability to scale the recipe means you can adjust the serving size depending on your needs, making it perfect for any occasion.

Historical Background and Cultural Significance

The origin of upside-down cakes can be traced back to ancient practices of baking in cast iron skillets, where fruits were placed at the bottom to caramelize while being baked. This tradition evolved in American kitchens, especially during the 1920s when fruits like pineapples made a splash in desserts.

Peach upside-down cakes, specifically, highlight local produce and the bounty of fresh fruits available during the summer months. This dish resonates with the agricultural traditions of peach-growing regions, where the fruit is celebrated and showcased in various recipes.

Over the years, this recipe has undergone many evolutions, adapting to modern baking techniques while maintaining its nostalgic roots. From the original versions baked in large pans to the contemporary mini cakes, this dessert continues to capture the hearts of many.

Regional variations abound, with some adding nuances like spices or using different stone fruits. While peaches may be the star of this recipe, the adaptability of the upside-down cake allows for creativity, making it a versatile dessert spanning many cultures and kitchens.

Ingredient Deep Dive

Peaches: Peaches have a rich history, originating in China but now cultivated worldwide. They are not just delicious but also packed with vitamins, minerals, and antioxidants. When selecting peaches, look for those that are firm but yield slightly to pressure, indicating ripeness. Store them at room temperature until ripe, then refrigerate to preserve freshness. If peaches are not available, consider substituting with nectarines or plums for a unique twist.

Flour: Flour serves as the backbone of many baked goods, including cakes. The choice of flour can affect the texture; all-purpose flour is ideal for this recipe, providing the right balance for fluffy mini cakes. When selecting flour, look for freshness to avoid stale flavors. Store it in an airtight container to prolong its shelf life, and if gluten-free options are needed, almond or coconut flour can be used, keeping in mind that modifications in liquid ratios may be necessary.

Common Mistakes to Avoid

  • Choosing Overripe Peaches: Overripe peaches can turn mushy and affect the texture of the cake. Ensure to select firm peaches for optimal sweetness and texture.
  • Using Cold Ingredients: Baking requires that your ingredients, especially eggs and butter, be at room temperature to ensure even mixing and baking. Cold ingredients can lead to a dense and unevenly baked cake.
  • Skipping Measuring: Accurate measurements are crucial in baking. Skipping this step can lead to imbalances in flavor and texture, potentially ruining the cake.
  • Overmixing the Batter: While it’s tempting to thoroughly mix, overmixing can lead to tougher cakes. Mix just until the ingredients are combined for a light, fluffy texture.
  • Not Preheating the Oven: Always preheat your oven before baking. Placing the batter in a cold oven can affect the rise and overall texture of your cake.
  • Neglecting to Grease the Molds: Properly greasing your muffin tin or cake molds ensures easy release after baking. Neglecting this step can lead to broken cakes.
  • Baking at the Wrong Temperature: Each oven is different, so check that your oven is calibrated correctly. Baking at either too low or too high of a temperature can result in uneven baking.
  • Skipping the Cooling Time: Allow your mini cakes to cool slightly before removing them from the molds. Skipping this step can cause them to break apart.
  • Serving Without Toppings: While these cakes are delicious alone, adding a dollop of whipped cream or serving with ice cream can elevate your dessert to the next level.

Essential Techniques

Mixing Batter: Understanding how to properly mix your batter is crucial for ensuring that your mini cakes rise and have the right texture. Start by creaming butter and sugar until light and fluffy—it helps incorporate air into the batter. Add eggs one at a time, mixing until fully blended before adding dry ingredients. To master this technique, avoid overmixing and be gentle when folding in any additional dry ingredients.

Caramelizing Peaches: Caramelizing the peaches not only enhances their flavor but also creates a beautiful presentation. To achieve perfect caramelization, always use moderate heat and ensure that the peaches are evenly coated in butter and sugar. Watch for a golden brown color, which indicates they are ready to layer on the batter. Common pitfalls include using too high heat, which can lead to burnt peaches, or not cooking long enough for proper sweetness.

Pro Tips for Perfect Irresistible Peach Upside-Down Mini Cakes

1. Always choose ripe, but firm peaches for the best flavor. If they’re underripe, they won’t caramelize properly, and if they’re overripe, they can become mushy.
2. Line your muffin tin with paper liners for easier cleanup and to help maintain the mini cake’s shape.
3. Give the caramel a bit of extra time on the stove to enhance its depth of flavor, but keep a close watch to avoid burning.
4. After inverting the cakes, allow them to cool in the tin for a few minutes before transferring them to a wire rack; this helps prevent sticking.
5. Feel free to enhance the flavor by adding cinnamon or nutmeg to the batter for an extra layer of warmth.
6. Top your mini cakes with fresh whipped cream or a scoop of vanilla ice cream for a delicious contrast to the sweetness of the peaches.
7. Consider drizzling a simple glaze over the top once cooled for an elegant finish.
8. These cakes freeze wonderfully! Store them in an airtight container to enjoy later.

Variations and Adaptations

If you’re feeling adventurous, try replacing peaches with other fruits like plums, cherries, or even apples, creating different flavor profiles. For a seasonal twist, consider incorporating a mix of berries in addition to the peaches during summer for a vibrant look.

Dietary modifications are also possible; you can make a gluten-free version by substituting all-purpose flour with a gluten-free blend or almond flour. If you’re looking for a lower-sugar treat, consider using honey or maple syrup in place of sugar, adjusting the liquid in the batter to maintain consistency.

For those who are more health-conscious, incorporating whole wheat flour can add a nutty flavor and additional fiber to the cakes. You can also explore adding zest from lemons or limes to the batter for a refreshing citrus note that pairs beautifully with the sweetness of the peaches.

Serving and Presentation Guide

When serving these mini cakes, presentation is everything! You can use a large serving platter to showcase them, stacking them for a whimsical look. Consider garnishing each mini cake with a sprig of mint for a pop of color and freshness. A drizzle of warm caramel sauce or a scattering of toasted nuts can provide an elegant finish to the cakes.

Temperature matters; serve these mini peach cakes either warm or at room temperature. Pair them with a scoop of vanilla ice cream or whipped cream to add a rich creamy texture that complements the peaches.

For a more sophisticated touch, serve with an espresso or flavored coffee to enhance the dessert experience. And don’t forget to keep portion sizes in mind—mini cakes are rich, so a small serving per person is often enough to satisfy.

Wine and Beverage Pairing

For a delightful pairing, opt for a light, fruity white wine such as Moscato or a sparkling Prosecco. These options will complement the sweetness of the peaches beautifully. If you prefer red, a chilled Lambrusco will offer a slight fizz that balances the rich flavors.

For non-alcoholic options, consider iced tea with a hint of peach or lemonade, which will tie in the flavors of the cake while serving as a refreshing counterpart on hot summer days. A chilled herbal tea can also enhance the dessert’s warm flavors, particularly if infused with mint or vanilla.

When serving coffee or tea, consider a light roast coffee with fruity notes to enhance the peach flavor, or serve with a chai latte for a spicy contrast.

Storage and Shelf Life

To store your peach upside-down mini cakes, keep them in an airtight container at room temperature for up to three days. If you want to extend their freshness, consider refrigerating them, where they can last up to a week.

When freezing, wrap each cooled mini cake in plastic wrap and place them in a freezer-safe bag. They can be stored in the freezer for up to three months. To enjoy, simply thaw overnight in the refrigerator and warm slightly in the microwave before serving.

Signs of spoilage include a sour smell or a change in texture; always check before consuming. Reheating should be done gently to prevent the cakes from drying out—consider microwaving them in short intervals.

Make Ahead Strategies

These mini cakes can be prepped ahead of time, making them perfect for entertaining. You can prepare the batter a day in advance; simply store it in the fridge until you’re ready to bake.

If you want to assemble everything the night before, prepare the caramelized peaches and place them in the molds, then top with batter before baking. This allows the flavors to meld beautifully overnight.

For optimal freshness, avoid adding any toppings or garnishes until just before serving. This ensures that the whipped cream or ice cream maintains its texture and doesn’t become soggy.

If you plan to serve the cakes at a later date, store them fully baked, and simply reheat for a couple of minutes before enjoying with your favorite accompaniments.

Scaling Instructions

Scaling this peach upside-down mini cake recipe is easy! If you want to halve the recipe, simply reduce all ingredient measurements by half, ensuring you also account for bake times, as smaller cakes may cook quicker.

When doubling or tripling the recipe for larger gatherings, be aware that the bake time may vary slightly. Use two muffin tins to bake more at once, ensuring that there’s enough space between them in the oven for air to circulate.

If you are using larger tins for standard-sized cakes, remember that bake times will differ. Always watch for doneness indicators, such as a toothpick coming out clean, rather than solely relying on time as a measure.

Nutritional Deep Dive

Each mini cake packs a delightful combination of nutrients, with peaches offering vitamins A and C while being low in calories. An average serving provides around 150 calories, making them a reasonable treat.

When considering macronutrients, the cake is primarily composed of carbohydrates, with minimal protein found in the eggs and flour. On the other hand, using whole wheat flour can add some additional fiber and help with digestion.

For those managing weight, portion control is essential, especially since these mini cakes can be quite rich. Balancing them with a side of fresh fruit or a salad can create a satisfying meal without overindulging on dessert.

Keep in mind allergy information, too; this cake contains gluten and dairy due to the flour and butter. Always consider gluten-free flour alternatives for those avoiding gluten, and feel free to substitute with plant-based butter for a dairy-free version.

Dietary Adaptations

Transforming this recipe for specific dietary needs is achievable with a few substitutions. For a gluten-free option, replace all-purpose flour with a gluten-free flour blend, but it’s essential to adjust the liquid requirements to maintain moisture.

Dairy-free adaptations can be made by substituting butter with coconut oil or plant-based butter and using a dairy-free milk alternative. These changes will still deliver delicious results without compromising on flavor.

For vegan versions, replace eggs with flaxseed or a commercial egg substitute, ensuring to adjust the liquid for consistency. Otherwise, consider using applesauce for moisture and sweetness to maintain fluffiness in the cake.

If you’re following a low-carb or keto diet, look for low-carb flour alternatives such as almond or coconut flour, and adjust the sweetener accordingly to enhance the dessert without raising carbs excessively.

Troubleshooting Guide

If your mini cakes turn out dense, it’s likely due to overmixing the batter or using cold ingredients. Always ensure ingredients are at room temperature, and stop mixing once everything is just combined.

A flavor imbalance, perhaps too sweet, can often be fixed by balancing with a hint of citrus. Adding a touch of lemon or lime zest to the batter elevates the taste profile beautifully.

For cakes that are not rising properly, check your baking powder’s freshness; expired leavening agents can greatly affect the texture. Additionally, make sure your oven is accurately calibrated.

If you encounter ingredient substitution issues, such as needing gluten-free options, always have a reliable reference for conversion ratios and baking techniques for different ingredients.

Recipe Success Stories

Community feedback for the peach upside-down mini cakes has been overwhelmingly positive. Many readers rave about these cakes for their light texture and vibrant flavors, often sharing personal variations that they’ve tried.

Several bakers have adapted these mini cakes for different occasions, whether it’s for birthdays, family gatherings, or brunches, and loved how easy they were to customize.

Photography tips abound, with many suggesting capturing the moment when the cakes are inverted, highlighting the beautiful caramelization of the peaches.

Encouraging readers to share their successes online has fostered a sense of community within the baking space, where everyone’s variations and adventures are celebrated.

Frequently Asked Questions

1. Can I use frozen peaches instead of fresh ones? Yes, frozen peaches can work well in this recipe, especially if they are thawed and drained of excess moisture. Be mindful that frozen fruits may release more liquid during baking, which could affect texture slightly.

2. How can I tell when the cakes are done baking? Use the toothpick test! Insert a toothpick in the center of one of the mini cakes; if it comes out clean or with a few crumbs, they are finished baking.

3. Can these mini cakes be made ahead of time? Absolutely! You can prepare them a day in advance and store them in an airtight container. They can also be frozen for later enjoyment.

4. What can I use if I don’t have muffin tins? If muffin tins aren’t available, consider using small ramekins or oven-safe cups to achieve the same mini-cake effect.

5. How do I prevent the cakes from sticking to the pan? Make sure to properly grease your pans with butter or non-stick spray. You can also line the bottom with parchment paper for added insurance against sticking.

6. Are there any gluten-free options for this recipe? Yes, you can substitute all-purpose flour for a gluten-free flour blend, making sure to adjust liquid ratios as needed for consistency.

7. Can I add spices to the batter? Absolutely! Consider adding a teaspoon of cinnamon or nutmeg for warmth. These spices pair beautifully with the sweetness of the peaches.

8. How long can I store the cakes for? Stored in an airtight container, the mini cakes can last for up to three days at room temperature and up to a week in the refrigerator.

9. Can I use other fruits for this recipe? Yes, feel free to get creative! Other fruits like apricots, plums, or nectarines can be used and will give you deliciously unique mini cakes.

10. Is there a dairy-free version of this cake? Yes, use plant-based butter and a dairy-free milk substitute to create a delicious dairy-free version without compromising taste.

Additional Resources

If you enjoyed this recipe, consider exploring related dessert recipes such as classic pineapple upside-down cake, berry cobbler, or fruit tarts.

For those looking to refine their baking skills, consider checking out technique guides on cake making, from mixing batter to mastering oven temperatures.

Additionally, regular seasonal variations can keep your dessert repertoire fresh—learning to bake with seasonal fruits allows you to enjoy year-round flavor variety.

Investing in reliable kitchen equipment, like non-stick bakeware and quality mixing tools, can make a significant difference in your overall baking success.

Join the Conversation

I invite you to share your experiences with the peach upside-down mini cakes by connecting with us on social media. Showcase your beautiful photos, modifications, and any tips you’ve gained through baking these delightful treats.

Photography tips are always welcome, as capturing the vibrant colors of the cakes can inspire fellow bakers. Engaging with our community through recipe reviews helps us all connect better and learn in our culinary journeys.

Consider discussing your favorite variations or adaptations of this recipe, creating a welcoming forum for baking enthusiasts. Your input enriches our community and supports budding bakers to explore and enjoy the art of creating delicious desserts!

The Recipe

Irresistible Peach Upside-Down Mini Cakes

Serves: 8 mini cakes

Prep Time: 15 mins

Cook Time: 20 mins

Total Time: 35 mins

Kitchen Equipment Needed

  • Muffin tin or individual cake molds
  • Mixing bowls
  • Measuring cups and spoons
  • Whisk or electric mixer
  • Spatula

Ingredients

  • 4 ripe peaches, pitted and sliced
  • 1/4 cup unsalted butter
  • 3/4 cup brown sugar
  • 1 1/2 cups all-purpose flour
  • 1 cup granulated sugar
  • 1/2 cup milk
  • 2 large eggs
  • 1 teaspoon vanilla extract
  • 2 teaspoons baking powder
  • 1/2 teaspoon salt

Directions

  1. Preheat your oven to 350°F (175°C) and grease the muffin tin or line with paper liners.
  2. In a saucepan, melt the butter and brown sugar over medium heat. Stir until combined and bubbly.
  3. Pour the caramel mixture into the bottom of each mold and arrange the peach slices on top.
  4. In a mixing bowl, combine the flour, baking powder, and salt. In another bowl, mix the sugar, eggs, milk, and vanilla until well combined.
  5. Gradually add the dry ingredients to the wet ingredients, mixing until just combined.
  6. Pour the batter over the peaches in the muffin tin, filling each mold about 3/4 full.
  7. Bake for 20-25 minutes or until a toothpick inserted into the center comes out clean.
  8. Allow to cool in the pan for 5 minutes, then invert onto a serving plate.

Recipe Notes

  • For best taste, use fresh, ripe peaches during the summer months.
  • Variations: Substitute peaches with your choice of fruits like cherries or plums for a different flavor profile.
  • The cakes can be stored in an airtight container and enjoyed within three days.
  • For a fun twist, drizzle with a caramel or chocolate sauce before serving.