Festive White Chocolate Cranberry Pecan Clusters: A Sweet Holiday Treat

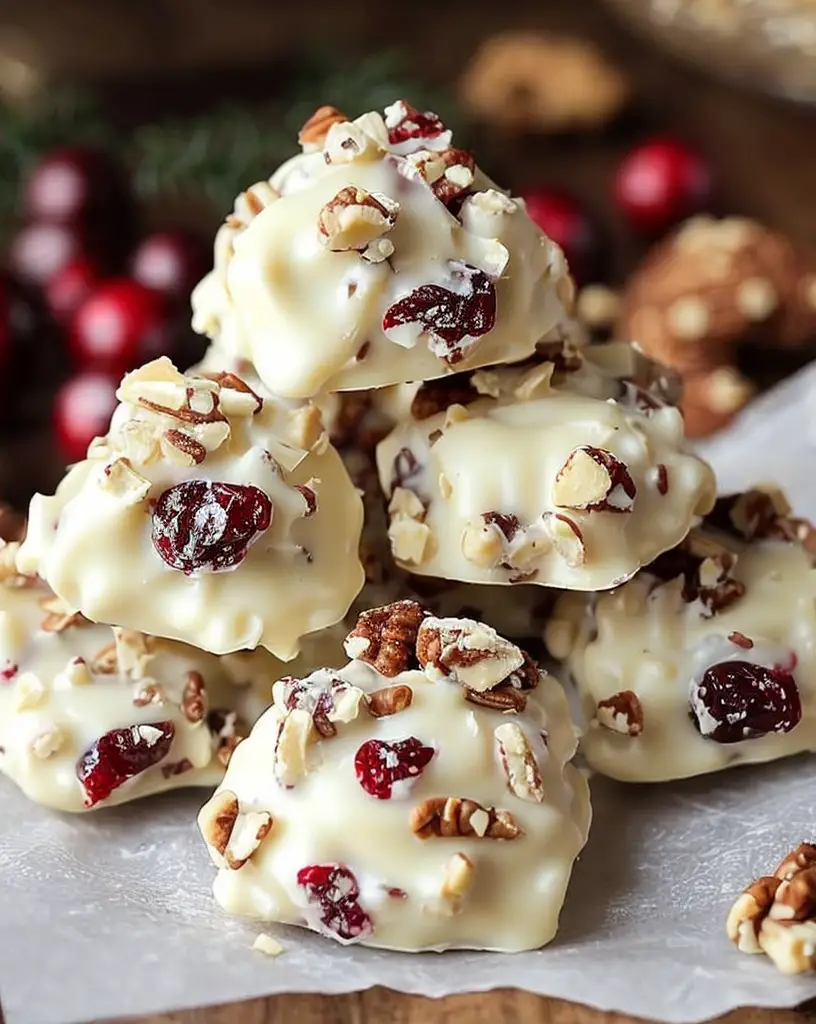
White Chocolate Cranberry Pecan Clusters Recipe: A Festive Treat

Indulge in the delightful combination of creamy white chocolate, tart cranberries, and crunchy pecans with this White Chocolate Cranberry Pecan Clusters recipe. Perfect for holiday celebrations, these clusters offer a balance of sweet and tangy flavors with a satisfying crunch, making them a beloved choice for festive treats.

Quick Recipe Highlights

  • Flavor Profile: A rich blend of sweet white chocolate with tangy cranberries complemented by nutty pecans.
  • Texture: A delightful mix of smooth, creamy chocolate and crunchy nuts with chewy dried fruits.
  • Aroma: Warm, nutty scents with subtle notes of vanilla from the chocolate.
  • Visual Appeal: Beautiful clusters with contrasting colors of white chocolate and red cranberries.
  • Skill Level Needed: Beginner-friendly with basic melting and mixing techniques.
  • Special Equipment: Microwave or double boiler for melting chocolate.

Recipe Overview

  • Difficulty Level: Easy; involves simple melting and mixing processes, perfect for novice bakers.
  • Category: Desserts, Snacks
  • Cuisine: Modern American with a festive twist.
  • Cost: Moderate; primarily determined by the quality of white chocolate and pecans.
  • Season: Best made during the holiday season for its festive flavors.
  • Occasion: Ideal for Christmas parties, potlucks, and as homemade gifts.

Why You’ll Love This Recipe

The taste and texture of these clusters stand out with the rich, creamy white chocolate enveloping tart cranberries and crunchy pecans. Preparation is straightforward, making it convenient for handling last-minute holiday treats. Ingredients are packed with nutritional value; pecans provide healthy fats, and cranberries add antioxidants. These clusters are great for social gatherings, perfect to present as thoughtful homemade gifts. Cost-effective with easily accessible ingredients, they become a must-have for festive celebrations.

Historical Background and Cultural Significance

White chocolate cranberry pecan desserts are a recent addition to festive culinary traditions, gaining popularity in the late 20th century. Their roots can be traced back to nut-laden sweets that have long been associated with holiday baking. Embracing modern American influences, these treats commonly appear during Thanksgiving and Christmas, embodying the fusion of traditional and contemporary flavors. They find regional variations across the U.S., where local pecans and cranberries adapt the clusters slightly in taste and texture.

Ingredient Deep Dive

White chocolate, the star ingredient, originated as a byproduct of chocolate manufacturing, beloved for its smooth texture and mild vanilla flavor. Rich in calcium and antioxidants, cranberries are essential for their tartness, counterbalancing the chocolate’s sweetness. Pecans, heart-healthy and rich in anti-inflammatory compounds, provide a rustic, nutty flavor that complements the other components. Store these ingredients in airtight containers to ensure freshness; cranberries and pecans should be kept in a cool, dry place, while white chocolate prefers a non-humid environment to avoid blooming.

Common Mistakes to Avoid

  • Overheating the chocolate: Use low heat and stir frequently.
  • Adding wet cranberries: Ensure they’re fully dry to prevent seizing the chocolate.
  • Skipping toasting pecans: Toast lightly to enhance flavor.
  • Using low-quality chocolate: Opt for premium brands for best results.
  • Incorrect chocolate melting: Avoid water exposure at all costs.
  • Insufficient mixing: Ensure cranberries and pecans are fully coated.
  • Rushed cooling: Allow clusters to set completely at room temperature.
  • Overcrowding storage: Store in single layers to maintain shape.

Essential Techniques

Melting white chocolate properly is crucial. Use a double boiler or microwave in short bursts to prevent scorching. Mastering this ensures a smooth, lump-free mixture crucial for proper coating. Thorough stirring helps achieve even distribution of cranberries and pecans, while cooling times affect the clusters’ firmness. Visually, melted chocolate should be glossy without streaks, indicating successful tempering.

Pro Tips for Perfect White Chocolate Cranberry Pecan Clusters

– Use a silicone spatula for effortless mixing and chocolate scraping.
– Consider adding a pinch of sea salt to enhance sweetness and flavor depth.
– Experiment with dark or milk chocolate variants for taste diversification.
– Ensure all add-ins are at room temperature before mixing.
– Opt for unsweetened cranberries for less sugary alternatives.
– Test chocolate temper by dipping a knife, looking for a quick set without streaks.

Variations and Adaptations

Experiment with regional nut variations like walnuts or almonds. Adapt seasonally by incorporating dried apricots or cherries instead of cranberries. Modify for dietary needs by choosing low-sugar chocolate or using dark chocolate for paleo and keto options. For richer clusters, add a splash of liqueur. Try breaking clusters into smaller bites, perfect for a dainty snack.

Serving and Presentation Guide

For elegant presentations, arrange clusters on a decorative serving platter. Consider garnishing with a drizzle of dark chocolate or a dusting of edible glitter. Traditionally, they pair well with after-dinner coffee, but modern approaches include serving them alongside fresh fruit incursions. Portion carefully to ensure even serving sizes.

Wine and Beverage Pairing

Pair these clusters with a sweet wine like a late harvest Riesling or a robust Port. Non-alcoholic alternatives include spiced herbal tea or rich hot chocolate. When selecting coffee, opt for medium roasts that complement the sweet-and-tart profile of the clusters. Serve chilled beverages to balance the richness of the clusters.

Storage and Shelf Life

Store clusters in airtight containers, layering parchment between levels. Keep at room temperature or refrigerate for up to two weeks. Watch for chocolate blooming as a sign of too much humidity or temperature fluctuations. Reheat gently if necessary, though best enjoyed at room temperature.

Make Ahead Strategies

Prepare clusters up to two weeks in advance. Store chocolate separately from cranberries and pecans if prepping more than a month ahead to retain full flavor. If refrigerated, allow reaching room temperature before serving for perfect texture and taste.

Scaling Instructions

Easily double or triple the recipe for large gatherings. Use larger mixing bowls and ensure all trays have adequate space for cooling. Adjust timing slightly for melting chocolate due to increased volume. Ensure ample storage space if batches exceed daily consumption needs.

Nutritional Deep Dive

White Chocolate Cranberry Pecan Clusters offer a balanced macro profile, with moderate carbs from cranberries and healthy fats from pecans. They provide magnesium, calcium, and polyphenols beneficial for heart health. Portion mindfully to fit within daily caloric goals, indulging occasionally without compromising dietary guidelines.

Dietary Adaptations

For gluten-free adaptations, confirm chocolate brands adhere to gluten-free practices. Use dairy-free white chocolate for those with lactose concerns. To align with vegan diets, select certified vegan chocolate and check cranberry processing. Adapt for low-carb diets using low-sugar chocolate brands.

Recipe Notes

  • Substitute dried cherries for cranberries for a sweeter profile.
  • Try adding a dash of cinnamon for a warming flavor.
  • Consider soy or almond chocolate for dietary sensitivity adaptations.

Troubleshooting Guide

  • Chocolate seizing issues: Avoid moisture and keep temperatures low.
  • Clusters not setting: Allow ample time in a cool, dry setting.
  • Tartness too pronounced: Balance with extra chocolate or a sweetener.
  • Clusters too hard: Ensure proper nut roasting and chocolate melting.
  • Discoloration: Store in airtight, dark environments to prevent blooms.

Recipe Success Stories

Join our community of enthusiastic bakers who’ve transformed their holiday tables with this recipe. Share your variations and presentation pictures with our hashtag #FestiveClusters, and tell us how you’ve made these delightful treats your own. Find inspiration through others’ stories, seeing how diverse interpretations enrich this classic recipe.

Frequently Asked Questions

Can I use milk chocolate instead of white chocolate?

Yes, milk chocolate can be a perfect substitute, lending a less sweet but creamier flavor. Make sure to adjust the quantities slightly to achieve the desired sweetness balance.

What is the best way to toast pecans?

Toast pecans in a preheated oven at 350°F for 5-10 minutes. Stir regularly to ensure even browning, watching closely to avoid burning, and let cool before mixing.

How do I prevent my chocolate from seizing?

Ensure no water contacts the chocolate during melting. Start with completely dry utensils and bowls, and keep temperatures low and consistent.

Can I freeze these clusters?

Yes, freeze them in an airtight container with parchment paper between layers. Allow to defrost at room temperature before serving to maintain texture.

How can I reduce the sugar content?

Choose sugar-free or low-sugar white chocolate alternatives and pair with unsweetened cranberries. This maintains flavor while reducing overall sugar levels.

What is the best way to cool clusters?

Let clusters cool on a lined baking sheet in a dry, cool area. Avoid humid environments to prevent condensation and chocolate blooming.

How do I ensure even chocolate coating?

Continuously stir the mixture during the mixing process, ensuring all cranberries and pecans are equally coated, and work in smaller batches if necessary.

Are there alternative nuts I can use?

Absolutely, almonds, walnuts, or hazelnuts make excellent substitutes, each offering nuanced flavor changes that still complement the chocolate and cranberries.

Can I use fresh cranberries?

It’s not recommended as the moisture content in fresh cranberries can cause the chocolate to seize. Stick with dried cranberries for best results.

What’s the serving recommendation for gatherings?

Portion clusters into individual paper cups for easy handling, ensuring hygienic serving and maintaining their shape during social occasions.

Additional Resources

Explore other festive recipes like our Dark Chocolate Almond Delight, or learn chocolate tempering techniques through our linked tutorial videos. Check out our ingredient guides for sourcing the perfect pecans and cranberries, along with seasonal adaptation tips for year-round enjoyment.

Join the Conversation

Connect with us on social media by using the hashtag #WhiteChocolateClusters. Share your personal twists or event pictures and engage with a community passionate about festive homemade treats. Join our seasonal recipe challenges and earn a chance to be featured on our page, fostering a connected baking community.

White Chocolate Cranberry Pecan Clusters: Festive Treats for Holiday Bliss

White Chocolate Cranberry Pecan Clusters

White Chocolate Cranberry Pecan Clusters are the perfect festive treats that bring joy to any holiday gathering. The delightful combination of creamy white chocolate, tart cranberries, and crunchy pecans creates a symphony of flavors that are sure to please your taste buds. These clusters are not only easy to make but also add a touch of elegance to your dessert table. Whether you’re hosting a party or looking for a special homemade gift, these delicious clusters will make an impact.

The magic of White Chocolate Cranberry Pecan Clusters lies in their simplicity and vibrant flavors. Each bite is a harmonious blend of sweet and tangy notes, complemented by the nutty richness of pecans. These treats are perfect for a festive occasion, be it Christmas, Thanksgiving, or New Year’s Eve.

Quick Recipe Highlights

  • Flavor Profile: A balanced mix of creamy white chocolate sweetness, tart cranberry tanginess, and rich pecan nuttiness.
  • Texture: Smooth and creamy with crunchy accents from the pecans.
  • Aroma: Sweet vanilla notes intertwined with a light fruity aroma.
  • Visual Appeal: Elegant white clusters dotted with vibrant red cranberries and golden pecans.
  • Skill Level Needed: Beginner-friendly; no baking experience required.
  • Special Equipment: Microwave-safe bowl, spatula, and parchment paper.

The Recipe

White Chocolate Cranberry Pecan Clusters: A Festive Delight for All Ages

Serves: 12

Prep Time: 10 mins

Cook Time: 5 mins

Total Time: 15 mins

Kitchen Equipment Needed

  • Microwave-safe bowl
  • Spatula
  • Measuring cups
  • Cookie sheet
  • Parchment paper

Ingredients

  • 1 cup white chocolate chips
  • 1/2 cup dried cranberries
  • 1/2 cup pecans, roughly chopped
  • 1/4 cup of desiccated coconut (optional for added texture)

Directions

  1. Line a cookie sheet with parchment paper and set aside.
  2. In a microwave-safe bowl, melt the white chocolate chips in 30-second intervals, stirring in between until smooth.
  3. Stir in the dried cranberries and chopped pecans until well combined.
  4. Drop spoonfuls of the mixture onto the prepared cookie sheet, shaping them into clusters.
  5. Allow clusters to set at room temperature or refrigerate them for faster results.
  6. Once set, transfer the clusters to an airtight container for storage or enjoy immediately.

Recipe Notes

  • Substitute pecans with almonds or walnuts for a different nutty flavor.
  • The addition of a sprinkle of sea salt can enhance the sweetness of the white chocolate.
  • Store clusters in a cool, dry place; these treats can last up to two weeks.

Indulge in Zesty Delight with Elegant Lemon Marbled Cheesecake Bars

Elegant Lemon Marbled Cheesecake Bars Recipe

Looking for a dessert that combines elegance with delightful flavors? This Elegant Lemon Marbled Cheesecake Bars recipe is the perfect choice. With a harmonious blend of zesty lemon and creamy cheesecake, these bars offer a burst of freshness, creating a dessert that’s both sophisticated and scrumptious. Ideal for any gathering, these bars are sure to impress your guests with their stunning appearance and irresistible taste.

These cheesecake bars are more than just a treat for the palate; they’re a feast for the eyes. With intricate marbled patterns and a rich, creamy texture, they represent a perfect balance between sweet and tangy. Whether you’re a fan of citrusy desserts or classic cheesecakes, these bars will quickly become a favorite in your recipe collection.

If you’re planning a tea party, holiday gathering, or simply looking to indulge your sweet tooth, the Elegant Lemon Marbled Cheesecake Bars offer a luxurious addition to your menu. Not only are they a visual delight, but the contrast of lemon’s tartness with the smooth cheesecake creates a symphony of flavors that’ll keep everyone coming back for more.

Quick Recipe Highlights

  • Flavor Profile: A delightful blend of tangy lemon zest and sweet cream cheese.
  • Texture: Smooth, creamy cheesecake with a buttery crumble crust.
  • Aroma: Fresh citrus with rich vanilla undertones.
  • Visual Appeal: Beautifully marbled with vibrant yellow and cream swirls.
  • Skill Level Needed: Intermediate, requiring basic cheesecake techniques and marbling skills.
  • Special Equipment: Mixer and offset spatula for smooth marbling.

Recipe Overview

  • Difficulty Level: Intermediate, due to the marbling technique and baking precision needed.
  • Category: Dessert, Cheesecake.
  • Cuisine: Modern, with classic cheesecake and lemon influences.
  • Cost: Affordable, utilizing common ingredients like cream cheese, lemons, and graham crackers.
  • Season: Best in spring and summer when lemons are freshest.
  • Occasion: Ideal for brunches, parties, and special celebrations.

Why You’ll Love This Recipe

The Elegant Lemon Marbled Cheesecake Bars are a delightful mix of flavors and textures, providing a refreshing end to any meal. The combination of creamy cheesecake and zesty lemon creates a tantalizing taste experience that will captivate your senses. Preparing these bars is more convenient than a full-sized cheesecake, making them perfect for busy schedules. You can easily prepare them in advance for stress-free entertaining.

Nutritionally, these bars offer a satisfying indulgence with the sweetness of the cheesecake balanced by the lemon’s Vitamin C content. They are a thoughtful treat for social gatherings, encouraging guests to savor every bite. With cost-effective ingredients, these bars are both economical and elevated, making them a smart choice for any occasion.

Historical Background and Cultural Significance

Cheesecake dates back to Ancient Greece, celebrated for its variety of textures and flavors. Lemon, historically associated with freshness and cleansing, has been paired with creamy desserts throughout culinary history. This fusion of ingredients creates a dish with deep cultural roots and widespread appeal, adapting over time to include modern twists like the marbling technique.

Cheesecake is rich in tradition across many regions, from New York to Italy. The lemon variation adds a bright and unique element, enhancing the classic dessert’s appeal. Customarily served during festive occasions, lemon cheesecake has evolved into a staple of springtime and warm-weather gatherings, delighting palates worldwide with its refreshing citrus notes.

Ingredient Deep Dive

Cream Cheese: This quintessential ingredient provides the smooth, rich base of the cheesecake. Packed with calcium, it lends creaminess and body to the bars. Choose full-fat cream cheese for the best texture and store it in the refrigerator for optimal freshness. Low-fat alternatives may be used, but expect a slight variation in texture.

Lemons: The star of this recipe brings brightness and tang, along with immunity-boosting Vitamin C. Opt for fresh, firm lemons with vibrant color. Zest and juice them just before use for the freshest flavor. If necessary, bottled lemon juice can serve as a substitute, but fresh is recommended for full aromatic impact.

Common Mistakes to Avoid

  • Overmixing the batter, which can result in a dense cheesecake.
  • Skipping the water bath, leading to cracks on the cheesecake’s surface.
  • Neglecting to bring ingredients to room temperature for smoother blending.
  • Using low-quality lemons, affecting overall flavor.
  • Forgetting to cool completely before slicing, which can ruin the marbled effect.
  • Not using parchment paper, making it difficult to remove bars from the pan.
  • Baking at too high of a temperature, risking overbrowning.
  • Improper storage, leading to soggy crusts from moisture absorption.

Essential Techniques

Marbling: Achieve beautiful swirls by alternating spoonfuls of plain and lemon batter, then swirling with a knife. This technique is critical for an appealing visual presentation.

Water Bath: Bake the bars with a pan of water beneath them to prevent cracking. Steam from the water keeps the baking environment moist, ensuring a creamy texture.

Proper Mixing: Use a moderate speed when blending ingredients to avoid incorporating excess air, which can cause cracks.

Pro Tips for Perfect Elegant Lemon Marbled Cheesecake Bars

– Use room temperature ingredients for a smooth batter.
– Taste-test lemons before use to adjust for sweetness or tartness.
– Add lemon zest to the crust for an extra burst of flavor.
– Chill overnight for the clearest marbling when sliced.
– Allow bars to reach room temperature before serving for maximum flavor.
– Use a clean, sharp knife for neat slices.
– Store in a single layer, without overlapping, to maintain texture.
– Experiment with lemon basil as a garnish for a sophisticated touch.

Variations and Adaptations

Regional Variations: Try adding lime or orange zest for a twist on citrus flavors.
Seasonal Adaptations: Incorporate fresh berries during summer or cranberries in winter.
Dietary Modifications: Use gluten-free graham crackers for a celiac-friendly dessert.
Flavor Variations: Substitute vanilla extract with almond or coconut for different aroma profiles.
Texture Modifications: Add a layer of lemon curd for a creamier finish.
Presentation Alternatives: Use individual ramekins for personal-sized servings.

Serving and Presentation Guide

To plate these exquisite bars, use a rectangular dish that contrasts with the bars’ creamy color. Garnish with thin lemon slices or fresh berries for added color. Serve chilled for a refreshing treat, pairing well with creamy textures and bright flavors. Control portion sizes to maintain balance and provide a satisfying dessert experience.

Wine and Beverage Pairing

Pair these bars with a light dessert wine like Moscato to enhance the citrus notes. Non-alcoholic options such as sparkling lemon water or herbal teas like chamomile complement the cheesecake’s richness. Serve beverages chilled to match the dessert’s refreshing quality.

Storage and Shelf Life

Store the bars in an airtight container in the refrigerator, keeping them fresh for up to five days. Avoid exposure to air which can dry out the surface. For freezing, wrap individual bars in plastic wrap and aluminum foil, lasting up to three months. Thaw in the refrigerator before serving.

Make Ahead Strategies

Prepare the crust and cheesecake layers a day ahead for convenient assembly. Chill overnight to enhance flavor melding. Reheat the bars briefly if needed, mindful to maintain their creamy texture. Freshly grate extra lemon zest before serving for a burst of aroma.

Scaling Instructions

For smaller batches, halve the ingredients and use an 8×8-inch pan for proportionate baking. To double or triple, adjust pans and extend baking time by 5-10 minutes. Ensure even batter distribution to maintain consistent marbling across larger batches.

Nutritional Deep Dive

Each serving provides essential nutrients such as calcium and vitamin C. Calorically balanced for indulgence, these bars are a smart addition to a moderated diet. With moderate fats and sugars, enjoy them as part of a well-rounded meal plan.

Dietary Adaptations

For gluten-free variations, use certified gluten-free graham crackers. Opt for dairy-free cream cheese and plant-based butter for vegan adaptations. To lower carbohydrates, replace the sugar with an appropriate substitute like erythritol or stevia.

Recipe Notes

  • Experiment with lemon juice concentrations to adjust tartness levels.
  • Add a pinch of salt to enhance the overall sweetness.
  • Incorporate chopped nuts into the crust for added texture.

Troubleshooting Guide

Texture Issues: Ensure proper cooling to prevent collapsing.
Flavor Balance: Adjust lemon juice to match personal taste preferences.
Temperature Problems: Use an oven thermometer for precise baking temperatures.
Equipment Challenges: A good quality mixer ensures a smooth batter.
Ingredient Substitution Impacts: Note possible changes in texture with low-fat substitutions.

Recipe Success Stories

Our readers rave about the beautiful marbling and vibrant lemon flavor of these bars. Some have added unique twists, like using Meyer lemons or swirling in a raspberry puree for additional depth. Stunning photographs of their creations can be found on our social media platforms, showcasing a variety of presentations and accompaniments.

Frequently Asked Questions

How can I prevent my cheesecake bars from cracking?

Use a water bath and avoid overmixing the batter. Ensure even temperature distribution to maintain the desired creamy texture.

Can I use bottled lemon juice instead of fresh?

While fresh lemon juice provides the best flavor, bottled can be used in a pinch. Expect some variation in tartness and fragrance.

What’s the best way to achieve the marbled effect?

Alternate spoonfuls of the plain and lemon batter, then gently swirl with a knife for an elegant marbled look.

How can I make my crust less crumbly?

Ensure ample butter is incorporated into the crust mixture. Press firmly into the pan for a solid base before baking.

What’s an easy way to garnish these bars?

Top with lemon zest or a thin lemon slice for a fresh, elegant touch. Fresh mint leaves add a pop of color and aroma.

How should I store these bars?

Refrigerate in an airtight container. For longer storage, freeze individually wrapped bars. This preserves freshness and prevents flavor loss.

Can I substitute the graham cracker crust?

Sure! Try a shortbread crust or mix in nuts for a different texture and flavor profile. Adjust baking time accordingly.

How do I ensure a smooth cheesecake layer?

Use room temperature ingredients and mix on low speed to avoid incorporating air. This ensures a silky, lump-free cheesecake texture.

Are there any non-dairy alternatives for cream cheese?

Yes, you can use dairy-free cream cheese spreads available in vegan grocery sections to accommodate lactose-intolerant diets.

What’s the best way to thaw frozen bars?

For optimal taste and consistency, thaw in the refrigerator overnight. Avoid microwaving to prevent texture changes.

Additional Resources

Explore our collection of cheesecake recipes for more delightful variations. Watch our marbling technique video for a step-by-step guide and browse through lemon zesting guides to master this essential skill. Check out our recommended baking pans for the perfect cheesecake presentation.

Join the Conversation

We encourage you to share your Elegant Lemon Marbled Cheesecake Bars creations on social media using #LemonCheesecakeBars. Join our community challenge by adding your personal flair to the recipe and upload photos of your masterpiece. Share tips, reviews, and engage with other dessert enthusiasts.

⚖️
Difficulty
Moderate

⏲️
Prep Time
20 mins

🕒
Cook Time
35 mins

⏱️
Total Time
55 mins

🍽️
Servings
12

Elegant Lemon Marbled Cheesecake Bars

Indulge in the luscious world of cheesecake with our Elegant Lemon Marbled Cheesecake Bars, a perfect blend of creamy cheesecake and zesty lemon swirls. This delightful dessert brings a refreshing burst of citrus, elevating the flavor profile to a whole new level. Whether it’s for a family gathering or a special occasion, these cheesecake bars are sure to impress with their unique combination of sweet and tart flavors.

Elevate your dessert game with the perfect balance of creaminess and citrusy zest. Our lemon cheesecake bars are not only a visual delight but also a testament to exquisite taste. Perfect as an after-dinner treat or a special surprise for your loved ones, these bars will quickly become a household favorite.

Quick Recipe Highlights

  • Flavor Profile: A perfect balance of creamy sweetness complemented by a tangy lemon twist.
  • Texture: Silky smooth cheesecake with a crunchy graham cracker base.
  • Aroma: Inviting notes of fresh lemon zest.
  • Visual Appeal: Beautiful marbled effect with vibrant lemon curds.
  • Skill Level Needed: Moderate, suitable for intermediate bakers looking to explore something new.
  • Special Equipment: Requires a stand mixer or electric hand mixer for best results.

The Recipe

Elegant Lemon Marbled Cheesecake Bars: A Citrus-Inspired Delight

Serves: 12

Prep Time: 20 mins

Cook Time: 35 mins

Total Time: 55 mins

Kitchen Equipment Needed

  • Stand mixer or electric hand mixer
  • 9×13 inch baking dish
  • Mixing bowls
  • Spatula

Ingredients

  • 1 1/2 cups graham cracker crumbs
  • 5 tablespoons unsalted butter, melted
  • 24 oz cream cheese, softened
  • 1 cup granulated sugar
  • 3 large eggs
  • 1 tablespoon lemon zest
  • 1/4 cup lemon juice
  • 1/4 cup sour cream
  • 1 teaspoon vanilla extract
  • 2 tablespoons all-purpose flour
  • 1/4 cup lemon curd

Directions

  1. Preheat your oven to 325°F (165°C). Line a 9×13 inch baking dish with parchment paper.
  2. In a mixing bowl, combine graham cracker crumbs and melted butter. Press the mixture evenly into the prepared baking dish to form the crust.
  3. In a large bowl, beat the cream cheese and sugar until smooth and creamy. Add eggs one at a time, mixing well after each addition.
  4. Stir in lemon zest, lemon juice, sour cream, and vanilla extract. Mix until just combined, then add flour and blend until smooth.
  5. Pour the cheesecake mixture over the prepared crust, spreading evenly.
  6. Dollop lemon curd over the cheesecake layer and use a knife to gently swirl to create a marbled effect.
  7. Bake in the preheated oven for 30-35 minutes until edges are set but the center still jiggles slightly.
  8. Allow to cool completely in the pan on a wire rack, then refrigerate for at least 2 hours before slicing into bars.

Recipe Notes

  • For a more intense lemon flavor, add extra lemon zest to the cheesecake mixture.
  • These bars can be stored in the refrigerator for up to 5 days.
  • Garnish with fresh berries or mint leaves for an added burst of color and flavor.

Indulge in Decadent Lemon Marbled Cheesecake Bars Recipe

Elegant Lemon Marbled Cheesecake Bars

Indulge in the rich, creamy decadence of Elegant Lemon Marbled Cheesecake Bars, a delightful fusion of zesty lemon and velvety cheesecake that will tantalize your taste buds. With the perfect balance of citrus brightness and luscious creaminess, these cheesecake bars offer a gourmet experience in every bite. Ideal for dessert lovers, this recipe is both sophisticated and approachable, making it a worthy addition to any dessert repertoire.

The freshness of lemon not only enhances the taste but also adds a vibrant visual element, creating a stunning marble effect. Such desserts bring elegance and grace to any occasion, whether a casual family gathering or an upscale dinner party. Dive into the world of Elegant Lemon Marbled Cheesecake Bars, where exquisite flavors meet culinary artistry in the most delightful way.

Quick Recipe Highlights

  • Flavor Profile: A harmonious blend of tangy lemon and rich, creamy cheesecake.
  • Texture: Silky smooth center with a crunchy base and a delicate top.
  • Aroma: Invigorating scent of fresh lemon zest combined with aromatic vanilla undertones.
  • Visual Appeal: Beautifully marbled textures with contrasting color swirls of lemon and cream.
  • Skill Level Needed: Intermediate mastery, requiring familiarity with baking techniques and precise measurement.
  • Special Equipment: Springform pan, hand mixer or stand mixer, and a zester.

Recipe Overview

  • Difficulty Level: Intermediate due to the need for precise baking techniques and marbling effects.
  • Category: Dessert
  • Cuisine: Continental, with influences from European pastry traditions.
  • Cost: Moderately priced, primarily influenced by the cost of cream cheese and fresh lemons.
  • Season: Spring and summer, when lemons are at their peak and add freshness to your meals.
  • Occasion: Perfect for entertaining guests, holiday meals, or as a luxurious treat.

Why You’ll Love This Recipe

Elegant Lemon Marbled Cheesecake Bars are a testament to the delightful marriage of flavors, offering a taste that is both rich and refreshing. With each bite, experience the smooth juxtaposition of tangy lemon with creamy cheesecake, perfectly topped with a subtly sweet layer. The marbled surface not only enhances visual appeal but also entices with its unique combination of taste and style.

Not limited by its delightful taste, this recipe also boasts convenience in preparation. Made in a single pan, it eliminates the need for multiple baking dishes, easing clean-up. The cheesecake bars are incredibly versatile, allowing for easy portioning and serving, making them a top choice for any gathering or solo indulgence.

Nutritionally, lemons provide a boost of Vitamin C, while the cheesecake delivers a satisfying treat, making it both a delightful and energizing choice. These bars bring people together, perfect as a conversation-starter or a shared indulgence, and underline the social and entertaining value of shared experiences.

In terms of cost-effectiveness, despite being an elegant dessert, the ingredients are readily accessible, allowing you to create a luxurious treat without breaking the bank.

Historical Background and Cultural Significance

The Elegant Lemon Marbled Cheesecake Bars take roots in centuries-old cheesecake traditions, with origins tracing back to ancient Greece, where cheesecake was initially served at the first Olympic games. Over time, this delectable dish evolved, gaining popularity across Europe, especially in France and Italy, where the art of marbling became a celebrated culinary technique.

Culturally, the addition of lemon to cheesecake is significant in many Mediterranean cuisines, highlighting the balance of sweet and citrus flavors that are quintessential to these regions. The modern adaptation of marbling adds a visually artistic element, evolving through culinary history as innovations in technique displayed mastery over visual and taste dimensions.

Regional variations of cheesecake are abundant, with each offering a unique twist. In the case of these bars, their grand appearance, and unique flavor profile make them stand out in any dessert menu, symbolizing both sophistication and indulgence. Traditionally, such desserts hold a sacred place during celebrations and gatherings, cherished for their flavors and aroma that unite guests in celebration.

Ingredient Deep Dive

Cream Cheese: The backbone of cheesecake, offering a creamy texture and tangy taste, it embodies refinement and is crucial to achieving that desired smoothness. Always opt for full-fat versions for the richest flavor and texture.

Lemons: Provide a fresh zesty kick that cuts through the richness, bringing brightness and flavor complexity to the dessert. Choose firm and vibrant lemons, a sign of freshness and high juice content.

Graham Crackers: Form the crunchy base, offering textural contrast to the creamy cheesecake above. Selection should focus on freshness and crispness for the best results.

Sugar: Essential for balancing flavors, sugar adds sweetness while enhancing the natural tastes of lemon and cheese. Consistency and granulation size are vital to dissolving and integrating well.

Vanilla Extract: Adds depth and complements the lemon, contributing to the aromatic profile that defines this dessert’s essence.

Common Mistakes to Avoid

  • Not allowing cream cheese to soften naturally, resulting in a lumpy batter.
  • Over-mixing the batter, which can lead to a dense cheesecake.
  • Using low-fat cream cheese, which affects texture and taste.
  • Skipping the lining of the pan, causing difficulties in removal and presentation.
  • Rushing cooling time, leading to cracking or collapsing.
  • Neglecting to create the marble effect before baking, missing out on visual appeal.
  • Improperly pre-baking the crust, leading to a soggy base.
  • Over-baking the cheesecake, resulting in a dry texture.
  • Underestimating the impact of lemon zest, which undercuts flavor depth.
  • Baking at the wrong temperature, altering texture and structure.

Essential Techniques

Perfecting the marbling technique is crucial for both aesthetic and taste balance. This involves swirling the lemon layer with the cheesecake base to achieve a visual and flavor integration without over-mixing. Secondly, learning how to manage the cheesecake batter’s temperature and texture ensures that the bars set properly without cracking.

Mastering water baths or bain-marie setups can greatly influence the cheesecake’s ability to cook evenly, preventing cracks and ensuring smooth texture. Visual cues range from the softness of the center to a firm jiggle, indicating readiness.

Pro Tips for Perfect Elegant Lemon Marbled Cheesecake Bars

– Allow all ingredients to reach room temperature for better mixing consistency.
– Pre-bake the crust to ensure a solid foundation, preventing sogginess.
– Use parchment paper for easier removal and clean edges.
– Incorporate lemon juice and zest for a more pronounced flavor profile.
– Monitor baking process through visual cues rather than strict timing.
– Cool bars in an incremental process to avoid cracking.
– Store in a cool area to allow flavors to meld and enhance.
– Showcase marbled pattern on top by paying attention to swirling technique.

Variations and Adaptations

Explore regional influences by incorporating other citrus fruits such as oranges or limes for a unique twist. Seasonal adaptations can introduce berries in summer months, offering a fruity contrast. For a dietary modification, use a gluten-free crust or a sugar substitute for those with specific dietary needs.

Serving and Presentation Guide

Embrace elegance with clean-cut squares, showcasing the marbled artwork atop each bar. Garnish with lemon slices or lemon zest curls for added visual appeal. Pair with a dollop of whipped cream or a light fruit coulis to complement and heighten the cheesecake experience.

Wine and Beverage Pairing

Pair with a light, crisp white wine such as Sauvignon Blanc, enhancing the lemon notes while refreshing the palate. Non-alcoholic options like iced lemon tea or sparkling water with lemon also harmonize beautifully. For a warm addition, consider serving alongside a fragrant Earl Grey tea that echoes the citrus elements.

Storage and Shelf Life

Refrigerate bars in an airtight container to maintain freshness for up to 5 days. Freeze individually wrapped bars for extended preservation, allowing for convenient, individual indulgence. Defrost overnight in the refrigerator for the best texture retention.

Make Ahead Strategies

Prepare crust and store separately to maintain crispness. Cheesecake batter can be prepared a day ahead, allowing lemon flavors to develop. Assemble and bake on the day of serving for freshness. Reheat gently or serve chilled based on personal preference for optimal taste and texture.

Scaling Instructions

To halve, adjust ingredients accordingly and use a smaller baking pan. For larger batches, double or triple and ensure increased pan size and baking time, tracking consistency. Always remember to maintain the ratio for perfect marbling and avoid overcrowding the baking area.

Nutritional Deep Dive

These cheesecake bars provide a harmonious mix of macronutrients, balanced by the vitamins and antioxidants from lemons. While indulgent, portion control allows enjoyment without overindulgence. Modify serving sizes based on dietary preferences to align with health goals.

Dietary Adaptations

For a gluten-free option, opt for gluten-free crackers or alternative flours for the base. Substitute dairy-free cream cheese for those avoiding dairy, ensuring consistency remains key. Vegan options can include plant-based cream cheese and egg substitutes, maintaining structure.

Recipe Notes

  • Consider using organic lemons for an intense flavor profile.
  • Add a hint of ginger for an unexpected warmth and spice.
  • Experiment with different citrus zest for unique aromas.

Troubleshooting Guide

If your cheesecake bars crack, ensure gradual cooling and check your oven temperature calibration. For firm crust preparation, verify pre-bake time to prevent sogginess. A lack of lemon flavor can be balanced by revisiting lemon juice and zest proportions.

Recipe Success Stories

Join the community dialogue, where readers like you showcase photo triumphs, innovative adaptation stories, and personalized versions of Elegant Lemon Marbled Cheesecake Bars. Share your experience in bringing a part of sophisticated gastronomy into your kitchen.

Frequently Asked Questions

Can I use lime juice instead of lemon?

Yes, lime juice can be a delightful substitute, offering a slightly different zest profile that works well with cream cheese.

How can I prevent my cheesecake bars from cracking?

Ensure ingredients are at room temperature, avoid over-baking, and cool gradually for best results.

What makes these bars different from traditional cheesecake?

These bars offer a modern twist with their marble effect and individual portion control, perfect for presentations.

Is a water bath necessary?

While not essential, a water bath can provide an even baking environment, reducing the chance of cracking and ensuring texture.

What’s the best way to achieve the marble effect?

Gently swirl the lemon filling into the cheesecake batter using a toothpick or knife before baking for best results.

Can these bars be made in advance?

Yes, they can be prepared ahead and either stored in the refrigerator or frozen for later enjoyment.

How do I store leftover cheesecake bars?

Keep them in an airtight container in the refrigerator or freeze individual pieces for long-lasting freshness.

What is the best way to slice cheesecake bars?

Use a sharp knife, warmed under hot water, and wipe between cuts for clean, precise slices.

Can I add fruit to the cheesecake bars?

Certainly, adding a fruit layer or topping after setting complements the lemon tartness beautifully.

How can I adjust sweetness to taste?

Tweak sugar levels in both the crust and the cheesecake filling to tailor sweetness to your preference.

Additional Resources

Enhance your cheesecake-making skills with related recipes available on our blog, view detailed technique videos, and explore guides for optimal ingredient selection and use of specialized baking equipment.

Join the Conversation

Share your creations on social media using #LemonCheesecakeBars, engage in community challenges, and provide feedback through comments. We invite you to share photography tips that capture the beauty of your dessert creations, bringing creativity and joy into your kitchen and beyond.

Elegant Lemon Marbled Cheesecake Bars: Elevate Your Dessert Game

Get ready to tantalize your taste buds with the rich and sophisticated flavors of Elegant Lemon Marbled Cheesecake Bars. This recipe combines the creamy texture of traditional cheesecake with the refreshing zest of lemon, all elegantly swirled for a stunning marble effect. Make these indulgent bars for your next gathering, and leave your guests craving more.

These cheesecake bars perfectly balance sweetness with the delicate tartness of lemon, offering a sophisticated dessert experience. The creamy, smooth texture melts in your mouth, while the gentle crunch of the crust provides a delightful contrast. Enhance your dessert repertoire with this crowd-pleasing treat.

Quick Recipe Highlights

  • Flavor Profile: Creamy cheesecake with a refreshing lemon tang
  • Texture: Smooth and creamy filling with a slightly crunchy crust
  • Aroma: Inviting scent of lemon and cream cheese
  • Visual Appeal: Beautifully marbled yellow and white swirls
  • Skill Level Needed: Intermediate baking skills
  • Special Equipment: Mixer, baking dish, cooling rack

The Recipe

Elegant Lemon Marbled Cheesecake Bars: A Refreshing Treat

Serves: 16

Prep Time: 20 mins

Cook Time: 45 mins

Total Time: 65 mins

Kitchen Equipment Needed

  • Electric mixer
  • 9×9-inch baking dish
  • Cooling rack
  • Mixing bowls
  • Rubber spatula

Ingredients

  • 1 1/2 cups crushed graham crackers
  • 1/4 cup melted butter
  • 16 oz cream cheese, softened
  • 3/4 cup sugar
  • 2 large eggs
  • 1/4 cup lemon juice
  • Zest of 1 lemon
  • 1/2 teaspoon vanilla extract

Directions

  1. Preheat your oven to 325°F (163°C). Grease a 9×9-inch baking dish with butter or non-stick spray.
  2. In a bowl, combine crushed graham crackers and melted butter. Press the mixture firmly into the bottom of the prepared baking dish to form the crust.
  3. In a large mixing bowl, beat softened cream cheese and sugar until smooth and creamy.
  4. Add eggs one at a time, mixing well after each addition.
  5. Mix in lemon juice, lemon zest, and vanilla extract until fully incorporated.
  6. Pour two-thirds of the cream cheese mixture over the crust, smoothing the top with a spatula.
  7. Drizzle the remaining mixture over the top to create a marbled effect by swirling with a knife or skewer.
  8. Bake in the preheated oven for 45 minutes, or until the edges are set and the center slightly jiggles.
  9. Allow to cool at room temperature, then refrigerate for at least 2 hours before slicing.

Recipe Notes

  • For extra lemon flavor, add more lemon zest to the batter.
  • Store in an airtight container in the refrigerator for up to 4 days.
  • Consider using a water bath to prevent cracking if desired.

Delicious Chocolate Pecan Caramel Truffles: Easy Homemade Recipe

Chocolate Pecan Caramel Truffles Recipe

Indulge in the irresistible allure of Chocolate Pecan Caramel Truffles. This decadent treat combines the rich flavors of chocolate with the nutty goodness of pecans and the silky sweetness of caramel. Whether you’re a chocolate enthusiast or simply seeking the perfect bite-sized dessert, these truffles promise to elevate any occasion. With a delicate balance of textures and unforgettable flavors, this recipe will quickly become a favorite in your dessert repertoire.

Quick Recipe Highlights

  • Flavor Profile: A rich blend of bittersweet chocolate and creamy caramel, contrasted by the toasty notes of pecans.
  • Texture: Smooth and creamy interior with a slight crunch from the pecans, all encapsulated in a glossy chocolate shell.
  • Aroma: Heavenly aromas of roasted nuts, deep cocoa, and sweet caramel.
  • Visual Appeal: These truffles shine with their glossy finish, speckled with finely chopped pecans for an artisanal touch.
  • Skill Level Needed: Intermediate – requires precision in tempering chocolate and making caramel.
  • Special Equipment: Candy thermometer, food processor, double boiler or a heatproof bowl over a simmering saucepan.

Recipe Overview

  • Difficulty Level: Intermediate, involving precise caramel-making and chocolate tempering for the perfect truffle.
  • Category: Desserts, Confectionery
  • Cuisine: Modern American with classic French influences
  • Cost: Moderate, with the main cost deriving from high-quality chocolate and pecans.
  • Season: Ideal for late fall and winter, when richer desserts are most appreciated.
  • Occasion: Perfect for festive gatherings, gift-giving, or elegant dinner parties.

Why You’ll Love This Recipe

These Chocolate Pecan Caramel Truffles offer a symphony of flavors that will delight your taste buds. The luscious caramel achieves the perfect sweetness, harmonizing with the slightly bitter chocolate and the earthy, buttery pecans. Convenience is another charm of this recipe, as these truffles can be made ahead and stored, ready to impress guests or satisfy a spontaneous chocolate craving. Moreover, each truffle serves as a small, satisfying indulgence, making portion control easier than with larger desserts. Finally, the accessibility of ingredients allows for a cost-effective yet luxurious treat, using pantry staples found in most homes or easily sourced from local stores.

Historical Background and Cultural Significance

The truffle, a petite yet opulent treat, traces its roots back to 19th-century France, where chefs first crafted these rich confections in homage to the prized fungus of the same name. Over time, the chocolate truffle evolved, encompassing a variety of fillings and flavors. Chocolate Pecan Caramel Truffles represent a modern twist, infusing classic French techniques with the quintessentially American flavors of pecans and caramel. These truffles celebrate the fusion of culinary traditions, offering a delightful nod to both French refinement and New World ingredients. Traditionally served during festive seasons, they embody a gesture of luxury and appreciation.

Ingredient Deep Dive

Pecans lend a distinctly American touch to these truffles. Originating from North America, pecans hold cultural significance, particularly in Southern cuisine, and are celebrated for their rich, buttery flavor. Nutritionally, pecans provide essential minerals and heart-healthy fats. When selecting pecans, opt for fresh, unshelled nuts or vacuum-sealed packs to ensure quality. Store them in a cool, dry place or in the freezer to prolong shelf life. Substitute walnuts for a slightly different flavor profile.

High-quality dark chocolate contributes to the truffles’ rich depth. Opt for chocolate with at least 70% cocoa for a balanced bittersweet flavor, while milk chocolate may be used for a sweeter, creamier variant. Store chocolate in a cool, dry place, away from direct light, to prevent blooming.

Fresh cream is pivotal for a silky caramel. Choose heavy cream for its richness, crucial in achieving the desired mouthfeel. Proper storage in the fridge ensures freshness and prolongs shelf life.

Common Mistakes to Avoid

  • Improperly tempering the chocolate, which can lead to a dull finish – Use a thermometer and follow precise temperature guidelines.
  • Burning the caramel by not monitoring the heat – Keep a vigilant eye and use a candy thermometer for accuracy.
  • Mixing the caramel while it’s still very hot into chocolate – Let it cool slightly to avoid a gritty texture.
  • Using low-quality chocolate, which affects taste – Invest in premium chocolate with a high cocoa percentage.
  • Not allowing enough setting time before coating truffles – Chill for at least an hour for best results.
  • Skipping the toasting of pecans, which enhances flavor – Lightly toast for a richer, nuttier taste.
  • Not seasoning the caramel, which balances sweetness – Add a pinch of salt to enhance flavors.
  • Ignoring chocolate blooming – Store truffles in a stable, cool environment to prevent this.
  • Handling truffles with warm hands – Use gloves or a cold utensil to maintain shape.
  • Skipping the chilling phase before rolling – Ensure the mixture is firm enough to handle.

Essential Techniques

Tempering Chocolate is crucial for shiny, snappy truffles. It involves carefully heating and cooling chocolate to stabilize the cocoa butter crystals. Use a thermometer to maintain control over the temperature, avoiding overheating.

Making Caramel involves dissolving sugar over heat until it achieves a golden amber color. Mastery comes from closely watching the sugar’s color and smell, as it turns from sweet to bitter quickly.

Properly Toasting Pecans elevates their natural flavor. Spread nuts in a single layer on a baking sheet and heat in a preheated oven, stirring occasionally.

Rolling Truffles evenly ensures a professional appearance. Use a small scoop or cold, clean hands, and refrigerate the mixture before shaping.

Pro Tips for Perfect Chocolate Pecan Caramel Truffles

Ensure all your ingredients are at room temperature before starting, particularly when making the caramel.
Chill your bowls and utensils before handling the truffle mixture to prevent melting.
Experiment with different chocolate brands for your preferred balance of sweetness and bitterness.
Incorporate a splash of vanilla extract into the caramel for added depth of flavor.
Garnish the finished truffles with a sprinkle of flaked sea salt for a sophisticated touch.
Practice patience and let the caramel cool down slightly before mixing it with chocolate.
Invest in a good candy thermometer for accuracy in both caramel and chocolate temperatures.
Use a fine-mesh sieve to dust the truffles with cocoa powder for a clean, polished look.

Variations and Adaptations

Regional variations might include using local nuts such as macadamias or hazelnuts.
Incorporate seasonal elements by adding a pinch of cinnamon or nutmeg in fall variants.
Adapt for dietary needs by using dairy-free cream and vegan chocolate for a vegan version.
Enhance flavor with additional extracts, such as almond or orange.
Alter texture by adding finely chopped nuts to the chocolate coating.
Create unique presentations by dipping in white chocolate and drizzling with dark chocolate.

Serving and Presentation Guide

For an elegant presentation, arrange truffles in mini paper cups on a platter.
Garnish with a light dusting of cocoa powder or chocolate shavings for added flair.
Serve alongside freshly brewed espresso for a classic pairing.
Consider temperature; these truffles are best served slightly chilled or at room temperature.
Offer truffles as an after-dinner treat, presented on a dessert cart.
Use small plates or tiered stands for an afternoon tea setting.

Wine and Beverage Pairing

Pair these truffles with a rich port or deep red wine to complement the chocolate and nut flavors.
For a non-alcoholic alternative, a robust coffee or brewed black tea can enhance the truffles’ depth.
If desired, a splash of Cognac or brandy can be served alongside for an extra indulgent treat.
Consider the temperature of your beverages; cooler wines offer a refreshing contrast.

Storage and Shelf Life

Store truffles in an airtight container in the refrigerator to maintain freshness.
Chocolate pecan caramel truffles will keep well for up to two weeks.
Check for blooming; if it occurs, while still edible, truffles may lose visual appeal.
For long-term storage, freeze truffles, ensuring they’re well-sealed to prevent moisture infiltration.
Allow frozen truffles to thaw overnight in the fridge for the best texture.

Make Ahead Strategies

Prepare the pecan and chocolate mixture up to a day in advance and refrigerate before forming truffles.
Caramel can be made ahead and gently reheated before use.
Mix components separately and combine just prior to shaping for maximum freshness.
Gradually reheat the chocolate mixture for rolling to ensure a workable consistency.

Scaling Instructions

To halve the recipe, divide all ingredients by two, maintaining original cooking times.
For larger batches, scale ingredients accordingly and prepare the caramel in smaller, manageable portions.
Adjust cooling times for larger quantities, ensuring truffles are properly chilled before serving.
Store extra batches neatly to avoid damaging the finish of the truffles.

Nutritional Deep Dive

Each truffle provides a luxurious treat without excessive caloric guilt when enjoyed in moderation.
Rich in antioxidants from dark chocolate, these truffles offer potential health benefits.
Nuts contribute protein and heart-healthy fats, adding nutritional value.
Portion control remains crucial; savor each truffle slowly to fully appreciate its flavors.
New recipes or substitutions can maintain truffle’s luxurious appeal while catering to dietary preferences.

Dietary Adaptations

Create gluten-free truffles by ensuring all chocolate and flavorings are gluten-free-certified.
For a dairy-free variant, substitute coconut cream and vegan chocolate.
To make the recipe vegan, ensure all ingredients, including caramel, are plant-based.
Opt for sugar alternatives like stevia for a low-carb version, creating a keto-friendly treat.

Recipe Notes

  • Experiment with different nut varieties such as walnuts or almonds for a distinct flavor profile.
  • Consider using flavored liqueurs in the caramel for an adult variation.
  • Truffles can also be rolled in chopped nuts for added texture.
  • Always allow proper cooling time to maintain consistency and shape.

Troubleshooting Guide

  • If truffles are too soft, ensure the chocolate is properly tempered or refrigerate longer.
  • Grainy caramel may result from overheating; maintain a steady temperature and avoid stirring excessively.
  • Blooming can be managed by storing in a stable, cool environment.
  • Address flavor imbalances by adjusting sugar and salt levels in the caramel to taste.
  • Difficulty stacking truffles can be mitigated by using mini paper cups for transport.
  • Incorrect texture from overmixing can be corrected by gentler handling of ingredients.

Recipe Success Stories

Join our community of baking enthusiasts and share your Chocolate Pecan Caramel Truffles experience! From perfecting the caramel to creative serving ideas, discover the variations and tips shared by food lovers around the world. Engage with us on social media, where you’ll find an array of personalization and presentation photos, adding inspiration to your own culinary creations. We encourage you to submit your home-cooked stories and possible adaptations, showcasing the versatility and universal appeal of this delightful treat.

Frequently Asked Questions

How can I ensure my caramel doesn’t burn?

Monitor the temperature closely with a candy thermometer, maintaining a steady heat. Stir gently only when necessary to distribute the heat evenly. Removing from heat at the right golden amber color is key.

What is the best method to temper chocolate at home?

Start by gently melting the chocolate to 113°F (45°C), then cool to 81°F (27°C) by adding more chocolate or stirring. Finally, warm gently to 88°F (31°C) to complete tempering.

Can these truffles be made without nuts?

Yes, simply omit the pecans for a nut-free version. Consider adding a hint of sea salt for a savory balance or incorporating dried fruit for texture.

Is there an alternative to heavy cream for making caramel?

You can substitute coconut cream or a plant-based cream alternative to create a dairy-free caramel, maintaining a similar creamy consistency.

How do I fix grainy caramel?

If your caramel turns grainy, you can prevent recrystallization by ensuring sugar crystals are dissolved completely before adding the cream. Reheating gently and stirring cautiously also helps.

What’s the best way to coat truffles evenly in chocolate?

Use dipping tools or a fork to hold the truffle, allowing excess chocolate to drip off, ensuring a smooth coating.

How can I store truffles to maintain freshness?

Keep truffles in a cool, dark place in an airtight container to prevent moisture and temperature fluctuations from affecting quality.

Can truffles be frozen, and for how long?

Yes, you can freeze them for up to three months. Seal them properly to prevent freezer burn, allowing them to thaw overnight in the refrigerator before serving.

Why are my truffles losing their shape?

This could be due to insufficient chilling before rolling or handling with warm hands. Ensure the mixture is adequately cooled and use a cold utensil for precise shaping.

How do I avoid a dull finish on the chocolate coating?

Ensure proper tempering of chocolate to achieve a shiny finish. Storing correctly, away from humidity and heat, also preserves the appearance of the chocolate.

Additional Resources

Explore our collection of related recipes and techniques for mastering confectionery skills. Discover detailed guides on selecting and storing premium chocolates, alongside video tutorials on caramel-making and chocolate tempering. Access seasonal variations and creative plating ideas to inspire your next dessert endeavor.

Join the Conversation

Engage with our vibrant community! Share your Chocolate Pecan Caramel Truffles adventures using #TruffleTime on social media. Take inspiration from photography tips, participate in community challenges, or submit your own reviews and adaptations. Your culinary creativity fuels our passion, and we’re eager to see how you bring this delightful recipe to life.

Delicious Chocolate Pecan Caramel Truffles Recipe

Master the art of confectionery with our Chocolate Pecan Caramel Truffles recipe. These indulgent treats combine the richness of chocolate, the buttery crunch of pecans, and the irresistible allure of caramel, creating a trifecta of flavors that excite every palate. Ideal for dessert enthusiasts and lovers of fine chocolate, this recipe is both a challenge and a delight for those willing to explore the harmonious blend of textures and tastes.

Whether you’re preparing for a sophisticated gathering or simply indulging your sweet tooth, these Chocolate Pecan Caramel Truffles are sure to impress and satisfy. Their aesthetically pleasing appearance and exquisite taste make them a perfect choice for any occasion where elegance and flavor are paramount. Embrace this recipe to create a memorable dessert experience that speaks volumes of your culinary skills and flair.

Quick Recipe Highlights

  • Flavor Profile: Rich chocolate balanced with buttery pecans and sweet caramel
  • Texture: Velvety chocolate coating with a crunchy center
  • Aroma: Intense chocolate aroma with nutty undertones
  • Visual Appeal: Glossy dark chocolate exterior with a sprinkled pecan finish
  • Skill Level Needed: Intermediate, requires attention to tempering chocolate
  • Special Equipment: Double boiler, candy thermometer

The Recipe

Chocolate Pecan Caramel Truffles: A Decadent Treat

Serves: 12

Prep Time: 20 mins

Cook Time: 15 mins

Total Time: 35 mins

Kitchen Equipment Needed

  • Double boiler
  • Candy thermometer
  • Mixing bowls
  • Microwave-safe bowl
  • Baking sheet

Ingredients

  • 2 cups dark chocolate chips
  • 1 cup pecans, chopped
  • 1 cup caramel candies
  • 2 tablespoons heavy cream
  • 1 teaspoon sea salt
  • 1 tablespoon butter

Directions

  1. In a microwave-safe bowl, melt the caramel candies with heavy cream, stirring every 30 seconds until smooth. Set aside to cool slightly.
  2. Toast the chopped pecans in a dry pan over medium heat until fragrant, about 5 minutes. Let cool.
  3. Using a double boiler, melt the dark chocolate chips, stirring until completely smooth. If you don’t have a double boiler, use a heatproof bowl over a pot of simmering water.
  4. Mix the toasted pecans into the melted caramel. Quickly, form small balls from the caramel-pecan mixture, using your hands. Work quickly as the caramel may harden.
  5. Dip each caramel pecan ball into the melted chocolate, coating it entirely. Remove with a fork, allowing excess chocolate to drip off before placing it on a baking sheet lined with parchment paper.
  6. Sprinkle each truffle with a pinch of sea salt before the chocolate sets.
  7. Allow the truffles to cool at room temperature until the chocolate has set, or refrigerate for quicker results.
  8. Store the truffles in an airtight container at cool room temperature.

Recipe Notes

  • For a smoother texture, ensure chocolate is tempered correctly.
  • Experiment with different types of nuts, like walnuts or hazelnuts.
  • Add a dash of vanilla extract for additional flavor depth.

Decadent Cranberry Pistachio White Chocolate Truffles for the Holidays

Cranberry Pistachio White Chocolate Truffles

Indulge in the luxurious flavors of Cranberry Pistachio White Chocolate Truffles. This delightful dessert combines the tangy sweetness of cranberries with the rich creaminess of white chocolate, accented by the light, nutty crunch of pistachios. Perfect for special occasions or as a sweet treat, these truffles are easy to make and impossible to resist. Let’s explore this heavenly recipe that marries texture and taste seamlessly.

Quick Recipe Highlights

– Flavor Profile: Sweet and tangy with a nutty finish
– Texture: Smooth and creamy with a crunchy exterior
– Aroma: Lush chocolate with a hint of cranberry
– Visual Appeal: Creamy white chocolate accentuated by bright green pistachios and red cranberries
– Skill Level Needed: Intermediate, basic truffle-making skills required
– Special Equipment: Double boiler, food processor

Recipe Overview

– Difficulty Level: Intermediate due to the precision required in melting and molding chocolate
– Category: Dessert
– Cuisine: Fusion, blending elements from European chocolate traditions with festive flavors
– Cost: Moderately priced with cranberries and high-quality white chocolate as the primary ingredients
– Season: Best made in winter or during holidays for the festive colors and flavors
– Occasion: Ideal for celebrations, gifting, or indulgent dessert platters

Why You’ll Love This Recipe

Cranberry Pistachio White Chocolate Truffles offer a delightful harmony of flavors and textures. The creamy white chocolate perfectly contrasts with the tart cranberries and crunchy pistachios, providing a decadent taste experience in every bite. These truffles are not only a feast for your palate but also easy to prepare, making them an excellent choice for busy home cooks who wish to impress without a significant time investment.

Aside from their delectable taste, these truffles boast nutritional benefits. Pistachios are a good source of healthy fats, fiber, and protein, while cranberries provide antioxidants. Even though these are sweet treats, there is a balance of indulgence and health.

They serve as wonderful conversation starters at social gatherings, with their elegant appearance making them suitable for gifting. Finally, the accessibility of ingredients and the simple (yet satisfying) process make these truffles a cost-effective indulgence that doesn’t compromise on luxury.

Historical Background and Cultural Significance

The art of making truffles dates back to the 19th century in France, where confectioners crafted rich chocolate balls filled with ganache. Traditionally, truffles were dusted with cocoa powder, resembling the underground fungi of the same name. Throughout the years, truffles have evolved and diversified, embracing new flavors and ingredients.

The addition of cranberries and pistachios introduces a twist to this classic confection, bringing in elements that reflect the adaptable nature of modern cuisine. Cranberries are a staple in North American holiday traditions, while pistachios are rooted in Middle Eastern heritage. This fusion highlights the recipe’s global allure and its capability to transcend boundaries.

Ingredient Deep Dive

Cranberries: These vibrant berries are not only visually appealing but packed with antioxidants. When selecting cranberries, opt for those that are plump and firm. For storage, keep them refrigerated to prolong freshness. Dried cranberries can be a practical alternative when fresh ones are unavailable.

Pistachios: Known for their distinct nutty flavor and health benefits, pistachios are rich in protein and healthy fats. Choose pistachios that are shelled and roasted without salt for optimal taste and ease of use in the recipe. Store them in a cool, dry place, and use walnuts or almonds as possible substitutes if pistachios are unavailable.

White Chocolate: The creamy foundation of this truffle, quality white chocolate is essential. Look for high cocoa butter content for a smooth melting experience. Store it in a cool, dry environment to maintain its quality.

Common Mistakes to Avoid

– Overheating chocolate leads to grainy truffles; melt gently in a double boiler.
– Skipping the chilling step may cause truffles to lose shape.
– Using low-quality chocolate impacts the taste; always choose high-quality brands.
– Incorrect pistachio grind can make truffles oily; pulse briefly to avoid this.
– Over-mixing cranberries can lead to a pasty texture.
– Not tempering chocolate properly results in dull, streaky coatings.
– Neglecting clean utensils might introduce unwanted flavors.
– Insufficient cooling time can make serving difficult.

Essential Techniques

Melting Chocolate: Use a double boiler to melt the chocolate slowly, ensuring a smooth consistency. It prevents chocolate from burning and maintains the right temperature for coating.

Chilling: Essential for setting truffles, chilling ensures they hold their shape. It’s important for both shaping and coating phases, providing a firm texture.

Pro Tips for Perfect Cranberry Pistachio White Chocolate Truffles

– Always chop the cranberries finely for even distribution in the mixture.
– Use a melon baller or small scoop for uniform truffle sizing.
– Keep hands cold while rolling truffles to prevent melting.
– Consider using gloves to avoid transferring body heat to truffles.
– Add a splash of vanilla extract for an aromatic boost.
– Roll truffles in crushed nuts immediately after coating for better adherence.
– Allow coated truffles to set completely before serving.

Variations and Adaptations

– Regional variations include adding a hint of orange zest for extra citrusy notes.
– Seasonal adaptations can incorporate spices like cinnamon during fall.
– Dietary modifications can use dark chocolate for a lower sugar content.
– Experiment with different nut coatings, like pecans or hazelnuts.
– Adjust texture by adding rice crisps for a crunchy interior.
– For presentation, drizzle with dark chocolate for contrast.

Serving and Presentation Guide

– Use elegant platters or small paper cups for serving.
– Garnish with a sprinkle of sea salt for a gourmet touch.
– Pair with fresh cranberries for a visual contrast.
– Serve chilled to maintain their shape.
– Consider portioning with small individual cups for easy handling.

Wine and Beverage Pairing

– Pair with a sparkling wine or Champagne to enhance the truffles’ delicate flavors.
– For non-alcoholic options, consider a spiced apple cider or cranberry juice.
– A rich cappuccino also pairs well, balancing the sweetness.
– Serve beverages chilled to complement the truffles’ texture.

Storage and Shelf Life

Store truffles in an airtight container in the refrigerator to maintain freshness for up to two weeks. Ensure they are separated by parchment paper to prevent sticking. Signs of spoilage include discoloration and off smells. If freezing, use a sealed bag, and thaw in the fridge before serving.

Make Ahead Strategies

Prepare the truffle mixture up to a day ahead, storing it in the fridge before rolling and coating. After assembly, keep them chilled until serving to preserve taste and texture. Add fresh elements like a garnish shortly before serving.

Scaling Instructions

To halve the recipe, simply divide ingredient quantities by two, and use smaller equipment as needed. Doubling or tripling requires additional preparation space and larger mixing tools. Ensure adequate chilling time when making larger batches to maintain quality.

Nutritional Deep Dive

Each truffle contains essential fats and proteins from pistachios, while cranberries contribute dietary fiber. White chocolate adds sugar, requiring mindful consumption. Adjust serve size to align with nutritional goals without compromising indulgence.

Dietary Adaptations

– For gluten-free adaptations, all ingredients are naturally gluten-free, ensuring safe consumption.
– Dairy-free alternatives can use coconut-based white chocolate.
– Vegan versions swap traditional chocolate for plant-based options.
– Low-carb focuses can use high-cocoa dark chocolate to reduce sugar intake.

Recipe Notes

– Experiment with different dried fruits for additional flavors.
– Substitute pistachios with toasted sunflower seeds for allergen-free options.

Troubleshooting Guide

– If truffles are too soft, increase chilling time.
– An overpowering sweet taste can be balanced with a touch of sea salt.
– Difficulty in coating indicates incorrect chocolate temperature; re-melt with care.
– Adjusting cranberry quantity can rectify an overly chewy texture.
– Adding a touch more dairy to the chocolate mix can assist in smoothing out graininess.

Recipe Success Stories

Readers have shared their success in adapting the recipe with various nuts and fruits. Community feedback highlights the versatility and approachable nature of the recipe, with numerous tales of gifting these elegant truffles during holidays with rave reviews.

Frequently Asked Questions

Question 1: Can I use fresh cranberries instead of dried?

Answer: While fresh cranberries can be used, they will need to be finely chopped and reduced in quantity to avoid excess moisture that could alter the truffle’s consistency.

Question 2: What’s the best way to ensure my chocolate coating is smooth?

Answer: Use high-quality chocolate with a good cocoa butter content, and ensure it’s properly tempered. Cooling on a wire rack can also help maintain a smooth finish.

Additional Resources

Explore related recipes like Dark Chocolate Hazelnut Truffles or Coconut Almond Bites for more variety. Watch technique videos on chocolate tempering to perfect your skills, and check out detailed guides on selecting quality chocolate.

Join the Conversation

Share your creations on social media with #CranberryPistachioTruffles, and connect with our community for more inspiration and guidance. Engage in our monthly challenges for a chance to win exciting kitchen gadgets, and help others master this luxurious dessert. Your feedback and story could be featured in our next success story segment!

Cranberry Pistachio White Chocolate Truffles Recipe

⚖️
Difficulty
Moderate

⏲️
Prep Time
20 mins

🕒
Cook Time
10 mins

⏱️
Total Time
30 mins

🍽️
Servings
12

Are you ready to embark on a delicious culinary journey? This Cranberry Pistachio White Chocolate Truffles recipe is a sweet treat that blends the tangy flavor of cranberries with the rich, nutty taste of pistachios, all wrapped in a creamy white chocolate shell. Whether you’re hosting a holiday party or simply treating yourself, these truffles are a decadent choice that will impress.

Imagine biting into one of these luscious cranberry pistachio truffles. The sweet aroma of white chocolate envelops you as the tart cranberries and crunchy pistachios provide a delightful contrast of flavors and textures. These truffles are not only a feast for the taste buds but also a beautiful addition to any dessert table with their vibrant colors.

This recipe doesn’t require any advanced culinary skills, making it a fun and rewarding project for anyone who loves to indulge in homemade confections. With just a few simple steps, you can create an elegant dessert that’s perfect for gift-giving or sharing with friends and family.

Quick Recipe Highlights

  • Flavor Profile: Creamy white chocolate, tangy cranberries, and nutty pistachios
  • Texture: Smooth and creamy truffle interior with a crunchy garnish
  • Aroma: Sweet and creamy white chocolate with nutty undertones
  • Visual Appeal: Bright white chocolate with specks of green pistachios and red cranberries
  • Skill Level Needed: Moderate, suitable for most home bakers
  • Special Equipment: Double boiler or microwave for melting chocolate

The Recipe

Cranberry Pistachio White Chocolate Truffles: A Sweet Symphony of Flavors

Serves: 12

Prep Time: 20 mins

Cook Time: 10 mins

Total Time: 30 mins

Kitchen Equipment Needed

  • Double boiler or microwave-safe bowl
  • Mixing bowls
  • Spatula
  • Baking sheet
  • Small cookie scoop or spoon

Ingredients

  • 1 cup white chocolate chips
  • 1/2 cup dried cranberries, finely chopped
  • 1/2 cup pistachios, chopped
  • 1/4 cup heavy cream
  • 1 teaspoon vanilla extract
  • Pinch of salt

Directions

  1. In a double boiler or microwave-safe bowl, gently melt the white chocolate chips until smooth. Stir continuously to prevent burning.
  2. Once melted, stir in the heavy cream, vanilla extract, and a pinch of salt until well combined.
  3. Fold in the finely chopped cranberries and half of the chopped pistachios.
  4. Refrigerate the mixture for about 1-2 hours, or until firm enough to handle.
  5. Using a small cookie scoop or spoon, form the mixture into 1-inch balls and place them on a baking sheet lined with parchment paper.
  6. Roll each truffle in the remaining chopped pistachios to coat.
  7. Return the truffles to the refrigerator for another 30 minutes to set.
  8. Serve chilled and enjoy!

Recipe Notes

  • For a different flavor profile, try using dark chocolate instead of white chocolate.
  • Store truffles in an airtight container in the refrigerator for up to a week.
  • These truffles make a delightful homemade gift for the holidays or special occasions.

Indulge in Irresistible Cranberry Pistachio White Chocolate Truffles Recipe

Cranberry Pistachio White Chocolate Truffles Recipe

Indulge your senses with the luxurious Cranberry Pistachio White Chocolate Truffles, a decadent treat that brings together the rich creaminess of white chocolate, the tartness of cranberries, and the subtle nuttiness of pistachios. Perfect for festive gatherings or a simple yet elegant after-dinner dessert, these truffles stand out with their exquisite blend of flavors and textures. Tailored for both novice cooks and seasoned chefs, this recipe will soon become a cherished favorite in your repertoire.

The brilliant contrast of colors — from the creamy white chocolate coating to the vibrant green pistachios and red cranberry bits — makes these truffles an eye-catching delight. Their aroma is an enticing combination of sweet and nutty, with hints of vanilla permeating the air as you prepare them. Whether you’re making them for a special occasion or just treating yourself, these truffles impress with their ease of preparation and gourmet taste.

Quick Recipe Highlights

  • Flavor Profile: A sweet harmony of creamy white chocolate, tangy cranberries, and earthy pistachios.
  • Texture: Silky and smooth with a delightful crunch from the nutty pistachio pieces.
  • Aroma: A sweet vanilla and nutty essence that tempts your senses.
  • Visual Appeal: A vibrant palette of white, green, and red encased in a perfectly round truffle shape.
  • Skill Level Needed: Ideal for all skill levels, from beginners to experts.
  • Special Equipment: A baking sheet, parchment paper, mixing bowls, and a small scoop or spoon.

Recipe Overview

  • Difficulty Level: Easy – straightforward assembly with minimal cooking skills required.
  • Category: Dessert, Snack
  • Cuisine: Contemporary, with influences of classic confectionery.
  • Cost: Budget-friendly using accessible ingredients like cranberries, pistachios, and white chocolate.
  • Season: Best enjoyed in winter holidays when cranberries are freshest and festivities call for indulgence.
  • Occasion: Perfect for holiday parties, casual snacking, or gifting.

Why You’ll Love This Recipe

These Cranberry Pistachio White Chocolate Truffles are a delight for those who love the combination of sweet and tart. Their soft, creamy center complements the crispy pistachio coating, creating an irresistible texture that melts in your mouth. The ease of preparation means you can whip them up in no time, making them a perfect choice for last-minute gatherings or unexpected guests.

The ingredients offer nutritional benefits; cranberries are high in antioxidants, while pistachios provide healthy fats and protein. White chocolate, though enjoyed sparingly, adds a touch of sweetness without overwhelming the palate. These truffles are not only delicious but also make for thoughtful homemade gifts that can be tailored to suit personal tastes by experimenting with different coatings or flavor infusions.

Their visual and flavor appeal is sure to captivate friends and family, often leading to requests for your recipe secrets. These truffles are cost-effective as they utilize easily available ingredients, making them an accessible luxury for any occasion.

Historical Background and Cultural Significance

While truffles traditionally hail from French cuisine, their allure has transcended borders, leading to a variety of local adaptations. This Cranberry Pistachio version combines elements of a classic candy-making tradition with a modern twist, showcasing the versatility and cultural blending celebrated in contemporary cooking.

Culturally, truffles are associated with gifting and celebration, often wrapped elegantly and exchanged during festive seasons. The incorporation of cranberries and pistachios reflects regional influences from North America and the Middle East, respectively, highlighting the global reach and adaptability of this classic confectionery.

Over the years, the evolution of truffle recipes has seen diverse culinary interpretations, with an emphasis on both traditional richness and modern dietary preferences. Today, these truffles can be found in gourmet stores worldwide, with this particular version offering a homemade touch that personalizes the truffle-making experience.

Ingredient Deep Dive

White Chocolate: This recipe’s foundation, white chocolate, offers a sweet, creamy base that balances the tart cranberries. Look for high-quality cocoa butter content for a silken texture and flavor. It can be stored in a cool, dry place, and substitutes like dark or milk chocolate can be used, though flavor profiles will alter.

Cranberries: Offering a burst of tartness, cranberries complement the sweet chocolate. They are rich in antioxidants and should remain dry to maintain texture. Store them in an airtight container, and consider using dried cherries or raisins as a substitute for varied flavor.

Pistachios: These nuts add a rounded, earthy flavor and stunning green color. Opt for unsalted and pre-shelled pistachios to streamline preparation. Keep in a sealed container to preserve their crunch, and if necessary, walnuts or almonds can stand in as alternatives, providing different textural experiences.

Common Mistakes to Avoid

  • Over-melting white chocolate: Melt gently to avoid burning.
  • Using wet ingredients: Ensure cranberries and pistachios are dry to prevent clumping.
  • Skipping the chilling step: Ensure truffle mix is firm before shaping.
  • Over-portioning: Use a consistent scoop size to ensure uniform truffles.
  • Not adjusting for humidity: Consider moisture levels when storing to maintain texture.
  • Underestimating the importance of chilling time between steps: Allows the truffles to set properly.
  • Using low-quality ingredients: Impacts flavor and overall experience.
  • Ignoring storage instructions: Affects freshness and taste.
  • Over-stirring the mixture: Can lead to an oily texture.
  • Skipping roasting for pistachios: Enhances flavor depth.

Essential Techniques

Melting Chocolate: Achieve a smooth, lump-free consistency by using a double boiler or microwave in short bursts, stirring frequently. This is critical to ensuring an even coating that enhances presentation and taste.

Chilling and Shaping: After combining ingredients, chilling is vital for achieving the desired firm texture before shaping. This technique helps maintain the truffles’ structure, making them visually appealing.

Nut Coating: Rolling truffles in nuts adds texture and enhances flavor. Ensure nuts are finely chopped and press them gently into the truffle surface for a uniform coating.

Pro Tips for Perfect Cranberry Pistachio White Chocolate Truffles

Allow white chocolate to cool slightly before mixing to prevent curdling.
Use a small scoop for uniform truffles.
Chill the mixture thoroughly for easier shaping.
Ensure hands are cool and dry when forming truffles to avoid melting.
Roll the truffles lightly in your palms for a polished finish.
Experiment with flavor extracts, like vanilla or almond, for added complexity.
Toast pistachios lightly for deeper flavor before chopping.
Always mix in small batches for flavor consistency.

Variations and Adaptations

Regional variations might include incorporating local nut favorites, such as pecans or macadamia nuts for a Southern twist. For a seasonal adaptation, consider adding a hint of pumpkin spice during autumn, or crushed peppermint during winter holidays for a festive touch.

Dietary modifications can make the recipe suitable for various needs; for instance, you could substitute coconut cream for dairy-free versions or use low-sugar white chocolate alternatives for those watching their sugar intake.

Experiment with flavor variations by infusing the cream with citrus zest or a touch of brandy for a more sophisticated adaptation. For texture modifications, rolling the truffles in shredded coconut or freeze-dried berry powder can provide unique flavor and presentation alternatives.

Serving and Presentation Guide

Plate truffles on a bed of finely chopped pistachios for a cohesive presentation, and garnish with a single whole cranberry for a pop of color. Consider modern serving suggestions like placing them in decorative mini paper cups or a glass jar for a chic dessert table addition.

Temperature considerations are vital; serve them chilled to maintain their creamy texture. For portion control, aim to serve 2-3 truffles per person as part of a dessert platter.

Wine and Beverage Pairing

Pair these delightful truffles with a crisp, light sparkling wine like Prosecco, which complements the creamy and nutty flavors without overpowering them. For non-alcoholic alternatives, a berry-infused iced tea or a citrusy lemonade will refresh the palate.

If tea or coffee suits your fancy, opt for a mild chamomile tea for its floral undertones or a light roast coffee that allows the truffles’ complex flavors to shine through.

Storage and Shelf Life

Store truffles in an airtight container in a cool location, such as the refrigerator, to preserve freshness and texture. They remain stable for up to two weeks when stored properly. Signs of spoilage include a dull appearance or off smell; in these cases, discard the truffles.

For longer storage, truffles can be frozen by placing them in a single layer on a baking sheet until firm, then transferred to a sealable freezer bag for up to two months. Thaw them in the refrigerator to maintain texture.

Make Ahead Strategies

To streamline the truffle-making process, consider breaking it down into steps: prepare the truffle mixture in advance and chill it, then shape and coat the truffles closer to the serving date. This method maintains freshness and allows for easy assembly.

For optimal results, store the truffle mix in the refrigerator and roll them a day ahead. Add fresh elements, such as garnishes, just before serving to ensure peak flavor and presentation.

Scaling Instructions

To halve the recipe, simply reduce ingredient proportions and monitor melting chocolate closely to prevent scorching. Doubling or tripling requires additional chilling space and may slightly alter the chilling time required for the mixture to set. Adjust container size and storage environment accordingly for larger batches.

Nutritional Deep Dive

Each truffle generally contains a balanced macro profile of fats and carbohydrates, primarily from the chocolate and nuts. Nutritionally, these treats are rich in energy, with some micronutrients offered by the nuts and cranberries.

Incorporating pistachios provides vitamin B6, potassium, and antioxidants. White chocolate, while calorie-dense, offers sweetness with moderation. Consider portion control as part of mindful eating practices, especially for weight management.

Dietary Adaptations

For those needing gluten-free options, this recipe is inherently gluten-free provided the chocolates and nuts are certified gluten-free. Dairy-free enthusiasts can substitute coconut cream for creaminess without sacrificing flavor.

Vegan adaptations might include using dairy-free white chocolate and plant-based cream alternatives, ensuring full flavor retention. Low-carb versions can be achieved by using sugar-free white chocolate and exploring nut flour coatings.

Recipe Notes

  • Substitute white chocolate with dark chocolate for a richer flavor profile.
  • Add a splash of orange liqueur for a citrusy twist.
  • Roll in cocoa powder for an alternative finish.
  • Mix in freeze-dried fruits for more texture variety.

Troubleshooting Guide

Texture issues like excess softness can arise from inadequate chilling; ensure ample fridge time. Overly sharp flavors can be balanced with additional white chocolate to sweeten the mix.

Temperature problems often stem from incorrect chocolate melting; monitor heat carefully to prevent burning. Ingredient substitutions can also affect consistency; if using alternate nuts, consider the oil content and adjust accordingly.

Recipe Success Stories

Our readers rave about the versatility of these truffles, with many customizing them to suit dietary needs or preferences. Some have creatively included matcha powder in their coatings for a vibrant, flavorful twist, while others enjoy the classic blend as an elegant addition to festive dessert platters.

Feedback has shown that these truffles often become family favorites, inspiring culinary creativity and sharing among friends, underscoring their role as both a delicious treat and a catalyst for social enjoyment.

Frequently Asked Questions

Can I use fresh cranberries instead of dried?

Using fresh cranberries might alter texture due to higher moisture; opt for drying them first or stick to dried variants for best results.

How do I make these truffles more festive?

Consider adding a touch of edible gold dust, festive sprinkles, or rolling truffles in colored sugar for a seasonal twist.

Can I make these truffles in advance?

Yes, you can prepare the truffle mixture ahead, shape them, and store them in an airtight container in the fridge for up to two weeks.

What is the best chocolate to use for this recipe?

High-quality white chocolate with good cocoa butter content is recommended for the best texture and flavor.

Can I add spices for extra flavor?

Absolutely, spices like cinnamon or nutmeg can be added to the mixture for a warm, aromatic twist.

How do I ensure the pistachios stick to the truffles?

Lightly press the pistachios onto the freshly rolled truffle to ensure they adhere well without damaging the truffle’s shape.

Are there any nut-free alternatives?

For nut-free versions, replace pistachios with finely chopped pumpkin seeds or omit the outer coating entirely.

Can I use different nuts for coating?

Feel free to experiment with almonds, walnuts, or pecans, although each will impart its unique flavor.

How do I prevent the truffles from melting too quickly?

Keep them chilled until serving, and consider using space-cooling methods like placing serving dishes over ice packs on warm days.

What’s the best way to gift these truffles?

Package them in decorative boxes or small cellophane bags with ribbons for an elegant gift presentation.

Additional Resources

Explore our collection of other truffle recipes for variation ideas, or check out our comprehensive guides on melting chocolate, choosing the best kitchen tools, and adapting recipes for dietary needs.

Join the Conversation

We encourage you to share your Cranberry Pistachio White Chocolate Truffles creations on social media using #TruffleTreats, and tag us for a chance to be featured. Engage with our community through fun challenges, sharing tips, and reviewing recipes to enhance the collective cooking journey.

Cranberry Pistachio White Chocolate Truffles

Looking for a delightful and easy-to-make treat that bursts with flavor? Our Cranberry Pistachio White Chocolate Truffles are just what you need! These truffles combine the creamy sweetness of white chocolate with the tartness of cranberries and the earthy crunch of pistachios. Perfect for holiday gatherings or as a sweet indulgence any time of year, this recipe will guide you through the steps to create these bite-sized delights. Impress your guests with this visually stunning and delectably rich dessert.

Quick Recipe Highlights

  • Flavor Profile: A harmonious blend of sweet white chocolate, tangy cranberries, and nutty pistachios.
  • Texture: Smooth and creamy with a delightful crunch from pistachios.
  • Aroma: Sweet and nutty with hints of cranberry.
  • Visual Appeal: Beautifully white chocolate-coated balls speckled with green and red hues from pistachios and cranberries.
  • Skill Level Needed: Beginner-friendly with simple steps.
  • Special Equipment: Double boiler or microwave-safe bowl for melting chocolate.

The Recipe

Cranberry Pistachio White Chocolate Truffles: Sweetness in Every Bite

Serves: 24

Prep Time: 20 mins

Cook Time: 10 mins

Total Time: 30 mins

Kitchen Equipment Needed

  • Mixing bowls
  • Double boiler or microwave-safe bowl
  • Baking sheet
  • Parchment paper
  • Spoon or scoop for shaping truffles

Ingredients

  • 1 cup white chocolate chips
  • 1/2 cup heavy cream
  • 1 teaspoon vanilla extract
  • 1/2 cup finely chopped pistachios
  • 1/2 cup dried cranberries, chopped
  • Additional pistachios and cranberries for coating (optional)

Directions

  1. Place white chocolate chips and heavy cream in a double boiler or microwave-safe bowl. Melt gently, stirring frequently until smooth.
  2. Remove from heat and stir in vanilla extract, chopped pistachios, and cranberries.
  3. Allow the mixture to cool slightly, then refrigerate for about 1 hour or until firm enough to handle.
  4. Line a baking sheet with parchment paper. Scoop small amounts of the truffle mixture and shape into balls, placing them onto the prepared baking sheet.
  5. Roll each truffle in additional chopped pistachios and cranberries if desired for added texture and flavor.
  6. Refrigerate truffles for another 30 minutes or until fully set before serving.

Recipe Notes

  • Feel free to experiment with other nuts or dried fruits for different flavor combinations.
  • Store truffles in an airtight container in the refrigerator for up to a week.
  • If gifting, place truffles in mini cupcake liners for an elegant presentation.

Irresistible Hot Fudge Pie Recipe Perfect for Chocolate Lovers

Hot Fudge Pie Recipe: A Decadent Chocolate Delight

Satisfy your chocolate cravings with this indulgent Hot Fudge Pie recipe. With a rich and gooey filling encased in a crispy crust, this dessert combines the best elements of a brownie and a pie. Whether you’re hosting a cozy dinner or craving a midweek treat, this Hot Fudge Pie promises to be a showstopper. Enjoy the lingering sweetness and captivating aroma of chocolate in a pie that feels luxurious yet comforting.

Quick Recipe Highlights

  • Flavor Profile: A rich, chocolaty decadence with a touch of vanilla
  • Texture: Gooey and fudgy interior with a lightly crisp, flaky outer crust
  • Aroma: Deep chocolate notes with hints of vanilla warmth
  • Visual Appeal: Dark, glossy top with a delicate, cracked surface
  • Skill Level Needed: Intermediate; requires baking knowledge and timing accuracy
  • Special Equipment: Hand mixer, pie dish

Recipe Overview

  • Difficulty Level: Moderate due to precise timing to achieve perfect fudgy consistency
  • Category: Dessert, Chocolate Dessert
  • Cuisine: American; echoes traditional Southern baking influences
  • Cost: Relatively low; main cost factors are quality chocolate and heavy cream
  • Season: Ideal for winter and fall, highlighting the comforting warmth of chocolate
  • Occasion: Perfect for dinner parties, holiday gatherings, or Valentine’s Day

Why You’ll Love This Recipe

This Hot Fudge Pie is a culinary masterpiece for chocolate lovers. Its fudgy texture and rich flavor create a perfect balance of sweetness without being overpowering. Not only is it a treat for your senses, but it’s also relatively easy to prepare, making it a favorite for both novice bakers and seasoned chefs. The use of basic pantry ingredients ensures it’s a budget-friendly option. Whether enjoyed warm with a scoop of vanilla ice cream or cooled to room temperature, this pie is versatile and bound to impress any crowd. Its decadent nature makes it an elegant dessert choice for special occasions, yet it’s straightforward enough for an everyday indulgence.

Historical Background and Cultural Significance

Hot Fudge Pie finds its roots in Southern American kitchens, known for their inventive and comforting desserts. Originally, this dish was created as a way to enjoy the rich flavors of chocolate in a pie form, combining the best aspects of a cake and pudding. Over the decades, it has become a staple at community gatherings and holiday feasts, prized for its balance of simplicity and rich taste. Variations of this recipe can be found throughout the United States, each adding a personal twist, such as spiced undertones or nuts. Traditionally served warm, it complements the communal spirit of family meals and celebrations.

Ingredient Deep Dive

– **Chocolate**: Central to the pie’s flavor, dark chocolate brings richness and depth, contributing to both the taste and glossy appearance. Opt for high-quality chocolate with at least 60% cocoa content for best results. Store in a cool, dry place and avoid direct sunlight to maintain its integrity.

– **Butter**: Provides moisture and richness, giving the pie its tender crumb. Unsalted butter is preferred to control the pie’s salt level. When measuring, ensure it’s at room temperature for easy blending with sugars.

– **Eggs**: Serve as a leavening and structuring agent, contributing to the pie’s fudgy texture. Fresh eggs ensure fluffiness and aid in proper rising during baking. Beat until just combined to avoid a dense mixture.

– **Vanilla Extract**: Enhances the chocolate flavor and adds a sweet aroma. Pure vanilla extract is advised over synthetic for a more authentic taste. Store in a cool, dark place for longevity.

Common Mistakes to Avoid

  • Overmixing the batter can lead to a dense pie. Mix until ingredients are just combined.
  • Using cold butter or eggs can hinder proper blending. Ensure all ingredients are at room temperature.
  • Opening the oven mid-bake can cause the pie to collapse. Trust the timing and resist checking too often.
  • Baking too long results in a dry texture; look for a slightly jiggly center when done.
  • Inaccurate chocolate measurements lead to inconsistent flavor; always measure ingredients properly.
  • Skipping the cooling step makes slicing difficult and messy. Allow the pie to cool slightly for clean cuts.
  • Using low-quality chocolate will affect taste; invest in good chocolate for a superior result.
  • Forgetting to preheat the oven can alter baking time and texture.

Essential Techniques

Achieving the perfect texture in Hot Fudge Pie requires mastering a few key techniques. One crucial method is the melting and tempering of chocolate and butter. Properly melted and cooled chocolate ensures a smooth, clump-free batter. Incorporating eggs one at a time ensures a consistent texture, and carefully folding in dry ingredients prevents overmixing. Each technique demands attention to temperature, timing, and consistency to ensure a successful pie.

Pro Tips for Perfect Hot Fudge Pie

– Always preheat your oven to ensure even baking from the start.
– Use a glass or ceramic pie dish to evenly conduct heat, preventing an overcooked base.
– For a gooey center, slightly underbake for an irresistible molten texture.
– Adding a pinch of salt can enhance the chocolate’s depth.
– Dust the top with cocoa powder for visual contrast and added flavor.
– Let the pie sit for at least 10 minutes before slicing to set properly.
– Serve warm with a scoop of ice cream for a classic touch.
– Experiment with flavored liqueurs in the batter for a sophisticated twist.

Variations and Adaptations

This Hot Fudge Pie invites numerous adaptations, enabling you to tailor it to your taste or dietary needs. Regional twists might include adding pecans for a Southern feel or incorporating spices like cinnamon for a seasonal touch. Adapt the recipe with almond flour to make it gluten-free, or substitute coconut oil for a dairy-free version. For those seeking a less sweet treat, darken the pie with extra-dark chocolate or even incorporate espresso powder for a mocha flavor. Presentation can also vary from traditional slices to individual ramekins for personal servings.

Serving and Presentation Guide

For an inviting presentation, a dusting of powdered sugar or cocoa powder adds elegance. Top each slice with a dollop of whipped cream or a scoop of ice cream to contrast the warm pie with cold creaminess. Consider garnishing with fresh berries for a pop of color and acidity. When serving, use a sharp knife and wipe the blade clean between cuts for neat slices. Serving the pie warm is traditional, but allowing it to cool slightly enhances flavors.

Wine and Beverage Pairing

Pair this fudgy delight with a rich red wine like a Zinfandel or Port to complement its deep chocolate flavors. For non-alcoholic options, strong black coffee or a full-bodied tea like Assam match beautifully. Beverages served slightly warmer than room temperature bring out the pie’s richness, while a scoop of cold vanilla ice cream served alongside adds contrast.

Storage and Shelf Life

Once baked, store the Hot Fudge Pie at room temperature for up to two days, covered loosely to prevent it from drying out. For longer storage, wrap it in plastic and refrigerate for up to a week, though TEXTurE may become denser. To freeze, cool completely, wrap in foil and plastic, and store for up to two months. Thaw overnight in the fridge before reheating gently in the oven for a fresh-baked feel.

Make Ahead Strategies

Prepare the pie up to a day in advance, cover, and refrigerate raw batter until the next day. Bake fresh before serving. Alternatively, bake the pie ahead, store at room temperature, and warm slightly in the oven before serving. Keep toppings like ice cream or whipped cream fresh to serve at the last minute.

Scaling Instructions

To adjust this recipe to your needs, easily halve the ingredients for smaller gatherings or double for larger parties. When scaling, use appropriately sized pans to ensure even baking. Check the pie intermittently during baking when altering batch size to prevent over or underbaking.

Nutritional Deep Dive

This pie is a treat, primarily offering carbohydrates and fats. Chocolate provides antioxidant benefits, while eggs offer protein and essential fats. Each serving offers a balance of energy sources, and moderating portion sizes can ensure enjoyment without excess. For health-conscious bakers, reducing sugar slightly or replacing with a natural sweetener can adapt the pie for specific diets.

Dietary Adaptations

Modify this recipe for gluten-free diets by swapping the flour with a gluten-free blend. For a dairy-free version, replace butter with coconut oil or plant-based margarine. Vegans can use egg substitutes like flax eggs, though the texture may vary. For low-carb adaptations, explore using almond flour and sugar alternatives.

Recipe Notes

  • Add a tablespoon of espresso powder for a mocha twist.
  • Consider topping with crushed nuts for added texture.
  • A splash of bourbon in the batter can add warmth and complexity.

Troubleshooting Guide

For a dry texture, check your baking time and ensure your oven is calibrated accurately. If the pie is too gooey, add a few baking minutes. Avoid flavor imbalances by using quality chocolate and freshly taste-testing spices and extracts. When substitution impacts texture, consider adjusting other wet-to-dry ingredient ratios accordingly.

Recipe Success Stories

Home bakers have shared their triumphs in personalizing this Hot Fudge Pie. Some highlight adding a swirl of raspberry jam before baking for a fruity kick. Others find success in using mini tart pans for party-friendly pieces. Enthusiasts have shared presentations featuring caramel drizzles or blueberry compotes that augment the pie’s rich base with complementary flavors.

Frequently Asked Questions

Can I use milk chocolate instead of dark chocolate?

You can substitute milk chocolate, but expect a sweeter, less intense chocolate flavor. To balance, slightly reduce the sugar in the recipe.

How do I prevent my pie crust from getting soggy?

Blind bake the crust partially before adding the filling, and apply a thin layer of beaten egg white to form a barrier.

Can this recipe be made in advance and frozen?

Yes, bake the pie, cool completely, then wrap and freeze. Thaw overnight in the fridge and reheat gently before serving for the best results.

What can I use in place of vanilla extract?

If vanilla extract is unavailable, try using a vanilla bean or a small amount of vanilla paste for similar flavor notes.

How do I know when my Hot Fudge Pie is done?

Look for a slightly set edge with a soft, jiggly center. This texture will firm up slightly as the pie cools.

Is it necessary to use a water bath for baking?

A water bath isn’t required for this recipe, as the pie doesn’t need the gentle steam environment usually needed for delicate custards.

Can I add nuts to this recipe?

Absolutely! Fold in chopped pecans, walnuts, or almonds to the batter for an added crunchy texture.

What makes this pie different from a regular chocolate cake?

This pie is denser and fudgier than a cake, with a much richer chocolate flavor and a gooier center.

Why is my pie not setting properly?

Ensure you’ve followed the baking time and haven’t used too large of a dish, which can affect setting. Cooling time is also crucial for proper setting.

Can I substitute coconut oil for butter in this pie?

Yes, coconut oil can replace butter for a dairy-free option, though it may alter taste subtly with a coconut note.

Additional Resources

Explore more of our chocolate dishes like “Dark Chocolate Tart” or watch our video guide on mastering chocolate tempering. Access our detailed chocolate shopping guide to find the best brands for your next dessert adventure.

Join the Conversation

We love seeing your creations! Share your Hot Fudge Pie photos on Instagram with the hashtag #FudgePieDelight. Join our monthly baking challenge, and don’t forget to leave your review and tips in the comments below, sharing your unique twists on this classic recipe.

⚖️
Difficulty
Easy

⏲️
Prep Time
10 mins

🕒
Cook Time
30 mins

⏱️
Total Time
40 mins

🍽️
Servings
8

Hot Fudge Pie Recipe: Unleash Decadence in Every Bite

If you’re a chocolate enthusiast, this Hot Fudge Pie Recipe will quickly become your favorite dessert. With its rich, gooey chocolate filling encased in a crisp, flaky crust, each bite delivers the perfect balance of sweetness and texture. Whether you’re hosting a dinner party or craving a sweet treat, this pie promises to satisfy your chocolate desires.

Perfect for any occasion, this Hot Fudge Pie is both simple to create and impressive in presentation. Imagine serving a slice with a scoop of vanilla ice cream or a dollop of whipped cream, the warm chocolate melting into a creamy delight. It’s a heavenly dessert experience that combines comfort and indulgence.

Quick Recipe Highlights

  • Flavor Profile: Rich, chocolatey goodness with a hint of vanilla
  • Texture: Gooey, molten center with a buttery, flaky crust
  • Aroma: Deep chocolate scents with sweet, baked notes
  • Visual Appeal: Glossy, dark chocolate with a golden-brown crust
  • Skill Level Needed: Basic baking skills sufficient for this easy recipe
  • Special Equipment: Pie dish, mixing bowls, hand mixer

The Recipe

Hot Fudge Pie: Your Go-To Chocolate Dessert

Serves: 8

Prep Time: 10 mins

Cook Time: 30 mins

Total Time: 40 mins

Kitchen Equipment Needed

  • Pie dish
  • Mixing bowls
  • Hand mixer
  • Whisk
  • Spatula

Ingredients

  • 1 unbaked pie shell
  • 1 cup sugar
  • 2 tablespoons cocoa powder
  • 1/2 cup butter, melted
  • 2 eggs, beaten
  • 1 teaspoon vanilla extract
  • 1/4 cup all-purpose flour
  • Pinch of salt

Directions

  1. Preheat your oven to 350°F (175°C) and prepare the pie shell by placing it in the pie dish.
  2. In a mixing bowl, combine the sugar and cocoa powder. Mix well.
  3. Add the melted butter, beaten eggs, and vanilla extract to the bowl. Use a hand mixer to blend until well combined.
  4. Gradually stir in the flour and salt until the batter is smooth and homogenous.
  5. Pour the chocolate mixture into the unbaked pie shell, spreading it evenly with a spatula.
  6. Bake in the preheated oven for 30 minutes or until the pie top is firm and the center has a slight jiggle.
  7. Allow the pie to cool slightly before slicing, serving with ice cream or whipped cream for the perfect finish.

Recipe Notes

  • For a more intense chocolate flavor, consider adding a handful of chocolate chips to the filling.
  • This pie is best served warm to appreciate its gooey texture.
  • Store leftover pie in the refrigerator and reheat gently before serving.

Deliciously Festive Cranberry-Glazed Roasted Butternut Squash Salad Recipe

Cranberry-Glazed Roasted Butternut Squash Salad Recipe

A delightful Cranberry-Glazed Roasted Butternut Squash Salad is your perfect autumn side dish. Bursting with vibrant colors and flavors, this salad brings the cozy warmth of roasted squash paired with a sweet-tart cranberry glaze. It’s an appealing combination that’s sure to impress both your family and guests. The natural sweetness of the squash contrasts beautifully with the tangy glaze, creating an irresistible dish that epitomizes fall on a plate.

Whether you’re looking for a standout dish to complete your holiday spread or seeking a unique salad to elevate your dinner routine, this Cranberry-Glazed Roasted Butternut Squash Salad shines. It’s not only visually stunning but also offers layers of taste and texture that make each bite delightful. With a mix of roasted vegetables, fresh greens, and a hint of nuttiness, this salad offers a gourmet feel without overwhelming steps, making it a must-try recipe.

Quick Recipe Highlights

  • Flavor Profile: Sweet, tart, and earthy with a hint of spice.
  • Texture: Soft roasted squash, crisp salad greens, and crunchy nuts.
  • Aroma: Warm spices with a subtle fruity note from the glaze.
  • Visual Appeal: Vibrant orange and deep red hues with fresh green accents.
  • Skill Level Needed: Intermediate, due to roasting and glazing techniques.
  • Special Equipment: Baking sheet, blender for glaze, large salad bowl.

Recipe Overview

  • Difficulty Level: Moderate due to the roasting and glazing steps that require attention to detail.
  • Category: Side Dish, Salad
  • Cuisine: A blend of modern American with autumn-inspired flavors.
  • Cost: Approximately $15, considering fresh produce and cranberries.
  • Season: Ideal for autumn and winter when butternut squash is in season.
  • Occasion: Thanksgiving, holiday dinners, special family gatherings.

Why You’ll Love This Recipe

The Cranberry-Glazed Roasted Butternut Squash Salad packs a punch in the taste department with its sweet, tart, and slightly savory elements that dance on your palate. The blend of textures—from the softness of roasted squash to the crunch of nuts and crispness of greens—will captivate your senses.

Not only is this salad a treat to the taste buds, but it also offers convenience: it’s simple to prepare ahead of time, leaving you with less stress during busy holiday cooking. From a nutritional standpoint, this salad provides a rich source of vitamins, fiber, and antioxidants, all coming from fresh, wholesome ingredients.

Socially, this dish is a centerpiece at any meal table. It serves remarkably well for entertaining guests, offering something unique versus ordinary side salads. Additionally, despite its luxurious taste, it’s a cost-effective dish, with accessible ingredients readily available in most grocery stores, making it both affordable and gourmet.

Historical Background and Cultural Significance

The interplay of squash and cranberries reflects the deep-rooted traditions of American cuisine, especially reminiscent of harvest celebrations. Historically, butternut squash has been a staple in Native American diets, prized for its versatility and nutritional merits.

Cranberries, native to North America, hold a festive place in culinary traditions, particularly during Thanksgiving. The evolution of incorporating a cranberry-based glaze to elevate a roasted squash dish symbolizes modern adaptations that honor traditional ingredients while embracing contemporary tastes and techniques.

Regional variations have seen this dish topped with locally sourced nuts or greens, and traditional serving customs during festive occasions have kept recipes like this prominent, showcasing the brilliance of seasonal, regional produce.

Ingredient Deep Dive

Butternut squash, a must-have autumn ingredient, brings a mild sweetness and creaminess when roasted. To choose butternut squash, look for those that are heavy for their size with dull but evenly colored skin. Store them in a cool, dry place, and consider sweet potatoes as a substitute if needed.

Cranberries offer a delightful tartness that complements sweet components. Look for fresh berries with a deep red color, and they can be stored in the freezer for up to a year, retaining most of their nutrients.

For the greens, opt for beets, arugula, or spinach to deliver a peppery contrast, along with nuts like pecans or walnuts, which add richness and crunch. Each ingredient not only supports the salad’s flavor dynamics but also contributes its nutritional benefits, providing essential vitamins and minerals.

Common Mistakes to Avoid

  • Not roasting the squash for long enough, resulting in a firm texture.
  • Using pre-prepared glaze can lead to overly sweet flavor dominance.
  • Adding the glaze when squash is too hot, causing the glaze to slide off.
  • Skipping the nuts, leading to a missing textural element.
  • Overcrowding the baking sheet, which can cause steaming rather than roasting.
  • Using wet greens, which affects texture and taste.
  • Forgetting to balance the tartness of cranberries with a sweetener.
  • Incorrectly storing squash, leading to premature spoilage.
  • Mixing hot squash with greens, which wilts the greens.

Essential Techniques

Roasting butternut squash is central to achieving its caramelized sweetness. Preheating the oven to a high temperature and spreading the squash in an even layer ensures optimal roasting results.

Creating the cranberry glaze involves simmering cranberries with sweeteners and spices. This technique is significant as it allows the fruit to break down and intensify in flavor. To master this, patience in achieving a syrupy consistency without burning is crucial.

Pro Tips for Perfect Cranberry-Glazed Roasted Butternut Squash Salad

1. **Choose the Right Squash**: Select a firm, heavy one for its size with no blemishes for the best flavor.
2. **Use Fresh Cranberries**: Freshness results in a vibrant glaze; if unavailable, frozen works as well without loss of taste.
3. **Roast for the Right Time**: Ensure the squash is caramelized for a sweet, nutty flavor.
4. **Balance the Glaze**: Taste as you go, adjusting sweetness and tartness with honey or sugar.
5. **Toast the Nuts**: Light toasting intensifies flavor and gives a pleasing crunch.
6. **Layer Flavors**: Don’t mix everything at once; let each component shine by layering while serving.
7. **Assemble Close to Serving**: Keeps greens crisp and vibrant, avoiding wilt.
8. **Play with Spices**: Add cinnamon or nutmeg for a warmth that complements the tart cranberries.

Variations and Adaptations

Regional adaptations may see the inclusion of local nuts or cheeses like goat feta for a creamy contrast. Seasonal changes, such as using spring greens, offer year-round adaptability.

For those with dietary needs, opting for maple syrup instead of honey makes it vegan, and gluten-free adjustments include ensuring any spice blends or added components are free from gluten-containing preservatives.

For flavor tweaks, consider adding citrus zest to the glaze or swapping pecans for almonds for added variety.

Serving and Presentation Guide

For a stunning presentation, serve this salad in a large shallow bowl, allowing layers to be visible. Garnish with a sprinkle of toasted nuts and a few fresh cranberries for a pop of color. Traditional accompaniments like crusty bread balance the meal, while modern touches, such as adding a cheese board, elevate the dining experience.

Consider the salad temperature; it’s best served warm or at room temperature, ensuring the flavors mingle perfectly.

Wine and Beverage Pairing

Pair this salad with a crisp Chardonnay or a light-bodied Pinot Noir to complement the rich flavors of squash and glaze. Non-alcoholic choices like sparkling apple cider offer a refreshing finish. The tartness of the cranberry glaze also invites a citrusy ginger tea for a warming experience.

Storage and Shelf Life

For optimal freshness, store roasted squash separately from the greens in airtight containers in the refrigerator for up to three days. The cranberry glaze can be refrigerated for a week or frozen for three months. When ready to reassemble, gently reheat the squash before adding to the greens to maintain the right contrast in texture.

Make Ahead Strategies

Roast the squash and prepare the glaze a day in advance, storing them separately to keep textures distinct. Assemble the salad shortly before serving, blending fresh and prepared components for the best taste.

Scaling Instructions

To adjust the recipe size, maintain the ratio of squash to glaze. Doubling ensures you have ample servings for larger gatherings, accommodating necessary baking sheet space to prevent steaming. Conversely, halving involves the same techniques, adjusting cooking times slightly for even results.

Nutritional Deep Dive

This salad excels in providing a satisfying combination of macronutrients from healthy fats in nuts to complex carbohydrates in butternut squash. Rich in vitamin A, C, and healthy fiber, each serving supports immune health and digestion.

For those mindful of weight management, portion control is straightforward with clear servings delineated, keeping caloric intake managed without sacrificing flavor satisfaction.

Dietary Adaptations

The flexibility of this recipe allows it to cater to gluten-free by checking all seasoning labels and dairy-free by avoiding cheese toppings. For a vegan choice, using agave syrup for the glaze works excellently.

Those on low-carb or keto diets should focus on serving size and adjusting portions to meet specific dietary goals while still enjoying the main flavors.

Recipe Notes

  • Use maple syrup as an alternative sweetener for the glaze.
  • Feel free to experiment with adding dried fruits such as apricots for extra sweetness.
  • For a creamy element, serve with a side of Greek yogurt dressing.

Troubleshooting Guide

Issues such as overcooked squash can be mitigated by monitoring closely and stirring midway during roasting. Balancing tart and sweet in the glaze requires tasting as you go, with room to adjust according to preference.

Should greens become soggy, always remember to add squash once it’s cooled enough not to wilt the greens.

Recipe Success Stories

Reader feedback praises the ease of preparation, with many adaptations incorporating local produce or adding cheeses. The vibrant colors consistently garner compliments, and the recipe photographs beautifully, shared widely across social media platforms.

Frequently Asked Questions

Can I use frozen squash instead of fresh?

Absolutely! Ensure they are thawed and patted dry to avoid excess moisture and follow the roasting step until caramelized.

What nuts work best in this salad?

Pecans and walnuts are traditional choices, lending a rich, buttery flavor that complements the squash well. Feel free to experiment with almonds or pine nuts for different profiles.

Additional Resources

Explore related recipes such as roasted root vegetable salads, cranberry sauces, or technique-focused videos for perfecting roast vegetables. Ingredient guides for sourcing best seasonal produce and equipment recommendations, including quality baking sheets, are also available.

Join the Conversation

Engage with us by sharing your salad creations on social media. Use #CranberryButternutSalad to connect with others who’ve enjoyed the recipe. Join community challenges like sharing a meal picture inspired by this dish or detailing your favorite adaptation in the comments below. Your feedback and reviews shape future recipes and improvements!

⚖️
Difficulty
Intermediate

⏲️
Prep Time
15 mins

🕒
Cook Time
40 mins

⏱️
Total Time
55 mins

🍽️
Servings
4

Cranberry-Glazed Roasted Butternut Squash Salad

Welcome to a delightful journey of flavors with our Cranberry-Glazed Roasted Butternut Squash Salad. This salad beautifully combines the sweetness of butternut squash with the tangy kick of cranberry glaze, making it a perfect dish for any festive occasion or weeknight meal. Whether you’re looking for a refreshing side dish or a stand-alone vegetarian option, this recipe offers a harmonious blend of textures and tastes.

The Cranberry-Glazed Roasted Butternut Squash Salad is not only visually stunning but also packed with nutrients and natural goodness. The warm, roasted squash pairs exquisitely with fresh greens and a vibrant cranberry dressing, offering a colorful centerpiece for your table. Whether you’re a novice cook or a seasoned chef, this salad is straightforward to prepare while delivering gourmet-level vitamin richness.

Quick Recipe Highlights

  • Flavor Profile: Sweet, tangy, and lightly earthy
  • Texture: Tender roasted squash, crisp greens, chewy cranberries
  • Aroma: Warm notes of roasted squash and fruity cranberry
  • Visual Appeal: Bright orange and red hues against vibrant greens
  • Skill Level Needed: Intermediate – requires roasting and glazing skills
  • Special Equipment: Baking sheet, mixing bowls, whisk

The Recipe

Cranberry-Glazed Roasted Butternut Squash Salad: An Autumn Wonderland

Serves: 4

Prep Time: 15 mins

Cook Time: 40 mins

Total Time: 55 mins

Kitchen Equipment Needed

  • Baking sheet
  • Large mixing bowls
  • Whisk
  • Sharp knife
  • Cutting board

Ingredients

  • 1 medium butternut squash, peeled and cubed
  • 2 tablespoons olive oil
  • Salt and pepper to taste
  • 1 cup fresh cranberries
  • 1/4 cup honey
  • 1 tablespoon balsamic vinegar
  • 4 cups mixed salad greens
  • 1/2 cup crumbled feta cheese
  • 1/4 cup toasted pecans

Directions

  1. Preheat the oven to 400°F (200°C). Toss the butternut squash cubes with olive oil, salt, and pepper. Spread in a single layer on a baking sheet and roast for 25-30 minutes, or until tender.
  2. In a small saucepan, combine cranberries, honey, and balsamic vinegar. Cook over medium heat until the cranberries start to pop and the sauce thickens, about 10 minutes. Remove from heat and set aside.
  3. In a large mixing bowl, combine the roasted squash, salad greens, feta cheese, and toasted pecans.
  4. Drizzle the cranberry glaze over the salad mixture. Gently toss to combine all ingredients.
  5. Serve immediately or chill before serving for a cooler salad option.

Recipe Notes

  • Try using maple syrup instead of honey for a vegan-friendly option.
  • For added crunch, include a handful of pomegranate seeds.
  • This salad pairs beautifully with grilled chicken or turkey for a heartier version.

Delicious Cranberry-Glazed Butternut Squash Salad Recipe for Fall Cooking

Cranberry-Glazed Roasted Butternut Squash Salad

Looking for a mouthwatering fall recipe to impress your family and friends? This Cranberry-Glazed Roasted Butternut Squash Salad is the perfect blend of seasonal flavors and textures. Sweet roasted butternut squash, tart cranberries, and a variety of crunchy textures come together to create a stunning dish that’s as delicious as it is beautiful. Whether served as a side or a standout main, this recipe will elevate your autumn meals with its sophisticated flavors and vibrant colors.

Quick Recipe Highlights

  • Flavor Profile: A delightful mix of sweet, tart, and savory notes with earthy undertones
  • Texture: A crunchy medley of roasted squash, nuts, and fresh greens
  • Aroma: Rich, warm aromas with hints of caramelized squash and fresh cranberry
  • Visual Appeal: A colorful array of orange, red, and green hues
  • Skill Level Needed: Intermediate-level expertise for perfect roasting and glazing
  • Special Equipment: Baking sheet, small saucepan, and salad bowl

Recipe Overview

  • Difficulty Level: Intermediate due to the need for precise roasting and glazing techniques
  • Category: Salad, Side Dish
  • Cuisine: Contemporary and seasonal with American influences
  • Cost: Approximately $10-15 for main ingredients like butternut squash and cranberries
  • Season: Best in fall for peak butternut squash and cranberry freshness
  • Occasion: Ideal for Thanksgiving dinners, potlucks, and family gatherings

Why You’ll Love This Recipe

The taste and texture of this salad are unparalleled, offering a perfect balance of sweet roasted butternut squash against the tartness of cranberry glaze. The convenience of this recipe lies in its simple preparation, making it an attractive choice for both busy weeknights and planned gatherings. Nutritionally, butternut squash is loaded with vitamins, while the cranberries add antioxidants, making it a healthier option without sacrificing flavor. Socially, it works wonders as a conversation starter at dinner parties due to its unique presentation and complex flavors. Economically, the use of seasonal produce ensures that this dish remains budget-friendly and accessible for most households.

Historical Background and Cultural Significance

This salad pays tribute to traditional seasonal harvests, bringing together elements native to North American autumns. Butternut squash has been cultivated for centuries, prized by Indigenous peoples for its versatility and nutritional value. Cranberries have a rich history in Native American cuisine, often used in sauces and preserves. Over time, these ingredients have found their way into modern culinary traditions, symbolizing the merging of ancient customs with contemporary tastes. This recipe highlights this historical evolution while offering a fresh take on classic autumn staples.

Ingredient Deep Dive

Butternut Squash: This versatile gourd is rich in vitamins A and C, providing immune-boosting properties. When selecting, look for a squash with a firm, unblemished skin and a hefty feel. Store in a cool, dry place for up to a month. If unavailable, acorn squash is a suitable substitute.

Cranberries: Loaded with antioxidants, cranberries offer brilliant color and tartness to dishes. Choose fresh, plump cranberries or opt for dried ones when out of season. Keep them refrigerated for up to two weeks, or freeze for longer storage.

Common Mistakes to Avoid

  • Overcooking the squash, which can result in mushy texture; check frequently for tenderness.
  • Using sugary cranberry sauce instead of natural cranberries; opt for fresh or unsweetened.
  • Skipping the glaze step, leading to a lack of cohesive flavor.
  • Not tossing the salad gently, causing the ingredients to break apart.
  • Choosing an underripe or overripe squash, affecting taste.
  • Forgetting to preheat the oven, leading to uneven cooking.
  • Using too much oil, which can overwhelm the subtle squash taste.
  • Failing to properly coat the squash in glaze, resulting in uneven flavor distribution.
  • Not cooling the squash before assembly, which can wilt the greens.
  • Add too many additional ingredients, overshadowing the main flavors.

Essential Techniques

Roasting: Ensures caramelization, enhancing sweetness. Use a high temperature and spread squash evenly for even roasting.

Glazing: Coating the squash with cranberry glaze mid-roast absorbs flavors. Key is to apply when squash is tender yet not fully cooked.

Marinating: Allow squash to rest, cool, and absorb flavors. Master by letting ingredients infuse for about 10 minutes post-roast.

Tossing: Ensure even distribution of all ingredients. Use hands or tongs to gently mix.

Pro Tips for Perfect Cranberry-Glazed Roasted Butternut Squash Salad

Allow the squash to cool slightly before glazing, ensuring an even coat.
Use parchment paper on the baking sheet for easier clean-up and even roasting.
Add a sprinkle of goat cheese crumbles for a creamy contrast to the flavors.
Toast nuts beforehand to elevate their crunch and aroma.
Balance sweetness by adding a splash of lemon juice to the glaze.
Include a handful of arugula for a peppery undertone.
Dress the salad just before serving to maintain freshest textures.

Variations and Adaptations

Regional variations can include adding maple syrup for a Canadian twist.
For a spring version, swap cranberries with strawberries for a brighter taste.
Make it vegan by omitting cheese and using maple syrup instead of honey.
For a protein boost, add grilled chicken or roasted chickpeas.
For a nut-free version, use pumpkin seeds instead of walnuts.

Serving and Presentation Guide

Plating techniques include using a wide, shallow bowl for optimal display.
Garnish with fresh herbs like parsley or thyme for added color and aroma.
Serve with a side of crusty bread or along with grilled meat.
Consider modern serving suggestions like individual salad cups for gatherings.
Ensure salad components are at room temperature for best flavor integration.
Control portions by pre-measuring salad elements before plating.

Wine and Beverage Pairing

Pair with a crisp Sauvignon Blanc or an earthy Pinot Noir for wine options.
Non-alcoholic alternatives include a cranberry spritzer or herbal iced tea.
For a cozy autumn dinner, consider pairing with a spiced apple cider.
Temperature-wise, serve wine slightly chilled and cider warm.
Serve drinks in clear glasses to complement the salad’s visual appeal.

Storage and Shelf Life

Store leftovers in an airtight container in the refrigerator for up to three days.
Avoid mixing dressings until ready to serve to prevent sogginess.
Signs of spoilage include moisture pooling at the bottom of the container.
To reheat, gently warm squash separately before combining with fresh components.
Freezing isn’t recommended as it alters the texture of both squash and greens.
For optimal taste, consume within 24 hours of preparation.

Make Ahead Strategies

Prep the squash a day in advance and store in the refrigerator.
Prepare glaze ahead and store separately; apply right before serving.
Cool cooked squash completely before storing to maintain firmness.
Assemble salad components, keeping dressing aside to add fresh.
Reheat roasted elements before final assembly if necessary.
Add fresh herbs or cheese at the last minute for peak flavor.

Scaling Instructions

To halve the recipe, simply cut all ingredients by half and adjust seasoning to taste.
Doubling requires more batch roasting for even cooking.
Larger batches may need additional baking sheets for roasting.
Adjust timing by checking for doneness more frequently when scaling up.
Store larger amounts in several smaller containers to maintain freshness.

Nutritional Deep Dive

A serving size provides balanced macronutrients, with healthy carbs from squash.
Micronutrients include vitamin A and C, plus fiber from greens and nuts.
Health benefits range from boosted immunity to improved digestion.
Low in saturated fats, making it heart-friendly.
Ideal for portion control, aiding in weight management without deprivation.

Dietary Adaptations

For gluten-free versions, ensure all ingredients are marked gluten-free.
A dairy-free option involves swapping any cheese with a plant-based alternative.
Vegetarians can indulge freely as the recipe is entirely plant-based.
Lower carbs by reducing squash and substituting cauliflower florets.
For Paleo diets, omit legumes and use coconut oil instead of olive oil.
Create a low-FODMAP dish by replacing onions with chive greens.

Recipe Notes

  • Substitute fresh cranberries with unsweetened dried or frozen ones if necessary.
  • Add a teaspoon of Dijon mustard to the glaze for an added depth of flavor.
  • Try using kale instead of mixed greens for added texture and fiber.
  • Experiment with flavored oils, such as walnut or pumpkin seed, for dressing.

Troubleshooting Guide

  • If the texture is off, check roasting time was adhered to and cool before assembling.
  • Unbalanced flavors can be adjusted with additional glaze or acidity like lemon juice.
  • Temperature imbalances stem from improperly cooling roasted components before mixing.
  • For equipment issues, ensure a preheated oven and properly calibrated thermometer.
  • Ingredient substitutions should mindful of potential flavor and texture impacts.
  • Timing concerns revolve around making sure the squash isn’t over-roasted.

Recipe Success Stories

Feedback from our community shows enhanced sweetness when roasting longer at lower temperatures.
Readers recommend adding feta for a Mediterranean twist that was widely appreciated.
Some adapted the salad with sweet potatoes, finding success in texture and taste.
User photos suggest presenting it on a holiday platter, showcasing colors brilliantly.
Photography tips include using natural light to capture the glossy cranberry glaze effectively.

Frequently Asked Questions

Can I use frozen cranberries for the glaze?

Yes, frozen cranberries can be used but should be thawed first. Adjust the sweetness if necessary as frozen varieties may taste slightly different from fresh ones.

How can I make the salad vegan?

To make the salad vegan, simply omit any cheese or replace it with a vegan-friendly alternative, and ensure the glaze uses plant-based sweeteners.

What can I use instead of butternut squash?

If butternut squash is unavailable, consider using delicata or acorn squash, which have similar textures and flavor profiles when roasted.

Is it possible to make the salad ahead of time?

Yes, you can roast the squash and prepare the glaze a day in advance. Combine all ingredients just before serving to ensure maximum freshness.

What is the best way to reheat this salad?

Reheat the squash separately on a baking sheet in a preheated oven for a few minutes before reassembling with fresh greens and dressings.

Can I add proteins for a more substantial meal?

Absolutely, grilled chicken, roasted chickpeas, or a poached egg can be excellent additions for a heartier main course.

How should leftover salad be stored?

Store leftover salad in an airtight container in the refrigerator, preferably without dressing, for up to three days to maintain texture and taste.

What can be done if my salad is too sweet?

If the salad tastes too sweet, add a splash of citrus juice or a dash of balsamic vinegar to balance the flavors effectively.

Can I prepare the salad using an air fryer?

Yes, an air fryer can effectively roast the butternut squash. Adjust timing based on your model’s specifications, aiming for a golden finish.

What do I do if the cranberries burn during glazing?

If cranberries start to burn, lower the oven temperature and ensure they’re adequately covered in glaze, which helps prevent direct scorching.

Additional Resources

Explore related recipes like a Maple-Glazed Sweet Potato Salad or Balsamic-Roasted Pumpkin.
Watch our detailed roasting technique video for perfect caramelization.
Visit our ingredient guide on seasonal squashes for selection and prep tips.
Browse equipment recommendations for roasting perfection, like advanced baking sheets.
Discover seasonal tips for using cranberries in a variety of dishes.

Join the Conversation

Share your version of Cranberry-Glazed Roasted Butternut Squash Salad on social media using #SquashSaladSeason.
Receive photography tips from our community by checking our dedicated hashtag #FoodPhotoTips.
Participate in seasonal cooking challenges to feature your recipe adaptations.
Review this recipe on our blog and connect with fellow salad enthusiasts for more ideas.

Cranberry-Glazed Roasted Butternut Squash Salad: A Festive Delight

Welcome to the world of festive flavors with our Cranberry-Glazed Roasted Butternut Squash Salad. This delightful dish combines the sweetness of roasted butternut squash with a tangy cranberry glaze, making it perfect for any holiday gathering or a cozy dinner. Imagine the vibrant colors and the burst of flavors that this salad brings to your table.

Cranberry-Glazed Roasted Butternut Squash Salad not only satisfies your taste buds but also offers a delightful textural contrast, pairing the softness of roasted vegetables with crunchy pecans and crumbled feta. The aroma of roasted squash combined with cranberries and fresh herbs will fill your kitchen with the warmth of the season.

Whether you’re an experienced cook or a kitchen newbie, this recipe is accessible and rewarding. It’s an ideal choice for when you want to impress your guests without spending all day at the stove. Let’s dive into the recipe details and discover how you can recreate this tantalizing Roasted Butternut Squash Salad at home!

Quick Recipe Highlights

  • Flavor Profile: Sweet and tangy, with hints of nuttiness and mild acidity.
  • Texture: Soft roasted squash, crunchy nuts, and creamy feta.
  • Aroma: Inviting notes of roasted squash and sweet cranberries.
  • Visual Appeal: Vibrant orange squash, deep red glaze, and green herbs.
  • Skill Level Needed: Beginner-friendly.
  • Special Equipment: None.

The Recipe

Cranberry-Glazed Roasted Butternut Squash Salad: An Autumn-Inspired Delight

Serves: 4

Prep Time: 15 mins

Cook Time: 25 mins

Total Time: 40 mins

Kitchen Equipment Needed

  • Baking sheet
  • Saucepan
  • Mixing bowls
  • Whisk

Ingredients

  • 1 medium butternut squash, peeled and cubed
  • 2 tbsp olive oil
  • Salt and pepper to taste
  • 1/2 cup fresh cranberries
  • 1/4 cup brown sugar
  • 1/4 cup orange juice
  • 1/2 cup crumbled feta cheese
  • 1/4 cup pecans, toasted
  • 2 tbsp fresh parsley, chopped

Directions

  1. Preheat your oven to 400°F (200°C). Line a baking sheet with parchment paper.
  2. Toss the butternut squash cubes with olive oil, salt, and pepper. Spread them in a single layer on the prepared baking sheet.
  3. Roast the squash in the oven for 20-25 minutes, or until tender and golden brown.
  4. Meanwhile, in a small saucepan, combine cranberries, brown sugar, and orange juice. Cook over medium heat until the cranberries burst and the mixture thickens into a glaze, about 10 minutes.
  5. Once the squash is roasted, remove it from the oven and transfer it to a serving bowl. Drizzle the cranberry glaze over the squash and gently toss to combine.
  6. Sprinkle the crumbled feta, toasted pecans, and chopped parsley over the salad. Toss gently to mix.
  7. Serve warm or at room temperature and enjoy your flavorful Cranberry-Glazed Roasted Butternut Squash Salad.

Recipe Notes

  • Substitute pecans with walnuts or almonds for a different nutty flavor.
  • For a vegan version, use a plant-based feta cheese.
  • The salad can be prepared a few hours in advance and served at room temperature.

Savor the Richness of German Chocolate Pecan Pound Cake

Mouth-watering German Chocolate Pecan Pound Cake

If you’re searching for a dessert that strikes the perfect balance between rich chocolate indulgence and a satisfying nutty crunch, look no further than the Mouth-watering German Chocolate Pecan Pound Cake. This recipe melds the deep, decadent flavors of German chocolate with the hearty texture of pecans, creating a pound cake that’s nothing short of irresistible. Whether enjoyed fresh out of the oven or as the centerpiece of a dinner party dessert spread, this cake promises to captivate your taste buds and impress your guests.

Quick Recipe Highlights

  • Flavor Profile: A rich blend of chocolate with hints of caramel and toasted pecans
  • Texture: Dense yet moist, with a crunchy pecan topping
  • Aroma: Chocolatey fragrance with notes of roasted nuts
  • Visual Appeal: A deep brown loaf with a glossy pecan-laden top
  • Skill Level Needed: Intermediate, requires baking know-how to achieve perfect texture
  • Special Equipment: Bundt pan, electric mixer

Recipe Overview

  • Difficulty Level: Intermediate due to precise ingredient combinations and baking techniques
  • Category: Desserts, Cakes
  • Cuisine: American with German influence from the classic German chocolate cake
  • Cost: Moderate; main ingredients like pecans and chocolate are premium items
  • Season: Fall to early winter, when nuts are at their freshest
  • Occasion: Ideal for holiday gatherings, birthday parties, or as a special treat

Why You’ll Love This Recipe

This pound cake is a favorite for so many reasons. The marriage of German chocolate and pecans offers a taste experience that is both nostalgic and innovative. Bake it and notice how the chocolate and pecans create a fibrous yet rich bite that’s unparalleled. It’s a convenient bake too—while the ingredients list looks lengthy, preparation is straightforward with captivating results. Plus, the cake is quite a nutritional powerhouse compared to typical desserts, offering healthy fats and antioxidants. Not only is it a joy to serve at social functions, reflecting your culinary prowess, but the availability of its ingredients makes it more cost-effective than many special occasion cakes.

Historical Background and Cultural Significance

German Chocolate Cake, from which this pound cake variant draws inspiration, originated in the mid-19th century. Despite its name, the cake is a Texas staple, having been named after Sam German, an American chocolatier. Over the decades, this beloved confection has undergone transformations, evolving into various interpretations, including our pecan-infused pound cake. Traditionally, this cake has been served at numerous Southern celebrations, making its way into family traditions as a favored heirloom recipe, especially during holidays, when indulgence is welcomed.

Ingredient Deep Dive

German chocolate: Known for its mild flavor, contributing a gentle cocoa taste. Select premium brands for best results; store in a cool, dry place away from strong odors. Pecans: A Southern staple, celebrated for their buttery texture. Look for fresh, plump nuts; refrigerate unused portions to maintain their natural oils. Use walnuts if pecans are unavailable, providing a similar, though distinct, earthy tone.

Common Mistakes to Avoid

  • Overmixing the batter causes a dense cake; stir until just combined.
  • Using cold ingredients; ensure eggs and butter are at room temperature.
  • Skipping pan greasing; always grease thoroughly to prevent sticking.
  • Overbaking results in dryness; check for doneness as per instructions.
  • Chopping pecans too finely; aim for larger pieces to retain texture.
  • Not preheating the oven leads to uneven baking.
  • Inaccurate measuring of ingredients; always use precise measurements.
  • Forgetting to let the cake cool before glaze; it might collapse otherwise.

Essential Techniques

Creaming butter and sugar: This foundational step introduces air, essential for the cake’s rise. Perfect by using medium speed until the mixture turns pale and fluffy. Folding nuts: Ensures they’re evenly distributed without deflating the batter, enhancing each slice’s consistency.

Pro Tips for Perfect Mouth-watering German Chocolate Pecan Pound Cake

Incorporate chocolate at a lower temperature to prevent curdling. Toast pecans briefly for enhanced aroma and flavor. Line the Bundt pan’s base to safeguard against sticking. Tap the pan mid-bake to release air bubbles, ensuring uniform texture. Use high-quality chocolate and adhesive cooking spray to maintain cake integrity. Rotate halfway through baking for even results. Let cool upside down for compact texture.

Variations and Adaptations

Regional variations might incorporate local nuts or use sweeteners like honey. During fall, add a pinch of cinnamon or nutmeg for warmth. For dietary needs, explore dairy-free options using plant-based milk and oils. Experiment with different chocolates for variety; try bittersweet for a different depth.

Serving and Presentation Guide

Use a wire rack method for cooling to retain moistness. Plate with light garnishing of finely chopped pecans or a dusting of cocoa. Offer alongside vanilla ice cream or warm custard for a delicious contrast. Cut into even slices to display layers to guests.

Wine and Beverage Pairing

Pair with a rich, silky red wine, like a Merlot, that complements chocolate. Offer fruity teas or strong black coffee as non-alcoholic options. Serve with chilled milk for a nostalgic twist or hot chocolate on cooler days.

Storage and Shelf Life

Store in an airtight container at room temperature for up to three days. Refrigerate for a week-long freshness; ensure it’s wrapped to prevent dryness. Freeze in slices, well-wrapped, to prolong shelf life, retaining moisture through gentle thawing.

Make Ahead Strategies

Prepare batter a day in advance; store refrigerated. Bake the night before; flavors will meld for a richer taste. Assemble glaze just before serving for freshness. Bake and freeze, defrosting slowly, for convenient pre-event preparation.

Scaling Instructions

To halve, divide ingredients precisely. Keep a smaller pan handy. Doubling requires careful oven allocation; bake in two separate batches if necessary. Adjust timing based on batch size; check smaller or larger cakes diligently.

Nutritional Deep Dive

This cake, while indulgent, provides about 300 calories per serving, with ample fats primarily from nuts. Pecans boost Vitamin E and magnesium intake. Chocolate offers antioxidants, complementing a balanced lifestyle when eaten responsibly.

Dietary Adaptations

Gluten-free adaptations are possible with almond or coconut flour; expect a slight texture variance. For dairy-free needs, use plant-based butter alternatives. Consider natural sweeteners in moderation for low-sugar diets while retaining chocolate richness.

Recipe Notes

  • Use fresh baking powder for reliable leavening.
  • Substitute walnuts for a different flavor profile.
  • Consider chocolate chips for added surprise in each bite.

Troubleshooting Guide

Check oven temperature if the cake’s top browns too quickly. If the texture is dense, ensure creaming stage was thorough. Overly sweet? Balance missing with bittersweet chocolate addition or unsweetened cocoa.

Recipe Success Stories

Many have shared their experiences of using praline pecans for extra sweetness, while others include personal tweaks like bourbon-infused chocolate. Join this conversation, showcasing your creative spin on this classic.

Frequently Asked Questions

Can I use light brown sugar instead of granulated sugar?

Yes, it will add a slight molasses flavor that complements the pecans and chocolate.

What’s the best way to ensure the cake doesn’t stick to the pan?

Always grease your Bundt pan thoroughly, and consider using parchment paper as a liner for additional security.

How can I tell if my cake is fully baked?

Insert a toothpick into the center; it should come out clean or with a few crumbs attached.

Is it possible to substitute pecans with another nut?

Walnuts and almonds make good alternatives that will also deliver a crunchy texture.

What kind of chocolate works best in this recipe?

Opt for semi-sweet or dark chocolate for a more intense flavor profile.

Can I add frosting, and if so, what type would work?

A light caramel frosting or chocolate ganache could enhance the cake beautifully without overwhelming its original taste.

How do I store leftovers to keep them moist?

Wrap slices individually in plastic wrap, followed by foil, and refrigerate or freeze.

What can I do if my cake comes out too dry?

Serve with whipped cream or chocolate sauce to add moisture back in.

What’s the best way to chop pecans for this recipe?

Use a sharp knife and aim for medium-sized pieces to ensure even distribution without overpowering the cake’s texture.

Can the cake be baked in a regular loaf pan?

Yes, but adjust cooking time downwards and check for even cooking with a toothpick test.

Additional Resources

Explore related recipes like Chocolate Praline Cake, Explore more baking techniques with our video series, Discover more about pecan varieties in our nut guide, and Find recommended cooking tools for best results.

Join the Conversation

Join our community of bakers by sharing your creations on Instagram using #GermanChocolatePecanPoundCake. Share your tips, pictures, and get involved in our monthly cake recipe challenges. Reach out with your questions and become a part of our growing family of dessert enthusiasts.

Mouth-watering German Chocolate Pecan Pound Cake Recipe

Indulge in a slice of exquisite dessert with our mouth-watering German Chocolate Pecan Pound Cake. Perfectly balanced between rich chocolate and nutty pecan undertones, this cake is a true crowd-pleaser for all chocolate lovers. A symphony of flavors awaits with every bite, and the moist, dense texture will have you reaching for a second slice. Ideal for gatherings and special occasions, this cake combines traditional flavors with a hint of creativity.

As you bake this cake, you’ll discover the irresistible aroma of chocolate mingling with toasty pecans, filling your kitchen with a comforting scent that promises pure delight. Visually, this cake is as stunning as it is delicious. The rich, dark chocolate hue is perfectly complemented by a sprinkle of pecans atop a smooth chocolate glaze, ensuring it’s as appealing to the eyes as it is to the taste buds.

Quick Recipe Highlights

  • Flavor Profile: Rich chocolate with nutty pecan undertones, creating a sublime blend of sweetness and nuttiness
  • Texture: Dense yet moist, offering the perfect balance of cake softness and crunchy pecans
  • Aroma: Captivating notes of chocolate and roasted pecans
  • Visual Appeal: Deep chocolate color contrasted with a glossy glaze and pecan garnish
  • Skill Level Needed: Intermediate, requiring some experience in cake baking for best results
  • Special Equipment: A bundt or tube pan for that signature pound cake shape

The Recipe

German Chocolate Pecan Pound Cake: A Delightfully Rich Dessert

Serves: 12

Prep Time: 20 mins

Cook Time: 1 hr 10 mins

Total Time: 1 hr 30 mins

Kitchen Equipment Needed

  • Electric mixer
  • Mixing bowls
  • Bundt or tube pan
  • Spatula
  • Wire rack

Ingredients

  • 2 cups granulated sugar
  • 1 cup unsalted butter, softened
  • 4 large eggs
  • 1 tablespoon vanilla extract
  • 3 cups all-purpose flour
  • 1/2 cup unsweetened cocoa powder
  • 1/2 teaspoon baking soda
  • 1/4 teaspoon salt
  • 1 cup buttermilk
  • 1 cup chopped pecans
  • 1 cup semi-sweet chocolate chips
  • 1/2 cup chopped pecans (for garnish)

Directions

  1. Preheat your oven to 325°F (163°C). Grease and flour a bundt or tube pan generously.
  2. In a large mixing bowl, cream together sugar and butter until light and fluffy. Add eggs one at a time, beating well after each addition. Stir in vanilla extract.
  3. In a separate bowl, whisk together flour, cocoa powder, baking soda, and salt.
  4. Gradually add the dry ingredients to the creamed mixture, alternating with buttermilk, beginning and ending with the dry ingredients. Mix until just combined.
  5. Fold in chopped pecans and chocolate chips.
  6. Pour the batter into the prepared pan and smooth the top with a spatula.
  7. Bake for 1 hr 10 mins, or until a toothpick inserted in the center comes out clean. Allow the cake to cool in the pan for 10 minutes, then invert onto a wire rack to cool completely.
  8. Once cooled, garnish with extra chopped pecans before serving.

Recipe Notes

  • If you don’t have buttermilk, you can make a substitute by adding 1 tablespoon of vinegar or lemon juice to 1 cup of milk.
  • For an extra touch, drizzle a chocolate glaze over the cake before adding the pecan garnish.
  • This cake can be made a day in advance and stored in an airtight container for added flavor infusion.