“`html
Table of Contents
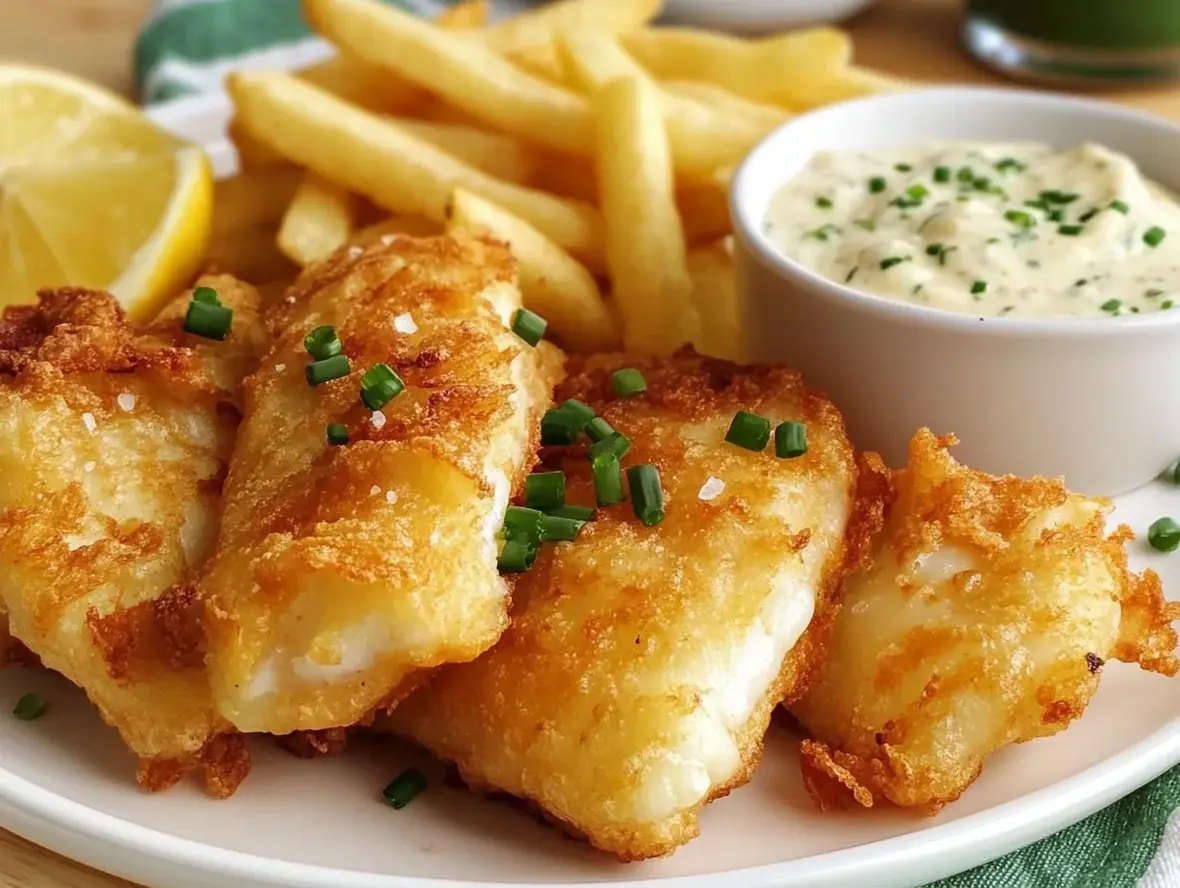
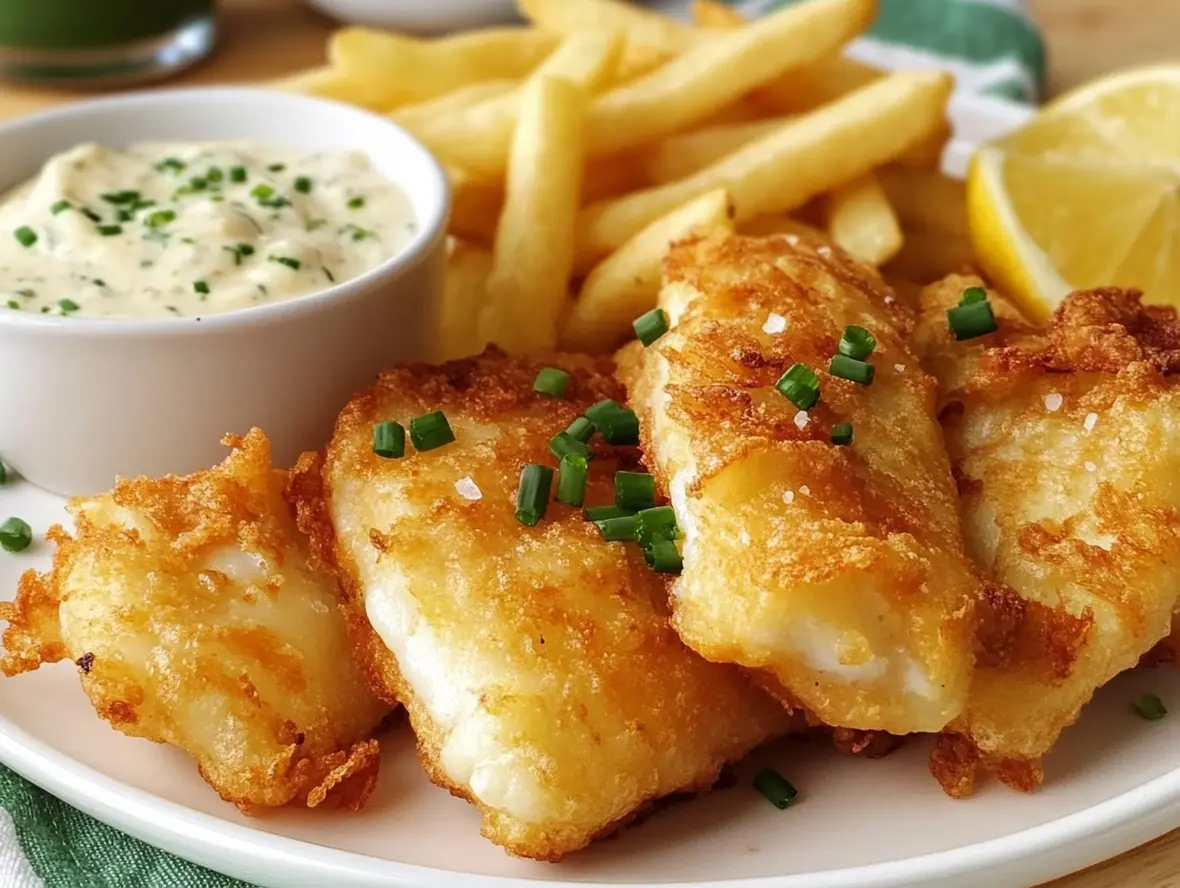
Crispy Fish Batter and Chips Recipe for Perfect Meals
Craving That Perfect Crispy Fish and Chips?
Are you tired of soggy bottoms and bland fish when you attempt to make fish and chips at home? Do you dream of that perfect, golden-brown crunch that rivals your favorite takeaway? Many home cooks struggle to achieve the ideal crispy texture, leading to disappointing meals. This comprehensive guide is designed to help you conquer the art of making incredibly crispy fish batter and perfectly fluffy-on-the-inside, crispy-on-the-outside chips, transforming your weeknight dinners or weekend treats into something truly special. Forget the frozen options; this recipe will empower you to create a show-stopping meal that will have everyone asking for seconds. Get ready to impress!
Ingredients You’ll Need
The secret to truly exceptional fish and chips lies in the quality of your ingredients and how you prepare them. Here’s what you’ll need for that irresistible crunch and flavor:
For the Crispy Fish Batter:
- 2 cups All-Purpose Flour: The base of our batter, providing structure. For a lighter crisp, you can substitute 1/2 cup with cornstarch or rice flour.
- 1 tsp Baking Powder: This leavening agent is crucial for an airy, light batter that fries up extra crispy.
- 1/2 tsp Salt: Enhances flavor and brings out the natural sweetness of the fish.
- 1/4 tsp Black Pepper: Freshly ground for the best aromatic punch.
- 1.5 – 2 cups Ice-Cold Lager Beer or Sparkling Water: This is the magic ingredient for crispiness! The carbonation helps make the batter light and airy, while the cold temperature aids in creating that shatteringly crisp exterior. Don’t worry, the alcohol bakes off.
- 6-8 Fish Fillets (Cod, Haddock, or Pollock): Choose firm white fish. Haddock is traditional for its flaky texture and mild flavor, while cod is readily available and holds up well. Ensure they are dry and boneless.
For the Perfect Chips:
- 4 large Russet Potatoes: These starchy potatoes are ideal for achieving fluffy interiors and crisp exteriors. Maris Pipers or King Edwards are also excellent choices.
- Vegetable Oil or Peanut Oil: For deep-frying. These oils have high smoke points, crucial for safe and effective frying. You’ll need about 4-6 cups, depending on your pot size.
- Salt: To season generously after frying.
Equipment:
- Large deep pot or deep fryer
- Slotted spoon or spider strainer
- Wire rack set over a baking sheet
- Mixing bowls
- Sharp knife and cutting board
Perfect Timing
30 minutes
25-30 minutes
55-60 minutes
This recipe takes approximately 30 minutes to prepare and another 25-30 minutes to cook, for a total of around 1 hour. This is slightly longer than the average quick meal, but entirely worth the effort for authentic, restaurant-quality fish and chips at home. The double-frying method for the chips adds an extra step but is key to their perfect texture, so plan accordingly!
Step-by-Step Fish Batter & Chips Mastery
Step 1: Prep the Fish
Begin by ensuring your fish fillets are dry. Pat them thoroughly with paper towels. This is super important for the batter to adhere properly and for achieving that coveted crispiness. If your fillets are very thick, you can cut them in half horizontally to create thinner pieces that cook more evenly. Season them lightly with salt and pepper.
Step 2: Make the Batter
In a medium bowl, whisk together the flour, baking powder, salt, and pepper. Gradually pour in the ice-cold beer or sparkling water, whisking gently until you have a smooth, thick batter, about the consistency of pancake batter. Don’t overmix; a few small lumps are perfectly fine and can even contribute to a lighter texture. The colder your liquid, the crispier your batter will be, so keep it chilled until you’re ready to use it. You might not need all the liquid, or you might need a little more – aim for that perfect, coating consistency.
Step 3: Prepare the Chips
Wash and scrub your potatoes thoroughly. You can peel them if you prefer, but leaving the skin on adds texture and nutrients. Cut the potatoes into your desired chip shape. Aim for roughly 1/2-inch thick batons for the best balance of crispy exterior and fluffy interior. Rinse the cut potatoes under cold water to remove excess starch, then pat them completely dry with paper towels. This step is crucial to prevent them from sticking together and to ensure they fry up crispy.
Step 4: Fry the Chips (The Double Fry Method)
Heat your vegetable or peanut oil in a large, heavy-bottomed pot or deep fryer to 310°F (155°C). Carefully add about half of the potato chips to the hot oil, being careful not to overcrowd the pot. Fry them for about 5-7 minutes, until they are softened and just starting to turn pale golden. This is the first fry, which cooks the inside. Remove the chips with a slotted spoon and drain them on a wire rack set over a baking sheet. Let them cool for at least 10 minutes. This resting period allows steam to escape, ensuring a crispier final fry. Increase the oil temperature to 375°F (190°C) for the second fry. Fry the chips again in batches for 2-4 minutes, until they are golden brown and crispy. Drain them again on the wire rack and immediately season generously with salt. The second fry creates that wonderfully crisp exterior.
Step 5: Fry the Fish
While the chips are having their first fry or cooling, you can prepare to fry the fish. Increase the oil temperature to 375°F (190°C) (or use a separate pot if you’re doing both simultaneously). Make sure your batter is still cold. Dip each seasoned fish fillet into the batter, ensuring it’s fully coated. Let any excess batter drip off for a moment. Carefully lower the battered fish into the hot oil, frying one or two pieces at a time to avoid overcrowding and dropping the oil temperature too much. Fry for about 5-8 minutes, turning occasionally, until the batter is a deep golden brown and the fish is cooked through and flakes easily. You’ve got this!
Step 6: Serve and Enjoy
Once the fish is golden and cooked, lift it out of the oil with your slotted spoon and drain it on the wire rack alongside the chips. Season the fish with a little extra salt if desired. Serve immediately while everything is piping hot and wonderfully crispy. The contrast between the flaky fish, crispy batter, and perfectly fried chips is simply divine.
Nutritional Information (Per Serving, approximate)
Exact nutritional values can vary based on portion sizes and specific ingredients used. This is an estimate:
- Calories: 600-750 kcal
- Protein: 30-40g
- Fat: 30-45g (depending on oil absorption)
- Carbohydrates: 40-50g
- Fiber: 4-6g
- Sodium: 800-1200mg (highly dependent on added salt)
Healthier Alternatives
While traditional fish and chips are indulgent, there are ways to make them a bit lighter without sacrificing too much flavor or the satisfying crunch:
- Baked Chips: Instead of frying, toss your potato wedges with a tablespoon of olive oil, paprika, and garlic powder, then bake at 400°F (200°C) until golden and tender.
- Air-Fried Fish: Pat the battered fish very dry and spray with cooking oil. Air fry at 390°F (200°C) for about 10-15 minutes, flipping halfway, until golden and cooked through. You may need to pre-cook the fish slightly or use a thinner batter.
- Lighter Batter: Use sparkling water instead of beer. You can also experiment with adding whole wheat flour or chickpea flour for added fiber and protein.
- Leaner Fish: Opt for fish like tilapia or cod, which are naturally lower in fat.
- Portion Control: Serve with a large side salad or steamed vegetables instead of exclusively relying on chips.
Serving Suggestions
Elevate your fish and chips experience with these classic and creative accompaniments:
- Mushy Peas: A British pub classic that adds a comforting, savory element.
- Tartar Sauce: Creamy, tangy, and filled with capers and pickles, it’s the perfect foil to rich, fried fish.
- Malt Vinegar: A splash of malt vinegar is essential for that authentic “chippy” tang.
- Lemon Wedges: A squeeze of fresh lemon juice brightens up the fish beautifully.
- Coleslaw: For a refreshing crunch and creamy counterpoint.
- Pickled Onions or Gherkins: Their sharp tang cuts through the richness of the fried components.
Common Mistakes to Avoid
Don’t let a few common pitfalls ruin your fish and chips dreams:
- Not drying the fish or potatoes enough: This is a guaranteed path to soggy results and oil splattering. Be diligent with your paper towels!
- Overmixing the batter: Overmixing develops gluten, leading to a tough, doughy batter instead of a light, crispy one.
- Oil not hot enough: If your oil isn’t at the correct temperature, your food will absorb too much oil, becoming greasy and heavy. Use a thermometer!
- Overcrowding the fryer: This drastically lowers the oil temperature, resulting in soggy, unevenly cooked food. Fry in batches!
- Using warm batter or warm liquid: Cold is key for crispiness. Ensure your batter and its liquid components are chilled.
Storing Your Masterpiece
Fish and chips are best enjoyed fresh. However, if you have leftovers, here’s how to store them:
- Refrigeration: Allow the food to cool completely, then store in an airtight container in the refrigerator for up to 1-2 days. The texture will degrade significantly, especially for the batter and chips.
- Reheating: The best way to reheat is in a hot oven (around 400°F/200°C) on a baking sheet for about 5-10 minutes, or in an air fryer until crisp again. Microwaving will make them uniformly soggy.
Frequently Asked Questions
What is the best type of fish for fish and chips?
Traditionally, cod and haddock are favored for their flaky texture and mild flavor. Pollock is also a good, budget-friendly option. The key is a firm white fish that holds up well to frying.
Why is my fish batter not crispy?
Several factors can contribute to non-crispy batter: oil not hot enough, overcrowding the fryer, using a batter that’s too thick or has been overmixed, or not drying the fish properly. Make sure your liquid is ice-cold!
Can I make the batter ahead of time?
It’s best to make the batter just before you’re ready to fry. If you must make it slightly ahead, keep it in the refrigerator and give it a quick whisk if it separates. However, the crispiness is maximized when the batter is freshest.
What oil is best for frying fish and chips?
Oils with a high smoke point are essential. Vegetable oil, canola oil, or peanut oil are excellent choices. They provide a neutral flavor and can withstand high temperatures.
How can I keep my chips crispy after frying?
The double-fry method is key! Ensure the first fry is at a lower temperature and the second at a higher temperature. Drain them thoroughly on a wire rack, not paper towels, which can trap steam and make them soggy. Serve immediately after the second fry.
Ready to fry up some perfection? This recipe is your ticket to unbelievably delicious, crispy fish and chips that will transport your taste buds. Don’t hesitate to try it out and let us know how it goes in the comments below! We’d love to see your creations!

Battered Fish and Chips
Description
Enjoy this classic fish and chips recipe with a crispy, golden batter that’s perfect for a family dinner or a weekend treat. No beer needed—just simple, delicious ingredients!
Ingredients
- 1 ½lbs. White Fish Fillets (e.g., Cod, Rockling, Tilapia, or Haddock)1 ¼ cupsAll-Purpose Flour1 tspBaking Powder½ cupWhole Milk1 tspOnion Powder1 tspGarlic Powder1 ½ tspSalt½ gallon(10 cups) Neutral Frying Oil (e.g., Canola or Vegetable Oil)½lb. Frozen French Fries1Lemon, cut into wedges
- 1 ¼ cupsAll-Purpose Flour1 tspBaking Powder½ cupWhole Milk1 tspOnion Powder1 tspGarlic Powder1 ½ tspSalt½ gallon(10 cups) Neutral Frying Oil (e.g., Canola or Vegetable Oil)½lb. Frozen French Fries1Lemon, cut into wedges
- 1 tspBaking Powder½ cupWhole Milk1 tspOnion Powder1 tspGarlic Powder1 ½ tspSalt½ gallon(10 cups) Neutral Frying Oil (e.g., Canola or Vegetable Oil)½lb. Frozen French Fries1Lemon, cut into wedges
- ½ cupWhole Milk1 tspOnion Powder1 tspGarlic Powder1 ½ tspSalt½ gallon(10 cups) Neutral Frying Oil (e.g., Canola or Vegetable Oil)½lb. Frozen French Fries1Lemon, cut into wedges
- 1 tspOnion Powder1 tspGarlic Powder1 ½ tspSalt½ gallon(10 cups) Neutral Frying Oil (e.g., Canola or Vegetable Oil)½lb. Frozen French Fries1Lemon, cut into wedges
- 1 tspGarlic Powder1 ½ tspSalt½ gallon(10 cups) Neutral Frying Oil (e.g., Canola or Vegetable Oil)½lb. Frozen French Fries1Lemon, cut into wedges
- 1 ½ tspSalt½ gallon(10 cups) Neutral Frying Oil (e.g., Canola or Vegetable Oil)½lb. Frozen French Fries1Lemon, cut into wedges
- ½ gallon(10 cups) Neutral Frying Oil (e.g., Canola or Vegetable Oil)½lb. Frozen French Fries1Lemon, cut into wedges
- ½lb. Frozen French Fries1Lemon, cut into wedges
- 1Lemon, cut into wedges
Instructions
- 1️⃣Prepare the fish:Cut the fish fillets into evenly sized portions. Avoid cutting them too thick to ensure they cook through completely when fried.2️⃣Cook the fries:Place the frozen French fries in the oven or air fryer and cook according to the package instructions.3️⃣Make the batter:In a large bowl, combine the flour, baking powder, milk, onion powder, garlic powder, and salt. Stir until smooth.4️⃣Heat the oil:Heat the oil in a large pot, such as a Dutch oven, until it reaches 350°F (175°C). Use a candy thermometer to monitor the temperature and maintain it consistently.5️⃣Coat and fry the fish:Dip each piece of fish into the batter, ensuring it is fully coated. Carefully place the battered fish into the hot oil. Fry in batches, cooking no more than three pieces at a time to avoid overcrowding.Fry the fish for 5 minutes, flipping once halfway through, until golden brown and fully cooked.6️⃣Drain and season:Remove the cooked fish using a strainer or slotted spoon, and place it on a wire rack to drain. Immediately season with a pinch of salt.7️⃣Serve:Serve the crispy fish alongside the cooked French fries, lemon wedges, and your favorite dipping sauces, such as tartar sauce or ketchup.
- Cut the fish fillets into evenly sized portions. Avoid cutting them too thick to ensure they cook through completely when fried.
- 2️⃣Cook the fries:Place the frozen French fries in the oven or air fryer and cook according to the package instructions.3️⃣Make the batter:In a large bowl, combine the flour, baking powder, milk, onion powder, garlic powder, and salt. Stir until smooth.4️⃣Heat the oil:Heat the oil in a large pot, such as a Dutch oven, until it reaches 350°F (175°C). Use a candy thermometer to monitor the temperature and maintain it consistently.5️⃣Coat and fry the fish:Dip each piece of fish into the batter, ensuring it is fully coated. Carefully place the battered fish into the hot oil. Fry in batches, cooking no more than three pieces at a time to avoid overcrowding.Fry the fish for 5 minutes, flipping once halfway through, until golden brown and fully cooked.6️⃣Drain and season:Remove the cooked fish using a strainer or slotted spoon, and place it on a wire rack to drain. Immediately season with a pinch of salt.7️⃣Serve:Serve the crispy fish alongside the cooked French fries, lemon wedges, and your favorite dipping sauces, such as tartar sauce or ketchup.
- Place the frozen French fries in the oven or air fryer and cook according to the package instructions.3️⃣Make the batter:In a large bowl, combine the flour, baking powder, milk, onion powder, garlic powder, and salt. Stir until smooth.4️⃣Heat the oil:Heat the oil in a large pot, such as a Dutch oven, until it reaches 350°F (175°C). Use a candy thermometer to monitor the temperature and maintain it consistently.5️⃣Coat and fry the fish:Dip each piece of fish into the batter, ensuring it is fully coated. Carefully place the battered fish into the hot oil. Fry in batches, cooking no more than three pieces at a time to avoid overcrowding.Fry the fish for 5 minutes, flipping once halfway through, until golden brown and fully cooked.6️⃣Drain and season:Remove the cooked fish using a strainer or slotted spoon, and place it on a wire rack to drain. Immediately season with a pinch of salt.7️⃣Serve:Serve the crispy fish alongside the cooked French fries, lemon wedges, and your favorite dipping sauces, such as tartar sauce or ketchup.
- 3️⃣Make the batter:
- In a large bowl, combine the flour, baking powder, milk, onion powder, garlic powder, and salt. Stir until smooth.4️⃣Heat the oil:Heat the oil in a large pot, such as a Dutch oven, until it reaches 350°F (175°C). Use a candy thermometer to monitor the temperature and maintain it consistently.5️⃣Coat and fry the fish:Dip each piece of fish into the batter, ensuring it is fully coated. Carefully place the battered fish into the hot oil. Fry in batches, cooking no more than three pieces at a time to avoid overcrowding.Fry the fish for 5 minutes, flipping once halfway through, until golden brown and fully cooked.6️⃣Drain and season:Remove the cooked fish using a strainer or slotted spoon, and place it on a wire rack to drain. Immediately season with a pinch of salt.7️⃣Serve:Serve the crispy fish alongside the cooked French fries, lemon wedges, and your favorite dipping sauces, such as tartar sauce or ketchup.
- 4️⃣Heat the oil:Heat the oil in a large pot, such as a Dutch oven, until it reaches 350°F (175°C). Use a candy thermometer to monitor the temperature and maintain it consistently.5️⃣Coat and fry the fish:Dip each piece of fish into the batter, ensuring it is fully coated. Carefully place the battered fish into the hot oil. Fry in batches, cooking no more than three pieces at a time to avoid overcrowding.Fry the fish for 5 minutes, flipping once halfway through, until golden brown and fully cooked.6️⃣Drain and season:Remove the cooked fish using a strainer or slotted spoon, and place it on a wire rack to drain. Immediately season with a pinch of salt.7️⃣Serve:Serve the crispy fish alongside the cooked French fries, lemon wedges, and your favorite dipping sauces, such as tartar sauce or ketchup.
- Heat the oil in a large pot, such as a Dutch oven, until it reaches 350°F (175°C). Use a candy thermometer to monitor the temperature and maintain it consistently.
- 5️⃣Coat and fry the fish:Dip each piece of fish into the batter, ensuring it is fully coated. Carefully place the battered fish into the hot oil. Fry in batches, cooking no more than three pieces at a time to avoid overcrowding.Fry the fish for 5 minutes, flipping once halfway through, until golden brown and fully cooked.6️⃣Drain and season:Remove the cooked fish using a strainer or slotted spoon, and place it on a wire rack to drain. Immediately season with a pinch of salt.7️⃣Serve:Serve the crispy fish alongside the cooked French fries, lemon wedges, and your favorite dipping sauces, such as tartar sauce or ketchup.
- Dip each piece of fish into the batter, ensuring it is fully coated. Carefully place the battered fish into the hot oil. Fry in batches, cooking no more than three pieces at a time to avoid overcrowding.Fry the fish for 5 minutes, flipping once halfway through, until golden brown and fully cooked.6️⃣Drain and season:Remove the cooked fish using a strainer or slotted spoon, and place it on a wire rack to drain. Immediately season with a pinch of salt.7️⃣Serve:Serve the crispy fish alongside the cooked French fries, lemon wedges, and your favorite dipping sauces, such as tartar sauce or ketchup.
- Fry the fish for 5 minutes, flipping once halfway through, until golden brown and fully cooked.
- 6️⃣Drain and season:Remove the cooked fish using a strainer or slotted spoon, and place it on a wire rack to drain. Immediately season with a pinch of salt.7️⃣Serve:Serve the crispy fish alongside the cooked French fries, lemon wedges, and your favorite dipping sauces, such as tartar sauce or ketchup.
- Remove the cooked fish using a strainer or slotted spoon, and place it on a wire rack to drain. Immediately season with a pinch of salt.7️⃣Serve:Serve the crispy fish alongside the cooked French fries, lemon wedges, and your favorite dipping sauces, such as tartar sauce or ketchup.
- 7️⃣Serve:
- Serve the crispy fish alongside the cooked French fries, lemon wedges, and your favorite dipping sauces, such as tartar sauce or ketchup.
Notes
For extra crunch, double-dip the fish in the batter before frying.Pair with a fresh salad or coleslaw for a balanced meal.Leftovers can be reheated in an air fryer to retain crispiness.
Pair with a fresh salad or coleslaw for a balanced meal.Leftovers can be reheated in an air fryer to retain crispiness.
Leftovers can be reheated in an air fryer to retain crispiness.
“`