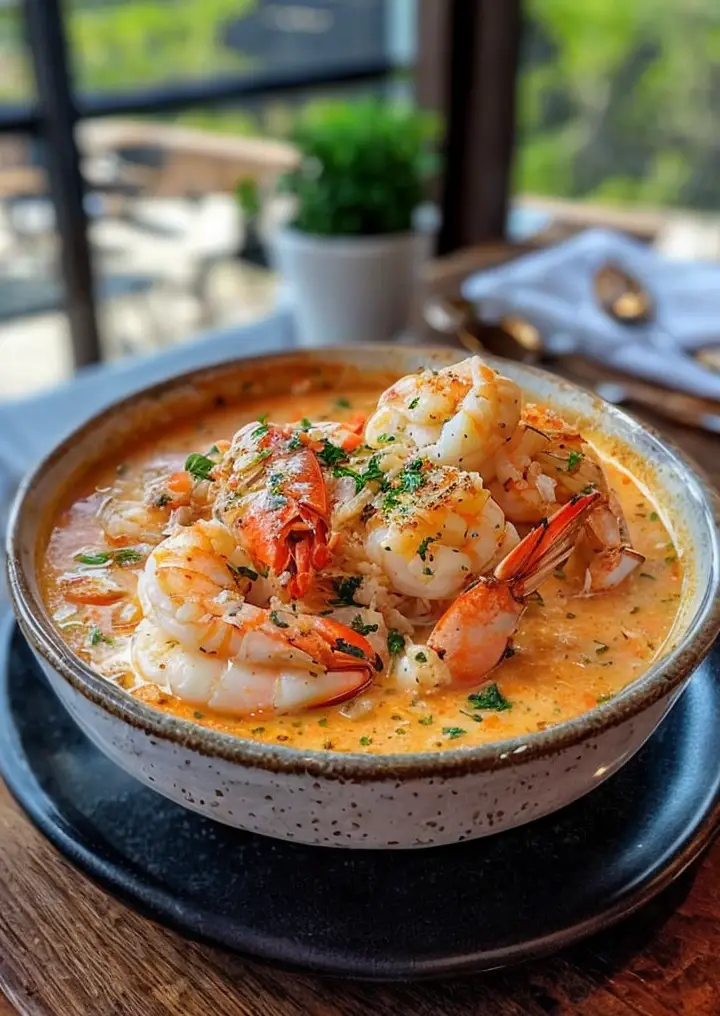
Coconut Lime Fish Soup: A Tropical Delight
Coconut Lime Fish Soup is a vibrant and refreshing dish that embodies the essence of tropical flavors. This comforting soup melds the zest of lime with the creamy richness of coconut milk, creating a harmonious balance that awakens the palate. As you indulge in this delightful recipe, the tender fish fillets soak up the aromatic broth, making each spoonful a tantalizing experience. With its bright colors and invigorating scents, this fish soup transforms any meal into a festive occasion.
The combination of fresh ingredients, such as lime zest, cilantro, and coconut milk, brings about a culinary journey that transports you to sandy beaches and swaying palm trees. Whether served on a chilly evening or a warm day, this Coconut Lime Fish Soup brings a bit of sunshine to your table. Perfect for sharing with family or enjoying solo, this dish is easier to make than you might think.
Quick Recipe Highlights
- Flavor Profile: With a contrast of citrus and creaminess, every sip of this soup is a burst of freshness complemented by tender fish and aromatic herbs.
- Texture: The soup has a silky smooth mouthfeel from the coconut milk, while the fish pieces add a satisfying bite.
- Aroma: Expect an enticing aroma with notes of lime and fresh herbs that invoke the spirit of the tropics.
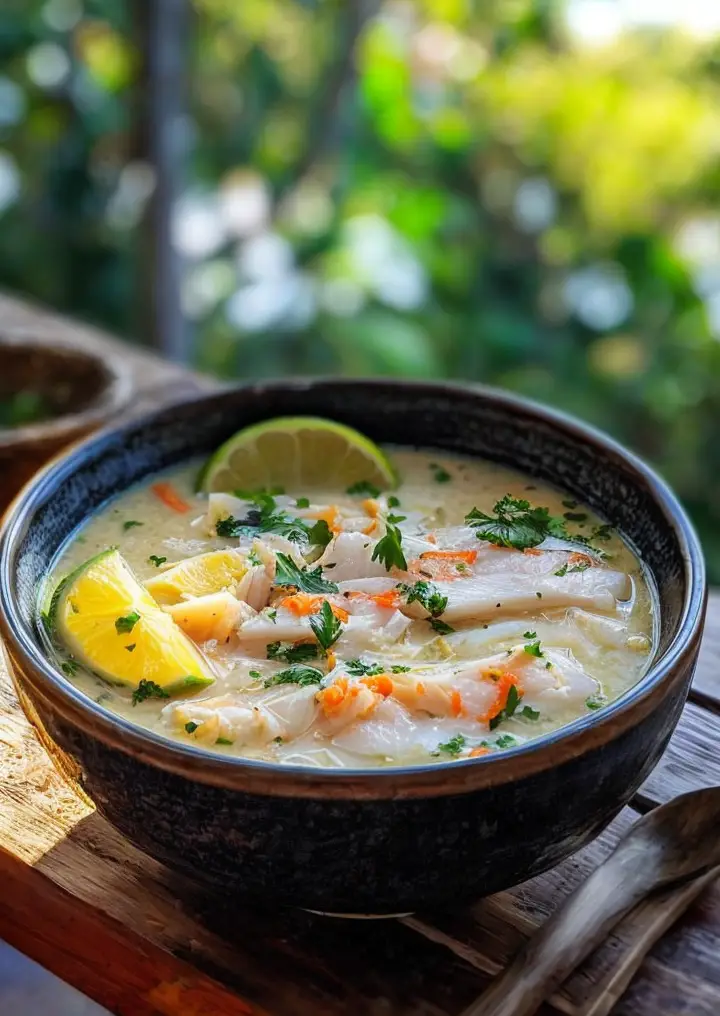
- Visual Appeal: The bowl of soup features bright green cilantro and lime wedges, creating an inviting presentation.
- Skill Level Needed: This dish is approachable for those with basic cooking skills, making it perfect for novice and experienced cooks alike.
- Special Equipment: A large pot is sufficient, and a sharp knife for preparing the fish will enhance your experience.
Recipe Overview
- Difficulty Level: While the technique is straightforward, balancing the flavors requires attention to detail, especially with the lime and seasonings.
- Category: This soup falls under the categories of comfort food and main dishes, making it versatile for lunches or dinners.
- Cuisine: Drawing inspiration from Southeast Asian culinary traditions, this soup reflects the region’s love for coconut and spices.
- Cost: Ingredients such as coconut milk and fresh fish can be slightly higher, but the overall cost remains reasonable for a delightful meal.
- Season: Ideal for any time of year, this recipe shines in warm months when fresh herbs and fish are abundant.
- Occasion: Perfect for special gatherings, casual dinners, or cozy nights at home, this dish is a crowd-pleaser that impresses.
Why You’ll Love This Recipe
Taste and texture are at the forefront of what makes this Coconut Lime Fish Soup so special. The creamy coconut milk paired with the zingy lime delivers a perfect play of richness and sharpness. Every bite of fish is tender and flavorful, enriched with the broth’s tropical essence. This delightful contrast creates an unforgettable dish that is as enjoyable to eat as it is to prepare.
Convenience is another advantage of this recipe. With a simple ingredient list and straightforward instructions, you can whip up this tropical soup in under an hour, making it ideal for weeknight dinners or last-minute gatherings. The ability to use readily available ingredients also means that cooking this soup doesn’t require extensive planning or effort.
Nutritionally, this Coconut Lime Fish Soup is a fantastic option. Packed with lean protein from the fish and healthy fats from the coconut milk, it offers a well-rounded meal that satisfies without being heavy. The addition of fresh herbs like cilantro adds vitamins and minerals, making it a nourishing choice without sacrificing flavor.
Socially, this dish makes a great centerpiece for gatherings. It encourages sharing and conversation as guests savor the vibrant flavors from a communal pot. The tropical essence of this soup adds an exotic flair, making it a memorable dish that sparks joy and conversation at any table.
Finally, the cost-effectiveness of this recipe cannot be overlooked. While seafood can sometimes be expensive, purchasing fresh fish in-season or opting for a budget-friendly white fish keeps this recipe accessible. Moreover, since each bowl is filling, it stretches your dollar further while delivering a gourmet experience at home.
Historical Background and Cultural Significance
The origins of fish soups date back to ancient times when coastal communities utilized the ocean’s bounties for sustenance. Coconut Lime Fish Soup, in particular, is a vibrant representation of Southeast Asian origins where coconut and citrus flavors dominate traditional culinary practices. The soup embodies the region’s reliance on fresh ingredients and a tropical climate that supports diverse fishing practices.
Cultural importance comes into play when considering how this soup unites people, reminiscent of communal meals shared among family and friends. Across various cultures, soup acts as a comfort food, fostering connections and traditions. This fish soup offers a modern twist to culinary rituals, celebrating both heritage and innovation.
Over the years, recipes for Coconut Lime Fish Soup have evolved, incorporating various local ingredients and tastes. While the base remains similar, chefs experiment with different fish varieties and garnishes, allowing for personal adaptations and reflections of individual culinary styles.
Regional variations are also abundant. From Thailand’s Tom Kha to Vietnam’s Canh Chua, these adaptations remain tied to the use of fresh ingredients, showcasing local produce and herbs. Each twist tells a unique story within the broader narrative of this beloved dish.
Ingredient Deep Dive
Fish
Fish holds a central role in many culinary traditions, providing a primary protein source. Understanding the nutritional benefits, including omega-3 fatty acids, makes fish a king in healthy eating. When selecting fish for this recipe, look for varieties known for their firm texture, such as cod or snapper. Freshness is crucial; choose fish with clear eyes and a mild, ocean-like scent. Proper storage involves keeping the fish cold and consuming it within a couple of days. Substitutions can include frozen fish, but fresh offers the best flavor.
Coconut Milk
Coconut milk is a fundamental ingredient in tropical cuisines, celebrated for its creamy texture and rich flavor. Packed with essential fats, it supports heart health and provides energy. When purchasing coconut milk, opt for canned varieties with no additives for the purest flavor. Store in a cool, dry place and refrigerate once opened, using it within a few days. For those seeking alternatives, almond or soy milk can substitute, but the coconut flavor will be altered.
Lime
Lime adds a bright acidity that enhances the overall dish. Its vitamin C content boosts immunity and protects skin health. When selecting limes, look for those that feel heavy for their size, indicating they’ll be juicier. Store limes at room temperature, or in the fridge for longevity. If you don’t have limes, lemon can be used as a suitable substitute.
Common Mistakes to Avoid
- Overcooking the Fish: Fish can easily become tough if overcooked; aim for tender, flaky pieces.
- Ignoring Seasoning Adjustments: The balance of lime and salt is key; taste as you go to achieve the perfect zing.
- Using Low-Quality Ingredients: Using fresh, high-quality fish and coconut milk elevates the dish significantly.
- Neglecting Aromatics: Fresh herbs like cilantro elevate the dish; don’t skip out on these key flavor components.
- Not Allowing the Flavors to Marry: Letting the soup sit for a few minutes after cooking helps the ingredients meld beautifully.
- Forgetting to zest the Lime: Adding zest enhances the flavor, making your soup more aromatic and flavorful.
- Running Out of Broth: Keep extra coconut milk or fish stock on hand, especially if you prefer a soupier consistency.
- Rushing the Preparation: Take your time to prepare and chop ingredients finely for better texture and flavor throughout.
Essential Techniques
Simmering
Simmering is a crucial technique that allows flavors to develop without boiling, ensuring the fish remains tender. Master it by keeping an eye on the heat; small bubbles should break the surface. Avoid boiling; it can toughen the fish and cloud the broth. Look for a consistent, gentle bubbling to signal success.
Chopping Herbs
Chopping herbs correctly enhances their flavor and aroma. Use a sharp knife for clean cuts, preventing bruising. This step is vital as any bruised herb can yield bitterness. Aim for a fine chop to integrate seamlessly into your dish.
Pro Tips for Perfect Coconut Lime Fish Soup
1. Always choose the freshest fish available for the best flavor and texture.
2. Experiment with different fish varieties based on what’s local and in season.
3. Don’t be afraid to customize the spice level to suit your taste for heat.
4. Fresh lime juice added right before serving brightens the entire dish.
5. Consider adding shrimp for a mixed seafood experience; just adjust cooking time accordingly.
6. Allow the soup to cool slightly before serving to let flavors intensify.
7. Keep a bowl of extra lime wedges on the side for guests who enjoy a more zesty kick.
8. Pair with a light salad or artisan bread for a complete meal experience.
Variations and Adaptations
Regional variations abound in Coconut Lime Fish Soup. For instance, you may opt for adding tropical fruits like mango or pineapple to provide a sweet contrast to the lime. Seasonal adaptations include using winter squashes or root vegetables to enhance heartiness in colder months.
For dietary modifications, substituting fish for plant-based alternatives, like mushrooms or tofu, caters to vegan diets while still maintaining the dish’s essence. In terms of flavor variations, consider experimenting with different herbs like basil or mint for a unique twist.
Serving presentations can be varied as well; serve in individual bowls garnished with colorful vegetables or herbs for a vibrant display that enhances visual appeal.
Serving and Presentation Guide
Plating techniques play an important role in how your Coconut Lime Fish Soup is received. Use shallow bowls to showcase the soup’s colorful ingredients. A generous sprinkle of chopped cilantro and a lime wedge on top can add a professional touch.
For garnishing ideas, toasted coconut flakes can enhance the tropical vibe and offer a satisfying crunch. Additionally, traditional accompaniments like crusty bread could be served on the side for dipping, adding texture to the meal.
Temperature considerations are essential; serve the soup hot to fully appreciate the aromatic ingredients. Portion control tips indicate that a cup and a half of soup per serving strikes the perfect balance for satisfying appetites.
Wine and Beverage Pairing
When it comes to wine pairings, a light, crisp white wine like Sauvignon Blanc complements the zesty lime in your soup beautifully. The fruitiness and acidity of this wine will not overpower the delicate flavors.
For non-alcoholic alternatives, consider a refreshing coconut water or sparkling water with lime to keep the tropical theme alive. If you fancy coffee or tea, choose something light and floral; a herbal tea could also serve as an excellent pairing.
Temperature considerations advise that chilled beverages pair well with warm soup, creating a satisfying contrast to the palate. Always serve drinks in chilled glasses to enhance the refreshing experience.
Storage and Shelf Life
Proper storage methods for Coconut Lime Fish Soup are essential for maintaining flavor and safety. Cool the soup down quickly and store it in an airtight container to preserve its integrity.
Ideal temperature requirements involve refrigeration; the soup should be consumed within 3-4 days when properly stored. For longer storage, freezing is an option, but be mindful of texture changes. Ensure you store in freezer-safe containers, leaving some room for expansion.
Signs of spoilage include off odors or discoloration, indicating it’s time to discard. When reheating, do so gently on the stovetop, bringing it back to a simmer but avoiding boiling to retain the best texture and flavors.
Make Ahead Strategies
Planning ahead can elevate your cooking game. Prepare all ingredients ahead of time, chopping vegetables and measuring out spices, allowing for a quick and easy assembly later. The soup can be prepped a day in advance, letting the flavors deepen overnight.
Storage between steps involves keeping fish separate until you’re ready to cook to prevent it from becoming rubbery. Quality impact assessments indicate that fresh ingredients provide the best results, so focus on the optimal timing for performance.
Assembly tips suggest that you cook the soup base ahead of time and add fish components just before serving to maintain ideal textures. Finally, you can add fresh elements like herbs right before serving to ensure freshness.
Scaling Instructions
Scaling the recipe up or down is easy; to halve the recipe, simply divide every ingredient by two. When doubling or tripling, be aware of pot size—ensure your pot can hold all components comfortably without risk of overflow.
Equipment adjustments may involve using larger pots or multiple batches for larger gatherings, maintaining the same cooking times. Timing modifications may be necessary as larger quantities can affect how quickly the soup comes to temperature.
When storing leftovers, ensure you have enough containers, and remember that flavors often improve overnight, making it worthwhile to prepare certain portions ahead of time.
Nutritional Deep Dive
A macro breakdown reveals that this Coconut Lime Fish Soup contains a healthy balance of protein from the fish and fats from the coconut milk. For those watching their carbohydrates, this meal is low-carb, fitting well into various dietary restrictions.
Micronutrient analysis shows that ingredients like lime and cilantro are rich in vitamins C and K, promoting overall health. The nutritional benefits extend to heart health, thanks to the omega-3 fatty acids found in fish.
Dietary considerations for this soup cater to a wide audience, offering excellent options for weight management thanks to the high-quality protein and healthy fats. Portion analysis suggests that a serving of this soup is satisfying while still being mindful of calorie intake, making it a guilt-free indulgence.
Dietary Adaptations
For those following gluten-free diets, Coconut Lime Fish Soup is naturally gluten-free, ensuring all can enjoy it without worry. It can easily be adapted to cater to dairy-free needs, as the coconut milk replaces traditional dairy products seamlessly.
Vegetarians can enjoy this dish by substituting fish with tofu or edamame, ensuring the recipe remains filling and delicious. Low-carb diets find this dish appealing as it incorporates vegetables without added starch, fitting perfectly into such eating plans.
Keto and Paleo enthusiasts can also enjoy this soup, as the low carbohydrate content aligns with their dietary restrictions, emphasizing whole food ingredients. Further adaptations for low-FODMAP diets involve understanding ingredient limitations while swapping in accessible alternatives.
Troubleshooting Guide
Texture issues can arise from overcooking the fish, leading to a rubbery mouthfeel. To avoid this, remain vigilant during cooking and remove fish as soon as it’s opaque. For flavor balance, adding extra lime or a drizzle of fish sauce can rectify overly bland soup; always taste and adjust as you go.
Temperature problems often stem from cooking on high heat; maintain medium to low heat for broth-making. If you find your ingredients are unbalanced, consider incorporating sweetness with a dash of sugar or honey to counteract too much acidity.
Equipment challenges come into play when tools aren’t suitable; ensure that pots are large enough to accommodate your entire recipe, preventing spillage. Ingredient substitutions may alter the intended flavor; keeping the key ingredients intact will provide the best result. Lastly, timing concerns are crucial; refer to cooking times accurately to ensure everything finishes together perfectly.
Recipe Success Stories
Our readers have applauded Coconut Lime Fish Soup for reigniting their love for fish dishes. One community member shared how adding shrimp transformed the dish into a fabulous seafood medley, delighting family and friends at gatherings.
Another success story highlighted adapting the recipe with local, seasonal vegetables, such as bok choy, adding depth and nutrition. Engaging our readers for feedback showcased successful adaptations that empower others to experiment, reinforcing the community’s enthusiastic embrace of creativity.
Photographic tips suggest capturing the vibrant colors against a neutral background, emphasizing the freshness of ingredients. These moments serve to inspire fellow home cooks to recreate this tropical delight at their tables.
Frequently Asked Questions
Can I make this soup vegetarian? Absolutely! Substitute the fish with firm tofu or tempeh, and the broth with vegetable stock for a vegetarian option.
What types of fish work best? Firm white fish like cod, snapper, and halibut are excellent choices for this recipe.
How spicy is this soup? The spice level can be adjusted based on your preference; add fresh chili peppers for heat or omit them for a milder soup.
Can I make this soup in advance? Yes, the soup can be prepared ahead of time, but add the fish just before serving to ensure it stays tender.
How long does the soup last in the fridge? Store leftovers in an airtight container for up to four days for the best flavor and quality.
Can I freeze the soup? Yes, you can freeze the soup, but textures may change; it’s advisable to consume it within three months for best results.
What can I serve with this soup? Serve alongside crusty bread, a light salad, or over steamed rice for a filling meal.
What can I substitute for coconut milk? Alternatives can include almond milk or cashew cream, though the flavor will differ from the original.
Is this soup keto-friendly? Yes, this soup is low in carbohydrates, making it suitable for keto diets.
How can I make it more filling? Consider adding vegetables like bok choy or carrots to bulk it up and increase its nutritional value.
Additional Resources
Explore related recipes to broaden your culinary repertoire. Look into techniques that enhance fish dishes, offering insights into choosing the right cooking methods or flavor pairings. Stayed informed about ingredient selections to maximize freshness and taste for your next meal. Also, don’t hesitate to invest in recommended kitchen tools to improve your cooking efficiency.
Seasonal variations add excitement—try adapting this dish with ingredients reflecting the availability in your region.
Join the Conversation
We invite you to share your Coconut Lime Fish Soup experiences with us! Engage with our community on social media, showcasing your culinary creations, and inspiring others. Photography tips for this recipe encourage capturing the vivid colors and textures to entice fellow food lovers.
Leave reviews and feedback to enhance our culinary treasure trove while sharing your unique variations of this dish. Let’s spark a vibrant conversation filled with creativity and love for cooking!
The Recipe
Coconut Lime Fish Soup
Serves: 4
Prep Time: 15 mins
Cook Time: 30 mins
Total Time: 45 mins
Kitchen Equipment Needed
- Large pot
- Sharp knife
- Cutting board
- Measuring cups and spoons
Ingredients
- 1 lb fish fillets (cod, snapper, or similar)
- 1 can (13.5 oz) coconut milk
- 4 cups fish stock or chicken broth
- 2 limes (zest and juice)
- 1 cup chopped cilantro
- 1 onion, diced
- 2 cloves garlic, minced
- 1 tablespoon fresh ginger, minced
- 1-2 Thai chilies, sliced (optional)
- Salt to taste
Directions
- In a large pot, heat a drizzle of oil over medium heat. Add onion, garlic, and ginger, sautéing until softened.
- Pour in the fish stock and bring to a simmer. Add lime zest and cayenne for a hint of spice.
- Stir in the coconut milk and let it cook for about 5 minutes, allowing flavors to meld.
- Add the fish fillets and cook gently until just cooked through, about 10 minutes.
- Finish with lime juice and cilantro to brighten the flavors. Adjust seasoning with salt as necessary.
- Serve hot, garnished with extra cilantro and lime wedges.
Recipe Notes
- For a richer texture, consider using full-fat coconut milk.
- Feel free to add vegetables like bell peppers or snap peas for additional nutrition.
- Adjust the spice level based on your preference by including or omitting chilies.