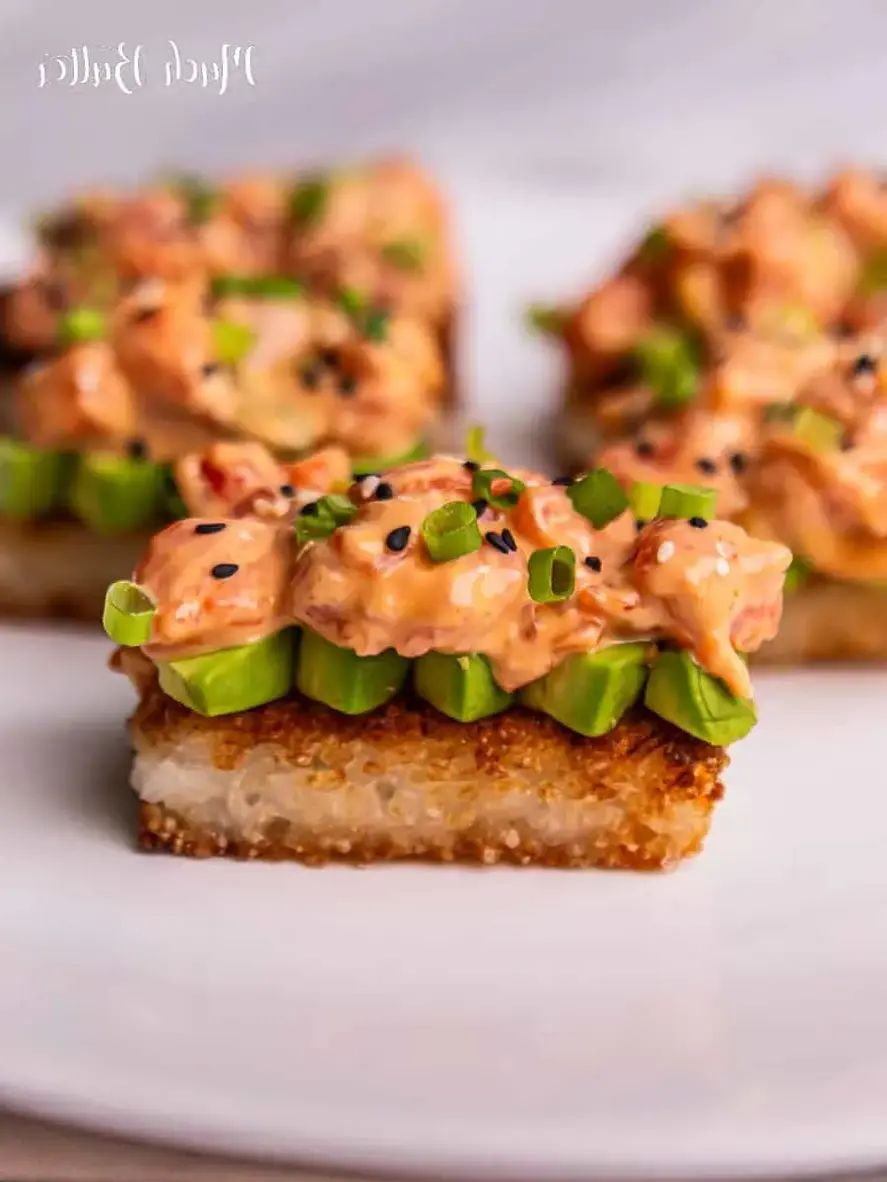
Salmon Crispy Rice


The Ultimate Guide to Viral Salmon Crispy Rice: Your New Favorite Appetizer

Prep Time

30 minutes (plus 4+ hours chilling)

Cook Time

15 minutes

Total Time

4 hours 45 minutes

Servings

16 pieces (4-6 people)

Difficulty

Medium

Course

Appetizer

Cuisine

Japanese Fusion

Author

The Kitchen Team

Website

cookingwithemy.com

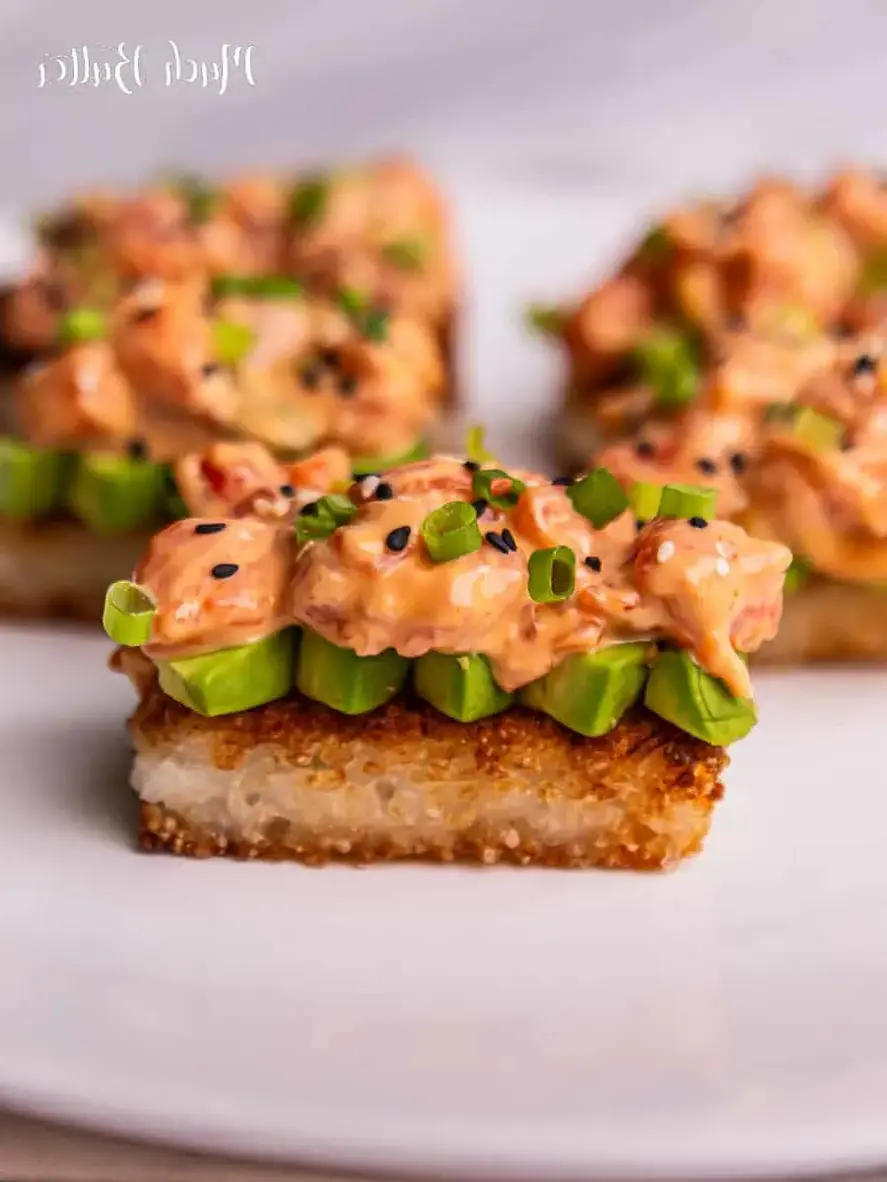
If you’ve scrolled through social media lately, you’ve undoubtedly seen the stunning, crave-worthy stacks of golden rice topped with vibrant salmon. This is salmon crispy rice, the appetizer that took TikTok and Instagram by storm, and for excellent reason. It’s the perfect harmony of textures and flavors: a hot, crunchy, pan-fried sushi rice cake, a cool layer of creamy avocado, and a bold, spicy salmon tartare-style mixture. It’s a restaurant-quality dish that’s surprisingly achievable at home.

Here at Cooking With Emy, we’ve perfected the viral formula. Our recipe breaks down every step to ensure your rice cakes are impeccably crisp, your salmon mixture is perfectly seasoned, and your final presentation is nothing short of spectacular. This isn’t just another trendy recipe; it’s a technique-driven guide to mastering a modern classic that will make you the star of any gathering. Let’s dive in and create the ultimate salmon crispy rice that balances crispy, creamy, and spicy in every single bite.

Why This Is The Best Salmon Crispy Rice Recipe

Many online recipes for salmon crispy rice skip crucial details that make the difference between a good attempt and a phenomenal result. Our version is meticulously tested by The Kitchen Team to guarantee success.

First, we focus on the rice foundation. Simply using leftover sushi rice won’t cut it. We season it with a balanced vinegar mixture and employ a specific pressing and chilling method that ensures the cakes hold their shape during frying without becoming dense or gummy. The result is a light interior with an audibly crunchy exterior.

Second, our spicy salmon mixture is more than just mayo and sriracha. We incorporate umami-rich soy sauce and nutty sesame oil, along with fresh scallions, for a complex flavor profile that complements, rather than overpowers, the high-quality salmon. We also provide precise guidance on selecting and handling sushi-grade fish safely.

💡 The Kitchen Team’s Pro Tip: The secret to the “crispy” in crispy rice isn’t just frying; it’s in the chilling. Pressing the rice firmly and letting it chill overnight allows the starches to fully set, creating a cohesive cake that fries up with a sturdy crunch instead of falling apart in the oil.

Finally, we give you the complete picture—from advanced prep strategies to stunning plating ideas and solutions for common pitfalls. This guide is your all-in-one resource for mastering this viral dish.

Salmon Crispy Rice Ingredients

Quality ingredients are non-negotiable for this recipe. Each component plays a starring role. Here’s everything you’ll need, broken down by component.

For the Crispy Rice Cakes:

Ingredient Quantity Notes
Short-grain sushi rice 1 ½ cups (uncooked) Yields ~3 cups cooked. Do not substitute with long-grain.
Rice vinegar 2 tbsp Unseasoned.
Sugar 1 tbsp Helps balance the vinegar.
Salt 1 tsp
Vegetable oil For frying Use a neutral, high-smoke point oil like canola or avocado.

For the Spicy Salmon Topping:

Ingredient Quantity Notes
Sushi-grade salmon fillet 1 lb Must be labeled “sushi-grade” or “sashimi-grade” for safe raw consumption.
Kewpie mayonnaise 4 tbsp Japanese mayo is creamier and umami-rich. American mayo can be substituted.
Sriracha 2 tbsp Adjust to your heat preference.
Soy sauce (or tamari) 2 tsp Use low-sodium if preferred.
Toasted sesame oil 2 tsp Do not use plain sesame oil; toasted has a much stronger flavor.
Finely chopped scallions 2 tbsp Green parts only.

For Assembly & Garnish:

Ingredient Quantity Notes
Ripe avocados 2 medium Sliced or gently smashed.
Fresh jalapeño 1 Thinly sliced into rounds.
Toasted black & white sesame seeds For sprinkling
Extra sriracha or eel sauce For drizzling (optional)

How to Make Salmon Crispy Rice: Step-by-Step

Part 1: Preparing & Chilling the Rice Cakes (Do this ahead of time)

Step 1: Cook & Season the Rice. Cook your sushi rice according to package directions. While the rice is still hot, transfer it to a large bowl. In a small saucepan, gently heat the rice vinegar, sugar, and salt just until dissolved. Pour the warm vinegar mixture over the hot rice. Using a rice paddle or spatula, fold and cut through the rice to distribute the seasoning evenly. Be gentle to avoid mashing the grains.

Step 2: Press and Chill. Line an 8×8 inch baking pan with plastic wrap, leaving overhang on all sides. Transfer the seasoned rice to the pan. Using slightly damp hands or a flat-bottomed glass, press the rice into a firm, even, compact layer. Fold the plastic wrap overhang over the top to cover completely. Refrigerate for at least 4 hours, but ideally overnight. This step is critical for firm rice cakes.

💡 The Kitchen Team’s Pro Tip: For ultra-neat edges, place a second sheet of plastic wrap directly on the surface of the rice before pressing. This prevents the rice from sticking to your hands or the glass.

Part 2: Making the Spicy Salmon

Step 3: Prepare the Salmon. Ensure your salmon is very cold. Using a sharp knife, chop the salmon into small, uniform pieces (about ¼-inch). You want a tartare-like consistency, not a paste. Place in a mixing bowl.

Step 4: Mix. To the bowl with salmon, add the Kewpie mayo, sriracha, soy sauce, sesame oil, and chopped scallions. Gently fold everything together until just combined. Avoid overmixing. Cover the bowl and return it to the refrigerator until you’re ready to assemble.

Part 3: Frying & Assembly

Step 5: Cut and Fry the Rice. Remove the chilled rice block from the pan using the plastic wrap. Using a sharp knife, cut it into 16 even rectangles. Heat about ¼ inch of vegetable oil in a large non-stick or cast-iron skillet over medium-high heat. To test the oil, add a single grain of rice; it should sizzle immediately. Working in batches to avoid crowding, carefully add the rice cakes. Fry for 3-4 minutes per side, or until deeply golden brown and incredibly crispy. Transfer to a wire rack set over a baking sheet or a plate lined with paper towels.

Step 6: Assemble Immediately. While the rice cakes are still warm, top each one with a slice or small smear of avocado. Add a generous tablespoon of the spicy salmon mixture. Garnish with a thin slice of jalapeño, a sprinkle of toasted sesame seeds, and an optional tiny drizzle of sriracha. Serve immediately for the best contrast of warm, crispy rice and cool, flavorful topping.

How to Serve & Present Salmon Crispy Rice

Presentation is key for this visually stunning dish. Arrange the assembled pieces on a long rectangular platter or a sleek slate board. Garnish the platter with extra scallion greens, microgreens, or edible flowers for a pop of color. Provide small plates or napkins for guests, as these are meant to be eaten in one or two bites.

This dish is perfect as the star appetizer for a dinner party, a luxurious game-day snack, or the centerpiece of a homemade sushi night. Pair it with a crisp, dry white wine like Sauvignon Blanc, a light lager, or a ginger-forward cocktail.

Storage & Make-Ahead Instructions

Make-Ahead: The rice block can be pressed and chilled for up to 2 days. The spicy salmon mixture can be made 1 day ahead and stored in an airtight container in the fridge. The avocado should always be sliced fresh.

Storage: It is not recommended to store fully assembled crispy rice. Components can be stored separately. Leftover fried (but un-topped) rice cakes can be kept in an airtight container in the fridge for 1 day. Re-crisp in an air fryer or toaster oven at 375°F for 3-5 minutes before assembling.

Important Food Safety: Due to the raw fish, any leftover salmon mixture should be discarded after 24 hours.

Creative Recipe Variations

The beauty of this recipe is its adaptability. Here are some popular twists from The Kitchen Team:

  • Spicy Tuna Crispy Rice: Substitute the salmon with sushi-grade tuna.
  • Vegetarian “Spicy Crab”: Use lump crab meat (imitation or real) or finely chopped hearts of palm mixed with the same spicy mayo blend.
  • Unagi (Eel) Style: Top the crispy rice with a piece of grilled unagi (available frozen at Asian markets) and drizzle with store-bought eel sauce.
  • Baked Option: For a lighter version, brush the rice cakes with oil and bake at 425°F on a parchment-lined sheet for 20-25 minutes, flipping halfway, until crispy.
  • Flavor Twists: Add a tiny dot of yuzu kosho to the salmon, or mix furikake into the rice before pressing.

Frequently Asked Questions (FAQ)

Can I use regular white rice instead of sushi rice?

No. Sushi rice (short-grain Japanese rice) is essential. It has a higher starch content that creates the necessary sticky, cohesive texture needed to form cakes that hold together when fried. Long-grain rice like Jasmine or Basmati will not work.

Where can I find sushi-grade salmon?

Look for a reputable fishmonger, a high-quality grocery store with a dedicated seafood counter, or a Japanese market. Always ask the fishmonger if the salmon is safe to eat raw. It should be labeled “sushi-grade” or “sashimi-grade,” indicating it has been frozen to a temperature that kills parasites.

My rice cakes are falling apart when I fry them. What did I do wrong?

This is usually due to insufficient chilling or pressing. The rice must be chilled for at least 4 hours to allow the starches to fully set. Also, ensure you are pressing the rice very firmly and evenly into the pan. Cutting with a very sharp knife helps prevent ragged edges that can crumble.

Can I make this gluten-free?

Yes! Simply ensure your soy sauce is a gluten-free tamari. All other ingredients are naturally gluten-free.

What can I use instead of Kewpie mayo?

You can use regular American mayonnaise. The flavor will be slightly different (less umami), but it will still be delicious. You could add a tiny pinch of MSG or dashi powder to the mixture to mimic Kewpie’s depth.

Can I air fry the rice cakes?

Yes! Brush the chilled rice cakes lightly with oil on all sides. Air fry at 400°F for 10-12 minutes, flipping halfway, until golden and crispy. They may not get *quite* as uniformly golden as pan-frying but will still be excellent.

How do I get my avocado to not brown before serving?

Slice the avocado at the very last minute, just before assembly. A light brush of lemon or lime juice on the slices can also help slow oxidation.

Is it safe for pregnant women to eat this?

Due to the raw fish, this dish is not recommended for pregnant women, young children, the elderly, or anyone with a compromised immune system unless the salmon is fully cooked. You could use fully cooked, flaked salmon in the mixture as a safer alternative.

Loved This Recipe? Share It!

If you mastered this viral salmon crispy rice, we’d love to see your creation! Share your photos and tag @cookingwithemy on social media. Don’t forget to save this complete guide for later by pinning the image below to your Pinterest boards!

Salmon Crispy Rice appetizer on a wooden board, beautifully garnished with sesame seeds and jalapeño
Pin this for later! | Photo credit: The Kitchen Team / Cooking With Emy


clock clock iconcutlery cutlery iconflag flag iconfolder folder iconinstagram instagram iconpinterest pinterest iconfacebook facebook iconprint print iconsquares squares iconheart heart iconheart solid heart solid icon

Salmon Crispy Rice


  • Author:
    Chef Emy

Ingredients


Scale
  • 3 cup Cooked Sushi Rice (short grain rice)
  • 2 tbsp Rice Vinegar
  • 1 tbsp Sugar
  • 1 tsp Salt
  • Vegetable Oil (for frying)
  • 1 lb Sushi-grade Salmon
  • 4 tbsp Kewpie Mayo
  • 2 tbsp Sriracha
  • 2 tbsp Scallion
  • 2 tsp Soy Sauce
  • 2 tsp Sesame Oil
  • Sliced Avocado
  • Jalapeno (thinly sliced)
  • Black and White Sesame Seed (toasted)

Instructions

  1. In a small mixing bowl, combine rice vinegar with sugar and salt then stir until dissolved. Pour the rice vinegar over cooked sushi rice and mix until well combined.
  2. Transfer the rice to a baking pan lined with a plastic wrap. Gently press the rice to even it out. Cover and let it chill in the fridge for at least 4 hours or overnight.
  3. Chop the sushi-grade salmon into a small pieces, transfer it a a bowl then combine the salmon with mayo, sriracha, soy sauce, scallion and sesame oil. Mix well and set aside in the fridge until ready to use.
  4. Once the rice chilled, cut into 16 rectangles. Heat vegetable oil in a pan over medium heat, fry the rice until both sides turns nice and golden. Remove from the heat and let it cool on a paper towel.
  5. Top the crispy rice with a sliced avocado, a tablespoon of salmon mixture and sliced of jalapeno. Sprinkle it with black and white sesame seeds. Serve immediately.
Sticky Chicken Rice Bowls Recipe | Cheff Recipes

Sticky Chicken Rice Bowls Recipe: Your New Weeknight Hero Dinner

Prep Time
15 minutes
Cook Time
20 minutes
Total Time
35 minutes
Servings
4 bowls
Difficulty
Easy

Why You’ll Love These Sticky Chicken Rice Bowls

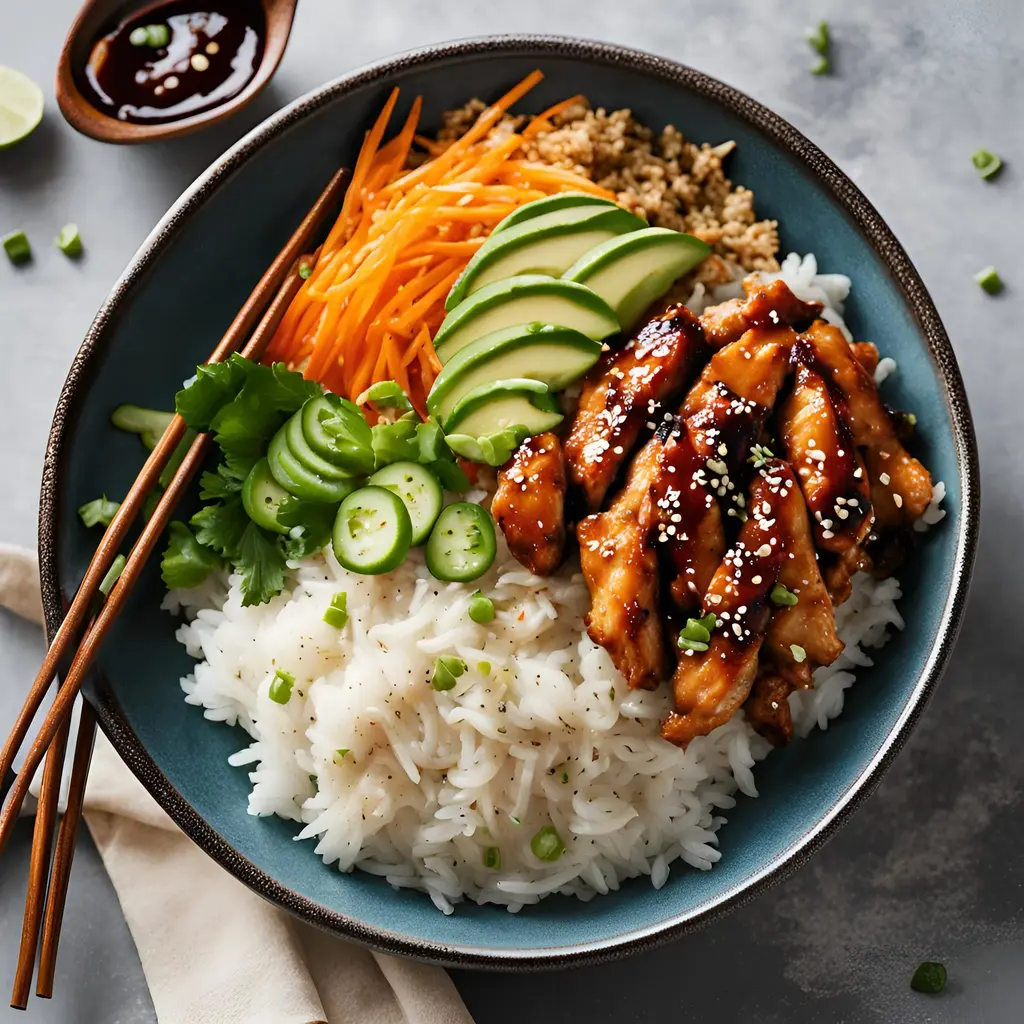
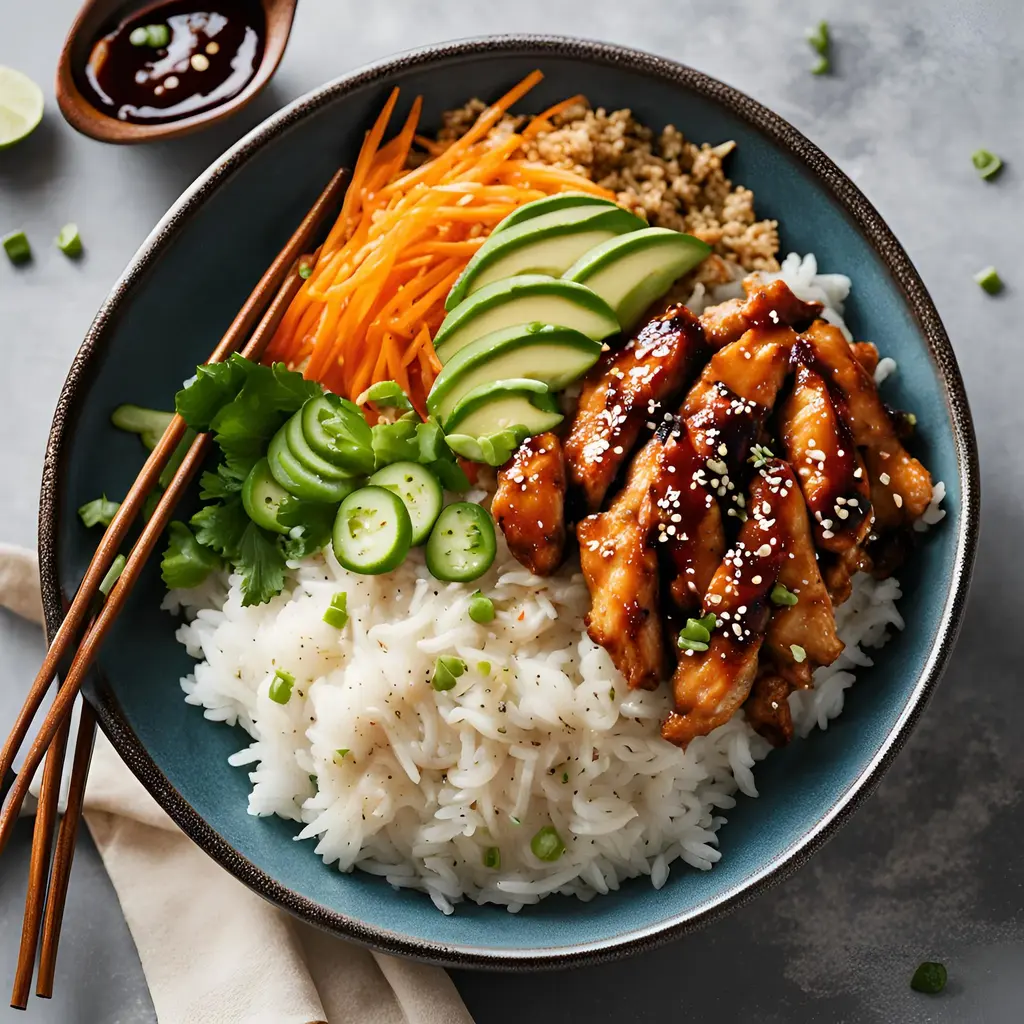
If you’re searching for a dinner that delivers maximum flavor with minimal fuss, you’ve just found your new kitchen best friend. These Sticky Chicken Rice Bowls are the ultimate solution for busy weeknights, meal prep Sundays, or anytime you crave something deeply satisfying. Imagine tender, perfectly seasoned chicken bites, coated in a glossy, savory-sweet sauce that truly lives up to its “sticky” name, all piled atop a bed of fluffy rice with crisp-tender broccoli. Finished with a creamy, spicy mayo drizzle and a sprinkle of sesame seeds, every bite is a perfect harmony of textures and tastes.

Here at CookingWithEmy.com, we believe a great recipe should be accessible, reliable, and downright delicious. This Sticky Chicken Rice Bowls recipe checks every box. It leverages simple techniques—like using an air fryer for the chicken—to achieve incredible results quickly. The sauce, a magical blend of soy sauce, honey, and aromatic spices, comes together in one pot and transforms the entire dish. Whether you’re cooking for your family, prepping lunches, or need a crowd-pleaser, this recipe is designed to impress without stress. Let’s dive in and create a meal that will have everyone asking for seconds.

What Makes This The Best Sticky Chicken Rice Bowls Recipe

You might be wondering what sets this recipe apart from other chicken bowl concepts. The secret lies in our layered approach to flavor and our smart cooking methods. First, we don’t just cook the chicken; we give it a flavor foundation with a robust spice rub featuring smoked paprika, chili powder, and oregano. This creates a delicious crust that stands up to the bold sauce. Second, our sticky sauce is a carefully balanced masterpiece. We use honey for a natural sweetness that caramelizes beautifully, rice vinegar for a bright tang that cuts through the richness, and a hint of sriracha and ginger for a warm, lingering heat. The arrowroot (or cornstarch) slurry is our pro-thickening trick, giving the sauce that luxurious, cling-to-everything texture that defines a great sticky glaze.

💡 The Kitchen Team’s Pro Tip: For the ultimate “sticky” factor, let the cooked sauce simmer for the full 4-5 minutes after adding the slurry. This not only thickens it but also cooks out any starchy flavor, allowing the soy, honey, and garlic notes to truly shine.

Finally, the assembly is intentional. By keeping the components separate until serving—fluffy rice, vibrant green broccoli, saucy chicken—we ensure every element retains its ideal texture. The spicy mayo drizzle and sesame seed finish aren’t just garnishes; they add essential creaminess, heat, and nutty crunch that elevate the bowl from great to extraordinary. This recipe is meticulously tested to guarantee success, making it the definitive version you’ll return to again and again.

Ingredients & Substitutions

Gathering your ingredients is the first step to culinary success. Here’s everything you’ll need, along with our expert notes and substitution guides to accommodate dietary needs or pantry shortages.

Ingredient Quantity Notes & Possible Substitutes
Uncooked Rice 2 cups White jasmine or basmati rice recommended for fragrance and fluffiness. Brown rice works but will increase cook time.
Broccoli 2 small heads, chopped Can substitute with cauliflower florets, snap peas, or bell peppers for different veggies.
Chicken Breasts 3 large Boneless, skinless chicken thighs are an excellent, more flavorful substitute. Adjust cook time slightly.
Olive Oil 2 tbsp Any neutral cooking oil like avocado, canola, or vegetable oil will work.
Chicken Spice Rub
Salt 1 tsp Use kosher salt for best results.
Black Pepper 1/2 tsp Freshly ground is ideal.
Chili Powder 1 tsp Adds mild heat and depth. Paprika can be used in a pinch.
Smoked Paprika 1 tsp Key for a subtle smoky flavor. Regular paprika works but lacks smokiness.
Onion Powder 1 tsp Granulated garlic can be used if needed.
Dried Oregano 1 tsp Dried thyme or Italian seasoning are good alternatives.
Sticky Sauce
Soy Sauce 1/2 cup For a gluten-free version, use tamari or coconut aminos (note: aminos are less salty).
Honey 1/2 cup Maple syrup or agave nectar are great vegan substitutes.
Rice Vinegar 1/4 cup Apple cider vinegar or white wine vinegar can be substituted.
Garlic, minced 3 cloves 1 tsp of garlic powder can be used in a serious pinch.
Sriracha 2 tbsp Adjust to your heat preference. Gochujang or another hot sauce works.
Sesame Oil 2 tsp Do not substitute; it’s essential for authentic Asian flavor.
Ground Ginger 1 tsp 1 tbsp freshly grated ginger is even better!
Arrowroot Powder 2 tsp Mixed with 2 tbsp water. Cornstarch is a perfect 1:1 substitute.
Spicy Mayo & Toppings
Mayonnaise 1/2 cup Kewpie mayo is fantastic here, or use vegan mayo.
Sriracha 1 tbsp Again, adjust heat to taste.
Water 2-3 tbsp To thin the mayo to a drizzling consistency.
Sesame Seeds For topping Black or white, toasted for extra nuttiness.

Step-by-Step Instructions

Follow these detailed steps for flawless Sticky Chicken Rice Bowls every single time. We’ve broken it down to make the process intuitive and foolproof.

Step 1: Prepare the Base Components

Begin by cooking your rice according to the package directions. For the fluffiest rice, use the absorption method: rinse 2 cups of rice until the water runs clear, then combine with 3 cups of water in a pot. Bring to a boil, reduce heat to low, cover, and simmer for 18 minutes. Remove from heat and let it steam, covered, for 10 more minutes. Fluff with a fork. While the rice cooks, steam your chopped broccoli until it is fork-tender but still bright green and crisp, about 4-5 minutes. You can do this in a steamer basket on the stove or in a microwave-safe bowl with a splash of water, covered with a damp paper towel. Set both aside.

💡 The Kitchen Team’s Pro Tip: Cook your rice in chicken or vegetable broth instead of water for an extra layer of savory flavor that permeates the entire bowl.

Step 2: Cook the Spiced Chicken

Pat the chicken breasts dry with paper towels. This is crucial for getting a good sear and preventing steaming. Cut them into uniform, bite-sized pieces (about 1-inch cubes). In a large bowl, toss the chicken pieces with the 2 tablespoons of olive oil, ensuring each piece is lightly coated. Add all the spices for the rub—1 tsp salt, 1/2 tsp pepper, 1 tsp chili powder, 1 tsp smoked paprika, 1 tsp onion powder, and 1 tsp oregano. Toss vigorously until the chicken is evenly and thoroughly coated with the spice mixture.

Preheat your air fryer to 400°F (200°C). Arrange the chicken pieces in a single layer in the air fryer basket, ensuring they aren’t crowded. This allows for proper air circulation and crispy edges. Cook for 10-12 minutes, shaking the basket halfway through, until the chicken is cooked through and has an internal temperature of 165°F. If you don’t have an air fryer, you can achieve similar results by sautéing the chicken in a large skillet over medium-high heat for 8-10 minutes, stirring occasionally.

Step 3: Create the Legendary Sticky Sauce

While the chicken cooks, it’s sauce time! In a medium saucepan, combine the soy sauce, honey, rice vinegar, minced garlic, 2 tablespoons of sriracha, sesame oil, and ground ginger. Whisk well to combine. Bring the mixture to a boil over medium-high heat, stirring occasionally.

In a small separate bowl, make your slurry by whisking the 2 teaspoons of arrowroot powder (or cornstarch) with 2 tablespoons of cold water until completely smooth. Once the sauce mixture is boiling, slowly stream in the slurry while whisking constantly. Reduce the heat to a steady simmer and let it cook for 4-5 minutes, whisking often. The sauce will transform from thin and watery to a glossy, thick glaze that coats the back of a spoon. Remove from heat.

Step 4: Assemble Your Masterpiece Bowls

Now for the fun part! In four serving bowls, start with a generous base of fluffy rice. Next, add a portion of the steamed broccoli. Once the chicken is done, you can toss it directly in the pot with the sticky sauce, or divide the chicken among the bowls and spoon the sauce over the top. We prefer tossing it in the pot to ensure every nook and cranny of the chicken gets sauced.

For the spicy mayo, whisk together the 1/2 cup mayonnaise and 1 tablespoon of sriracha. Add water, one tablespoon at a time, until it reaches a smooth, drizzling consistency. Drizzle this creamy, spicy ribbon over each bowl. Finally, finish with a generous sprinkle of sesame seeds for that perfect nutty crunch and visual appeal.

Serving Suggestions & Pairings

These bowls are a complete meal on their own, but you can easily build a fuller spread. For a refreshing contrast, serve with a simple side salad of shredded cabbage, carrots, and cucumber with a light ginger-sesame dressing. If you’re feeding a crowd, consider adding other small plates like crispy spring rolls, edamame sprinkled with sea salt, or miso soup.

Beverage pairings can elevate the experience. A crisp, off-dry Riesling or a hoppy IPA beer complements the sweet, spicy, and savory notes beautifully. For a non-alcoholic option, iced green tea with lemon or sparkling water with a slice of lime is perfect.

Storage & Reheating Instructions

Storage: Store components separately in airtight containers in the refrigerator for up to 3-4 days. The rice, chicken (with sauce), and broccoli can be stored in individual containers. The spicy mayo can be kept in a small jar or container.

Reheating: For best results, reheat the rice and sauced chicken separately. The microwave works well: sprinkle a few drops of water over the rice and heat in 30-second intervals. Reheat the chicken and sauce in a skillet over medium-low heat with a splash of water to loosen the glaze, or microwave gently. Assemble your bowl fresh with cold broccoli and a fresh drizzle of spicy mayo to maintain the best textures.

Freezing: We do not recommend freezing the assembled bowls, as the texture of the rice and broccoli will suffer. However, the cooked, sauced chicken freezes well for up to 2 months. Thaw overnight in the refrigerator before reheating.

Creative Recipe Variations

The beauty of this recipe is its adaptability. Here are some fantastic ways to mix it up:

  • Protein Swap: Try it with shrimp (cook for 3-4 minutes in the air fryer), firm tofu (pressed and cubed), or even thinly sliced beef sirloin.
  • Veggie Power Bowl: Load it up with additional veggies like sautéed mushrooms, shredded carrots, avocado slices, or kimchi for a probiotic kick.
  • Different Grain Base: Swap the white rice for quinoa, cauliflower rice (for a low-carb option), or soba noodles.
  • Flavor Twists: Add a tablespoon of gochujang (Korean chili paste) to the sticky sauce for a deeper, fermented heat. Or, swap the honey for brown sugar for a more caramel-like sweetness.

Frequently Asked Questions (FAQ)

Can I make this sticky chicken rice bowls recipe without an air fryer?
Absolutely! You can cook the spiced chicken in a large skillet over medium-high heat with a little oil for 8-10 minutes, or bake it on a parchment-lined sheet pan at 400°F for 15-18 minutes, until cooked through.
Is there a way to make this recipe gluten-free?
Yes, easily! Simply ensure you use tamari or a certified gluten-free soy sauce instead of regular soy sauce. All other ingredients in this recipe are naturally gluten-free.
My sauce didn’t get very thick. What did I do wrong?
The most common reason is that the slurry wasn’t fully incorporated while the sauce was at a full boil, or it wasn’t allowed to simmer long enough. Make sure your slurry is smooth (no lumps) and that you whisk it in vigorously. Then let it simmer for the full 4-5 minutes to activate the thickening power.
Can I prep these bowls ahead of time for meal prep?
They are an excellent meal prep candidate! Store the rice, broccoli, and sauced chicken in separate compartments of a meal prep container. Keep the spicy mayo in a small separate container. Assemble and add the mayo drizzle just before eating to keep everything fresh.
What can I use instead of arrowroot powder?
Cornstarch is a perfect 1:1 substitute. Use the same amount (2 tsp) mixed with the same amount of cold water (2 tbsp).
How spicy is this recipe?
As written, it has a mild to medium heat level, thanks to the sriracha in both the sauce and the mayo. You can control the heat by reducing or omitting the sriracha, or by adding more if you love spice!
Can I use frozen broccoli?
Yes, frozen broccoli florets work perfectly. There’s no need to thaw; just steam them according to the package directions until hot and tender-crisp.
What type of rice is best for these bowls?
We love jasmine or basmati rice for their fragrant, fluffy texture that soaks up the sauce wonderfully. Short-grain white rice or sushi rice will give a stickier, clumpier base, which some people prefer.

Share Your Creation!

Did you make these incredible Sticky Chicken Rice Bowls? We would be thrilled to see your results! Share a photo of your masterpiece and tag us on social media @cookingwithemy. Your version might just inspire someone else’s next delicious dinner!

Love This Recipe? Save It For Later!

Pin the image below to your favorite Dinner Ideas or Meal Prep board on Pinterest to always have this Sticky Chicken Rice Bowls recipe handy.

Follow us on Pinterest: @cookingwithemy for more easy and flavorful recipes!

[PINTEREST-READY IMAGE: A beautifully styled photo of the Sticky Chicken Rice Bowl in a white bowl, with chopsticks, sauce drizzled, and sesame seeds visible. Text overlay: “The BEST Sticky Chicken Rice Bowls | cookingwithemy.com”]

clock clock iconcutlery cutlery iconflag flag iconfolder folder iconinstagram instagram iconpinterest pinterest iconfacebook facebook iconprint print iconsquares squares iconheart heart iconheart solid heart solid icon

Sticky Chicken Rice Bowls Recipe


  • Author:
    Chef Emy

Description

Sticky Chicken Rice Bowls are a delicious and easy-to-make meal that combines tender chicken with a savory-sweet glaze, served over a bed of fluffy rice. Perfect for a weeknight dinner or a quick lunch, this dish is sure to become a family favorite. Lets dive into the details of creating this mouthwatering meal.


Ingredients


Scale
  • 2 cup uncooked rice
  • 2 small heads broccoli, chopped
  • 3 large chicken breasts
  • 2 tbsp olive oil
  • 1 tsp salt
  • 1/2 tsp pepper
  • 1 tsp chili powder
  • 1 tsp smoked paprika
  • 1 tsp onion powder
  • 1 tsp oregano
  • Sticky Sauce
  • 1/2 cup soy sauce
  • 1/2 cup honey
  • 1/4 cup rice vinegar
  • 3 cloves garlic, minced
  • 2 tbsp sriracha
  • 2 tsp sesame oil
  • 1 tsp ground ginger
  • 2 tsp arrowroot powder mixed with 2 tbsp water to make a slurry (sub cornstarch)
  • Spicy mayo
  • 1/2 cup mayo
  • 1 tbsp sriracha
  • 23 tbsp water
  • sesame seeds for topping

Instructions

  1. Cook rice according to package.
  2. Steam broccoli in microwave or on stove top until fork tender. Set aside.
  3. Cut chicken up into small bitesized pieces.
  4. Toss chicken with oil and all spices. Lay flat in air fryer and cook in preheated air fryer at 400F to 12 minutes or until chicken is 160F internally.
  5. While chicken is cooking, add soy sauce, honey, rice vinegar, garlic, sriracha, sesame oil, and ground ginger to a sauce pot. Bring to a boil. Once boiling, add arrowroot slurry. Let boil 4-5 minutes or until sauce has thickened greatly.
  6. Prepare bowls by layering rice, broccoli, chicken, and covering in sauce. Mix together spicy mayo ingredients and drizzle on top. Top with sesame seeds.


Beef Pan-Fried Noodles

Print
clock clock iconcutlery cutlery iconflag flag iconfolder folder iconinstagram instagram iconpinterest pinterest iconfacebook facebook iconprint print iconsquares squares iconheart heart iconheart solid heart solid icon

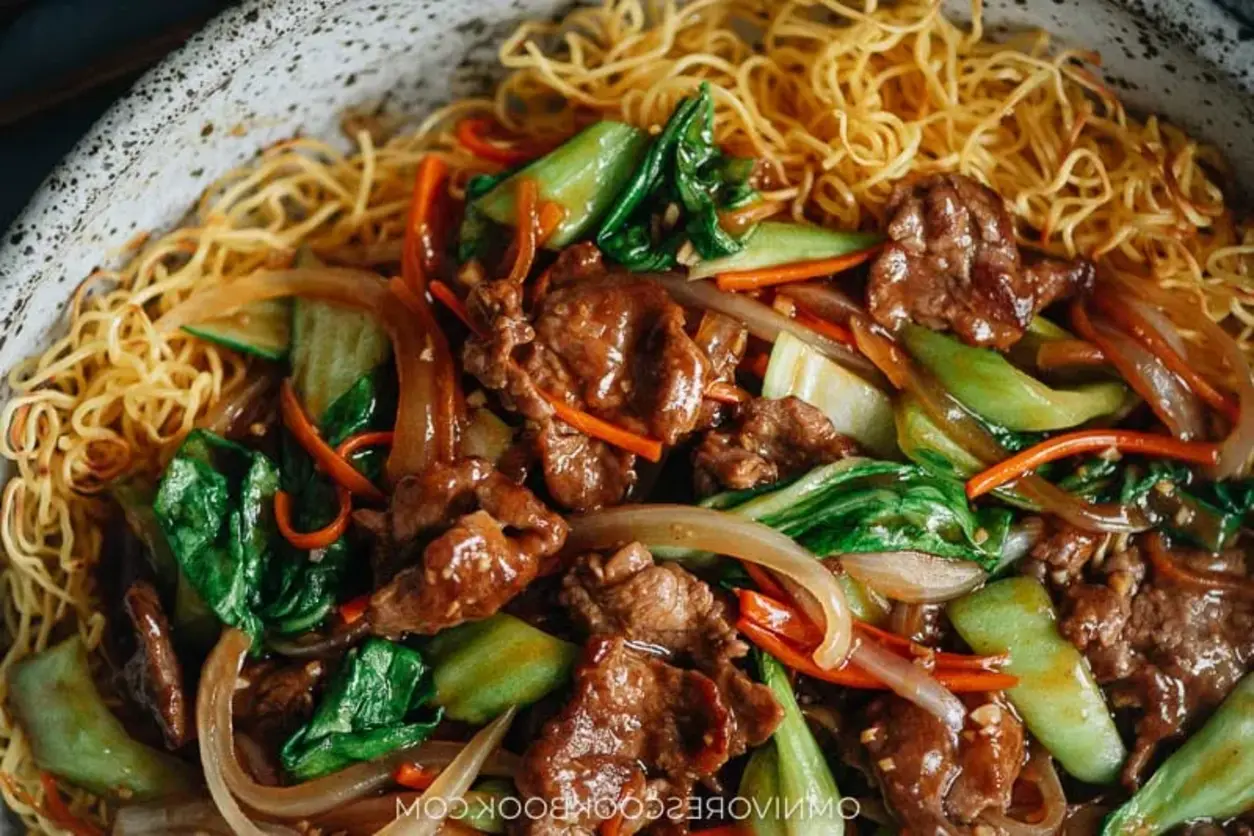
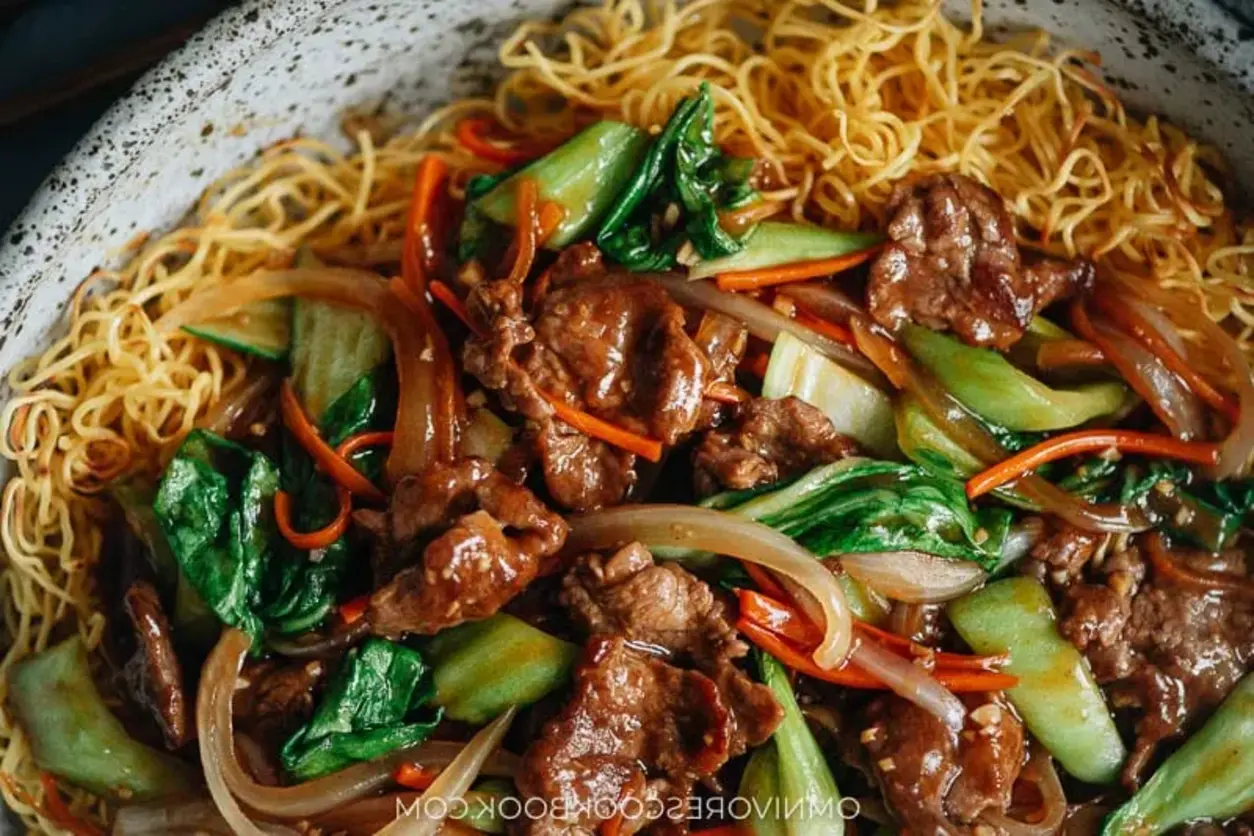
Beef Pan-Fried Noodles


  • Author: Chef Emy

Description

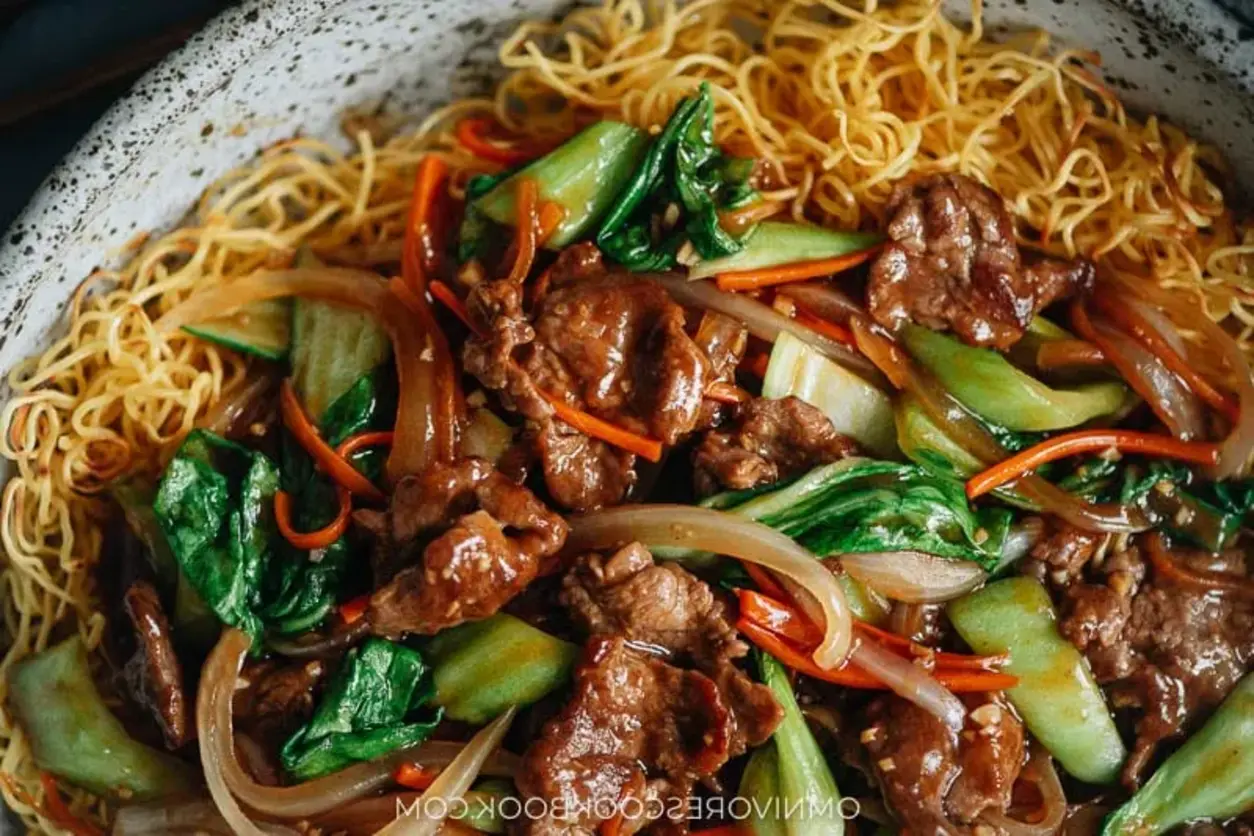
Turn your kitchen into a Chinese restaurant by making crispy pan fried noodles with juicy beef in a rich and savory sauce that tastes too good to be true!


Ingredients

Scale
  • 8 oz flank steak (or skirt steak) (, thinly sliced against the grain)
  • 8 oz fresh Hong Kong pan fry noodles ((or other type of thin noodles) (Footnote 1))
  • 2 tablespoons Shaoxing wine ((or dry sherry))
  • 2 teaspoons cornstarch
  • 1/4 teaspoon salt
  • 1 cup low-sodium beef broth
  • 2 tablespoons soy sauce ((*Footnote 2))
  • 2 tablespoons oyster sauce
  • 1 tablespoon Shaoxing wine ((or dry sherry))
  • 2 tablespoons cornstarch
  • 1 teaspoon sugar
  • 1/4 teaspoon Chinkiang vinegar
  • 1/4 teaspoon white pepper
  • 4 tablespoons peanut oil (, divided)
  • 4 heads baby bok choy (, quartered)
  • 4 cloves garlic (, minced)
  • 1 " ginger (, minced)
  • 1/2 yellow onion (, sliced)
  • 1/2 carrot (, sliced into strips)

Instructions

  1. Combine the beef and the marinade ingredients in a medium-sized bowl. Toss with your hands to coat the beef evenly and let marinate while preparing other ingredients.
  2. Combine the sauce ingredients in a medium-sized bowl and stir to mix thoroughly.
  3. Prepare the noodles according to package directions (*Footnote 3). Drain and set aside in a colander to dry.
  4. Heat a large heavy-bottomed pan (nonstick or carbon steel) with 2 tablespoons of peanut oil over medium-high heat until hot. Spread the noodles into a patty shape (*Footnote 4). Cook without flipping until the bottoms turn golden. Turn the noodles to fry the other side until golden. Drizzle in a bit more oil to help with the frying, if needed. Once done, transfer the noodles to a big serving plate.
  5. Pour 1 tablespoon of oil into the same pan. Add the beef and spread it out in a single layer using a pair of tongs or chopsticks. Let cook undisturbed for 30 seconds or so, or until the bottom turns golden brown. Flip to cook the other side until browned. Stir a few times until the beef is cooked (its OK if theres a hint of pink inside), transfer to a big plate, and set aside.
  6. Add the remaining 1 tablespoon of oil to the pan. Add the onion and carrots. Quickly stir a few times to mix well. Add the ginger and garlic. Stir and cook for 30 seconds to release the fragrance.
  7. Add the bok choy. Cook and stir for another minute, until the veggies start to soften.
  8. Stir the sauce thoroughly to dissolve the cornstarch completely and pour the sauce into the pan. Stir and cook to bring the sauce to a boil, and cook until it starts to thicken.
  9. Add the cooked beef back into the pan. Stir to mix everything well. Once the sauce reaches the desired consistency, pour everything over the fried noodles. (*Footnote 5)
  10. Serve immediately as a main dish.

Salmon Crispy Rice


The Ultimate Guide to Viral Salmon Crispy Rice: A Restaurant-Quality Appetizer at Home

Discover the secret to the perfect balance of crispy, creamy, and spicy that took social media by storm.

Prep Time

30 minutes

Cook Time

15 minutes

Chill Time

4 hours

Total Time

4 hours 45 minutes

Servings

16 pieces (4-6 people)

Difficulty

Medium

Introduction: The Viral Sensation You Can Master

If you’ve scrolled through food TikTok or Instagram lately, you’ve undoubtedly seen them: gorgeous, golden-brown squares of crispy rice, topped with vibrant pink salmon and creamy avocado. This is salmon crispy rice, the appetizer that conquered the internet and upscale restaurant menus alike. But what makes it so special? It’s the unparalleled textural symphony in every bite—the shattering, crunchy exterior of the rice cake giving way to cool, creamy avocado and the rich, spicy, umami-packed salmon tartare. It’s a dish that feels luxurious, complex, and exciting, yet its core components are surprisingly simple.

Here at Cooking With Emy, we’ve perfected the at-home version. We’ve moved beyond the hype to deliver a foolproof, detailed recipe that ensures your salmon crispy rice isn’t just good—it’s extraordinary. This guide will walk you through every nuance, from selecting the right rice to achieving that perfect, non-greasy fry. Forget waiting for a table at a trendy spot; the best salmon crispy rice is about to come from your own kitchen.

Why This Is The Best Salmon Crispy Rice Recipe

Many recipes promise “crispy rice,” but end up with rice cakes that are greasy, crumbly, or bland. Our method is different. We focus on the foundational techniques that guarantee success. First, we season the rice itself with a traditional sushi vinegar mixture. This isn’t just for flavor; the vinegar helps the rice grains bind together, creating a sturdier cake that holds its shape during frying. Second, we insist on a long, firm chill. This step is non-negotiable for achieving maximum crispiness. It dries the surface of the rice, allowing it to fry up golden and crunchy rather than steam in the oil.

💡 The Kitchen Team’s Pro Tip: The secret weapon for the salmon mixture is Kewpie mayo. Its unique blend of vinegars and egg yolks creates a richer, tangier, and more savory base than American mayonnaise, perfectly complementing the fatty salmon without overpowering it.

Finally, our balance of flavors in the spicy salmon topping is meticulously calibrated. It’s not just about heat; it’s about the harmony of spicy (sriracha), salty (soy sauce), umami (sesame oil), and fresh (scallion). This recipe is engineered for the home cook, with clear steps and explanations for why each step matters, ensuring you become a salmon crispy rice expert on your first try.

Ingredients & Why They Matter

Quality ingredients are paramount for a dish with so few components. Each one plays a starring role.

Ingredient Quantity Notes & Purpose
Short-Grain Sushi Rice 1 cup uncooked (yields ~3 cups cooked) Essential. The high starch content is what creates the chewy, sticky texture that presses into a firm cake and gets super crispy.
Rice Vinegar, Sugar, Salt 2 tbsp, 1 tbsp, 1 tsp The seasoning mix for the rice. It adds flavor depth and helps the rice bind.
Vegetable Oil For frying (about 1 cup) Use a neutral, high-smoke-point oil like canola, avocado, or peanut oil.
Sushi-Grade Salmon 1 lb CRITICAL. Must be labeled “sushi-grade” or “sashimi-grade” from a trusted source, indicating it’s been frozen to a temperature safe for raw consumption.
Kewpie Mayo 4 tbsp Adds creamy richness and umami. If unavailable, mix 3 tbsp regular mayo with 1 tbsp rice vinegar and a pinch of sugar.
Sriracha 2 tbsp Provides the signature spicy kick. Adjust to your preference.
Soy Sauce (or Tamari) 2 tsp For salty, savory depth. Use low-sodium if preferred.
Toasted Sesame Oil 2 tsp A flavor powerhouse. A little goes a long way.
Scallions, finely chopped 2 tbsp Adds a necessary fresh, oniony bite.
Ripe Avocados 2 medium For the creamy layer. Choose avocados that are slightly soft to the touch.
Fresh Jalapeño 1, thinly sliced For a fresh, vegetal heat. Remove seeds for less spice.
Toasted Sesame Seeds For garnish Adds nutty flavor and visual appeal. Toast in a dry pan until fragrant.

Step-by-Step Instructions for Perfect Crispy Rice

Follow these steps in order for guaranteed success. Read through all steps before beginning.

Part 1: Preparing & Chilling the Rice (The Foundation)

Step 1: Cook & Season the Rice. Cook your sushi rice according to package directions. While it’s still hot, transfer it to a large, non-metallic bowl. In a small saucepan, gently heat the rice vinegar, sugar, and salt just until dissolved. Pour this mixture evenly over the hot rice. Using a rice paddle or flat spatula, fold and slice through the rice to coat every grain without mashing it. Let it cool until just warm to the touch.

Step 2: Press and Chill. Line an 8×8 inch baking pan with plastic wrap, leaving overhang on all sides. Transfer the seasoned rice to the pan. Using slightly damp hands or a flat-bottomed glass, press the rice into a perfectly even, compact layer. The firmer you press, the better the cakes will hold. Fold the plastic wrap overhang over the top to cover completely. Refrigerate for at least 4 hours, but ideally overnight. This is the key to crispy, not oily, results.

💡 The Kitchen Team’s Pro Tip: For extra-clean cuts, briefly run a sharp knife under hot water and wipe it dry before slicing the chilled rice block. Cut into 16 even rectangles (4 cuts by 4 cuts).

Part 2: Preparing the Spicy Salmon

Step 3: Chop the Salmon. Ensure your sushi-grade salmon is very cold. Using a sharp knife, chop it into small, consistent pieces (about 1/4-inch). You want a tartare-like texture, not a paste. Place in a medium bowl.

Step 4: Mix the Sauce. In a small bowl, whisk together the Kewpie mayo, sriracha, soy sauce, and sesame oil until smooth.

Step 5: Combine. Pour the sauce over the chopped salmon. Add the chopped scallions. Gently fold everything together until just combined. Be careful not to overmix and break down the salmon too much. Cover and return to the refrigerator until ready to assemble.

Part 3: Frying the Rice Cakes & Assembly

Step 6: Fry to Golden Perfection. In a large, heavy-bottomed skillet (cast iron is excellent), heat about 1/4 inch of vegetable oil over medium-high heat. To test if it’s ready, drop a single grain of rice in; it should sizzle immediately. Carefully add the rice cakes in a single layer, not crowding the pan (work in batches). Fry for 3-4 minutes per side, until deeply golden brown and incredibly crispy. Transfer to a wire rack set over a baking sheet (this keeps them crispy—avoid paper towels which can trap steam).

Step 7: The Grand Assembly. Slice your avocados. Place a crispy rice cake on your serving platter. Top with a thin slice or small smear of avocado. Spoon a generous tablespoon of the spicy salmon mixture on top. Garnish with a slice of jalapeño, a drizzle of sriracha (if desired), and a sprinkle of toasted sesame seeds. Serve immediately.

Serving & Presentation: Make It a Showstopper

Presentation is half the fun with this dish. Arrange the finished pieces on a sleek, dark platter for contrast. Consider serving with small bowls of extra garnishes like microgreens, tobiko (flying fish roe), or a drizzle of unagi (eel) sauce for guests to customize. This dish is the ultimate shareable appetizer for dinner parties, game day, or a luxurious night in. Pair it with a crisp, dry white wine like Sauvignon Blanc or a light Japanese lager to cut through the richness.

Storage, Make-Ahead & Reheating Instructions

Storage: This dish is best enjoyed immediately. However, components can be prepped ahead. The unfried rice block can be kept wrapped in the fridge for up to 2 days. The spicy salmon mixture can be made and stored in an airtight container in the fridge for up to 1 day. Do not store assembled pieces.

Reheating (Rice Cakes Only): To recrisp leftover fried rice cakes (without toppings), place them on a baking sheet in a single layer and bake in a 400°F oven for 5-8 minutes until hot and crispy again. An air fryer at 375°F for 3-4 minutes also works brilliantly.

Creative Variations to Try

Once you’ve mastered the classic, the canvas is yours to paint!

  • Tuna Crispy Rice: Substitute sushi-grade ahi tuna for the salmon.
  • Spicy Crab: Use lump crab meat mixed with the spicy mayo sauce.
  • Vegetarian/Vegan: Top with a mash of edamame and avocado, or a spicy tofu “tartare.”
  • Dynamite-Style: Mix the salmon with a “dynamite” sauce (mayo and sriracha) and broil the assembled pieces for 1-2 minutes until lightly browned on top.
  • Different Toppings: Try a slice of seared rare beef, a dollop of uni (sea urchin), or a sprinkle of furikake.

Your Salmon Crispy Rice Questions, Answered

Can I use regular long-grain rice instead of sushi rice?

We strongly advise against it. Sushi rice (short-grain) has the necessary starch content to become sticky and hold together as a cake. Long-grain rice will not bind properly and will likely fall apart during frying.

How do I know if salmon is “sushi-grade”?

“Sushi-grade” is not a regulated term, but it’s used by reputable fishmongers to indicate the fish has been frozen to at least -4°F (-20°C) for a specific duration to kill parasites. Always purchase from a trusted source you can ask directly. When in doubt, ask for “sashimi-grade” or fish specifically intended for raw consumption.

Can I bake or air fry the rice cakes instead of pan-frying?

For true, all-over crispiness, pan-frying in a shallow layer of oil is best. You can brush the rice cakes generously with oil and bake/air fry, but the result will be more of a crunchy exterior rather than the deep, shatteringly crisp fry. Bake at 425°F on an oiled sheet for 20-25 mins, flipping halfway.

My rice cakes are falling apart. What did I do wrong?

This usually stems from 1) Not pressing the rice firmly enough into the pan, 2) Not chilling it long enough (the rice must be very cold and firm), or 3) Using the wrong type of rice. Ensure you’re using short-grain, press with conviction, and be patient with the chill time.

Can I make this gluten-free?

Absolutely! Ensure your soy sauce is replaced with tamari or a certified gluten-free soy sauce alternative. All other core ingredients are naturally gluten-free.

How far in advance can I assemble them?

We recommend assembling immediately before serving. The moisture from the salmon and avocado will quickly soften the crispy rice. Prep all components and have them ready to go for a quick assembly right as guests arrive.

What’s the best oil for frying?

Use a neutral oil with a high smoke point: vegetable, canola, avocado, or peanut oil are all excellent choices.

Can I use leftover takeout sushi rice?

Yes, you can! If it’s already seasoned with vinegar, you may skip that step. Just ensure you can press it into a cohesive block. It may need a bit more chilling time to firm up.

Love This Recipe? Save It For Later!

Did this guide help you create the perfect salmon crispy rice? Pin the image below to your Pinterest boards to save this recipe for your next dinner party or craving. Follow us on Pinterest @cookingwithemy for more viral recipe breakdowns and kitchen inspiration!

We are The Kitchen Team at Cooking With Emy. Thank you for cooking with us!


clock clock iconcutlery cutlery iconflag flag iconfolder folder iconinstagram instagram iconpinterest pinterest iconfacebook facebook iconprint print iconsquares squares iconheart heart iconheart solid heart solid icon

Salmon Crispy Rice


  • Author:
    Chef Emy

Ingredients


Scale
  • 3 cup Cooked Sushi Rice (short grain rice)
  • 2 tbsp Rice Vinegar
  • 1 tbsp Sugar
  • 1 tsp Salt
  • Vegetable Oil (for frying)
  • 1 lb Sushi-grade Salmon
  • 4 tbsp Kewpie Mayo
  • 2 tbsp Sriracha
  • 2 tbsp Scallion
  • 2 tsp Soy Sauce
  • 2 tsp Sesame Oil
  • Sliced Avocado
  • Jalapeno (thinly sliced)
  • Black and White Sesame Seed (toasted)

Instructions

  1. In a small mixing bowl, combine rice vinegar with sugar and salt then stir until dissolved. Pour the rice vinegar over cooked sushi rice and mix until well combined.
  2. Transfer the rice to a baking pan lined with a plastic wrap. Gently press the rice to even it out. Cover and let it chill in the fridge for at least 4 hours or overnight.
  3. Chop the sushi-grade salmon into a small pieces, transfer it a a bowl then combine the salmon with mayo, sriracha, soy sauce, scallion and sesame oil. Mix well and set aside in the fridge until ready to use.
  4. Once the rice chilled, cut into 16 rectangles. Heat vegetable oil in a pan over medium heat, fry the rice until both sides turns nice and golden. Remove from the heat and let it cool on a paper towel.
  5. Top the crispy rice with a sliced avocado, a tablespoon of salmon mixture and sliced of jalapeno. Sprinkle it with black and white sesame seeds. Serve immediately.

Sticky Chicken Rice Bowls Recipe | Cheff Recipes

Sticky Chicken Rice Bowls Recipe: Your New Weeknight Hero Dinner

Craving a dinner that’s explosively flavorful, incredibly easy to make, and will have everyone asking for seconds? These Sticky Chicken Rice Bowls are your answer. We’re taking tender, perfectly seasoned chicken, coating it in an irresistible savory-sweet-sticky glaze, and serving it over fluffy rice with crisp-tender broccoli. It’s a complete, balanced meal that delivers restaurant-quality taste in under 30 minutes. Let’s make dinner the best part of your day.

Recipe At A Glance
Prep Time: 15 minutes
Cook Time: 12 minutes (Air Fryer) or 15-18 minutes (Stovetop)
Total Time: ~30 minutes
Servings: 4 generous bowls
Difficulty: Easy
Author: The Kitchen Team
Website: cookingwithemy.com

Why You’ll Love These Sticky Chicken Rice Bowls

In the hustle of everyday life, we need dinner recipes that are reliable, fast, and packed with flavor. This Sticky Chicken Rice Bowls recipe checks every single box. It’s the culinary equivalent of a warm hug—comforting, satisfying, and made with love. The magic lies in the harmony of textures and tastes: juicy chicken with a lightly crispy exterior, coated in a glossy, complex sauce that’s the perfect blend of sweet, salty, tangy, and with just a hint of heat. Served over a simple bed of rice and greens, it becomes a complete meal that feels indulgent yet is surprisingly straightforward to prepare.

Whether you’re cooking for a busy family, meal-prepping for the week, or need an impressive dish that doesn’t require hours in the kitchen, this recipe is your new go-to. It’s versatile, forgiving, and uses ingredients you likely already have in your pantry. Get ready to fall in love with how easy and delicious dinner can be.

What Makes This The Best Sticky Chicken Rice Bowls Recipe

You might find other “sticky” chicken recipes online, but ours is meticulously crafted for maximum flavor and foolproof success. Here’s what sets it apart:

The Double-Layer Flavor Bomb: We don’t just rely on the sauce. The chicken is first tossed in a robust blend of smoked paprika, chili powder, onion powder, and oregano before cooking. This creates a deeply seasoned foundation so every bite of chicken is flavorful, even before the sticky sauce hits it.

The Perfect Sticky Sauce Science: Our sauce ratio is perfected. The combination of soy sauce (salty umami), honey (sweetness and gloss), rice vinegar (bright tang), and aromatics like fresh garlic and ginger creates a balanced base. The key is the slurry—arrowroot or cornstarch—which gives the sauce that luxurious, cling-to-everything texture without being gummy.

Smart, Flexible Cooking Methods: We provide the ultra-fast air fryer method for crispy, juicy chicken in minutes, but also include detailed stovetop and oven instructions. No matter your kitchen tools, you can achieve perfect results.

The “Wow” Factor Finish: The spicy mayo drizzle and sesame seed sprinkle aren’t just garnishes; they’re essential components. The creamy, spicy mayo cuts through the richness, and the sesame seeds add a final nutty crunch. It’s this attention to detail that elevates a simple bowl into a memorable meal.

💡 The Kitchen Team’s Pro Tip: For the ultimate sticky sauce, let it simmer for the full 4-5 minutes after adding the slurry. This not only thickens it properly but also cooks out any raw starch taste and allows the flavors to meld and deepen beautifully.

Ingredients & Substitutions

Here’s everything you need to create these incredible bowls. We’ve also included a comprehensive substitution guide so you can adapt based on what’s in your fridge or dietary needs.

Ingredient Quantity Notes & Substitutions
Uncooked White Rice 2 cups Jasmine or basmati are ideal for fragrance. Substitute with brown rice (adjust cooking time), cauliflower rice, or quinoa.
Broccoli, small heads 2 Chopped into florets. Can use frozen broccoli florets (thawed), or swap for snap peas, bell peppers, or asparagus.
Chicken Breasts 3 large Boneless, skinless. For more flavor, use chicken thighs. Cut into uniform 1-inch pieces for even cooking.
Olive Oil 2 tbsp Avocado oil, vegetable oil, or any neutral high-heat oil works.
For the Chicken Spice Blend:
Salt 1 tsp Kosher or sea salt.
Black Pepper 1/2 tsp Freshly ground is best.
Chili Powder 1 tsp Adds mild heat and color. Can use paprika for zero heat.
Smoked Paprika 1 tsp **Crucial** for depth. Use regular paprika if you must, but smoked is highly recommended.
Onion Powder 1 tsp Granulated garlic can be added too.
Dried Oregano 1 tsp Thyme or Italian seasoning blend are good alternatives.
For the Sticky Sauce:
Soy Sauce (or Tamari) 1/2 cup Use low-sodium if preferred. For gluten-free, use tamari or coconut aminos.
Honey 1/2 cup Maple syrup or agave nectar for a vegan version.
Rice Vinegar 1/4 cup Apple cider vinegar or white wine vinegar in a pinch.
Garlic, minced 3 cloves Fresh is non-negotiable for the best flavor! About 1 tbsp.
Sriracha 2 tbsp Adjust to your heat preference. Gochujang (1 tbsp) is a great flavorful alternative.
Sesame Oil 2 tsp **Toasted** sesame oil is key for its nutty aroma. Don’t substitute.
Ground Ginger 1 tsp 1 tbsp freshly grated ginger is phenomenal if you have it.
Arrowroot Powder or Cornstarch 2 tsp Mixed with 2 tbsp water to make a slurry. They are interchangeable here.
For the Spicy Mayo & Topping:
Mayonnaise 1/2 cup Kewpie mayo is excellent here, or use vegan mayo.
Sriracha 1 tbsp Again, adjust to taste.
Water 2-3 tbsp To thin the mayo to a drizzling consistency.
Sesame Seeds For topping White or black, or a mix. Sliced green onions are also a fantastic fresh garnish.

Step-by-Step Instructions

Follow these simple steps for perfect Sticky Chicken Rice Bowls every single time. We’re breaking it down into clear phases to keep you organized and stress-free.

Phase 1: Prep Your Components

1. Cook the Rice: Begin by cooking your 2 cups of rice according to the package directions. This usually takes the longest, so getting it started first is a smart move. Once cooked, fluff it with a fork and keep it covered to stay warm.

2. Steam the Broccoli: While the rice cooks, steam your chopped broccoli until it is bright green and fork-tender, about 4-5 minutes. You can do this in a steamer basket on the stove, in the microwave with a splash of water in a covered bowl, or even in the air fryer at 350°F for 5-6 minutes. Set aside.

3. Cut and Season the Chicken: Pat the chicken breasts dry with paper towels—this helps with browning. Cut them into uniform, bite-sized pieces (about 1-inch cubes). In a large bowl, toss the chicken pieces with the 2 tbsp of olive oil, 1 tsp salt, 1/2 tsp pepper, 1 tsp chili powder, 1 tsp smoked paprika, 1 tsp onion powder, and 1 tsp oregano. Ensure each piece is evenly coated.

💡 The Kitchen Team’s Pro Tip: Let the seasoned chicken sit for 5-10 minutes after tossing. This allows the salt to begin drawing moisture to the surface, which will then create a better sear and lock in juiciness during cooking.

Phase 2: Cook the Chicken (Choose Your Method)

Air Fryer Method (Fast & Crispy): Preheat your air fryer to 400°F (200°C). Lay the seasoned chicken pieces in the basket in a single layer, ensuring they aren’t crowded (cook in batches if necessary). Air fry for 10-12 minutes, shaking the basket halfway through, until the chicken is golden brown and has reached an internal temperature of 165°F (74°C).

Stovetop Method (Classic Sear): Heat a large skillet or wok over medium-high heat. Add 1 tbsp of oil. Once hot, add the chicken in a single layer (cook in batches to avoid steaming). Cook for 5-7 minutes, turning occasionally, until browned and cooked through.

Oven Method (Hands-Off): Preheat oven to 400°F (200°C). Spread chicken on a parchment-lined baking sheet. Bake for 15-18 minutes, until cooked through.

Phase 3: Create the Legendary Sticky Sauce

While the chicken cooks, make the sauce. In a medium saucepan, combine the 1/2 cup soy sauce, 1/2 cup honey, 1/4 cup rice vinegar, minced garlic, 2 tbsp sriracha, 2 tsp sesame oil, and 1 tsp ground ginger. Whisk to combine.

Bring the mixture to a boil over medium-high heat. In a small bowl, whisk the 2 tsp arrowroot powder (or cornstarch) with 2 tbsp of cold water until completely smooth to create your slurry. Once the sauce is boiling, slowly whisk in the slurry. Continue to boil for 4-5 minutes, whisking occasionally. The sauce will bubble and thicken significantly into a glossy, sticky glaze. Remove from heat.

Phase 4: Assemble Your Masterpiece

1. Sauce the Chicken: If you used the stovetop method, you can add the cooked chicken directly to the sauce pan and toss to coat. For air fryer or oven chicken, place the cooked chicken in a large bowl and pour the sticky sauce over it. Gently toss until every piece is gloriously coated.

2. Make the Spicy Mayo: In a small bowl, whisk together the 1/2 cup mayonnaise and 1 tbsp (or more) sriracha. Add water, 1 tablespoon at a time, until it reaches a thin, drizzle-able consistency.

3. Build the Bowls: Divide the warm, fluffy rice among four bowls. Top with a portion of the steamed broccoli. Pile on the saucy sticky chicken. Drizzle generously with the spicy mayo. Finish with a sprinkle of sesame seeds and, if you like, some thinly sliced green onions.

4. Serve Immediately! The contrast of warm, sticky chicken and cool, creamy spicy mayo is divine. Enjoy right away.

Serving Suggestions & Presentation

While these bowls are a complete meal, here are some ideas to mix things up or turn it into a feast:

Elevate Your Bowl: Add a soft-boiled or fried egg on top for extra protein and a rich, runny yolk. Pickled vegetables (like quick-pickled cucumbers or red onions) add a fantastic crunchy, acidic contrast that cuts the richness beautifully.

Make it a Spread: Serve the sticky chicken family-style! Place a big platter of the saucy chicken in the center of the table alongside bowls of rice, steamed broccoli, the spicy mayo, and other toppings like shredded carrots, edamame, kimchi, and nori strips. Let everyone build their own perfect bowl.

Perfect Pairings: A simple, crisp side salad with a ginger-sesame dressing complements the bowls wonderfully. For a drink, a cold lager, crisp white wine, or even a sparkling water with lime keeps the palate refreshed.

Storage & Reheating Instructions

Storage: Store components separately for best results. Place cooled sticky chicken, rice, and broccoli in airtight containers in the refrigerator for up to 3-4 days. The spicy mayo can be stored in a separate container for up to 1 week.

Reheating: To reheat, sprinkle a few drops of water over the rice and chicken and microwave in 30-second intervals until hot. You can also reheat the chicken and rice together in a skillet over medium-low heat, stirring frequently, until warmed through. The sauce may thicken in the fridge; a splash of water or broth when reheating will bring it back to the perfect consistency. Assemble with fresh broccoli and spicy mayo after reheating.

Freezing: We do not recommend freezing the fully assembled bowls or the sauced chicken, as the texture of the sauce can become grainy. However, you can freeze the cooked, un-sauced chicken for up to 2 months. Thaw in the refrigerator overnight and make a fresh batch of sticky sauce when ready to serve.

Delicious Recipe Variations

The beauty of this recipe is its adaptability. Don’t be afraid to make it your own!

Protein Swap: Try this with shrimp (cook quickly at the end), salmon cubes, tofu (press extra firm tofu well, cube, and coat in cornstarch before air frying for crispiness), or even pork tenderloin cut into medallions.

Vegetable Medley: Swap or add to the broccoli with sliced bell peppers, sugar snap peas, shredded carrots, or baby corn. Stir-fry them quickly for a vibrant mix.

Dietary Tweaks:
Gluten-Free: Use tamari or certified gluten-free soy sauce/coconut aminos.
Lower Sugar: Reduce honey to 1/4 cup and add a pinch of stevia, or use a sugar-free maple syrup alternative.
Spice Level: Control the heat! Omit sriracha from the sauce for a mild version, or add a diced fresh chili for extra fire.

Flavor Twists:
Korean-Inspired: Use gochujang (1-2 tbsp) in place of the sriracha in the sauce for a deeper, fermented chili flavor.
Teriyaki Style: Add 1 tbsp of grated fresh ginger and a splash of pineapple juice to the sauce.
Orange Chicken: Add 1/4 cup orange juice and 1 tbsp orange zest to the sauce ingredients.

Frequently Asked Questions (FAQ)

Can I make this sticky chicken rice bowls recipe ahead of time?

Absolutely! It’s a fantastic meal prep option. Cook the rice, chicken, and sauce, and store them separately in the fridge for up to 3 days. The broccoli is best steamed fresh. Reheat and assemble when ready to eat for the best texture.

My sauce didn’t get thick and sticky. What went wrong?

The most common issue is not bringing the sauce to a full, rolling boil after adding the cornstarch/arrowroot slurry. The starch needs that high heat to activate and thicken. Also, ensure your slurry is smooth (no lumps) and made with cold water. Let it boil for the full 4-5 minutes.

Can I use chicken thighs instead of breasts?

Yes, and many prefer thighs for their richer flavor and juiciness. Use boneless, skinless thighs and cut them into bite-sized pieces. They may require 1-2 extra minutes of cooking time. The fat content makes them incredibly delicious with this sticky glaze.

I don’t have an air fryer. What’s the best alternative?

The stovetop method in a hot skillet is your best bet for getting a nice sear and color on the chicken quickly. The oven method is more hands-off but may not get the same level of browning unless you use the broiler for the last minute.

Is arrowroot powder better than cornstarch?

They work almost identically here. Arrowroot creates a slightly glossier sauce and is a good choice if you’re cooking the sauce for a very long time (as cornstarch can break down). For this quick recipe, they are perfectly interchangeable.

How can I make this recipe less spicy for my kids?

Simply omit the sriracha from both the sticky sauce and the spicy mayo. The dish will still be packed with flavor from the soy, honey, vinegar, and spices. You can serve sriracha on the side for adults who want the heat.

What’s the best way to reheat leftovers without drying out the chicken?

The microwave is fine if you add a tiny splash of water or broth to the container and cover it loosely. For best results, reheat in a non-stick skillet over medium-low heat with a tablespoon of water. Cover for a minute to steam, then uncover and stir until hot.

Can I freeze the sticky sauce by itself?

Yes, you can! Make a double batch of the sauce (without the slurry) and freeze it in an airtight container or ice cube trays for easy portions. Thaw in the fridge, then reheat in a saucepan, add the slurry, and boil to thicken when ready to use.

We hope you love this Sticky Chicken Rice Bowls recipe as much as we do! It’s a testament to how simple ingredients can create something truly spectacular. If you make it, please share your creation with us on social media by tagging @cookingwithemy. We love seeing your kitchen triumphs!

clock clock iconcutlery cutlery iconflag flag iconfolder folder iconinstagram instagram iconpinterest pinterest iconfacebook facebook iconprint print iconsquares squares iconheart heart iconheart solid heart solid icon

Sticky Chicken Rice Bowls Recipe


  • Author: Chef Emy

Description

Sticky Chicken Rice Bowls are a delicious and easy-to-make meal that combines tender chicken with a savory-sweet glaze, served over a bed of fluffy rice. Perfect for a weeknight dinner or a quick lunch, this dish is sure to become a family favorite. Lets dive into the details of creating this mouthwatering meal.


Ingredients

Scale
  • 2 cup uncooked rice
  • 2 small heads broccoli, chopped
  • 3 large chicken breasts
  • 2 tbsp olive oil
  • 1 tsp salt
  • 1/2 tsp pepper
  • 1 tsp chili powder
  • 1 tsp smoked paprika
  • 1 tsp onion powder
  • 1 tsp oregano
  • Sticky Sauce
  • 1/2 cup soy sauce
  • 1/2 cup honey
  • 1/4 cup rice vinegar
  • 3 cloves garlic, minced
  • 2 tbsp sriracha
  • 2 tsp sesame oil
  • 1 tsp ground ginger
  • 2 tsp arrowroot powder mixed with 2 tbsp water to make a slurry (sub cornstarch)
  • Spicy mayo
  • 1/2 cup mayo
  • 1 tbsp sriracha
  • 23 tbsp water
  • sesame seeds for topping

Instructions

  1. Cook rice according to package.
  2. Steam broccoli in microwave or on stove top until fork tender. Set aside.
  3. Cut chicken up into small bitesized pieces.
  4. Toss chicken with oil and all spices. Lay flat in air fryer and cook in preheated air fryer at 400F to 12 minutes or until chicken is 160F internally.
  5. While chicken is cooking, add soy sauce, honey, rice vinegar, garlic, sriracha, sesame oil, and ground ginger to a sauce pot. Bring to a boil. Once boiling, add arrowroot slurry. Let boil 4-5 minutes or until sauce has thickened greatly.
  6. Prepare bowls by layering rice, broccoli, chicken, and covering in sauce. Mix together spicy mayo ingredients and drizzle on top. Top with sesame seeds.

Beef Pan-Fried Noodles

Print

clock clock iconcutlery cutlery iconflag flag iconfolder folder iconinstagram instagram iconpinterest pinterest iconfacebook facebook iconprint print iconsquares squares iconheart heart iconheart solid heart solid icon

Beef Pan-Fried Noodles


  • Author: Chef Emy

Description

Turn your kitchen into a Chinese restaurant by making crispy pan fried noodles with juicy beef in a rich and savory sauce that tastes too good to be true!


Ingredients

Scale
  • 8 oz flank steak (or skirt steak) (, thinly sliced against the grain)
  • 8 oz fresh Hong Kong pan fry noodles ((or other type of thin noodles) (Footnote 1))
  • 2 tablespoons Shaoxing wine ((or dry sherry))
  • 2 teaspoons cornstarch
  • 1/4 teaspoon salt
  • 1 cup low-sodium beef broth
  • 2 tablespoons soy sauce ((*Footnote 2))
  • 2 tablespoons oyster sauce
  • 1 tablespoon Shaoxing wine ((or dry sherry))
  • 2 tablespoons cornstarch
  • 1 teaspoon sugar
  • 1/4 teaspoon Chinkiang vinegar
  • 1/4 teaspoon white pepper
  • 4 tablespoons peanut oil (, divided)
  • 4 heads baby bok choy (, quartered)
  • 4 cloves garlic (, minced)
  • 1 " ginger (, minced)
  • 1/2 yellow onion (, sliced)
  • 1/2 carrot (, sliced into strips)

Instructions

  1. Combine the beef and the marinade ingredients in a medium-sized bowl. Toss with your hands to coat the beef evenly and let marinate while preparing other ingredients.
  2. Combine the sauce ingredients in a medium-sized bowl and stir to mix thoroughly.
  3. Prepare the noodles according to package directions (*Footnote 3). Drain and set aside in a colander to dry.
  4. Heat a large heavy-bottomed pan (nonstick or carbon steel) with 2 tablespoons of peanut oil over medium-high heat until hot. Spread the noodles into a patty shape (*Footnote 4). Cook without flipping until the bottoms turn golden. Turn the noodles to fry the other side until golden. Drizzle in a bit more oil to help with the frying, if needed. Once done, transfer the noodles to a big serving plate.
  5. Pour 1 tablespoon of oil into the same pan. Add the beef and spread it out in a single layer using a pair of tongs or chopsticks. Let cook undisturbed for 30 seconds or so, or until the bottom turns golden brown. Flip to cook the other side until browned. Stir a few times until the beef is cooked (its OK if theres a hint of pink inside), transfer to a big plate, and set aside.
  6. Add the remaining 1 tablespoon of oil to the pan. Add the onion and carrots. Quickly stir a few times to mix well. Add the ginger and garlic. Stir and cook for 30 seconds to release the fragrance.
  7. Add the bok choy. Cook and stir for another minute, until the veggies start to soften.
  8. Stir the sauce thoroughly to dissolve the cornstarch completely and pour the sauce into the pan. Stir and cook to bring the sauce to a boil, and cook until it starts to thicken.
  9. Add the cooked beef back into the pan. Stir to mix everything well. Once the sauce reaches the desired consistency, pour everything over the fried noodles. (*Footnote 5)
  10. Serve immediately as a main dish.

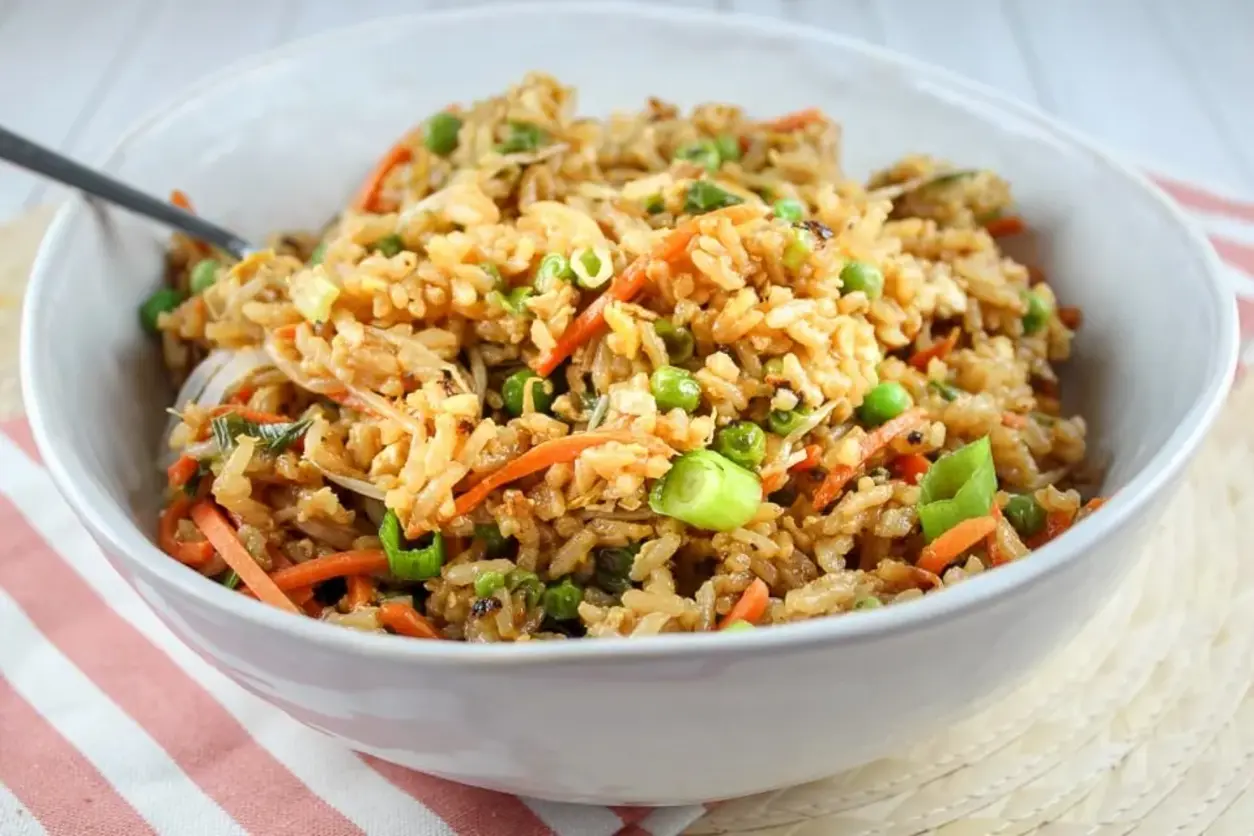
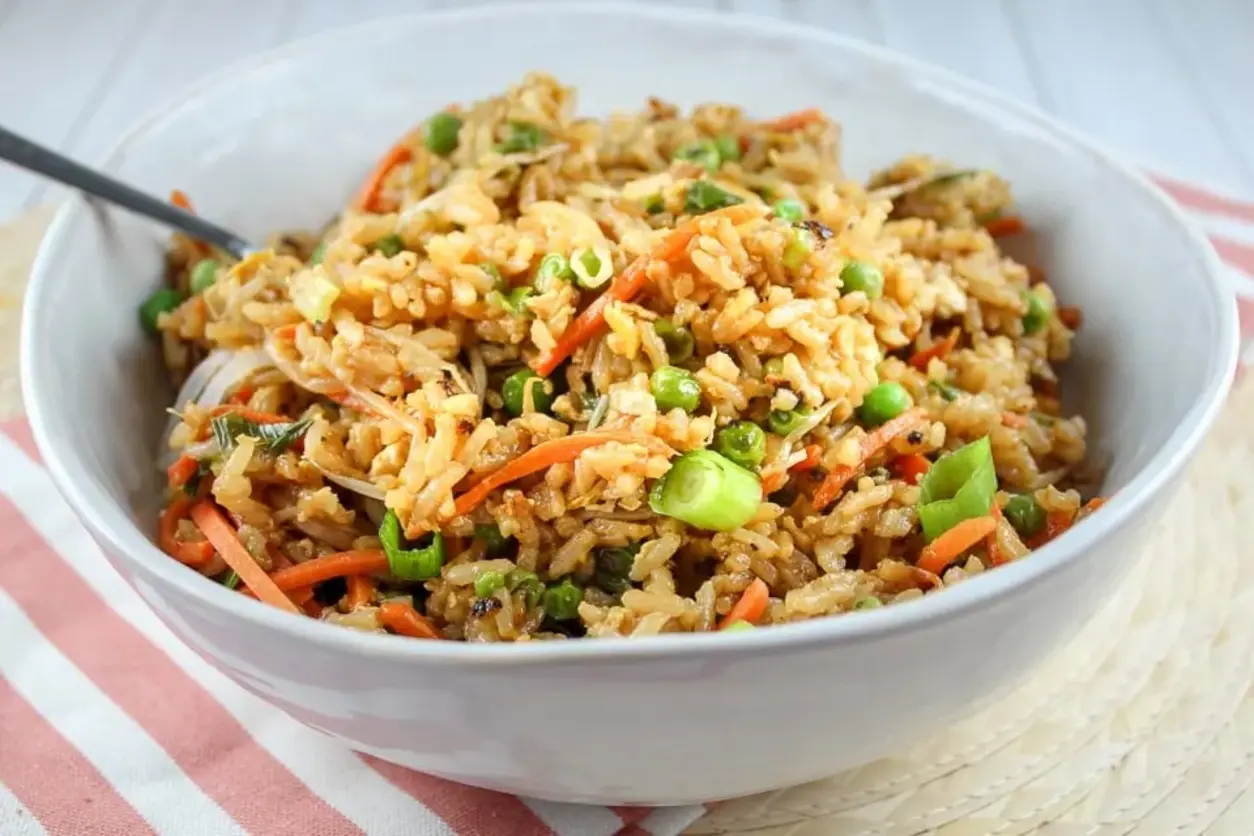
Copycat PF Chang’s Fried Rice Recipe

Better-Than-Takeout Copycat PF Chang’s Fried Rice Recipe (Ready in 30 Minutes!)

Prep Time
15 minutes
Cook Time
15 minutes
Total Time
30 minutes
Servings
4 people
Difficulty
Easy

Why This Copycat PF Chang’s Fried Rice Recipe is a Game-Changer

There’s something magical about the fried rice from PF Chang’s. That perfect balance of savory, slightly sweet, and utterly satisfying flavor, packed with tender vegetables and fluffy rice, is a takeout favorite for millions. But what if you could recreate that iconic dish in your own kitchen, anytime the craving strikes, for a fraction of the cost and in less time than it takes for delivery? That’s exactly what this Copycat PF Chang’s Fried Rice Recipe delivers.

Here at Cooking With Emy, we’ve deconstructed the beloved restaurant classic and perfected a homemade version that’s not just a clone—it might even be better. We’re talking about the same wok-charred aroma, the same complex sauce, and the same delightful texture, all achieved with simple ingredients and straightforward techniques. This recipe is a testament to the fact that incredible Asian-inspired cuisine is completely accessible for home cooks. Whether it’s a busy weeknight, a casual weekend lunch, or you’re impressing dinner guests, this fried rice is your new secret weapon.

Beyond the incredible flavor, this recipe empowers you. You control the sodium, the freshness of the ingredients, and the customizations. Want extra protein? Add it. Need it gluten-free? Easy swap. This guide will walk you through every step, from choosing the right rice to mastering the stir-fry technique that gives you those authentic restaurant-style results. Get ready to say goodbye to soggy, bland fried rice and hello to a vibrant, flavorful dish that will have everyone asking for seconds.

Why Our Copycat PF Chang’s Fried Rice is Better Than Takeout

You might be wondering, “If I can just order it, why should I make it?” The reasons are compelling. First, freshness. Your vegetables will be crisp, your eggs will be fluffy, and your rice will have the perfect bite—no sitting under a heat lamp here. Second, cost-effectiveness. For the price of one restaurant order, you can feed your entire family with this recipe. Third, health consciousness. By making it yourself, you can adjust the oil and sodium to your preference and avoid any unwanted additives.

The soul of this dish lies in its sauce. While PF Chang’s recipe is a closely guarded secret, our version uses a carefully calibrated blend of soy sauce, molasses, ginger, and garlic to hit all the right notes: umami, sweetness, warmth, and aroma. The molasses is the real star, providing a deep, rich sweetness that sets it apart from standard fried rice. Combined with the nutty fragrance of toasted sesame oil, it creates a flavor profile that is unmistakably reminiscent of the original.

💡 The Kitchen Team’s Pro Tip: The key to “restaurant-quality” fried rice is using day-old, cold rice. Freshly cooked rice is too moist and will steam and clump in the wok. Cook your rice a few hours ahead, spread it on a baking sheet to cool, then refrigerate it. The grains dry out slightly and separate perfectly for frying.

Finally, the speed. From start to finish, you’re looking at about 30 minutes. That’s often quicker than waiting for a delivery driver, and the result is a hot, sizzling dish straight from your own stove to the table.

Ingredients for the Ultimate Copycat PF Chang’s Fried Rice

Gathering the right ingredients is the first step to success. This list is designed for simplicity and flavor, using items you can find in any major grocery store.

Ingredient Quantity Notes & Substitutions
Jasmine Rice 1 cup (uncooked) Essential. Yields about 3 cups cooked. Long-grain white rice works in a pinch.
Chicken Broth (or Water) 1 ¾ cups Broth adds more flavor. Use low-sodium to control salt.
Sesame Oil 3 teaspoons, divided Use toasted sesame oil for its intense flavor. Do not substitute with plain oil.
Large Eggs 2 Lightly beaten.
Shoestring Carrots ⅓ cup Buy pre-cut or julienne a regular carrot. Frozen diced carrots work too.
Frozen Peas ⅓ cup No need to thaw. You can use fresh peas if in season.
Green Onions ¼ cup (sliced) + more for garnish Slice the white and light green parts for cooking, green tops for garnish.
Fresh Bean Sprouts ⅓ cup Adds great crunch. If unavailable, you can omit or add thinly sliced cabbage.
Soy Sauce 3 tablespoons Use regular or low-sodium. For gluten-free, use tamari or coconut aminos.
Ground Mustard ½ teaspoon This is a secret flavor enhancer. If you only have mustard seeds, grind them.
Minced Fresh Ginger ½ teaspoon Fresh is best! Jarred minced ginger is a good shortcut.
Minced Fresh Garlic 1 teaspoon Again, fresh is ideal for the brightest flavor.
Molasses 2 teaspoons The key ingredient! Provides the signature deep sweetness. Do not skip.
💡 The Kitchen Team’s Pro Tip: For a protein-packed meal, add 1 cup of diced, cooked chicken, shrimp, or tofu when you add the rice. Use leftovers like rotisserie chicken for ultimate convenience!

Step-by-Step Instructions for Perfect Fried Rice

Follow these steps in order for the best results. Have all your ingredients prepped and within arm’s reach before you turn on the heat—this is called mise en place and is crucial for stir-frying.

Step 1: Cook the Rice (or Use Leftovers)

In a medium saucepan, bring the chicken broth (or water) to a boil. Add the jasmine rice, stir once, then reduce the heat to low. Cover and simmer for 15 minutes, or until all the liquid is absorbed and the rice is fluffy. Remove from heat, fluff with a fork, and spread it out on a large plate or baking sheet to cool quickly. If using day-old rice, skip this step.

Step 2: Prepare the Signature Sauce

While the rice cooks (or cools), whisk together the soy sauce, ground mustard, minced ginger, minced garlic, and molasses in a small bowl. Set this sauce aside. This allows the flavors to meld beautifully.

Step 3: Scramble the Eggs

Place a large wok or a heavy-bottomed skillet (cast iron or stainless steel works great) over medium-high heat. Add 1 teaspoon of the sesame oil. Once the oil is shimmering, crack the eggs directly into the pan. Quickly scramble them with a spatula until they are just set but still slightly soft. Remove the scrambled eggs to a clean plate.

Step 4: Stir-Fry the Vegetables

In the same wok, add another 1 teaspoon of sesame oil. Add the shoestring carrots, frozen peas, and the sliced white/light green parts of the green onions. Stir-fry for 3-4 minutes until the carrots begin to soften and the peas are heated through. Add the fresh bean sprouts and stir-fry for just 1 more minute—you want them to stay crisp.

Step 5: Bring It All Together

Push the vegetables to the sides of the wok, creating a well in the center. Add the final 1 teaspoon of sesame oil to the center. Add the cooled, cooked rice to the oil. Stir-fry the rice by itself for about 2 minutes, letting it get slightly toasted and coated in the oil.

💡 The Kitchen Team’s Pro Tip: For that authentic “wok hei” (breath of the wok) flavor, don’t overcrowd the pan. Let the rice sit for 30-60 seconds without stirring to get a slight char on the bottom before tossing.

Now, mix the rice and vegetables together. Add the cooked scrambled eggs back into the wok, breaking them up into smaller pieces.

Step 6: Sauce and Final Fry

Give your prepared sauce a quick stir, then pour it evenly over the rice mixture. Immediately begin stir-frying vigorously. Continue cooking for 3-4 minutes, ensuring every grain of rice is coated in the glossy, dark sauce. The rice should be heated through and have a wonderful sheen.

Step 7: Serve Immediately

Transfer the fried rice to a serving platter or individual bowls. Garnish generously with the reserved sliced green onion tops. Serve hot for the best texture and flavor.

How to Serve Your Copycat PF Chang’s Fried Rice

This fried rice is a superstar all on its own, but it also plays incredibly well with others. Here are some of our favorite ways to serve it:

  • As a Main Dish: Top with extra protein like grilled teriyaki chicken, honey walnut shrimp, or crispy tofu. A fried egg with a runny yolk on top is also a phenomenal addition.
  • As a Side Dish: It’s the perfect companion to homemade versions of other PF Chang’s classics like Mongolian Beef, Chicken Lettuce Wraps, or Dynamite Shrimp.
  • Garnish Galore: Set out small bowls of additional toppings like toasted sesame seeds, chopped cilantro, a drizzle of chili oil or sriracha, or even crispy fried shallots.
  • For a Party: This recipe doubles or triples easily for a crowd. Keep it warm in a slow cooker on the “low” setting for buffet-style serving.

Storage & Reheating Instructions

Proper storage is key to enjoying leftovers.

To Store: Allow the fried rice to cool completely to room temperature (within 2 hours of cooking). Transfer to an airtight container and refrigerate for up to 3-4 days.

To Reheat for Best Results: The microwave can make rice soggy. For the best texture, reheat in a wok or skillet over medium heat. Add a tiny splash of water or broth to create steam, and stir frequently until piping hot. This helps revive the texture. You can also reheat single portions in the microwave, covered, for 60-90 seconds, stirring halfway through.

Freezing: We don’t recommend freezing this fried rice, as the texture of the vegetables and rice can become mushy upon thawing and reheating.

Creative Variations to Try

Once you’ve mastered the base recipe, make it your own with these delicious twists:

  • Pork Fried Rice: Add ½ cup of diced Chinese char siu (barbecued pork) or cooked ground pork with the vegetables.
  • Vegetarian/Vegan: Use water or vegetable broth, omit the eggs, and add extra-firm cubed tofu (pan-fried first for best texture). Use a vegan “fish” sauce or extra tamari for depth.
  • Spicy Kick: Add 1-2 teaspoons of chili-garlic sauce or a diced fresh Thai chili to the sauce mixture.
  • Pineapple Fried Rice: Stir in ½ cup of small pineapple chunks with the vegetables for a sweet and tangy Hawaiian-inspired version.
  • Brown Rice Version: Substitute cooked brown jasmine rice. Note it may absorb more sauce, so you may want to have a little extra soy sauce on hand to adjust at the end.

Frequently Asked Questions (FAQ)

Can I use freshly cooked rice instead of day-old rice?

You can, but it’s not ideal. Fresh rice is very moist and will likely become mushy when stir-fried. If you must, spread the freshly cooked rice in a thin layer on a baking sheet and let it cool for 30-60 minutes, or place it in the freezer for 15-20 minutes to dry out the surface moisture.

I don’t have molasses. What can I use instead?

Molasses provides a unique, deep flavor. The best substitute is dark brown sugar (about 1 tablespoon, dissolved in the soy sauce). You could also use a little hoisin sauce or oyster sauce, but the flavor profile will shift.

My fried rice turned out soggy. What went wrong?

The most common culprits are: 1) Using warm, moist rice. 2) Overcrowding the wok/pan, which steams the ingredients instead of frying them. 3) Adding too much sauce or liquid. Ensure your rice is cold and dry, cook in batches if necessary, and measure your sauce ingredients precisely.

What’s the best type of pan to use?

A carbon steel wok is the traditional and best tool because it heats evenly and allows for quick tossing. However, a large, heavy-bottomed skillet (12 inches or larger) like cast iron or stainless steel works perfectly fine for home cooks.

Can I make this gluten-free?

Absolutely! Simply replace the regular soy sauce with an equal amount of gluten-free tamari or coconut aminos. Double-check that your molasses is gluten-free (it almost always is).

What other vegetables can I add?

Get creative! Diced bell peppers, corn kernels, chopped broccoli florets, sliced mushrooms, or water chestnuts are all excellent additions. Just be mindful of cooking times—add harder veggies (like broccoli) with the carrots, and softer ones (like mushrooms) a minute later.

How do I get my eggs to be in bigger, restaurant-style pieces?

Instead of scrambling them finely in the pan, pour the beaten eggs into the hot oil and let them set for 30 seconds like a thin omelet before scrambling. This creates larger, fluffier curds.

Is this recipe authentic Chinese fried rice?

This is a copycat of an American-Chinese restaurant dish. It is inspired by and designed to taste like PF Chang’s version, which is itself an adaptation for the American palate. It is delicious, but distinct from traditional Chinese home-style fried rice.

Love This Recipe? Share the Love!

If this Copycat PF Chang’s Fried Rice brought some takeout magic to your kitchen, we’d be thrilled if you shared it with friends and family! Pin the image below to your Pinterest boards to save it for later, or share it on Facebook and Instagram. Don’t forget to tag @cookingwithemy so we can see your delicious creations!

Close-up of homemade Copycat PF Chang's Fried Rice in a bowl, garnished with green onions
PIN THIS: Save our Better-Than-Takeout PF Chang’s Fried Rice recipe for your next dinner!

Follow us on Pinterest for more amazing recipes!

clock clock iconcutlery cutlery iconflag flag iconfolder folder iconinstagram instagram iconpinterest pinterest iconfacebook facebook iconprint print iconsquares squares iconheart heart iconheart solid heart solid icon

PF Changs Fried Rice


  • Author:
    Chef Emy

Description

PF Chang’s Fried Rice is a huge favorite among my friends and I!! Its really pretty easy to make and ready in less than 30 minutes and you can add chicken to it to make it a meal.


Ingredients


Scale
  • 1 cup Jasmine rice
  • 1 3/4 cup chicken broth (or water)
  • 3 tsp sesame oil
  • 2 eggs
  • 1/3 cup shoestring carrots
  • 1/3 cup frozen peas
  • 1/4 cup green onion (sliced)
  • 1/3 cup fresh bean sprouts
  • 3 tbsp soy sauce
  • 1/2 tsp ground mustard
  • 1/2 tsp minced ginger
  • 1 tsp minced garlic
  • 2 tsp molasses

Instructions

  1. Heat chicken broth (or water) in sauce pan to boiling
  2. Add rice and turn down to simmer for 15 minutes until liquid is gone and rice is fluffy
  3. While rice is cooking, whisk together soy sauce, mustard, ginger, garlic and molasses and set aside
  4. Once rice is ready remove from heat
  5. Place stir fry pan on heat and add 1 tsp of sesame oil
  6. Crack eggs into pan and scramble in pan
  7. Once eggs are scrambled, add 1 tsp sesame oil to pan
  8. Add carrots, green onion, peas and bean sprouts stir fry for 3-4 minutes
  9. Add remaining tsp of sesame oil and rice and stir fry for 3-4 minutes
  10. Spread rice around pan up around sides so rice is spread out as much as possible
  11. Add soy sauce mixture and stir fry additional 3-4 minutes
  12. Serve and top with green onions


Beef Pan-Fried Noodles

Print

clock clock iconcutlery cutlery iconflag flag iconfolder folder iconinstagram instagram iconpinterest pinterest iconfacebook facebook iconprint print iconsquares squares iconheart heart iconheart solid heart solid icon

Beef Pan-Fried Noodles


  • Author: Chef Emy

Description

Turn your kitchen into a Chinese restaurant by making crispy pan fried noodles with juicy beef in a rich and savory sauce that tastes too good to be true!


Ingredients

Scale
  • 8 oz flank steak (or skirt steak) (, thinly sliced against the grain)
  • 8 oz fresh Hong Kong pan fry noodles ((or other type of thin noodles) (Footnote 1))
  • 2 tablespoons Shaoxing wine ((or dry sherry))
  • 2 teaspoons cornstarch
  • 1/4 teaspoon salt
  • 1 cup low-sodium beef broth
  • 2 tablespoons soy sauce ((*Footnote 2))
  • 2 tablespoons oyster sauce
  • 1 tablespoon Shaoxing wine ((or dry sherry))
  • 2 tablespoons cornstarch
  • 1 teaspoon sugar
  • 1/4 teaspoon Chinkiang vinegar
  • 1/4 teaspoon white pepper
  • 4 tablespoons peanut oil (, divided)
  • 4 heads baby bok choy (, quartered)
  • 4 cloves garlic (, minced)
  • 1 " ginger (, minced)
  • 1/2 yellow onion (, sliced)
  • 1/2 carrot (, sliced into strips)

Instructions

  1. Combine the beef and the marinade ingredients in a medium-sized bowl. Toss with your hands to coat the beef evenly and let marinate while preparing other ingredients.
  2. Combine the sauce ingredients in a medium-sized bowl and stir to mix thoroughly.
  3. Prepare the noodles according to package directions (*Footnote 3). Drain and set aside in a colander to dry.
  4. Heat a large heavy-bottomed pan (nonstick or carbon steel) with 2 tablespoons of peanut oil over medium-high heat until hot. Spread the noodles into a patty shape (*Footnote 4). Cook without flipping until the bottoms turn golden. Turn the noodles to fry the other side until golden. Drizzle in a bit more oil to help with the frying, if needed. Once done, transfer the noodles to a big serving plate.
  5. Pour 1 tablespoon of oil into the same pan. Add the beef and spread it out in a single layer using a pair of tongs or chopsticks. Let cook undisturbed for 30 seconds or so, or until the bottom turns golden brown. Flip to cook the other side until browned. Stir a few times until the beef is cooked (its OK if theres a hint of pink inside), transfer to a big plate, and set aside.
  6. Add the remaining 1 tablespoon of oil to the pan. Add the onion and carrots. Quickly stir a few times to mix well. Add the ginger and garlic. Stir and cook for 30 seconds to release the fragrance.
  7. Add the bok choy. Cook and stir for another minute, until the veggies start to soften.
  8. Stir the sauce thoroughly to dissolve the cornstarch completely and pour the sauce into the pan. Stir and cook to bring the sauce to a boil, and cook until it starts to thicken.
  9. Add the cooked beef back into the pan. Stir to mix everything well. Once the sauce reaches the desired consistency, pour everything over the fried noodles. (*Footnote 5)
  10. Serve immediately as a main dish.

Copycat PF Chang’s Fried Rice Recipe

Better-Than-Takeout Copycat PF Chang’s Fried Rice Recipe (Ready in 30 Minutes!)

Prep Time10 minutes
Cook Time20 minutes
Total Time30 minutes
Servings4 people
DifficultyEasy

Why This Copycat PF Chang’s Fried Rice Recipe Beats Calling for Takeout

There’s a unique magic to the fried rice served at PF Chang’s. It’s not just a side dish; it’s a fragrant, savory, slightly sweet masterpiece that often steals the show. That perfect wok hei (the “breath of the wok”), the tender-crisp vegetables, and that unmistakably rich, umami sauce create a combination that’s incredibly craveable. But what if you could recreate that iconic restaurant experience in your own kitchen, on a Tuesday night, for a fraction of the cost and in less than 30 minutes? That’s exactly what this meticulously tested copycat PF Chang’s fried rice recipe delivers.

Here at CookingWithEmy.com, we believe the best restaurant recipes are the ones you can master at home. This guide goes far beyond a simple ingredient list. We’re giving you the why behind each step, the chef-approved techniques to achieve that authentic texture, and the secret to balancing the sauce so it tastes like it came straight from their kitchen. Forget soggy, bland fried rice. We’re unlocking the secrets to grains that are separate, fluffy, and packed with flavor in every single bite. Your family is going to ask for this on weekly rotation.

What Makes PF Chang’s Fried Rice So Special? The Science of Flavor

Many fried rice recipes fall short because they treat it as a leftover catch-all dish. PF Chang’s approach is different—it’s intentional. The foundation is Jasmine rice, chosen for its delicate floral aroma and slightly sticky texture that holds sauce beautifully without becoming mushy. The sauce itself is a carefully calibrated blend where soy sauce provides saltiness and depth, molasses adds a complex, rounded sweetness (not just plain sugar), and ground mustard and ginger create a subtle, warm pungency that lingers on the palate.

💡 The Kitchen Team’s Pro Tip: The single biggest mistake in homemade fried rice is using freshly cooked, hot rice. This guarantees a gummy, sticky mess. For perfect restaurant-style fried rice, your rice must be cold and day-old. The refrigeration process dries out the grains, making them firm and separate. If you’re in a pinch, spread freshly cooked rice on a baking sheet and pop it in the freezer for 20-25 minutes to mimic this effect.

The cooking technique is equally crucial. The process of scrambling the eggs first, then removing them, and adding them back later ensures they stay tender and don’t overcook into rubbery bits. Cooking the vegetables just until crisp-tender preserves their color and texture. Finally, spreading the rice in a thin layer in the hot pan for a minute or two before stirring in the sauce creates those delightful slightly crispy, toasted bits that are the hallmark of great wok cooking.

Gathering Your Ingredients: The Blueprint for Flavor

Quality ingredients are non-negotiable for a true copycat experience. Here’s your complete shopping list. For the most authentic taste, try to find the specific ingredients listed, but we’ve also included suitable substitutions where possible.

Ingredient Quantity Notes & Purpose
Jasmine Rice (uncooked) 1 cup The aromatic base. Do not substitute with instant rice.
Chicken Broth (or water) 1 ¾ cups Broth adds a layer of savory flavor to the rice as it cooks.
Sesame Oil 3 teaspoons Divided. Use toasted sesame oil for its intense, nutty aroma.
Large Eggs 2 For protein and richness.
Shoestring Carrots ⅓ cup Pre-cut saves time. You can julienne a regular carrot.
Frozen Peas ⅓ cup No need to thaw—they cook quickly in the pan.
Green Onions ¼ cup (plus more for garnish) Slice thin, using both white and green parts.
Fresh Bean Sprouts ⅓ cup Adds a wonderful fresh crunch. Look for crisp sprouts.
Soy Sauce (regular) 3 tablespoons The salt and umami backbone. Use low-sodium if preferred.
Ground Mustard ½ teaspoon The “secret” ingredient that adds depth.
Minced Ginger ½ teaspoon Use fresh for the brightest flavor.
Minced Garlic 1 teaspoon Freshly minced is always best.
Molasses 2 teaspoons Provides a deep, caramel-like sweetness. Key for the signature sauce.
💡 The Kitchen Team’s Pro Tip: For a truly next-level restaurant taste, use a combination of soy sauce and 1 tablespoon of oyster sauce in your sauce mixture. Oyster sauce adds a gorgeous, velvety richness and a more complex savory-sweet flavor profile that is often used in professional kitchens.

Step-by-Step Cooking Instructions: Your Path to Perfection

Follow these steps in order for flawless results. Have all your ingredients prepped and within arm’s reach (this is called mise en place) before you turn on the heat. A large skillet or wok and a good spatula are your best friends here.

Step 1: Cook the Rice (The Foundation)

In a medium saucepan, bring the chicken broth (or water) to a rolling boil. Add the jasmine rice, give it one quick stir, then immediately reduce the heat to the lowest possible simmer. Cover tightly with a lid and cook for 15 minutes. Do not peek or stir. After 15 minutes, remove from heat (keep the lid on!) and let it steam for another 5-10 minutes. Then, fluff with a fork and spread it out on a plate or baking sheet to cool completely. For best results, refrigerate this rice for at least 2 hours or, ideally, overnight.

Step 2: Prepare the Signature Sauce

While the rice is cooling, in a small bowl, whisk together the 3 tablespoons of soy sauce, ½ teaspoon of ground mustard, ½ teaspoon of minced ginger, 1 teaspoon of minced garlic, and 2 teaspoons of molasses. Whisk until the molasses is fully dissolved and the mixture is uniform. Set this flavor bomb aside.

Step 3: Scramble the Eggs

Place your largest skillet or wok over medium-high heat. Add 1 teaspoon of the sesame oil. Once the oil is shimmering (about 30 seconds), crack the two eggs directly into the pan. Let them set for 10 seconds, then quickly scramble them with your spatula until they are just cooked through but still soft. Immediately transfer them to a clean plate. Don’t wash the pan!

Step 4: Stir-Fry the Vegetables

To the same pan, add another 1 teaspoon of sesame oil. Increase the heat to high. Add the shoestring carrots, frozen peas, and the white parts of the sliced green onions. Stir-fry for 2-3 minutes until the carrots begin to soften and the peas are bright green. Add the fresh bean sprouts and stir-fry for just 1 more minute—you want them to stay crunchy. Remove this veggie mixture to the plate with the eggs.

Step 5: The Grand Finale – Bringing It All Together

Add the final 1 teaspoon of sesame oil to the now-empty pan, still over high heat. Add the cooled, day-old rice. Use your spatula to break up any clumps and stir-fry the rice for 2-3 minutes, letting it heat through and even toast slightly in spots. Now, push the rice up around the sides of the pan, creating a well in the center. Pour your prepared sauce mixture into the well. Let it bubble and simmer for 15-20 seconds to cook the raw garlic and ginger, then quickly toss and stir the rice to coat every grain evenly.

Return the cooked eggs and vegetables to the pan. Toss everything together vigorously for another 1-2 minutes until piping hot and perfectly combined. Taste and adjust seasoning if needed (a splash more soy sauce if desired).

Serving & Presentation: Make It a Feast

Transfer your masterpiece to a large serving platter or individual bowls. Garnish generously with the reserved green parts of the green onions. For an extra touch of authenticity and visual appeal, sprinkle with a few toasted sesame seeds or add a drizzle of chili oil or sriracha for heat lovers.

This copycat PF Chang’s fried rice is a complete meal on its own, especially if you added protein (see Variations below). To create a full PF Chang’s-inspired dinner at home, pair it with:

  • Copycat PF Chang’s Lettuce Wraps: The classic, refreshing starter.
  • Simple Beef and Broccoli: For a hearty, saucy main.
  • Quick Egg Drop Soup: A light, comforting beginning to the meal.
  • Crispy Spring Rolls: For added texture and fun.

Storage & Reheating Guide

Let any leftover fried rice cool completely before storing. Transfer to an airtight container and refrigerate for up to 3-4 days.

Reheating Correctly is Key: To restore its texture, never microwave it directly from the fridge as it will steam and become soggy. The best methods are:

  1. Skillet Method (Preferred): Reheat a serving in a non-stick skillet over medium heat with a tiny splash of water or broth. Stir frequently until hot throughout. This helps re-crisp the rice.
  2. Microwave with Damp Paper Towel: Place rice in a microwave-safe bowl, cover with a slightly damp paper towel, and heat in 30-second intervals, fluffing between each.

Freezing: We do not recommend freezing this fried rice, as the texture of the vegetables and eggs will suffer significantly upon thawing.

Creative Recipe Variations: Make It Your Own

The beauty of this recipe is its versatility. Use it as a canvas for your favorite proteins and veggies.

  • Chicken Fried Rice: Add 1 cup of diced, cooked chicken breast or thigh when you add the vegetables.
  • Shrimp Fried Rice: Sauté ½ lb of medium shrimp (peeled and deveined) in 1 tsp of oil until pink, then remove and add back at the end with the eggs.
  • Pork or Beef Fried Rice: Use 1 cup of thinly sliced, cooked leftover steak, roast pork, or ground beef.
  • Vegetarian/Vegan: Omit the eggs and use water instead of chicken broth. Ensure your soy sauce is vegan-friendly. Add extra-firm tofu cubes, pan-fried until golden.
  • Extra Veggie: Toss in diced bell peppers, water chestnuts, or baby corn with the other vegetables.
  • Spicy Kick: Add 1-2 teaspoons of sambal oelek or chili-garlic sauce to the sauce mixture.

Your Copycat PF Chang’s Fried Rice Questions Answered

Can I use brown rice instead of jasmine rice?

You can, but the texture and flavor will be different. Brown rice is chewier and less fragrant. If substituting, cook the brown rice according to package directions and ensure it is thoroughly cooled before using. You may need a touch more sauce as brown rice absorbs more liquid.

I don’t have molasses. What can I use?

Dark brown sugar (1 ½ teaspoons) is the closest substitute, as it contains molasses. You could also use honey or maple syrup, but the flavor profile will shift slightly. Avoid light corn syrup.

My fried rice turned out soggy. What went wrong?

The most common culprits are: 1) Using freshly cooked, warm rice, 2) Overcrowding the pan (which steams instead of fries), or 3) Adding too much sauce/liquid. Always start with cold, dry rice and use a large enough pan or wok over high heat.

Can I make this gluten-free?

Absolutely! Simply replace the regular soy sauce with an equal amount of tamari or a certified gluten-free soy sauce. Double-check that your molasses and other ingredients are gluten-free.

What’s the best type of pan to use?

A large, well-seasoned carbon steel wok is ideal because its shape and high heat retention are perfect for stir-frying. A large cast-iron skillet or a heavy-bottomed non-stick skillet are excellent alternatives. The key is having a pan that gets and stays very hot.

Can I prep any parts of this recipe ahead of time?

Yes! You can (and should) cook the rice 1-2 days ahead. You can also whisk the sauce mixture and store it in the fridge for up to 3 days. Chop all your vegetables and store them in containers in the fridge. This makes the actual cooking process a lightning-fast 10 minutes.

Is ground mustard the same as prepared yellow mustard?

No, they are very different. Ground mustard is a dry powder made from ground mustard seeds. Prepared mustard is a wet condiment with vinegar and other ingredients. Do not substitute one for the other in this recipe. If you don’t have ground mustard, you can omit it, but you’ll lose a layer of flavor.

How can I get more of that “restaurant smoky flavor”?

That’s the coveted “wok hei.” To approximate it at home, ensure your pan is screaming hot before adding ingredients, and don’t stir constantly. Let the rice and vegetables sit in contact with the hot surface for 30-45 seconds at a time to develop a slight sear before tossing.

Love This Recipe? Share the Love!

If this copycat PF Chang’s fried rice recipe brought the restaurant experience to your kitchen, we’d be thrilled if you shared it with friends and family! Pin the image below to your Pinterest boards to save it for later, and follow us on Pinterest @cookingwithemy for more restaurant-quality recipes you can make at home.

📌 Save This Recipe for Later!

Pin this image to your “Dinner Ideas” or “Copycat Recipes” board so you always have it handy.

Copycat PF Chang's Fried Rice recipe in a bowl, ready to eat, with chopsticks.
Better-Than-Takeout PF Chang’s Fried Rice

Don’t forget to follow CookingWithEmy on Pinterest for daily inspiration!

clock clock iconcutlery cutlery iconflag flag iconfolder folder iconinstagram instagram iconpinterest pinterest iconfacebook facebook iconprint print iconsquares squares iconheart heart iconheart solid heart solid icon

PF Changs Fried Rice


  • Author:
    Chef Emy

Description

PF Chang’s Fried Rice is a huge favorite among my friends and I!! Its really pretty easy to make and ready in less than 30 minutes and you can add chicken to it to make it a meal.


Ingredients


Scale
  • 1 cup Jasmine rice
  • 1 3/4 cup chicken broth (or water)
  • 3 tsp sesame oil
  • 2 eggs
  • 1/3 cup shoestring carrots
  • 1/3 cup frozen peas
  • 1/4 cup green onion (sliced)
  • 1/3 cup fresh bean sprouts
  • 3 tbsp soy sauce
  • 1/2 tsp ground mustard
  • 1/2 tsp minced ginger
  • 1 tsp minced garlic
  • 2 tsp molasses

Instructions

  1. Heat chicken broth (or water) in sauce pan to boiling
  2. Add rice and turn down to simmer for 15 minutes until liquid is gone and rice is fluffy
  3. While rice is cooking, whisk together soy sauce, mustard, ginger, garlic and molasses and set aside
  4. Once rice is ready remove from heat
  5. Place stir fry pan on heat and add 1 tsp of sesame oil
  6. Crack eggs into pan and scramble in pan
  7. Once eggs are scrambled, add 1 tsp sesame oil to pan
  8. Add carrots, green onion, peas and bean sprouts stir fry for 3-4 minutes
  9. Add remaining tsp of sesame oil and rice and stir fry for 3-4 minutes
  10. Spread rice around pan up around sides so rice is spread out as much as possible
  11. Add soy sauce mixture and stir fry additional 3-4 minutes
  12. Serve and top with green onions


Easy Gyeran Bap – Korean Egg Rice

Easy Gyeran Bap – Korean Egg Rice: Your 10-Minute Ticket to Ultimate Comfort

Prep TimeCook TimeTotal TimeServingsDifficulty
2 minutes8 minutes10 minutes1Easy

In the bustling world of Korean cuisine, with its sizzling barbecues and complex stews, lies a humble hero: Gyeran Bap. This dish, whose name simply means “egg rice,” is a testament to the profound magic of simplicity. It’s a warm bowl of steamed short-grain rice, crowned with a perfectly fried egg, and brought to life with a drizzle of savory soy sauce, nutty sesame oil, and a sprinkle of fresh green onion. It’s the meal you make when you’re tired, hungry, short on time, or just in desperate need of edible comfort. At Cooking With Emy, we believe the best recipes are often the simplest, and this easy Gyeran Bap recipe is proof. Ready in just 10 minutes with pre-cooked rice, it’s a delicious, protein-packed solution for breakfast, lunch, or a lightning-fast dinner.

Why This Is The Best Gyeran Bap Recipe

You might wonder what could possibly elevate a dish with so few ingredients. The secret lies in technique and balance. Our recipe isn’t just about throwing an egg on rice; it’s about creating a harmonious bite where every component shines.

First, we start by mixing hot rice with butter. This isn’t just for richness—it creates a luxurious, slightly creamy base that helps the seasoning cling to every grain. The choice of a sunny-side-up egg with a runny yolk is non-negotiable. That golden yolk becomes a rich, velvety sauce that coats the rice when you break into it. We use both soy sauce for salty umami depth and toasted sesame oil for aromatic nuttiness—they are the yin and yang of Korean flavor. Finally, the fresh crunch of green onion and the toasty pop of sesame seeds provide the perfect finish. This recipe respects tradition while ensuring foolproof results for any home cook.

💡 The Kitchen Team’s Pro Tip: For the most authentic flavor, use Korean or Japanese short-grain rice (like Calrose). Its sticky, chewy texture and slight sweetness are the ideal foundation for Gyeran Bap, absorbing the sauces and egg yolk perfectly.

Gyeran Bap Ingredients & Why They Matter

Each ingredient in this minimalist dish plays a critical role. Here’s your shopping list and the “why” behind each item.

IngredientQuantityPurpose & Notes
Cooked Short-Grain White Rice1 ½ cupsThe heart of the dish. Must be hot and fresh (or reheated). Its sticky texture is essential.
Large Egg1The star. Aim for a runny yolk to create a sauce. Use the freshest egg you have.
Unsalted Butter1 tbspAdds richness and helps seasonings adhere to the rice. Unsalted lets you control sodium.
Toasted Sesame Oil½ tspDo not substitute with plain sesame oil. Toasted is deeply aromatic and nutty.
Regular Soy Sauce1 tbspProvides the essential salty, umami backbone. Adjust to taste.
Toasted Sesame Seeds1 tspAdds texture and a final layer of toasty flavor.
Green Onion, finely chopped1 tbspFresh, sharp contrast to the rich, warm elements.
Neutral Oil (e.g., vegetable)½ tspFor frying the egg without burning. A high smoke point is key.

How To Make Gyeran Bap: Step-by-Step Guide

Follow these simple steps for a perfect bowl every single time.

Step 1: Prepare the Rice

Place your hot, cooked rice in a medium bowl. Immediately add the tablespoon of unsalted butter. Using a spoon or chopsticks, mix vigorously until the butter is completely melted and every grain of rice is lightly coated. This step is crucial—it seasons the rice from within and creates a perfect base.

💡 The Kitchen Team’s Pro Tip: If using cold leftover rice from the fridge, reheat it properly! Place it in a microwave-safe bowl, sprinkle with 1-2 teaspoons of water, cover with a damp paper towel, and microwave for 1-2 minutes until steaming hot. This restores moisture without making it soggy.

Step 2: Fry the Egg to Perfection

Heat the ½ teaspoon of neutral oil in a small non-stick skillet over medium heat. Once the oil shimmers, carefully crack the egg into the pan. For classic Gyeran Bap, we cook it sunny-side up. Let it cook undisturbed until the egg whites are fully set and opaque, but the yolk is still gloriously runny. This usually takes 2-3 minutes. If you prefer over-easy, gently flip it for just 10-15 seconds.

Step 3: Assemble the Bowl

Transfer the buttered rice to your serving bowl. Gently place the fried egg right on top of the rice mound.

Step 4: The Flavor Finish

Drizzle the soy sauce and toasted sesame oil over the egg and rice. Sprinkle the chopped green onion and toasted sesame seeds evenly over everything.

Step 5: The Grand Finale – Mix and Enjoy!

Here’s the best part. Using your spoon, immediately break the egg yolk and let it cascade over the rice. Mix everything together thoroughly, ensuring the yolk, soy sauce, sesame oil, and butter emulsify into a creamy, savory sauce that coats every bite. Eat immediately while hot!

Serving Suggestions: Beyond The Bowl

While Gyeran Bap is a complete meal, it also loves company. Here are our favorite pairings:

  • Kimchi: The spicy, fermented crunch is the quintessential side. A bite of kimchi followed by a bite of Gyeran Bap is heaven.
  • Roasted Seaweed (Gim): Wrap small bundles of the egg rice in sheets of crispy seaweed for a fun, textural experience.
  • Simple Soup: Serve with a light Miyeokguk (seaweed soup) or a quick miso soup for a more expansive meal.
  • Extra Protein: Flake some canned tuna or spam on top, or add slices of avocado for healthy fats.
  • Veggie Boost: Sautéed spinach, carrots, or zucchini mixed into the rice adds color and nutrition.

How To Store & Reheat Leftovers

Gyeran Bap is best enjoyed fresh. However, if you must store it, keep the components separate for best results. Store plain buttered rice in an airtight container in the fridge for up to 3 days. Cook a fresh egg when ready to eat. If you have a fully assembled bowl, the yolk will harden and the rice can dry out. To reheat rice only, use the microwave method with a damp paper towel to add steam.

Creative Variations To Try

Once you’ve mastered the classic, play with these delicious twists:

  • Spicy Gyeran Bap: Add a drizzle of gochujang (Korean chili paste) or a sprinkle of gochugaru (Korean chili flakes) before mixing.
  • Cheesy Gyeran Bap: Sprinkle shredded mozzarella or a slice of American cheese over the hot rice right after adding the butter. Let it melt before adding the egg.
  • “Bibimbap-Style”: Add a small handful of bean sprouts, shredded carrots, and sautéed mushrooms to the bowl before the egg for a veggie-packed version.
  • Furikake Gyeran Bap: Substitute the sesame seeds and green onion with a tablespoon of Japanese furikake rice seasoning for a different umami profile.

Gyeran Bap FAQ

Can I use brown rice or jasmine rice?

You can, but the experience will be different. Short-grain rice is stickier and chewier, which is ideal for holding the sauce. Jasmine rice is fragrant and fluffy, while brown rice is nuttier and more fibrous. Both work in a pinch, but for authenticity, short-grain is king.

What’s the best substitute for toasted sesame oil?

There is no true substitute for its unique flavor. If you absolutely must, a tiny drop of roasted peanut oil or a bit more butter can add richness, but you’ll miss the signature nutty aroma. It’s worth buying a bottle—it lasts ages in the fridge.

Is this dish eaten for breakfast in Korea?

Absolutely! Gyeran Bap is a popular quick breakfast, much like avocado toast in the West. It’s also common as a simple lunch, a late-night snack (ya sik), or a quick dinner.

My egg yolk broke while frying. Is it ruined?

Not at all! It will still taste delicious. The runny yolk is preferred for its sauciness, but a fully cooked yolk is still great. Just be gentle when sliding it onto the rice.

Can I make this vegan?

Yes. Use vegan butter or a neutral oil for the rice. Omit the egg or use a soft-cooked tofu scramble. For the “yolk” effect, you can try a sauce made from blended cooked squash or a vegan egg yolk product. Use a vegan soy sauce alternative like tamari (ensure it’s gluten-free if needed).

What type of soy sauce should I use?

Regular (not light or dark) Korean or Japanese soy sauce is perfect. Avoid “low-sodium” for this recipe, as you’re using a small amount for maximum flavor impact. If using a very salty brand like some Chinese light soy sauces, start with ½ tablespoon and adjust.

Can I add meat to this?

Definitely. Diced spam, cooked bulgogi beef, leftover grilled chicken, or flaked canned tuna are fantastic additions. Add them on top of the rice before the egg.

Why is my rice clumping together after adding butter?

Your rice might be too cold or dry. Ensure it’s piping hot when you add the butter. If it’s still clumpy, add a tiny splash of warm water or broth while mixing to loosen it up.

There you have it—the complete guide to mastering Easy Gyeran Bap. It’s more than just egg and rice; it’s a lesson in simplicity, balance, and finding profound satisfaction in the basics. We hope this becomes a staple in your kitchen as it is in ours.

Love this recipe? Share it with a friend who needs a quick, delicious meal idea!

Pin this Easy Gyeran Bap recipe for later!

Save this perfect 10-minute meal to your Quick Dinners or Korean Food board on Pinterest so you always have it handy.

Follow us on Pinterest for More!
clock clock iconcutlery cutlery iconflag flag iconfolder folder iconinstagram instagram iconpinterest pinterest iconfacebook facebook iconprint print iconsquares squares iconheart heart iconheart solid heart solid icon

10-min. Easy Korean Egg Rice (Gyeran Bap)


  • Author: Chef Emy

Description

Gyeran Bap Korean Egg Rice. Simple steamed white short grain rice with a fried egg over top, seasoned with soy sauce, green onion, sesame seeds, sesame oil and butter. Easy to make and simply delicious. Great for breakfast, lunch or dinner. Ready in just 10 minutes if you already have cooked rice.


Ingredients

Scale
  • 1 1/2 cups cooked short grain rice (or cooked jasmine rice )
  • 1 egg
  • 1 tbsp unsalted butter
  • 1/2 tsp sesame oil (toasted)
  • 1 tbsp regular soy sauce (or add more/less if desired)
  • 1 tsp sesame seeds (toasted)
  • 1 tbsp green onion (finely chopped)
  • ½ tsp vegetable oil (or any neutral oil)
  • kimchi, canned tuna, roasted seaweed flakes, avocado, sauteed carrots/spinach/zucchini, or more protein

Instructions

  1. Mix hot cooked rice with butter until well combined. Transfer rice to a large bowl. (If you have leftover rice in the fridge, microwave it covered for 2-3 minutes or until hot. Or to make freshly cooked rice, refer to Notes section below for instructions).
  2. Transfer the buttered rice to a large serving bowl. A large bowl will make it easier for mixing and enjoying later.
  3. Heat vegetable oil in a non-stick pan on medium heat. Fry the egg sunny side up, over-easy or however you wish. To fry sunny side up: fry the egg until you have nearly-set whites with runny yolks while spooning some of the hot oil over the whites to set them faster.
  4. Place the fried egg over top of buttered rice.
  5. Next garnish with sesame seeds, sesame oil, chopped green onions and soy sauce and add more if desired.
  6. Break up the egg and mix everything together until well combined. Enjoy hot!