Table of Contents
Sticky Chicken Rice Bowls Recipe: Your New Weeknight Hero Dinner
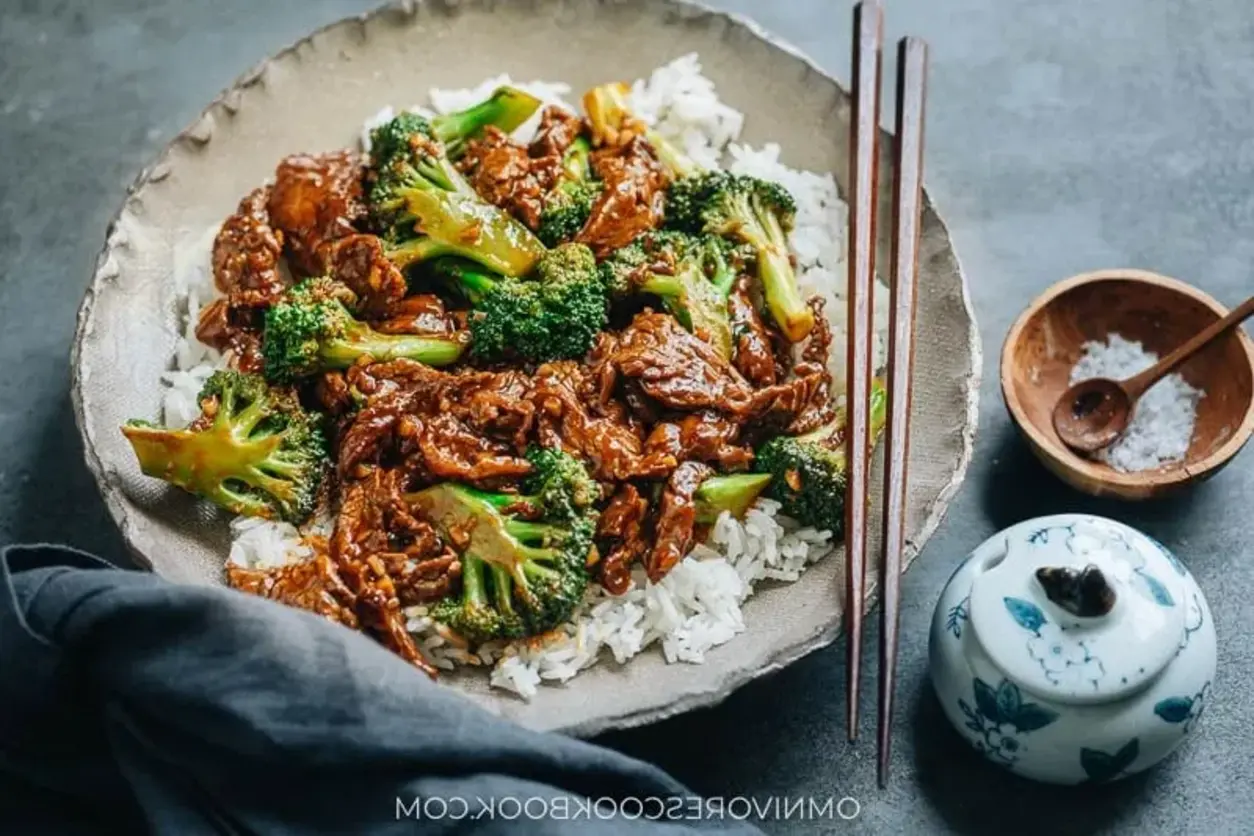
Craving a dinner that’s explosively flavorful, incredibly easy to make, and will have everyone asking for seconds? These Sticky Chicken Rice Bowls are your answer. We’re taking tender, perfectly seasoned chicken, coating it in an irresistible savory-sweet-sticky glaze, and serving it over fluffy rice with crisp-tender broccoli. It’s a complete, balanced meal that delivers restaurant-quality taste in under 30 minutes. Let’s make dinner the best part of your day.

Why You’ll Love These Sticky Chicken Rice Bowls
In the hustle of everyday life, we need dinner recipes that are reliable, fast, and packed with flavor. This Sticky Chicken Rice Bowls recipe checks every single box. It’s the culinary equivalent of a warm hug—comforting, satisfying, and made with love. The magic lies in the harmony of textures and tastes: juicy chicken with a lightly crispy exterior, coated in a glossy, complex sauce that’s the perfect blend of sweet, salty, tangy, and with just a hint of heat. Served over a simple bed of rice and greens, it becomes a complete meal that feels indulgent yet is surprisingly straightforward to prepare.
Whether you’re cooking for a busy family, meal-prepping for the week, or need an impressive dish that doesn’t require hours in the kitchen, this recipe is your new go-to. It’s versatile, forgiving, and uses ingredients you likely already have in your pantry. Get ready to fall in love with how easy and delicious dinner can be.
What Makes This The Best Sticky Chicken Rice Bowls Recipe
You might find other “sticky” chicken recipes online, but ours is meticulously crafted for maximum flavor and foolproof success. Here’s what sets it apart:
The Double-Layer Flavor Bomb: We don’t just rely on the sauce. The chicken is first tossed in a robust blend of smoked paprika, chili powder, onion powder, and oregano before cooking. This creates a deeply seasoned foundation so every bite of chicken is flavorful, even before the sticky sauce hits it.
The Perfect Sticky Sauce Science: Our sauce ratio is perfected. The combination of soy sauce (salty umami), honey (sweetness and gloss), rice vinegar (bright tang), and aromatics like fresh garlic and ginger creates a balanced base. The key is the slurry—arrowroot or cornstarch—which gives the sauce that luxurious, cling-to-everything texture without being gummy.
Smart, Flexible Cooking Methods: We provide the ultra-fast air fryer method for crispy, juicy chicken in minutes, but also include detailed stovetop and oven instructions. No matter your kitchen tools, you can achieve perfect results.
The “Wow” Factor Finish: The spicy mayo drizzle and sesame seed sprinkle aren’t just garnishes; they’re essential components. The creamy, spicy mayo cuts through the richness, and the sesame seeds add a final nutty crunch. It’s this attention to detail that elevates a simple bowl into a memorable meal.
Ingredients & Substitutions
Here’s everything you need to create these incredible bowls. We’ve also included a comprehensive substitution guide so you can adapt based on what’s in your fridge or dietary needs.
| Ingredient | Quantity | Notes & Substitutions |
|---|---|---|
| Uncooked White Rice | 2 cups | Jasmine or basmati are ideal for fragrance. Substitute with brown rice (adjust cooking time), cauliflower rice, or quinoa. |
| Broccoli, small heads | 2 | Chopped into florets. Can use frozen broccoli florets (thawed), or swap for snap peas, bell peppers, or asparagus. |
| Chicken Breasts | 3 large | Boneless, skinless. For more flavor, use chicken thighs. Cut into uniform 1-inch pieces for even cooking. |
| Olive Oil | 2 tbsp | Avocado oil, vegetable oil, or any neutral high-heat oil works. |
| For the Chicken Spice Blend: | ||
| Salt | 1 tsp | Kosher or sea salt. |
| Black Pepper | 1/2 tsp | Freshly ground is best. |
| Chili Powder | 1 tsp | Adds mild heat and color. Can use paprika for zero heat. |
| Smoked Paprika | 1 tsp | **Crucial** for depth. Use regular paprika if you must, but smoked is highly recommended. |
| Onion Powder | 1 tsp | Granulated garlic can be added too. |
| Dried Oregano | 1 tsp | Thyme or Italian seasoning blend are good alternatives. |
| For the Sticky Sauce: | ||
| Soy Sauce (or Tamari) | 1/2 cup | Use low-sodium if preferred. For gluten-free, use tamari or coconut aminos. |
| Honey | 1/2 cup | Maple syrup or agave nectar for a vegan version. |
| Rice Vinegar | 1/4 cup | Apple cider vinegar or white wine vinegar in a pinch. |
| Garlic, minced | 3 cloves | Fresh is non-negotiable for the best flavor! About 1 tbsp. |
| Sriracha | 2 tbsp | Adjust to your heat preference. Gochujang (1 tbsp) is a great flavorful alternative. |
| Sesame Oil | 2 tsp | **Toasted** sesame oil is key for its nutty aroma. Don’t substitute. |
| Ground Ginger | 1 tsp | 1 tbsp freshly grated ginger is phenomenal if you have it. |
| Arrowroot Powder or Cornstarch | 2 tsp | Mixed with 2 tbsp water to make a slurry. They are interchangeable here. |
| For the Spicy Mayo & Topping: | ||
| Mayonnaise | 1/2 cup | Kewpie mayo is excellent here, or use vegan mayo. |
| Sriracha | 1 tbsp | Again, adjust to taste. |
| Water | 2-3 tbsp | To thin the mayo to a drizzling consistency. |
| Sesame Seeds | For topping | White or black, or a mix. Sliced green onions are also a fantastic fresh garnish. |
Step-by-Step Instructions
Follow these simple steps for perfect Sticky Chicken Rice Bowls every single time. We’re breaking it down into clear phases to keep you organized and stress-free.
Phase 1: Prep Your Components
1. Cook the Rice: Begin by cooking your 2 cups of rice according to the package directions. This usually takes the longest, so getting it started first is a smart move. Once cooked, fluff it with a fork and keep it covered to stay warm.
2. Steam the Broccoli: While the rice cooks, steam your chopped broccoli until it is bright green and fork-tender, about 4-5 minutes. You can do this in a steamer basket on the stove, in the microwave with a splash of water in a covered bowl, or even in the air fryer at 350°F for 5-6 minutes. Set aside.
3. Cut and Season the Chicken: Pat the chicken breasts dry with paper towels—this helps with browning. Cut them into uniform, bite-sized pieces (about 1-inch cubes). In a large bowl, toss the chicken pieces with the 2 tbsp of olive oil, 1 tsp salt, 1/2 tsp pepper, 1 tsp chili powder, 1 tsp smoked paprika, 1 tsp onion powder, and 1 tsp oregano. Ensure each piece is evenly coated.
Phase 2: Cook the Chicken (Choose Your Method)
Air Fryer Method (Fast & Crispy): Preheat your air fryer to 400°F (200°C). Lay the seasoned chicken pieces in the basket in a single layer, ensuring they aren’t crowded (cook in batches if necessary). Air fry for 10-12 minutes, shaking the basket halfway through, until the chicken is golden brown and has reached an internal temperature of 165°F (74°C).
Stovetop Method (Classic Sear): Heat a large skillet or wok over medium-high heat. Add 1 tbsp of oil. Once hot, add the chicken in a single layer (cook in batches to avoid steaming). Cook for 5-7 minutes, turning occasionally, until browned and cooked through.
Oven Method (Hands-Off): Preheat oven to 400°F (200°C). Spread chicken on a parchment-lined baking sheet. Bake for 15-18 minutes, until cooked through.
Phase 3: Create the Legendary Sticky Sauce
While the chicken cooks, make the sauce. In a medium saucepan, combine the 1/2 cup soy sauce, 1/2 cup honey, 1/4 cup rice vinegar, minced garlic, 2 tbsp sriracha, 2 tsp sesame oil, and 1 tsp ground ginger. Whisk to combine.
Bring the mixture to a boil over medium-high heat. In a small bowl, whisk the 2 tsp arrowroot powder (or cornstarch) with 2 tbsp of cold water until completely smooth to create your slurry. Once the sauce is boiling, slowly whisk in the slurry. Continue to boil for 4-5 minutes, whisking occasionally. The sauce will bubble and thicken significantly into a glossy, sticky glaze. Remove from heat.
Phase 4: Assemble Your Masterpiece
1. Sauce the Chicken: If you used the stovetop method, you can add the cooked chicken directly to the sauce pan and toss to coat. For air fryer or oven chicken, place the cooked chicken in a large bowl and pour the sticky sauce over it. Gently toss until every piece is gloriously coated.
2. Make the Spicy Mayo: In a small bowl, whisk together the 1/2 cup mayonnaise and 1 tbsp (or more) sriracha. Add water, 1 tablespoon at a time, until it reaches a thin, drizzle-able consistency.
3. Build the Bowls: Divide the warm, fluffy rice among four bowls. Top with a portion of the steamed broccoli. Pile on the saucy sticky chicken. Drizzle generously with the spicy mayo. Finish with a sprinkle of sesame seeds and, if you like, some thinly sliced green onions.
4. Serve Immediately! The contrast of warm, sticky chicken and cool, creamy spicy mayo is divine. Enjoy right away.
Serving Suggestions & Presentation
While these bowls are a complete meal, here are some ideas to mix things up or turn it into a feast:
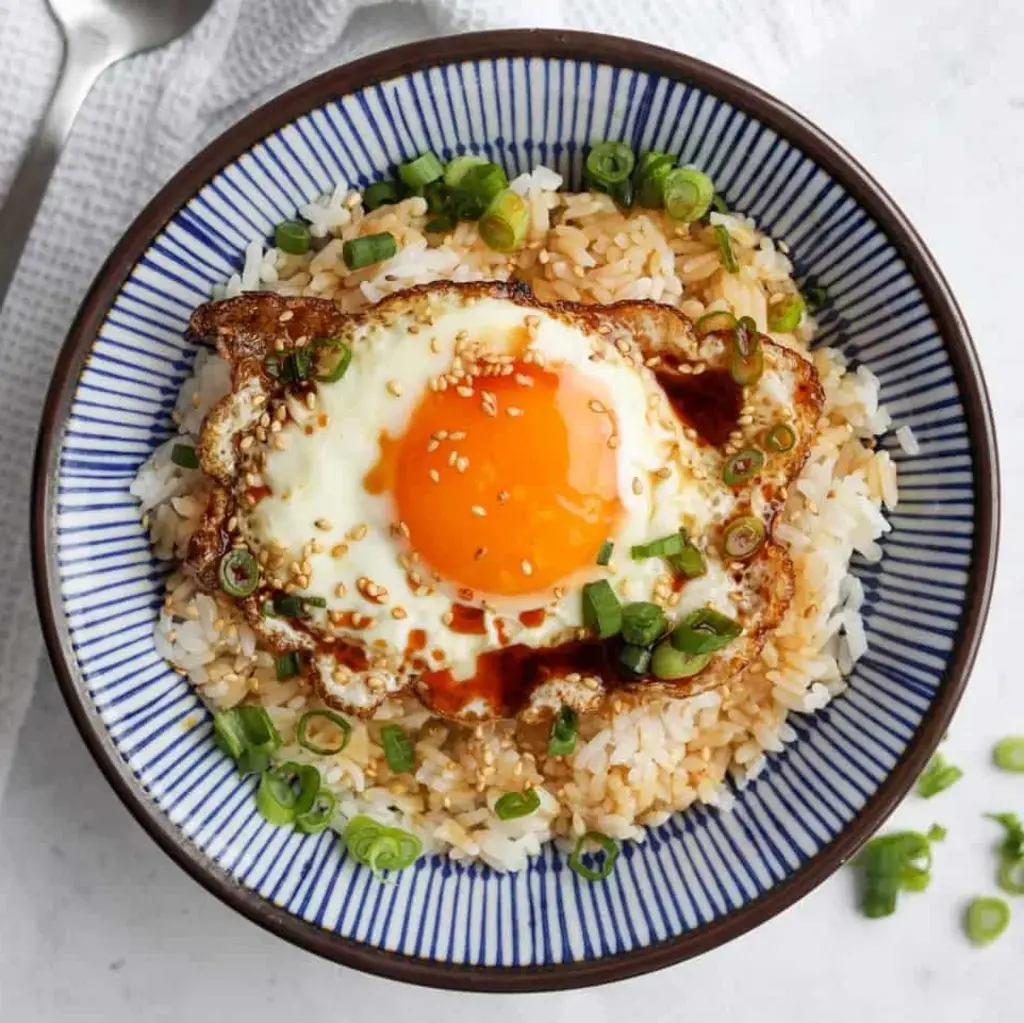
Elevate Your Bowl: Add a soft-boiled or fried egg on top for extra protein and a rich, runny yolk. Pickled vegetables (like quick-pickled cucumbers or red onions) add a fantastic crunchy, acidic contrast that cuts the richness beautifully.
Make it a Spread: Serve the sticky chicken family-style! Place a big platter of the saucy chicken in the center of the table alongside bowls of rice, steamed broccoli, the spicy mayo, and other toppings like shredded carrots, edamame, kimchi, and nori strips. Let everyone build their own perfect bowl.
Perfect Pairings: A simple, crisp side salad with a ginger-sesame dressing complements the bowls wonderfully. For a drink, a cold lager, crisp white wine, or even a sparkling water with lime keeps the palate refreshed.
Storage & Reheating Instructions
Storage: Store components separately for best results. Place cooled sticky chicken, rice, and broccoli in airtight containers in the refrigerator for up to 3-4 days. The spicy mayo can be stored in a separate container for up to 1 week.
Reheating: To reheat, sprinkle a few drops of water over the rice and chicken and microwave in 30-second intervals until hot. You can also reheat the chicken and rice together in a skillet over medium-low heat, stirring frequently, until warmed through. The sauce may thicken in the fridge; a splash of water or broth when reheating will bring it back to the perfect consistency. Assemble with fresh broccoli and spicy mayo after reheating.
Freezing: We do not recommend freezing the fully assembled bowls or the sauced chicken, as the texture of the sauce can become grainy. However, you can freeze the cooked, un-sauced chicken for up to 2 months. Thaw in the refrigerator overnight and make a fresh batch of sticky sauce when ready to serve.
Delicious Recipe Variations
The beauty of this recipe is its adaptability. Don’t be afraid to make it your own!
Protein Swap: Try this with shrimp (cook quickly at the end), salmon cubes, tofu (press extra firm tofu well, cube, and coat in cornstarch before air frying for crispiness), or even pork tenderloin cut into medallions.
Vegetable Medley: Swap or add to the broccoli with sliced bell peppers, sugar snap peas, shredded carrots, or baby corn. Stir-fry them quickly for a vibrant mix.
Dietary Tweaks:
Gluten-Free: Use tamari or certified gluten-free soy sauce/coconut aminos.
Lower Sugar: Reduce honey to 1/4 cup and add a pinch of stevia, or use a sugar-free maple syrup alternative.
Spice Level: Control the heat! Omit sriracha from the sauce for a mild version, or add a diced fresh chili for extra fire.
Flavor Twists:
Korean-Inspired: Use gochujang (1-2 tbsp) in place of the sriracha in the sauce for a deeper, fermented chili flavor.
Teriyaki Style: Add 1 tbsp of grated fresh ginger and a splash of pineapple juice to the sauce.
Orange Chicken: Add 1/4 cup orange juice and 1 tbsp orange zest to the sauce ingredients.
Frequently Asked Questions (FAQ)
Can I make this sticky chicken rice bowls recipe ahead of time?
Absolutely! It’s a fantastic meal prep option. Cook the rice, chicken, and sauce, and store them separately in the fridge for up to 3 days. The broccoli is best steamed fresh. Reheat and assemble when ready to eat for the best texture.
My sauce didn’t get thick and sticky. What went wrong?
The most common issue is not bringing the sauce to a full, rolling boil after adding the cornstarch/arrowroot slurry. The starch needs that high heat to activate and thicken. Also, ensure your slurry is smooth (no lumps) and made with cold water. Let it boil for the full 4-5 minutes.
Can I use chicken thighs instead of breasts?
Yes, and many prefer thighs for their richer flavor and juiciness. Use boneless, skinless thighs and cut them into bite-sized pieces. They may require 1-2 extra minutes of cooking time. The fat content makes them incredibly delicious with this sticky glaze.
I don’t have an air fryer. What’s the best alternative?
The stovetop method in a hot skillet is your best bet for getting a nice sear and color on the chicken quickly. The oven method is more hands-off but may not get the same level of browning unless you use the broiler for the last minute.
Is arrowroot powder better than cornstarch?
They work almost identically here. Arrowroot creates a slightly glossier sauce and is a good choice if you’re cooking the sauce for a very long time (as cornstarch can break down). For this quick recipe, they are perfectly interchangeable.
How can I make this recipe less spicy for my kids?
Simply omit the sriracha from both the sticky sauce and the spicy mayo. The dish will still be packed with flavor from the soy, honey, vinegar, and spices. You can serve sriracha on the side for adults who want the heat.
What’s the best way to reheat leftovers without drying out the chicken?
The microwave is fine if you add a tiny splash of water or broth to the container and cover it loosely. For best results, reheat in a non-stick skillet over medium-low heat with a tablespoon of water. Cover for a minute to steam, then uncover and stir until hot.
Can I freeze the sticky sauce by itself?
Yes, you can! Make a double batch of the sauce (without the slurry) and freeze it in an airtight container or ice cube trays for easy portions. Thaw in the fridge, then reheat in a saucepan, add the slurry, and boil to thicken when ready to use.
We hope you love this Sticky Chicken Rice Bowls recipe as much as we do! It’s a testament to how simple ingredients can create something truly spectacular. If you make it, please share your creation with us on social media by tagging @cookingwithemy. We love seeing your kitchen triumphs!
Sticky Chicken Rice Bowls Recipe
Description
Sticky Chicken Rice Bowls are a delicious and easy-to-make meal that combines tender chicken with a savory-sweet glaze, served over a bed of fluffy rice. Perfect for a weeknight dinner or a quick lunch, this dish is sure to become a family favorite. Lets dive into the details of creating this mouthwatering meal.
Ingredients
- 2 cup uncooked rice
- 2 small heads broccoli, chopped
- 3 large chicken breasts
- 2 tbsp olive oil
- 1 tsp salt
- 1/2 tsp pepper
- 1 tsp chili powder
- 1 tsp smoked paprika
- 1 tsp onion powder
- 1 tsp oregano
- Sticky Sauce
- 1/2 cup soy sauce
- 1/2 cup honey
- 1/4 cup rice vinegar
- 3 cloves garlic, minced
- 2 tbsp sriracha
- 2 tsp sesame oil
- 1 tsp ground ginger
- 2 tsp arrowroot powder mixed with 2 tbsp water to make a slurry (sub cornstarch)
- Spicy mayo
- 1/2 cup mayo
- 1 tbsp sriracha
- 23 tbsp water
- sesame seeds for topping
Instructions
- Cook rice according to package.
- Steam broccoli in microwave or on stove top until fork tender. Set aside.
- Cut chicken up into small bitesized pieces.
- Toss chicken with oil and all spices. Lay flat in air fryer and cook in preheated air fryer at 400F to 12 minutes or until chicken is 160F internally.
- While chicken is cooking, add soy sauce, honey, rice vinegar, garlic, sriracha, sesame oil, and ground ginger to a sauce pot. Bring to a boil. Once boiling, add arrowroot slurry. Let boil 4-5 minutes or until sauce has thickened greatly.
- Prepare bowls by layering rice, broccoli, chicken, and covering in sauce. Mix together spicy mayo ingredients and drizzle on top. Top with sesame seeds.