📋 Table of Contents
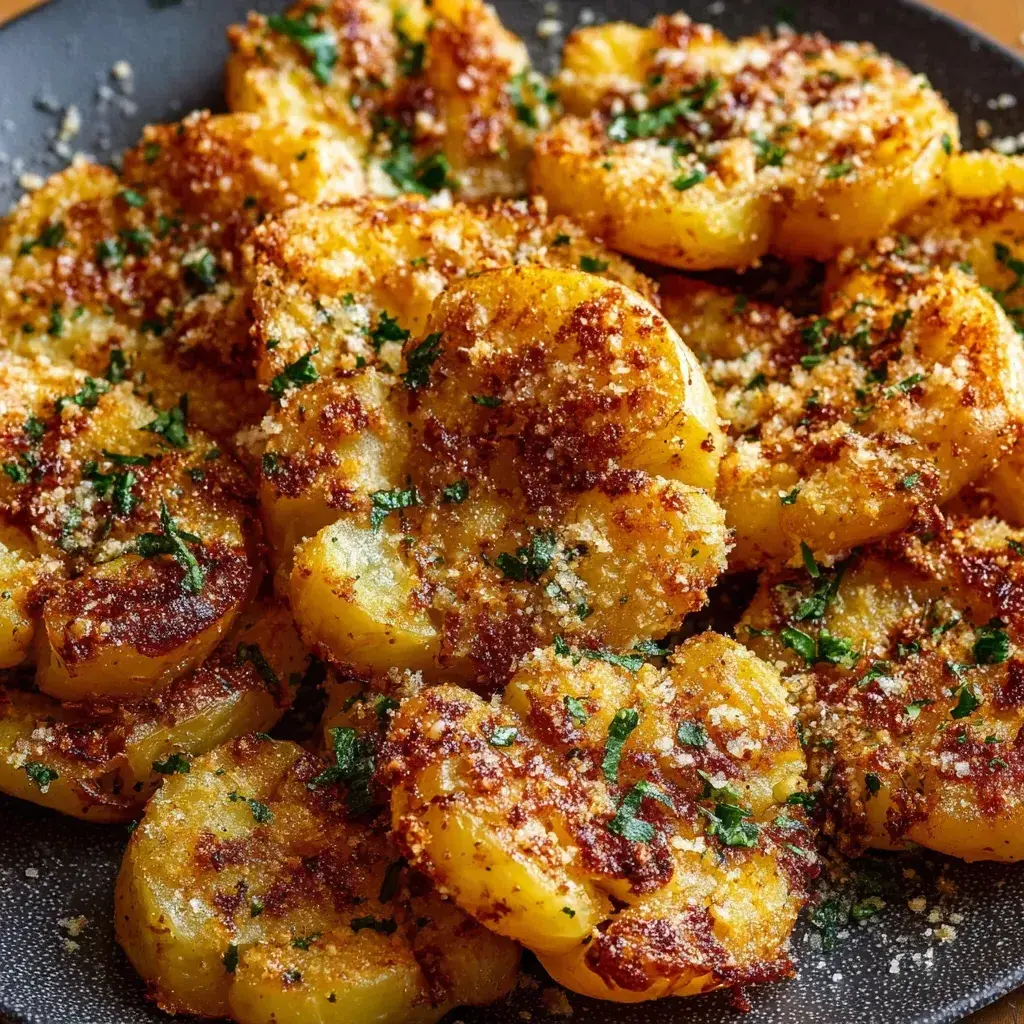
Crispy Garlic Butter Parmesan Smashed Potatoes – The Ultimate Side Dish
Golden, garlicky, crispy-edged, and covered in a blanket of parmesan—these smashed potatoes are what side dish dreams are made of.

Author: Chef Emy | Site: cookingwithemy.com
🥔 Introduction
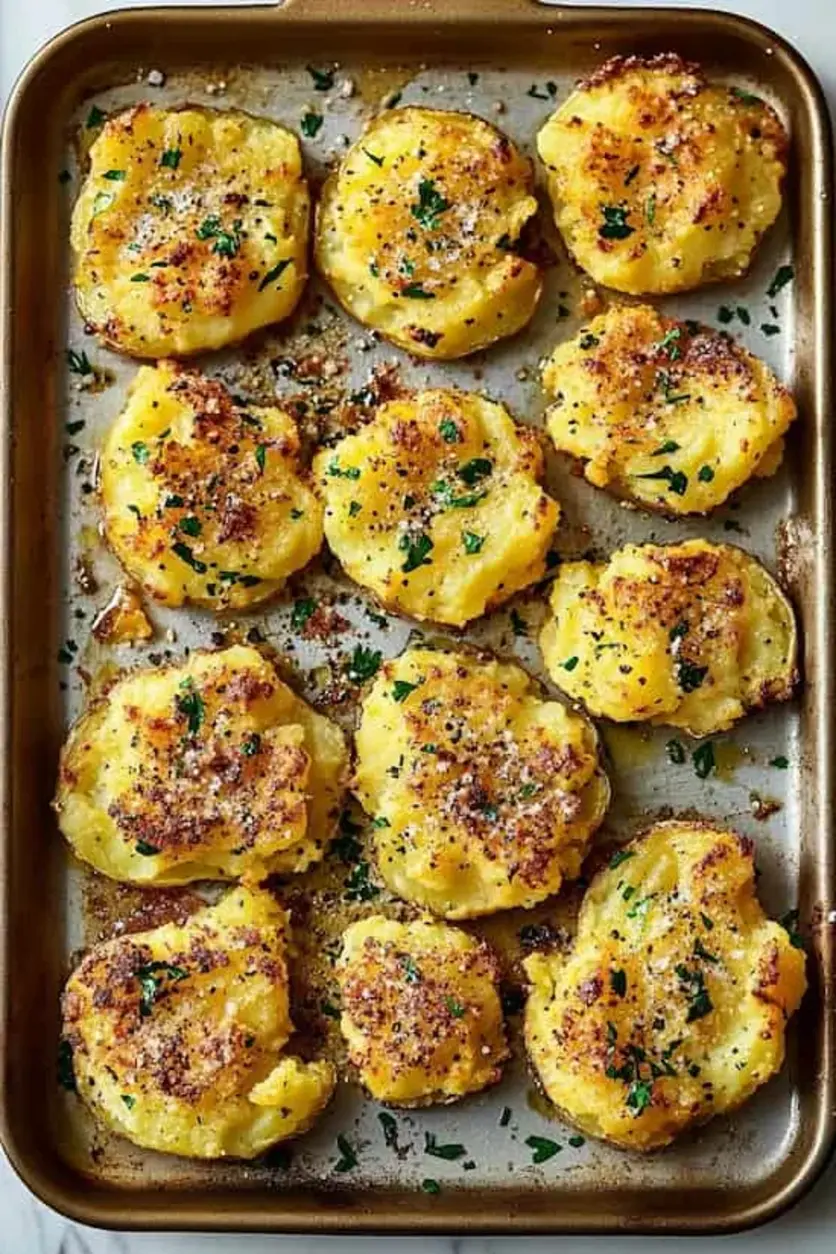
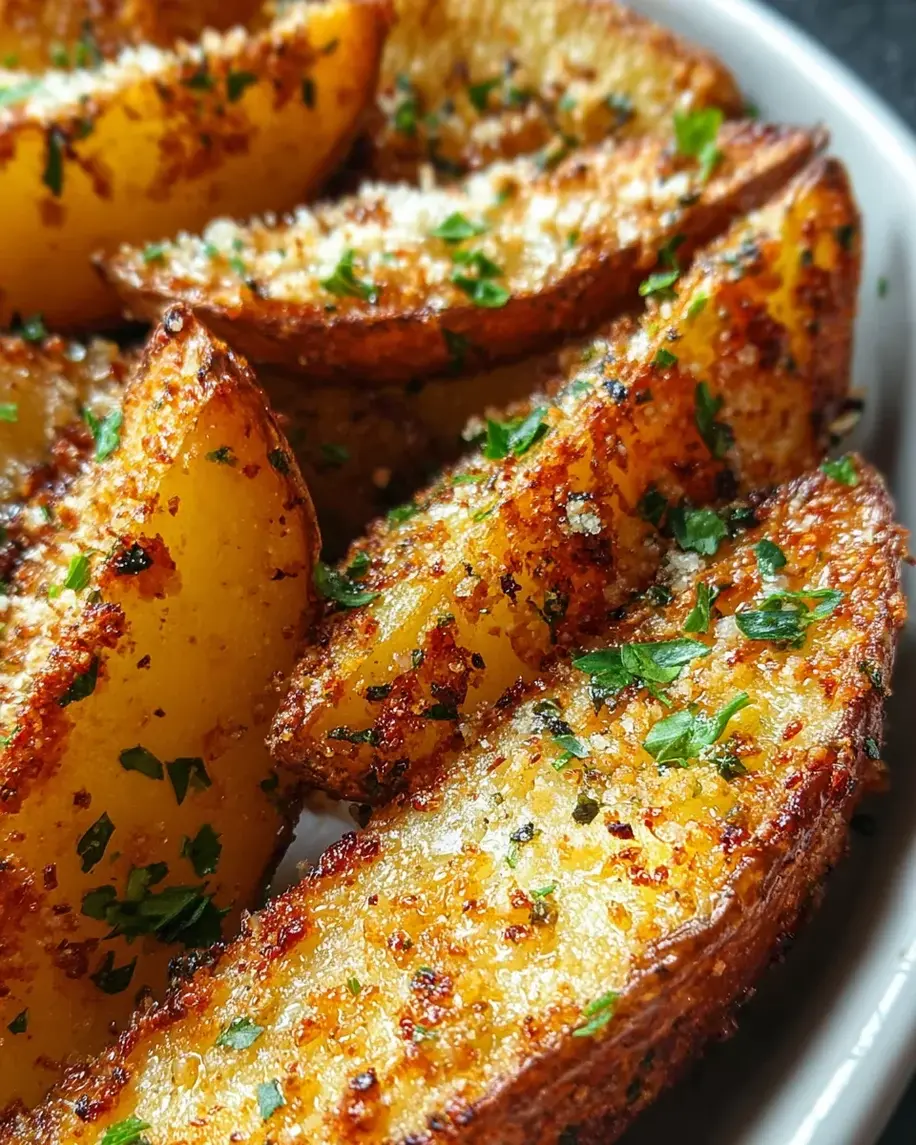
There’s something magical about a potato that’s been boiled until tender, smashed flat, then roasted until the edges turn golden and crispy. Add a generous brushing of garlic butter and a blanket of nutty parmesan cheese, and you’ve got a dish that’s absolutely irresistible. These Crispy Garlic Butter Parmesan Smashed Potatoes are the perfect side dish for almost any meal—from a casual weeknight dinner to a holiday feast.
What makes these smashed potatoes so special is the contrast in textures. The exterior becomes delightfully crunchy and golden, while the inside stays fluffy and tender. The garlic butter infuses every bite with rich, savory flavor, and the parmesan adds a salty, nutty crust that’s simply addictive. Whether you’re serving them alongside a juicy steak, roasted chicken, or even as a standalone snack, these potatoes are guaranteed to steal the show.
At The Kitchen Team, we’ve tested countless potato recipes, and this one is hands-down our favorite. It’s simple enough for beginners but impressive enough to serve to guests. Plus, it’s naturally gluten-free and can easily be made vegetarian or vegan with a few simple swaps. Let’s dive into why these smashed potatoes are the best you’ll ever make!
🌟 Why These Are the Best Smashed Potatoes
Not all smashed potatoes are created equal. After testing dozens of variations, here’s why this recipe stands out:
- Perfectly crispy edges: By boiling the potatoes first and then roasting them at a high temperature, you get that coveted crunch without drying out the inside.
- Garlic butter infusion: Instead of just drizzling butter on top, we brush each smashed potato with garlic butter before roasting, ensuring the flavor penetrates every crevice.
- Parmesan crust: The parmesan cheese melts and creates a golden, savory crust that adds incredible depth of flavor and texture.
- Simple ingredients: You only need a handful of pantry staples to create this show-stopping dish.
- Versatile and customizable: Add herbs, spices, or different cheeses to make it your own.
📝 Ingredients
Here’s everything you’ll need to make these incredible smashed potatoes:
| Ingredient | Amount | Notes |
|---|---|---|
| Baby gold potatoes | 1.5 pounds | Yukon Gold or red potatoes work best |
| Unsalted butter | 3 tablespoons | Use good quality butter for best flavor |
| Garlic cloves | 3 cloves, minced | Fresh garlic is essential |
| Olive oil | 1 tablespoon | Extra virgin for drizzling |
| Grated parmesan cheese | 1/3 cup | Freshly grated is best |
| Fresh parsley | 1 tablespoon, chopped | For garnish |
| Salt | 1/2 teaspoon | Adjust to taste |
| Black pepper | 1/4 teaspoon | Freshly ground |
👩🍳 Step-by-Step Instructions
- Boil the potatoes: Place the baby potatoes in a large pot and cover with cold salted water. Bring to a boil over high heat, then reduce to a simmer. Cook for 15-20 minutes, until the potatoes are fork-tender. Drain well and let them sit in the colander for 2-3 minutes to steam dry.
- Preheat the oven: While the potatoes are cooking, preheat your oven to 425°F (220°C). Line a large baking sheet with parchment paper or lightly grease it with olive oil.
- Smash the potatoes: Arrange the boiled potatoes on the prepared baking sheet, leaving space between each one. Use a flat-bottomed glass, a potato masher, or the bottom of a measuring cup to gently press down on each potato until it’s about 1/2 inch thick. Try to keep them intact—some cracks are fine and actually help create crispy edges.
- Make the garlic butter: In a small saucepan, melt the butter over low heat. Add the minced garlic and cook for 1-2 minutes until fragrant, stirring constantly. Be careful not to let the garlic brown, as it will become bitter.
- Season and roast: Brush each smashed potato generously with the garlic butter, making sure to get it into all the cracks. Drizzle lightly with olive oil. Sprinkle evenly with salt, black pepper, and half of the grated parmesan cheese.
- First roast: Place the baking sheet in the preheated oven and roast for 15 minutes. The potatoes should start turning golden on the edges.
- Add remaining cheese: Remove the baking sheet from the oven and sprinkle the remaining parmesan over the potatoes. Return to the oven and roast for another 10-15 minutes, until the edges are deep golden brown and crispy.
- Garnish and serve: Remove from the oven and let cool for 2 minutes. Sprinkle with fresh chopped parsley and serve immediately while hot and crispy.
🍽️ Serving Suggestions
These crispy garlic butter parmesan smashed potatoes are incredibly versatile. Here are some of our favorite ways to serve them:
- As a side dish: Pair with grilled steak, roasted chicken, baked salmon, or pork chops.
- For breakfast: Serve alongside eggs, bacon, and avocado for a hearty morning meal.
- As an appetizer: Top with a dollop of sour cream or crème fraîche and extra chives for a party-worthy starter.
- With dips: Serve with garlic aioli, ranch dressing, or spicy sriracha mayo for dipping.
- In a bowl: Add to grain bowls or salads for extra texture and flavor.
These potatoes are best enjoyed fresh out of the oven when they’re at their crispiest. However, they’re still delicious at room temperature, making them perfect for potlucks and picnics.
❄️ Storage & Reheating
While these smashed potatoes are best enjoyed fresh, you can store leftovers for later:
- Refrigerator: Store in an airtight container for up to 3 days.
- Freezer: Freeze in a single layer on a baking sheet, then transfer to a freezer bag for up to 2 months.
- Reheating: To restore crispiness, reheat in a 400°F oven for 5-7 minutes, or in an air fryer at 375°F for 3-4 minutes. Avoid microwaving, as it will make them soggy.
🎨 Variations & Substitutions
Get creative with these delicious variations:
| Variation | Substitutions |
|---|---|
| Herb lovers | Add 1 tsp dried rosemary or thyme to the garlic butter |
| Spicy version | Add 1/4 tsp red pepper flakes or cayenne pepper |
| Vegan option | Use vegan butter and nutritional yeast instead of parmesan |
| Cheese swap | Try pecorino romano, asiago, or sharp cheddar |
| Lemon garlic | Add 1 tsp lemon zest and a squeeze of lemon juice |
| Bacon topped | Sprinkle crumbled cooked bacon over the top before serving |
❓ Frequently Asked Questions
1. Can I use different types of potatoes?
Yes! While baby gold potatoes work best, you can also use red potatoes, fingerling potatoes, or even Yukon Golds cut into uniform pieces. Avoid starchy Russet potatoes, as they tend to fall apart when smashed.
2. Why are my smashed potatoes not crispy?
This usually happens if the potatoes are too wet before roasting, the oven temperature is too low, or the baking sheet is overcrowded. Make sure to dry the potatoes thoroughly after boiling, use a high oven temperature (425°F), and leave space between each potato on the baking sheet.
3. Can I prepare these ahead of time?
Absolutely! You can boil and smash the potatoes up to 24 hours in advance. Store them in the refrigerator on the baking sheet, covered with plastic wrap. When ready to serve, brush with garlic butter and roast as directed, adding 5 extra minutes to the cooking time.
4. How do I make these dairy-free?
Use a high-quality vegan butter and replace the parmesan with nutritional yeast or a dairy-free cheese alternative. The flavor will be slightly different, but still delicious!
5. Can I use garlic powder instead of fresh garlic?
Fresh garlic provides the best flavor, but in a pinch, you can use 1/2 teaspoon garlic powder mixed into the melted butter. Avoid garlic salt, as it will make the potatoes too salty.
6. What’s the best way to smash the potatoes?
Use a flat-bottomed glass, a potato masher, or the bottom of a measuring cup. Press gently and evenly to avoid breaking the potatoes apart. A little cracking is fine—it actually helps create more crispy edges!
7. Can I add other vegetables to the pan?
Yes! Add halved Brussels sprouts, carrot chunks, or wedges of onion to the baking sheet. They’ll roast beautifully alongside the potatoes and soak up the garlic butter goodness.
8. How do I know when the potatoes are done boiling?
The potatoes should be tender enough that a fork slides in easily with little resistance. Be careful not to overcook them, or they’ll fall apart when you try to smash them.
9. Can I make these in an air fryer?
Absolutely! Preheat your air fryer to 400°F. Place the smashed potatoes in a single layer in the basket (you may need to work in batches). Cook for 10-12 minutes, flipping halfway through, until golden and crispy.
10. What if I don’t have parchment paper?
You can grease the baking sheet well with olive oil or use a silicone baking mat. Avoid using wax paper, as it will burn at this high temperature.
📌 Save This Recipe for Later!
Pin this Crispy Garlic Butter Parmesan Smashed Potatoes recipe to your favorite board on Pinterest so you never lose it!
Follow @cookingwithemy on Pinterest for more!
Crispy Garlic Butter Parmesan Smashed Potatoes
Description
Golden, garlicky, crispy-edged, and covered in a blanket of parmesanthese smashed potatoes are what side dish dreams are made of. They take simple baby potatoes and transform them into a texture lover’s delight: tender inside, crisp on the outside, and loaded with flavor in every bite.
Ingredients
Scale
- 1.5 pounds baby gold potatoes
- 3 tablespoons unsalted butter
- 3 cloves garlic, minced
- 1 tablespoon olive oil
- 1/3 cup grated parmesan cheese
- 1 tablespoon chopped fresh parsley
- 1/2 teaspoon salt
- 1/4 teaspoon ground black pepper
Instructions
- Place baby potatoes in a large pot of salted water and bring to a boil. Cook for about 1520 minutes until fork-tender. Drain and let them dry briefly. <
- p id=instruction-step-2>2. Preheat your oven to 425°F (220°C). Line a large baking sheet with parchment paper or lightly grease it with olive oil.
- id=instruction-step-3>3. Place boiled potatoes on the baking sheet. Use a flat-bottomed glass or potato masher to gently press down and flatten each one to about 1/2 inch thick.
- id=instruction-step-4>4. In a small saucepan, melt the butter over low heat. Stir in the garlic and cook for 12 minutes until fragrant. Do not let it brown.
- =instruction-step-5>5. Brush each smashed potato generously with the garlic butter, then drizzle lightly with olive oil. Sprinkle with salt, black pepper, and half of the parmesan.
- =instruction-step-6>6. Roast the potatoes in the oven for 2025 minutes or until golden and crisp. In the last 5 minutes, sprinkle the remaining parmesan over the top and let it melt into a crispy coating.
- instruction-step-7>7. Remove from the oven and sprinkle with chopped fresh parsley before serving.