Halloumi Makhani | Creamy & High Protein Delight

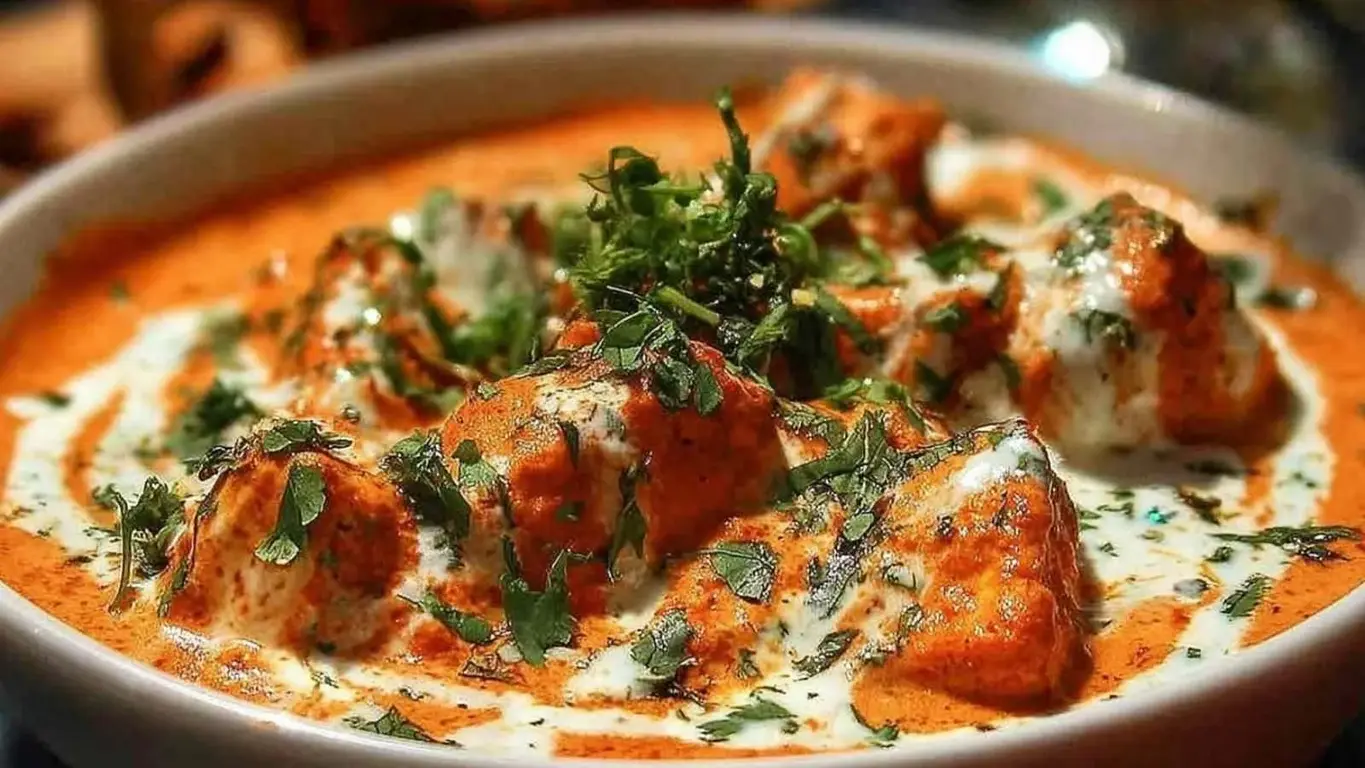
Get ready to savor a delightful twist on a classic dish with this Halloumi Makhani! This creamy, protein-packed recipe combines grilled Halloumi cheese and a rich, spiced tomato sauce, making it a quick and flavorful meal. Perfect for busy weeknights or a cozy dinner with loved ones!

Print

clock clock iconcutlery cutlery iconflag flag iconfolder folder iconinstagram instagram iconpinterest pinterest iconfacebook facebook iconprint print iconsquares squares iconheart heart iconheart solid heart solid icon

Halloumi Makhani


  • Author: Chef Emy

Description

Golden, pan-fried halloumi cheese folded into a rich and creamy spiced tomato makhani sauce. A high-protein vegetarian main thats bold, satisfying, and ready in 30 minutes.


Ingredients

Scale
  • 7 oz halloumi cheese cubed and patted dry
  • 1 medium onion finely chopped
  • 2 cloves garlic minced
  • 1 inch fresh ginger grated
  • 1.75 cups tomato puree passata, plain and unseasoned
  • 0.33 cup heavy cream or full-fat coconut cream for dairy-free
  • 2 tbsp butter or ghee ghee preferred for richer flavor
  • 1 tsp garam masala
  • 1 tsp cumin
  • 0.5 tsp paprika
  • 0.5 tsp chili powder adjust to taste
  • salt and pepper to taste
  • fresh cilantro for garnish

Instructions

  1. Melt the butter or ghee in a large skillet over medium heat. Add the finely chopped onion and cook for 5 to 7 minutes, stirring occasionally, until soft and fully translucent.
  2. Add the minced garlic and grated ginger. Stir and cook for about 1 minute until fragrant. Watch closely so the garlic does not burn.
  3. Combine the garam masala, cumin, paprika, and chili powder in a small bowl. Add the spice blend to the pan and toast for 30 to 60 seconds, stirring constantly, until the mixture smells warm and aromatic.
  4. Pour in the tomato puree, season with salt and pepper, and stir well. Bring to a gentle simmer, reduce heat to low, cover, and cook for 10 minutes.
  5. While the sauce simmers, heat a separate non-stick pan over medium-high heat. Add the halloumi cubes in a single layer. Pan-fry for 2 to 3 minutes per side without moving them until deep golden brown. If the halloumi sticks when you try to flip, let it cook another 30 seconds and try again. Remove from pan and set aside.
  6. Remove the sauce from heat briefly and stir in the heavy cream until fully combined. Return to low heat.
  7. Gently fold the fried halloumi cubes into the creamy makhani sauce. Cook together for 2 to 3 minutes until the halloumi is heated through.
  8. Remove from heat, taste for seasoning, garnish with fresh cilantro, and serve immediately.

Notes

Pat halloumi dry before frying for the best golden crust. For a lighter sauce, substitute heavy cream with plain Greek yogurt added off the heat to prevent curdling. Freezing is not recommended as the cream sauce may separate. Store leftovers in an airtight container in the fridge for up to 3 days.

Garlic Balsamic Steak Bites | Quick & High Protein Meal

Looking for a quick and tasty meal? These garlic balsamic steak bites are a high-protein delight that come together in under 20 minutes! Perfect for busy nights or meal prep, they’re packed with flavor and can be served in multiple ways. Dive into this savory goodness and enjoy a restaurant-quality dish right at home! 🍽️

Print

clock clock iconcutlery cutlery iconflag flag iconfolder folder iconinstagram instagram iconpinterest pinterest iconfacebook facebook iconprint print iconsquares squares iconheart heart iconheart solid heart solid icon

Garlic Balsamic Steak Bites


  • Author: Chef Emy

Description

Juicy sirloin steak cubes seared to perfection and tossed in a rich, savory-sweet garlic balsamic glaze. A high-protein weeknight dinner ready in under 20 minutes.


Ingredients

Scale
  • 1.5 lbs sirloin steak cut into 1-inch cubes
  • 2 tbsp olive oil
  • 4 garlic cloves minced
  • 0.25 cup balsamic vinegar aged balsamic preferred for richer glaze
  • 2 tbsp honey or maple syrup
  • 2 tbsp unsalted butter
  • 1 tbsp fresh rosemary chopped; or 1 tsp dried
  • salt and freshly ground black pepper to taste
  • red pepper flakes optional, for heat

Instructions

  1. Pat the steak cubes completely dry with paper towels and season generously on all sides with salt and freshly ground black pepper.
  2. Heat the olive oil in a large skillet or cast-iron pan over medium-high heat for 1 to 2 minutes, until the oil shimmers. The pan must be fully hot before adding the steak.
  3. Working in two batches to avoid overcrowding, sear the steak cubes for 1 to 2 minutes per side without moving them until deeply browned. Remove from pan and set aside, then repeat with the second batch.
  4. Reduce heat to medium. Add minced garlic and rosemary to the same pan and cook for about 30 seconds, stirring constantly, until fragrant. Do not let the garlic burn.
  5. Pour in the balsamic vinegar and honey or maple syrup, scraping up the browned bits from the bottom of the pan. Let the sauce bubble and reduce for 1 to 2 minutes, stirring occasionally, until slightly thickened and coating the back of a spoon.
  6. Remove the pan from heat completely. Stir in the butter until fully melted and the sauce is glossy.
  7. Return the seared steak bites to the pan and toss to coat evenly in the glaze. Serve immediately, garnished with fresh rosemary if desired.

Notes

Do not overcrowd the pan when searing work in two batches for the best crust. Pat steak completely dry before seasoning. Remove pan from heat before adding butter to keep the sauce silky. Store leftovers in an airtight container in the refrigerator for up to 3 days. Reheat gently in a skillet with a splash of broth. Freezing is not recommended.

Cheesy One Pot Beef and Potatoes | Hearty Weeknight Meal

Get ready for a cozy, flavorful dinner with this Cheesy One Pot Beef and Potatoes! This high-protein, one-pan meal is perfect for busy weeknights, combining tender beef and creamy cheese with hearty potatoes. Cleanup is a breeze, leaving you more time to enjoy this delicious family-friendly feast. Perfect for busy nights or lunchboxes! 🍽️✨

Print

clock clock iconcutlery cutlery iconflag flag iconfolder folder iconinstagram instagram iconpinterest pinterest iconfacebook facebook iconprint print iconsquares squares iconheart heart iconheart solid heart solid icon

Cheesy One Pot Beef and Potatoes


  • Author: Chef Emy

Description

A hearty, comforting one-pan dinner with seasoned ground beef, tender baby potatoes, and a rich creamy cheddar sauce. High in protein and perfect for busy weeknights.


Ingredients

Scale
  • 1 lb ground beef 90/10 recommended
  • 1 lb baby potatoes halved or quartered into uniform pieces
  • 1 large onion diced
  • 2 cloves garlic minced fresh
  • 2 cup beef broth low-sodium preferred
  • 1 cup heavy cream
  • 1 cup sharp cheddar cheese freshly shredded from block
  • 1 tbsp olive oil
  • 1 tsp dried thyme
  • 1 tsp smoked paprika
  • salt and freshly ground black pepper to taste
  • 2 tbsp fresh parsley chopped, for garnish

Instructions

  1. Heat the olive oil in a large pot or Dutch oven over medium-high heat. Add the ground beef and cook until fully browned, breaking it apart as it cooks, about 5 to 7 minutes. Drain excess fat and transfer the beef to a plate. Set aside.
  2. In the same pot, add the diced onion and cook over medium heat for about 5 minutes until softened and translucent. Add the minced garlic and stir constantly for 1 minute until fragrant.
  3. Add the halved baby potatoes, dried thyme, smoked paprika, salt, and pepper. Stir to coat evenly and let the spices toast for about 30 seconds.
  4. Pour in the beef broth and bring to a simmer. Reduce heat to medium-low, cover the pot tightly, and cook for 15 to 20 minutes until the potatoes are completely fork-tender. Test at the 15-minute mark.
  5. Reduce heat to low. Stir in the heavy cream, then add the shredded cheddar in two additions, stirring between each until the sauce is glossy and smooth, about 2 minutes. If the sauce looks grainy, reduce heat immediately.
  6. Return the cooked ground beef to the pot. Stir to combine and cook on low for 2 to 3 minutes until heated through.
  7. Remove from heat, garnish with fresh chopped parsley, and serve immediately.

Notes

Shred your own cheddar from a block for the best melt. Pre-shredded cheese contains anti-caking agents that can make the sauce grainy. Leftovers reheat best on the stovetop with a splash of broth. Tastes even better the next day.

High Protein Chicken Pot Pie | Comfort Food Classic

Cozy up with a slice of this high protein chicken pot pie! It’s a delicious twist on a comforting classic, packed with tender chicken and veggies, making it perfect for family dinners or meal prep. Enjoy a nutritious meal that’s as satisfying as it is tasty. Give it a try for your next cozy night in! 🥧✨

Print

clock clock iconcutlery cutlery iconflag flag iconfolder folder iconinstagram instagram iconpinterest pinterest iconfacebook facebook iconprint print iconsquares squares iconheart heart iconheart solid heart solid icon

Irresistible High Protein Chicken Pot Pie


  • Author: Chef Emy

Description

A comforting high protein chicken pot pie with tender chicken, creamy Greek yogurt filling, and a flaky whole wheat crust. Perfect for family dinners and meal prep.


Ingredients

Scale
  • 1 lb boneless skinless chicken breast cubed into 3/4-inch pieces
  • 1 tbsp olive oil
  • 1 cup frozen mixed vegetables carrots, peas, corn
  • 0.5 cup onion diced
  • 0.5 cup celery diced
  • 0.5 cup plain Greek yogurt full-fat recommended for richer sauce
  • 0.25 cup low-fat milk
  • 2 tbsp whole wheat flour
  • 1 cup low-sodium chicken broth
  • 1 tsp garlic powder
  • 1 tsp dried thyme
  • salt and pepper to taste
  • 1 cup whole wheat flour for crust
  • 0.5 cup all-purpose flour for crust
  • 0.5 cup plain Greek yogurt for crust
  • 3 tbsp cold butter cut into small pieces, keep refrigerated until ready to use
  • 0.25 cup cold water add gradually, you may not need all of it
  • 0.5 tsp salt for crust

Instructions

  1. Preheat your oven to 375 degrees F (190 degrees C).
  2. Heat olive oil in a large skillet over medium heat. Add cubed chicken in a single layer and cook for 6 to 8 minutes, turning halfway, until golden brown and cooked through to an internal temperature of 165 degrees F. Remove from skillet and set aside.
  3. In the same skillet over medium heat, add diced onion and celery. Saute for 3 to 4 minutes until softened and the onion turns slightly translucent.
  4. Sprinkle whole wheat flour over the vegetables and stir constantly for about 1 minute to cook out the raw flour taste.
  5. Gradually pour in the chicken broth while whisking continuously until smooth. Add Greek yogurt, milk, garlic powder, dried thyme, salt, and pepper. Simmer for 3 to 5 minutes, stirring frequently, until the sauce thickens and coats the back of a spoon. Stir in cooked chicken and frozen vegetables. Remove from heat.
  6. For the crust, combine both flours and salt in a mixing bowl. Add cold butter and use a fork or pastry cutter to work it in until the mixture resembles coarse, pea-sized crumbs. If your kitchen is warm, refrigerate the bowl for 5 minutes before continuing.
  7. Stir in Greek yogurt and add cold water one tablespoon at a time, mixing just until the dough comes together. Do not overmix. Shape into a disk.
  8. Roll out dough on a lightly floured surface to approximately 11 inches in diameter.
  9. Pour the chicken filling into the pie dish. Lay the crust over the top, trim any overhang to half an inch, and crimp the edges to seal. Cut 4 to 5 slits in the center for steam to escape. Optional: brush top crust with a lightly beaten egg for a golden finish.
  10. Bake for 25 to 30 minutes until the crust is deeply golden brown and the filling is bubbling through the slits. Let cool for 10 minutes before slicing.

Notes

For extra protein, stir a scoop of unflavored protein powder into the filling before adding to the pie dish. Freeze unbaked for best results, baking straight from frozen at 375 degrees F and adding 15 to 20 extra minutes to the bake time.

Chicken Bell Pepper Ranch Burritos | 30g Protein Meal Prep

Get ready to enjoy a delicious twist on dinner with these Chicken Bell Pepper Ranch Burritos! Packed with juicy chicken, colorful bell peppers, and creamy ranch, they’re quick to whip up and perfect for busy nights or meal prep. Customize them to your liking and savor the flavors wrapped in a warm tortilla. Perfect for family dinners or lunchboxes! 🌯✨

Print

clock clock iconcutlery cutlery iconflag flag iconfolder folder iconinstagram instagram iconpinterest pinterest iconfacebook facebook iconprint print iconsquares squares iconheart heart iconheart solid heart solid icon

Chicken Bell Pepper Ranch Burritos


  • Author: Chef Emy

Description

Tender seasoned chicken strips, colorful bell peppers, creamy ranch dressing, and melted cheddar cheese wrapped in a soft flour tortilla. A hearty, flavorful high-protein meal ready in about 30 minutes.


Ingredients

Scale
  • 2 tbsp olive oil
  • 1 lb boneless skinless chicken breast thinly sliced
  • 1 tsp garlic powder
  • 1 tsp onion powder
  • 1 tsp smoked paprika
  • 0.5 tsp chili powder
  • salt and pepper to taste
  • 1 red bell pepper thinly sliced
  • 1 green bell pepper thinly sliced
  • 0.5 cup ranch dressing
  • 1 cup shredded cheddar cheese
  • 1 cup cooked rice
  • 4 large flour tortillas
  • 0.25 cup fresh cilantro chopped, optional

Instructions

  1. Heat olive oil in a large skillet over medium-high heat until shimmering.
  2. Add sliced chicken and season with garlic powder, onion powder, smoked paprika, chili powder, salt, and pepper.
  3. Cook chicken for 5 to 7 minutes, stirring occasionally, until golden brown and cooked through. Internal temperature should reach 165 degrees F.
  4. Add sliced red and green bell peppers to the skillet. Saute for 3 to 4 minutes until just tender but still slightly crisp.
  5. Warm tortillas in a dry skillet for 30 seconds per side or microwave wrapped in a damp paper towel for 20 seconds.
  6. Lay each tortilla flat and layer with rice, chicken and bell pepper mixture, ranch dressing, and shredded cheddar cheese.
  7. Fold in the sides and roll each burrito tightly from the bottom.
  8. Optional: toast burritos seam-side down in the skillet over medium heat for 1 to 2 minutes per side until golden and crispy.
  9. Garnish with chopped fresh cilantro if using. Serve immediately.

Notes

Swap whole wheat tortillas and light ranch for a lighter version. Use pepper jack or mozzarella for a different flavor profile. Substitute black beans or mushrooms for a vegetarian option. Freeze individually wrapped burritos for up to 2 months. Store ranch and rice separately when meal prepping to prevent sogginess.

Teriyaki Chicken Wraps | 30g Protein in 20 Minutes

Get ready for a flavor-packed meal with these Teriyaki Chicken Wraps! Whip them up in just 20 minutes for a high-protein, satisfying lunch or dinner. Customize with your favorite veggies for a deliciously healthy twist. Perfect for busy nights or lunchboxes! 🌯✨

Print

clock clock iconcutlery cutlery iconflag flag iconfolder folder iconinstagram instagram iconpinterest pinterest iconfacebook facebook iconprint print iconsquares squares iconheart heart iconheart solid heart solid icon

Teriyaki Chicken Wrap


  • Author: Chef Emy

Description

Tender chicken strips glazed in a quick homemade teriyaki sauce, wrapped in a soft whole wheat tortilla with fresh vegetables. A high-protein, family-friendly meal perfect for lunch, dinner, or meal prep.


Ingredients

Scale
  • 0.25 cup soy sauce or tamari for gluten-free; low-sodium recommended
  • 0.25 cup honey
  • 2 tbsp rice vinegar
  • 1 tbsp toasted sesame oil
  • 2 garlic cloves minced
  • 1 tsp fresh ginger grated; can use frozen ginger
  • 1 tbsp cornstarch
  • 2 tbsp water
  • 1 lb boneless skinless chicken breasts cut into thin strips, patted dry
  • 2 tbsp olive oil
  • 4 large whole wheat tortillas
  • 1 cup shredded carrots
  • 1 cup cucumber julienned
  • 0.5 cup red bell pepper thinly sliced
  • 0.25 cup green onions sliced
  • 2 tbsp sesame seeds
  • 0.25 cup fresh cilantro optional, for garnish

Instructions

  1. In a small bowl, whisk together soy sauce, honey, rice vinegar, sesame oil, minced garlic, grated ginger, cornstarch, and water until fully smooth and lump-free. Set the teriyaki sauce aside near the stove.
  2. Pat chicken strips dry with paper towels. Heat olive oil in a large skillet over medium-high heat. Add chicken strips in a single layer without crowding the pan cook in two batches if needed. Cook for 5-7 minutes, turning occasionally, until golden and cooked through to an internal temperature of 165°F.
  3. Pour the teriyaki sauce over the cooked chicken. Stir and cook for 2-3 minutes until the sauce thickens, turns glossy, and coats every piece. Stir continuously as the sauce thickens quickly. Remove from heat.
  4. Warm the tortillas in a dry skillet over medium heat for 30 seconds per side, or microwave for 20-30 seconds until soft and pliable. Do not skip this step cold tortillas will crack when rolling.
  5. Lay each warmed tortilla flat. Place a quarter of the teriyaki chicken in the center, leaving about 2 inches of space on each side. Top with shredded carrots, cucumber, red bell pepper, and green onions. Sprinkle with sesame seeds and cilantro if using.
  6. Fold the left and right sides of the tortilla inward over the filling. Starting from the bottom edge, roll tightly upward, keeping the sides tucked in as you go. Cut diagonally in half and serve immediately.

Notes

For meal prep, store chicken, vegetables, and tortillas separately and assemble just before eating. Homemade teriyaki sauce keeps in the refrigerator for 7-10 days. For a spicier version, add red pepper flakes or sriracha to the sauce. For a vegetarian version, substitute chicken with firm tofu or tempeh. Assembled wraps stored whole and uncut keep in the refrigerator for up to 1 day.

Cottage Cheese Bread | High Protein & Low Carb Delight

Looking for a quick and versatile bread option? This cottage cheese bread is not only high in protein but also low in carbs — perfect for wraps or as a pizza base! With just two simple ingredients, you can whip up a delicious, fluffy treat that’s ready in no time. Perfect for busy nights or lunchboxes!

Print

clock clock iconcutlery cutlery iconflag flag iconfolder folder iconinstagram instagram iconpinterest pinterest iconfacebook facebook iconprint print iconsquares squares iconheart heart iconheart solid heart solid icon

Easy 2-Ingredient Cottage Cheese Bread


  • Author: Chef Emy

Description

A flourless, high-protein, low-carb bread made with just cottage cheese and eggs. Soft, tender, and incredibly versatile for wraps, pizza bases, or snacks.


Ingredients

Scale
  • 2 large whole eggs
  • 1 cup cottage cheese full-fat, reduced-fat, or fat-free; low-sodium preferred
  • 0.75 tsp garlic powder optional
  • 1 tsp Italian seasoning optional
  • 1 pinch dried oregano optional, for topping

Instructions

  1. Preheat your oven to 350°F (175°C).
  2. Add the cottage cheese and eggs to a blender or food processor. If using, add garlic powder and Italian seasoning. Blend until completely smooth with no lumps remaining, about 30 to 60 seconds.
  3. Line a baking sheet with parchment paper and coat it lightly with cooking spray.
  4. Pour the blended mixture onto the prepared baking sheet and use the back of a spoon or spatula to spread it evenly into your desired shape. For a thicker loaf-style result, pour the batter into a small parchment-lined loaf pan instead.
  5. Sprinkle oregano or additional seasoning on top if desired. Bake for 30 to 35 minutes for thin flatbread, or up to 50 minutes for a thicker loaf, until golden brown and edges look fully set.
  6. Remove from the oven and transfer to a wire rack. Let cool completely before peeling off parchment or cutting.

Notes

For crispier bread, extend baking time by 5 to 10 minutes. Always use parchment paper coated with cooking spray to prevent sticking. To freeze, place parchment between individual portions and store in an airtight bag for up to one month. Reheat in a toaster oven at 350°F for best texture.

High Protein Creamy Chicken Noodle Casserole | Meal Prep Ready

Cozy up with this creamy chicken noodle casserole that’s loaded with flavor and protein! With shredded chicken and a rich, cheesy sauce, it’s perfect for meal prep or family dinners. Make it ahead, enjoy the leftovers, and savor the comfort! Perfect for busy nights! 🍽️

Print

clock clock iconcutlery cutlery iconflag flag iconfolder folder iconinstagram instagram iconpinterest pinterest iconfacebook facebook iconprint print iconsquares squares iconheart heart iconheart solid heart solid icon

High Protein Creamy Chicken Noodle Casserole


  • Author: Chef Emy

Description

A hearty, creamy chicken noodle casserole made with shredded chicken breast, Greek yogurt, high protein milk, and reduced fat cheddar. Comfort food that delivers 38 grams of protein per serving and is perfect for family dinners and meal prep.


Ingredients

Scale
  • 3 cups shredded chicken breast cooked and hand-pulled, rotisserie works great
  • 8 oz wide egg noodles cooked just shy of al dente, pulled 1-2 minutes early
  • 2 cans cream of chicken soup 10.5 oz each
  • 3/4 cup plain full-fat Greek yogurt 4% milk fat, do not substitute non-fat
  • 1/2 cup high protein milk Fairlife recommended
  • 1.5 cups reduced fat shredded cheddar cheese divided 1 cup mixed in, 1/2 cup for topping
  • 1 cup frozen peas
  • 1 cup frozen diced carrots thawed before adding
  • 1/2 tsp garlic powder
  • 1/2 tsp onion powder
  • salt and black pepper to taste
  • 1 cup French fried onions topping only, added right before serving to preserve crispiness

Instructions

  1. Preheat your oven to 375°F and lightly grease a 9×13 inch baking dish with cooking spray. Set aside.
  2. In a large mixing bowl, whisk together the cream of chicken soup, Greek yogurt, high protein milk, garlic powder, onion powder, salt, and pepper until smooth. Whisking helps eliminate lumps and creates an even sauce.
  3. Add the shredded chicken breast, cooked egg noodles, peas, thawed carrots, and 1 cup of the shredded cheddar to the bowl. Fold gently with a spatula until everything is coated in the sauce. Do not overmix.
  4. Pour the mixture into your prepared baking dish and spread into an even layer. Sprinkle the remaining 1/2 cup of shredded cheddar across the top.
  5. Cover tightly with aluminum foil and bake for 20 minutes. Remove the foil and bake for another 10 minutes until the cheese is fully melted, edges are bubbling, and the top has a light golden color.
  6. Remove from the oven and let the casserole rest for 5 minutes. Scatter the French fried onions over the top right before serving so they stay crispy.

Notes

Thaw carrots before mixing to avoid a watery sauce. For extra protein, swap egg noodles for Barilla Protein+ pasta or chickpea noodles. Hold off on the fried onion topping when freezing add after reheating to keep them crispy. Add a splash of milk before reheating to restore creaminess. Casserole stores in the refrigerator for up to 4-5 days and in the freezer for up to 3 months.

Smothered Chicken and Rice | Hearty One-Pan Meal

Cozy up with this smothered chicken and rice dish that’s all about comfort and flavor! This hearty one-pan meal brings together tender chicken and a creamy sauce, making it perfect for family dinners or meal prep. Plus, it packs a protein punch! Dive in and enjoy a plate of warmth and satisfaction. Perfect for busy nights or lunchboxes! 🍽️

Print

clock clock iconcutlery cutlery iconflag flag iconfolder folder iconinstagram instagram iconpinterest pinterest iconfacebook facebook iconprint print iconsquares squares iconheart heart iconheart solid heart solid icon

Smothered Chicken and Rice


  • Author: Chef Emy

Description

Tender chicken breasts cooked in a rich, creamy gravy and served over fluffy rice. A comforting, hearty one-pan meal perfect for family dinners.


Ingredients

Scale
  • 4 boneless skinless chicken breasts pounded to even thickness
  • 2 tbsp olive oil
  • 1 large onion diced
  • 2 cloves garlic minced
  • 2 cups low-sodium chicken broth
  • 1 cup heavy cream
  • 2 tbsp all-purpose flour
  • 1 tsp paprika
  • 0.5 tsp dried thyme
  • salt and pepper to taste
  • 2 cups cooked white rice prepared separately, day-old preferred
  • 2 tbsp fresh parsley chopped, for garnish

Instructions

  1. Season chicken breasts on both sides with salt, pepper, paprika, and thyme. Let rest 5 minutes to absorb seasoning.
  2. Heat olive oil in a large skillet over medium-high heat. Add chicken and cook 5 to 7 minutes per side until deep golden brown. Remove and set aside.
  3. In the same skillet, add diced onion and cook 3 to 4 minutes until softened. Add garlic and stir 1 minute until fragrant.
  4. Sprinkle flour over the onions and garlic. Stir constantly for 1 minute to form a roux and cook out the raw flour taste.
  5. Gradually whisk in chicken broth, scraping up any browned bits from the bottom. Bring to a simmer and cook 3 to 4 minutes until slightly thickened.
  6. Stir in heavy cream and return chicken to the skillet. Reduce heat to medium-low and simmer 15 to 20 minutes until chicken reaches an internal temperature of 165 degrees F and sauce has thickened. Add a splash of broth if sauce becomes too thick.
  7. Serve chicken and gravy over cooked rice. Garnish with fresh parsley and serve immediately.

Notes

For extra flavor, add a splash of white wine after cooking the onions. If sauce becomes too thick, thin with additional chicken broth. For a spicier version, add a pinch of cayenne to the seasoning mix. Rice should be cooked separately before starting the chicken.

Ranch Chicken Veggies | Slow Cooker Comfort Meal

Looking for a cozy dinner that practically cooks itself? This Ranch Chicken and Veggies dish features juicy chicken thighs simmered with tender potatoes and carrots, all enveloped in a rich, creamy ranch sauce made from cottage cheese. It’s a high-protein, family-friendly meal perfect for busy weeknights or make-ahead prep. Dive into this comfort food that’s sure to warm your heart! 🍽️

Print

clock clock iconcutlery cutlery iconflag flag iconfolder folder iconinstagram instagram iconpinterest pinterest iconfacebook facebook iconprint print iconsquares squares iconheart heart iconheart solid heart solid icon

Ranch Chicken & Veggies with Cottage Cheese


  • Author: Chef Emy

Description

Juicy slow cooker chicken thighs, baby potatoes, and thick-cut carrots simmered in a creamy ranch cottage cheese sauce. A high-protein, family-friendly crockpot dinner with minimal prep.


Ingredients

Scale
  • 1.5 lb boneless skinless chicken thighs
  • 1 lb baby potatoes leave whole if small, halve if large
  • 3 large carrots peeled and sliced into thick coins, about 3/4 inch
  • 0.75 cup full-fat cottage cheese
  • 1 packet ranch seasoning mix about 1 oz
  • 0.5 tsp garlic powder
  • 0.5 tsp onion powder
  • 0.25 cup low-sodium chicken broth
  • salt and black pepper to taste
  • fresh parsley for garnish

Instructions

  1. Add the chicken thighs, baby potatoes, and sliced carrots to the bottom of your slow cooker. Season lightly with salt and black pepper.
  2. In a small blender or food processor, combine the cottage cheese, ranch seasoning packet, garlic powder, onion powder, and chicken broth. Blend until completely smooth, about 30 to 45 seconds.
  3. Pour the blended cottage cheese mixture over the chicken and vegetables. Use a spoon to gently toss everything so it is lightly coated.
  4. Place the lid on and cook on LOW for 6 to 7 hours, or on HIGH for 3 to 4 hours. Chicken is done when it reaches 165°F internally and shreds easily with two forks.
  5. Shred the chicken directly in the crockpot using two forks, then stir everything together so the sauce coats the potatoes and carrots. Taste and adjust seasoning. Garnish with chopped fresh parsley and cracked black pepper before serving.

Notes

Always blend the cottage cheese completely smooth before adding it to the crockpot to achieve a creamy sauce. Cut carrots thick to prevent them from turning mushy. Add a splash of broth when reheating leftovers. Stores in the refrigerator up to 4 days or freezer up to 3 months.