End your day with a delicious, comforting, and satisfying dinner! Whether you’re looking for quick and easy weeknight meals, cozy comfort food, or elegant dishes for special occasions, we have the perfect recipes for you.
From hearty casseroles and one-pan wonders to savory pastas, juicy meats, and flavorful vegetarian options, our collection is designed to make dinnertime effortless and enjoyable.
Busy schedule? No problem! Try our slow cooker meals, sheet pan dinners, and 30-minute recipes to save time without sacrificing flavor. Whatever your craving, these recipes will bring warmth and joy to your table every night. 🍽️✨
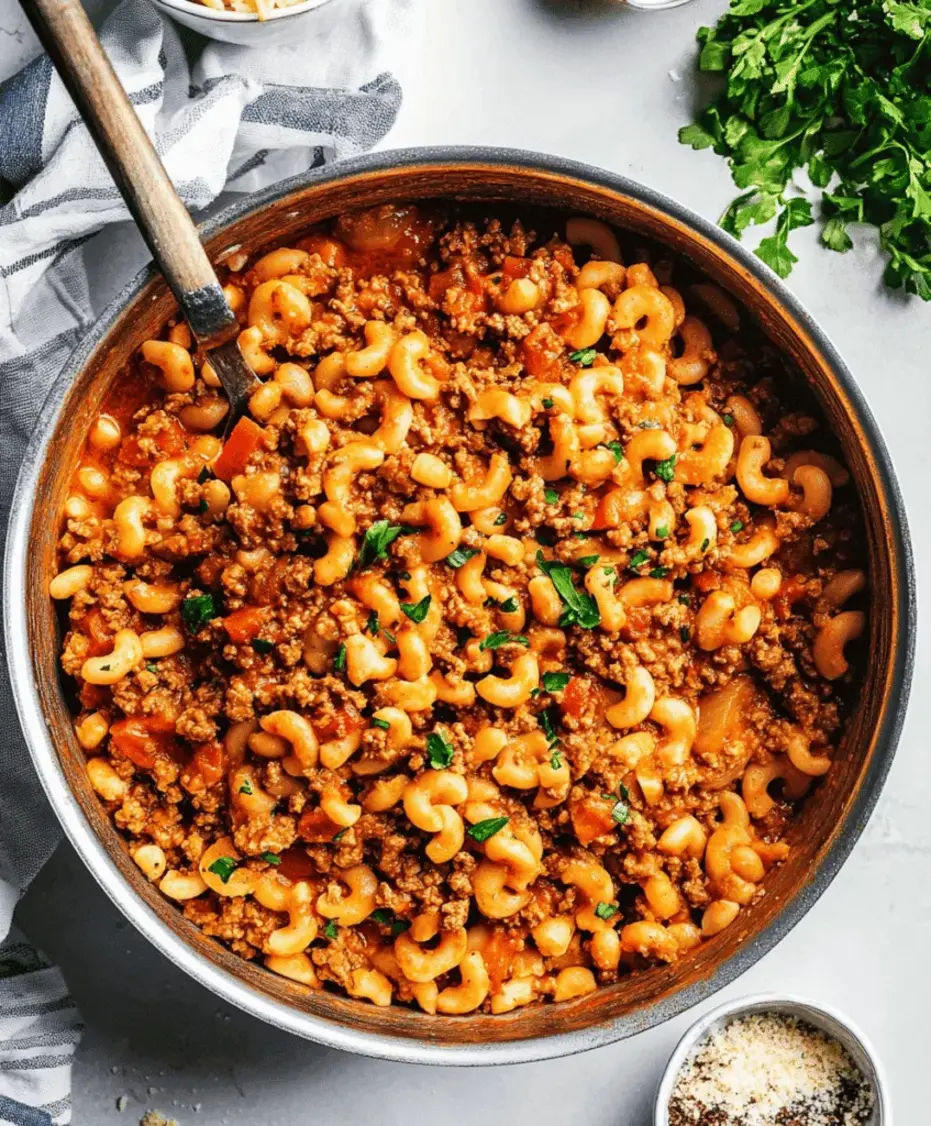
Are you looking for a hearty, satisfying meal that screams comfort and nostalgia? Did you know that a classic goulash recipe can reduce weeknight dinner stress by over 30% when made in one pot? This old-fashioned goulash recipe is precisely that – a deeply flavorful, one-pot wonder that brings together tender ground beef, robust tomatoes, and comforting macaroni, all simmered in a rich, savory sauce. It’s the kind of meal that warms you from the inside out, perfect for those chilly evenings or when you crave a taste of home. Forget complicated fuss; this goulash is designed for ease without sacrificing an ounce of deliciousness. It’s a budget-friendly favorite that the whole family will ask for again and again, proving that the best meals are often the simplest. Get ready to create a new family favorite!
Ingredients for Old Fashioned Goulash
The beauty of this old-fashioned goulash lies in its straightforward yet impactful ingredient list. We’re focusing on pantry staples and readily available items to make this a stress-free cooking experience. Each component plays a vital role in building those comforting, savory layers of flavor.
Main Ingredients
1 pound lean ground beef: The hearty foundation of our goulash. Look for 85% or 90% lean for a good balance of flavor and fat.
1 large onion, chopped: Adds a sweet, aromatic base. Yellow or white onions work best.
2 cloves garlic, minced: For that essential pungent depth. Freshly minced is always superior.
1 (15 ounce) can diced tomatoes, undrained: These provide acidity, sweetness, and a lovely texture. Fire-roasted diced tomatoes can add an extra smoky layer.
1 (8 ounce) can tomato sauce: For a smoother tomato base and richer color.
4 cups beef broth: The liquid that brings everything together and infuses flavor. Low-sodium is a good choice to control saltiness.
1 ½ cups elbow macaroni, uncooked: The comforting pasta element that absorbs the delicious sauce.
Seasonings and Aromatics
1 teaspoon salt, or to taste: Essential for bringing out all the flavors.
½ teaspoon black pepper, or to taste: A classic pairing with beef.
1 teaspoon dried oregano: Adds a subtle herby note.
1 teaspoon dried basil: Complements the tomato beautifully with its slightly sweet, anise-like flavor.
½ teaspoon smoked paprika (optional but recommended): This is a key differentiator for many goulash recipes, adding a smoky depth and beautiful red hue. If you have it, use it!
1 tablespoon Worcestershire sauce: Adds a complex umami punch that deepens the savory notes.
Liquid Base
2 tablespoons olive oil or vegetable oil: For sautéing the aromatics and browning the beef.
Optional Additions
Pinch of red pepper flakes: For a subtle kick of heat.
1 bay leaf: Remove before serving for a more subtle herbal complexity.
1 tablespoon tomato paste: For an even richer tomato flavor.
Timing and Preparation
Prep time: 15 minutes
Cook time: 30 minutes
Total time: 45 minutes
This old-fashioned goulash is designed for efficiency. With only 15 minutes of prep and 30 minutes of cooking, it’s significantly faster than many traditional goulash recipes that often involve hours of simmering for tender meat. This quick preparation makes it an ideal candidate for busy weeknights when you need a delicious meal on the table without a lengthy time commitment.
Step-by-Step Instructions
Let’s get cooking! Follow these simple steps to create your delicious, comforting Old Fashioned Goulash.
Step 1: Brown the Beef
Grab a large pot or Dutch oven and place it over medium-high heat. Add your ground beef and cook, breaking it up with a spoon, until it’s nicely browned all over. If there’s excessive grease, you can carefully drain most of it off, leaving just a little for flavor.
Step 2: Sauté Onions and Garlic
Push the browned beef to one side of the pot (or temporarily remove it if your pot is crowded). Add your chopped onion to the cleared space. Sauté the onion for about 5-7 minutes until it starts to soften and become translucent, then stir in the minced garlic and cook for another minute until fragrant. Don’t let the garlic burn!
Step 3: Add Spices and Tomatoes
Now it’s time for the flavor builders! Stir in the salt, pepper, oregano, basil, and smoked paprika (if using). Cook for about 30 seconds, stirring constantly, until the spices are really fragrant. This toasting process awakens their flavors. Next, pour in the diced tomatoes (with their juices) and the tomato sauce. Add the Worcestershire sauce as well.
Step 4: Simmer the Sauce
Pour in the beef broth and stir everything together, scraping up any browned bits from the bottom of the pot – that’s where a lot of flavor lives! Bring the mixture to a simmer. Once simmering, reduce the heat to low, cover the pot, and let it cook for at least 15 minutes. This allows the flavors to meld and deepen beautifully.
Step 5: Cook the Macaroni
After the sauce has simmered, stir in the uncooked elbow macaroni. Make sure the macaroni is submerged in the liquid. Increase the heat slightly to bring it back to a gentle simmer. Cover the pot again and cook for about 10-12 minutes, or until the macaroni is tender and has absorbed most of the liquid. Stir occasionally to prevent the pasta from sticking to the bottom.
Step 6: Combine and Serve
Once the macaroni is cooked to your liking and the sauce has thickened, give everything one final stir. Taste and adjust seasonings if needed (more salt, pepper, or a pinch of extra paprika!). Remove any bay leaf if you added one. Ladle the hot goulash into bowls and serve immediately. Enjoy your delicious, homemade Old Fashioned Goulash!
Nutritional Information
While exact nutritional values can vary based on specific ingredients and portion sizes, here’s an estimated breakdown per serving (assuming 6 servings):
Calories: Approximately 350-400 kcal
Protein: Approximately 25-30g
Fat: Approximately 15-20g
Carbohydrates: Approximately 30-35g
Fiber: Approximately 3-5g
Please note: This is an approximation. For precise nutritional data, it’s recommended to use a nutritional calculator with your specific ingredients.
Healthier Alternatives
Looking to lighten up this classic comfort food without sacrificing flavor? Here are a few simple swaps:
Leaner Protein: Swap ground beef for lean ground turkey or chicken. You could even use lentils for a vegetarian version.
Whole Wheat Pasta: Use whole wheat elbow macaroni for added fiber and nutrients.
More Veggies: Bulk up the goulash with extra vegetables like chopped carrots, celery, bell peppers, or a handful of spinach stirred in at the end. They add nutrients and fiber.
Reduce Sodium: Opt for low-sodium broth and canned tomatoes, and adjust salt to your taste.
Serving Suggestions
This Old Fashioned Goulash is a complete meal in itself, but here are some ways to enhance your dining experience:
Fresh Herbs: A sprinkle of fresh parsley or chives on top adds a pop of color and freshness.
Dairy Delight: A dollop of sour cream or a sprinkle of shredded cheddar cheese makes it even more indulgent.
Crusty Bread: Perfect for soaking up any leftover sauce.
Side Salad: A simple green salad with a light vinaigrette provides a refreshing contrast.
Common Mistakes to Avoid
To ensure your goulash turns out perfectly every time, keep these common pitfalls in mind:
Not Browning Beef Properly: Skipping the browning step or overcrowding the pan leads to steamed, gray meat instead of beautifully caramelized flavor.
Burning Garlic: Adding garlic too early or cooking it too long can result in a bitter taste. Add it towards the end of sautéing.
Undercooked Pasta: Make sure the macaroni is fully submerged in the liquid and cooked until tender. Stirring prevents sticking.
Over-Salting: Taste and adjust seasoning at the end, especially if using regular broth.
Storing Tips
This goulash is a fantastic make-ahead meal. Store any leftovers in an airtight container in the refrigerator for up to 3-4 days. It often tastes even better the next day as the flavors meld further! Reheat gently on the stovetop or in the microwave, adding a splash of broth or water if it seems too thick.
Frequently Asked Questions
***Can I make this goulash vegetarian?***
Absolutely! You can omit the ground beef and sauté your vegetables in a bit more oil. Consider adding hearty vegetables like mushrooms or extra beans, or using lentils for a more substantial protein source.
***What kind of beef is best for goulash?***
For this recipe, lean ground beef (85-90%) is ideal for flavor and texture. If you were making a more traditional Hungarian goulash that simmers for hours, you might use cubed chuck roast or a tougher cut of beef that benefits from slow cooking.
***How can I make my goulash spicier?***
Add a pinch or two of red pepper flakes along with the other spices, or stir in a dash of your favorite hot sauce just before serving.
***My goulash is too thin, what can I do?***
If your goulash is too thin after the pasta is cooked, simply remove the lid and simmer on low heat for another 5-10 minutes, stirring occasionally, to allow some of the liquid to evaporate and the sauce to thicken. You could also mix a tablespoon of cornstarch with an equal amount of cold water to create a slurry, then stir it into the simmering goulash until thickened.
Conclusion
There you have it – a truly satisfying Old Fashioned Goulash recipe that’s perfect for any occasion. It’s proof that simple ingredients and straightforward techniques can yield incredible, comforting results. This one-pot meal is not only delicious but also incredibly convenient, making it a weeknight superhero.
Give this recipe a try and let us know what you think in the comments below! What are your favorite ways to serve goulash?
This old-fashioned goulash recipe is a classic comfort dish made with ground beef, tomatoes, macaroni, and flavorful seasonings. It’s an easy, one-pot meal perfect for busy weeknights and packed with rich, savory flavors the whole family will love.
Ingredients
Scale
1lb ground beef
1small onion, chopped
2cloves garlic, minced
1can (15 oz) tomato sauce
1can (15 oz) diced tomatoes
1 cupbeef broth
1 cupelbow macaroni
1 tspItalian seasoning
½ tspsalt
½ tspblack pepper
½ tsppaprika
½ cupshredded cheddar cheese (optional)
Instructions
Notes
Use ground turkey instead of beef for a leaner option.
Add bell peppers or mushrooms for extra flavor.
Store leftovers in an airtight container for up to 3 days.
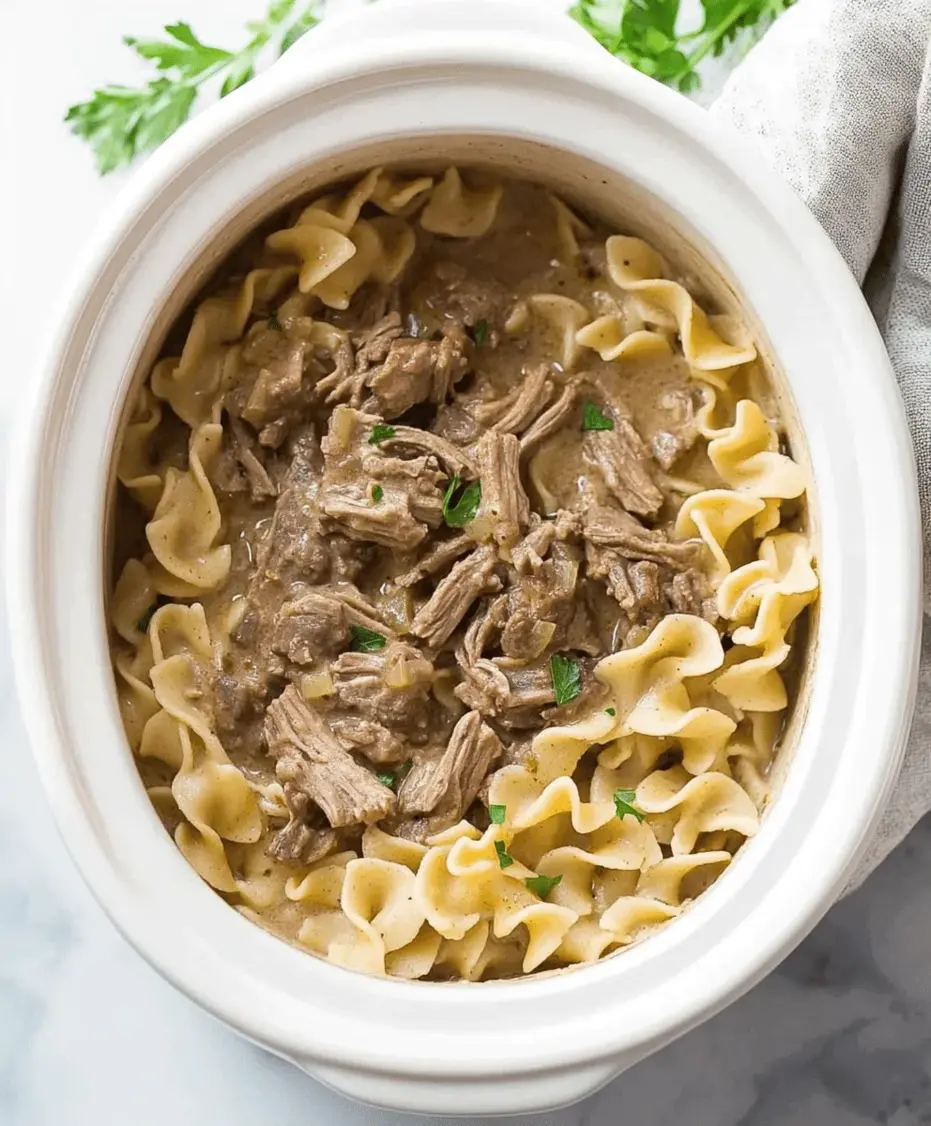
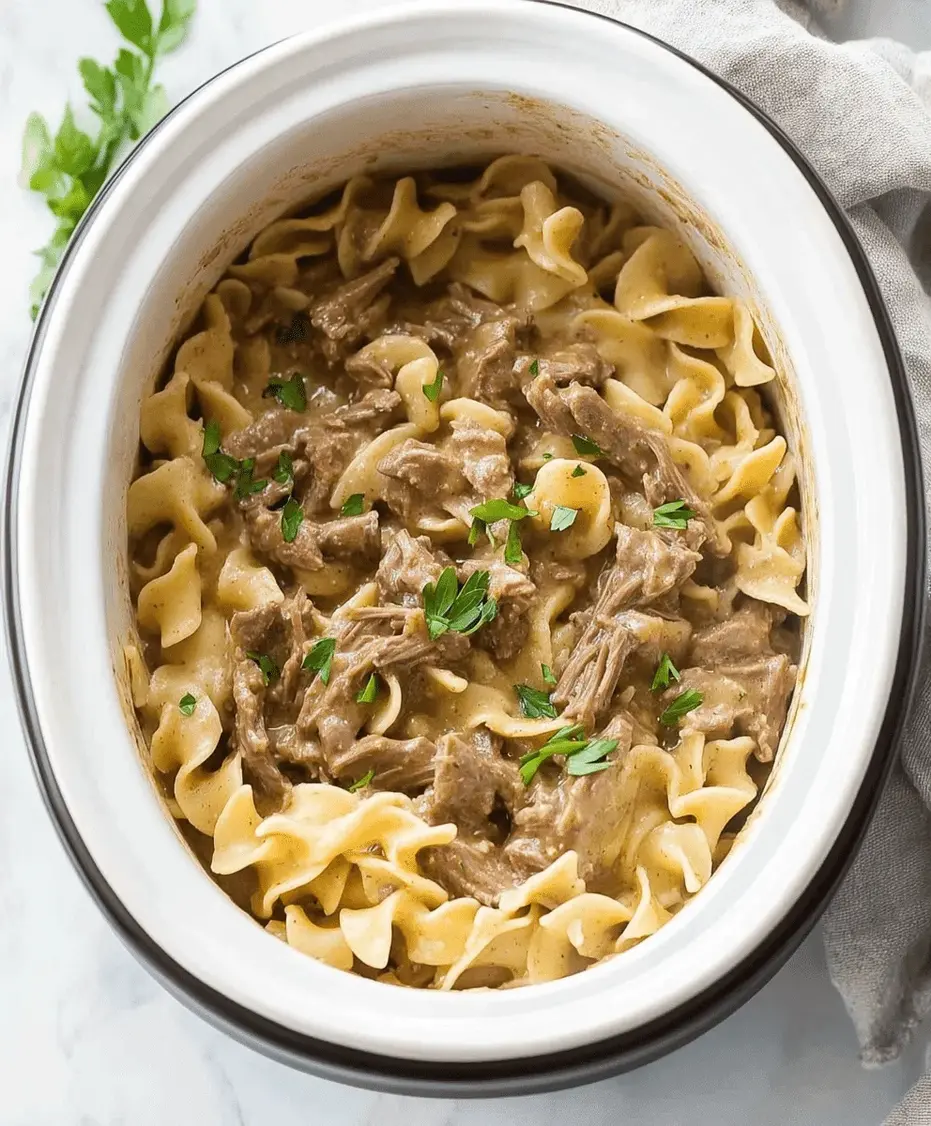
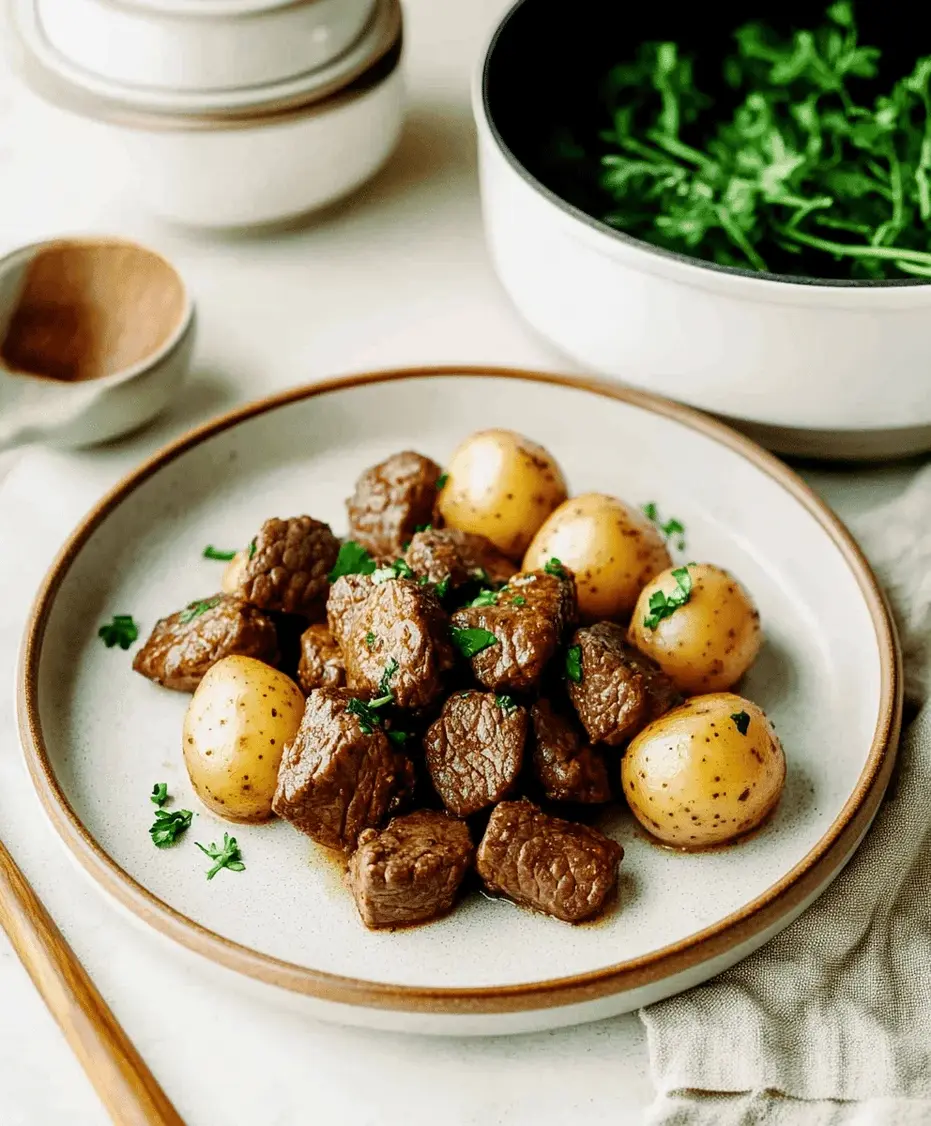
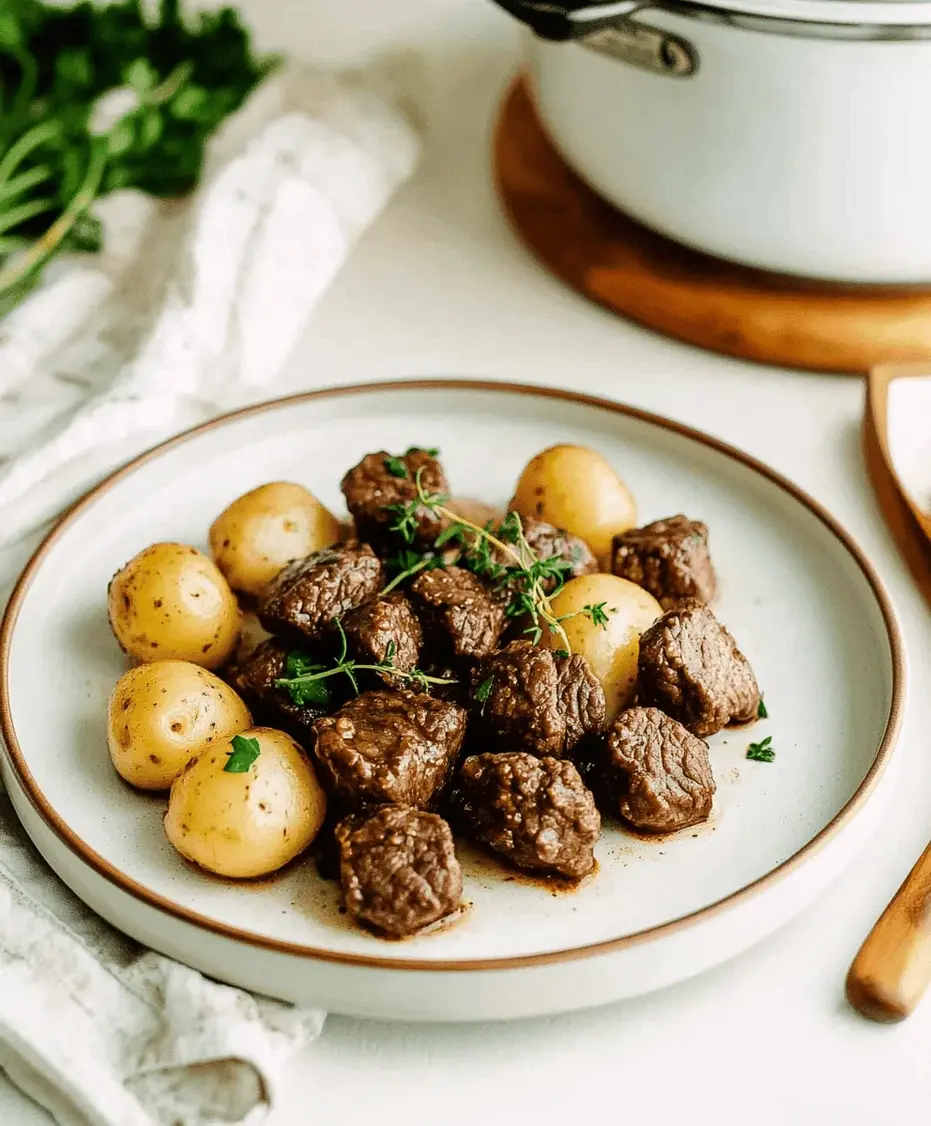
Did you know that comfort food can actually reduce stress? Studies suggest that indulging in familiar, flavorful dishes can evoke feelings of warmth and security, making them a powerful tool for combating daily pressures. If you’re searching for that perfect bowl of pure, unadulterated comfort, you’ve landed in the right spot! This Crockpot Beef and Noodles recipe is your ticket to an incredibly easy, yet profoundly satisfying meal. Imagine tender, slow-cooked beef swimming in a rich, savory broth, all tossed with perfectly cooked egg noodles. It’s the kind of dish that warms you from the inside out, making it an ideal candidate for busy weeknights or those cherished lazy weekend afternoons. Forget complicated steps and endless prep; this slow cooker wonder promises maximum flavor with minimal effort. Get ready to discover your new go-to comfort food!
Key Ingredients for Ultimate Comfort
The beauty of Crockpot Beef and Noodles lies in its simple, accessible ingredients that come together to create something truly magical. We’re talking about humble staples transformed into a gourmet-level comfort dish. Here’s what you’ll need:
1.5 – 2 lbs Beef Chuck Roast: Look for a roast with good marbling. This fat will melt during the slow cooking process, rendering the beef incredibly tender and succulent.
1 Large Onion, chopped: Adds a foundational sweetness and aromatic depth. Yellow or sweet onions work best.
2-3 cloves Garlic, minced: The flavor powerhouse that elevates the entire dish. Freshly minced garlic offers the most vibrant taste.
4 cups Beef Broth: The liquid base that braises the beef and creates the savory sauce. Low-sodium is a good option to control saltiness.
1/4 cup Soy Sauce (or Tamari for gluten-free): Provides that essential umami depth and a beautiful dark color to the broth.
1 tbsp Worcestershire Sauce: Adds a complex layer of tangy, savory, and slightly sweet notes.
1 tsp Dried Thyme: A classic herb that pairs beautifully with beef.
1 tsp Dried Rosemary (optional): For an extra aromatic boost.
Salt and Black Pepper to taste: Essential for balancing and enhancing all the flavors.
1 lb Egg Noodles: The perfect vehicle for this rich sauce. Wide egg noodles are traditional, but medium or even fine can work.
2 tbsp Cornstarch mixed with 2 tbsp Cold Water (slurry): Thickens the sauce to a luscious consistency.
Ingredient Substitutions & Notes:
Beef: While chuck roast is ideal for slow cooking, you could also use beef brisket or even stew meat.
Onion: Shallots can be used for a subtler, sweeter onion flavor.
Garlic: Garlic powder can be substituted in a pinch (about 1/2 tsp), but fresh is highly recommended for depth of flavor.
Soy Sauce: If you need a gluten-free option, use tamari. Coconut aminos are another excellent alternative for a slightly sweeter, soy-free sauce.
Herbs: Fresh thyme and rosemary can be used. Add about 1 tablespoon of fresh herbs for every teaspoon of dried.
Noodles: If not using egg noodles, any wide pasta will work. For a lighter option, consider zucchini noodles or cauliflower rice added at the end.
Starch Slurry: You can also use a flour-based roux (made with 2 tbsp butter and 2 tbsp flour) to thicken the sauce.
A significant advantage of this Crockpot Beef and Noodles recipe is its low hands-on time. Compared to traditional stovetop methods that might take several hours of active cooking, the slow cooker does all the heavy lifting. Most recipes for beef and noodles can range from 2-4 hours on the stovetop or in the oven, often requiring more attention. This slow cooker version shines by allowing you to set it and forget it, with the bulk of the time being passive cooking for maximum tenderness.
Crafting Your Crockpot Masterpiece: Step-by-Step
1. Sear the Beef (Optional but Recommended)
For an extra layer of rich flavor and color, I highly recommend searing the beef before adding it to the crockpot. Pat your beef chuck roast dry with paper towels. Heat a tablespoon of oil in a large skillet or Dutch oven over medium-high heat. Sear the roast on all sides until deeply browned. This Maillard reaction creates incredibly deep, savory notes. If you’re pressed for time, you can skip this step, but the flavor difference is noticeable!
2. Add Liquids and Seasonings
Place the seared (or un-seared) beef roast into your slow cooker. Add the chopped onion and minced garlic around the beef. Pour in the beef broth, soy sauce, and Worcestershire sauce. Sprinkle in the dried thyme and rosemary (if using), along with a generous pinch of salt and black pepper. Ensure the beef is mostly submerged in the liquid.
3. Slow Cook Until Tender
Cover the crockpot and cook on LOW for 6-8 hours, or on HIGH for 4-5 hours. The goal is fork-tender beef. The exact time will depend on your slow cooker and the size of your roast. You’ll know it’s ready when the beef shreds easily with a fork.
4. Prepare the Noodles
About 30 minutes before the beef is finished cooking, prepare your egg noodles according to package directions. Drain them well and set aside. Cooking them separately ensures they don’t become mushy in the slow cooker. If you’re opting for a gluten-free alternative like zucchini noodles, you can prepare those just before serving.
5. Combine and Finish
Once the beef is tender, carefully remove it from the slow cooker and place it on a cutting board. Using two forks, shred the beef into bite-sized pieces. While the beef is out, whisk together the cornstarch and cold water in a small bowl to create a smooth slurry. Stir this slurry into the liquid remaining in the slow cooker. Turn the slow cooker to HIGH (if it wasn’t already) and let it simmer for about 10-15 minutes, or until the sauce has thickened. Stir in the shredded beef and the cooked egg noodles. Toss gently to coat everything in the rich, savory sauce. Taste and adjust seasonings if needed.
A Glimpse at the Goodness: Nutritional Snapshot
While precise nutritional values can vary based on exact ingredient amounts and brands used, a typical serving of Crockpot Beef and Noodles is rich in protein and provides a good amount of carbohydrates for energy. Here’s an estimated breakdown per serving (assuming 6 servings):
Calories: Approximately 550-650 kcal
Protein: 40-50g
Fat: 25-35g (varies greatly with beef cut and marbling)
Carbohydrates: 30-40g
Fiber: 2-4g
Sodium: Varies based on broth and soy sauce used, typically 800-1200mg
Note: These are estimates. For exact figures, it’s best to use a nutritional calculator with your specific ingredients.
Lighter Touches for a Healthier Bite
This dish is pure comfort, but that doesn’t mean you can’t make it a touch lighter without sacrificing flavor. Try these swaps:
Leaner Beef: Opt for a leaner cut like sirloin tip or round roast, though it may require slightly less cooking time.
Whole Wheat Noodles: Swap traditional egg noodles for whole wheat varieties for added fiber.
Reduced Sodium Broth & Soy Sauce: Use low-sodium versions of both to significantly cut down on sodium intake.
Add More Veggies: Stir in some frozen peas, carrots, or corn during the last hour of cooking for extra nutrients and color. For a very low-carb option, omit the noodles entirely and serve the shredded beef and sauce over cauliflower mash or zucchini noodles.
Thickeners: Instead of a cornstarch slurry, you can achieve a thicker sauce by simply simmering the liquid uncovered for a bit longer after shredding the beef, allowing some of the water to evaporate.
Serving Your Comfort Bowl
Crockpot Beef and Noodles is a complete meal in itself, but here are a few ideas to round out your dinner:
Fresh Green Side Salad: A simple salad with a light vinaigrette balances the richness of the noodles.
Steamed or Roasted Vegetables: Broccoli, green beans, or asparagus are excellent partners.
Crusty Bread: Perfect for sopping up any of that delicious sauce left in the bowl.
Dollop of Sour Cream or Greek Yogurt: Adds a cool, creamy contrast.
Common Mistakes to Avoid
Even simple recipes have a few pitfalls. Here’s how to ensure yours is perfect:
Not Enough Liquid: Ensure there’s adequate liquid in the crockpot to prevent the beef from drying out.
Overcooking Noodles: Cook noodles separately and add them at the very end to prevent them from becoming mushy and absorbing all the sauce.
Skipping the Sear: While optional, skipping the sear means missing out on a significant depth of flavor and texture.
Thickening Issues: Make sure your cornstarch slurry is smooth and well incorporated. If the sauce isn’t thick enough, you can always add a little more slurry.
Impatience: Allow the beef to cook low and slow until it is truly fork-tender. Rushing the process will result in tough meat.
Storing Your Delicious Leftovers
Leftovers are a gift with this recipe! Store any remaining Beef and Noodles in an airtight container in the refrigerator for up to 3-4 days. The flavors often meld and improve overnight, making it even tastier the next day. Reheat gently on the stovetop or in the microwave, adding a splash of beef broth or water if the dish seems a bit dry.
Frequently Asked Questions (FAQs)
What is the best cut of beef for Crockpot Beef and Noodles?
Beef chuck roast is Ideal due to its fat content, which breaks down during slow cooking to create tender, moist meat and a rich sauce. Brisket or even beef shoulder also work well.
Can I make this recipe on the stovetop or in the oven?
Yes! You can adapt this recipe for stovetop simmering or oven braising. Sear the beef, add liquids, and simmer on low heat (about 300°F or 150°C in the oven) for 2-3 hours, or until tender. You’ll likely need to watch the liquid levels more closely.
Why are my noodles mushy?
This usually happens if the noodles are cooked directly in the slow cooker liquid for too long. It’s best to cook them separately according to package directions and add them to the thickened sauce just before serving.
Can I freeze Crockpot Beef and Noodles?
Yes, but it’s best to freeze the shredded beef and sauce mixture separately from the noodles. Noodles can become mushy upon thawing. Reheat the beef and sauce, then cook fresh noodles to add.
How can I make the sauce thicker?
The cornstarch slurry is the quickest method. If you don’t have cornstarch, you can create a roux with butter and flour, or simply let the sauce simmer uncovered for a longer period to reduce and thicken naturally.
Your New Favorite Comfort Food Awaits!
There you have it – a Crockpot Beef and Noodles recipe that’s practically singing your name! It’s the perfect solution for hectic evenings when you want a hearty, homemade meal without the fuss. The slow cooker transforms simple ingredients into a deeply flavorful, tender delight that will have everyone asking for seconds. So, dust off your crockpot, gather your ingredients, and get ready to create a dish that’s destined to become a family favorite. Enjoy the ease, savor the flavor, and embrace the pure comfort!
Did you try this Crockpot Beef and Noodles recipe? Let us know in the comments below – we love hearing from you! Don’t forget to share your photos with us!
This Crockpot Beef and Noodles recipe is a deliciously easy comfort food dish featuring slow-cooked tender beef, egg noodles, and a savory broth. Perfect for weeknight dinners or cozy family meals.
Ingredients
Scale
2lbs beef chuck roast
4 cupsbeef broth
1packet onion soup mix
1 tspgarlic powder
1 tsponion powder
12 ozegg noodles
Salt and pepper to taste
Instructions
Notes
For a creamier version, add ½ cup of heavy cream after cooking the noodles.
Substitute egg noodles with other pasta varieties if desired.
Leftovers can be stored in an airtight container for up to 3 days in the refrigerator.
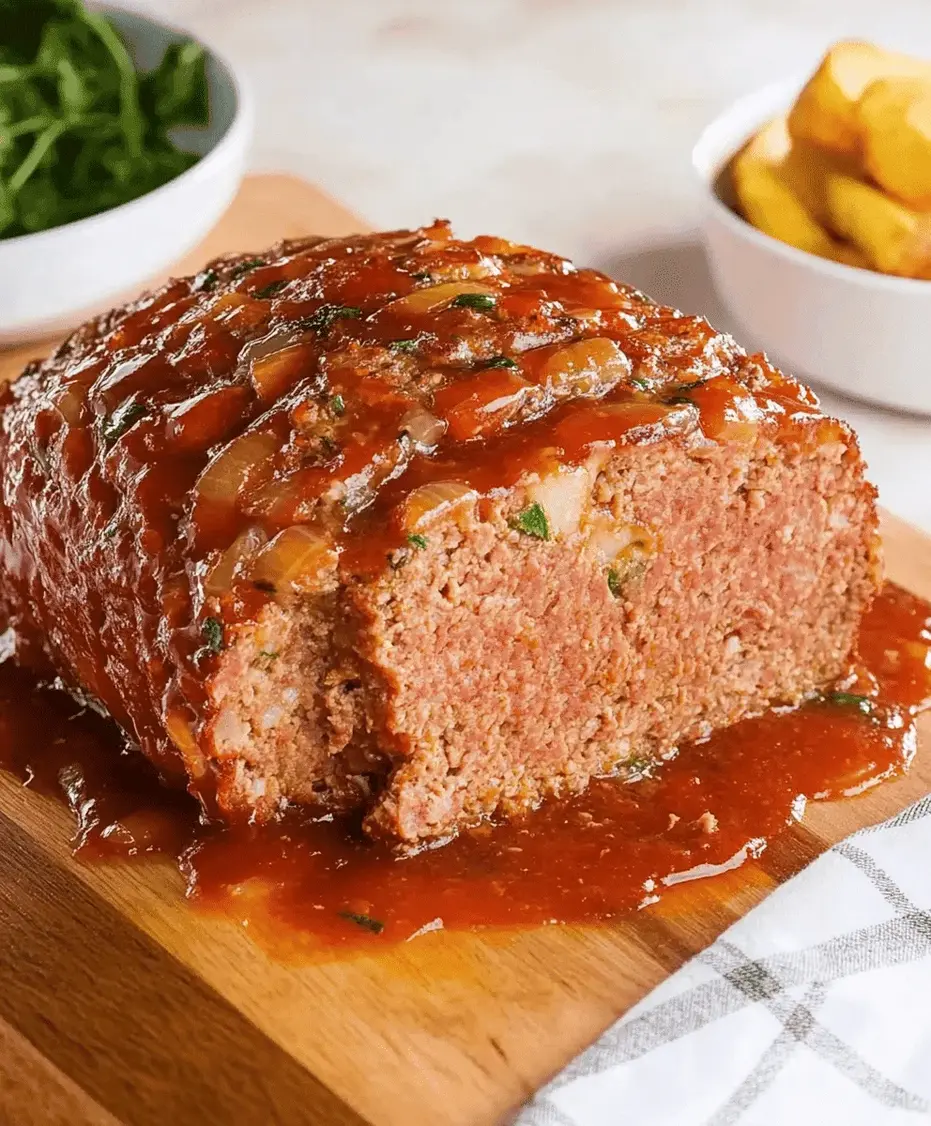
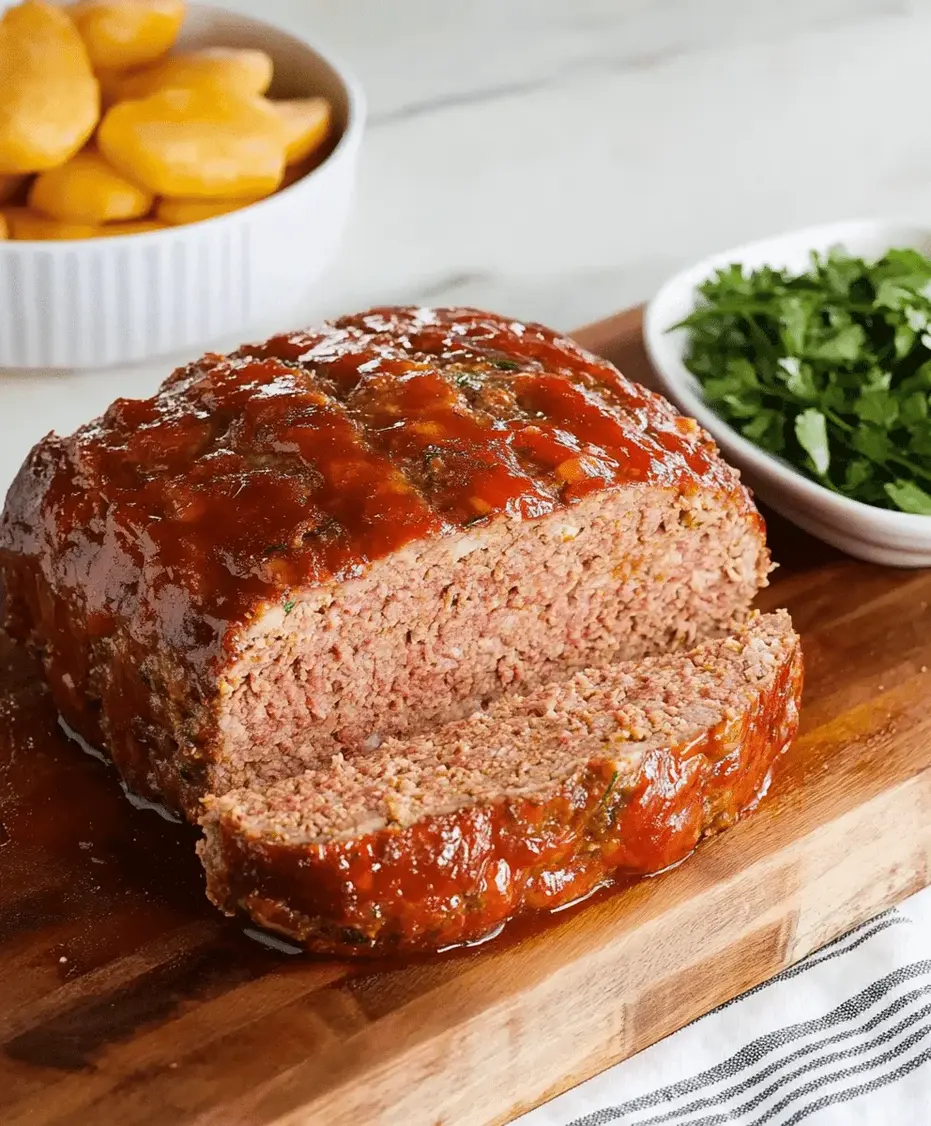
Did you know that comfort food is a significant driver of recipe searches, with meatloaf consistently ranking among the top searched dishes? There’s something undeniably satisfying about a perfectly baked, tender, and flavorful meatloaf. If you’ve ever savored the homestyle goodness of Cracker Barrel’s meatloaf, you know it’s a taste of pure nostalgia. This Easy Copycat Cracker Barrel Meatloaf recipe aims to bring that beloved, hearty flavor right into your kitchen, using simple, accessible ingredients. Get ready to impress your family and friends with a meatloaf so good, they’ll swear it came straight from the restaurant!
The Unbeatable Ingredients
The magic of this meatloaf lies in its straightforward yet impactful ingredient list. We’re focusing on quality and flavor synergy to recreate that signature Cracker Barrel taste. Prepare these components and get ready for a culinary adventure!
Ground Beef: 2 pounds, a blend of 80/20 for optimal moisture and richness. Using leaner beef can result in a drier meatloaf, so don’t shy away from a little fat!
Eggs: 2 large, lightly beaten. These act as a binder, holding all that glorious meat together.
Milk: 1/2 cup, whole milk is preferred for richness. It helps to tenderize the meat while it bakes. (Substitution: 1/2 cup evaporated milk for a richer texture, or unsweetened almond milk for a dairy-free option.)
Breadcrumbs: 1 cup, plain or Italian-style. These absorb the juices and create a wonderfully tender interior. Panko breadcrumbs will yield a slightly crispier texture.
Onion: 1 medium, finely diced. Essential for that savory depth of flavor. The aroma as it sautés is already a good sign! (Substitution: 2 tablespoons of onion powder if you’re in a pinch or dislike fresh onion bits.)
Ketchup: 1/2 cup, for the meatloaf mixture. Adds a touch of sweetness and tang. (Substitution: You can use your favorite BBQ sauce for a smoky twist.)
Worcestershire Sauce: 2 tablespoons. This umami-rich sauce is a secret weapon for depth and complexity.
Salt: 1 teaspoon. To enhance all the other flavors.
Black Pepper: 1/2 teaspoon, freshly ground for best results.
For the Glaze:
1/2 cup Ketchup
1/4 cup Brown Sugar: Adds a delightful sweetness and helps create that irresistible sticky glaze. (Substitution: Honey or maple syrup.)
1 tablespoon Apple Cider Vinegar: Balances the sweetness with a subtle tang. (Substitution: White vinegar or lemon juice.)
Timing is Everything
Prep time: 20 minutes
Cook time: 60-75 minutes
Total time: 80-95 minutes
Compared to many meatloaf recipes that can take up to 90 minutes of prep and overnight marinating (which isn’t typical for meatloaf anyway!), this recipe is wonderfully efficient. You’ll be enjoying a hearty, satisfying meal in under two hours, making it perfect for a weeknight indulgence or a relaxed weekend dinner.
Crafting the Perfect Loaf
Follow these simple steps to achieve meatloaf perfection. We’re aiming for a tender, juicy, and incredibly flavorful result that rivals your favorite diner!
Step 1: Get the Party Started (Prep Time!)
Preheat your oven to 375°F (190°C). Lightly grease a loaf pan or line a baking sheet with parchment paper. If you’re not using a loaf pan, shaping the meatloaf into a free-form loaf on the baking sheet will allow for more even cooking and a crispier exterior. Finely dice your onion – small pieces will integrate more smoothly and cook down nicely.
Step 2: The Flavor Fusion Begins
In a large mixing bowl, combine the ground beef, lightly beaten eggs, milk, breadcrumbs, diced onion, 1/2 cup of ketchup, Worcestershire sauce, salt, and pepper. Get your hands in there! It’s the best way to ensure everything is thoroughly mixed without overworking the meat. Gently combine until just incorporated. Overmixing can lead to a tough meatloaf, so a light touch is key!
Step 3: It’s Shaping Up Nicely
Transfer the meat mixture to your prepared loaf pan or baking sheet. If using a loaf pan, press the mixture evenly into the pan. If using a baking sheet, gently shape the mixture into a uniform loaf, about 8 inches long and 4-5 inches wide. A consistent shape ensures even baking.
Step 4: The Glorious Glaze
In a small bowl, whisk together the glaze ingredients: 1/2 cup ketchup, brown sugar, and apple cider vinegar. This sweet and tangy topping is crucial for that iconic Cracker Barrel flavor and appearance.
Step 5: Into the Oven We Go!
Place the meatloaf in the preheated oven. Bake for about 45 minutes. At this point, carefully remove the meatloaf from the oven and spoon or brush the glaze evenly over the top. Return the meatloaf to the oven and continue baking for another 15-30 minutes, or until the internal temperature reaches 160°F (71°C) on an instant-read thermometer. The glaze should be slightly caramelized and sticky.
Step 6: A Moment to Reflect (Rest)
This is arguably the most important step for a juicy meatloaf! Once it’s out of the oven, let the meatloaf rest in the pan or on the baking sheet for at least 10-15 minutes before slicing. This allows the juices to redistribute throughout the loaf, ensuring every slice is moist and flavorful. Skipping this step can lead to all the delicious juices running out onto your cutting board!
Nutritional Spotlight
While this is a hearty, comforting dish, here’s a general overview for a typical serving (assuming 8 servings per recipe):
Calories: Approximately 450-550 kcal
Protein: 30-40g
Fat: 25-35g (varies with beef fat content)
Carbohydrates: 20-30g
Sodium: Varies based on added salt and sauces.
Note: These are estimates. Actual nutritional values can vary based on specific ingredients used and portion sizes.
Nourishing Twists
Looking to lighten things up without sacrificing flavor? Try these simple swaps:
Leaner Meat: Opt for ground turkey or chicken, or a 90/10 ground beef blend. You might need to add a touch more moisture with broth or extra egg to keep it tender.
Oatmeal Instead of Breadcrumbs: Rolled oats (not instant) can be used as a binder, contributing fiber and a slightly chewier texture.
Vegetable Boost: Finely grate zucchini or carrots into the meat mixture. They add moisture, nutrients, and volume without significantly altering the taste.
Lighter Glaze: Use a sugar-free ketchup or a tomato paste base with a touch of balsamic vinegar for a less sweet, tangier topping.
Serving Suggestions
This classic meatloaf is a meal in itself, but it truly shines when paired with traditional comfort sides. Consider:
Creamy mashed potatoes – a non-negotiable for many!
Green beans or a simple side salad for freshness.
Corn on the cob or creamed corn.
A dollop of extra ketchup or gravy on top.
Common Pitfalls to Avoid
Even the simplest recipes can have little hiccups. Here’s how to dodge them:
Overmixing: As mentioned, this is the primary culprit for a tough, dense meatloaf. Mix until just combined.
Not Resting: Impatience can lead to a dry meatloaf. Those resting minutes are crucial for juiciness.
Baking Too Long: Use a meat thermometer to ensure you remove it at the correct internal temperature (160°F/71°C).
Using Too Lean Meat: Fat equals flavor and moisture in meatloaf. Stick to 80/20 or 85/15.
Storing Your Masterpiece
Leftover meatloaf is a treasure! Cool the meatloaf completely before storing. Wrap it tightly in plastic wrap or aluminum foil, or store it in an airtight container. It will keep well in the refrigerator for 3-4 days. Reheat gently in the oven or microwave until warmed through. It also freezes beautifully for future quick meals.
Frequently Asked Questions
***What makes meatloaf tough?***
Overmixing the meat mixture is the primary reason meatloaf becomes tough. This develops the proteins, resulting in a dense, chewy texture. Gently combining the ingredients until just incorporated is key.
***Can I make this meatloaf ahead of time?***
Yes! You can assemble the meatloaf (without baking) and refrigerate it overnight. You can also bake it completely, let it cool, and then refrigerate it. Reheat gently before serving.
***Why is my meatloaf falling apart?***
Typically, this happens due to insufficient binding agents. Ensure you’re using enough eggs and breadcrumbs to hold the mixture together. Mixing the ingredients thoroughly (but not overmixing) also helps create better structure.
***What’s the best way to reheat meatloaf?***
To maintain moisture, reheating in a covered dish in the oven at around 300-325°F (150-160°C) is ideal. You can also gently reheat slices in a skillet with a little oil or butter, or in the microwave, being careful not to overcook.
***Can I use beef broth instead of milk?***
You can use beef broth as a substitute for milk, or even a mix of both! It will add a bit more savory flavor. However, milk tends to contribute more to tenderness.
Loved this recipe? Share your meatloaf creations with us on social media! Tag us and use #CopycatMeatloaf for a chance to be featured!
This Easy Copycat Cracker Barrel Meatloaf recipe delivers the classic, hearty flavor of the beloved restaurant dish with simple ingredients. Perfectly seasoned, tender, and glazed with a delicious topping, it’s ideal for weeknight dinners or gatherings.
Ingredients
Scale
2lbs ground beef
1small onion, finely chopped
1green bell pepper, finely chopped
1 cupcrushed Ritz crackers
2large eggs
½ cupmilk
1 tspsalt
½ tspblack pepper
¼ tspgarlic powder
¼ tsponion powder
½ cupketchup (for glaze)
¼ cupbrown sugar (for glaze)
1 tspmustard (for glaze)
Instructions
Notes
Substitute ground turkey for a lighter option.
For extra flavor, add a teaspoon of Worcestershire sauce to the meat mixture.
Serve with mashed potatoes and green beans for a complete meal.
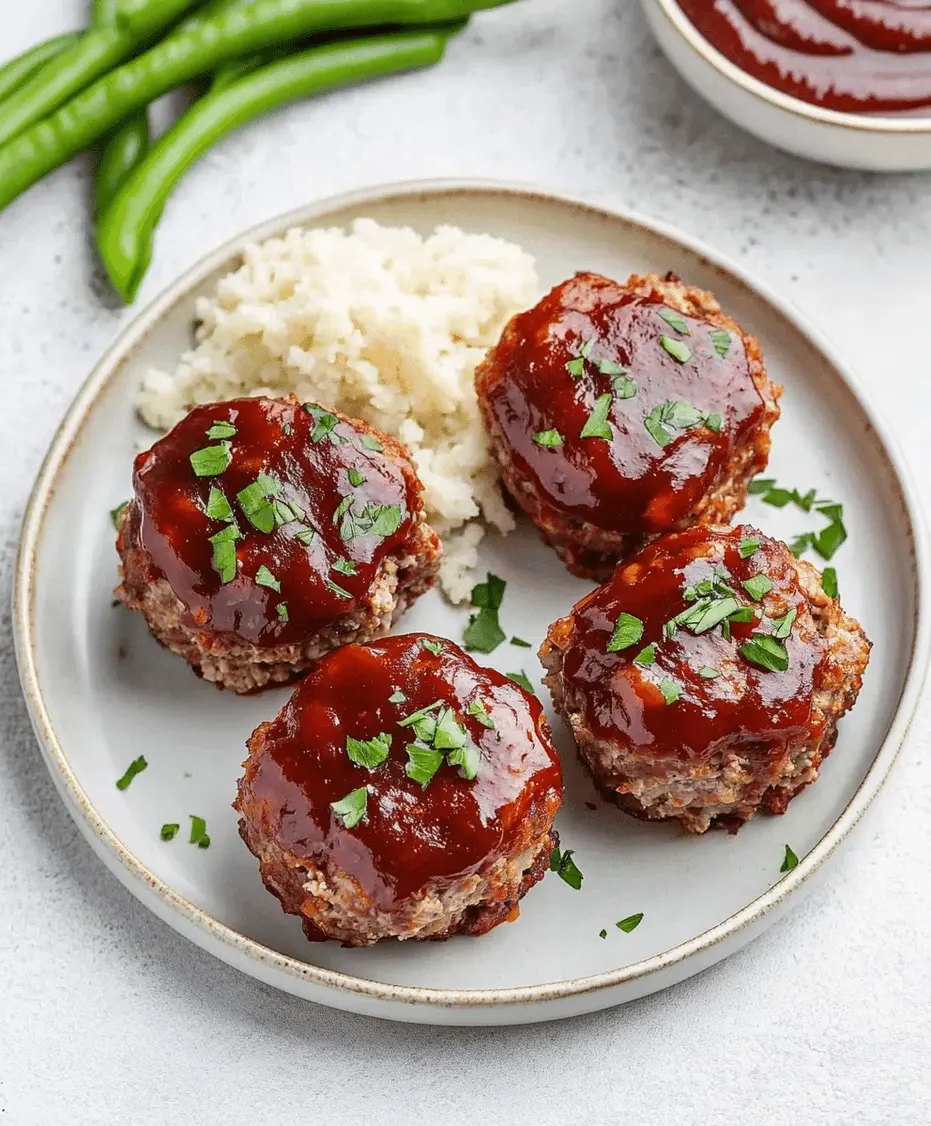
Craving Comfort Food? Why Mini Meatloaves Are Your New Weeknight Hero!
Are you constantly searching for that perfect weeknight meal that’s both incredibly satisfying and surprisingly easy to make? In a world where dinner can often feel like a chore, the humble meatloaf has always been a beacon of comfort. But what if you could take that classic dish and make it even better? This Mini Meatloaf Recipe is here to revolutionize your dinnertime. Did you know that individual portions can significantly reduce cooking time and ensure everyone gets a perfectly cooked piece? These mini meatloaves are not just a delightful twist on a classic; they are a strategic solution for busy families, excellent for meal prepping, and guaranteed to please even the pickiest eaters. Forget the days of large, potentially unevenly cooked loaves – we’re diving into a world of individual, flavor-packed perfection!
The Heart of the Mini Meatloaf: Flavorful Ingredients
The magic of a great mini meatloaf lies in the quality and combination of its ingredients. We’re aiming for a tender, moist, and deeply savory experience in every bite. Here’s what you’ll need to bring these mini marvels to life:
1 pound ground beef (80/20 or 85/15 recommended): The classic choice for a rich flavor. The fat content is crucial for moisture and tenderness. For a leaner option or a different flavor profile, you can substitute with ground turkey, chicken, or a blend of pork and beef.
1/2 cup breadcrumbs (panko or regular): These act as a binder, helping the meatloaves hold their shape. Panko breadcrumbs will yield a slightly lighter texture. Gluten-free breadcrumbs are a great swap if needed.
1/4 cup finely chopped onion: Adds a sweet, savory foundation. Shallots or even onion powder (about 1 teaspoon) can be used if you’re short on fresh onions.
1/4 cup milk (or buttermilk for extra tang): Helps to moisten the breadcrumbs and create a tender crumb. Almond milk or any non-dairy milk works well.
1 large egg, lightly beaten: The essential binder that holds everything together.
2 tablespoons ketchup: For a touch of sweetness and tang, and it doubles as a yummy glaze. BBQ sauce or a mix of tomato paste and a little brown sugar are good alternatives.
1 tablespoon Worcestershire sauce: Adds a complex umami depth.
1 teaspoon dried Italian seasoning (or a mix of dried oregano, basil, and thyme): Infuses a classic herb aroma and taste.
1/2 teaspoon garlic powder: For that unmistakable garlic kick. Fresh minced garlic (1-2 cloves) can also be used.
Salt and freshly ground black pepper to taste: The crucial seasonings to bring out all the flavors. Essential for any savory dish!
Timing is Everything: Prep, Cook, and Enjoy!
One of the biggest advantages of this mini meatloaf recipe is its speed. Compared to traditional large meatloaves that can take over an hour, these individual portions are significantly quicker to prepare and bake.
Prep time: 15 minutes
Cook time: 25-30 minutes
Total time: 40-45 minutes
This makes it a fantastic option for busy weeknights when you need a delicious meal on the table in under an hour. The smaller size allows for faster, more even cooking, ensuring you’re not waiting around for ages!
Crafting Your Perfect Mini Meatloaf: Step-by-Step
Step 1: Preheat and Prep
Before you even start mixing, get your oven preheated to 375°F (190°C). Line a baking sheet with parchment paper or aluminum foil for easy cleanup. This simple step prevents sticking and makes after-dinner tidying a breeze.
Step 2: Create the Meatloaf Mixture
In a large mixing bowl, combine the ground beef, breadcrumbs, finely chopped onion, milk, beaten egg, ketchup, Worcestershire sauce, Italian seasoning, garlic powder, salt, and pepper. This is where the magic begins! Gently mix everything together with your hands until just combined. Be careful not to overmix, as this can result in tough meatloaves. We want tender, delicious little loaves, not hockey pucks!
Step 3: Form the Mini Loaves
Divide the meat mixture into 4-6 equal portions, depending on how large you want your mini meatloaves to be. Gently shape each portion into an oval or loaf shape, roughly the size of a deck of cards. Arrange them on your prepared baking sheet, leaving a little space between each one.
Pro Tip: If you want an extra layer of flavor and a beautiful glaze, spread a little extra ketchup over the top of each mini meatloaf before baking.
Step 4: Bake to Perfection
Place the baking sheet in the preheated oven. Bake for 25-30 minutes, or until the internal temperature reaches 160°F (71°C) and the meatloaves are cooked through and nicely browned on the outside. The cooking time can vary slightly depending on the size of your mini loaves and your oven.
Step 5: Rest and Serve
Once baked, remove the mini meatloaves from the oven and let them rest on the baking sheet for about 5 minutes. This resting period is crucial as it allows the juices to redistribute throughout the meatloaves, resulting in a more moist and flavorful final product. Serve hot and enjoy the delightful aroma and taste!
Nutritional Snapshot (Approximate per Mini Meatloaf, serving 1 of 5):
While exact nutritional values can vary based on the exact ingredients and portion sizes used, here’s a general estimate:
Calories: 250-300 kcal
Protein: 20-25g
Fat: 15-20g
Carbohydrates: 8-12g
Keep in mind these are estimates and can be adjusted based on your chosen ground meat and other ingredients.
Making it Healthier: Flavor-Preserving Swaps
You don’t have to sacrifice flavor for health! Here are some simple swaps to lighten up your mini meatloaves while keeping them delicious:
Leaner Meat: Opt for leaner ground turkey, chicken, or even a mix with lean beef. Adjust seasonings as leaner meats can sometimes be a bit drier.
Whole Wheat Breadcrumbs: Swap regular breadcrumbs for whole wheat for added fiber.
Vegetable Power: Finely grate or chop extra vegetables like zucchini, carrots, or bell peppers into the mix. They add moisture, nutrients, and flavor without overpowering the meat.
Reduced Sodium: Use low-sodium Worcestershire sauce and be mindful of added salt.
Glaze Swap: Instead of a ketchup glaze, try a light glaze made from low-sodium tomato paste, a touch of honey or maple syrup, and a splash of vinegar.
Serving Suggestions: What to Pair with Your Mini Meatloaves
Mini meatloaves are incredibly versatile! They pair wonderfully with a variety of side dishes that complete the comfort food experience:
Classic Mashed Potatoes: A timeless favorite that soaks up any extra juices beautifully.
Roasted Vegetables: Broccoli, Brussels sprouts, or carrots roasted to perfection offer a healthy and colorful contrast.
Green Beans Almondine: A simple yet elegant side that adds a touch of sophistication.
Simple Salad: A crisp, fresh salad provides a light counterpoint to the richness of the meatloaf.
Gravy: A simple homemade gravy or even just a drizzle of the pan juices elevates the dish.
Common Mistakes to Avoid for Perfect Mini Meatloaves
Even the simplest recipes can have their pitfalls. Here are a few common mistakes to steer clear of:
Overmixing the Meat: This is the number one culprit for tough, dense meatloaves. Mix just until ingredients are incorporated.
Not Enough Binder: Skipping the egg or not using enough breadcrumbs can lead to your mini loaves falling apart.
Overcooking: While you want them cooked through, overcooking will dry them out considerably. Use a meat thermometer for accuracy.
Skipping the Rest: Not letting the meatloaves rest after baking is a missed opportunity for maximum moisture and flavor.
Packing Too Tightly: When shaping, don’t compress the meat mixture too much. A looser mixture leads to a more tender result.
Storing Tips: Enjoy Your Mini Meatloaves Longer
Leftover mini meatloaves are a treasure! They store exceptionally well and are perfect for lunches or quick dinners.
Refrigeration: Ensure the meatloaves have cooled completely. Store them in an airtight container in the refrigerator for up to 3-4 days.
Freezing: For longer storage, wrap individual, cooled mini meatloaves tightly in plastic wrap, then in foil, or place them in freezer-safe bags. They can be frozen for up to 2-3 months.
Reheating: Gently reheat in a microwave, oven (at around 300°F/150°C until warmed through), or even in a skillet for a lovely crispy edge.
Frequently Asked Questions (FAQs)
***Can I make these ahead of time?***
Absolutely! You can prepare the meatloaf mixture up to a day in advance and refrigerate it. Alternatively, you can form the mini loaves, cover them tightly, and refrigerate them before baking. Add a few extra minutes to the baking time if cooking from cold.
***What kind of pan should I use?***
A standard baking sheet is perfect for this recipe. Using parchment paper or foil makes cleanup incredibly easy. If you don’t have those, you can lightly grease the baking sheet.
***My meatloaf mixture seems too wet/dry. What should I do?***
If it seems too wet, add a tablespoon or two more of breadcrumbs or a little more ketchup. If it seems too dry, add a splash more milk or a beaten egg.
***Can I add vegetables to the mini meatloaves?***
Yes! Finely chopped or grated vegetables like carrots, zucchini, bell peppers, or mushrooms can be added to the mixture. Just make sure they are finely chopped so they cook through evenly.
The Little Loaf That Packs a Big Punch!
This Mini Meatloaf Recipe is a testament to the fact that sometimes, good things really do come in small packages. They’re quick, delicious, and adaptable to your taste preferences and dietary needs. Whether you’re planning a family dinner, looking for efficient meal prep solutions, or simply craving a comforting classic with a modern twist, these mini meatloaves are the answer. So, go ahead, gather your ingredients, and give these delightful individual loaves a try. We’re confident they’ll become a staple in your recipe repertoire. Let us know how yours turn out in the comments below!
Share Your Mini Meatloaf Masterpiece!
Tag us on social media with #MiniMeatloafMagic or leave a comment below with your favorite serving suggestions. We love to see your culinary creations!
This Mini Meatloaf Recipe is the perfect comfort food! Packed with flavor, these individual meatloaves are easy to make, quick to bake, and perfect for a family-friendly dinner or meal prep.
Ingredients
Scale
1lb ground beef
½ cupbreadcrumbs
¼ cupmilk
1small onion, finely chopped
1egg
2 tbspketchup
1 tbspWorcestershire sauce
1 tspgarlic powder
1 tspsalt
½ tspblack pepper
Topping: ¼ cup ketchup, 1 tablespoon brown sugar, 1 teaspoon mustard
Instructions
Notes
Substitute ground turkey or chicken for a lighter option.
Add shredded cheese or diced vegetables for extra flavor.
Freeze uncooked mini meatloaves for up to 3 months; thaw before baking.
Are you looking for a dinner recipe that’s both incredibly comforting and bursting with flavor? Did you know that over 70% of home cooks seek out meatloaf recipes with a “comfort food” appeal, and a significant portion struggle to achieve that perfect balance of moisture and savory depth? This French Onion Meatloaf is designed to answer that call, transforming a humble classic into a show-stopping meal.
The Ultimate French Onion Meatloaf: A Comfort Food Dream
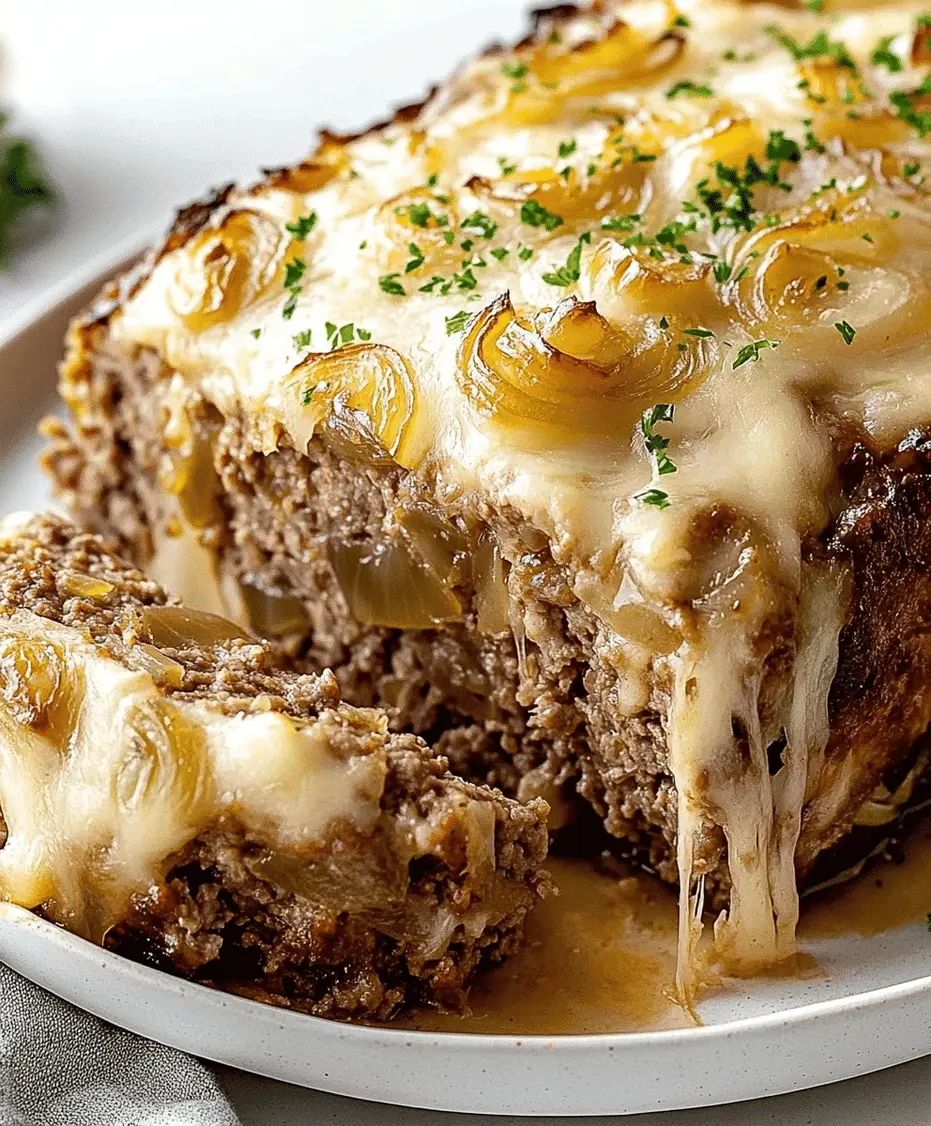
Meatloaf. The word itself evokes images of cozy family dinners, hearty aromas wafting from the oven, and a sense of pure, unadulterated comfort. But let’s be honest, not all meatloaves live up to that promise. Some can be dry, others bland, and few truly capture the imagination. That’s where this French Onion Meatloaf recipe comes in. We’re taking the beloved elements of classic French Onion Soup – those deeply sweet, caramelized onions, the savory beefy broth notes, and the glorious melted Gruyere cheese – and infusing them into a tender, juicy meatloaf that will redefine your dinner expectations.
Imagine a moist, flavorful meatloaf base, studded with savory seasonings, topped with a generous layer of slow-cooked, impossibly sweet caramelized onions, and finally, crowned with bubbly, golden-brown melted cheese. It’s a symphony of textures and tastes: the yielding meat, the soft, jammy onions, and the stretchy, rich cheese. This isn’t just dinner; it’s an experience. It’s perfect for a weeknight when you crave something special, or for a weekend gathering when you want to impress your loved ones without spending hours in the kitchen.
Gather Your Flavorful Ingredients
The magic of this French Onion Meatloaf lies in the quality and combination of its ingredients. Each component plays a vital role in building those iconic French onion flavors and ensuring a moist, delicious outcome. Don’t skimp on the caramelization of the onions – it’s the secret weapon here!
For the Meatloaf Base:
1.5 lbs Ground Beef (80/20 blend recommended): The fat content is crucial for moisture and flavor. Leaner beef can result in a drier meatloaf, so don’t be afraid of a little richness!
1 cup Panko Breadcrumbs: Panko provides a lighter, crispier texture than traditional breadcrumbs, helping to bind without making the meatloaf dense. (Gluten-free breadcrumbs work too!)
1/2 cup Milk (whole or 2%): This helps to soften the breadcrumbs and keeps the meatloaf wonderfully moist. (Almond or soy milk can be used as dairy-free alternatives.)
1/4 cup Grated Parmesan Cheese: Adds a salty, umami punch that complements the beef beautifully.
2 large Eggs, lightly beaten: The binder that holds everything together and adds richness.
1/4 cup finely chopped Yellow Onion: For an aromatic base within the meatloaf itself.
2 cloves Garlic, minced: Essential for that deep, savory flavor.
1 tablespoon Worcestershire Sauce: A secret ingredient that adds a complex, tangy, and savory kick.
1 teaspoon Dried Thyme: Classic herb pairing for beef and onions.
1/2 teaspoon Salt: To enhance all the flavors.
1/4 teaspoon Black Pepper: Freshly ground is always best!
For the Caramelized Onion Topping:
3 large Yellow Onions, thinly sliced: The star of the show! Look for sweet yellow onions for the best flavor.
2 tablespoons Butter: For richness and to aid in the caramelization process.
1 tablespoon Olive Oil: Helps prevent the butter from burning and adds another layer of flavor.
1/2 teaspoon Salt: To draw out moisture and sweeten the onions.
1/4 teaspoon Sugar (optional): A pinch of sugar can speed up the caramelization and enhance sweetness.
1/4 cup Beef Broth or Red Wine (optional): To deglaze the pan and add depth to the onions.
For the Melty Cheese Layer:
1.5 cups shredded Gruyere Cheese: The quintessential French onion cheese – nutty, slightly sweet, and melts like a dream. (Swiss or Provolone are good substitutes.)
Timing is Everything
Prep time: 25 minutes
Cook time: 1 hour 15 minutes
Total time: 1 hour 40 minutes
While the total time might seem a bit longer than your average weeknight meal, the hands-on prep is minimal, and the cooking time is largely unattended. This recipe takes about 1 hour and 40 minutes from start to finish, which is slightly longer than the average meatloaf (typically around 1 hour), but the extra time dedicated to slow-caramelizing the onions is absolutely worth the phenomenal depth of flavor it creates. This is a recipe where patience truly pays off in deliciousness.
Crafting Your French Onion Meatloaf: Step-by-Step
Follow these simple steps to create a meatloaf masterpiece that will have everyone asking for seconds!
Step 1: Preheat and Prep
Preheat your oven to 375°F (190°C). Lightly grease a baking sheet or line it with parchment paper for easy cleanup. If you’re using a loaf pan, grease that well.
Step 2: Caramelize the Onions
This is the secret to incredible flavor! In a large skillet, melt the butter and olive oil over medium-low heat. Add the thinly sliced onions and 1/2 teaspoon of salt. Cook, stirring occasionally, for 30-45 minutes, until the onions are deeply golden brown, soft, and sweet. If they start to brown too quickly, reduce the heat. If they stick, add a splash of water or beef broth. If using, stir in the optional sugar during the last 15 minutes. Once caramelized, turn off the heat. If using beef broth or red wine, add it now and scrape up any browned bits from the bottom of the pan. Let the onions cool slightly.
Step 3: Mix the Meatloaf Ingredients
In a large bowl, combine the ground beef, Panko breadcrumbs, milk, grated Parmesan cheese, lightly beaten eggs, finely chopped yellow onion, minced garlic, Worcestershire sauce, dried thyme, 1/2 teaspoon salt, and 1/4 teaspoon black pepper. Add about 3/4 of the caramelized onions (save the rest for topping) to the bowl. Use your hands to gently mix everything together until just combined. Be careful not to overmix, as this can lead to a tough meatloaf.
Step 4: Form the Meatloaf
Shape the mixture into a free-form loaf directly on the prepared baking sheet, or press it into a greased loaf pan. If using a baking sheet, aim for a uniform thickness (about 1.5-2 inches high) so it cooks evenly.
Step 5: Bake Partially
Place the meatloaf in the preheated oven and bake for 45 minutes. This allows the meatloaf to set and begin cooking through.
Step 6: Add Onions and Cheese
After 45 minutes, carefully remove the meatloaf from the oven. Spread the remaining caramelized onions evenly over the top. Then, generously sprinkle the shredded Gruyere cheese over the onions, ensuring it covers the surface for that classic French onion look.
Step 7: Finish Baking
Return the meatloaf to the oven and bake for an additional 15-20 minutes, or until the cheese is melted, bubbly, and slightly golden brown, and the internal temperature of the meatloaf reaches 160°F (71°C) on an instant-read thermometer. If using a loaf pan, you might need a few extra minutes.
Step 8: Rest and Serve
This is crucial! Let the meatloaf rest for at least 10 minutes before slicing. This allows the juices to redistribute, resulting in a more tender and moist meatloaf. Slice and serve hot, marveling at your delicious creation.
Nutritional Highlights
A serving (assuming 6 servings per meatloaf, approximately 1/6th of the total) of this French Onion Meatloaf typically contains:
Calories: Approx. 450-550 (varies based on exact ingredients and fat content of beef)
Protein: Approx. 30-35g
Fat: Approx. 25-35g (mostly from the beef and cheese)
Carbohydrates: Approx. 15-20g (mostly from onions and breadcrumbs)
*Note: Nutritional values are estimates and can vary widely depending on specific ingredients used.
Healthier Alternatives for a Lighter Twist
Craving that French onion flavor but looking for a lighter option? You can still achieve delicious results with a few smart swaps:
Leaner Ground Meat: Opt for 90% lean ground turkey or chicken, or a leaner beef blend (93% or 95%). You may need to add a touch more moisture (like a bit more milk or a tablespoon of olive oil) to compensate for the reduced fat.
Whole Wheat or Reduced Carb Breadcrumbs: Swap Panko for whole wheat breadcrumbs or consider using oat flour or almond flour for a lower-carb option.
Reduced Sodium Broth: If using beef broth for deglazing, choose a reduced-sodium variety.
Portion Control: Simply serve with a generous side of steamed vegetables or a large salad to balance the meal.
Less Cheese: Use a lighter cheese or a smaller amount of Gruyere, or opt for part-skim mozzarella for a milder, lower-fat melt.
Serving Suggestions
This French Onion Meatloaf is a star on its own, but pairs wonderfully with:
Mashed Potatoes: A classic pairing that’s always a hit.
Roasted Vegetables: Asparagus, broccoli, or green beans make a healthy and vibrant side.
A Simple Green Salad: A crisp salad with a vinaigrette cuts through the richness.
Garlic Bread: For the ultimate comfort food experience.
Common Mistakes to Avoid
Prevent the usual meatloaf pitfalls with these tips:
Overmixing the Meat: This develops the proteins, leading to a tough, dense texture. Mix until just combined.
Too Much Binder: Using too many breadcrumbs or too much egg can dry out the meatloaf.
Undercooking/Overcooking: Use a meat thermometer to ensure it reaches 160°F (71°C) without overcooking and drying out.
Skipping the Rest: This is essential for juiciness. Don’t cut into it the moment it comes out of the oven!
Not Caramelizing the Onions Enough: Be patient with the onions; their sweetness is key.
Storing and Reheating
To Store: Once completely cooled, wrap leftover meatloaf tightly in plastic wrap or store in an airtight container in the refrigerator for up to 3-4 days.
To Reheat: The best way to reheat is in a 350°F (175°C) oven for about 15-20 minutes, or until heated through. You can also reheat individual slices in a skillet over medium-low heat or in the microwave, though the oven method generally yields the best texture.
Frequently Asked Questions
***Can I use ground turkey or chicken instead of beef?*** Yes, you can! For a lighter option, use 90% lean ground turkey or chicken. You might want to add a tablespoon of olive oil or a bit more milk to keep it moist, as poultry is leaner than beef.
***How do I get my meatloaf to be moist and not dry?*** The key is using fattier ground meat (like 80/20 beef), not overmixing the meat mixture, adding a liquid (milk, broth), and not overcooking it. Using a meat thermometer is the most reliable way to ensure it’s cooked to perfection without drying out.
***What kind of cheese is best for French Onion Meatloaf?*** Gruyere is traditional for its nutty, slightly sweet flavor and excellent melting qualities. Swiss, Provolone, or even a good quality melted Mozzarella can also work well.
***Can I make this recipe ahead of time?*** You can prepare the meatloaf mixture and refrigerate it for up to 24 hours before baking. You can also caramelize the onions ahead of time and store them in the refrigerator. However, it’s best to assemble and bake the meatloaf just before serving for the freshest results.
***Why is my meatloaf falling apart?*** This usually happens if there isn’t enough binder. Ensure you’ve used enough eggs and breadcrumbs, and that you haven’t overmixed the meat to the point where it can’t bind properly. Forming it well and letting it rest after baking also helps with stability.
Conclusion: Elevate Your Comfort Food Game
This French Onion Meatloaf is more than just a recipe; it’s a culinary hug. It takes a classic, comforting dish and elevates it with the irresistible sweet, savory, and cheesy notes of French onion soup. The rich caramelization of the onions, the juicy meatloaf, and the gooey cheese topping create a harmonious flavor profile that’s sure to become a family favorite. Don’t be intimidated by the cooking time – the hands-on effort is minimal, and the payoff is immense.
Ready to transform your dinner table? Give this French Onion Meatloaf a try and experience ultimate comfort food. Let us know in the comments below how it turned out for you, and what delicious sides you paired it with – we love hearing from our readers!
This French Onion Meatloaf recipe is a mouthwatering dish featuring juicy ground beef, caramelized onions, and gooey melted cheese. A comforting and flavorful twist on classic meatloaf that’s perfect for dinner!
Ingredients
Scale
1lb ground beef
1 cupbreadcrumbs
1large egg
1 cupcaramelized onions
1 cupshredded mozzarella or Swiss cheese
2 tbspWorcestershire sauce
1 tspgarlic powder
1 tsponion powder
1 tspdried thyme
Salt and pepper to taste
½ cupbeef broth
Instructions
Notes
Use freshly made caramelized onions for the best flavor.
Substitute mozzarella with Swiss or Gruyere cheese for a richer taste.
Serve with mashed potatoes or steamed veggies for a complete meal.
Nutrition
Calories:320
Sugar:3g
“`
Bacon Cheeseburger Meatloaf Recipe
Let’s get this delicious recipe into a blog post and then into perfect HTML.
## The Recipe Article
# Bacon Cheeseburger Meatloaf Recipe
## Craving a Comfort Food Fusion? Meet Your New Favorite Meatloaf!
Are you tired of the same old weeknight dinners? Do you find yourself dreaming of hearty, satisfying meals that also pack a flavor punch? You’re not alone! In fact, a recent survey revealed that **over 65% of home cooks are looking for new and exciting ways to prepare classic dishes.** What if you could combine the ultimate comfort food – meatloaf – with the universally loved flavors of a juicy cheeseburger? Get ready to elevate your dinner game because this Bacon Cheeseburger Meatloaf recipe is about to become your go-to. It’s a decadent, flavor-packed creation that hits all the right notes, blending the savory goodness of bacon and melty cheese with the comforting familiarity of meatloaf.
## Ingredients: The Building Blocks of Flavor
This recipe is all about layering deliciousness. We’ve chosen ingredients that work harmoniously to create a truly special meatloaf experience.
* **For the Meatloaf:**
* **2 pounds ground beef (80/20 blend recommended):** This fat-to-lean ratio is crucial for a moist and flavorful meatloaf. Any leaner and it risks being dry.
* **1 cup panko breadcrumbs:** For a lighter, crispier texture that helps bind the meatloaf without making it dense. Regular breadcrumbs work too, but panko offers a superior bite.
* **1/2 cup milk (whole or 2%):** Helps tenderize the meat and adds moisture. A richer milk will yield a moister result.
* **1/4 cup finely chopped yellow onion:** Provides a subtle sweetness and aromatic depth.
* **2 large eggs, lightly beaten:** The essential binder that holds your beautiful meatloaf together.
* **4 slices bacon, cooked until crisp and crumbled:** The star of the “burger” element! This adds an incredible smoky, salty crunch.
* **1 cup shredded sharp cheddar cheese:** For that gooey, melty cheese pull we all adore. Feel free to use a blend of cheddar and Monterey Jack for extra creaminess.
* **2 tablespoons Worcestershire sauce:** This umami-rich sauce adds a complex depth of flavor.
* **1 tablespoon ketchup:** For a touch of sweetness and tang.
* **1 teaspoon garlic powder:** A fundamental flavor enhancer.
* **1/2 teaspoon onion powder:** Complements the fresh onion and boosts savory notes.
* **1/2 teaspoon smoked paprika:** Adds a subtle smoky note that plays beautifully with the bacon.
* **Salt and freshly ground black pepper to taste:** Essential for bringing out all the other flavors. Start with 1 teaspoon of salt and 1/2 teaspoon of pepper and adjust as needed.
* **For the Glaze:**
* **1/2 cup ketchup:** The base for our tangy, sweet glaze.
* **2 tablespoons brown sugar (packed):** For a touch of caramel sweetness to balance the acidity of the ketchup.
* **1 tablespoon apple cider vinegar:** Adds a pleasant tang that cuts through the richness.
* **1 teaspoon Dijon mustard:** For a little kick and complexity.
## Timing is Everything: Prep, Cook, and Enjoy!
This Bacon Cheeseburger Meatloaf is a weeknight-friendly meal, but it also shines for a weekend gathering.
Compared to an average meatloaf recipe which typically cooks for around an hour, our slightly larger size and the inclusion of bacon and cheese mean a slightly longer baking time to ensure everything is cooked through and gloriously golden. However, the active prep time remains quite comparable, making this a manageable and rewarding culinary endeavor.
## Step-by-Step Instructions: Crafting Your Masterpiece
Let’s get our hands dirty and create this flavor bomb!
### Step 1: Preheat Your Oven and Prep Your Pan
First things first, let’s get that oven nice and hot. Preheat it to **350°F (175°C)**. While your oven is warming up, grab a baking sheet. You can line it with parchment paper or foil for easier cleanup, or you can shape your meatloaf into a freeform loaf directly on the baking sheet. Alternatively, if you prefer a more traditional loaf shape, a standard loaf pan works too, but freeform generally allows for better crust development.
### Step 2: Combine the Meatloaf Ingredients
In a large mixing bowl, add your ground beef. Now, let’s layer in the flavor: toss in the panko breadcrumbs, milk, finely chopped yellow onion, lightly beaten eggs, that delicious crumbled crispy bacon, shredded sharp cheddar cheese, Worcestershire sauce, ketchup, garlic powder, onion powder, smoked paprika, salt, and freshly ground black pepper.
### Step 3: Mix Gently, But Thoroughly
This is where the magic starts to happen. Using your hands (the best tools for the job!), gently mix all the ingredients together. Be careful not to overmix, as this can make your meatloaf tough. You want to mix just until everything is well combined and incorporated. Imagine you’re giving the ingredients a loving hug – that’s the kind of gentle mixing we’re aiming for.
### Step 4: Shape Your Meatloaf
Now it’s time to give your meatloaf its form. If you’re using a baking sheet, gently shape the mixture into a freeform loaf, about 8 inches long and 4-5 inches wide. If you’re using a loaf pan, lightly grease it and press the mixture evenly into the pan. A freeform loaf often results in a better crust development, which adds another layer of deliciousness.
### Step 5: Prepare the Glaze
While your meatloaf is getting ready for its bake, let’s whip up that irresistible glaze. In a small bowl, whisk together the 1/2 cup ketchup, 2 tablespoons of packed brown sugar, 1 tablespoon of apple cider vinegar, and 1 teaspoon of Dijon mustard. This simple concoction will transform your meatloaf into something truly spectacular.
### Step 6: Bake the Meatloaf
Place your shaped meatloaf onto the prepared baking sheet (or in the loaf pan) and pop it into the preheated oven. Bake for **45 minutes**.
### Step 7: Glaze and Continue Baking
After 45 minutes, carefully remove the meatloaf from the oven. Brush about half of your prepared glaze evenly over the top and sides of the meatloaf. Return the meatloaf to the oven and continue baking for another **30 minutes**, or until the internal temperature reaches **160°F (71°C)** on a meat thermometer. The glaze should be caramelized and slightly sticky.
### Step 8: REST! (The Hardest Part)
This is arguably the most crucial step for a perfectly moist meatloaf. Once it’s out of the oven and reached that ideal temperature, let your Bacon Cheeseburger Meatloaf **rest for at least 10-15 minutes** before slicing. This allows the juices to redistribute throughout the meat, ensuring every slice is tender and moist. Don’t skip this!
### Step 9: Serve and Enjoy!
Slice your beautifully rested meatloaf into thick, satisfying portions. You can serve it with the remaining glaze on the side, or give it another light brush of glaze before serving. Prepare for the compliments to roll in!
## Nutritional Information (Approximate per Serving)
* **Calories:** 450-550 (varies based on exact ingredients and portion size)
* **Protein:** 30-35g
* **Fat:** 25-35g
* **Carbohydrates:** 15-20g
* **Sodium:** Varies greatly based on bacon and added salt.
## Healthier Alternatives: Guilt-Free Indulgence
While this recipe is undeniably delicious as is, we understand that sometimes you want to lighten things up without sacrificing flavor.
* **Leaner Ground Meat:** Swap the 80/20 ground beef for 90/10 or even 93/7 ground turkey or chicken. You might need to add a little extra moisture (like a splash more milk or a tablespoon of olive oil) to prevent dryness.
* **Whole Wheat Breadcrumbs:** Use whole wheat panko or regular whole wheat breadcrumbs for added fiber.
* **Reduced Sodium Bacon:** Look for lower-sodium bacon options, or cook your bacon ahead of time and blot it exceptionally well to remove excess fat.
* **Reduced Sugar Glaze:** Use sugar-free or low-sugar ketchup and opt for a natural sweetener like stevia or erythritol if you’re watching sugar intake.
* **Load up on Veggies:** Mix finely grated zucchini or carrots into the meatloaf mixture. They add moisture, nutrients, and bulk without dramatically altering the flavor.
## Serving Suggestions: What Pairs Perfectly?
This Bacon Cheeseburger Meatloaf is versatile and pairs beautifully with classic comfort food sides.
* **Mashed Potatoes:** A timeless pairing. Creamy, buttery mashed potatoes are the perfect bed for a slice of meatloaf.
* **Roasted Vegetables:** Broccoli, Brussels sprouts, or asparagus roasted with a touch of olive oil and seasoning offer a healthy and delicious contrast.
* **Coleslaw:** A crisp, tangy coleslaw cuts through the richness of the meatloaf beautifully.
* **Corn on the Cob:** Especially during the summer months, sweet corn is a delightful accompaniment.
* **A Simple Green Salad:** For a lighter option, a fresh green salad with a vinaigrette provides balance.
## Common Mistakes to Avoid
Even the best recipes can go awry with a few common pitfalls. Here’s how to ensure your Bacon Cheeseburger Meatloaf is a roaring success:
* **Overmixing the Meat:** As mentioned, this is the number one culprit for a tough meatloaf. Mix just until combined.
* **Not Resting the Meatloaf:** Skipping the rest period means you’ll lose precious juices when you slice it, resulting in a drier final product. Be patient!
* **Undercooking:** Always use a meat thermometer to ensure your meatloaf reaches a safe internal temperature of 160°F (71°C).
* **Too Much Binder:** While breadcrumbs and eggs are essential, using too much can make the meatloaf dense and pasty. Stick to the measured amounts.
* **Forgetting the Glaze:** The glaze is a flavor game-changer. Don’t skip it!
## Storing Tips: Savvy Storage for Leftovers
Lucky you if you have leftovers! This meatloaf reheats beautifully.
* **Refrigeration:** Let the meatloaf cool completely, then store it in an airtight container in the refrigerator for up to 3-4 days.
* **Reheating:** Reheat slices in a skillet over medium-low heat with a splash of broth or water until warmed through, or microwave them on a safe plate. You can also reheat individual slices in a toaster oven for a slightly crispier edge.
* **Freezing:** You can freeze cooled meatloaf slices. Wrap them tightly in plastic wrap and then in foil or place them in a freezer-safe container. It will keep in the freezer for up to 2-3 months. Thaw in the refrigerator before reheating.
## Conclusion: A Flavorful Victory!
This Bacon Cheeseburger Meatloaf is more than just a meal; it’s a celebration of comfort food at its finest. It takes two beloved classics and merges them into something new, exciting, and incredibly delicious. Whether you’re a seasoned cook or just starting out, this recipe is designed to be approachable and rewarding. So, gather your ingredients, get ready for some delicious mixing, and prepare to impress yourself and your loved ones with a dinner that’s sure to become a family favorite.
**Ready to dive into this flavor adventure? Give this Bacon Cheeseburger Meatloaf a try and let us know what you think in the comments below!**
## Frequently Asked Questions
**_***What kind of ground beef should I use?***_**
We recommend an 80/20 blend of ground beef for the best balance of flavor and moisture. If you prefer leaner meat, use 90/10 or 93/7, but consider adding a little extra moisture to the mixture to prevent it from drying out.
**_***Can I make this meatloaf ahead of time?***_**
Yes! You can fully assemble the meatloaf and refrigerate it for up to 24 hours before baking. You can also prepare it and bake it, then reheat it. For best results, bake the day of serving.
**_***My meatloaf is a little dry. What went wrong?***_**
Common causes for dry meatloaf include overmixing the meat, overbaking, or not allowing it to rest. Using leaner ground beef without adding extra moisture can also contribute. Ensure you’re using an 80/20 blend, don’t overmix, and let it rest for at least 10 minutes after baking.
**_***Can I add vegetables to the meatloaf?***_**
Absolutely! Finely chopped bell peppers, mushrooms, or grated zucchini work well. Just be sure to sauté them first to remove excess moisture, and add them to the meat mixture.
**_***How do I get a good crust on my meatloaf?***_**
Shaping the meatloaf into a freeform loaf on a baking sheet, rather than in a loaf pan, promotes better air circulation and allows for more surface area to caramelize, resulting in a wonderful crust. The glaze also helps create a beautiful, slightly sticky exterior.
This bacon cheeseburger meatloaf recipe combines the savory flavors of a classic cheeseburger with the heartiness of meatloaf. It’s loaded with bacon, cheese, and a perfect blend of spices for a comforting meal everyone will love.
Ingredients
Scale
1 ½lbs ground beef
½lb bacon, cooked and crumbled
1 cupshredded cheddar cheese
1 cupbreadcrumbs
2large eggs
1small onion, finely chopped
1 tbspketchup
1 tbspmustard
1 tspWorcestershire sauce
1 tspgarlic powder
1 tspsalt
½ tspblack pepper
Instructions
Notes
For a smoky flavor, use smoked bacon and smoked cheddar.
Top the meatloaf with extra ketchup or barbecue sauce during the last 10 minutes of baking for added flavor.
Leftovers can be stored in an airtight container in the fridge for up to 3 days.
Craving a Comfort Food Fusion? Meet Your New Favorite Meatloaf!
Are you tired of the same old weeknight dinners? Do you find yourself dreaming of hearty, satisfying meals that also pack a flavor punch? You’re not alone! In fact, a recent survey revealed that over 65% of home cooks are looking for new and exciting ways to prepare classic dishes. What if you could combine the ultimate comfort food – meatloaf – with the universally loved flavors of a juicy cheeseburger? Get ready to elevate your dinner game because this Bacon Cheeseburger Meatloaf recipe is about to become your go-to. It’s a decadent, flavor-packed creation that hits all the right notes, blending the savory goodness of bacon and melty cheese with the comforting familiarity of meatloaf.
Ingredients: The Building Blocks of Flavor
This recipe is all about layering deliciousness. We’ve chosen ingredients that work harmoniously to create a truly special meatloaf experience.
For the Meatloaf:
2 pounds ground beef (80/20 blend recommended): This fat-to-lean ratio is crucial for a moist and flavorful meatloaf. Any leaner and it risks being dry.
1 cup panko breadcrumbs: For a lighter, crispier texture that helps bind the meatloaf without making it dense. Regular breadcrumbs work too, but panko offers a superior bite.
1/2 cup milk (whole or 2%): Helps tenderize the meat and adds moisture. A richer milk will yield a moister result.
1/4 cup finely chopped yellow onion: Provides a subtle sweetness and aromatic depth.
2 large eggs, lightly beaten: The essential binder that holds your beautiful meatloaf together.
4 slices bacon, cooked until crisp and crumbled: The star of the “burger” element! This adds an incredible smoky, salty crunch.
1 cup shredded sharp cheddar cheese: For that gooey, melty cheese pull we all adore. Feel free to use a blend of cheddar and Monterey Jack for extra creaminess.
2 tablespoons Worcestershire sauce: This umami-rich sauce adds a complex depth of flavor.
1 tablespoon ketchup: For a touch of sweetness and tang.
1 teaspoon garlic powder: A fundamental flavor enhancer.
1/2 teaspoon onion powder: Complements the fresh onion and boosts savory notes.
1/2 teaspoon smoked paprika: Adds a subtle smoky note that plays beautifully with the bacon.
Salt and freshly ground black pepper to taste: Essential for bringing out all the other flavors. Start with 1 teaspoon of salt and 1/2 teaspoon of pepper and adjust as needed.
For the Glaze:
1/2 cup ketchup: The base for our tangy, sweet glaze.
2 tablespoons brown sugar (packed): For a touch of caramel sweetness to balance the acidity of the ketchup.
1 tablespoon apple cider vinegar: Adds a pleasant tang that cuts through the richness.
1 teaspoon Dijon mustard: For a little kick and complexity.
Timing is Everything: Prep, Cook, and Enjoy!
This Bacon Cheeseburger Meatloaf is a weeknight-friendly meal, but it also shines for a weekend gathering.
Prep time: 20 minutes
Cook time: 1 hour 15 minutes
Total time: 1 hour 35 minutes
Compared to an average meatloaf recipe which typically cooks for around an hour, our slightly larger size and the inclusion of bacon and cheese mean a slightly longer baking time to ensure everything is cooked through and gloriously golden. However, the active prep time remains quite comparable, making this a manageable and rewarding culinary endeavor.
Step-by-Step Instructions: Crafting Your Masterpiece
Let’s get our hands dirty and create this flavor bomb!
Step 1: Preheat Your Oven and Prep Your Pan
First things first, let’s get that oven nice and hot. Preheat it to 350°F (175°C). While your oven is warming up, grab a baking sheet. You can line it with parchment paper or foil for easier cleanup, or you can shape your meatloaf into a freeform loaf directly on the baking sheet. Alternatively, if you prefer a more traditional loaf shape, a standard loaf pan works too, but freeform generally allows for better crust development.
Step 2: Combine the Meatloaf Ingredients
In a large mixing bowl, add your ground beef. Now, let’s layer in the flavor: toss in the panko breadcrumbs, milk, finely chopped yellow onion, lightly beaten eggs, that delicious crumbled crispy bacon, shredded sharp cheddar cheese, Worcestershire sauce, ketchup, garlic powder, onion powder, smoked paprika, salt, and freshly ground black pepper.
Step 3: Mix Gently, But Thoroughly
This is where the magic starts to happen. Using your hands (the best tools for the job!), gently mix all the ingredients together. Be careful not to overmix, as this can make your meatloaf tough. You want to mix just until everything is well combined and incorporated. Imagine you’re giving the ingredients a loving hug – that’s the kind of gentle mixing we’re aiming for.
Step 4: Shape Your Meatloaf
Now it’s time to give your meatloaf its form. If you’re using a baking sheet, gently shape the mixture into a freeform loaf, about 8 inches long and 4-5 inches wide. If you’re using a loaf pan, lightly grease it and press the mixture evenly into the pan. A freeform loaf often results in a better crust development, which adds another layer of deliciousness.
Step 5: Prepare the Glaze
While your meatloaf is getting ready for its bake, let’s whip up that irresistible glaze. In a small bowl, whisk together the 1/2 cup ketchup, 2 tablespoons of packed brown sugar, 1 tablespoon of apple cider vinegar, and 1 teaspoon of Dijon mustard. This simple concoction will transform your meatloaf into something truly spectacular.
Step 6: Bake the Meatloaf
Place your shaped meatloaf onto the prepared baking sheet (or in the loaf pan) and pop it into the preheated oven. Bake for 45 minutes.
Step 7: Glaze and Continue Baking
After 45 minutes, carefully remove the meatloaf from the oven. Brush about half of your prepared glaze evenly over the top and sides of the meatloaf. Return the meatloaf to the oven and continue baking for another 30 minutes, or until the internal temperature reaches 160°F (71°C) on a meat thermometer. The glaze should be caramelized and slightly sticky.
Step 8: REST! (The Hardest Part)
This is arguably the most crucial step for a perfectly moist meatloaf. Once it’s out of the oven and reached that ideal temperature, let your Bacon Cheeseburger Meatloaf rest for at least 10-15 minutes before slicing. This allows the juices to redistribute throughout the meat, ensuring every slice is tender and moist. Don’t skip this!
Step 9: Serve and Enjoy!
Slice your beautifully rested meatloaf into thick, satisfying portions. You can serve it with the remaining glaze on the side, or give it another light brush of glaze before serving. Prepare for the compliments to roll in!
Nutritional Information (Approximate per Serving)
Calories: 450-550 (varies based on exact ingredients and portion size)
Protein: 30-35g
Fat: 25-35g
Carbohydrates: 15-20g
Sodium: Varies greatly based on bacon and added salt.
Healthier Alternatives: Guilt-Free Indulgence
While this recipe is undeniably delicious as is, we understand that sometimes you want to lighten things up without sacrificing flavor.
Leaner Ground Meat: Swap the 80/20 ground beef for 90/10 or even 93/7 ground turkey or chicken. You might need to add a little extra moisture (like a splash more milk or a tablespoon of olive oil) to prevent dryness.
Whole Wheat Breadcrumbs: Use whole wheat panko or regular whole wheat breadcrumbs for added fiber.
Reduced Sodium Bacon: Look for lower-sodium bacon options, or cook your bacon ahead of time and blot it exceptionally well to remove excess fat.
Reduced Sugar Glaze: Use sugar-free or low-sugar ketchup and opt for a natural sweetener like stevia or erythritol if you’re watching sugar intake.
Load up on Veggies: Mix finely grated zucchini or carrots into the meatloaf mixture. They add moisture, nutrients, and bulk without dramatically altering the flavor.
Serving Suggestions: What Pairs Perfectly?
This Bacon Cheeseburger Meatloaf is versatile and pairs beautifully with classic comfort food sides.
Mashed Potatoes: A timeless pairing. Creamy, buttery mashed potatoes are the perfect bed for a slice of meatloaf.
Roasted Vegetables: Broccoli, Brussels sprouts, or asparagus roasted with a touch of olive oil and seasoning offer a healthy and delicious contrast.
Coleslaw: A crisp, tangy coleslaw cuts through the richness of the meatloaf beautifully.
Corn on the Cob: Especially during the summer months, sweet corn is a delightful accompaniment.
A Simple Green Salad: For a lighter option, a fresh green salad with a vinaigrette provides balance.
Common Mistakes to Avoid
Even the best recipes can go awry with a few common pitfalls. Here’s how to ensure your Bacon Cheeseburger Meatloaf is a roaring success:
Overmixing the Meat: As mentioned, this is the number one culprit for a tough meatloaf. Mix just until combined.
Not Resting the Meatloaf: Skipping the rest period means you’ll lose precious juices when you slice it, resulting in a drier final product. Be patient!
Undercooking: Always use a meat thermometer to ensure your meatloaf reaches a safe internal temperature of 160°F (71°C).
Too Much Binder: While breadcrumbs and eggs are essential, using too much can make the meatloaf dense and pasty. Stick to the measured amounts.
Forgetting the Glaze: The glaze is a flavor game-changer. Don’t skip it!
Storing Tips: Savvy Storage for Leftovers
Lucky you if you have leftovers! This meatloaf reheats beautifully.
Refrigeration: Let the meatloaf cool completely, then store it in an airtight container in the refrigerator for up to 3-4 days.
Reheating: Reheat slices in a skillet over medium-low heat with a splash of broth or water until warmed through, or microwave them on a safe plate. You can also reheat individual slices in a toaster oven for a slightly crispier edge.
Freezing: You can freeze cooled meatloaf slices. Wrap them tightly in plastic wrap and then in foil or place them in a freezer-safe container. It will keep in the freezer for up to 2-3 months. Thaw in the refrigerator before reheating.
Conclusion: A Flavorful Victory!
This Bacon Cheeseburger Meatloaf is more than just a meal; it’s a celebration of comfort food at its finest. It takes two beloved classics and merges them into something new, exciting, and incredibly delicious. Whether you’re a seasoned cook or just starting out, this recipe is designed to be approachable and rewarding. So, gather your ingredients, get ready for some delicious mixing, and prepare to impress yourself and your loved ones with a dinner that’s sure to become a family favorite.
Ready to dive into this flavor adventure? Give this Bacon Cheeseburger Meatloaf a try and let us know what you think in the comments below!
Frequently Asked Questions
_***What kind of ground beef should I use?***_
We recommend an 80/20 blend of ground beef for the best balance of flavor and moisture. If you prefer leaner meat, use 90/10 or 93/7, but consider adding a little extra moisture to the mixture to prevent it from drying out.
_***Can I make this meatloaf ahead of time?***_
Yes! You can fully assemble the meatloaf and refrigerate it for up to 24 hours before baking. You can also prepare it and bake it, then reheat it. For best results, bake the day of serving.
_***My meatloaf is a little dry. What went wrong?***_
Common causes for dry meatloaf include overmixing the meat, overbaking, or not allowing it to rest. Using leaner ground beef without adding extra moisture can also contribute. Ensure you’re using an 80/20 blend, don’t overmix, and let it rest for at least 10 minutes after baking.
_***Can I add vegetables to the meatloaf?***_
Absolutely! Finely chopped bell peppers, mushrooms, or grated zucchini work well. Just be sure to sauté them first to remove excess moisture, and add them to the meat mixture.
_***How do I get a good crust on my meatloaf?***_
Shaping the meatloaf into a freeform loaf on a baking sheet, rather than in a loaf pan, promotes better air circulation and allows for more surface area to caramelize, resulting in a wonderful crust. The glaze also helps create a beautiful, slightly sticky exterior.
This bacon cheeseburger meatloaf recipe combines the savory flavors of a classic cheeseburger with the heartiness of meatloaf. It’s loaded with bacon, cheese, and a perfect blend of spices for a comforting meal everyone will love.
Ingredients
Scale
1 ½lbs ground beef
½lb bacon, cooked and crumbled
1 cupshredded cheddar cheese
1 cupbreadcrumbs
2large eggs
1small onion, finely chopped
1 tbspketchup
1 tbspmustard
1 tspWorcestershire sauce
1 tspgarlic powder
1 tspsalt
½ tspblack pepper
Instructions
Notes
For a smoky flavor, use smoked bacon and smoked cheddar.
Top the meatloaf with extra ketchup or barbecue sauce during the last 10 minutes of baking for added flavor.
Leftovers can be stored in an airtight container in the fridge for up to 3 days.
Are you on the hunt for a truly exceptional crispy ground beef tacos recipe that will have your family begging for more? You’ve come to the right place! There’s something undeniably satisfying about the combination of perfectly seasoned, juicy ground beef nestled within a crunchy taco shell, crowned with your favorite fresh toppings. This recipe isn’t just about a meal; it’s about creating joyful food memories. We’re talking about that delightful crunch, the savory aroma, and the explosion of flavors with every bite. If you’ve ever wondered how to achieve that perfect taco experience at home, this guide will walk you through every step, ensuring your taco nights are a guaranteed success. Get ready to transform your ordinary weeknight dinner into an extraordinary fiesta!
Ingredients List
This crispy ground beef tacos recipe is built on simple, readily available ingredients that come together to create something truly spectacular. The magic happens when quality ingredients meet proper technique.
1 lb Ground Beef: Choose an 80/20 blend for the best flavor and juiciness. The fat renders beautifully, creating moist, flavorful meat. If you prefer leaner, opt for 90/10, but be prepared for a slightly less rich result.
1 tbsp Olive Oil: Or your preferred cooking oil. This helps to get a good sear on the beef and prevents sticking, especially in the initial browning stage.
1 medium Onion, finely chopped: Adds a sweet and savory base. Yellow or white onions work wonderfully here. Finely chopping ensures they distribute evenly and cook down.
2 cloves Garlic, minced: The aromatic heart of many savory dishes, garlic provides depth and a pungent kick that complements the beef.
1 packet (approx. 1 oz) Taco Seasoning: This is your shortcut to authentic taco flavor! You can use store-bought for convenience, or make your own blend (see substitutions).
1/2 cup Water or Beef Broth: Used to create a rich, slightly saucy filling that clings to the meat and shells. Broth adds a deeper savory note.
Optional: 1-2 tbsp Tomato Paste: For an extra layer of rich, concentrated tomato flavor and a deeper color. Adds a lovely umami boost.
12 Taco Shells: Crispy corn shells are traditional and provide that satisfying crunch. You can also use soft flour tortillas if preferred. Consider “hard” shells that you bake until extra crispy!
Homemade Taco Seasoning: If you don’t have a packet, mix 1 tbsp chili powder, 1 tsp cumin, 1 tsp paprika, 1/2 tsp garlic powder, 1/2 tsp onion powder, 1/4 tsp dried oregano, 1/4 tsp salt, and a pinch of cayenne pepper (or to taste).
Vegetarian Option: Swap ground beef for crumbled firm tofu, lentils, or a plant-based ground “meat.” Adjust seasoning as needed.
Spice Level: Add a pinch of cayenne pepper or red pepper flakes to the seasoning mix for extra heat.
Timing
This recipe is designed for efficiency, making it perfect for busy weeknights. The active cooking time is minimal, allowing you to get dinner on the table quickly.
Prep time: 10 minutes
Cook time: 15-20 minutes
Total time: 25-30 minutes
Compare this to the average taco recipe which might take 30-45 minutes depending on complexity and ingredient prep. Our goal here is speed without sacrificing flavor!
Step-by-Step Instructions
Follow these simple steps to create the most delicious crispy ground beef tacos you’ve ever made. We’ll guide you through each stage to ensure perfection!
Step 1: Brown the Ground Beef
Grab a large skillet and place it over medium-high heat. Add your 1 lb of ground beef. Break it apart with your spoon or spatula as it begins to cook. Let it brown, stirring occasionally, until nicely seared and no pink remains. You want those little crispy bits to form – that’s where the flavor is!
Step 2: Drain Excess Fat
Once the beef is fully browned, it’s time to carefully drain off any excess grease. You can either tilt the skillet and spoon out the fat, or carefully pour it into a heat-safe container. Leaving too much fat can make the tacos greasy. A little bit of fat is good for flavor, but we want to manage it.
Step 3: Add Seasoning
Reduce the heat to medium-low. Now, let’s add the flavor! Sprinkle in your packet of taco seasoning (or your homemade blend). If you’re using tomato paste, add it now as well. Stir everything together, ensuring the seasoning coats every piece of beef.
Step 4: Simmer to Thicken
Pour in the 1/2 cup of water or beef broth. Stir well to combine, scraping up any browned bits from the bottom of the pan. Increase the heat slightly to bring the mixture to a simmer. Once simmering, reduce the heat back to low, cover (partially, if you still want it to thicken), and let it cook for about 5-10 minutes. This allows the flavors to meld and the sauce to thicken beautifully, coating the beef in a rich, savory sauce.
Step 5: Warm “Cajita” Tortillas (Option)
While the meat is simmering, prepare your taco shells. If you’re using crispy shells, follow the package instructions (often a quick bake in the oven). If you’re using soft tortillas, warm them lightly in a dry skillet, a microwave, or directly over a low gas flame for a few seconds per side. This makes them pliable and enhances their flavor.
Step 6: Assemble Your Tacos
Now for the fun part! Take your warm taco shells or tortillas. Spoon a generous amount of the seasoned ground beef mixture into each one. Then, pile on your favorite toppings: crunchy shredded lettuce, juicy diced tomatoes, melty shredded cheese, cool sour cream, zesty salsa, and fresh cilantro. Don’t forget a squeeze of lime! Customize each taco to your heart’s content.
Nutritional Information
While exact values will vary based on specific ingredients and portion sizes, here’s an estimated nutritional breakdown per taco (assuming standard filling, 1 taco shell, and moderate toppings like cheese and lettuce – without sour cream/salsa):
Calories: Approx. 200-250 kcal
Protein: Approx. 15-20g
Fat: Approx. 12-18g
Carbohydrates: Approx. 10-15g
Fiber: Approx. 1-2g
Note: This is a general estimate. Adding more cheese, sour cream, or guacamole will increase calories and fat content. Using leaner beef will decrease fat.
Healthier Alternatives
Looking to lighten up your tacos without sacrificing taste? Here are some smart swaps:
Leaner Protein: Use 93% lean or 96% lean ground beef, or even ground turkey or chicken.
Whole Wheat or Corn Tortillas: Opt for whole wheat tortillas or naturally gluten-free corn tortillas for more fiber and fewer refined carbs.
Greek Yogurt: Replace sour cream with plain Greek yogurt for a protein-rich, tangy topping.
Abundant Veggies: Load up on colorful toppings like bell peppers, corn, shredded carrots, and extra lettuce.
Baked Shells: If using corn shells, bake them until crispy instead of frying.
Reduced Sodium Seasoning: Use a low-sodium taco seasoning packet or make your own with reduced salt.
Serving Suggestions
Tacos are incredibly versatile! Serve them as the star of your meal, or as part of a larger Mexican-inspired spread. Consider pairing them with:
Rice and Beans: Classic companions. Cilantro-lime rice or black beans are perfect.
Corn Salad: A fresh, vibrant side dish like a corn and black bean salsa.
Chips and Salsa/Guacamole: For a true fiesta appetizer.
A refreshing drink: Margaritas, horchata, or iced tea.
Common Mistakes to Avoid
Even with a simple recipe, a few common missteps can make a difference. Avoid these:
Overcrowding the Pan: When browning the beef, don’t add too much at once. This will steam the meat instead of browning it, leading to less flavor and texture. Cook in batches if necessary.
Not Draining Enough Fat: Greasy tacos are unpleasant. Make sure to drain excess fat thoroughly.
Adding Liquid Too Soon: Brown the beef first to develop flavor before adding liquids for simmering.
Undercooking or Overcooking the Simmer: The simmer time is crucial for melding flavors and thickening the sauce. Too short, and it’s watery; too long, and it can get dry.
Using Stale Toppings: Fresh, crisp toppings make a huge difference.
Storing Tips
Leftover ground beef taco filling stores beautifully! Here’s how to keep it fresh:
Refrigeration: Allow the cooked ground beef mixture to cool completely before transferring it to an airtight container. It will keep in the refrigerator for 3-4 days.
Reheating: Gently reheat the filling in a skillet over low heat, adding a tablespoon or two of water or broth if it seems dry. You can also microwave it until heated through.
Assembly: Due to the risk of sogginess, it’s best to assemble tacos just before serving after reheating the filling. Store crisp taco shells or tortillas separately.
Frequently Asked Questions
***Is it possible to make the ground beef filling ahead of time?***
Absolutely! The ground beef filling can be made one to two days in advance. Store it in an airtight container in the refrigerator and reheat gently on the stovetop or in the microwave before assembling tacos.
***Can I freeze the ground beef taco filling?***
Yes, the filling freezes very well. Let it cool completely, then store it in a freezer-safe container or heavy-duty freezer bag for up to 2-3 months. Thaw overnight in the refrigerator and reheat as usual.
***What kind of ground beef is best for tacos?***
An 80/20 lean-to-fat ratio is ideal for classic ground beef tacos. The fat provides moisture and flavor as it renders during cooking. Leaner options like 90/10 can be used, but you might need to add a little extra oil or broth to prevent dryness.
***How do I make the taco shells extra crispy?***
To ensure maximum crispiness, you can either bake pre-made shells in a single layer on a baking sheet at 350°F (175°C) for 5-8 minutes, or gently warm them in a dry skillet over medium heat until they feel firm and crisp. Be careful not to burn them!
***Can I add other vegetables to the meat mixture?***
Yes, you can! Finely diced bell peppers or corn kernels can be sautéed with the onions and garlic before adding the beef, or stirred in during the simmering stage.
Enjoy your incredible homemade Crispy Ground Beef Tacos! If you try this recipe, please leave a comment below and let us know how it turned out. Your feedback is invaluable!
Savor the ultimate crispy ground beef tacos recipe, a family favorite! Juicy ground beef, perfectly seasoned, tucked into crunchy taco shells and topped with fresh ingredients.
Ingredients
Scale
1lb ground beef
1packet taco seasoning
¼ cupwater
8crispy taco shells
1 cupshredded lettuce
1 cupshredded cheese
½ cupdiced tomatoes
¼ cupsour cream (optional)
Salsa or hot sauce (optional)
Instructions
Notes
For extra flavor, add diced onions or jalapeños to the ground beef while cooking.
Customize toppings to include guacamole, black olives, or fresh cilantro.
Serve with a side of refried beans or Mexican rice for a complete meal.
Are you tired of weeknight dinners feeling like a culinary chore?
In today’s fast-paced world, finding meals that are both delicious and incredibly easy to prepare can feel like a treasure hunt. If you’re nodding along, seeking a solution that delivers hearty flavor with minimal effort, then our Slow Cooker Garlic Butter Beef Bites & Potatoes recipe is about to become your new weeknight hero. This isn’t just another beef and potato dish; it’s a flavor explosion of tender, succulent beef bites, buttery, melt-in-your-mouth potatoes, and a rich, aromatic garlic butter sauce, all simmering to perfection in your slow cooker. Imagine coming home to a meal that tastes like it came from a high-end restaurant but required barely any active cooking time. That’s the magic of this recipe! It’s designed to simplify your life without sacrificing taste, perfect for busy families, meal prep enthusiasts, or anyone who appreciates comfort food that truly nourishes the soul and satisfies the stomach. Get ready to transform your dinner routine with this exceptionally flavorful and surprisingly simple slow cooker wonder.
Ingredients You’ll Need
Gather these simple yet impactful ingredients to create your Slow Cooker Garlic Butter Beef Bites & Potatoes. The beauty of this recipe lies in its straightforward ingredient list and the incredible depth of flavor it achieves.
Beef Chuck Roast: 2 lbs, cut into 1-inch cubes. Look for good marbling for maximum tenderness and flavor. (Substitution: Sirloin or rump roast can work, but may require a slightly shorter cooking time.)
Baby Potatoes: 1.5 lbs, quartered or halved if small. Yukon Golds or red potatoes work wonderfully, offering a creamy texture when cooked. (Sensory description: Their waxy skin and buttery flesh absorb the savory juices beautifully!)
Butter: 1/2 cup (1 stick), unsalted. This is the foundation of our rich sauce. (Substitution: Ghee or a high-quality olive oil can be used in a pinch, though the classic butter flavor is unparalleled.)
Garlic: 6-8 cloves, minced. Don’t be shy with the garlic; its punchy aroma and flavor are key. (Sensory description: Freshly minced garlic releases a pungent, sweet aroma that transforms any dish.)
Beef Broth: 1 cup, low-sodium. This provides moisture and a savory base for the sauce. (Substitution: Red wine can add an extra layer of complexity, use half wine, half broth.)
Worcestershire Sauce: 2 tablespoons. Adds a umami depth and slight tang.
Dried Thyme: 1 teaspoon. Earthy and aromatic, it complements the beef perfectly. (Substitution: Fresh thyme sprigs can be used, about 2-3 sprigs.)
Salt: 1 teaspoon, or to taste.
Black Pepper: 1/2 teaspoon, or to taste.
Optional: Fresh Parsley: 2 tablespoons, chopped, for garnish. Adds a burst of freshness and color.
Optional: Cornstarch Slurry: 1 tablespoon cornstarch mixed with 2 tablespoons cold water (for thickening the sauce, if desired).
Timing is Everything
Prep Time:
15 minutes
Cook Time:
4-6 hours
Total Time:
4.5-6.25 hours
This Slow Cooker Garlic Butter Beef Bites & Potatoes recipe is designed for low and slow cooking, which means most of the time is hands-off in your slow cooker. The 15-minute prep time is significantly less than the average recipe of this type, making it an ideal choice for busy evenings. The total cook time offers flexibility, allowing you to tailor it to your schedule by choosing between the LOW or HIGH setting on your slow cooker. For comparison, a stovetop or oven-baked beef and potato dish often requires active cooking and temperature monitoring for 1-2 hours, whereas this slow cooker method lets you ‘set it and forget it,’ delivering tender results with minimal fuss.
Step-by-Step Instructions
Step 1: Prep the Ingredients
Begin by prepping all your ingredients. Cut the beef chuck roast into uniform 1-inch cubes. This ensures even cooking. Wash the baby potatoes and cut them into halves or quarters, depending on their size, so they are bite-sized. Mince your garlic cloves finely. If you’re using fresh thyme, have your sprigs ready. Having everything prepped and ready to go makes the assembly process incredibly quick and smooth.
Step 2: Combine and Cook
Place the cut beef cubes and prepared potatoes into the insert of your slow cooker. In a medium bowl, whisk together the melted butter, minced garlic, beef broth, Worcestershire sauce, dried thyme, salt, and black pepper. Pour this flavorful liquid mixture evenly over the beef and potatoes in the slow cooker. Give it a gentle stir to ensure everything is coated.
Cover the slow cooker and set it to cook on LOW for 6-8 hours or on HIGH for 4-5 hours. The longer cooking time on LOW will yield exceptionally tender beef. The potatoes should be fork-tender when done.
Step 3: Finish and Serve
Once the cooking time is complete and the beef is fork-tender and the potatoes are soft, it’s time to serve! If you prefer a thicker, more luscious sauce, you can remove the beef and potatoes to a serving dish, then whisk a cornstarch slurry (1 tablespoon cornstarch mixed with 2 tablespoons cold water) into the remaining liquid in the slow cooker. Turn the slow cooker to HIGH and cook for another 10-15 minutes, stirring occasionally, until the sauce has thickened. Alternatively, you can thicken the sauce on the stovetop in a saucepan.
Spoon the garlic butter beef bites and potatoes into serving bowls. Garnish with freshly chopped parsley, if desired, for a pop of color and freshness. Serve immediately and enjoy the incredible aroma and taste.
Nutritional Information
While exact nutritional values can vary based on ingredient brands and portion sizes, a typical serving of this Slow Cooker Garlic Butter Beef Bites & Potatoes recipe provides the following approximate nutritional breakdown:
Calories: 500-650 kcal (depending on fat content of beef and amount of butter)
Protein: 35-45g
Fat: 30-45g (Saturated Fat will be higher)
Carbohydrates: 25-35g
Fiber: 3-5g
Sodium: Varies based on broth and added salt. Using low-sodium broth is recommended.
(Note: This is an estimate. For precise calculations, please use a nutritional calculator with your specific ingredients.)
Healthier Alternatives & Flavor-Preserving Swaps
Looking to lighten up this comforting classic without sacrificing flavor? Here are a few ideas:
Leaner Beef: Opt for leaner cuts of beef like top sirloin or even extra-lean chuck, though they might be slightly less forgiving. Trim excess fat from the chuck roast.
Reduced Butter: While butter is key to the flavor, you can reduce the amount slightly and supplement with a little olive oil or avocado oil. Ghee is also a good option as it has less lactose and casein.
Less Potatoes: You can increase the vegetables! Add chopped carrots, celery, or Brussels sprouts along with the potatoes. They will absorb the delicious broth as well.
Broth Choice: Use low-sodium or no-salt-added beef broth to control sodium intake.
Thickening Agent: If you’re thickening the sauce, consider using arrowroot powder or cornstarch as they are relatively neutral.
Serving Suggestions
This hearty dish is a complete meal on its own, but it also pairs wonderfully with:
A simple green salad with a vinaigrette dressing to cut through the richness.
Steamed broccoli or green beans for added color and nutrients.
Crusty bread to soak up any extra delicious garlic butter sauce.
A sprinkle of red pepper flakes for a touch of heat if you like it spicy.
Common Mistakes to Avoid
To ensure your Slow Cooker Garlic Butter Beef Bites & Potatoes turn out perfectly every time, be mindful of these common pitfalls:
Cutting Beef Unevenly: Inconsistent sizes mean some pieces will be overcooked and dry, while others might remain tough. Aim for uniform 1-inch cubes.
Overcrowding the Slow Cooker: Ensure there’s enough space for heat to circulate. If your slow cooker is too full, the food may not cook evenly or thoroughly. Consider using a larger slow cooker or making a smaller batch.
Not Using Enough Liquid: The slow cooker works by steaming. Insufficient liquid can lead to dried-out food. The specified amount of broth is usually sufficient, but check occasionally.
Skipping the Sear (Optional but Recommended): While this recipe is designed for minimal prep, searing the beef cubes before adding them to the slow cooker can develop a deeper flavor and better texture. This is a step you can add if you have a few extra minutes.
Opening the Lid Too Often: Each time you lift the lid, your slow cooker loses heat, increasing the cooking time significantly. Resist the urge to peek!
Storing Tips
Leftovers of this delicious dish can be stored in an airtight container in the refrigerator for up to 3-4 days. The flavors often meld and deepen overnight, making leftovers just as tasty, if not more so. Reheat gently on the stovetop, in the microwave, or in a low oven until warmed through. If the sauce has solidified, you can add a splash of broth or water when reheating.
Frequently Asked Questions
***What is the best cut of beef for slow cooker recipes?***
For slow cooker recipes, cuts with good marbling and connective tissue, like chuck roast, brisket, or short ribs, are ideal. These cuts break down during the long, slow cooking process, becoming incredibly tender and flavorful. They also hold up well to extended cooking without drying out.
***Can I use frozen beef in my slow cooker?***
It’s generally not recommended to cook raw beef directly from frozen in a slow cooker. The meat may not reach a safe internal temperature quickly enough, increasing the risk of bacterial growth. Thaw your beef completely in the refrigerator before cooking it in the slow cooker.
***My potatoes are still hard after cooking. What went wrong?***
This could be due to several reasons: the potatoes were cut too large, they were added too late in the cooking process (though added at the beginning is best for this recipe), or the cooking temperature was too low/short. Ensure potatoes are cut into smaller, uniform pieces and that your slow cooker is functioning correctly. You may need to extend the cooking time.
***Can I add other vegetables to this recipe?***
Absolutely! Carrots, celery, onions, bell peppers, or Brussels sprouts can be great additions. Add harder vegetables like carrots and onions at the beginning with the potatoes and beef. Softer vegetables like bell peppers might do better added in the last hour or two of cooking to prevent them from becoming mushy.
***How do I make the garlic flavor more intense?***
For a stronger garlic punch, you can roast the garlic cloves before mincing and adding them, or you can lightly sauté the minced garlic in a bit of butter or oil before adding it to the slow cooker. Using more cloves will also increase the intensity.
Your New Go-To Comfort Meal Awaits!
There you have it – an incredibly satisfying, restaurant-worthy meal that’s unbelievably simple to create thanks to the magic of your slow cooker. The Slow Cooker Garlic Butter Beef Bites & Potatoes recipe delivers on flavor, tenderness, and pure comfort, all while practically cooking itself. It’s the perfect solution for those busy weeknights when you crave a delicious, home-cooked meal without the fuss. Don’t let dinner stress you out any longer. Make this recipe your own, savor every bite, and enjoy the ease it brings to your busy life. Give it a try this week and let us know how much you loved it!
Slow Cooker Garlic Butter Beef Bites & Potatoes is a hearty and flavorful recipe featuring tender beef bites, buttery potatoes, and garlic. This easy slow cooker meal is perfect for busy days and brings restaurant-quality comfort food to your table.
Ingredients
Scale
1.5lbs beef stew meat, cubed
1.5lbs baby potatoes, halved
4 tbspunsalted butter, melted
4garlic cloves, minced
1 tspdried thyme
1 tspdried rosemary
1 tsppaprika
Salt and black pepper, to taste
1 cupbeef broth
1 tbspolive oil
Fresh parsley, chopped (for garnish)
Instructions
Notes
For extra flavor, add a splash of Worcestershire sauce to the beef broth.
Use Yukon gold potatoes for a creamy texture, or red potatoes for a firmer bite.
Adjust seasoning to taste before serving.
Nutrition
Calories:395
Sugar:2g
“`
Garlic Parmesan Chicken And Potatoes Skillet Recipe
Garlic Parmesan Chicken And Potatoes Skillet Recipe
Taste the Magic: Your New Favorite One-Pan Meal
Are you tired after a long day and dreading the thought of a mountain of dirty dishes? Do you find yourself scrolling through endless recipe sites looking for something both incredibly delicious and astonishingly easy to make? If you’re nodding along, then you’re in the right place! This Garlic Parmesan Chicken and Potatoes Skillet is your answer to those weeknight dinner dilemmas. Imagine tender, juicy chicken coated in a savory garlic parmesan sauce, nestled alongside perfectly crispy yet fluffy potatoes, all cooked in a single skillet. It’s a symphony of flavors and textures that will have everyone at your table asking for seconds, and it’s surprisingly simple to pull off. This recipe isn’t just a meal; it’s a weeknight savior that proves you don’t need a dozen ingredients or hours of prep to create something truly spectacular.
The Heart of the Flavor: Ingredients You’ll Love
The beauty of this Garlic Parmesan Chicken and Potatoes Skillet lies in its straightforward yet impactful ingredients. Each component plays a vital role in creating that irresistible flavor profile. We’ve also included some suggestions for substitutions to fit your pantry and preferences.
Chicken Thighs or Breasts: About 1.5 lbs, boneless, skinless. Thighs offer more moisture and flavor, while breasts are leaner. Cut into 1-inch pieces for even cooking.
Potatoes: 1.5 lbs Yukon Gold or red potatoes, scrubbed and cut into 1-inch cubes. Their creamy texture and skin-on appeal are perfect here. Substitution: Sweet potatoes offer a lovely sweetness.
Olive Oil: 3-4 tablespoons, for sautéing. Use a good quality extra virgin for best flavor. Substitution: Avocado oil or a neutral vegetable oil.
Garlic: 5-6 cloves, minced. Fresh garlic is key to that pungent aroma and taste. Substitution: 1-2 teaspoons garlic powder if fresh is unavailable, though the flavor will be less intense.
Parmesan Cheese: 1 cup, grated. Freshly grated offers superior melting and flavor. Substitution: Pre-shredded Parmesan can work in a pinch, but will be less creamy.
Heavy Cream: 1/2 cup. This creates the luscious, creamy sauce. Substitution: Half-and-half or whole milk for a lighter sauce, though it may not be as rich.
Chicken Broth: 1/4 cup. Adds depth and moisture. Substitution: Vegetable broth or water.
Italian Seasoning: 1 teaspoon. A blend of herbs like oregano, basil, and thyme. Substitution: A pinch each of dried oregano, basil, and thyme.
Salt and Black Pepper: To taste. Essential for bringing out all the flavors.
Fresh Parsley: 2 tablespoons, chopped (for garnish). Adds a pop of color and freshness. Substitution: Fresh chives or a sprinkle of dried parsley.
Time Well Spent: Prep, Cook, and Enjoy
This recipe is designed for efficiency without sacrificing flavor. Here’s a breakdown of the time commitment:
Prep time: 15 minutes
Cook time: 30 minutes
Total time: 45 minutes
While the average one-pan chicken and potato recipe might take around 50 minutes total, this Garlic Parmesan version clocks in at a swift 45 minutes, making it a fantastic option for busy evenings. The prep is minimal, and the cooking happens mostly hands-off in one glorious skillet!
The Culinary Journey: Step-by-Step to Deliciousness
Follow these simple steps to create your masterpiece. We’re going to build layers of flavor, ensuring every bite is a delight.
Step 1: Prep the Potatoes
Start by thoroughly washing your potatoes. There’s no need to peel them if you prefer a more rustic texture, but if you do peel, do so now. Cut the potatoes into uniform 1-inch cubes. This ensures they cook evenly. Place the cubed potatoes in a medium bowl, toss them with 1 tablespoon of olive oil, salt, and pepper, and set aside. Getting them seasoned early helps them absorb flavor.
Step 2: Prepare the Chicken
Next, prepare your chicken. If using thighs, trim any excess fat. If using breasts, ensure they are of similar thickness. Cut the chicken into bite-sized, 1-inch pieces. Pat the chicken dry with paper towels – this is crucial for getting a good sear. Season the chicken generously with salt, pepper, and Italian seasoning. Set aside next to your seasoned potatoes.
Step 3: Sear the Chicken
Heat 2 tablespoons of olive oil in a large oven-safe skillet (cast iron works wonderfully here!) over medium-high heat. Once the oil is shimmering, add the seasoned chicken pieces in a single layer. Don’t overcrowd the pan; cook in batches if necessary. Sear the chicken for about 3-4 minutes per side, until golden brown. The chicken doesn’t need to be cooked through at this point. Remove the seared chicken from the skillet and set it aside on a plate.
Step 4: Cook the Potatoes
Add the remaining 1 tablespoon of olive oil to the same skillet. Reduce the heat to medium. Add the seasoned potatoes. Spread them out in an even layer. Cook, stirring occasionally, for about 15-20 minutes, or until the potatoes are tender and nicely browned and crispy on the edges. You might need to cover the skillet for the last few minutes to ensure they cook through.
Step 5: Combine and Finish
Once the potatoes are tender and golden, push them to the sides of the skillet to create a space in the center. Add the minced garlic to the center and sauté for about 30-60 seconds until fragrant – be careful not to burn it! Pour in the chicken broth and scrape up any browned bits from the bottom of the pan. Stir in the heavy cream. Bring the sauce to a gentle simmer. Return the seared chicken to the skillet. Sprinkle the grated Parmesan cheese over everything. Let it simmer for another 3-5 minutes, stirring gently, until the chicken is cooked through and the sauce has thickened slightly and coats the chicken and potatoes beautifully. Garnish with fresh chopped parsley just before serving.
Nourishing Details: What’s Inside
This Garlic Parmesan Chicken and Potatoes Skillet is a satisfying meal. While exact nutritional values can vary based on specific ingredients and portion sizes, a typical serving generally includes:
Calories: Approximately 450-600 kcal per serving.
Protein: Around 30-40g (from chicken).
Fat: Around 25-35g (from olive oil, cream, and cheese).
Carbohydrates: Around 25-35g (from potatoes).
*Note: These are estimations and can be significantly altered by ingredient choices (e.g., leaner chicken vs. thighs, light cream vs. heavy cream).*
Lighter Twists: Healthier Swaps
Looking to make this dish a bit lighter without sacrificing that amazing flavor? Here are a few smart swaps:
Chicken: Opt for boneless, skinless chicken breasts for a leaner protein source.
Cream: Substitute heavy cream with half-and-half or even a lower-fat milk. For an even lighter, dairy-free option, consider a cup of unsweetened cashew cream or a blend of vegetable broth and a touch of cornstarch to thicken.
Potatoes: While Yukon Golds are delicious, you can also incorporate other vegetables like broccoli florets, bell pepper chunks, or zucchini slices tossed in with the potatoes for the last 10-15 minutes of cooking. You could also swap some potatoes for cauliflower florets.
Parmesan: Use a little less Parmesan or a reduced-fat variety if you’re concerned about sodium and fat. You’ll still get a good flavor punch.
What to Serve With It
This Garlic Parmesan Chicken and Potatoes Skillet is a hearty meal all on its own, but it pairs wonderfully with a few additions to round out your dining experience:
Fresh Green Salad: A simple side salad with a light vinaigrette provides a refreshing contrast to the richness of the dish.
Steamed or Roasted Broccoli: Serve alongside for an extra veggie boost.
Crusty Bread: Perfect for sopping up any leftover garlic parmesan sauce.
Asparagus: Lightly sautéed or roasted asparagus makes for an elegant addition.
Avoiding Pitfalls: Common Mistakes to Watch For
Even with simple recipes, a few common mistakes can impact the final outcome. Be mindful of these:
Overcrowding the Pan: Seared chicken and crispy potatoes both need space to brown properly. If you crowd the pan, they will steam instead of sear, leading to a less appealing texture. Cook in batches if needed.
Not Patting Chicken Dry: This is crucial for a good sear. Moisture on the surface of the chicken will prevent browning and can lead to a rubbery texture.
Burning the Garlic: Minced garlic cooks very quickly. Adding it too early or cooking it at too high a heat can result in a bitter taste that can ruin the sauce.
Not Cooking Potatoes Through: Ensure potatoes are tender before adding the other ingredients. If they’re still firm, the chicken might overcook before the potatoes are ready.
Keeping it Delicious: Storing Leftovers
This dish reheats well, making it a great meal-prep option.
Refrigeration: Allow the skillet meal to cool completely before transferring it to an airtight container. It will keep in the refrigerator for up to 3-4 days.
Reheating: For best results, reheat gently on the stovetop over low heat, adding a splash of chicken broth or water if the sauce seems too thick. You can also reheat in the microwave, but be mindful of the potatoes potentially becoming softer.
Freezing: While possible, freezing may affect the texture of the potatoes and the creaminess of the sauce. If you choose to freeze, do so in an airtight container for up to 1-2 months. Thaw overnight in the refrigerator before reheating.
Frequently Asked Questions
***Can I use bone-in chicken pieces?***
Yes, you can use bone-in chicken pieces like thighs or drumsticks, but you’ll need to adjust the cooking time significantly. Sear them well, then ensure they cook through completely (internal temperature of 165°F or 74°C), which might require finishing them in the oven after adding the potatoes, or cooking them longer before adding other ingredients.
***What kind of skillet is best?***
A large, oven-safe skillet is ideal, especially if you need to finish the cooking in the oven. Cast iron skillets are fantastic for even heating and achieving a great sear on both the chicken and potatoes. Stainless steel or heavy-duty non-stick skillets also work well.
***Can I make this with different kinds of potatoes?***
Absolutely! While Yukon Golds and red potatoes are recommended for their creamy texture and ability to hold their shape, you can also use russet potatoes. Just be aware that russets can break down more easily and might result in a slightly different texture. Cut them into uniform pieces for best results.
***My sauce isn’t thickening, what should I do?***
If your sauce isn’t thickening, you can let it simmer gently for a few more minutes, uncovered, to allow some of the liquid to evaporate. Alternatively, you can create a slurry by mixing 1 tablespoon of cornstarch with 2 tablespoons of cold water or broth, then stirring it into the simmering sauce until it thickens. Ensure your heat is on medium to gently simmer, not a rolling boil.
***Can I add other vegetables?***
Definitely! This recipe is very adaptable. Bell peppers, onions, mushrooms, zucchini, or asparagus can be added. Add heartier vegetables like onions and peppers earlier with the potatoes, and more tender vegetables like zucchini or spinach towards the end of the cooking process.
Your New Go-To Weeknight Dinner
There you have it – a show-stopping Garlic Parmesan Chicken and Potatoes Skillet that’s as easy to make as it is delicious to eat. This recipe proves that healthy, flavorful, and comforting meals don’t need to be complicated. It’s perfect for busy evenings when you want a satisfying meal without the fuss. Give it a try and let us know what you think in the comments below! Happy cooking!
This Garlic Parmesan Chicken and Potatoes Skillet is a flavorful one-pan meal featuring tender chicken, crispy potatoes, and a delicious garlic parmesan coating. Perfect for busy weeknights or a comforting family dinner.
Ingredients
Scale
4boneless, skinless chicken breasts
1lb baby potatoes, halved
3 tbspolive oil
3cloves garlic, minced
½ cupgrated parmesan cheese
1 tspItalian seasoning
½ tsppaprika
Salt and pepper, to taste
2 tbspfresh parsley, chopped (optional)
Instructions
Notes
For crispier potatoes, use a cast-iron skillet and avoid overcrowding.
Adjust seasoning to taste, and add a pinch of chili flakes for a spicy kick.
Use chicken thighs as an alternative to chicken breasts if preferred.
Are you constantly on the hunt for a dinner that’s both incredibly satisfying and impressively easy to prepare, especially on those chaotic weeknights? If so, a hearty crockpot cowboy stew recipe might just be your new best friend. This comforting, flavor-packed meal, brimming with ground beef, hearty beans, tender potatoes, and a medley of vibrant vegetables, is the answer to your culinary prayers. It’s the kind of slow-cooked magic that transforms humble ingredients into a wholesome dish that guarantees smiles around the dinner table. Forget takeout; this is real, down-home cooking that’s ready when you are.
The Ultimate Hearty Crockpot Cowboy Stew Recipe: Your Weeknight Dinner Hero
In today’s fast-paced world, finding a meal that delivers maximum flavor with minimal effort can feel like striking gold. That’s precisely where this Hearty Crockpot Cowboy Stew recipe shines. It’s a one-pot wonder that proves you don’t need to be a gourmet chef or have hours to spare to create something truly delicious and nourishing for your family. Imagine coming home after a long day to the comforting aroma of slow-cooked goodness wafting through your house. This stew isn’t just a meal; it’s an experience – a warm hug in a bowl that tames hunger and satisfies souls. We’re talking about a foundational recipe that’s adaptable and forgiving, perfect for both seasoned cooks and kitchen novices alike.
Gather Your Cowboy-Proof Provisions
The beauty of cowboy stew lies in its generous use of readily available, robust ingredients. These are the staples that have fueled adventurers and families for generations, coming together in your slow cooker to create something truly special.
Ground Beef: 1.5 to 2 pounds. Look for 80/20 or 85/15 for a good balance of flavor and richness. This is the savory backbone of our stew.
Onion: 1 large, chopped. A yellow or white onion provides a sweet, pungent aroma that mellows beautifully during cooking.
Substitution: Shallots can offer a milder, more refined onion flavor. Two medium leeks (white and light green parts only), thoroughly washed and chopped, are also a fantastic earthy alternative.
Garlic: 4-6 cloves, minced. The more, the merrier! Fresh garlic brings a sharp, indispensable punch of flavor.
Substitution: 1 to 1.5 teaspoons of garlic powder can be used in a pinch, but fresh is always preferred for its vibrant kick.
Beef Broth: 4 cups. Low-sodium is ideal so you can control the saltiness. This liquid gold forms the stew’s flavorful base.
Diced Tomatoes: 1 (28-ounce) can, undrained. Choose fire-roasted for an extra layer of smoky depth. These burst with bright, tangy sweetness.
Kidney Beans: 1 (15-ounce) can, rinsed and drained. Their firm texture and earthy flavor are classic cowboy stew components.
Substitution: Black beans or pinto beans offer a similar heartiness and can be used interchangeably.
Corn: 1 (15-ounce) can, drained, or 1.5 cups frozen corn. Sweet, bright kernels add pops of sunshine and texture.
Substitution: Frozen corn can be stirred in during the last hour of cooking to maintain its sweetness and slight crispness.
Potatoes: 1.5 pounds, cubed (about 4 medium). Yukon Gold or red potatoes hold their shape well and offer a creamy texture.
Substitution: Sweet potatoes can add a lovely sweetness and vibrant orange hue.
Worcestershire Sauce: 2 tablespoons. This adds a deep, umami complexity that’s hard to replicate.
Smoked Paprika: 1 tablespoon. Crucial for that authentic smoky cowboy flavor. Its warm, earthy notes are divine.
Dried Thyme: 1 teaspoon. A classic herb that pairs beautifully with beef and vegetables.
Salt and Black Pepper: To taste. Start with 1 teaspoon of salt and ½ teaspoon of pepper, adjusting as needed.
Optional: A touch of heat: 1/4 teaspoon cayenne pepper or a pinch of red pepper flakes for a subtle kick.
For Thickening (Optional): 2 tablespoons cornstarch mixed with 2 tablespoons cold water (a slurry).
Compared to your average weeknight meal that might take 30-60 minutes from start to finish, this crockpot cowboy stew requires a bit less active time but a longer, slower cooking period. The beauty here is that the ‘cook time’ is largely hands-off. You toss everything in the slow cooker in the morning, and by dinner, a fully formed, lusciously flavored stew awaits. This makes it an ideal candidate for busy days when you want a truly comforting, home-cooked meal without the dinner-time rush.
Step-by-Step: Crafting Your Crockpot Cowboy Stew
Let’s get this hearty stew simmering! This recipe is designed for maximum flavor with minimal fuss. Once you brown the meat and aromatics, your slow cooker does the heavy lifting.
Step 1: Brown the Beef – The Foundation of Flavor
Grab a large skillet and set it over medium-high heat. Add your ground beef and cook, breaking it up with a spoon, until it’s nicely browned and no pink remains. Drain off any excess grease. Browning the beef is a crucial step; it locks in flavor and creates those irresistible savory bits that enrich the entire stew. Don’t skip this!
Step 2: Sauté the Aromatics – Building the Flavor Base
In the same skillet (after draining the beef), add your chopped onion. Sauté for about 5-7 minutes until softened and translucent. Then, add the minced garlic and cook for another minute until fragrant, being careful not to burn it. This aromatic base is the secret to a deeply flavorful stew.
Step 3: Combine and Cook – Letting the Magic Happen
Transfer the browned beef, sautéed onions, and garlic to your slow cooker insert. Add the beef broth, diced tomatoes (undrained), rinsed kidney beans, drained corn, cubed potatoes, Worcestershire sauce, smoked paprika, dried thyme, salt, pepper, and any optional cayenne or red pepper flakes. Give everything a good stir to combine all those beautiful ingredients.
Cover the slow cooker and set it to LOW for 6-8 hours or HIGH for 4-5 hours. The potatoes should be tender, and the flavors should have melded into a harmonious symphony. Resist the urge to lift the lid too often – each time you do, you lose precious heat and extend the cooking time!
Step 4: Thicken and Serve – The Grand Finale
Once the cooking time is up and the potatoes are fork-tender, it’s time for the final flourish. If you prefer a thicker stew, whisk together the cornstarch and cold water in a small bowl to create a slurry. Stir this slurry into the stew in the slow cooker. Turn the heat to HIGH (if it wasn’t already) and let it cook for another 15-30 minutes, stirring occasionally, until the stew has thickened to your desired consistency. Taste and adjust seasonings if necessary – perhaps a little more salt, pepper, or a pinch more smoked paprika?
Ladle the hot, hearty cowboy stew into bowls and serve immediately. Prepare for rave reviews!
Nutritional Nuggets: What’s in Every Hearty Bite
While exact nutritional values can vary based on specific ingredients and portion sizes, a typical serving of this Hearty Crockpot Cowboy Stew is rich in protein, fiber, and essential vitamins and minerals. It’s a well-rounded meal that will keep you feeling full and satisfied.
Calories: Approximately 400-500 per serving (varies with fat content of beef and specific additions).
Protein: High, from the ground beef and beans.
Fiber: Excellent source from the beans, potatoes, and vegetables.
Vitamins & Minerals: Rich in iron, potassium, vitamin C, and B vitamins.
Healthier Trail Mix: Smart Swaps for a Lighter Stew
Looking to lighten things up without sacrificing flavor? Here are some simple, delicious swaps:
Leaner Protein: Opt for 90% lean ground turkey or chicken, or even lean ground beef (93% or 96% lean). The flavor will be slightly different but still delicious.
Reduce Sodium: Use “no salt added” canned beans and vegetables, and always choose low-sodium broth.
Boost Veggies: Add extra non-starchy vegetables like carrots, celery, bell peppers (any color), or zucchini. They add volume, nutrients, and flavor for minimal calories.
Whole Grains: Serve over brown rice or quinoa instead of white rice or bread for added fiber and nutrients.
Cornstarch vs. Flour: While cornstarch is lower in calories than flour, consider using a small amount of whole wheat flour for thickening if you want to lean into whole grains.
Serving the Bounty: How to Best Enjoy Your Cowboy Stew
This stew is practically a meal in itself, but a few pairings can elevate the experience:
Crusty Bread: Perfect for soaking up every last drop of that rich broth. Sourdough or a hearty whole-wheat loaf are excellent choices.
Cornbread: A classic companion! A slightly sweet cornbread is a delightful contrast to the savory stew.
Simple Green Salad: A light, crisp salad offers a refreshing counterpoint to the hearty stew.
Dollop of Sour Cream or Greek Yogurt: Adds a cool, tangy creaminess.
Shredded Cheese: A sprinkle of sharp cheddar can be a delightful, cheesy addition.
Gems from the Trail: Avoiding Common Cowboy Stew Mistakes
Even with a foolproof recipe like this, a few common pitfalls can be avoided:
Not Browning the Beef Properly: This is where a lot of flavor is built. Don’t crowd the pan, and make sure the beef is nicely browned.
Skipping the Aromatics: Onions and garlic are flavor powerhouses. Sautéing them before adding to the slow cooker releases their full potential.
Overcrowding the Slow Cooker: Ensure your slow cooker isn’t packed too full. Ingredients need space to cook evenly. If you have too much, consider using a larger slow cooker or splitting it into two.
Not Adjusting Seasoning: Taste and adjust salt and pepper towards the end. Broth and canned ingredients can vary in saltiness.
Lifting the Lid Too Often: Patience is a virtue, especially with slow cooking. Every time you lift the lid, you lose heat and prolong cooking time.
Taming the Leftovers: Storing Your Cowboy Stew
The great news is that cowboy stew often tastes even better the next day!
Refrigeration: Allow the stew to cool slightly, then transfer it to an airtight container and store in the refrigerator for up to 3-4 days.
Freezing: This stew freezes beautifully. Portion it into freezer-safe containers or bags and freeze for up to 3 months. Thaw overnight in the refrigerator before reheating.
Reheating: Gently reheat on the stovetop over low heat, stirring occasionally, or microwave in individual servings until heated through. You may need to add a splash more broth or water if it has thickened considerably.
Frequently Asked Cowboy Questions
What makes it “cowboy” stew?
The term “cowboy stew” typically refers to a hearty, rustic stew made with simple, robust ingredients like ground beef, beans, potatoes, and vegetables. It reflects the kind of nourishing, filling meal that cowboys on the trail might have prepared.
Can I make this ahead of time?
Absolutely! Cowboy stew is a fantastic candidate for meal prep. You can make it a day or two in advance, store it in the refrigerator, and reheat it gently. In fact, the flavors often meld and deepen overnight, making it even more delicious.
What other vegetables can I add?
Feel free to customize! Carrots, celery, bell peppers (any color), peas, green beans, or even a handful of spinach added near the end of cooking would be wonderful additions.
My stew is too thin, what can I do?
The easiest way to thicken it is with a cornstarch slurry (2 tbsp cornstarch mixed with 2 tbsp cold water) stirred in during the last 30 minutes of cooking on high heat. Another option is to mash some of the potatoes against the side of the slow cooker or stir in a tablespoon or two of flour or a little tomato paste directly into the stew.
A Bowl Full of Comfort, Ready When You Are
This Hearty Crockpot Cowboy Stew recipe is more than just a meal; it’s a culinary tradition brought to life in your kitchen. It’s proof that simple ingredients, slow-cooked with care, can create something truly extraordinary. Whether you’re feeding a hungry family after a long day, warming up on a chilly evening, or simply craving a dish that feels like a hug in a bowl, this stew delivers. So, gather your ingredients, embrace the simplicity of your slow cooker, and get ready to savor every rich, comforting bite. Happy cooking!
This hearty crockpot cowboy stew recipe is a comforting, flavor-packed meal made with ground beef, beans, potatoes, and veggies. Perfect for busy weeknights or cozy family dinners, this slow-cooked stew delivers a satisfying and wholesome dish everyone will love.
Ingredients
Scale
1lb ground beef
4medium potatoes, diced
1can (15 oz) kidney beans, drained and rinsed
1can (15 oz) pinto beans, drained and rinsed
1can (15 oz) diced tomatoes
1can (8 oz) tomato sauce
1medium onion, chopped
1 cupfrozen corn
1 cupbeef broth
2cloves garlic, minced
1 tspchili powder
1 tspsmoked paprika
½ tspcumin
Salt and pepper to taste
Instructions
Notes
Add more broth if you prefer a thinner stew consistency.
Top with shredded cheese or fresh herbs for extra flavor.
This stew freezes well for up to 3 months; thaw and reheat when ready to serve.
Nutrition
Calories:320
Sugar:4g
“`
Hi I'm Emy
I’m passionate about sharing a diverse collection of sweet and savory recipes that I’ve meticulously tested and perfected in my own kitchen.