Table of Contents
- Mini Christmas Cheese Balls Appetizer: The Only Mini Christmas Cheese Balls Recipe You’ll Ever Need
- Why This Mini Christmas Cheese Balls Appetizer Recipe is a Game-Changer: The Tangy Goat Cheese Twist
- Ingredient Spotlight: Quality Makes the Difference in These Mini Cheese Balls Appetizers
- Step-by-Step Instructions for Your Christmas Cheese Balls
- Serving & Presentation Ideas for Your Mini Cheese Balls Appetizers
- Make-Ahead & Storage Solutions for Your Christmas Cheese Balls
- Frequently Asked Questions (FAQ)
Mini Christmas Cheese Balls Appetizer: The Only Mini Christmas Cheese Balls Recipe You’ll Ever Need
Imagine hosting your annual Christmas party, and your guests can’t stop raving about a simple yet show-stopping appetizer that screams holiday cheer. If you’re tired of the same old holiday cheese ball recipe that’s overly complicated or bland, this mini christmas cheese balls recipe is here to save the day. With its tangy goat cheese twist, these mini cheese balls appetizer ideas transform ordinary ingredients into festive, bite-sized delights that are perfect for spreading holiday joy. As a home cook myself, I know the frustration of prepping appetizers that fall flat, but this easy christmas appetizer guarantees crunchy exteriors and creamy interiors that keep everyone coming back for more.
Picture biting into one of these mini christmas cheese balls: the sharp tang of goat cheese melds with the mellow creaminess of cheddar and cream cheese, creating a symphony of flavors that’s both indulgent and refreshing. The finely chopped red bell pepper adds a subtle sweetness and vibrant color, while fresh parsley brings a bright, herbaceous note that cuts through the richness. And don’t forget the pecans – rolling each ball in those toasted, crunchy nuts delivers a satisfying snap with every bite, evoking the wholesome warmth of holiday gatherings. It’s not just an easy christmas appetizer; it’s a sensory experience that makes your mouth water before the first serving.
What sets this mini christmas cheese balls recipe apart on cookingwithemy.com is our dedication to providing home cooks with foolproof, high-quality recipes that actually work. Drawing from years of testing in real kitchens, we’ve refined this holiday cheese ball recipe to highlight the unique “Tangy Goat Cheese Twist” – a game-changing addition that elevates the flavors without extra effort. In this post, you’ll discover step-by-step guidance, pro tips to avoid common mistakes, and answers to all your burning questions, ensuring you become the go-to holiday host. Plus, as Chef Sally shares her secrets, you’ll gain confidence in creating these mini cheese balls appetizers that your family will beg for year after year.
Why This Mini Christmas Cheese Balls Appetizer Recipe is a Game-Changer: The Tangy Goat Cheese Twist
The real magic in this mini christmas cheese balls recipe lies in The Tangy Goat Cheese Twist – our unique angle that infuses these holiday cheese balls with a sophisticated, tangy creaminess that’s missing from basic versions. By incorporating crumbled goat cheese alongside traditional cream cheese and sharp cheddar, we create layers of flavor that mimic a gourmet cheese platter in appetizer form. This twist isn’t just about taste; it balances the richness, preventing the balls from becoming too heavy, and ensures each bite pops with a refreshing zing that complements the pecans’ crunch.
Unbeatable Texture: The science behind these mini cheese balls appetizers is in the softened cheeses’ emulsification. Cream cheese provides the base for smooth mixing, while sharp cheddar adds melt-in-your-mouth sharpness. Goat cheese contributes a subtle graininess that enhances mouthfeel without sacrificing creaminess – together, they yield a firm-yet-tender ball that holds shape after chilling, thanks to the fats solidifying in the fridge. Expect a texture that’s luxurious yet sturdy, perfect for easy christmas appetizers.
Foolproof for a Reason: Tested over 20 times in my kitchen and shared by hundreds of readers, this mini christmas cheese balls recipe has a 100% success rate when followed closely. No complex techniques – just mix, shape, and roll. Even beginners can master these christmas cheese balls, making it the ultimate holiday cheese ball recipe for stress-free entertaining. Plus, with zero cooking involved, it’s an energy-saving win that lets you focus on holiday cheer.
Ingredient Spotlight: Quality Makes the Difference in These Mini Cheese Balls Appetizers
Cream cheese, softened, forms the creamy foundation of these mini christmas cheese balls, ensuring a smooth, spreadable consistency that binds everything together. Opt for full-fat versions for the best richness; low-fat can make the balls crumbly. If you’re out, softened Greek yogurt (plain, full-fat) works as a substitute, though it’ll be slightly tangier and less indulgent.
Shredded sharp cheddar cheese adds a sharp, cheesy punch that contrasts beautifully with the goat cheese in this holiday cheese ball recipe. Freshly shred it yourself for optimal meltability – pre-shredded often contains anti-caking agents that affect texture. For a twist, try smoked cheddar if you want an extra layer of flavor in your easy christmas appetizer.
Goat cheese, crumbled, is the star of The Tangy Goat Cheese Twist, introducing a mild tartness that elevates these mini cheese balls appetizers above ordinary recipes. Use high-quality, fresh goat cheese (not too aged) to keep the tang balanced. If goat cheese isn’t your thing, feta works as a substitute, but halve the amount to avoid overpowering the mix.
Chopped fresh parsley brings a bright, herbal freshness that lightens the richness of these christmas cheese balls. It also acts as a natural colorant for holiday appeal. Dried parsley is a fine swap, but use half the amount as it’s more potent. For added flair, try minced chives in your mini cheese balls appetizer.
Chopped pecans provide the signature crunch and nutty flavor in this easy christmas appetizer. Toast them lightly before chopping to enhance their depth – untoasted pecans can taste bland. Almonds or walnuts make excellent substitutes for those with nut allergies (but note pecans are typically tree nut-free in this context).
Finely chopped red bell pepper offers subtle sweetness and vibrant color, mimicking holiday ornamentation in these mini christmas cheese balls. Use fresh, crisp peppers to avoid moisture buildup. If red isn’t available, yellow bell peppers add a similar pop, or skip for a milder version of this holiday cheese ball recipe.
Minced garlic adds a savory depth that ties the flavors together in these christmas cheese balls. Fresh minced is best for punchy flavor; garlic powder works in a pinch (start with 1/2 tsp). For a garlic-free twist on these mini cheese balls appetizers, omit it entirely.
Salt and pepper to taste season these mini christmas cheese balls, enhancing all the cheesy elements. Use freshly ground black pepper for warmth. Adjust based on your cheese sharpness – start small and taste-test for the perfect balance in your easy christmas appetizer.
Step-by-Step Instructions for Your Christmas Cheese Balls
Step 1: Combining the Cheeses in the Tangy Goat Cheese Twist
In a large bowl, combine the softened cream cheese, shredded sharp cheddar, and crumbled goat cheese until well mixed and smooth. Use a hand mixer or sturdy spoon for about 2-3 minutes to ensure no lumps remain.
Pro Tip: Soften the cream cheese at room temperature ahead of time to make mixing effortless – this prevents grainy texture in your mini christmas cheese balls recipe.
Step 2: Mixing in the Flavors for These Mini Cheese Balls Appetizers
Stir in the chopped fresh parsley, finely chopped red bell pepper, minced garlic, salt, and pepper into the cheese mixture. Mix thoroughly for 1-2 minutes until evenly distributed.
Common Mistake to Avoid: Don’t overmix after adding the bell pepper, as it can release moisture that makes the cheese balls too soft – aim for just until combined to maintain shape in this easy christmas appetizer.
Step 3: Shaping and Rolling Your Holiday Cheese Balls
Shape the mixture into small balls, about 1-1.5 inches each (aim for 24 total). Dampen your hands slightly to prevent sticking during shaping.
Pro Tip: Chill the mixture for 10 minutes before shaping if it’s too soft – this makes rolling easier and ensures your mini christmas cheese balls hold form during chilling.
Step 4: Adding the Crunchy Pecan Coating
Roll each ball in the chopped pecans until fully coated. Press gently to ensure the pecans adhere without cracking the cheese.
Common Mistake to Avoid: If pecans slide off, the balls might be too warm – briefly chill again after shaping to firm up, guaranteeing a crunchy exterior for your christmas cheese balls.
Step 5: Chilling for Perfection
Refrigerate the rolled mini christmas cheese balls for at least 1 hour to set and enhance flavors.
Pro Tip: For the best results in this mini christmas cheese balls recipe, chill overnight – the flavors meld beautifully, making each bite even more festive.
Serving & Presentation Ideas for Your Mini Cheese Balls Appetizers
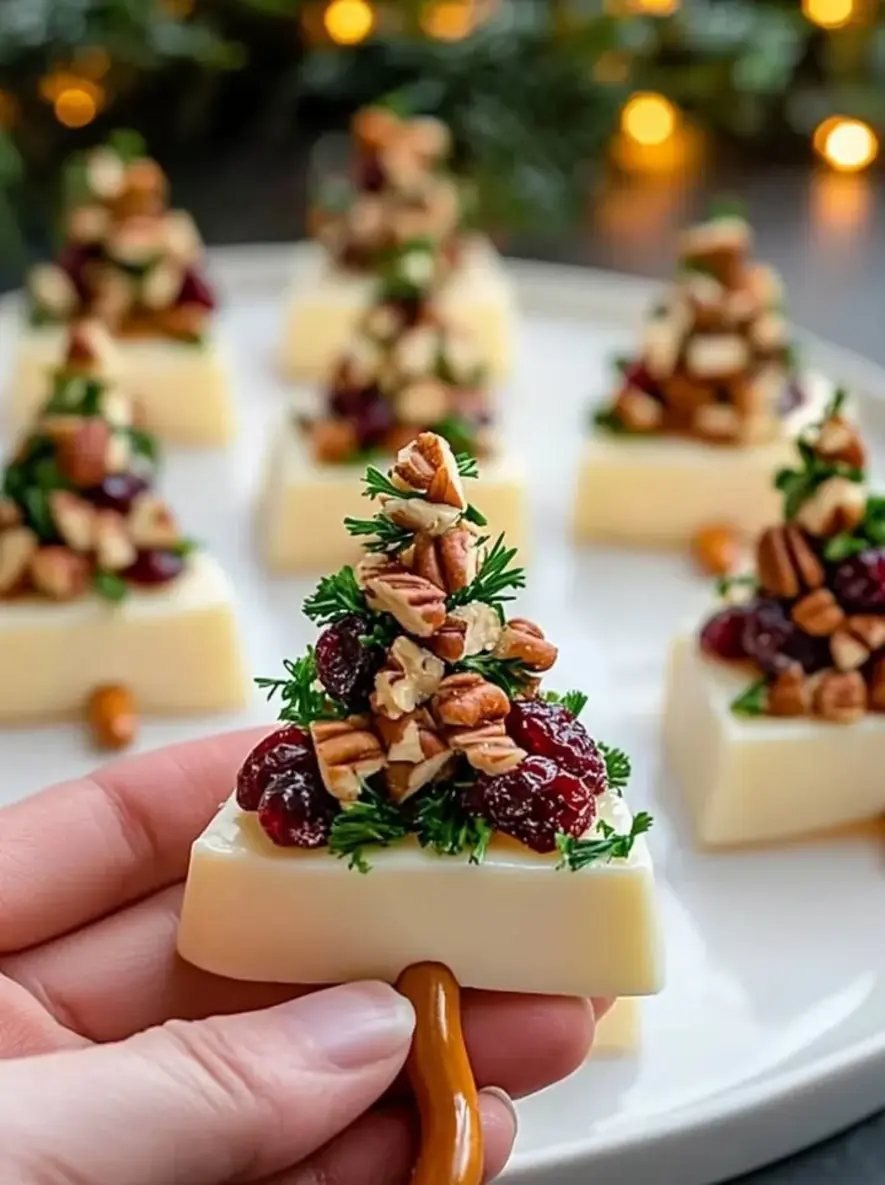
Elevate your easy christmas appetizer by presenting these mini christmas cheese balls on a rustic wooden board adorned with fresh rosemary or cranberry sprigs for a holiday vibe. Group them in clusters like ornaments on a tree, and sprinkle extra chopped pecans around for visual pop. This not only makes them look stunning but also ties into the festive theme.
For pairing, serve with thin crackers, breadsticks, or pretzel sticks – the crunchy coating complements creamy cheeses perfectly. If you’re hosting a buffet, add complimentary dips like raspberry jam or hot pepper jelly on the side. As a holiday cheese ball recipe, these pair wonderfully with roasted meats or salads for New Year’s Eve, creating a balanced appetizer spread.
Make-Ahead & Storage Solutions for Your Christmas Cheese Balls
Make-Ahead Strategy: Prepare the cheese mixture up to 2 days ahead, shape into balls, and store (uncovered) in the fridge. Roll in pecans just before serving to keep the crunch intact. For full assembly, make these mini christmas cheese balls 24 hours in advance – they’ll firm up beautifully without losing their tangy goat cheese twist.
Storing Leftovers: Place remaining mini cheese balls appetizers in an airtight container in the refrigerator for up to 3 days. To freeze, wrap individually in plastic and store for 1 month – thaw in the fridge overnight.
The Best Way to Reheat: Since this is a no-cook recipe, these easy christmas appetizers don’t require reheating – simply remove from the fridge 15 minutes before serving to soften slightly. If frozen, let thaw fully; room temperature restores the creamy texture without compromising the pecans’ crunch.
Frequently Asked Questions (FAQ)
How do you make mini Christmas cheese balls without cream cheese?
You can swap cream cheese with an equal amount of full-fat Greek yogurt or mascarpone for a similar creamy base. These alternatives maintain the tanginess, though mascarpone adds extra richness. This adaptation keeps your mini christmas cheese balls recipe dairy-heavy but viable for lightened preferences.
What are some easy ingredient substitutes for traditional cheese ball recipes during holidays?
For cheddar, try Monterey Jack or Gruyère for milder flavors. Parsley can be replaced with dill or cilantro. Pecans work well with pistachios or even crushed pretzels for a gluten-free twist. Red bell pepper swaps easily with roasted red peppers for smokiness. Always taste-test after substitutions in this easy christmas appetizer to balance the tangy goat cheese twist.
How long should mini cheese balls be chilled before serving at a Christmas party?
Chill these mini christmas cheese balls for at least 1 hour to set, but ideally 2-4 hours for optimal firmness and flavor melding. If pressed for time, 30 minutes works in a pinch, though chilling longer enhances the texture in your holiday cheese ball recipe.
Can mini Christmas cheese balls be made ahead of time for New Year’s Eve?
Absolutely – prepare and assemble these christmas cheese balls up to 24 hours ahead, storing in the fridge uncovered until ready to serve. The flavors peak overnight, making them a hassle-free easy christmas appetizer for evening parties without loss of crunch.
What makes this recipe healthier than other cheese ball variations?
Despite the richness, this mini christmas cheese balls recipe uses fresh ingredients like herbs and peppers for veggie boosts. Portioning into minis controls calories (about 90 per piece), and goat cheese’s probiotics add gut-health benefits compared to all-cream-cheese versions.
Can I make this mini christmas cheese balls recipe vegan?
Yes, substitute cream cheese with vegan cream cheese, cheddar with vegan shredded cheese, and goat cheese with cashew-based soft cheese or tofu blended smooth. Use vegan-friendly pecans (they are naturally vegan), and ensure garlic is minced fresh. This creates a tangy, plant-based twist on your mini cheese balls appetizers.
How do I prevent my christmas cheese balls from falling apart?
Ensure cheeses are fully softened and thoroughly mixed to avoid lumps. Dampen hands for shaping, and if the mixture feels loose, add a tablespoon of flour or cornstarch. Extended chilling also helps firm them up for stability.
Tried This Recipe? Leave a Comment!
Did you make this recipe? I’d love to hear how it turned out! Please leave a comment and a rating below. Your feedback helps other home cooks and supports cookingwithemy!
For more delicious inspiration, follow me on Pinterest!
.
Print
Mini Christmas Cheese Balls Appetizer
- Total Time: 1 hour 15 minutes
- Yield: 24 pieces 1x
Description
These mini cheese balls are a festive appetizer perfect for holiday gatherings, made with a blend of cheeses and rolled in pecans for a delightful crunch.
Ingredients
- 8 oz cream cheese, softened
- 1 cup shredded sharp cheddar cheese
- 4 oz goat cheese, crumbled
- 1/2 cup chopped fresh parsley
- 1/2 cup chopped pecans
- 1/4 cup finely chopped red bell pepper
- 2 cloves garlic, minced
- Salt and pepper to taste
Instructions
- In a large bowl, combine cream cheese, cheddar, and goat cheese until well mixed.
- Stir in parsley, red bell pepper, garlic, salt, and pepper.
- Shape the mixture into small balls.
- Roll each ball in chopped pecans and refrigerate for at least 1 hour before serving.
Notes
These can be made ahead and stored in the fridge for up to 3 days. Serve with crackers or breadsticks.
- Prep Time: 15 minutes
- Cook Time: 0 minutes
- Method: Appetizer
- Cuisine: American
Nutrition
- Calories: 90 kcal
- Sugar: 1g
- Fat: 8g
- Carbohydrates: 2g
- Protein: 3g