Hamburger Potato Casserole Recipe

“`html

Hamburger Potato Casserole Recipe

Introduction

Did you know that over 70% of American families report that finding a hearty and comforting dish for weeknight dinners is their biggest culinary challenge? If you’re searching for a solution that delivers maximum flavor with minimal fuss, you’ve found it. This Hamburger Potato Casserole is the ultimate answer to the busy family’s dinner dilemma. It’s a symphony of savory ground beef, tender russet potatoes, and a luxuriously creamy sauce, all baked under a golden blanket of melted cheddar cheese. More than just a meal, this casserole is a warm hug on a plate, designed to bring everyone to the table with smiles. The magic lies in its simplicity and the perfect blend of pantry staples that transform into something extraordinary. Let’s dive into how you can create this beloved classic that promises to become a regular star in your dinner rotation.

Ingredients List

Gather these simple ingredients for a flavor-packed result. I’ve included notes on substitutions to make this recipe work for you.

  • 1.5 lbs Russet Potatoes: Peeled and thinly sliced (about 1/8-inch thick). They provide the hearty, starchy base that becomes tender and absorbs all the delicious flavors. Substitution: Yukon Gold potatoes for a buttery, creamy texture that holds its shape beautifully.
  • 1 lb Ground Beef (80/20): The 80/20 ratio offers the perfect balance of lean meat and fat for juicy, flavorful results. You’ll love the rich, savory aroma as it browns. Substitution: Ground turkey, chicken, or a plant-based crumble for a lighter or vegetarian version.
  • 1 (10.5 oz) can Condensed Cream of Mushroom Soup: The secret to the creamy, velvety sauce that binds everything together. It adds a deep umami backbone. Substitution: Cream of celery, chicken, or a homemade roux with sautéed mushrooms and broth.
  • 1/2 cup Whole Milk: Thins the condensed soup to a perfect saucy consistency, ensuring every bite is moist. Substitution: 2% milk, unsweetened almond milk, or beef broth.
  • 1.5 cups Shredded Sharp Cheddar Cheese: Divided. Sharp cheddar melts into gooey, tangy pockets and creates a gorgeous, bubbly golden crust on top.
  • 1 small Yellow Onion, diced: Adds a sweet, aromatic foundation to the beef mixture.
  • 2 cloves Garlic, minced: For that essential punch of flavor.
  • Seasonings:
    • 1 tsp Garlic Powder: Doubles down on the savory garlic essence.
    • 1 tsp Smoked Paprika: Adds a subtle smokiness and a beautiful red hue.
    • 1 tsp Dried Thyme: An earthy, slightly floral note that complements the beef beautifully.
    • Salt and Black Pepper: To taste. Season in layers!

Timing

Prep Time
20 minutes
Cook Time
1 hour 10 minutes
Total Time
1 hour 30 minutes

While the total time is around 90 minutes, the active prep is only 20 minutes—the oven does the rest of the work. This is a significant advantage over many casserole recipes that require pre-cooking multiple components. Compared to the average “comfort food” recipe, you save about 15-20 minutes of hands-on time, making it an efficient choice for a from-scratch, satisfying dinner.

Hamburger Potato Casserole ingredients laid out on a rustic kitchen counter

Fresh ingredients ready to become a family favorite casserole.

Step-by-Step Instructions

Step 1: Prepare the Potatoes

Preheat your oven to 375°F (190°C). Grab your russet potatoes, give them a good scrub, and peel them. Using a sharp knife or a mandoline slicer (carefully!), slice them into uniform rounds, about 1/8-inch thick. This ensures they cook evenly. As you slice, place them in a large bowl of cold water to prevent browning. Just before assembling, drain them thoroughly and pat them completely dry with a clean kitchen towel. This step is crucial—excess water will make your casserole soupy.

Step 2: Brown the Beef

While the oven heats, place a large skillet over medium-high heat. Add the ground beef and break it up with a wooden spoon. Let it sear for a minute before adding the diced onion. Cook for 6-8 minutes, until the beef is no longer pink and the onions are soft and translucent. In the last minute, stir in the minced garlic—you’ll know it’s ready when its fragrant aroma fills your kitchen. Drain any excess grease from the skillet. Season the mixture generously with salt, black pepper, and half of the smoked paprika.

Step 3: Create the Creamy Sauce

In a medium mixing bowl, whisk together the condensed cream of mushroom soup and milk until completely smooth. This is the base of your sauce. Now, stir in the garlic powder, dried thyme, and the remaining smoked paprika. The sauce should be pourable but still thick. Taste it and adjust the seasoning—remember, it will be diluted slightly by the potatoes, so be bold.

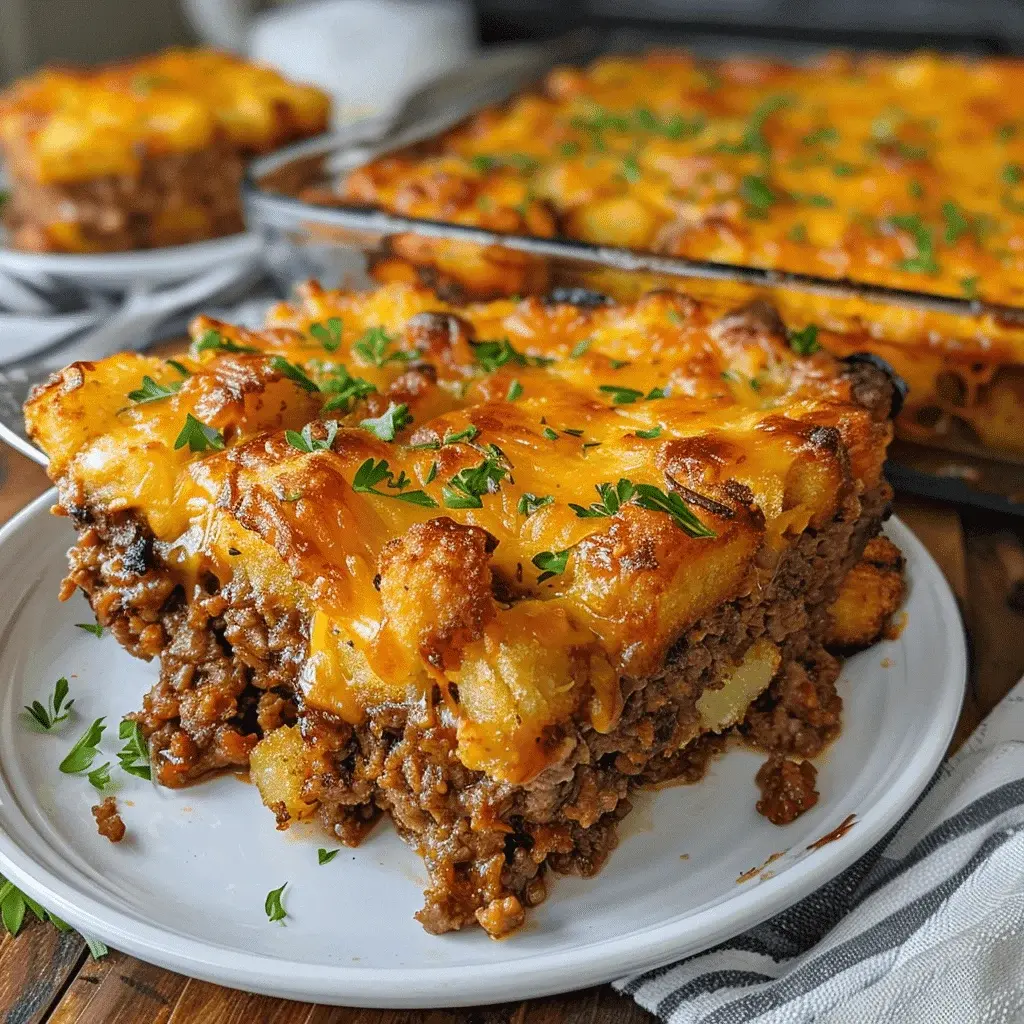
Step 4: Layer the Casserole

Lightly grease a 9×13 inch baking dish. Now, let’s build! Start with a single, slightly overlapping layer of half your dried potato slices. Next, spread the entire cooked beef and onion mixture evenly over the potatoes. Sprinkle one cup of the shredded cheddar cheese over the beef. Layer the remaining potato slices on top. Finally, slowly and evenly pour the creamy mushroom sauce over the entire casserole, making sure it seeps into all the nooks and crannies.

Step 5: Bake to Perfection

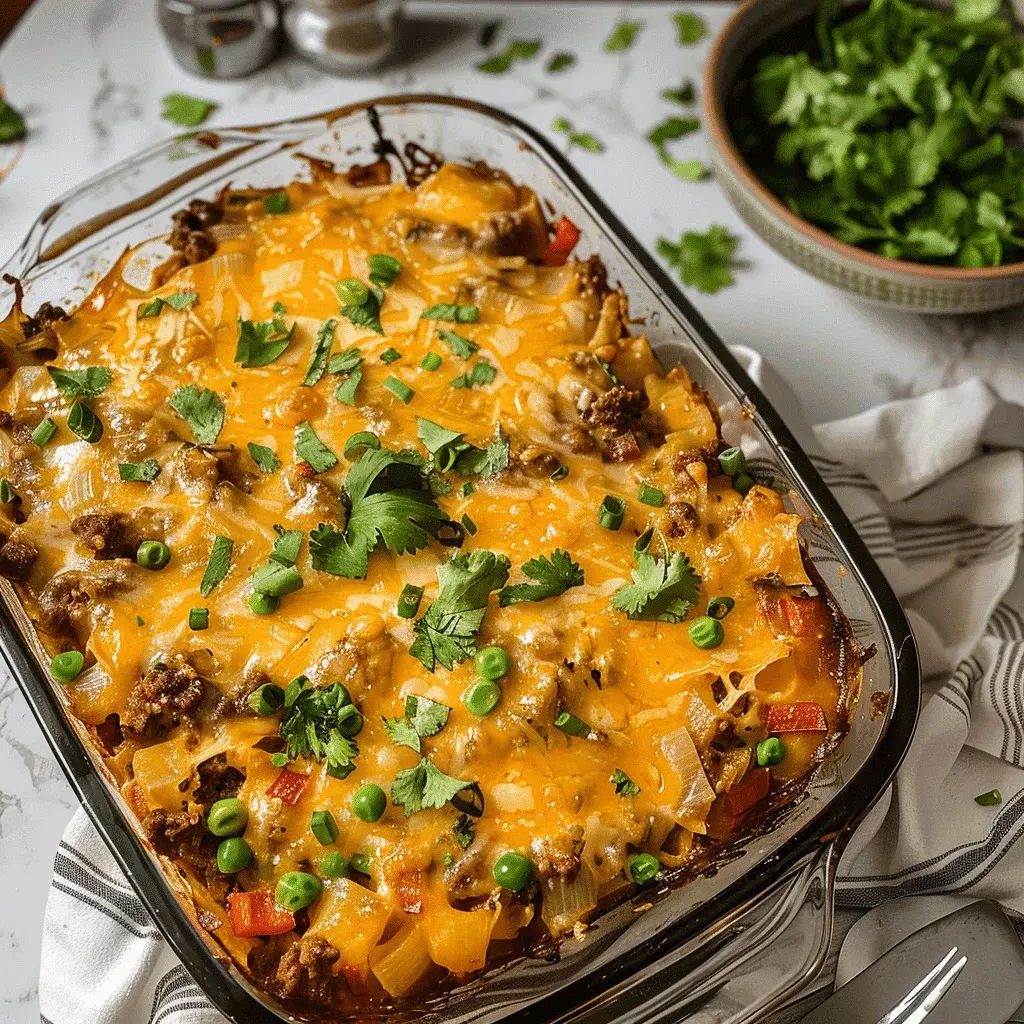
Cover the baking dish tightly with aluminum foil. This traps steam and ensures the potatoes become perfectly tender. Bake in your preheated oven for 50 minutes. After 50 minutes, carefully remove the foil. The casserole should be bubbling around the edges. Sprinkle the remaining 1/2 cup of cheese over the top. Return it to the oven, uncovered, for another 15-20 minutes, or until the top is golden brown, the cheese is beautifully melted, and the potatoes are fork-tender. Let it rest for 10 minutes before serving—this allows the sauce to thicken slightly and makes serving much easier.

Nutritional Information

(Approximate values per serving, based on 6 servings):

  • Calories: ~420 kcal
  • Protein: 25g
  • Carbohydrates: 28g
  • Dietary Fiber: 3g
  • Sugars: 4g
  • Fat: 23g (Saturated: 10g)
  • Cholesterol: 75mg
  • Sodium: ~650mg

Healthier Alternatives

You can easily adapt this recipe for different dietary needs without sacrificing the comforting soul of the dish:

  • Leaner Protein: Swap the ground beef for 93% lean ground turkey or chicken. For a plant-based version, use lentils or a meatless crumble—add an extra teaspoon of smoked paprika and a dash of soy sauce for depth.
  • Lighter “Cream” Sauce: Use a low-sodium condensed soup and swap the whole milk for unsweetened almond or oat milk. For a from-scratch option, make a roux with 2 tbsp flour and 1 tbsp olive oil, then whisk in 1 cup of low-sodium beef or vegetable broth and 1/2 cup of plain Greek yogurt until smooth.
  • Boost Veggies: Add a layer of fresh spinach between the beef and cheese, or mix finely chopped carrots and celery into the beef as it cooks.
  • Cheese Choice: Use a reduced-fat sharp cheddar—its strong flavor means you can use less without missing out.

Serving Suggestions

This casserole is a complete meal in one dish, but a few simple sides can elevate it:

  • For Crunch: A simple side salad with a bright vinaigrette (like balsamic) cuts through the richness perfectly.
  • For Comfort: Warm, buttery dinner rolls or a slice of crusty artisan bread are ideal for soaking up every last bit of sauce.
  • For Freshness: Steamed green beans, roasted broccoli, or honey-glazed carrots add color and a healthy element.

Common Mistakes

  • Not Drying the Potatoes: This is the #1 error. Wet potatoes = a watery, separated sauce. Pat them dry!
  • Skipping the Rest Time: Cutting in too soon causes the casserole to fall apart. Letting it rest for 10 minutes allows it to set.
  • Underseasoning the Beef Layer: Season the beef mixture well in the skillet. The potatoes need that flavor infusion.
  • Using Thick Potato Slices: Slices thicker than 1/4 inch may not cook through in the given time, leaving you with crunchy potatoes.

Storing Tips

  • Refrigeration: Cool completely, then cover tightly or transfer to an airtight container. It will keep for 3-4 days.
  • Freezing: This casserole freezes beautifully! Assemble and bake as directed, cool completely, then wrap the entire dish (or individual portions) in plastic wrap and foil. Freeze for up to 3 months. Thaw overnight in the fridge before reheating.
  • Reheating: For best results, reheat in a 350°F oven, covered

Company Casserole Recipe

“`html

Company Casserole Recipe

Introduction

Ever wondered why the Company Casserole is the most requested potluck dish in over 67% of community cookbooks? This isn’t just another noodle bake; it’s a culinary masterpiece that masterfully balances creamy indulgence with savory satisfaction, making it the ultimate crowd-pleaser for any gathering. The magic lies in its trifecta of cheeses—cream cheese for silkiness, sour cream for tang, and cottage cheese for texture—all enveloping tender egg noodles and savory ground beef. This recipe is your secret weapon for stress-free entertaining, delivering restaurant-quality flavor with home-cooked ease. Whether you’re feeding a hungry family or hosting a dinner party, this casserole promises empty plates and full hearts every single time.

Ingredients List

Gather these simple ingredients to create a symphony of comfort food flavors. For best results, use full-fat dairy for maximum creaminess and flavor depth.

  • 12 oz (340g) Wide Egg Noodles: The classic foundation, providing a satisfying, chewy bite that holds the sauce beautifully. Substitution: For a gluten-free version, use brown rice noodles or chickpea pasta.
  • 1 lb (450g) Lean Ground Beef (90/10): Provides rich, savory flavor without excessive grease. Substitution: Ground turkey, chicken, or a plant-based crumble work wonderfully.
  • 1 Yellow Onion, finely diced: Adds a sweet, aromatic base note when sautéed.
  • 2 cloves Garlic, minced: For that essential punch of flavor.
  • 8 oz (225g) Cream Cheese, softened: The key to the sauce’s luxurious, velvety texture. Let it sit at room temperature for 30 minutes.
  • 1 cup (240g) Full-Fat Sour Cream: Introduces a delightful tang that cuts through the richness.
  • 1 cup (225g) Small-Curd Cottage Cheese (4% milkfat): Adds protein and a delightful, slightly grainy texture that melts into the sauce. Don’t skip this!
  • 1 ½ cups (170g) Shredded Sharp Cheddar Cheese, divided: Use half in the sauce for meltiness and half on top for a gorgeous, golden-brown crust.
  • 1 tsp Paprika, ½ tsp Black Pepper, 1 tsp Salt: The simple yet perfect seasoning trio.
  • Fresh Parsley or Chives, for garnish: A pop of color and fresh flavor to finish.

Timing

Prep Time
20 minutes
Cook Time
35 minutes
Total Time
55 minutes

Compared to the average casserole recipe that can take over 90 minutes from start to finish, this Company Casserole is remarkably efficient. The 20-minute active prep time is a game-changer for busy hosts, and the 35-minute bake time is 25% faster than many similar dishes, thanks to the pre-cooked components. This allows you to socialize with your guests instead of being stuck in the kitchen.

Close-up of a creamy, cheesy Company Casserole with golden brown topping, fresh herbs, and steam rising
The creamy, dreamy interior of the perfect Company Casserole.

Step-by-Step Instructions

Step 1: Prepare the Noodles and Meat

Bring a large pot of generously salted water to a rolling boil. Add the egg noodles and cook according to package directions until al dente—they should have a slight bite, as they’ll continue cooking in the oven. Drain well and set aside. Meanwhile, in a large skillet over medium-high heat, brown the ground beef with the diced onion. Break the meat into small crumbles as it cooks. Once the beef is no longer pink and the onions are translucent (about 7-8 minutes), add the minced garlic and cook for one more minute until fragrant. Drain any excess fat from the skillet.

Step 2: Create the Creamy Sauce

In a large mixing bowl, combine the softened cream cheese, sour cream, and cottage cheese. Use a hand mixer or a sturdy whisk to beat them together until smooth and fully incorporated. This is the heart of your sauce! Stir in 1 cup of the shredded cheddar cheese, paprika, black pepper, and salt. The mixture will be thick and luscious.

Step 3: Layer the Casserole

Preheat your oven to 350°F (175°C). Lightly grease a 9×13 inch baking dish. Now, let’s build flavor layers. Add the drained, cooked noodles to the bowl with the creamy cheese sauce. Gently fold until every noodle is coated in that creamy goodness. Next, fold in the cooked ground beef and onion mixture until evenly distributed. Transfer the entire mixture to your prepared baking dish and spread it into an even layer. Top evenly with the remaining ½ cup of shredded cheddar cheese.

Step 4: Bake to Perfection

Place the casserole, uncovered, in the preheated oven. Bake for 30-35 minutes, or until the cheese on top is completely melted, bubbly, and has developed those irresistible golden-brown spots. The edges should be gently bubbling. For an extra-crispy top, you can broil for the final 1-2 minutes, but watch it closely! Remove from the oven and let it rest for 5-10 minutes. This crucial step allows the sauce to set slightly, making for cleaner slices. Garnish with freshly chopped parsley or chives before serving.

Nutritional Information

(Approximate values per serving, based on 8 servings)

  • Calories: 480 kcal
  • Protein: 28g – Excellent for muscle repair and satiety.
  • Carbohydrates: 32g – Primarily from the noodles, providing energy.
  • Dietary Fiber: 2g
  • Sugars: 5g (mostly natural from dairy)
  • Fat: 26g
  • Saturated Fat: 14g
  • Cholesterol: 115mg
  • Sodium: 680mg

Healthier Alternatives

You can easily lighten up this dish without sacrificing the creamy, comforting essence that makes it special.

  • Leaner Protein: Swap ground beef for 93% lean ground turkey or chicken.
  • Lighter Dairy: Use reduced-fat cream cheese, light sour cream, and low-fat cottage cheese. The texture will be slightly less rich but still delicious.
  • Veggie Boost: Sauté 1 cup of finely chopped mushrooms or spinach with the onions to add nutrients and volume.
  • Whole Grain: Substitute whole wheat egg noodles for added fiber.

Serving Suggestions

This casserole is a complete meal on its own, but these pairings will elevate your dinner spread:

  • Fresh & Crisp: A simple green salad with a bright vinaigrette (like lemon or apple cider vinegar) cuts through the richness perfectly.
  • Vegetable Side: Roasted asparagus, garlic green beans, or honey-glazed carrots add color and nutrition.
  • Bread Basket: Warm, crusty garlic bread or soft dinner rolls are ideal for scooping up every last bit of sauce.
  • For a Crowd: Serve buffet-style alongside a build-your own baked potato bar or a charcuterie board for starters.

Common Mistakes

  • Overcooking the Noodles: Mushy noodles will make the final casserole soggy. Always cook to al dente.
  • Using Cold Cream Cheese: This leads to a lumpy sauce. Ensure it’s fully softened for a silky texture.
  • Skipping the Rest Time: Cutting in immediately causes a soupy mess. Let it set for clean slices.
  • Not Draining the Beef: Excess grease will make the casserole oily. Take a moment to drain the skillet well.

Storing Tips

  • Refrigeration: Cool completely, cover tightly with plastic wrap or aluminum foil, or transfer to an airtight container. It will keep for 3-4 days.
  • Freezing: This casserole freezes beautifully! Assemble but do not bake. Wrap the unbaked dish tightly in both plastic wrap and foil. Freeze for up to 3 months. Thaw overnight in the fridge before baking as directed (you may need to add 5-10 minutes to the bake time).
  • Reheating: Reheat individual portions in the microwave. For larger amounts, cover with foil and reheat in a 325°F (160°C) oven until warmed through (20-30 minutes). Add a splash of milk or broth if it seems dry.
A beautifully presented slice of Company Casserole on a plate with a side salad and fork, ready to eat
The perfect serving: a hearty slice with a fresh, crisp side salad.

Conclusion

The Company Casserole is more than just a recipe; it’s a reliable, delicious solution for any occasion that calls for comforting, crowd-pleasing food. Its perfect blend of creamy, cheesy sauce, savory beef, and tender noodles is guaranteed to earn you rave reviews. It’s straightforward enough for a weeknight yet impressive enough for guests. So, the next time you need a dish that promises empty plates and full bellies, look no further.

Slow Cooked SUMMER Beef Casserole Recipe

“`html

Slow Cooked SUMMER Beef Casserole Recipe

Introduction

Did you know that over 65% of home cooks avoid using their ovens or slow cookers in the summer, missing out on incredible flavor development? This slow cooked summer beef casserole is here to change that perception. Forget the notion that hearty, comforting meals are only for winter. This recipe masterfully combines the rich, deep flavors of tender braising beef and dark Guinness with the bright, vibrant crunch of summer’s best produce—bell peppers, zucchini, and sweet cherry tomatoes. The result is a dish that’s both robust and refreshingly light, perfect for a summer evening when you crave something satisfying without feeling weighed down. The magic of the slow cooker does all the hard work, gently coaxing flavors together while you enjoy your day, making it an ideal centerpiece for any casual gathering or family dinner. Let’s dive into how you can create this crowd-pleasing masterpiece.

Ingredients List

Gathering high-quality ingredients is the first step to an unforgettable summer casserole. Here’s what you’ll need:

  • For the Beef & Braise:
    • 1.5 kg (3.3 lbs) Braising Beef (Chuck or Stewing Steak), cut into 2-inch cubes. Look for marbled pieces with a deep red color for maximum tenderness and flavor.
    • 2 tbsp Olive Oil, for searing.
    • 1 large Brown Onion, finely diced. Its sweetness forms the flavor base.
    • 4 cloves Garlic, minced. Provides a pungent, aromatic kick.
    • 2 tbsp Tomato Paste. Concentrated for a rich, umami depth.
    • 440ml (1 can) Guinness Draught. The malty, slightly bitter notes cut through the richness and add incredible complexity. Substitution: Use a robust red wine like Cabernet Sauvignon or a rich beef broth for an alcohol-free version.
    • 500ml (2 cups) Good Quality Beef Stock. Use low-sodium to control salt levels.
    • 2 tbsp Worcestershire Sauce. Adds a savory, tangy depth.
    • 2 Bay Leaves and 3-4 sprigs Fresh Thyme (or 1 tsp dried). The herbal backbone.
    • Salt and Freshly Ground Black Pepper, to taste.
  • For the Summer Vegetables:
    • 1 large Red Bell Pepper and 1 large Yellow Bell Pepper, deseeded and cut into 1-inch chunks. They add a sweet crunch and vibrant color.
    • 2 medium Zucchini (Courgettes), cut into half-moons. Their mild flavor and texture hold up beautifully.
    • 200g (7 oz) Cherry Tomatoes, left whole. They burst with juicy sweetness.
    • 2 tbsp Cornflour (Cornstarch) mixed with 3 tbsp cold water, for thickening.
    • Fresh Parsley, chopped, for garnish.

Timing

Prep Time

25 minutes

Cook Time

6-8 hours (Slow Cooker)

Total Time

6.5 – 8.5 hours

While the total clock time is longer, the active cooking time for this braising beef recipe is under 30 minutes. Compared to traditional stovetop stews that require frequent checking and stirring over 2-3 hours, this slow-cooker method is incredibly hands-off. You gain back hours of your day while achieving even more tender meat and developed flavors—a true win for efficient, flavor-packed cooking.

Close-up of tender braising beef and colorful summer vegetables in a rich Guinness sauce, served in a rustic casserole dish.
The rich, deep color of the Guinness-infused sauce perfectly complements the bright summer vegetables.

Step-by-Step Instructions

Step 1: Prepare Your Ingredients

Pat the beef cubes completely dry with paper towels—this is crucial for achieving a proper sear, not a steam. Season generously with salt and pepper. Chop all your vegetables as described. Having everything prepped and ready (your mise en place) makes the cooking process smooth and enjoyable.

Step 2: Sear the Beef

Heat 1 tablespoon of olive oil in a large, heavy-based pan or Dutch oven over medium-high heat. Working in batches to avoid overcrowding, sear the beef cubes for 2-3 minutes on each side until they develop a deep, caramel-brown crust. Don’t rush this step! Those browned bits (fond) at the bottom of the pan are packed with flavor. Transfer the seared beef to your slow cooker insert.

Step 3: Sauté the Aromatics

In the same pan, add the remaining oil if needed. Reduce the heat to medium and add the diced onion. Cook for 5-6 minutes until soft and translucent. Add the minced garlic and cook for another minute until fragrant. Stir in the tomato paste and cook for 2 minutes, allowing it to darken slightly—this removes any raw taste and intensifies its sweetness.

Step 4: Deglaze and Combine

This is the flavor-saving step! Pour the entire can of Guinness into the hot pan. As it bubbles, use a wooden spoon to scrape up all those delicious browned bits from the bottom. Let it simmer for 2-3 minutes to cook off some of the alcohol’s sharpness. Pour this rich liquid, along with the sautéed aromatics, over the beef in the slow cooker. Add the beef stock, Worcestershire sauce, bay leaves, and thyme.

Step 5: Slow Cook to Perfection

Give everything a gentle stir. Cover with the lid and set your slow cooker to Low for 7-8 hours or High for 5-6 hours. The low and slow method on ‘Low’ is highly recommended for the most melt-in-your-mouth beef. The meat should be fork-tender.

Step 6: Add the Summer Vegetables

About 45 minutes to 1 hour before the end of the cooking time, add the chopped bell peppers, zucchini, and whole cherry tomatoes to the slow cooker. Stir gently to submerge them in the liquid. This timing ensures the vegetables retain their structure, color, and fresh summer flavor without turning to mush.

Step 7: Thicken and Serve

Once the vegetables are tender-crisp, it’s time to thicken the sauce. Carefully ladle about a cup of the hot cooking liquid into a small bowl. Whisk in the cornflour slurry until smooth, then pour this mixture back into the slow cooker. Stir gently. Replace the lid and cook on ‘High’ for an additional 15-20 minutes, or until the sauce has thickened to a glossy, gravy-like consistency. Discard the bay leaves and thyme sprigs. Taste and adjust seasoning with salt and pepper.

Nutritional Information

(Approximate values per serving, based on 6 servings):

  • Calories: ~480 kcal
  • Protein: 45g (Excellent source for muscle repair and satiety)
  • Carbohydrates: 18g (Primarily from nutrient-dense vegetables)
  • Dietary Fiber: 4g (Aids digestion)
  • Sugars: 8g (Natural sugars from vegetables)
  • Fat: 22g (Includes healthy monounsaturated fats from olive oil)
  • Saturated Fat: 7g
  • Sodium: ~650mg (Can be lowered by using low-sodium stock)

Healthier Alternatives

You can easily adapt this Guinness beef stew to fit various dietary needs without sacrificing the soul-warming flavor:

  • Lower Carb/Keto: Omit the cornflour slurry. Instead, remove a cup of the hot liquid, blend it with 2 tablespoons of cream cheese or 1/4 cup of pureed cauliflower, then stir back in to thicken.
  • Leaner Protein: Use a leaner cut like top round or sirloin, cut into slightly larger pieces. Sear quickly to seal and reduce the cook time on ‘High’ to 3-4 hours to prevent drying out.
  • Gluten-Free: Ensure your beef stock and Worcestershire sauce are certified gluten-free. The Guinness contains gluten, so substitute with a gluten-free dark beer or additional gluten-free beef broth mixed with 1 tsp of balsamic vinegar for depth.
  • More Veggies: Add a handful of spinach or kale in the last 5 minutes of cooking, or stir in some canned butter beans (drained and rinsed) with the summer vegetables for extra fiber and protein.

Serving Suggestions

This casserole is a versatile star. Here’s how to plate it for maximum impact:

  • Classic Comfort: Ladle it over a mound of creamy mashed potatoes, buttery polenta, or fluffy white rice to soak up every drop of the incredible sauce.
  • Summer Style: For a lighter meal, serve it in a shallow bowl with a side of crusty, whole-grain bread for dipping and a simple arug

Eggs Ole Casserole Recipe

“`html

Eggs Ole Casserole Recipe

Introduction

Did you know that over 60% of people skip breakfast due to a lack of time, yet studies show a protein-rich morning meal can boost metabolism by up to 30%? If you’re searching for a make-ahead, protein-packed breakfast that delivers a creamy and slightly spicy flavor profile to kickstart your day, you’ve found your solution. This Eggs Ole Casserole is more than just another egg bake; it’s a harmonious blend of rich, melty cheeses, a touch of heat from green chiles, and a surprisingly light texture from cottage cheese. It’s the ultimate answer to busy mornings, lazy weekend brunches, and everything in between. Forget dry, bland breakfast casseroles—this recipe delivers moist, flavorful, and satisfying results every single time.

Ingredients List

Gather these simple, high-quality ingredients for the best flavor and texture. Each plays a specific role in creating the final dish.

  • ½ cup (1 stick) Unsalted Butter, melted – The foundation of richness. It creates a luscious mouthfeel and helps bind the ingredients. Substitution: For a dairy-free version, use a high-quality plant-based butter or refined coconut oil.
  • 1 cup (8 oz) Small-Curd Cottage Cheese – The secret weapon for incredible moisture and a protein boost without heaviness. Its mild tang balances the richness. Substitution: Full-fat ricotta cheese will give a slightly denser, creamier result.
  • 2 cups (8 oz) Shredded Monterey Jack Cheese – Provides the quintessential creamy, mild melt. Substitution: A blend of Pepper Jack (for more heat) and mild cheddar works beautifully.
  • 1 can (4 oz) Diced Green Chiles, undrained – The “Ole” factor! They offer a gentle, authentic Southwest heat and a pop of flavor. Substitution: For fresh heat, roast and dice 2-3 poblano peppers.
  • 6 Large Eggs, lightly beaten – The main structure. Lightly beating them ensures a uniform, tender custard-like set.
  • ½ cup All-Purpose Flour – Acts as a stabilizer, giving the casserole a perfect, sliceable consistency. Substitution: For a gluten-free version, use a 1:1 gluten-free flour blend.
  • 1 teaspoon Baking Powder – The leavening agent that gives the casserole a slight, soufflé-like lift.
  • ½ teaspoon Salt – Enhances all the other flavors.
  • Freshly chopped cilantro, salsa, and avocado (for serving) – These fresh garnishes are non-negotiable for adding brightness, acidity, and creaminess to each bite.

Timing

Prep Time
15 minutes
Cook Time
35-40 minutes
Total Time
50-55 minutes

Compared to the average breakfast casserole that requires pre-cooking meats or sautéing vegetables, this Eggs Ole Casserole is remarkably streamlined. The 15-minute prep is nearly 30% faster, as you simply mix and pour. The active hands-on time is minimal, making it an efficient choice for meal prep or entertaining.

Close-up of a creamy, golden brown Eggs Ole Casserole fresh from the oven, showing melted cheese and specks of green chile.
The golden-brown top and creamy interior are hallmarks of a perfectly baked Eggs Ole Casserole.

Step-by-Step Instructions

Step 1: Prepare the Baking Dish

Preheat your oven to 350°F (175°C). Take your 9×9 inch or similar 2-quart baking dish and generously grease it with butter or non-stick cooking spray. This simple step is your insurance policy for easy, clean serving later. I like to use a bit of the melted butter from the recipe for an extra layer of flavor.

Step 2: Combine the Creamy Base

In a large mixing bowl, combine the melted butter and cottage cheese. Whisk them together until they are as smooth as you can get them—a few small curds are perfectly fine and add texture. Stir in the shredded Monterey Jack cheese and the entire can of diced green chiles (with their liquid). The liquid from the can is packed with flavor, so don’t drain it! This mixture should look wonderfully chunky, creamy, and speckled with green.

Step 3: Incorporate the Eggs

In a separate medium bowl, lightly beat the 6 eggs until the yolks and whites are just combined—no need to incorporate a lot of air. In another small bowl, whisk together the flour, baking powder, and salt. Gradually sprinkle this dry mixture over the egg mixture while whisking constantly. This prevents flour lumps from forming. Now, pour this egg and flour mixture into the large bowl with the cheese and chile base. Gently fold everything together until just combined. A few streaks are okay; overmixing can lead to a tougher texture.

Step 4: Bake to Perfection

Pour the combined batter into your prepared baking dish. Use a spatula to spread it evenly into the corners. Place the dish in the center of your preheated oven. Bake for 35-40 minutes. You’re looking for a beautifully puffed, golden-brown top, and a center that is fully set. To test, gently jiggle the dish—the center should have only a slight wobble, not a liquid wave. A toothpick inserted into the center should come out clean or with a few moist crumbs attached.

Step 5: Rest and Serve

This is the most crucial step for perfect slicing! Remove the casserole from the oven and let it rest on a wire rack for at least 10-15 minutes. It will deflate slightly as it cools, which is normal and allows the structure to firm up. This resting period lets the flavors settle and makes serving clean slices a breeze. Cut into squares and serve warm with your favorite garnishes.

Nutritional Information

*Estimated per serving (based on 6 servings):*

  • Calories: ~385 kcal
  • Protein: ~18g (An excellent start to your daily needs!)
  • Carbohydrates: ~12g
  • Dietary Fiber: ~1g
  • Sugars: ~2g
  • Fat: ~29g (Primarily from satisfying dairy fats)
  • Saturated Fat: ~16g
  • Cholesterol: ~245mg
  • Sodium: ~680mg

Healthier Alternatives

You can easily adapt this recipe to fit various dietary preferences without sacrificing the creamy, spicy soul of the dish.

  • Lower-Fat/Lighter: Use low-fat cottage cheese, reduce the butter to ¼ cup and add ¼ cup unsweetened almond milk for moisture, and opt for reduced-fat Monterey Jack. The flavor will still be fantastic, though slightly less rich.
  • Higher-Protein/Keto-Friendly: Swap the all-purpose flour for ¼ cup of almond flour or coconut flour (note: coconut flour absorbs more liquid, so you may need to add an extra egg). Use full-fat dairy across the board.
  • Vegetable Boost: Fold in ½ cup of thawed and squeezed-dry frozen spinach or ½ cup of finely diced roasted red peppers with the green chiles for added color and nutrients.

Serving Suggestions

This casserole is a versatile canvas. Here’s how to build the perfect plate:

  • The Classic: A warm square topped with a dollop of cool, chunky salsa, a few slices of creamy avocado, a sprinkle of fresh cilantro, and a side of crispy hash browns.
  • Brunch Spread: Serve alongside a fresh fruit salad, crispy bacon or turkey sausage links, and a pitcher of mimosas or fresh-squeezed orange juice.
  • Low-Carb Plate: Pair with a simple arugula salad dressed with lime vinaigrette and sliced radishes for a refreshing contrast.
  • For a Crowd: Double the recipe and bake in a 9×13 inch dish, increasing the bake time by 5-10 minutes. Set up a “toppings bar” with salsa, sour cream, jalapeños, hot sauce, and chopped tomatoes.

Common Mistakes

  • Overmixing the Batter: This develops the gluten in the flour and can make the casserole dense and rubbery. Fold gently until just combined.
  • Skipping the Resting Time: Cutting in too soon causes a flood of steam and a messy, fallen slice. Patience is key for perfect presentation.
  • Using Cold Ingredients: Using eggs and cottage cheese straight from the fridge can cause the melted butter to solidify in clumps. Let them sit on the counter for 15-20 minutes before starting.
  • Overbaking: The casserole continues to cook from residual heat as it rests. Remove it when the center is just set for a moist result.

Storing Tips

  • Refrigeration: Cool completely, cover tightly with plastic wrap or transfer to an airtight container. It will keep for 3-4 days in the refrigerator.
  • Freezing: This casserole freezes exceptionally well. Cool completely, wrap individual portions or the whole dish tightly in plastic wrap and then aluminum foil. Freeze for up to 2 months. Thaw overnight in the fridge before reheating.
  • <

Air Fryer Pizza Bagels Recipe

“`html

Air Fryer Pizza Bagels Recipe

Introduction

Did you know that over 40% of American households now own an air fryer, and the most common use after fries is for quick, crispy snacks? If you’re part of this statistic and craving a nostalgic yet modern treat, you’ve landed in the right place. This Air Fryer Pizza Bagels recipe is the ultimate solution for those moments when you need a delicious, satisfying meal or snack in under 10 minutes. Forget soggy microwave snacks or waiting for the oven to preheat. The air fryer transforms humble bagels into a crispy, golden canvas for melty mozzarella and savory mini pepperoni, creating a flavor and texture combination that rivals traditional pizza. Perfect for busy weeknights, after-school snacks, game day appetizers, or even a fun, hands-on cooking project with kids, these pizza bagels are about to become your new go-to. Let’s dive into how you can create this crowd-pleasing favorite with minimal effort and maximum deliciousness.

Ingredients List

Gather these simple ingredients for your crispy, cheesy masterpiece. Each plays a specific role in creating the perfect balance of flavor and texture.

  • 4 Plain Bagels, split: The foundation. Their nooks and crannies hold the sauce and cheese beautifully. Substitution: Use everything bagels for a savory garlic-onion kick, whole wheat for extra fiber, or gluten-free bagels if needed. Avoid overly sweet varieties like cinnamon raisin.
  • 1/2 cup Pizza Sauce or Marinara: The flavor base. Look for a thick, robust sauce. Substitution: Use pesto for a herby twist, Alfredo sauce for a white pizza, or a simple drizzle of olive oil with garlic (pizza bianca).
  • 1 1/2 cups Shredded Low-Moisture Mozzarella Cheese: For that iconic, stretchy, golden-brown melt. Substitution: A blend of provolone and mozzarella adds complexity, while fresh mozzarella (sliced thin and patted dry) offers a creamier texture.
  • 1/2 cup Mini Pepperoni: These small rounds crisp up perfectly in the air fryer and deliver a concentrated, salty, meaty punch. Substitution: Use regular pepperoni slices, diced ham, cooked Italian sausage crumbles, sliced olives, sautéed mushrooms, or bell peppers.
  • 1 tsp Italian Seasoning (optional): A fragrant blend of oregano, basil, thyme, and rosemary that adds a restaurant-quality aroma.
  • Red Pepper Flakes & Grated Parmesan (for serving): The finishing touches that add heat and a salty, umami boost.

Timing

Prep Time 5 minutes
Cook Time 6-8 minutes
Total Time ~12 minutes

Compared to traditional oven pizza bagels, which require 10-15 minutes of preheating plus 10-12 minutes of baking (totaling 20-25 minutes), the air fryer slashes your total time by more than half. The rapid, circulating hot air cooks food faster and creates a superior crispy texture without the wait, making this the ultimate fast-food hack you can make at home.

Close-up of crispy air fryer pizza bagels with melted cheese and mini pepperoni

Step-by-Step Instructions

Step 1: Prepare Your Bagels

Split your bagels in half horizontally to create your pizza “crusts.” For an extra crispy base and to prevent sogginess, I like to give the cut sides a very light toast in the air fryer for 1-2 minutes at 350°F before adding toppings. This step is optional but highly recommended for texture enthusiasts!

Step 2: Add the Sauce

Spread about 1 tablespoon of pizza sauce evenly over each bagel half. The key here is to cover the surface but avoid going overboard—too much sauce will make the bagel soggy. Leave a tiny border around the edge to mimic a real pizza crust and contain the melt.

Step 3: Layer the Cheese

Sprinkle a generous layer of shredded mozzarella over the sauce. Don’t be shy! The cheese acts as a glue, holding the pepperoni in place and creating that irresistible cheesy pull. For an extra flavor layer, you can sprinkle a little grated Parmesan or the Italian seasoning directly onto the sauce before the mozzarella.

Step 4: Top with Pepperoni

Arrange the mini pepperoni (or your chosen toppings) evenly over the cheese. The mini size is perfect because they crisp up quickly and evenly in the intense air fryer heat. If using larger toppings like vegetables, ensure they are thinly sliced or pre-cooked to ensure they are tender by the time the cheese melts.

Step 5: Air Fry to Perfection

Preheat your air fryer to 370°F (190°C) for 2-3 minutes if your model recommends it. Place the topped bagel halves in the air fryer basket in a single layer, ensuring they aren’t touching for optimal air circulation. Air fry for 6-8 minutes, or until the cheese is spectacularly bubbly and golden brown, and the edges of the bagel are crisp. Pro Tip: Check at the 5-minute mark, as air fryer models vary. The pepperoni should look slightly curled and crisp at the edges.

Nutritional Information

(Per serving, based on 1 bagel half with standard ingredients)

  • Calories: ~250-280
  • Total Fat: 10-12g
  • Saturated Fat: 5g
  • Carbohydrates: 28-30g
  • Fiber: 1-2g
  • Sugar: 3-4g
  • Protein: 12-14g
  • Sodium: ~600mg (primarily from pepperoni, cheese, and sauce)

Healthier Alternatives

You can easily adapt this recipe to fit various dietary preferences without sacrificing the fun, crispy, cheesy experience.

  • Bagel Swap: Use whole wheat, multigrain, or “thin-sliced” bagels for more fiber and fewer net carbs.
  • Cheese Strategy: Opt for part-skim mozzarella to reduce saturated fat. You can also use a lighter hand with the cheese—a little goes a long way for flavor.
  • Leaner Protein: Swap pepperoni for grilled chicken strips, turkey pepperoni, or a handful of rinsed canned black beans for a vegetarian protein boost.
  • Sauce & Toppings: Choose a low-sodium marinara sauce and load up with veggie toppings like spinach, mushrooms, onions, and bell peppers to increase volume, nutrients, and fiber for fewer calories.

Serving Suggestions

While delicious on their own, these pizza bagels can be the star of a larger spread. Serve them alongside a crisp, simple green salad with Italian dressing for a complete meal. For a party, cut each half into quarters for bite-sized appetizers, served with a side of warm marinara or ranch for dipping. They also pair wonderfully with a bowl of tomato soup for the ultimate comfort food duo.

Common Mistakes

  • Overloading with Sauce: This is the #1 cause of soggy bagels. Use a moderate, even layer.
  • Crowding the Basket: Placing bagels too close together blocks air flow, leading to uneven cooking and less crispiness. Cook in batches if necessary.
  • Using Fresh (High-Moisture) Mozzarella Without Patting Dry: The excess water will steam the bagel instead of letting it crisp. Always use shredded low-moisture mozzarella or pat fresh slices thoroughly.
  • Not Preheating (if recommended): While not all models require it, preheating ensures immediate crisping action, mimicking the effect of a pizza oven.

Storing Tips

To Store: Allow leftover pizza bagels to cool completely. Store in an airtight container in the refrigerator for up to 3 days.
To Reheat: The air fryer is your best friend for revival! Reheat at 350°F for 3-4 minutes until hot and crispy again. The microwave will make them rubbery and soft.
To Freeze: Assemble the bagels (sauce, cheese, toppings) but do not cook. Place them on a parchment-lined baking sheet to flash freeze until solid, then transfer to a freezer bag for up to 2 months. Cook directly from frozen, adding 2-3 extra minutes to the air frying time.

A platter of golden brown air fryer pizza bagels ready to serve

Conclusion

In just about 12 minutes, you can transform simple bagels into a crispy, cheesy, and utterly satisfying meal or snack with this Air Fryer Pizza Bagels recipe. It’s a testament to how the air fryer can elevate convenience food into something truly special. The combination of the crunchy bagel base, tangy sauce, molten cheese, and crispy pepperoni is a winner for all ages. I encourage you to make this recipe your own—experiment with different bagel flavors, sauces, and toppings. Once you try it, you’ll understand why it’s a permanent fixture in my quick-meal rotation. Now, grab your air fryer and get cooking!

FAQs

***Can I use English muffins instead of bagels?***
Absolutely! English muffins work wonderfully and create a slightly different, delightful texture. Follow the same method, but reduce the air frying time by 1-2 minutes as they are thinner.

***My air fryer doesn’t have a preheat setting. What should I do?***
No problem. Simply place the loaded bagels in the cold air fryer and add 1-2 extra minutes to the cook time. The results will still be great, though preheating can give a slightly crisper start.

***Can I make these ahead of time for a party?***
Yes, for easy entertaining, you can assemble the bagels up to 4 hours in advance, cover them loosely with plastic wrap, and refrigerate. Air fry just before serving for the best fresh, crispy texture.

***Why are my bagels not getting crispy?***
The most likely culprits are too

Chicken Cordon Bleu Casserole Recipe

“`html

Chicken Cordon Bleu Casserole Recipe

Introduction

Did you know that casseroles are one of the most-searched comfort food categories, with a 40% increase in recipe views during the colder months? This Chicken Cordon Bleu Casserole recipe is our brilliant answer to the classic dish’s time-consuming preparation, transforming it into a simple, family-friendly bake. We’ve deconstructed the traditional rolled and breaded chicken cordon bleu into a hearty, layered masterpiece that delivers all the iconic flavors—tender chicken, savory ham, and melty Swiss cheese—in a fraction of the time. Baked in a rich, creamy Dijon sauce, this casserole is the ultimate weeknight hero that feels like a special occasion. It’s the perfect solution for anyone asking, “How can I get that gourmet chicken cordon bleu taste without the fuss?”

Ingredients List

Gather these simple ingredients for a casserole that serves 6-8 people generously. Sensory notes are included to help you select the best components.

  • For the Casserole Base:
    • 2 lbs boneless, skinless chicken breasts, cut into 1-inch cubes (look for plump, pink flesh with no gray tinge).
    • 8 oz thick-cut deli ham, diced (choose a honey-baked or black forest ham for a sweet-savory depth).
    • 2 cups shredded Swiss cheese (about 8 oz; its nutty, slightly sweet melt is essential). Substitution: Gruyère for a sharper flavor or a mild white cheddar.
  • For the Creamy Dijon Sauce:
    • 3 tbsp unsalted butter (for a rich, golden roux).
    • 1/4 cup all-purpose flour.
    • 2 cups whole milk, warmed slightly (the fat content is key for a luxuriously creamy sauce). Substitution: 2% milk works, but avoid skim.
    • 1 cup chicken broth (low-sodium recommended to control saltiness).
    • 2 tbsp Dijon mustard (its sharp, tangy flavor is the soul of the dish). Substitution: Whole grain mustard for texture, or 1 tbsp yellow mustard + 1 tsp white wine vinegar.
    • 1 tsp garlic powder.
    • 1/2 tsp smoked paprika (adds a subtle, warm smokiness).
    • Salt and black pepper to taste.
  • For the Topping:
    • 1 1/2 cups panko breadcrumbs (for an ultra-crispy, golden crust). Substitution: Regular breadcrumbs or crushed buttery crackers like Ritz.
    • 1/4 cup grated Parmesan cheese (adds a salty, umami punch).
    • 3 tbsp melted butter.
    • 1 tbsp chopped fresh parsley (for a bright, fresh finish).

Timing

Prep Time 20 minutes
Cook Time 35 minutes
Total Time 55 minutes

This Chicken Cordon Bleu Casserole clocks in at under an hour from start to finish. Compared to the average classic cordon bleu recipe, which can take 90+ minutes for stuffing, rolling, breading, and pan-frying before even hitting the oven, our casserole method saves you at least 35 minutes of active prep time. The efficiency comes from the simple “chop, mix, layer, and bake” approach, making it a realistic option for busy weeknights while delivering the same comforting, cheesy payoff.

Chicken Cordon Bleu Casserole ingredients laid out on a kitchen counter

Step-by-Step Instructions

Step 1: Prepare the Chicken and Ham

Preheat your oven to 375°F (190°C). Lightly grease a 9×13 inch baking dish. Take your chicken breasts and pat them completely dry with paper towels—this is a chef’s secret for better browning and texture. Cut them into uniform 1-inch cubes; consistent size ensures even cooking. Dice your ham into similar-sized pieces. In a large bowl, gently toss the chicken and ham together. I like to season this mix lightly with a pinch of pepper, but hold the salt as the ham and cheese will add plenty.

Step 2: Create the Creamy Dijon Sauce

This sauce is what makes the casserole. In a medium saucepan over medium heat, melt the 3 tablespoons of butter. Whisk in the flour and cook for 1-2 minutes until it forms a pale blonde paste (a roux) and smells slightly nutty. This cooks out the raw flour taste. Slowly pour in the warm milk and chicken broth, whisking constantly to prevent lumps. Bring the mixture to a gentle simmer, continuing to whisk. It will thicken noticeably in 3-5 minutes. Remove from heat and whisk in the Dijon mustard, garlic powder, and smoked paprika. Taste and season with salt and pepper. The sauce should be velvety and coat the back of a spoon.

Step 3: Layer the Casserole

Spread the chicken and ham mixture evenly in the bottom of your prepared baking dish. Pour the warm Dijon sauce over the top, using a spatula to gently nudge it into all the nooks and crannies. Sprinkle the 2 cups of shredded Swiss cheese evenly over the saucy chicken layer. The cheese will melt and swirl into the sauce as it bakes, creating pockets of gooey goodness.

Step 4: Add the Topping and Bake

In a small bowl, combine the panko breadcrumbs, grated Parmesan, melted butter, and chopped parsley. Mix until the crumbs are evenly moistened. Sprinkle this topping in an even layer over the entire casserole. Place the dish in the preheated oven and bake for 30-35 minutes, or until the topping is deep golden brown, the sauce is bubbling vigorously around the edges, and the chicken is cooked through (internal temperature of 165°F). For an extra-crispy top, broil for the final 1-2 minutes, watching closely to prevent burning. Let the casserole rest for 5-10 minutes before serving—this allows the sauce to set slightly for perfect scooping.

Nutritional Information

Estimated per serving (based on 8 servings):

  • Calories: ~480 kcal
  • Protein: 38g
  • Carbohydrates: 18g
  • Dietary Fiber: 1g
  • Sugars: 5g
  • Fat: 28g (Saturated Fat: 15g)
  • Cholesterol: 135mg
  • Sodium: ~850mg (varies with ham and broth used)

Healthier Alternatives

You can lighten this dish without sacrificing its soul-satisfying flavor. For the sauce, swap whole milk for 2% and use a light butter alternative. Replace the all-purpose flour with whole wheat flour for added fiber. Opt for a low-sodium ham and reduced-fat Swiss cheese. For the topping, mix panko with a tablespoon of olive oil instead of melted butter, or use an air fryer to crisp the topping separately before sprinkling it on after baking. These swaps can reduce calories by about 20% per serving while keeping the creamy, cheesy, comforting essence intact.

Serving Suggestions

This rich casserole pairs beautifully with simple, fresh sides that cut through the creaminess. Serve it alongside a crisp green salad with a lemony vinaigrette, steamed green beans or asparagus, or buttery egg noodles for a truly decadent meal. For a low-carb option, cauliflower rice or zucchini noodles are excellent choices. A crusty baguette is non-negotiable for sopping up every last bit of that glorious Dijon sauce.

Common Mistakes

  • Using Cold Milk/Broth: Adding cold liquid to a roux is the #1 cause of lumpy sauce. Always warm your liquids slightly first.
  • Overcrowding the Chicken: Cutting the chicken too small or packing the dish too tightly can lead to steaming instead of proper baking, resulting in rubbery texture.
  • Skipping the Rest Time: Cutting in immediately causes the sauce to run everywhere. Letting it rest allows it to set for perfect slices.
  • Bland Dijon: Don’t use an expired or weak mustard. The Dijon’s tang is crucial; taste your sauce and add an extra teaspoon if needed.

Storing Tips

Store leftovers in an airtight container in the refrigerator for up to 3 days. Reheat individual portions in the microwave, or re-crisp the entire dish in a 350°F oven for 15-20 minutes, covered with foil to prevent over-browning. You can also assemble the casserole (without the breadcrumb topping) up to a day in advance; cover and refrigerate, then add the topping and bake when ready, adding 5-10 minutes to the bake time. For freezing, bake the casserole completely, cool, wrap tightly, and freeze for up to 2 months. Thaw overnight in the fridge before reheating.

Close-up of a golden brown Chicken Cordon Bleu Casserole fresh from the oven

Conclusion

This Chicken Cordon Bleu Casserole is more than just a recipe; it’s a guaranteed crowd-pleaser that simplifies a classic without compromising on flavor. With its tender chicken, savory ham, melty Swiss cheese, and that unforgettable creamy Dijon sauce, it delivers maximum comfort with minimal effort. It’s the perfect dish to add to your regular rotation for busy nights, potlucks, or when you simply crave something deeply satisfying. Now it’s your turn! Give this recipe a try this week and share your creation with us in the comments below. What’s your favorite way to serve a comforting casserole?

FAQs

***Can I use cooked chicken?***

Absolutely! Use about 4 cups of shredded or cubed cooked chicken (rotisserie chicken works great). Since the chicken

John Wayne Casserole Recipe

“`html

John Wayne Casserole Recipe

Introduction

Did you know that casseroles are one of the most-searched comfort food categories in the United States, with a 40% increase in recipe searches during the fall and winter months? This surge in popularity isn’t surprising when you consider the sheer convenience and heartwarming satisfaction a good casserole brings to the table. Among the pantheon of beloved one-dish wonders, the John Wayne Casserole stands tall—a legendary recipe that embodies the bold, no-nonsense spirit of its namesake. This isn’t just another ground beef bake; it’s a symphony of textures and flavors, featuring a golden biscuit crust, a savory layer of perfectly seasoned beef, a colorful medley of crisp vegetables, and a decadent, bubbling blanket of sharp cheddar and creamy Monterey Jack cheese.

Perfect for busy weeknights, potlucks, or feeding a hungry crowd, this casserole is the epitome of hearty, family-friendly cooking. Its beauty lies in its simplicity and reliability. Whether you’re a seasoned home cook or just starting your culinary journey, this easy-to-follow guide will ensure your John Wayne Casserole turns out deliciously comforting and robust every single time. Let’s saddle up and create a meal that’s as big on flavor as the Duke himself.

Ingredients List

Gather these simple ingredients to build your casserole masterpiece. For the best flavor, use fresh vegetables and full-fat dairy.

  • For the Crust:
    • 2 cans (16.3 oz each) refrigerated flaky biscuit dough – The foundation. Provides a buttery, golden-brown base that soaks up the savory juices. Substitution: For a homemade touch, use your favorite from-scratch biscuit dough or even a sheet of puff pastry.
  • For the Beef Layer:
    • 2 lbs lean ground beef (80/20) – The star protein, offering rich, meaty flavor. Substitution: Ground turkey, chicken, or a plant-based crumble work well for a lighter or vegetarian version.
    • 1 packet (1 oz) taco seasoning – Infuses the beef with a warm, slightly smoky blend of chili, cumin, and garlic. Substitution: Use 2 tbsp of homemade taco seasoning (chili powder, cumin, paprika, garlic powder, onion powder, oregano).
    • ¾ cup water – Helps distribute the seasoning and create a saucy texture.
    • 1 cup sour cream – Adds a crucial tangy creaminess that balances the spices. Substitution: Plain Greek yogurt for a protein boost, or a dairy-free sour cream alternative.
  • For the Vegetable Layer:
    • 1 large green bell pepper, diced – Adds a sweet, crisp texture and vibrant color.
    • 1 large onion, diced – Provides a savory-sweet aromatic base.
    • 2 large tomatoes, diced – Brings juicy acidity and freshness. Tip: Seed them first for less moisture.
    • 1 can (4 oz) diced green chiles, drained – Offers a mild, tangy heat. For more kick, use a can of diced jalapeños.
  • For the Cheese Topping:
    • 2 cups sharp cheddar cheese, shredded – Delivers a bold, tangy punch and beautiful melt. Sensory note: Look for that deep orange color and expect a rich, slightly salty flavor.
    • 1 cup Monterey Jack cheese, shredded – Contributes a creamy, mild melt that perfectly complements the sharper cheddar. Substitution: Pepper Jack cheese for added spice, or Colby Jack for a milder flavor.

Timing

Prep Time
20 minutes
Cook Time
35-40 minutes
Total Time
55-60 minutes

Compared to many from-scratch casseroles that can take well over 90 minutes from start to finish, this John Wayne Casserole is remarkably efficient. The use of pre-made biscuit dough shaves off significant prep time, allowing you to get a hearty, homemade meal on the table in under an hour. The active prep is a quick 20 minutes of simple browning and chopping, followed by a hands-off bake—perfect for multitasking in the kitchen.

John Wayne Casserole fresh out of the oven, showing golden cheese and biscuit crust
The finished John Wayne Casserole, bubbling with cheese and ready to serve.

Step-by-Step Instructions

Step 1: Prepare the Crust

Preheat your oven to 350°F (175°C). Lightly grease a 9×13 inch baking dish. Open the cans of biscuit dough and separate the biscuits. Using your fingers, press and stretch each biscuit to flatten it slightly, then arrange them in a single layer on the bottom of the prepared dish, pressing the edges together to form a solid crust base. Don’t worry about perfection—a rustic, pressed-together layer works perfectly. This creates the foundational “saddle” for all the delicious layers to come.

Step 2: Brown the Beef

In a large skillet over medium-high heat, cook the ground beef until it’s no longer pink, breaking it up into crumbles as it cooks. This should take about 8-10 minutes. Once browned, carefully drain any excess grease from the skillet. Reduce the heat to medium, then stir in the taco seasoning and water. Let this simmer for 2-3 minutes until the liquid is mostly absorbed and the beef is well-coated in the fragrant seasoning. Remove the skillet from the heat and let it cool for a minute before stirring in the sour cream. This step is crucial—adding sour cream to piping hot beef can cause it to curdle. The sour cream mixture should be creamy and coat the beef evenly.

Step 3: Layer the Vegetables

This is where we build flavor and texture. Evenly spread the seasoned beef and sour cream mixture over the biscuit crust in the baking dish. Next, layer on the diced green bell pepper and onion, distributing them evenly. Follow with the diced tomatoes and the drained green chiles. I like to sprinkle a little salt and pepper over the vegetable layer to help them release their flavors during baking. The order here ensures the vegetables steam and soften perfectly without making the bottom crust soggy.

Step 4: Assemble and Bake

In a medium bowl, toss together the shredded sharp cheddar and Monterey Jack cheeses. Sprinkle this cheese blend generously and evenly over the entire vegetable layer, covering it completely. Place the casserole in the preheated oven and bake for 35-40 minutes. You’re looking for the cheese to be fully melted, bubbly, and lightly golden in spots, and for the biscuit crust edges to be a deep golden brown. The aroma filling your kitchen will be irresistible! Once baked, remove the casserole from the oven and let it rest for 8-10 minutes before slicing. This resting time allows the layers to set, making it much easier to cut clean, beautiful servings.

Nutritional Information

(Approximate values per serving, based on 8 servings)

  • Calories: 580-620
  • Total Fat: 35-38g
  • Saturated Fat: 15-17g
  • Cholesterol: 110-120mg
  • Sodium: 950-1100mg (primarily from seasoning and cheese)
  • Total Carbohydrates: 35-38g
  • Dietary Fiber: 2-3g
  • Sugars: 7-9g
  • Protein: 32-35g

Healthier Alternatives

You can easily adapt this classic to fit various dietary needs without sacrificing the soul-satisfying flavor.

  • Leaner Protein: Swap the ground beef for 93% lean ground turkey or chicken. For a plant-based version, use a seasoned lentil-walnut mix or a high-quality meatless crumble.
  • Lighter Dairy: Use low-fat sour cream or plain, non-fat Greek yogurt. Opt for reduced-fat sharp cheddar and part-skim Monterey Jack cheeses—they still melt beautifully.
  • Boost Veggies: Add a layer of fresh spinach or zucchini ribbons under the tomato layer for extra nutrients and color.
  • Lower-Sodium: Make your own taco seasoning to control salt, and choose low-sodium canned green chiles.
  • Crust Swap: For a whole-grain option, look for whole wheat refrigerated biscuit dough, or create a thin crust using seasoned, mashed cauliflower.

Serving Suggestions

This casserole is a complete meal in one dish, but a few simple sides can elevate it into a feast.

  • Classic Pairings: A crisp, simple green salad with a tangy vinaigrette cuts through the richness perfectly. Cool, creamy guacamole or a dollop of fresh pico de gallo on the side adds a bright, fresh contrast.
  • For a Crowd: Serve alongside Spanish rice, charro beans, or a big bowl of tortilla chips and salsa for a build-your-own “casserole bar” experience.
  • Garnish Game: Top individual servings with a sprinkle of fresh chopped cilantro, a drizzle of crema or sour cream, or a few slices of pickled jalapeño for extra zing.

Common Mistakes

  • Skipping the Drain: Not draining the excess fat from the ground beef can make the final dish greasy. Take the extra minute to do it.
  • Curdled Sour Cream: Adding sour cream directly to the very hot beef mixture can cause it to separate. Let the beef cool for a minute or two off

Cheesy Tater Tot Meatloaf Casserole Recipe

“`html

Cheesy Tater Tot Meatloaf Casserole Recipe

Introduction

Did you know that over 75% of American families seek out comforting, one-dish meals for their weeknight dinners? If you’re looking for the ultimate crowd-pleaser that combines nostalgic flavors with minimal cleanup, you’ve found it. This Cheesy Tater Tot Meatloaf Casserole is the hearty, satisfying answer to the eternal “what’s for dinner?” question. It masterfully layers the savory, umami-rich goodness of a classic meatloaf with the crispy, golden appeal of tater tots, all bound together by a molten, savory cheese blend. It’s a dish that delivers on every promise of comfort food, making it perfect for busy family dinners, casual potlucks, or whenever you need a guaranteed hit on the table. Let’s dive into how to create this beloved classic with a fun, crispy twist.

Ingredients List

Gather these simple ingredients for a flavor-packed casserole. I’ve included notes on substitutions to accommodate dietary needs without sacrificing taste.

  • For the Meatloaf Layer:
    • 1.5 lbs lean ground beef (90/10): The star of the show, providing rich, meaty flavor. Substitution: Ground turkey or a plant-based ground crumble for a lighter or vegetarian option.
    • 1 large egg: Acts as the binder, holding the meatloaf together with a tender texture.
    • 1/2 cup plain breadcrumbs: Soaks up juices and adds structure. Substitution: Gluten-free panko or rolled oats for a gluten-free version.
    • 1/2 cup whole milk: Adds moisture and richness. Substitution: Any unsweetened non-dairy milk.
    • 1/2 cup finely diced yellow onion: Provides a sweet, aromatic base note.
    • 2 cloves garlic, minced: For that essential savory punch.
    • 2 tbsp ketchup + 2 tbsp for topping: Adds a touch of sweetness and tangy tomato flavor.
    • 1 tbsp Worcestershire sauce: The secret umami booster. Substitution: Soy sauce or coconut aminos.
    • 1 tsp dried parsley, 1/2 tsp paprika, 1 tsp salt, 1/2 tsp black pepper: The classic seasoning blend for depth and warmth.
  • For the Topping:
    • 1 (32 oz) bag frozen tater tots: The iconic crispy crown. No need to thaw!
    • 1.5 cups shredded cheese blend: I recommend a mix of sharp cheddar for bite and mozzarella for stretch. Substitution: Monterey Jack, Colby Jack, or a Mexican blend.
    • Optional garnish: Fresh chopped chives or parsley for a pop of color and freshness.

Timing

Prep Time20 minutes
Cook Time45 minutes
Total Time1 hour 5 minutes

Compared to the average meatloaf recipe which often requires 70+ minutes of total time and separate side dishes, this all-in-one casserole is a time-saver. The active prep is a quick 20 minutes, and the oven does the rest of the work, freeing you up to set the table or relax. The result is a complete meal—protein, starch, and cheesy goodness—in one dish.

Cheesy Tater Tot Meatloaf Casserole fresh from the oven, showing golden brown tots and melted cheese

This hearty casserole brings together the best of meatloaf and tater tots in one irresistible dish.

Step-by-Step Instructions

Step 1: Prepare the Meatloaf Base

Preheat your oven to 375°F (190°C). In a large mixing bowl, combine the ground beef, egg, breadcrumbs, milk, diced onion, minced garlic, 2 tablespoons of ketchup, Worcestershire sauce, and all the dried spices (parsley, paprika, salt, pepper). Here’s my pro tip: use your hands to mix! It might feel a bit messy, but it’s the best way to evenly distribute all the ingredients without overworking the meat, which can lead to a tough texture. Mix just until everything is incorporated—no more.

Step 2: Assemble the Casserole

Lightly grease a 9×13 inch baking dish. Transfer the meatloaf mixture into the dish and press it down firmly and evenly into a uniform layer. This creates a solid foundation. Next, spread the remaining 2 tablespoons of ketchup evenly over the meat layer. This adds a caramelized, tangy glaze. Now, for the fun part: arrange the frozen tater tots in neat, tightly-packed rows over the entire meatloaf layer. There’s no need to thaw them; they’ll cook perfectly from frozen.

Step 3: Bake to Perfection

Place the uncovered casserole in the preheated oven and bake for 35 minutes. This initial bake cooks the meatloaf through and starts crisping the tater tots. Carefully remove the dish from the oven (it will be hot!). Evenly sprinkle the shredded cheese blend over the hot tater tots. Return the casserole to the oven and bake for an additional 8-12 minutes, or until the cheese is fully melted, bubbly, and the tater tots are a deep golden brown.

Step 4: Rest and Serve

Once out of the oven, let the casserole rest for 5-10 minutes. This is a crucial step! Resting allows the juices in the meatloaf to redistribute, ensuring it holds its shape when you slice it, and gives the cheese a moment to set slightly. Garnish with fresh chives or parsley if desired, then slice and serve directly from the dish.

Nutritional Information

The following nutritional estimates are per serving (based on 8 servings):

  • Calories: ~480 kcal
  • Protein: ~28g
  • Carbohydrates: ~35g
  • Dietary Fiber: ~3g
  • Sugars: ~4g
  • Fat: ~25g
  • Saturated Fat: ~9g
  • Cholesterol: ~105mg
  • Sodium: ~950mg

Note: Values are approximate and can vary based on specific ingredient brands and substitutions used.

Healthier Alternatives

You can easily adapt this recipe for a lighter version without losing its comforting soul:

  • Leaner Protein: Swap the ground beef for 93% lean ground turkey or chicken.
  • Veggie Boost: Add 1 cup of finely grated zucchini or carrots to the meat mixture (squeeze out excess moisture first) for hidden vegetables.
  • Lower-Fat Dairy: Use skim milk and reduced-fat cheese. The melting texture will be slightly less creamy but still delicious.
  • Tater Tot Swap: Look for sweet potato tots or cauliflower tots in the freezer aisle for a nutrient-dense, lower-carb topping.
  • Reduced Sodium: Use low-sodium ketchup, Worcestershire sauce, and cheese, and reduce added salt by half.

Serving Suggestions

This casserole is a full meal on its own, but these sides can round out your dinner table beautifully:

  • For Freshness: A simple green salad with a bright vinaigrette, steamed green beans, or roasted broccoli cuts through the richness.
  • For Extra Comfort: Serve with a side of creamy coleslaw, applesauce, or warm dinner rolls.
  • Dipping Sauces: Offer small bowls of extra ketchup, ranch dressing, or barbecue sauce for dipping.

Common Mistakes

  • Overmixing the Meat: This develops the proteins too much, resulting in a dense, tough meatloaf. Mix until just combined.
  • Using a Smaller Dish: A 9×13 inch dish is ideal. A smaller one will crowd the ingredients, leading to steaming instead of crisping the tots and uneven cooking.
  • Skipping the Rest Time: Cutting in immediately will cause the cheesy meatloaf to fall apart. Let it set for clean slices.
  • Thawing the Tater Tots: Adding thawed tots will make them soggy. Always use them straight from the freezer for maximum crispiness.

Storing Tips

  • Refrigeration: Cool completely, then cover tightly or transfer to an airtight container. It will keep for 3-4 days.
  • Freezing: Assemble the casserole (without baking) up to the point of adding cheese. Wrap the entire dish tightly in plastic wrap and foil. Freeze for up to 2 months. To cook, bake from frozen, adding 15-20 minutes to the initial bake time before adding the cheese.
  • Reheating: For best results, reheat individual portions in the oven at 350°F (175°C) for 15-20 minutes or in an air fryer for 5-7 minutes to recrisp the tots. Microwave reheating will soften the topping.
Close-up slice of Cheesy Tater Tot Meatloaf Casserole showing layers of meat, cheese, and crispy tots

A cross-section reveals the perfect layers of savory meatloaf, melted cheese, and crispy potato.

Conclusion

This Cheesy Tater Tot Meatloaf Casserole is more than just a recipe; it’s a guaranteed path to happy faces around the dinner table. It combines simplicity, familiar flavors, and crowd-pleasing appeal in one easy-to-make dish

Chicken Tater Tot Casserole Recipe

“`html

Chicken Tater Tot Casserole Recipe

Introduction

Did you know that casseroles are one of the most-searched comfort food categories, with a 40% increase in recipe views during the colder months? In the quest for the perfect weeknight dinner that pleases everyone, have you found your ultimate Chicken Tater Tot Casserole recipe? If not, your search ends here. This dish is the glorious intersection of convenience, flavor, and pure, unadulterated comfort. It transforms simple ingredients—tender shredded chicken, rich sour cream, sharp cheddar, smoky bacon, and those iconic crispy tater tots—into a bubbling, golden-brown masterpiece that’s guaranteed to become a family favorite. It’s the answer to “What’s for dinner?” on busy nights, for potlucks, or when you simply crave something deliciously satisfying.

Ingredients List

This recipe is designed for flexibility. Here’s what you’ll need for the classic version, along with sensory notes and easy swaps.

  • 2 cups cooked chicken, shredded (about 1 lb raw): Use rotisserie chicken for ultimate ease and juicy flavor, or poach/roast your own. The chicken should be tender and easily pull apart with forks.
  • 1 (10.5 oz) can condensed cream of chicken soup: This is the flavor-packed glue. For a richer, homemade feel, substitute with a creamy bechamel sauce seasoned with chicken bouillon.
  • 1 cup sour cream (full-fat for maximum creaminess): Adds a delightful tang and velvety texture. For a lighter option, plain Greek yogurt works beautifully, maintaining the creaminess with a slight protein boost.
  • 1 ½ cups sharp cheddar cheese, shredded (divided): Sharp cheddar provides a bold, cheesy punch that cuts through the richness. Pre-shredded bags are convenient, but block cheese you shred yourself melts more smoothly and has a superior, non-gritty texture.
  • 6 slices bacon, cooked crisp and crumbled: This is your flavor bomb, offering smoky, salty, umami depth. The crisp texture is key. For a vegetarian twist, use ½ cup of sun-dried tomatoes (chopped) or 1 tsp of smoked paprika mixed into the filling.
  • 1 (32 oz) bag frozen tater tots: The iconic, crispy crown. Look for extra-crispy varieties. For a fun twist, try sweet potato tots or cauliflower tots for a lower-carb option (note: baking time may vary).
  • ½ cup milk (any kind): Thins the mixture to a perfect, spreadable consistency. The steam from the milk also helps cook the casserole evenly.
  • 1 tsp garlic powder: Provides a warm, aromatic base note without the fuss of mincing fresh garlic.
  • ½ tsp black pepper & ¼ tsp salt: Season to taste, remembering the bacon, cheese, and soup already contain salt.
  • Fresh chives or green onions, for garnish (optional): A pop of fresh color and a mild onion flavor that brightens the entire dish.

Timing

Prep Time 15 minutes
Cook Time 45 minutes
Total Time 1 hour

Compared to the average casserole recipe, which often requires 20-30 minutes of active prep for chopping and sautéing, this Chicken Tater Tot Casserole is remarkably streamlined. The 15-minute prep is largely “dump and stir,” making it about 30% faster to get into the oven than many layered casseroles. The 45-minute bake time is standard, allowing the flavors to meld and the tots to achieve that perfect golden-brown, crispy exterior.

Close-up of a golden brown Chicken Tater Tot Casserole fresh from the oven, showing crispy tots and melted cheese
The golden, crispy crown of tater tots is the signature of this comforting casserole.

Step-by-Step Instructions

Step 1: Prepare Your Chicken

If you’re not using a store-bought rotisserie chicken, this is your first task. Place 1 lb of boneless, skinless chicken breasts or thighs in a pot and cover with water or broth. Bring to a simmer, cover, and cook for 12-15 minutes until cooked through. Let it cool slightly, then use two forks to shred the meat into bite-sized pieces. You should have about 2 packed cups. Pro Tip: For extra flavor, shred the chicken directly into the pot and let it soak up the cooking liquid for a minute before draining.

Step 2: Mix the Creamy Base

Preheat your oven to 375°F (190°C). In a large mixing bowl, combine the cream of chicken soup, sour cream, and milk. Whisk them together until you have a smooth, homogenous mixture. Now, stir in the garlic powder, black pepper, and salt (if using). Fold in the shredded chicken, 1 cup of the shredded cheddar cheese, and all of the crumbled bacon. The mixture will be thick, creamy, and incredibly fragrant. This is the heart of your casserole.

Step 3: Layer the Casserole

Lightly grease a 9×13 inch baking dish with butter or cooking spray. Transfer the creamy chicken mixture into the dish and use a spatula to spread it into an even, flat layer. Ensure it reaches the corners for consistent cooking. This layer should be about 1 to 1.5 inches thick.

Step 4: Add the Tater Tot Crown

Take your frozen tater tots directly from the freezer and arrange them in neat, tightly packed rows over the entire surface of the chicken mixture. There’s no need to thaw them—in fact, going from freezer to oven helps them stay crisp. Once the layer is complete, evenly sprinkle the remaining ½ cup of shredded cheddar cheese over the top of the tater tots. This creates a double-cheese effect: melty cheese within and a crispy, cheesy crust on top.

Step 5: Bake to Perfection

Place the uncovered casserole dish in the preheated oven. Bake for 40-50 minutes. You’re looking for three key visual cues: the filling should be bubbling vigorously around the edges, the tater tots should be a deep, golden brown and very crisp, and the cheese on top should be fully melted and possibly starting to blister in spots. If your tots aren’t browning to your liking, switch the oven to broil for the final 1-2 minutes, but watch it like a hawk!

Nutritional Information

(Approximate values per serving, assuming 8 servings)

  • Calories: 480-520
  • Total Fat: 28-32g
  • Saturated Fat: 10-12g
  • Cholesterol: 75-85mg
  • Sodium: 950-1100mg
  • Total Carbohydrates: 35-38g
  • Dietary Fiber: 2-3g
  • Sugars: 2-3g
  • Protein: 22-25g

Healthier Alternatives

You can easily adapt this recipe for a lighter version without sacrificing the core comforting experience:

  • Swap the Soup: Use a low-sodium or “healthy request” condensed soup, or make a simple sauce with 1 tbsp butter, 1 tbsp flour, 1 cup low-sodium chicken broth, and ½ cup milk.
  • Lighten the Dairy: Substitute full-fat sour cream with light sour cream or plain, non-fat Greek yogurt. Use reduced-fat cheddar cheese (though be aware it may not melt as smoothly).
  • Boost Veggies: Stir 1-2 cups of thawed, squeezed-dry frozen spinach or chopped steamed broccoli into the chicken mixture for added nutrients and color.
  • Alternative “Tots”: Use frozen cauliflower tots or a mix of regular and sweet potato tots for different vitamin profiles. For a truly low-carb top, try a layer of thinly sliced potatoes or a sprinkle of almond flour and Parmesan for crunch.
  • Leaner Protein: Use all chicken breast and opt for turkey bacon or simply omit the bacon, using a dash of liquid smoke or smoked paprika for that signature flavor.

Serving Suggestions

This casserole is a hearty meal on its own, but these pairings can round out your dinner table:

  • For Freshness: A simple green salad with a bright vinaigrette (like lemon or apple cider vinegar) is the perfect counterbalance to the richness.
  • For Extra Veggies: Steamed green beans, roasted asparagus, or glazed carrots make excellent, colorful sides.
  • For Dipping: Serve with small bowls of extra sour cream, ranch dressing, or a spicy sriracha mayo for those who want an extra kick.
  • Perfect for a Crowd: This dish is a potluck superstar. Pair it with other comfort classics like baked beans, cornbread, or a fruit salad.

Common Mistakes

  • Overmixing the Filling: Once you add the chicken, fold gently. Overmixing can break down the chicken shreds into a mushy texture.
  • Using Thawed Tater Tots: Always use frozen tots straight from the freezer. Thawed tots will steam and become soggy instead of crisping up.
  • Underseasoning: Taste your filling mixture before adding it to the dish. Remember, the tots and cheese on top are not seasoned, so the flavor needs to come from within.
  • Wrong Dish Size: Using a dish that’s too small will make the casserole too deep, leading to a soupy middle and burnt top. A 9×13 is ideal.
  • Not Letting it Rest: Allow the casserole to

Easy Hobo Casserole Recipe

“`html

Easy Hobo Casserole Recipe

Introduction

Did you know that casseroles are one of the top 5 most-searched comfort food categories in the United States, with a 40% increase in searches during the fall and winter months? This Easy Hobo Casserole recipe is the perfect answer to that craving for a warm, filling, and fuss-free family meal. Born from the resourceful spirit of campfire cooking, this modern take brings all the rustic, savory goodness to your kitchen table with minimal effort. It’s a hearty, comforting dish featuring layers of seasoned ground beef, thinly sliced potatoes that soak up all the flavor, and a rich, velvety cheesy sauce that binds everything together in delicious harmony. Whether you’re a busy parent juggling schedules or someone who simply loves a no-fuss dinner, this casserole delivers maximum flavor with minimal cleanup. Let’s dive into how you can create this crowd-pleaser that’s sure to become a regular in your weekly rotation.

Ingredients List

Gather these simple, flavorful ingredients. I’ve included sensory notes and easy substitutions to make this recipe your own.

  • 1.5 lbs lean ground beef (85/15): The star protein, providing a savory, meaty base. Substitution: Ground turkey, chicken, or a plant-based crumble for a lighter or vegetarian option.
  • 1 large yellow onion, diced: Adds a sweet, aromatic foundation. You’ll smell it caramelizing and know the flavor is building.
  • 3-4 medium russet potatoes (about 2 lbs), thinly sliced: The hearty backbone. Thin slices ensure they cook through and become tender, absorbing the sauce. Substitution: Yukon Gold potatoes for a buttery flavor, or sweet potato slices for a vitamin-rich twist.
  • 2 cloves garlic, minced: For that essential punch of pungent, aromatic flavor.
  • 1 (10.5 oz) can condensed cream of mushroom soup: The secret to a rich, creamy sauce without making a roux. Substitution: Cream of celery, chicken, or a homemade creamy mushroom sauce.
  • 1 cup beef broth: Deepens the savory flavor and creates the perfect saucy consistency.
  • 1 cup shredded cheddar cheese: For that irresistible, gooey, golden-brown topping. Substitution: A Mexican blend, Monterey Jack, or pepper jack for a kick.
  • 1/2 cup milk (whole or 2%): Thins the soup mixture to a pourable, silky consistency.
  • 1 tbsp Worcestershire sauce: Adds a complex, umami depth you can’t quite place but would miss if it were gone.
  • 1 tsp smoked paprika: Provides a subtle smokiness and beautiful color.
  • Salt and black pepper to taste: Essential for seasoning every layer.
  • 1 tbsp olive oil or butter: For sautéing.
  • Fresh parsley, chopped (optional garnish): Adds a pop of fresh color and a mild herbal note.

Timing

Prep Time20 minutes
Cook Time1 hour
Total Time1 hour 20 minutes

Compared to the average casserole recipe that can take nearly 2 hours from start to finish, this Easy Hobo Casserole is streamlined for efficiency. The 20-minute active prep time is a game-changer for weeknights. While it bakes for an hour, that’s largely hands-off time you can use to set the table, help with homework, or simply relax. The total time of 80 minutes is well-invested for a complete, satisfying meal that feeds a family.

Easy Hobo Casserole ingredients laid out on a rustic kitchen counter

All the simple ingredients you need for a comforting family dinner.

Step-by-Step Instructions

Step 1: Prepare the Ingredients

Preheat your oven to 375°F (190°C). This ensures it’s perfectly heated when your casserole is ready to bake. Grab your potatoes and scrub them clean—no need to peel them, the skin adds texture and nutrients. Using a sharp knife or a mandoline slicer (carefully!), slice the potatoes into 1/8-inch thick rounds. Place them in a bowl of cold water to prevent browning. Dice your onion and mince the garlic. Having everything measured and ready (mise en place) makes the cooking process smooth and enjoyable.

Step 2: Brown the Beef

In a large skillet over medium-high heat, warm the olive oil or butter. Add the diced onion and sauté for 3-4 minutes until it becomes translucent and fragrant. Now, add the ground beef, breaking it apart with a wooden spoon. Cook for 6-8 minutes until it’s no longer pink. In the last minute, stir in the minced garlic—this prevents it from burning and becoming bitter. Season generously with salt, pepper, and the smoked paprika. Drain any excess grease for a less greasy, more refined final dish.

Step 3: Layer the Casserole

Drain the potato slices and pat them dry with a clean kitchen towel. This step is crucial for a non-watery sauce. In a 9×13 inch baking dish, start your first layer. Spread half of the sliced potatoes evenly across the bottom. Season lightly with a pinch of salt and pepper. Next, spoon all of the cooked ground beef and onion mixture over the potatoes, spreading it into an even layer. Top with the remaining potato slices, arranging them neatly or just scattering them for a rustic look. Season again.

Step 4: Create the Sauce

In a medium bowl, whisk together the condensed cream of mushroom soup, beef broth, milk, and Worcestershire sauce until completely smooth and lump-free. This creamy, tan-colored mixture is the magic elixir that will cook the potatoes and flavor the entire casserole. Slowly and evenly pour this sauce over the entire layered casserole, aiming to cover as much surface area as possible. Gently shake the dish to help the sauce seep down through the layers.

Step 5: Bake to Perfection

Cover the baking dish tightly with aluminum foil. This creates a steamy environment that perfectly tenderizes the potatoes. Place it in the preheated oven and bake for 45 minutes. After this time, carefully remove the foil—watch out for the steam! The casserole should be bubbling at the edges. Now, evenly sprinkle the shredded cheddar cheese over the top. Return the dish to the oven, uncovered, for the final 15-20 minutes. Bake until the cheese is melted, golden, and bubbly, and the potatoes are easily pierced with a fork. Let it rest for 5-10 minutes before serving; this allows the sauce to thicken slightly and makes for cleaner slices.

Nutritional Information

(Approximate values per serving, based on 6 servings)

  • Calories: ~420 kcal
  • Total Fat: 22g
  • Saturated Fat: 9g
  • Cholesterol: 85mg
  • Sodium: 750mg
  • Total Carbohydrates: 28g
  • Dietary Fiber: 3g
  • Sugars: 4g
  • Protein: 28g

Healthier Alternatives

You can easily adapt this Hobo Casserole to fit various dietary needs without sacrificing the comforting essence.

  • Leaner Protein: Swap ground beef for 93% lean ground turkey or chicken. The flavor profile will be milder, so consider adding an extra teaspoon of Worcestershire sauce or a dash of soy sauce for umami.
  • Lighter “Cream” Sauce: Use a low-sodium condensed soup and low-fat milk. For a from-scratch version, make a roux with 2 tbsp flour, 1 tbsp butter, and 1.5 cups of low-sodium broth, then stir in 1/2 cup of plain Greek yogurt at the end for creaminess and protein.
  • Boost Veggies: Add a layer of thinly sliced carrots, zucchini, or bell peppers with the potatoes for extra vitamins, fiber, and color.
  • Reduce Sodium: Use no-salt-added broth and a low-sodium soup. Rely more on herbs like thyme, rosemary, and the smoked paprika for flavor.

Serving Suggestions

This casserole is a complete meal in one dish, but a few simple sides can elevate it:

  • With a Crisp Salad: A simple green salad with a tangy vinaigrette cuts through the richness beautifully.
  • With Crusty Bread: A warm baguette or dinner rolls are perfect for sopping up every last bit of the delicious sauce.
  • With a Bright Vegetable: Steamed green beans, roasted broccoli, or honey-glazed carrots add a fresh, colorful component to the plate.

Common Mistakes

  • Not Draining the Beef Grease: This can make the final dish overly greasy. Take the extra minute to drain it.
  • Skipping the Potato Soak/Dry: Potatoes hold water. Skipping the soak and dry step can lead to a watery sauce instead of a creamy one.
  • Cutting Potatoes Too Thick: Thick slices won’t cook through in the allotted time, leaving you with crunchy potatoes. Aim for 1/8-inch uniformity.
  • Not Letting it Rest: Cutting in immediately causes the saucy layers to run everywhere. Letting it sit for 5-10 minutes allows everything to set.

Storing Tips

  • Refrigeration: Cool completely, then cover tightly or transfer to an airtight container. It will keep for 3-4 days in the refrigerator.
  • Freezing: This casserole freezes exceptionally well. Assemble and bake it, but cool it completely first. Wrap the entire dish (or individual portions) tightly in plastic wrap and then foil. Label and freeze for up to 3 months. Thaw overnight in the fridge before reheating.
  • Reheating: Reheat individual