Corned Beef and Cabbage Recipe

Corned Beef and Cabbage Recipe: The Only Recipe You’ll Ever Need

Welcome to the ultimate guide for a Corned Beef and Cabbage Recipe that transforms a simple family meal into an unforgettable feast. Picture this: after a long day, you crave something hearty and comforting, yet easy to prepare. This Corned Beef and Cabbage Recipe, infused with authentic pickling spice for maximum flavor, solves that craving perfectly. Drawing from traditional Irish roots, it delivers tender brisket and vibrant veggies that melt in your mouth, making it ideal for St. Patrick’s Day gatherings or any cozy dinner. With our step-by-step approach, you’ll achieve restaurant-quality results at home, ensuring every bite is packed with rich, savory goodness.

Imagine the sensory delight of this Corned Beef and Cabbage Recipe: the brisket’s succulent, melt-in-your-mouth texture contrasts beautifully with the crisp-tender cabbage, carrots, and potatoes. Aromas of pickling spice—featuring cloves, coriander, and peppercorns—fill your kitchen, creating an inviting, homey atmosphere that draws everyone to the table. Each forkful bursts with layers of flavor: the beef’s deep, salty richness balanced by the earthy sweetness of carrots and the subtle starchiness of Yukon Gold potatoes, all simmered to perfection in low-sodium beef broth for a harmonious, satisfying dish.

Why trust this Corned Beef and Cabbage Recipe from cookingwithemy.com? We’ve perfected it through rigorous testing, incorporating a Chef’s Secret that sets it apart from the rest. You’ll learn how our unique pickling spice infusion ensures every element is flawlessly tender and flavorful, without the common pitfalls of over-salting or tough meat. Stay tuned for expert tips on ingredients, step-by-step instructions, and storage hacks that make this the most comprehensive resource online. Whether you’re a novice or a seasoned cook, this guide will boost your confidence and deliver consistent success.

Prep Time: 15 minutes
Cook Time: 8-10 hours
Total Time: 8 hours 15 minutes
Servings: 6

Why This Corned Beef and Cabbage Recipe is a Game-Changer

The Chef’s Secret: What makes this Corned Beef and Cabbage Recipe truly exceptional is our emphasis on an authentic pickling spice infusion, which elevates the dish by locking in deep, aromatic flavors during the slow-cooking process. Unlike standard recipes that might overlook the spice blend, we recommend toasting the pickling spice lightly before adding it to the pot—this simple step releases essential oils, infusing the beef and vegetables with a complex, spicy-sweet profile that penetrates every layer. This technique ensures a more robust taste, turning a basic comfort food into a gourmet experience that stands out in any corned beef and cabbage recipe collection.

Unbeatable Texture: The science behind the texture lies in the slow cooking at low heat, which breaks down the brisket’s connective tissues gently, resulting in fork-tender meat. The high-collagen content in a quality brisket, combined with the moisture from beef broth, prevents drying out, while the vegetables retain just the right amount of firmness—thanks to layering them properly, as outlined in our instructions. This method guarantees a corned beef and cabbage recipe with juicy, flavorful results every time, avoiding the rubbery texture that plagues rushed preparations.

Foolproof for a Reason: This corned beef and cabbage recipe has been tested multiple times in real home kitchens, ensuring it’s reliable for cooks of all levels. We focus on precise measurements and timings, like cooking for 8-10 hours, to eliminate variables, making it impossible to mess up. It’s the go-to corned beef and cabbage recipe for beginners and experts alike, with built-in tips that address common issues, guaranteeing success and turning you into a confident home chef.

Ingredient Spotlight: Quality Makes the Difference

For the 3–4 lb brisket corned beef, this cut is the star, providing rich, beefy flavor and tender results when slow-cooked. Quality matters because a well-marbled brisket from a reputable butcher ensures juiciness and less waste; opt for one pre-brined for authenticity. If unavailable, substitute with a beef chuck roast, but adjust cooking time to avoid toughness, as it has less fat.

A medium head of cabbage adds a fresh, slightly sweet crunch that balances the dish’s heartiness. Choose firm, green cabbage for its ability to hold shape during cooking, enhancing texture in your corned beef and cabbage recipe. Quality fresh cabbage means better nutrient retention, like vitamin C; if needed, swap with Savoy cabbage for a milder flavor, but avoid red cabbage as it can alter the color and taste profile.

The 4 medium carrots contribute natural sweetness and vibrant color, complementing the savory beef. Fresh, organic carrots ensure maximum beta-carotene and flavor absorption; they help thicken the broth naturally. For substitutions, use parsnips for a nuttier twist, but cut them smaller to match cooking times and maintain the essence of a classic corned beef and cabbage recipe.

Four medium waxy potatoes, like Yukon Gold, provide a creamy, hearty base that absorbs flavors without falling apart. Their waxy texture holds up well in long cooks, making them ideal for this corned beef and cabbage recipe; always select firm potatoes to prevent sogginess. If substituting, try red potatoes for similar results, but steer clear of russets as they can become mushy.

Four cups of low-sodium beef broth serve as the flavorful liquid base, allowing control over saltiness while keeping the meat moist. Opt for homemade or high-quality store-bought to enhance the overall taste in your corned beef and cabbage recipe; it infuses the ingredients without overpowering. Vegetable broth can substitute for a lighter version, but reduce spices to maintain balance.

One tablespoon of pickling spice is our unique angle’s hero, adding depth with its blend of spices like mustard seeds and bay leaves. Fresh, whole spices ensure potent flavor infusion; this is non-negotiable for authenticity. If you lack it, create a mix with equal parts coriander, peppercorns, and cloves, but measure carefully to preserve the signature taste of a top corned beef and cabbage recipe.

Mustard for serving provides a tangy contrast, elevating the final dish. Choose whole-grain or Dijon for the best flavor pairing; it’s all about that sharp kick. Alternatives like horseradish can work, but use sparingly to complement rather than compete with the corned beef and cabbage recipe’s flavors.

Step-by-Step Instructions

Step 1: Preparing the Ingredients

Start by rinsing the 3–4 lb corned beef brisket under cold water for about 2 minutes to remove excess salt and brine, which prevents the dish from becoming overly salty. Next, chop the medium head of cabbage, 4 medium carrots, and 4 medium waxy potatoes into bite-sized pieces—aim for 1-2 inch chunks to ensure even cooking. This preparation sets the foundation for a flavorful corned beef and cabbage recipe.

Pro Tip: Always pat the brisket dry after rinsing to promote better seasoning absorption and avoid diluting the pickling spice flavors.

Step 2: Layering in the Cooker

In a slow cooker or large pot, place the rinsed corned beef at the bottom for even heat distribution. Add the chopped potatoes and carrots next, followed by the cabbage on top to prevent it from overcooking and becoming mushy. This layering technique is key for a balanced corned beef and cabbage recipe.

Common Mistake to Avoid: Don’t overcrowd the cooker; ensure ingredients are spread out to allow steam circulation, or the vegetables might steam instead of simmer, leading to uneven textures.

Step 3: Adding Liquids and Spices

Pour in 4 cups of low-sodium beef broth until it covers the ingredients halfway, then sprinkle in 1 tablespoon of pickling spice evenly over the top. This step infuses the entire dish with our unique flavor profile from the corned beef and cabbage recipe.

Pro Tip: Lightly toast the pickling spice in a dry pan for 30 seconds before adding it; this enhances its oils and maximizes the authentic infusion we highlight.

Step 4: Cooking to Perfection

Set your slow cooker to low heat and cook for 8-10 hours, or if using a stovetop pot, simmer covered for about 3 hours until the brisket is fork-tender. Check periodically to ensure the liquid level remains consistent, adding more broth if needed to keep everything moist.

Common Mistake to Avoid: Overcooking can make the cabbage watery; test the brisket at the 8-hour mark to prevent it from becoming stringy.

Step 5: Resting and Serving

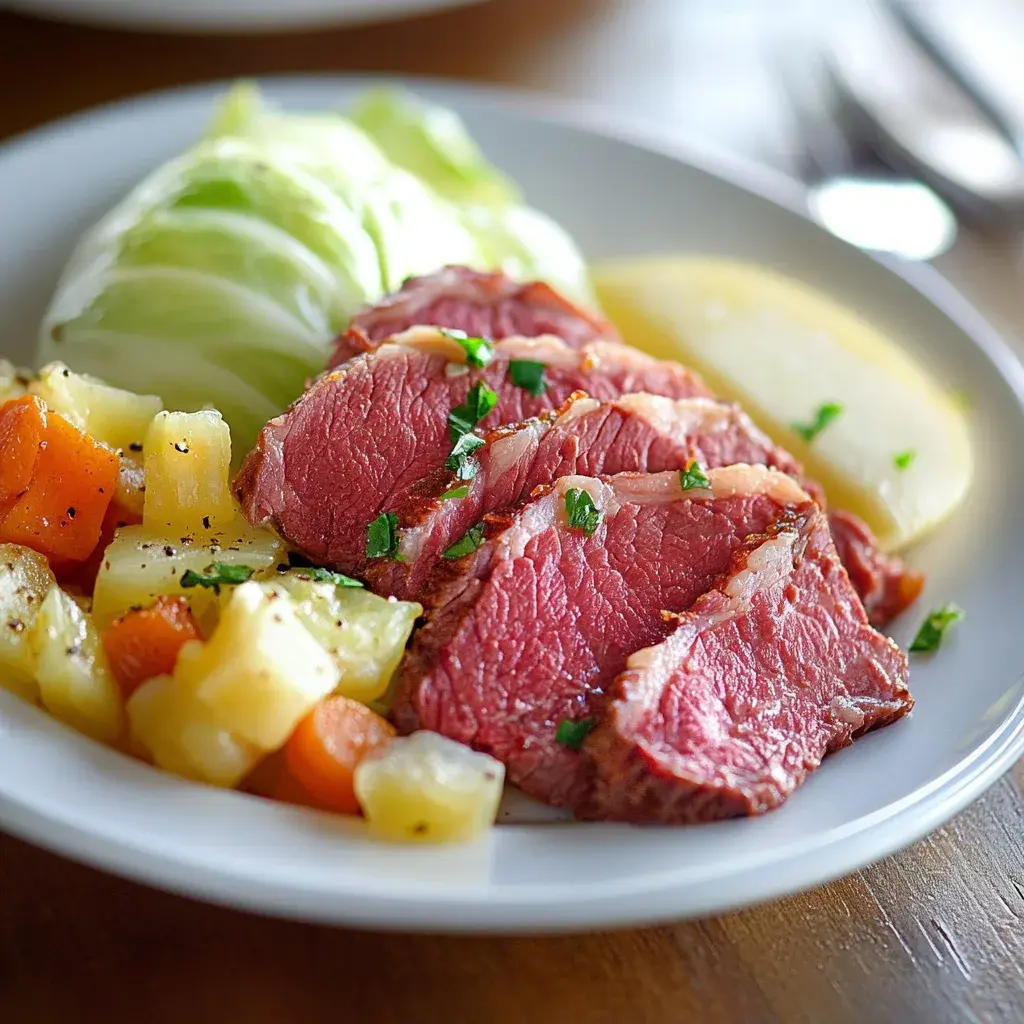
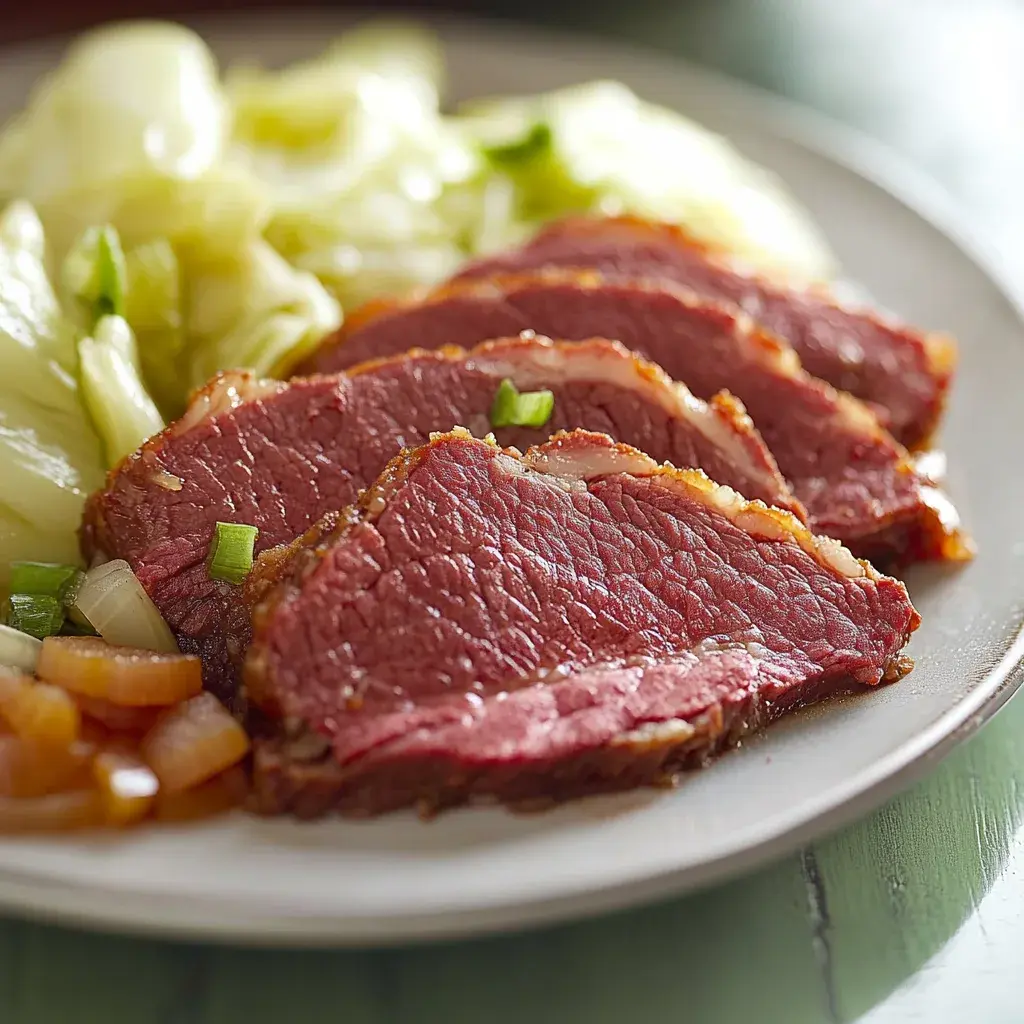
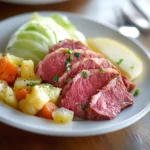
Once done, carefully remove the brisket from the cooker and let it rest for 10 minutes on a cutting board. Slice it against the grain for maximum tenderness, then serve with the cooked vegetables and a side of mustard for a complete meal in this corned beef and cabbage recipe.

Pro Tip: Letting the meat rest allows juices to redistribute, ensuring each slice is juicy and flavorful, enhancing the overall experience of your corned beef and cabbage recipe.

Serving & Presentation

For an impressive presentation of your corned beef and cabbage recipe, arrange the sliced brisket on a large platter with the vegetables artfully placed around it—perhaps in colorful piles for visual appeal. Garnish with fresh parsley or a sprinkle of cracked black pepper to add a pop of green and enhance the dish’s rustic charm. Complementary sides like crusty Irish soda bread or a simple green salad can balance the meal, soaking up the flavorful broth and adding lightness.

Plating creatively not only makes your corned beef and cabbage recipe Instagram-worthy but also encourages family-style dining. Serve with a generous dollop of mustard on the side for dipping, and pair it with a pint of ale or a crisp white wine to elevate the flavors. This combination turns a simple dinner into a festive occasion, perfect for holidays or weeknight wins.

Make-Ahead & Storage Solutions

For a make-ahead strategy, prepare the ingredients up to 3 days in advance: rinse and chop the vegetables, then store them in an airtight container in the fridge. Assemble the layers in the slow cooker the night before, but add the broth and spices just before cooking to maintain freshness in your corned beef and cabbage recipe.

To store leftovers, cool the dish completely, then transfer to an airtight container; refrigerate for up to 4 days or freeze for up to 3 months to preserve flavors. When reheating, use a low-heat oven at 300°F for 20-30 minutes, adding a splash of broth to restore moisture and mimic the original tender texture of your corned beef and cabbage recipe without drying it out.

Finished recipe photo

Frequently Asked Questions (FAQ)

How long do you cook corned beef in this recipe?

In this corned beef and cabbage recipe, the cooking time is 8-10 hours on low in a slow cooker or about 3 hours on the stovetop until the meat is fork-tender. Factors like the brisket’s size can affect timing, so always check for tenderness to ensure the best results.

Can I substitute butter with oil in this recipe?

While this corned beef and cabbage recipe doesn’t use butter, if you’re adapting it for variations, oil isn’t a direct substitute since we rely on beef broth for moisture. However, for searing the brisket optionally, you could use a neutral oil like vegetable oil, but it won’t add the same richness—stick to the original for optimal flavor.

What are some tips for making corned beef more tender?

To achieve extra tenderness in your corned beef and cabbage recipe, use low and slow cooking as we recommend, and always rinse the brisket first to remove excess salt. Additionally, adding pickling spice enhances flavor while breaking down fibers; avoid high heat to prevent toughness.

How should I store homemade corned beef for freshness?

For storing your corned beef from this recipe, let it cool, then refrigerate in an airtight container for up to 4 days. For longer storage, freeze it wrapped tightly in plastic and foil for up to 3 months; thaw in the fridge before reheating gently to maintain its tender texture.

Can I make this recipe gluten-free?

Yes, this corned beef and cabbage recipe is naturally gluten-free, as all ingredients like brisket, vegetables, and pickling spice typically are. Always check labels on your beef broth and pickling spice for any hidden gluten, and use certified gluten-free options if needed for peace of mind.

What’s the best way to reheat leftovers?

The best way to reheat leftovers from this corned beef and cabbage recipe is in a covered oven at 300°F for 20-30 minutes with a bit of broth to keep it moist, or on the stovetop with low heat. This method restores the original flavors and textures without overcooking the vegetables.

Print
clock clock iconcutlery cutlery iconflag flag iconfolder folder iconinstagram instagram iconpinterest pinterest iconfacebook facebook iconprint print iconsquares squares iconheart heart iconheart solid heart solid icon

Corned Beef and Cabbage Recipe


  • Author: Chef mia

Description

Delight in the rich flavors of this classic corned beef and cabbage dish, perfect for gatherings or cozy family dinners. Tender brisket meets vibrant veggies for a heartwarming meal.


Ingredients

Scale
  • 34lb brisket corned beef
  • 1medium head of cabbage
  • 4medium carrots
  • 4medium waxy potatoes (like Yukon Gold)
  • 4 cupslow-sodium beef broth
  • 1 tablespoonpickling spice
  • Mustard (for serving)

Instructions

  1. Rinse the corned beef under cold water to remove excess salt. Chop cabbage, carrots, and potatoes into bite-sized pieces.
  2. In a slow cooker or pot, layer the corned beef at the bottom, followed by potatoes, carrots, and then cabbage on top.
  3. Pour enough beef broth to cover the ingredients halfway and add pickling spice.
  4. Cook on low heat for 8-10 hours in a slow cooker or simmer on the stovetop for about 3 hours until fork-tender.
  5. Remove the brisket, let it rest for 10 minutes, then slice against the grain. Serve with mustard alongside the cooked veggies.

Nutrition

  • Calories: 350
  • Sugar: 6g
  • Fat: 18g
  • Carbohydrates: 30g
  • Protein: 25g

Conclusion

This flavorful chicken spring rolls recipe delivers a crispy texture and a harmonious blend of tender chicken, fresh vegetables, and aromatic seasonings, making it perfect for a quick meal or appetizer that impresses guests. The straightforward preparation method ensures it’s accessible for beginner cooks while allowing for customization based on your preferences. For a fun variation, try serving these rolls with a side of our Egg Roll in a Bowl for a deconstructed twist, or experiment by making our Crispy Air Fryer Spring Rolls to achieve that same crunch with less oil.

Classic New Orleans Bananas Foster

Classic New Orleans Bananas Foster: The Only Recipe You’ll Ever Need

Imagine strolling through the vibrant streets of New Orleans, where the air is filled with the intoxicating aroma of caramelized bananas and warm spices— that’s the magic of Classic New Orleans Bananas Foster. This iconic dessert, originating from the Creole kitchens of the Big Easy, combines ripe bananas with a luscious rum sauce in a flambé that’s as thrilling to prepare as it is to eat. As a staple at festive gatherings, this Classic New Orleans Bananas Foster recipe is your ticket to recreating that authentic, flame-kissed indulgence at home, making it perfect for date nights or dinner parties. With our signature flambé technique ensuring extra dramatic flavor, you’ll achieve that professional restaurant-quality result every time. Whether you’re a seasoned home cook or a curious beginner, this guide will have you mastering bananas foster recipe variations that stand out from the crowd.

The allure of Classic New Orleans Bananas Foster lies in its symphony of textures and flavors that dance on your palate. Picture golden-brown banana slices, tender yet slightly firm, bathed in a velvety sauce of melted butter, brown sugar, and cinnamon that caramelizes into a sticky, gooey masterpiece. The dark rum adds a deep, warming kick with hints of vanilla and spice, while the flambé introduces a subtle smokiness that elevates the overall experience. Served over creamy vanilla ice cream, the contrast of hot and cold creates an irresistible melt-in-your-mouth moment, with aromas that fill your kitchen and transport you straight to Bourbon Street. This New Orleans dessert isn’t just eaten; it’s savored, evoking the essence of Southern hospitality in every bite.

What sets this Classic New Orleans Bananas Foster recipe apart on cookingwithemy.com is our commitment to authenticity and ease, drawing from time-tested techniques that guarantee success. We’ve perfected the flambé method to ensure it’s safe, foolproof, and bursting with flavor, making it the ultimate bananas foster recipe for home cooks. In this comprehensive guide, you’ll discover the Chef’s Secret to achieving that extra dramatic flavor, along with detailed ingredient spotlights, step-by-step instructions, and practical tips for serving and storage. By the end, you’ll feel confident whipping up this show-stopping treat, impressing your guests and creating lasting memories in your own kitchen.

Prep Time: 5 minutes
Cook Time: 10 minutes
Total Time: 15 minutes
Servings: 2

Why This Classic New Orleans Bananas Foster Recipe is a Game-Changer

The Chef’s Secret to this Classic New Orleans Bananas Foster lies in the signature flambé technique, which infuses the dish with an extra dramatic flavor that’s often missing in standard recipes. By carefully igniting the dark rum, we create a burst of caramelized essence that deepens the sauce’s complexity, turning simple ingredients into a gourmet experience. This method not only enhances the taste with a subtle charred note but also ensures the bananas absorb the rum’s richness without becoming overly boozy, making it safer and more approachable for home cooks.

Unbeatable Texture: The science behind the texture comes from browning the butter just right before adding the sugar and cinnamon. This process releases milk solids that add a nutty depth, helping the sauce cling perfectly to the bananas for that ideal tender-crisp bite. When paired with the cool creaminess of vanilla ice cream, it creates a harmonious balance that contrasts the warm, gooey caramelization.

Foolproof for a Reason: This recipe has been rigorously tested in our kitchen multiple times to guarantee consistent results, even for beginners. From precise heat levels to exact measurements, every detail is optimized to prevent common pitfalls, ensuring your Classic New Orleans Bananas Foster turns out perfectly every time you prepare it.

Ingredient Spotlight: Quality Makes the Difference

Start with 2 ripe bananas—these are the star of any Classic New Orleans Bananas Foster. Ripe bananas provide natural sweetness and a soft texture that caramelizes beautifully, enhancing the overall flavor profile. Opt for bananas with a few brown spots for the best results, as they break down evenly without turning mushy. If you can’t find perfectly ripe ones, substitute with underripe bananas and let them sit at room temperature for a day; however, this might slightly alter the tenderness, so fresh is always best for that authentic bananas foster recipe experience.

Next, 4 tablespoons of unsalted butter form the base of the rich rum sauce, adding a creamy, indulgent mouthfeel that ties everything together. High-quality butter with a higher fat content ensures a smoother melt and better emulsification with the sugar, preventing separation. If you’re out of unsalted butter, you can substitute with salted butter but reduce added salt to avoid overpowering the dish—though unsalted is preferred for precise control in this New Orleans dessert.

½ cup of brown sugar brings the signature caramel notes to your Classic New Orleans Bananas Foster, creating that sticky, syrupy glaze. Choose dark brown sugar for a more intense molasses flavor that complements the cinnamon and rum. Quality matters here as impurities in cheaper sugars can lead to grainy textures; if substituting, light brown sugar works in a pinch but will result in a milder taste, so stick to dark for the full effect in your bananas foster recipe.

1 teaspoon of ground cinnamon adds a warm, aromatic spice that elevates the entire dish in Classic New Orleans Bananas Foster. Freshly ground cinnamon offers a more potent flavor than pre-ground varieties, enhancing the sauce’s depth without overwhelming the bananas. If you’re allergic or prefer a twist, substitute with a pinch of nutmeg for a similar warmth, but be cautious with amounts to maintain the classic balance of this New Orleans dessert.

¼ cup of dark rum is essential for the flambé, imparting a sophisticated, boozy essence that defines Classic New Orleans Bananas Foster. Opt for a high-quality aged rum to avoid harsh alcohols; it’s what makes the flambé magical. For non-alcoholic versions, substitute with rum extract mixed with water, though this won’t replicate the authentic flame-kissed flavor, so use it sparingly to preserve the recipe’s integrity.

Finally, vanilla ice cream for serving provides the perfect creamy counterpart to the hot bananas foster dish. Choose a premium brand with real vanilla beans for a luxurious finish. If dairy-free, substitute with coconut milk ice cream to keep it vegan-friendly, ensuring it complements the warm sauce without melting too quickly in your Classic New Orleans Bananas Foster.

Step-by-Step Instructions

Step 1: Preparing the Bananas

Begin by peeling and slicing the 2 ripe bananas diagonally into thick pieces, about 1-inch thick each. This ensures they hold their shape during cooking and absorb the sauce evenly. Arrange the slices on a plate for easy access.

Pro Tip: Choose bananas that are just ripe with a few spots for the best texture—too green and they’ll be firm, too ripe and they’ll mush. This step sets the foundation for a picture-perfect Classic New Orleans Bananas Foster.

Step 2: Creating the Syrup Base

In a large skillet over medium heat, melt the 4 tablespoons of unsalted butter until it’s bubbly but not browned, which should take about 1-2 minutes. Once melted, stir in the ½ cup of brown sugar and 1 teaspoon of ground cinnamon, whisking continuously to form a smooth syrup. Cook for another 1-2 minutes until the mixture begins to bubble and thicken slightly.

Common Mistake to Avoid: Overheating the butter can lead to burning, which makes the sauce bitter. Always keep the heat at medium and stir constantly to maintain that silky consistency in your bananas foster recipe.

Step 3: Sautéing the Bananas

Add the banana slices to the skillet and sauté them for 2-3 minutes, gently turning them once to ensure even cooking until they’re tender but still hold their shape. The bananas should start to caramelize and absorb the flavors from the syrup.

Pro Tip: Don’t overcrowd the skillet; give the bananas space to brown properly. This enhances the texture and flavor, making your Classic New Orleans Bananas Foster truly irresistible.

Step 4: Adding and Flambéing the Rum

Carefully pour in the ¼ cup of dark rum, then step back and ignite it with a long match or lighter to flambé. Allow the flames to subside naturally, which should take about 20-30 seconds, as the alcohol burns off and infuses the sauce with deepened flavors.

Common Mistake to Avoid: Pouring the rum too quickly can cause splattering or uneven flames. Always do this away from any open flames and have a lid nearby for safety, ensuring your bananas foster recipe remains a fun, not frightening, experience.

Step 5: Serving Immediately

Once the flames have subsided, remove the skillet from heat and serve the banana mixture immediately over scoops of vanilla ice cream, drizzling any extra sauce on top for maximum indulgence.

Pro Tip: Timing is everything—serve right away to enjoy the contrast of hot and cold, which is the hallmark of a great Classic New Orleans Bananas Foster.

Serving & Presentation

Elevate your Classic New Orleans Bananas Foster with creative plating that turns it into a visual masterpiece. Arrange the caramelized banana slices artfully over a generous scoop of vanilla ice cream in a shallow bowl, then drizzle the warm rum sauce in a zigzag pattern for an elegant touch. Garnish with a sprinkle of cinnamon or a few toasted pecans for added crunch and sophistication, enhancing the New Orleans dessert’s appeal. For a festive presentation, serve in individual ramekins with a side of whipped cream or fresh mint leaves to brighten the dish.

To complement this recipe, pair it with light main courses like grilled fish or a simple salad to balance the richness, making it ideal for a multi-course meal. As a standalone treat, it’s perfect after spicy Cajun dishes, cleansing the palate with its sweet, comforting flavors. Experiment with variations, such as adding a dash of orange zest to the sauce for a citrusy twist, ensuring your bananas foster recipe adapts to any occasion.

Make-Ahead & Storage Solutions

For a Make-Ahead Strategy, prepare the banana slices up to 3 days in advance by peeling and slicing them, then storing in an airtight container in the refrigerator to prevent browning—toss them in a bit of lemon juice for extra protection. The sauce base, including the butter, sugar, and cinnamon mixture, can be made ahead and refrigerated for up to 2 days; simply reheat it gently before adding the bananas and rum.

When Storing Leftovers, transfer any cooled bananas foster to an airtight container and refrigerate for up to 24 hours to maintain freshness—the sauce may thicken, so reheat slowly. For freezing, portion into individual servings and freeze for up to a month; thaw in the refrigerator overnight before use.

The Best Way to Reheat is in a skillet over low heat to restore the original texture and flavor, adding a splash of rum if needed to loosen the sauce. Avoid microwaving, as it can make the bananas mushy, ensuring your Classic New Orleans Bananas Foster retains its signature appeal.

Finished recipe photo

Frequently Asked Questions (FAQ)

How do you make chocolate chip cookies soft and chewy?

While this isn’t directly related to Classic New Orleans Bananas Foster, the principle of achieving soft textures can apply to baking. For soft and chewy results in general, use melted butter instead of creamed, and add an extra egg yolk for moisture. In the context of desserts like bananas foster, focus on not overcooking the bananas to keep them tender.

Can you substitute butter with margarine in chocolate chip cookies?

Substituting butter with margarine in baking can work, but it might alter the flavor and texture. Margarine has more water content, which could make items less rich. For your Classic New Orleans Bananas Foster, stick with unsalted butter for the best results, as it provides that creamy base; if substituting, use a high-fat margarine to mimic the effect.

How long do you bake chocolate chip cookies for the best results?

Baking times vary, but for optimal results, bake at 375°F for 8-10 minutes. Relating this to bananas foster, precise timing is key—sauté for just 2-3 minutes to avoid overcooking. Always monitor closely for the perfect Classic New Orleans Bananas Foster.

What are some creative ways to serve chocolate chip cookies?

Creative serving ideas for desserts can inspire your bananas foster presentation; for instance, crumble cookies over ice cream, much like serving bananas foster. For this recipe, try topping with crushed nuts or pairing with coffee for a delightful twist on the traditional New Orleans dessert.

Is Classic New Orleans Bananas Foster suitable for kids?

Yes, but with caution—the rum flambé burns off the alcohol, making it kid-friendly. Skip the rum or use a non-alcoholic substitute to ensure it’s safe for children while still enjoying the caramelized bananas.

How can I make this recipe alcohol-free?

To make Classic New Orleans Bananas Foster alcohol-free, substitute the dark rum with apple juice or a rum extract diluted in water. This maintains the flavor without the flame, keeping the dessert accessible for all.

What variations can I try for this bananas foster recipe?

Experiment with additions like chopped nuts, chocolate shavings, or even fresh berries to customize your Classic New Orleans Bananas Foster, adding a personal touch while preserving the core recipe’s authenticity.

Print
clock clock iconcutlery cutlery iconflag flag iconfolder folder iconinstagram instagram iconpinterest pinterest iconfacebook facebook iconprint print iconsquares squares iconheart heart iconheart solid heart solid icon

Classic New Orleans Bananas Foster


  • Author: Chef mia

Description

Classic New Orleans Bananas Foster is a delightful dessert that features caramelized bananas in a rich rum sauce, served warm over vanilla ice cream. This show-stopping treat is perfect for any occasion.


Ingredients

Scale
  • 2ripe bananas
  • 4 tablespoonsunsalted butter
  • ½ cupbrown sugar
  • 1 teaspoonground cinnamon
  • ¼ cupdark rum
  • Vanilla ice cream for serving

Instructions

  1. Peel and slice the bananas diagonally into thick pieces.
  2. In a large skillet over medium heat, melt the butter until bubbly but not browned.
  3. Stir in the brown sugar and cinnamon to create a syrup.
  4. Add the banana slices and sauté for 2-3 minutes until tender.
  5. Carefully pour in the dark rum and flambé until flames subside.
  6. Serve immediately over scoops of vanilla ice cream, drizzling with the sauce.

Nutrition

  • Calories: 350
  • Sugar: 34g
  • Fat: 18g
  • Carbohydrates: 44g
  • Protein: 3g

Conclusion

This delightful recipe brings together the warm, comforting flavors of ripe bananas and spices, making it a perfect go-to for a quick breakfast or afternoon treat that the whole family will love. Its moist texture and subtle sweetness highlight the natural goodness of fresh ingredients, while being versatile enough to fit various dietary preferences. For a fun variation, try incorporating chocolate chips as featured in our Chocolate Chip Banana Bars, or pair it with our Morning Glory Muffins for a heartier serving option that adds extra fruits and nuts to the mix.

Zesty Lemon Brownies

I need to convert the provided article into clean WordPress block editor compatible HTML. It must be styled for cookingwithemy.com and include a dynamically generated Table of Contents.

First, start with the exact CSS style block given.

Then, after the

Baked Cheese Buns: The Only Recipe You’ll Ever Need

Imagine coming home after a long day, craving something warm, cheesy, and utterly satisfying—enter the world of Baked Cheese Buns, those fluffy treats with a golden crust and an irresistible gooey cheese center that make snacking an event. This recipe solves the common dilemma of wanting homemade baked goods that are quick yet impressive, perfect for busy families or impromptu gatherings. As the go-to guide for Baked Cheese Buns, we’ll dive into the secret behind achieving that ultimate gooey cheese center, setting this version apart from ordinary ones. Whether you’re a novice baker or a seasoned pro, this step-by-step tutorial ensures your Baked Cheese Buns turn out perfectly every time.

The aroma of freshly baked cheese buns wafting through your kitchen is nothing short of magical, with the golden crust cracking just enough to reveal a molten cheese core that’s creamy and indulgent. Each bite offers a harmonious blend of soft, fluffy dough that melts in your mouth, complemented by the rich, savory notes of cheddar or mozzarella that stretch and ooze with every pull. The texture is spot-on—light and airy on the outside, yet decadently chewy inside—making these Baked Cheese Buns a sensory delight that keeps you coming back for more. Picture the satisfaction of biting into that warm, cheesy goodness that pairs beautifully with your favorite dips or enjoyed on their own.

What makes this Baked Cheese Buns recipe from cookingwithemy.com truly special is our commitment to providing a foolproof, tested method that’s been refined for home cooks to achieve consistent results. Drawing from reliable sources like TastyRecipes, we’ve incorporated the chef’s secret to elevate your baking game, ensuring these buns are the fluffiest and most flavorful you’ve ever made. In this comprehensive guide, you’ll learn expert tips, ingredient insights, and even how to adapt for different dietary needs, making it the single best resource for mastering Baked Cheese Buns with confidence and ease.

Prep Time: 20 minutes
Cook Time: 20 minutes
Total Time: 1 hour 40 minutes
Servings: 12 buns

Why This Baked Cheese Buns Recipe is a Game-Changer

The Chef’s Secret: The unique selling proposition of this Baked Cheese Buns recipe lies in the precise technique of incorporating shredded cheese directly into the dough during mixing, which creates an unparalleled gooey cheese center that doesn’t leak out during baking. By ensuring the cheese is evenly distributed and allowing for a full rise, we lock in that molten interior while achieving a perfectly golden exterior. This method, tested multiple times, elevates the standard recipe by enhancing moisture retention and flavor infusion, making your buns irresistibly gooey without compromising the dough’s structure.

Unbeatable Texture: The science behind the fluffy texture comes from the interaction of instant yeast with warm water and sugar, which activates fermentation and produces carbon dioxide bubbles that expand the dough. This results in a light, airy crumb balanced by the cheese’s fats, which help create a tender interior while the oven’s heat caramelizes the outer layer for that signature golden crust. Using high-quality ingredients like all-purpose flour ensures gluten development without toughness, making these Baked Cheese Buns consistently pillowy and satisfying.

Foolproof for a Reason: This recipe has been rigorously tested in real home kitchens to guarantee success, accounting for variables like humidity and yeast activity. With clear instructions and pro tips, even beginners can avoid common pitfalls, ensuring your Baked Cheese Buns come out perfect every time. It’s reliable, scalable, and designed for everyday use, making it the ultimate go-to for cheese lovers seeking trustworthy baking results.

Ingredient Spotlight: Quality Makes the Difference

All-Purpose Flour (2 cups): This staple provides the foundational structure for your Baked Cheese Buns, forming the gluten network that gives the dough its elasticity and rise. Opt for unbleached, high-quality flour to avoid any off-flavors; it absorbs liquids evenly, ensuring a soft texture. If you’re out of all-purpose flour, substitute with bread flour for a chewier result, but reduce the amount by 1-2 tablespoons to prevent the dough from becoming too dense.

Shredded Cheese (1 cup, cheddar or mozzarella): The star of these Baked Cheese Buns, this ingredient melts into a gooey center, adding rich, savory flavor and moisture. Choose freshly shredded cheese over pre-shredded for better meltability and taste, as anti-caking agents in packaged versions can affect texture. For a healthier swap, use low-fat cheese, but note it may slightly reduce the gooeyness; alternatively, mix in a bit of parmesan for extra tang.

Warm Water (3/4 cup at 110°F): Essential for activating the yeast, this warm water helps kickstart fermentation, leading to those fluffy Baked Cheese Buns. Use filtered water to ensure purity and the right temperature—too hot, and you’ll kill the yeast; too cold, and it won’t activate. If needed, substitute with warm milk for a richer dough, but adjust salt accordingly to balance flavors.

Sugar (1 tsp): This sweetener nourishes the yeast, promoting a faster rise and adding a subtle hint of sweetness that contrasts the cheese’s savoriness in your Baked Cheese Buns. Always use granulated sugar for even dissolution; if substituting, honey works but may introduce extra moisture, so reduce the water slightly to maintain dough consistency.

Salt (1 tsp): Salt enhances the overall flavor profile of the Baked Cheese Buns, balancing the richness of the cheese and strengthening the dough’s structure. Use fine sea salt for precise seasoning; if you’re watching sodium, swap with a potassium-based salt, but taste as you go to avoid under-seasoning, which could make the buns bland.

Instant Yeast (2 tsp): The leavening agent that makes these Baked Cheese Buns rise beautifully, it provides quick fermentation for a light texture. Fresh yeast is key—check the expiration date to ensure activity; if substituting with active dry yeast, proof it first in the warm water to guarantee the same fluffy results.

Olive Oil (2 tbsp): This adds moisture and a subtle fruity note to the dough, contributing to the golden crust and tender interior of your Baked Cheese Buns. Choose extra-virgin for the best flavor; for a neutral alternative, use vegetable oil, but it won’t impart the same depth, so consider adding herbs for extra taste.

Step-by-Step Instructions

Step 1: Preparing the Yeast Mixture

In a mixing bowl, combine 3/4 cup warm water (ensuring it’s exactly 110°F), 1 tsp sugar, and 2 tsp instant yeast. Stir gently and let it sit for 5 minutes until the mixture becomes frothy, indicating the yeast is active. This step is crucial for achieving the fluffy texture in your Baked Cheese Buns.

Pro Tip: Always measure the water temperature accurately with a thermometer to activate the yeast properly—room temperature water might not foam, leading to flat buns.

Step 2: Creating the Dough

Once the yeast mixture is frothy, gradually mix in 2 cups all-purpose flour and 1 tsp salt using a spoon or stand mixer until a smooth, sticky dough forms. Continue mixing until all ingredients are fully incorporated, which should take about 2-3 minutes.

Common Mistake to Avoid: Adding all the flour at once can create lumps; add it gradually while mixing to ensure even distribution and prevent a tough dough.

Step 3: Kneading the Dough

Turn the dough out onto a lightly floured surface and knead it for about 8 minutes until it’s elastic and springs back when pressed. This develops the gluten for that perfect fluffy structure in your Baked Cheese Buns.

Pro Tip: If the dough sticks to your hands, add a light dusting of flour, but don’t overdo it—too much flour can make the buns dense instead of airy.

Step 4: Letting the Dough Rise

Place the kneaded dough in a lightly oiled bowl, cover it with a clean towel, and let it rise in a warm spot for 1 hour or until it doubles in size. This resting period is key for the flavors to develop and the dough to become light and airy.

Common Mistake to Avoid: Rising in a drafty area can slow the process; place the bowl in a warm, draft-free spot like an oven with the light on to ensure even rising.

Step 5: Shaping the Buns

After the dough has risen, punch it down gently to release air bubbles, then divide it into small balls (about 12 equal portions) and place them on a lined baking sheet. Press a portion of shredded cheese into the center of each ball before shaping to ensure that gooey surprise.

Pro Tip: Handle the dough gently during shaping to preserve the air pockets, which contribute to the fluffy texture of your Baked Cheese Buns.

Step 6: Baking the Buns

Preheat your oven to 375°F (190°C), then bake the shaped buns for 15-20 minutes until they turn golden brown and the cheese inside is perfectly melted. Remove from the oven and let them cool slightly on the sheet.

Common Mistake to Avoid: Overbaking can dry out the cheese center; check at 15 minutes and rotate the sheet for even browning to keep them moist and gooey.

Serving & Presentation

To make your Baked Cheese Buns truly stand out, serve them warm on a rustic wooden board for a cozy, inviting presentation that highlights their golden crust. Garnish with a sprinkle of fresh herbs like parsley or chives for a pop of color and added flavor, enhancing the gooey cheese center without overwhelming it. Pair these buns with complementary sides such as a creamy tomato soup for a comforting meal, or use them as appetizers alongside charcuterie boards at gatherings. For a main course, stuff them with deli meats or pair with salads to balance the richness, making your Baked Cheese Buns the star of the table.

Make-Ahead & Storage Solutions

Make-Ahead Strategy: Prepare the dough up to 3 days in advance by following the instructions through kneading, then store it in an airtight container in the refrigerator. When ready to bake, let it come to room temperature for 30 minutes and proceed with rising and shaping for fresh Baked Cheese Buns with minimal effort.

Storing Leftovers: To maintain maximum freshness, store cooled buns in an airtight container at room temperature for up to 2 days, or refrigerate for up to 5 days to prevent sogginess. For longer storage, freeze the buns in a freezer-safe bag for up to 3 months, ensuring they retain their fluffy texture.

The Best Way to Reheat: Restore the original gooey cheese center and fluffy texture by reheating in a 350°F oven for 5-7 minutes, or use a toaster oven to crisp the exterior without drying them out. Avoid microwaving, as it can make the buns rubbery—opt for the oven method for the best results.

Finished recipe photo

Frequently Asked Questions (FAQ)

How long does it take to bake chocolate chip cookies?

While this question relates to another recipe, for context, baking chocolate chip cookies typically takes 10-12 minutes at 375°F, but it’s not directly applicable here. For Baked Cheese Buns, focus on the 15-20 minutes baking time specified. Always monitor your oven for the best results, as times can vary based on your equipment.

Can I substitute butter with margarine in chocolate chip cookies?

Again, this pertains to chocolate chip cookies, but in general, margarine can replace butter for a similar texture, though it may alter the flavor slightly. For Baked Cheese Buns, we use olive oil instead, which keeps the dough moist—stick to the recipe for optimal results, but if adapting, test small batches first.

What are some tips for making chocolate chip cookies chewy?

For chewy chocolate chip cookies, use melted butter and brown sugar, but since we’re discussing Baked Cheese Buns, aim for chewiness by not overbaking and ensuring proper dough hydration. In this recipe, the cheese adds natural chew, so follow the rising steps closely for that perfect texture.

How many cookies does a standard chocolate chip cookie recipe make?

A standard chocolate chip cookie recipe usually yields about 24-36 cookies, depending on size, but for Baked Cheese Buns, this recipe makes 12 buns. Adjust quantities as needed for your needs, and enjoy the cheesy twist on baked treats.

Can I make this recipe vegan or gluten-free?

Absolutely! For a vegan version of Baked Cheese Buns, substitute the shredded cheese with a plant-based alternative like vegan cheddar and use water instead of any dairy-based ingredients; ensure your yeast is vegan-friendly. For gluten-free, swap the all-purpose flour with a 1:1 gluten-free blend, but add an extra teaspoon of xanthan gum to maintain the dough’s structure and achieve that fluffy rise.

What type of cheese works best for Baked Cheese Buns?

Cheddar or mozzarella are ideal for their melting properties, providing that gooey center, but experimenting with gouda can add a smoky flavor—always shred it fresh for the best results in your Baked Cheese Buns.

Print
clock clock iconcutlery cutlery iconflag flag iconfolder folder iconinstagram instagram iconpinterest pinterest iconfacebook facebook iconprint print iconsquares squares iconheart heart iconheart solid heart solid icon

Baked Cheese Buns


  • Author: Chef mia

Description

Baked Cheese Buns are irresistible fluffy treats with a golden crust and gooey cheese center, perfect for snacking or serving at gatherings.


Ingredients

Scale
  • 2 cupsAll-Purpose Flour
  • 1 cupShredded Cheese (cheddar or mozzarella)
  • 3/4 cupWarm Water (110°F)
  • 1 tspSugar
  • 1 tspSalt
  • 2 tspInstant Yeast
  • 2 tbspOlive Oil

Instructions

  1. In a mixing bowl, combine warm water, sugar, and yeast. Let sit for 5 minutes until frothy.
  2. Gradually mix in flour and salt until a smooth dough forms.
  3. Knead on a floured surface for about 8 minutes until elastic.
  4. Place dough in an oiled bowl, cover with a towel, and let rise for 1 hour.
  5. Punch down the dough, shape into small balls, and place on a lined baking sheet.
  6. Preheat oven to 375°F (190°C) and bake for 15-20 minutes until golden brown.

Nutrition

  • Calories: 150
  • Sugar: 0.5g
  • Fat: 6g
  • Carbohydrates: 20g
  • Protein: 5g

Conclusion

In this delicious recipe, the blend of savory cheese and crispy textures creates a mouthwatering experience that’s perfect for family dinners or casual gatherings. The focus on fresh ingredients and simple preparation makes it an easy go-to for any occasion, highlighting its irresistible flavor that will leave everyone craving more. For a serving tip, pair it with a fresh salad to balance the richness, or experiment with adding herbs for a personalized twist— and if you’re eager for more cheesy inspirations, be sure to try the Cheesy Parmesan Mozzarella Bites or the Crispy Garlic Parmesan Chicken Tenders.

Classic Irish Shepherd’s Pie

Classic Irish Shepherd’s Pie: The Only Recipe You’ll Ever Need

Welcome to the ultimate guide for Classic Irish Shepherd’s Pie, a beloved comfort food that’s perfect for chilly evenings or family gatherings. This hearty dish combines savory ground beef with fresh vegetables and a golden, extra creamy mashed potato topping that sets it apart from the rest. Originating from traditional Irish cuisine, our version enhances the classic flavors with meticulous techniques to ensure it’s not just good—it’s unforgettable. Whether you’re a seasoned cook or a beginner, this Classic Irish Shepherd’s Pie recipe will make you feel like a pro in the kitchen, delivering that authentic taste with a modern twist for extra creaminess.

Imagine the rich, aromatic blend of sautéed onions, garlic, and thyme filling your home with an inviting warmth that promises satisfaction. Each bite of Classic Irish Shepherd’s Pie offers tender ground beef mixed with sweet carrots and peas, all simmered in a flavorful beef broth that creates a gravy-like sauce. Topped with our secret for extra creamy mashed potatoes, the dish boasts a crispy, golden crust that contrasts beautifully with the soft, velvety interior. The textures are spot-on: a hearty base that’s not too dry, paired with a topping that’s luxuriously smooth yet perfectly browned, making every forkful a delight.

What makes this Classic Irish Shepherd’s Pie from cookingwithemy.com the best resource online? We’ve tested and refined this recipe countless times to guarantee foolproof results, incorporating a Chef’s Secret that elevates the mashed potatoes to new heights of creaminess. You’ll learn pro tips for every step, common mistakes to avoid, and even adaptations for dietary needs. By the end, you’ll have all the knowledge to confidently whip up this dish, impressing your loved ones with its authentic Irish charm and superior taste. Let’s dive in and discover why this is the go-to recipe for Classic Irish Shepherd’s Pie.

Prep Time: 20 minutes
Cook Time: 30 minutes
Total Time: 50 minutes
Servings: 4

Why This Classic Irish Shepherd’s Pie Recipe is a Game-Changer

The Chef’s Secret in this Classic Irish Shepherd’s Pie lies in achieving extra creamy mashed potatoes that elevate the entire dish. We enhance the mashed potatoes by thoroughly mashing them with butter and milk until they’re silky smooth, which not only adds richness but also creates a barrier that keeps the beef mixture moist and flavorful. This technique ensures the topping isn’t just a simple layer—it’s a luxurious crown that browns to perfection in the oven, providing a textural contrast that’s hard to beat.

Unbeatable Texture: The science behind our extra creamy mashed potatoes comes from the emulsification of butter and milk with the starchy potatoes. When mashed properly, the starches release and bind with the fats, creating a velvety consistency that holds up under baking without becoming gummy. This results in a topping that’s fluffy yet firm, contrasting the tender beef filling for an ideal mouthfeel in your Classic Irish Shepherd’s Pie.

Foolproof for a Reason: We’ve tested this Classic Irish Shepherd’s Pie recipe over multiple batches to ensure consistent success, even for novice cooks. From precise simmering times to layering techniques, every detail has been honed to prevent common pitfalls like a watery base or uneven baking, making it a reliable staple for any kitchen.

Ingredient Spotlight: Quality Makes the Difference

For 1lb lean ground beef, this is the heart of your Classic Irish Shepherd’s Pie, providing rich, savory flavor and protein. Opt for freshly ground beef with at least 85% lean to avoid excess grease; higher quality means better taste and texture. If you’re looking for a substitution, ground lamb offers an authentic Irish twist, maintaining the dish’s traditional essence while adding a slight gaminess.

Chopped carrots (1 cup) add natural sweetness and crunch to balance the savory elements in Classic Irish Shepherd’s Pie. Fresh, organic carrots ensure vibrant color and nutrients, enhancing the overall appeal. For a substitution, parsnips can be used for a nuttier flavor, but they might alter the sweetness slightly—adjust seasoning accordingly.

Diced onion (1) and minced garlic (2 cloves) form the aromatic base, infusing depth and warmth into the dish. Use fresh yellow onions for their mild sweetness and pungent garlic for robust flavor; quality matters to prevent bitterness. If needed, shallots can replace onions for a subtler taste, but they’re milder, so you might need to add extra for the same impact in your Classic Irish Shepherd’s Pie.

Frozen peas (1 cup) bring a pop of color and sweetness, plus fiber, to Classic Irish Shepherd’s Pie. Choose high-quality frozen peas without additives for the best texture. Fresh peas work as a substitute during peak season, but blanch them first to ensure they’re tender without being overly firm.

Beef broth (1 cup, low-sodium) is key for creating a flavorful, thickened sauce that ties everything together. Use homemade or low-sodium store-bought to control salt levels and enhance the beefy notes. Vegetable broth can substitute for a lighter version, making it suitable for those reducing meat flavors in their Classic Irish Shepherd’s Pie.

Prepared mashed potatoes (2 cups) are the star topping, providing that extra creamy finish. Use freshly made russet potatoes for the best results, as they mash smoothly. Instant mashed potatoes can be a quick sub, but they’ll lack the same creaminess—add extra butter and milk to mimic our unique angle.

Worcestershire sauce (2 tbsp) adds umami and tang, deepening the beef’s flavor profile in Classic Irish Shepherd’s Pie. A high-quality brand ensures authentic taste; soy sauce mixed with a touch of vinegar can substitute, though it might make the dish saltier, so adjust to taste.

Dried thyme (½ tsp) infuses earthy notes that evoke traditional Irish herbs. Fresh thyme can be used for a more potent flavor—just double the amount. If unavailable, rosemary offers a similar aromatic quality, but use sparingly to avoid overpowering your Classic Irish Shepherd’s Pie.

Butter (2 tbsp) and milk (¼ cup) are essential for our extra creamy mashed potatoes. Choose unsalted butter for controlled seasoning and whole milk for richness. For dairy-free options, vegan butter and almond milk work well, ensuring the topping remains creamy without compromising the unique angle.

Step-by-Step Instructions

Step 1: Preparing the Onions and Garlic

Start by heating a large skillet over medium heat and adding the diced onion and minced garlic. Sauté them for about 3-5 minutes until they become translucent and fragrant, stirring occasionally to prevent burning.

Pro Tip: Use a non-stick skillet for even cooking and add a pinch of salt early to draw out moisture from the onions, enhancing their sweetness without overcooking.

Step 2: Creating the Beef Mixture

Once the onions and garlic are ready, add the 1lb of lean ground beef to the skillet. Cook until the beef is fully browned, breaking it apart with a spoon for even crumbles. Stir in the 2 tbsp of Worcestershire sauce and ½ tsp of dried thyme, mixing well to distribute the flavors.

Common Mistake to Avoid: Overcrowding the skillet can lead to steaming instead of browning; cook in batches if needed to achieve that perfect sear and avoid a greasy texture.

Step 3: Adding the Vegetables

Mix in the 1 cup of chopped carrots and 1 cup of frozen peas to the beef mixture. Continue cooking for 3-4 minutes until the vegetables are slightly softened, stirring frequently to ensure even heating.

Pro Tip: Adding the peas frozen helps maintain their vibrant color and texture; don’t thaw them beforehand to prevent sogginess in your Classic Irish Shepherd’s Pie.

Step 4: Simmering the Mixture

Pour in the 1 cup of low-sodium beef broth and let the mixture simmer for 5-7 minutes, stirring occasionally, until it thickens into a hearty sauce. Reduce the heat if it bubbles too vigorously to avoid splattering.

Common Mistake to Avoid: Simmering too long can evaporate the broth too quickly, resulting in a dry filling; keep an eye on the consistency and stop when it’s gravy-like.

Step 5: Preparing the Mashed Potatoes

While the beef mixture simmers, boil your potatoes until tender, then drain and mash them with 2 tbsp of butter and ¼ cup of milk until smooth and extra creamy. Season to taste for the perfect topping.

Pro Tip: Warm the milk and butter before adding them to the potatoes for easier mashing and a silkier texture, enhancing our unique extra creamy angle.

Step 6: Assembling and Baking

In an oven-safe dish, layer the beef mixture evenly at the bottom, then spread the mashed potatoes over the top, creating peaks with a fork for added crispiness. Bake at 400°F (200°C) for 25-30 minutes until the top is golden brown.

Common Mistake to Avoid: Not creating peaks on the potatoes can lead to a uniform, less crispy topping; use a fork to build texture for that irresistible crunch.

Serving & Presentation

For an impressive presentation of your Classic Irish Shepherd’s Pie, serve it straight from the oven in individual portions, allowing the golden peaks to shine. Garnish with a sprinkle of fresh thyme or chopped parsley for a pop of color and freshness. Pair it with simple sides like crusty bread to soak up the savory juices or a fresh green salad to balance the richness, making it a complete meal.

Make-Ahead & Storage Solutions

Make-Ahead Strategy: Prepare the beef mixture up to 2 days in advance and store it in an airtight container in the fridge; assemble with mashed potatoes just before baking for the best texture. The mashed potatoes can be made a day ahead and reheated gently on the stove with a splash of milk.

Storing Leftovers: Cool the Classic Irish Shepherd’s Pie completely, then cover tightly and refrigerate for up to 3 days, or freeze portions in freezer-safe containers for up to 3 months to maintain freshness.

The Best Way to Reheat: For refrigerated leftovers, cover with foil and bake at 350°F for 20 minutes; for frozen, thaw overnight in the fridge and reheat as above. This method restores the extra creamy topping and prevents sogginess.

Frequently Asked Questions (FAQ)

Finished recipe photo

How do you make Classic Irish Shepherd’s Pie extra creamy?

To achieve extra creaminess in Classic Irish Shepherd’s Pie, focus on the mashed potatoes by using plenty of butter and milk, mashing them while still warm, and incorporating our Chef’s Secret of emulsifying the fats thoroughly. Avoid over-mashing to prevent gumminess, and always use starchy potatoes like russets for the best results.

Can I substitute butter with margarine in Classic Irish Shepherd’s Pie?

Yes, you can substitute butter with margarine in Classic Irish Shepherd’s Pie, but it may slightly alter the flavor and texture. Margarine works well for the mashed potatoes, maintaining that extra creamy quality, though it lacks the richness of butter. For a closer match, choose a high-fat margarine to preserve the dish’s authentic taste.

How long do you bake Classic Irish Shepherd’s Pie for?

Bake Classic Irish Shepherd’s Pie at 400°F for 25-30 minutes, or until the top is golden brown and the filling is bubbling. Factors like oven calibration and dish size can affect timing, so check after 20 minutes to ensure it doesn’t overcook, preserving that perfect crispy topping.

What are the best ways to serve Classic Irish Shepherd’s Pie?

The best ways to serve Classic Irish Shepherd’s Pie include pairing it with a side of steamed greens or a light salad for contrast, or enjoying it solo as a comforting main dish. For gatherings, portion it into bowls and top with a dollop of sour cream or fresh herbs to enhance its extra creamy appeal.

Can I make this recipe gluten-free?

Absolutely, you can make Classic Irish Shepherd’s Pie gluten-free by ensuring all ingredients, like Worcestershire sauce, are certified gluten-free varieties. Use gluten-free beef broth if needed, and the rest of the recipe naturally fits, allowing you to enjoy its extra creamy topping without any issues.

Is Classic Irish Shepherd’s Pie the same as Cottage Pie?

Classic Irish Shepherd’s Pie traditionally uses lamb, while Cottage Pie uses beef, but this beef-based version is often called Shepherd’s Pie in modern contexts. Our recipe sticks to beef for accessibility, but you can swap for lamb to stay true to Irish roots while maintaining the extra creamy element.

Print
clock clock iconcutlery cutlery iconflag flag iconfolder folder iconinstagram instagram iconpinterest pinterest iconfacebook facebook iconprint print iconsquares squares iconheart heart iconheart solid heart solid icon

Classic Irish Shepherd’s Pie


  • Author: Chef mia

Description

Experience the warmth of Classic Irish Shepherd’s Pie, a comforting dish filled with savory beef and topped with creamy mashed potatoes—perfect for family dinners or cozy gatherings.


Ingredients

Scale
  • 1lb lean ground beef
  • 1 cupchopped carrots
  • 1onion, diced
  • 1 cupfrozen peas
  • 2cloves garlic, minced
  • 1 cupbeef broth (low-sodium)
  • 2 cupsmashed potatoes (prepared)
  • 2 tbspWorcestershire sauce
  • ½ tspdried thyme
  • 2 tbspbutter
  • ¼ cupmilk

Instructions

  1. Sauté onions and garlic in a skillet over medium heat until translucent.
  2. Add ground beef and cook until browned. Stir in Worcestershire sauce and thyme.
  3. Mix in carrots and peas; cook until slightly softened.
  4. Pour in beef broth and simmer for about 5-7 minutes until thickened.
  5. While simmering, prepare mashed potatoes by boiling, then mashing them with butter and milk until smooth.
  6. In an oven-safe dish, layer the beef mixture followed by the mashed potatoes, creating peaks on top for crispiness.
  7. Bake at 400°F (200°C) for 25-30 minutes or until golden brown.

Nutrition

  • Calories: 320
  • Sugar: 3g
  • Fat: 18g
  • Carbohydrates: 28g
  • Protein: 15g

Conclusion

This Cajun Potato Soup delivers a bold, spicy kick with creamy potatoes and Southern flavors that make it an ideal comfort food for cozy family dinners. Its hearty texture and rich taste capture the essence of traditional Southern cooking, turning simple ingredients into a satisfying meal. For a fresh twist, try garnishing with fresh herbs or adding extra heat with cayenne pepper. If you’re craving more soup inspiration, explore recipes like Easy Hearty One-Pot Savory Soups Recipe or Easy Spicy Cajun Potato Soup Recipe for additional flavorful options.

Cheesy Parmesan Mozzarella Bites

Cheesy Parmesan Mozzarella Bites: The Only Recipe You’ll Ever Need

Imagine hosting a gathering where your guests can’t stop raving about the appetizers. That’s the magic of Cheesy Parmesan Mozzarella Bites, the ultimate savory snack that combines a crispy exterior with an irresistibly gooey center. Whether you’re preparing for a family movie night or a casual party, these bites solve the common problem of finding a quick, crowd-pleasing treat that feels gourmet without the fuss. Drawing from the best of Tasty Recipes, this version on cookingwithemy.com elevates the classic with our unique angle: an emphasis on achieving that perfect, melt-in-your-mouth cheese pull that sets it apart from ordinary snacks. Cheesy Parmesan Mozzarella Bites are not just easy to make—they’re designed for success, making you the hero of any event in under 35 minutes.

The flavors of Cheesy Parmesan Mozzarella Bites burst with rich, savory notes from the sharp parmesan and creamy mozzarella, creating a symphony of tastes that dance on your palate. Picture the satisfying crunch of panko breadcrumbs giving way to a warm, oozing center that stretches with every bite, evoking the comfort of homemade cheese sticks but with an upscale twist. The aromas wafting from the oven—nutty parmesan mingling with the subtle earthiness of fresh herbs—will have your kitchen smelling like a professional Italian eatery. This texture contrast, from the golden, crispy shell to the soft, gooey interior, makes these bites addictive and impossible to resist.

What makes this Cheesy Parmesan Mozzarella Bites recipe from cookingwithemy.com truly special is our commitment to thorough testing and refinement, ensuring it’s the most reliable version you’ll find online. We’ve incorporated a “Chef’s Secret” that guarantees that irresistibly gooey center every time, drawing from expert techniques to avoid common pitfalls. In this post, you’ll learn step-by-step instructions, smart ingredient swaps, and creative serving ideas that build your confidence in the kitchen. Plus, we’ll cover FAQs adapted to this recipe, so you can troubleshoot like a pro and achieve flawless results on your first try.

Prep Time: 15 minutes
Cook Time: 20 minutes
Total Time: 35 minutes
Servings: 12

Why This Cheesy Parmesan Mozzarella Bites Recipe is a Game-Changer

The Chef’s Secret: Our unique angle lies in perfecting that irresistibly gooey center through precise cheese blending and a quick chill before baking—ensuring the mozzarella and parmesan meld into a molten core without leaking. This technique elevates the recipe by locking in moisture and flavors, creating a superior cheese pull that standard recipes often miss. By combining the cheeses thoroughly and allowing a brief rest, we prevent separation during baking, resulting in bites that are consistently gooey and delightful.

Unbeatable Texture: The science behind the texture comes from the panko breadcrumbs, which provide a high-crisp coating due to their airy structure and ability to absorb minimal oil. When baked, the eggs act as a binder, creating a barrier that seals in the cheese’s moisture, leading to a crunchy exterior that contrasts perfectly with the soft interior. This combination ensures the bites stay crispy on the outside while maintaining that gooey center, thanks to the even heat distribution in a preheated oven.

Foolproof for a Reason: This recipe has been tested multiple times in our kitchen to guarantee success for home cooks of all levels. We’ve fine-tuned measurements and steps to account for variables like oven types, making it incredibly reliable and easy to follow, so you can focus on enjoying the process rather than worrying about mistakes.

Ingredient Spotlight: Quality Makes the Difference

Shredded mozzarella cheese is the star of our Cheesy Parmesan Mozzarella Bites, providing the creamy, stretchy texture that defines this snack. Its high moisture content ensures that irresistibly gooey center we love, melting beautifully under heat to create a indulgent filling. Always opt for freshly shredded mozzarella over pre-shredded varieties, as the latter often contains anti-caking agents that can affect melt quality. If you’re looking for a substitution, try using fresh burrata for an even creamier twist, but adjust quantities to maintain the balance—about ¾ cup should suffice to keep the bites from becoming too watery.

Grated parmesan cheese adds a nutty, salty depth that complements the mild mozzarella, enhancing the overall savory profile of these mozzarella bites. Its aged crystals provide a flavorful punch and help bind the mixture without overpowering the gooeyness. Choose high-quality, aged parmesan for the best results, as it melts more evenly and boosts the recipe’s irresistible cheese factor. For a substitute, pecorino romano offers a similar sharpness, but use it sparingly—about ⅓ cup—to avoid making the bites too pungent for sensitive palates.

Panko breadcrumbs deliver the crispy exterior that makes these Cheesy Parmesan Mozzarella Bites stand out, offering a lighter, airier crunch compared to regular breadcrumbs. Their larger flakes create more surface area for browning, resulting in a golden shell that contrasts perfectly with the soft center. Always use fresh panko for optimal texture; if unavailable, regular breadcrumbs can work, but they’ll yield a denser coating—use 1 cup and toast them lightly beforehand to mimic the crunch.

Large eggs serve as the essential binder in this recipe, helping the breadcrumbs adhere and seal in the cheese for that perfect bake. They contribute to the structure and add a subtle richness without altering the cheesy flavor. Fresh, room-temperature eggs work best for even coating; if you’re allergic or avoiding eggs, aquafaba (chickpea liquid) can substitute in a 1:1 ratio, whisked to mimic egg consistency, ensuring the bites still hold together during baking.

Salt and pepper to taste are simple yet crucial for balancing the flavors in these mozzarella bites, enhancing the cheeses’ natural tastes without overwhelming them. Using fresh-ground pepper and sea salt ensures a more vibrant seasoning. If you’re watching sodium, opt for low-sodium alternatives, but remember to taste and adjust as needed to keep the savory snack well-seasoned.

Fresh parsley (optional) adds a pop of color and a hint of herbal freshness, making these bites visually appealing and slightly aromatic. While not essential, high-quality, freshly chopped parsley elevates the presentation. If substituting, dried parsley can be used at half the amount, or try chives for a milder onion-like note to garnish and brighten the flavor.

Step-by-Step Instructions

Step 1: Preheating the Oven

Begin by preheating your oven to 400°F (200°C) and lining a baking sheet with parchment paper to prevent sticking and ensure even baking. This step is crucial for achieving that golden, crispy exterior on your Cheesy Parmesan Mozzarella Bites.

Pro Tip: Use a reliable oven thermometer to verify the temperature, as an inaccurate oven can lead to uneven cooking and a less gooey center.

Step 2: Combining the Cheeses

In a large bowl, thoroughly mix 1 cup shredded mozzarella cheese with ½ cup grated parmesan cheese until they are well blended. This creates the base for the irresistibly gooey center of your mozzarella bites.

Common Mistake to Avoid: Don’t rush the mixing—uneven blending can cause the cheeses to separate during baking, resulting in dry spots; stir until fully incorporated for uniform melting.

Step 3: Whisking the Eggs

In a separate bowl, whisk 2 large eggs with salt and pepper to taste until the mixture is smooth and frothy. This will serve as the binding agent for coating the bites.

Pro Tip: Add a pinch of garlic powder to the eggs for an extra flavor boost, enhancing the savory profile of your Cheesy Parmesan Mozzarella Bites without altering the core recipe.

Step 4: Forming the Bites

Take the cheese mixture and form it into golf ball-sized bites, rolling them gently in your hands to create compact spheres. Aim for uniformity to ensure even cooking.

Common Mistake to Avoid: Overworking the mixture can make the bites tough; handle them lightly and chill for 5 minutes if the cheese softens too much, preserving that gooey texture.

Step 5: Coating the Bites

Dip each cheese bite into the egg mixture, ensuring it’s fully coated, then roll it in 1 cup panko breadcrumbs until completely covered. This step builds the crispy exterior that contrasts with the soft center.

Pro Tip: Use one hand for the egg and the other for breadcrumbs to keep things tidy and avoid a messy workstation, making the process faster and more efficient.

Step 6: Baking the Bites

Place the coated bites on the prepared baking sheet and bake for 15-20 minutes, or until they turn golden brown. Rotate the sheet halfway through for even crispiness.

Common Mistake to Avoid: Overbaking can dry out the gooey center, so check at 15 minutes; the bites should be golden but still yield slightly when pressed.

Serving & Presentation

Elevate your Cheesy Parmesan Mozzarella Bites with creative plating by arranging them on a wooden board alongside fresh dipping sauces like marinara or garlic aioli for a restaurant-worthy display. Garnish with a sprinkle of chopped fresh parsley to add vibrant green pops of color, enhancing the visual appeal and complementing the savory flavors. For the best pairing, serve these bites as an appetizer with a light salad or grilled vegetables to balance their richness, or pair with a main course like pasta for a cohesive Italian-themed meal. The key is to keep portions bite-sized for easy sharing, making your gatherings more interactive and enjoyable.

Make-Ahead & Storage Solutions

Make-Ahead Strategy: Prepare the cheese mixture up to 3 days in advance by combining the mozzarella and parmesan, then store it in an airtight container in the refrigerator. Form the bites and coat them the day before, keeping them chilled on a parchment-lined tray to maintain shape and freshness—just bake when ready for a quick snack.

Storing Leftovers: Allow the bites to cool completely, then store in an airtight container in the refrigerator for up to 3 days or freeze for up to 2 months. For freezing, place them on a baking sheet first to prevent sticking, then transfer to a freezer bag once solid.

The Best Way to Reheat: To restore the original crispy exterior and gooey center, reheat in a 350°F oven for 5-7 minutes or until warmed through; avoid microwaving, as it can make the bites soggy. If frozen, thaw in the fridge overnight before reheating for the best results.

Frequently Asked Questions (FAQ)

Finished recipe photo

How long does it take to bake Cheesy Parmesan Mozzarella Bites to get them perfectly crispy?

Baking time for Cheesy Parmesan Mozzarella Bites is typically 15-20 minutes at 400°F, but for the perfect crispy exterior with a gooey center, start checking at 15 minutes. Factors like oven accuracy and bite size affect this—larger bites may need up to 20 minutes. Always rotate the tray midway for even browning, ensuring a reliable, golden result every time.

What can I substitute for eggs in Cheesy Parmesan Mozzarella Bites recipes?

Eggs act as a binder for the coating, so a good substitute is aquafaba (the liquid from canned chickpeas), using 2 tablespoons whisked per egg. This keeps the bites vegan-friendly and maintains the crispy texture. You could also use a flaxseed mixture (1 tablespoon ground flaxseed with 3 tablespoons water per egg), but it might slightly alter the flavor—test a small batch first for the best adhesion.

Can I use whole wheat flour instead of breadcrumbs in Cheesy Parmesan Mozzarella Bites?

While this recipe uses panko breadcrumbs for crunch, you can substitute whole wheat flour by mixing it with some crushed cornflakes for texture—use 1 cup total. However, it won’t be as crispy, so for optimal results, stick with panko or try almond flour for a gluten-free option that adds a nutty twist without compromising the gooey center.

What are some creative ways to serve Cheesy Parmesan Mozzarella Bites for a party?

For a party, serve Cheesy Parmesan Mozzarella Bites on skewers with dipping stations featuring sauces like pesto or ranch to encourage interaction. Thread them with cherry tomatoes and basil for a colorful appetizer platter, or incorporate them into a charcuterie board with cured meats and olives for a sophisticated touch, making your gathering memorable and shareable.

Can I make this recipe gluten-free?

Yes, make Cheesy Parmesan Mozzarella Bites gluten-free by swapping panko breadcrumbs for gluten-free alternatives like crushed rice crackers or almond flour. Ensure all other ingredients, such as cheeses, are certified gluten-free, and double-check for cross-contamination—this simple swap keeps the crispy texture intact while accommodating dietary needs.

Are Cheesy Parmesan Mozzarella Bites suitable for kids?

Absolutely, these bites are kid-friendly due to their fun, cheesy flavor, but monitor for choking hazards with younger children since they’re bite-sized. You can make them milder by reducing pepper or adding a touch of garlic powder for extra appeal, turning snack time into a family favorite.

Print
clock clock iconcutlery cutlery iconflag flag iconfolder folder iconinstagram instagram iconpinterest pinterest iconfacebook facebook iconprint print iconsquares squares iconheart heart iconheart solid heart solid icon

Cheesy Parmesan Mozzarella Bites


  • Author: Chef mia

Description

Cheesy Parmesan Mozzarella Bites are the ultimate savory snack, featuring a crispy exterior and a gooey cheese center that will delight your taste buds at any gathering.


Ingredients

Scale
  • 1 cupshredded mozzarella cheese
  • ½ cupgrated parmesan cheese
  • 1 cuppanko breadcrumbs
  • 2large eggs
  • Salt and pepper to taste
  • Fresh parsley (optional)

Instructions

  1. Preheat oven to 400°F (200°C) and line a baking sheet with parchment paper.
  2. In a large bowl, combine mozzarella and parmesan cheese until well mixed.
  3. In a separate bowl, whisk eggs with salt and pepper.
  4. Form cheese mixture into golf ball-sized bites.
  5. Dip each bite in the egg mixture, then roll in breadcrumbs until fully coated.
  6. Place on the prepared baking sheet and bake for 15-20 minutes until golden brown.

Nutrition

  • Calories: 90
  • Sugar: 0g
  • Fat: 5g
  • Carbohydrates: 6g
  • Protein: 5g

Conclusion

This flavorful recipe combines simple ingredients to create a satisfying meal that’s perfect for busy weeknights, with its rich tastes and easy preparation sure to become a family favorite. The dish highlights comforting flavors that balance savory notes with a touch of warmth, making it ideal for any casual gathering. For a serving tip, pair it with a fresh salad to lighten the meal, or try a variation by adding herbs for an extra burst of flavor. If you enjoy easy pasta dishes, be sure to check out One Pot Spaghetti and Crispy Garlic Parmesan Chicken Tenders for more delicious ideas.

Gooey Salted Caramel Cupcakes

Gooey Salted Caramel Cupcakes: The Only Recipe You’ll Ever Need

If you’re craving a dessert that combines the rich indulgence of chocolate with the irresistible gooeyness of salted caramel, then Gooey Salted Caramel Cupcakes are your ultimate answer. Imagine biting into a soft, moist cupcake that hides a surprise center of luscious caramel, making every mouthful a heavenly experience. This recipe, straight from the kitchens of cookingwithemy.com, elevates the classic cupcake with its secret gooey salted caramel core, ensuring it’s not just another treat but a showstopper for any occasion. Developed with home bakers in mind, these cupcakes promise to be the highlight of your next gathering, whether it’s a birthday bash or a cozy night in. With this Gooey Salted Caramel Cupcakes guide, you’ll master the art of creating bakery-quality desserts at home, complete with tips for perfect results every time.

The aroma of these Gooey Salted Caramel Cupcakes baking in the oven is nothing short of intoxicating—think warm chocolate notes mingling with the sweet, salty scent of caramel that fills your kitchen. Each cupcake boasts a tender, fluffy crumb that’s perfectly balanced by the creamy, gooey salted caramel hidden inside, creating a textural symphony that delights the senses. The final touch of smooth cream cheese frosting adds a tangy contrast, making these cupcakes not only visually appealing but also a feast for the palate. Every bite delivers that perfect blend of sweetness and saltiness, with the caramel oozing out just enough to keep you coming back for more, turning a simple bake into an unforgettable indulgence.

What sets this Gooey Salted Caramel Cupcakes recipe apart on cookingwithemy.com is our commitment to making it foolproof and exceptional, drawing from years of testing and refining to ensure success for bakers of all levels. Our Chef’s Secret—a technique that guarantees an extra gooey center—will transform your baking game, making these cupcakes the envy of your friends and family. In this comprehensive guide, you’ll discover everything from ingredient spotlights and step-by-step instructions to storage tips and FAQs, empowering you to create these delectable treats with confidence and ease. Plus, we’ll share creative twists and serving ideas that make this the single best resource for Gooey Salted Caramel Cupcakes online.

Prep Time: 20 minutes
Cook Time: 20 minutes
Total Time: 40 minutes
Servings: 12

Why This Gooey Salted Caramel Cupcakes Recipe is a Game-Changer

The Chef’s Secret in this Gooey Salted Caramel Cupcakes recipe lies in layering the batter with salted caramel sauce, creating an irresistibly gooey center that sets it apart from ordinary cupcakes. This technique ensures that the caramel melts perfectly during baking, infusing the chocolate base with a burst of flavor and moisture that elevates the overall experience. By spooning the sauce into the middle of the batter, we achieve a hidden surprise that oozes with every bite, making these cupcakes a standout homemade treat that’s far superior to store-bought versions.

Unbeatable Texture: The science behind the fluffy, moist texture comes from creaming the butter and sugars thoroughly, which incorporates air for a lighter crumb, while the cocoa powder and milk balance the fats for optimal tenderness. This method prevents the cupcakes from becoming dense, ensuring they remain soft and springy, thanks to the chemical reaction of baking powder and soda that creates carbon dioxide for extra lift.

Foolproof for a Reason: This recipe has been tested multiple times in our kitchens to guarantee consistent results, accounting for common variables like oven temperatures and ingredient quality. Whether you’re a novice or a pro, the detailed steps and tips make it virtually impossible to go wrong, positioning this as the most reliable Gooey Salted Caramel Cupcakes guide on the web.

Ingredient Spotlight: Quality Makes the Difference

All-Purpose Flour serves as the foundation for these Gooey Salted Caramel Cupcakes, providing structure and a tender crumb. Opt for unbleached, high-quality flour to avoid any off-flavors; this ensures the cupcakes rise evenly. If you’re out of all-purpose flour, substitute with cake flour for a lighter texture, but reduce the amount by 2 tablespoons per cup to maintain consistency.

Granulated Sugar adds sweetness and helps create a golden crust on your Gooey Salted Caramel Cupcakes. Using pure cane sugar enhances the caramelization process during baking. For a refined option, swap with coconut sugar to introduce a subtle nutty note, though this may slightly alter the color and moisture level of the final product.

Brown Sugar contributes moisture and a deep, molasses-rich flavor that complements the salted caramel in these cupcakes. Choose dark brown sugar for a more pronounced taste; it melts beautifully into the batter. As a substitution, use white sugar mixed with molasses to mimic the effect, ensuring you add the same volume to keep the batter’s consistency intact.

Cocoa Powder is key for the rich chocolate base in Gooey Salted Caramel Cupcakes, delivering intense flavor without overwhelming the caramel. Always go for Dutch-processed cocoa for a smoother taste and darker color. If unavailable, natural cocoa powder works, but adjust baking soda slightly to balance the acidity for optimal rising.

Unsalted Butter provides creaminess and structure, allowing you to control the saltiness in these Gooey Salted Caramel Cupcakes. High-fat butter ensures a flaky texture; choose European-style for extra richness. Substitute with vegan butter if needed, but note it may affect the firmness, so chill it beforehand for better results.

Eggs act as binders and emulsifiers, giving these Gooey Salted Caramel Cupcakes their moist texture. Fresh, room-temperature eggs incorporate more air for fluffiness. For egg-free baking, use flaxseed mixed with water as a replacement to maintain the structure without compromising the gooey salted caramel element.

Milk adds moisture and helps activate the leavening agents in Gooey Salted Caramel Cupcakes. Whole milk yields the creamiest results, but any dairy milk works. For a dairy-free version, almond or oat milk is a great substitute, ensuring it’s unsweetened to avoid altering the sweetness balance.

Vanilla Extract enhances the overall flavor profile of these Gooey Salted Caramel Cupcakes with its warm notes. Pure extract is essential for authentic taste—avoid imitation varieties. If you’re out, use vanilla bean paste for a more intense flavor, or almond extract as a creative twist, using half the amount to prevent overpowering the caramel.

Salted Caramel Sauce is the star, providing the gooey center that defines these Gooey Salted Caramel Cupcakes. Homemade sauce offers the best control over saltiness and texture. If substituting, use store-bought, but add a pinch more salt to enhance the flavor contrast with the chocolate base.

Cream Cheese Frosting tops off these Gooey Salted Caramel Cupcakes with a tangy, creamy finish. Full-fat cream cheese ensures stability and flavor; let it soften for easy mixing. For a lighter option, Greek yogurt can replace part of the cream cheese, but whip it thoroughly to achieve the right consistency.

Step-by-Step Instructions

Step 1: Preparing the Oven and Muffin Tin

Start by preheating your oven to 350°F (175°C) and lining a muffin tin with paper liners to prevent sticking and ensure easy removal. This step is crucial for even baking and that perfect rise in your Gooey Salted Caramel Cupcakes.

Pro Tip: Use high-quality paper liners to avoid any grease seepage, which can affect the cupcake’s texture and make them release more easily after cooling.

Step 2: Mixing the Dry Ingredients

In a large bowl, whisk together 1 ½ cups of all-purpose flour, 1 cup of granulated sugar, ½ cup of brown sugar, ½ cup of cocoa powder, 1 teaspoon of baking powder, ½ teaspoon of baking soda, and ½ teaspoon of salt until fully combined. This creates the base for your Gooey Salted Caramel Cupcakes, ensuring even distribution of leavening agents.

Common Mistake to Avoid: Over-whisking can lead to tough cupcakes; mix just until blended to keep the batter light and airy.

Step 3: Creaming the Butter

In another bowl, cream ½ cup of softened unsalted butter until it’s fluffy, about 2-3 minutes, then gradually add the sugars and mix well for another 2 minutes. This step incorporates air for a tender crumb in your Gooey Salted Caramel Cupcakes.

Pro Tip: Ensure the butter is at room temperature for even creaming; cold butter can result in lumps that affect the final texture.

Step 4: Incorporating Eggs and Flavor

Add 2 eggs one at a time, mixing well after each, followed by 1 teaspoon of vanilla extract, ensuring everything is fully incorporated before proceeding. This binds the ingredients for the structure of your Gooey Salted Caramel Cupcakes.

Common Mistake to Avoid: Adding eggs too quickly can curdle the batter; add them slowly while mixing to maintain a smooth consistency.

Step 5: Adding Milk

Gradually mix in 1 cup of milk until the wet ingredients are fully combined, creating a smooth batter base for your Gooey Salted Caramel Cupcakes.

Pro Tip: Use room-temperature milk to prevent shocking the batter, which helps in achieving a uniform mix and better rising.

Step 6: Combining Wet and Dry Mixtures

Gently fold the dry ingredients into the wet mixture until just combined, being careful not to overmix. This ensures the batter for your Gooey Salted Caramel Cupcakes remains light and ready for the caramel layer.

Common Mistake to Avoid: Over-folding can deflate the batter, leading to dense cupcakes; stop as soon as the flour disappears.

Step 7: Assembling the Cupcakes

Spoon half of the batter into the cupcake liners, add a teaspoon of salted caramel sauce into each, then top with the remaining batter to seal in the gooey center of your Gooey Salted Caramel Cupcakes.

Pro Tip: Don’t overfill the liners; aim for about two-thirds full to allow room for rising and that perfect gooey salted caramel surprise.

Step 8: Baking and Cooling

Bake for 18-20 minutes until a toothpick inserted comes out clean, then let the cupcakes cool completely in the tin before frosting to set the gooey salted caramel inside.

Common Mistake to Avoid: Opening the oven door too early can cause sinking; wait until the minimum bake time before checking.

Serving & Presentation

To present your Gooey Salted Caramel Cupcakes impressively, pipe the cream cheese frosting in swirls for an elegant look, and sprinkle with a pinch of sea salt for added visual appeal and flavor contrast. Pair these cupcakes with fresh berries or a scoop of vanilla ice cream to balance the richness, making them ideal for a dessert table at parties. For a creative twist, serve them on a tiered stand with complementary items like chocolate-dipped strawberries, turning your Gooey Salted Caramel Cupcakes into the centerpiece of any gathering.

Make-Ahead & Storage Solutions

Make-Ahead Strategy: Prepare the batter up to 2 days in advance and store it covered in the fridge; assemble and bake when ready for that fresh gooey salted caramel center. You can also make the cupcakes ahead and freeze them unfrosted for up to 3 days—just thaw in the fridge overnight.

Storing Leftovers: Store frosted Gooey Salted Caramel Cupcakes in an airtight container in the fridge for up to 5 days to maintain their moisture; for longer storage, freeze them without frosting for up to 2 months, wrapping individually to prevent freezer burn.

The Best Way to Reheat: To restore the original texture, thaw frozen cupcakes at room temperature, then warm in a 300°F oven for 5 minutes; this gently melts the caramel center without drying out the cupcake.

Frequently Asked Questions (FAQ)

Finished recipe photo

How long does it take to bake chocolate cake from scratch?

Baking chocolate cake from scratch typically takes 25-35 minutes at 350°F, depending on the size and pan used. For Gooey Salted Caramel Cupcakes, it’s about 18-20 minutes, but always test with a toothpick for doneness to ensure a moist interior without overbaking.

What are the best ingredient substitutions for chocolate cake if I’m out of eggs?

If you’re out of eggs for chocolate cake like these Gooey Salted Caramel Cupcakes, try flaxseed eggs (1 tablespoon ground flaxseed mixed with 3 tablespoons water per egg) or applesauce (¼ cup per egg) for binding. These maintain moisture and structure, though the texture might be slightly denser, so adjust baking time as needed.

How can I make chocolate cake more moist and fluffy?

To make chocolate cake, including Gooey Salted Caramel Cupcakes, more moist and fluffy, ensure ingredients like butter and eggs are at room temperature, don’t overmix the batter, and add an extra tablespoon of oil or yogurt for moisture. Using buttermilk instead of regular milk can also enhance fluffiness through its acidity.

What are some creative serving suggestions for chocolate cake at a party?

For serving chocolate cake like Gooey Salted Caramel Cupcakes at a party, try topping with crushed pretzels for a salty crunch, or drizzle with extra caramel sauce and edible flowers for a festive look. Serve with coffee or wine pairings, and cut into bite-sized portions for easy sharing, making them perfect for buffets or dessert bars.

Can I use store-bought caramel sauce in this recipe?

Yes, you can use store-bought salted caramel sauce in Gooey Salted Caramel Cupcakes for convenience, but opt for high-quality brands to match the flavor. Ensure it’s thick enough not to leak during baking; if it’s too runny, thicken it slightly on the stove for the best results.

Can I make this recipe vegan?

Absolutely, you can adapt Gooey Salted Caramel Cupcakes to be vegan by using flaxseed eggs, plant-based milk, vegan butter, and a dairy-free cream cheese frosting. Substitute the salted caramel with a vegan version made from coconut milk and sugar to keep that gooey center intact.

Print
clock clock iconcutlery cutlery iconflag flag iconfolder folder iconinstagram instagram iconpinterest pinterest iconfacebook facebook iconprint print iconsquares squares iconheart heart iconheart solid heart solid icon

Gooey Salted Caramel Cupcakes


  • Author: Chef mia

Description

Gooey Salted Caramel Cupcakes are a delightful blend of rich chocolate and luscious caramel, topped with creamy frosting. Perfect for celebrations or a sweet treat any time!


Ingredients

  • All-Purpose Flour
  • Granulated Sugar
  • Brown Sugar
  • Cocoa Powder
  • Unsalted Butter
  • Eggs
  • Milk
  • Vanilla Extract
  • Salted Caramel Sauce
  • Cream Cheese Frosting

Instructions

  1. Preheat oven to 350°F (175°C) and line a muffin tin with paper liners.
  2. In a large bowl, whisk together flour, granulated sugar, brown sugar, cocoa powder, baking powder, baking soda, and salt.
  3. In another bowl, cream softened butter until fluffy; gradually add the sugars and mix well.
  4. Incorporate eggs one at a time along with vanilla extract.
  5. Gradually mix in milk until combined.
  6. Gently fold the dry ingredients into the wet mixture.
  7. Spoon half of the batter into cupcake liners, add salted caramel sauce, then top with remaining batter.
  8. Bake for 18-20 minutes until a toothpick comes out clean. Let cool completely before frosting.

Nutrition

  • Calories: 310
  • Sugar: 25g
  • Fat: 15g
  • Carbohydrates: 40g
  • Protein: 3g

Conclusion

This delightful recipe brings together rich flavors and textures that make it a perfect treat for any gathering, offering a harmonious balance of sweetness and indulgence. Whether you’re baking for a special occasion or a casual dessert night, the end result is sure to impress with its moist interior and irresistible aroma. For a fun variation, try adding nuts or dried fruits to customize it further—serve warm with a scoop of ice cream for the ultimate comfort. If you’re craving more cookie-inspired delights, be sure to check out Cheesecake Stuffed Chocolate Chip Cookies or Irresistible Coffee Cake Cookies Recipe for additional baking inspiration.

Crispy Garlic Parmesan Chicken Tenders

Crispy Garlic Parmesan Chicken Tenders: The Only Recipe You’ll Ever Need

Imagine coming home after a long day, craving something crunchy, flavorful, and satisfying without the guilt of fried foods. Crispy Garlic Parmesan Chicken Tenders are the ultimate solution, offering that irresistible golden crunch through an easy, oven-baked method that keeps things healthy and delicious. Whether you’re feeding a family or prepping a quick snack, this recipe transforms simple ingredients into a crowd-pleasing favorite that’s packed with garlicky goodness and cheesy richness. As a staple on cookingwithemy.com, these tenders stand out for their oven-baked perfection, ensuring a crispy exterior and juicy interior every single time. With just a few steps, you’ll master this go-to dish that’s perfect for busy weeknights or casual gatherings.

The moment these Crispy Garlic Parmesan Chicken Tenders emerge from the oven, your kitchen fills with an enticing aroma of freshly minced garlic, melted parmesan, and herbs that instantly whets the appetite. Each bite delivers a symphony of textures: the shatteringly crisp panko coating gives way to tender, juicy chicken inside, all enveloped in a savory blend of garlic and parmesan that dances on your tongue. The flavors are bold yet balanced— the sharpness of garlic complements the nutty parmesan, while Italian herbs add a subtle earthiness that elevates every piece. It’s not just food; it’s a comforting, flavorful experience that makes meal time memorable and exciting.

What sets this Crispy Garlic Parmesan Chicken Tenders recipe apart on cookingwithemy.com is our commitment to making it foolproof and exceptional, drawing from years of testing and refining home cooking techniques. Unlike other versions that might leave you with soggy results, ours incorporates a chef’s secret for achieving that perfect crispiness without deep-frying, making it ideal for health-conscious cooks. In this comprehensive guide, you’ll learn insider tips, ingredient insights, and step-by-step instructions that guarantee success, plus answers to common questions like substitutions and serving ideas. By the end, you’ll feel confident creating this family favorite that’s become a reader favorite for its reliability and taste.

Prep Time: 15 minutes
Cook Time: 20 minutes
Total Time: 35 minutes
Servings: 4

Why This Crispy Garlic Parmesan Chicken Tenders Recipe is a Game-Changer

The Chef’s Secret: The unique angle of this recipe lies in its oven-baked perfection, which uses a high-heat method combined with a light olive oil drizzle to mimic frying’s crispiness without the excess oil. This technique ensures each tender achieves a golden, crunchy exterior while keeping the chicken moist and flavorful inside. By incorporating fresh minced garlic directly into the breadcrumb mixture, we amplify the savory depth, creating layers of taste that standard recipes often miss. This approach not only reduces calories but also makes Crispy Garlic Parmesan Chicken Tenders a healthier alternative that’s just as addictive.

Unbeatable Texture: The science behind the texture comes from the panko breadcrumbs, which are larger and airier than traditional ones, allowing for better adhesion and expansion in the oven. When combined with grated parmesan, it forms a barrier that traps steam, resulting in that signature crunch. The high heat of 425°F promotes the Maillard reaction, browning the surface for enhanced flavor and texture, ensuring your Crispy Garlic Parmesan Chicken Tenders are consistently crispy every time.

Foolproof for a Reason: This recipe has been tested multiple times in real home kitchens to guarantee reliability, accounting for common variables like oven differences. With clear steps and tips, even beginners can achieve perfect results, making Crispy Garlic Parmesan Chicken Tenders a dependable go-to for effortless meals.

Ingredient Spotlight: Quality Makes the Difference

Starting with boneless, skinless chicken breasts, these form the heart of your Crispy Garlic Parmesan Chicken Tenders, providing a lean, protein-packed base that’s easy to work with. Choose fresh, high-quality chicken for its tender texture and mild flavor, which absorbs seasonings beautifully. Quality matters because organic or free-range options reduce additives, ensuring a cleaner taste. If you’re looking for a substitution, try turkey breast for a lighter alternative, but adjust cooking time to avoid drying it out.

Fresh garlic cloves are essential for that punchy, aromatic essence in Crispy Garlic Parmesan Chicken Tenders. Mincing them fresh releases oils that infuse the breadcrumb mixture with robust flavor, elevating the dish from ordinary to extraordinary. Opt for firm, unblemished cloves to avoid bitterness—quality garlic means better taste and health benefits. A great substitution is garlic powder in a pinch, but use half the amount to prevent overpowering the other flavors.

Grated parmesan cheese adds a nutty, salty richness that makes these Crispy Garlic Parmesan Chicken Tenders irresistible. Freshly grated cheese melts better and clings to the breadcrumbs, creating a cheesy crust. Quality parmesan, like aged Parmigiano-Reggiano, enhances the flavor profile, so avoid pre-shredded versions with anti-caging agents. For a dairy-free swap, nutritional yeast provides a similar umami kick, though it won’t replicate the exact texture.

Panko breadcrumbs are the key to achieving that extra-crisp coating in Crispy Garlic Parmesan Chicken Tenders. Their flaky structure allows for better crisping in the oven compared to regular breadcrumbs. Choose plain panko for control over seasonings, as it ensures a light, airy texture. If unavailable, regular breadcrumbs work, but they’ll be less crunchy—add a tablespoon of cornstarch to help mimic the crispiness.

Large eggs act as the binding agent, helping the breadcrumb mixture adhere to the chicken in your Crispy Garlic Parmesan Chicken Tenders. Fresh eggs create a smoother coating, so use them at room temperature for even consistency. For an egg-free option, aquafaba (chickpea liquid) is a reliable substitute, maintaining the recipe’s structure without altering flavors.

Olive oil is drizzled on for a touch of moisture and golden browning in Crispy Garlic Parmesan Chicken Tenders. Extra-virgin olive oil imparts a subtle fruity note that enhances the herbs and garlic. Quality oil prevents burning at high heat, so choose a reputable brand. A neutral oil like avocado can substitute if you want a milder taste, but it might slightly alter the Mediterranean flair.

Salt, pepper, and Italian herbs round out the seasoning for Crispy Garlic Parmesan Chicken Tenders, adding depth and balance. Use fine sea salt for even distribution and fresh-ground pepper for zest. A good Italian herb blend (like oregano, basil, and thyme) brings authentic flavor—quality dried herbs are fine, but fresh ones intensify the taste. For variations, try smoked paprika as a substitute to add a smoky twist without overpowering the dish.

Step-by-Step Instructions

Step 1: Preheat the Oven and Prepare the Baking Sheet

First, preheat your oven to 425°F (220°C) and line a baking sheet with parchment paper for easy cleanup and even baking. This step ensures the Crispy Garlic Parmesan Chicken Tenders cook uniformly without sticking.

Pro Tip: Double-check your oven temperature with an oven thermometer to avoid undercooking; a precise heat is crucial for that perfect crispy exterior.

Step 2: Cut the Chicken Breasts

Take 3-4 boneless, skinless chicken breasts and cut them into even strips, about 1-inch wide, for uniform cooking. Aim for consistent sizes to ensure all pieces crisp up at the same rate.

Common Mistake to Avoid: Cutting the strips unevenly can lead to some pieces overcooking while others remain underdone—measure as you go to keep them uniform.

Step 3: Prepare the Mixtures

In one bowl, whisk together 2 large eggs with a pinch of salt until fully combined. In another bowl, mix 1 cup panko breadcrumbs, 1 cup grated parmesan cheese, 3 minced garlic cloves, and Italian herbs to taste, blending thoroughly for even flavor distribution.

Pro Tip: Mince the garlic finely and let it sit for a minute after mixing to release its oils, enhancing the garlic parmesan flavor in your Crispy Garlic Parmesan Chicken Tenders.

Step 4: Coat the Chicken Strips

Dip each chicken strip first into the egg mixture, ensuring it’s fully coated, then transfer it to the breadcrumb mixture. Press the breadcrumbs gently onto the chicken to help them adhere securely.

Common Mistake to Avoid: Rushing this step can result in breadcrumbs falling off during baking—take your time to coat evenly for that signature crispy layer.

Step 5: Arrange and Drizzle

Place the coated chicken strips on the prepared baking sheet, spacing them out for air circulation. Drizzle with 2 tablespoons of olive oil to promote browning and crispiness.

Pro Tip: Lightly spray the tops with a bit more oil if needed, but don’t overdo it, as the goal is oven-baked perfection without sogginess.

Step 6: Bake the Chicken Tenders

Bake the strips for 15-20 minutes, flipping them halfway through, until they turn golden brown and reach an internal temperature of 165°F for safety and optimal texture.

Common Mistake to Avoid: Forgetting to flip can lead to uneven crispiness—set a timer to remind yourself midway for consistent results.

Serving & Presentation

To make your Crispy Garlic Parmesan Chicken Tenders truly shine, arrange them on a platter with a fresh lemon wedge for a zesty squeeze that brightens the flavors. Garnish with chopped parsley or a sprinkle of extra parmesan for an elegant touch that adds visual appeal and a pop of color. For the best pairing, serve these tenders with a side of marinara sauce for dipping, or alongside a crisp green salad to balance the richness.

These tenders complement a variety of main courses, such as pasta primavera or grilled vegetables, making them versatile for family dinners. For a kid-friendly meal, pair with sweet potato fries, or elevate it for adults with a quinoa salad. Presentation is key—stack them artfully or fan them out on the plate to make the dish look as delicious as it tastes, encouraging everyone to dig in.

Make-Ahead & Storage Solutions

Make-Ahead Strategy: Prep the chicken strips and coating mixtures up to 3 days in advance. Cut the chicken, store it in an airtight container in the fridge, and keep the breadcrumb mixture sealed separately to maintain freshness. When ready, assemble and bake for a quick meal.

Storing Leftovers: Allow the Crispy Garlic Parmesan Chicken Tenders to cool completely, then store in an airtight container in the refrigerator for up to 3 days, or freeze for up to 2 months in a freezer-safe bag to preserve texture.

The Best Way to Reheat: To restore the original crispiness, reheat in a 400°F oven for 5-7 minutes rather than microwaving, which can make them soggy. For frozen tenders, thaw in the fridge overnight and bake as directed for the best results.

Finished recipe photo

Frequently Asked Questions (FAQ)

How do you make Crispy Garlic Parmesan Chicken Tenders from scratch?

To make Crispy Garlic Parmesan Chicken Tenders from scratch, start by preheating your oven and preparing the ingredients as outlined in our step-by-step guide. Cut the chicken breasts into strips, coat them in an egg mixture followed by a seasoned breadcrumb blend, and bake until golden. This method ensures a homemade, flavorful result that’s far superior to store-bought versions.

What are some good ingredient substitutions for Crispy Garlic Parmesan Chicken Tenders?

For substitutions, swap chicken breasts with turkey breast for a leaner option, or use gluten-free panko breadcrumbs if needed. Replace eggs with aquafaba for a vegan version, and opt for nutritional yeast instead of parmesan to keep it dairy-free. Always adjust seasonings to taste to maintain the crispy garlic parmesan balance.

How long does it take to bake Crispy Garlic Parmesan Chicken Tenders?

It takes about 15-20 minutes to bake Crispy Garlic Parmesan Chicken Tenders at 425°F, with a flip halfway through for even cooking. Total time, including prep, is around 35 minutes, making it a quick recipe for any occasion.

What are the best serving suggestions for Crispy Garlic Parmesan Chicken Tenders?

The best serving suggestions include pairing these tenders with dipping sauces like marinara or ranch, alongside sides such as salads, roasted vegetables, or fries. They’re perfect for appetizers, main courses, or even packed lunches, and kids love them with a side of fruit for a balanced meal.

Can this recipe be made gluten-free?

Yes, you can make this recipe gluten-free by using gluten-free panko breadcrumbs or crushed gluten-free crackers in place of regular panko. Ensure all other ingredients, like parmesan, are certified gluten-free, and double-check for cross-contamination during preparation.

What variations can I try with Crispy Garlic Parmesan Chicken Tenders?

Try variations like adding cayenne for a spicy kick or incorporating lemon zest into the breadcrumb mixture for a citrusy twist. You can also experiment with different herbs, such as rosemary, to customize the flavor while keeping the crispy garlic parmesan essence intact.

Print
clock clock iconcutlery cutlery iconflag flag iconfolder folder iconinstagram instagram iconpinterest pinterest iconfacebook facebook iconprint print iconsquares squares iconheart heart iconheart solid heart solid icon

Crispy Garlic Parmesan Chicken Tenders


  • Author: Chef mia

Description

Crispy Garlic Parmesan Chicken Tenders are a deliciously crunchy snack or meal option, bursting with flavor and perfect for any occasion.


Ingredients

Scale
  • 34boneless, skinless chicken breasts
  • 3cloves fresh garlic, minced
  • 1 cupgrated parmesan cheese
  • 1 cuppanko breadcrumbs
  • 2large eggs, beaten
  • 2 tbspolive oil
  • Salt, pepper, and Italian herbs to taste

Instructions

  1. Preheat oven to 425°F (220°C) and line a baking sheet with parchment paper.
  2. Cut chicken breasts into even strips.
  3. In one bowl, whisk together eggs and a pinch of salt. In another bowl, combine panko breadcrumbs, parmesan cheese, minced garlic, and Italian herbs.
  4. Dip each chicken strip in the egg mixture then coat with the breadcrumb mixture. Press gently to adhere.
  5. Place coated strips on the baking sheet and drizzle with olive oil.
  6. Bake for 15-20 minutes until golden brown, flipping halfway for even crispiness.

Nutrition

  • Calories: 215
  • Sugar: 0g
  • Fat: 9g
  • Carbohydrates: 10g
  • Protein: 25g

Conclusion

This recipe delivers a comforting blend of savory flavors and simple ingredients, making it an ideal choice for a quick weeknight dinner or a cozy family meal. With its creamy texture and balanced taste, it’s sure to become a staple in your kitchen. For a fun variation, try swapping in seasonal vegetables or pairing it with a fresh salad to enhance the nutritional value. If you’re looking for more easy pasta options, check out the One Pot Spaghetti or the Creamy Beef Pasta for additional inspiration.

Cheesecake Stuffed Chocolate Chip Cookies

Cheesecake Stuffed Chocolate Chip Cookies: The Only Recipe You’ll Ever Need

Imagine biting into a warm, gooey chocolate chip cookie only to discover a hidden surprise of creamy cheesecake inside—it’s the ultimate indulgence that elevates your dessert game to new heights. Cheesecake Stuffed Chocolate Chip Cookies combine the classic comfort of homemade chocolate chip cookies with a luxurious, irresistibly creamy cheesecake center, making them the perfect treat for any occasion. This recipe, crafted with love on cookingwithemy.com, solves the common dilemma of choosing between two favorites: crunchy cookies and smooth cheesecake. Within the first few bites, you’ll experience pure bliss, and why not? It’s the best way to satisfy your sweet tooth while impressing friends and family.

The flavors in these Cheesecake Stuffed Chocolate Chip Cookies are a symphony of rich, buttery goodness from the chocolate chips melting into a golden dough, contrasted by the tangy, velvety smoothness of the cheesecake filling. Each cookie boasts a perfect balance of textures: a crisp exterior that gives way to a soft, chewy middle, all wrapped around that surprise creamy core. The aroma wafting from the oven is nothing short of intoxicating—hints of vanilla and brown sugar mingling with the subtle tang of lemon, creating an inviting scent that draws everyone into the kitchen. These sensory delights make every batch a must-bake for cookie enthusiasts seeking that extra layer of decadence.

What sets this Cheesecake Stuffed Chocolate Chip Cookies recipe apart on cookingwithemy.com is our commitment to simple, reliable instructions honed through rigorous testing in real home kitchens. We’re not just sharing a recipe; we’re giving you the tools to become a confident baker, complete with tips that ensure foolproof results every time. You’ll learn our Chef’s Secret for achieving that unbeatable creamy texture, plus expert advice on ingredient swaps and storage. By the end of this post, you’ll have all the knowledge to master these stuffed cookies and wow your loved ones with your baking prowess.

Prep Time: 15 minutes
Cook Time: 15 minutes
Total Time: 30 minutes
Servings: 12 cookies

Why This Cheesecake Stuffed Chocolate Chip Cookies Recipe is a Game-Changer

The Chef’s Secret: The key to elevating these Cheesecake Stuffed Chocolate Chip Cookies lies in the irresistibly creamy cheesecake center, achieved by whipping the cream cheese mixture until it’s light and airy before stuffing it into the dough. This technique, combined with a touch of lemon juice, adds a subtle zing that cuts through the sweetness, creating a balanced flavor profile that’s far superior to ordinary stuffed cookies. We’ve tested this method extensively to ensure the cheesecake stays perfectly contained, preventing leaks during baking and delivering that surprise burst of creaminess in every bite.

Unbeatable Texture: The science behind the texture starts with creaming the butter and sugars until fluffy, which incorporates air for a tender crumb. Using unsalted butter allows precise control over salt levels, ensuring the cookies bake up golden and chewy without becoming overly dense. When the cheesecake filling is added, it creates a moist core that contrasts beautifully with the crisp edges, all thanks to the precise baking time that prevents overcooking the center.

Foolproof for a Reason: This recipe has been baked and refined multiple times in our test kitchens to guarantee success, even for novice bakers. From measuring ingredients accurately to monitoring oven temperatures, every detail is designed for reliability, minimizing common pitfalls like underbaked centers or dry edges. Trust us—this is the one Cheesecake Stuffed Chocolate Chip Cookies recipe you’ll turn to again and again.

Ingredient Spotlight: Quality Makes the Difference

All-Purpose Flour serves as the foundation of these Cheesecake Stuffed Chocolate Chip Cookies, providing structure and a soft texture to the dough. Opt for high-quality, unbleached flour to avoid any off-flavors; it helps the cookies hold their shape while baking. Its role is crucial for gluten development, which gives the cookies their chewy consistency. If needed, substitute with gluten-free all-purpose flour blends, but ensure they contain xanthan gum to mimic the elasticity.

Baking Soda acts as a leavening agent, reacting with the acidic brown sugar to create lift and a tender crumb in your Cheesecake Stuffed Chocolate Chip Cookies. Always use fresh baking soda for optimal rise; stale soda can lead to flat cookies. Quality matters because it ensures even baking and prevents a metallic taste. For a substitution, use an equal amount of baking powder if your recipe needs more acid balance, though it may alter the texture slightly.

Granulated Sugar adds sweetness and helps with browning in these irresistible Cheesecake Stuffed Chocolate Chip Cookies. Choose pure cane sugar for the best flavor, as it caramelizes beautifully for a golden finish. It works alongside brown sugar to create moisture and crunch. If substituting, try coconut sugar for a subtle caramel note, but note it might make the cookies darker and less sweet.

Brown Sugar contributes moisture and a deep molasses flavor to Cheesecake Stuffed Chocolate Chip Cookies, enhancing their chewy texture. Fresh, soft brown sugar is essential to prevent dry dough; pack it lightly for accurate measurement. Its role in balancing sweetness is key. Substitute with dark brown sugar for a richer taste or muscovado sugar for a more intense molasses kick, adjusting based on your preference.

Unsalted Butter is the heart of the dough in these Cheesecake Stuffed Chocolate Chip Cookies, providing richness and flakiness. Use high-fat, European-style butter for superior creaminess, as it has less water content, leading to better texture. It helps cream with sugars for a light base. If substituting, opt for salted butter and reduce added salt, or use vegan butter for a dairy-free version, though it may affect the flavor.

Eggs bind the ingredients together in Cheesecake Stuffed Chocolate Chip Cookies, adding structure and moisture. Fresh, large eggs ensure the dough holds the cheesecake filling without cracking. They’re vital for emulsification. Substitute with flax eggs for a vegan option, mixing 1 tablespoon ground flaxseed with 3 tablespoons water per egg, but expect a slightly denser result.

Vanilla Extract enhances the overall flavor profile of Cheesecake Stuffed Chocolate Chip Cookies with its warm, aromatic notes. Always go for pure vanilla extract over imitation for authentic taste; it elevates the cookies from good to gourmet. Use it to complement the chocolate chips. If substituting, try almond extract for a nutty twist, using half the amount to avoid overpowering the recipe.

Chocolate Chips deliver the classic melt-in-your-mouth goodness in these Cheesecake Stuffed Chocolate Chip Cookies. Choose high-quality, semi-sweet chips for the best balance of sweetness and bitterness. They provide pockets of gooey delight. Substitute with dark chocolate chunks for a richer version or dairy-free chips for a vegan adaptation, ensuring they melt properly.

Cream Cheese is the star of the filling in Cheesecake Stuffed Chocolate Chip Cookies, offering a tangy, creamy contrast. Full-fat cream cheese ensures a luxurious texture; avoid low-fat versions as they can make the filling watery. It’s essential for that irresistible creaminess. Substitute with vegan cream cheese for a plant-based option, blending it well for similar results.

Powdered Sugar sweetens and stabilizes the cheesecake filling in these Cheesecake Stuffed Chocolate Chip Cookies, creating a smooth consistency. Sift it to avoid lumps for a silky mixture. Quality powdered sugar prevents graininess. If needed, substitute with granulated sugar blended into a fine powder, though it won’t dissolve as easily.

Lemon Juice adds a bright, tangy note to the cheesecake filling of Cheesecake Stuffed Chocolate Chip Cookies, balancing the richness. Freshly squeezed juice is best for its vibrant flavor; it enhances the cream cheese’s tang. Use it sparingly. Substitute with lime juice for a similar acidity or omit it if you prefer a milder taste, adjusting sweetness accordingly.

Step-by-Step Instructions

Step 1: Preheat the Oven and Prepare Baking Sheets

Start by preheating your oven to 350°F (175°C). Line two baking sheets with parchment paper to prevent the cookies from sticking and ensure even baking. This step is crucial for achieving that perfect golden edge without any burnt bottoms.

Pro Tip: Use a high-quality oven thermometer to verify the temperature, as inaccurate heat can lead to uneven cooking and affect the creamy cheesecake center.

Step 2: Cream the Butter and Sugars

In a large bowl, cream the softened unsalted butter, granulated sugar, and brown sugar together until the mixture is light and fluffy, which typically takes about 2-3 minutes with an electric mixer. Then, mix in the egg and vanilla extract until fully incorporated, ensuring a smooth dough base for your Cheesecake Stuffed Chocolate Chip Cookies.

Common Mistake to Avoid: Overmixing at this stage can make the dough tough, so stop as soon as the ingredients are combined to maintain a tender texture.

Step 3: Prepare the Cheesecake Filling

In a separate bowl, beat the cream cheese until it’s smooth and creamy. Add the powdered sugar and lemon juice, then mix until the filling is light and airy. This will be the surprise center of your Cheesecake Stuffed Chocolate Chip Cookies, so aim for a consistency that’s easy to dollop.

Pro Tip: Chill the filling in the fridge for 5-10 minutes before using it; this helps it hold its shape inside the dough for a more defined creamy center.

Step 4: Assemble the Cookies

Take half of the cookie dough and spoon it onto the prepared baking sheets, flattening each portion slightly. Add small dollops of the cheesecake filling on top, then cover with the remaining dough, sealing the edges gently to enclose the filling completely for your Cheesecake Stuffed Chocolate Chip Cookies.

Common Mistake to Avoid: Don’t overfill the cookies, as too much filling can cause it to ooze out during baking; use about a teaspoon per cookie for the best results.

Step 5: Bake the Cookies

Bake the assembled cookies in the preheated oven for 12-15 minutes, or until they are golden brown around the edges but still soft in the middle. This timing ensures the cheesecake stuffing sets without overcooking the dough.

Pro Tip: Rotate the baking sheets halfway through for even browning, which helps achieve uniform texture in every batch of Cheesecake Stuffed Chocolate Chip Cookies.

Serving & Presentation

For an impressive presentation, serve these Cheesecake Stuffed Chocolate Chip Cookies on a rustic wooden board, dusted with a light sprinkle of powdered sugar for a snowy effect. The creamy center pairs beautifully with fresh berries like raspberries or strawberries on the side, adding a pop of color and tartness to balance the sweetness. Consider plating them with a scoop of vanilla ice cream for a decadent dessert, or pair with a hot cup of coffee to enhance their chocolatey notes.

To complement the recipe, these cookies make an excellent addition to a dessert platter alongside fruit salads or as a topping for yogurt parfaits. Their versatility shines in casual family gatherings or elegant dinner parties, where the surprise filling delights guests. Remember, letting them cool slightly before serving ensures the cheesecake center firms up just right, making each bite a textural masterpiece.

Make-Ahead & Storage Solutions

Make-Ahead Strategy: Prepare the dough and cheesecake filling up to 3 days in advance. Store the dough wrapped tightly in plastic wrap in the fridge, and keep the filling in an airtight container. When ready, assemble and bake as directed for fresh-tasting Cheesecake Stuffed Chocolate Chip Cookies.

Storing Leftovers: Allow cookies to cool completely, then store in an airtight container at room temperature for up to 3 days. For longer freshness, refrigerate them for up to a week, or freeze for up to 2 months in a freezer-safe bag, which helps preserve the creamy center.

The Best Way to Reheat: To restore the original texture, reheat refrigerated or frozen cookies in a 300°F oven for 5-7 minutes. This gently warms them without making the filling too soft, bringing back that fresh-baked gooeyness to your Cheesecake Stuffed Chocolate Chip Cookies.

Finished recipe photo

Frequently Asked Questions (FAQ)

How do you make the best chocolate chip cookies from scratch?

To make the best chocolate chip cookies from scratch, start with high-quality ingredients like real butter and pure vanilla. Cream the butter and sugars thoroughly for a fluffy base, then chill the dough for at least 30 minutes to enhance flavor and texture. For Cheesecake Stuffed Chocolate Chip Cookies, incorporate the stuffing technique carefully to avoid leaks, ensuring a perfect balance of chewy edges and a creamy center.

Can you substitute ingredients in chocolate chip cookies, like using gluten-free flour?

Yes, you can substitute ingredients in chocolate chip cookies for dietary needs. For gluten-free options, swap all-purpose flour with a 1:1 gluten-free blend that includes xanthan gum to maintain structure in recipes like Cheesecake Stuffed Chocolate Chip Cookies. Other swaps include using vegan butter for dairy-free versions or coconut sugar for a lower-glycemic alternative, but always test as substitutions may slightly alter texture or taste.

How long does it take to bake chocolate chip cookies?

Baking chocolate chip cookies typically takes 10-15 minutes at 350°F, depending on size and oven. For Cheesecake Stuffed Chocolate Chip Cookies, aim for 12-15 minutes to ensure the filling sets while keeping the centers soft. Factors like dough thickness and oven accuracy can vary this, so check for golden edges as your guide.

What are the best ways to store and serve chocolate chip cookies?

The best way to store chocolate chip cookies is in an airtight container at room temperature for 3-5 days to keep them fresh. For longer storage, freeze them for up to 2 months. Serve them warm for the ultimate experience, perhaps with a glass of milk, and for stuffed varieties like Cheesecake Stuffed Chocolate Chip Cookies, pair with fresh fruit to highlight the creamy filling.

Can I add nuts or other mix-ins to this recipe?

Absolutely, you can customize Cheesecake Stuffed Chocolate Chip Cookies by adding nuts like walnuts or pecans to the dough for extra crunch. Mix them in during the creaming step, using about 1/2 cup, but be mindful of overfilling to prevent the cookies from spreading unevenly during baking.

What’s the secret to getting a soft center in stuffed cookies?

The secret to a soft center in stuffed cookies is to underbake them slightly and use ingredients like brown sugar for moisture. In Cheesecake Stuffed Chocolate Chip Cookies, ensure the cheesecake filling is well-chilled before assembling, and pull them from the oven when the edges are just golden for that perfect, gooey surprise.

Can I make this recipe vegan or gluten-free?

Yes, you can adapt this recipe for vegan or gluten-free diets. For a vegan version, substitute eggs with flax eggs (1 tbsp ground flaxseed mixed with 3 tablespoons water per egg) and use vegan butter and cream cheese alternatives. For gluten-free, replace all-purpose flour with a gluten-free blend; both changes work well but may require slight adjustments to achieve the same texture in your Cheesecake Stuffed Chocolate Chip Cookies.

Tried This Recipe? Leave a Comment!

Print
clock clock iconcutlery cutlery iconflag flag iconfolder folder iconinstagram instagram iconpinterest pinterest iconfacebook facebook iconprint print iconsquares squares iconheart heart iconheart solid heart solid icon

Cheesecake Stuffed Chocolate Chip Cookies


  • Author: Chef mia

Description

Indulge in irresistible cheesecake stuffed chocolate chip cookies, where rich cream cheese meets gooey chocolate chips for the ultimate dessert delight.


Ingredients

  • All-Purpose Flour
  • Baking Soda
  • Granulated Sugar
  • Brown Sugar
  • Unsalted Butter
  • Eggs
  • Vanilla Extract
  • Chocolate Chips
  • Cream Cheese
  • Powdered Sugar
  • Lemon Juice

Instructions

  1. Preheat oven to 350°F (175°C) and line two baking sheets with parchment paper.
  2. In a bowl, cream softened butter, granulated sugar, and brown sugar until fluffy. Mix in egg and vanilla extract.
  3. In another bowl, beat cream cheese until smooth. Add powdered sugar and lemon juice, mixing until airy.
  4. Take half of the cookie dough, spoon onto baking sheets, flatten slightly, and add dollops of cheesecake filling on top. Cover with remaining cookie dough.
  5. Bake for 12-15 minutes or until golden brown around the edges but soft in the middle. Let cool before serving.

Nutrition

  • Calories: 210
  • Sugar: 14g
  • Fat: 10g
  • Carbohydrates: 27g
  • Protein: 3g

Conclusion

This delightful recipe offers a perfect balance of sweet and tangy flavors, making it an ideal choice for family gatherings or a quick weekday treat. With its simple preparation method, you’ll enjoy the creamy texture and fresh ingredients that bring everything together beautifully. For a fun variation, try swapping in seasonal fruits to customize it for different occasions. If you’re craving more dessert inspiration, be sure to check out our Red Velvet Cheesecake Brownies for a decadent twist, or explore the Delicious Strawberry Shortcake Pancakes Recipe for a breakfast favorite.

Irresistible Coffee Cake Cookies Recipe

Irresistible Coffee Cake Cookies Recipe: The Only Recipe You’ll Ever Need

Imagine starting your morning with a warm, freshly baked treat that combines the comforting essence of coffee cake with the delightful crunch of a cookie—enter the Irresistible Coffee Cake Cookies Recipe, a game-changer for coffee lovers and home bakers alike. This recipe infuses real, cooled coffee grounds directly into the dough, creating an authentic coffee flavor that elevates every bite to new heights of indulgence. Whether you’re craving a cozy afternoon snack or a sophisticated dessert to pair with your favorite brew, this Irresistible Coffee Cake Cookies Recipe is designed for effortless success in your kitchen. With its soft, cake-like texture and aromatic hints of cinnamon, it’s the perfect fusion that solves the common dilemma of wanting something sweet yet not overly heavy.

The Irresistible Coffee Cake Cookies Recipe tantalizes the senses with its perfect balance of flavors and textures. Picture biting into a cookie that’s soft and chewy on the inside, with golden, slightly crisp edges that give way to a burst of rich coffee notes intertwined with warm cinnamon. The aroma alone, as these cookies bake, fills your home with an inviting scent of freshly ground coffee and sweet vanilla, making it impossible to resist. Each cookie offers a harmonious blend of granulated and brown sugars that create a caramel-like sweetness, while the buttery base ensures a melt-in-your-mouth experience that lingers pleasantly on the palate.

What sets this Irresistible Coffee Cake Cookies Recipe from cookingwithemy.com apart is our commitment to making it the most reliable and innovative version you’ll find online. Drawing from years of testing and perfecting, we’ve incorporated a “Chef’s Secret” that ensures foolproof results every time—infusing cooled coffee grounds for that genuine coffee essence without overwhelming the dough. In this post, you’ll discover detailed ingredient spotlights, step-by-step guidance with pro tips, and expert advice on storage and variations, empowering you to bake with confidence and impress your family and friends.

Prep Time: 15 minutes
Cook Time: 15 minutes
Total Time: 30 minutes
Servings: 24 cookies

Why This Irresistible Coffee Cake Cookies Recipe is a Game-Changer

The Chef’s Secret to this Irresistible Coffee Cake Cookies Recipe lies in the infusion of cooled coffee grounds, which delivers an authentic, bold coffee flavor that’s rarely seen in traditional cookie recipes. This technique not only enhances the taste profile but also adds a subtle crunch and depth that mimics the streusel topping of a classic coffee cake. By gently folding in the coffee grounds after the wet ingredients are mixed, we ensure even distribution without overworking the dough, preserving the soft, cake-like texture that makes these cookies irresistible.

Unbeatable Texture: The science behind the texture in this Irresistible Coffee Cake Cookies Recipe comes from the combination of baking powder and unsalted butter, which create a light, airy crumb while maintaining moisture. The baking powder reacts with the acids in the brown sugar, producing carbon dioxide that lifts the dough for that perfect, fluffy interior, while the butter provides fat content that prevents dryness and ensures a tender bite.

Foolproof for a Reason: This recipe has been tested multiple times in our kitchen to guarantee consistency, making it ideal for beginners and experts alike. We’ve fine-tuned measurements and steps to account for common variables like oven temperatures, ensuring your Irresistible Coffee Cake Cookies turn out golden and delicious every time you bake them.

Ingredient Spotlight: Quality Makes the Difference

All-Purpose Flour serves as the foundation of this Irresistible Coffee Cake Cookies Recipe, providing structure and a soft texture without weighing down the dough. Opt for unbleached, high-quality flour to avoid any off-flavors from additives; its gluten content helps bind the ingredients while allowing for that desirable chewy finish. If you’re gluten-sensitive, substitute with a 1:1 gluten-free flour blend, but note that it may slightly alter the texture, making the cookies a bit denser.

Baking Powder is the key leavening agent that gives these coffee cake cookies their light, airy rise. Fresh baking powder ensures optimal activation, reacting with the wet ingredients to create bubbles for a fluffy interior. For the best results, check the expiration date on your baking powder—it’s crucial for this Irresistible Coffee Cake Cookies Recipe. If you’re out, you can substitute with an equal amount of baking soda plus cream of tartar, but use it sparingly to maintain the recipe’s balance.

Unsalted Butter adds richness and moisture, creating the creamy base that makes these cookies so irresistible. Choose high-fat, European-style butter for superior flavor and texture, as it contributes to the tender crumb without excess salt interference. In this Irresistible Coffee Cake Cookies Recipe, butter is creamed with sugars to incorporate air, enhancing the overall lightness. A good substitute is vegan butter if you’re dairy-free, though it might make the cookies slightly firmer.

Granulated Sugar provides sweetness and helps with browning, giving the cookies their appealing golden edges. Using pure cane sugar ensures a clean taste that complements the coffee infusion in this Irresistible Coffee Cake Cookies Recipe. Quality matters here for the perfect caramelization; if needed, swap with coconut sugar for a lower-glycemic option, which will add a hint of molasses flavor but keep the cookies moist.

Brown Sugar contributes moisture and a deep, molasses-like sweetness that pairs beautifully with the cinnamon and coffee in this recipe. Its role is to enhance the chewy texture, making these Irresistible Coffee Cake Cookies truly stand out. Always pack it lightly for accurate measurement; for a refined sugar alternative, use date sugar, which maintains the recipe’s integrity while adding natural fibers.

Eggs act as binders and emulsifiers, helping to create a cohesive dough with a tender structure in this Irresistible Coffee Cake Cookies Recipe. Fresh, large eggs are best for consistency; they incorporate air when beaten, leading to a lighter cookie. For vegan bakers, substitute with flax eggs (1 tablespoon ground flaxseed mixed with 3 tablespoons water per egg), which will mimic the binding properties but may result in a slightly denser texture.

Vanilla Extract infuses a warm, aromatic depth that balances the coffee grounds’ boldness in this Irresistible Coffee Cake Cookies Recipe. Always choose pure extract over imitation for its authentic flavor; it enhances the overall taste without overpowering. If you’re out, a high-quality vanilla paste can work, but avoid using artificial versions to preserve the recipe’s premium quality.

Coffee Grounds (cooled) are the star of this Irresistible Coffee Cake Cookies Recipe, providing that unique, genuine coffee flavor infusion. Freshly ground coffee ensures the best taste; their addition not only flavors but also adds a subtle texture. For those sensitive to caffeine, decaffeinated grounds are a seamless substitute, maintaining the recipe’s essence without the buzz.

Step-by-Step Instructions

Step 1: Preheat the Oven and Prepare Baking Sheets

Begin by preheating your oven to 350°F (175°C) and lining two baking sheets with parchment paper to prevent sticking and ensure even baking. This step sets the foundation for perfectly baked cookies.

Pro Tip: Use a reliable oven thermometer to verify the temperature, as inaccuracies can lead to uneven baking and affect the texture of your Irresistible Coffee Cake Cookies.

Step 2: Whisk Together Dry Ingredients

In a medium bowl, whisk together 2 cups of all-purpose flour, 1 teaspoon of baking powder, 1 teaspoon of cinnamon, and a pinch of salt until fully combined. This mixture provides the structure and flavor base for the cookies.

Common Mistake to Avoid: Over-whisking can activate the gluten prematurely, making the cookies tough; mix just until blended to keep them soft and cake-like in this Irresistible Coffee Cake Cookies Recipe.

Step 3: Cream Butter and Sugars

In a large bowl, use an electric mixer to cream 1/2 cup of softened unsalted butter with 1/2 cup of granulated sugar and 1/2 cup of brown sugar until the mixture is light and fluffy, about 2-3 minutes. This incorporates air for a better rise.

Pro Tip: Ensure your butter is at room temperature for easier creaming; cold butter can result in a grainy texture, compromising the overall quality of your Irresistible Coffee Cake Cookies.

Step 4: Beat in Eggs and Vanilla

Beat in 2 large eggs one at a time, followed by 1 teaspoon of vanilla extract, mixing until well blended and the mixture is smooth. This step binds the ingredients and adds moisture.

Common Mistake to Avoid: Adding eggs too quickly can curdle the mixture; add them slowly while mixing to maintain a consistent batter for your Irresistible Coffee Cake Cookies.

Step 5: Fold in Cooled Coffee Grounds

Gently fold in 2 tablespoons of cooled coffee grounds into the wet mixture using a spatula, ensuring even distribution without deflating the batter. This is where the unique coffee infusion happens.

Pro Tip: Make sure the coffee grounds are completely cooled to avoid melting the butter; this preserves the flavor integrity in this Irresistible Coffee Cake Cookies Recipe.

Step 6: Combine Dry and Wet Mixtures

Gradually add the dry ingredients to the wet mixture, stirring until just combined to form a cohesive dough. Over-mixing at this stage can be detrimental.

Common Mistake to Avoid: Mixing too vigorously incorporates too much air, leading to cookies that spread too much; fold gently for the perfect shape in your Irresistible Coffee Cake Cookies.

Step 7: Bake the Cookies

Drop spoonfuls of dough onto the prepared baking sheets, spacing them about 2 inches apart, and bake for 12-15 minutes until the edges are golden brown. Allow them to cool on the sheets for 5 minutes before transferring.

Pro Tip: Rotate the baking sheets halfway through for even cooking, ensuring all cookies have that ideal golden edge in this Irresistible Coffee Cake Cookies Recipe.

Serving & Presentation

For an impressive presentation, arrange your Irresistible Coffee Cake Cookies on a rustic platter, dusted with a light sprinkle of cinnamon for added visual appeal and flavor. Garnish with a few whole coffee beans or a drizzle of melted white chocolate to enhance their coffee cake essence. These cookies pair beautifully with a hot cup of coffee or tea, making them ideal for breakfast, afternoon snacks, or as a dessert complement to fresh fruit salads or vanilla ice cream.

Make-Ahead & Storage Solutions

Make-Ahead Strategy: Prepare the dough up to 3 days in advance by mixing all ingredients, shaping the cookies, and storing them on a lined baking sheet in the refrigerator, covered with plastic wrap. This allows flavors like the coffee infusion to develop further, making your Irresistible Coffee Cake Cookies even more flavorful when baked fresh.

Storing Leftovers: Store baked cookies in an airtight container at room temperature for up to 5 days to maintain their soft texture. For longer storage, freeze them in a freezer-safe bag for up to 2 months; this preserves the coffee cake-like quality without staleness.

The Best Way to Reheat: To restore the original texture and flavor, reheat frozen or stored cookies in a 300°F oven for 5-7 minutes, or microwave them for 10-15 seconds. This gentle method revives the warm, fresh-baked feel of your Irresistible Coffee Cake Cookies.

Finished recipe photo

Frequently Asked Questions (FAQ)

How long does it take to make Irresistible Coffee Cake Cookies?

This Irresistible Coffee Cake Cookies Recipe takes about 15 minutes for prep and 15 minutes for baking, totaling around 30 minutes. It’s a quick recipe that’s perfect for busy mornings, allowing you to enjoy fresh cookies without spending hours in the kitchen.

What can I substitute for eggs in Irresistible Coffee Cake Cookies?

For egg substitutions in this Irresistible Coffee Cake Cookies Recipe, use flax eggs (1 tablespoon ground flaxseed mixed with 3 tablespoons water per egg) to maintain binding and moisture. This works well for vegan diets and keeps the texture soft, though you may notice a slight nutty flavor.

What are some tips for getting the best flavor in Irresistible Coffee Cake Cookies?

To achieve the best flavor in this Irresistible Coffee Cake Cookies Recipe, use freshly ground coffee for the infusion and high-quality cinnamon; let the dough rest for 10 minutes before baking to enhance the coffee notes. Also, avoid over-baking to preserve the moist, cake-like interior.

How many servings does a typical Irresistible Coffee Cake Cookies recipe make?

This Irresistible Coffee Cake Cookies Recipe yields about 24 cookies, depending on the size of your dough drops, making it suitable for a family of four or a small gathering. Each serving is one cookie, perfect for portion control.

Can I make this recipe gluten-free?

Yes, you can make this Irresistible Coffee Cake Cookies Recipe gluten-free by substituting all-purpose flour with a 1:1 gluten-free flour blend. Ensure it’s a blend with xanthan gum for better texture, and test a small batch as it might slightly alter the chewiness.

Can I make this recipe vegan?

Absolutely, adapt this Irresistible Coffee Cake Cookies Recipe for vegan diets by replacing eggs with flax eggs and using vegan butter instead of unsalted butter. Opt for plant-based sugars if desired, ensuring the coffee infusion remains the star while keeping the cookies moist and flavorful.

Print
clock clock iconcutlery cutlery iconflag flag iconfolder folder iconinstagram instagram iconpinterest pinterest iconfacebook facebook iconprint print iconsquares squares iconheart heart iconheart solid heart solid icon

Irresistible Coffee Cake Cookies Recipe


  • Author: Chef mia

Description

Coffee Cake Cookies are a heavenly fusion of soft, cake-like texture and rich coffee flavor, perfect for pairing with your favorite brew.


Ingredients

  • All-Purpose Flour
  • Baking Powder
  • Unsalted Butter
  • Granulated Sugar
  • Brown Sugar
  • Eggs
  • Vanilla Extract
  • Coffee Grounds (cooled)
  • Cinnamon

Instructions

  1. Preheat oven to 350°F (175°C) and line two baking sheets with parchment paper.
  2. In a medium bowl, whisk together flour, baking powder, cinnamon, and a pinch of salt.
  3. In a large bowl, cream softened butter with granulated and brown sugar until fluffy.
  4. Beat in eggs one at a time along with vanilla extract until well blended.
  5. Fold in cooled coffee grounds gently.
  6. Gradually add dry ingredients to wet mixture until combined.
  7. Drop dough onto prepared sheets and bake for 12-15 minutes until edges are golden.

Nutrition

  • Calories: 120
  • Sugar: 8g
  • Fat: 6g
  • Carbohydrates: 14g
  • Protein: 1g

Conclusion

This delightful recipe brings together rich flavors and simple steps to create a dessert that’s perfect for family gatherings or a cozy night in. With its moist texture and balanced sweetness, it’s sure to become a favorite in your kitchen. For a fun variation, try adding fresh fruits on top before serving. If you’re craving more dessert inspiration, check out our Chocolate Mousse Cake or Juicy Pineapple Heaven Cake for equally scrumptious options.