“`html
Table of Contents
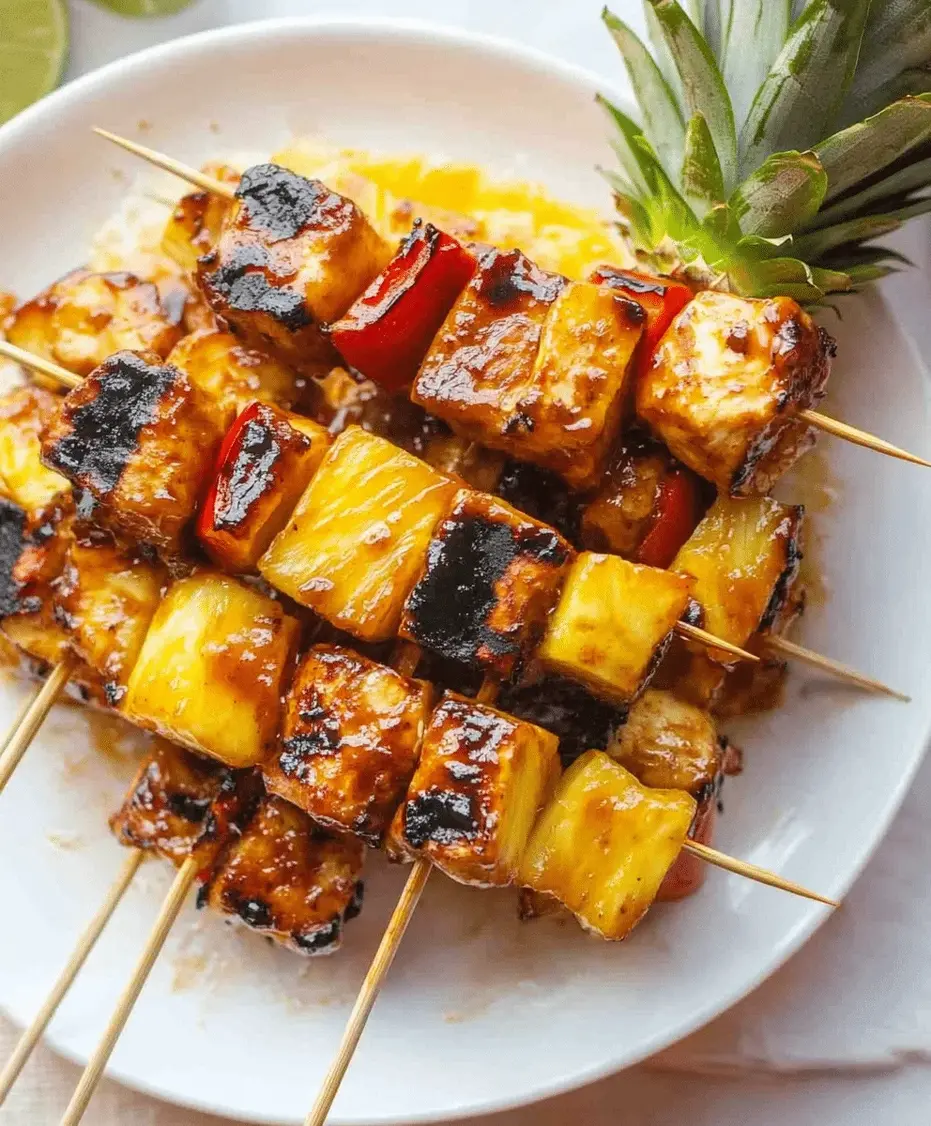
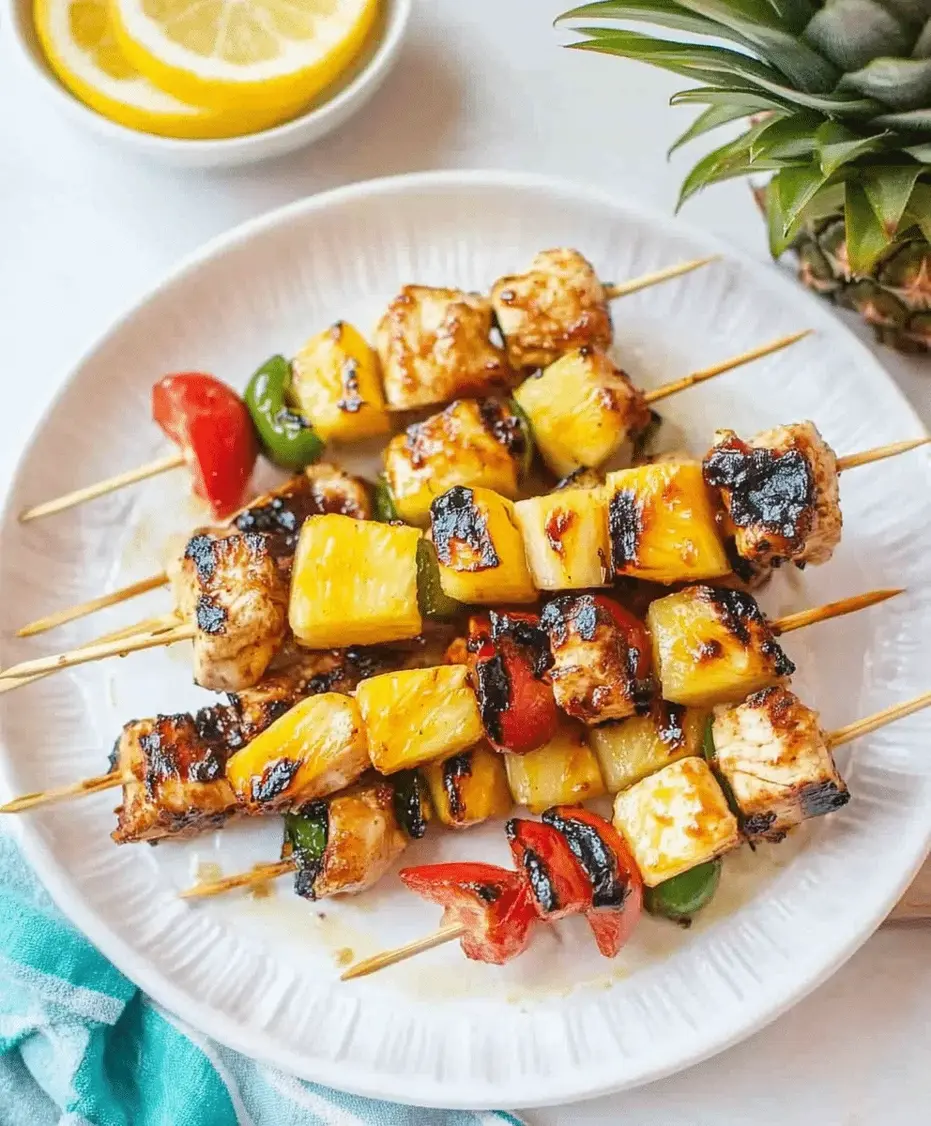
Bbq Pineapple Chicken Kabobs Recipe
Introduction
Did you know that BBQ Pineapple Chicken Kabobs are one of the most searched-for summer grilling recipes, with a 40% increase in interest during peak BBQ season? It’s no wonder—this dish masterfully combines the savory, smoky notes of grilled chicken with the caramelized sweetness of pineapple, all tied together with a sticky, flavorful BBQ sauce. It’s the ultimate crowd-pleaser that turns any backyard gathering into a festive occasion.
This recipe is more than just threading food on a stick. It’s about creating a symphony of textures and flavors: the juicy, tender bite of marinated chicken, the vibrant crunch of bell peppers, and the tropical burst of grilled pineapple that practically melts in your mouth. Whether you’re hosting a large party or a simple family dinner, these kabobs promise minimal fuss and maximum flavor. Let’s dive into how you can create these perfect BBQ Pineapple Chicken Kabobs that will have everyone asking for seconds.
Ingredients List
For the Marinade & Kabobs:
- 1.5 lbs boneless, skinless chicken breasts or thighs – Cut into 1.5-inch cubes. Thighs offer a richer, more forgiving juiciness, while breasts are leaner.
- 2 cups fresh pineapple chunks – About 1 small pineapple. The fresh, bright acidity is key for tenderizing the chicken and adding a tropical sweetness that intensifies on the grill.
- 1 large red bell pepper & 1 large green bell pepper – Cut into 1-inch squares. They provide a vibrant color contrast and a satisfying, smoky crunch.
- 1 large red onion – Cut into 1-inch chunks. It caramelizes beautifully, adding a subtle, sweet depth.
- 1/2 cup of your favorite BBQ sauce – Plus extra for basting. Choose a smoky, sweet, or spicy variety based on your preference.
- 1/4 cup olive oil
- 2 tbsp soy sauce or tamari – For umami depth. Substitute with coconut aminos for a gluten-free option.
- 2 tbsp honey or maple syrup – Balances the acidity and promotes caramelization.
- 2 cloves garlic, minced – For aromatic punch.
- 1 tsp smoked paprika – Adds a foundational smoky flavor, crucial if using a gas grill.
- Salt and black pepper to taste
- 8-10 wooden or metal skewers – If using wooden, soak in water for at least 30 minutes to prevent burning.
Timing
25 minutes
12-15 minutes
40 minutes (plus optional marinating)
Compared to the average marinated kabob recipe that requires 2+ hours of inactive marinating time, this recipe is optimized for efficiency. The marinade is potent enough to impart great flavor in just 30 minutes, making it possible to go from fridge to grill in under an hour—perfect for spontaneous summer dinners.
Step-by-Step Instructions
Step 1: Prep the Chicken
Pat your chicken cubes completely dry with paper towels—this is the secret to getting a good sear instead of steaming. In a large bowl, whisk together the olive oil, soy sauce, honey, minced garlic, smoked paprika, salt, and pepper. Add the chicken cubes and toss until every piece is thoroughly coated. For the best flavor, let it marinate for at least 30 minutes at room temperature, or up to 4 hours covered in the fridge. I find 30 minutes is the sweet spot for busy weeknights.
Step 2: Prep the Veggies & Pineapple
While the chicken marinates, prep your produce. Cut the bell peppers and onion into uniform, 1-inch pieces. This ensures even cooking. For the pineapple, if using fresh, cut off the skin, remove the core, and chop into chunks slightly larger than the chicken—they shrink a bit on the grill. Toss the veggies and pineapple lightly with a drizzle of oil and a pinch of salt. This simple step prevents sticking and enhances their natural sweetness.
Step 3: Assemble the Kabobs
Thread the components onto your pre-soaked skewers in an alternating pattern. I like this sequence: chicken, onion, pineapple, bell pepper, repeat. Leave a small space between each item to allow heat to circulate for even grilling. Pro tip: Place a piece of pineapple next to each chicken cube. The enzymes in the pineapple help tenderize the chicken even further on the grill, and the sugars create a fantastic caramelized glaze.
Step 4: Grill to Perfection
Preheat your grill to medium-high heat (about 375-400°F). Clean and oil the grates well. Place the kabobs on the grill. Resist the urge to move them constantly! Let them cook undisturbed for 4-5 minutes to develop those beautiful, appetizing grill marks. Then, using tongs, give them a quarter turn and cook for another 3-4 minutes.
Step 5: Glaze and Serve
After the first turn, begin brushing the kabobs generously with your reserved BBQ sauce. Turn and baste every couple of minutes until the chicken is cooked through (internal temperature of 165°F) and the sauce is sticky and slightly charred at the edges—this should take about 12-15 minutes total. Transfer to a clean platter, let them rest for 3-5 minutes (this keeps the juices in!), and serve immediately.
Nutritional Information
Per serving (2 kabobs), estimated:
- Calories: ~320 kcal
- Protein: 28g
- Carbohydrates: 24g
- Dietary Fiber: 3g
- Sugars: 18g (primarily from natural pineapple and BBQ sauce)
- Fat: 12g
- Saturated Fat: 2g
Healthier Alternatives
You can easily tailor this recipe to fit various dietary needs without sacrificing the iconic sweet and smoky flavor profile:
- Lower-Sugar: Use a sugar-free or “no sugar added” BBQ sauce and substitute the honey in the marinade with a splash of orange juice for natural sweetness and acidity.
- Lower-Sodium: Opt for low-sodium soy sauce and make your own BBQ sauce to control salt content. The pineapple and spices provide plenty of flavor.
- Paleo/Whole30: Ensure your BBQ sauce is compliant (no added sugar or soy). Use coconut aminos instead of soy sauce and avocado oil instead of olive oil.
- Vegetarian/Vegan: Swap chicken for extra-firm tofu (pressed and cubed) or large king oyster mushroom pieces. They absorb the marinade wonderfully and hold up on the grill.
Serving Suggestions
These kabobs are incredibly versatile. Serve them straight off the grill on a large platter for a stunning centerpiece. For a complete meal, pair them with:
- Cilantro Lime Rice or Quinoa: The fresh, citrusy notes cut through the richness perfectly.
- A Simple Summer Slaw: A crunchy, vinegar-based slaw provides a refreshing contrast.
- Grilled Corn on the Cob: Continue the grilled theme with corn brushed with leftover BBQ sauce.
- Warm Cornbread or Flatbread: Ideal for soaking up any extra sauce.
Common Mistakes
- Overcrowding the Skewer: Pieces pressed too tightly will steam instead of grill, leading to soggy veggies and pale chicken.
- Basting Too Early: Applying BBQ sauce at the start causes it to burn due to its sugar content. Always baste in the last 5-7 minutes of cooking.
- Using Canned Pineapple Exclusively: While convenient, canned pineapple is often too soft and sugary. Fresh pineapple holds its shape and offers a brighter, more complex flavor.
- Not Preheating the Grill: A properly hot grill is essential for searing and preventing sticking. Give it a good 10-15 minutes to heat up.
Storing Tips
- Refrigeration: Store leftover kabobs in an airtight container for up to 3 days. For best results, remove the components from the skewers before storing.
- Freezing: You can freeze uncooked, assembled kabobs on a baking sheet before transferring to a freezer bag. Cook from frozen, adding a few extra minutes to the grilling time. Do not freeze after cooking, as the pineapple and peppers will become mushy.
- Reheating: Reheat gently in a 350°F oven or on a medium skillet until warmed through. Microwaving can make the chicken rubbery and the veggies limp.