“`html
Table of Contents
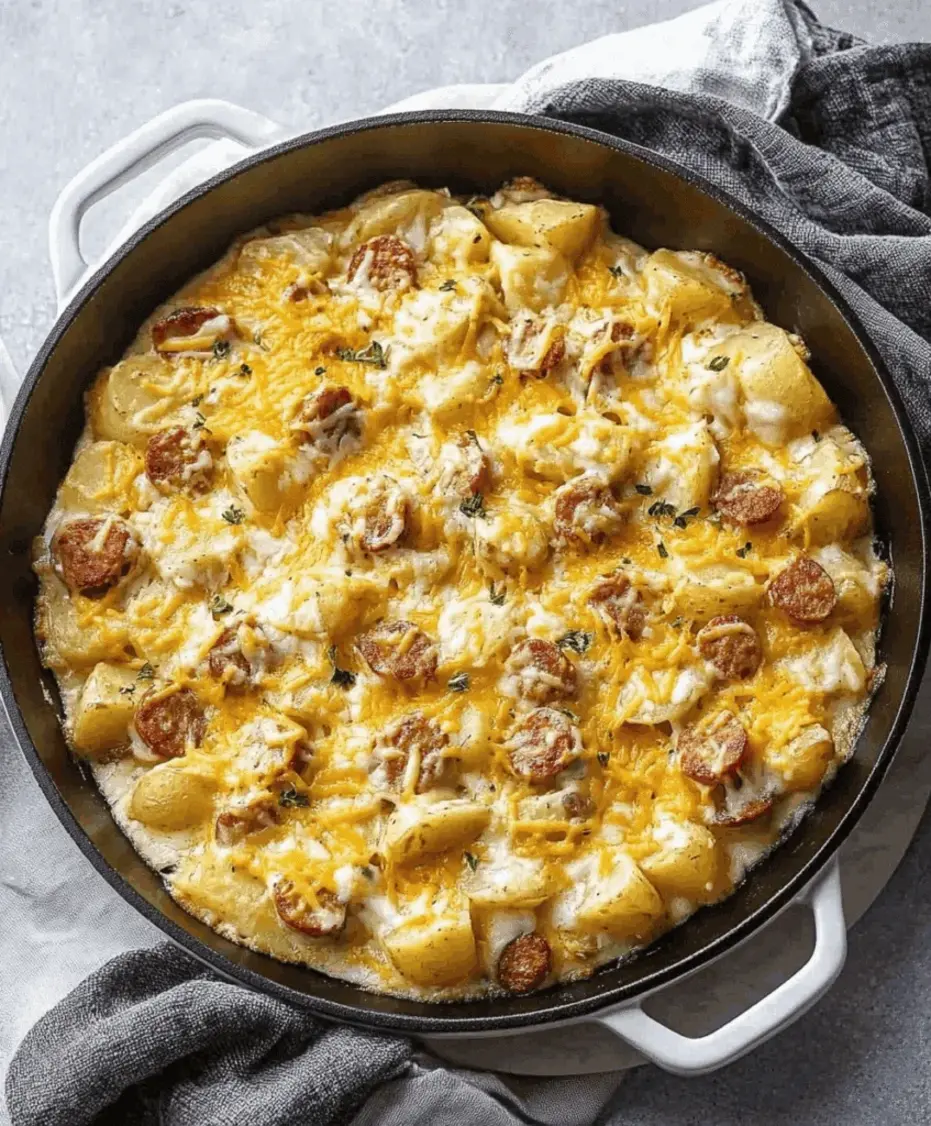
One Pan Cheesy Ranch Potatoes And Sausage Recipe
Introduction
Did you know that according to a recent survey, over 70% of home cooks prioritize recipes that minimize cleanup? If you’re part of that majority searching for a one pan cheesy ranch potatoes and sausage recipe that delivers maximum flavor with minimal fuss, you’ve landed in the right place. This isn’t just another casserole; it’s a strategic solution for busy weeknights, a flavor-packed comfort meal that comes together in a single sheet pan. Imagine golden, crispy-edged potatoes infused with the unmistakable tang of ranch seasoning, paired with juicy, savory sausage, all blanketed under a molten layer of gooey cheese. The beauty lies in its simplicity and its symphony of textures and tastes—creamy, crispy, cheesy, and savory in every bite. Forget the pile of dishes and the complicated steps; this recipe is engineered for efficiency without sacrificing the soul-satisfying goodness that makes a meal memorable. Let’s dive into how you can transform a few humble ingredients into a family favorite that will have everyone asking for seconds.
Ingredients List
Gather these simple ingredients for a dish that’s greater than the sum of its parts. Each plays a crucial role in building the final flavor profile.
- 2 lbs Yukon Gold Potatoes, cubed: Their buttery, creamy interior and thin skin make them ideal for roasting. Substitution: Russet potatoes will give a fluffier interior, or red potatoes for a firmer bite.
- 1 lb Smoked Sausage or Kielbasa, sliced into ½-inch rounds: Provides a smoky, savory, and juicy protein base. Substitution: Italian sausage (casings removed), chicken sausage, or even diced ham.
- 1 (1 oz) packet Dry Ranch Seasoning Mix: The star flavor agent, offering herby, tangy, garlicky notes. Substitution: 3 tbsp of a homemade ranch blend (dried dill, parsley, garlic powder, onion powder, salt, pepper).
- 3 tbsp Olive Oil or Avocado Oil: For crispiness and to help the seasoning adhere. You’ll notice a golden, crackly exterior on the potatoes.
- 1 ½ cups Shredded Cheddar Cheese: Use a blend of sharp and mild for depth. The cheese should melt into a smooth, velvety blanket.
- 1 cup Shredded Mozzarella Cheese: Adds that iconic stretchy, gooey texture.
- 1 small Yellow Onion, diced (optional): Adds sweetness and aromatic depth as it caramelizes.
- 1 Bell Pepper, diced (optional): Introduces color, a slight sweetness, and freshness.
- Fresh Chives or Parsley, for garnish: A pop of green for visual appeal and a fresh finish.
Timing
Compared to the average casserole or baked pasta dish that often requires pre-cooking components and uses multiple pots, this one pan cheesy ranch potatoes and sausage recipe shaves off at least 20-30 minutes of active kitchen time. The 15-minute prep is mostly hands-off chopping and tossing, while the oven does the heavy lifting. This efficiency makes it a champion for weeknight dinners.

Step-by-Step Instructions
Step 1: Prepare Your Pan and Potatoes
Preheat your oven to 400°F (200°C). This high heat is key for achieving crispy potatoes. While it heats, wash and cube your Yukon Gold potatoes into 1-inch pieces—try to keep them uniform so they cook evenly. Pat them very dry with a kitchen towel; this is the secret to getting them golden and crisp, not steamed. Line a large, rimmed baking sheet with parchment paper or foil for the ultimate easy cleanup.
Step 2: Season and Toss
In a large bowl, combine the dried potato cubes, diced onion, and bell pepper (if using). Drizzle with the olive oil and sprinkle the entire packet of dry ranch seasoning over the top. Now, get your hands in there! Toss and massage everything together until every single piece of potato and veg is evenly coated in the oil and specks of seasoning. You’ll smell the signature ranch aroma immediately.
Step 3: Add the Sausage
Add your sliced smoked sausage to the bowl. Give it a few more gentle tosses to distribute the sausage among the potatoes. Pour the entire mixture onto your prepared baking sheet and spread it out into a single, even layer. Avoid overcrowding—if the pan is too small, the food will steam. Giving each piece its own space is crucial for that desirable caramelization.
Step 4: Bake to Perfection
Place the pan in the preheated oven and bake for 30 minutes. At the halfway mark (15 minutes in), take the pan out and use a spatula to give everything a good stir and flip. This ensures all sides get exposed to the hot pan and oven air, promoting even browning. You should see the potatoes starting to turn golden and the sausage sizzling.
Step 5: The Cheesy Finish
After 30 minutes, remove the pan from the oven. The potatoes should be fork-tender and beautifully browned. Immediately sprinkle the shredded cheddar and mozzarella cheese evenly over the entire hot surface. Return the pan to the oven for 5-7 more minutes, or just until the cheese is completely melted, bubbly, and slightly golden in spots. Let it rest for 5 minutes after baking—this allows the cheese to set slightly for easier serving. Garnish with fresh chives or parsley.
Nutritional Information
(Approximate values per serving, recipe serves 6)
- Calories: ~520 kcal
- Protein: 22g
- Carbohydrates: 32g
- Dietary Fiber: 3g
- Sugars: 3g
- Fat: 34g
- Saturated Fat: 13g
Healthier Alternatives
You can easily adapt this one pan cheesy ranch potatoes and sausage recipe for dietary preferences without losing its comforting essence.
- Lower Fat: Use turkey or chicken sausage and reduce the cheese by half, opting for a part-skim mozzarella. The ranch seasoning provides so much flavor, you won’t miss the fullness of fat.
- Lower Carb: Swap half the potatoes for cubed cauliflower or broccoli florets. They roast beautifully and soak up the ranch flavor.
- Dairy-Free: Omit the cheese or use a high-quality dairy-free shred. A sprinkle of nutritional yeast added with the seasoning can add a “cheesy” umami note.
- Lower Sodium: Choose a low-sodium sausage and use a salt-free homemade ranch seasoning blend.
Serving Suggestions
This dish is a hearty meal on its own, but it pairs wonderfully with simple sides to round out the table. A crisp, green salad with a light vinaigrette cuts through the richness. For a Southern twist, serve with collard greens or buttered cornbread. If you’re feeding a crowd, add a bowl of tangy coleslaw or some pickled vegetables for a bright, acidic contrast. It also makes a fantastic brunch item alongside scrambled eggs.
Common Mistakes
- Wet Potatoes: Not drying the cubed potatoes leads to steaming instead of roasting, resulting in soggy texture.
- Overcrowding the Pan: If the ingredients are piled on top of each other, they’ll steam. Use a large enough pan for a single layer.
- Skipping the Stir: Forgetting to stir at the 15-minute mark means uneven cooking—some pieces may burn while others remain pale.
- Using Pre-Shredded Cheese with Anti-Caking Agents: These cheeses don’t melt as smoothly. For the best, creamiest melt, shred your own cheese from a block.
Storing Tips
Store leftovers in an airtight container in the refrigerator for up to 4 days. Reheat individual portions in the microwave for quickness, or for best texture, reheat on a sheet pan in a 350°F oven until warmed through and the cheese is bubbly again (about 10-15 minutes). You can also freeze the fully assembled and baked dish (without fresh garnish) for up to 2 months. Thaw overnight in the fridge before reheating.
Conclusion
This One Pan Cheesy Ranch Potatoes and Sausage recipe truly is the weeknight dinner hero we all need. It combines minimal effort with maximum reward, delivering a comforting, flavor-packed meal that pleases both kids and adults. The magic of the ranch seasoning, the satisfying combination of textures, and the glorious melted cheese create a dish that feels indulgent yet is straightforward to make. Give it a try on your next busy evening and experience the joy of a delicious dinner with only one pan to wash.
Made this recipe? We’d love to see your creation! Tag @spicemingle on social media or leave a comment below with your experience or favorite twist on the recipe.
FAQs
***Can I make this One Pan Cheesy Ranch Potatoes and Sausage ahead of time?***
Yes! You can chop the potatoes, onion, pepper, and sausage a day ahead. Store them separately in airtight containers in the fridge. When ready to cook, toss with oil and seasoning and bake. You can also fully assemble and bake, then reheat as needed.
***What’s the best type of potato to use for roasting?***
For this recipe, Yukon Golds are ideal due to their creamy texture and buttery flavor that pairs perfectly with ranch. They also hold their shape well during roasting.
***Can I use fresh herbs instead of dry ranch seasoning?***
The dry seasoning is concentrated and designed to coat evenly. For a fresh herb approach, use 2 tbsp olive oil, 1 tsp each of garlic powder and onion powder, and 1 tbsp each of finely chopped fresh dill and parsley. The flavor profile will be different but still delicious.