Table of Contents
Paleo Cereals Breakfast: The Only Recipe You’ll Ever Need
Imagine starting your day with a bowl of Paleo Cereals Breakfast that delivers a crunchy grain-free delight, packed with nutrients to fuel your mornings without the post-breakfast crash. For those seeking a healthier alternative to traditional cereals, this Paleo Cereals Breakfast recipe is your go-to solution, blending nuts, seeds, and fruits for sustained energy. As a busy professional or a health-conscious parent, you’ll appreciate how this easy recipe stabilizes blood sugar levels while satisfying cravings, making it the ultimate grain-free option for a vibrant start.
The allure of Paleo Cereals Breakfast lies in its irresistible textures and flavors that dance on your palate. Picture the satisfying crunch of mixed nuts like almonds and walnuts, paired with the subtle nuttiness of chia seeds or flaxseeds that release a gentle, earthy aroma as they bake. Sweetened just right with dried fruits and a touch of honey, each bite offers a harmonious blend of crispiness and chewiness, evoking the comforting scent of toasted coconut flakes wafting through your kitchen. This grain-free cereal creates a symphony of tastes—tangy cranberries contrasting with the rich, buttery pecans—all coming together for a breakfast that feels indulgent yet wholesome.
What sets this Paleo Cereals Breakfast recipe from cookingwithemy.com apart is our commitment to making it the single best resource online, refined through extensive testing for foolproof results. Drawing from TastyRecipes’ trusted source, we’ve incorporated a Chef’s Secret that elevates the flavors and textures beyond standard versions. In this post, you’ll discover detailed ingredient spotlights, step-by-step guidance with pro tips, and answers to common questions, ensuring you feel confident creating this crunchy grain-free delight every time. Plus, learn how simple tweaks can make it your personalized staple.
Why This Paleo Cereals Breakfast Recipe is a Game-Changer
The Chef’s Secret to this Paleo Cereals Breakfast lies in the perfect balance of toasting the mixture to achieve a crunchy grain-free delight that sets it apart. By lightly coating the nuts, seeds, and fruits with honey or maple syrup before baking, we enhance the natural oils and create a caramelized edge that locks in flavors and provides an unbeatable crunch. This technique not only amplifies the healthy fats from the nuts but also ensures even browning, making every bite more satisfying and nutrient-dense than typical cereal recipes.
Unbeatable Texture: The science behind the texture comes from the high-fiber content of chia seeds or flaxseeds, which absorb moisture during baking and expand slightly, creating a light, airy crispiness. This contrasts beautifully with the hearty nuts, preventing sogginess when mixed with almond milk, as the fats help maintain structure and deliver a sustained release of energy throughout your morning.
Foolproof for a Reason: This recipe has been tested multiple times in our kitchen to guarantee success, even for novice cooks. We adjusted baking times and ratios to ensure consistent results, making it reliable for Paleo Cereals Breakfast enthusiasts who want a quick, healthy meal without surprises.
Ingredient Spotlight: Quality Makes the Difference
For the 1 cup of raw mixed nuts (almonds, walnuts, pecans), these form the hearty base of your Paleo Cereals Breakfast, providing essential healthy fats and proteins that keep you energized. Fresh, high-quality nuts ensure a superior crunch and richer flavor, as stale ones can make the mixture taste flat. If you’re allergic or prefer variety, substitute with cashews or hazelnuts, but opt for unsalted versions to control sodium levels and maintain the recipe’s balance.
Regarding the 1/2 cup of chia seeds or flaxseeds, these superfoods add omega-3s and fiber, helping to create a binding, gel-like texture that enhances the grain-free delight without overwhelming the other elements. Always choose whole seeds for better freshness and nutritional value; ground flaxseeds work as a substitute if you want quicker absorption, but be mindful of their shorter shelf life to avoid rancidity.
The 1/2 cup of unsweetened dried fruits (cranberries, raisins) brings natural sweetness and a chewy contrast to the crunch, making this Paleo Cereals Breakfast truly addictive. Quality matters here—select fruits without added sugars to keep it paleo-friendly and low in glycemic impact; you can swap with dried blueberries or apricots for a different twist, ensuring they’re sulfite-free for optimal health benefits.
As for the 1/2 cup of unsweetened coconut flakes, they contribute a tropical aroma and light, flaky texture that elevates the overall experience. Fresh flakes from reputable sources prevent bitterness, and if unavailable, shredded coconut can replace them, though it might alter the toasting effect slightly—just reduce baking time to avoid over-browning.
Finally, the 2 tablespoons of honey or maple syrup act as the natural binder and sweetener, caramelizing during baking to enhance the crunchy grain-free delight. Opt for raw, organic honey for its antimicrobial properties or pure maple syrup for a lower glycemic option; if substituting, agave nectar works, but use it sparingly to maintain the recipe’s paleo integrity and prevent the mixture from becoming too sticky.
Step-by-Step Instructions
Step 1: Preheating the Oven
Begin by preheating your oven to 350°F (175°C) to ensure even baking for your Paleo Cereals Breakfast. This step is crucial for activating the natural oils in the nuts and seeds, allowing them to crisp up perfectly without burning.
Pro Tip: Use an oven thermometer to verify the temperature accuracy, as a slightly cooler oven can lead to uneven toasting and a less crunchy grain-free delight.
Step 2: Combining the Ingredients
In a large bowl, combine the 1 cup of raw mixed nuts, 1/2 cup of chia seeds or flaxseeds, 1/2 cup of unsweetened dried fruits, and 1/2 cup of unsweetened coconut flakes, mixing them until evenly distributed. This creates a balanced base that ensures every scoop of your Paleo Cereals Breakfast is flavorful and nutritious.
Common Mistake to Avoid: Don’t rush this step; over-mixing can crush the nuts, reducing the desired crunch—gently toss with your hands or a spoon to preserve texture.
Step 3: Adding the Sweetener
Drizzle the 2 tablespoons of honey or maple syrup over the mixed ingredients, then toss everything thoroughly until the nuts and seeds are lightly coated. This helps the mixture bind and caramelize, enhancing the overall taste of your Paleo Cereals Breakfast.
Pro Tip: Warm the honey slightly in the microwave for 10 seconds if it’s too thick, making it easier to distribute evenly and achieve that perfect sticky coating for maximum flavor.
Step 4: Spreading and Baking
Spread the coated mixture evenly on a parchment-lined baking sheet, ensuring it’s in a single layer for optimal crisping. Bake for 15-20 minutes, stirring halfway through, until the mixture turns golden brown, transforming it into a crunchy grain-free delight.
Common Mistake to Avoid: Overcrowding the baking sheet can trap steam and result in a soggy texture—use a larger sheet if needed to allow air circulation for even baking.
Step 5: Cooling and Serving
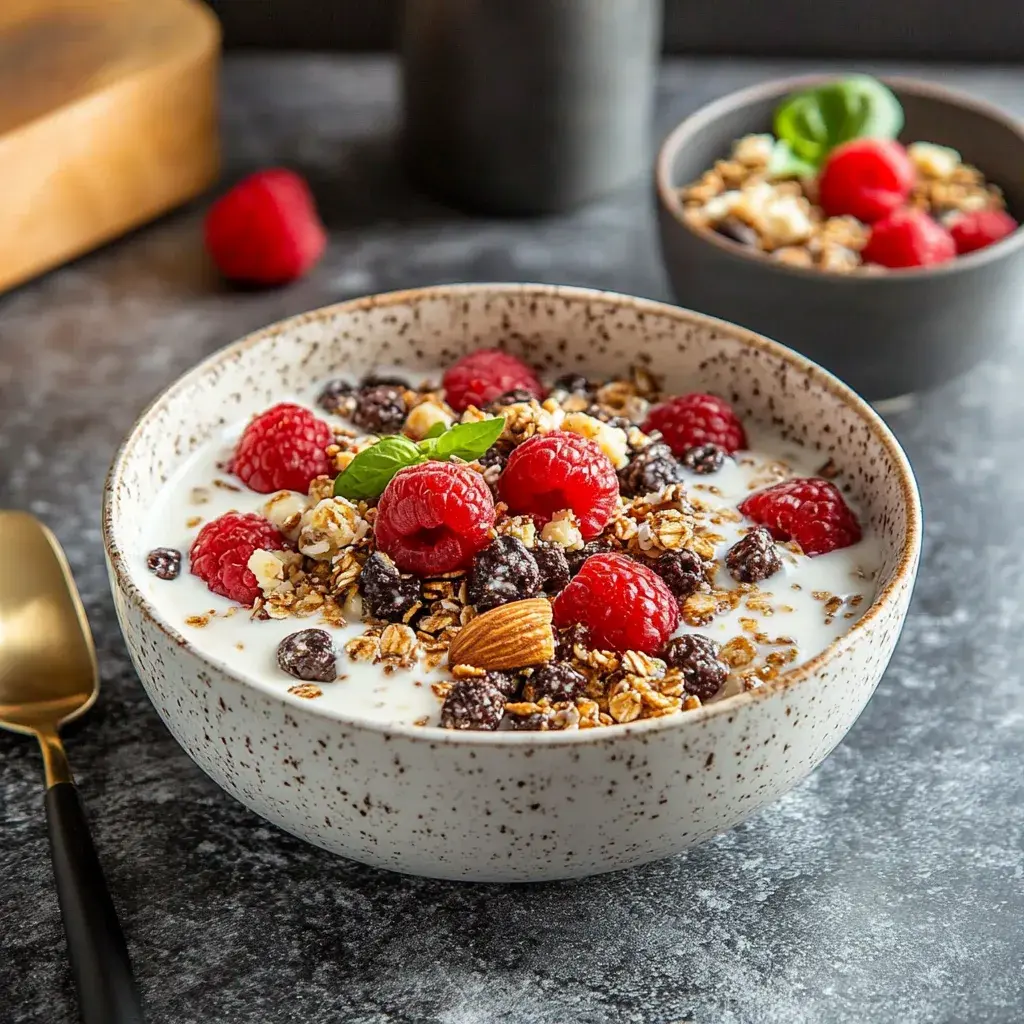
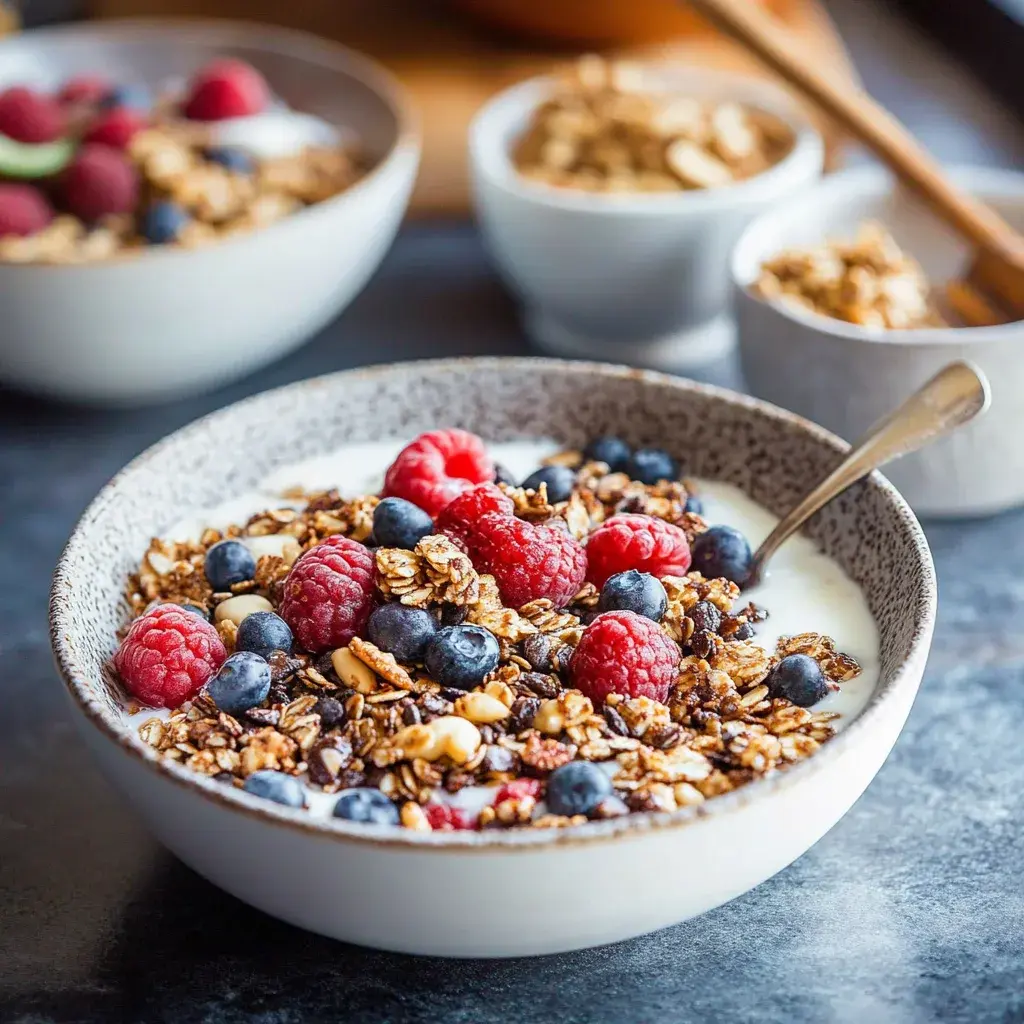
Remove the baking sheet from the oven and allow the mixture to cool completely on the sheet, which helps it harden and develop the full crunch. Once cooled, serve with almond milk or yogurt for a complete Paleo Cereals Breakfast experience.
Pro Tip: Let it cool on the parchment paper to absorb any residual moisture, ensuring the longest-lasting crunch for your morning routine.
Serving & Presentation
For an impressive presentation of your Paleo Cereals Breakfast, layer it in a clear glass bowl to showcase the vibrant mix of nuts, seeds, and fruits, allowing the colors to pop and entice your family. Add fresh toppings like sliced bananas or berries for a burst of juiciness that complements the crunchy grain-free delight, creating a visually appealing and balanced plate. To elevate it further, sprinkle a dash of cinnamon or a handful of dark chocolate shavings for added depth, turning a simple breakfast into a gourmet treat.
Pair this recipe with complementary sides like a side of fresh avocado for healthy fats or a smoothie made with spinach and almond milk to boost your nutrient intake. It’s versatile enough to serve as a standalone meal or alongside eggs for a brunch spread, making it ideal for both quick weekday mornings and leisurely weekends. The key is to keep portions balanced, ensuring that the natural sweetness doesn’t overpower, for a satisfying and healthful start to your day.
Make-Ahead & Storage Solutions
For a Make-Ahead Strategy, prepare the mixture up to 3 days in advance by following the instructions up to the point of baking; store the raw, coated ingredients in an airtight container in the fridge. When ready, simply bake as directed to enjoy fresh Paleo Cereals Breakfast without morning rush.
Storing Leftovers: Once baked and cooled, keep the cereals in an airtight container at room temperature for up to one week; for longer storage, freeze in portions for up to a month to maintain crispiness, avoiding moisture buildup that could soften the texture.
The Best Way to Reheat: To restore the original crunch, spread leftovers on a baking sheet and warm in a 350°F oven for 5-7 minutes, or use a dry skillet on low heat—avoid the microwave, as it can make the mixture chewy instead of crisp.
Frequently Asked Questions (FAQ)
How long does it take to bake Paleo Cereals Breakfast?
Baking Paleo Cereals Breakfast typically takes 15-20 minutes at 350°F (175°C), but exact time can vary based on your oven and the thickness of the mixture. Always check at the 15-minute mark and stir if needed to prevent burning, ensuring you achieve that perfect crunchy grain-free delight without overcooking.
Can I substitute honey with another sweetener in Paleo Cereals Breakfast?
Yes, you can substitute honey with maple syrup or even a paleo-friendly option like date syrup in this Paleo Cereals Breakfast recipe. Maple syrup offers a similar consistency and caramelizing effect, while date syrup adds extra natural sweetness—use the same 2 tablespoons measurement to maintain the balance and avoid making the mixture too sticky or overly sweet.
What are some tips for getting the perfect crunch in Paleo Cereals Breakfast?
To achieve the perfect crunch in Paleo Cereals Breakfast, ensure your oven is accurately preheated and spread the mixture in a single layer on the baking sheet for even air circulation. Use fresh ingredients to prevent moisture, and let it cool completely before serving—stirring midway through baking helps avoid hot spots, enhancing the grain-free delight’s texture.
What are the best serving suggestions for Paleo Cereals Breakfast?
The best serving suggestions for Paleo Cereals Breakfast include pairing it with unsweetened almond milk for a creamy contrast or topping it with fresh fruits like strawberries and a dollop of coconut yogurt for added probiotics. For a heartier meal, mix in a handful of berries or nuts post-baking to customize flavors, making it versatile for breakfast bowls or snacks.
Is Paleo Cereals Breakfast suitable for kids?
Absolutely, Paleo Cereals Breakfast is kid-friendly as it’s naturally sweet and crunchy, but you can adjust the honey amount for younger palates to reduce sugar intake. Introduce it gradually to children with food allergies, ensuring nuts are finely chopped if needed, and it’s a great way to sneak in nutrients for picky eaters.
Can I make this recipe vegan?
Yes, this Paleo Cereals Breakfast recipe is already vegan-friendly since it uses plant-based ingredients like nuts and seeds. Just double-check that your honey is replaced with maple syrup or agave if you’re strictly vegan, and enjoy it as is for a wholesome, animal-free option.
Tried This Recipe? Leave a Comment!
Did you make this Paleo Cereals Breakfast recipe? I’d love to hear how it turned out! Please leave a comment and a rating below. Your feedback helps other home cooks and supports cookingwithemy!
For more delicious inspiration, follow me on Pinterest!

Paleo Cereals Breakfast
Description
Paleo Cereals Breakfast is the perfect choice for a delicious and energizing start to your day. This easy-to-make recipe combines a delightful mix of crunchy nuts, seeds, and dried fruits, creating a wholesome breakfast that not only satisfies your taste buds but also keeps you full longer. Packed with healthy fats and fiber, this grain-free alternative to traditional cereals helps stabilize blood sugar levels, making it ideal for both busy mornings and leisurely brunches. Customize your bowl by adding spices or fresh fruit toppings, and enjoy it with almond milk or yogurt for an extra creamy touch. With its rich textures and flavors, this Paleo Cereals Breakfast is sure to become a staple in your morning routine.
Ingredients
- 1 cupraw mixed nuts (almonds, walnuts, pecans)
- 1/2 cupchia seeds or flaxseeds
- 1/2 cupunsweetened dried fruits (cranberries, raisins)
- 1/2 cupunsweetened coconut flakes
- 2 tablespoonshoney or maple syrup
Instructions
- Preheat your oven to 350°F (175°C).
- In a large bowl, combine the nuts, seeds, coconut flakes, and dried fruits until evenly mixed.
- Drizzle honey or maple syrup over the mixture and toss until everything is lightly coated.
- Spread the mixture on a parchment-lined baking sheet and bake for 15-20 minutes until golden brown.
- Allow to cool completely before serving with almond milk or yogurt.
Notes
Use fresh ingredients for enhanced flavor.
Experiment with spices like cinnamon or vanilla extract for added depth.
Store leftovers in an airtight container at room temperature for up to one week.
Nutrition
- Calories: 320
- Sugar: 7g
- Fat: 24g
- Carbohydrates: 22g
- Protein: 8g
Conclusion
This hearty red wine beef stew delivers comforting, savory flavors with tender beef simmered in rich red wine, making it perfect for a cozy family dinner or special occasion. The depth of the wine enhances the overall taste, creating a satisfying meal that’s both simple and impressive. For a serving tip, pair it with crusty bread to soak up the delicious gravy, or try a variation by incorporating Authentic Tender Mongolian Beef Easy Recipe for a similar beef-focused dish that adds an Asian twist. If you enjoy wine-infused recipes, don’t miss the Classic Coq au Vin Recipe, which offers another elegant meaty option with French flair.