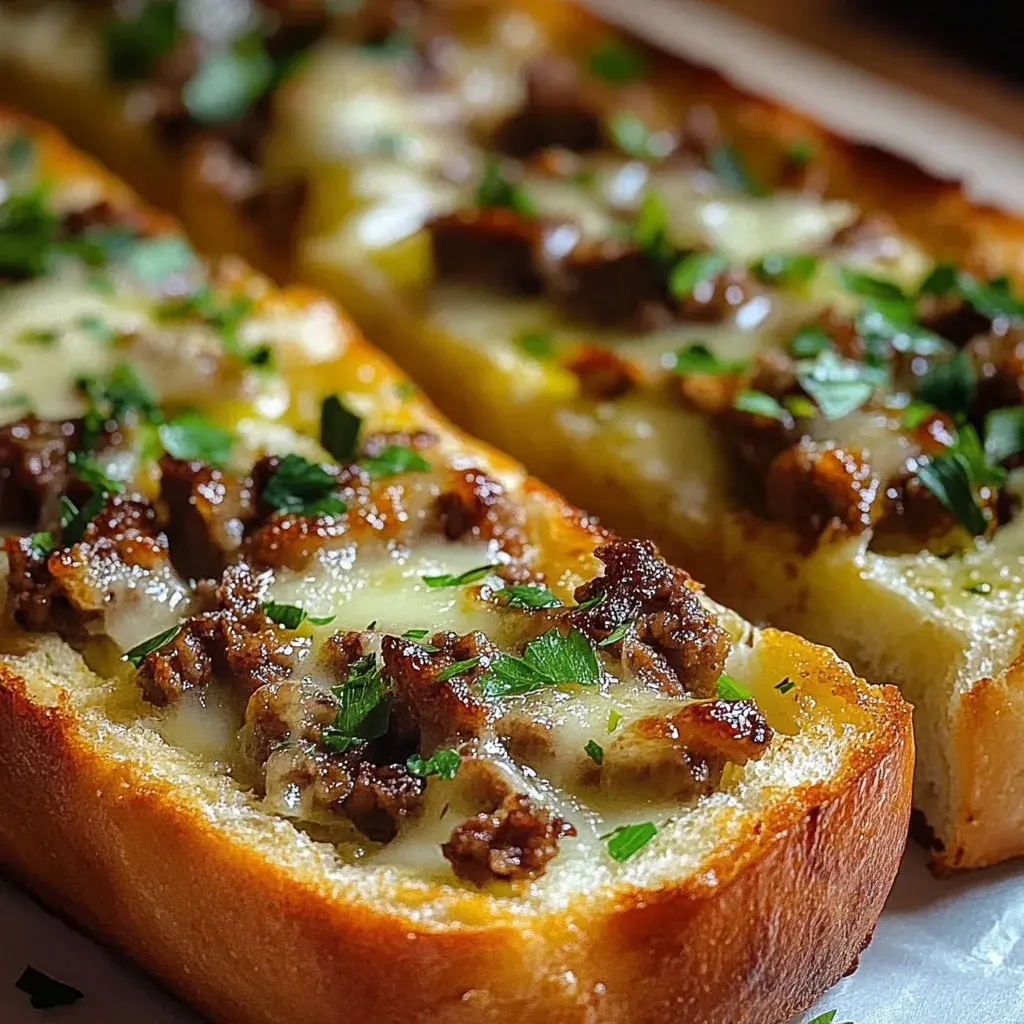
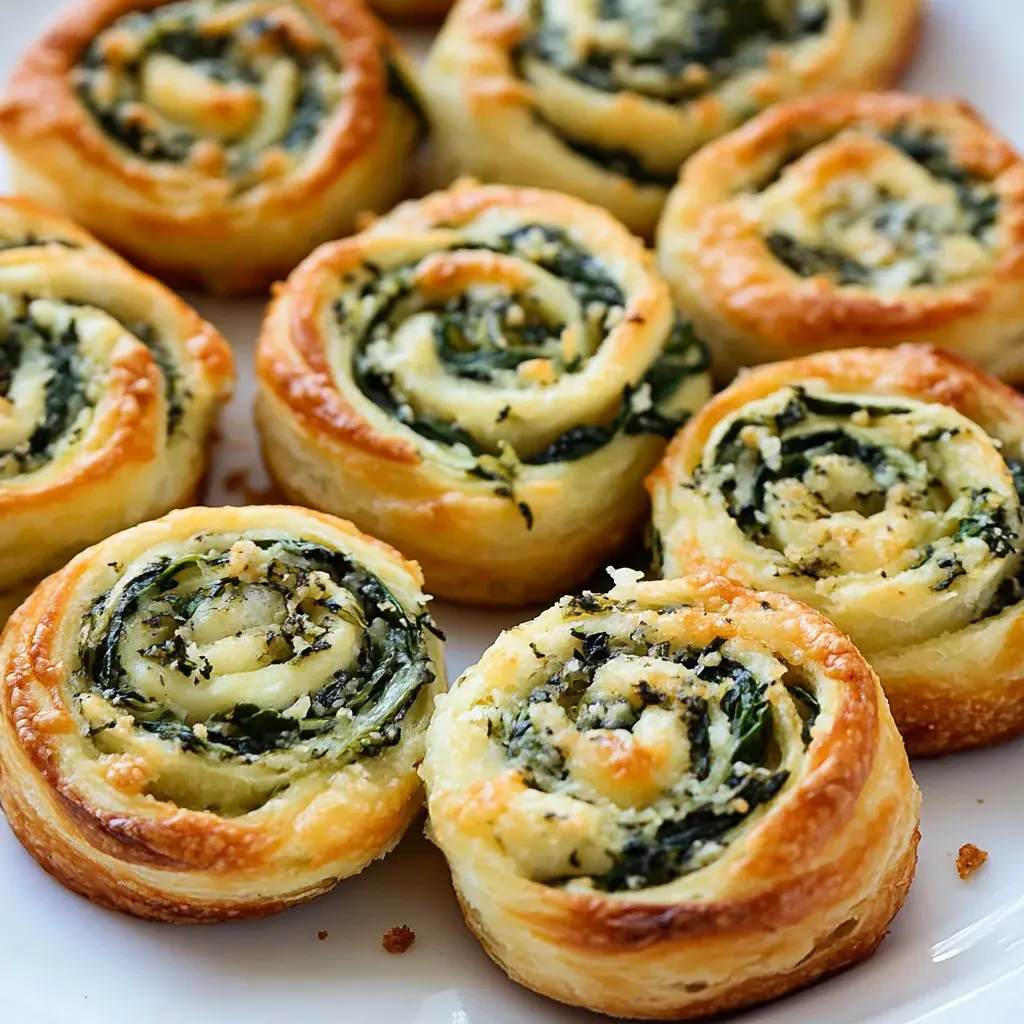
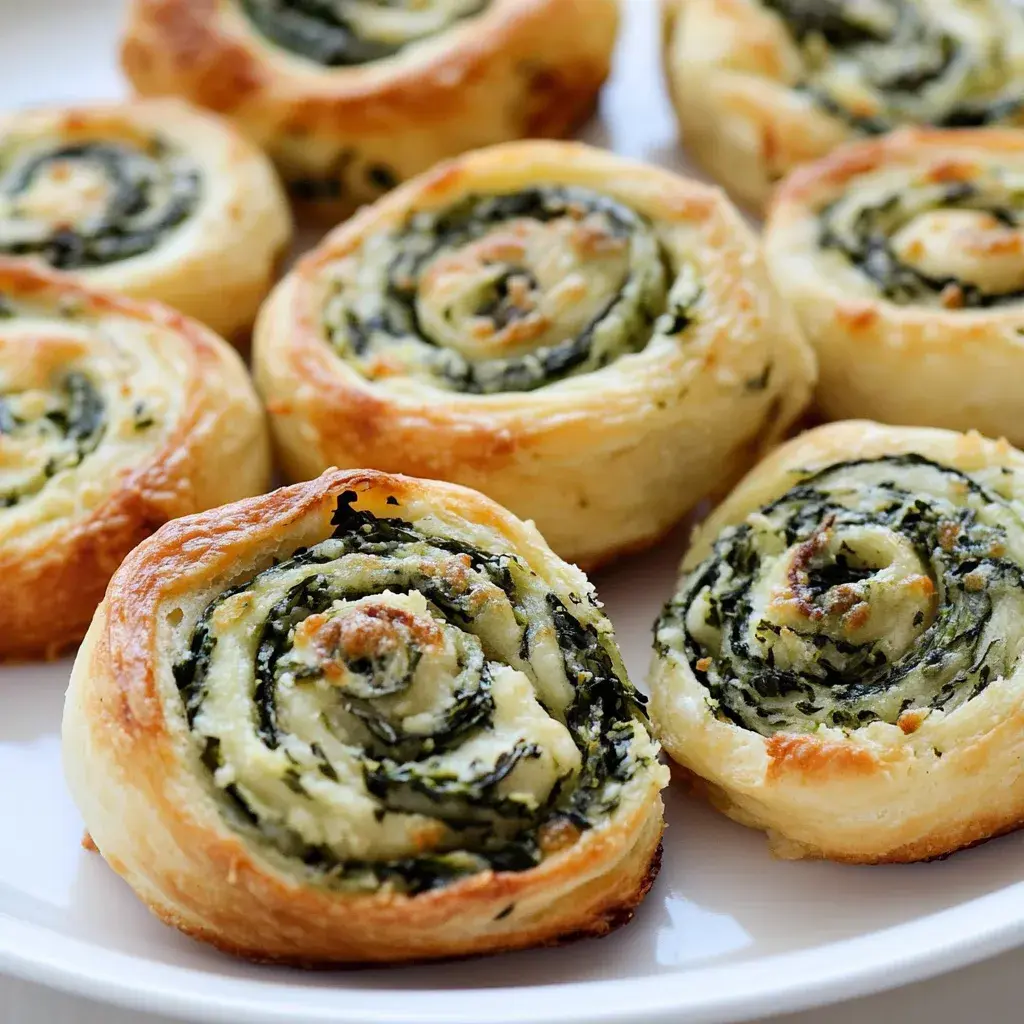
Delicious Crock Pot Green Enchilada Chicken Soup Recipe

Crock Pot Green Enchilada Chicken Soup: A Flavorful Twist on a Classic

⚖️
Difficulty
Easy

⏲️
Prep Time
15 mins

🕒
Cook Time
6 hrs

⏱️
Total Time
6 hrs 15 mins

🍽️
Servings
6 servings

Crock Pot Green Enchilada Chicken Soup is a delightful and hearty dish perfect for cozy evenings or when you’re entertaining guests. Infused with rich flavors of green enchilada sauce, tender chicken, and a medley of vegetables, this soup is a meal that will warm you from the inside out. The slow-cooking process allows the ingredients to meld together beautifully, creating a dish that’s not only comforting but also incredibly satisfying.

As you approach this luscious soup, the aroma of cumin and green chilies fills the air, inviting you into the kitchen. Each spoonful offers a balance of creamy textures and zesty brightness, highlighting the unique combination of Mexican-inspired ingredients. Garnished with cilantro and lime, this soup doesn’t just nourish the body; it also excites the palate, making it a flavorful choice for family dinners or festive gatherings.

Quick Recipe Highlights

  • Flavor Profile: This soup boasts a bright, tangy taste from the green enchilada sauce and a hint of spice from jalapeños, balanced by the richness of creamy ingredients.
  • Texture: Velvety soup filled with tender chicken pieces and crunchy vegetables creates a delightful contrast in each bite.
  • Aroma: The enticing scent of spices such as cumin and the freshness of cilantro wake up your senses as it simmers.
  • Visual Appeal: Vibrant green hues combined with colorful toppings make it visually appealing and perfect for any table setting.
  • Skill Level Needed: This dish is simple enough for beginners, allowing anyone to create a delicious soup with minimal fuss.
  • Special Equipment: A reliable crock pot is essential for achieving the rich flavors that develop over the long cooking period.

Recipe Overview

  • Difficulty Level: Easy; this recipe is very forgiving and perfect for novice cooks who want to impress guests without extensive culinary skills.
  • Category: Comfort food; ideal for cold days or casual gatherings that invoke warmth and shared moments.
  • Cuisine: This dish is deeply rooted in Mexican cuisine, reflecting the rich flavors and robust culinary traditions of the region.
  • Cost: Affordable ingredients such as chicken, canned sauces, and vegetables make this dish budget-friendly for families.
  • Season: Best enjoyed in cooler months, this warming soup is a go-to dish for chilly autumn and winter days.
  • Occasion: Perfect for weeknight dinners, potlucks, or any festive occasion where comfort food is appreciated.

Why You’ll Love This Recipe

Crock Pot Green Enchilada Chicken Soup is utterly tantalizing, with a harmonious blend of spicy, savory, and creamy elements that excite the taste buds. Each spoonful delivers a satisfying warmth, encapsulating the essence of comfort food. The combination of green enchilada sauce with tender chicken results in a flavorful profile that is hard to resist, making it not just a meal but an experience.

The convenience of using a crock pot means you can toss everything together, set it, and forget it. While you go about your day, the slow cooking melds all the flavors together so that when mealtime arrives, you have a delicious, hearty soup waiting for you. This recipe allows for easy meal preparation, suitable for busy lifestyles without compromising on taste.

Nutritionally, the ingredients in this soup are packed with health benefits. Chicken provides a lean protein, while beans add fiber that keeps you satiated longer. Additionally, choosing ingredients like low-sodium broth and fresh vegetables adds to your nutrient intake without excess calories, making it a wholesome choice.

Serving this soup fosters a warm and inviting atmosphere, perfect for gatherings. Friends and family can gather around with bowls in hand, sharing stories and laughter as they enjoy a hearty meal together. The communal feeling of serving a dish that is both filling and flavorful enhances the dining experience and creates lasting memories.

Finally, this recipe stands out for its cost-effectiveness. Using budget-friendly staples means you can enjoy a delicious meal without overspending. This accessibility is appealing for both busy families and anyone looking for economical meal solutions without sacrificing quality or flavor.

Historical Background and Cultural Significance

The origins of green enchilada chicken soup can be traced back to traditional Mexican cuisine, which often features slow-cooked soups that highlight local ingredients and cultural flavors. Enchiladas themselves have a rich history, with evidence of rolled tortillas filled with meat or cheese dating back to pre-Columbian times. This soup, while not a traditional dish in its own right, brings together elements of enchiladas and hearty chicken soup into a comforting, Americanized staple.

In Mexican culture, flavor is paramount, and the use of green sauces demonstrates the celebration of fresh ingredients such as tomatillos and green chilies. The soup serves not only as nourishment but also as a means of preserving culinary traditions that bring communities together. Historically, soups have been a practical solution to utilize various leftovers and ingredients, making it a cornerstone of family meals.

The evolution of green enchilada chicken soup reflects changing culinary practices in American households, where convenience meets tradition. As families became busier, the adaptation of slow-cooked meals gained popularity, allowing for intimate family gatherings around the dinner table with minimal fuss in preparation. This blend of cultural influences highlights how traditional recipes can be reimagined for modern lifestyles.

Regional variations have sprouted, with many cooks adding their own unique spins; some incorporate different beans, spices, or toppings based on local preferences. These adaptations speak to the creativity found within home kitchens across the United States, showcasing how food can be both personal and communal.

Ingredient Deep Dive

Chicken is one of the primary proteins in this recipe, renowned for its versatility in various cuisines worldwide. It is a source of high-quality protein that supports muscle growth and overall health. When selecting chicken for the soup, opt for boneless thighs or breasts for tenderness, and ensure proper storage by keeping it in the coldest section of the fridge for up to two days or freezing for longer preservation.

Green enchilada sauce adds the distinctive flavor this soup is known for. Typically made with tomatillos and green chilies, this sauce is low in calories yet rich in taste. Aim for varieties without added sugars or preservatives. Store unopened cans in a cool, dry place and use within a week after opening.

Black beans bring not only flavor and texture to the dish but also a powerhouse of nutrition. They are an excellent source of fiber, which aids digestion and helps maintain stable blood sugar. Look for canned varieties that are low in sodium, rinse them well before using, and store leftovers in airtight containers in the fridge.

Fresh vegetables such as bell peppers, onions, and corn enrich the soup with both flavor and nutrition. When selecting bell peppers, choose ones that are firm and vibrant in color, storing them in the crisper drawer of the fridge. Corn adds natural sweetness, bringing a delightful contrast to the savory elements of the soup.

Cilantro, a fragrant herb commonly used in Mexican cuisine, adds brightness to the overall dish. Use fresh, vibrant leaves and avoid overly wilted greens. Storing cilantro in a jar with water helps maintain freshness for a longer duration, enhancing the overall presentation and flavor of your soup.

Common Mistakes to Avoid

  • Not seasoning adequately: Always taste and adjust seasoning while cooking, especially with slow cooker recipes, as flavors can become muted.
  • Using low-quality ingredients: High-quality chicken and sauce make a significant difference in flavor; avoid overprocessed options.
  • Overcooking vegetables: Add sensitive vegetables like bell peppers towards the end of cooking to retain their texture and flavor.
  • Ignoring the sauce consistency: If the soup becomes too thick, adjust the consistency with broth or water instead of serving it as is.
  • Not letting it sit: Flavors develop more when soup rests; allow it to sit off heat before serving for deeper taste.
  • Skipping garnishes: Fresh herbs and lime brighten the dish; don’t overlook these simple additions for presentation.
  • Overfilling the pot: Stick to recommended ingredient amounts to ensure proper cooking and prevent overflow.
  • Neglecting to check for leftovers: This soup stores well, so always save extras for a quick meal later in the week.

Essential Techniques

To master slow-cooking, it’s vital to layer flavors by sautéing onions and spices before adding to the pot. This technique enhances the depth of your dish, making it much more flavorful. Be mindful of cooking settings and don’t rush the process, as flavors only develop with time.

When shredding chicken post-cooking, ensure you use two forks to easily pull apart the meat while it’s still warm. Practice makes perfect here; a visual cue is the meat should be easily torn without resistance.

Pro Tips for Perfect Crock Pot Green Enchilada Chicken Soup

1. Sear chicken before placing it in the crock pot for added depth of flavor.
2. Use homemade green enchilada sauce if you can for a fresher, personalized touch.
3. Add an extra can of beans for more protein and fiber without increasing the number of meat servings.
4. Experiment with different vegetables, like zucchini or spinach, for a nutritious upgrade.
5. Adjust the level of heat by adding jalapeños for spice or keep it mild for the kids.
6. Stir in a dollop of sour cream or a splash of cream before serving for a creamier texture.
7. Allow the soup to cool down before refrigerating for better integrity and flavor retention.
8. Consider garnishing with avocado slices to add rich creaminess and nutritional benefits.

Variations and Adaptations

Regional variations of this dish can greatly enhance its flavor profile. In the Southwest, you might incorporate roasted green chiles for an earthy flavor, while in Texas, adding a hint of barbecue sauce can provide a surprising twist. Seasonal adaptations can also be introduced depending on what’s fresh in your area. In the summer, consider adding fresh corn and diced tomatoes for a bright, refreshing contrast.

If you’re looking for dietary modifications, consider utilizing a plant-based chicken substitute for a vegan option. Opt for low-fat dairy to transform it into a healthier version without sacrificing flavor. To enhance flavors, add smoked paprika for a depth of taste or even swap traditional corn with sweet corn for a delightful sweetness that complements the spicy elements.

When it comes to presentation, serving in individual bowls can make the dish feel special. Top with crispy tortilla strips and a sprinkle of cheese for an appealing crunch and contrast in texture.

Serving and Presentation Guide

Plating this soup elegantly begins with serving it in warm bowls to enhance the overall experience. Layer fresh herbs like cilantro or scallions on top for a pop of green and freshness. Drizzle sour cream or yogurt artistically on each bowl before serving, which not only looks appealing but also adds a tangy flavor profile.

Traditional accompaniments include tortilla chips or freshly baked cornbread, which can be served on the side to provide varied textures that complement the soup. For modern servings, consider beautiful wooden trays or rustic vessels to evoke a comfortable, homey feel.

Keep in mind that temperature plays a crucial role: Serve the soup hot, right from the crock pot, allowing guests to enjoy its comforting warmth. Portion control is also essential; offer generous servings while keeping in mind that this dish is filling, encouraging guests to savor every last bite.

Wine and Beverage Pairing

When it comes to wine pairings, a chilled Sauvignon Blanc harmonizes perfectly with green enchilada flavors, enhancing the dish’s herbal and citrus notes. If you prefer red wine, opt for a light-bodied Pinot Noir that won’t overpower the soup’s subtle spices.

For non-alcoholic options, serve lime-infused sparkling water which provides a refreshing contrast to the hearty soup. If enjoying this dish during colder months, consider a warm spiced apple cider that complements the soup’s warmth beautifully.

Tea lovers can choose a mild chamomile or mint tea that can refresh the palate after each bite and enhance the overall dining experience with its soothing characteristics.

Storage and Shelf Life

To ensure the best quality and flavor retention of your Crock Pot Green Enchilada Chicken Soup, store it in an airtight container in the refrigerator for up to three days. Make sure to cool it quickly to avoid bacterial growth.

For longer shelf life, consider freezing the soup. Transfer cooled portions into freezer-safe bags or airtight containers, marking the date for reference. When reheating, thaw in the refrigerator overnight or submerge the bag in cold water before warming in the microwave or on the stove.

Be mindful of spoilage signs: Off odors, changes in texture, or signs of frost in the freezer indicate it’s time to dispose of it. Reheat thoroughly before serving, ensuring the soup is heated to at least 165°F for safe consumption.

Make Ahead Strategies

Preparing in advance can enhance the ease of enjoying this delightful soup. Chop your vegetables and store them in an airtight container in the refrigerator the night before; this saves valuable time on the day of cooking.

You can also pre-measure dry and wet ingredients, ensuring everything is ready to mix without delay. Assemble all ingredients in the crock pot liner to make the process seamless on the day of cooking, just before turning it on.

The flavor of the soup deepens as it sits, so if you prepare it a day in advance, allow it to meld overnight before serving. When reheating, simply add a little broth or water to revive the consistency and up the freshness by adding new herbs or garnishes before serving.

Scaling Instructions

If you want to halve the recipe for a smaller gathering, simply adjust the ingredient quantities accordingly and shorten the cooking time if using high temperatures. Always taste and adjust seasonings to match the final amount.

For those needing larger quantities, doubling or tripling ingredients is straightforward. Just ensure your crock pot can accommodate the larger amount without overflowing. If needed, split the mixture across two pots and maintain the same cooking time for even heating.

Equipment adjustments may be necessary: larger pots or additional containers can manage increased volumes smoothly. Always monitor the soup closely, checking for doneness and flavors throughout the extended cooking period.

Nutritional Deep Dive

This dish is loaded with macros that will keep you feeling strong and satisfied. The protein from the chicken provides essential amino acids necessary for muscle repair and growth. Enjoyed with beans, the dish becomes even more nourishing, providing significant fiber content which is beneficial for digestive health.

Micronutrient analysis also reveals a host of essential vitamins and minerals from the diverse vegetables used—from vitamin C in bell peppers to potassium in beans. The addition of cilantro contributes antioxidants, which play a crucial role in rectifying bodily inflammation.

Considering portion analysis, a standard serving of this soup is rich in flavor yet moderate in calories, offering an excellent choice for those managing their diet. Adjusting your serving size can help maintain balanced energy levels throughout the day while indulging in this delicious meal.

Dietary Adaptations

For those looking to make this soup gluten-free, simply check your green enchilada sauce and use certified gluten-free broth to maintain flavor without gluten content. Substitution of beans for any grains often suffices in maintaining the dish’s integrity.

Dairy-free individuals can skip the cheese and sour cream, replacing them with cashew cream or other dairy-free alternatives that add the right texture and flavor. Vegan options are also possible by substituting chicken with tempeh or seitan, enhancing protein richness.

Low-carb diets can benefit from skipping beans entirely and focusing on low-carb veggies such as zucchini or cauliflower to maintain the heartiness without the starches. Keto variations might include adding more fat through cheese or cream while limiting higher-carb ingredients.

For those following paleo diets, replacing beans with more vegetables alongside a fresh, homemade enchilada sauce incorporates clean and whole food principles aligning with this eating philosophy.

Troubleshooting Guide

If you experience texture issues where the soup feels too thin, consider blending a portion to thicken it up while keeping it flavorful. In contrast, if it’s too thick, adding a splash of broth or water can restore the right consistency.

In regards to flavor balance, if you find the soup lacks punch, add additional lime juice or seasonings towards the end of the cooking process to refresh the taste without overpowering the original recipe.

Temperature problems might arise if the soup is either too hot or too cold; always maintain an eye on heating and ensure proper reheating guidelines are followed after storing.

For equipment challenges, if your crock pot isn’t performing well, consider experimenting with different settings or checking if replacements are needed. Timing concerns can arise; adjust your cooking time and allow for additional check-ins throughout if cooking longer than expected.

Recipe Success Stories

Community feedback on this delicious soup has been overwhelmingly positive, with many praising its easy preparation and adaptability. Readers have shared how they personalized the recipe with their own ingredient twists, such as adding extra spices or new veggies.

Variation successes include adding unique toppings; some suggest crushed tortilla chips for added texture, while others recommend garnishing with fresh avocado and lime. Readers appreciate that it accommodates various dietary needs, allowing for broad enjoyment of this dish.

Those who shared photographs highlighted how visually appealing the final dish can be, showcasing vibrant colors that reflect the freshness of each ingredient. Tips on recipe adaptations have led many to discover new favorites.

It’s these adaptations and shared experiences that create an engaged and supportive cooking community around this beloved recipe, inspiring everyone to find joy and creativity in the kitchen.

Frequently Asked Questions

Can I use frozen chicken in this recipe? Yes, you can use frozen chicken. Just ensure to extend the cooking time slightly until the chicken is cooked through and tender.

What can I substitute for green enchilada sauce? You may make your own sauce using tomatillos, jalapeños, garlic, and spices, or opt for a store-bought green salsa verde as an alternative.

How do I store leftovers? Keep leftovers in an airtight container in the refrigerator for up to three days. Always cool the soup completely before storing.

Can I make this soup ahead of time? Absolutely! This soup can be made ahead of time and tastes even better the next day when flavors have merged and developed.

Is this soup spicy? It has a mild level of heat from the green enchilada sauce. You can adjust spice levels by adding more or less chili or jalapeño.

What toppings do you recommend? Fresh cilantro, lime wedges, diced avocado, sour cream, and cheddar cheese are great topping options for added flavor and texture.

Can I use other meats instead of chicken? Certainly! Turkey, pork, or even beef can be used in place of chicken for a different flavor profile.

How long does it take to cook in a high setting? Cooking on high usually takes about 3 to 4 hours. Adjust according to your time constraints.

Can I add more vegetables to this soup? Yes! Feel free to include additional vegetables like zucchini, carrots, or even spinach for added nutrition and flavor.

Is there a vegetarian version of this soup? You can replace chicken with plant-based proteins and ensure the broth used is vegetable-based for a delicious vegetarian version.

Additional Resources

If you’re looking for similar recipes, consider exploring our collection of comforting soups, which include variations like chicken tortilla soup or spicy black bean soup. For technique guides, delve into our sections on slow cooking and ingredient pairing, which will enhance your culinary skills.

For ingredient information, resource guides are available to help you learn more about the nutrients each ingredient provides. If you’re interested in equipment recommendations, consider exploring the best crock pots and kitchen gadgets that simplify meal preparation.

A focus on seasonal variations allows you to adapt this recipe to include fresh ingredients, making it relevant year-round. Incorporating local produce enhances the flavors and supports sustainable eating habits.

Join the Conversation

We love to hear from our readers! Share your experiences cooking this Crock Pot Green Enchilada Chicken Soup, including any personal adaptations or unique plating ideas. Engaging in social media conversations can inspire others and foster a community of food enthusiasts.

Photography tips are always welcomed, so don’t hesitate to share your best soup shots using the hashtag provided. If you enjoyed this recipe, consider writing a review or rating it to help fellow home cooks discover its appeal.

Your voices contribute to our vibrant foodie community, exploring different variations and sharing tips to enhance this beloved dish further.

The Recipe

Crock Pot Green Enchilada Chicken Soup

Serves: 6

Prep Time: 15 mins

Cook Time: 6 hrs

Total Time: 6 hrs 15 mins

Kitchen Equipment Needed

  • Crock pot
  • Cutting board
  • Sharp knife
  • Measuring cups and spoons
  • Wooden spoon

Ingredients

  • 1 lb boneless, skinless chicken breasts
  • 1 can (10 oz) green enchilada sauce
  • 1 can (15 oz) black beans, drained and rinsed
  • 1 cup corn (frozen or canned)
  • 1 cup diced bell peppers
  • 1 cup chopped onion
  • 2 cloves garlic, minced
  • 2 cups chicken broth
  • 1 tsp cumin
  • 1 tsp chili powder
  • Salt and pepper to taste
  • Fresh cilantro for garnish
  • Lime wedges for serving

Directions

  1. Place chicken breasts in the bottom of the crock pot.
  2. Add green enchilada sauce, beans, corn, bell peppers, onion, garlic, chicken broth, cumin, chili powder, salt, and pepper.
  3. Stir to combine all ingredients and ensure chicken is covered with the sauce.
  4. Cover the crock pot and cook on low for 6 hours or high for 3-4 hours until the chicken is tender.
  5. Once cooked, remove the chicken and shred it with two forks.
  6. Return the shredded chicken to the soup and stir well to combine.
  7. Serve hot, garnished with fresh cilantro and lime wedges.

Recipe Notes

  • Feel free to add more veggies based on your personal preference.
  • This soup freezes well; store in airtight containers for up to 3 months.
  • For a creamier texture, stir in a dollop of sour cream just before serving.

Best Italian Penicillin Soup Recipe for Cozy Comfort

Italian Penicillin Soup: A Comforting Culinary Hug

⚖️
Difficulty
Easy

⏲️
Prep Time
15 mins

🕒
Cook Time
30 mins

⏱️
Total Time
45 mins

🍽️
Servings
4

Italian Penicillin Soup is the ultimate comfort food, blending hearty ingredients and nurturing spices that evoke feelings of warmth and home. Known for its medicinal qualities in folklore, this soup is more than just a meal; it’s a soothing remedy for the soul. Imagine a bowl filled with vibrant vegetables, tender chicken, and aromatic herbs simmered together to create a flavorful elixir. Each spoonful of this Italian-inspired dish is designed to provide comfort and well-being, making it an ideal choice for cold days or whenever you’re feeling under the weather.

This delightful Italian soup stands out not only for its taste but also for its rich heritage. Its roots in traditional Italian cooking combine rustic flavors with modern accessibility, allowing anyone to recreate this culinary masterpiece at home. Whether enjoyed with friends on a chilly evening or savored alone for some self-care, Italian Penicillin Soup is sure to become a favorite in your kitchen.

Quick Recipe Highlights

  • Flavor Profile: The soup boasts a delightful combination of savory chicken broth, earthy vegetables, and aromatic herbs, providing a taste that’s both rich and comforting.
  • Texture: Expect a hearty, soup-like consistency with tender chunks of chicken and vegetables that create a pleasing mouthfeel.
  • Aroma: The aroma is inviting, with hints of garlic, thyme, and rosemary creating a warming scent that’s hard to resist.
  • Visual Appeal: The vibrant colors of the vegetables against the golden broth make it visually enticing and appetizing.
  • Skill Level Needed: This soup is easy to make, perfect for beginner cooks looking to develop their skills without complexity.
  • Special Equipment: You’ll need a large pot or Dutch oven for simmering, along with basic kitchen utensils like cutting boards and knives.

Recipe Overview

  • Difficulty Level: This Italian Penicillin Soup is categorized as easy, perfect for novice cooks or families seeking a weekend project.
  • Category: It fits perfectly within the soup category, providing a wholesome meal option in any household.
  • Cuisine: Rooted in Italian culinary traditions, this soup reflects the heartfelt approach of Italian cooking—simple yet flavorful.
  • Cost: The ingredients are budget-friendly, making this dish an economical choice for families or gatherings.
  • Season: Ideal for colder months, offering a cozy and warming experience when the temperatures drop.
  • Occasion: Excellent for family dinners, casual gatherings, or as a restorative dish when someone is feeling under the weather.

Why You’ll Love This Recipe

Taste and texture appeal: This Italian Penicillin Soup captivates with its heartwarming flavor and textured components. You will find tender chicken and fresh vegetables harmoniously merging in a broth that’s rich and savory. The incorporation of herbs elevates every bite, ensuring an indulgent experience that evokes feelings of nostalgia.

Convenience and preparation benefits: The simplicity of preparation means this soup can be put together quickly, making it an excellent choice for busy weeknights or impromptu gatherings. The one-pot cooking method minimizes dishwashing and creates a seamless cooking experience, allowing you to focus more on enjoying the meal.

Nutritional advantages: Packed with proteins from the chicken, fiber from the vegetables, and vitamins from the aromatic herbs, this soup is as nutritious as it is delicious. It’s a well-rounded meal that supports immune function, making it not only comforting but good for your health too.

Social and entertaining value: Sharing a pot of Italian Penicillin Soup with loved ones becomes a memorable experience, fostering togetherness and conversation. The inviting aroma fills the room, encouraging everyone to gather and enjoy a heartwarming meal that brings comfort to the table.

Cost-effectiveness and accessibility: Utilizing readily available ingredients, this soup is budget-friendly. It’s a great way to use up leftover vegetables or pantry staples, showcasing how delicious meals can be created without straining your wallet or resources.

Historical Background and Cultural Significance

Origin story: The roots of Italian Penicillin Soup trace back to traditional Italian kitchens, where comfort food was crafted with love and care. Often showcased in family gatherings, this dish has been passed down through generations, representing familial bonds and warmth.

Cultural importance: This recipe holds a significant place in Italian culture, where food is synonymous with healing. It symbolizes nurturing, showing how a simple bowl of soup can provide comfort during hard times or illness. It speaks to the Italian philosophy of ‘cucina povera,’ focusing on frugality and resourcefulness in cooking.

Evolution of the recipe: Over the years, variations of Italian Penicillin Soup have sprouted across different regions of Italy. Each region adds its unique twist, leading to diverse flavors while maintaining the comforting essence of the original recipe.

Regional variations: From creamy broth versions to hearty tomato-based takes, the beauty of this soup lies in its adaptability. Different provinces claim their variations, showcasing local ingredients and culinary preferences that highlight Italy’s vibrant food culture.

Ingredient Deep Dive

Chicken: Chicken serves as the main protein in this Italian Penicillin Soup. Rich in protein, it contributes to muscle strength and overall health. Opt for organic chicken for the best flavor, and ensure proper storage in the refrigerator or freezer to keep it fresh. If desired, substitutes such as turkey or plant-based options are available or can be adjusted based on dietary preferences.

Carrots: These vibrant vegetables add sweetness and color to the soup. Carrots are rich in beta-carotene, which is essential for eye health. When selecting carrots, choose firm and brightly colored ones, and store them in a cool refrigerator environment for longevity. They can also be easily replaced with parsnips for an intriguing twist.

Celery: Celery brings a delightful crunch and aromatic essence to the Italian Penicillin Soup. It’s low in calories yet high in fiber, promoting digestive health. When purchasing celery, look for crisp stalks and avoid ones with wilted or brown edges. Additionally, you can substitute celery with fennel for a unique flavor profile.

Herbs (thyme, rosemary, parsley): Fresh herbs elevate the dish, enhancing the bouquet of flavors and contributing to its visual appeal. They are rich in antioxidants and can provide various health benefits. For the freshest experience, use herbs that are vibrant with no wilting leaves; otherwise, you can store them wrapped in a damp paper towel in the fridge.

Common Mistakes to Avoid

  • Not seasoning adequately: Many novice cooks forget to season their broth and ingredients properly, resulting in a bland soup. Always taste as you go and adjust seasoning levels as necessary.
  • Using overcooked vegetables: Overcooked vegetables can become mushy and lose their nutritional benefits. Aim for tender yet slightly firm vegetables to retain their texture.
  • Skipping the aromatics: Aromatics like garlic and onions provide depth of flavor, yet are often overlooked. Sauté them first to unlock their full potential before adding other ingredients.
  • Overcrowding the pot: Too many ingredients at once can prevent even cooking. Cook in batches when necessary to maintain a balanced texture and flavor.
  • Ignoring simmering times: Boiling soup too aggressively can result in tough meats and overcooked vegetables. Gently simmer to achieve melting tenderness.
  • Not allowing flavors to meld: Leaving the soup to rest enhances the flavor significantly. Always allow it to simmer for a sufficient time for the ingredients to fully integrate.
  • Improper storage: If not stored correctly, leftovers can spoil quickly. Utilize airtight containers and refrigerate or freeze promptly to maintain freshness.
  • Forgetting to garnish: A simple garnish can elevate your dish’s presentation and taste. Consider topping with fresh herbs, a drizzle of olive oil, or a sprinkle of cheese for added appeal.

Essential Techniques

Sautéing: Sautéing is vital for infusing flavors into your soup. Start by adding aromatics and vegetables to hot oil, stirring continuously until they soften and fragrant. This technique ensures a flavorful base for your dish, helping to build depth.

Simmering: Simmering allows flavors to meld, making it crucial for a successful soup. Cook your soup on low heat to reach a gentle bubbling, which extracts flavors from the ingredients while preserving tenderness.

Taste Testing: Regularly taste your soup during the cooking process to ensure seasoning is on point. It’s essential to adjust flavors during cooking rather than waiting for the final product to understand what’s needed.

Garnishing: Lovely presentation enhances the dining experience. Sprinkle chopped herbs or drizzle good quality olive oil on top before serving; this adds flavor and visual interest to the soup.

Pro Tips for Perfect Italian Penicillin Soup

Start with quality ingredients: Using fresh, organic, and high-quality ingredients significantly improves the flavor profile of your Italian Penicillin Soup. Choose seasonal vegetables for the best taste and health benefits.

Make it a day in advance: Allowing the soup to rest overnight amplifies the flavors. Store it in an airtight container and reheat it gently the next day for a comforting meal.

Experiment with spices: Don’t be afraid to add your favorite spices or experiment with different herbs like oregano or basil to customize your soup’s flavor.

Cook the noodles separately: If adding pasta, consider cooking them separately and adding them to each bowl upon serving. This prevents them from becoming mushy and allows for a better texture.

Use a Dutch oven: A heavy-bottomed pot like a Dutch oven ensures even heating and minimizes the risk of burning the soup, resulting in a perfect cook every time.

Strain before serving: For a cleaner soup, use a strainer to remove excess solids before serving, giving you a smoother texture without losing flavor.

Garnish for flair: Elevate the dish with creative garnishes like a drizzle of pesto, a sprinkle of parmesan, or fresh parsley to enhance both flavors and appearance.

Add a splash of lemon: A touch of lemon juice right before serving adds brightness to the soup, enhancing the overall flavor and balance.

Variations and Adaptations

Regional variations: Italian Penicillin Soup can be adapted to reflect local flavors, such as using regional cheeses or herbs unique to specific areas of Italy. For example, incorporating a bit of Pecorino Romano can add a delightful twist.

Seasonal adaptations: In summer, consider incorporating fresh zucchini or peas for a lighter version, while in winter months, root vegetables like parsnips or squash can add depth and heartiness.

Dietary modifications: To cater to gluten-free diets, opt for gluten-free pasta or eliminate it altogether. A vegetarian version can easily be made by substituting chicken with lentils or chickpeas and using vegetable broth.

Flavor variations: Enhance the soup with different flavor profiles by incorporating spices like cumin or smoked paprika for an exotic twist, or even adding a splash of white wine for depth.

Texture modifications: For a creamier version, blend a portion of the soup after cooking to create a thick, velvety consistency while leaving some ingredients intact for texture.

Presentation alternatives: Consider serving the soup in rustic bread bowls for an inviting presentation or with sides of crusty garlic bread for an authentic Italian experience.

Serving and Presentation Guide

Plating techniques: Choose wide, shallow bowls for serving to enhance the presentation of your Italian Penicillin Soup. A sprinkle of fresh herbs in the center provides a vibrant pop of color.

Garnishing ideas: Top your soup with freshly grated parmesan cheese, croutons, or a drizzle of olive oil to elevate flavors and make it visually appealing.

Traditional accompaniments: Pair with a slice of crusty Italian bread or grilled cheese sandwiches for a nostalgic, comforting duo that complements the soup beautifully.

Modern serving suggestions: Serve in mason jars for a casual, trendy presentation for gatherings. This approach adds charm and ease to entertaining guests.

Temperature considerations: Ensure the soup is piping hot when served to release its rich aromas and flavors, enhancing the overall dining experience.

Portion control tips: Use ladles for even serving sizes while plating to maintain a consistent look across bowls, ensuring everyone enjoys a similar experience.

Wine and Beverage Pairing

Wine pairings: A crisp white wine like Pinot Grigio complements the light flavors of the Italian Penicillin Soup beautifully. For a red option, a Chianti brings out the robust flavors while remaining refreshing.

Non-alcoholic alternatives: Pair your soup with a sparkling water or herbal tea such as chamomile for a refreshing contrast that enhances the meal’s comforting qualities.

Coffee/tea pairings: A light chamomile or mint tea can cleanse the palate beautifully after a hearty bowl of soup, balancing flavors and aiding digestion.

Temperature considerations: Serve wine chilled to enhance its refreshing qualities, ensuring it complements the warmth of the soup without being overwhelming.

Serving suggestions: Serve wine in elegant glasses to elevate your dining experience. Consider a small cheese platter on the side for an added touch of sophistication and flavor variety.

Storage and Shelf Life

Storage methods: Allow the leftover Italian Penicillin Soup to cool completely before transferring it to airtight containers. This prevents condensation and maintains its freshness.

Temperature requirements: Store the soup in the refrigerator if consuming within three days. For prolonged preservation, opt for freezing to maintain quality for up to three months.

Container recommendations: Glass containers are excellent for storage, allowing you to monitor contents easily. Ensure they’re labeled with dates for easy tracking.

Signs of spoilage: Look for signs like off smells, discoloration, or undesirable texture changes as indicators of spoilage, and discard if any of these arise.

Reheating instructions: Reheat the soup gently on the stove over low heat to preserve flavor and texture. Avoid using a microwave, which can create uneven heating.

Freezing guidelines: If freezing, consider portioning the soup into individual servings for convenient reheating. Ensure containers are airtight to prevent freezer burn.

Make Ahead Strategies

Prep timeline: Chopping vegetables and measuring out ingredients can be done a day in advance. Store prepped elements in airtight containers to save time before cooking.

Storage between steps: If you wish to prepare the broth a day ahead of time, allow it to cool and store in the refrigerator. Combine with fresh ingredients on the day of serving for optimal flavors.

Quality impact assessment: Although making ahead is convenient, ensure you account for taste and texture. Cooking fresh vegetables enhances their nutrients and keeps the soup vibrant.

Assembly tips: Assemble all ingredients before cooking to streamline the process. This saves time and helps maintain focus during preparation.

Reheating guidelines: When reheating made-ahead soup, gently warm on the stove while stirring to evenly distribute the heat. Adjust flavor as necessary upon reheating.

Fresh element additions: Consider sautéing fresh herbs or vegetables just before serving for an added burst of flavor and to enhance presentation.

Scaling Instructions

Halving the recipe: If you need a smaller batch, simply halve the ingredients. This maintains the soup’s integrity and ensures every dish is flavorful.

Doubling or tripling: Increase ingredient quantities cautiously when scaling the recipe. Monitor cooking times closely, as larger quantities may require extra simmering for flavors to develop.

Equipment adjustments: If you’re preparing a larger batch, consider using a bigger pot or batch-cooking in stages to prevent overcrowding and maintain flavor distribution.

Timing modifications: Keep an eye on cooking times when adjusting quantities. Larger volumes take longer to reach optimal temperatures, often requiring additional simmering.

Storage considerations: When scaling recipes, calculate storage needs accordingly. Use multiple containers to avoid overcrowding and ensure even cooling of leftovers.

Nutritional Deep Dive

Macro breakdown: This Italian Penicillin Soup is a balanced meal with protein from chicken, complex carbohydrates from vegetables, and healthy fats if olive oil is used in preparation.

Micronutrient analysis: Key nutrients in this soup include Vitamin A from carrots, Vitamin C from various vegetables, and potassium from the broth, contributing to overall health and wellness.

Health benefits: Beyond its comforting taste, this soup supports hydration, provides immune-boosting nutrients, and helps in recovery due to its vitamin-enriched ingredients.

Dietary considerations: It is suitable for various diets, including balanced eating plans, due to its mix of lean proteins and vibrant vegetables, making it ideal for different health goals.

Portion analysis: Serving sizes can be tailored according to individual dietary requirements. Monitoring portion sizes ensures a health-conscious approach to enjoying rich flavors without overindulgence.

Weight management tips: This soup is a perfect inclusion for weight management plans. It’s filling due to high fiber content, making it a hearty meal without excessive calories.

Dietary Adaptations

Gluten-free: To adapt this recipe for gluten-free diets, use gluten-free pasta or omit pasta altogether, substituting it with more vegetables instead.

Dairy-free: Ensure the soup remains creamy by using plant-based milk options or nutritional yeast for an added cheesy flavor without dairy.

Vegan: Create a wholesome vegan option by replacing chicken with chickpeas or lentils and ensuring the broth is vegetable-based.

Low-carb: For a low-carb twist, eliminate the pasta and additionally swap starchy vegetables for non-starchy options such as leafy greens or broccoli.

Keto: Maintain a keto-friendly approach by keeping the ingredients low in carbohydrates and rich in healthy fats; consider adding avocado or olive oil for extra nutrition.

Paleo: Adhere to a paleo diet by utilizing natural and whole ingredients, avoiding grains, and focusing on fresh vegetables and lean meats.

Low-FODMAP: Ensure the soup caters to low-FODMAP diets by replacing garlic and onions with chives and ensuring no triggers are included.

Other specific diets: This soup can be easily tailored to suit many dietary needs by focusing on specific ingredient adjustments or substitutions based on individual preferences.

Troubleshooting Guide

Texture issues: If the soup comes out too thin, consider thickening it with cornstarch or arrowroot mixed with water. If it’s too thick, add more broth to balance the consistency.

Flavor balance: Struggling with a lack of flavor? Adding salt incrementally or a squeeze of citrus at the end enhances and brightens flavors that may seem flat.

Temperature problems: If the soup is too hot, let it cool down naturally before serving. Alternatively, if it’s too cold, reheating it gently over low heat will restore warmth without compromising texture.

Equipment challenges: Limited kitchen tools? Cooking in batches with limited utensils can effectively get the job done without sacrificing quality.

Ingredient substitutions: If you’re missing an ingredient, like chicken, consider using seasonal vegetables or legumes for a wholesome alternative, retaining the essence of the soup.

Timing concerns: Don’t rush the simmering time; allow the soup to rest and meld flavors properly to ensure every bowl is a rich representation of your effort.

Recipe Success Stories

Community feedback: Many readers have shared their joy in recreating this Italian Penicillin Soup, highlighting its comforting qualities and how it brings families together.

Variation successes: From adding spicy Italian sausage to experimenting with fresh veggies, readers report their own unique twists that amplify the flavor.

Adaptation stories: One cooking enthusiast shared how their grandmother taught them to prepare this soup, passing down family traditions, making it an emotional favorite.

Reader suggestions: Several readers recommend ingredient variations that cater to dietary requirements, demonstrating the versatility and love for this dish.

Photography tips: Community members have shared stunning photos of their soup creations online, inspiring others to explore this recipe and showcase their own presentation ideas.

Frequently Asked Questions

Can I make this soup vegetarian?

Absolutely! Simply replace the chicken with legumes like chickpeas or lentils and use vegetable broth instead of chicken broth. This maintains the heartiness while catering to a vegetarian diet.

How can I store leftovers?

Leftover soup can be stored in an airtight container in the refrigerator for up to three days. For longer storage, it can be frozen for up to three months. Ensure it cools completely before freezing.

Can I use frozen vegetables?

Yes, frozen vegetables can be a great time-saver. Just be sure to cook them properly in the broth to retain flavors and textures when using them in your Italian Penicillin Soup.

Is this soup gluten-free?

To ensure that your Italian Penicillin Soup is gluten-free, use gluten-free pasta if desired and check that your broth does not contain any gluten-based ingredients.

What herbs work best?

Thyme, rosemary, and parsley are traditional choices, but feel free to experiment with basil or oregano, depending on your flavor preferences and what you have on hand.

How can I make this soup spicy?

To add heat, you can incorporate red pepper flakes, diced jalapeños, or spicy sausage for a kick. Adjust according to your preference for spice levels.

Can I make it in advance?

Yes, the Italian Penicillin Soup actually benefits from sitting. Flavor develops over time, making it a great candidate to be made a day in advance.

What’s the best way to reheat the soup?

The best way to reheat Italian Penicillin Soup is gently on the stovetop over low heat. This preserves the integrity of the ingredients and ensures even heating throughout.

Can I add pasta to the soup?

Yes! If you enjoy pasta, consider adding it directly before serving for the best texture. You may also cook it separately and add individual portions when serving.

What should I serve with the soup?

This soup pairs wonderfully with garlic bread, a fresh salad, or a side of crusty Italian bread for dipping, enhancing the overall dining experience.

Additional Resources

If you’re looking to expand your culinary repertoire, explore more related recipes, including various types of soups, stews, and comfort foods. Check out technique guides for mastering skills essential in the kitchen, and don’t forget to learn about seasonal ingredients and their preparation. Utilize resource-rich ingredient information to enhance your cooking confidence and flavor outcomes.

Join the Conversation

We love hearing from you! Share your experiences and photos of your Italian Penicillin Soup creations on social media. Engage with fellow cooking enthusiasts through your own variation stories and feedback, contributing to a vibrant community of food lovers. Your reviews not only inspire others but foster a welcoming environment as we all share in the appreciation of culinary delights.

The Recipe

Italian Penicillin Soup

Serves: 4

Prep Time: 15 mins

Cook Time: 30 mins

Total Time: 45 mins

Kitchen Equipment Needed

  • Large pot or Dutch oven
  • Cutting boards
  • Sharp knives
  • Ladle

Ingredients

  • 1 lb chicken breast, diced
  • 2 carrots, chopped
  • 2 celery stalks, chopped
  • 1 onion, diced
  • 4 cups chicken broth
  • 2 cups water
  • 1 tsp thyme
  • 1 tsp rosemary
  • Salt and pepper to taste
  • Fresh parsley for garnish

Directions

  1. In a large pot, sauté the onions, carrots, and celery until they soften.
  2. Add the diced chicken and cook until it’s browned on all sides.
  3. Pour in the chicken broth and water, then bring to a simmer.
  4. Add thyme, rosemary, salt, and pepper, and let simmer for 30 minutes.
  5. Adjust seasonings as needed, then serve hot, garnishing with fresh parsley.

Recipe Notes

  • Feel free to add your favorite vegetables for a personalized twist!
  • This soup can be frozen for up to three months; just thaw and reheat when ready to enjoy.
  • For a creamier soup, consider adding a splash of cream before serving.

Best Cowboy Butter Chicken Linguine – Perfect for Dinner

Cowboy Butter Chicken Linguine: A Hearty and Flavorful Dinner Delight

⚖️
Difficulty
Medium

⏲️
Prep Time
15 mins

🕒
Cook Time
20 mins

⏱️
Total Time
35 mins

🍽️
Servings
4

Cowboy Butter Chicken Linguine is a delicious and satisfying dish that brings together the flavors of succulent chicken, rich butter, and zesty spices, all enveloped in a perfectly cooked pasta. This dish not only captures the essence of classic cowboy cuisine but also brings warmth and comfort to your dinner table. Picture tender chunks of chicken, enhanced by savory garlic and herbs, creating a harmony that makes every bite utterly delightful. Whether you’re looking to spice up your weeknight meal or impress guests at a dinner party, this linguine recipe is sure to become a staple.

This Cowboy Butter Chicken Linguine is a celebration of textures and flavors. The creaminess of the butter contrasts beautifully with the al dente pasta, while the chicken adds a hearty protein component that satisfies. Aromatic ingredients like fresh herbs and garlic lend an inviting aroma to the cooking process, instantly filling your kitchen with delightful scents that beckon your family to the table.

Quick Recipe Highlights

  • Flavor Profile: This dish features a perfect balance of rich butter flavors with a kick from spices like paprika and a hint of zest from fresh lemon juice.
  • Texture: Enjoy the contrast of tender chicken and buttery sauce with the firm texture of linguine, creating a mouthwatering experience.
  • Aroma: The intoxicating smell of sautéed garlic and fresh herbs fills your kitchen, enhancing the anticipation for this delicious meal.
  • Visual Appeal: The vibrant colors of the dish, from golden-brown chicken to the lush green parsley, make it a feast for the eyes as well as the palate.
  • Skill Level Needed: Suitable for intermediate cooks, this recipe requires some basic culinary skills, making it approachable yet rewarding.
  • Special Equipment: A large skillet or frying pan works best, along with a pot for boiling the pasta, to ensure everything comes together beautifully.

Recipe Overview

  • Difficulty Level: The difficulty is set to medium because it requires attention to timing and proper technique to ensure the chicken is cooked perfectly while the pasta remains al dente.
  • Category: This Cowboy Butter Chicken Linguine can serve as an excellent main course for lunch or dinner, catering to a variety of occasions.
  • Cuisine: Rooted in Southern American cooking, this dish carries the rustic charm of cowboy-inspired meals while being infused with a contemporary twist.
  • Cost: Serving approximately four, the cost of ingredients is relatively affordable, making this a cost-effective meal option for families.
  • Season: Ideal for any season, Cowboy Butter Chicken Linguine shines in comfort during cooler months while being refreshing in warmer weather.
  • Occasion: Perfect for family dinners, casual gatherings, or even date nights, this recipe is both versatile and satisfying for various occasions.

Why You’ll Love This Recipe

This Cowboy Butter Chicken Linguine delivers on taste and texture appeal with its savory, buttery sauce that wraps around each strand of linguine. It’s a harmonious blend of rich chicken flavors and aromatic seasonings, making it a crowd-pleaser at any dinner table. Each forkful is a delightful combination of creamy, spicy, and herbal notes, inviting you to enjoy a plateful until the very last bite.

Preparation of this dish is convenient and straightforward, fitting seamlessly into your busy lifestyle. With a prep time of just 15 minutes and only 20 minutes of cooking, you can whip up this flavorsome meal after a long day. It’s an accessible recipe that doesn’t compromise on flavor or quality, ensuring you can serve a wholesome dinner without hours spent in the kitchen.

Not only is it delicious, but this recipe also boasts nutritional advantages. Packed with protein from chicken and complex carbohydrates from linguine, it provides a fulfilling balance of macronutrients. Additionally, the use of fresh herbs elevates the dish’s vitamins and minerals, making it a healthier choice.

Ideal for social gatherings, Cowboy Butter Chicken Linguine encourages conversation and sharing around the table. The appealing aroma and dynamic flavors make it a showstopper, perfect for serving to guests. It pairs beautifully with a fresh salad or garlic bread, creating a complete dining experience.

Cost-effectiveness is another great reason to love this recipe. With affordable ingredients, minimal waste, and high yields, you and your family can enjoy a gourmet meal without breaking the bank. It’s budget-friendly while still feeling indulgent, satisfying both your palate and your wallet.

Historical Background and Cultural Significance

Cowboy cuisine has deep roots in American history, particularly in the frontier days when hearty meals were necessary for sustenance. The concept of “cowboy cooking” often relies on accessible ingredients that could withstand the rigors of outdoor life. This Cowboy Butter Chicken Linguine incorporates these principles by using simple yet robust flavors to create a comforting dish that resonates with the American culinary tradition.

In many ways, this dish symbolizes the melding of cultures within the American Southwest, showcasing influences from Native American ingredients and southwestern spices. As cowboy culture evolved, so did the food associated with it, reflecting the adaptation and creativity of individuals who sought to make flavorful meals using what was available.

The evolution of recipes like Cowboy Butter Chicken Linguine highlights the adaptability of cooking techniques over generations. From open-fire grilling to stovetop cooking, the versatility of preparation methods speaks to the heart of cowboy cuisine, ultimately leading to dishes that provide nourishment in creative formats.

Regional variations can be found throughout the Southwest as cooks add unique takes to core ingredients. From using different types of pasta to incorporating locally sourced vegetables, the influences of geography play a significant role in how this dish may be interpreted across the United States.

Ingredient Deep Dive

Chicken: Chicken has a long-lasting cultural significance as a staple protein across various cuisines. Historically, it is known to provide essential nutrients like protein and B vitamins. When selecting chicken for this recipe, look for fresh, free-range options for better flavor. Store raw chicken in the refrigerator up to two days, and it can be frozen for longer storage. If chicken is unavailable, turkey can also serve as a suitable substitute.

Butter: Butter is often an unsung hero in cooking, adding richness and depth to dishes. Used throughout history, it is a source of fat that enhances flavors and improves texture. When choosing butter, opt for unsalted varieties for better control over seasoning. Store it in a cool place, and it can last for several months in the freezer. Margarine can be used as a substitute if necessary but may alter the flavor slightly.

Linguine: Originating from Italy, linguine is a thin, flat type of pasta that is perfect for holding onto sauces. It is rich in carbohydrates and serves as an excellent energy source. When buying linguine, look for high-quality brands made with durum wheat for the best texture. Store it in a cool, dry place, and it can be kept for a long time. Gluten-free pasta options are available for those with sensitivities.

Herbs and Spices: Fresh herbs like parsley and spices add vibrant flavors and aromatic notes that elevate dishes. They have been part of culinary traditions for centuries, owing to their various health benefits. When selecting herbs, look for fresh and vibrant colors; dried herbs can also be used but may require adjustments in quantity. Store fresh herbs in the refrigerator and dried herbs in a cool, dark place. You can substitute with dried herbs if fresh is unavailable but remember to reduce the quantity.

Common Mistakes to Avoid

  • Overcooking the chicken: Always monitor the internal temperature to prevent dry, tough meat. Chicken should reach 165°F for perfect juiciness.
  • Boiling pasta too long: Following package instructions is crucial to achieve al dente linguine. Overcooking leads to mushy pasta.
  • Inefficient seasoning: Under-seasoning is a common mistake; taste the sauce and adjust spices before serving to enhance flavors.
  • Using cold ingredients: Allow butter to soften before cooking; cold butter can disrupt cooking times and texture.
  • Not saving pasta water: Reserve some pasta cooking water to adjust the sauce consistency, creating a perfectly balanced dish.
  • Skipping fresh herbs: Fresh herbs enhance flavors significantly. Don’t skip them, as dried ones can’t provide the same freshness.
  • Too much heat: Cooking at too high temperatures can scorch the butter and spices. Stay at medium heat for the best results.
  • Missing garnishing: Garnishing with parsley or lemon zest adds a visual appeal and additional flavor, elevating the dish’s presentation.
  • Skipping the sauce: Allowing the sauce to simmer for a few extra minutes brings out its flavors. Don’t rush this step for better results.
  • Fretting over leftovers: This dish keeps well. Embrace delicious leftovers instead of worrying about unused portions.

Essential Techniques

Sautéing: Sautéing is important because it allows you to develop complex flavors by browning the chicken and vegetables, enhancing their taste for the dish. To master this technique, heat your pan first before adding oil, and don’t overcrowd the pan. Common pitfalls include not letting the oil heat sufficiently, which may lead to steaming instead of browning. Look for a golden-brown color as visual success cues.

Making a Sauce: Creating a sauce by deglazing the pan can elevate the dish. After cooking chicken, add a splash of liquid (like broth or lemon juice) to lift the flavorful browned bits off the bottom. This technique adds depth to your sauce. Avoid not scraping the bottom during this process, as those bits are packed with flavor. Your sauce will be complete when it is slightly thickened and glossy.

Cooking Pasta: Knowing how to cook pasta properly is essential for your dish’s overall quality. Always salt your pasta water generously, as this is your primary opportunity to flavor the pasta itself. A common mistake is not stirring at the start, which can cause the pasta to stick together. Look for pasta that has a slight bite (al dente) when tasting to know it’s ready.

Pro Tips for Perfect Cowboy Butter Chicken Linguine

1. Use fresh ingredients whenever possible—fresh herbs and spices dramatically impact flavor.
2. For added creaminess, consider mixing a tablespoon of cream into the sauce right before serving.
3. If you prefer a little heat, add a pinch of red pepper flakes to the sauce for an extra kick.
4. Experiment with proteins—substituting shrimp or a plant-based protein can yield delicious results.
5. For a lighter version, swap regular butter for olive oil and reduce the amount given.
6. Always taste your sauce before serving, adjusting seasonings for personal preference.
7. Consider garnishing with additional fresh parsley and lemon zest for color and freshness.
8. For a vegetarian twist, replace chicken with sautéed mushrooms or zucchini for similar flavors.

Variations and Adaptations

Regional variations abound, with some opting for different pasta shapes like fettuccine or pappardelle, allowing for unique textural experiences. Seasonal adaptations can be made by incorporating vegetables like asparagus or bell peppers, which add vibrant colors and nutrients. For dietary modifications, this dish can easily be made gluten-free by using a suitable pasta alternative or plant-based for those fully embracing vegan diets.

Flavor variations can also be explored; for instance, adding a dollop of pesto can introduce an aromatic twist, while using smoked paprika gives off a Southern BBQ vibe. Texture modifications can involve adding toasted nuts or crispy bacon for crunch, creating a delightful contrast with the creamy sauce. Presentation alternatives, like serving in a rustic cast-iron skillet, can heighten the dining experience, making this dish as breathtaking to look at as it is to eat.

Serving and Presentation Guide

Plating techniques can elevate your Cowboy Butter Chicken Linguine to a restaurant-quality experience. Start with a base of linguine, using a fork to twirl the strands into a neat nest on the plate. Drizzle sauce generously and top with the sautéed chicken. Garnishing with freshly chopped parsley adds a burst of color and freshness, while serving with lemon wedges can offer a zesty contrast.

Incorporate traditional accompaniments like garlic bread or a simple green salad on the side. Modern serving suggestions include presenting the dish in a stylish, shallow bowl to emphasize its sauce. Remember temperature considerations: serve this dish warm, as the butter sauce may solidify if it cools too much. For portion control, aim for approximately one cup of linguine per serving, ensuring consistency.

Wine and Beverage Pairing

For a delightful pairing, consider a bright Chardonnay that complements the buttery sauce while balancing acidity. A light, fruity Pinot Grigio is another excellent option, as its crisp flavors harmonize beautifully with the dish. Non-alcoholic alternatives could include sparkling water with a twist of lemon for a refreshing contrast. If coffee or tea fits the occasion, a light herbal tea can cleanse the palate elegantly between bites. Always serve beverages chilled for the best experience.

Storage and Shelf Life

To store your Cowboy Butter Chicken Linguine, place it in an airtight container and refrigerate for up to three days. For longer storage, consider freezing the meal, which can last for up to a month. Use freezer-safe containers to maintain quality. Signs of spoilage include an off smell or discoloration of the chicken or pasta.

When reheating, it’s best to do so on low heat in a skillet, adding a splash of broth or water to reach optimal consistency. Microwaving can dry out the dish, so take care to monitor the heating process. If freezing, allow the dish to cool completely before placing it in the freezer to prevent ice crystals from forming.

Make Ahead Strategies

Preparation can be streamlined by cooking the chicken and sauce a day in advance, storing them separately in the refrigerator, and boiling the pasta right before serving. This method preserves the integrity of the dish and ensures the pasta does not become soggy. If you plan to serve later, store the components cold and combine them just before meal time.

Ensure to assess any quality impacts from storing components, particularly with fresh herbs or creamy elements, which may lose vibrancy over time. Reheating guidelines involve gentle heating for the chicken and sauce before tossing with fresh, hot linguine for maximum flavor. Optionally, consider adding fresh herbs at the end to brighten the dish.

Scaling Instructions

To halve the recipe, carefully reduce each ingredient while maintaining the same ratios. This is an excellent way to test the dish with fewer servings. For doubling or tripling, prepare for a longer cooking time, especially for the chicken, ensuring adequate airflow in the skillet to avoid steaming.

Equipment adjustments may involve using larger pots or skillets to accommodate increased volume comfortably. Timing modifications should also be factored in, as ingredients may need to cook longer when scaled up. Lastly, consider storage considerations for larger quantities, ensuring appropriate containers are easily accessible for leftovers.

Nutritional Deep Dive

From a macronutrient standpoint, this Cowboy Butter Chicken Linguine provides a rich source of protein from chicken, essential for muscle repair and growth. Carbohydrates from linguine serve as a primary energy source, making this meal hearty and fulfilling. Additionally, fats from butter contribute to overall energy while enhancing the flavor profile.

Micronutrient analysis reveals benefits from parsley, a source of vitamins A, C, and K, and garlic, which is known for its heart-healthy properties. For those monitoring dietary considerations, proper portion analysis should be performed, as one serving offers considerable calories without compromising on essential nutrients. In terms of weight management, mindful portion control and ingredient swaps can create a balanced meal.

Dietary Adaptations

This recipe can easily be modified for those following a gluten-free diet by using gluten-free linguine. For dairy-free individuals, swap butter with coconut oil to create a similar richness without dairy. Adapting this dish for vegan diets can involve replacing chicken with tofu or chickpeas, providing plant-based protein while maintaining flavor.

Low-carb dieters can explore zucchini noodles as a pasta alternative, combining more vegetables into their meals. Meanwhile, for keto enthusiasts, one can use spiralized vegetables and adjust sauce ingredients to fit low-carb criteria. For paleo enthusiasts, maintaining simple, whole ingredients is essential, using fresh herbs and unprocessed components for a healthy outcome.

Troubleshooting Guide

If you encounter texture issues such as a grainy sauce, this often arises from overcooking the butter or not properly emulsifying the sauce. Stir vigorously and adjust with a bit of pasta water to bring it together smoothly. In terms of flavor balance, too salty a dish can be remedied by adding a splash of lemon juice or a pinch of sugar to counteract saltiness.

Temperature problems can arise if the butter separates; use a lower cooking temperature and be patient. Equipment challenges may involve a non-stick pan; investing in quality cookware will improve results. When substituting ingredients, always consider the moisture content and seasonings to avoid under or over-flavoring the dish. Lastly, watch your timing; if components are added too early or too late, it can throw off the overall balance.

Recipe Success Stories

Feedback from the community has been overwhelmingly positive, with many readers praising the dish for its comforting flavors that evoke heartwarming family memories. Variations have sparked creativity, leading to discoveries such as chili-lime seasoning for more heat or unexpected vegetable additions that delight the senses. Adaptation stories recount how easy it was to tailor the dish according to dietary preferences, making it inclusive for various gatherings.

Readers have shared photography tips, highlighting how colorful garnishes enhance the dish’s appeal in photographs. Suggestions for side dishes abound, from salads dressed in citrus vinaigrette to crispy garlic bread that rounds off the meal beautifully. Collectively, these success stories reflect a shared love for this Cowboy Butter Chicken Linguine that encourages experimentation and community sharing.

Frequently Asked Questions

1. Can I use frozen chicken for this recipe? Yes, frozen chicken can be used, but ensure it is fully thawed before cooking. This will guarantee even cooking and prevent the chicken from becoming tough.

2. What can I substitute for linguine? If linguine is unavailable, you can use spaghetti, fettuccine, or even gluten-free pasta, adapting the cooking time as necessary.

3. How do I store leftovers? Store leftovers in an airtight container in the refrigerator for up to three days. For extended storage, consider freezing in suitable containers.

4. Is this dish spicy? The heat level can be adjusted based on your spice preferences; omit spicy seasonings for a milder flavor or add red pepper flakes for more heat.

5. Can I make this recipe vegetarian? Absolutely! Substitute the chicken for tofu, mushrooms, or chickpeas for a delicious vegetarian-friendly meal.

6. What should I serve with this dish? This recipe pairs well with a fresh green salad, garlic bread, or roasted vegetables for a complete meal.

7. Is it possible to meal prep this dish? Yes! You can prepare components in advance, storing them separately and combining them before serving for a great meal prep option.

8. Can I use a different fat instead of butter? While butter adds richness, you can use olive oil or coconut oil for a different flavor profile without sacrificing creaminess.

9. How do I know when the chicken is done cooking? The chicken should reach an internal temperature of 165°F. You can also check for clear juices when cut into the thickest part of the meat.

10. Can I modify this recipe for a low-carb diet? Yes! Opt for spiralized zucchini or konjac noodles as a low-carb option while adjusting the sauce to maintain flavor.

Additional Resources

For those who loved our Cowboy Butter Chicken Linguine, consider trying recipes like Creamy Garlic Shrimp Pasta or Spicy Cajun Chicken Fettuccine. Explore technique guides that focus on sautéing or pasta cooking to improve your culinary skills. If you want to learn more about using fresh herbs effectively, check out our ingredient information section, where we discuss their benefits and storage recommendations. Equipment recommendations can help streamline your cooking process. Lastly, keep an eye on seasonal variations in recipes to bring fresh ingredients into your kitchen, enhancing both flavor and nutrients.

Join the Conversation

We invite you to share your experience with Cowboy Butter Chicken Linguine on social media! Capture stunning photos of your creations and tag us to connect with other passionate cooks. Your reviews and feedback help us improve and inspire further recipe development, so feel free to leave comments about your cooking journey. We also encourage creativity by suggesting your variations of the recipe—how did you make it your own? Together, let’s build a vibrant community that celebrates the joy of cooking!

The Recipe

Cowboy Butter Chicken Linguine

Serves: 4

Prep Time: 15 mins

Cook Time: 20 mins

Total Time: 35 mins

Kitchen Equipment Needed

  • Large skillet or frying pan
  • Pot for boiling pasta
  • Wooden spoon or spatula
  • Measuring cups and spoons
  • Knife and cutting board

Ingredients

  • 1 pound chicken breast, diced
  • 8 ounces linguine
  • 1/2 cup unsalted butter
  • 3 cloves garlic, minced
  • 1 teaspoon paprika
  • 1 lemon, juiced and zested
  • 1/4 cup fresh parsley, chopped
  • Salt and pepper to taste

Directions

  1. Cook the linguine according to package instructions until al dente. Drain and set aside.
  2. In a large skillet, melt the butter over medium heat.
  3. Add the diced chicken to the skillet; season with salt, pepper, and paprika. Cook until chicken is golden brown and cooked through, about 8-10 minutes.
  4. Add the minced garlic and sauté for another minute until fragrant.
  5. Stir in the lemon juice and zest, mixing well.
  6. Add the cooked linguine to the skillet, tossing to combine with the sauce. Adjust seasoning as needed.
  7. Remove from heat, and stir in chopped parsley. Serve warm.

Recipe Notes

  • For a spicy kick, add red pepper flakes while cooking the chicken.
  • If you’re short on time, use rotisserie chicken for a quicker preparation.
  • Feel free to substitute other proteins or vegetables based on personal preference.

Best Crispy Garlic Parmesan Crusted Potatoes Recipe

Crispy Garlic Parmesan Crusted Potatoes: A Flavorful Side Dish That Stands Out

⚖️
Difficulty
Easy

⏲️
Prep Time
15 mins

🕒
Cook Time
40 mins

⏱️
Total Time
55 mins

🍽️
Servings
4-6 servings

Crispy Garlic Parmesan Crusted Potatoes are an irresistible addition to any meal. Imagine golden-brown chunks of tender potatoes enveloped in a delectable garlic-and-Parmesan crust that promises to delight your taste buds. The crispy exterior gives way to fluffy potato goodness, creating a dynamic contrast that makes every bite remarkably satisfying. This recipe encapsulates comfort food at its finest, ideal for complementing grilled meats or enjoyed solo with a dollop of sour cream or homemade dipping sauce.

These potatoes offer not just taste but a delightful texture; the combination of crispy garlic and rich Parmesan creates a savory crunch that is hard to resist. Paired with the natural sweetness of roasted potatoes, each piece is loaded with flavor. Whether you are hosting a gathering or simply looking to elevate your weeknight dinner, these crispy garlic Parmesan potatoes will surely impress your family and friends.

Quick Recipe Highlights

  • Flavor Profile: Savory and cheesy with a rich garlic essence that boosts the potato’s natural flavors.
  • Texture: Crunchy on the outside, soft and fluffy on the inside for a delightful mouthfeel.
  • Aroma: The inviting scent of roasted garlic and melting cheese will fill your kitchen.
  • Visual Appeal: Crispy, golden-brown crust encasing soft, tender potato, creating an appetizing sight.
  • Skill Level Needed: This recipe is beginner-friendly, requiring basic cooking skills.
  • Special Equipment: A baking sheet, mixing bowl, and a sharp knife are all that is needed.

Recipe Overview

  • Difficulty Level: Easy, making it perfect for novice cooks and busy home chefs alike.
  • Category: This dish serves as an excellent side for lunch, dinner, or even as a snack or appetizer.
  • Cuisine: Reflects a fusion of American comfort food with a hint of Italian influence thanks to its use of Parmesan cheese.
  • Cost: Inexpensive to prepare, with common and readily available ingredients that won’t break the bank.
  • Season: Ideal for year-round, but especially comforting during the cooler months.
  • Occasion: Perfect for family gatherings, barbecues, or holiday feasts.

Why You’ll Love This Recipe

Crispy Garlic Parmesan Crusted Potatoes are much more than just a side dish; they provide a rich taste and enjoyable textures that will leave everyone wanting more. The combination of crispy garlic and Parmesan creates a comforting flavor that pairs seamlessly with a variety of main dishes, while the golden crust makes them a star on any plate.

One of the recipe’s primary advantages is its straightforward preparation. The use of simple ingredients means you can whip this dish up quickly without extensive cooking experience. Plus, these potatoes come together in just under an hour, making them a convenient option for busy weeknights or last-minute gatherings.

In addition to being delicious, this dish offers numerous nutritional advantages. Potatoes are a good source of vitamins and minerals, including potassium and vitamin C. When prepared in this manner—with a light coating of garlic and cheese—they can be an enjoyable part of a balanced diet while still satisfying your cravings.

Socially, these crispy potatoes shine in group settings. They’re easily shareable, favored by both adults and children alike, creating an atmosphere of culinary camaraderie. Serving them at your next gathering will undoubtedly prompt conversations about flavors and favorite dishes.

Cost-effectiveness is yet another reason to love this recipe. With affordable ingredients that can be found in most kitchens, you’re able to delight your guests without a hefty grocery bill. This means it’s not only a win for your taste buds but for your wallet too.

Historical Background and Cultural Significance

The origin of crispy garlic Parmesan crusted potatoes can be traced back to traditional European cooking methods that celebrated simple, hearty ingredients. Potatoes, once considered a peasant food, have risen to prominence in kitchens around the world. The introduction of garlic and Parmesan showcases the influence of Italian cuisine melding with comfort food styles.

In many cultures, potatoes are a staple; they symbolize nourishment and agricultural bounty. In communities where potatoes are cultivated, they hold both culinary and cultural significance, often being celebrated in local festivals and gatherings. These crispy potatoes take on this heritage, transforming simple ingredients into a celebratory dish.

Over the years, variations of this recipe have evolved. From adding spices like paprika to experimenting with different cheese blends, creative cooks have adapted this dish to fit their unique tastes and cultural backgrounds, showcasing how versatile potatoes can be in the culinary world.

Regional variations also play a role. In different parts of the world, similar crusted potato dishes exist, each with local twists. For instance, in some Mediterranean regions, herbs like oregano or dill might be incorporated for added flavor, while in Latin American countries, spices like cumin or chili powder could make a guest appearance.

Ingredient Deep Dive

Potatoes: Potatoes are not only versatile but have a rich history, originating from the Andean region of South America before they were introduced to Europe by Spanish explorers. They are packed with dietary fiber, vitamin C, and potassium. When selecting potatoes for this recipe, look for firm, smooth-skinned varieties, avoiding those with green spots or blemishes. Store them in a cool, dark place to prolong freshness, and consider using Yukon Gold or red potatoes for their creaminess and flavor.

Parmesan Cheese: Parmesan cheese brings a nutty and salty flavor profile that perfectly complements the potatoes. Originating from Italy, parmesan is made from cow’s milk, and its hard texture makes it ideal for grating. Rich in calcium and protein, it enhances the dish’s taste while adding nutritional benefits. When buying parmesan, opt for block cheese to grate fresh instead of pre-shredded versions, which often contain additives. For storage, keep it wrapped in parchment paper in the fridge, ensuring its flavor remains intact. If substitutions are needed, consider Pecorino Romano for a similar taste with a sharper flavor.

Garlic: Garlic, known for its pungent aroma and health benefits, has been used in various culinary traditions for centuries. It offers anti-inflammatory properties and can enhance immunity. Selecting fresh garlic bulbs, characterized by firm, papery skin is essential for optimal flavor. Store garlic in a cool, dark place, and for a milder flavor, you may choose to roast the cloves before adding them to the potatoes. For substitutions, garlic powder can work in a pinch, but fresh garlic will deliver superior flavor.

Common Mistakes to Avoid

  • Overcrowding the Baking Sheet: Placing too many potatoes on the sheet at once prevents them from crisping up, resulting in soggy texture. Give them space for air circulation.
  • Not Preheating the Oven: Skipping this step can lead to uneven cooking and insufficient crispiness; always preheat for the best results.
  • Using Wet Potatoes: Wash and dry the potatoes thoroughly before coating; excess moisture can affect crispness.
  • Insufficient Seasoning: Don’t skimp on the seasoning. Garlic and salt are crucial for flavor; adjust to your taste.
  • Using Inappropriate Cheese: Always use good quality Parmesan cheese; pre-grated varieties lack flavor and may not melt effectively.
  • Not Allowing to Cool: Letting the potatoes rest on the baking sheet after cooking can maintain their crunchiness; serve immediately for the best texture.
  • Cutting Evenly: Ensure that potato pieces are uniform in size for consistent cooking. Varied sizes can lead to some being overdone while others remain undercooked.
  • Neglecting to Toss: Toss the potatoes halfway through cooking for even browning and crispy edges; don’t forget to flip.
  • Skipping the Oil: Using too little oil will affect the richness and crispiness of the crust; don’t be afraid to coat the potatoes generously.
  • Chilling the Potatoes: It may be tempting to make them ahead of time, but chilling them can result in sogginess when reheated. Serve fresh for maximum flavor.

Essential Techniques

Coating the Potatoes: Properly coating your potatoes with garlic and Parmesan is crucial for achieving that golden crust. The key is to toss the potatoes in oil before adding the garlic and cheese mixture, ensuring they are evenly covered. Avoid clumping; a uniform coating will lead to a better texture.

Roasting: Roasting potatoes at the right temperature allows them to caramelize, enhancing their natural sweetness while creating that much-desired crispy texture. Utilize high heat, around 425°F, to ensure quick cooking while promoting browning. Check for doneness periodically and use a fork or knife to test tenderness.

Pro Tips for Perfect Crispy Garlic Parmesan Crusted Potatoes

1. **Use Fresh Ingredients**: Always use fresh garlic, good quality Parmesan, and firm potatoes to enhance flavor and texture profoundly.
2. **Don’t Skip the Oil**: Properly coat the potatoes with olive oil before mixing in garlic and cheese—not only for flavor but also to help them crisp.
3. **Add Herbs**: Experiment by adding dried herbs like oregano, thyme, or rosemary to the breadcrumbs for additional flavor.
4. **Pre-bake for Extra Crispiness**: For an ultra-crisp texture, consider par-cooking the potatoes in boiling water for a few minutes before seasoning and roasting.
5. **Monitor Cooking Time**: Cooking times may vary based on oven performance; keep an eye out and adjust accordingly.
6. **Apply a Second Layer of Cheese**: For added richness, sprinkle extra Parmesan during the last few minutes of baking.
7. **Let Them Rest**: Allow the potatoes to rest for a few minutes after baking; this will help maintain their crispy texture once served.
8. **Serve with Dipping Sauce**: Pair with a garlic aioli or ranch dressing for added flavor and excitement.

Variations and Adaptations

Crispy Garlic Parmesan Crusted Potatoes can easily be modified to reflect seasonal ingredients or dietary guidelines. For a regional twist, consider incorporating local herbs and spices: for instance, a Southwest variation could include cayenne pepper and fresh cilantro to add vibrant heat and freshness.

Seasonally, highlight flavors such as rosemary in the winter months or fresh basil during the summer. Additionally, for those observing dietary restrictions, gluten-free breadcrumbs can replace traditional breadcrumbs while still ensuring a delightful, crispy crust.

For flavor variations, swap Parmesan with a blend of cheeses; cheddar or mozzarella can create creamy indulgence. Texture modifications include using sweet potatoes for a healthier option, enhancing both flavor and nutritional value.

When it comes to presentation, consider layering these potatoes in a colorful serving dish topped with fresh herbs or a squeeze of lemon for a pop of color and brightness.

Serving and Presentation Guide

When serving Crispy Garlic Parmesan Crusted Potatoes, presentation is key. Choose a rustic-style platter to highlight the comforting nature of the dish. Arrange the potatoes in a circular pattern, with the crunchy tops facing up for an appealing view.

Adding fresh herbs like chopped parsley or thyme as a garnish not only enhances color but also provides a refreshing hint. For added flair, accompany the potatoes with lemon wedges to brighten the dish.

Serve warm to ensure the crust remains crispy. For portion control, consider serving in small bowls, allowing guests to take as much as they’d like without overwhelming their plates. This encourages sharing and enhances the communal dining experience.

Lastly, pairing this dish with a sauce like garlic aioli or a homemade dip offers a modern touch and elevates the presentation, creating a more immersive culinary experience.

Wine and Beverage Pairing

To complement the rich flavors of Crispy Garlic Parmesan Crusted Potatoes, consider pairing them with a crisp white wine such as Sauvignon Blanc or a light-bodied red like Pinot Noir, which won’t overpower the dish. A light beer like a pilsner can also harmonize beautifully with the crispy texture.

For non-alcoholic options, consider serving sparkling water with a hint of citrus or iced herbal tea, which will maintain the refreshing palate while enhancing enjoyment.

If coffee or tea is preferred, a mild herbal tea or a cold brew enhances the creamy and savory elements of the potatoes, making it an enjoyable post-meal beverage.

Storage and Shelf Life

To store your Crispy Garlic Parmesan Crusted Potatoes, allow them to cool entirely, then transfer them to an airtight container. They can be stored in the refrigerator for up to 3 days, though once refrigerated, the crispiness of the crust will diminish.

For reheating, place the potatoes in a preheated oven at 400°F for about 10-15 minutes or until heated through. If you’re looking to store for a longer period, consider freezing the uncooked coated potatoes. This allows you to enjoy a fresh version later by baking them from frozen at the same temperature—just extend the cooking time.

Be vigilant for signs of spoilage, such as an off smell or discoloration. It’s always best to eat them fresh when possible for optimal texture and flavor.

Make Ahead Strategies

Preparing Crispy Garlic Parmesan Crusted Potatoes can be streamlined by prepping them ahead of time. You can wash and cut the potatoes and store them submerged in water in the fridge for up to 24 hours. Before cooking, ensure that they are thoroughly dried to avoid excess moisture.

The coating can also be prepared a day in advance. Simply mix the garlic and cheese with breadcrumbs, store them in an airtight container, and combine when you’re ready to bake.

When ready to bake, toss the potatoes in the pre-prepared mixture, and you’ll have a delicious, oven-ready dish with minimal fuss. Keep in mind, freshly baked potatoes will yield the best flavor and texture.

Scaling Instructions

Scaling this recipe is quite straightforward. If you need to double the quantity, ensure you have a large enough baking sheet to accommodate the added potatoes without overcrowding.

For halving the recipe, simply calculate the amount of potatoes and ingredients needed, which may require adjusting cooking times slightly. Always taste and adjust seasonings to maintain balance, especially if scaling up or down.

If preparing for a crowd, consider using two baking sheets and rotating them halfway through to ensure even cooking. Keeping an eye on baked goods closely can avoid any burning from overcrowpaging the cooking space.

Nutritional Deep Dive

Crispy Garlic Parmesan Crusted Potatoes offer a wonderful balance of macronutrients, primarily carbohydrates from the potatoes while also delivering fiber for digestion. The addition of Parmesan cheese contributes protein and calcium, making it a well-rounded side option.

When analyzing micronutrients, potatoes provide useful amounts of vitamins C and B6, as well as potassium, crucial for heart health and muscle function. Individual dietary needs can be met by adjusting portion sizes or pairing with nutrient-rich proteins or vegetables.

For those focusing on weight management, these potatoes can make an excellent side without excessive calories. By controlling portion sizes and serving with lean proteins, you can maintain a nutritional approach while still enjoying comfort food.

Dietary Adaptations

For those with dietary restrictions, there’s a variety of adaptations that can be made to this Crispy Garlic Parmesan Crusted Potatoes recipe. If you’re gluten-free, swap out regular breadcrumbs for certified gluten-free versions, ensuring every guest can indulge.

Dairy-free eaters can replace the Parmesan with nutritional yeast, which imparts a cheesy flavor without dairy, or use vegan cheese alternatives melted overtop for a similarly indulgent version.

For vegan variations, simply eliminate any dairy-based ingredients and consider adding more spices or lemon zest for flavor enhancement. Low-carb followers can substitute potatoes with cauliflower for a similar texture while keeping carbohydrates to a minimum.

Keto dieters may eliminate the breadcrumbs, opting for a sprinkle of crushed pork rinds to incorporate that crunch without the extra carbs. The flexibility of this dish allows everyone to find their perfect version.

Troubleshooting Guide

For texture issues, if your potatoes are not crisping up, ensure your oven is adequately pre-heated and not overcrowded on the baking sheet, as this can trap steam causing sogginess.

Flavor balance can sometimes be off; if your dish lacks the savory depth, consider enhancing with more garlic or salt after tasting during the cooking process.

Temperature problems can arise during cooking; if your potatoes are browning too quickly, lower the oven temperature or tent with foil to slow down the cooking. Conversely, if they aren’t browning, increase the heat slightly for better caramelization.

Facing equipment challenges? If you don’t have a baking sheet, you can use a cast-iron skillet to achieve similar results, ensuring the potatoes are still spread out evenly.

For ingredient substitutions, if you’re out of Parmesan, notable variations such as Asiago or Grana Padano make excellent alternatives given their sharp flavor profiles.

Recipe Success Stories

Community feedback for Crispy Garlic Parmesan Crusted Potatoes has been overwhelmingly positive, marked by numerous online success stories from home cooks who’ve adapted the recipe to suit their preferences. Some share how adding their herbs and spices led to exciting, fresh flavors and satisfied family members.

Variations have also shone through the creativity of readers; those who’ve replaced potatoes with sweet potatoes for a healthier twist have enjoyed equally delightful results, prompting others to explore substitutions.

Readers have suggested pairing these potatoes with various proteins, emphasizing that they complement grilled meats beautifully and add an impressive side dish to barbecues. Tips on photography from home cooks have elevated visual storytelling, encouraging other food lovers to capture their culinary creations and share them online.

Encouraging feedback from families has highlighted the importance of involving children in the cooking process—sharing smiles and laughter while preparing a dish everyone can enjoy together.

Frequently Asked Questions

Can I use another type of cheese?

Yes! While Parmesan adds a distinct flavor, you can experiment with other cheeses like Pecorino Romano, cheddar, or a blend. Just keep in mind that flavors will change accordingly.

How can I make these potatoes spicier?

For those who enjoy a kick, feel free to add red pepper flakes to the breadcrumbs or even sprinkle some spicy seasoning blends before baking.

Are these potatoes healthy?

In moderation, they can fit into a healthy diet, particularly if served alongside lean proteins and lots of veggies. Adjusting portion sizes can balance caloric intake.

Can I prepare these in advance?

Absolutely! Cut and prepare the potatoes ahead of time, storing them submerged in cold water in the refrigerator. Just dry and proceed to coat and bake when ready to cook.

What should I serve with these potatoes?

Crispy Garlic Parmesan Crusted Potatoes pair well with virtually any meat dish—grilled chicken, steak, or even a vegetarian main, making them versatile.

Can I bake them instead of frying?

This recipe is designed for the oven, providing a healthier alternative to frying while still creating that crispiness you love.

How long will leftovers last?

Leftovers can be stored in an airtight container for up to 3 days in the refrigerator. However, for best texture, they should be consumed fresh.

Can I freeze these potatoes?

Yes! You can freeze the uncooked coated potatoes. When ready to enjoy, bake from frozen, just increasing the cooking time slightly.

Do I have to peel the potatoes?

No, the skin adds extra flavor and nutrients. Just wash them thoroughly to remove any dirt before cooking.

Are these potatoes suitable for kids?

Yes! Kids often love the crispy, cheesy exterior and they are a fun side dish that even picky eaters tend to enjoy.

Additional Resources

If you enjoyed this recipe and are looking for more ways to spice up your meals, consider exploring related recipes like Garlic Roasted Brussels Sprouts or Creamy Mashed Potatoes for comforting side options.

You can also dive deeper into technique guides for other potato preparations, such as how to perfectly smash or bake potatoes for different textures.

For ingredient information, a detailed guide on various types of cheeses could enhance your understanding of which flavors pair best in recipes. Finally, consider checking out equipment recommendations to ensure you have the right tools for your culinary adventures.

Join the Conversation

We invite you to share your experience with Crispy Garlic Parmesan Crusted Potatoes on social media. Snap a picture of your beautifully presented dish and tag us to join a community of food lovers.

Recipe reviews are welcomed, and suggestions for variations and adaptations help enrich our shared culinary journey. While you’re at it, engage with us by providing tips on photography or your favorite ways to elevate potato dishes. Your contributions can inspire fellow cooks to create delicious moments in their kitchens.

The Recipe

Crispy Garlic Parmesan Crusted Potatoes

Serves: 4-6

Prep Time: 15 mins

Cook Time: 40 mins

Total Time: 55 mins

Kitchen Equipment Needed

  • Baking sheet
  • Mixing bowl
  • Sharp knife
  • Measuring cups
  • Mixing spatula

Ingredients

  • 2 pounds of baby Yukon Gold potatoes
  • 1/2 cup grated Parmesan cheese
  • 4 cloves of garlic, minced
  • 1 cup breadcrumbs
  • 1/4 cup olive oil
  • 1 teaspoon salt
  • 1/2 teaspoon black pepper
  • 1 teaspoon dried Italian herbs (optional)

Directions

  1. Preheat the oven to 425°F (220°C).
  2. Wash and cut the baby potatoes into halves or quarters, depending on size.
  3. In a mixing bowl, combine olive oil, minced garlic, salt, and black pepper.
  4. Gently toss the potatoes in the oil mixture until well coated.
  5. In another bowl, mix together Parmesan cheese, breadcrumbs, and Italian herbs if using.
  6. Transfer the coated potatoes into the breadcrumb mixture and toss until each piece is evenly coated.
  7. Spread the potatoes onto a baking sheet in a single layer.
  8. Bake in the preheated oven for 30-40 minutes, tossing halfway through, until golden brown and crispy.
  9. Remove from oven and serve warm.

Recipe Notes

  • Feel free to adjust the seasoning according to your taste preferences.
  • Leftovers can be stored in the refrigerator for up to 3 days.
  • For an extra cheesy flavor, sprinkle more Parmesan during the last few minutes of baking.

Easy Salmon Rice Bowls with Fresh Veggies

Delicious Salmon Rice Bowls: A Flavorful and Nutritious Meal

⚖️
Difficulty
Easy

⏲️
Prep Time
15 mins

🕒
Cook Time
20 mins

⏱️
Total Time
35 mins

🍽️
Servings
4

Experience the perfect blend of flavors and textures with these Salmon Rice Bowls. Perfect for a busy weeknight dinner or a relaxing weekend meal, these bowls combine tender salmon paired with perfect rice, fresh vegetables, and a gratifying sauce that ties everything together. Each bite is an explosion of flavors, making it a delightful option for food lovers seeking a nutritious yet satisfying meal. Whether you’re looking to impress guests or enjoy some self-care at home, these Salmon Rice Bowls will not disappoint.

This recipe features flaky salmon that melts in your mouth, complemented by perfectly cooked rice. Fresh vegetables like cucumber and avocado add a refreshing crunch, while the savory sauce elevates the overall taste profile. The contrasting elements of cozy warmth from the rice and the cooling effect of fresh ingredients create a well-rounded and enjoyable eating experience. Dive into this blend of textures and flavors, making this dish a go-to favorite for any occasion.

Quick Recipe Highlights

  • Flavor Profile: Savory salmon harmonizes beautifully with zesty sauce and fresh veggies, creating a delightful balance of taste.
  • Texture: The dish features flaky and tender salmon, complemented by soft rice and crunchy vegetables, enhancing every bite.
  • Aroma: The enticing aroma of the grilled salmon mingles with notes of sesame and citrus, inviting you to enjoy your meal.
  • Visual Appeal: Vibrant colors from fresh greens, glossy salmon, and white rice come together, making this dish a feast for the eyes.
  • Skill Level Needed: This easy recipe requires basic cooking skills, perfect for both beginners and seasoned home cooks.
  • Special Equipment: You’ll need a good saucepan for the rice and a grill or skillet for cooking the salmon.

Recipe Overview

  • Difficulty Level: This easy Salmon Rice Bowls recipe ensures success for even novice cooks. With straightforward steps and minimal equipment, anyone can create this dish.
  • Category: These bowls fit perfectly into the dinner category, being both a wholesome and complete meal that’s easy to prepare.
  • Cuisine: Drawing inspiration from Asian cuisine, this recipe utilizes ingredients like soy sauce and sesame, creating a fusion of flavors that’s widely appealing.
  • Cost: This delicious meal can be made for approximately $10 per serving, making it a fresh and economical choice for dinner.
  • Season: Enjoy these rice bowls year-round; fresh vegetables can be adapted according to seasonal availability for the best flavors.
  • Occasion: Ideal for family dinners, casual get-togethers, or meal prep, these bowls can be served on any occasion that calls for a tasty, healthy meal.

Why You’ll Love This Recipe

These Salmon Rice Bowls offer an irresistible taste and texture that appeals to a wide range of palates. The combination of sweet, salty, and umami flavors makes it a satisfying treat. The flaky salmon, whether grilled or pan-seared, adds a rich and buttery flavor that pairs wonderfully with the soft and tender rice. Crunchy vegetables like cucumbers and creamy avocado deliver delightful contrasts, ensuring every mouthful is a delicious journey.

Preparation is a breeze, making these Salmon Rice Bowls convenient for those with busy lifestyles. With just 15 minutes of prep time and 20 minutes of cooking time, you’ll be enjoying a restaurant-quality meal without the long wait. This recipe also lends itself well to meal prepping, allowing you to create bowls in advance for quick lunches or dinners throughout the week.

Nutritionally, these bowls are packed with omega-3 fatty acids from the salmon, supporting heart health. The addition of fresh vegetables ensures you’re also getting ample vitamins and minerals in every bowl. This meal is balanced, healthy, and perfect for anyone looking to fuel their body with wholesome ingredients.

Socially, Salmon Rice Bowls are an excellent dish for entertaining. Their vibrant presentation and enticing aromas make them a visual and culinary centerpiece at any gathering. Serving these bowls allows guests to customize their servings, making it an enjoyable and interactive dining experience. Whether hosting a casual dinner party or a festive family meal, this recipe will impress your guests.

Affordability is another aspect that makes these Salmon Rice Bowls a treasure. As a relatively inexpensive choice, the ingredients can easily be purchased at your local grocery store, bringing an upscale meal to your kitchen without breaking the bank. Enjoying restaurant-quality dishes at home allows for budget-friendly meals while still treating yourself to gourmet flavors.

Historical Background and Cultural Significance

The origins of using rice as a staple food can be traced back thousands of years in various cultures around the world, particularly in Asia. Rice has long been recognized for its versatility and ability to carry flavors. Pairing it with fish, particularly salmon, reflects a culinary tradition that emphasizes fresh, seasonal ingredients and healthful eating.

In Japanese culture, rice bowls are a prominent feature in various meals, symbolizing simplicity and nourishment. The harmonious combination of flavors and textures found in dishes like this reinforces the cultural significance of food as a means of bringing people together and promoting health.

Over the years, the recipe has evolved through various adaptations as culinary influences from different cultures have been integrated, such as Asian flavors and Western cooking styles. This flexibility has created a modern dish that honors traditional roots while appealing to contemporary tastes.

Regional variations abound, with some incorporating teriyaki sauce, others utilizing specific vegetables or garnishes unique to their culture. This adaptability demonstrates the universal appeal of rice bowls while celebrating the diversity of global cuisine.

Ingredient Deep Dive

Salmon: Rich in omega-3 fatty acids, salmon is a nutritious fish that benefits heart health and brain function. When selecting salmon, choose fresh or frozen fillets with vibrant color. Store in the refrigerator for up to two days or freeze for longer shelf life. Alternatives like trout or tofu can be used for substitutions.

Rice: This essential grain is a staple in many cuisines, providing a base for countless dishes. Opt for short-grain rice for a sticky texture, ideal for sushi-style bowls. Store uncooked rice in a cool, dry place, and cooked rice in an airtight container in the fridge for up to a week. Quinoa or cauliflower rice can serve as gluten-free alternatives.

Common Mistakes to Avoid

  • Overcooking the salmon: This can lead to dry fish. Monitor the cooking time and temperature closely for the best texture.
  • Not washing the rice: Failure to rinse rice can result in excess starch, making it gummy rather than light and fluffy.
  • Using low-quality soy sauce: Investing in good soy sauce enhances flavor significantly. Don’t settle for subpar ingredients.
  • Skipping marination: Marinating salmon briefly enhances its flavor, so don’t skip this crucial step!
  • Ignoring seasoning: Balancing flavors between the rice, vegetables, and salmon is key. Taste as you go and adjust accordingly.
  • Assembling ahead of time: If made too far in advance, the ingredients can lose their texture. Assemble right before serving.
  • Choosing the wrong vegetables: Opt for fresh, in-season vegetables for the best flavor and texture; wilting can detract from the meal.
  • Storing leftovers improperly: Make sure to store leftovers in airtight containers to prolong freshness and avoid spoilage.

Essential Techniques

Cooking Salmon: Mastering the technique of cooking salmon is essential for achieving the perfect flaky texture. It’s important to use medium heat and avoid flipping too often. Look for a golden crust and check for doneness using a fork. Properly cooked salmon should flake easily and still be slightly translucent inside.

Cooking Rice: Cooking rice to perfection is crucial for a successful bowl. Rinse the rice to remove excess starch before cooking. Use a standard ratio of water to rice, usually 2:1, and ensure it simmers gently without boiling over. The perfect rice will have absorbed the water fully and be fluffy without clumps.

Pro Tips for Perfect Salmon Rice Bowls

Use the freshest salmon you can find for unbeatable flavor and texture.

If you prefer a bit of spice, add chili flakes or sriracha to your sauce for a kick.

Garnish with sesame seeds and chopped green onions for an extra touch of flavor and color.

Experiment with different rice varieties such as jasmine or brown rice for unique flavors.

Make a larger batch of the sauce and store extra for future use.

Let the cooked salmon rest for a few minutes before serving to help retain its juices.

Utilize seasonal vegetables to make the bowls nutritious and colorful.

Serve the bowls in individual portions for a visually appealing presentation.

Variations and Adaptations

Regional variations of Salmon Rice Bowls can elevate your experience; consider a teriyaki glaze for a sweet twist or spicy mayo for an extra kick. Seasonal adaptations might see you swapping in roasted vegetables during fall or adding grilled asparagus in the summer for freshness. Dietary modifications can include using quinoa or cauliflower rice for a low-carb option. For flavor variations, try adding wasabi or pickled ginger for an authentic sushi experience. Explore texture modifications by adding crunchy nuts or seeds to contrast with the soft salmon. Presentation can be enhanced with edible flowers or vibrant seasonal herbs to delight the eyes.

Serving and Presentation Guide

When plating your Salmon Rice Bowls, use a shallow bowl to showcase each ingredient’s color and texture. Arrange the rice as a nest, with salmon and veggies artfully displayed on top. A squeeze of lime and drizzle of sauce should complete the presentation. Garnishing with sesame seeds and thinly sliced green onions not only adds flavor but elevates the visual appeal. Consider serving at room temperature for the best taste experience, and maintain appropriate portion sizes to ensure a balanced meal.

Wine and Beverage Pairing

Pair your Salmon Rice Bowls with a finely chilled Pinot Grigio or a light Sauvignon Blanc for a delightful contrast. These wines elevate the flavors of the dish without overpowering the delicate salmon. For non-alcoholic options, consider a refreshing iced green tea or sparkling water with citrus slices to cleanse the palate. Each beverage pairing complements the dish’s freshness while enhancing its overall enjoyment.

Storage and Shelf Life

Store leftover Salmon Rice Bowls in airtight containers in the refrigerator for up to three days. Properly cooled, the fish, rice, and vegetables will retain their flavors and textures, maintaining a fresh taste for later meals. Avoid reheating multiple times, as this can affect quality; instead, reheat only the portions needed. Freeze any unconsumed components separately if desired, ensuring they are sealed tightly against freezer burn.

Make Ahead Strategies

Prepare the ingredients ahead by marinating the salmon and chopping vegetables a day in advance. Cook the rice and let it cool before storing it in the fridge for easy assembly later. For optimal quality, avoid assembling the entire bowl until just before serving to keep vegetables crisp. When reheating, add fresh elements, such as avocado, just before enjoying to enhance freshness and flavor.

Scaling Instructions

To halve this Salmon Rice Bowls recipe, simply divide the ingredients accordingly while maintaining the same cooking techniques. If doubling or tripling the recipe, adjust cooking time slightly and consider using larger pans. Ensure that the salmon is cooked to the proper internal temperature, and check multiple pieces if cooking a larger batch. Mixing proportions may require additional storage containers for leftovers, so plan accordingly.

Nutritional Deep Dive

This Salmon Rice Bowls recipe offers a healthy macronutrient breakdown, with lean protein from salmon, carbohydrates from rice, and plenty of fiber from vegetables. You’ll benefit from essential omega-3 fatty acids that promote heart health, contributing to a balanced diet. The addition of fresh greens offers vital micronutrients without excessive calories, assisting with weight management when portioned properly.

Dietary Adaptations

For gluten-free options, replace soy sauce with tamari or coconut aminos. To create a dairy-free dish, avoid creamy sauces, using vinegar or citrus-based dressings instead. Vegan adaptations might include using marinated tofu or tempeh as a protein source. For a low-carb alternative, substitute rice with cauliflower rice while enriching the bowl with more vegetables. Adjust for specific dietary needs as necessary to ensure inclusivity in your culinary experience.

Troubleshooting Guide

If your salmon turns out too dry, make sure to reduce the cooking time or marinate longer to enhance moisture retention. For overly soggy rice, ensure proper water ratios are used and avoid stirring too frequently. If the flavors are unbalanced, taste and adjust sauces and seasonings as needed; salt, acid, and sweetness can be adjusted for maximal flavor. Common equipment challenges can often be resolved by checking temperature settings and ensuring even cooking surfaces.

Recipe Success Stories

Many readers have shared their positive experiences attempting this Salmon Rice Bowls recipe, often mentioning its ease and great taste. Variations including different fish or vegetables have sparked creativity in home kitchens. Community feedback highlights the adaptability of the recipe—encouraging others to experiment with their favorite ingredients or sauces while sharing delicious results through photos. The enthusiasm around this dish demonstrates its resonant appeal and encourages continuous innovation among cooks.

Frequently Asked Questions

Can I use frozen salmon for this recipe? Yes, frozen salmon can work well; just thaw it beforehand for even cooking.

What kind of rice is best for salmon rice bowls? Sushi rice or jasmine rice works best to create that ideal texture.

Can I make this recipe in advance? Absolutely! Prep ingredients a day in advance, but put the bowls together right before serving.

What is a good substitute for soy sauce? Tamari or coconut aminos are great gluten-free alternatives to soy sauce.

How do I know when salmon is cooked? A perfectly cooked salmon will flake easily with a fork and have an internal temperature of 145°F.

Can I skip the marination step? While you can, marinating adds flavor and makes the salmon more succulent.

Is this recipe child-friendly? Yes! You can customize flavors and spice levels to cater to children’s taste.

What can I do with leftover rice? Leftover rice can be reused in fried rice or salads, reducing food waste.

How should I store leftovers? Store in airtight containers in the refrigerator for up to three days.

Can I use different vegetables? Absolutely! Feel free to incorporate your favorite seasonal vegetables.

What if I don’t have a grill? You can pan-sear salmon on the stove as an alternative.

Can I make it spicy? Yes! Consider adding sriracha or chili paste to the sauce for heat.

Additional Resources

For more delicious dinner ideas, explore our collection of wholesome recipes that include quick meals, hearty dishes, and seasonal favorites. Techniques such as sushi rolling or knife skills are also available, addressing the fundamentals of culinary practices. Learn more about essential kitchen equipment, best ingredient choices, and tips for maximizing seasonal produce in your cooking.

Join the Conversation

Share your thoughts and experiences on salmon rice bowls through social media platforms. Join our community forum to exchange ideas, showcase your beautiful dishes, or seek advice on making this dish uniquely yours. User-generated photos not only inspire creativity but help enhance community engagement while celebrating culinary diversity!

The Recipe

Salmon Rice Bowls

Serves: 4

Prep Time: 15 mins

Cook Time: 20 mins

Total Time: 35 mins

Kitchen Equipment Needed

  • Non-stick pan or grill
  • Pot for cooking rice
  • Measuring cups and spoons
  • Knife and cutting board
  • Tongs or spatula

Ingredients

  • 4 salmon fillets
  • 2 cups rice (any variety)
  • 1 cucumber, thinly sliced
  • 1 avocado, sliced
  • 1/4 cup soy sauce
  • 2 tablespoons sesame oil
  • 1 tablespoon honey
  • 1 teaspoon grated ginger
  • Green onions and sesame seeds for garnish

Directions

  1. Start by rinsing the rice under cold water until the water runs clear, then cook according to package instructions.
  2. While the rice cooks, mix soy sauce, sesame oil, honey, and grated ginger in a bowl to create the marinade.
  3. Marinate the salmon fillets for about 10 minutes in the mixture.
  4. Heat a pan or grill over medium heat and cook the marinated salmon for 5-7 minutes on each side until cooked through.
  5. Remove the salmon and let it rest for a few minutes. Flake if desired.
  6. To assemble the bowls, spoon the cooked rice into bowls, top with the salmon, cucumber, and avocado.
  7. Drizzle additional sauce over the top and garnish with sesame seeds and green onions before serving.

Recipe Notes

  • For added spice, mix sriracha into the sauce.
  • Substitute brown rice for a healthier alternative.
  • Fresh herbs like cilantro can enhance flavor.
  • Add other vegetables like bell peppers or radishes for variety.

Easy Salmon Rice Bowls with Fresh Veggies

Delicious Salmon Rice Bowls: A Healthy and Flavorful Meal

⚖️
Difficulty
Easy

⏲️
Prep Time
15 mins

🕒
Cook Time
20 mins

⏱️
Total Time
35 mins

🍽️
Servings
4

Salmon rice bowls are a delightful and nutritious meal that combine the flaky, rich flavor of salmon with hearty rice and fresh vegetables. This dish is perfect for busy weeknights as it can be prepared in under 30 minutes, making it an ideal choice for anyone looking for a quick and healthy dinner option. The vibrant colors and textures of this meal are visually appealing, while the incredible flavor profile will leave your taste buds dancing.

Not only are salmon rice bowls delicious, but they are also packed with nutrients, offering a healthy dose of protein, omega-3 fatty acids, and essential vitamins. Customizable to your liking, they can be topped with various garnishes, sauces, and veggies to suit your personal taste. Whether you prefer a teriyaki glaze or a zesty lime dressing, this recipe allows for creativity and personalization.

Quick Recipe Highlights

  • Flavor Profile: The combination of rich salmon, savory rice, and crunchy vegetables creates a delightful medley of flavors that will make every bite unforgettable.
  • Texture: The flaky salmon contrasts beautifully with the fluffy rice and crisp veggies, providing a satisfying mouthfeel that keeps you coming back for more.
  • Aroma: The irresistible aroma of cooked salmon mingled with fresh herbs and spices fills your kitchen, enhancing your appetite before you even take a bite.
  • Visual Appeal: The vibrant colors from the salmon, rice, and fresh toppings create an eye-catching presentation, making this dish perfect for entertaining or a simple family dinner.
  • Skill Level Needed: This recipe is easy to follow, making it suitable for beginner cooks and experienced chefs alike, so anyone can enjoy a gourmet meal at home.
  • Special Equipment: You will need basic kitchen tools such as a frying pan, a rice cooker or pot, and a cutting board for chopping vegetables.

Recipe Overview

  • Difficulty Level: This dish offers an easy level of difficulty, allowing even novice cooks to confidently prepare a meal that tastes like it came from a restaurant.
  • Category: Salmon rice bowls fall into the dinner category, making them a great weekday meal or a flavor-packed dish for special occasions.
  • Cuisine: This recipe draws inspiration from various culinary traditions, particularly Asian influences with the use of soy sauce, ginger, and fresh herbs, creating a globally inspired meal.
  • Cost: Salmon rice bowls can be made relatively affordably, especially if you buy salmon in bulk or swap with an equally delicious, lower-cost fish like tilapia.
  • Season: This dish can be enjoyed year-round, with seasonal vegetables that can always be incorporated based on the fresh produce available in your area.
  • Occasion: Ideal for both casual weeknight dinners and more festive gatherings, this meal is versatile and sure to impress.

Why You’ll Love This Recipe

The taste and texture appeal of salmon rice bowls is simply irresistible. The warm, flaky salmon pairs beautifully with the tender rice, while the fresh vegetables add a delightful crunch. Each bite bursts with flavor, invoking a feeling of comfort and satisfaction that is hard to replicate with other dishes.

Convenience is another major benefit of this recipe. With a preparation time of just 15 minutes and a cooking time of 20 minutes, you can have a satisfying meal ready in less than an hour, making it perfect for busy individuals or families seeking a quick yet nourishing dinner solution.

From a nutritional perspective, salmon rice bowls are a powerhouse of health benefits. Salmon is rich in omega-3 fatty acids, which support heart health and brain function, while the addition of fresh vegetables boosts your intake of vitamins and minerals, making this dish both tasty and nourishing.

This recipe provides an excellent opportunity for socializing and entertaining. Preparing salmon rice bowls is not only about cooking; it’s an experience that invites guests to customize their bowls with their favorite toppings, creating an engaging and interactive dining atmosphere.

Finally, the cost-effectiveness of this dish cannot be overlooked. By using ingredients that are often on sale or in bulk, you can create a gourmet meal without breaking the bank, making it a great option for anyone looking to eat well on a budget.

Historical Background and Cultural Significance

The origin of salmon rice bowls can be traced to the rich culinary traditions of coastal communities where fish is a staple. Over centuries, these communities have perfected the art of preparing and consuming fish, elevating it from a basic food source to a flavorful and sought-after dish.

Culturally, salmon holds a significant place in many societies. It’s often associated with strength and prosperity, representing the bounty of nature’s offerings. In regions where salmon fishing is prevalent, communities celebrate this fish through festivals and culinary innovations.

The evolution of the salmon rice bowl has fused traditional cooking methods with contemporary culinary techniques. Today, this dish showcases how different flavors from various cuisines can overlap, creating a modern dining experience that reflects a global palate.

Regional variations abound, with different cultures putting their twist on this basic recipe. Whether it’s adding spicy sauces, unique vegetables, or varying the type of fish, the flexibility afforded by salmon rice bowls makes them a canvas for culinary creativity.

Ingredient Deep Dive

Salmon: This fish is celebrated for its flavor and nutritional profile. Rich in omega-3 fatty acids, salmon supports heart health and brain function. When selecting salmon, look for bright, firm flesh with a fresh smell. Store in the refrigerator and consume within a few days, or freeze for longer preservation. Alternatives include other fatty fish like mackerel or sardines if you prefer different flavors.

Rice: A staple in many cuisines, rice serves as the base for our salmon bowls. It can be white, brown, wild, or jasmine, each offering unique flavors and textures. Brown rice is more nutritious and offers higher fiber content, while jasmine rice is aromatic and fluffy. Store dry rice in a cool, dry place, and be sure to rinse before cooking to remove excess starch.

Vegetables: Fresh vegetables add color and crunch to the dish. Consider options like bell peppers, cucumbers, or seaweed. Each brings its flavor profile and nutritional benefits, enhancing the overall quality of the meal. Select vibrant, unblemished produce and store them properly in the refrigerator to maintain their freshness. You can substitute or combine vegetables based on seasonal availability.

Common Mistakes to Avoid

  • Overcooking the salmon: This can lead to dry, tough fish. Cook until just flaky.
  • Forgetting to season: Proper seasoning enhances flavor; don’t skip this step!
  • Using old rice: Fresh, properly stored rice improves the dish’s overall quality.
  • Not using enough acid: A splash of lemon or vinegar brightens the flavors.
  • Skipping the marinade: Marinating the salmon adds depth and prevents dryness.
  • Stacking too many ingredients: A cluttered bowl can overwhelm the palate—choose a few key toppings.
  • Overcooking the rice: Follow package instructions closely to achieve fluffy rice.
  • Using low-quality fish: The flavor of the dish relies heavily on good-quality salmon.
  • Not prepping ingredients ahead: This can slow down the cooking process.
  • Ignoring presentation: A beautifully presented dish enhances the eating experience.

Essential Techniques

Cooking Salmon: Getting perfect salmon requires attention. Start with medium heat—this allows the fish to cook evenly without burning. Look for opaque, flaky texture as an indicator of doneness. A common pitfall is overcooking, which can be avoided by removing the salmon from heat just before it’s fully cooked.

Cooking Rice: Rinse the rice before cooking to remove excess starch. Use the correct rice-to-water ratio; generally, it’s 1:2. Watch for small bubbles in the pot; this indicates it’s time to lower the heat and cover. Overcooking or undercooking can affect the entire structure of your dish.

Pro Tips for Perfect Salmon Rice Bowls

1. Use high-quality, fresh salmon for the best flavor.

2. Let the cooked salmon rest for a few minutes before flaking for a juicy result.

3. Experiment with different grains; quinoa or farro can add unique textures.

4. Incorporate a variety of colors in your vegetables for visual appeal and nutrition.

5. Drizzle sauces just before serving to maintain their flavor and presentation.

6. Consider adding a sprinkle of sesame seeds for an added crunch.

7. Customize your bowl based on seasonality with the freshest produce available.

8. Invest in a good sushi knife for slicing fish effortlessly and cleanly.

Variations and Adaptations

Salmon rice bowls can be easily adapted to fit different regional tastes. For example, you can replace traditional soy sauce with a spicy sriracha sauce for a kick, or go fully Mediterranean by adding olives and feta cheese. Seasonal adaptations are another fun way to enjoy this dish; in the summer, fresh cherry tomatoes and basil would shine, while in the fall, roasted pumpkins and squash can provide warmth and comfort.

Mild flavor variations may include the addition of fresh herbs like dill or cilantro, imparting a unique freshness to your bowl. Additionally, explore texture modifications by using crispy tofu or grilled chicken in place of salmon, allowing for dietary modifications that still keep the spirit of the dish alive.

For a striking presentation, consider layering ingredients in a glass bowl or jar for an eye-catching display that’s great for meal prep. This concept uses visual appeal to enhance the dining experience while offering ease in transportation for lunches.

Serving and Presentation Guide

Presentation plays a key role in the enjoyment of your salmon rice bowls. Start with a clean, wide bowl to showcase the colorful ingredients. You can layer the rice first, followed by salmon, and then scatter the vegetables on top for an elegant look. Garnish with fresh herbs, sesame seeds, and a slice of lemon for a pop of color.

Consider temperature when serving. The salmon should retain warmth, while vegetables can be served crisp. Serve the bowl in separate sections to maintain the integrity of each component, ensuring that guests can appreciate the textures and flavors distinctly.

Controlling portions is also important; aim for balanced servings of protein, carbohydrates, and vegetables on each plate to create a satisfying meal without overwhelming your guests.

Wine and Beverage Pairing

A crisp, chilled white wine like Sauvignon Blanc complements the rich flavors of salmon beautifully. Alternatively, try a light Pinot Grigio for its refreshing acidity which pairs well with the various vegetables. If you’re looking for non-alcoholic options, consider a citrus-infused sparkling water that balances the richness of the dish.

For coffee lovers, a light-bodied tea such as green tea can offer a cleansing finish after each bite, while herbal varieties could also work well to enhance the freshness of your meal.

Storage and Shelf Life

Store leftover salmon rice bowls in an airtight container in the refrigerator for up to three days. To maintain the quality of the ingredients, it’s best to separate the salmon and vegetables from the rice before storage. Reheat in the microwave until just warmed through, taking care not to overcook the salmon.

If you plan to freeze your bowls, assemble them without the dressing or fresh vegetables for the best results. They should be consumed within two months, with a quick reheating in the microwave or oven before enjoying. Always check for signs of spoilage, such as off smells or discoloration, before consuming preserved food.

Make Ahead Strategies

For easy meal prep, consider cooking your rice and salmon in advance, portioning them into separate containers. This allows you to quickly assemble a fresh meal any day of the week. Pre-chopping vegetables and storing them in the fridge can further streamline the process, saving time during busy evenings.

To impact quality positively, consider preparing flavorful sauces or dressings ahead of time, which can enhance your meal while maintaining freshness. When ready to eat, simply combine the pre-cooked elements with fresh toppings for a delicious meal.

Scaling Instructions

If you need to serve a larger group, doubling or tripling the recipe is easy. All you need to do is scale up each ingredient proportionally, taking care to allow for adequate cooking space. Ensure pots and pans are large enough to handle increased quantities.

In contrast, if you’re cooking for fewer people, you can halve the recipe. However, be cautious with any cooking techniques that rely on specific measurements, as this can alter the final outcome.

Nutritional Deep Dive

When breaking down the macronutrients in salmon rice bowls, expect a healthy mix of protein, carbohydrates, and fats. Each serving typically contains about 25-30 grams of protein from the salmon, alongside around 45 grams of carbohydrates from the rice. The addition of vegetables contributes vitamins, minerals, and fiber, creating a well-rounded meal that supports overall health.

Micronutrient analysis reveals the richness of nutrients such as Vitamin D, B vitamins, and selenium from the salmon, while rice provides energy through complex carbohydrates. These elements not only support physical health but can also contribute to overall cognitive function and energy levels throughout the day.

Dietary Adaptations

For those following a gluten-free lifestyle, simply ensure that any sauces used are gluten-free, and opt for rice as your base. For dairy-free needs, all ingredients in the recipe remain dairy-free, allowing for a safe and delicious meal option.

If you’re vegan, swap the salmon for marinated tofu or chickpeas to retain protein levels while appealing to plant-based diets. Low-carb adaptations can be transformed by switching rice for cauliflower rice, maintaining the meal’s element without the extra carbs.

Troubleshooting Guide

If you find your salmon is too dry, consider reducing the cooking time or utilizing a flavorful marinade prior to cooking. This excess moisture will infuse flavor and prevent dryness.

Texture issues with rice often arise when not rinsing the grains, leading to stickiness. Make sure to rinse thoroughly before boiling to create the fluffiest rice possible.

Recipe Success Stories

Readers have shared their excitement upon trying this salmon rice bowl recipe, often adapting it to fit personal tastes. From swapping veggies to experimenting with different sauces, the community engagement around this recipe highlights its versatility.

Photography of freshly made salmon rice bowls has been a favorite among followers, showcasing colorful presentations and flavorful adaptations made by our culinary community. Inspiring others to prepare their unique version encourages creativity while continuing the love for cooking at home.

Frequently Asked Questions

Can I use frozen salmon? Yes, frozen salmon works well for this recipe. Just ensure it’s thoroughly thawed before cooking to ensure even cooking and flavor absorption.

What can I use instead of rice? Quinoa, couscous, or even zoodles (zucchini noodles) can replace rice, offering different textures and flavor profiles.

How can I store leftovers? Store any leftover components separately in airtight containers in the fridge for up to three days.

What sauces work well with this recipe? Teriyaki, soy sauce, sriracha, and ginger dressings all pair wonderfully with salmon rice bowls.

Is this dish suitable for meal prep? Absolutely! You can prepare all components in advance and assemble them just before eating.

How can I make my salmon more flavorful? Marinating for about 30 minutes before cooking in soy sauce, ginger, and garlic enhances flavor.

Can I make this dish vegetarian? Yes, simply replace salmon with your choice of protein, such as tofu or tempeh, for a delightful alternative.

What herbs should I use? Fresh herbs like cilantro, parsley, or chives enhance flavor and freshness; choose based on your personal taste.

Can I use brown rice? Yes, brown rice provides a nuttier flavor and is more nutritious, though it may take longer to cook.

Is there a way to make this dish spicy? Definitely! Add chopped jalapeños, red pepper flakes, or a spicy sauce to kick up the heat in the dish.

Additional Resources

If you enjoyed this recipe, consider checking out other related recipes like Asian-inspired ramen bowls or poke bowls. Explore technique guides on knife skills for prepping ingredients or equipment recommendations to enhance your cooking experience further.

Join the Conversation

We love to hear from our community! Share your experiences with this recipe on social media, tag your creations, and let us know how you made this salmon rice bowl your own. Your photography tips and unique recipe variations could inspire fellow food lovers to experiment in their own kitchens!

The Recipe

Salmon Rice Bowls

Serves: 4

Prep Time: 15 mins

Cook Time: 20 mins

Total Time: 35 mins

Kitchen Equipment Needed

  • Frying pan
  • Rice cooker or pot
  • Cutting board
  • Chef’s knife
  • Airtight containers for storage

Ingredients

  • 2 cups cooked rice (white or brown)
  • 4 salmon fillets (about 6 ounces each)
  • 1 tablespoon olive oil
  • 1 teaspoon salt
  • 1 teaspoon black pepper
  • 1 cup assorted chopped vegetables (bell peppers, cucumbers, carrots)
  • 2 green onions, sliced
  • Sesame seeds for garnish
  • Dressing of choice (soy sauce, teriyaki, or ginger sauce)

Directions

  1. Cook rice according to package instructions while preparing the salmon.
  2. Heat olive oil in a frying pan over medium heat. Season salmon with salt and pepper.
  3. Place salmon fillets skin-side down in the pan and cook for about 6-8 minutes, then flip and cook for another 2-4 minutes until cooked through.
  4. Remove salmon and let rest for a few minutes before flaking into large pieces.
  5. Assemble bowls by starting with a layer of rice, adding salmon, fresh vegetables, and toppings as desired.
  6. Drizzle with your choice of dressing, garnish with sesame seeds and sliced green onions.
  7. Enjoy your delicious and nutritious salmon rice bowls!

Recipe Notes

  • Feel free to use leftover salmon if pre-cooked; just reheat gently in the pan.
  • Try different sauces to create new flavor profiles—don’t be afraid to experiment!
  • Store any leftovers in an airtight container in the refrigerator for up to 3 days.

Best CrockPot Tuscan Garlic Chicken with Creamy Sauce

CrockPot Tuscan Garlic Chicken: A Creamy Delight for Dinner

⚖️
Difficulty
Easy

⏲️
Prep Time
15 mins

🕒
Cook Time
6 hours

⏱️
Total Time
6 hours 15 mins

🍽️
Servings
4

If you’re searching for a comforting and satisfying meal, look no further than this exquisite CrockPot Tuscan Garlic Chicken. This dish brings together tender chicken breasts, creamy sauce, and aromatic spices to create a tantalizing dinner option that will impress your family or guests. The combination of sun-dried tomatoes, spinach, and herbs creates a savory experience that makes every bite a delight. With its easy preparation and the ability to cook in a slow cooker, you can spend less time in the kitchen and more time enjoying the moment.

This creamy, flavorful dish is not only delicious but also versatile. It pairs perfectly with pasta, rice, or crusty bread, allowing you to customize your meal according to your needs or preferences. Imagine walking into your home after a long day to the enticing aroma of Italian flavors wafting through the air. This CrockPot Tuscan Garlic Chicken is sure to become a staple in your dinner repertoire!

Quick Recipe Highlights

  • Flavor Profile: Rich and savory with hints of garlic and fresh herbs.
  • Texture: Creamy sauce enveloping tender chicken, with a slight chew from the spinach and sun-dried tomatoes.
  • Aroma: Fragrant notes of garlic, basil, and thyme that fill the air as it cooks.
  • Visual Appeal: Beautifully vibrant colors from the tomatoes and spinach against the creamy sauce.
  • Skill Level Needed: Suitable for novice cooks and busy families alike.
  • Special Equipment: Just a reliable crockpot is needed to make this dish a breeze.

Recipe Overview

  • Difficulty Level: This recipe is labeled as easy, designed for any level of chef. The slow cooking process minimizes complexity while maximizing flavor.
  • Category: This dish belongs to the comfort food category, perfect for cozy family dinners or gatherings with friends.
  • Cuisine: Inspired by Italian cuisine, this dish offers a blend of Mediterranean flavors with a creamy twist.
  • Cost: An approximate cost of $15 for a meal serving four, making it budget-friendly.
  • Season: Ideal for year-round cooking, especially comforting during colder months.
  • Occasion: Perfect for weeknight dinners, meal prep, or serving guests during gatherings.

Why You’ll Love This Recipe

Taste and texture take center stage in this CrockPot Tuscan Garlic Chicken. The tender chicken soaks up the creamy sauce filled with the robust flavors of garlic and sun-dried tomatoes, while the spinach adds a fresh element. It truly feels like a warm hug on a plate, giving you that satisfying comfort food experience without a heavy feeling afterward.

The convenience factor is another compelling reason to fall in love with this recipe. Simply toss the ingredients into your CrockPot in the morning, set it to cook, and let it do the work for you. By the time you return home, your dinner will be warm and ready, waiting for you to enjoy. This recipe can easily cater to busier afternoons without sacrificing flavor.

Nutritionally, this dish provides a balance of protein with the chicken, along with vitamins from the spinach and healthy fats from the cream. It’s a great option for a wholesome meal as it can easily be adjusted based on dietary preferences or ingredient availability without losing its fundamental appeal.

Culinary experiences often blend into memorable occasions, and this dish opens up opportunities for social gatherings. Its beautiful presentation and rich flavors naturally invite conversation and enjoyment, perfect for entertaining guests or celebrating special milestones.

Lastly, the cost-effectiveness and accessibility of the ingredients make this recipe an easy choice for families. You can find all the ingredients at your local grocery store, keeping your planned dinner both attainable and delicious, making it a go-to for meal planning.

Historical Background and Cultural Significance

The origins of Tuscan cuisine trace back to the rural farms of Italy, where simplicity is celebrated, and fresh, local ingredients are the centerpiece of every meal. Creamy sauces are a hallmark of many Italian dishes, bringing richness while highlighting the natural flavors of the ingredients. This CrockPot Tuscan Garlic Chicken is a modern take on traditional flavors, merging comfort food with Italian culinary heritage.

Culturally, Italian cuisine is deeply rooted in family and tradition. Meals are often shared, serving as a means of connection among loved ones. This CrockPot dish encourages the same sentiments, inviting family and friends to gather around the table to enjoy a nourishing and fulfilling meal together. The ease of preparation makes it suitable for those big family dinners without extensive cooking time.

Over the years, the recipe has evolved, adapting to various modern kitchens while retaining its comforting essence. The use of a slow cooker has transformed traditional cooking methods, allowing busy individuals to still enjoy time-honored flavors without the fuss of elaborate preparations.

Regional variations of Tuscan dishes can be seen with different ingredients being introduced based on seasonal availability. This flexibility ensures the dish remains relevant and continues to be loved by many across cultures.

Ingredient Deep Dive

The star of the dish, chicken breasts, play a crucial role in many cuisines worldwide. Often chosen for their lean protein content, chicken has a relatively mild flavor that easily absorbs seasonings, making it a versatile choice in countless recipes. When selecting chicken, look for fresh breasts without discoloration for the best quality. Ensure proper storage to retain freshness and flavor; refrigerate and consume within a few days or freeze for later use.

Sun-dried tomatoes, another key ingredient, carry a rich history in Mediterranean cuisine. They add a concentrated burst of flavor and a chewy texture that contrasts beautifully with creamy components in dishes. They are rich in antioxidants and vitamins, making them a healthy addition as well. Choose high-quality sun-dried tomatoes; store them in oil for optimal flavor retention, and can easily be substituted with fresh tomatoes if necessary.

Spinach not only contributes vibrant color and flavor but is also packed with nutrients. Its origins can be traced back to ancient Persia, becoming a staple in many diets due to its versatility and health benefits. Fresh spinach has a slightly earthy taste and a tender crunch. When selecting, choose crisp, fresh leaves free from blemishes. Properly storing spinach in a refrigerator prolongs its freshness, and it can also be swapped with other greens, like kale or Swiss chard.

Common Mistakes to Avoid

  • Not browning the chicken: Skipping the step of browning the chicken can result in less flavor in your final dish. Taking the time to caramelize the meat enhances the overall taste significantly.
  • Overcooking: Chicken can become dry and tough if overcooked. Monitor the cooking time carefully to ensure it remains tender and juicy.
  • Using low-quality ingredients: This recipe relies heavily on the quality of ingredients. Always choose the freshest chicken and best-quality tomatoes and cream for the best results.
  • Skipping the herbs: Fresh herbs are crucial for brightening up the dish. Neglecting these will lead to a bland flavor profile.
  • Piling in too many ingredients: Overloading the crockpot can prevent ingredients from cooking evenly. Follow the recommended amounts for optimal results.
  • Not letting it rest before serving: Allowing the flavors to meld for a few moments before serving enchances the overall taste and aroma.
  • Ignoring texture variations: Adding too much cream without balancing with acidity can make the dish feel heavy. A splash of lemon juice or vinegar can lighten the flavor profile.
  • Not adjusting seasoning: Season to taste before serving. Tasting throughout the cooking process will help achieve the perfect balance.

Essential Techniques

Browning the chicken is a crucial technique that elevates the overall flavor of the dish. It caramelizes the surface and creates a depth of flavor that slow cooking alone can’t achieve. To master this technique, ensure your pan is hot and use a little oil before adding the chicken. Look for a beautiful golden-brown crust as an indicator of success.

Layering flavors is another key technique in this recipe. Adding garlic and sun-dried tomatoes to the pan first ensures they infuse their flavors into the chicken adequately. Stir thoroughly and ensure the ingredients caramelize slightly before introducing the chicken to the pot for a rich, aromatic base.

Slow cooking is important for developing flavors in your dish. The long cooking times allow all the ingredients to meld. To ensure successful slow cooking, maintain an even heat, and avoid opening the lid frequently, as this can significantly increase cooking time.

Cooking pasta or rice separately can enhance the overall texture of the meal. Prepare them according to package instructions, and toss them in the serving bowl with the sauce just before serving to ensure they are perfectly coated and absorb the flavors effectively.

Pro Tips for Perfect CrockPot Tuscan Garlic Chicken

– Utilize fresh ingredients whenever possible. Fresh garlic and herbs will always deliver a more pronounced flavor compared to dried options.
– Consider adding a splash of white wine during cooking to enhance the sauce’s flavor profile.
– For an even creamier sauce, add more cream or a dollop of cream cheese towards the end of cooking.
– Play around with different vegetables like bell peppers or mushrooms for added flavor and nutrition.
– Allow leftovers to mingle in the fridge overnight. This often leads to an even richer and more developed flavor.
– Serve with a side of garlic bread to make the meal complete and fully embrace the Italian cuisine.

Variations and Adaptations

Regional adaptations can be made by incorporating local ingredients, such as using local herbs or vegetables. For instance, adding zucchini or eggplant can add different textures and flavors. Seasonal variations can also be embraced by using fresh tomatoes in place of sun-dried tomatoes during the summer months for a lighter version.

For dietary modifications, the cream can be replaced with coconut milk or a plant-based cream for a dairy-free version. Replace the chicken with jackfruit or tempeh for a vegan adaptation, while maintaining the seasonings for a similar flavor profile. Another option is using low-carb alternatives like cauliflower rice to serve the dish for those following a keto diet.

Presentation alternatives include serving the chicken over a bed of sautéed greens or alternatively serving it stuffed in a baked potato for a heartier option. These variations not only cater to different dietary needs but can also elevate the dish to suit various occasions.

Serving and Presentation Guide

For an elegant presentation, consider plating the chicken on a large serving platter drizzled with extra sauce. Adaptive garnishing with freshly chopped parsley or basil not only adds vibrancy but also a fresh kick of flavor. Traditional accompaniments like crisp white bread or buttery garlic knots work well for mopping up any extra sauce, while modern serving suggestions include serving over creamy polenta or pasta.

Temperature considerations are essential; ensure the meal is served warm but not overly hot to allow the flavors to be fully appreciated. Portion control is crucial; ensuring servings are reasonable will make the dish more enjoyable and can prevent food waste.

Wine and Beverage Pairing

A well-chosen wine can enhance your dining experience. A crisp white such as Pinot Grigio or a light red like Chianti complements the flavors of Tuscan Garlic Chicken beautifully. For a non-alcoholic alternative, consider sparkling water infused with lemon or a refreshing herbal iced tea. If coffee or tea is your preference, a mild chamomile tea can provide a soothing finish to the meal.

Serve wines chilled, ensuring they bring out the freshness of the dish while not overpowering the flavors. Proper wine glasses and temperature considerations can elevate the overall dining experience.

Storage and Shelf Life

Storing leftovers correctly is key to maintaining the flavor and quality. Allow the chicken to cool before placing it in an airtight container; it can last up to 3 days in the refrigerator. To retain its best quality, reheat gently on the stovetop and avoid boiling, as this can toughen the chicken.

For longer storage, you can freeze servings for up to 3 months. Ensure your container is freezer-safe and label it with the date. Before serving, allow it to thaw in the fridge overnight and heat gently to rediscover the original delightful flavors.

Signs of spoilage include any off-odors or mold; it’s crucial to err on the side of caution and dispose of any questionable food. When reheating, ensure it reaches an internal temperature of 165°F for safe eating.

Make Ahead Strategies

Preparing this CrockPot Tuscan Garlic Chicken in advance can save time on busy days. The night before, chop vegetables and measure spices, storing them together to simplify the morning assembly. You can also marinate the chicken overnight in the creamy sauce for added flavor.

Store prepped ingredients in the refrigerator to maintain freshness and ensure they are ready to mix in the morning. This dish can also be cooked a day ahead; let it cool before storing and simply reheat when ready to serve.

Consider adding fresh greens, such as spinach, during the last moments of reheating to enhance color and freshness. These elements can be easily incorporated without sacrificing quality, allowing you to present a delicious, made-ahead meal with ease.

Scaling Instructions

Scaling this recipe for larger gatherings is straightforward. If halving the recipe, all ingredient quantities can simply be reduced by half, while maintaining cooking times, adjusting if necessary based on your crockpot’s capacity. For doubling or tripling, ensure your crockpot is large enough to accommodate the increase in ingredients and check the cooking time; larger quantities might require a slightly longer cook time.

Using multiple crockpots can also be beneficial when preparing for large gatherings or events. Follow the same timing guidelines but monitor the dishes for doneness based on the size of your chicken pieces.

Storing excess servings for later is an efficient strategy. Ensure you allow for cooling time before properly containerizing and follow the storage guidelines for both immediate consumption and future enjoyment.

Nutritional Deep Dive

This dish provides a healthy macro breakdown, with lean proteins from chicken, ample fats from cream, and carbohydrates if served with pasta or bread. Chicken breast is low in fat while being high in protein, essential for muscle building and repair.

Micronutrient analysis reveals vitamins A and K from spinach, plus various B vitamins and antioxidants from tomatoes. These contribute to overall well-being, supporting immune function and general health.

Watching portion sizes is vital for those monitoring caloric intake. Offering a delightful balance of flavors and nutritional benefits, this dish can easily fit into many meal plans without compromising enjoyment. Additionally, substitutions can allow for variations that cater to personal dietary preferences while still promoting healthful eating.

Dietary Adaptations

This recipe lends itself well to gluten-free adaptations by ensuring that any accompanying sides, such as rice or quinoa, are also gluten-free options. Dairy-free versions can replace heavy cream with coconut cream or nut-based alternatives, maintaining the creamy texture while accommodating dietary restrictions.

– For vegan adjustments, substitute the chicken with plant-based protein sources and utilize non-dairy cream.
– Low-carb variations can be achieved by serving the dish over zucchini noodles or cauliflower rice, allowing those on keto diets to enjoy without unnecessary carbs.
– Additionally, focusing on flavor with herbs and spices can elevate flavor profiles in low-FODMAP iterations by omitting garlic and onion.
– Paleo adherents can embrace this dish with simple modifications like using coconut milk and removing non-compliant ingredients, ensuring you remain within your dietary guidelines.

Troubleshooting Guide

For texture issues, ensure that the chicken does not overcook, as this can lead to a dry outcome. Using a meat thermometer can prevent this; chicken should reach 165°F for optimal tenderness.

Flavor balance may occasionally be off; if too salty, counteract with a splash of lemon juice or a bit of sugar to bring harmony. Ensure to taste frequently during cooking to identify any adjustments needed in seasoning.

Temperature problems can arise if the crockpot is overloaded. Ensure your hi/lo settings are appropriate for the amount of food to ensure proper doneness at the end of cooking.

Equipment challenges may arise if using a different style of crockpot or when scaling up. Familiarize yourself with your crockpot’s settings and adjust accordingly based on results from earlier cooking experiences.

In terms of ingredient substitutions, ensure that any swaps maintain the balance of flavors; for instance, not all creams are interchangeable, so testing will yield the best results.

Recipe Success Stories

Community feedback highlights the pleasure many find in this dish; users frequently rave about the ease of preparing such a flavorful meal. Adapting the recipe to their tastes has led to unique creations all while enjoying the rich flavors.

Stories of variation successes abound, with readers excited to share how they tailored the dish. From adding seasonal vegetables to experimenting with different cheese options, it remains a delightful story of culinary exploration.

Readers often share their photography tips to showcase how visually appealing the meal can be, proving that not only is it delicious, but presents elegantly as well.

Success stories reveal how sharing the dish with family has sparked delightful conversations around the dinner table, connecting loved ones through food.

Frequently Asked Questions

Can I use frozen chicken for this recipe?

Yes, frozen chicken can be used in the recipe; however, you should increase the cooking time to ensure the chicken is fully cooked and safe to eat. It’s advisable to thaw the chicken first if possible to help it cook evenly.

What can I serve with CrockPot Tuscan Garlic Chicken?

This dish pairs wonderfully with a variety of sides such as pasta, rice, roasted vegetables, or a fresh salad. Garlic bread is also a favorite choice for dipping into the creamy sauce.

How do I store leftovers?

Let the chicken cool before placing it in an airtight container. It can be stored in the refrigerator for up to three days. Alternatively, freeze for up to three months, ensuring you’re using freezer-safe containers.

Can I make this dish in advance?

Absolutely! You can prepare it a day ahead and refrigerate before reheating. The flavors often improve overnight as they meld together.

Is there a vegetarian option for this recipe?

Yes, you can substitute the chicken for plant-based proteins like chickpeas or tempeh. Use coconut cream to maintain that creamy texture while keeping the dish delicious.

What if I don’t have sun-dried tomatoes?

If you don’t have sun-dried tomatoes, fresh tomatoes can be used instead, though the flavor will be less concentrated. Alternatively, roasted red peppers can add a different taste experience.

Can I use a different type of cheese?

Certainly! Parmesan or ricotta can be used for different flavor profiles. Keep in mind that changing the cheese can alter the overall richness of the dish.

How can I adjust the spice level?

To elevate the spice level, incorporate red pepper flakes or black pepper to taste. Adjust these at the beginning of cooking to infuse flavors throughout.

Can I add other vegetables?

Yes, vegetables like zucchini or bell peppers can be added for more nutrition and taste. Simply chop and add them to the pot alongside the chicken.

Does this recipe freeze well?

Yes, CrockPot Tuscan Garlic Chicken freezes beautifully. Just ensure it’s stored properly in freezer-safe containers, and defrost it in the fridge before reheating when ready to eat.

Additional Resources

If you’re interested in exploring more Italian-inspired dishes, consider trying out recipes like Chicken Piccata or Italian Meatballs. Each showcases similar flavors and techniques, allowing you to discover more culinary delights.

For technique guides, familiarize yourself with the art of slow cooking, mastering tools like the slow cooker or instant pot to elevate everyday meals. Explore ingredient information to learn tips for selecting the freshest produce and proteins for your recipes.

Equipment recommendations can optimize your cooking experience. Investing in high-quality kitchen equipment can make preparation and cooking much smoother, ensuring you have the right tools at your fingertips.

Seasonal variations can encourage creativity in the kitchen. Consider swapping out ingredients based on what’s available in your local market.

Join the Conversation

We love hearing from our readers about their experiences with this CrockPot Tuscan Garlic Chicken! Share your photos and thoughts on social media. Join the community by posting your adaptations or just offering feedback; your perspective enriches the cooking experience for others.

Engaging with fellow culinary enthusiasts can inspire new ideas as you explore variations on this recipe and share advice on improving outcomes. We encourage you to share your tips, success stories, and even challenges to foster discussion within the community.

Join us in celebrating the simple joys food brings to our lives; let’s continue creating memorable meals and sharing the love of cooking.

The Recipe

CrockPot Tuscan Garlic Chicken

Serves: 4

Prep Time: 15 mins

Cook Time: 6 hours

Total Time: 6 hours 15 mins

Kitchen Equipment Needed

  • CrockPot or slow cooker
  • Skillet (for browning chicken)
  • Cutting board and knife
  • Measuring cups and spoons
  • Spoon or spatula for stirring

Ingredients

  • 4 chicken breasts
  • 1 cup heavy cream
  • 1/2 cup sun-dried tomatoes, chopped
  • 2 cups fresh spinach
  • 4 cloves garlic, minced
  • 1 teaspoon dried basil
  • 1 teaspoon dried thyme
  • Salt and pepper to taste
  • 1/2 cup grated Parmesan cheese (optional)

Directions

  1. Heat a skillet over medium heat and add a bit of oil. Brown the chicken breasts on both sides (about 4-5 minutes per side) and set aside.
  2. In the same skillet, add minced garlic and sauté for 1-2 minutes until fragrant, then add sun-dried tomatoes and herbs.
  3. Transfer the sautéed mixture to the CrockPot. Add the browned chicken on top.
  4. Pour the heavy cream over the chicken, season with salt and pepper, and gently stir to combine.
  5. Cook on low for 6-7 hours or high for 3-4 hours until the chicken is cooked (165°F) and tender.
  6. In the last 30 minutes, add the fresh spinach and parmesan cheese if using, stir and cover to continue cooking until spinach has wilted.
  7. Adjust seasoning if needed before serving. Enjoy with your choice of sides!

Recipe Notes

  • For extra flavor, feel free to add mushrooms or bell peppers during cooking.
  • This recipe can also be made ahead and reheated, which often enhances flavors.
  • Adjust the cream or use a lower-fat alternative for a lighter version of the sauce.

Easy Baked Chicken Wings with Crispy, Golden Perfection

Baked Chicken Wings: A Crispy Delight for Any Occasion

⚖️
Difficulty
Easy

⏲️
Prep Time
15 mins

🕒
Cook Time
50 mins

⏱️
Total Time
65 mins

🍽️
Servings
4 servings

Baked chicken wings are the perfect dish for any gathering, combining the delightful crunch of a well-cooked outer layer with tender, juicy meat on the inside. As they bake in the oven, the smell of the seasoned wings fills your home, enticing everyone to eagerly await the first bite. This recipe for baked chicken wings not only offers a healthier alternative to deep-fried wings, but it also promises a crispy exterior that rivals its fried counterpart without the excess oil.

In this recipe, we’ll dive into creating perfect baked chicken wings that boast an incredible flavor profile. With a blend of seasonings and a baking method that allows the wings to crisp up beautifully, you will enjoy a dish that’s bursting with flavor and texture. Whether you’re hosting a game day party or a simple family dinner, these wings are sure to impress.

Quick Recipe Highlights

  • Flavor Profile: Spice up your taste buds with bold flavors, including garlic powder, paprika, and a hint of cayenne pepper.
  • Texture: Enjoy the satisfying crunch of perfectly baked wings, paired with the succulent juiciness of each bite.
  • Aroma: The enticing aroma of roasted garlic and spices fills the kitchen, inviting everyone to the table.
  • Visual Appeal: Golden-brown wings with crispy edges make for an eye-catching presentation at any meal.
  • Skill Level Needed: This recipe is beginner-friendly, ideal for cooks of all skill levels looking to impress.
  • Special Equipment: A baking sheet lined with parchment paper or aluminum foil for easy cleanup is recommended.

Recipe Overview

  • Difficulty Level: Easy, perfect for beginners who want to master simple seasoning

Delicious Chicken Chow Mein with The Best Chow Mein Sauce

Delicious Chicken Chow Mein with the Best Chow Mein Sauce

⚖️
Difficulty
Medium

⏲️
Prep Time
15 mins

🕒
Cook Time
15 mins

⏱️
Total Time
30 mins

🍽️
Servings
4 servings

Are you ready to indulge in the savory, satisfying flavors of homemade Chicken Chow Mein? This iconic dish, loved for its crispy vegetables and juicy chicken, brings the taste of Chinese cuisine right into your home. With the perfect mix of textures and the famed Chow Mein sauce, this recipe is a delightful fusion of sweet, salty, and umami flavors that will leave your taste buds dancing. Whether you’re feeding a family or entertaining friends, this dish is sure to impress and satisfy.

Crafting the perfect Chicken Chow Mein is easier than you think! It’s a quick recipe that allows you to use fresh ingredients for a mouth-watering meal. The combination of stir-fried chicken, vibrant vegetables, and the star of the show – the best Chow Mein sauce – creates a colorful and nutritious dish, making it an ideal option for lunch or dinner. Plus, it’s versatile—feel free to add a variety of ingredients based on what you have at home!

Quick Recipe Highlights

  • Flavor Profile: Expect an explosion of flavors from the rich sauce combined with tender chicken and fresh vegetables.
  • Texture: Enjoy a mixture of crunchy veggies and soft noodles, creating a delightful contrast in every bite.
  • Aroma: The tantalizing smells of garlic and ginger will fill your kitchen, making your meal irresistible.
  • Visual Appeal: The vibrant colors of the bell peppers, carrots, and green onions make this dish a feast for the eyes.
  • Skill Level Needed: This recipe is suitable for medium skill levels and is great for those looking to enhance their cooking techniques.
  • Special Equipment: You’ll need a large skillet or wok, and some basic cooking utensils like a spatula and knife.

Recipe Overview

  • Difficulty Level: With a blend of simple techniques and quick cooking methods, this medium-difficulty recipe is perfect for those ready to step up their cooking game.
  • Category: This Chicken Chow Mein falls under the category of main course, making it an essential part of any dinner or lunch spread.
  • Cuisine: Rooted in Chinese culinary traditions, Chow Mein is influenced by various regions throughout Asia, bringing a unique twist to your home-cooked meals.
  • Cost: This dish can be prepared with affordable ingredients, making it a budget-friendly option for families or meal preppers.
  • Season: Chicken Chow Mein is versatile enough to be enjoyed year-round, but it shines brightly in the spring and summer, when fresh vegetables are plentiful.
  • Occasion: Perfect for weeknight dinners, potlucks, or family gatherings, this dish is sure to be the highlight of any meal.

Why You’ll Love This Recipe

The Chicken Chow Mein in this recipe offers a tantalizing experience for the palate. Each bite delivers a burst of flavors that harmonize beautifully, thanks to the expertly crafted Chow Mein sauce. You’ll find the combination of tender chicken and fresh, crisp vegetables provides an inviting textural contrast that makes the dish exciting. The noodles are perfectly cooked, adding to the overall satisfaction of a well-balanced meal.

Besides the incredible taste, this recipe is convenient and straightforward. With a total preparation and cooking time of just 30 minutes, you can whip up this dish on a busy weeknight without feeling rushed. The quick cooking time allows you to maintain the nutritional integrity of the vegetables, ensuring you’re serving a meal that’s not only delicious but wholesome.

Nutritionally, this Chicken Chow Mein is a great choice. It’s packed with protein from the chicken and fiber from a variety of vegetables. The freshness of the ingredients complements your dietary needs, making it a balanced option for those looking to maintain a healthy lifestyle while still enjoying flavorful food.

Socially, this recipe offers an excellent opportunity for sharing. Preparing a large batch invites gatherings around the dining table. Plus, Chow Mein’s universal appeal makes it a crowd-pleaser at dinner parties or family meals, encouraging laughter and conversation as everyone enjoys their food.

Finally, it’s cost-effective! The ingredients used for this Chicken Chow Mein are not only budget-friendly but are often things you might already have in your pantry or fridge. This means no last-minute grocery trips, helping you save both time and money while still delighting your taste buds.

Historical Background and Cultural Significance

Chow Mein has a rich history that dates back to Chinese immigrant communities in the United States in the late 19th century. Initially brought over as a street-food staple from China, it quickly adapted to local tastes, leading to the creation of the beloved dish we enjoy today, characterized by its fried noodles and varied ingredients.

This dish holds significant cultural importance, symbolizing the culinary fusion that occurs when traditional techniques meet new ingredients and flavors. In America, it’s also a communal dish, often served at gatherings and celebrations, highlighting its role in bringing people together.

Over the years, Egg Chow Mein has evolved from its origins, leading to numerous regional variations, each with its unique spin. For instance, the Cantonese style features thicker noodles, while the American version typically incorporates a sweet sauce and additional vegetables. This evolution reflects the adaptability of Chow Mein within different culinary contexts.

Today, Chicken Chow Mein is enjoyed worldwide, each region adding its twist. The influential nature of this dish proves that food serves not only to nourish but also to connect cultures and traditions through flavors and shared experiences.

Ingredient Deep Dive

Chicken

Chicken is a cornerstone protein in many cuisines, known for its versatility and rich flavor. It’s a common choice for those looking for protein-rich meals due to its low fat content and high protein ratio. When selecting chicken, look for fresh, local options if possible, or ensure any packaged chicken is properly refrigerated. It’s best stored in the coldest part of your refrigerator and used within a few days of purchase for optimal freshness.

In terms of substitutions, tofu or tempeh can be used for a vegetarian twist. Both variants will offer protein while complementing the flavors of the Chow Mein sauce wonderfully.

Noodles

Chow Mein noodles are typically made from wheat flour and are essential for the dish’s texture. They can be found fresh or dried in most grocery stores. When choosing your noodles, fresh chow mein noodles offer the best texture and flavor, while dried noodles need to be cooked before use. Store them in a cool, dry place, sealing any opened packets tightly.

For alternatives, rice noodles or gluten-free options can be used based on dietary needs, although they will slightly alter the overall texture of the dish.

Common Mistakes to Avoid

  • Overcooking the chicken: This can lead to dryness. Chicken should be cooked just until it’s no longer pink in the middle for optimal juiciness.
  • Using too much sauce: While the sauce adds flavor, too much can make the dish soggy. Start with less and add more as needed.
  • Incorrect noodle cooking: Ensure that your noodles are cooked properly before adding them to the pan. They should be al dente to hold their texture.
  • Chopping vegetables too finely: If vegetables are cut too small, they may overcook and lose their crunch.
  • Not prepping ingredients ahead of time: Stir-frying is quick, so having everything ready before you start cooking is crucial.
  • Using cold ingredients: Bring everything to room temperature before cooking to ensure even cooking.
  • Ignoring the heat level: Stir-frying requires high heat. Don’t be afraid to crank up the heat to get a good sear on the ingredients.
  • Not using enough oil: A little oil goes a long way in preventing sticking and ensuring a good sauté on the ingredients.
  • Overcrowding the pan: If too many ingredients are in the pan at once, they may steam instead of fry, resulting in a less desirable texture.
  • Not tasting as you go: Always taste your dish as you cook to make necessary adjustments on flavors.

Essential Techniques

Stir-frying is essential to achieving the characteristic flavors and textures of Chicken Chow Mein. It involves cooking food quickly over high heat, allowing ingredients to brown and crisp while retaining their innate flavors. To master this technique, ensure your wok or skillet is preheated before adding any ingredients, and keep everything moving to avoid burning.

Slicing vegetables correctly is another technique that impacts cooking time and overall experience. Uniformly cut vegetables ensure even cooking, and using a sharp knife can make this process quick and easy. For an ideal bite, consider the ideal size for each type of vegetable, keeping in mind that denser vegetables like carrots should be sliced thinner than softer ones like bell peppers.

Pro Tips for Perfect Chicken Chow Mein

1. Use a high smoke point oil, like vegetable or canola, for stir-frying to prevent burning and ensure a proper sear.

2. Prep all ingredients before you start cooking, as things move quickly during the stir-frying process.

3. Don’t skip the marinating step for your chicken; even a quick 10-minute marinade in soy sauce and cornstarch can elevate the dish’s depth of flavor.

4. Keep sauces separate to adjust flavor profiles according to taste preferences when serving a group.

5. Consider whisking the Chow Mein sauce together in advance for consistent flavor distribution.

6. Plate the dish promptly after cooking to maintain the integrity of the textures.

7. Garnish with sesame seeds or green onions right before serving for an added freshness and visual appeal.

8. For extra heat, add red pepper flakes or sriracha to your sauce mix based on your spice tolerance.

Variations and Adaptations

Chicken Chow Mein can be easily adapted based on regional inspirations. For instance, adding shrimp or beef can introduce new flavors and textures, while still keeping the dish true to its roots. Seasonal adaptations include changing vegetables with what’s fresh, like asparagus in spring or pumpkin in fall, bringing vibrant seasonal flavors to your meal.

Dietary modifications are also effortless; for a vegetarian option, substitute chicken with tofu or seitan. To create a gluten-free version, opt for rice noodles and gluten-free soy sauce, maintaining the flavors while accommodating dietary needs. Furthermore, consider adding roasted cashews or peanuts for a crunchy surprise.

Serving and Presentation Guide

When it comes to serving Chicken Chow Mein, presentation matters! Use a large platter to showcase the colorful ingredients or serve individual bowls for a more personal touch. A sprinkle of sesame seeds, cilantro, or green onions on top enhances both the flavor and the visual appeal.

Garnish with lime wedges or chili flakes on the side, allowing guests to add their preferred level of zest or spice. Temperature is key; serving Chow Mein immediately after cooking preserves the texture of the noodles and freshness of the vegetables, providing a lovely, warm meal.

Wine and Beverage Pairing

Pairing wine with Chicken Chow Mein can elevate your dining experience. A chilled Riesling or Sauvignon Blanc complements the dish’s flavors beautifully, offering a refreshing contrast to the savory elements of the meal. If you prefer red wine, a light Pinot Noir can balance the umami of the sauce without overwhelming the palate.

For non-alcoholic alternatives, consider serving iced tea or a homemade lemon-lime soda. Both are refreshing choices that pair well with the dishes’ rich flavors while keeping the meal light.

Storage and Shelf Life

For optimal storage, place any leftover Chicken Chow Mein in an airtight container and refrigerate. It should stay fresh for up to three days. If you need to store it for an extended period, consider freezing the dish, which can last up to two months.

When reheating, it’s best to do so on the stove over medium heat, adding a splash of water or soy sauce to restore moisture. Check for signs of spoilage, such as an off smell or off texture, to ensure the meal remains delightful.

Make Ahead Strategies

To cut down on cooking time, consider prepping the vegetables and marinating the chicken a day in advance. Store the prepped ingredients separately in the refrigerator, ensuring freshness. This way, when you’re ready to cook, simply toss everything in your pan for a quick, delightful dinner.

Additionally, you can prepare and freeze individual servings ahead of time. Just ensure they are packed in portions and labeled with the date. When you’re ready to enjoy, defrost and reheat for an easy, delicious meal on busy nights.

Scaling Instructions

If you’re planning to feed a larger crowd, scaling this recipe is straightforward. For halving the recipe, simply adjust the amount of chicken, noodles, and sauce accordingly. Doubling or tripling the recipe is also possible; just make sure to increase the cooking time and use larger cooking equipment to handle the increased volume.

While timing adjustments may be required, quality can be maintained by monitoring the cooking process closely. Be mindful of portion sizes as well, ensuring everyone gets a satisfying serving without food waste.

Nutritional Deep Dive

Chicken Chow Mein is not only a feast for the taste buds but also a nutritious option. The macro breakdown shows a solid balance of proteins, carbohydrates, and fats, ensuring a well-rounded meal. The chicken provides essential proteins, while the vegetables contribute a plethora of vitamins and minerals, aiding in overall health.

In terms of micronutrients, this dish is rich in Vitamin A from the carrots and Vitamin C from bell peppers, boosting your immune system and promoting good health. Be mindful of portion sizes to maintain an enjoyable balance while being mindful of caloric intake.

Dietary Adaptations

For those seeking dietary adaptations, Chicken Chow Mein offers versatility. A gluten-free version can be easily achieved by substituting traditional noodles for rice noodles and ensuring you’re using gluten-free soy sauce.

Vegan adaptations are another popular option. Simply replace the chicken with tofu or tempeh and ensure the sauce is vegan-friendly. This offers a similar taste profile while catering to those avoiding animal products.

Troubleshooting Guide

If your Chow Mein turns out too soggy, it often means too much sauce was used, or vegetables were overcooked. In the future, refrain from adding all the sauce at once, allowing for adjustments during the cooking process.

For flavor imbalances, consider adding a pinch of salt or acidity from lime juice to enhance the dish. If you find the noodles too sticky, ensure that sufficient oil is used during cooking to create a non-stick surface.

Recipe Success Stories

Readers have embraced this Chicken Chow Mein recipe, engaging both in the kitchen and through shared experiences. Many reported having great success by introducing their twists, like adding assorted vegetables and swapping proteins, which delighted their families beyond expectation.

Community feedback highlights the importance of taste and ease, with many praising the simplicity yet depth of flavor found in this recipe. Users have shared beautiful photographs of their finished dishes on social platforms, showcasing their culinary achievements.

Frequently Asked Questions

Can I make Chicken Chow Mein ahead of time?
You can prepare components like chicken and vegetables and store them separately in the fridge. Assemble and stir-fry just before serving for freshness.

How long does leftover Chow Mein last?
When stored in an airtight container, Chicken Chow Mein typically lasts up to three days in the fridge.

What vegetables work best in Chow Mein?
Bell peppers, carrots, snap peas, and broccoli are popular choices. Feel free to substitute with any vegetables you enjoy!

Can I make this recipe gluten-free?
Absolutely! Substitute regular noodles with rice noodles and ensure you use gluten-free soy sauce.

Is Chicken Chow Mein spicy?
The dish is typically not spicy, but you can add red pepper flakes or sriracha to elevate the heat according to your preference.

What can I serve with Chicken Chow Mein?
It pairs well with steamed rice or dumplings, and even fresh spring rolls make an excellent side.

Can I freeze Chicken Chow Mein?
Yes! You can freeze the dish for up to two months. Reheat on the stove while adding a splash of water to restore moisture.

How do I prevent the noodles from sticking?
Using enough oil during stir-frying and ensuring your noodles are properly cooked can help prevent sticking.

Can I add shrimp or tofu instead of chicken?
Yes! Both shrimp and tofu are excellent substitutions that work well with the flavors of Chow Mein.

What is the best way to reheat leftovers?
The best method is on the stovetop over medium heat, with a bit of water or sauce to bring back moisture.

Additional Resources

For those wanting to explore more, you might consider looking into other Asian-inspired dishes that pair sweet, savory, and umami flavors. Techniques such as stir-frying, steaming, and searing can all be found in related recipes, encouraging a deeper knowledge of cooking Asian cuisine.

Ingredient guides offer insights into selecting the freshest produce and proteins. Meanwhile, equipment recommendations can assist in optimizing your cooking experience, ensuring you have the essentials to create a restaurant-quality meal at home.

Join the Conversation

We’d love to hear how your Chicken Chow Mein turns out! Share your culinary creations on social media using our tags, and don’t forget to rate and review the recipe below. Photography tips can help you capture your dish beautifully, so others can appreciate your cooking skills.

Engaging with the recipe community is a wonderful way to learn new tips and tricks, share variations you’ve successfully experimented with, and continue enhancing your cooking repertoire. Join us as we explore more flavors together!

The Recipe

Chicken Chow Mein

Serves: 4 servings

Prep Time: 15 mins

Cook Time: 15 mins

Total Time: 30 mins

Kitchen Equipment Needed

  • Large skillet or wok
  • Chopping board
  • Sharp knife
  • Spatula
  • Mixing bowl

Ingredients

  • 1 lb chicken breast, sliced thin
  • 8 oz chow mein noodles, cooked
  • 2 cups mixed vegetables (bell peppers, carrots, snap peas)
  • 2 tablespoons vegetable oil
  • 4 green onions, chopped
  • 3 cloves garlic, minced
  • 1 inch ginger, minced
  • ½ cup soy sauce
  • 2 tablespoons oyster sauce
  • 1 tablespoon cornstarch

Directions

  1. Heat 1 tablespoon of oil in a large skillet or wok over medium-high heat.
  2. Add the garlic, ginger, and chicken; stir fry until the chicken is cooked through.
  3. Remove the chicken and set it aside in a bowl.
  4. In the same pan, add the remaining oil and stir fry the mixed vegetables until vibrant and tender.
  5. Add the cooked noodles, chicken, soy sauce, oyster sauce, and cornstarch; mix well.
  6. Stir everything for 5 minutes or until heated through and well combined.
  7. Serve hot, garnishing with chopped green onions on top.

Recipe Notes

  • Feel free to customize the vegetables based on your preferences.
  • For a spicier version, add sriracha or chili flakes to the sauté.
  • Substituting chicken for tofu or shrimp is an effective way to modify this recipe.

Easy Lemon Caper Sauce – Perfect for Fish and Pasta

Lemon Caper Sauce: A Bright and Zesty Delight

⚖️
Difficulty
Easy

⏲️
Prep Time
10 mins

🕒
Cook Time
5 mins

⏱️
Total Time
15 mins

🍽️
Servings
4

Lemon Caper Sauce is a vibrant addition to any meal, transforming simple dishes into culinary masterpieces with its zesty flavor and bright aroma. This sauce, with its outstanding fresh lemon and salty caper notes, is not only delicious but incredibly versatile. Whether drizzled over grilled chicken, tossed with pasta, or served alongside seafood, this sauce will elevate your dining experience, making it a go-to recipe for any home chef looking to impress.

With its quick preparation time and minimal ingredients, Lemon Caper Sauce is an ideal candidate for last-minute cooking endeavors. Its simplicity doesn’t compromise its flavor profile, allowing for a luxurious taste that belies its easy preparation. With every bite, you’ll be enchanted by the fresh, tangy notes, perfectly complemented by the burst of umami from the capers. Serve it warm or at room temperature, and enjoy how it enhances not just the taste but the overall experience of your meal.

Quick Recipe Highlights

  • Flavor Profile: Bright, tangy, and slightly salty from the capers, this sauce enhances the natural flavors of your dishes.
  • Texture: Smooth and creamy, with a hint of chunkiness from the capers that adds a delightful mouthfeel.
  • Aroma: The refreshing scent of lemon combined with the earthy notes of capers creates an inviting aroma.
  • Visual Appeal: A bright yellow hue specked with green capers makes this sauce visually stunning against any plate.
  • Skill Level Needed: Requires basic cooking techniques, making it accessible for all skill levels.
  • Special Equipment: A saucepan and whisk are all you need to whip up this delightful sauce.

Recipe Overview

  • Difficulty Level: This Lemon Caper Sauce is easy to make, requiring minimal cooking knowledge, perfect for beginners and seasoned cooks alike.
  • Category: This sauce is a condiment that works well with a variety of dishes, from seafood to grilled meats and vegetables.
  • Cuisine: It draws inspiration from Mediterranean cuisine, where lemon and capers are commonly used for their flavor-enhancing properties.
  • Cost: The ingredients are affordable and accessible, making it a budget-friendly option for weeknight dinners or special occasions.
  • Season: Lemon Caper Sauce shines in the spring and summer when fresh herbs and vegetables are abundant.
  • Occasion: Ideal for casual dinners, entertaining guests, or meal prep for quick and flavorful meals throughout the week.

Why You’ll Love This Recipe

The taste and texture of Lemon Caper Sauce are nothing short of delightful. Its bright acidity cuts through richer foods, enhancing their flavors without overpowering them. The sauce’s creaminess creates a comforting mouthfeel, making each bite an indulgent experience. Whether enjoyed on grilled fish or tossed with pasta, the balance of flavors will leave your palate satisfied.

Convenience is key with this recipe. With just ten minutes of hands-on prep and a few simple ingredients, you can create a sauce that would rival those served in high-end restaurants. The blend of lemon and capers not only brightens up your meal but also harmonizes wonderfully, allowing you to serve gourmet-quality dishes with minimal effort.

In terms of nutrition, this sauce offers the health benefits of fresh lemon juice, which is known for its vitamin C content and antioxidant properties. The capers are not just flavorful but also provide small amounts of fiber and beneficial compounds, contributing to a balanced diet. This sauce is a guilt-free indulgence that can enhance your wellness journey.

Social and entertaining value is another highlight of this Lemon Caper Sauce. Its delightful flavor profile makes it a conversation starter at gatherings and parties. Guests will appreciate the fresh twist it adds to their dishes, making it a popular choice for those looking to impress. Its versatility allows for pairings with a variety of cuisines, making it an excellent choice for diverse palates.

Lastly, the cost-effectiveness of this recipe cannot be understated. With inexpensive ingredients that pack a flavorful punch, Lemon Caper Sauce is an accessible addition to any home cook’s repertoire. This means you can enjoy gourmet flavors without breaking the bank, allowing you to serve delectable meals regularly.

Historical Background and Cultural Significance

Lemon Caper Sauce has its roots in Mediterranean cuisine, particularly in countries like Italy and Greece where lemons and capers are staple ingredients. Historically, the use of capers dates back to ancient times, with their tangy flavor enhancing dishes across various cultures. Over time, the pairing of lemon with capers became synonymous with fresh seafood dishes, and it is now a beloved sauce used in many modern recipes.

The cultural significance of this sauce lies in its representation of coastal cooking, embodying the essence of simple yet bright flavors that characterize Mediterranean fare. It’s a sauce that reflects a lifestyle revolving around fresh ingredients, seasonal produce, and the joy of cooking together, making it popular among home chefs and professional cooks alike.

As culinary traditions evolved, Lemon Caper Sauce saw adaptations in various regions, often reflecting local ingredients and tastes. Some variations incorporate additional herbs, garlic, or even a touch of cream, further enriching its flavor profile. Each region’s take on the sauce demonstrates how food can bridge cultural divides, inviting everyone to the table.

Regional variations also highlight the flexibility of Lemon Caper Sauce in adapting to different cuisines. In some areas, it relates closely to sauces enjoyed with pasta or grilled vegetables, while in others, it finds itself at home paired with distinct dishes like fried fish or chicken piccata. This adaptability serves as a testament to its enduring popularity across palates and cultures.

Ingredient Deep Dive

Lemon is the star ingredient in this sauce, offering a bright and zesty flavor that lifts any dish. Rich in vitamin C and antioxidants, lemons are not only refreshing but also beneficial for your health. When selecting lemons, look for ones that are firm and bright yellow, indicating they are ripe and juicy. Store them in the refrigerator to prolong their freshness.

Capers are the other key ingredient in Lemon Caper Sauce. These small flower buds provide a burst of salty, briny flavor, adding complexity to the sauce. They are often packed in salt or vinegar, so rinse them before use to moderate their saltiness. Capers can be found in most grocery stores, and for best results, opt for the larger “nonpareil” variety. Keep them stored in their brine to maintain their flavor and freshness.

Olive oil plays a crucial role in creating the emulsion for this sauce. A high-quality extra virgin olive oil adds richness and enhances the overall flavor. Look for cold-pressed oils with fruity notes to complement the tanginess of the lemon. Store olive oil in a cool, dark place to keep it from going rancid.

Garlic, although optional, adds depth to the Lemon Caper Sauce. It can provide a subtle sweetness and robust flavor that balances the acidity of the lemon. Fresh garlic is always preferred, and when selecting, look for bulbs that are firm and without sprouting. Store whole bulbs in a cool, dry place, but once peeled, keep them in the refrigerator for freshness.

Finally, fresh herbs can elevate the sauce further. Parsley is a common choice, adding a burst of color and freshness. Herbs are best used fresh; however, dried herbs can be substituted in a pinch. When storing fresh herbs, place them in a jar with water or wrap them in damp paper towels to prolong their life.

Common Mistakes to Avoid

  • Using bottled lemon juice: Always opt for fresh lemon juice to achieve the best flavor profile. Bottled juice lacks the brightness of fresh juice and may contain preservatives.
  • Not rinsing capers: Failing to rinse capers can result in an overly salty sauce. Always wash them under cold water before incorporating them into your recipe.
  • Overcooking the sauce: The sauce only needs a brief cooking time to combine flavors; overcooking can dull its brightness. Aim for just a few minutes to heat everything through.
  • Skipping fresh herbs: Leaving out fresh herbs can make your Lemon Caper Sauce taste flat. Always consider adding parsley or thyme for added freshness.
  • Inadequate emulsification: Ensure that you whisk the olive oil in slowly when combining it with the other ingredients; this potency creates a creamy texture.
  • Ignoring the balance of flavors: It’s crucial to taste for seasoning! Adjust the acidity and salt levels to achieve the desired balance.
  • Using low-quality olive oil: The quality of olive oil greatly affects the taste. Always choose a flavorful extra virgin olive oil for optimal results.
  • Not allowing the sauce to rest: After making the sauce, let it sit for a few minutes to meld the flavors together, which enhances the overall taste.
  • Cooking on too high heat: Using high heat can burn the garlic if added. Always start on medium to low heat to develop flavors without burning.
  • Overlooking presentation: A visually appealing sauce enhances the overall dining experience. Consider garnishing with lemon zest or additional capers for presentation.

Essential Techniques

Creating an emulsion is a critical step in making Lemon Caper Sauce, as it combines the oil with the acid seamlessly. Begin by whisking together the lemon juice and other ingredients, then slowly drizzle in the olive oil while whisking continuously to maintain a smooth texture. Common pitfalls include adding the oil too quickly, which can prevent emulsification.

Juicing lemons properly is also an important technique. Roll the lemon on the counter before cutting it to release more juice. Cut it in half and use a hand juicer or reamer to extract every drop. Avoiding the seeds is crucial, as they can add bitterness to your sauce.

Pro Tips for Perfect Lemon Caper Sauce

Select the ripest and juiciest lemons possible for your sauce to ensure maximum flavor and acidity. Look for bright yellow color and a slight give when pressed. This ensures the freshest taste.

When making the sauce, don’t hesitate to adjust the levels of lemon juice based on your taste preference. Start with less and slowly increase until achieving the desired tanginess, as personal preferences can vary significantly.

Consider blending in butter for a luscious finish. Butter will lend a silky texture and round out the sauce’s tanginess, creating a richer flavor. Just remember to remove it from heat before adding the butter to prevent separation.

For added depth of flavor, try including a teaspoon of Dijon mustard in the sauce. It complements the lemon and capers beautifully and contributes to that iconic creamy texture.

If you prefer a smoother texture, consider blending the sauce in a food processor after the initial cooking. This will create an entirely different mouthfeel that some may prefer.

When serving, a sprinkle of freshly cracked black pepper can enhance the overall presentation and add a dash of spice. Fresh herbs like parsley or dill will also brighten the dish visually and flavor-wise.

Final tip: allow the sauce to rest for at least 10 minutes before serving. This resting time allows the flavors to meld beautifully, resulting in a sauce that tastes even better than when freshly mixed.

Variations and Adaptations

Lemon Caper Sauce can be tailored to regional tastes, such as adding a splash of red wine vinegar for a more robust flavor or incorporating anchovies for a savory kick. You might also experiment with various citrus fruits, like lime or orange, to create your unique version of this sauce.

In terms of seasonal adaptations, consider adding seasonal herbs or veggies. In the summer, fresh basil can add a lovely fragrant twist, while in the fall, a hint of sage can complement the sauce beautifully. Adapt the ingredients based on what’s available at your local farmers’ market.

Dietary modifications are easy with Lemon Caper Sauce. Making it vegan? Substitute olive oil for avocado oil, and skip on adding butter. This way, you can maintain its delicious flavor without sacrificing your diet.

Flavor variations can be abundant; try adding finely chopped shallots or garlic for extra depth. If you enjoy a bit of heat, a touch of red pepper flakes can bring in an exciting kick to your sauce.

Texture modifications can also enhance your dish; blending in a silken tofu makes for a creamier, healthier alternative. Alternatively, adding minced nuts like almonds can provide a pleasant crunch.

For presentation, creating a color contrast with a bright herb salad on top of the dish just before serving will make the meal look more appealing and provide an exciting mix of flavors and textures.

Serving and Presentation Guide

Plating techniques can greatly enhance the visual appeal of Lemon Caper Sauce. Consider drizzling the sauce in a circular pattern on the plate, and placing your main dish atop it to create a stunning contrast.

Garnishing ideas can take your dish to the next level. Fresh herbs, such as parsley or chives, sprinkled on top will add color and vibrancy. Lemon zest can also add a pop of color and a burst of flavor to the dish.

Traditional accompaniments for Lemon Caper Sauce include grilled fish or chicken, which beautifully complement its bright flavor profile. For a modern twist, try it drizzled over roasted vegetables or pasta.

Temperature considerations are key as well; serve the sauce warm for a more comforting meal. If using it as a marinade, refrigeration will only deepen the flavors and enhance the taste.

Portion control tips can include serving the sauce in small dishes, allowing each guest to add as much or as little as they like, ensuring everyone enjoys the dish according to their taste preferences. This approach makes for a more personalized dining experience.

Wine and Beverage Pairing

Wine pairings with Lemon Caper Sauce are delightful; a crisp Sauvignon Blanc with its acidity marries beautifully with the zesty flavors. Alternatively, a chilled Pinot Grigio can complement the brightness of the sauce.

For non-alcoholic alternatives, consider sparkling water with a lime wedge to enhance the meal without the alcohol. The bubbles in the drink can provide a refreshing contrast to the richness of the food.

Should you wish to indulge in coffee or tea, a light herbal tea, such as chamomile or mint, would balance well without overpowering the dish.

Temperature considerations also come into play. While serving wine, ensure it is chilled—Sauvignon Blanc and Pinot Grigio are best served between 42-50°F to maintain their freshness and vibrancy.

Lastly, serving suggestions like pairing Lemon Caper Sauce with light appetizers can make for a delightful dining experience; think of serving with crudité or bruschetta topped with a dollop of the sauce to engage guests right from the start.

Storage and Shelf Life

Storage methods for Lemon Caper Sauce should involve an airtight container in the refrigerator, where it can last up to one week. The sauce tastes best when fresh but will maintain quality for a few days due to its acidic nature.

Temperature requirements need attention. Always ensure the sauce is refrigerated promptly after use, especially if you’ve made a larger batch. Leaving it out at room temperature can spoil the flavors and ingredients.

Container recommendations include glass jars for storage since they do not retain odors and allow for easy visibility of the contents. Ensure the jar has a tight seal to keep air out.

Signs of spoilage include an off smell or discoloration; if you notice these changes, it’s best to discard the remaining sauce. Freshness is key in maintaining the vibrant flavor of Lemon Caper Sauce.

For reheating instructions, gently warm the sauce in a saucepan on low heat, whisking to restore its emulsion. Avoid boiling it as it can alter the freshness and taste.

Freezing guidelines recommend against freezing due to the sauce’s acidity and texture changes when thawed. Aim to make just the amount you need to enjoy fresh and vibrant flavors.

Make Ahead Strategies

Prep timelines for optimizing this sauce involve prepping fresh lemons and capers in advance, as they can be covered and stored until you’re ready. Aim for a quick assembly just before serving for optimal taste.

Storing between steps can make your preparation easier, especially if you want to prepare more complex meals. Chop ingredients early but avoid mixing until just before use, ensuring the freshest taste.

Quality impact assessment is vital; some flavors will enhance overnight in the refrigerator. Consider making the sauce a few hours prior for optimal flavor melding, balancing between fresh and developed flavors.

Assembly tips include prepping everything in advance—having your ingredients ready provides ease during the cooking process. Quickly whisk everything while enjoying a relaxed, enjoyable cooking experience.

Reheating guidelines suggest gently warming to restore the sauce’s original texture. Always whisk during reheating, helping it return to its smooth consistency. Avoid overheating to prevent separation.

Lastly, add fresh elements, like herbs, just before serving. These will add brightness and freshness, enhancing the visual and flavor profile of your dish.

Scaling Instructions

Halving the recipe is simple—just divide all ingredients by two. This approach allows you to create a smaller batch for intimate meals or testing the sauce for the first time.

Doubling or tripling requires careful consideration of your mixing method and cooking vessel. Use a larger saucepan to accommodate the increase in volume and ensure an even heat distribution.

Equipment adjustments may be necessary; ensure that all your tools, like the mixing bowl and whisk, can handle the increased quantities without compromising the emulsion process.

Timing modifications involve slightly longer mixing if you double the recipe; just be attentive to ensure the sauce remains well-blended and emulsified without losing its quality.

Storage considerations become important when scaling. Make sure to provide enough space in your container for potential expansions during at-home storage, especially if preparing larger quantities in advance.

Nutritional Deep Dive

Macro breakdown for Lemon Caper Sauce will vary depending on the ingredient quantities used, yet the overall composition features healthy fats from the olive oil and minimal calories, making it a great addition to any meal without excessive guilt.

Micronutrient analysis shows this sauce as a source of vitamin C from lemons and beneficial compounds found in capers, which are also known for their antioxidant properties. They make the sauce not only delicious but also nutritious.

Health benefits of fresh lemon juice extend to aiding digestion and promoting hydration, while capers, being low in calories, contribute to a feeling of fullness without excess caloric intake.

Dietary considerations should include the potential for high sodium levels from capers, especially for those on sodium-restricted diets. Adjust usage accordingly to maintain a balanced approach.

Portion analysis per serving can be noted, with one tablespoon typically providing rich flavor with minimal caloric impact. A little goes a long way, supporting portion control while enhancing your meals.

Weight management tips should involve using sauces like Lemon Caper Sauce in place of heavier dressings or sauces, making every meal feel indulgent without contributing excessive calories.

Dietary Adaptations

For gluten-free individuals, Lemon Caper Sauce is naturally safe, as it contains no gluten-containing ingredients. Always double-check for cross-contamination if using pre-packaged components, such as capers.

Dairy-free diets can easily accommodate this sauce by avoiding any butter additions or creamy elements, which make it a versatile option for many dietary restrictions.

For those following a vegan lifestyle, simply exclude the butter or replace it with a vegan-friendly alternative, ensuring this delicious sauce remains plant-based while staying flavorful.

Individuals on low-carb or keto diets can enjoy Lemon Caper Sauce as the ingredients are mostly low in carbs, allowing for flavorful meals without interfering with nutritional targets.

Paleo-friendly adaptations can include replacing the olive oil with ghee for its beneficial fats while ensuring that no processed ingredients make their way into the sauce.

For low-FODMAP diets, ensure you avoid any garlic additions, as it can trigger symptoms, while maintaining the bright essence of the sauce with the right balance of lemon and capers.

Additionally, those with specific dietary needs may explore other modifications, such as substituting capers with olives, offering a new twist while preserving the sauce’s vibrancy.

Troubleshooting Guide

Texture issues can arise if the emulsion breaks due to temperature changes or adding ingredients too quickly. To fix this, whisk more vigorously or add a small amount of water while heating, which can help restore smoothness.

Flavor balance issues can emerge from overly salty capers or too much lemon. Always taste before serving; if it’s too salty, add more olive oil or water to dilute flavors and achieve harmony.

Temperature problems may occur if the sauce is overheated during cooking; if it separates, emulsion is lost. Simply cool it down, then re-emulsify by whisking at room temperature.

Equipment challenges can happen if your tools are not suited for making sauces. Ensure you’re using a robust whisk, blender, or food processor to adequately blend the ingredients without failure.

Ingredient substitutions can lead to drastic flavor profile changes. Always test small batches if substituting a key ingredient to determine compatibility while keeping the integrity of the original recipe intact.

Timing concerns often arise with new cooks. Ensure you have all ingredients prepped in advance to make the cooking process seamless and reduce the risk of overcooking any components.

Recipe Success Stories

Community feedback on Lemon Caper Sauce is overwhelmingly positive, with many chefs praising its simplicity and versatility. Feedback notes highlight how it transforms a basic dinner into a gourmet experience with just a few steps.

Variation successes are often shared online, showcasing how other home cooks have added their unique spins by incorporating local ingredients or tweaking flavors to suit personal palettes.

Adaptation stories can be inspiring, where individuals have taken this sauce into their homes and used it as a base for numerous meal preps, demonstrating its adaptability to varying dishes throughout the week.

Readers frequently share photography tips, noting how bright plates highlight the sauce’s vibrancy. Many have found success in using contrasting colors when serving dishes, enhancing overall engagement.

Overall, success stories showcase the joy of Lemon Caper Sauce as a family favorite, bringing people together at the dinner table with flavorful and memorable experiences. It’s a testament to how simple ingredients can create lasting memories.

Frequently Asked Questions

1. How long does Lemon Caper Sauce last in the fridge?

Lemon Caper Sauce generally lasts for up to a week when stored in an airtight container in the refrigerator. The flavors may continue to meld, enhancing the taste as it sits.

2. Can I freeze Lemon Caper Sauce?

It is not recommended to freeze Lemon Caper Sauce, as the acid from the lemons and the texture of the capers can change upon thawing. It’s best enjoyed fresh.

3. What dishes pair well with Lemon Caper Sauce?

This sauce works wonderfully with grilled fish, chicken, vegetables, and pasta. It adds a bright note to any protein or starch, enhancing the overall flavor profile of the meal.

4. Can I make this sauce without capers?

While capers are the signature ingredient, you may substitute them with chopped olives for a different flavor. However, the briny taste of capers contributes significantly to the sauce’s essence.

5. Is this sauce vegan-friendly?

Yes, Lemon Caper Sauce is vegan as long as you omit butter or use a plant-based alternative. The primary ingredients are lemon juice and olive oil, which are suitable for a vegan diet.

6. How do I enhance the flavor of the sauce further?

Consider adding finely minced garlic, fresh herbs, or a touch of Dijon mustard for a different flavor dimension! Each additional ingredient can complement the bright taste beautifully.

7. What if my sauce is too acidic?

If the sauce comes out too acidic, adding a small amount of sugar or honey can help balance the flavors. Keep adjusting until you find the right taste for your preference.

8. Can I adjust the recipe for my dietary needs?

Absolutely! Lemon Caper Sauce can be easily modified; from gluten-free to dairy-free and even low-carb by mixing and matching alternative ingredients while maintaining its delightful taste.

9. How do I store leftover sauce?

Keep any leftover Lemon Caper Sauce in an airtight container in the fridge. It can be kept for about a week, but it is best enjoyed fresh.

10. Can I make this sauce with other citrus fruits?

Yes! You can experiment with limes or oranges to create different nuances of flavor while still retaining the sauce’s original character. Just adjust the amount to balance acidity.

Additional Resources

For those eager to explore more, consider checking out related recipes that utilize similar flavors, such as Chicken Piccata or Pasta Primavera. It’s also helpful to read up on specific techniques for emulsions or ingredient uses in other dishes.

Ingredient information is beneficial, especially when learning about capers and lemons: you can delve into culinary blogs that detail their health benefits and usage tips for perfecting your cooking.

Equipment recommendations for making sauces may include quality whisk sets, blending tools, and storage containers—all of which will aid in creating delightful flavors in your kitchen.

Seasonal variations such as adapting sauces for winter comfort foods can offer insights into how this sauce can be modified for various seasons, ensuring your meals stay fresh and exciting year-round.

Join the Conversation

Engage with our community by sharing your Lemon Caper Sauce success stories on social media! Use trending hashtags related to your cuisine or meals to gather inspiration and connect with others.

Photography tips are always welcomed; share your efforts to capture that stunning plate, focusing on how you styled your dishes to showcase the sauce beautifully.

Recipe reviews help create a sense of community and shared ideas, so be sure to leave your insights—what you loved, what you’d change, and any tips for future cooks.

Community engagement can truly enhance the cooking experience. Don’t hesitate to ask questions, suggest variations others have tried, or even share feedback on how the sauce fits into your culinary journey. We’re all in this delicious venture together!

The Recipe

Lemon Caper Sauce

Serves: 4

Prep Time: 10 mins

Cook Time: 5 mins

Total Time: 15 mins

Kitchen Equipment Needed

  • Whisk
  • Small saucepan
  • Measuring cups and spoons
  • Citrus juicer

Ingredients

  • 1/4 cup fresh lemon juice
  • 1/4 cup capers, rinsed and drained
  • 1/2 cup extra-virgin olive oil
  • 1 tablespoon fresh parsley, chopped (optional)
  • Salt and pepper to taste

Directions

  1. In a small saucepan over medium heat, combine lemon juice and capers. Heat for 2-3 minutes to warm through.
  2. Gradually whisk in the olive oil until the mixture is smooth and emulsified.
  3. Season with salt and pepper to taste, and stir in parsley if using.
  4. Remove from heat and let sit for 10 minutes before serving to meld flavors.
  5. Drizzle generously over your favorite grilled meat, seafood, or vegetables.

Recipe Notes

  • Try adding minced garlic for an added depth of flavor.
  • Feel free to adjust the lemon juice quantity based on your taste preference.
  • Fresh herbs can be switched out for others like dill or thyme for a different twist.