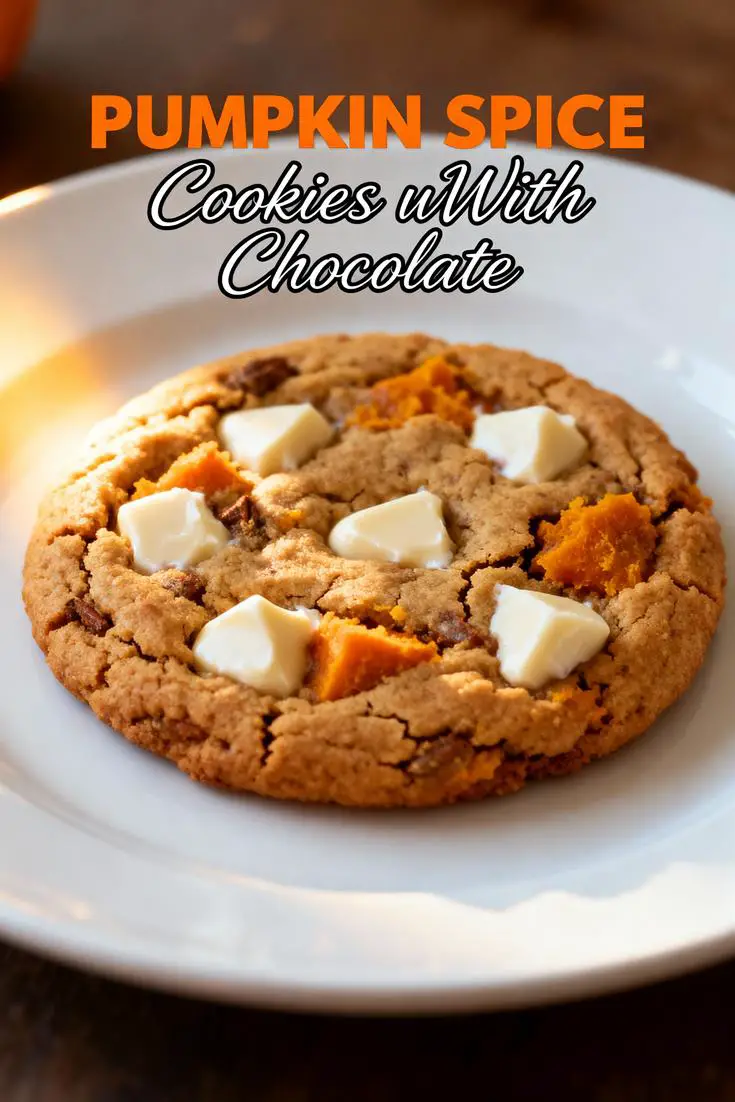
Delicious Garlic-Butter Chicken Bites with Creamy Parmesan Pasta

Garlic-Butter Chicken Bites with Parmesan Cream Pasta: A Creamy Delight for Dinner

⚖️
Difficulty
Easy

⏲️
Prep Time
15 mins

🕒
Cook Time
20 mins

⏱️
Total Time
35 mins

🍽️
Servings
4 servings

Garlic-Butter Chicken Bites with Parmesan Cream Pasta is an exquisite dish that brings richness and comfort to your dinner table. The tender and juicy chicken bites, saturated in a luscious garlic-butter sauce, marry beautifully with the creamy Parmesan pasta. The amalgamation of flavors dances on your palate – the garlic’s aromatic presence complemented by the nuttiness of the Parmesan cheese. This dish not only fills your stomach but warms your heart, making it the perfect meal for busy weeknights or a special gathering with loved ones.

What makes this recipe stand out is its simplicity without sacrificing flavor. With just a few ingredients, you’ll have a hearty meal that impresses both in taste and presentation. Creamy pasta can often feel heavy, but the garlic-butter sauce adds a light, fragrant touch that enhances the overall dining experience. Add a sprinkle of fresh herbs for a pop of color and a burst of freshness, transforming your simple dinner into a gourmet affair.

Quick Recipe Highlights

  • Flavor Profile: Rich and savory with hints of garlic and creamy Parmesan, balanced by the tender chicken.
  • Texture: The chicken bites are juicy, while the pasta is silky and creamy, creating a mouthwatering contrast.
  • Aroma: The garlic-butter sauce releases an inviting aroma that fills your kitchen, enticing everyone to dine.
  • Visual Appeal: The golden chicken bites paired with the creamy white pasta and vibrant herbs make for an attractive presentation.
  • Skill Level Needed: This dish is simple enough for beginner cooks but can be elevated by experienced chefs with pro techniques.
  • Special Equipment: A skillet and a pot for boiling pasta are all you need, along with basic kitchen utensils.

Recipe Overview

  • Difficulty Level: This dish is classified as easy due to its uncomplicated steps and brief preparation time, making it perfect for home cooks of all levels.
  • Category: A delightful option for a main course, it shines in family dinners, casual gatherings, or romantic evenings.
  • Cuisine: Drawing inspiration from Italian-American cuisine, this recipe blends traditional flavors with modern convenience.
  • Cost: The cost of making this dish is quite economical, with primary ingredients like chicken and pasta being affordable staples.
  • Season: Garlic-Butter Chicken Bites with Parmesan Cream Pasta is versatile for any season, making it a comforting meal year-round.
  • Occasion: Ideal for weeknight dinners or cozy weekends, it’s also a crowd-pleaser for potlucks or family feasts.

Why You’ll Love This Recipe

The harmonious blend of garlic and butter permeates the chicken bites, creating a savory taste that complements the creamy pasta perfectly. Every bite is a delightful contrast between the tender chicken and pasta, enveloped in a silky sauce that feels indulgent yet comforting.

What sets this recipe apart is the convenience of preparation. With just one skillet required for cooking the chicken and sautéing the sauce, cleanup is a breeze. This ease makes it suitable for those juggling busy schedules yet yearning for a homemade meal that tastes like a restaurant specialty.

From a nutritional viewpoint, this dish provides protein from the chicken while offering carbohydrates from the pasta. The addition of garlic not only enhances flavor but also offers health benefits, making this a guilt-free indulgence.

When hosting friends or family, Garlic-Butter Chicken Bites with Parmesan Cream Pasta becomes a centerpiece that sparks conversations and creates memorable moments. Its aroma draws guests to the table, while its taste leaves a lasting impression.

In terms of cost-effectiveness, this dish utilizes affordable ingredients without compromising taste or quality. It’s a reassuring choice for any home cook looking to impress their families or guests with a delectable meal that won’t break the bank.

Historical Background and Cultural Significance

The origins of garlic and butter can be traced back centuries, with both ingredients featuring prominently in various cultures around the world. Garlic, revered for its flavor and health benefits, has been celebrated in Mediterranean cooking for generations, while butter has long been a staple in numerous culinary traditions.

Garlic-Butter Chicken Bites with Parmesan Cream Pasta represents the blend of Italian and American cuisines, where simple yet flavorful ingredients come together to create a hearty meal. This dish reflects the Italian-American community’s cooking styles, which evolved as immigrants adapted traditional recipes to suit available ingredients.

Over time, variations of this basic recipe have emerged, showcasing different sauces and cooking styles, while maintaining the same core principles of comfort and flavor. This evolution allows home cooks to personalize the dish according to their taste preferences.

Regional variations include the use of different herbs or vegetables, showcasing how this versatile recipe can be adapted to reflect local ingredients. Whether in a family kitchen or at a festive gathering, this dish embodies the spirit of sharing and togetherness.

Ingredient Deep Dive

Chicken: Chicken is a widely eaten protein source, appreciated for its versatility. Its lean meat offers essential amino acids while being lower in fat compared to red meats. When selecting chicken, look for fresh pieces with a consistent color and firm texture. Proper storage involves refrigerating or freezing, and it can be substituted with turkey for a lighter option.

Parmesan Cheese: This hard cheese originates from Italy and is renowned for its robust flavor and granular texture. Parmesan is rich in calcium and protein and adds umami to dishes. For freshness, choose a wedge to grate at home rather than pre-grated options. It pairs beautifully with many dishes, but if unavailable, pecorino Romano works well as a substitute.

Common Mistakes to Avoid

  • Overcooking the chicken can lead to dryness; ensure to cook until just done, retaining moisture.
  • Using pre-grated Parmesan may not yield the same flavor intensity; always choose fresh where possible.
  • Boiling pasta too long can result in a mushy texture; aim for al dente for the best bite.
  • Ignoring the importance of seasoning during each step can lead to a bland dish, so taste as you cook.
  • Not letting the chicken rest before cutting can result in lost juices; allow it to rest for a few minutes.
  • Using a cold skillet to sear the chicken will hinder browning; always preheat the skillet.
  • Mechanical mixing of the pasta and sauce can cause it to break apart; gently fold together for the best results.
  • Skipping the fresh herbs can diminish the visual appeal and aromatic qualities of the dish.

Essential Techniques

Searing is crucial for developing flavor through caramelization, ensuring that the chicken bite captures an appealing crust. To master it, allow the skillet to heat adequately and avoid overcrowding the pan. Look for a golden-brown color as a sign of perfectly seared meat.

Making a cream sauce requires careful attention to prevent curdling or separation. Slowly incorporating the cheese while maintaining a consistent low heat will result in a smooth, velvety sauce. Be vigilant and stir often to create a unified texture.

Pro Tips for Perfect Garlic-Butter Chicken Bites with Parmesan Cream Pasta

1. Marinate the chicken briefly in olive oil, garlic, and herbs for enhanced flavor absorption.
2. Use salted butter to add another layer of flavor to the dish, balancing the richness of the sauce.
3. Fresh herbs, like parsley or basil, make excellent garnish for a burst of color and freshness.
4. Incorporate vegetables such as spinach or peas into the pasta for added nutrition and color.
5. For a spicy kick, add red pepper flakes to the garlic-butter sauce during cooking.
6. Always have your ingredients prepared and ready before cooking; this streamlines the process significantly.
7. Experiment with different pastas for varied textures; options like penne or fettuccine work well.
8. To give leftovers an extra flavor boost, reheat them with a splash of cream or broth.

Variations and Adaptations

For a touch of regional flair, consider adapting the recipe to reflect different cuisines. For instance, you could add Italian sausage for a unique flavor profile or incorporate Mediterranean veggies for a fresh twist.

Seasonal adaptations can include roasted vegetables in the fall or summer squash and tomatoes for a sunny, bright plate. This allows one to enjoy the recipe year-round while highlighting what’s freshest and most flavorful.

Dietary modifications are also possible; swapping regular pasta with gluten-free pasta will accommodate those with gluten sensitivities. If you aim for a lighter dish, consider using zucchini noodles instead of traditional pasta.

Flavor variations can be integrated with different cheeses, such as creamy goat cheese or a spicy pepper jack, providing a delightful and unique twist.

Texture modifications can be achieved by using panko breadcrumbs on the chicken for an extra crunch instead of just sautéing it.

Presenting the dish can be done creatively by layering the pasta and chicken in a beautiful serving dish, garnishing with lemon zest and chopped herbs for added brightness.

Serving and Presentation Guide

Consider using large, shallow bowls for plating the pasta, allowing the creamy sauce to pool beautifully around the ingredients. Garnishing with fresh herbs enhances the visual appeal and adds a burst of color and aroma.

For a more elegant touch, try drizzling a bit of high-quality olive oil on top before serving, which adds flavor and a glossy sheen.

Traditional accompaniments, such as garlic bread or a fresh garden salad, can enhance the dining experience, offering texture and freshness that complements the richness of the pasta.

Modern serving suggestions might include using small cast-iron skillets for individual servings, creating a rustic charm while keeping the food warm.

When it comes to temperature considerations, ensure the dish is served hot for the best taste experience, as creamy sauces tend to lose their appeal when lukewarm.

Portion control can be managed by serving smaller amounts in visually appealing dishes, allowing guests to enjoy the indulgent flavors without overloading their plates.

Wine and Beverage Pairing

For an ideal pairing, a crisp white wine like Sauvignon Blanc complements the richness of the creamy pasta beautifully, cutting through the butter and enhancing the flavors of the chicken.

Non-alcoholic alternatives include sparkling water with a squeeze of lemon or an herbal iced tea, providing a refreshing contrast to the rich dish.

Coffee or a light tea served after the meal can nicely round out the experience, enhancing the overall enjoyment of the evening.

Temperature considerations are key when serving wine; whites should be chilled while reds served slightly below room temperature offer a balanced palate.

For a sparkling wine option, Prosecco pairs wonderfully without overpowering the dish, maintaining a light and celebratory atmosphere.

Storage and Shelf Life

Store any leftovers in an airtight container in the refrigerator. Under proper conditions, they can last up to 3 days, preserving both taste and texture.

For longer storage, the dish can be frozen, albeit understanding that the cream may alter in texture but still remain delicious. Reheating should be gently achieved on low heat to avoid breaking the sauce.

Check for signs of spoilage, like off-odors or unusual textures, before consuming. It’s crucial to ensure that leftovers remain enjoyable and safe.

Reheating instructions involve warming gently in a saucepan over low heat, sparing the creamy texture and enhancing the flavors once more without any loss.

Freezing guidelines suggest portioning out the pasta and chicken separately for better quality upon thawing, ensuring each component retains its structure when defrosted.

Make Ahead Strategies

One can prep the chicken bites ahead of time by marinating them in garlic and butter, enhancing flavor and tenderness while saving time during the main cooking session.

Storage between steps can involve preparing the cream sauce in advance; simply warm it up before mixing it with freshly cooked pasta and chicken.

Quality impact assessment reveals that while the chicken stays flavorful when marinated beforehand, avoid making the cream sauce too early, which can alter its smooth texture.

Assembly tips should include cooking the pasta just before serving to maintain its ideal texture, ensuring it doesn’t become mushy during storage.

Reheating guidelines should prioritize using low heat to preserve flavors, along with stirring in a splash of cream to rejuvenate the sauce.

Adding fresh elements, like herbs or a squeeze of lemon, just before serving can greatly elevate the dish, ensuring it tastes fresh and vibrant.

Scaling Instructions

When halving the recipe, it’s simple to divide all ingredients, ensuring a consistent flavor profile for smaller servings.

Doubling or tripling the recipe requires adjusting cooking times; you may need to cook the chicken in batches to ensure even browning and cooking throughout.

Equipment adjustments come into play when scaling up; larger pots or pans may be necessary to accommodate increased ingredients without overcrowding.

Timing modifications become important, as larger batches may take longer to cook through; maintain an eye on smaller pieces for faster cooking.

Lastly, consider storage for different quantities, ensuring there’s adequate room in your fridge for leftovers if making a big batch.

Nutritional Deep Dive

A macro breakdown of Garlic-Butter Chicken Bites with Parmesan Cream Pasta reveals a balanced meal containing protein from the chicken, carbohydrates from the pasta, and fats from the butter and cheese.

Micronutrient analysis shows essential vitamins and minerals present in garlic, like vitamin C and B6, which enhance overall health, while the presence of calcium in Parmesan supports bone health.

Health benefits also include the inclusion of garlic, recognized for its potential to bolster the immune system and enhance cardiovascular health.

Dietary considerations for this dish can accommodate variance depending on personal or cultural needs. Careful ingredient choices can make it a more inclusive menu option.

Portion analysis confirms this recipe allows for substantial servings packed with flavor yet manageable enough to avoid heaviness, fitting into most dietary patterns well.

Weight management tips would suggest recognizing portion sizes as the dish is creamy and rich, making control essential for a enjoyable experience without excess.

Dietary Adaptations

For a gluten-free variation, utilize gluten-free pasta options, ensuring all ingredients are compliant to achieve a safe meal for those with sensitivities.

Dairy-free adaptations can involve the usage of almond or cashew cream instead of traditional creams, while nutritional yeast can offer a cheesy flavor without dairy.

For vegan diets, swapping chicken with a protein source like chickpeas or tempeh will still allow enjoyable flavor profiles, utilizing plant-based alternatives.

Low-carb dieters could replace traditional pasta with zoodles (zucchini noodles) to align with their eating preferences while retaining delicious flavors.

The Keto and Paleo diets can similarly utilize high-protein, low-carb substitutes to maintain flavor, prioritizing healthy fats for energy.

Low-FODMAP adaptations must be carefully crafted to include lactose-free creams and avoiding high-FODMAP ingredients for a compliant dish.

Troubleshooting Guide

If you’re managing texture issues, ensure the pasta achieves an al dente state before combining with the sauce. This prevents a gummy result and retains bite.

Flavor balance can be adjusted by tasting as you cook; add a pinch of salt or a squeeze of lemon juice to brighten flavors if they’re too rich.

Temperature problems can be mitigated by allowing the dish to heat slowly; reheating too quickly can disrupt the sauce’s creamy texture.

Equipment challenges might arise from using the wrong pan; always select a large enough skillet to accommodate the chicken evenly for optimal browning.

Ingredient substitutions can lead to unexpected results; when doing so, maintain a close watch on cooking times so that they adjust accordingly.

Timing concerns with chicken cook times can be resolved by utilizing a meat thermometer to ensure it reaches safe internal temperatures without drying out.

Recipe Success Stories

Community feedback often highlights the dish’s enjoyable richness combined with simplicity, making it a family favorite in many households.

Variation successes include those who adapt the dish with seasonal vegetables, enhancing nutritional value while adhering to personal tastes.

Readers suggest using whole-grain pasta for added fiber and a nutty flavor, showcasing an interest in healthier adaptations while still enjoying comfort food.

Photography tips often recommend capturing the creamy texture of the sauce and the golden chicken in natural light to emphasize the dish’s inviting nature and appeal.

Overall, the recipe’s adaptability allows it to meet diverse dietary needs, establishing itself as a versatile addition to weeknight dinners or special occasions alike.

Frequently Asked Questions

Can I use frozen chicken for this recipe?

Yes, you can use frozen chicken, but ensure it’s fully thawed in the refrigerator before cooking to ensure even cooking throughout.

How can I make the dish a bit spicier?

To add a spicy kick, incorporate crushed red pepper flakes into the garlic-butter sauce along with herbs of your choice.

Can I substitute the pasta with something else?

Absolutely! Zucchini noodles or spaghetti squash can work well as lower-carb alternatives that still absorb the flavors beautifully.

Is this dish suitable for meal prep?

Yes, it’s excellent for meal prep! Store in individual containers for up to three days for easy reheating throughout the week.

Does the sauce thicken over time?

Yes, the sauce may thicken as it cools down; if this occurs, add a splash of chicken or vegetable broth during reheating for creaminess.

What can I pair with this dish?

A light salad, garlic bread, or roasted vegetables make excellent side dishes that complement the creaminess of the pasta.

Can I make a vegetarian version of this recipe?

Certainly! Swap the chicken with tofu or tempeh for a vegetarian option that still captures all the delicious flavors.

How do I store leftovers?

Store leftovers in an airtight container in the refrigerator for up to three days. For longer storage, consider freezing them.

Can I use a different cheese?

Yes, feel free to experiment! Cheeses like goat cheese or mozzarella can provide different flavors and textures to the sauce.

What is the best way to reheat the leftovers?

Gently reheat in a saucepan over low heat, stirring often to retain the sauce’s creamy consistency without burning.

Additional Resources

For those interested in expanding their culinary repertoire, explore related recipes that incorporate similar flavors, such as Creamy Mushroom Pasta or Garlic Shrimp Alfredo.

Embark on technique guides available online to enhance fundamental skills admired in gastronomy, like sauce-making and ingredient pairing.

Ingredient information helps you understand seasonal availability, nutritional benefits, and best practices for selection and storage, making for a well-rounded culinary experience.

Equipment recommendations for a functional kitchen highlight must-have tools for cooking success, ensuring you approach each recipe with the right tools for the job.

Seasonal variations inspire creativity when utilizing fresh ingredients, resulting in vibrant flavors while keeping meals exciting and new.

Join the Conversation

Engage with our community by sharing your experiences or photos of Garlic-Butter Chicken Bites with Parmesan Cream Pasta on social media.

Seek out and offer photography tips for capturing the beauty of the dish, making your experience not just about taste, but visual delight too.

Recipe reviews encourage feedback from fellow cooks, allowing for recipe refinements and exchanges of variations that may inspire others.

Active community engagement brings together passionate cooks with a love for flavor and creativity, making the cooking experience a shared joy.

Explore recipe variations that cater to different dietary preferences and share your unique interpretations with others, enhancing our collective culinary adventure.

The Recipe

Garlic-Butter Chicken Bites with Parmesan Cream Pasta

Serves: 4 servings

Prep Time: 15 mins

Cook Time: 20 mins

Total Time: 35 mins

Kitchen Equipment Needed

  • Skillet
  • Large Pot
  • Measuring Cups and Spoons
  • Wooden Spoon or Spatula
  • Knife and Cutting Board

Ingredients

  • 1 pound of chicken breasts, cubed
  • 4 tablespoons of unsalted butter
  • 4 cloves of garlic, minced
  • 1 cup of heavy cream
  • 1 cup of grated Parmesan cheese
  • 8 ounces of pasta of your choice
  • Salt and pepper, to taste
  • Fresh parsley, for garnish

Directions

  1. In a large pot, boil salted water and cook the pasta according to package instructions until al dente.
  2. Meanwhile, in a skillet, melt 2 tablespoons of butter over medium heat, then add cubed chicken. Season with salt and pepper.
  3. Cook the chicken for about 7-8 minutes, stirring occasionally, until golden and cooked through. Remove from the pan and set aside.
  4. In the same skillet, melt the remaining butter, add minced garlic, and sauté for 1-2 minutes until fragrant.
  5. Reduce heat and stir in the heavy cream, slowly incorporating the Parmesan cheese until the sauce is thick and creamy.
  6. Add the cooked pasta and chicken back to the skillet, stirring to combine everything well. Adjust seasoning as necessary.
  7. Serve hot, garnished with fresh parsley and additional Parmesan if desired.

Recipe Notes

  • Fresh herbs enhance the dish; try adding basil or thyme for different flavor profiles.
  • For a lighter version, consider substituting half of the heavy cream with chicken broth.
  • Feel free to add vegetables like spinach or peas for added nutrition.

Savory Crockpot French Onion Meatloaf Topped with Swiss Cheese

Crockpot French Onion Meatloaf with Melted Swiss Cheese: A Comfort Food Delight

⚖️
Difficulty
Easy

⏲️
Prep Time
15 mins

🕒
Cook Time
6 hours

⏱️
Total Time
6 hours 15 mins

🍽️
Servings
6 servings

This Crockpot French Onion Meatloaf with Melted Swiss Cheese is a dish that combines the rich, savory flavors of classic French onion soup with the comfort of a hearty meatloaf. The tenderness of the meatloaf is beautifully complemented by the gooey, melted Swiss cheese on top, creating a union of textures that makes every bite a delight. Perfect for family dinners, this recipe is not only satisfying but is also simple to prepare, making it an impressive meal with minimal fuss.

The aromatic notes of caramelized onions and herbs waft through the kitchen as this decadent dish simmers in your crockpot. This rich aroma heightens anticipation, making it an excellent choice for gatherings and cozy evenings at home. Whether paired with mashed potatoes, a fresh salad, or crusty bread, you’ll find that this meatloaf satisfies both the stomach and the soul.

Quick Recipe Highlights

  • Flavor Profile: The combination of savory ground beef, sweet caramelized onions, and tangy Swiss cheese creates a delightful flavor explosion.
  • Texture: The soft, moist meatloaf contrasts perfectly with the gooey, melt-in-your-mouth cheese topping.
  • Aroma: An enchanting bouquet of caramelized onions, herbs, and simmering meat fills the air.
  • Visual Appeal: Golden cheese atop a perfectly formed meatloaf makes for a stunning presentation.
  • Skill Level Needed: This recipe is beginner-friendly, requiring minimal cooking skills.
  • Special Equipment: A crockpot is essential for slow cooking this dish to perfection.

Recipe Overview

  • Difficulty Level: This easy recipe is perfect for novice cooks, requiring simple preparation and minimal monitoring.
  • Category: As a main dish, this meatloaf fits well into the comfort food category.
  • Cuisine: Inspired by French cuisine, this recipe takes classic elements and turns them into a family favorite.
  • Cost: The ingredients are affordable and readily available, making this dish accessible for most budgets.
  • Season: Ideal for cooler months, this hearty dish is perfect for fall and winter meals.
  • Occasion: It’s a great choice for family dinners, potlucks, or casual gatherings with friends.

Why You’ll Love This Recipe

This Crockpot French Onion Meatloaf is not just about taste; it promises comfort in every bite. The combination of ground beef and tender caramelized onions enveloped in melted Swiss cheese gives an indulgent experience that invites seconds. Every mouthful bursts with flavors reminiscent of cold weather comfort food, and the slow cooking makes the meatlov especially juicy and tender.

The convenience of using a crockpot elevates this recipe even further. You can simply throw the ingredients together in the morning, set it to cook, and forget about it until dinnertime. This hands-off approach makes it perfect for busy individuals or families looking for a hearty home-cooked meal without the stress of active cooking.

Besides being delicious, this meatloaf is also packed with nutrients. The beef provides protein and iron, while the onions offer vitamins and fiber. You can feel good serving this meal to your loved ones, knowing it not only fills them up but also nourishes them.

This dish shines during social gatherings and entertaining. It’s hard not to smile at the sight of a beautifully plated meatloaf, especially when your guests catch a whiff of its savory aroma. Sharing this meal brings people together and creates an inviting atmosphere of warmth and friendship.

Affordability is another standout feature of this Crockpot French Onion Meatloaf. With budget-friendly ingredients that you likely already have on hand, you can serve a comforting meal to your family without breaking the bank. There’s something inherently satisfying about cooking with wholesome ingredients that won’t stretch your budget.

Historical Background and Cultural Significance

The origins of meatloaf can be traced back to ancient times when various cultures created dishes combining ground meat and spices to create hearty meals. As cooking evolved, so did the methods and ingredients used, leading to regional adaptations. In France, the tradition of incorporating caramelized onions into dishes became popular, influencing the creation of our Crockpot French Onion Meatloaf.

Culturally, meatloaf has become a symbol of home-cooked comfort food in the United States. Families have cherished it for generations, and its versatility has made it an enduring dish at dinner tables across the country. By adding Swiss cheese and a French-inspired twist, we honor traditional flavors while keeping the heart of the dish grounded in the classic meatloaf we know and love.

As culinary traditions mix and adapt, the French onion flavor profile has influenced countless dishes. This recipe showcases how classic French flavors can seamlessly blend into American comfort food. Over the years, variations have emerged, leading to new takes on this beloved meal, with different cheeses and toppings to suit individual preferences.

Regional variations of meatloaf can surprise those unfamiliar with the dish’s versatility. For example, Southern-style meatloaf may incorporate barbecue flavors while others from the Midwest could include ketchup or other sauces. This adaptability allows cooks to create personal takes on the classic, maintaining its status as a beloved comfort food.

Ingredient Deep Dive

Main ingredients include ground beef, onions, Swiss cheese, breadcrumbs, and seasonings.

Ground beef, a staple protein in many households, offers essential nutrients, including zinc and selenium. When buying ground beef, look for lean cuts to ensure a flavorful yet less fatty result. Proper storage involves keeping it refrigerated and using it within a few days for freshness. If necessary, ground beef can be frozen, but be mindful of using it within three to four months for best quality. Alternatives such as ground turkey can provide a leaner option, while vegetarian substitutes like lentils or veggie patties can also work well in this recipe.

Onions are the key players in creating that signature French onion flavor. Rich in antioxidants, they provide health benefits, such as supporting cardiovascular health. When selecting onions, choose firm bulbs free of blemishes. Proper storage entails keeping them in a cool, dry place. Additionally, caramelized onions can be prepared ahead and used in various dishes, enhancing flavor profiles. Onion substitutes can include shallots for a milder taste or green onions for a fresher twist.

Swiss cheese, known for its nutty flavor and melt-in-your-mouth texture, is essential for that gooey topping. This cheese type offers a good source of calcium and protein but should be used in moderation due to its fat content. When choosing Swiss cheese, look for slices that have a nice shine and a soft texture. Properly wrapped cheese can last in the fridge for a few weeks. For variations, Gruyère or Emmental can add unique flavor nuances.

Breadcrumbs act as the binding agent in meatloaf, keeping it moist while providing structure. Made from toasted bread, they contribute vitamins and fiber depending on the type chosen. When purchasing breadcrumbs, opt for whole grain or seasoned varieties for added flavor. Store breadcrumbs in airtight containers to maintain freshness. Alternatives include crushed crackers or oats for a gluten-free option.

Seasonings such as salt, pepper, and herbs not only enhance the dish but also provide various health benefits. Fresh herbs, like parsley, can add essential vitamins and minerals, while spices contribute to overall health. When selecting herbs, fresh options add depth to flavor, while dried versions are more concentrated. Store herbs in a cool, dark place, and feel free to experiment with different flavor profiles like adding Italian or Mexican spices for a unique twist.

Common Mistakes to Avoid

  • Overmixing the meatloaf mixture can lead to a dense texture rather than a light and fluffy one. Mix just until combined for the best results.
  • Failing to properly season can result in a bland meatloaf. Taste the mixture before cooking to adjust herbs and spices as necessary.
  • Not allowing the meatloaf to rest after cooking can cause it to fall apart. Let it sit for at least 10 minutes before slicing.
  • Cutting into the meatloaf too soon can lead to juices spilling out, making it dry. Patience is key for a moist outcome.
  • Using too much filler, like breadcrumbs, can make the meatloaf overly dry. Stick to the ratio suggested in the recipe.
  • Neglecting to check the internal temperature might result in undercooked meatloaf. Aim for an internal temperature of 160°F for safety.
  • Not greasing the crockpot can lead to sticking and a messy cleanup. Use non-stick spray or olive oil on the pot before adding the ingredients.
  • Oven temperature miscalculations can hurt your meatloaf. If baking instead of slow cooking, ensure the oven is preheated precisely.
  • Skipping the cheese topping can deprive the dish of its decadent finish. Always add the topping for that perfect comfort food experience.
  • Ignoring the choice of ground meat could alter the flavor significantly. Select a fresh, quality ground meat for the most flavorful meatloaf.

Essential Techniques

Caramelizing onions is a crucial step that adds depth and sweetness to the meatloaf. It requires patience; cook them slowly over low heat, stirring occasionally until they achieve a golden brown color. This technique could make the difference between a simple meatloaf and an extraordinary one.

When mixing the meatloaf, it’s essential to treat the mixture gently. Over-mixing can create a dense loaf, while under-mixing can result in loose meat. Aim for a just-combined consistency to achieve the perfect texture.

Chilling the formed meatloaf before cooking can help it hold its shape, providing a better structure once cooked. Refrigerating for at least 30 minutes before placing it in the crockpot allows the flavors to meld and the loaf to firm up.

Pro Tips for Perfect Crockpot French Onion Meatloaf

1. For a deeper onion flavor, sauté the onions before adding them to the meat mixture.
2. Consider using a blend of meats, like pork or turkey with beef, for enhanced flavor and texture.
3. Broil the meatloaf for a few minutes at the end of cooking for a crispy cheese topper.
4. Line your crockpot with parchment paper for easier cleanup.
5. Experiment with different cheeses to change the flavor profile; consider sharp cheddar or gouda.
6. Add moisture to the mix with a tablespoon of Worcestershire sauce or a splash of beef broth.
7. Top the meatloaf with additional caramelized onions for a gourmet finish.
8. If you’re short on time, form your meatloaf the night before and refrigerate; it’s ready to cook in the morning.

Variations and Adaptations

Regional variations can include Southern-inspired additions like barbecue sauce mixed into the meatloaf. Experimenting with seasonal ingredients, such as mushrooms in the fall or bell peppers in summer, can provide excitement to the dish. If dietary restrictions arise, consider making a gluten-free version using gluten-free breadcrumbs or noontime meals that incorporate quinoa instead.

For extra spices, incorporating herbs such as thyme or rosemary can elevate the flavor complexity. To add texture, consider mixing in finely diced vegetables like carrots or zucchini. Finally, you can adapt the presentation by serving individual meatloaf muffins instead of a whole loaf, making it a fun option for dinner parties.

Serving and Presentation Guide

For plating, slice the meatloaf carefully and arrange the pieces on a warm plate. A garnish of fresh parsley or microgreens can not only add a pop of color but also enhance the meal’s appeal. Traditional accompaniments include creamy mashed potatoes, but you can also serve the meatloaf alongside roasted vegetables for a healthy balance.

Modern serving suggestions can include a drizzle of gravy or a dollop of sour cream on each slice. Remember to serve it hot, as this enhances the flavors and allows the cheese to stay gooey. Portion control is essential; aim for 1-2 slices per person, depending on appetite, and serve with an appropriate side dish for a complete meal.

Wine and Beverage Pairing

When serving Crockpot French Onion Meatloaf, a smooth red wine such as Merlot or a light-bodied Pinot Noir pairs wonderfully. These wines complement the meatiness of the dish while balancing the cheese’s richness. For non-alcoholic alternatives, a sparkling apple cider or a crisp iced tea would work beautifully.

If you enjoy coffee, consider a medium roast brewed to a warm temperature to round out the meal. The temperature of the beverages should ideally match the comfort of the food – not too hot or too cold so that everything harmonizes well.

Storage and Shelf Life

To store leftover meatloaf, ensure it’s cooled completely before transferring it to an airtight container. Keep it in the refrigerator for up to 3-4 days. For longer storage, meatloaf can also be frozen for up to 3 months. Just ensure it’s well-wrapped to prevent freezer burn.

Recognizing the signs of spoilage is crucial; any off-smells or changes in texture indicate it should be discarded. When reheating, ensure the meatloaf reaches an internal temperature of 165°F. You can use the oven to reheat, maintaining the crispy texture, or use a microwave for convenience.

Make Ahead Strategies

You can prepare the meat mixture a day in advance, storing it in the refrigerator until you’re ready to cook. This not only saves time but allows the flavors to meld together beautifully. If you plan to use the crockpot, consider assembling it the night before to have it ready to plug in the next morning.

While assembling, portion out the mixture into individual loaves or muffin tins for easier reheating later. To maintain optimal freshness, ensure proper wrapping if you plan to freeze any assembled loaves. When reheating, add an extra splash of broth to maintain moisture.

Scaling Instructions

To halve the recipe, simply proportionally reduce each ingredient. For doubling or tripling, ensure you use a larger crockpot or adjust cooking times. Monitor the mound size since smaller loaves may cook faster than suggested. Always check internal temperature to guarantee thorough cooking.

When scaling, it’s essential to give yourself enough time for cooking and proper rest. Adjust storage containers accordingly, as scaling up will create more leftovers, which can be a delight to have on hand for easy meals throughout the week.

Nutritional Deep Dive

Understanding the nutritional breakdown of this meatloaf can help you make informed choices. A serving typically provides a good amount of protein, iron, and other essential minerals. However, depending on serving size and additional sides, calories can add up, making portion control key for weight management.

While including vegetables like onions contributes vitamins and minerals, consider incorporating additional veggies into the mix for enhanced fiber content. Analyzing your nutrient intake can support a balanced diet, ensuring you’re receiving adequate vitamins and minerals while enjoying satisfying meals.

Dietary Adaptations

For gluten-free diners, substitute traditional breadcrumbs with gluten-free options, like oats or almond flour. Those needing a dairy-free version can replace the Swiss cheese with dairy-free cheese or nutritional yeast for a cheesy flavor without the lactose.

Vegan modifications can involve using lentils or chickpeas combined with flaxseed meal as a binder instead of ground beef. Low-carb or ketogenic dieters may enjoy a version made with ground turkey or chicken, replacing breadcrumbs with groundnuts or seeds.

Lastly, for a low-FODMAP take, use green onions in place of regular onions and ensure that your bread is compliant. This caters to dietary needs without compromising on flavor.

Troubleshooting Guide

Texture issues can arise if the meatloaf is too dry; ensure the right balance of meat to breadcrumbs is maintained. A too-wet mix can be remedied by adding more crumbs or oats.

Flavor balance is crucial; if it’s too bland, increase seasoning, add Worcestershire sauce, or utilize fresh herbs. For those without access to them, kitchen substitutes can help adjust flavor profiles.

Temperature problems can often be resolved by checking equipment accuracy; be aware of any inconsistencies in the slow cooker’s heat settings.

Overly greasy meatloaf may indicate excessive fat in your chosen meat; consider using leaner cuts.

Lastly, timing concerns may arise if the crockpot’s cooking duration is not followed—a good policy is to test for doneness around an hour before the estimated finish time.

Recipe Success Stories

Community feedback has been overwhelmingly positive, with many sharing how this Crockpot French Onion Meatloaf has become a staple in their households. Readers frequently rave about the dish’s rich flavor and how it’s perfect for comforting family dinners.

Adaptation stories highlight how some have successfully switched out ingredients, like trying different cheese options or adding their favorite herbs. The beauty of this recipe is its versatility, allowing cooks to experiment with tastes that excite their families.

Photography tips for capturing the essence of the dish include using natural light and garnishing the plate with fresh parsley for a pop of color.

Engaging with readers who share their variations and experiences adds a layer of community that deepens the connection to this comforting recipe.

Frequently Asked Questions

Can I make this meatloaf in the oven instead of a crockpot? Absolutely! Preheat your oven at 350°F and bake for about an hour or until the internal temperature reaches 160°F.

Can I use ground turkey instead of beef? Yes, using ground turkey will create a leaner meatloaf, though the taste and texture might differ slightly.

How long can I store leftovers? Leftovers can be stored in an airtight container in the fridge for 3-4 days. For longer storage, freeze it for up to 3 months.

What can I serve with this meatloaf? Traditional sides include mashed potatoes or green beans, but you can also try it with a fresh salad or crusty bread.

Is it safe to reheating meatloaf multiple times? Yes, as long as it is properly stored and brought back to an internal temperature of 165°F each time you heat it.

Can I leave out the cheese? Yes, while the Swiss cheese adds a delicious element, you can certainly make it without for a dairy-free option.

How can I tell when the meatloaf is done? Use a meat thermometer; it should register at least 160°F in the center of the loaf to ensure it’s cooked through.

Does this recipe work for meal prep? Yes! You can make it in advance and reheat for easy lunches or dinners throughout the week.

What other cheese could work for this recipe? Other great options include gouda, cheddar, or a cheese blend to suit your taste.

Can you freeze the uncooked meatloaf? Yes, you can shape it and freeze it. Just thaw it overnight in the fridge before cooking.

Can I add vegetables to the meatloaf? Yes, finely diced vegetables such as bell peppers or zucchini can add flavor and moisture.

Additional Resources

Looking for more delicious recipes? Check out our slow cooker favorites for easy meal ideas. Enhance your culinary skills with technique guides focused on meat preparation and seasoning. For those interested in ingredient information, we’ve got a wealth of details on selecting and storing different meats, cheeses, and vegetables.

Seasonal variations also provide inspiration; for fall, consider adding pumpkin puree to your meatloaf for a unique twist. Discover how versatile this humble dish can be and find new ways to impress your family.

Join the Conversation

We would love to hear from you! Share your experiences with our Crockpot French Onion Meatloaf recipe on your social media channels. Post your photos, variations, or even your tips for perfecting the dish.

Engaging with the community not only enhances our collective knowledge but also brings us together around the joy of cooking. Feel free to leave feedback and suggestions, and let’s inspire one another in our home kitchens.

The Recipe

Crockpot French Onion Meatloaf with Melted Swiss Cheese

Serves: 6 servings

Prep Time: 15 mins

Cook Time: 6 hours

Total Time: 6 hours 15 mins

Kitchen Equipment Needed

  • Crockpot or slow cooker
  • Mixing bowl
  • Measuring cups and spoons
  • Meat thermometer
  • Wooden spoon or spatula

Ingredients

  • 1 lb ground beef
  • 1 large onion, finely chopped
  • 1 cup breadcrumbs
  • 2 large eggs
  • 1 tsp Worcestershire sauce
  • 1 tsp garlic powder
  • 1 tsp salt
  • 1 tsp pepper
  • 1 cup shredded Swiss cheese
  • Fresh parsley for garnish

Directions

  1. In a large mixing bowl, combine the ground beef, chopped onion, breadcrumbs, eggs, Worcestershire sauce, garlic powder, salt, and pepper.
  2. Mix until just combined—do not overmix.
  3. Shape the mixture into a loaf and place it in the greased crockpot.
  4. Cover and cook on low for 6 hours or until the internal temperature reaches 160°F.
  5. In the last 15 minutes of cooking, sprinkle shredded Swiss cheese over the meatloaf and cover until melted.
  6. Once cooked, carefully remove the meatloaf from the crockpot, let it rest for 10 minutes, and slice.
  7. Serve hot, garnished with fresh parsley.

Recipe Notes

  • Feel free to add additional spices or herbs to customize the flavor to your liking.
  • This meatloaf can be frozen once cooked and reheated later.
  • Leftovers can be used in sandwiches or served cold for lunch.

Delicious Stuffed Chicken Breast with Spinach and Sun-Dried Tomatoes

Stuffed Chicken Breast with Spinach and Sun-Dried Tomatoes: A Flavorful Delight

⚖️
Difficulty
Medium

⏲️
Prep Time
15 mins

🕒
Cook Time
30 mins

⏱️
Total Time
45 mins

🍽️
Servings
4

Stuffed chicken breast with spinach and sun-dried tomatoes is a delightful dish that captures the essence of comfort food while offering a delightful burst of flavors. Imagine juicy, tender chicken breasts stuffed to perfection with a rich mixture of fresh spinach, tangy sun-dried tomatoes, and creamy cheese. Every bite reveals the medley of flavors, setting off an explosion of taste that will leave your palate dancing. It’s the perfect backdrop for a hearty family meal or an elegant dinner party.

Beyond its incredible taste, this stuffed chicken breast also boasts a vibrant visual appeal with its bright green spinach and red sun-dried tomatoes peeking through the golden-brown chicken exterior. The harmonious blend of textures, from the crispy outside to the soft, cheesy filling, makes each bite a satisfying experience. Whether served alongside roasted vegetables or a simple salad, this dish is sure to impress.

Quick Recipe Highlights

  • Flavor Profile: This dish features a beautiful combination of savory chicken with the nutty flavor of spinach and the slight tartness of sun-dried tomatoes, complemented by the creaminess of cheese.
  • Texture: Experience a delightful contrast between the crispy chicken skin and the tender stuffing, which creates a satisfying mouthfeel.
  • Aroma: The enticing aroma of fresh herbs combined with the rich smell of baking chicken create an inviting atmosphere in your kitchen.
  • Visual Appeal: This recipe looks stunning on the plate, with colorful ingredients and a golden-brown crust, making it a feast for the eyes as well as the palate.
  • Skill Level Needed: Our stuffed chicken breast is categorized as medium difficulty, perfect for both novice cooks and experienced chefs wanting to surprise their guests.
  • Special Equipment: You’ll need a sharp knife for butterflying the chicken, a baking dish, and toothpicks or kitchen twine to secure the filling.

Recipe Overview

  • Difficulty Level: This stuffed chicken recipe is considered medium-level due to the need for careful preparation and ensuring the chicken is cooked properly while keeping the filling moist.
  • Category: This dish falls under main course meals, ideal for both everyday dinners and special occasions.
  • Cuisine: The recipe is rooted in Mediterranean cuisine, showcasing the flavors common in Italian and Greek dishes.
  • Cost: The primary ingredients are budget-friendly, with costs averaging around $15-$20 depending on quality and source.
  • Season: Stuffed chicken breast is perfect for all seasons; however, it shines particularly bright in spring and summer with fresh herbs and vegetables.
  • Occasion: This dish is highly suitable for family gatherings, dinner parties, or romantic meals, making it a versatile choice for various occasions.

Why You’ll Love This Recipe

The taste and texture of stuffed chicken breast with spinach and sun-dried tomatoes will captivate your senses. The delicate flavors blend seamlessly as the savory chicken complements the vibrant stuffing. The mix of creamy cheese, earthy spinach, and tangy tomatoes adds complexity, making it a noteworthy centerpiece for any meal. Each forkful offers a balance of richness and freshness, ensuring a truly elevated dining experience.

Convenience is another reason to adore this recipe. With a prep time of just 15 minutes and a cook time of 30 minutes, it’s perfect for busy weeknights yet sophisticated enough for entertaining. The step-by-step instructions make it easy to follow, allowing you to impress your family or guests without a culinary degree. Assemble, bake, and serve for a magnificent meal with minimal fuss.

On the health front, stuffed chicken breasts are packed with beneficial nutrients. Spinach is loaded with vitamins A and K, while sun-dried tomatoes bring antioxidants and a wealth of flavor. Lean chicken is an excellent source of protein, making this dish a smart choice for balanced nutrition. Combine it with a light salad, and you have a wholesome meal.

Socially, this recipe encourages togetherness. Preparing and enjoying stuffed chicken breast can be a communal activity, perfect for family cooking nights or entertaining friends. Sharing this flavorful dish fosters warmth and connection, making memorable moments around the dining table.

Lastly, its cost-effectiveness makes it accessible. Using simple yet wholesome ingredients ensures that this dish is both economical and impressive. With minimal additional expenses for a side dish or wine pairing, you can create a gourmet experience at home without breaking the bank.

Historical Background and Cultural Significance

The origins of stuffed chicken dishes can be traced back to ancient times when various cultures experimented with stuffing meats. The practice of filling poultry with different ingredients is found in many culinary traditions, each showcasing regional flavors and ingredients. Over the years, Mediterranean flavors have influenced modern stuffed chicken dishes, with each prep encapsulating historical and cultural narratives.

Stuffed chicken has significant cultural importance in various cuisines, serving as a celebration dish for gatherings and holidays. Particularly in Italian and Greek cultures, chicken is often a centerpiece during family celebrations where love and tradition blend through food. The Mediterranean emphasis on fresh ingredients, herbs, and flavors shines in this recipe, echoing the region’s culinary ethos.

The evolution of this recipe reflects contemporary cooking trends that emphasize health and flavor. With an increasing focus on nutritious meals, incorporating vegetables like spinach aligns with modern dietary preferences, making stuffed chicken appealing to today’s cook. More than just a dish, it’s a testament to evolving culinary practices that sustain timeless traditions.

Regional variations of stuffed chicken can be found in many Mediterranean countries, where local ingredients dictate the stuffing. For instance, adding feta cheese and olives in Greek variations enriches the flavor profile, while Italian versions may include risotto or mushrooms. These adaptations highlight the diversity and creativity inherent in adapting a classic dish to fit different regional tastes.

Ingredient Deep Dive

Chicken breast serves as the ideal protein base for this recipe. Known for its adaptability and mild flavor, it allows the stuffing to shine while providing a hearty meal. When choosing chicken, opt for organic or free-range varieties for optimal taste and nutrition. It’s best to keep raw chicken properly refrigerated and consume it within a couple of days or freeze for longer storage.

Spinach is a nutrient powerhouse, rich in vitamins A, C, and K, as well as iron and magnesium. This leafy green adds flavor and nutritional benefits to the dish, making it an essential component. Fresh spinach is often preferred for its vibrant color and texture, but frozen spinach can work as a convenient substitute. To store fresh spinach, keep it in a moisture-free environment, avoiding excessive washing until ready to use.

Sun-dried tomatoes bring an intense, concentrated flavor to the dish. They offer a sweet and tangy profile that contrasts beautifully with the savory chicken. Look for sun-dried tomatoes packed in oil for added moisture, enhancing the dish’s overall flavor. Store sun-dried tomatoes in a cool, dark place, and once opened, refrigerate them in a sealed container to maintain freshness.

Cheese adds a creamy, decadent element to the stuffed chicken. Options such as goat cheese or mozzarella work wonderfully, bringing distinct flavors and textures. When selecting cheese, consider the melting properties you desire. For storage, keep cheese wrapped tightly in the fridge to avoid moisture loss and maintain its quality. Certain cheeses can also be frozen, extending their shelf life for later use.

Herbs and spices, such as garlic, basil, or oregano, amplify the dish’s flavor profile, enhancing every bite. Fresh herbs provide the best aroma and taste, but dried versions can work well as substitutes in a pinch. When using herbs, always check for freshness and store them in airtight containers in a cool environment for longevity.

Common Mistakes to Avoid

  • Overstuffing the chicken: This may cause it to burst during cooking, spilling out the filling. Aim for a generous yet manageable amount of stuffing.
  • Not seasoning the filling: Ensure each ingredient is appropriately seasoned to enhance the dish’s overall flavor. Taste as you go.
  • Using dry chicken: Make sure to monitor your cook time to avoid overcooked, dry chicken, which can result from baking it too long.
  • Insufficient sealing: Secure the stuffed chicken properly with toothpicks or kitchen twine to prevent the filling from escaping during cooking.
  • Skipping the resting time: Allowing the chicken to rest post-cooking allows the juices to redistribute, ensuring moist, flavorful meat.
  • Using frozen spinach without thawing: This can introduce excess moisture into the filling. Always thaw and drain frozen spinach beforehand.
  • Ignoring the internal temperature: Always check that the chicken reaches a safe internal temperature of 165°F to ensure it’s fully cooked.
  • Underestimating cook time: Factors like oven calibration and chicken thickness can affect timing, so start checking for doneness earlier than you think.
  • Neglecting marination: For even deeper flavor, consider marinating the chicken for a few hours or overnight before stuffing and cooking.
  • Forgetting garnishes: Don’t overlook the finishing touches such as fresh herbs, which enhance the presentation and flavor.

Essential Techniques

Butterflying chicken breast is essential for even cooking and stuffing. By making a horizontal cut almost through the thickness of the breast, you can open it up to create a pocket for stuffing. To master this technique, use a sharp knife and take your time, ensuring not to cut all the way through. Look for visual cues, such as the pocket’s evenness, to ensure success.

Securing the stuffed chicken is vital to keep your filling intact while cooking. Toothpicks or kitchen twine can be used to close the pocket. Each end should be secured tightly but not excessively, as this may cause the chicken to dry out. Check for any leaking stuffing during cooking and ensure you use a sharp knife to make clean cuts when necessary.

Baking is the primary method for cooking stuffed chicken breast, providing even heat for a tender result. Preheating your oven is crucial for achieving the right cooking environment from the beginning. Visual cues for success include a golden-brown exterior and juices running clear when tested. An instant-read thermometer offers the best method to ensure the chicken cooks to the recommended temperature.

Pro Tips for Perfect Stuffed Chicken Breast

1. For extra flavor, consider marinating the chicken in lemon juice and herbs for a few hours before preparation to infuse it with herbs and acidity.
2. Mix herbs into the stuffing for a flavor boost; fresh basil or parsley can complement the spinach and cheese beautifully.
3. Searing the chicken briefly in a hot pan before baking will give it a lovely golden color and added flavor from the Maillard reaction.
4. Experiment with different cheeses to discover your favorite combination; sharp cheddar or ricotta can offer unique flavors.
5. Bake the chicken on a wire rack set over a baking sheet to promote even cooking and prevent steam from making the bottom soggy.
6. Allow the chicken to rest after baking for at least 5-10 minutes; this helps retain juices and enhances overall flavor.
7. For a crispy topping, sprinkle breadcrumbs mixed with Parmesan on the chicken during the last 5 minutes of baking for a delightful crunch.
8. Pair the dish with a refreshing salad or side vegetables to balance the richness of the stuffed chicken.

Variations and Adaptations

Regional variations of stuffed chicken can incorporate local flavors and ingredients, such as adding feta and olives for a Greek twist or using Italian herbs like oregano and thyme. Seasonal adaptations can be made by changing the stuffing according to what’s fresh, such as roasted red peppers in the summer or sweet potatoes in fall.

Dietary modifications can cater to various preferences. For a gluten-free version, ensure all ingredients are certified gluten-free, and consider using gluten-free breadcrumbs if opting for a crunchy topping. Vegan and plant-based adaptations can include substituting chicken with large portobello mushrooms or firm tofu, filled with a combination of veggies and grains.

Flavor variations can enhance the basic stuffing; try adding artichoke hearts, roasted garlic, or different cheeses for diverse profiles. Texture modifications could involve adding chopped nuts for a crunch or cooked grains for added heartiness. Presentation alternatives may include slicing the stuffed chicken into medallions for a more elegant plating instead of serving whole.

Serving and Presentation Guide

Plating techniques for stuffed chicken breast should focus on elevating its presentation. Slicing the chicken diagonally showcases the stuffing beautifully, revealing vibrant colors. Place the chicken on a bed of sautéed greens or a light salad to create visual contrast and a fresh touch.

Garnishing ideas include fresh herbs like parsley or basil sprinkled atop the chicken for a burst of color and freshness. Incorporating seasonal vegetables around the plate adds balance and radiance while complementing the dish. Traditional accompaniments like roasted potatoes or wild rice enhance the overall meal experience.

Modern serving suggestions might involve individual portions served on rustic wooden boards or stone plates for a trendy aesthetic. Ensure that the chicken is served hot, as this enhances the enjoyment of flavors. Consider portion control tips, such as serving with smaller sides or family-style sharing platters to encourage diners to savor each bite.

Wine and Beverage Pairing

When choosing a wine to pair with stuffed chicken breast, white wines such as Sauvignon Blanc or Chardonnay work well, providing a crispness that balances the richer filling. For red wine lovers, a light Pinot Noir can complement the flavors without overpowering them.

Non-alcoholic alternatives like sparkling water with a splash of lemon or a refreshing iced tea can also be delightful accompaniments to enhance the meal. If you enjoy coffee or tea post-meal, a smooth coffee or herbal tea can provide a comforting finish.

Temperature considerations should always be taken into account; whites should be chilled to about 50°F, while reds are best served slightly below room temperature. Serving in appropriate glassware elevates the dining experience, enhancing both aroma and flavor appreciation.

Storage and Shelf Life

To ensure that stuffed chicken breast maintains its quality, store any leftovers in an airtight container in the refrigerator. It’s best consumed within 3-4 days to enjoy optimal flavor and texture. Place a layer of parchment paper between layers if stacking to prevent moisture accumulation.

For longer storage, you can freeze the cooked chicken. Wrap it tightly in plastic wrap, followed by aluminum foil, to prevent freezer burn. When reheating, ensure that it reaches an internal temperature of 165°F for safety.

Signs of spoilage can include an off odor or changes in color. If left unwrapped, the chicken may become dry, so always use proper storage techniques to maintain texture. Reheating should be done gently in an oven or covered skillet over low heat to preserve the dish’s juiciness.

Make Ahead Strategies

To save time, consider prepping the stuffed chicken breast a day in advance. Assemble the chicken with the filling and store it wrapped in the refrigerator until ready to bake. This not only saves time but also allows the flavors to meld for a richer taste.

If you prefer, prepare the filling and chicken separately and store them in airtight containers. Bring the chicken to room temperature before baking it to ensure even cooking. Quality may be impacted slightly if frozen, so opt for fresh ingredients whenever possible for the best results.

Additionally, consider adding fresh herbs or vegetables just before baking to maintain their brightness and texture. This will enhance the overall appeal of the dish when served.

Scaling Instructions

If you wish to halve the recipe, simply reduce each ingredient proportionally and adjust the cooking time slightly, keeping an eye on the chicken for doneness. For doubling or tripling, ensure to use larger pans or baking dishes to allow for even cooking.

Equipment adjustments may be necessary for larger batches; consider using multiple baking trays or a larger oven. Timing modifications should also be factored in, with thicker pieces requiring longer cooking times.

Storage considerations remain the same, ensuring you keep any leftovers in airtight containers. Larger servings can allow for various meal occasions, especially during family gatherings or events.

Nutritional Deep Dive

A macro breakdown of this dish reveals lean protein from chicken, healthy fats from cheese, and valuable vitamins from spinach and tomatoes. Each serving of stuffed chicken offers about 25-30 grams of protein, making it suitable for muscle repair and growth.

Micronutrient analysis shows beneficial elements such as Vitamin A from spinach, contributing to eye health, and potassium from tomatoes, aiding in heart function. This dish also contains essential minerals, including calcium found in cheese, which supports bone strength.

When considering health benefits, the high protein content can aid weight management, as proteins promote satiety. Coupled with the nutrient-dense vegetables, this meal supports balanced nutritional intake, beneficial for overall well-being.

Dietary considerations must include monitoring portion sizes, especially if portioned with sides. Adapting the recipe for specific dietary needs, like low-carb or gluten-free, is manageable while maintaining good nutrition.

Dietary Adaptations

For gluten-free diets, ensure all ingredients, including seasoning and cheese, are labeled gluten-free. This dish is easily adaptable without sacrificing flavor, making it accessible for those with gluten sensitivities.

Dairy-free variations can substitute cheese with nutritional yeast or dairy-free cheese. This keeps the filling creamy while avoiding dairy ingredients, catering to lactose intolerance or allergies.

Vegan adaptations could involve using hearty vegetables like mushrooms as the ‘chicken’, making for a satisfying alternative packed with flavor. The filling can include legumes or grains to mimic protein content.

Keto and low-carb adaptations focus on reducing starch ingredients while emphasizing healthy fats and protein. Alternatively, a paleo version could eliminate dairy and processed ingredients while retaining natural flavors and nutrition.

Troubleshooting Guide

Texture issues may arise if the chicken is overcooked, resulting in dryness. Always monitor the cook time closely and use a meat thermometer to check for doneness reliably.

Flavor balance might become skewed if too much salt is added to either the chicken or stuffing. Adjust with acidity, like lemon juice, to brighten the flavors without overwhelming seasoning.

Temperature problems are common if the oven isn’t calibrated correctly. Consider using an oven thermometer to confirm that cooking temperatures are accurate for optimal results.

Equipment challenges may arise with old or inadequate baking dishes. Opt for high-quality, sturdy bakeware that can withstand high temperatures and promote even cooking.

Ingredient substitutions can alter flavor; if making swaps, consider the compatibility of alternative ingredients and adjust seasoning accordingly to retain flavor integrity. Also, fresh herbs should be added towards the end of cooking for punchy flavor.

Timing concerns may lead to undercooked chicken. Always allow adequate time for cooking, and remember that larger pieces may require additional time, checking more frequently for doneness as necessary.

Recipe Success Stories

Community feedback on this stuffed chicken recipe has been overwhelmingly positive, with readers praising its flavor and presentation. Many have shared their take on the dish, incorporating local ingredients to make it their own, resulting in delightful variations that inspire creativity in the kitchen.

Variation successes include integrating different kinds of cheeses and stuffing materials, such as artichokes or ricotta, showcasing how adaptable this recipe can be. Readers have expressed joy in sharing this dish at family gatherings, noting it becomes the star of the table.

Photography tips have emerged as well, with users suggesting to capture the colorful filling and golden crust to entice others. User-generated photos on social media demonstrate the versatility of the dish, encouraging a sense of community among home cooks.

Incorporating seasonal ingredients has led to mixed success stories, with many enjoying the opportunity to experiment with flavors while keeping the dish relevant to various times of the year. Feedback from the community continues to inspire tweaks and improvements to the original recipe.

Frequently Asked Questions

1. Can I prepare this dish ahead of time? Yes, you can prepare the stuffed chicken breast the day before. Just keep it refrigerated until you are ready to bake it.

2. What can I substitute for chicken breast? You can use turkey breast or portobello mushrooms as a substitute if looking for a poultry-free or lower-fat option.

3. How do I prevent the chicken from drying out? Ensure you bake at the correct temperature, use a meat thermometer to check for doneness, and let the chicken rest post-cooking.

4. What should I serve with stuffed chicken? Pair it with a simple side salad, roasted vegetables, or garlic bread to round out the meal.

5. Can this recipe be frozen? Yes, cooked stuffed chicken can be frozen. Wrap it tightly and store in an airtight container for up to three months.

6. How can I make this recipe dairy-free? Use dairy-free cheese options or nutritional yeast to maintain flavor and texture without dairy products.

7. What is the best way to reheat leftovers? Reheat in the oven at a low temperature to prevent drying out, ensuring they are heated all the way through.

8. How thick should I slice the chicken? When slicing, aim for pieces about half an inch thick to ensure each bite showcases the stuffing.

9. Can I add other vegetables to the stuffing? Absolutely! Feel free to customize your stuffing with bell peppers, zucchini, or mushrooms, depending on your preferences.

10. How can I add more flavor to the chicken? Marinate the chicken before stuffing, or add spices to the seasoning mix in the stuffing for an extra flavor boost.

Additional Resources

For readers looking for inspiration, consider exploring other related recipes that feature stuffed ingredients, such as stuffed peppers or baked zucchini. Technique guides on how to butterfly chicken or prepare homemade marinades can enhance your cooking skills.

Ingredient information on how to select the best cheeses or seasonal greens can ensure you make informed choices, elevating your dish. Equipment recommendations for high-quality baking dishes can also help ensure success every time.

Seasonal variations such as adding fall vegetables or spring herbs provide an opportunity to try new combinations and taste profiles, making this recipe relevant throughout the year.

Join the Conversation

We encourage you to share your experiences with this stuffed chicken breast recipe on social media! Include your photographs and any adaptations you’ve tried. Community engagement helps foster a sense of belonging and encourages others to try new things in the kitchen.

Leave a comment below detailing your results or any tips you found useful while preparing the dish. Each experience shared not only empowers others but enriches the culinary experience across our community. We love seeing your success stories and offering a platform for creative ideas!

The Recipe

Stuffed Chicken Breast with Spinach and Sun-Dried Tomatoes

Serves: 4

Prep Time: 15 mins

Cook Time: 30 mins

Total Time: 45 mins

Kitchen Equipment Needed

  • Sharp knife
  • Baking dish
  • Cutting board
  • Meat thermometer
  • Toothpicks or kitchen twine

Ingredients

  • 4 boneless, skinless chicken breasts
  • 1 cup fresh spinach, chopped
  • ½ cup sun-dried tomatoes, chopped
  • 1 cup mozzarella cheese, shredded
  • 2 cloves garlic, minced
  • 1 teaspoon dried basil
  • 1 teaspoon olive oil
  • Salt and pepper to taste
  • Toothpicks or kitchen twine for securing

Directions

  1. Preheat the oven to 375°F (190°C).
  2. In a mixing bowl, combine spinach, sun-dried tomatoes, mozzarella, garlic, basil, and olive oil. Season with salt and pepper.
  3. Butterfly each chicken breast by slicing it horizontally, but not all the way through, creating a pocket.
  4. Stuff each breast with the spinach mixture, pressing it down gently.
  5. Secure the openings with toothpicks or kitchen twine.
  6. Place the stuffed chicken in a baking dish, drizzling with additional olive oil and seasoning with salt and pepper.
  7. Bake for 25-30 minutes, or until the chicken is cooked through and the juices run clear.
  8. Remove toothpicks before serving and let it rest for 5 minutes.

Recipe Notes

  • Feel free to customize the filling with additional ingredients like feta cheese or pine nuts.
  • For extra flavor, marinate the chicken for an hour before stuffing.
  • This recipe can easily be doubled for larger gatherings.
  • Serve with a light salad or roasted vegetables for a complete meal.

Delicious Black Pepper Chicken Recipe You’ll Love to Make

Black Pepper Chicken: A Spicy Delight for Your Dinner Table

⚖️
Difficulty
Easy

⏲️
Prep Time
15 mins

🕒
Cook Time
20 mins

⏱️
Total Time
35 mins

🍽️
Servings
4 servings

Black Pepper Chicken is a delectable dish that marries bold spices with the succulent flavors of fresh chicken. The delightful pungency of freshly ground black pepper enhances the natural taste of the chicken, providing a mouthwatering experience for anyone who takes a bite. This dish not only satisfies your taste buds, but it is also a feast for the eyes, featuring vibrant vegetables that add color and nutrition.

As you prepare this dish, the aroma fills the kitchen, inviting family and friends to gather. The combination of heat from the black pepper and sweetness from bell peppers creates a perfect balance that is sure to impress. Whether you are looking to whip up a quick weeknight dinner or need an impressive dish for entertaining guests, this Black Pepper Chicken recipe is the perfect solution.

Quick Recipe Highlights

  • Flavor Profile: This dish features a spicy and savory blend of black pepper with an underlying sweetness from bell peppers, creating a harmonious flavor experience.
  • Texture: The chicken is tender and juicy while the vegetables provide a satisfying crunch, offering a delightful contrast in each bite.
  • Aroma: The fragrance of sizzling chicken and toasted black pepper creates an irresistible invitation for anyone nearby.
  • Visual Appeal: Bright colors from fresh vegetables against the glistening, glossy sauce make this dish not only tasty but visually stunning.
  • Skill Level Needed: This recipe is perfect for beginners, requiring basic cooking skills and minimal equipment.
  • Special Equipment: You will need a sharp knife, cutting board, and a large skillet or wok to prepare this dish efficiently.

Recipe Overview

  • Difficulty Level: This recipe is categorized as easy, making it accessible for cooks of all skill levels. You’ll benefit from step-by-step instructions that guide you seamlessly through the cooking process.
  • Category: Black Pepper Chicken fits perfectly into the main course category, as it is filling and satisfying, making it an ideal centerpiece for any dinner.
  • Cuisine: Rooted in Asian culinary traditions, Black Pepper Chicken showcases influences from Chinese cuisine, characterized by spice and quick, high-heat cooking techniques.
  • Cost: The cost of ingredients for this recipe is relatively low, making it budget-friendly without sacrificing quality or flavor.
  • Season: Enjoy this dish year-round, especially in cooler months when heartier meals are preferred.
  • Occasion: Black Pepper Chicken is versatile enough for both casual family dinners and more formal occasions, perfect for impressing your guests.

Why You’ll Love This Recipe

Black Pepper Chicken is a delight to the palate with its perfect blend of flavors. The heat from black pepper complements the sweetness of the bell peppers wonderfully. Each bite offers a satisfying crunch with tender chicken, making it a dish you won’t forget.

This recipe is designed for convenience, allowing you to pull it together in just a short time. With minimal prep work required, it’s perfect for busy weeknights. Just slice your ingredients, toss them in a skillet, and you have a delicious meal ready to serve.

In terms of nutrition, chicken is a great source of lean protein, while the vegetables provide essential vitamins and minerals. This makes Black Pepper Chicken not only tasty but a nutritious option for a weeknight dinner.

Socially, this dish is a crowd-pleaser. Whether hosting friends or gathering the family, it invites conversations over its flavorful profile and aromatic experience. People love sharing the recipe afterward too, creating a sense of community around this delightful dish.

Lastly, it’s cost-effective. Most ingredients are common pantry staples, making it easy to whip up without needing an elaborate shopping list. You can treat your family and friends to a restaurant-quality meal at home, ensuring they leave satisfied and happy.

Historical Background and Cultural Significance

Black Pepper Chicken has roots in traditional Asian cuisine, where black pepper has been used for centuries to enhance the flavor of many dishes. Its prevalence in cultures across Asia showcases not only culinary versatility but also the historical significance of trade routes that introduced this spice to different regions.

Culturally, black pepper is often referred to as the “king of spices” and has played an essential role in the culinary practices of many Asian countries. This dish is celebrated not only for its taste but also for its historical value, bringing diners a taste of cultural traditions and local flavors.

The evolution of this recipe over time has seen variations, adapting to local ingredients and preferences. As Asian cuisines have become more popular worldwide, Black Pepper Chicken has established itself as a staple in Chinese restaurants, loved for its comforting and satisfying characteristics.

Regional variations can include additional vegetables or alternative proteins, such as beef or tofu, showcasing the dish’s flexibility to cater to different tastes while maintaining the core flavor profile of black pepper.

Ingredient Deep Dive

Chicken
Chicken is a staple protein in many cultures around the world. It is versatile, easy to cook, and can absorb flavors well, making it ideal for a variety of dishes. Nutritionally, chicken is leaner than many other meats, providing essential nutrients like protein, B vitamins, and selenium. When selecting chicken, look for firm, pink flesh with no signs of dryness, and store it in a cold area of your refrigerator to maintain freshness. Chicken can be substituted with turkey or plant-based proteins for a delicious alternative.

Black Pepper
Black pepper, often dubbed the “king of spices,” has a rich history tied to trade and culinary practices. Its bold flavor can elevate any dish, while also offering potential health benefits, including improved digestion and respiratory health. When selecting black pepper, opt for whole peppercorns for maximum freshness, and store them in a cool, dark place. It can be substituted with white pepper for a similar taste but different flavor profile.

Common Mistakes to Avoid

  • Using pre-ground pepper: Always use freshly ground black pepper for the best flavor.
  • Overcooking the chicken: Aim for tender, juicy chicken; use a meat thermometer to check for doneness.
  • Neglecting to marinate: Allowing the chicken to marinate in spices enhances flavor and tenderness.
  • Using too much heat: High heat is essential, but be careful not to burn the spices or chicken.
  • Not preparing ingredients beforehand: Have all ingredients ready to go; this makes cooking smoother.
  • Skipping the vegetables: They add flavor, nutrition, and color to the dish; don’t leave them out!
  • Ignoring tasting: Always taste and adjust seasoning as you cook for the best flavor.
  • Choosing low-quality ingredients: Fresh, high-quality ingredients make a significant difference in taste.
  • Rushing the cooking time: Allow the chicken to sear properly to achieve that beautiful golden color.
  • Incorrect storage: Ensure that leftovers are cooled before refrigerating to maintain freshness.

Essential Techniques

Marinating
Marinating is an essential step that enhances the flavor and tenderness of chicken. For this recipe, marinate the chicken in a mix of black pepper, soy sauce, and other spices. To master marinating, allow at least 30 minutes or even overnight for deeper flavor absorption. Avoid undersalting, which can lead to bland results.

High-Temperature Cooking
Using high heat is critical to achieving that wonderful sear. Start your skillet on medium-high heat before adding oil and chicken to ensure even cooking and browning. Visual cues for success include a sizzling sound as the chicken hits the pan and a nice browning on the surface.

Pro Tips for Perfect Black Pepper Chicken

1. Use quality chicken thighs for juiciness—this part of the bird is less prone to dryness than breasts.
2. Ground your black pepper fresh for a more intense flavor profile.
3. Don’t overcrowd the pan; cook in batches for even browning.
4. Allow chicken to rest after cooking for juices to redistribute.
5. Play with your vegetable choices; broccoli, snap peas, and carrots can add unique flavors.
6. Top off with chopped scallions for an added crunch and flavor boost just before serving.
7. Use a splash of vinegar in your marinade to enhance the flavor complexity.
8. Serve with a side of rice or noodles to soak up the flavorful sauce.

Variations and Adaptations

For a regional twist, try using Sichuan pepper for a unique mouth-numbing experience. In terms of seasonal adaptations, you can incorporate seasonal vegetables like zucchini during summer or Brussels sprouts in the fall. For those looking for dietary modifications, swap out chicken for cauliflower for a vegan option. Spice enthusiasts may try adding chili flakes for extra heat, while those needing a change in texture can add crispy fried onions on top for a satisfying crunch. Presentation wise, serve in a colorful bowl topped with fresh cilantro for a vibrant finish.

Serving and Presentation Guide

Plating your Black Pepper Chicken can enhance the dining experience. Use a wide, shallow bowl to showcase the colorful chicken and vegetables. Garnish with fresh cilantro or sesame seeds for a pop of color. Serve alongside steamed rice or noodles, ensuring a beautiful contrast. Temperature considerations are essential; serve hot, directly from the stove, to maximize flavor. For portion control, consider using individual bowls to keep servings consistent.

Wine and Beverage Pairing

For wine pairings, a crisp white wine such as Sauvignon Blanc complements the spice of Black Pepper Chicken well. Alternatively, pair it with a light Pinot Noir if preferring red. If non-alcoholic options are preferred, consider iced green tea with lemon for a refreshing counterpart. Temperature for serving should ensure that wines are slightly chilled, enhancing the overall dining experience.

Storage and Shelf Life

To store your Black Pepper Chicken, allow it to cool to room temperature before transferring it to an airtight container. It can be refrigerated for up to 3-4 days. If you have leftovers, ensure you reheat them gently in a skillet to maintain texture. Signs of spoilage include off smells or discoloration. For long-term storage, consider freezing the dish in a sealed container or freezer bag for up to 2 months.

Make Ahead Strategies

Preparing Black Pepper Chicken ahead of time can save valuable minutes during busy weekdays. You can slice the chicken and vegetables in advance, storing them separately in your fridge. Marinating the chicken the night before allows for better flavor absorption. When ready to cook, simply toss everything in the skillet. If making a large batch, cool and store properly for reheating on future nights.

Scaling Instructions

Scaling this recipe is straightforward. For half the recipe, reduce all ingredients proportionately, ensuring cooking time remains similar. When doubling or tripling, be cautious of pan size; consider using two pans if necessary to avoid steaming instead of searing. Adjust timing slightly, as larger quantities may require more cooking duration. Always ensure ingredients are selected for freshness when scaling.

Nutritional Deep Dive

Black Pepper Chicken packs a nutritional punch without sacrificing taste. The protein content from chicken supports muscle health, while the colorful vegetables ensure a rich array of vitamins A and C. In terms of macros, expect moderate carbohydrates from added vegetables, while healthy fats can be included with oils used for cooking. For weight management, consider portion control, as this dish is both filling and satisfying.

Dietary Adaptations

For a gluten-free version, use tamari instead of soy sauce, ensuring a completely gluten-free meal option. Dairy-free individuals can confidently enjoy this dish as written, as it does not contain any dairy ingredients. Vegans may adapt the recipe by substituting chicken with tofu or tempeh, benefiting from the protein-rich alternative. For those following a low-carb or keto diet, serve with leafy green vegetables instead of rice.

Troubleshooting Guide

If your chicken ends up too dry, consider adjusting cooking time or checking temperatures more carefully in future preparations. Should flavors seem unbalanced, you might have undersalted; always taste and adjust seasoning as needed. For texture issues, ensure that you are not overcrowding the pan during cooking to achieve proper crispiness. If substitutions are necessary, always opt for fresh alternatives to maintain taste.

Recipe Success Stories

Community feedback surrounding Black Pepper Chicken has been overwhelmingly positive. Many have shared their variations by introducing different proteins or spices, which sparks creativity and excitement within the home cooking community. Readers often express their delight when they serve this dish at gatherings and celebrate the recipe’s simplicity paired with its impressive taste.

Frequently Asked Questions

Can I use boneless chicken breasts instead of thighs?

Yes, boneless chicken breasts can be used, though thighs tend to yield more flavor and juiciness due to their fat content.

What can I substitute for soy sauce?

Tamari is a great gluten-free alternative, while coconut aminos can provide a slightly sweeter flavor for a soy-free option.

Can I make this dish in advance?

Yes, prepping vegetables and marinating chicken beforehand will allow for quick cooking when you’re ready to serve. Store components separately in the fridge.

How spicy is this recipe?

The spice level can be adjusted by adding more or less black pepper. For added heat, consider incorporating crushed red pepper flakes.

Is Black Pepper Chicken suitable for kids?

Generally, it is suitable for kids, but you may consider reducing the amount of black pepper for a milder flavor.

What is the best way to reheat leftovers?

Gently reheating in a skillet over low heat keeps the chicken tender and prevents it from drying out.

Can I add more vegetables?

Absolutely! Feel free to include your favorite vegetables like broccoli or snap peas for added nutrition and flavor.

What sides go well with this dish?

Steamed rice or noodles are classic accompaniments, but you can also serve it with a fresh salad for crunch.

How do I know when my chicken is cooked through?

Use a meat thermometer to check for an internal temperature of 165°F (75°C) for safety and doneness.

Can I freeze Black Pepper Chicken?

Yes, it freezes well! Store in an airtight container for up to two months. Reheat gently when ready to enjoy.

Additional Resources

Explore related recipes, such as General Tso’s Chicken or Sweet and Sour Chicken, that highlight similar flavors but offer unique twists. Check out technique guides for stir-frying, marinating, or handling spices effectively for improved results in your dishes. Utilize ingredient information to explore the health benefits of vegetables commonly used in Asian cooking.

Join the Conversation

Engage with us by sharing your personal experiences cooking Black Pepper Chicken on social media. We love seeing your creativity and adaptations! Don’t forget to leave a review or comment with your thoughts on this recipe, and let us know how it turned out in your kitchen. Share photography tips to help others capture their cooking experiences beautifully.

The Recipe

Black Pepper Chicken

Serves: 4 servings

Prep Time: 15 mins

Cook Time: 20 mins

Total Time: 35 mins

Kitchen Equipment Needed

  • Large skillet or wok
  • Sharp knife
  • Cutting board
  • Measuring cups and spoons
  • Spatula or wooden spoon

Ingredients

  • 1 lb boneless, skinless chicken thighs, cut into bite-sized pieces
  • 2 tablespoons soy sauce
  • 2 teaspoons freshly ground black pepper
  • 1 tablespoon vegetable oil
  • 1 bell pepper, sliced
  • 1 onion, sliced
  • 3 cloves garlic, minced
  • 2 green onions, sliced for garnish

Directions

  1. In a bowl, marinate the chicken pieces with soy sauce and black pepper for at least 15 minutes.
  2. Heat the oil in a large skillet over medium-high heat.
  3. Add the marinated chicken and cook until browned and cooked through, about 5-7 minutes.
  4. Add sliced bell pepper, onion, and garlic; stir-fry for an additional 5 minutes.
  5. Adjust seasoning, if necessary, and garnish with green onions before serving.

Recipe Notes

  • For an extra layer of flavor, consider additional marinating time of up to several hours in the refrigerator.
  • Feel free to add your favorite stir-fried vegetables to the dish.
  • If preferred, substitute chicken with tofu or another protein source for variety.

Elevate Dinner with Seared Snapper and Lobster Cream Sauce

Seared Snapper with Lobster Cream Sauce: A Luxurious Seafood Delight

⚖️
Difficulty
Medium

⏲️
Prep Time
15 mins

🕒
Cook Time
20 mins

⏱️
Total Time
35 mins

🍽️
Servings
4

Indulge in a culinary masterpiece with our Seared Snapper with Lobster Cream Sauce. This dish perfectly blends the flaky, tender texture of snapper with the richness of lobster and a velvety cream sauce, creating an unforgettable dining experience. Ideal for special occasions or a romantic dinner, this recipe is sure to impress with its luxurious flavors and beautiful presentation.

Imagine the aroma of fresh seafood filling your kitchen as you prepare this delightful dish. The snapper’s mild flavor is complemented by the sweet, buttery notes of lobster, creating a perfect balance that tantalizes the palate. With the addition of herbs and a touch of citrus, this recipe transforms simple ingredients into a gourmet delight that your guests will rave about.

Quick Recipe Highlights

  • Flavor Profile: The Seared Snapper offers a mild, buttery flavor, while the Lobster Cream Sauce adds a touch of sweetness and richness.
  • Texture: The snapper is flaky and tender, complemented by the creamy, luscious lobster sauce that coats every bite.
  • Aroma: Enjoy enticing seafood aromas infused with hints of garlic, herbs, and a touch of lemon.
  • Visual Appeal: This dish is visually stunning, featuring beautifully seared snapper garnished with a rich, bright sauce.
  • Skill Level Needed: While it requires some culinary techniques like searing and making a sauce, it’s accessible for home cooks.
  • Special Equipment: A large skillet is essential for searing the fish, and a saucepan for the sauce preparation.

Recipe Overview

  • Difficulty Level: This recipe is rated medium, requiring a few steps and techniques that may challenge novice cooks but are manageable with a bit of care.
  • Category: Perfect for seafood lovers, this dish falls under the category of luxurious entrees, suitable for both everyday meals and special occasions.
  • Cuisine: Influenced by coastal culinary traditions, this recipe embodies the spirit of seafood-rich cuisines, focusing on fresh ingredients and bold flavors.
  • Cost: Depending on the availability of lobster and snapper, costs may vary but are generally reasonable for a gourmet dish featuring premium ingredients.
  • Season: Ideal for spring and summer when seafood is at its peak freshness, and floral herb flavors are vibrant.
  • Occasion: Perfect for dinner parties, anniversaries, or any celebration where you want to impress.

Why You’ll Love This Recipe

The taste and texture of Seared Snapper with Lobster Cream Sauce will leave you longing for more. The delicate snapper, kissed with a golden crust, provides a satisfying contrast to the smooth, rich lobster sauce. Together, they create a harmonious blend of flavors that is both comforting and indulgent.

Preparation is a breeze, allowing you to enjoy more time with your guests rather than being stuck in the kitchen. The quick cooking time ensures that even on busy nights, you can whip up a restaurant-quality meal in under 40 minutes.

This dish also offers nutritional benefits, as snapper is an excellent source of lean protein and omega-3 fatty acids. Paired with a creamy lobster sauce, it provides necessary nutrients while satisfying your culinary cravings.

For social gatherings, this recipe is a showstopper. Its elegant presentation and sumptuous flavors are bound to spark conversation, making it perfect for hosting friends and family.

Affordability becomes a non-issue when you consider how much you can impress guests with such a meal. With smart shopping and effective use of ingredients, this dish remains accessible to many home cooks.

Historical Background and Cultural Significance

The origins of snapper date back to ancient times as a staple in coastal diets, revered for its mild taste and versatile cooking methods. Lobster, regarded as a delicacy, has a rich history tied to coastal communities and has been a symbol of luxury in meals.

This dish represents a blend of culinary influences from various regions, particularly Mediterranean and coastal American cuisines where seafood reigns supreme. Over the years, recipes have evolved to include rich sauces and diverse pairings enhancing the original flavors.

In many cultures, seafood represents celebration and abundance, frequently appearing in festive gatherings and special occasions. This combination of ingredients captures the essence of togetherness and the joy of dining.

Regional variations exist, with some cultures favoring complementary ingredients like saffron or spicy peppers, showcasing the versatility of snapper and lobster in diverse culinary landscapes.

Ingredient Deep Dive

Snapper: This fish is celebrated for its mild flavor and tender, flaky texture. Known to be low in calories yet high in protein, snapper is an excellent choice for a healthy diet. When selecting snapper, look for bright, clear eyes and firm flesh. Store it in the coldest part of your refrigerator and consume within a couple of days for optimal freshness, or freeze it for longer preservation.

Lobster: Lobster has been cherished for centuries, often considered the king of shellfish. Packed with protein, vitamins, and essential minerals, it’s a fantastic addition to any meal. When choosing lobster, freshness is key; opt for live or freshly cooked lobsters with firm shells. For storage, keep live lobsters in a cool, damp environment or use cooked lobster within a few days, freezing any leftovers if necessary.

Common Mistakes to Avoid

  • Overcooking the snapper: Overcooked fish can become dry; aim for a golden crust while keeping it moist inside.
  • Underseasoning: Seafood benefits from adequate seasoning, so don’t skip salt, pepper, or herbs while cooking.
  • Ignoring sauce consistency: Make sure the lobster cream sauce is thick enough to coat the fish without being too runny.
  • Skipping resting time: Allow the fish to rest briefly after cooking to redistribute juices and enhance flavor.
  • Using non-fresh ingredients: Fresh ingredients significantly impact flavor; always use the freshest seafood you can find.
  • Neglecting the right pan: A hot, well-prepared skillet is essential for a perfect sear on your snapper.
  • Not tasting as you go: Always taste your sauce and adjust seasoning before serving to ensure perfect flavor.
  • Being too ambitious: If you’re new to cooking seafood, consider practicing the techniques separately before combining them in this recipe.

Essential Techniques

Searing: Searing is crucial for creating a beautiful, flavorful crust on your snapper. Master this by preheating your skillet until hot, adding oil, and letting the fish cook undisturbed to achieve a golden-brown exterior.

Making a Cream Sauce: Crafting a creamy sauce requires attention to detail. Start by building flavors with aromatics, then slowly whisk in cream, ensuring it thickens without boiling. Look for a smooth, glossy texture free of lumps.

Pro Tips for Perfect Seared Snapper with Lobster Cream Sauce

1. Always ensure your pan is hot before adding the snapper to achieve that perfect sear.

2. Use a blend of fresh herbs to enhance the aroma and flavor of your lobster sauce.

3. Incorporate a splash of white wine into the sauce for an added depth of flavor.

4. Pair your dish with a light side salad to balance the richness of the cream sauce.

5. Consider using homemade fish stock for even more flavor in the sauce.

6. Be cautious when salting the sauce as lobster itself is naturally salty.

7. Avoid freezing the lobster after it’s cooked, as its texture may deteriorate.

8. Serve immediately for the best texture and flavor experience.

Variations and Adaptations

There are numerous variations you can try with Seared Snapper with Lobster Cream Sauce. For a spicy kick, consider adding jalapeños or a dash of hot sauce to the lobster sauce. In regions where lobster may be harder to source, consider substituting crab or shrimp for a similar but distinct flavor.

For a lighter version, substitute cream with a blend of coconut milk and herbs, giving the dish a tropical twist. Additionally, serving with seasonal vegetables instead of traditional starches makes for a healthier presentation.

If you prefer a vegetarian approach, use a plant-based cream sauce and substitute the fish with grilled portobello mushrooms for a hearty meal.

Finally, for those who love citrus, adding lemon or lime juice to the sauce brightens the entire dish and balances the creaminess beautifully.

Serving and Presentation Guide

For an elegant presentation, serve the snapper on a large, white plate to showcase its beautiful golden color. Drizzle the lobster cream sauce artistically around the fish rather than drowning it to enhance visual appeal. Garnish with fresh herbs or edible flowers for a pop of color that captivates the eye.

Consider pairing this dish with a light lemon wedge for guests to squeeze over their serving, allowing for a fresh burst of flavor with each bite. Small, well-portioned servings encourage slower tasting and enhance the dining experience.

Wine and Beverage Pairing

The best wine pairing for Seared Snapper with Lobster Cream Sauce is a crisp Sauvignon Blanc, which complements the seafood without overpowering the flavors. Alternatively, a light Chardonnay offers a buttery contrast that harmonizes beautifully with the creamy sauce.

If you’re looking for a non-alcoholic option, consider serving sparkling water infused with citrus fruits for a refreshing touch alongside this rich dish. For coffee lovers, a light roast or a refreshing iced tea could work well after the meal.

Storage and Shelf Life

To maintain the integrity of your meal, refrigerate any leftovers in an airtight container but consume within two days. To reheat, gently warm in a skillet over low heat, adding a splash of cream if the sauce has thickened too much. Never freeze the assembled dish, as this can compromise the texture of the fish and sauce.

For best results, store leftovers separately, keeping the snapper and sauce in distinct containers. When done properly, snapper can last 1-2 days in the refrigerator without significant loss of quality.

Make Ahead Strategies

You can prepare components of this dish in advance to save time on cooking day. The lobster sauce can be made early in the day; just reheat gently before serving. The snapper can be prepped by seasoning and resting in the refrigerator until you’re ready to sear it.

Consider preparing side dishes ahead of time and reheating them before serving to streamline the entire dinner process. Store the snapper and the rest of the components separately to maintain their individual textures and flavors.

Scaling Instructions

If you need to halve or double the recipe for larger gatherings, keep ingredient ratios consistent. Adjust cooking times slightly, as larger or smaller portions will affect how quickly they cook. Always monitor the doneness of the fish to achieve the desired result.

For equipment adjustments, ensure that your pans are large enough to accommodate more fish without overcrowding, which can lead to uneven cooking. When scaling, timing may need adjustments, but keep an eye on everything closely.

Nutritional Deep Dive

Seared Snapper with Lobster Cream Sauce offers a balanced nutritional profile. Snapper is low in calories but high in essential nutrients like omega-3 fatty acids, which are deficient in many diets. The addition of lobster increases protein content while providing important vitamins and minerals like zinc and vitamin B12.

On the other hand, the cream sauce can add saturated fats; however, they also provide calories necessary for energy. Balancing this dish with lighter sides promotes a well-rounded meal while still enjoying its flavors.

Dietary Adaptations

This recipe can easily adapt to various dietary preferences, such as gluten-free by ensuring no gluten-containing sauces are used. For those who are dairy-free, consider using almond or cashew cream substitutions, which can replicate the texture without the milk solids.

If following a low-carb or keto diet, the lobster sauce can remain unchanged while serving the snapper on a bed of sautéed greens instead of traditional starches. Creating variations for vegan diets would require plant substitutes, removing all animal products while maintaining a delicious profile.

Troubleshooting Guide

If your snapper turns out too dry, try searing on lower heat or adjusting cooking time. For a sauce that’s too thin, let it simmer longer to reduce and thicken. On the other hand, if the lobster sauce separates, consider whisking it again on low heat to recombine the ingredients.

Should you face seasoning issues, always taste and adjust – adding a hint of salt or acidity can transform the dish. If your pan isn’t hot enough, it may lead to sticking or poor searing, so always ensure proper preheating for a successful sear.

Recipe Success Stories

Home cooks report rave reviews from guests after preparing the Seared Snapper with Lobster Cream Sauce. Many have shared adaptation successes, from different seafood substitutions to innovative sauce variations that cater to personal tastes. Photography tips abound as readers share their beautiful plating results, showcasing the vibrant colors and textures of this stunning dish.

Readers noted that trying this recipe for special occasions, such as anniversaries or family gatherings, made for memorable evenings, with many coming back for seconds. This recipe’s flexibility in accommodating dietary needs also stands out as a favorite feature for a diverse guest list.

Frequently Asked Questions

Q: Can I use frozen snapper? A: Yes, but ensure it is fully thawed and patted dry before cooking for the best texture.

Q: How can I make this dish spicier? A: Add a pinch of cayenne pepper or chopped jalapeños to the lobster sauce for a kick.

Q: What can I substitute for lobster? A: Crab meat or shrimp can be excellent alternatives in the cream sauce.

Q: How do I know when snapper is cooked? A: It should be opaque and flake easily with a fork when done.

Q: Can I prepare the lobster sauce ahead of time? A: Absolutely! It can be prepared several hours ahead and reheated before serving.

Q: Is there a vegetarian version of this dish? A: Yes, you can use grilled vegetables with a plant-based cream sauce.

Q: What sides pair well with this dish? A: Light salads, roasted vegetables, or herbed rice make great accompaniments.

Q: Can I make this dish gluten-free? A: Yes, as long as you use gluten-free options for any stock or sauces.

Q: Does snapper need to be scaled before cooking? A: Yes, scaling should be done to prepare the fish properly unless using fillets.

Q: How long does leftover snapper last? A: Store it in the refrigerator and consume within 2 days for the best quality.

Additional Resources

For more seafood recipes, check out our collection of gourmet dishes featuring seasonal ingredients. Enhance your skills in sauce-making with our technique guides, or discover more about selecting the freshest seafood with our ingredient information guide. Investing in quality kitchen equipment can also elevate your cooking experience, find out what tools you need for perfect preparation every time.

Join the Conversation

We value your feedback and encourage social media sharing of your cooking experiences with this recipe! Use the hashtag #SearedSnapperWithLobsterCream and join our community of seafood enthusiasts. Share photography of your creations, discuss variations, and engage with others who share your love for gourmet cooking!

The Recipe

Seared Snapper with Lobster Cream Sauce

Serves: 4

Prep Time: 15 mins

Cook Time: 20 mins

Total Time: 35 mins

Kitchen Equipment Needed

  • Large skillet
  • Saucepan
  • Whisk
  • Spatula
  • Measuring cups and spoons

Ingredients

  • 4 snapper fillets
  • 1 cup heavy cream
  • 1 cup cooked lobster meat, chopped
  • 2 tablespoons butter
  • 2 cloves garlic, minced
  • 1 tablespoon lemon juice
  • Salt and pepper to taste
  • Fresh herbs for garnish

Directions

  1. Heat the skillet over medium-high heat and melt 1 tablespoon of butter.
  2. Season the snapper fillets with salt and pepper and place them in the skillet, cooking for about 4-5 minutes on each side until golden brown and cooked through. Remove and keep warm.
  3. In the same skillet, add remaining butter and sauté garlic for 1 minute.
  4. Pour in the heavy cream and bring to a simmer, stirring constantly.
  5. Add the lobster meat and lemon juice to the cream, mixing gently to combine. Season with salt and pepper.
  6. Serve the snapper topped with lobster cream sauce and garnish with fresh herbs.

Recipe Notes

  • For a lighter sauce, substitute half of the heavy cream with chicken or vegetable stock.
  • If snapper is unavailable, other white fish such as halibut or cod can be used.
  • Adjust the consistency of the sauce by adding more or less cream as per preference.
  • Fresh herbs like parsley or dill can enhance the flavor and presentation.

Delicious Garlic Butter Bacon Alfredo Pizza Twists Recipe

Garlic Butter Bacon Alfredo Pizza Twists: Deliciously Cheesy and Savory Treats!

⚖️
Difficulty
Easy

⏲️
Prep Time
20 mins

🕒
Cook Time
15 mins

⏱️
Total Time
35 mins

🍽️
Servings
4 servings

If you’re looking for a mouthwatering snack that combines the rich flavors of garlic butter, crispy bacon, and creamy Alfredo sauce, then these Garlic Butter Bacon Alfredo Pizza Twists are just what you need! Perfectly twisted pizza dough envelops a cheesy, savory filling, promising to satisfy even the most discerning taste buds. These delightful pizza twists are ideal for gatherings, game nights, or simply as a fun family dinner that everyone will love.

The combination of the savory garlic butter and crispy bacon creates an irresistible aroma that fills your kitchen, leaving everyone eager to dig in. Each twist is baked to golden perfection with a melty cheese core that promises a burst of flavor in every bite. Whether you serve them as an appetizer or a main dish, these pizza twists are sure to impress with their delightful presentation and unbeatable taste!

Quick Recipe Highlights

  • Flavor Profile: The combination of rich garlic butter and crispy bacon provides a mouthwatering depth, balanced by the creamy Alfredo sauce.
  • Texture: The crunchy exterior gives way to a gooey, cheesy center, making every bite a delightful experience.
  • Aroma: Expect an inviting aroma of garlic and butter that will have your mouth watering before the first bite.
  • Visual Appeal: The golden, crispy twists with a hint of melted cheese are sure to catch the eye at any gathering.
  • Skill Level Needed: This recipe requires basic cooking skills, making it accessible even for novice cooks.
  • Special Equipment: You’ll need a baking sheet, parchment paper, and a twisting technique to master this recipe.

Recipe Overview

  • Difficulty Level: This Garlic Butter Bacon Alfredo Pizza Twists recipe is rated easy, making it perfect for beginners or those short on time.
  • Category: These pizza twists fall under the category of appetizers or party snacks, ideal for sharing.
  • Cuisine: Inspired by Italian flavors, this recipe brings a fun twist to traditional handcrafted pizza.
  • Cost: The ingredients are affordable and commonly found in most kitchens, making this an economical dish to prepare.
  • Season: This dish is versatile and can be enjoyed year-round, but particularly shines during gatherings and parties.
  • Occasion: Perfect for game nights, birthday parties, or as a cozy family dinner treat.

Why You’ll Love This Recipe

First and foremost, the irresistible blend of garlic butter and bacon makes these pizza twists a flavor explosion, satisfying every salty and savory craving you might have. The creamy Alfredo sauce adds a richness that ties the flavors together, transforming these twists into a delectable treat. Each bite presents a satisfying combination of crunchy outside and gooey, cheesy inside, making them hard to resist.

Convenience is another highlight of this recipe. With a prep time of only 20 minutes and a cook time of 15 minutes, you can whip up these indulgent snacks in no time. Plus, they are perfect for batch cooking—you can make a large quantity and freeze them for future cravings. When new friends drop by, these pizza twists are a guaranteed crowd-pleaser with minimal effort.

In terms of nutritional advantages, while these twists are definitely a treat, they do offer some protein from the bacon and cheese, and the garlic provides excellent health benefits. Serve them alongside a green salad for a balanced meal that still feels indulgent and satisfying.

Socially, Garlic Butter Bacon Alfredo Pizza Twists are a fantastic dish for entertaining. They’re easy to share, fun to eat, and make for a great conversation starter at parties or get-togethers. Perfect for casual dining, they encourage camaraderie as your guests help themselves to these cheesy delights.

Finally, cost-effectiveness makes this recipe truly appealing. You can find the ingredients at your local grocery store without breaking the bank, enabling you to feed friends or family without feeling guilty. A simple yet delicious recipe that doesn’t skimp on flavor or texture, Garlic Butter Bacon Alfredo Pizza Twists offer incredible value.

Historical Background and Cultural Significance

The history of pizza can be traced back to ancient civilizations, but modern pizza as we know and love it today originated in Naples, Italy. The concept of twisting pizza dough into a fun shape comes from the evolution of pizza consumption—people love to break traditional dining norms, and these twists offer a new take on a classic beloved dish. This recipe brings Italian heritage into contemporary cooking, allowing home cooks to enjoy an Italian classic with an exciting twist.

Throughout the years, pizza has transcended borders and has become a staple in various cultures around the world. By incorporating local flavors and ingredients, people have tailored this classic dish to their unique culinary styles. Garlic Butter Bacon Alfredo Pizza Twists combine the rich savory elements that resonate with American tastes while maintaining a nod to Italian roots.

As the popularity of pizza increases globally, so does the creativity in preparing and presenting it. This recipe reflects more than just a meal; it embodies the spirit of innovation in the kitchen. Garlic Butter Bacon Alfredo Pizza Twists symbolize the adventurous nature of cooks wanting to experiment with traditional dishes.

Regional variations of this dish are numerous. In Italy, one may find a simple garlic and olive oil combination, while American kitchens might incorporate toppings like bacon or Alfredo sauce due to local tastes. Each region brings its unique identity to pizza, proving that this beloved dish knows no bounds in creativity and flavor.

Ingredient Deep Dive

Garlic: Garlic has been celebrated for its flavor and medicinal properties throughout history. This aromatic bulb enhances flavors and adds depth to various dishes. Nutritionally, garlic contains compounds like allicin, known for its health benefits, including heart health improvement and anti-inflammatory properties. When selecting garlic, look for firm bulbs without any soft spots, and store them in a cool, dark place to maintain freshness. If fresh garlic is unavailable, garlic powder can serve as an alternative, though the flavor may not be as strong.

Bacon: A fan favorite, bacon is often referred to as the ‘candy of meat’ due to its irresistible taste. The crispy texture and savory flavor enhance virtually any dish. Nutritionally, bacon is a source of protein and essential nutrients but should be eaten in moderation due to its fat and sodium content. When choosing bacon, seek out high-quality cuts, ideally from heritage breeds. Store cooked bacon in the refrigerator for up to a week, or freeze uncooked strips for extended storage. If you’re looking for substitutions, turkey bacon can work, though the taste and texture will differ.

Common Mistakes to Avoid

  • Using low-quality ingredients: Using subpar cheese or bacon can affect the overall flavor of the twists. Always choose quality ingredients for the best results.
  • Not preheating the oven: Preheating is crucial for achieving a perfectly crispy exterior. An unheated oven will lead to uneven cooking.
  • Overstuffing the twists: Adding too much filling can result in the dough bursting open during baking. Be generous but mindful of filling amounts.
  • Not twisting the dough tightly enough: Loose twists can result in a less visually appealing product and may also affect texture and cooking time.
  • Skipping parchment paper: This ensures easy cleanup and prevents the twists from sticking to the baking sheet.
  • Baking at the wrong temperature: Baking at a lower temperature may result in soggy, undercooked twists. Ensure you bake at the recommended temperature.
  • Not allowing the twists to cool: Cutting into hot twists can lead to a messy presentation. Allow them to cool slightly before serving.
  • Omitting the garlic butter glaze: The garlic butter not only adds flavor but helps crisp the twists. Don’t forget this important step!
  • Incorrect serving temperature: These twists are best served warm, so ensure they hit the table shortly after baking for the best experience.
  • Neglecting to experiment with seasonings: Don’t hesitate to add herbs or spices to the garlic butter for additional flavor complexity.

Essential Techniques

Twisting the dough is a unique technique that adds flair to your pizza twists. To master this technique, start by rolling the dough into strips uniformly. Holding two ends, twist them in opposing directions, ensuring the filling stays intact. Common pitfalls include twisting too loosely, which can cause filling spills, or overly tight twists that might restrict cooking. Aim for a balance, and watch for even spirals for visual appeal.

Another important technique is preparing the garlic butter glaze. This step introduces flavor and promotes browning while baking. Melt unsalted butter in a saucepan with minced garlic, stirring until fragrant. Be cautious not to burn the garlic as it can turn bitter. Once prepared, brush it generously over the twists before baking, ensuring even coverage for consistent flavor and appearance.

Pro Tips for Perfect Garlic Butter Bacon Alfredo Pizza Twists

To make your twists exceptional, opt for fresh pizza dough or homemade dough for superior flavor and texture. Use high-quality mozzarella cheese for excellent melting properties. Allow your dough to rest before rolling out, making it easier to handle and shape. For an extra punch of flavor, incorporate a pinch of Italian herbs into the garlic butter glaze. Make sure to preheat the baking sheet to achieve a crispy bottom crust. Experiment with your favorite meats or vegetables for unique filling variations.

Variations and Adaptations

For a twist on flavor, try replacing bacon with diced ham or cooked sausage. This keeps the savory aspect but offers diversity in taste. During seasonal changes, consider incorporating roasted vegetables for a festive flair. For dietary adaptations, replace traditional pizza dough with gluten-free alternatives to cater to those with gluten sensitivities. Vegan options can be achieved using plant-based cheeses, and alternative spreads can replace the Alfredo sauce for dairy-free flexibility. Finally, consider different cheese varieties like pepper jack or gouda for unique flavor contributions!

Serving and Presentation Guide

Presentation is key when serving these pizza twists! Arrange the twists on a large platter, drizzled with any remaining garlic butter for an eye-catching touch. Garnish with freshly chopped parsley for a pop of color. Consider serving them alongside a spicy dipping sauce, such as marinara or a creamy ranch, to enrich the flavor experience. To maintain an inviting temperature, serve immediately from the oven or place in a warming drawer during gatherings. Portion control is also important; aim for two to three twists per person as a satisfying starter!

Wine and Beverage Pairing

A delightful pairing for Garlic Butter Bacon Alfredo Pizza Twists is a crisp white wine such as Chardonnay or Sauvignon Blanc, as their acidity complements the richness of the cheese and bacon. If you prefer a red wine, a Pinot Noir can make for a lovely match, balancing the savory notes without overpowering the dish. For non-alcoholic options, consider fizzy sparkling water with lemon or a light iced tea to cleanse the palate. Always serve beverages chilled to enhance the dining experience!

Storage and Shelf Life

For optimal storage, place leftovers in an airtight container and refrigerate promptly. These twists are best consumed within 3 days, retaining flavor and texture. If you wish to store them longer, freezing is an option! Ensure they cool completely before wrapping individually in plastic wrap and then in foil. They’ll keep well in the freezer for up to 2 months. When you’re ready to enjoy, simply reheat in the oven at 350°F until warm and crispy, never microwave, as it can yield soggy twists.

Make Ahead Strategies

To ease your kitchen workload, consider preparing the filling ahead of time. You can make the garlic butter and bacon mixture a day in advance and refrigerate it until you’re ready to use it. Additionally, you can roll out the pizza dough and shape it into twists a few hours before serving. The beauty of this recipe lies in its flexibility; just make sure the twists are baked fresh for the best crispy experience. Reheating is straightforward, but keep the freshly added garlic butter glaze on hand to brush on afterward.

Scaling Instructions

Scaling this recipe is straightforward. To halve the recipe, reduce all ingredients equally, ensuring the dough is still manageable for twisting. If you’re looking to double or triple the recipe for larger gatherings, simply adjust the ingredient amounts accordingly and ensure you have enough baking sheets at your disposal. Depending on your oven size, you may need to bake them in batches to avoid overcrowding, which could lead to uneven cooking. When considering storage, account for the increased volume accordingly.

Nutritional Deep Dive

Analyzing the macros, each twist provides a good amount of protein, primarily from the bacon and cheese. The carbohydrates mainly come from the pizza dough, contributing to energy. However, be aware of the fat content from the bacon and butter. It’s advisable to consider portion control when indulging in this delicious treat. Incorporating nutritious side dishes, like a salad, can help balance the meal and manage caloric intake. For weight management, consider enjoying these twists on special occasions rather than as an everyday snack.

Dietary Adaptations

For gluten-free individuals, opt for almond flour or pre-made gluten-free pizza dough to mimic the texture of traditional dough without gluten. If dairy is a concern, explore cashew-based cheeses or nutritional yeast for a similar creaminess without the lactose. Vegans can benefit from this recipe by replacing the bacon with seasoned tofu or vegan sausage alternatives, alongside plant-based cheese options. Those following a low-carb or keto regimen can use cauliflower crusts as a suitable substitute while maintaining a delicious flavor profile.

Troubleshooting Guide

If you encounter texture issues—like sogginess—it may be due to excess moisture in your filling. Ensure your bacon is thoroughly cooked and drained before mixing. Flavor balance problems could arise if not enough seasoning is used; adjust accordingly with salt and spices based on personal preference. If your dough sticks excessively, light flouring during rolling will help manage it. Equipment challenges can surface from using worn-out baking sheets; be sure to purchase or maintain quality kitchen tools to avoid mishaps.

Recipe Success Stories

Community feedback highlights how versatile this recipe is; many have successfully modified it to suit family preferences, with variations including additional seasonings or different cheese types. Adaptations from readers mentioning their favorite substitutions have been positively received, showcasing the recipe’s flexibility. Numerous individuals have loved sharing their photos online, creating a community of enthusiastic home cooks aspiring to recreate these delicious twists at home. Engaging with readers invites even more creativity, further enriching the recipe’s legacy.

Frequently Asked Questions

What are the best ways to serve Garlic Butter Bacon Alfredo Pizza Twists?

These twists are delightful when served warm, straight from the oven. A platter presentation with additional dipping sauces like marinara or ranch enhances the experience and invites sharing.

Can I use different types of cheese for this recipe?

Absolutely! Feel free to experiment with different cheese varieties. Cheddar, gouda, or even pepper jack can add exciting flavors and melt beautifully.

How should I store leftover Pizza Twists?

Store remaining twists in an airtight container in the refrigerator for up to three days. For longer storage, wrap them tightly in plastic and freeze for up to two months.

Can these Pizza Twists be made ahead of time?

Yes! You can prepare the filling and roll out the dough in advance. Just store components separately in the refrigerator until you’re ready to bake.

What other fillings can I use for this recipe?

You can get creative with the filling! Consider vegetables like spinach or mushrooms, or switch out bacon for cooked chicken or pepperoni for variety.

Are these twists safe for freezing?

Yes! They freeze well. Make sure they are completely cooled before wrapping them individually to avoid freezer burn.

What is the best way to reheat frozen twists?

The best method is to reheat them in the oven at 350°F until warmed and crispy to restore their original texture.

Can I make these Pizza Twists vegan?

Yes! Substitute bacon for tofu or seitan and use dairy-free cheese; you can also create a vegan Alfredo sauce using cashews or nutritional yeast.

What is the ideal dipping sauce for these Pizza Twists?

Popular choices include marinara sauce, ranch dressing, and garlic aioli. These contrasting flavors add enjoyment and enhance the overall dish.

How long does it take to make these Pizza Twists?

The total time from prep to serving is approximately 35 minutes, making this a quick and easy snack or meal option!

Additional Resources

Explore our related recipes such as Cheese-Stuffed Breadsticks and Spicy Pepperoni Rolls for more delightful snack ideas. For more cooking techniques, check out our guides on bread-making and pizza dough preparation. Interested in specific ingredients? Our ingredient guides on cheese varieties or herb uses will enhance your culinary knowledge. Lastly, consider acquiring kitchen equipment like a pizza stone or rolling mat for improved cooking experiences.

Join the Conversation

We encourage you to connect with us on social media to share your experience with Garlic Butter Bacon Alfredo Pizza Twists! Tag us in your photos and share your unique twists on the recipe. For those who have tried the recipe, your reviews and suggestions create a vibrant community where home cooks can learn from one another. Engaging with the recipe helps us grow and adapt, encouraging further experimentation and variations that will wow our readers.

The Recipe

Garlic Butter Bacon Alfredo Pizza Twists

Serves: 4 servings

Prep Time: 20 mins

Cook Time: 15 mins

Total Time: 35 mins

Kitchen Equipment Needed

  • Baking sheet
  • Parchment paper
  • Mixing bowl
  • Baking brush

Ingredients

  • 1 pound pizza dough
  • 1/2 cup unsalted butter, melted
  • 4 cloves garlic, minced
  • 1 cup cooked bacon, crumbled
  • 1 cup mozzarella cheese, shredded
  • 1/2 cup Alfredo sauce
  • 1/4 teaspoon salt
  • 1/4 teaspoon black pepper
  • 1/4 teaspoon Italian seasoning

Directions

  1. Preheat your oven to 375°F (190°C) and line a baking sheet with parchment paper.
  2. In a skillet, melt butter and sauté minced garlic until fragrant. Stir in crumbled bacon and season with salt, pepper, and Italian seasoning.
  3. Roll out the pizza dough on a floured surface and cut it into strips, roughly 1 inch wide.
  4. Spread a thin layer of Alfredo sauce on each strip, followed by a generous sprinkling of the bacon-garlic mixture and mozzarella cheese.
  5. Starting from one end, twist each strip gently, and place them on the prepared baking sheet.
  6. Brush the twists with the remaining garlic butter, ensuring even coverage. Sprinkle extra cheese if desired.
  7. Bake for 15 minutes, or until golden brown. Remove from the oven and serve warm.

Recipe Notes

  • Feel free to customize the filling by adding vegetables or changing up the cheese used.
  • For added kick, sprinkle some red pepper flakes in the filling.

Indulge in Creamy Cheesy Garlic Butter Linguine with Beef

Creamy Cheesy Garlic Butter Linguine with Savory Beef: A Comforting Delight

⚖️
Difficulty
Medium

⏲️
Prep Time
15 mins

🕒
Cook Time
30 mins

⏱️
Total Time
45 mins

🍽️
Servings
4

Indulge in a bowl of Creamy Cheesy Garlic Butter Linguine with Savory Beef, a perfect fusion of textures and flavors that will bring warmth to your table. This dish celebrates the comforting harmony of al dente linguine enveloped in a rich garlic butter sauce infused with savory beef and creamy cheese. It’s not just a meal; it’s an experience that draws family and friends together over a delicious plate of food, elevating your dining moments into cherished memories.

This recipe creates a beautifully balanced dish that is both filling and satisfying. The creamy texture of the sauce, paired with the robust flavors of garlic and tender beef, makes each bite a melt-in-your-mouth delight. Finished with a sprinkle of cheese and a dash of herbs, the presentation is as inviting as the taste, making it ideal for both casual weeknight dinners and more formal gatherings.

Quick Recipe Highlights

  • Flavor Profile: The combination of rich cheese, savory garlic, and hearty beef leads to a delectable and well-rounded taste experience that delights the palate.
  • Texture: The linguine offers a firm yet tender bite, while the creamy sauce wraps around the noodles, creating a luxurious mouthfeel alongside the succulent beef pieces.
  • Aroma: The dish is aromatic, featuring the enticing scent of caramelized garlic and melted cheese that fills your kitchen, promising comfort and warmth.
  • Visual Appeal: With its glossy finish and specks of freshly chopped herbs, the dish is not only delicious but also visually stunning, making it a centerpiece for any table.
  • Skill Level Needed: This recipe is perfect for those with intermediate cooking skills, combining various techniques such as sautéing, boiling, and sauce-making.
  • Special Equipment: You’ll need a large pot for pasta, a skillet for the sauce, and a mixing spoon to bring everything together.

Recipe Overview

  • Difficulty Level: The dish is classified as medium difficulty due to its multiple steps, but with a bit of practice, home cooks can master it in no time.
  • Category: This recipe fits comfortably in the pasta category, ideal for dinner meals that require a bit more flair and flavor.
  • Cuisine: Drawing from Italian culinary traditions, this dish embodies the essence of comfort foods that bring families together.
  • Cost: This meals approximate cost is budget-friendly, relying on staple ingredients like pasta, beef, and cheese that provide great value.
  • Season: This dish shines in cooler seasons when hearty meals are especially comforting, but it can be enjoyed year-round.
  • Occasion: Perfect for weeknight family dinners, casual gatherings, or even potlucks where you want to impress guests with minimal effort.

Why You’ll Love This Recipe

This Creamy Cheesy Garlic Butter Linguine with Savory Beef is sure to become a favorite for several reasons. First and foremost, the taste and texture appeal are unmatched. The rich, creamy sauce clings lovingly to every strand of linguine while the tender bites of beef add a satisfying protein element, ensuring that every forkful is savory and delightful.

The dish’s convenience is another major advantage; it can be whipped up in about 45 minutes, making it an excellent choice for busy weeknights. Its straightforward preparation steps cater to a range of culinary skills, promising an easy-going cooking experience without sacrificing flavor or quality.

Nutritionally, this recipe includes a healthy balance of carbohydrates from the pasta, protein from the beef, and essential fats from the cheese and butter. This delivers not only comfort but also energy to fuel your day. Plus, the incorporation of garlic boosts immune function and overall health—making each bowl not just a dish, but a nourishing meal.

When it comes to social gatherings, this dish is sure to be a conversation starter. Sharing a plate of creamy linguine fosters connection, whether you’re hosting friends for dinner or enjoying a cozy night with family. Its flavor and comfort invite laughter and storytelling over shared plates, making mealtimes special.

Lastly, given its budget-friendly ingredients yet impressive outcome, this recipe is incredibly cost-effective. You can feed a family of four without breaking the bank, offering a satisfying and indulgent experience that anyone can enjoy.

Historical Background and Cultural Significance

The origins of linguine can be traced back to the coastal regions of Italy, particularly in the Liguria area. With roots firmly planted in traditional Italian cuisine, this type of pasta has been enjoyed for centuries, often paired with seafood and rich sauces. The name ‘linguine’ itself derives from the Italian word for “little tongues,” a nod to its elongated flat shape that resembles a small tongue.

Culturally, pasta holds a significant place in Italian heritage, symbolizing family and togetherness. Traditional recipes are often passed down through generations, enlarging the bond among family members as they gather around the table, sharing stories and laughter. This dish resonates with that tradition, encouraging families to connect over a home-cooked meal infused with love.

Over the years, the recipe for linguine has evolved and diversified. It has taken on various forms, incorporating local ingredients and flavors from regions far and wide. The addition of savory beef and creamy sauce is a testament to how classic recipes can be adapted without losing their authenticity, reflecting the creativity that Italian cooking embraces.

From its humble beginnings in Italy to global kitchens today, lingouine continues to inspire culinary innovation. Variations abound, ranging from vegetarian takes to seafood-infused styles, proving its versatility and beloved status in cuisines around the world.

Ingredient Deep Dive

Linguine: Linguine is a staple in Italian cuisine, often preferred for its ability to hold onto sauces better than other pasta shapes. It is traditionally made from durum wheat semolina, lending it a firm texture when cooked al dente. Linguine is high in carbs, giving you energy, and can be paired with a variety of sauces, making it incredibly versatile.

Beef: Beef is a great source of protein and essential vitamins including B12 and iron, vital for maintaining a healthy diet. Using quality cuts not only enhances flavor but also ensures tenderness. Additionally, selecting grass-fed options can provide healthier fat profiles.

Garlic: Known for its distinct sharp flavor and aroma, garlic has been utilized for centuries not only as a culinary ingredient but also for its medicinal properties. Rich in antioxidants, garlic is known to boost the immune system. When sautéed, it develops a sweeter, less pungent flavor that beautifully complements cream-based sauces.

Cheese: The main cheese component in this dish typically includes Parmesan or Pecorino Romano, which add rich flavors and creaminess. Cheese is a great calcium source, though it is important to use it in moderation. Freshly grated cheese is recommended for superior flavor compared to pre-grated options.

Common Mistakes to Avoid

  • Overcooking the pasta: This can lead to a mushy texture, so be sure to cook it al dente for the best results.
  • Not salting the water: A well-salted cooking water enhances pasta flavor, so don’t skip this step for optimal taste.
  • Skipping the garlic sauté: Sautéing garlic in butter unlocks its full flavor; adding it raw can lead to a harsh taste.
  • Using pre-grated cheese: Freshly grated cheese melts better and offers superior flavor compared to its pre-packaged counterpart.
  • Not allowing the sauce to simmer: Simmering allows flavors to meld together, enhancing overall taste.
  • Overloading with beef: Balance between beef and pasta is key; too much beef can overshadow the pasta experience.
  • Not incorporating pasta water: Adding a splash of reserved pasta water to the sauce creates a silkier finish and better adherence to the noodles.
  • Skipping the herbs: Fresh herbs add vital brightness and dimension that elevate the dish;

Crispy Deep Fried Spare Ribs: A Flavorful Delight Recipe

Crispy Deep Fried Spare Ribs: A Flavor Explosion You Can’t Resist!

⚖️
Difficulty
Medium

⏲️
Prep Time
20 mins

🕒
Cook Time
40 mins

⏱️
Total Time
60 mins

🍽️
Servings
4 servings

Are you ready to indulge in a dish that will tantalize your taste buds and make your dining experience unforgettable? Our Crispy Deep Fried Spare Ribs are not just any ordinary ribs; they are a celebration of flavors, textures, and aromas that you won’t want to miss. Imagine sinking your teeth into perfectly cooked, tender meat enveloped in a crunchy, golden crust, delivering a burst of juicy flavor with every bite. This dish is an ultimate comfort food that promises to be a star at any gathering or family meal.

The harmony of sweet, savory, and slightly spicy seasoning enhances the inherent richness of the pork, creating a satisfying taste that lingers on your palate. The crispy coating adds a delightful crunch, contrasting beautifully with the tender meat inside. Perfect for casual get-togethers or special occasions, this recipe is bound to leave your guests asking for seconds and taking notes for home cooking.

Quick Recipe Highlights

  • Flavor Profile: The sweet, smoky, and slightly spicy marinade of these ribs infuses each bite with a savory depth, making it absolutely delectable.
  • Texture: The ribs are marinated to ensure tenderness, then coated and deep-fried until they achieve a satisfying crunch, giving you the best of both worlds.
  • Aroma: The mouthwatering scent of marinated pork and spices drifting from your kitchen will have everyone on their toes in anticipation.
  • Visual Appeal: Crispy Deep Fried Spare Ribs are visually stunning with their glistening, golden-brown crust that is hard to resist.
  • Skill Level Needed: Only a moderate level of cooking skill is necessary, making this recipe perfect even for the novice chef eager to impress.
  • Special Equipment: A deep fryer or heavy pot is needed for achieving the best frying results. A thermometer will also ensure your oil is at the perfect temperature for frying.

Recipe Overview

  • Difficulty Level: This dish requires a medium difficulty level due to the marinating process and the specifics of deep frying, which can take a bit of practice to perfect.
  • Category: These Crispy Deep Fried Spare Ribs fall under main course dishes, perfect for a hearty lunch or dinner option.
  • Cuisine: Inspired by Asian and American BBQ traditions, this recipe reflects a fusion of techniques and flavors that are universally loved.
  • Cost: Budget around $15-$20 for all the ingredients to serve a family of four, making it a cost-effective choice for entertaining.
  • Season: These ribs are great to enjoy year-round, particularly during summer barbecues and family gatherings.
  • Occasion: Perfect for casual gatherings among friends, family parties, and even holiday feasts where you want to impress your guests.

Why You’ll Love This Recipe

Imagine a gathering with friends, laughter, and conversation, all while indulging in the wonderful flavor of Crispy Deep Fried Spare Ribs. Each bite gives a satisfying crunch followed by tender, juicy meat, making it a dish everyone will cherish. The spice blend used in the marinade not only enhances the taste but also provides a nostalgic feel, often recalling cookouts and friendly get-togethers.

This recipe is incredibly convenient to prepare. After a simple marination process, the time spent cooking is relatively short. You can enjoy a delicious meal without demanding hours of hands-on work in the kitchen. Additionally, cooking deep-fried spare ribs allows you to batch-cook and freeze extras for later, ensuring you can easily serve up your famous ribs unexpected visits.

Nutritionally, while indulgent, pork ribs provide protein along with important vitamins and minerals. This dish balances well with a light side salad or steamed vegetables, allowing for a hearty yet nutritious meal. You could even complement it with rice or noodles to incorporate more healthful carbohydrates.

Crispy Deep Fried Spare Ribs are also a fantastic choice for social gatherings, sparking joy and conversation as guests gather around the table. Sharing delicious food fosters connection, making it a wonderful centerpiece for any meal. Plus, the sheer deliciousness makes for a great memory among friends and family.

Lastly, the cost-effectiveness of this recipe cannot be overlooked. With simple, widely available ingredients, you can whip up a beautiful and fulfilling meal without breaking the bank. It’s an accessible cuisine for all, while still offering a gourmet feel.

Historical Background and Cultural Significance

The origins of spare ribs trace back centuries, with different cultures boasting their own variations that reflect local customs and ingredients. Pork ribs are especially beloved in regions blessed with rich agricultural landscapes, providing an ample supply of pork. As methods of cooking evolved, the art of deep frying emerged, becoming a beloved preparation style for meat dishes around the world.

Culturally, ribs represent more than just a meal; they symbolize gatherings, grilling tradition, and hearty feasts. In many cultures, enjoying grilled or fried ribs signifies celebration and community, often seen at barbecues and festive occasions. The evolution of this recipe showcases the globalization of flavors, drawing inspiration from Asian spices and American BBQ techniques to create something uniquely delicious.

As cuisines intermix, regional variations of deep-fried ribs have emerged, with each locale adding its twist to the preparation and flavor profile. From spicy Korean gochujang flavors to sweet-and-sour variations found in Chinese cuisine, spare ribs continue to diversify and innovate.

The enduring appeal of ribs ensures their continued significance in culinary history. They have remained a constant favorite, heralded in cookbooks, restaurants, and home kitchens, celebrated for their ability to bring people together around the table.

Ingredient Deep Dive

The main ingredient in our Crispy Deep Fried Spare Ribs is, of course, pork ribs. Pork’s significance in various cultures cannot be understated; it is often celebrated for its rich flavor and versatility. Nutritionally, pork ribs are a good source of high-quality protein, essential for building and repairing body tissues. When choosing ribs, opt for well-marbled cuts, as these will yield the most flavor and tenderness.

Marinades play a crucial role in flavoring the ribs. A mixture of soy sauce, honey, garlic, and spices ensures a robust flavor profile, enhancing the meaty goodness of the ribs. When selecting spices, fresh options prefer, those spices provide the best aroma and flavor. Store spices in a cool, dark place to maintain potency and consider alternatives like liquid smoke to infuse unexpectedly grilled flavors if needed.

Oil is another key ingredient for frying. A neutral oil with a high smoke point, such as canola or vegetable oil, ensures crispy results without overwhelming the dish’s flavors. Check for freshness before use and store oils in a cool environment to prolong shelf life.

Common Mistakes to Avoid

  • Not marinating long enough: Marination enhances flavor penetration, so allow time for the best results.
  • Using the wrong oil temperature: Ensure your oil is heated to the right temperature (around 350°F) for crispy outcomes.
  • Crowding the fryer: Fry in small batches to maintain the oil temperature and ensure even cooking.
  • Skipping the drying step: Pat ribs dry before frying to achieve that irresistible crispiness.
  • Not checking the doneness: Use a meat thermometer to avoid overcooking or undercooking your ribs.
  • Inadequate seasoning: Make sure the marinade is balanced, adjusting for sweetness, salt, and spice.
  • Failure to leave space for frying: Ensure there’s enough space between each rib to avoid steaming instead of frying.
  • Ignoring resting time: Allow fried ribs to rest on a wire rack to maintain crispiness.
  • Using old ingredients: Ensure all ingredients are fresh for maximum flavor and safety.
  • Not monitoring cooking time: Keep an eye on the ribs while frying; they can quickly go from golden to burnt.

Essential Techniques

Deep frying is an essential technique for achieving that perfect crisp on spare ribs. It involves immersing food in hot oil, cooking quickly while sealing in moisture. Mastering the perfect frying temperature is key; too hot can burn the coating while too low will result in greasy ribs. A thermometer helps maintain consistency. Visual cues include a golden brown color and a satisfying crunch when biting into the meat.

Marinating is equally important, allowing flavors to penetrate the meat and ensure juiciness. Ensure ribs are fully submerged in marinade for even flavor distribution. Time is essential—allow the ribs to marinate for at least 4 hours, preferably overnight, for maximum taste infusion.

Brining is another technique that enhances flavor and moisture retention; soaking the meat in a saltwater solution increases juiciness and infuses flavor. A brine with added spices can elevate your ribs to new heights.

Pro Tips for Perfect Crispy Deep Fried Spare Ribs

Use a meat tenderizer to ensure even cooking. This technique promotes even tenderness throughout the meat, leading to better flavor and texture.

Rest ribs after frying on a wire rack; this will keep them crispy by allowing excess oil to drain away rather than sitting in it.

Consider double frying for even crispier ribs. Frying them once, resting, and then frying again creates a crunch that’s truly irresistible.

Use high-quality oil for frying; this can significantly impact the flavor and crispiness of the finished dish. Fresh oil results in clearer last-minute frying.

Experiment with seasoning in the batter; creative combinations can enhance your rib’s unique flavor.

Let the fried ribs cool briefly before serving, as they will continue to cook slightly, ensuring the best texture for enjoyment.

Variations and Adaptations

Regional variations of deep-fried spare ribs can include different spice blends and marinades. For instance, you can explore a smoky BBQ rub for a thicker crust that adds a distinct Southern flavor. Seasonal adaptations, such as adding autumn spices during the fall, can offer a unique twist based on time of year.

For dietary modifications, consider an air fryer version for a healthier alternative that retains crispy texture without full deep frying.

Flavor variations such as adding lime zest or ginger to the marinade can brighten the flavors and create a new palate experience.

Texture modifications can involve experimenting with the coating—switching breadcrumbs for crushed nuts can offer a delightful crunch in addition to flavor.

Presentation alternatives could include serving with vibrant dips or salsas on the side to engage the visual aspect of your dish, enhancing the dining experience.

Serving and Presentation Guide

When serving your Crispy Deep Fried Spare Ribs, aim for an eye-catching arrangement on a large platter, garnished with fresh herbs or sliced vegetables. This not only looks appealing but encourages family-style dining.

Consider using sauces for dipping or drizzling over the ribs, such as sweet chili or homemade BBQ sauce. This adds a dimension of flavor and can elevate the presentation.

Utilize colorful side dishes, such as a vibrant salad or roasted vegetables, to create contrast and balance the richness of the ribs.

Temperature is crucial; serve as soon as possible after frying for optimum crispiness.

For portion control, introduce individual plating for guests or serving them family-style, encouraging a shared experience while reducing waste.

Wine and Beverage Pairing

When it comes to wine pairings, consider a bold red wine like Zinfandel, which complements the smoky, rich flavors of the ribs perfectly. Alternatively, a fruity Merlot can add a nice contrast to the savory notes.

For non-alcoholic alternatives, try sparkling apple cider or iced tea with a squeeze of lemon for refreshing accompaniment.

If coffee is more your style, a rich, dark roast can balance the meal’s bold flavors while providing a delicious conclusion to the meal experience.

When serving beverages, ensure they are chilled appropriately. Serve white wine crisp and cold, while red wine can be slightly cooler than room temperature, enhancing the drinking experience.

Storage and Shelf Life

To store your Crispy Deep Fried Spare Ribs, refrigerate them in an airtight container for about 3 to 4 days. For longer storage, freezing is a great option–wrap individual portions in plastic wrap and place them in a freezer bag to prevent freezer burn.

The ideal temperature for storage should be below 40°F in the refrigerator and below 0°F in the freezer. Always label your containers with dates for easy reference.

Signs of spoilage include a sour smell, discoloration, or a slimy texture—discard any ribs that exhibit these characteristics.

For reheating, an oven or toaster oven is the best method to retain crispiness; reheating on high heat for a short time helps regain the crunch that makes these ribs so delightful.

Make Ahead Strategies

One of the best features of this recipe is the ability to prepare marinated spare ribs ahead of time. You can marinate them overnight, ensuring deep flavor without the last-minute rush.

Store the marinated ribs in a large, resealable bag, removing as much air as possible to avoid oxidation, sealing in the marinade’s effectiveness.

When frying, you can prep the batter in advance as well, storing it in the refrigerator to save time on cooking day. Just give it a stir before using.

Bringing along fresh elements like salads or dipping sauces can elevate the meal while keeping it fresh. Prepare these a day in advance for added convenience.

Each of these strategies will maintain the quality of your dish and decrease time spent in the kitchen during busy evenings.

Scaling Instructions

Scaling the recipe is simple, whether you want to halve or double the portions. For halving, reduce all ingredients and cooking time proportionately, maintaining the same quality.

Doubling or tripling the recipe requires more attention to cooking times and possibly larger cooking equipment. Ensure enough frying oil is available to accommodate increased batches.

Consider the size of your frying vessel; if necessary, split the frying into batches to maintain proper temperature and texture.

When scaling, also adjust any accompanying side dishes or garnishes proportionately to create a balanced meal.

Additionally, remember to consider storage needs for leftovers if you’re preparing more than your usual amount.

Nutritional Deep Dive

Crispy Deep Fried Spare Ribs provide a substantial source of protein, essential in building muscle and maintaining bodily functions. With approximately 20-25 grams per serving, they support weight maintenance and growth.

In terms of micronutrients, ribs offer minerals like zinc and iron, vital for immune function and maintaining healthy blood levels.

While delicious, it’s important to enjoy these ribs in moderation due to their higher-calorie content, typically around 400-500 calories per serving.

Pairing with vegetables or salads adds nutrients and fiber, balancing the overall meal. Portion control is crucial while maintaining the integrity of the dish.

For those managing dietary goals, consuming these ribs alongside healthful sides further aligns meals with mindful eating.

Dietary Adaptations

For a gluten-free version of Crispy Deep Fried Spare Ribs, swap regular soy sauce for tamari, ensuring that the marinade remains gluten-free while still maintaining flavor.

If you’re aiming for dairy-free, simply omit any dairy products in the marinade and substitute with plant-based alternatives as needed.

For a low-carb lifestyle, consider using a coating made from almond flour instead of traditional breadcrumbs, still retaining that crunchy exterior while shaving off carbs.

If you’re looking for a vegan option, try marinating cauliflower or hearty vegetables, following the same frying technique for a delicious plant-based alternative.

Keto and paleo enthusiasts can enjoy these ribs by ensuring that all ingredients, particularly the marinade, adhere to their specific dietary requirements, enabling indulgence without compromise.

Troubleshooting Guide

If your ribs turn out greasy, it may be a sign of not reaching optimal frying temperatures. Always ensure your oil is hot enough before adding your ribs.

If the coating is too thick, consider using a lighter hand when dredging in flour or breadcrumbs, allowing a thinner layer to avoid overpowering the meat’s flavor.

For texture issues, such as sogginess, ensure that the ribs have cooled properly on a wire rack after frying, allowing for air circulation.

Should your ribs be overly dry, consider marinating longer for better moisture retention or using a higher fat-content cut of meat.

Ingredient substitutions, such as utilizing gluten-free options or alternative spices, may require adjustments in flavor balance. Always taste and adjust seasoning accordingly.

Recipe Success Stories

Readers have shared numerous feedback about their Crispy Deep Fried Spare Ribs experiences. Many rave about the fantastic flavor that emerges from marination, often experimenting with different spice blends leading to unique creations.

Adaptation success stories include variations such as spicy Jalapeño-infused ribs that have raised the bar for heat-loving fans. Feedback from communities indicates that these ribs often become the centerpiece of family gatherings, leading to requests for recipes.

Sharing stories of various presentation techniques, such as serving with vibrant coleslaw, has inspired others on how to elevate serving styles and turn this hearty dish into a full-fledged feast.

Photography tips among readers have helped highlight the beauty of the ribs, encouraging many to create stunning presentations worth sharing across social media platforms.

Frequently Asked Questions

Can I use other cuts of meat for this recipe?

Absolutely! While spare ribs are traditional, you can also use baby back ribs or even chicken wings and thighs for a great fried dish. The cooking times may vary, so adjust accordingly.

Can I bake the ribs instead of frying?

Baking is an option for a lighter preparation. Preheat the oven to 400°F, season the ribs, and place them on a rack in a roasting pan to enhance crispiness.

What dipping sauces pair well with these ribs?

Popular dipping sauces include sweet chili sauce, BBQ sauce, or a spicy sriracha mayo. You can also create a refreshing cilantro-lime dressing to cut through the richness.

How do I prevent my ribs from becoming tough?

Be cautious not to overcook your ribs. Marinating helps tenderize the meat, but pay attention to the frying time to keep them juicy.

What are the best sides to serve with Crispy Deep Fried Spare Ribs?

Pair these ribs with fresh coleslaw, grilled corn, or a light salad. Such sides help balance the richness of the dish.

How can I ensure the ribs remain crispy after frying?

Rest ribs on a wire rack rather than paper towels to prevent steam from making them soggy. Serve immediately for optimum crispiness.

Can I prepare the marinade ahead of time?

Yes! You can prepare the marinade in advance and even marinate the ribs a day prior to frying, saving you time on cooking day.

Is there a way to make this recipe healthier?

Consider air frying the ribs or minimizing the amount of oil by baking them. Using skinless chicken alternatives can also reduce fat content significantly.

What should I do if my oil is smoking?

If your oil starts to smoke, it means it’s too hot. Remove the pan from heat immediately and allow it to cool slightly before resuming cooking.

How do I store leftovers properly?

Cool the ribs before placing them in an airtight container in the fridge for 3-4 days; you can freeze the ribs for longer storage as needed.

Additional Resources

To further enhance your cooking skills, check out related recipes like Honey BBQ Ribs or Spicy Garlic Chicken Wings. Also, don’t miss our technique guides on frying, marinating, and ingredient selections for various dishes.

For those interested in seasonal variations, explore how to adapt this recipe with festive spices during holidays, or try using local produce in your accompanying sides.

Additionally, look for equipment recommendations that will elevate your frying experience and ensure you have the best tools at hand for creating perfect dishes.

Join the Conversation

We love to hear from you! Share your cooking experiences with our Crispy Deep Fried Spare Ribs by tagging us on social media. Post your variations or adaptations, and don’t shy away from showing off your plating skills!

Join our community as we exchange tips, stories, and celebrate the joy of cooking together. Your feedback can help inspire future cooking endeavors for everyone involved.

The Recipe

Crispy Deep Fried Spare Ribs

Serves: 4 servings

Prep Time: 20 mins

Cook Time: 40 mins

Total Time: 60 mins

Kitchen Equipment Needed

  • Deep fryer or heavy pot
  • Thermometer
  • Mixing bowls
  • Whisk
  • Wire rack for cooling

Ingredients

  • 2 lbs spare ribs
  • 1/4 cup soy sauce
  • 2 tbsp honey
  • 2 cloves garlic, minced
  • 1 tsp black pepper
  • 1 tsp paprika
  • 1/2 cup flour
  • 1/2 cup breadcrumbs
  • Salt to taste
  • Oil for frying

Directions

  1. Prepare the ribs by removing excess membrane and patting them dry.
  2. In a bowl, mix soy sauce, honey, garlic, black pepper, and paprika. Marinade the ribs in this mixture for at least 4 hours, ideally overnight.
  3. Heat the oil in a deep fryer or heavy pot to 350°F.
  4. In a separate bowl, combine flour and breadcrumbs, then season with salt.
  5. Dredge the marinated ribs in the flour mixture, ensuring they’re coated evenly.
  6. Carefully place ribs in the hot oil, frying in batches to avoid overcrowding. Fry for about 8-10 minutes or until golden brown and crispy.
  7. Remove the ribs and place them on a wire rack to drain excess oil.
  8. Serve hot with your favorite dipping sauce and enjoy!

Recipe Notes

  • For added flavor, you can marinate the ribs overnight for richer taste.
  • Feel free to experiment with different spices or even add chili flakes for heat.
  • If you prefer a lighter option, try baking at 400°F for a healthier alternative without compromising too much on texture.

Savory Stuffed Chicken with Peppers, Spinach, and Mozzarella Recipe

Savory Stuffed Chicken with Roasted Red Peppers, Spinach, and Mozzarella: A Delightful Culinary Experience

⚖️
Difficulty
Medium

⏲️
Prep Time
20 mins

🕒
Cook Time
30 mins

⏱️
Total Time
50 mins

🍽️
Servings
4

Welcome to the enticing world of savory stuffed chicken with roasted red peppers, spinach, and mozzarella. This delightful dish is not only comforting but also bursting with flavors that will tantalize your taste buds. The succulent chicken fillets are generously filled with a mixture of roasted red peppers, vibrant spinach, and creamy mozzarella, creating a medley of taste and texture. Whether you’re preparing a weeknight dinner for your family or hosting a dinner party, this recipe is sure to impress and satisfy everyone at the table.

The combination of juicy chicken, aromatic spices, and fresh ingredients creates an irresistible dish that embodies culinary excellence. As you prepare the stuffing, the roasted red peppers add a touch of sweetness while the spinach contributes a wholesome freshness. Meanwhile, the melted mozzarella cheese provides a rich creaminess that binds all the flavors together. This savory stuffed chicken not only tastes gourmet but is also simple enough to make at home, proving that elegance in dining doesn’t have to come with complexity.

Quick Recipe Highlights

  • Flavor Profile: The sweet and smoky roasted red peppers perfectly complement the earthy spinach and rich mozzarella.
  • Texture: Each bite offers a tender, juicy chicken with a delightful, creamy center.
  • Aroma: Expect a fragrant blend of savory spices, fresh herbs, and caramelized vegetables wafting through your kitchen.
  • Visual Appeal: The vibrant colors of the filling peek through the golden, baked chicken, making for a stunning presentation.
  • Skill Level Needed: Requires basic cooking skills; perfect for enthusiastic beginners and experienced cooks.
  • Special Equipment: A sharp knife for cutting and a baking dish to hold and cook the chicken.

Recipe Overview

  • Difficulty Level: This recipe is rated medium due to the art of stuffing the chicken and ensuring even cooking.
  • Category: Ideal for a main course, this dish fits perfectly into dinner menus.
  • Cuisine: This recipe draws inspiration from Mediterranean cuisine, renowned for its use of fresh ingredients and vibrant flavors.
  • Cost: The approximate cost to make this dish is budget-friendly, thanks to accessible ingredients.
  • Season: Savory stuffed chicken shines in any season but is particularly delightful during spring and summer when fresh vegetables are abundant.
  • Occasion: Perfect for family gatherings, festive dinners, or a special date night to impress.

Why You’ll Love This Recipe

The taste and texture appeal of savory stuffed chicken can’t be overstated. The juicy chicken combined with the rich, melted mozzarella creates a flavorsome experience that dances on your palate. Each bite of the tender fillet will remind you of a cozy Italian kitchen, perfectly blended flavors, and hearty dishes. You’ll savor the delightful contrast between the flavors of roasted red peppers and fresh spinach, making every piece memorable.

Convenience and preparation benefits also make this dish a family favorite. With a prep time of just 20 minutes and a cooking time that doesn’t exceed 30 minutes, this recipe is perfect for busy weeknights or last-minute entertaining. You can easily prepare the filling ahead of time, making it easy to pull together whenever you need a satisfying meal without spending all day in the kitchen.

From a nutritional perspective, this savory stuffed chicken is a guilt-free indulgence. Packed with lean protein from the chicken, vitamins, and minerals from the spinach and peppers, it offers a balanced meal that supports a healthy lifestyle. Plus, the addition of mozzarella allows you to enjoy cheesy goodness without overwhelming calories.

This dish holds social and entertaining value as well. It’s both visually presented and flavorful, making it the centerpiece of any table setting. When served to guests, it’s a conversation starter, inviting compliments as well as requests for the recipe. It fosters a sense of shared experience, bringing loved ones together over a delicious meal.

Moreover, the cost-effectiveness and accessibility of this recipe ensure that it can be made without breaking the bank. Most ingredients are not only easy to find but also budget-friendly, making it a worthwhile investment for meal planning. This means you can whip up an impressive dish without worrying about expenses, allowing culinary creativity to shine.

Historical Background and Cultural Significance

The origin story of stuffed chicken dates back centuries, with roots in Mediterranean cuisine, where it was often served at special occasions. This culinary tradition has evolved over time, with each region putting a unique spin on the concept. As cultures blended through trade and migration, the dish became a symbol of celebration and abundance in many households.

Culturally, stuffed chicken conveys a sense of warmth and hospitality, often associated with family gatherings and festive meals. It represents the love and effort put into cooking for others, creating memorable dining experiences that can be cherished for years. In many cultures, sharing a hearty meal signifies care and togetherness, making stuffed chicken a timeless choice for both everyday nourishment and special events.

The evolution of the recipe has seen numerous variations across different cuisines, including the use of various fillings and cooking methods. From Italian variations filled with herbs and cheeses to Middle-Eastern stuffed chicken, the endless possibilities reflect the adaptability of this beloved dish. Today, it continues to inspire home cooks worldwide, offering a canvas for creativity and personal expression.

Regional variations also enrich the appeal of stuffed chicken. In many Asian cuisines, chicken is often stuffed with aromatic spices and herbs, while in Latin America, you might find it filled with savory beans and grains. Each adaptation provides a glimpse into local culinary practices, fostering appreciation for diverse flavors and cooking techniques.

Ingredient Deep Dive

For the main ingredient, chicken provides not only flavor but also essential nutrients. Known for its lean protein content, chicken is a staple in many diets, promoting muscle health and overall wellness. When selecting chicken, look for fresh, organic options where possible—these often have more flavor and better texture. Store raw chicken in the refrigerator and use it within a day or two. For long-term storage, freezing is an excellent option, ensuring that you’ll always have this versatile meat on hand.

Roasted red peppers add vibrant color and sweetness to the dish, making them an excellent complement to the savory elements. Full of vitamins A and C, they offer numerous health benefits, including skin protection and immunity support. When choosing red peppers, pick ones that are firm to the touch and free of blemishes. They can be roasted or purchased jarred for convenience, but if making them at home, remember to store any leftovers in an airtight container in the fridge, where they can last for up to a week.

Spinach is the ultimate nutritional powerhouse, loaded with iron, calcium, and antioxidants. It adds a fresh taste and vibrant green hue to your meal, enhancing both visual appeal and nutrient density. Selecting fresh spinach means looking for crisp, dark leaves that aren’t wilted or discolored. Store it in a breathable bag in your refrigerator to keep it fresh longer. You can also opt for frozen spinach as a substitute.

Finally, mozzarella cheese binds all these ingredients together, providing a luscious creamy texture and rich flavor that elevates the entire dish. Mozzarella is known for its low-fat content compared to other cheeses, making it a healthier option for those watching their intake. When selecting mozzarella, choose part-skim or fresh varieties for the best results. Store it in the refrigerator and use it within a week for optimal taste.

Common Mistakes to Avoid

  • Not pounding the chicken: Failing to pound chicken to an even thickness can result in uneven cooking.
  • Overstuffing: Putting too much filling in the chicken can cause it to burst during cooking, making a mess and ruining presentation.
  • Skipping seasoning: Not adequately seasoning the chicken and stuffing can lead to bland flavor.
  • Insufficient cooking time: Undercooking the chicken can pose food safety risks, while overcooking makes it tough.
  • Ignoring resting time: Not letting chicken rest before slicing can cause juices to run out, resulting in dry meat.
  • Using old ingredients: Utilizing stale or expired ingredients can compromise flavor and safety.
  • Inadequate preheating: Failing to preheat oven properly can affect cooking time and texture.
  • Not using a meat thermometer: Not checking the internal temperature may lead to undercooked chicken.

Essential Techniques

Pounding chicken is an essential technique that creates an even, thin layer, which makes it easier to stuff and ensures even cooking. To master this technique, place the chicken between two pieces of plastic wrap and gently pound with a meat mallet until evenly thick. Be careful not to tear the meat. Look for an even color and thickness across the chicken breast as a visual cue of success.

Stuffing the chicken correctly is crucial for ensuring that it cooks evenly and retains moisture. When adding the filling, spread it evenly along the center of the chicken breast, leaving space at the edges. A good visual cue is to fold the chicken over the stuffing without it overflowing. This way, the cheese will melt beautifully while keeping the savory concoction inside.

Pro Tips for Perfect Savory Stuffed Chicken

1. Try marinating the chicken in lemon juice and herbs for added flavor and tenderness.
2. Consider using different types of cheese like goat cheese or feta for a unique twist.
3. Don’t overfill, as this can lead to bursts during cooking; just fill to the point where you can fold the chicken over.
4. Add spices or herbs directly to the stuffing for an extra flavor kick.
5. Browning the chicken in a skillet before baking adds depth of flavor and a beautiful color.
6. Let the chicken rest after cooking for at least 10 minutes to ensure juiciness.
7. Pair the dish with a fresh salad for a well-rounded meal.
8. Experiment with added vegetables in the stuffing, like mushrooms or artichokes, for added texture and flavor.

Variations and Adaptations

Regional variations of this savory stuffed chicken may include using local ingredients, like fresh basil or sun-dried tomatoes, to enhance the flavor profile. Seasonal adaptations can also be made by including ingredients like zucchini or asparagus for a different take in the spring or summer months. For dietary modifications, try using gluten-free breadcrumbs in the stuffing or swapping the chicken for a plant-based protein to create a vegan version. Flavor variations might include using different spices or sauces, such as pesto or balsamic glaze, while texture modifications can come from adding nuts such as pine nuts for crunch. Lastly, consider presentation alternatives by serving the stuffed chicken on a bed of sautéed vegetables or with a light drizzle of herb-infused oil.

Serving and Presentation Guide

Plating techniques play a vital role in the visual appeal of savory stuffed chicken. Aim to slice the chicken in a way that showcases the colorful filling. Use a clean, sharp knife for neat slices, and arrange them in a fan shape on the plate. Garnishing ideas can include a sprinkle of freshly chopped parsley or microgreens for a pop of color. Traditional accompaniments such as mashed potatoes or rice provide a rustic touch, while modern suggestions like a light salad can brighten the dish. Temperature considerations are crucial; serve the chicken warm along with any sides. For portion control tips, consider 4-6 oz servings depending on whether it’s a light dinner or hearty meal.

Wine and Beverage Pairing

When it comes to pairing wine with savory stuffed chicken, a light-bodied red like Pinot Noir complements the dish beautifully, enhancing its flavors without overwhelming them. Alternatively, a crisp white wine, such as Sauvignon Blanc, adds a refreshing touch that balances the richness of the melted cheese. For non-alcoholic alternatives, sparkling water with a twist of lemon can cleanse the palate, while a light herbal tea offers a soothing complement. Serve wines chilled to room temperature for red and chilled for white wines, aiming for a refreshing experience with every sip.

Storage and Shelf Life

Proper storage methods are essential for preserving the quality of savory stuffed chicken. Store leftovers in an airtight container in the refrigerator for up to four days, ensuring they stay fresh and safe to eat. For longer storage, freeze the stuffed chicken in a suitable container where it can last for up to three months. Temperature requirements are crucial as well; never leave cooked chicken at room temperature for more than two hours to prevent spoilage. When reheating, aim for an internal temperature of 165°F to ensure food safety, and consider using an oven for even reheating. Signs of spoilage can include an off smell or discoloration—discard if you have any doubts.

Make Ahead Strategies

Preparing savory stuffed chicken ahead of time can ease your cooking stress. Assemble the chicken and filling, but hold off on cooking until closer to serving time. Store it in the fridge for up to a day to allow flavors to meld beautifully. Quality will remain high if you don’t freeze it, but if you are preparing for an event, consider freezing uncooked chicken in individual portions, which makes cooking a breeze. Assemble the chicken and filling at least a few hours ahead, and when you’re ready, pop it into the oven. Finally, just before serving, add fresh asparagus or green beans for an exhilarating crunch and color.

Scaling Instructions

If you wish to halve the recipe, simply divide all ingredients and cooking times accordingly. For doubling or tripling, ensure that your baking dish is large enough to accommodate the increase in size without crowding the chicken. Timing modifications may be necessary, particularly if cooking multiple batches, as they will require slightly more time to cook through evenly. Check for doneness regularly. Storage considerations should include ensuring that the chicken cools before being placed in the fridge or freezer. For guests or larger family meals, this dish can easily feed a crowd without losing flavor quality.

Nutritional Deep Dive

A macro breakdown of this savory stuffed chicken shows a balanced meal consisting of protein from the chicken and cheese, healthy fats from olive oil used during cooking, and carbohydrates depending on side dishes served. The micronutrient analysis reveals vitamin A from the spinach and vitamins C and E from the roasted red peppers. Overall health benefits include high protein content supporting muscle recovery and vitamin benefits that promote good vision and skin health. For dietary considerations, portion analysis suggests that 4-6 oz portions allows for a balanced approach to eating while supporting weight management by providing a filling yet healthy meal.

Dietary Adaptations

For a gluten-free version of savory stuffed chicken, replace regular breadcrumbs with gluten-free options or skip them altogether for a low-carb meal. For those who need dairy-free variations, consider using nutritional yeast instead of cheese or a plant-based cheese substitute. Vegan alternatives can include using tofu or tempeh, marinated with the essence of the original recipe’s flavors. Low-carb enthusiasts can modify the stuffing to include low-carb vegetables and spices instead. Paleo fans will appreciate using almond flour instead of breadcrumbs, while keeping ingredients aligned with whole food preferences. Additionally, a low-FODMAP option may require avoiding garlic in the stuffing.

Troubleshooting Guide

If texture issues arise, like dry chicken, check the cooking temperature and time, as they can easily dry out at high heat. For flavor balance, ensuring adequate seasoning before baking is crucial; taste the filling first. Temperature problems can usually be resolved by using a meat thermometer to ensure you’ve reached the right internal temperature. Equipment challenges are often solved by ensuring compatibility with pans and ensuring a proper oven setup. Ingredient substitutions should be made cautiously, as they can alter the final flavor but can also enhance creativity. Timing concerns can sometimes be resolved by starting the meal prep earlier or using side dishes that don’t require last-minute attention.

Recipe Success Stories

Stories from the community reveal how this savory stuffed chicken has brought families together. Readers share their variation successes, like adding extra vegetables to the stuffing or experimenting with spices. Feedback highlights how approachable the dish is for beginners, often becoming a staple in meal rotation. Adaptation stories speak volumes about the versatility of this recipe, with readers describing unique twists that captured their family’s attention, sparking requests for repeat meals. Enthusiasts suggest photography tips such as plating ideas that can elevate the visual appeal when shared online.

Frequently Asked Questions

Can I prepare the stuffed chicken a day in advance?
Yes, you can prepare the stuffed chicken up to a day ahead. Assemble the ingredients and store them in the refrigerator until you’re ready to bake.

What can I serve with savory stuffed chicken?
Wonderful accompaniments include roasted vegetables, mashed potatoes, or a fresh garden salad, offering a nice balance to the main dish.

Is it okay to freeze leftovers?
Absolutely! You can freeze cooked stuffed chicken in an airtight container, and it should be good for 2-3 months. Just reheat thoroughly before serving.

Can I use different types of cheese?
Yes! While mozzarella is traditional, you can try cheddar, goat cheese, or even a spicy pepper jack for a flavor twist.

How do I know when the chicken is cooked through?
The best method is to use a meat thermometer, aiming for an internal temperature of 165°F (74°C).

Can I substitute spinach with other greens?
Absolutely! Kale, Swiss chard, or even arugula can make for delicious alternatives.

What if I don’t have roasted red peppers?
You can substitute with fresh red peppers or even use sun-dried tomatoes for a different flavor profile.

Is this recipe suitable for meal prep?
Yes! This dish holds well, making it perfect for meal prep to enjoy throughout the week.

Can I grill the chicken instead of baking it?
Yes, grilling adds a fantastic smoky flavor, but ensure to minimize the filling to prevent spillage on the grill.

How can I make the dish spicier?
Consider adding red pepper flakes or jalapeños to the stuffing to give it an extra kick!

Additional Resources

Explore related recipes such as creamy spinach and artichoke dip or contemporary twists on chicken parmesan for varied inspirations. Technique guides discussing how to properly roast vegetables or master the art of stuffing can enhance your skills. Ingredient information about the benefits of fresh herbs can also complement this dish, adding layers of flavor. Equipment recommendations for quality kitchen tools simplify the cooking process, while addressing seasonal variations can keep your meal planning fresh year-round.

Join the Conversation

Engage with our community through social media sharing! We encourage you to post your photo recreations of savory stuffed chicken or share your unique adaptations. Photography tips can help capture the beauty of your plating and inspire others. Don’t forget to leave a review of this recipe and interact with fellow food enthusiasts about your favorite variations or side dishes. Your feedback and creativity can spark new ideas and recipes within our vibrant cooking community!

The Recipe

Savory Stuffed Chicken with Roasted Red Peppers, Spinach, and Mozzarella

Serves: 4

Prep Time: 20 mins

Cook Time: 30 mins

Total Time: 50 mins

Kitchen Equipment Needed

  • Meat mallet
  • Baking dish
  • Sharp knife
  • Cutting board
  • Sauté pan
  • Mixing bowl

Ingredients

  • 4 boneless, skinless chicken breasts
  • 1 cup roasted red peppers, chopped
  • 1 cup fresh spinach, chopped
  • 1 cup mozzarella cheese, shredded
  • 1/2 cup breadcrumbs (or gluten-free option)
  • 2 cloves garlic, minced
  • 1 teaspoon Italian seasoning
  • Salt and pepper to taste
  • Olive oil for drizzling

Directions

  1. Preheat the oven to 375°F (190°C).
  2. Pound the chicken breasts to an even thickness for easier stuffing.
  3. In a mixing bowl, combine roasted red peppers, spinach, mozzarella, breadcrumbs, garlic, Italian seasoning, salt, and pepper.
  4. Place an equal portion of the filling onto each chicken breast, then fold them over to encase the filling.
  5. Place the stuffed chicken in a greased baking dish and drizzle with olive oil.
  6. Bake for 30 minutes, or until the chicken is fully cooked and the cheese is melted and bubbly.
  7. Let rest for a few minutes before slicing to serve.

Recipe Notes

  • Feel free to customize the stuffing ingredients to suit your taste.
  • This dish can be served with a light salad or over a bed of rice.
  • Leftovers can be stored in the refrigerator for 3-4 days.

Effortless Air Fryer Baked Sweet Potato Recipe for Everyone

Perfect Air Fryer Baked Sweet Potatoes: A Healthier Twist on a Classic Dish

⚖️
Difficulty
Easy

⏲️
Prep Time
10 mins

🕒
Cook Time
30 mins

⏱️
Total Time
40 mins

🍽️
Servings
4

Sweet potatoes are a versatile and nutritious ingredient that has long been a favorite for home cooks. When prepared in an air fryer, they develop a beautiful caramelized exterior while retaining a perfectly tender inside. This recipe for air fryer baked sweet potatoes is not only quick and easy but also gives this beloved side dish a healthful twist. Imagine fluffy, sweet, and savory bites that are bursting with flavor, perfectly suited for any meal of the day.

With the air fryer’s ability to create crispy textures without all the added oil, this method elevates the humble baked sweet potato into a gourmet experience. The natural sweetness of the potatoes pairs wonderfully with a sprinkle of sea salt and your favorite toppings, whether it’s a dollop of Greek yogurt, olive oil, or a sprinkle of spices. You’ll find that these air-fried sweet potatoes become a staple in your kitchen, offering satisfaction with every delicious bite.

Quick Recipe Highlights

  • Flavor Profile: Sweet, savory, and slightly smoky, the air fryer enhances the natural sweetness of the potatoes.
  • Texture: Enjoy a delightful contrast of crispy skin with a soft and fluffy interior.
  • Aroma: The cooking process brings out an inviting aroma of roasted sweet potatoes, making your kitchen smell amazing.
  • Visual Appeal: Eye-catching golden-brown skins with a bright orange flesh make this dish not only tasty but beautiful.
  • Skill Level Needed: This recipe is beginner-friendly; anyone can master it with minimal effort.
  • Special Equipment: You’ll need an air fryer to achieve the best results for this recipe.

Recipe Overview

  • Difficulty Level: This is an easy recipe that requires minimal cooking experience. Perfect for beginners or busy weeknights.
  • Category: Ideal as a side dish for dinner, a delicious addition to brunch, or a satisfying snack.
  • Cuisine: Sweet potatoes are a staple in many cuisines, including Southern and Caribbean cooking, often praised for their versatility.
  • Cost: A budget-friendly recipe, sweet potatoes generally cost around $0.50 to $1.00 each, making this an economical choice.
  • Season: Available year-round, but their peak season is in the fall and winter months, making them a cozy, seasonal favorite.
  • Occasion: Great for family dinners, potlucks, or as a healthy side dish for holiday celebrations.

Why You’ll Love This Recipe

The taste and texture of air fryer baked sweet potatoes are simply irresistible. Their natural sweetness is complemented by a slight crispiness from the air fryer, making each bite a delightful experience. Add in your favorite toppings, and you can customize it to suit any palate, transforming these sweet potatoes from a simple side dish into a flavorful centerpiece.

Convenience is another great aspect of this recipe. In just 40 minutes, you can have a healthy and delicious dish on your table, requiring only 10 minutes of prep time. It’s a fantastic option for busy weeknights, and since the air fryer cooks the potatoes faster than traditional baking, you’ll save time while still enjoying a wholesome meal.

Nutritionally speaking, sweet potatoes are powerhouse vegetables packed with vitamins, minerals, and fiber. Rich in vitamin A and antioxidants, they contribute to better immune health while providing a great source of energy. This recipe is not just delicious but also serves as a nutritious addition to your diet.

Social gatherings and entertaining become much more enjoyable with this dish. Air fryer baked sweet potatoes are perfect for sharing with friends and family, allowing everyone to customize their own servings with toppings of their choice. They’re a perfect conversation starter at any gathering, bringing a touch of freshness to your table.

Last but not least, this recipe is cost-effective and accessible. Sweet potatoes are affordable and can be found at most grocery stores prominent in your local markets. With such minimal investment, you can serve a satisfying dish that pleases both your taste buds and your wallet.

Historical Background and Cultural Significance

The sweet potato’s journey began thousands of years ago in Central and South America. Indigenous cultures valued this tuber for its high nutritional content and versatility in cooking. As it made its way around the globe, sweet potatoes became integrated into various culinary traditions, from the savory Southern dishes in the United States to the delightful desserts of the Caribbean.

Culturally, the sweet potato holds significant value in many communities. It symbolizes harvest festivals and is often used in holiday meals and gatherings. For instance, sweet potatoes feature prominently in Thanksgiving celebrations in the United States, highlighting their importance as a comfort food.

Over the years, as cooking technologies have evolved, sweet potatoes have transitioned from traditional baking methods to modern approaches like air frying. This evolution has allowed for unique textures and flavors, catering to today’s health-conscious consumers who seek delicious meals without excess fat.

Regionally, there are numerous variations of sweet potato dishes across the world. From candied sweet potatoes in the Southern U.S. to sweet potato pie, this ingredient has inspired countless recipes that celebrate its natural sweetness and nutritional benefits.

Ingredient Deep Dive

– Sweet Potatoes: These nutrient-dense tubers are a central ingredient in this recipe. They provide carbohydrates, fiber, and vitamins, particularly a high amount of vitamin A, beneficial for eye health. When selecting sweet potatoes, look for smooth skin and firm flesh; avoid those with soft spots or blemishes. Stored in a cool, dark place, they can last for weeks. For substitutions, consider using other root vegetables such as butternut squash or carrots.

– Olive Oil: Used to enhance flavor and help achieve a crispy texture, olive oil is rich in healthy fats. Choosing extra-virgin olive oil will provide additional antioxidants. Always store olive oil in a cool, dark place to maintain its quality. If you need a substitute, avocado oil or a non-stick cooking spray can work well.

Common Mistakes to Avoid

  • Not preheating the air fryer; this can result in uneven cooking.
  • Overcrowding the air fryer basket, leading to soggy potatoes instead of crispy ones.
  • Skipping seasoning, which can dull the natural flavors of sweet potatoes.
  • Selecting potatoes that are too large; uniformity in size helps with even cooking.
  • Not checking for doneness; testing with a fork is essential to avoid undercooking.
  • Forgetting to poke holes in the skin; this helps steam escape and prevents bursting.
  • Using cold sweet potatoes right from the fridge; let them sit at room temperature for better cooking.
  • Using low-quality cooking oil, which can affect flavor.
  • Skipping the final resting phase, which allows the potatoes to steam and soften further.
  • Not adjusting cooking times for different sizes; small potatoes will cook faster than large ones.

Essential Techniques

– Preheating the Air Fryer: This step is crucial as it ensures that the sweet potatoes begin cooking immediately, helping to develop a crispy skin. To master this, set your air fryer to the recommended temperature and allow it to heat for about 5 minutes before placing the potatoes inside. Watch out for the preheating indicator, ensuring the air fryer reaches the desired temperature.

– Checking for Doneness: The best way to ensure your sweet potatoes are cooked to perfection is to use a fork to pierce them. A perfectly baked sweet potato should feel soft but not mushy. To master this, start checking for doneness at least 5 minutes before the recommended cooking time ends, adjusting as necessary.

Pro Tips for Perfect Air Fryer Baked Sweet Potatoes

1. **Use uniform-sized sweet potatoes:** This helps ensure even cooking. If you’re using a variety of sizes, try to pick size ranges that will allow them to finish cooking at the same time.

2. **Don’t skip the seasoning:** A dash of salt and a sprinkle of spices can transform flavor; consider using paprika or cayenne for an extra kick.

3. **Brush with oil:** Lightly brush or spray the sweet potatoes with olive oil before cooking for optimal crispiness.

4. **Flip halfway through cooking:** Turn the sweet potatoes halfway through the cooking time to ensure even roasting on all sides.

5. **Experiment with toppings:** Get creative by adding toppings after cooking; think yogurt, avocado, or a sprinkle of herbs to elevate your baked sweet potato experience.

6. **Cook in batches if needed:** If you’re making a larger quantity, do this in batches to avoid overcrowding the air fryer basket.

7. **Allow resting time after cooking:** This allows the potatoes to finish steaming, making them even fluffier.

8. **Store leftovers properly:** Keep baked sweet potatoes in an airtight container in the refrigerator for up to 5 days for best results.

Variations and Adaptations

Sweet potatoes can be enjoyed in countless variations. For regional flair, you could try adding spices such as cumin or coriander for a Middle Eastern-inspired roasted sweet potato dish. In the fall, incorporate seasonal spices like nutmeg or cinnamon to create a cozy flavor profile.

Seasonal adaptations can also enhance the dish—try topping your sweet potatoes with pumpkin puree and pecans for a festive autumn treat. For dietary modifications, those following a low-carb or keto diet can enjoy alternatives like cauliflower or turnips, which can mimic the taste and texture but with fewer carbs.

Flavor variations can be quite exciting as well. If you’re feeling adventurous, spice your air fryer baked sweet potatoes with chili powder for a bit of heat or lemon zest for a refreshing twist. When it comes to texture modifications, consider mashing the baked sweet potatoes with butter for a creamy side dish.

Presentation alternatives are also essential; serve sweet potatoes in halves and drizzle with balsamic reduction or yogurt for an eye-catching feel.

Serving and Presentation Guide

Serve your air fryer baked sweet potatoes halved on a vibrant platter to showcase their beautiful color. For garnishing, sprinkle fresh herbs like parsley or chives on top for a pop of green. Traditional accompaniments include a dollop of sour cream or a drizzle of extra virgin olive oil, enhancing both flavor and visual appeal.

For modern serving suggestions, consider creating sweet potato bowls by adding toppings such as black beans, shredded cheese, or salsa to each half. Always serve hot, as they are best enjoyed warm, and pay attention to portion control, offering two halves per serving for a satisfying side that complements any meal.

Wine and Beverage Pairing

Wine pairings for sweet potatoes can enhance the dining experience—a light white wine like Sauvignon Blanc or a fruity Beaujolais works well with the natural sweetness of the potatoes. If you’re looking for non-alcoholic alternatives, consider a refreshing iced herbal tea or sparkling water infused with citrus to cleanse your palate between bites.

For those who enjoy a robust flavor, a rich chai latte or a cup of spiced cider could also beautifully complement your sweet potatoes, providing a delightful contrast to their earthy taste.

Storage and Shelf Life

When it comes to storage, it’s essential to let the cooked sweet potatoes cool completely before placing them in an airtight container. Store them in the refrigerator at a temperature below 40°F to keep fresh, and they will last for up to 5 days.

Signs of spoilage to watch for include a slimy texture or an off smell. To reheat, place them in the microwave for 1-2 minutes or pop them back in the air fryer for about 5 minutes for a crispy texture. If you wish to freeze them, make sure to cool and wrap them tightly, and they can last for up to 3 months in the freezer.

Make Ahead Strategies

To save time, you can prepare your sweet potatoes in advance. Wash and poke holes in them, then store them in the fridge for up to 24 hours before cooking. This allows you to have a fast meal prep on a busy evening.

As for assembly, if you like, pre-cook the sweet potatoes and refrigerate them without any toppings. When you’re ready to serve, simply air fry them again for a crispy finish and add your favorite toppings. Don’t forget to add fresh elements like herbs or a squeeze of lemon after reheating for the best flavor.

Scaling Instructions

When scaling this recipe up or down, keep in mind the size of your air fryer. If you’re halving the recipe, simply reduce the number of sweet potatoes and adjust seasoning to taste. Conversely, for larger gatherings, it’s best to cook in batches to maintain the integrity of the crisp texture.

Additionally, while cooking times generally remain consistent, smaller sweet potatoes may require slightly less cooking time, and larger ones may take longer. Always check for doneness with a fork.

Nutritional Deep Dive

A medium-sized sweet potato contains around 114 calories, making it an excellent low-calorie option. It’s an excellent source of carbs and fiber while being low in fat, typically containing only 0.2 grams per serving. Rich in vitamins A and C, sweet potatoes support immune function and skin health.

Additionally, they provide a good source of potassium, which helps regulate blood pressure, while their high fiber content aids in digestion. Remember to moderate your portions, as portion size can affect carbohydrate levels for those monitoring sugar intake.

Dietary Adaptations

For gluten-free diets, air fryer baked sweet potatoes are naturally safe to enjoy without any modifications. For dairy-free options, top with coconut yogurt instead of sour cream, making it both creamy and flavorful.

Vegans can enhance their sweet potatoes with nut toppings or tahini sauce, while those on a low-carb or keto diet should consider alternatives like spaghetti squash, creating a similar texture while skipping the starch.

Following the Paleo lifestyle? Simply season with herbs and spices, and you have a delicious addition to your meal plan. The versatility of sweet potatoes ensures that everyone will find a way to enjoy this appealing dish.

Troubleshooting Guide

Texture issues can occur if sweet potatoes are undercooked; ensure they’re tender all the way through by using a fork before serving. If your baked sweet potatoes come out too dry, consider reducing the cooking time next batch or adding moisture during reheating.

Flavor balance can be challenging; if they lack sweetness, a small sprinkle of cinnamon or a drizzle of honey can elevate the flavor. Temperature problems might arise if your air fryer is not set correctly; always refer to the instructions for your specific model.

If you’re facing equipment challenges, ensure not to overcrowd your air fryer, as this will lead to uneven cooking. Ingredient substitutions may affect timing; it’s essential to monitor cooking closely when making adjustments to the recipe.

Recipe Success Stories

Community feedback on this recipe has been overwhelmingly positive. Readers have shared variations they’ve tried, such as stuffing sweet potatoes with chickpeas and spices for a filling meal. Adaptation stories tell of families introducing new toppings like feta and olives, creating a Mediterranean-inspired dish that has become a new favorite.

Photography tips often emerge from the vibrant colors of the baked sweet potatoes; readers enjoy snapping pictures of their creations to share online. Overall, this recipe serves as a reliable go-to that many are proud to serve during family dinners and holiday gatherings.

Frequently Asked Questions

1. Can I make air fryer baked sweet potatoes without oil?

Yes, you can skip the oil; simply season your sweet potatoes before cooking. However, oil helps achieve a crispier texture, so consider a light spray for optimal results.

2. How do I know when sweet potatoes are done baking?

The best way to check is by inserting a fork. If it goes in easily, your sweet potatoes are cooked through. Additionally, the skin should be tender and slightly crispy.

3. What toppings go well with sweet potatoes?

Sweet potatoes pair wonderfully with toppings like Greek yogurt, avocado, chickpeas, or simply butter and brown sugar. The choice is yours!

4. Can I microwave sweet potatoes instead?

Yes, microwaving is an option! Microwave sweet potatoes on high for about 5-10 minutes until fully cooked, and then finish in the air fryer for crispiness, if desired.

5. Can I store leftovers?

Absolutely! Cooked sweet potatoes can be stored in an airtight container in the fridge for up to 5 days. Just reheat in the microwave or air fryer before serving.

6. Can I freeze baked sweet potatoes?

Yes, you can freeze baked sweet potatoes. Allow them to cool, wrap them well, and store in the freezer for up to 3 months. Reheat directly from frozen.

7. Are sweet potatoes healthier than white potatoes?

Sweet potatoes are often considered healthier due to their higher nutrient density, particularly in vitamin A and fiber, making them a better choice for health-conscious individuals.

8. What’s the best way to season sweet potatoes?

Simple seasonings like salt, pepper, and olive oil work well; however, feel free to experiment with spices like cinnamon, paprika, or garlic powder for additional flavor.

9. Are there different types of sweet potatoes?

Yes, there are several varieties of sweet potatoes, including orange, purple, and white-fleshed options. Each type offers unique flavors and nutritional profiles.

10. Do I need to peel sweet potatoes before cooking?

No, you can cook sweet potatoes with the skin on. The skin is nutritious and adds texture to the finished dish.

Additional Resources

If you love this air fryer baked sweet potato recipe, check out other related recipes on our blog to explore more flavorful dishes. Our technique guides can help you perfect your air fryer skills, alongside ingredient information to make you a more confident cook.

Investing in quality equipment, like a reliable air fryer, can further enhance your cooking experience. Seasonal variations can inspire creative adaptations, and our recipe archives are filled with ideas that celebrate fresh ingredients throughout the year.

Join the Conversation

We’d love for you to share your air fryer baked sweet potato creations with us on social media! Snap a photo and tag us with your favorite toppings or unique adaptations. Engage with the community by leaving reviews and feedback on this recipe, and share your insights or cooking tips that can help fellow food enthusiasts discover the joy of baking sweet potatoes in the air fryer.

The Recipe

Air Fryer Baked Sweet Potatoes

Serves: 4

Prep Time: 10 mins

Cook Time: 30 mins

Total Time: 40 mins

Kitchen Equipment Needed

  • Air Fryer
  • Fork
  • Cutting board
  • Knife
  • Airtight container for storage

Ingredients

  • 4 medium sweet potatoes
  • 1 tablespoon olive oil
  • Salt, to taste
  • Optional toppings: Greek yogurt, avocado, spices, etc.

Directions

  1. Preheat your air fryer to 400°F (200°C).
  2. Wash the sweet potatoes thoroughly and poke holes all over with a fork.
  3. Brush or spray the sweet potatoes lightly with olive oil and sprinkle salt.
  4. Place sweet potatoes in the air fryer basket, ensuring they are not overcrowded.
  5. Cook for about 30 minutes, flipping halfway through until tender and crispy.
  6. Remove from the air fryer and let them rest for a few minutes before serving.
  7. Top with your favorite toppings and enjoy!

Recipe Notes

  • Adjust cooking time based on the size of your sweet potatoes.
  • Experiment with different toppings to match your flavor preferences.
  • Store leftovers in an airtight container in the fridge for up to 5 days.
  • You can freeze cooked sweet potatoes for up to 3 months—just thaw and reheat before serving.