“`html
Table of Contents
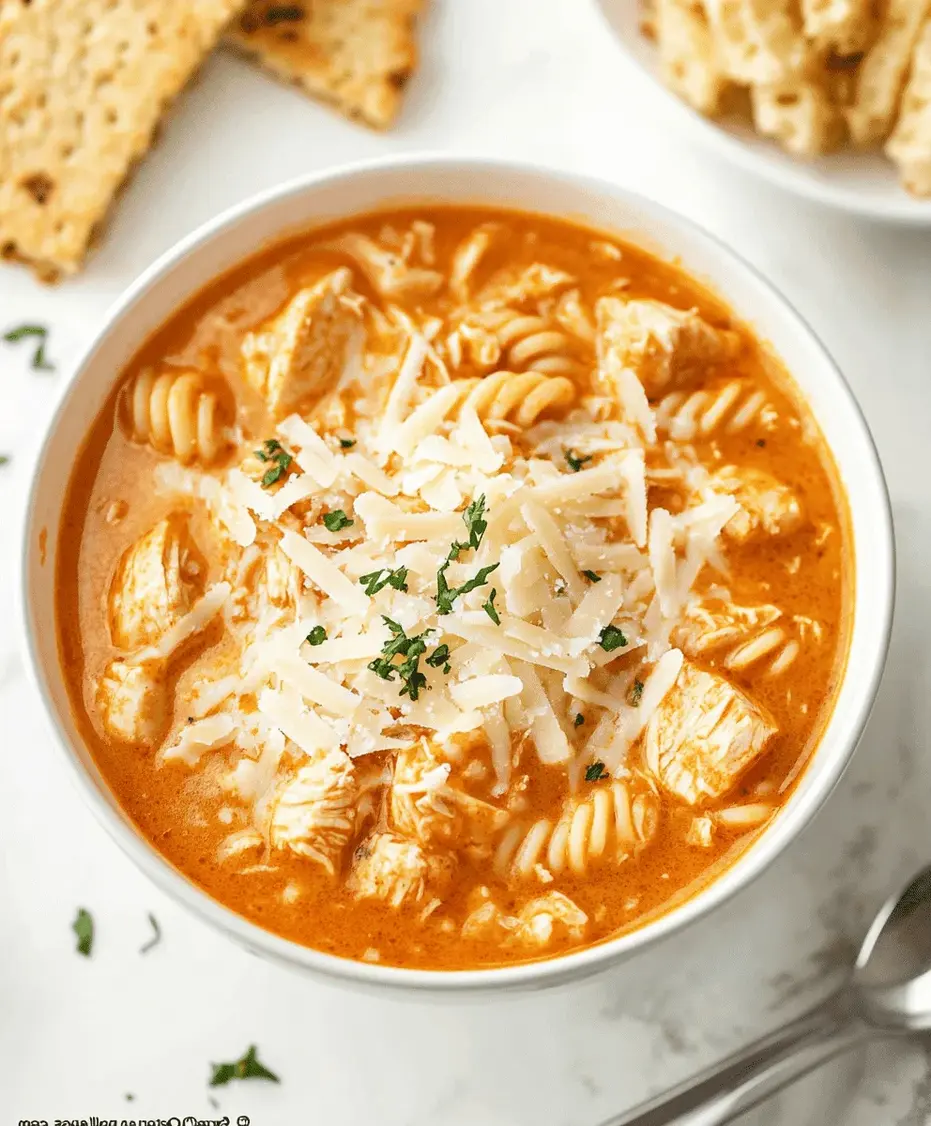
Crockpot Cheesy Chicken Broccoli Rice Recipe
Craving a Effortless Weeknight Dinner? You’re Not Alone!
Are you tired of spending your evenings stressed about what to cook? In a world where busy schedules are the norm, finding a delicious and satisfying meal that requires minimal effort is a game-changer. That’s exactly where our Crockpot Cheesy Chicken Broccoli Rice Recipe comes into play. This recipe isn’t just about feeding your family; it’s about simplifying your life without sacrificing flavor. Imagine coming home to a warm, comforting aroma, knowing that a complete and wholesome meal is waiting for you, all thanks to the magic of your slow cooker. We’ll walk you through why this dish is the ultimate weeknight warrior, perfect for even the most novice cooks.
Gather Your Delicious De-li-ghts
The beauty of this Crockpot Cheesy Chicken Broccoli Rice recipe lies in its straightforward ingredient list. Most of these are pantry staples, making it a go-to for those spontaneous dinner decisions. Here’s what you’ll need to bring this creamy, dreamy dish to life:
-
1.5 lbs Boneless, Skinless Chicken Breasts or Thighs: Opt for thighs if you prefer a more tender and flavorful result that’s less prone to drying out. Chicken breasts are leaner and work beautifully too. You want them to be cut into bite-sized pieces for even cooking.
Substitution: Turkey breast or even firm tofu for a vegetarian option. -
1 cup Uncooked Long-Grain White Rice: This is the backbone of our dish, providing a comforting and absorbent base.
Substitution: Brown rice for a nuttier flavor and added fiber, though it may require a bit more liquid and cooking time. Quinoa is also an option. -
10.5 oz Condensed Cream of Chicken Soup: This is the magic ingredient for creaminess and a rich, savory depth.
Substitution: You can make your own healthier condensed soup from scratch with chicken broth, flour, and milk, or use a dairy-free alternative like condensed cream of mushroom soup. -
10.5 oz Condensed Cream of Broccoli Soup: Adds another layer of flavor and a lovely green hue.
Substitution: Another can of cream of chicken soup if you’re not a fan of broccoli soup, or a dairy-free version. -
1 cup Chicken Broth: Essential for loosening the soups and ensuring the rice cooks through beautifully.
Substitution: Vegetable broth or water. -
1 cup Frozen Broccoli Florets: Easy, convenient, and perfectly tender by the time the dish is ready.
Substitution: Fresh broccoli florets, cut into bite-sized pieces. You might want to add them in the last 30-60 minutes of cooking for extra vibrancy. -
1 tsp Garlic Powder: For that essential aromatic punch.
Substitution: 2-3 cloves of fresh minced garlic. -
1/2 tsp Onion Powder: Adds a subtle yet important savory note.
Substitution: 1/4 cup finely chopped yellow onion, sautéed before adding to the crockpot. -
1 cup Shredded Cheddar Cheese (or a blend): For that irresistible cheesy, gooey goodness that kids and adults alike will adore.
Substitution: Monterey Jack, Colby Jack, or a dairy-free shredded cheese blend. - Salt and Black Pepper to Taste: To enhance all the delicious flavors.
Timing is Everything (Especially Dinner!)
When it comes to weeknight meals, saving time is paramount. This Crockpot Cheesy Chicken Broccoli Rice recipe is designed for efficiency:
Compared to many traditional casseroles or oven-baked dishes that can take an hour or more of active cooking time, the total time for this slow cooker meal is remarkably hands-off. The prep time is minimal, making it achievable even after a long day. This is significantly faster than many baked pasta dishes or roasts, and often more hands-off than stovetop methods.

Step-by-Step Instructions: Your Culinary Journey Begins
Step 1: Prepare the Chicken
First things first, let’s get our protein ready. If your chicken breasts or thighs are whole, cut them into bite-sized cubes, about 1-inch pieces. This ensures they cook through evenly and are easy to eat directly from the bowl. Pat them dry with a paper towel – this helps them brown slightly if you choose to sear them, although it’s optional for this recipe!
Step 2: Layer the Ingredients
Now, for the magic in the crockpot! Place the uncooked rice at the bottom of your slow cooker. This gives the rice a head start to absorb the developing flavors. Next, add the bite-sized chicken pieces evenly over the rice. This layering is key to preventing the rice from clumping too much. In a separate bowl, whisk together the condensed cream of chicken soup, condensed cream of broccoli soup, chicken broth, garlic powder, and onion powder until smooth and well combined. Pour this creamy mixture evenly over the chicken and rice. Season generously with salt and black pepper.
Step 3: Cook to Perfection
Secure the lid on your slow cooker. Set it to cook on the LOW setting for 3 to 4 hours, or on the HIGH setting for 2 to 3 hours. The exact cooking time will depend on the size and model of your slow cooker. You’re looking for the chicken to be cooked through and tender, and the rice to be fully cooked and fluffy. Resist the urge to lift the lid too often, as this releases heat and prolongs cooking time.
Step 4: Stir in the Cheese
Once the chicken and rice are cooked, it’s time for the grand finale – the cheese! Add the frozen broccoli florets and the shredded cheddar cheese to the slow cooker. Stir gently to incorporate them into the mixture. Place the lid back on and let it cook for another 10-15 minutes, or just until the broccoli is tender-crisp and the cheese is melted and gooey. The residual heat is usually enough to do the trick!
Step 5: Serve and Enjoy
Give everything one final stir. Taste and adjust seasoning if needed. Ladle generous portions of this cheesy, comforting dish into bowls, ensuring each serving gets a good mix of chicken, rice, and broccoli. Garnish with a sprinkle of fresh parsley or chives for a pop of color and freshness, if desired. Prepare for happy sighs around the dinner table!
Nutritional Information
While exact nutritional values can vary based on specific ingredients and portion sizes, a typical serving of Crockpot Cheesy Chicken Broccoli Rice is generally estimated to contain:
- Calories: Approximately 400-550 kcal
- Protein: 25-35g
- Carbohydrates: 30-45g (depending on rice and soup)
- Fat: 15-25g (can vary with cheese and soup choices)
- Fiber: 2-4g (significantly more if using brown rice and fresh broccoli)
Please note: This is an approximation. For precise nutritional data, it’s recommended to use a nutritional calculator with your exact ingredients.
Elevate Your Meal: Healthier Alternatives
Looking to make this comforting classic even more nutritious without sacrificing its delicious cheesy goodness? Here are some thoughtful swaps:
- Opt for Leaner Protein: Use chicken breast over thighs, or even consider lean turkey breast.
- Whole Grains: Swap white rice for brown rice or quinoa. This boosts fiber and nutrients, though you might need to adjust liquid amounts and cooking times slightly.
- “Lighten Up” the Creamy Base: Use “light” or “reduced-fat” versions of cream soups. Even better, make your own lighter condensed soup using reduced-sodium chicken broth, a small amount of flour or cornstarch for thickening, and low-fat milk or unsweetened almond milk.
- Bulk Up on Veggies: Add more broccoli or mix in other slow-cooker friendly vegetables like peas, carrots, or finely chopped bell peppers.
- Mindful Cheese Usage: Use a sharp cheddar so a little goes a long way, or opt for a blend that includes a lower-fat cheese.
Serving Suggestions
This Crockpot Cheesy Chicken Broccoli Rice is a hearty meal all on its own, but here are a few ideas to round out your dinner:
- Serve with a simple side salad for added freshness and crunch.
- A side of crusty bread is perfect for soaking up any extra creamy sauce.
- For a lighter meal, serve smaller portions of the casserole alongside steamed green beans or asparagus.
- Add a dash of hot sauce or a sprinkle of red pepper flakes for those who enjoy a little heat.
Common Mistakes to Avoid
To ensure your Crockpot Cheesy Chicken Broccoli Rice is a resounding success every time, be mindful of these common pitfalls:
- Overcooking the Rice: Adding the rice too early or cooking for too long can result in mushy, overcooked grains. Keep an eye on the cooking time, especially on high.
- Opening the Lid Too Often: Each time you open the slow cooker, you release significant heat, increasing cooking time. Trust the process!
- Using Raw Broccoli Early: Adding fresh broccoli at the very beginning can turn it to mush. Frozen broccoli added near the end is ideal. If using fresh, add it in the last 30-60 minutes.
- Not Enough Liquid: Ensure you have enough broth to properly cook the rice. If using brown rice, you may need to add a bit more.
- Adding Cheese Too Soon: Adding cheese too early might make it greasy or separate. Adding it near the end ensures a creamy, melted texture.
Storing and Reheating
Leftovers are a weeknight blessing! Store any remaining Crockpot Cheesy Chicken Broccoli Rice in an airtight container in the refrigerator for up to 3-4 days. Reheat gently in the microwave, stirring halfway through, until heated through. You might need to add a splash of milk or broth to restore some of the creaminess if it seems a bit dry after refrigeration.

Embrace the Ease, Savor the Flavor
The Crockpot Cheesy Chicken Broccoli Rice recipe is more than just a meal; it’s a solution. It’s that dependable, comforting dish you can count on when life gets hectic. With minimal prep, maximum flavor, and incredibly satisfying results, it’s a true hero of the weeknight dinner circuit. So, go ahead, toss those ingredients into your slow cooker and let it work its magic. You deserve a delicious, stress-free meal!
Frequently Asked Questions
***Is it okay to use frozen chicken?***
Generally, it’s best to use thawed chicken for slow cookers to ensure even cooking and food safety. If you must use frozen, you’ll need to significantly increase the cooking time, and the texture might be affected.
***Can I use uncooked rice directly in the crockpot?***
Yes, absolutely! This recipe is designed for uncooked rice. The slow cooker provides enough moisture and time for it to cook through perfectly. Just ensure there’s enough liquid.
***What if my rice isn’t fully cooked?***
If after the initial cooking time, your rice is still a bit firm, add another 1/4 cup of broth or water, stir gently, and continue cooking on low for another 30-60 minutes, or until tender.
***Can I make this ahead of time?***
You can prep the ingredients (cut chicken, measure rice, etc.) ahead of time and store them separately in the fridge. Then, simply assemble and start cooking when needed. The fully cooked casserole can also be refrigerated and reheated, as mentioned in the storing tips.
***How do I make it less soupy?***
If you prefer a thicker consistency, you can omit about 1/4 cup of the broth or thicken the sauce at the end by mixing 1 tablespoon of cornstarch with 2 tablespoons of cold water, then stirring it into the hot mixture in the slow cooker and letting it simmer for a few minutes until thickened.
Enjoy Your Delicious Creation!
We hope you love this Crockpot Cheesy Chicken Broccoli Rice Recipe as much as we do! If you try it, let us know in the comments below or share your photos on social media tagging us!

Crockpot Cheesy Chicken Broccoli Rice Recipe
Instructions
Nutrition
- Calories: 350
- Sugar: 3g
“`