Table of Contents
Chocolate Peanut Butter Cookies – The Perfect Blend of Rich Chocolate & Peanut Butter
I’ll never forget the first time I bit into a Chocolate Peanut Butter Cookie that truly tasted like both chocolate and peanut butter — not just one overshadowing the other. It was a rainy afternoon in my tiny Paris apartment during culinary school, and I had just finished a grueling week of sauce work. I wanted something comforting, something that reminded me of the peanut butter cookies my mother used to make back in Morocco, but with a deep, French-chocolate sophistication. That day, I set out to create the perfect balance: a cookie where the rich cocoa doesn’t bully the peanut butter, and the peanut butter doesn’t drown out the chocolate. This recipe is the result of that mission — a delicious twist on the classic peanut butter cookie that delivers both flavors in every single bite.
Imagine sinking your teeth into a cookie that’s crisp around the edges, soft and tender in the center, with the warm aroma of cocoa and toasted peanuts filling your kitchen. The first flavor that hits you is the deep, slightly bittersweet notes of unsweetened cocoa powder — the kind that tells you this cookie means business. Then, right behind it, the creamy, savory-sweet richness of peanut butter spreads across your tongue, with just a hint of salt to keep everything bright. The brown sugar adds a subtle caramel undertone, and the shortening gives it that old-fashioned, melt-in-your-mouth tenderness. It’s the kind of cookie that makes you close your eyes for a second and just… savor.
What sets my version apart is a technique I picked up in Paris: using a combination of shortening and peanut butter to create a uniquely tender crumb, plus a precise baking window — just 7 to 8 minutes — that ensures the centers stay soft while the edges set perfectly. I’ve tested this recipe more times than I can count, adjusting the cocoa-to-peanut butter ratio until it sang. One common mistake I see home bakers make is overbaking, which turns the chocolate flavor bitter and the texture dry. But don’t worry — I’ll show you exactly what to look for. 💡 emy’s Pro Tip: Pull the cookies out when the edges look set but the centers still appear slightly soft and puffed. They’ll continue baking on the hot sheet as they cool.
Why This Chocolate Peanut Butter Cookies Recipe Is the Best
The Flavor Secret: The magic here is in the balance. Most chocolate peanut butter cookies lean too heavily on one flavor, but I’ve calibrated the ratio of unsweetened cocoa powder to creamy peanut butter so that each flavor shines equally. The brown sugar adds moisture and a caramelized depth that bridges the two. Growing up in Morocco, I learned that the best dishes — whether savory or sweet — are about layering flavors, not overpowering. That philosophy is baked into every cookie.
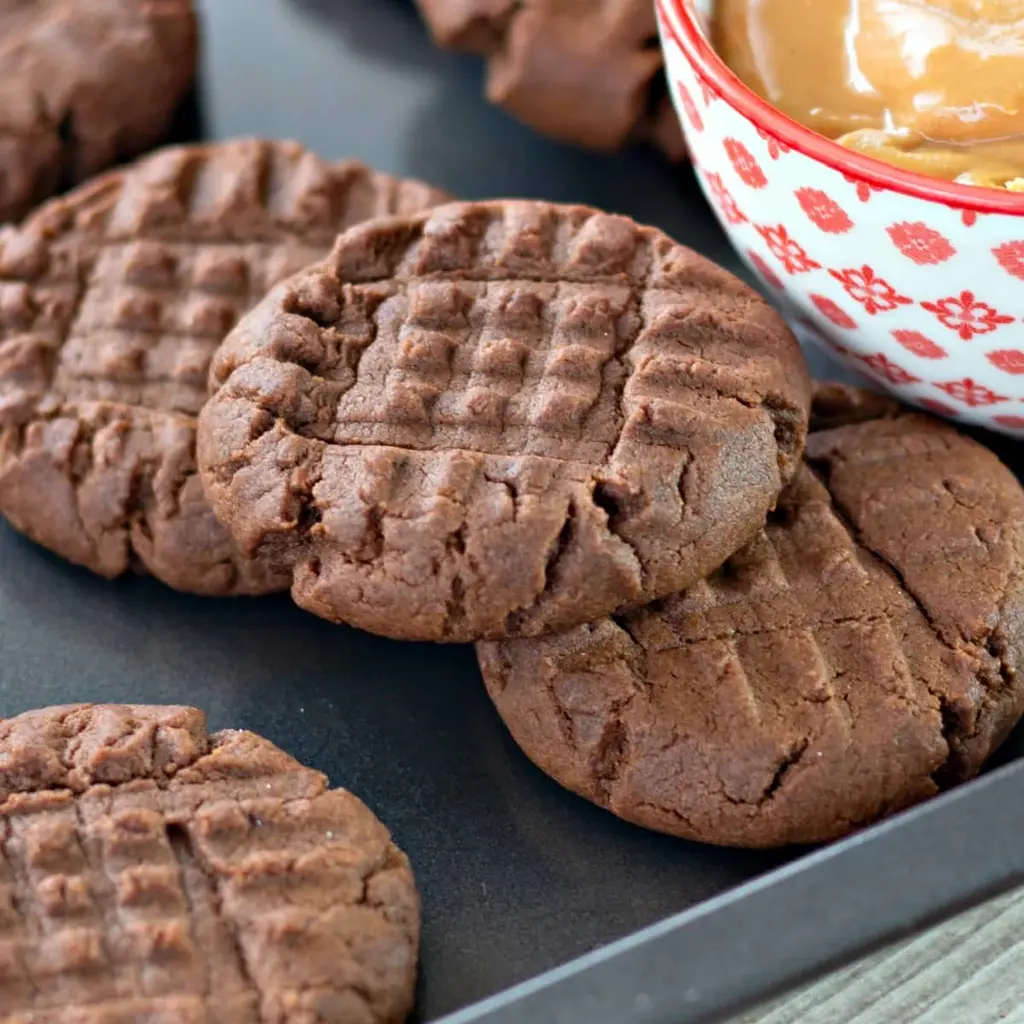
Perfected Texture: My training in Paris taught me the importance of fat composition. Shortening gives these cookies a tender, almost velvety crumb, while the peanut butter adds structure and a slight chewiness. The fork-pressing technique isn’t just for looks — it creates those signature ridges that crisp up beautifully, giving you a contrast of crunchy edges and a soft, fudgy center. It’s textural heaven.
Foolproof & Fast: From prep to cooling, you’re looking at just over 20 minutes. The dough comes together in one bowl with an electric mixer, no chilling required, and the ingredient list uses pantry staples. Whether you’re a seasoned baker or a beginner, these Chocolate Peanut Butter Cookies are forgiving, reliable, and absolutely delicious. I’ve made them for my neighbors in NYC and for my family back in Morocco — they’re always a hit.
Chocolate Peanut Butter Cookies Ingredients
Every time I walk through the Union Square Greenmarket in NYC, I pick up fresh eggs and butter, but for these cookies, I also grab a jar of good-quality creamy peanut butter. I remember my mother in Morocco using a locally ground peanut paste that was a bit grittier than what we get here, but the creamy American-style peanut butter works beautifully in this recipe. Here’s everything you’ll need.
Ingredients List
- 1/2 cup shortening (regular or butter flavor)
- 3/4 cup creamy peanut butter
- 1 1/2 cups brown sugar (packed)
- 3 tablespoons milk
- 1 teaspoon vanilla extract
- 1 large egg
- 1 1/4 cups all-purpose flour
- 1/2 cup unsweetened cocoa powder
- 1 teaspoon baking soda
- 1/2 teaspoon salt
Ingredient Spotlight
Shortening: Shortening is key for that soft, tender crumb. It has a higher melting point than butter, which helps the cookies hold their shape and stay soft. I typically use butter-flavored shortening for a hint of richness. In a pinch, you can substitute unsalted butter, but the cookies will spread a bit more and have a slightly different texture.
Creamy Peanut Butter: This is the backbone of the flavor. Use a standard creamy peanut butter like Skippy or Jif — natural peanut butter that separates can make the cookies greasy. The creamy texture ensures the crisscross pattern holds. If you only have crunchy, it will still work, but the texture will be chunkier.
Unsweetened Cocoa Powder: This is where the deep chocolate flavor comes from. I recommend a Dutch-process or regular unsweetened cocoa — both work well. Do NOT use hot chocolate mix or sweetened cocoa, as it will throw off the sugar balance and make the cookies too sweet. The bitterness of the cocoa is what makes the peanut butter pop.
Brown Sugar: Packed brown sugar adds moisture, chewiness, and a subtle caramel undertone. Light or dark brown sugar both work; dark will give a deeper molasses flavor. If you only have granulated sugar, add 1 tablespoon of molasses to approximate the moisture.
| Original Ingredient | Best Substitution | Flavor / Texture Impact |
|---|---|---|
| Shortening | Unsalted butter (softened) | More spread, slightly richer flavor, less tender crumb |
| Creamy peanut butter | Crunchy peanut butter | Adds texture, crisscross pattern may be less defined |
| Unsweetened cocoa powder | Dutch-process cocoa powder | Smoother, less acidic chocolate flavor |
| Brown sugar | Granulated sugar + 1 tbsp molasses | Similar moisture and caramel notes |
| All-purpose flour | Gluten-free 1:1 baking blend | Slightly more delicate texture, works well |
How to Make Chocolate Peanut Butter Cookies — Step-by-Step
Making these Chocolate Peanut Butter Cookies is a joy. The dough comes together quickly, and the aroma as they bake is absolutely intoxicating. Follow these steps carefully, and you’ll have a batch of perfect cookies every time.
Step 1: Prep the Oven and Bowls
Preheat your oven to 375°F. Line a baking sheet with parchment paper or leave it ungreased — this recipe works beautifully either way. Set out a large mixing bowl and a small mixing bowl.
💡 emy’s Pro Tip: For even baking, position your oven rack in the center. If you’re baking multiple trays, rotate them halfway through and bake one tray at a time for the most consistent results.
Step 2: Cream the Wet Ingredients
In the large mixing bowl, beat together the shortening, creamy peanut butter, packed brown sugar, milk, and vanilla extract with an electric mixer on medium speed until the mixture is light, fluffy, and well blended — about 2 minutes. Add the egg and mix just until combined. Do not overmix; you want the egg to be fully incorporated but not beaten to death.
⚠️ Common Mistake to Avoid: Overmixing the egg can make the cookies tough. Mix on low speed for just 15–20 seconds after adding the egg, until you no longer see yellow streaks.
Step 3: Combine Dry Ingredients
In the small mixing bowl, whisk together the all-purpose flour, unsweetened cocoa powder, baking soda, and salt. This ensures the cocoa and leavening are evenly distributed throughout the dough — no bitter pockets of cocoa! Add the dry mixture to the wet mixture in two additions, stirring with a wooden spoon or spatula until just combined. The dough will be thick and slightly sticky.
💡 emy’s Pro Tip: Sift the cocoa powder if it looks lumpy. This step, which I learned in Paris, prevents those bitter clumps from sneaking into your cookies.
Step 4: Scoop and Press
Scoop the cookie dough onto your ungreased cookie sheet, forming 1 to 1½ inch dough balls. Space them about 2 inches apart — they will spread slightly. Lightly dip a fork in water or granulated sugar (to prevent sticking), then press down gently on each dough ball to create the traditional crisscross pattern. Press until the cookie is about ½ inch thick.
⚠️ Common Mistake to Avoid: Pressing too hard can make the cookies too thin and crispy. A gentle, even press is all you need. Dip the fork in water between each cookie to keep the lines clean.
Step 5: Bake and Cool
Bake for 7–8 minutes at 375°F, just until the edges are set and the tops look slightly crackly. The centers will still look soft and slightly puffed — that’s perfect. Let the cookies cool on the baking sheet for exactly 2 minutes; this allows them to finish setting without overbaking. Then transfer them to a wire cooling rack to cool completely.
💡 emy’s Pro Tip: For soft, chewy cookies, err on the side of underbaking. If you prefer crisper cookies, add 1 minute to the bake time. Every oven is different, so keep an eye on them at the 7-minute mark.
| Step | Action | Duration | Key Visual Cue |
|---|---|---|---|
| 1 | Preheat oven | 10–15 mins | Oven indicator light turns off |
| 2 | Cream wet ingredients | 2 mins | Light, fluffy, uniform color |
| 3 | Combine dry ingredients | 1 min | No dry streaks, thick dough |
| 4 | Scoop and press | 5 mins | Clean crisscross pattern, ½ in thick |
| 5 | Bake | 7–8 mins | Edges set, centers soft and puffed |
Serving & Presentation
These Chocolate Peanut Butter Cookies are stunning on their own, but I love to dress them up for company. Arrange them on a rustic wooden board or a ceramic platter — the dark cocoa color pops beautifully against light stoneware. For a touch of elegance, dust the cookies lightly with powdered sugar or flaky sea salt right before serving. The salt enhances both the chocolate and the peanut butter flavors beautifully.
In my NYC apartment, I often serve these alongside a tall glass of cold almond milk or a scoop of vanilla bean ice cream for an indulgent dessert. Back in Morocco, my mother would have paired them with a glass of hot mint tea — the sweetness and warmth are a lovely contrast. For a true American classic, try them with a cold glass of whole milk. They also make fantastic ice cream sandwiches: just sandwich a scoop of vanilla or chocolate ice cream between two cookies and freeze for 30 minutes.
These cookies are also wonderful for cookie swaps, bake sales, or as a lunchbox treat. They travel well and stay fresh for days. If you’re feeling fancy, drizzle a little melted dark chocolate over the top and sprinkle with chopped peanuts for a bakery-style finish.
| Pairing Type | Suggestions | Why It Works |
|---|---|---|
| Side Dish | Fresh fruit salad, sliced bananas | Bright acidity cuts through richness |
| Sauce / Dip | Chocolate ganache, caramel sauce, peanut butter glaze | Elevates the chocolate and peanut butter notes |
| Beverage | Cold milk, hot coffee, mint tea, vanilla milkshake | Creamy or bitter contrasts balance sweetness |
| Garnish | Flaky sea salt, powdered sugar, chopped peanuts, chocolate drizzle | Adds texture, visual appeal, and flavor depth |
Make-Ahead, Storage & Reheating
Living in NYC means my schedule is always full, so I love that these Chocolate Peanut Butter Cookies are as practical as they are delicious. You can prep the dough ahead of time, bake just what you need, and save the rest for last-minute cravings or unexpected guests. Here’s my tested system for storing and reheating.
| Method | Container | Duration | Reheating Tip |
|---|---|---|---|
| Refrigerator | Airtight container (baked cookies) | Up to 1 week | Microwave for 10 seconds for “fresh from the oven” softness |
| Freezer | Freezer-safe bag or container (baked or unbaked dough balls) | Up to 3 months | Bake frozen dough: add 2 mins; reheat baked cookies at 300°F for 5 mins |
| Make-Ahead | Covered bowl (unbaked dough) in fridge | Up to 3 days in advance | Let dough sit at room temp for 10 mins before scooping |
For the best texture, I recommend storing baked cookies in an airtight container at room temperature for up to 5 days — they’ll stay soft and chewy. If you’re in a humid climate (hello, NYC summer), pop them in the fridge to keep them from getting too soft. To reheat, a quick 10-second blast in the microwave brings back that just-baked warmth. For frozen unbaked dough, bake directly from frozen at 375°F for 9–10 minutes — no thawing needed. This is my go-to move for last-minute cookie emergencies.
Variations & Easy Swaps
One of the things I love about this Chocolate Peanut Butter Cookies recipe is how adaptable it is. Whether you’re catering to dietary needs or just want to shake things up, these variations have all been tested in my kitchen. Here’s a quick overview, followed by detailed descriptions.
| Variation | Key Change | Best For | Difficulty Impact |
|---|---|---|---|
| Chunky Peanut & Sea Salt | Crunchy peanut butter + flaky sea salt on top | Texture lovers, sweet-salty fans | No change |
| Gluten-Free Version | 1:1 gluten-free flour blend | Gluten-sensitive bakers | No change |
| Double Chocolate Drizzle | Add 1/2 cup chocolate chips + drizzle melted dark chocolate | Chocolate lovers, special occasions | Slightly more hands-on |
Chunky Peanut & Sea Salt
This is my favorite variation when I want a little extra crunch. Simply swap the creamy peanut butter for crunchy peanut butter, and just before baking, sprinkle a pinch of flaky sea salt (like Maldon) on top of each cookie. The salt amplifies the chocolate and peanut butter flavors and adds a delightful textural contrast. It’s a trick I picked up from a pastry chef in Paris who salted all her chocolate desserts — it makes the flavors sing.
Gluten-Free Version
To make these cookies gluten-free, swap the all-purpose flour with a 1:1 gluten-free baking blend that contains xanthan gum (like Bob’s Red Mill or King Arthur). The texture will be slightly more delicate, but the flavor remains identical. I’ve tested this for my gluten-sensitive friends, and they couldn’t tell the difference. Make sure your baking soda and cocoa powder are certified gluten-free if needed. The crisscross pattern may be a bit softer, so press gently.
Double Chocolate Drizzle
For the ultimate chocolate indulgence, fold 1/2 cup of semi-sweet chocolate chips into the dough along with the dry ingredients. After baking and cooling, melt 1/4 cup of dark chocolate chips with 1 teaspoon of coconut oil and drizzle it over the cookies. This variation is perfect for birthdays, holidays, or any day you want to feel extra special. I love making these when I’m missing the chocolate shops of Paris — they’re like a patisserie in cookie form.
Can I use butter instead of shortening in Chocolate Peanut Butter Cookies?
Yes, you can substitute unsalted butter for the shortening in this Chocolate Peanut Butter Cookies recipe. Use the same amount — 1/2 cup (1 stick) of unsalted butter, softened to room temperature. The cookies will spread a bit more and have a slightly richer, buttery flavor, but the texture will be a little less tender than with shortening. If you use butter, consider chilling the dough for 15 minutes before baking to control spread. I’ve tested both, and while shortening gives a more classic crumb, butter adds a lovely flavor that many home bakers prefer.
Why are my chocolate peanut butter cookies turning out dry?
Dry cookies are usually the result of overbaking or overmeasuring flour. In this Chocolate Peanut Butter Cookies recipe, the key is to bake for just 7–8 minutes — the edges should look set, but the centers will still appear slightly puffed and soft. They continue baking on the hot sheet as they cool. Also, make sure you’re measuring your flour correctly: spoon it into the measuring cup and level it off with a knife, rather than scooping directly, which packs in too much flour. The brown sugar and peanut butter in this recipe add moisture, so if they’re still dry, try adding 1–2 extra tablespoons of milk next time.
Can I freeze the dough for Chocolate Peanut Butter Cookies?
Absolutely! Freezing the dough is one of my favorite timesaving tricks. Scoop the dough into 1½-inch balls and place them on a parchment-lined baking sheet. Freeze until solid (about 1 hour), then transfer the frozen dough balls to a freezer-safe bag or container. They’ll keep for up to 3 months. When you’re ready to bake, place the frozen dough balls on a cookie sheet and bake at 375°F for 9–10 minutes — no need to thaw. The cookies will be just as delicious as fresh. This is my go-to method for having homemade cookies ready at a moment’s notice.
What is the best cocoa powder for chocolate peanut butter cookies?
For this Chocolate Peanut Butter Cookies recipe, I recommend using unsweetened natural cocoa powder or Dutch-process cocoa powder. Natural cocoa powder has a slightly more acidic, fruity flavor that pairs beautifully with the sweetness of brown sugar and the savory notes of peanut butter. Dutch-process cocoa is smoother and milder. Both work well, so choose based on your preference. I typically use natural cocoa for its bold chocolate punch. Avoid sweetened cocoa mixes or hot chocolate powder, as they contain sugar and additives that will alter the texture and sweetness balance of the cookies.
How do I store Chocolate Peanut Butter Cookies to keep them fresh?
To keep your Chocolate Peanut Butter Cookies soft and fresh, store them in an airtight container at room temperature for up to 5 days. If your kitchen is warm or humid (like mine in NYC during summer), refrigerate them in an airtight container — they’ll stay fresh for up to 1 week. To prevent cookies from drying out, you can add a slice of bread to the container; it absorbs excess moisture and keeps the cookies soft. For longer storage, freeze baked cookies in a freezer-safe bag for up to 3 months. Thaw at room temperature for 15 minutes or microwave for 10 seconds.
Can I make these cookies without an electric mixer?
Yes, you can absolutely make these Chocolate Peanut Butter Cookies by hand! Use a sturdy wooden spoon and a large bowl. Start by softening the shortening and peanut butter to room temperature, then cream them together with the brown sugar, milk, and vanilla. This will take a bit of elbow grease — about 3–4 minutes of vigorous stirring — until the mixture is smooth and light. Add the egg and beat well. Then stir in the dry ingredients until just combined. The dough will be thick, but it’s completely doable by hand. In fact, I sometimes make them this way when I want a more meditative baking experience.
Why do my cookies spread too much during baking?
If your Chocolate Peanut Butter Cookies spread too much, it’s usually due to one of three reasons: the dough was too warm, the baking sheet was too hot, or there wasn’t enough structure from the flour. Make sure your shortening and peanut butter are at room temperature but not overly soft. If the dough feels sticky, refrigerate it for 15 minutes before scooping. Also, use a cool, ungreased baking sheet — if you’re reusing a hot sheet, the cookies will start spreading before they set. Finally, measure your flour accurately: too little flour can cause excess spread. Spoon and level for the best results.
Can I add chocolate chips to this recipe?
Yes, chocolate chips are a wonderful addition to this Chocolate Peanut Butter Cookies recipe! You can fold in 1/2 to 3/4 cup of semi-sweet, milk, or dark chocolate chips after you’ve combined the wet and dry ingredients. The chips add extra pockets of melted chocolate that complement the cocoa base. If you’re feeling adventurous, try white chocolate chips or peanut butter chips for a double dose of peanut butter flavor. Just note that adding chips may slightly increase the spread, so keep an eye on baking time. This is an easy way to customize the cookies to your taste.
What can I use instead of shortening in this cookie recipe?
If you don’t have shortening, the best substitute is unsalted butter at room temperature. Use the same amount (1/2 cup, or 1 stick). The cookies will have a slightly richer flavor and a bit more spread. You can also use coconut oil (solid, not melted), but the cookies will have a subtle coconut flavor and a slightly different texture. For a dairy-free option, plant-based butter sticks work beautifully. I’ve tested all of these, and while shortening gives the most tender, classic crumb, each substitute produces delicious cookies. If using butter, you may want to chill the dough for 10–15 minutes before baking.
How do I get the perfect crisscross pattern on peanut butter cookies?
The classic crisscross pattern is easier than you think! First, scoop uniform 1 to 1½-inch dough balls. Lightly dip a fork in granulated sugar or water — this prevents sticking. Press the fork gently into the dough ball, then press again in the opposite direction to create a cross. Press until the cookie is about ½ inch thick. Don’t press too hard, or the cookies will be too thin and crispy. Dip the fork in sugar or water between each cookie for clean lines. The sugar also adds a subtle sparkle and lightly crispy edge. This pattern isn’t just decorative — it helps the cookies bake evenly and gives them those lovely ridges that crisp up beautifully.
Share Your Version!
I absolutely love hearing how this Chocolate Peanut Butter Cookies recipe turns out in your kitchen. Did you try the classic version, or did you go for one of the variations? Did you add chocolate chips, a sprinkle of sea salt, or maybe a drizzle of caramel? Every baker brings their own touch, and I’d be thrilled to see yours. Leave a star rating and a comment below — your feedback helps other readers know what to expect, and it truly makes my day to hear from you. If you’re on Instagram or Pinterest, snap a photo of your cookies and tag me @cookingwithemi. I love sharing your creations with our community.
One thing I’m especially curious about: did the 7–8 minute baking window work for your oven? Ovens can vary so much, and I’d love to know if you needed to adjust the timing. Also, which variation are you most excited to try? The Double Chocolate Drizzle is always a crowd-pleaser, but the Chunky Peanut & Sea Salt has a special place in my heart. Drop your thoughts in the comments — I read every single one!
From my NYC kitchen to yours — I hope this recipe brings as much warmth to your table as it does to mine. — emy 🧡
Love This Recipe? Save It to Pinterest!
If you enjoyed this Chocolate Peanut Butter Cookies recipe, don’t let it get lost in your browser tabs! 😄 Pin it now so you can find it again anytime — and explore hundreds more tried-and-tested recipes waiting for you on my Pinterest boards.
👉 Follow emy on Pinterest @exorecipe
📌 Pin this recipe · 🔁 Re-pin your favorites · 💬 Tag me when you make it — I love seeing your creations!
🎉 Made this recipe? I’d love to hear from you!
⭐ Leave a star rating below, share a photo on Instagram tagging @cookingwithemi, or tell me in the comments — what’s your favorite way to enjoy these Chocolate Peanut Butter Cookies? Your feedback helps this little NYC kitchen grow, and I read every single comment with a cup of mint tea in hand. 💬💛
— emy 🧡

Chocolate Peanut Butter Cookies
Description
Chocolate Peanut Butter Cookies are the perfect blend of rich chocolate and peanut butter. You will love this delicious twist on the classic peanut butter cookie!
Ingredients
- 1/2 cup shortening (regular or butter flavor)
- 3/4 cup creamy peanut butter
- 1 1/2 cups brown sugar (packed)
- 3 tablespoons milk
- 1 teaspoon vanilla extract
- 1 large egg
- 1 1/4 cups all-purpose flour
- 1/2 cup unsweetened cocoa powder
- 1 teaspoon baking soda
- 1/2 teaspoon salt
Instructions
- Preheat oven to 375F.
- In a large mixing bowl, beat together the shortening, peanut butter, brown sugar, milk, and vanilla with an electric mixer until well blended. Add the egg and mix just until combined.
- In a small mixing bowl, whisk together the flour, cocoa powder, baking soda, and salt. Add the dry mixture to the wet mixture and stir until combined.
- Scoop the cookie dough onto an ungreased cookie sheet to form 1 to 1 ½ inch dough balls. Use a fork to press the dough down and create the traditional crisscross pattern on each cookie.
- Bake for 7-8 minutes at 375F just until set around the edges. Cool for 2 minutes on the cookie sheet, then transfer to a wire cooling rack to cool.
