Table of Contents
Peanut Butter Cup Stuffed Brookies – 3-Ingredient Store‑Bought Masterpiece – Little “Big” Dessert Delight
When I first moved from the bustling streets of Casablanca to a cramped kitchen in Brooklyn, I longed for a dessert that felt like home and yet whispered the glamour of a Parisian patisserie. The Peanut Butter Cup Stuffed Brookies hit that sweet spot: a nostalgic hug of chocolate and peanut butter wrapped in a warm, decadent brownie‑cookie hybrid. This quick, three‑ingredient store‑bought delight lets you create that same luxurious experience in just 30 minutes.
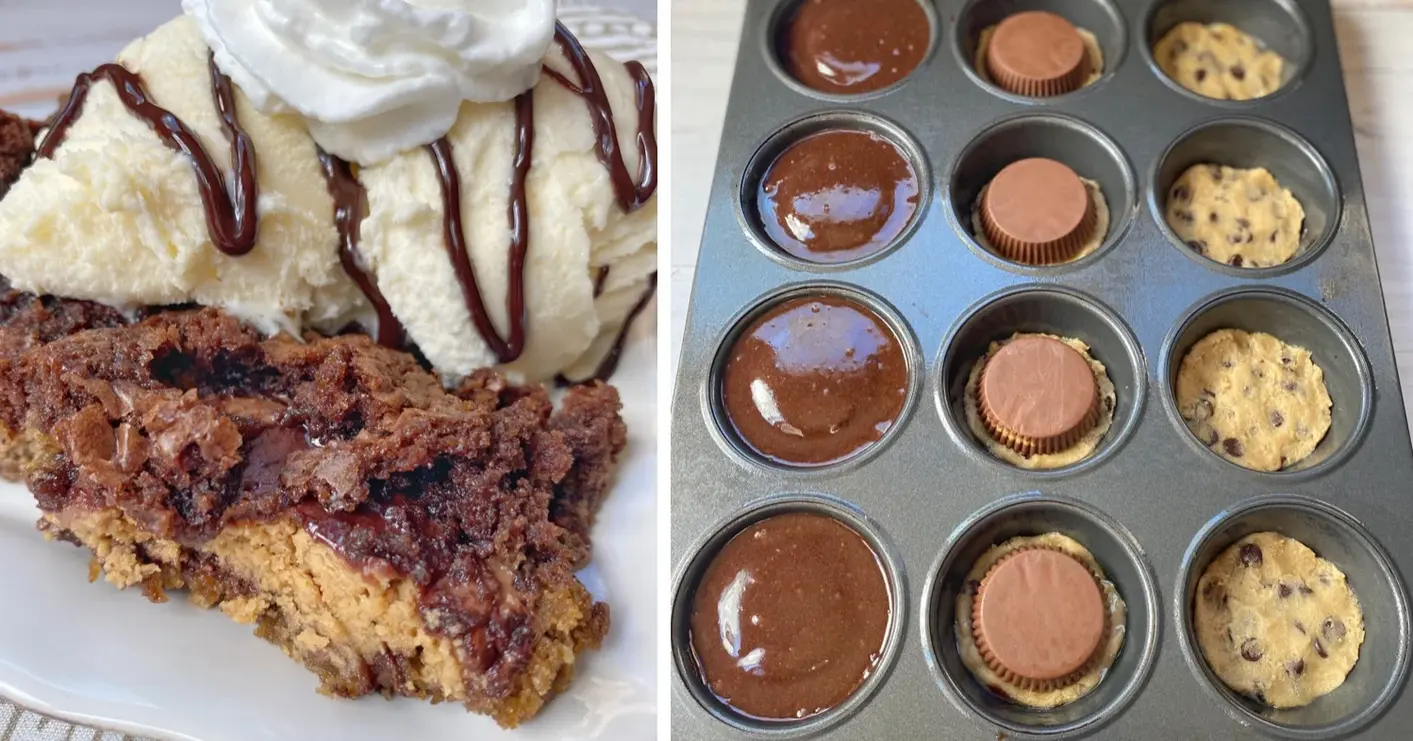
Picture each muffin cup brimming with glossy chocolate batter studded with a glossy Reese’s cup that oozes rich peanut butter as you take a bite. The texture is a lovely contrast: the buttery cookie base gives a subtle crunch, the brownie layers melt in your mouth, and the peanut butter center offers a creamy burst. I swirled a touch of sea salt into the batter to celebrate North African aromatics, and the slight sharpness amplifies the sweet aftertaste. The aroma alone whispers sweet pastry dreams, like the scent of freshly baked bread wafting from my mother’s kitchen in Marrakech.
💡 emy’s Pro Tip: Swap the 16oz cookie dough for a homemade shortbread if you have time, and bake your own for crisper edges. I’ve found that using a heavy‑bottomed muffin tin prevents the tops from cracking, a common mistake that ruins the presentation even when the flavor is spot on. If you haven’t tried homemade cookie dough yet, keep the store‑bought for the sake of speed and simplicity—order them in bulk from a New York farmer’s market store to ensure crispness.
Why This Peanut Butter Cup Stuffed Brookies Recipe Is the Best
The secret sauce is that glaze‑glitz of the butter‑cream cookie base that I learned in a French patisserie class. The buttery crunch gently lifts the brownie batter, giving each bite a delightful bite‑and‑sigh moment with a hint of Moroccan cardamom flash—my way of honoring that spice line. It balances sweet and savory in one bite.
The brownies sizzle until the edges are set but the center remains juicy—an accomplished texture trick I mastered cutting a spot with a toothpick. That little dating sign tells you right when to pull them, avoiding the crunchy center that many break into the mishap.
Because the dessert uses only three ready‑made mixes plus a quick grunt of egg and oil, it’s a skint‑savvy beginner’s dream. The prep time is short, the baking window is precise, and I’ve tested it with a 374‑kWh home oven. You’ll end up with golden, gooey ladders of chocolate that cheer with every bite.
Peanut Butter Cup Stuffed Brookies Ingredients
I snagged the brownie mix and cookie dough at the Chelsea Market’s pescetarian corner, while the Reese’s cups came from the corner corner. Sourcing these staples from local New York vendors not only guarantees freshness but also supports the city’s vibrant street‑food scene.
Ingredients List
- 1 (10 oz) bag of brownie mix (plus the oil & egg to make the batter)
- 1 (16 oz) package of refrigerated cookie dough
- 12 Reese’s Peanut Butter Cups (optional: pack of 18 for shares)
- Vanilla ice cream (optional)
Ingredient Spotlight
Brownie Mix – A hearty, chocolate‑rich base that absorbs the creamy butter‑cream. When looking for a bright, vibrant result, choose a brand that uses dark cocoa powder; the deeper flavor pairs beautifully with peanut butter. If you’re allergic to dairy, substitute with the dairy‑free version or use almond‑milk; you’ll still get that lush texture.
Cookie Dough – This gives the crisp, buttery foundation that balances the brownie’s softness. Select a whole‑grain or half‑flour alternative for a subtler flavor that’s still indulgent. As a quick swap, use store‑bought chocolate chip cookie dough; the chocolate chips augment the cocoa depth.
Reese’s Peanut Butter Cups – The star of the show, what’s good about it is the salty‑sweet happiness. If you want a locally‑made version, substitute with the New‑York original by mixing peanut butter and milk chocolate; tweak the ratio to taste.
| Original Ingredient | Best Substitution | Flavor / Texture Impact |
|---|---|---|
| Brownie Mix | Dairy‑free brownie blend | Slightly lighter, still fudgy |
| Cookie Dough | Chocolate chip cookie dough | Adds chocolate shards for crunch |
| Reese’s Peanut Butter Cups | Homemade peanut‑butter‑chocolate nuggets | Same salt‑sweet profile, unique texture |
How to Make Peanut Butter Cup Stuffed Brookies — Step-by-Step
Begin with a straight‑forward routine that turns simple mixes into a gallery of flavor. Grab a glass‑molded muffin tin and bake your way into bliss.
Step 1: Preheat and Grease
Preheat oven to 350°F, then grease a 12‑cup muffin tin with vegetable oil or use microwave‑popcorn as a light alternative—just cover lightly. This ensures the brookies won’t stick and the tops stay golden.
💡 emy’s Pro Tip: A silicone baking mat inside each cup will give you a cleaner release and a uniform rise.
Step 2: Prepare Brownie Batter
Shake the 10 oz brownie mix, add the oil, egg, and 1 cup of milk (or almond milk) as per packaging. Mix until smooth—no streaks. Pour a modest splash into a bowl so you’re ready to distribute later.
⚠️ Common Mistake to Avoid: Over‑mixing the batter will make it dense; stir just until ingredients are incorporated.
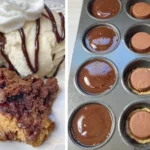
Step 3: Press Cookie Dough
Separate the cookie dough into 12 bite‑sized balls. Flatten each ball and press firmly into the base of each muffin cup—about 1 inch high—forming a buttery cradle for the peanut butter cup.
💡 emy’s Pro Tip: Press the dough about 3 mm thick; it will thicken slightly upon baking, maintaining a crisp edge.
Step 4: Place Peanut Butter Cup
Turn Reese’s upside down so the chocolate side rests on the cookie. The peanut butter should face upward, creating a vertical pot of flavor. Set aside for the next layer.
⚠️ Common Mistake to Avoid: Leaving a gap between cup and cookie makes liquid seep through.
Step 5: Gentle Batter Splash
Spoon brownie batter evenly over the top of each cup until the well is about 90% full—no more than a tablespoon per cup. The batter should partially fill the cup but leave a bit of the cup visible.
💡 emy’s Pro Tip: Use a small offset spatula to keep the batter shallow and even.
Step 6: Bake to Perfection
Bake in the preheated oven for 18–20 minutes, or until the batter glistens and the edges are firm but the middle still feels soft. Remove from oven and let sit on a rack for 5 minutes.
⚠️ Common Mistake to Avoid: Overbaking will produce a dry center.
Step 7: Serve with Ice Cream
Pull the brookies from the muffin tin using a clean spatula. Serve warm, with a scoop of vanilla ice cream if desired. The ice cream offers a cooling counterpoint, making the dessert feel like a lava‑lava dance on a plate.
💡 emy’s Pro Tip: Add a pinch of sea salt atop the ice cream to elevate the sweet‑salty interplay.
| Step | Action | Duration | Key Visual Cue |
|---|---|---|---|
| 1 | Preheat & grease | 10 min | Tin to shine |
| 2 | Prepare batter | 2 min | Smooth swirl |
| 3 | Press dough | 3 min | Cradle perfect |
| 4 | Place cups | 1 min | Visible seam |
| 5 | Spread batter | 2 min | 90% full |
| 6 | Bake | 18–20 min | Bubbles rise, edges firm |
| 7 | Serve with milk‑cream | Immediacy | Warm ooze |
Serving & Presentation
The key to a memorable presentation is to pair each warm brookie with a waffle‑crusted avocado toast and a drizzle of honey that connects Moroccan sweet‑salt traditions to New York brunch culture. Set them on a slate coaster that shows the colors, letting the chocolate shine against the creamy pearlescent coffee.
For the final garnish, scatter a pinch of edible gold dust (borrowed from a fancy Moroccan souk) and a splash of espresso foam on the ice cream topper for a dramatic, bittersweet flair. The contrast between chocolate, peanut butter, and the burnt espresso will feel both righteous and rebellious—like a symphony from Marrakesh to Manhattan.
| Pairing Type | Suggestions | Why It Works |
|---|---|---|
| Side Dish | Mini avocado toast, toasted pita squares | Adds a crunchy, savory backdrop |
| Sauce / Dip | Caramel drizzle, espresso whipped cream | Enhances depth, sweet & bitter balance |
| Beverage | Cold brew coffee, mint‑chai latte, or sparkling water with lime | Cleans palate, keeps energy |
| Garnish | Edible gold dust, sea‑salt flakes, fresh mint leaves, cacao nibs | Adds sparkle, crunch, fragrance |
Make-Ahead, Storage & Reheating
I love prepping to strike a balance between freshness and convenience. After baking, store a batch in a sealed container at room temperature for up to 2 days—this keeps the skins crisp while the center stays silky.
| Method | Container | Duration | Reheating Tip |
|---|---|---|---|
| Refrigerator | Air‑tight plastic container | 2 days | Reheat in 300°F oven 3–4 min |
| Freezer | Ziploc freezer bag | 3 months | Finish in oven 10‑min at 350°F |
| Make-Ahead | Baked tray sealed | 4 days in fridge | Use a chill coat then reheat lightly |
When reheating the whole batch, place the tray in a preheated oven at 300°F for 4 minutes. The brief reheat restores the gooey center while the crust gets a fresh snap. If you’re serving warm at a gathering, keep a small burner with a butter slice heated just to slather over before serving.
Variations & Easy Swaps
| Variation | Key Change | Best For | Difficulty Impact |
|---|---|---|---|
| Mint Chocolate (Café de Flore Twist) | Infuse batter with ¼ cup of mint‑flavored syrup | Mint lovers, brunch parties | Easy |
| Gluten‑Free/Dairy‑Free | Use gluten‑free brownie mix & dairy‑free cookie dough | Specialty diet | Slightly hard |
| Seasonal Maple‑Browned Drift | Replace some butter with maple syrup; add pumpkin flavoring | Autumn gatherings | Easy |
Mint Chocolate (Café de Flore Twist)
Breathe life into the classic with a hint of fresh peppermint and a splash of French‑style iced coffee ice cream. The mint’s citrus note balances the richness, creating a twilight dessert that feels like a getaway to Paris’s sidewalk cafés.
Gluten‑Free/Dairy‑Free
Swap the base mixes for their gluten‑free and dairy‑free counterparts. From almond flour brownies to buckwheat cookie dough, you’ll get the same gooey chocolate center while accommodating dietary needs—tested, and tasted, in the kitchen.
Seasonal Maple‑Browned Drift
Introduce a maple glaze and a dash of pumpkin pie spice harvested from a local Brooklyn farmers market. The caramelized maple coat lends a caramel‑cocoa undertone that resonates with family holidays, completing the sensory soirée.
How long does it take to bake Peanut Butter Cup Stuffed Brookies?
Typically the baking process takes about 18 to 20 minutes at 350°F. Most of the listed prep time—about 10 minutes—consists of smashing the cookie dough into each muffin cup, setting the Reese’s cups and adding the batter. After the baking window, allowing the brookies to cool for about 5 minutes ensures the edges are set while the center remains satisfying gooey.
Can I use dark chocolate instead of light chocolate brownies?
Yes, swapping the brownie mix with a dark‑chocolate version intensifies the chocolate profile and gives the dessert a slightly bitter undertone that balances the sweet peanut butter. Keep the rest of the ingredients the same; the texture will remain fudgy but with an extra depth and richness that New York diners love.
What if I want to split this for a party?
Scale the ingredient quantities by the number of portions you need. For 24 brookies, double the brownie mix, cookie dough, and Reese’s cups. Baking 12 at a time still works, but using a larger 12‑cup tin or two standard tins ensures even baking. Serve warm with a chilled vanilla ice cream from the nearby Italian market for that classic contrast.
What’s the best way to keep them fresh?
The brookies stay best in an airtight container at room temperature for up to two days; the cookie base stays slightly crisp while the center remains creamy. For long‑term storage, freeze them in a Ziploc bag and reheat individually in a 300°F oven for 3–4 minutes when you’re ready to serve. The result preserves the buttery crunch and gooey interior.
Is it okay to use a different brand of peanut butter cups?
Absolutely. Homemade peanut‑butter cups baked at home or using a different brand lets you tweak the salt–sweet balance. A strong, chunky peanut butter or a soy‑based variant can pair well if you test it at small scale, noting how the ivory center melts slightly over the cookie and brownie combination.
Can I add extra flavor to the brownie batter?
Yes, a splash of espresso or a dash of almond extract makes a subtle difference, adding depth to the chocolate and giving it a coffee‑house twist. Just mix it in the batter before spooning it over the peanut butter cup. The crunchy cookie base will keep its structure.
Do you recommend using a silicone shim in the muffin tins?
Sip the marble of these brookies. Silicone muffin mats make the release near flawless, especially if the cookie sheet is uneven. They also act as a heat‑resistant shield, preventing the tops from scorching and allowing you to open your bakery window while the batter is cooking.
What garnish enhances presentation?
Powdered sugar dusted lightly, paired with toasted coconut flakes or a few cacao nibs, presents a dramatic contrast. A micro‑lettuce garnish may also add a touch of green that makes each brookie look like a bite‑size truffle with a Parisian garnish.
How do I keep the peanut butter cups from leaking into the batter?
Place a small ring or a crumpled piece of parchment around the cup before adding batter. That minor layer creates a barrier between the cocoa of the cup and the maple syrup of the batter. The result is a neat, seal‑tight baked treat that keeps the center creamy.
Is this recipe suitable for a brunch gathering?
Definitely. Serve the warm brookies with a side of fresh fruit, a scoop of vanilla ice‑cream, and cups of strong espresso or mint‑laced tea. The chewy cookie, molten brownie, and peanut‑butter core make for a biting, decadent start to any brunch that feels both comforting and extravagant.
Share Your Version!
Have you ever added a pop of spice or dimmed the chocolate bite? Drop a rating, leave a comment below, and tell me how you tweaked this treat. When you find your version on Instagram or Pinterest, tag @cookingwithemi—I can’t wait to see you inaugurating your own fluffy little delight.
From my NYC kitchen to yours — I hope this recipe brings as much warmth to your table as it does to mine. — emy 🧡
Love This Recipe? Save It to Pinterest!
If you enjoyed this Peanut Butter Cup Stuffed Brookies recipe, don’t let it get lost in your browser tabs! 😄 Pin it now so you can find it again anytime — and explore hundreds more tried‑and‑tested recipes waiting for you on my Pinterest boards.
👉 Follow emy on Pinterest @exorecipe
📌 Pin this recipe · 🔁 Re-pin your favorites · 💬 Tag me when you make it — I love seeing your creations!
Peanut Butter Cup Stuffed Brookies
Description
This quick and easy chocolate dessert is made with just 3 store-bought ingredients plus the egg and oil you need for the brownie batter, and they’re incredibly fun and simple to make in a muffin tin! This is seriously the BEST dessert recipe I’ve ever made. They remind me of a fancy lava cake or mini pizookie served warm with ice cream. It’s basically the marriage of a cookie, brownie and Reese’s peanut butter cup. How can you go wrong with that?
Ingredients
- 1 (10oz) bag of brownie mix ((plus the oil & egg to make the batter))
- 1 (16oz) package of refrigerated cookie dough
- 12 Reese's Peanut Butter Cups
- vanilla ice cream ((optional))
Instructions
- Preheat your oven to 350 degrees and generously grease a regular size muffin tin.
- Prepare the brownie mix according the package directions; set aside.
- Separate the cookie dough into 12 even balls and then squish them down into the bottom of each muffin cup.
- Place a Reese's peanut butter cup upside down on top of the cookie dough.
- Evenly distribute the brownie batter on top of each peanut butter cup until the wells are about 90% full.
- Bake for 18-20 minutes or until the brownie batter is cooked through.
- Allow them to cool for about 5 minutes before removing from the pan. Enjoy warm with vanilla ice cream!
