
Table of Contents
Air Fryer Korean Soy Garlic Chicken Thighs – Lightly Bread with Potato Starch for a Crispy Exterior
Growing up in a bustling Moroccan souk, I learned that a few simple pantry staples could transform an everyday dinner into a street‑carne of flavors. Back in Paris, the mastery of a light glaze began my fascination with sauces, and now, in the heart of New York City, I fuse those techniques to create a sauce that sings with sweetness and daring heat. This one‑pan, almost‑fry “Air Fryer Korean Soy Garlic Chicken Thighs” is the perfect marriage of Old‑World intrigue and modern convenience.
Imagine the crisp bite of fresh garlic sinking into a slightly kızarmalı chicken thigh, while the black pepper dances with a splash of honey and a hint of soy sauce. The result is a glossy, caramelized surface that crackles with garlic crunch. There’s the aroma of a Moroccan spice market mingling with the scent of a New York street, a sky‑blue haze hinting at most even as the sauce melds in the pan. It’s a story that begins in the sun‑lit kitchen of your table and ends as a golden finish.
I like to emphasize that this recipe is quick, clean, and perfect for the hurried foodie of Times Square. The only twist is using potato starch to lightly bread the thighs. I’ll share a pro tip about keeping the starch dry to preserve a crisp exterior and a common mistake: adding too much oil will water‑coat the chicken, making it mushy. Trust me, it’s simple: keep the oil at a medium‑high heat.
Why This Air Fryer Korean Soy Garlic Chicken Thighs Recipe Is the Best
The secret is in the coating—a dusting of potato starch and fine flour that forms a crunch that corners the chicken. As I trained in Paris, I learned how a fine dust can turn a denser protein into a caramelized crust that sears within minutes. That technique turns an ordinary thigh into a pan‑frit with a glossy glaze that gleams like a sunset over the Mediterranean.
Texture is everything. By letting the chicken sit in the oil long enough to develop a golden crust, the inner meat remains juicy and luscious. The aromatics—garlic, white onion, and chili—introduce heat that crisp, but never burn, allowing the sweetness to highlight rather than overpower.
It’s a fool‑proof, fast recipe because the single‑pan method eliminates the need for a protracted spice infusion or a slow sous‑vide. Anyone, even a novice in the kitchen, can whip it up for a weeknight dinner without fuss.
Soy Garlic Chicken Thighs Ingredients
I usually pick these ingredients at the Queensboro Plaza or the farmers nearby on 34th Street. The fresh chicken comes from a local humane‑friendly, the garlic is roasted to a rosy golden hue, and the soy sauce has that deep, umami western finish that reminds me of a street‑carne after a market service in my mother’s kitchen back in Fez.
Ingredients List
- 1 lb boneless skinless chicken thighs
- 3 tbsp potato starch
- 3 tbsp all‑purpose flour
- 1 tsp garlic powder
- ½ tsp salt
- ½ tsp black pepper
- 3 tbsp neutral oil (canola or grapeseed)
- 8 cloves garlic, minced
- 2 stalks green onion (green and white parts separated)
- 1 tsp red chili flakes
- ½ cup chicken stock (or water + bouillon)
- 3 tbsp honey
- 1 tbsp rice vinegar
- 1 tbsp dark soy sauce
- 1 tsp cornstarch
- Green onion (green part) for garnish
- Sesame seeds for garnish
Ingredient Spotlight
Chicken thighs – Fresh, locally sourced thighs give a juicy, tender center. Look for whole, dark‑tinted skin and a firm texture. If you prefer a leaner cut, choose bone‑in‑stone for a smoother bite.
Garlic – Choose “English” or “Sivri” varieties for a sweeter garlic. Roast the cloves in a dimple of plain metal until you get the golden, caramelized flavor. Substitute with roasted new‑style garlic if you’re a bit sensitive to the pungent bite.
Honey – This sweet liquid is what I used for my mother’s flatbread. A 3‑day floral honey keeps a smooth background and acts like lulling glaze to keep the sauce crisp. Skip the liquid if you’re vegan; use agave syrup for a twist.
| Original Ingredient | Best Substitution | Flavor / Texture Impact |
|---|---|---|
| Chicken thighs | Boneless chicken breasts | Same juiciness, slightly slimmer |
| Potato starch | Cornstarch or mashed potatoes | Keeps crunch but reduces flour-like texture |
| Honey | Agave nectar | Adds floral sweet note but lowers caramel-like weight |
How to Make Air Fryer Korean Soy Garlic Chicken Thighs — Step-by-Step
I love to start the sauce before the heat, so we’ll prep all the sauce first, then set the chicken aside while we dust them.
Step 1: Prepare the Sauce
Combine ½ cup chicken stock, 3 tbsp honey, 1 tbsp rice vinegar, 1 tbsp dark soy sauce, and 1 tsp cornstarch in a small bowl, whisk until smooth. Set aside. This full‑gloss sauce takes on the flavor of the meal before the heat.
💡 emy’s Pro Tip: Whisk the sauce until the cornstarch just thickens; this will keep the sauce silky when you add it later.
Step 2: Dry the Chicken
Pat the 1‑lb boneless thighs with a paper towel to remove excess moisture; this helps the coating stick in the pan.
⚠️ Common Mistake to Avoid: Trying to soak the chicken in after coating—this makes a soggy center.
Step 3: Mix the Coating
In a shallow dish, mix 3 tbsp potato starch, 3 tbsp flour, 1 tsp garlic powder, ½ tsp salt, and ½ tsp black pepper.
💡 emy’s Pro Tip: Tapping the mixture into a plastic bag keeps the starch from clumping.
Step 4: Coat the Chicken
Lightly dredge each side of the thighs in the coating; you’ll see a light brown crust forming. Leave them to rest for a few seconds—this will allow the starch to adhere.
⚠️ Common Mistake to Avoid: Skipping the rest period can cause the coating to stick to the pan.
Step 5: Warm the Oil
Pour 3 tbsp neutral oil into a large skillet; heat over medium‑high until shimmering but not smoking. You’ll hear a gentle hiss.
💡 emy’s Pro Tip: Use canola or grapeseed oil for a lighter color that doesn’t bleed into the sauce.
Step 6: Fry the Chicken
Add the coated thighs to the skillet. Cook 7 minutes per side or until golden brown on both sides; the interior should still be juicy.
⚠️ Common Mistake to Avoid: Over‑frying will cause a hard center.
Step 7: Remove the Chicken
Transfer the browned thighs to a plate and set aside. The aroma will start to perfume the room.
💡 emy’s Pro Tip: Let the thighs rest for 2 mins—this allows juices to settle.
Step 8: Saute the Aromatics
Add the minced garlic, white parts of the green onion, and chili flakes to the same pan. Saute 3 min until the garlic turns golden and the aroma stays luminous.
⚠️ Common Mistake to Avoid: Burning garlic too soon; you’ll get bitter.
Step 9: Add the Sauce
Pour the pre‑prepared sauce over the aromatics; let it simmer for 1 min until it thickens.
💡 emy’s Pro Tip: The sauce thickens as it meets heat—watch it lightly bloom.
Step 10: Return the Chicken & Finish
Add the chicken back to the pan. Cook 5 min, turning occasionally, until the chicken is fully cooked and coated with a glossy glaze.
⚠️ Common Mistake to Avoid: Draining the butter before returning the chicken—keep the sauce from drying out.
| Step | Action | Duration | Key Visual Cue |
|---|---|---|---|
| 1 | Mix sauce ingredients | 1 min | Smooth, glossy consistency |
| 2 | Dry chicken thighs | 2 min | Dry surface |
| 3 | Mix coating | 30 sec | Light brown rust |
| 4 | Coat chicken | 30 sec | Starch settle on surface |
| 5 | Heat oil | 1 min | Glinting oil surface |
| 6 | Fry chicken | 14 min | Golden crust |
| 7 | Remove chicken | 20 sec | Soft fragrant |
| 8 | Saute aromatics | 3 min | Golden garlic |
| 9 | Add sauce | 1 min | Silky glaze |
| 10 | Return and finish | 5 min | Glazing glaze |
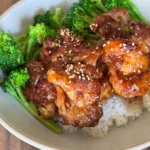
Serving & Presentation
Plate the chicken on a wooden board flaked with olive oil. Drizzle the remaining sauce over the top, then scatter some toasted sesame seeds just like my mother’s miniature dishes. The gentle crunch of the sesame gives a subtle contrast to the silky glaze.
Serve with steamed jasmine rice or a crisp cauliflower rice, that keep the plate balanced and the colors dance across the palate. On a side, bring a side dish of slow‑roasted mushrooms, or a light salad of micro‑greens and a pop of lime for the final pop.
If you want a more dramatic presentation, garnish the dish with a handful of paprika dust, or a few micro‑flower petals from a downtown pharmacy, to accent the colors.
| Pairing Type | Suggestions | Why It Works |
|---|---|---|
| Side Dish | Steamed green beans; roasted popcorn; carrot ribbons | Bright colors contrast with orange glaze, add crunch. |
| Sauce / Dip | Yogurt with fresh mint; tomato coulis; citrus aioli | Cool flavors balance salty sweetness. |
| Beverage | Sparkling glass; iced tea; white wine | Cold pours the palate after heavy sauce. |
| Garnish | Sesame seeds; micro‑angel chilies; parsley dust | Adds textural sparkle. |
Make-Ahead, Storage & Reheating
I usually make 2‑day batches in the fridge: I let the chicken rest at room temperature (about 70°F), then pack them in narrow containers. I keep a backup set in the freezer for the weekend; freeze the sauce portion separately so you can heat them in a microwave before serving.
| Method | Container | Duration | Reheating Tip |
|---|---|---|---|
| Refrigerator | Glass jar | 2 days | Heat in microwave 30‑sec before serving. |
| Freezer | Tight‑sealed plastic container | 2 months | Microwave in a pot or 2‑min stew to reheat. |
| Make‑Ahead | Compostable lunch boxes | 1 week | Keep sauce ready in a separate cup. |
During reheating, my tip is to toss the chicken pieces in hot oil for a minute to bring the glaze lime again. That keeps the sauce from thickening too much and preserves the cherished texture. If you’re in a hurry, you can finish the dish straight from a sealed bag.
Variations & Easy Swaps
| Variation | Key Change | Best For | Difficulty Impact |
|---|---|---|---|
| Kimchi Twist | Add diced kimchi at the last stir | Spicy lovers, Korean seekers | Easy |
| Gluten‑Free | Swap potato starch for almond flour, keep the coat texture | Gluten‑free diners | Medium |
| Spring Peach Glaze | Finish with sliced peaches and a splash of whisky | Summer parfaits | Easy |
Kimchi Twist
Add spicy kimchi in a new pan. The fermented taste lifts the dish to a floor‑to‑sky royalty, while the airy sheen keeps the sauce crisp inside.
Gluten‑Free
Swap potato streak for almond dust. It keeps the alcohol interference but trims away the chewy structure; the final bite tastes like dusty pearl.
Spring Peach Glaze
Finish with sliced peaches and a splash of bourbon – a gorgeous minglée over a fresh glass.
What is the best pan to cook soy garlic chicken thighs?
For a quick and crispy finish, I recommend a large stainless steel skillet that can withstand high heat. If you prefer a cleaner countertop, a non‑stick pan will work, but be cautious not to have the surface dry too hard. A well‑seasoned steel pan lets the chicken brown beautifully while locking in moisture, just like a vintage Paris restaurant in the heart of NYC.
How long does it take to cook soy garlic chicken thighs?
The whole process typically clocks around 30 minutes from prep to plate. Each take 10 minutes of prep, 20 minutes of cooking, and 10 minutes of resting – a workers’ lunch at a New York café-style brunch. It’s quick enough for a busy weeknight but long enough for flavors to marry.
What ingredient can replace potato starch in the coating?
If you’re allergic to wheat or feel shy about it, corn blue or mung beans can substitute. They’ll still give that light crunch and separate from the fried zones in a bowl like a suburban dinner box. They preserve the buttery coating look you love.
What side dish goes best with soy garlic chicken thighs?
A fresh salad of cucumber, radish, and a pinch of olive oil cuts through the rich glaze. Also, sautéed mushrooms or a mild potato mash keep the plate bright while matching the briny tones. I pair a light sweet rice pilaf to tone down the glaze just like the mint on a Moroccan platter.
Can I use a skillet instead of an air fryer?
Absolutely. A heavy‑bottom skillet lets you sear the chicken to a golden hue, then finish the glaze in the same pan. That’s how I developed this recipe back in Cairo. The key is to control the heat so the coating forms a golden crust without burning the sauce.
Do I need to marinate the chicken before cooking?
No. The quick coating of the rice or potato starch combined with the swirling sauce washes the chicken’s surface, and a little salt in the pan keeps the center juicy to say a warm invitation. For extra flavor, sprinkle a very light herb or a dash of lemon juice after the garnish.
How do I store leftover soy garlic chicken thighs?
You can keep them in a covered jar in the refrigerator for up to 3 days. To retain the glaze texture, place them in a chilled butter cup, adding a squeeze of fresh lemon or a tiny pinch of smoked paprika before reheating. Never over‑heat them; keep the temperature at 140°F (60°C) when you reheat.
What’s a good sauce to serve with soy garlic chicken thighs?
A sprinkle of yogurt rolls with a cumin‑so wine or a fresh vinaigrette with parsley and lemon zest strikes the midnight. It keeps the dish vibrant and light, balancing each bright hour mentioned in my NYC day‑night plan for kitchens. It’s also the standard pairing at my favorite rooftop restaurants.
Share Your Version!
I’d love to hear your own tweaks—like how you adjust the heat or add a dash of lemon zest to brighten the sauce. Drop a rating or comment below, or post a picture of your plated dish on Instagram or Pinterest and tag @cookingwithemi. 🌟
Got a favorite spice block you dip the chicken in? Tell me what you tried and let me know how you made it your own. I can’t wait to see your take on this classic!
From my NYC kitchen to yours — I hope this recipe brings as much warmth to your table as it does to mine. — emy 🧡
Love This Recipe? Save It to Pinterest!
If you enjoyed this Air Fryer Korean Soy Garlic Chicken Thighs recipe, don’t let it get lost in your browser tabs! 😄 Pin it now so you can find it again anytime — and explore hundreds more tried‑and‑tested recipes waiting for you on my Pinterest boards.
👉 Follow emy on Pinterest @exorecipe
📌 Pin this recipe · 🔁 Re-pin your favorites · 💬 Tag me when you make it — I love seeing your creations!
Got feedback on the recipe? Or a kitchen trick you’re curious about? Drop a comment below or shoot me a pic of your dish on Instagram. I’m excited to see what you cook!
Easy Soy Garlic Chicken Thighs
Description
Soy Garlic Chicken Thighs are 10 /10 delicious and super easy to make. Everything can be done in one pan. Lightly bread with potato starch. Pan fry the chicken pieces, add the sauce and let it thicken and thats it.
Ingredients
- Chicken
- 1 lb chicken thighs boneless skinless
- 3 tbsp potato starch
- 3 tbsp all purpose flour
- 1 tsp garlic powder
- 1/2 tsp salt
- 1/2 tsp black pepper
- 3 tbsp neutral oil for pan frying
- 8 cloves of garlic (minced)
- 2 stalks green onion (green and white parts seperated)
- 1 tsp red chili flakes
- Sauce
- 1/2 cup chicken stock (sub: water & chicken bouillon)
- 3 tbsp honey
- 1 tbsp rice vinegar
- 1 tbsp dark soy sauce
- 1 tsp cornstarch
- Garnish
- Green onion (green part)
- Sesame seeds
Instructions
- SOY GARLIC CHICKEN SAUCE: combine all the sauce ingredients 1/2 cup chicken stock (or sub with water and chicken bouillon), 3 tbsp honey, 1 tbsp 1 tbsp rice vinegar, 1 tbsp dark soy sauce, 1 tsp cornstarch, mix then set aside.
- CHICKEN: Dry the boneless skinless chicken thighs with a paper towel.
- Mix the potato starch, flour, garlic powder, salt, and black pepper on a large plate.
- Lightly coat the chicken thighs on both sides.
- Heat enough neutral oil in a large frying pan over medium-high heat to cover the bottom of the pan.
- Once the oil is hot, add the chicken thighs and fry until golden brown on both sides, about 7 minutes per side.
- Remove the chicken from the pan and set aside on a plate.
- SAUCE: In the same pan, add the minced garlic, the white part of the green onion, and red chili flakes and saute for 3 minutes until the garlic is golden brown.
- Add the sauce to the pan and cook for 1 minute or until the sauce has thickened.
- Add the chicken back to the pan. Cook for 5 minutes or until the chicken is cooked and covered with the glossy sauce.
- Serve it with your favorite veggies and steamed rice.
