Table of Contents
Chocolate Lava Cake Instant Pot Magic – Quick, Gooey Delight
Growing up in a bustling Moroccan market and later training in Paris, my love for chocolate evolved into a craving for desserts that feel like a hug. I first discovered the magic of instant pot lava cake at a friend’s birthday party in Brooklyn—no oven required, just a quick press of a button and a molten center waiting to be unveiled. This recipe brings that instant wall‑opener vibe to the NYC kitchen, turning the humble chocolate lava cake into a quick, gooey treat you can share on a weekday night.
When the chocolate melts, its silky, bittersweet aroma lifts you back to the Gueliz cafés, while the soft, airy sponge shimmers like the Atlantic sunset over Lower Manhattan. The texture is a delightful contrast—outside, a light, crumbly shell; inside, a syrupy cocoa river that clings to your spoon. I add a touch of espresso powder to deepen the chocolate bite, a whisper of cinnamon for subtle warmth, and a dash of instant espresso for the extra kick that reminds me of Parisian espresso bars.
I’ve tweaked this recipe over years of experimenting—skipping the 1‑hour cooling step and using a silicone pad to keep the cakes from sticking. Pro tip: use a non‑stick release spray in the ramekins; it’s a game‑changer for even melts. Common mistake: adding too much flour—keep the sift gentle to avoid a dry crumb. Ready? Let’s dive in.
Why This Chocolate Lava Cake Recipe Is the Best
The flavor secret lies in the balance of dark chocolate and espresso. I bring my Moroccan spice knowledge to choose the right sweetness, and my Parisian pastry training ensures the batter holds heat without overcooking the center. This combo delivers true filling feels without the guilt of a thick cake.
Perfected texture comes from precise folding—stopping as soon as the flour is incorporated keeps the batter light. A silky batter transforms into a crisp shell before the center stays molten, a technique I learned when reheating croissants in Parisian kitchens.
Foolproof & fast: all steps initialize around the instant pot, so you’re out of the kitchen in 20 minutes. The lingering steam cools the cake, preventing it from drying out, meaning even novice bakers can achieve professional results.
Chocolate Lava Cake Ingredients
I source my chocolate chips from the tiny specialty shop on Seventh Avenue, while the butter comes from a local dairy that prides itself on European‑style butter. My avocado‑greens are from the Union Square farmers market, smashing up the frisson of spice in every bite.
Ingredients List
- 1 cup dark chocolate chips (or chopped dark chocolate)
- ½ cup unsalted butter, cubed
- 3 large eggs
- 1 tsp vanilla bean paste (or extract)
- 1 ½ cups powdered sugar
- 7 tbsp all‑purpose flour
- 1 tsp instant espresso powder (optional)
- 1 tsp ground cinnamon
- ¼ tsp salt
- 4 tsp cocoa powder
- Melted butter (or cake release spray)
- 2 tbsp Baileys (optional)
- Vanilla ice cream (optional)
Ingredient Spotlight
Dark Chocolate Chips: Choose at least 70% cacao for depth. If you can’t find them, use Dutch‑processed cocoa and a little extra butter to keep moisture. Replacement idea: 80% chocolate blocks chopped, slightly longer melt time but richer flavor.
Unsalted Butter: The butter’s fat content keeps the batter silky. Swap for clarified butter if you want a cleaner taste; just reduce the butter by 2 tbsp to keep the fat ratio.
Instant Espresso Powder: Adds coffee undertone without the bitterness of brew. If you prefer decaf or don’t have espresso powder, use instant coffee powder; taste remains robust.
| Original Ingredient | Best Substitution | Flavor / Texture Impact |
|---|---|---|
| Dark chocolate chips | Dark chocolate blocks | Higher cocoa, richer flavor, longer melt time. |
| Unsalted butter | Clarified butter | Cleaner taste, slightly less moisture. |
| Instant espresso powder | Instant coffee powder | Same depth, more bitterness if not decaf. |
How to Make Chocolate Lava Cake — Step-by-Step
Here’s how to turn every kitchen visit into a chocolate science experiment, complete with a gooey jazz note in the center.
Step 1: Melt Chocolate & Butter
Combine chocolate and butter in a heat‑proof bowl over a pot of simmering water (double boiler). Stir every 30 seconds until smooth. Shake off droplets, let cool 2 minutes.
💡 emy’s Pro Tip: Microwave in 30‑second bursts, stirring each time to avoid scorching.
Step 2: Add Eggs & Vanilla
Whisk eggs with vanilla paste until pale. Add to chocolate, stir gently; the batter thickens but remains pourable.
⚠️ Common Mistake to Avoid: Letting the mixture cool too far—keeps eggs from whipping correctly.
Step 3: Fold Dry Ingredients
Sift flour, powdered sugar, espresso, cinnamon, salt over the wet mix. Fold quickly until glossy, no streaks.
💡 emy’s Pro Tip: Use a spatula, not a whisk, to preserve air pockets for lift.
Step 4: Prep Ramekins
Spray or brush four 4‑oz ramekins with casting spray or melted butter. Dust a teaspoon cocoa powder inside and swirl. Discard excess.
⚠️ Common Mistake to Avoid: Over‑filling ramekins—leads to overflow.
Step 5: Setup Instant Pot
Add 1 cup water to the pot, place trivet, then arrange ramekins side by side. Press seal and set to high pressure 10 minutes.
💡 emy’s Pro Tip: A silicone mat on the trivet keeps cakes from floating.
Step 6: Cook
Let the pot build pressure, cook 10 minutes. When done, lift vent to release all steam manually, then quickly remove the pot. Pat any condensation with paper.
⚠️ Common Mistake to Avoid: Ignoring the quick release—stuck sauce remains on cakes.
Step 7: Release & Invert
Cool a couple minutes, then lift the ramekins off trivet and slide onto plates. The moisture from the cooker makes release effortless.
💡 emy’s Pro Tip: Keep the plates warm for a few seconds to keep the lava flowing.
Step 8: Cool & Check
Let cool 2 minutes—feel the heat rising. Insert a toothpick; if it’s moist but a few crumbs cling, you’re done.
⚠️ Common Mistake to Avoid: Over‑baking—leads to dry center.
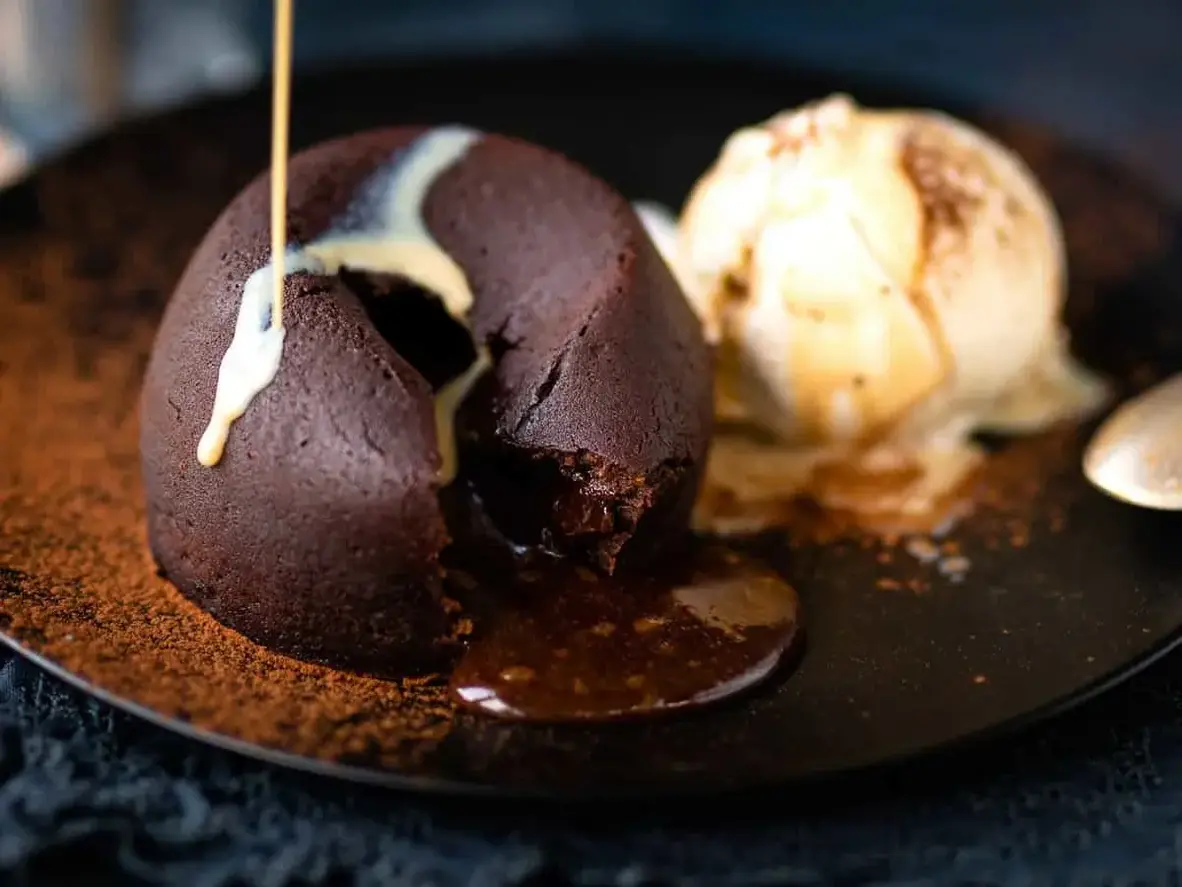
Step 9: Serve Warm
Plate directly, drizzle Baileys if desired, and serve with vanilla ice cream. The molten chocolate seeps through, creating a luscious experience.
💡 emy’s Pro Tip: Scoop a dollop of raspberry coulis for a bright counter‑point.
| Step | Action | Duration | Key Visual Cue |
|---|---|---|---|
| 1 | Heat chocolate and butter | 5 mins | Smooth, glossy finish |
| 2 | Whisk eggs into chocolate | 1 min | Creamy rise |
| 3 | Fold dry ingredients | 2 mins | No streaks |
| 4 | Prep ramekins | 3 mins | Even cocoa coating |
| 5 | Set up Instant Pot | 5 mins | Water level 1 cup |
| 6 | Cook at high pressure | 10 mins | Pressure build‑up |
| 7 | Release & invert | 2 mins | Clear surface |
| 8 | Cool & check | 2 mins | Toothpick spit |
| 9 | Serve | 1 min | Molten flow |
Serving & Presentation
For a chic NYC vibe, place each cake on a slate plate, drizzle a lemon‑infused honey glaze, and sprinkle chopped pistachios for color contrast. A tiny sprig of fresh mint whispers Mediterranean warmth. I often serve with a scoop of velvet‑soft vanilla bean ice cream—my mother’s Moroccan recipe—so the heat of the lava melts into creamy bliss.
The first bite is the moment the chocolate center bursts, followed by a layer of caramelized sweetness that lingers on the tongue. Pair with an espresso‑infused cappuccino at a local coffee shop or a chilled glass of dusty rosé for the ultimate sweet‑and‑savory balance.
| Pairing Type | Suggestions | Why It Works |
|---|---|---|
| Side Dish | Fresh berries | Acidity balances chocolate. |
| Sauce / Dip | Chocolate ganache | Enhances molten center. |
| Beverage | Espresso latte | Coffee notes complement cocoa. |
| Garnish | Pistachios, chili flakes | Texture & subtle heat. |
Make-Ahead, Storage & Reheating
I keep the lava cakes pristine by letting them fully cool on a wire rack, then pistachio‑sandpaper styrofoam boxes. A quick swipe of a damp cloth keeps condensation in check for a fresh taste.
| Method | Container | Duration | Reheating Tip |
|---|---|---|---|
| Refrigerator | Lava cake in lined container | 3 days | Microwave 30 seconds, drizzle banana‑cream. |
| Freezer | Wrapped in foil | 3 months | Thaw overnight, microwave 1 min. |
| Make-Ahead | Pre‑filled ramekins, sealed | 2 days before | Keep at room temp, no reheating needed. |
For a final touch, I line the ramekins with a thin parchment sheet—they’ll release effortlessly when ready to serve, no need for that little trick of water splashing. The moment I plate, the aroma is unmistakable; that instant feel feels like a Parisian café in NYC.
Variations & Easy Swaps
| Variation | Key Change | Best For | Difficulty Impact |
|---|---|---|---|
| Spiced Espresso Lava | Add cinnamon, cayenne | Holiday parties | Same |
| Gluten‑Free Version | Use almond flour | All‑ergy mindful diners | Easy |
| Spring Snack Twist | Add lemon zest | Light brunch | Easy |
Variation 1: Spiced Espresso Lava
Incorporating a teaspoon of ground cinnamon and a pinch of cayenne into the dry mix gives the lava a warm, smoky edge, reminiscent of Moroccan tea house spices. The espresso powder still delivers the deep chocolate bite.
Variation 2: Gluten-Free Version
Replace all‑purpose flour with almond flour and oat flour blend. Texture stays airy, though the crumb has a nuttier flavor that nudges the dessert toward the Mediterranean spectrum.
Variation 3: Spring Snack Twist
Add 1 tsp lemon zest and a splash of sparkling water for a fresh citrus lift—perfect for a spring afternoon patio in Brooklyn.
Can I use a slow cooker for chocolate lava cake?
While a slow cooker won’t crack the perfect molten center you’re aiming for, you can create a “no‑bake” version by baking the batter in a low‑heat slow cooker for 45 minutes and then chilling. The result will be more of a soft chocolate cake than a true lava cake. It’s an interesting experiment if you don’t have an oven, but for authentic gooey lava, pressure‑cooking or oven baking are superior.
How long does it take to cook a chocolate lava cake?
In an instant pot, the cooking time is just 10 minutes high pressure. After a quick release and a 2‑minute cool, the cakes are ready to serve. If you’re using a conventional oven, expect 18‑20 minutes per batch. The total preparation is around 20‑25 minutes, making it a perfect weekday dessert.
Is chocolate lava cake gluten free?
Yes—just swap the all‑purpose flour for a gluten‑free blend such as a combination of almond flour and chickpea flour. Keep the same ratio and you’ll maintain the light texture while completely avoiding wheat. This makes the dessert suitable for most gluten‑intolerant diners.
Can I freeze chocolate lava cake?
Frozen lava cakes can be stored for up to 3 months. Wrap each ramekin tightly in foil, then place in an airtight container. When ready to serve, thaw overnight, then microwave 30‑90 seconds while drizzling a thin glaze. The texture is slightly denser but still mouth‑watering.
Do I need to spray ramekins for lava cake?
It’s not mandatory, but using a non‑stick release spray or a thin film of melted butter will ensure the cakes track free from the sides, especially after the brief cooling period. If you forget, simply run a buttered brush around the edges and then turn the cake on its side.
What mug can I use for lava cake?
Specialty mug cakes are similar, but they puff up unevenly because silicone molds don’t transfer heat well. For an instant pot, stick with metal ramekins—4‑oz cups are ideal—or a silicone padded pan on the trivet. A silicone mat will keep them flat and prevent sticking.
How can I tell if the lava cake is done?
After the cooling phase, insert a toothpick in the center; if one or two moist crumbs cling and the middle still bows when you gently tug, it’s ready. Over‑cooking will firm the entire cake; a slight wobble means the lava is still gooey.
Can I use a blender for the chocolate lava cake batter?
A blender can work if you use a whisk attachment and keep it low speed to preserve air. However, hand whisking keeps the batter airy, which is crucial for a fluffy exterior. If you’re in a rush, a blender is acceptable, but optionally fold in any lumps gently afterward.
What is the optimal temperature for baking this cake?
The instant pot manages internal heat, so setting 10 minutes at high pressure is ideal. For oven baking, preheat to 400°F; this 200°C gives a quick rise and keeps the center molten. Avoid higher temps, or the outside will overcook before the center melts.
Do I need a trivet in the Instant Pot?
The trivet lifts the ramekins away from the pot’s bottom, ensuring even steam circulation. It prevents direct contact that could scorch and also keeps the cake level. A silicone pad works just as well if you don’t have a metal trivet.
Share Your Version!
I’d love to see your twist on this instant pot lava cake—perhaps a favorite spice or a new garnish. Drop a rating and leave a comment below. Post a photo on Instagram or Pinterest, tag me @cookingwithemi, and tell me which unique angle of mine inspired you. Let’s keep the conversation hot!
From my NYC kitchen to yours— I hope this recipe brings as much warmth to your table as it does to mine. — emy 🧡
Love This Recipe? Save It to Pinterest!
If you enjoyed this Chocolate Lava Cake recipe, don’t let it get lost in your browser tabs! 😄 Pin it now so you can find it again anytime — and explore hundreds more tried‑and‑tested recipes waiting for you on my Pinterest boards.
👉 Follow emy on Pinterest @chefrecipes2
📌 Pin this recipe · 🔁 Re-pin your favorites · 💬 Tag me when you make it — I love seeing your creations!

Molten chocolate lava cakes
Description
These molten chocolate lava cakes (also known as chocolate fondants) hide a core of gooey chocolate inside their sponge shell. A delicious and easy dessert in your Instant Pot or oven.
Ingredients
- 1 cup (180g) dark chocolate chips (or chopped dark chocolate)
- ½ cup (113g) unsalted butter (cubed)
- 3 large eggs
- 1 tsp vanilla bean paste (or extract)
- 1 ½ cups (180g) cups powdered sugar ((= icing sugar))
- 7 tbsp flour (all purpose / plain)
- 1 tsp instant Espresso powder ((optional))
- 1 tsp ground cinnamon
- ¼ tsp salt
- 4 tsp cocoa powder (or as needed)
- melted butter (or cake release spray)
- 2 tbsp Baileys (optional)
- vanilla ice cream (optional)
Instructions
- Put the chocolate and butter in a bowl and microwave for 30 second bursts, stirring in between, until melted and smooth. Alternatively set the bowl over a pot of barely simmering water and allow the chocolate to melt gradually (double boiler method). Set aside to cool slightly.
- Add the eggs and vanilla. Mix together using a small balloon whisk. The chocolate will thicken.
- Sift the flour, icing sugar, espresso powder, ground cinnamon and salt over the chocolate. Fold together until you have a glossy, thick batter and no dry streaks remain.
- Spray four ramekins or metal pudding molds with cake release or brush with melted butter. Add a scant teaspoon of cocoa powder in each and swirl to cover. Discard any excess cocoa powder. Divide the batter between the prepared ramekins or molds.
- Place the metal trivet in your pressure cooker and add 1 cup / 250ml of water. Place the ramekins on the trivet – you should have enough space to fit them all in a single layer but if not you can stack them.
- Set vent to sealing and cook for 10 minutes at high pressure. Release the steam manually and remove them lava cakes from the cooker. If any condensation has collected on top of the cakes, pat it dry with kitchen paper.
- Leave to cool for a couple of minutes before serving. Carefully invert the lava cakes on plates (the moisture from the pressure cooker makes them really easy to release).
- Preheat your oven to 400°F / 200°C. Place the molds on a heavy baking tray (one that will not warp in the oven) and cook for 18-20 minutes. The lava cakes will rise slightly if they are very soft and squidgy on top you might need to cook them for a couple of minutes more.
- Leave to cool for two minutes. Carefully run a knife around the edge of the molds. Invert onto plates and serve.
- Preheat the air fryer to 350°F / 180°C. Place the molds in the air fryer basket and bake for 10-12 minutes until the lava cakes are set on top with a slight jiggle in the middle.
- Remove the lava cakes from the air fryer basket and leave them to cool for two minutes. Carefully run a knife around the edge of the molds. Invert onto plates and serve.
- Serve warm with a scoop of vanilla ice cream on the side and perhaps a little Baileys drizzled over.
