
Table of Contents
The Ultimate Weeknight Wonder: Crispy Japanese Katsu Bowls with Homemade Tonkatsu Sauce
Introduction: The Ultimate Comfort Bowl
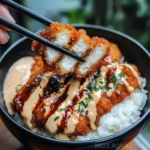
Imagine this: a bed of steaming, perfectly sticky white rice, topped with a golden-brown, impossibly crispy cutlet that shatters with each bite, all brought together by a rich, savory-sweet sauce that ties every element into pure harmony. This isn’t just a meal; it’s an experience. Welcome to your new favorite weeknight dinner: Japanese Katsu Bowls with Tonkatsu Sauce.
At Cooking With Emy, we believe the best recipes are those that feel like a treat but are simple enough for any night of the week. This katsu bowl recipe is exactly that. It brings the vibrant, comforting flavors of a Japanese restaurant right into your kitchen, with a process that’s surprisingly straightforward. “Katsu” refers to the breaded and fried cutlet, a technique introduced to Japan in the late 19th century that has since become a beloved staple. Paired with the iconic, umami-packed tonkatsu sauce, it’s a combination that’s stood the test of time for a very good reason.
Whether you choose tender chicken breast or juicy pork loin, the result is a satisfying, crunchy, and deeply flavorful dish that will have everyone asking for seconds. Let’s dive in and create some magic.
Why This Is The Best Katsu Bowl Recipe
You might find many katsu recipes online, but this one from The Kitchen Team is crafted for guaranteed success and maximum flavor. First, we emphasize the pounding technique. Getting your meat to an even ½-inch thickness isn’t just about cooking it evenly; it tenderizes the protein, ensuring every bite is succulent and never tough. Second, we champion the triple-breading station (flour, egg, panko). This isn’t a place to cut corners—it’s the sacred ritual that creates that signature, airy, and ultra-crispy crust that defines great katsu.
Most importantly, we provide a simple, 4-ingredient homemade tonkatsu sauce recipe that blows any store-bought version out of the water. The balance of tangy ketchup, complex Worcestershire, salty soy, and a hint of sugar creates a symphony of flavors that is the soul of the dish. This recipe also offers flexibility (chicken or pork!), clear frying instructions to avoid greasiness, and assembly tips for a picture-perfect bowl that’s as beautiful as it is delicious.
Ingredients & Substitutions
Gathering your mise en place (everything in its place) before you start cooking is the secret to a smooth, enjoyable katsu-making process. Here’s what you’ll need.
| Ingredient | Quantity | Notes & Possible Substitutes |
|---|---|---|
| Boneless chicken breasts or pork loin cutlets | 2 (about 6 oz each) | Pound to ½-inch thickness. Pork is traditional for “tonkatsu,” but chicken (“chicken katsu”) is equally popular and delicious. |
| Panko breadcrumbs | 1 cup | Do not substitute with regular breadcrumbs. Panko’s larger, flakier crumbs create a lighter, crispier texture. |
| All-purpose flour | ½ cup | Used for the initial dredge. For a gluten-free option, use a 1:1 GF flour blend. |
| Large eggs | 2 | Beaten well. This is the “glue” for the panko. |
| Cooked white rice (sushi rice preferred) | 3 cups | Short-grain sushi rice is ideal for its sticky texture. Jasmine or Calrose rice are great alternatives. |
| Neutral oil for frying (vegetable, canola, or peanut) | About 1-1.5 cups | Enough to reach ½-inch depth in your pan. Must have a high smoke point. |
| Ketchup | 3 tbsp | The base for the homemade tonkatsu sauce. |
| Worcestershire sauce | 2 tbsp | Provides deep, savory umami. Use a vegetarian Worcestershire if needed. |
| Soy sauce (regular or light) | 1 tbsp | Adds saltiness and depth. Use tamari for a gluten-free sauce. |
| Granulated sugar | 1 tsp | Balances the acidity. Adjust to taste. |
| Salt & Black Pepper | To taste | For seasoning the meat before breading. |
| Garnish: Fresh parsley, green onion, or shredded cabbage | Optional | Adds color, freshness, and a nice textural contrast. |
Step-by-Step Instructions
Follow these steps carefully for a flawless, restaurant-quality result right at home.
Step 1: Prepare the Meat
Place your chicken breasts or pork cutlets between two sheets of plastic wrap or in a large zip-top bag. Using a meat mallet, rolling pin, or even a heavy skillet, pound the meat evenly until it is about ½-inch thick throughout. This step is non-negotiable for even cooking and tenderness. Season both sides generously with salt and pepper.
Step 2: Set Up Your Breading Station
Get three shallow bowls or plates. In the first, place the ½ cup of all-purpose flour. In the second, beat the two eggs until uniform. In the third, spread out the 1 cup of panko breadcrumbs. This assembly line (dry-wet-dry) is crucial for a clean, even coating.
Step 3: Bread the Cutlets
Take one seasoned cutlet and dredge it thoroughly in the flour, shaking off any excess. Next, dip it into the beaten egg, allowing the excess to drip off. Finally, press it firmly into the panko breadcrumbs, turning and patting to ensure an even, complete coating. Place the breaded cutlet on a clean plate or wire rack and repeat with the remaining cutlet.
Step 4: Fry to Golden Perfection
In a large skillet (cast iron is excellent for this), heat about ½-inch of oil over medium-high heat until it reaches 350°F (175°C). Carefully lay the breaded cutlets into the hot oil. Do not overcrowd the pan; fry one at a time if necessary. Fry chicken for 3-4 minutes per side, or pork for 2-3 minutes per side, until deeply golden brown and cooked through. The internal temperature should reach 165°F (74°C) for chicken and 145°F (63°C) for pork. Transfer to a wire rack set over a baking sheet or a plate lined with paper towels to drain.
Step 5: Make the Tonkatsu Sauce
While the cutlets are frying or resting, make your sauce. In a small bowl, whisk together the 3 tablespoons ketchup, 2 tablespoons Worcestershire sauce, 1 tablespoon soy sauce, and 1 teaspoon sugar until smooth. Taste and adjust sweetness or saltiness to your preference. Let it sit for a few minutes to allow the flavors to meld.
Step 6: Assemble Your Bowls
Slice your crispy katsu against the grain into 1-inch strips. Divide the warm cooked rice between two bowls. Artfully arrange the sliced katsu over the rice. Drizzle generously with the homemade tonkatsu sauce. Garnish with finely sliced green onions or a sprinkle of parsley for a pop of color and freshness.
Serving & Presentation
A katsu bowl is a complete meal, but a few traditional sides can elevate it. A simple, tangy side of shredded cabbage dressed with a light rice vinegar dressing cuts through the richness beautifully. A small bowl of miso soup or a light green salad with ginger dressing makes for a perfect start. For a more authentic “teishoku” (set meal) experience, add a small portion of pickled vegetables (tsukemono) like daikon radish or cucumber.
When slicing the katsu for serving, always cut against the grain. This shortens the muscle fibers, making each piece incredibly tender and easy to eat with chopsticks. Present the sauce on the side for dipping, or drizzle it artistically over the top—both methods are acceptable and delicious!
Storage & Reheating
Storage: Store components separately for best results. Place cooled, uncut katsu in an airtight container in the refrigerator for up to 3 days. Store rice and sauce in separate containers.
Reheating: To recapture the crispiness, avoid the microwave for the katsu. Instead, reheat it in a toaster oven, conventional oven, or air fryer at 375°F (190°C) for 5-8 minutes, until hot and re-crisped. Reheat rice in the microwave with a sprinkle of water, covered, to restore moisture. The sauce can be used cold or gently warmed.
Delicious Recipe Variations
The beauty of this dish lies in its adaptability. Here are some fantastic ways to mix it up:
| Variation | How-To | Flavor Profile |
|---|---|---|
| Katsu Curry Bowl (Katsu Karē) | Replace tonkatsu sauce with a rich Japanese curry sauce. Serve the crispy katsu over rice and ladle the curry around it. | Hearty, spiced, deeply savory. |
| Cheese Katsu | Place a slice of mild cheese (like mozzarella or gouda) on the pounded cutlet before breading. Seal the edges well before frying. | Indulgent, gooey, extra-rich. |
| Vegetable Katsu (Ebi or Yasai Katsu) | Use thick slices of sweet potato, eggplant, or large peeled shrimp. Bread and fry using the same method. | Sweet, earthy, or briny—perfect for vegetarians or pescatarians. |
| Spicy Mayo Drizzle | Mix 2 tbsp mayo with 1 tsp sriracha and a squeeze of lime. Drizzle over the katsu alongside the tonkatsu sauce. | Creamy, tangy, with a kick of heat. |
Frequently Asked Questions (FAQ)
Can I bake the katsu instead of frying it?
Yes, for a lighter version. Place the breaded cutlets on a wire rack set over a baking sheet. Spray or brush generously with oil. Bake in a preheated oven at 425°F (220°C) for 15-20 minutes, flipping halfway, until golden and cooked through. The crust will be slightly less shatteringly crisp than deep-fried, but still delicious.
What’s the difference between tonkatsu sauce and Worcestershire sauce?
Tonkatsu sauce is a thicker, sweeter, and fruitier condiment specifically for katsu. Worcestershire sauce is a thinner, more pungent, and vinegary liquid used as a seasoning in many dishes. Our homemade tonkatsu sauce uses Worcestershire as a key ingredient, combined with ketchup and soy to create that distinct flavor.
Can I make this recipe gluten-free?
Absolutely! Use a 1:1 gluten-free flour blend for the dredge, ensure your panko is labeled gluten-free (made from rice), and use tamari instead of soy sauce in the tonkatsu sauce. Double-check that your Worcestershire sauce is gluten-free.
My panko isn’t sticking well. What did I do wrong?
This usually happens if you don’t shake off the excess flour or egg. Make sure the cutlet is evenly coated in flour, then let the excess egg drip off completely before moving to the panko. Press firmly and pat the panko onto the surface. Letting the breaded cutlet rest for 5-10 minutes before frying can also help the coating set.
Can I use an air fryer?
Definitely! It’s a great, less-messy option. Spray or brush the breaded cutlets generously with oil on both sides. Air fry at 400°F (200°C) for 10-12 minutes, flipping halfway, until golden and cooked through.
What can I use if I don’t have a meat mallet?
A heavy rolling pin, the bottom of a sturdy skillet, or even a wine bottle will work perfectly. The goal is to flatten the meat evenly, not pulverize it.
How do I know when my oil is hot enough without a thermometer?
Insert the handle of a wooden chopstick or spoon into the oil. If small bubbles immediately form around it and float up, the oil is ready. Alternatively, drop a few panko crumbs in; they should sizzle vigorously and brown in about 15 seconds.
Can I prepare the katsu ahead of time?
You can bread the cutlets and keep them refrigerated on a wire rack for up to 2 hours before frying. For longer prep, you can freeze the breaded, uncooked cutlets on a parchment-lined tray, then transfer to a freezer bag for up to a month. Fry directly from frozen, adding a couple extra minutes to the cooking time.
Share Your Creation!
We hope you love this Ultimate Japanese Katsu Bowl recipe as much as we do! It’s a dish that’s meant to be shared. Did you make it with chicken or pork? Did you try a fun variation? We’d love to see your beautiful bowls! Share your photos and tag us @cookingwithemy on social media.
Love This Recipe? Save It For Later!
Pin the image below to your Dinner Ideas or Japanese Recipes board on Pinterest so you always have this recipe handy. Follow us on Pinterest @cookingwithemy for more delicious inspiration!
[INSERT PIN-READY IMAGE OF FINISHED KATSU BOWL HERE]
Image Alt Text: Crispy golden Japanese chicken katsu bowl with homemade tonkatsu sauce drizzled over fluffy white rice, garnished with green onions.
Japanese Katsu Bowls with Tonkatsu Sauce
Description
Japanese Katsu Bowls with Tonkatsu Sauce are the ultimate comfort food, combining crispy, golden cutlets with fluffy rice and a savory-sweet sauce. This simple yet flavorful recipe is perfect for a quick weeknight dinner or an indulgent treat that feels like dining out.
Ingredients
Scale
- 2 boneless chicken breasts or pork loin cutlets (pounded to ½-inch thickness)
- 1 cup panko breadcrumbs
- ½ cup all-purpose flour
- 2 large eggs (beaten)
- 3 cups cooked white rice (sushi rice preferred)
- ½ cup tonkatsu sauce (store-bought or homemade*)
- Oil for frying (vegetable or canola)
- Fresh parsley or green onion for garnish (optional)
- 3 tbsp ketchup
- 2 tbsp Worcestershire sauce
- 1 tbsp soy sauce
- 1 tsp sugar
Instructions
- Pound chicken to ½-inch thickness and season with salt and pepper.
- Set up a breading station with three bowls: one for flour, one for beaten eggs, and one for panko breadcrumbs.
- Coat each cutlet in flour, then dip in egg, and finally coat with panko breadcrumbs, pressing gently to adhere.
- Heat oil in a large frying pan over medium-high heat to about 350°F (175°C).
- Fry the cutlets for 3-4 minutes per side (for chicken) or 2-3 minutes per side (for pork) until golden and cooked through. Transfer to a paper towel-lined plate.
- If making homemade tonkatsu sauce, mix ketchup, Worcestershire sauce, soy sauce, and sugar in a small bowl. Adjust sweetness to taste.
- Assemble bowls by adding cooked rice, sliced cutlets, and a generous drizzle of tonkatsu sauce. Garnish with parsley or green onions, if desired. Serve immediately.
