
Table of Contents
The Ultimate Weeknight Feast: Crispy Japanese Katsu Bowls with Homemade Tonkatsu Sauce
| Prep Time | 20 minutes |
| Cook Time | 15 minutes |
| Total Time | 35 minutes |
| Servings | 2 generous bowls |
| Difficulty | Easy |
Introduction: The Ultimate Comfort Food
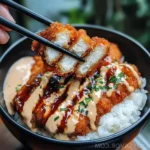
Imagine the satisfying crunch of a perfectly golden, crispy cutlet giving way to tender, juicy meat, all resting on a bed of steaming fluffy rice and smothered in a savory-sweet, umami-rich sauce. That’s the magic of Japanese Katsu Bowls with Tonkatsu Sauce. This dish, known as Katsudon in its classic egg-and-onion form, is a cornerstone of Japanese comfort food, beloved in homes and restaurants alike. At Cooking With Emy, we believe the best meals are those that deliver maximum flavor without maximum fuss. This recipe is exactly that—a simple yet spectacular weeknight dinner that feels like a special occasion. Whether you’re a seasoned home cook or just starting your culinary journey, mastering this Japanese katsu bowl recipe will give you a go-to dish that’s guaranteed to impress.
The beauty of katsu lies in its beautiful simplicity and perfect textural contrast. The word “katsu” is actually a shortened Japanization of the English word “cutlet.” While traditionally made with pork (tonkatsu), chicken katsu has become wildly popular for its lighter taste and quicker cooking time. Paired with the iconic, slightly tangy, and deeply savory tonkatsu sauce, it creates a harmony of flavors that is utterly addictive. In this guide, we’ll walk you through every step, from pounding the cutlet to the ideal crispness, to whipping up a quick homemade tonkatsu sauce that far surpasses any store-bought version. Get ready to bring the vibrant, comforting taste of a Japanese izakaya right to your dining table.
Why This Is The Best Katsu Bowl Recipe
You might find many recipes for Japanese katsu bowls online, but ours is crafted for guaranteed success and deep, authentic flavor. First, we emphasize the technique of proper pounding. This isn’t just about thinning the meat; it’s about tenderizing it and ensuring even cooking, so every bite is juicy, not dry. We also focus on the breading station method—a crucial step for achieving that signature, shatteringly crisp panko crust that stays put.
Second, we champion the homemade tonkatsu sauce. While convenient, store-bought versions can be overly sweet or contain preservatives. Our 4-ingredient homemade sauce, balanced with ketchup, Worcestershire, soy, and a touch of sugar, delivers a complex, tangy, and rich flavor profile that you can adjust to your personal taste. It makes all the difference.
Finally, our recipe provides flexibility. We give you the choice between chicken and pork, precise frying temperatures to avoid burning or undercooking, and serving suggestions to build a complete, nutritious, and visually stunning bowl. This isn’t just a recipe; it’s a masterclass in creating a perfect katsu experience at home.
Ingredients & Substitutions
Gathering the right ingredients is the first step to katsu perfection. Here’s what you’ll need, along with smart swaps for dietary needs or pantry limitations.
| Ingredient | Quantity | Notes & Substitutions |
|---|---|---|
| Boneless chicken breasts or pork loin cutlets | 2 (about 6 oz each) | Chicken: For a lighter option. Pork: For traditional tonkatsu. Pork chops work too. Can substitute with firm tofu or chicken thighs. |
| Panko breadcrumbs | 1 cup | Essential for crispiness. Do not substitute with regular breadcrumbs. For gluten-free, use gluten-free panko. |
| All-purpose flour | 1/2 cup | Helps the egg adhere. For gluten-free, use a 1:1 GF flour blend. |
| Large eggs, beaten | 2 | The “glue” for the panko. For an egg-free version, use a thick mixture of milk or plant-based milk and cornstarch. |
| Cooked white rice (sushi rice preferred) | 3 cups | Sushi rice is stickier and holds the bowl together. Jasmine or short-grain rice are excellent substitutes. |
| Vegetable or canola oil (for frying) | About 1-1.5 cups | Neutral oil with a high smoke point. Peanut or avocado oil also work well. |
| Ketchup | 3 tbsp | Base for the homemade sauce. Use a brand without high fructose corn syrup for best flavor. |
| Worcestershire sauce | 2 tbsp | Provides depth and umami. For a vegetarian sauce, use a vegetarian Worcestershire. |
| Soy sauce | 1 tbsp | Adds saltiness and savor. Use tamari for a gluten-free sauce. |
| Granulated sugar | 1 tsp | Balances the acidity. Can use honey or maple syrup. |
| Salt & Black Pepper | To taste | For seasoning the meat. |
| Fresh parsley or green onion (garnish) | Optional | For color and a fresh finish. Shredded cabbage is a classic side garnish. |
Step-by-Step Instructions
Follow these detailed steps for foolproof, restaurant-quality katsu. We’ve broken it down to make the process seamless and enjoyable.
| Step | Instructions | Visual Cue |
|---|---|---|
| 1. Prep the Meat | Place chicken breasts or pork cutlets between two sheets of plastic wrap. Using a meat mallet, rolling pin, or heavy skillet, pound evenly to a 1/2-inch thickness. This ensures quick, even cooking. Season both sides generously with salt and pepper. | Meat is uniformly thin and pliable. |
| 2. Set Up Breading Station | Set up three shallow bowls or plates in an assembly line. Place flour in the first, beaten eggs in the second, and panko breadcrumbs in the third. This “standard breading procedure” is key for an even coat. | Three distinct stations ready for dredging. |
| 3. Bread the Cutlets | Dredge each cutlet in flour, shaking off any excess. Next, dip fully into the beaten egg, allowing excess to drip off. Finally, press firmly into the panko, coating both sides and edges thoroughly. Gently press the panko to adhere. For extra crispiness (see Pro Tip), let rest on a wire rack for 5 mins, then repeat the egg and panko step. | Cutlet is fully coated with a textured, even layer of panko. |
| 4. Heat the Oil | In a large, heavy-bottomed skillet (cast iron is ideal), add oil to a depth of about 1/2 inch. Heat over medium-high heat to 350°F (175°C). Use a cooking thermometer for accuracy. The oil should shimmer but not smoke. | Oil reaches 350°F. A panko breadcrumb dropped in should sizzle immediately. |
| 5. Fry the Katsu | Carefully place the breaded cutlets into the hot oil. Do not overcrowd; fry one at a time if necessary. Fry chicken for 3-4 minutes per side, pork for 2-3 minutes per side, until deeply golden brown and cooked through. Internal temperature should reach 165°F for chicken, 145°F for pork. | Cutlet is a rich, golden brown and floats slightly in the oil. |
| 6. Drain & Rest | Transfer the fried cutlet to a wire rack set over a baking sheet (preferred) or a paper towel-lined plate. This keeps the bottom crisp. Let it rest for 3-4 minutes before slicing. | Cutlet is draining, not steaming, on the rack. |
| 7. Make the Sauce | While the cutlet rests, make the tonkatsu sauce. In a small bowl, whisk together the ketchup, Worcestershire sauce, soy sauce, and sugar until smooth. Taste and adjust sweetness or saltiness as desired. | Sauce is a smooth, deep brown color. |
| 8. Slice & Assemble | Slice the rested katsu against the grain into 1-inch wide strips. Divide warm rice between two bowls. Arrange the sliced katsu over the rice. Drizzle generously with the tonkatsu sauce. Garnish with chopped green onions or parsley. | Beautiful bowl with white rice, golden cutlet strips, and glossy sauce. |
Serving & Presentation
A katsu bowl is a complete meal, but the right accompaniments elevate it to a feast. The classic Japanese presentation includes a side of finely shredded cabbage, which adds a refreshing, crisp contrast to the rich katsu. A small mound of tangy Japanese potato salad or a simple miso soup makes for a perfect starter. For your bowl, consider adding a soft-boiled or onsen egg on top; the runny yolk creates a luxurious sauce when mixed with the rice and tonkatsu. A sprinkle of toasted sesame seeds or a drizzle of Japanese mayonnaise (Kewpie) adds another layer of flavor and texture. Serve with chopsticks and a spoon for the ultimate experience, and don’t forget a small dish of extra tonkatsu sauce for dipping!
Storage & Reheating
Storage: Store leftover components separately for best results. Place cooled, unsliced katsu in an airtight container in the refrigerator for up to 3 days. Store rice and sauce in separate containers. The breading will soften in the fridge but can be revived.
Reheating for Best Crispness: The oven or air fryer is your best friend. Oven: Preheat to 375°F. Place katsu on a wire rack over a baking sheet and heat for 10-12 minutes, until hot and crisp. Air Fryer: Reheat at 370°F for 4-6 minutes. Avoid the microwave, as it will make the crust soggy. Reheat rice separately with a splash of water, and warm the sauce gently on the stove or in the microwave.
Delicious Recipe Variations
The basic katsu bowl is a fantastic canvas for creativity. Here are some popular twists:
- Classic Katsudon: After frying, slice the katsu. In a small skillet, simmer 1/4 cup dashi, 1 tbsp soy sauce, and 1 tbsp mirin. Add a handful of sliced onions, then place the sliced katsu on top. Pour 1-2 beaten eggs over everything, cover, and cook until the egg is just set. Slide over rice.
- Curry Katsu: Serve the crispy katsu over rice with a generous ladle of rich Japanese curry sauce. A family favorite!
- Cheese Katsu: Place a slice of mild cheese (like mozzarella or gouda) on the pounded cutlet before breading. Fry as usual for a gooey, cheesy center.
- Vegetable Katsu: Use thick slices of sweet potato, kabocha squash, or even cauliflower steaks. Blanch harder veggies first for tenderness.
- Spicy Mayo Drizzle: Mix Japanese mayo with sriracha or chili crisp and drizzle over the top for a kick.
Frequently Asked Questions (FAQ)
Can I make Japanese katsu bowls ahead of time?
You can prep components ahead! Bread the cutlets and store them, separated by parchment paper, in the fridge for up to 4 hours before frying. You can also make the tonkatsu sauce up to a week in advance. Fry the katsu fresh for the best texture.
What’s the difference between panko and regular breadcrumbs?
Panko is made from crustless white bread, resulting in larger, flakier, drier crumbs. They create a lighter, airier, and crispier crust that doesn’t absorb as much oil. Regular breadcrumbs are finer and denser, leading to a heavier, sandier coating.
Can I use an air fryer for this recipe?
Absolutely! For air fryer katsu, spray the breaded cutlets generously with oil on both sides. Air fry at 400°F for 10-12 minutes, flipping halfway, until golden and cooked through. The result is excellent with less oil.
My tonkatsu sauce tastes too sweet/vinegary. How can I fix it?
Tonkatsu sauce should be balanced. If too sweet, add a dash more soy sauce or Worcestershire. If too tangy or sharp, add a tiny bit more ketchup or a pinch of sugar. Always adjust to your taste.
What can I serve with katsu bowls besides rice?
Shredded cabbage is the classic pairing. A simple cucumber salad, steamed broccoli, or edamame also work wonderfully. For a low-carb option, serve the katsu and sauce over a bed of shredded cabbage or mixed greens.
Is tonkatsu sauce the same as BBQ sauce or Worcestershire?
No, it’s unique. It’s thicker and fruitier than Worcestershire and less smoky and sweet than American BBQ sauce. It’s a distinct blend of fruits, vegetables, and spices with a savory-sweet profile.
How do I know when the oil is hot enough without a thermometer?
Use the wooden chopstick or spoon test: dip the handle into the oil. If steady, vigorous bubbles form around it immediately, the oil is ready (around 350°F). Alternatively, drop a single panko crumb in; it should sizzle and float to the top right away.
Can I freeze cooked katsu?
Yes, but with caution. Freeze cooked, cooled katsu on a parchment-lined sheet until solid, then transfer to a freezer bag for up to 2 months. Reheat directly from frozen in a 375°F oven or air fryer until hot and crisp throughout.
Share Your Creation!
We hope you love making and devouring these Crispy Japanese Katsu Bowls as much as we do! Did you try the double-dredge trick? Make your own sauce? Tag @cookingwithemy on social media and use the hashtag #CookingWithEmy so we can celebrate your kitchen victory with you. Your photos inspire our entire Kitchen Team!
Love This Recipe? Save It For Later!
Pin the image below to your Dinner Ideas or Japanese Recipes board on Pinterest so you always have this guide handy.
Follow us on Pinterest @cookingwithemy for more delicious inspiration daily!
📌 Save This Recipe on Pinterest
Japanese Katsu Bowls with Tonkatsu Sauce
Description
Japanese Katsu Bowls with Tonkatsu Sauce are the ultimate comfort food, combining crispy, golden cutlets with fluffy rice and a savory-sweet sauce. This simple yet flavorful recipe is perfect for a quick weeknight dinner or an indulgent treat that feels like dining out.
Ingredients
Scale
- 2 boneless chicken breasts or pork loin cutlets (pounded to ½-inch thickness)
- 1 cup panko breadcrumbs
- ½ cup all-purpose flour
- 2 large eggs (beaten)
- 3 cups cooked white rice (sushi rice preferred)
- ½ cup tonkatsu sauce (store-bought or homemade*)
- Oil for frying (vegetable or canola)
- Fresh parsley or green onion for garnish (optional)
- 3 tbsp ketchup
- 2 tbsp Worcestershire sauce
- 1 tbsp soy sauce
- 1 tsp sugar
Instructions
- Pound chicken to ½-inch thickness and season with salt and pepper.
- Set up a breading station with three bowls: one for flour, one for beaten eggs, and one for panko breadcrumbs.
- Coat each cutlet in flour, then dip in egg, and finally coat with panko breadcrumbs, pressing gently to adhere.
- Heat oil in a large frying pan over medium-high heat to about 350°F (175°C).
- Fry the cutlets for 3-4 minutes per side (for chicken) or 2-3 minutes per side (for pork) until golden and cooked through. Transfer to a paper towel-lined plate.
- If making homemade tonkatsu sauce, mix ketchup, Worcestershire sauce, soy sauce, and sugar in a small bowl. Adjust sweetness to taste.
- Assemble bowls by adding cooked rice, sliced cutlets, and a generous drizzle of tonkatsu sauce. Garnish with parsley or green onions, if desired. Serve immediately.
