Table of Contents: Your Katsu Journey
The Ultimate Japanese Katsu Bowls with Tonkatsu Sauce: Crispy, Savory, & Unforgettable
The Ultimate Comfort Food Awaits
Imagine the perfect bite: a shatteringly crisp, golden-brown cutlet, its juicy interior giving way to a bed of steaming, fluffy rice, all brought together by a rich, savory-sweet tonkatsu sauce that dances on your palate. This is the magic of Japanese Katsu Bowls, a dish that transforms simple ingredients into a symphony of texture and flavor that feels both indulgent and comforting. At Cooking With Emy, we believe the best meals are those that transport you, and this recipe is your first-class ticket to a bustling Tokyo tonkatsu-ya (pork cutlet shop) or a cozy Kyoto kitchen.

More than just “fried meat on rice,” a proper katsu bowl (katsudon can refer to a specific egg-topped version, but the bowl concept is widely loved) is a study in contrasts. It’s a dish where meticulous preparation meets ultimate satisfaction. While it may seem like restaurant fare, we’re here to prove that creating authentic, incredibly delicious Japanese Katsu Bowls with Tonkatsu Sauce at home is not only possible but surprisingly straightforward. With our tested method and pro tips, you’ll achieve that signature crunch and complex sauce flavor that will have everyone asking for seconds.
Why This Is The Best Katsu Bowl Recipe You’ll Find
What sets this recipe apart? It’s built on the foundational techniques used in Japanese kitchens, adapted for the home cook without any compromise on quality. First, we focus on the texture of the panko crust. Many recipes don’t emphasize the crucial step of properly toasting or frying the panko for maximum crunch and color. Our method ensures a light, airy, and deeply golden crust that stays crispy even when sauced. Second, we demystify the tonkatsu sauce. While store-bought is perfectly fine, our simple homemade version balances sweet, tangy, and umami in a way that outshines most bottled brands, using pantry staples you likely already have.
Furthermore, we provide the flexibility to use chicken or pork, with precise cooking times for each, so your protein is always perfectly cooked—never dry, never greasy. The assembly of the bowl is also key; it’s not just dumping components together. The order and technique matter for the optimal eating experience. This recipe is the culmination of testing and passion, designed to deliver a result that is truly worthy of being called “the ultimate.”
Gathering Your Ingredients
Quality ingredients lead to an exceptional dish. Here’s what you’ll need to create these iconic bowls. The beauty lies in the simplicity of the list.
| Ingredient | Quantity | Notes |
|---|---|---|
| Boneless Chicken Breasts or Pork Loin Cutlets | 2 (about 6 oz each) | Pounded to an even ½-inch thickness. Pork is traditional for tonkatsu, but chicken (chicken katsu) is a fantastic alternative. |
| Panko Breadcrumbs | 1 cup | Must be panko. Their large, flaky texture creates the signature airy crunch. Regular breadcrumbs will not yield the same result. |
| All-Purpose Flour | ½ cup | For the initial dredge. It helps the egg wash adhere. |
| Large Eggs | 2 | Beaten well. This is the “glue” for the panko. |
| Cooked White Rice | 3 cups | Short-grain sushi rice is preferred for its sticky, fluffy texture. Jasmine rice works in a pinch. |
| Neutral Oil for Frying | About 1-1.5 cups | Vegetable, canola, or peanut oil. You need enough for shallow frying, about ½-inch deep in your pan. |
| Salt & Black Pepper | To taste | For seasoning the meat. |
| For Homemade Tonkatsu Sauce (or use ½ cup store-bought): | ||
| Ketchup | 3 tbsp | Provides sweetness and body. |
| Worcestershire Sauce | 2 tbsp | The umami backbone. Use a good brand. |
| Soy Sauce | 1 tbsp | Adds depth and saltiness. Use low-sodium if preferred. |
| Granulated Sugar | 1 tsp | Balances the acidity. Adjust to your taste. |
| Optional Garnishes: Thinly sliced green onions, shredded cabbage, sesame seeds, fresh parsley. | ||
Step-by-Step Cooking Instructions
Follow these steps carefully for a foolproof, restaurant-quality result. Mise en place (having everything prepared) is your best friend here.
Prepare the Protein
Place your chicken breasts or pork cutlets between two sheets of plastic wrap. Using a meat mallet, rolling pin, or even a heavy skillet, pound them to an even ½-inch thickness. This ensures quick, even cooking and maximizes the surface area for that delicious crust. Season both sides generously with salt and pepper.
Set Up Your Breading Station
Get three shallow bowls or plates. In the first, place the all-purpose flour. In the second, beat the two eggs until uniform. In the third, place the panko breadcrumbs. This assembly line is crucial for a clean, efficient breading process.
Bread the Cutlets
Working with one cutlet at a time, dredge it thoroughly in the flour, shaking off any excess. Next, dip it into the beaten egg, coating it completely and allowing the excess to drip off. Finally, place it in the panko breadcrumbs, pressing down gently and sprinkling crumbs over the top to ensure a complete, even coating. Transfer the breaded cutlet to a clean plate and repeat with the remaining cutlet.
Heat the Oil & Fry
Pour oil into a large, heavy-bottomed skillet (cast iron is ideal) to a depth of about ½ inch. Heat over medium-high heat until it reaches approximately 350°F (175°C). You can test it by dropping a small panko crumb in; it should sizzle vigorously. Carefully place the breaded cutlets in the hot oil. Do not overcrowd the pan; fry in batches if necessary. Fry chicken for 3-4 minutes per side, or pork for 2-3 minutes per side, until deeply golden brown and cooked through. The internal temperature should reach 165°F for chicken and 145°F for pork.
Drain & Rest
Transfer the fried cutlets to a wire rack set over a baking sheet or a plate lined with paper towels. This allows air to circulate and keeps the bottom from getting soggy. Let them rest for 2-3 minutes before slicing. This rest period lets the juices redistribute.
Make the Tonkatsu Sauce (If Homemade)
While the cutlets rest, whisk together the ketchup, Worcestershire sauce, soy sauce, and sugar in a small bowl until the sugar is dissolved. Taste and adjust sweetness or saltiness to your preference. For a smoother sauce, you can let it sit for 10 minutes to allow the flavors to meld.
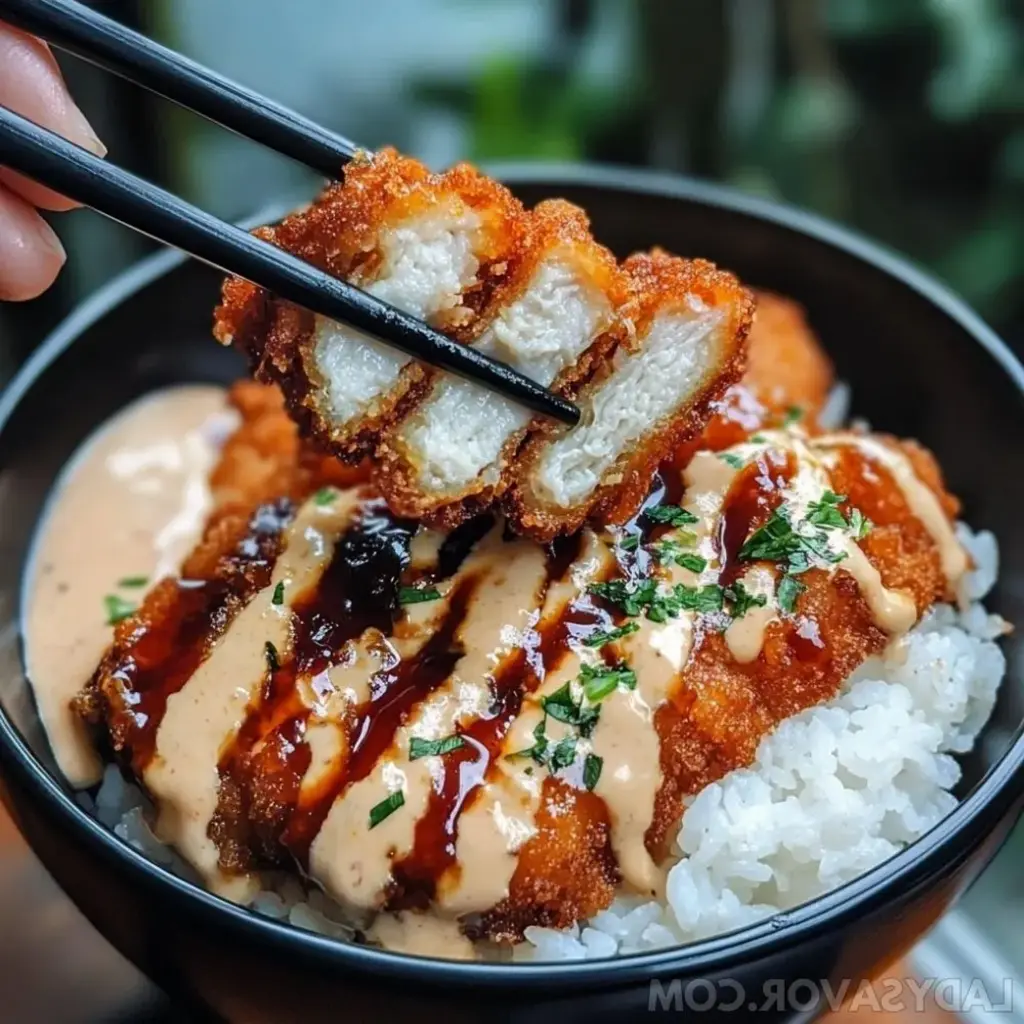
Slice & Assemble the Bowls
Slice the rested katsu cutlets against the grain into 1-inch wide strips. Divide the warm, cooked rice between two bowls. Arrange the sliced katsu over the rice. Drizzle generously with the tonkatsu sauce. Garnish with your chosen toppings like green onions or sesame seeds.
Serving & Presentation
Presentation is part of the joy of Japanese cuisine. Serve your katsu bowls immediately while the cutlets are hot and crisp. Alongside the bowl, traditional accompaniments include a small mound of finely shredded cabbage (which acts as a refreshing, crisp counterpoint), a wedge of lemon to squeeze over for brightness, and a small dish of extra tonkatsu sauce for dipping. For a more complete meal, consider starting with a simple miso soup or serving with a side of Japanese-style potato salad or pickled vegetables (tsukemono).
Storage & Reheating Tips
Storage: Store leftover components separately for best results. Place cooled, unsliced katsu cutlets in an airtight container in the refrigerator for up to 3 days. Store rice and sauce in separate containers.
Reheating for Best Crispness: The oven or air fryer is your friend. To reheat katsu, preheat your oven or air fryer to 375°F (190°C). Place the cutlets on a wire rack (to allow air flow) and heat for 8-12 minutes, or until hot and re-crisped. Avoid the microwave, as it will steam the crust and make it soggy. Reheat rice separately with a sprinkle of water, covered, in the microwave.
Delicious Recipe Variations
The katsu bowl is wonderfully adaptable. Here are some popular twists:
- Katsu Curry Bowl (Katsu Karē): Instead of tonkatsu sauce, smother the katsu and rice with a rich, thick Japanese curry sauce.
- Katsudon: After frying, simmer the sliced katsu in a mixture of dashi, soy, mirin, and sugar, then pour a beaten egg over the top. Cover until the egg is softly set, then serve over rice.
- Cheese Katsu: Insert a slice of melty cheese (like mozzarella or gouda) into a pocket in the pork cutlet before breading and frying.
- Vegetable Katsu: Use thick slices of sweet potato, eggplant, or even cauliflower steaks as the main component for a vegetarian version.
- Different Proteins: Try this with turkey cutlets or even firm tofu (pressed well) using the same method.
Your Katsu Questions Answered (FAQ)
| Question | Answer |
|---|---|
| Can I bake the katsu instead of frying? | Yes, for a lighter version. Place breaded cutlets on a wire rack over a baking sheet, spray generously with oil, and bake at 425°F (220°C) for 15-20 minutes, flipping halfway, until golden and cooked. The crust will be slightly less shatteringly crisp than fried but still delicious. |
| What’s the best substitute for panko? | There is no perfect 1:1 substitute. In a pinch, you can pulse regular breadcrumbs in a food processor to make them finer, but they will be denser. Crushed cornflakes or unsweetened cereal can provide crunch but offer a different flavor. |
| Can I make this gluten-free? | Absolutely. Use gluten-free all-purpose flour for dredging and certified gluten-free panko breadcrumbs (available at many stores). For the sauce, ensure your soy sauce, Worcestershire sauce, and ketchup are gluten-free brands, or use tamari instead of soy sauce. |
| How do I know when my oil is hot enough? | The ideal temperature is 350°F (175°C). Use a deep-fry or instant-read thermometer for accuracy. Without one, the “wooden chopstick test” works: dip the end of a wooden chopstick or spoon handle into the oil. If steady, vigorous bubbles form around it immediately, the oil is ready. |
| Why is my crust falling off? | This usually happens due to excess moisture or improper breading order. Ensure the cutlet is dry before flouring, shake off excess flour, let the excess egg drip off, and press the panko firmly onto the surface. Also, don’t move the cutlet in the oil for the first minute of frying to let the crust set. |
| Can I use an air fryer? | Yes! Spray the breaded cutlets liberally with oil on both sides. Air fry at 400°F (200°C) for 10-12 minutes, flipping halfway, until golden and cooked through. Results are excellent and much lower in oil. |
| What’s the difference between tonkatsu sauce and Worcestershire? | Tonkatsu sauce is a thicker, sweeter, fruitier, and more complex condiment that contains Worcestershire sauce as a base ingredient, along with fruits, vegetables, and spices. Worcestershire sauce alone is thinner, tangier, and less sweet. |
| How can I make the sauce spicier? | Add a pinch of cayenne pepper, a few drops of Sriracha, or a small amount of grated fresh ginger to the homemade sauce mixture. |
| Can I prepare the cutlets ahead of time? | You can bread the cutlets and refrigerate them on a parchment-lined tray, uncovered, for up to 2 hours before frying. This can actually help the coating set. For longer, freeze the breaded, uncooked cutlets on the tray, then transfer to a freezer bag for up to a month. Fry from frozen, adding a couple extra minutes per side. |
| Is this dish considered healthy? | As a fried dish, it’s an indulgent treat. You can make it healthier by using the baking or air frying method, choosing lean chicken breast, serving with a large portion of shredded cabbage or a side salad, and being mindful of the amount of sauce used. |
We hope you love creating these Ultimate Japanese Katsu Bowls as much as we do! It’s a dish that’s sure to become a regular in your dinner rotation.
Love This Recipe? Save It For Later!
Pin this image to your Dinner Ideas or Japanese Food board on Pinterest to always have this ultimate guide handy.
Follow us on Pinterest @cookingwithemy for more delicious inspiration!
Japanese Katsu Bowls with Tonkatsu Sauce
Description
Japanese Katsu Bowls with Tonkatsu Sauce are the ultimate comfort food, combining crispy, golden cutlets with fluffy rice and a savory-sweet sauce. This simple yet flavorful recipe is perfect for a quick weeknight dinner or an indulgent treat that feels like dining out.
Ingredients
Scale
- 2 boneless chicken breasts or pork loin cutlets (pounded to ½-inch thickness)
- 1 cup panko breadcrumbs
- ½ cup all-purpose flour
- 2 large eggs (beaten)
- 3 cups cooked white rice (sushi rice preferred)
- ½ cup tonkatsu sauce (store-bought or homemade*)
- Oil for frying (vegetable or canola)
- Fresh parsley or green onion for garnish (optional)
- 3 tbsp ketchup
- 2 tbsp Worcestershire sauce
- 1 tbsp soy sauce
- 1 tsp sugar
Instructions
- Pound chicken to ½-inch thickness and season with salt and pepper.
- Set up a breading station with three bowls: one for flour, one for beaten eggs, and one for panko breadcrumbs.
- Coat each cutlet in flour, then dip in egg, and finally coat with panko breadcrumbs, pressing gently to adhere.
- Heat oil in a large frying pan over medium-high heat to about 350°F (175°C).
- Fry the cutlets for 3-4 minutes per side (for chicken) or 2-3 minutes per side (for pork) until golden and cooked through. Transfer to a paper towel-lined plate.
- If making homemade tonkatsu sauce, mix ketchup, Worcestershire sauce, soy sauce, and sugar in a small bowl. Adjust sweetness to taste.
- Assemble bowls by adding cooked rice, sliced cutlets, and a generous drizzle of tonkatsu sauce. Garnish with parsley or green onions, if desired. Serve immediately.
