Table of Contents
Mini No-Bake Lemon Cheesecake Tarts: Your Secret to Effortless, Elegant Desserts
Imagine a dessert that captures the bright, sunny essence of lemon in a creamy, dreamy filling, all nestled in a buttery, crumbly crust—and requires zero oven time. That’s the magic of these Mini No-Bake Lemon Cheesecake Tarts. Perfect for baby showers, bridal luncheons, patio parties, or just because, these adorable two-bite treats are about to become your go-to recipe for wowing a crowd with minimal effort. Let’s make dessert both beautiful and easy.

Introduction: The Perfect Bite-Sized Sunshine
In the world of no-bake desserts, few things are as universally loved—and deceptively simple—as a good cheesecake. Now, shrink that down into a perfect, portable, pop-in-your-mouth package and infuse it with the vibrant, tangy flavor of fresh lemon. You’ve just envisioned these stunning mini no-bake lemon cheesecake tarts. They are the culinary equivalent of a ray of sunshine: instantly uplifting, refreshing, and guaranteed to bring smiles.
As The Kitchen Team, we’ve tested countless no-bake recipes, and this one stands out for its perfect balance. The filling is luxuriously smooth and creamy, yet light enough that you can happily enjoy two (or three!). The crust provides that essential textural contrast without being overly sweet. Best of all, this recipe is incredibly forgiving and adaptable, making it perfect for novice bakers and seasoned pros alike who want a stunning result without the stress of baking.
Why This Is The Best Mini No-Bake Lemon Cheesecake Tarts Recipe
You might be wondering what sets this recipe apart from other no-bake lemon desserts floating around the internet. We’ve engineered this version for maximum flavor and foolproof success.
1. The Ultimate Crust: We use a classic graham cracker base, but the technique of chilling it in a plastic-wrapped muffin tin is a game-changer. It creates firm, perfectly shaped shells that hold their structure when you lift them out, so you get a professional-looking tart every single time.
2. The Zest is Key: We use both fresh lemon juice and lemon zest. The zest contains potent citrus oils that deliver an intense, true lemon flavor without adding more liquid, which could thin the filling. This one step elevates the taste from “lemony” to “wow.”
3. The Cream Cheese Secret: Using fully softened cream cheese is non-negotiable. It blends seamlessly with the sugar and lemon, preventing any lumpy texture. We beat it first before adding other elements to ensure a silky-smooth base.
4. Stabilized Whipped Cream: Folding freshly whipped heavy cream into the cream cheese mixture does two things: it lightens the texture dramatically, and the fat in the whipped cream helps the filling set firmly as it chills. No gelatin needed!
Ingredients & Why They Matter
Simple ingredients, big impact. Here’s exactly what you need and the role each one plays. For best results, have all ingredients at room temperature unless otherwise specified.
| Ingredient | Quantity | Purpose & Notes |
|---|---|---|
| Graham Cracker Crumbs | 1 cup (5 oz) | Forms the classic, slightly sweet, and sturdy crust. You can buy pre-crushed or pulse whole crackers in a food processor. |
| Granulated Sugar (for crust) | 2 tbsp | Sweetens the crust and helps it caramelize slightly for structure. |
| Unsalted Butter, melted | 6 tbsp | The binder for the crust. Melted butter coats the crumbs and solidifies when chilled, creating a solid shell. |
| Cream Cheese, full-fat | 1 (8-oz) package | MUST be softened to room temperature. This is the rich, tangy base of the filling. Full-fat is essential for proper texture and setting. |
| Granulated Sugar (for filling) | 1/2 cup | Sweetens the filling and dissolves into the cream cheese for a smooth texture. |
| Fresh Lemon Zest | 2 tsp, divided | The star of the show! Provides intense, aromatic lemon flavor. We divide it to layer the flavor. |
| Fresh Lemon Juice | 2 tbsp | Adds the necessary tang and acidity to balance the sweetness. Always use freshly squeezed. |
| Heavy Whipping Cream | 1/3 cup | When whipped, it lightens the filling and adds structure. Ensure it’s cold for best whipping results. |
| Pure Vanilla Extract | 1/4 tsp | A flavor enhancer that rounds out the sharpness of the lemon and cream cheese. |
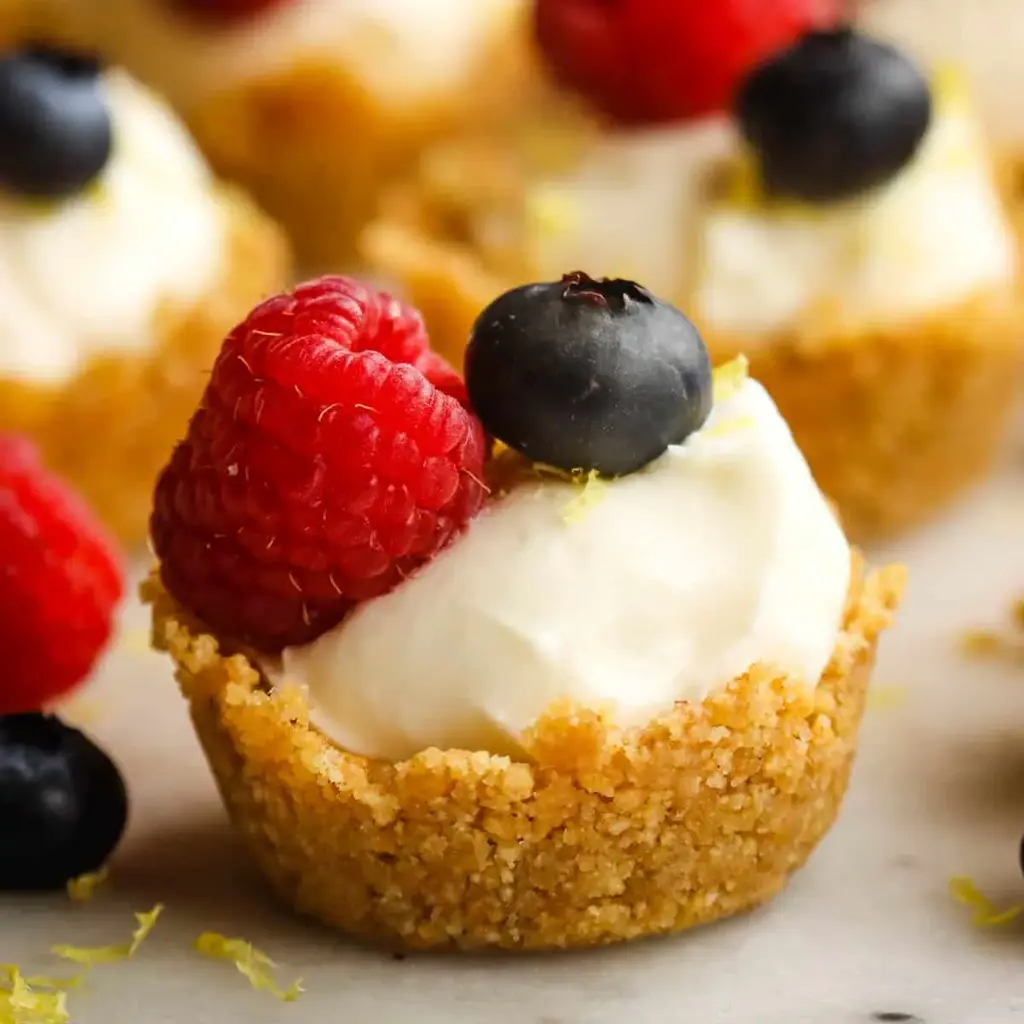
| Garnish (optional) | As desired | Fresh berries (blueberries, raspberries), a dollop of fruit preserves, mint sprigs, or extra lemon zest. |
Step-by-Step Instructions
Follow these detailed steps for perfect mini tarts. The process is straightforward, but the details make all the difference.
Part 1: Creating the Perfect No-Bake Crust
Step 1: Prepare the Pan. This is our secret weapon for easy removal. Take a standard 24-cup mini muffin pan. Tear off two large sheets of plastic wrap. Place them crosswise over the pan, pressing the wrap down into each cavity, working from the center outwards to eliminate air pockets. Leave plenty of overhang on all sides—this will act as your “handles” later.
Step 2: Mix the Crust. In a medium bowl, combine the 1 cup of graham cracker crumbs and 2 tablespoons of granulated sugar. Pour the 6 tablespoons of melted, slightly cooled butter over the top. Use a fork to mix until all the crumbs are evenly moistened and the mixture resembles wet sand.
Step 3: Form the Shells. Place a heaping tablespoon of the crumb mixture into each prepared mini muffin cup. Using your fingers, a small spoon, or a tamper, firmly press the crumbs onto the bottom and up the sides to form a compact, even shell. This pressure is crucial—it prevents the shells from crumbling later.
Step 4: Chill. Transfer the entire pan to the freezer for 15-20 minutes. This quick freeze solidifies the butter, setting the shells so they can be easily lifted out.
Part 2: Making the Luxurious Lemon Filling
Step 5: Whip the Cream. In a clean, cool medium bowl, combine the 1/3 cup of cold heavy whipping cream and the 1/4 teaspoon of vanilla extract. Using a hand mixer or stand mixer fitted with the whisk attachment, whip on medium-high speed until stiff peaks form. This means when you lift the beaters, the cream stands straight up. Set aside.
Step 6: Beat the Cream Cheese Base. In a separate, larger bowl, beat the softened (8-oz) block of cream cheese with a hand mixer or stand mixer on medium speed until completely smooth and creamy, about 1 minute. Scrape down the sides of the bowl. Add the 1/2 cup of granulated sugar and 1 teaspoon of the lemon zest. Beat again until fully combined and smooth.
Step 7: Incorporate Lemon. Add the 2 tablespoons of fresh lemon juice to the cream cheese mixture. Beat on low speed just until incorporated. Over-beating after adding the liquid can sometimes cause separation, so mix just until it’s uniform.
Step 8: Fold it All Together. Using a flexible spatula, add about one-third of the whipped cream to the cream cheese mixture. Gently fold it in to lighten the base. Then, add the remaining whipped cream and the remaining 1 teaspoon of lemon zest. Fold gently but thoroughly until no white streaks remain. The filling should be smooth, thick, and airy.
Part 3: Assembly & Final Chill
Step 9: Remove the Shells. Take the pan from the freezer. Grasp the overhanging plastic wrap on two sides and gently but firmly lift the entire grid of crusts out of the pan. Place them on a tray or cutting board.
Step 10: Fill the Tarts. You can use a small spoon, a piping bag fitted with a large round tip, or a zip-top bag with a corner snipped off. Fill each chilled shell with the lemon cheesecake filling, dividing it evenly among the 24 shells. Smooth the tops with the back of a spoon or an offset spatula.
Step 11: Set to Perfection. Carefully transfer the filled tarts (still on their plastic wrap) to a flat tray or plate. Cover lightly with more plastic wrap or place in a large airtight container. Refrigerate for at least 2 hours, or ideally 4-6 hours, to allow the filling to fully set and the flavors to meld.
Serving & Presentation Ideas
These tarts are a blank canvas for your creativity. Here are our favorite ways to serve them:
The Classic: Just before serving, top each tart with a single perfect raspberry, blueberry, or a small strawberry slice. A tiny mint leaf adds a pop of color.
Elegant Glaze: Warm a tablespoon of lemon curd or apricot preserves with a teaspoon of water. Brush a thin layer over the top of each set tart for a beautiful, glossy finish.
Party Platter: Arrange the tarts on a tiered stand or a large platter. Scatter edible flowers, lemon slices, and whole berries around the base for a stunning centerpiece.
Individual Portions: Place each tart in a mini paper liner for easy handling at a party or as a take-home treat for guests.
Storage & Make-Ahead Tips
Refrigeration: Store assembled tarts in a single layer in an airtight container in the refrigerator for up to 4 days. The crust will soften slightly over time but will still be delicious.
Freezing for Later: These tarts freeze exceptionally well! Place the filled and set tarts on a parchment-lined baking sheet and freeze until solid (about 2 hours). Then, transfer them to a freezer-safe bag or container. They will keep for up to 2 months. Thaw in the refrigerator for 2-3 hours before serving.
Make-Ahead Strategy: You can prepare the crust shells up to 2 days in advance. Keep them in the pan, covered tightly in the freezer. The filling can be made 1 day ahead and stored in a covered bowl in the fridge. Assemble and chill the day you plan to serve for the best texture.
Delicious Variations to Try
Once you’ve mastered the classic, the fun begins! Here are some twists from The Kitchen Team:
Berry Swirl: Before chilling, dollop a tiny bit of raspberry or strawberry jam on top of each filled tart and use a toothpick to swirl it gently into the filling.
Lime or Orange: Substitute lime zest/juice or orange zest/juice for the lemon. Orange pairs beautifully with a dark chocolate cookie crust.
Cookie Crust Alternatives: Use crushed vanilla wafers, gingersnaps, or shortbread cookies instead of graham crackers for a different flavor profile.
Mascarpone Version: Replace half of the cream cheese with mascarpone for an even richer, more Italian-inspired flavor.
Frequently Asked Questions
We hope you love making and sharing these Mini No-Bake Lemon Cheesecake Tarts as much as we do! They’re proof that the most impressive desserts don’t have to be complicated. If you make them, be sure to tag us @cookingwithemy on social media—we love seeing your creations!
📌 Love This Recipe? Save It For Later!
Pin the image below to your Desserts or Summer Recipes board on Pinterest to keep this easy, no-bake lemon tart recipe handy for your next celebration!
Follow us on Pinterest for more delicious inspiration: @cookingwithemy
[Imagine a beautiful, high-quality vertical image here showing a platter of these mini lemon tarts, garnished with berries and mint, in natural light.]
Mini Lemon Cheesecake Tarts
Description
With a light and tangy lemon cheesecake filling, these adorable mini cheesecake tarts are a perfect bite-size treat for any spring or summer celebration. They come together quickly, with no baking necessary, and can be garnished with any fruit you like!
Ingredients
Scale
- 1 cup graham cracker crumbs ((5 ounces, or 10 crackers crushed))
- 2 tablespoons granulated sugar
- 6 tablespoons unsalted butter (melted)
- 1 8-oz package cream cheese (softened)
- 1/2 cup sugar
- 2 teaspoons lemon zest (divided)
- 2 tablespoons lemon juice (freshly squeezed)
- 1/3 cup heavy whipping cream
- 1/4 teaspoon vanilla extract
- fresh fruit or fruit preserves for garnish
Instructions
- In a medium bowl, combine graham cracker crumbs and sugar. Add the melted butter and stir to combine.
- Line a 24-cup mini muffin pan with plastic wrap. Use two sheets, placed crosswise across the tin, with plenty of overhang as pictured in the post, and press plastic wrap down into each cavity, working from the inside out. Place a heaping tablespoon of graham cracker crumbs in each cavity and press onto bottom and sides with your fingers.
- Transfer to freezer to chill for 15-20 minutes while you make the filling. Gently lift the plastic wrap to remove the tart shells from the pan.
- In a medium bowl, beat together the cream cheese, lemon zest, lemon juice, and sugar.
- In a separate medium bowl, whip the whipping cream and vanilla to stiff peaks. Fold the whipped cream into the cream cheese mixture until combined
- Spoon a dollop of filling into each tart shell. Chill the tarts for about two hours to firm up the filling and shell before serving. Garnish with remaining zest and fruit as desired and serve chilled.
