Indulge in a Decadent Peanut Butter Chocolate Layer Cake: A Perfect Dessert!
Indulge your taste buds with this incredible Peanut Butter Chocolate Layer Cake, a dessert that embodies the perfect balance of rich chocolate and creamy peanut butter. This layered cake brings a delightful combination of flavors that will have everyone asking for seconds. Each bite melts in your mouth, delivering a sweet and savory experience that tantalizes and delights. Whether for a birthday celebration or just a regular day that needs a lift, this cake adds a special touch to any occasion.
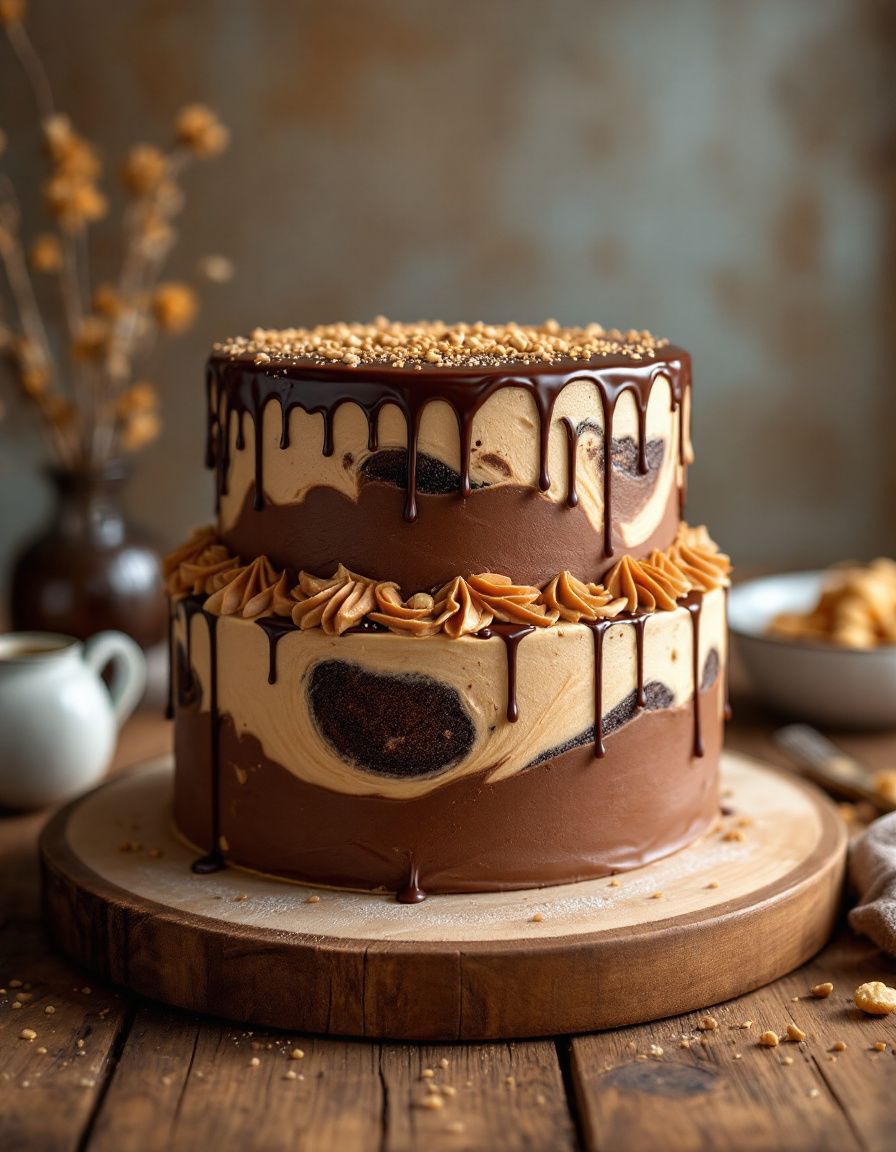
Imagine slicing through layers of moist chocolate cake, which is perfectly complemented by a smooth, velvety peanut butter frosting. The rich aroma of baked chocolate mingles with the unmistakable scent of roasted peanuts, making this treat irresistible. Not only does this cake look stunning when served, with its elegant layers and glossy frosting, but it also tastes divine, combining nostalgia and gourmet sophistication in every mouthful.
Quick Recipe Highlights
- Flavor Profile: This cake features a luscious chocolate base paired with a creamy peanut butter frosting that creates a heavenly taste that is both satisfying and indulgent.
- Texture: The moist layers of chocolate cake contrast beautifully with the fluffy, rich frosting, offering a delightful mouthfeel that keeps you coming back for more.
- Aroma: The cake emits a wonderful aroma of sweet chocolate and nutty peanut butter, enticing anyone nearby to take a slice.
- Visual Appeal: With its dark chocolate layers and a generous swirl of creamy, light-colored peanut butter frosting, this cake is both eye-catching and inviting.
- Skill Level Needed: While slightly advanced, the cake is approachable for someone with basic baking skills, making it a great project for enthusiastic bakers.
- Special Equipment: You’ll need two 9-inch cake pans and a stand mixer or electric mixer to achieve the perfect texture and consistency.
Recipe Overview
- Difficulty Level: This Peanut Butter Chocolate Layer Cake is classified as medium difficulty, requiring patience and attention during baking and frosting to achieve optimal results.
- Category: This dessert fits perfectly into special occasion sweets, ideal for birthdays, anniversaries, or family gatherings.
- Cuisine: This cake draws inspiration from American classic desserts, showcasing the beloved combination of chocolate and peanut butter that has captured hearts across the nation.
- Cost: The approximate cost for the ingredients is modest, making it affordable for many, especially given its crowd-pleasing nature.
- Season: This cake is perfect year-round but shines particularly during fall and winter celebrations, as its richness complements festive vibes.
- Occasion: It’s particularly well-suited for celebrations such as birthdays or holiday gatherings, offering a delightful treat that brings joy to any table.
Why You’ll Love This Recipe
The Peanut Butter Chocolate Layer Cake is not a mere dessert; it’s a celebration of flavors that delights your palate with its rich composition. The sweetness of the cake intertwines with the nutty tones of peanut butter, creating a perfect harmony that dances on your taste buds. Each slice is a balance of decadence and comfort, making it an ideal indulgence. You’ll find that the layers not only provide an aesthetic charm but also enhance every bite with distinct textures.
Convenience is another reason to cherish this recipe. Although it requires some steps, the process itself is straightforward, even for novice bakers. This cake can be made in advance, allowing you to focus on other aspects of your gathering without the stress of last-minute baking. The ingredients are commonly found, making it accessible and easy to whip up.
The nutritional aspects are often overlooked when it comes to desserts, but this cake includes wholesome ingredients such as eggs and peanut butter, which contribute protein and essential nutrients. While it is indulgent, sharing a slice can be a delightful treat without compromising your health goals when enjoyed in moderation.
This cake is a joy to serve at gatherings, functioning as a centerpiece that sparks conversation and delight among family and friends. The shared experience of enjoying a slice cultivates warmth and togetherness, making it an exceptional addition to your dessert repertoire.
Cost-effectiveness is an added bonus; this recipe allows you to create a rich, elaborate cake that can serve many without breaking the bank. It’s an inviting choice for bakers aiming to impress their guests without resorting to expensive store-bought cakes.
Historical Background and Cultural Significance
The origins of the Peanut Butter Chocolate Layer Cake can be traced back to an American culinary tradition that celebrates the combination of chocolate and peanut butter. This classic pairing has roots in early American history, with peanut butter becoming widely popular in the early 20th century. As desserts evolved, the combination found its way into various recipes, becoming a favorite choice for many home bakers. The cake represents a fusion of flavors that resonates deeply within American culture.
Culturally, this cake signifies comfort and celebration. Many families have their own versions, passed down through generations, often serving as a centerpiece during birthdays and holidays. The enticing flavors invoke nostalgic memories of joyful gatherings, where friends and family unite over shared sweets, deepening the cake’s significance.
Through the years, the recipe for this cake has evolved, with various adaptations appearing, such as gluten-free or vegan versions, as dietary preferences and health consciousness have grown. Its flexibility keeps it relevant, appealing to current culinary trends while retaining its traditional charm.
Regional variations often introduce local flavors or additional ingredients, resulting in an exciting range of adaptations to suit different palates and enhance the delightful experience of this beloved dessert. Whether prepared with different types of chocolate or embellishments like nuts and caramel, the fundamental appeal of the Peanut Butter Chocolate Layer Cake endures.
Ingredient Deep Dive
- Flour: Essential for structure, all-purpose flour provides the base of the cake. It has a long history in baking and contributes to the cake’s lightness. When selecting flour, opt for high-quality brands with consistent performance. Store in a cool, dry place, and it can last several months. For gluten-free baking, alternatives like almond or coconut flour can provide different textures.
- Cocoa Powder: Used for its rich chocolate flavor, cocoa powder enhances both the taste and color of the cake. It has roots in ancient civilizations that first cultivated cacao. When selecting cocoa powder, look for unsweetened and use it within six months of opening for the best flavor. Storage is simple—keep it in a cool environment. Dutch-processed cocoa can be a substitute for a milder taste.
- Granulated Sugar: This ingredient is critical for sweetness and moisture retention. Sugar has a prominent place in baking and is used worldwide. It’s best to use white or caster sugar for cakes, as they dissolve easily. Store it in an airtight container to avoid clumping. For alternatives, brown sugar adds moisture while giving a different flavor profile.
- Peanut Butter: The star of this recipe, peanut butter contributes both flavor and creaminess, creating a delectable frosting. Its history traces back over a century in the U.S. For the best flavor, choose natural peanut butter without added sugars or preservatives. It can be stored at room temperature if usages are frequent. Alternatives include almond butter or Nutella for a nutty twist.
- Eggs: They are essential for binding and provide moisture, richness, and flavor. Eggs play a significant role in baking and have been used for centuries. Look for fresh eggs with intact shells. They can be stored in the refrigerator for several weeks. If an alternative is needed, use flaxseed meal mixed with water as a binder.
- Butter: Used in the cake and frosting for richness, butter creates a delightful texture. It has been integral to desserts for centuries. Use unsalted butter for better control over the cake’s overall taste; it can be stored in the fridge for up to four months. For a lighter alternative, consider using vegetable oil, which can yield a different texture.
Common Mistakes to Avoid
- Not checking the freshness of ingredients can lead to baking failures; always verify the expiration dates on your ingredients, especially baking powder and flour for optimal results.
- Overmixing batter results in a dense cake; mix just until combined to ensure a light and airy texture.
- Underbaking can leave the cake gooey in the center; always test doneness with a toothpick inserted in the center, which should come out clean.
- Inaccurate measuring can alter the cake; always use proper measuring cups for dry and wet ingredients to maintain balance.
- Skipping the cooling time can lead to structural failure; allow the cake layers to cool properly before frosting to prevent melting or sliding.
- Using cold ingredients can affect the batter’s texture; make sure butter and eggs are at room temperature for smoother mixing.
- Ignoring oven temperature discrepancies may cause poor results; invest in an oven thermometer to ensure proper baking conditions.
- Not leveling the cake layers may create an uneven stack; use a serrated knife to trim the tops of the layers for a more polished finish.
- Skipping taste testing the frosting can make for a bland finish; ensure the peanut butter frosting is balanced in sweetness and peanut flavor for the best outcome.
Essential Techniques
– **Creaming Butter and Sugar**: This technique is essential for incorporating air into the batter, which helps achieve a light cake texture. To master it, ensure your butter is softened, and beat until fluffy and pale. Avoid overmixing, and look for a creamy consistency as a visual cue.
– **Folding Ingredients**: When incorporating dry and wet ingredients or adding whipped eggs, folding helps retain air without deflating the mixture. Practice a gentle scooping motion, turning the bowl as you go. If the batter remains light and airy, you’ve mastered the technique.
– **Layering the Cake**: When assembling your cake, use a turntable for even frosting and stacking. Start with a cooled bottom layer and spread frosting evenly. Use a bench scraper for smooth edges, and visually check for symmetry as you layer.
– **Storing Leftovers**: Properly storing leftover cake is key to maintaining taste and texture. Use an airtight container or wrap slices tightly in plastic wrap, ensuring freshness. Look for signs of spoilage, such as mold or off-smells, before consuming.
Pro Tips for Perfect Peanut Butter Chocolate Layer Cake
– Always use room temperature ingredients for a smoother batter; this ensures even mixing and better consistency.
– Chill your peanut butter frosting before spreading for an easier application that achieves a clean finish.
– Add an extra layer of chocolate ganache for additional richness and an elegant finish.
– Use high-quality cocoa powder for the best chocolate flavor; it can significantly impact the cake’s overall taste.
– Test your oven for hot spots by baking a small batch of cookies; this helps ensure even baking for your cake layers.
– Consider toasting your flour briefly in the oven before use; this can deepen the flavor profile of your cake.
Variations and Adaptations
– **Regional Variations**: In the South, adding a layer of banana-flavored filling between the cakes can add a unique twist and introduce a delightful sweetness that complements the peanut butter.
– **Seasonal Adaptations**: In the fall, incorporating spices like cinnamon and nutmeg into the cake batter can provide a warm, comforting flavor that aligns beautifully with the season.
– **Dietary Modifications**: For a gluten-free version, substitute all-purpose flour with almond flour, ensuring that the proportions are adjusted for density.
– **Flavor Variations**: Add complimentary flavors like a hint of coffee in the chocolate cake for enhanced depth and richness.
– **Texture Modifications**: For added crunch, sprinkle chopped peanuts between the layers for added texture and flavor contrast.
– **Presentation Alternatives**: For a modern touch, consider a drip cake design with melted chocolate running down the sides for a stunning visual impact.
Serving and Presentation Guide
Serving your Peanut Butter Chocolate Layer Cake can be both a delightful and visual experience. Begin by placing the cake on a decorative plate that accentuates its rich colors. Use a serrated knife to slice through the layers cleanly, ensuring your portions are even. Garnishing with a dusting of cocoa powder or chocolate shavings creates an inviting appeal.
For garnishing, consider using fresh berries or mint leaves on the side, adding a pop of color and freshness that contrasts with the richness of the cake. Traditionally, a dollop of whipped cream can enhance servings, providing a lightness to balance the flavors. Serve at room temperature for the optimal taste experience, as this allows for the frosting’s creaminess to shine.
Temperature considerations are vital—cool cakes hold their shape better. Avoid layering warm cakes, as the frosting may melt. As for portion control, consider cutting smaller slices that can entice guests to enjoy a second helping without feeling overindulged.
Wine and Beverage Pairing
When pairing beverages with your Peanut Butter Chocolate Layer Cake, consider rich, bold flavors that can stand up to the dessert. A full-bodied red wine, such as a Cabernet Sauvignon or a Zinfandel, complements the chocolate beautifully. The tannins in red wine enhance the cake’s richness while mellowing the sweetness.
For non-alcoholic pairings, a rich, dark hot chocolate could provide a deliciously decadent experience. Alternatively, coffee lovers will appreciate a robust espresso, offering a lovely balance with the cake’s flavors. It’s also recommended to serve chilled beverages, such as iced coffee or sweet tea, which can provide a refreshing contrast.
When serving wine, ensure it is slightly below room temperature to highlight the flavors without overwhelming the palate. Provide options that best suit your audience, giving them the freedom to explore combinations with each slice of cake.
Storage and Shelf Life
To keep your Peanut Butter Chocolate Layer Cake fresh, store it in an airtight container at room temperature for up to three days. If you’d like to extend its shelf life, refrigeration is an option, but be aware it may cause the frosting to harden; consider letting it return to room temperature before serving.
For long-term storage, this cake can be frozen. Wrap well in plastic wrap and then in aluminum foil. It can be stored in the freezer for up to three months, ensuring your cake stays fresh. Always label your storage containers to keep track of dates and contents.
As for signs of spoilage, check for unusual smells or signs of mold. During reheating, consider warming individual slices in the microwave for a few seconds to renew their soft texture. If stored properly and monitored regularly, enjoying your cake days later can still yield a delightful experience.
Make Ahead Strategies
To streamline your baking process, consider preparing your Peanut Butter Chocolate Layer Cake in stages. A suggested prep timeline includes baking the cake layers one or two days in advance. Store them tightly wrapped to retain moisture, making assembly on the day of serving a breeze.
When it comes to frosting, you can prepare the peanut butter mixture ahead of time. Chilling the frosting enhances its spreadability, allowing for easier application. A great quality control measure is to make sure all components are adequately cooled before assembly, which ensures a clean look.
Quality impact assessment shows that cakes can sometimes taste even better the day after they are assembled, as flavors meld together beautifully. Reheating guidelines state that if refrigerated, letting your cake sit at room temperature for about a half-hour will improve the frosting’s consistency.
You may also consider adding fresh elements, such as whipped cream or a fresh fruit garnish, right before serving to retain a fresh flavor and texture contrast.
Scaling Instructions
When scaling your Peanut Butter Chocolate Layer Cake, halving the recipe is straightforward; simply divide each ingredient by two while maintaining the same baking temperature. Doubling or tripling requires careful adjustment; for example, increase the baking time slightly while monitoring the center for doneness.
Equipment adjustments may be necessary as well. For larger batches, ensure your mixing bowl can accommodate all ingredients without overflow, and consider using multiple pans. Timing modifications are crucial; keep a close eye on cakes, especially as size increases, requiring slightly longer baking times.
For storage considerations, larger cakes may not fit in standard-sized containers; ensure you have ample space or use cake boxes for safekeeping. Documenting ingredient adjustments and any notable changes during the baking process can aid future scaling success.
Nutritional Deep Dive
Understanding the nutritional breakdown of your Peanut Butter Chocolate Layer Cake is essential for making informed choices. A standard slice contains a reasonable amount of carbohydrates from sugar and flour, offering a quick source of energy. In terms of fats, healthy fats from peanut butter provide a satisfying component.
A micronutrient analysis reveals that the peanut butter offers protein, magnesium, and vitamin E, adding beneficial qualities to the dessert. When considering dietary considerations, it’s important to enjoy this cake in moderation because of its higher calorie content, especially in larger servings.
Portion analysis indicates that a standard serving is about one-twelfth of the cake, which helps keep calorie intake reasonable while still allowing for enjoyment. Weight management tips suggest balancing sweet treats with whole foods in other meals to maintain a healthy lifestyle.
Dietary Adaptations
For gluten-free dessert lovers, consider using high-quality gluten-free flour blends; they can effectively replace regular flour while maintaining a similar texture. To create a dairy-free version, substitute butter with coconut oil and use almond milk instead of regular milk in the batter.
Vegan adaptations can replace eggs with flaxseed meal or applesauce, and ensure the peanut butter frosting is free from dairy-based ingredients. Furthermore, for those following low-carb or keto diets, a sugar substitute like erythritol and an almond flour base can make this cake an option.
Other specific diets, such as paleo, can easily be addressed by using natural sweeteners like honey or maple syrup. Be sure to keep an eye on portion sizes, no matter what adaptation you choose.
Troubleshooting Guide
If texture issues arise, such as a dense cake, it may be due to overmixing. Ensure your batter is mixed just enough to combine, avoiding excess agitation. If flavors seem off, consider that you may have added too much salt or under-measured the sugar; adjusting them in future batches will enhance the flavor.
Temperature problems can often be traced back to improper oven calibration. If your cake is cooking unevenly, invest in an oven thermometer to monitor actual temperatures. For equipment challenges, remember that every oven bakes differently; adjusting the rack position can ensure even cooking.
If ingredient substitutions lead to unanticipated results, keep detailed notes on adjustments made, so you can learn what works best for your alterations. Timing concerns during baking might arise if layers are too thick or too thin; always check for doneness with a toothpick to avoid surprises.
Recipe Success Stories
Community feedback on the Peanut Butter Chocolate Layer Cake often reflects a theme of joy and satisfaction. Many bakers have reported back with glowing reviews, praising its reliable outcome and delicious flavor. Readers have shared their own adaptations and variations, such as adding crushed cookies in the frosting for a delightful crunch.
These success stories illustrate the versatility of the cake, with modifications that range from adding spices to experimenting with different frosting techniques. Photography tips often highlight the importance of good lighting to ensure the cake’s beautiful layers and rich frosting are well captured. This encourages more bakers to join in on the fun, sharing their delightful experiences and beautiful cakes.
Social media buzz also surrounds this recipe, with community members posting their own twists and serving suggestions. The sharing of photography alongside the cake results in a vibrant exchange of ideas and creativity within the kitchen.
Frequently Asked Questions
Can I make this cake gluten-free?
Absolutely! You can substitute the all-purpose flour for a gluten-free flour blend. Ensure that the blend contains a binding agent, such as xanthan gum, which can mimic the texture of gluten in baking.
How do I prevent my cake from sinking in the middle?
Sinking often occurs when cakes are underbaked or if the oven temperature is too low. Always ensure that your cake is fully cooked by using a toothpick or cake tester to check for doneness before removing it from the oven.
Can I freeze the cake after baking?
Yes, you can freeze the cake layers individually by wrapping them tightly in plastic wrap and aluminum foil. This keeps them fresh for up to three months, allowing for future enjoyment at a later time.
What’s the best way to store leftovers?
Store leftover cake in an airtight container at room temperature for up to three days. If you plan to keep it longer, refrigerate it to ensure freshness, though the texture may change slightly.
Can I substitute the peanut butter for another nut butter?
Definitely! You can replace peanut butter with almond butter, cashew butter, or sunflower seed butter. Just be aware that this may result in a different flavor and texture.
How can I make the frosting less sweet?
If you find the frosting too sweet, consider adding a pinch of salt or incorporating a bit of cream cheese, which can balance the sweetness without overpowering the peanut butter flavor.
What is the best way to frost the cake?
Start with a crumb coat to seal in any loose crumbs, chill the cake briefly, then apply your final layer of frosting evenly with a spatula for a polished look. A turntable can help achieve even frosting.
Is it okay to use natural peanut butter?
Yes, natural peanut butter works well, but it may be a tad runnier than traditional varieties. Just ensure it’s well-stirred before measuring to ensure consistency in your frosting.
Can I add additional flavors to the cake?
Yes, you can easily add flavorings like vanilla extract or espresso powder to enhance the chocolate flavor. Just be mindful to adjust ingredient ratios for balance.
What if I overbake the cake?
If the cake is overbaked, it may turn dry or crumbly. Monitor baking times closely and use a toothpick to avoid this issue, taking it out of the oven as soon as it comes clean.
How do I get even layers for my cake?
Using a scale to measure batter helps ensure that each layer has the same amount. Level off the tops with a serrated knife if they dome to aid in stacking for a straight finish.
Additional Resources
For those who want to dive deeper into baking, consider exploring related recipes that complement this Peanut Butter Chocolate Layer Cake, such as classic chocolate cupcakes or peanut butter cookies. Technique guides on layering cakes or mastering frostings can further enhance your dessert baking skills.
Ingredient-specific information on chocolate varieties and nut butters can provide insights into how to pick the best products for your creations. Equipment recommendations sold in baking supplies can also make a significant difference in your baking experience, from proper mixers to high-performing bakeware.
Seasonal variations can inspire your baking creativity throughout the year, helping you adapt this rich cake to each festive occasion. Discover how to switch flavors with strawberries in the spring or pumpkin in the fall as you become more adventurous in your baking journey.
Join the Conversation
We’d love for you to share your thoughts on this Peanut Butter Chocolate Layer Cake! Engage with us on social media by posting your success stories and delectable photographs. Your reviews help other bakers make informed decisions and inspire new creations while connecting with a community of like-minded dessert lovers.
Photography tips, like natural lighting and various angles, can make a significant difference in showcasing your finished cake. Whether you add unique twists or stick to the classic recipe, we invite you to share how this cake became a part of your culinary experience. Let’s celebrate the joy of baking together!
The Recipe
Peanut Butter Chocolate Layer Cake
Serves: 12 servings
Prep Time: 30 mins
Cook Time: 25 mins
Total Time: 55 mins
Kitchen Equipment Needed
- Two 9-inch round cake pans
- Mixing bowls
- Electric mixer or stand mixer
- Measuring cups and spoons
- Spatula
- Cooling rack
Ingredients
- 2 cups all-purpose flour
- 1 ¾ cups granulated sugar
- ¾ cup unsweetened cocoa powder
- 1 ½ tsp baking powder
- 1 ½ tsp baking soda
- 1 tsp salt
- 2 large eggs
- 1 cup whole milk
- ½ cup vegetable oil
- 2 tsp vanilla extract
- 1 cup boiling water
- 1 cup creamy peanut butter
- ½ cup unsalted butter, softened
- 2 cups powdered sugar
- ¼ cup milk (for frosting)
Directions
- Preheat your oven to 350°F (175°C) and grease the cake pans.
- In a large bowl, mix flour, sugar, cocoa powder, baking powder, baking soda, and salt.
- Add eggs, milk, oil, and vanilla, and mix until well combined.
- Gradually add boiling water, stirring until smooth.
- Pour the batter evenly into the prepared pans and bake for 25-30 minutes.
- Once baked, allow the cakes to cool in the pans for 10 minutes before transferring them to a cooling rack.
- For the frosting, beat peanut butter and softened butter until creamy. Gradually add powdered sugar and milk, mixing until smooth.
- Once the cakes are completely cool, spread a layer of frosting between the layers, and cover the top and sides of the cake.
- Decorate as desired and serve to delighted guests!
Recipe Notes
- The cake layers can be made ahead and stored in the fridge for up to three days before frosting.
- For a richer chocolate experience, consider adding chocolate chips to the batter.
- Feel free to freeze any leftovers, ensuring it’s well-wrapped to maintain freshness.
