Purple Velvet Cake Recipe: A Delightful Twist on Classic Velvet Cakes
This Purple Velvet Cake Recipe is a stunning tribute to the classic velvet cake but infused with a unique purple hue that will enchant your guests. Ideal for special occasions, this cake features layers of rich, velvety texture balanced with a subtle sweetness and tangy cream cheese frosting. Each slice offers a delightful taste experience that combines lightness and richness, making it a showstopper at celebrations or family gatherings.
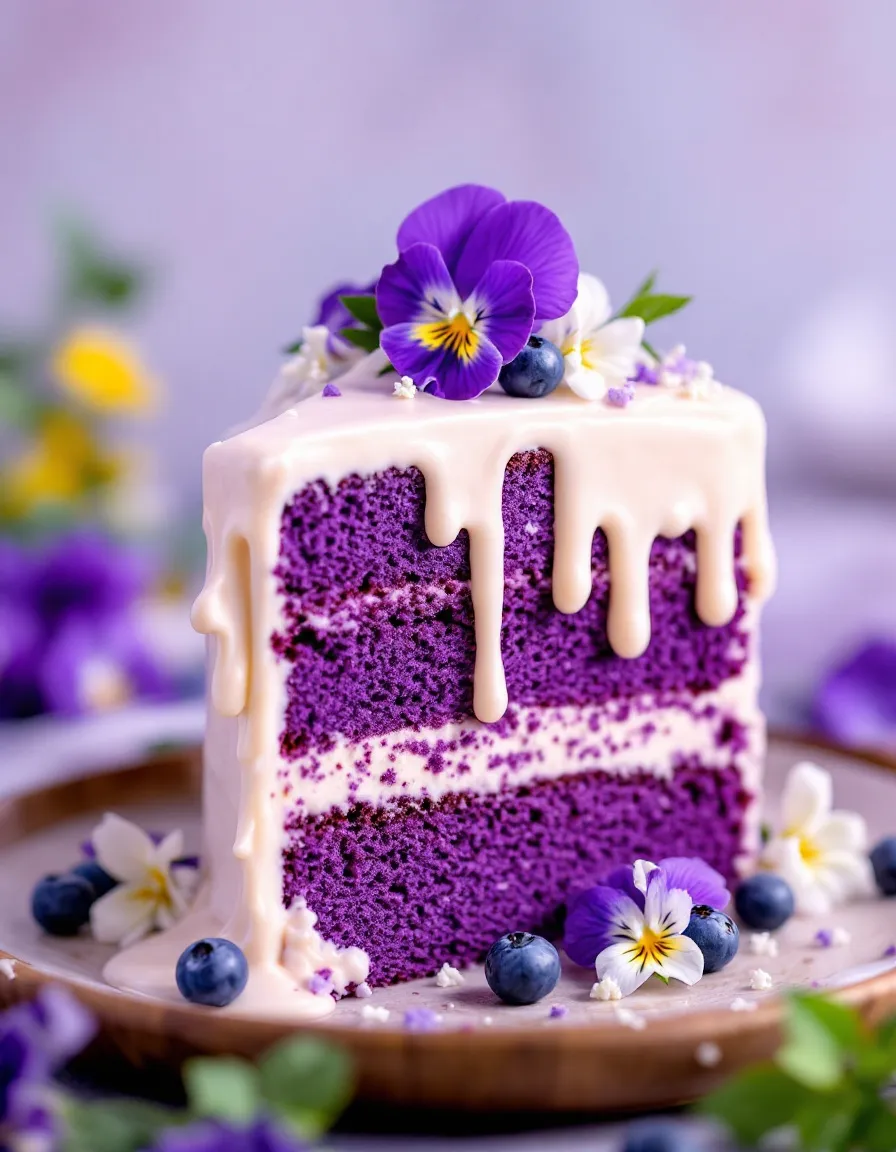
As you savor the deep purple color contrasting sharply with the creamy frosting, you can’t help but notice the tantalizing aroma that fills your kitchen while the cake bakes. With its luscious frosting and beautifully moist interior, this Purple Velvet Cake draws you in with each bite, promising an experience that is both gourmet and comforting.
Quick Recipe Highlights
- Flavor Profile: This Purple Velvet Cake delivers a deliciously balanced flavor with a hint of cocoa and a creamy, tangy frosting that enhances the sweetness.
- Texture: The light and fluffy layers contrast beautifully with the smooth, rich cream cheese frosting, creating a luxurious mouthfeel.
- Aroma: The enticing fragrance of vanilla and butter fills the air, complemented by the warm cocoa notes during baking.
- Visual Appeal: The striking deep purple of the cake, combined with the whipped white frosting, offers an eye-catching presentation perfect for any table setting.
- Skill Level Needed: While this recipe requires some baking technique, it is approachable for home bakers with some experience.
- Special Equipment: You’ll need basic baking tools like mixing bowls, measuring cups, and a cake pan to bring this recipe to life.
Recipe Overview
- Difficulty Level: Making the Purple Velvet Cake is moderately challenging, requiring techniques such as proper folding and layering to achieve the desired texture.
- Category: This delightful cake falls under dessert, making it a perfect end to any meal or a special treat for afternoon tea.
- Cuisine: This cake combines elements from classic American pastry traditions and modern culinary creativity, representing a fusion of flavor and aesthetics.
- Cost: The ingredients, particularly flour and cocoa, are generally affordable, making it a budget-friendly cake for gatherings.
- Season: Ideal for spring and summer celebrations, the vibrant color and light flavors resonate with warmer weather and festive occasions.
- Occasion: Perfect for birthdays, anniversaries, or as a centerpiece for holiday gatherings, this cake caters to festive moments.
Why You’ll Love This Recipe
The appeal of the Purple Velvet Cake lies in its exquisite taste and texture, opening with a rich cocoa flavor that subtly blends with the sweetness of the cake. The texture is undeniably appealing, with each slice revealing a soft and moist interior complemented by the smoothness of the cream cheese frosting. This combination of flavors creates a captivating dessert that will leave your guests raving.
Additionally, preparing this cake can be a convenient choice for those who wish to impress at gatherings without spending hours in the kitchen. Most of the preparation can be done ahead of time, allowing you to focus on other event details while still serving a stunning dessert. This convenience makes the Purple Velvet Cake an attractive option for busy bakers.
From a nutritional standpoint, using buttermilk in this recipe lends moisture without added fat, while the natural color from purple ingredients introduces antioxidants, making it a slightly healthier choice among indulgent desserts. Sharing this rich cake can also elevate your social gatherings, as desserts often spark joy and bring people together, creating conversations around flavor and presentation.
Financially, making this Purple Velvet Cake at home is much more cost-effective than purchasing a gourmet cake from a bakery. With relatively inexpensive ingredients easily found at your local grocery store, this dessert appeals to budget-conscious bakers without compromising on quality or flavor.
Finally, the accessibility of this recipe allows anyone to enjoy the process of baking. The straightforward steps can accommodate various skill levels, engaging both novice and experienced home bakers in a culinary adventure filled with creativity and delicious results.
Historical Background and Cultural Significance
The origin of velvet cakes can be traced back to the early 19th century, with its roots in the American South. Traditionally, velvet cakes are known for their moist texture and rich flavors, making them a staple for special occasions. The introduction of the iconic red velvet cake brought a visual allure that captivated bakers and dessert lovers alike.
Culturally, this Purple Velvet Cake signifies the creative evolution of festive baking, merging classic techniques with modern twists. The introduction of vibrant colors in baking, particularly through natural pigments derived from various ingredients, showcases how culinary practices have evolved with a focus on health and aesthetics.
As time progressed, the velvet cake continued to adapt, with bakers experimenting with flavors, colors, and designs. This sweet evolution led to the emergence of recipes like the Purple Velvet Cake, marrying nostalgia with contemporary trends that emphasize visual appeal in dessert presentation.
Regional variations continue to emerge, reflecting local traditions and preferences, with each iteration adding to the dialogue surrounding this beloved dessert. The Purple Velvet Cake itself may be adorned with seasonal decorations, making it versatile for various holiday celebrations and meaningful moments.
Ingredient Deep Dive
Cake Flour: Cake flour is the foundation of the Purple Velvet Cake, lending a delicate structure and fluffy texture essential to create the perfect layers. Its low protein content allows for a softer crumb, making it crucial to achieve that signature velvet feel. When choosing cake flour, look for brands that specifically highlight low protein content for the best results. Store in a cool, dry place and consider refrigerating for optimal freshness.
Cocoa Powder: Rich, unsweetened cocoa powder contributes to the delightful flavor of the cake and enhances its deep purple color. Dark cocoa provides a more intense flavor and color compared to regular cocoa powder, enhancing the cake’s allure. When selecting cocoa powder, opt for high-quality organic brands, which often boast superior flavor profiles. Store in an airtight container in a cool location to maintain its flavor potency.
Common Mistakes to Avoid
- Overmixing the batter: Overmixing can lead to a dense cake. Mix gently until just combined to maintain the desired texture.
- Not creaming the butter and sugar properly: Properly creaming these ingredients incorporates air for leavening, which is vital for a light cake.
- Incorrect oven temperature: Ensure your oven is correctly calibrated to avoid under or overbaking your cake, impacting the rise and texture.
- Skipping the buttermilk: Buttermilk adds moisture and a unique flavor profile; substituting can alter the cake’s final taste and texture.
- Underbaking the cake: Always test for doneness with a toothpick; it should come out clean or with a few crumbs attached to avoid a gooey cake.
- Not letting the cake cool completely before frosting: Frosting a warm cake can result in runny icing and uneven layers.
- Using stale ingredients: Ensure that your baking powder and baking soda are fresh for optimal rise and texture.
- Ignoring frost setting time: Allow the finished cake to rest before serving; this helps the flavors meld and ensures it’s easier to slice.
Essential Techniques
Creaming Butter and Sugar: This technique is essential as it aerates the mixture, incorporating air that results in a light and fluffy cake. To master this, start with softened butter and gradually add sugar, mixing until the mixture is pale and fluffy. Visual cues include a light texture and a noticeable increase in volume. Common pitfalls include using cold butter or not mixing long enough.
Folding Ingredients: Folding is employed in this recipe to gently combine wet and dry ingredients without deflating the air that has been incorporated. It’s crucial to use a spatula and a gentle wrist motion when folding the ingredients. Knowing when to stop folding is vital; overdoing it can yield a dense cake. Success cues include a uniform batter without noticeable streaks.
Pro Tips for Perfect Purple Velvet Cake
1. Always measure your flour accurately by spooning it into the measuring cup and leveling off with a knife for consistent results.
2. Consider using a stand mixer for creaming butter and sugar, allowing you to multitask while preparing other ingredients.
3. Chill your mixing bowls and beaters before whipping the cream cheese frosting for better volume and stability.
4. Experiment with natural colorants like beet juice if you prefer an all-natural alternative for achieving the purple color.
5. Let your cake layers cool completely on a wire rack before frosting to avoid melting the icing.
6. Use a serrated knife to level the cake layers for a professional-looking finish before stacking.
7. Decorate your cake with fresh berries or edible flowers to enhance the visual appeal and add flavor.
8. For an extra pop of flavor, consider adding a splash of vanilla extract to the cake batter.
Variations and Adaptations
This Purple Velvet Cake can be adapted seasonally by infusing flavors like pumpkin spice in the fall or citrus in the spring. Additionally, you can modify the recipe to meet dietary preferences; for a gluten-free version, substitute with a gluten-free flour blend. Incorporating different extracts, like almond or coconut, can offer unique flavor profiles, while adjusting the frosting to a whipped cream or ganache can cater to different textures and tastes.
Social gatherings often see this cake inspired by local flavors, where adding regional ingredients reflects the locality—such as using berry purees for a tart infusion. The cake can also be transformed into cupcakes, allowing for easier serving and individual portions that would appeal to guests of all ages.
Serving and Presentation Guide
When it comes to plating the Purple Velvet Cake, a simple yet elegant design is key. Start with a clean, flat serving plate to showcase the layers. For garnishing, consider using fresh fruits, whipped cream, or edible flowers for a burst of color and flavor. Traditional accompaniments for this cake may include a scoop of vanilla ice cream or a drizzle of chocolate sauce for added indulgence.
Modern serving suggestions include portioning the cake into smaller slices or layered cups alongside other desserts for a stunning dessert table. Ensure the cake is served at room temperature for the best flavor and texture, and be mindful of portion control—especially during celebrations, where guests may indulge.
Wine and Beverage Pairing
When selecting wine pairings for your Purple Velvet Cake, consider a light-bodied red like Pinot Noir, which complements the chocolatey undertones without overpowering the cake. For a unique twist, a sweet dessert wine like Moscato pairs beautifully, enhancing the cake’s sweetness. If you prefer non-alcoholic options, herbal teas or sparkling water with a hint of lemon may refresh the palate. Cold brew coffee can also be a delightful accompaniment, providing a rich flavor profile that balances well with the creaminess of the frosting.
Storage and Shelf Life
To ensure your Purple Velvet Cake stays fresh, store it in an airtight container at room temperature for up to three days. If you plan to keep it longer, refrigerate it, which will extend its shelf life for up to a week. For freezing, wrap the cake tightly in plastic wrap, followed by aluminum foil, and store it in the freezer for up to three months. Before serving, allow the cake to thaw in the refrigerator overnight for optimal texture and flavor.
Signs of spoilage include a noticeable change in texture or flavor, often indicated by dryness or sourness. Reheating is not typically recommended, but if desired, a few moments at room temperature can help restore some moisture before serving.
Make Ahead Strategies
For optimal planning, you can bake the Purple Velvet Cake layers one to two days in advance, allowing them to cool completely before wrapping them in plastic wrap and storing them in the refrigerator. This will save time on the day of your event and help enhance the flavor as the cake settles. The frosting can also be prepared in advance and stored in an airtight container in the fridge.
When ready to assemble, whip the frosting for a few seconds to restore its texture and spreadability. After assembling the cake, let it rest for approximately 30 minutes before serving; this allows the flavors to meld beautifully.
Scaling Instructions
For those looking to adjust the Purple Velvet Cake recipe, halving the ingredient amounts will still yield a delicious cake, ideal for smaller gatherings. Doubling or tripling the recipe is simple; however, ensure you have larger baking pans and appropriate measuring equipment to accommodate the increased volume. Adjust the baking time slightly when using larger or multiple pans—typically adding 5 to 10 minutes may be necessary but always check for doneness with a toothpick.
When storing larger batches, consider separating layers with parchment paper between cake layers to maintain freshness.
Nutritional Deep Dive
Each slice of Purple Velvet Cake offers a mix of macronutrients including carbohydrates from flour and sugars, and fats primarily from butter and cream cheese frosting. The cake generally contains around 300-400 calories per slice, making it a richer dessert option.
Micronutrients include key vitamins and minerals present in the ingredients; for instance, buttermilk adds calcium, while antioxidants are found in cocoa. Be mindful of portion sizes, which can help in enjoying the cake while managing dietary goals.
For those monitoring weight, consider enjoying a smaller portion or pairing it with a fresh fruit salad to balance indulgence with nutrition.
Dietary Adaptations
Creating a gluten-free version of the Purple Velvet Cake is easily achievable by substituting all-purpose flour with a gluten-free flour blend. To cater to dairy-free diets, opt for plant-based butter and alternatives for the cream cheese. Vegan adaptations are possible using egg substitutes like flaxseeds or applesauce, and a coconut cream for the frosting.
For those following low-carb diets, consider using almond flour and erythritol-based sweeteners for a keto-friendly twist. Each dietary adaptation retains the core essence of the cake while allowing those with restrictions to enjoy a delightful dessert.
Troubleshooting Guide
If your cake turns out too dry, consider baking it for slightly less time next round, or ensuring that all ingredients are measured accurately. For cakes that do not rise adequately, check the freshness of your leavening agents like baking powder and baking soda, as expired ingredients may compromise your batter.
If your frosting is too runny, add additional powdered sugar to thicken it up, while whipped cream can be stabilized with gelatin if it begins to separate. If you find your cake layers sticking, lining pans with parchment paper can ensure easier removal and help avoid any accidents during assembly.
To handle flavor imbalances, tasting your batter prior to baking allows for adjustments in sweetness; adding a pinch of salt can also enhance the overall flavor profile.
Recipe Success Stories
Community feedback surrounding the Purple Velvet Cake has been overwhelmingly positive, with bakers sharing their adaptation stories and successes. Many have reported turning this cake into stunning centerpiece desserts for special occasions, with families and friends raving over the luxurious texture and taste.
Readers have provided valuable suggestions, like incorporating chocolate ganache or experimenting with flavor variations such as lemon zest, contributing to a growing repertoire of cakes. Photography tips shared among home bakers have inspired new bakers to showcase their creations online, facilitating an engaging community focused on culinary creativity.
Frequently Asked Questions
1. Can I substitute the buttermilk?
Yes, if you don’t have buttermilk, a mixture of milk with a tablespoon of vinegar or lemon juice can create a similar tangy flavor and the acidity needed for the cake.
2. How can I prevent my cake from sinking?
Ensuring all ingredients are at room temperature and avoiding overmixing the batter will help maintain the cake’s structure and prevent sinking in the middle.
3. Can I use a different frosting?
Absolutely! While cream cheese frosting is traditional, a simple buttercream or whipped cream frosting can also be delightful alternatives.
4. How do I achieve a more vibrant purple color?
You can enhance the purple color by using purple sweet potato or natural food coloring specifically meant for baking.
5. Can I make this cake a day in advance?
Yes, you can make the cake layers a day ahead. Just ensure they are well-wrapped to keep them moist, and frost them on the day you plan to serve.
6. What can I do with leftover cake?
Leftover cake can be stored in an airtight container at room temperature for a couple of days or refrigerated for up to a week. It can also be frozen for longer storage.
7. Is it necessary to use cake flour?
Cake flour helps achieve the characteristic tender crumb of velvet cakes. If unavailable, use a 50/50 blend of all-purpose flour and cornstarch to lower the protein content.
8. How can I prevent my frosting from melting?
To stabilize frosting, use chilled equipment and refrigerate the cake before serving. Consider adding a bit of cornstarch or powdered sugar to help maintain consistency.
9. Can I add a filling between the layers?
Yes, adding a fruit preserve or ganache filling between layers can enhance the flavor experience. Just ensure the filling complements the cream cheese frosting.
10. How can I make a smaller version of this cake?
To make a smaller cake, simply halve the ingredient measurements and use smaller cake pans, adjusting the baking time accordingly for the layers.
Additional Resources
If you’re looking for related recipes, consider exploring other variations of velvet cakes, such as red velvet or green velvet. Technique guides on cake decorating can enhance your presentation skills, allowing you to showcase your baking efforts beautifully. Purchasing high-quality ingredients can significantly impact the final product, so explore reputable brands for food colorings and flavorings. Visiting online communities dedicated to cake baking can provide inspiration and new techniques, ensuring you feel engaged with fellow baking enthusiasts.
Join the Conversation
We invite you to share your experiences with making the Purple Velvet Cake! Join the community on social media by tagging your photos and sharing feedback on how you personalized the recipe. Engaging with others can spark creativity and inspire adaptations, making this a collaborative and delicious ride. Your success stories can motivate fellow bakers, so don’t hesitate to share your journey!
The Recipe
Purple Velvet Cake
Serves: 8 servings
Prep Time: 20 mins
Cook Time: 30 mins
Total Time: 50 mins
Kitchen Equipment Needed
- Mixing bowls
- Measuring cups and spoons
- Stand mixer or handheld mixer
- Spatula
- 9-inch round cake pans
- Wire rack for cooling
Ingredients
- 2 ½ cups cake flour
- 1 cup granulated sugar
- 1 cup buttermilk, room temperature
- ½ cup unsalted butter, softened
- 1 tablespoon vanilla extract
- 1 tablespoon cocoa powder
- 1 teaspoon baking soda
- ½ teaspoon baking powder
- ½ teaspoon salt
- 4 large eggs, room temperature
- 1 cup purple food coloring (or natural alternative)
Directions
- Preheat the oven to 350°F (175°C) and grease two 9-inch round cake pans.
- In a large mixing bowl, cream together the softened butter and sugar until light and fluffy.
- Add the eggs one at a time, mixing well after each addition.
- In another bowl, combine the flour, cocoa powder, baking soda, baking powder, and salt.
- Gradually add the dry ingredients to the wet mixture, alternating with buttermilk, stirring until just combined.
- Mix in vanilla extract and food coloring until the desired color is achieved.
- Divide the batter evenly between the prepared pans and smooth the tops.
- Bake for 30 minutes or until a toothpick inserted comes out clean. Let cool in pans for 10 minutes before transferring to a wire rack.
- Once cooled, frost with cream cheese frosting and decorate as desired.
Recipe Notes
- Store leftover cake in an airtight container for up to a week.
- For a flair, consider using flavored extracts in the frosting.
- Feel free to add sprinkles on top for added color and texture.
