Table of Contents
Salmon Crispy Rice: The Ultimate Restaurant-Quality Appetizer You Can Make at Home
| Prep Time | Cook Time | Total Time | Servings | Difficulty |
|---|---|---|---|---|
| 30 minutes (plus 4+ hours chilling) | 20 minutes | 5+ hours (mostly inactive) | 16 pieces (serves 4-6) | Medium |
The Viral Sensation: Why This Dish Broke the Internet
If you’ve spent any time on food TikTok or Instagram lately, you’ve undoubtedly seen the glorious, golden stacks of salmon crispy rice. This isn’t just another food trend; it’s a culinary phenomenon for a reason. It masterfully combines textures and flavors that seem almost impossible to achieve outside a high-end sushi bar: the intense, shattering crisp of pan-fried rice, the cool creaminess of ripe avocado, and the rich, spicy kick of seasoned salmon. Here at Cooking With Emy, we’ve perfected the method to bring this viral favorite directly to your kitchen. Forget waiting for a reservation at that trendy spot—this recipe guides you to create an even more delicious, impressive, and shareable appetizer that will have everyone thinking you’re a professional chef.

The magic lies in the contrast. Each component plays a vital role. The rice cake isn’t just crispy; it’s a sturdy, flavorful base with a subtle tang from seasoned vinegar. The salmon mixture, often called “spicy salmon,” is a harmonious blend of fat, heat, and umami. When topped with a fresh slice of jalapeño and a sprinkle of toasted sesame seeds, you achieve a bite that is truly greater than the sum of its parts. This guide from The Kitchen Team will not only give you the recipe but will dive deep into the “why” behind each step, ensuring your success on the first try.
Why This Is The Best Salmon Crispy Rice Recipe
Many online recipes for crispy rice salmon skip crucial steps that make all the difference between a good bite and an extraordinary one. Our version is meticulously tested by The Kitchen Team to guarantee restaurant-quality results. First, we insist on properly seasoning and chilling the rice. This isn’t just about flavor—it’s a textural necessity. The vinegar mixture seasons every grain, while the extended chilling firms up the rice, allowing it to fry up incredibly crispy on the outside while remaining slightly tender within. We also emphasize the importance of sushi-grade salmon, a non-negotiable for both safety and sublime taste.
Furthermore, our balance of sauces in the salmon mixture is perfect. We use Kewpie mayo for its unique umami-rich creaminess, combined with sriracha, soy sauce, and a hint of sesame oil. This creates a complex flavor profile that isn’t just spicy but deeply savory. We also provide detailed frying techniques to achieve that perfect, uniform golden crust without greasiness. This recipe is designed for the home cook who wants to impress, providing all the pro tips and detailed explanations you need to master this iconic dish.
Ingredients & What You’ll Need
Gathering the right ingredients is the first step to success. Here’s your complete shopping list, broken down by component. Using high-quality ingredients here is paramount, especially for the salmon and rice.
| Quantity | Ingredient | Notes & Substitutions |
|---|---|---|
| 3 cups | Cooked Sushi Rice (short-grain) | Must be short-grain (like Calrose or Japanese rice). Cook it slightly firmer than usual. |
| 2 tbsp | Rice Vinegar | Seasoned or unseasoned is fine. If unseasoned, you’ll add the sugar and salt separately. |
| 1 tbsp | Granulated Sugar | Balances the vinegar’s acidity. |
| 1 tsp | Salt | Sea salt or kosher salt preferred. |
| As needed | Vegetable Oil (for frying) | Use a neutral, high-smoke-point oil like avocado, canola, or grapeseed. |
| 1 lb | Sushi-Grade Salmon | CRITICAL: Must be labeled “sushi-grade” or “sashimi-grade” from a trusted fishmonger. |
| 4 tbsp | Kewpie Mayo | Japanese mayo. In a pinch, regular mayo with a tiny squeeze of lemon can work. |
| 2 tbsp | Sriracha | Adjust to your preferred spice level. |
| 2 tbsp | Scallions, finely chopped | Both green and white parts. |
| 2 tsp | Soy Sauce | Use low-sodium if preferred. |
| 2 tsp | Sesame Oil | Use toasted sesame oil for maximum flavor. |
| 2 | Ripe Avocados | Sliced just before assembly to prevent browning. |
| 1 | Fresh Jalapeño | Thinly sliced. Remove seeds for less heat. |
| For garnish | Toasted Black & White Sesame Seeds | Toasting enhances their nutty flavor dramatically. |
Step-by-Step Instructions
Part 1: Preparing & Chilling the Rice Cakes
Step 1: Season the Rice. In a small bowl, combine the rice vinegar, sugar, and salt. Stir vigorously until the sugar and salt are completely dissolved. Place your warm, freshly cooked sushi rice in a large, non-reactive bowl (glass or ceramic is ideal). Pour the vinegar mixture over the rice. Using a rice paddle or a flat spatula, use a slicing and folding motion to mix. Be gentle yet thorough to coat every grain without mashing the rice. Fan the rice as you mix to help it cool slightly and become glossy.
Step 2: Form and Chill. Line an 8×8 inch baking pan with plastic wrap, leaving plenty of overhang on all sides. Transfer the seasoned rice to the pan. Using slightly damp hands or a flat-bottomed glass wrapped in plastic, press the rice down firmly and evenly into a uniform layer. The tighter you pack it, the better the cakes will hold together. Fold the overhanging plastic wrap over the top to seal. Refrigerate for at least 4 hours, but ideally overnight. This step cannot be rushed.
Part 2: Making the Spicy Salmon Mixture
Step 3: Prepare the Salmon. Ensure your sushi-grade salmon is very cold. Using a sharp knife, chop the salmon into small, uniform pieces (about 1/4-inch). You can also pulse it a few times in a food processor, but be careful not to puree it—you want texture. Transfer the chopped salmon to a mixing bowl.
Step 4: Combine. To the salmon, add the Kewpie mayo, sriracha, chopped scallions, soy sauce, and sesame oil. Using a fork or spatula, fold everything together until just combined. Be careful not to overmix, as this can break down the salmon’s texture too much. Taste and adjust seasoning if desired (you might want more sriracha). Cover the bowl tightly and return it to the refrigerator until you’re ready to assemble.
Part 3: Frying the Rice & Final Assembly
Step 5: Cut and Fry. Remove the chilled rice block from the pan using the plastic wrap as handles. Place it on a cutting board. Using a sharp, wet knife, cut the block into 16 even rectangles (cut in half, then each half into 8 pieces). Pat any loose grains off the sides. In a large, heavy-bottomed skillet or cast-iron pan, heat about 1/4 inch of vegetable oil over medium heat. To test if it’s ready, drop a single grain of rice in—it should sizzle immediately. Carefully add the rice cakes in a single layer, not crowding the pan. Fry for 3-4 minutes per side, or until deeply golden brown and incredibly crispy. Transfer to a wire rack set over a baking sheet or a plate lined with paper towels to drain. Repeat with remaining cakes, adding more oil as needed.
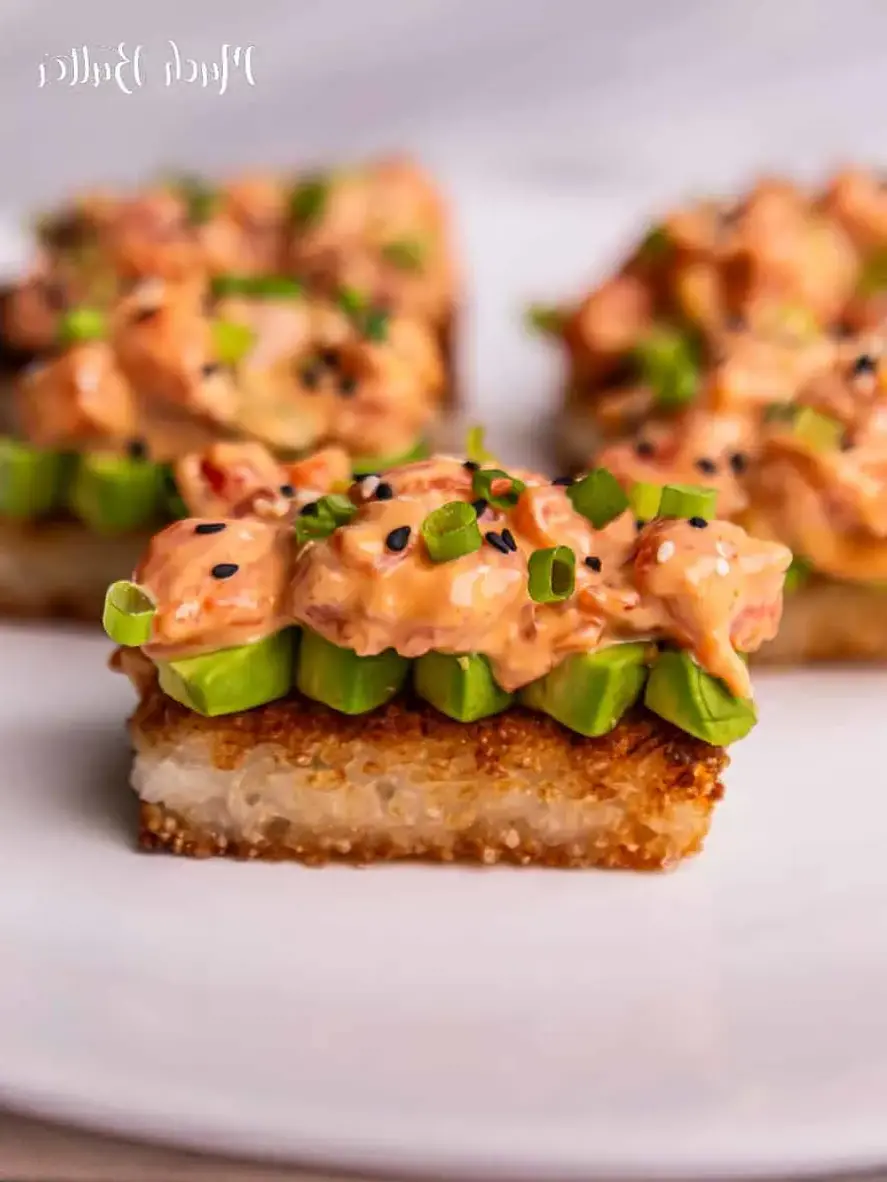
Step 6: Assemble. Work quickly while the rice cakes are still warm. Place a slice of avocado on each crispy rice cake, gently pressing to adhere. Top with a generous tablespoon of the spicy salmon mixture. Garnish with a thin slice of jalapeño and a generous sprinkle of toasted sesame seeds. A tiny extra dot of sriracha on top adds color and heat. Serve immediately.
Serving & Presentation
Presentation is key for this stunning appetizer. Arrange the assembled salmon crispy rice bites on a large, elegant platter or a sleek slate board. Scatter a few extra scallion greens or microgreens around for a pop of color. Serve with small appetizer plates and napkins, as these are a one-or-two-bite wonder. They pair beautifully with a crisp, dry white wine like Sauvignon Blanc or Pinot Grigio, a light lager, or even a ginger-forward cocktail. This dish is perfect for dinner parties, holiday gatherings, or as an extravagant start to a homemade sushi night.
Storage & Make-Ahead Tips
Make-Ahead: This recipe is fantastic for planning. You can prepare the seasoned rice block and the spicy salmon mixture up to 24 hours in advance. Keep both tightly covered in the refrigerator. Fry the rice cakes and assemble just before serving for the ultimate texture.
Storage: Leftovers are best stored deconstructed. Keep unfried, cut rice cakes in an airtight container in the fridge for 1 day. Store leftover spicy salmon in a sealed container for 1 day. We do not recommend storing assembled bites, as the rice will lose its crispness and the avocado will brown. Fried (but un-topped) rice cakes can be reheated in a 400°F air fryer or oven for a few minutes to re-crisp.
Creative Variations
The basic framework of crispy rice is a canvas for creativity. Here are some delicious twists from The Kitchen Team:
| Variation | Ingredient Swap/Addition | Flavor Profile |
|---|---|---|
| Tuna Crispy Rice | Substitute sushi-grade tuna for the salmon. | Leaner, slightly meatier flavor. Add a bit of mashed avocado to the tuna mix for creaminess. |
| Spicy Crab | Use lump crab meat mixed with kewpie, sriracha, and a dash of lemon zest. | Sweet, delicate, and luxurious. |
| Vegetarian “Unagi” | Top with grilled eggplant brushed with unagi (eel) sauce. | Smoky, sweet, and savory—perfect for vegetarians. |
| Dynamite Shrimp | Top with tempura shrimp tossed in a spicy mayo sauce. | Extra crunchy and packed with flavor. |
| Wasabi Pea Crunch | Add crushed wasabi peas to the salmon mixture or as a final garnish. | Adds an incredible crunchy texture and a nose-clearing heat. |
Frequently Asked Questions (FAQ)
1. Can I use regular long-grain rice instead of sushi rice?
No, we do not recommend it. Short-grain sushi rice has a much higher starch content (amylopectin), which is essential for the rice sticking together and achieving the desired chewy-yet-crispy texture. Long-grain rice will not hold together properly.
2. How do I know if salmon is truly “sushi-grade”?
“Sushi-grade” is not a USDA-regulated term. It means the fish has been frozen to a specific temperature (-31°F or below for a certain period) to kill parasites. Always purchase from a reputable fishmonger or market you trust. Tell them you plan to eat it raw. Never use regular grocery store salmon fillets for raw consumption.
3. Can I bake or air fry the rice cakes instead of pan-frying?
You can, but the texture will differ. For baking, brush rice cakes generously with oil and bake at 425°F on a parchment-lined sheet until golden, flipping once. In an air fryer, spray with oil and cook at 400°F for 10-12 minutes, flipping halfway. Pan-frying yields the most authentic, uniformly crispy result.
4. My rice cakes are falling apart. What did I do wrong?
This is usually due to: 1) Insufficient chilling time (the rice must be completely cold and set), 2) Not pressing the rice firmly enough into the pan, or 3) Using the wrong type of rice. Ensure you’re using short-grain, packed it tightly, and chilled it thoroughly.
5. Can I make this gluten-free?
Absolutely! Ensure your soy sauce is a certified gluten-free tamari or coconut aminos. All other ingredients in this recipe are naturally gluten-free.
6. How far in advance can I assemble the bites?
We recommend assembling immediately before serving, ideally within 10-15 minutes. The steam from the warm rice cake will start to soften the crispy exterior and wilt the garnishes if left too long.
7. What’s the best way to reheat leftover fried rice cakes?
Reheat them in an air fryer at 375°F for 3-4 minutes or in a conventional oven at 400°F on a wire rack for 5-7 minutes. This will help re-crisp the exterior. A microwave will make them soggy.
8. Is there a substitute for Kewpie mayo?
Yes, you can use regular American mayo. To mimic Kewpie’s unique flavor, add a tiny pinch of MSG (or a dash of dashi powder) and a small squeeze of lemon juice to the regular mayo before mixing it with the salmon.
Love This Recipe? Save It For Later!
Pin this image to your favorite appetizer or sushi board on Pinterest to save this ultimate Salmon Crispy Rice recipe for your next party!
Follow us on Pinterest: @cookingwithemy for more viral recipes and pro cooking tips.
[Image: A beautifully styled platter of golden salmon crispy rice bites, garnished with sesame seeds and jalapeños, on a dark slate background.]
Tag @cookingwithemy when you make this! We love seeing your creations.
Salmon Crispy Rice
Ingredients
Scale
- 3 cup Cooked Sushi Rice (short grain rice)
- 2 tbsp Rice Vinegar
- 1 tbsp Sugar
- 1 tsp Salt
- Vegetable Oil (for frying)
- 1 lb Sushi-grade Salmon
- 4 tbsp Kewpie Mayo
- 2 tbsp Sriracha
- 2 tbsp Scallion
- 2 tsp Soy Sauce
- 2 tsp Sesame Oil
- Sliced Avocado
- Jalapeno (thinly sliced)
- Black and White Sesame Seed (toasted)
Instructions
- In a small mixing bowl, combine rice vinegar with sugar and salt then stir until dissolved. Pour the rice vinegar over cooked sushi rice and mix until well combined.
- Transfer the rice to a baking pan lined with a plastic wrap. Gently press the rice to even it out. Cover and let it chill in the fridge for at least 4 hours or overnight.
- Chop the sushi-grade salmon into a small pieces, transfer it a a bowl then combine the salmon with mayo, sriracha, soy sauce, scallion and sesame oil. Mix well and set aside in the fridge until ready to use.
- Once the rice chilled, cut into 16 rectangles. Heat vegetable oil in a pan over medium heat, fry the rice until both sides turns nice and golden. Remove from the heat and let it cool on a paper towel.
- Top the crispy rice with a sliced avocado, a tablespoon of salmon mixture and sliced of jalapeno. Sprinkle it with black and white sesame seeds. Serve immediately.
