Table of Contents
Fudgy Marshmallow Brownies Marshmallow Fluff Swirl Surprise – Sweet and Fudgy Twist
I grew up in a bustling Moroccan kitchen where sugar and spice danced together, and later trained in Paris where precision mattered more than any spice. Back in New York, I discovered a way to make every brownie feel like a warm hug – by swirling marshmallow fluff into a fudgy chocolate base, creating a texture contrast that literally melts in your mouth. This recipe isn’t just a brownie; it’s a passport to flavors I know by heart, and the “Marshmallow Fluff Swirl Surprise” is my signature twist that keeps people coming back.
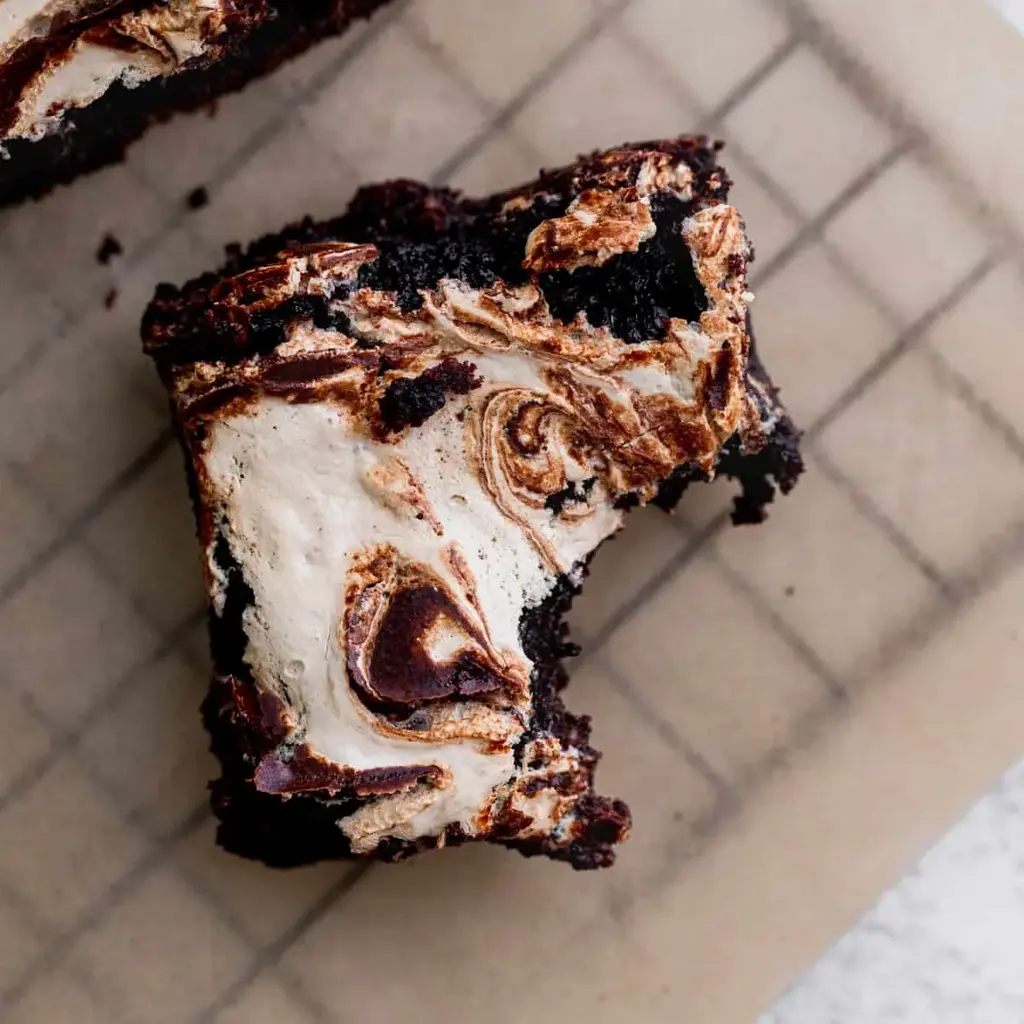
When you smell these brownies, the scent of dark chocolate layers with the buttery sweetness of marshmallow that rises like a cloud. Visually, each square is a glistening, fudgy masterpiece, flecked with chocolate chips that pop in every bite. The puff of marshmallow on the top gives a soft, almost velvety finish that contrasts the dense, chocolatey crumb, creating an orchestra of textures that waltz on the palate.
I’ve perfected this formula at a tiny 9×9 pan over a city balcony, and none of the tricks I use are hard to get right. Skip mixing the batter too long or the marshmallow will split. Instead, let the batter rest for a minute after folding in the chocolate chips—I’ll show you why that matters. Keep an eye on the oven door; this recipe can ooze out if overbaked, so trust the toothpick test and rescue in 5‑minute increments if needed.
Why This Marshmallow Brownies Recipe Is the Best
My background in French pastry gives me an eye for textures; the blend of brown sugar with melted butter and the gentle swirl of marshmallow introducing a glassy surface let me create a brownie that feels both decadent and delicate. This synergy will transport you to the market stalls of Marrakech and the cafés of Paris in one bite.
The perfect moisture comes from the precise ratio of cocoa to flour, ensuring each bite stays fudgy without becoming sticky. I add a dash of cornstarch to keep the crumb light yet rich. The technique of folding chocolate chips in just after combining the wet and dry ingredients keeps them evenly distributed and prevents clumping.
Even as a beginner, you’ll find the step-by-step style and the alternating pro tips keep you confident. From the first whisk of eggs to the gentle swirl of marshmallow, each motion is explained in plain language, safe for any kitchen—no prior baking experience required.
Marshmallow Brownies Ingredients
I source almost every ingredient in my favorite Little Italy grocery store, where the butter always feels silky even on a humid summer day. I love walking past the chocolate aisle—soul‑stirring, the way it almost sings to me like a lullaby from a Parisian patisserie.
Ingredients List
- 2 cups White granulated sugar
- 3 Large eggs
- 1 Egg yolk
- 1/2 cup Unsalted butter, melted
- 2 tsp Pure vanilla extract
- 1/2 cup Oil (canola or vegetable)
- 3/4 cup All‑purpose flour
- 1 cup Unsweetened cocoa powder (Use Dutch‑process cocoa powder)
- 1 1/2 TBSP Cornstarch
- 1/2 tsp Salt
- 1 cup Semi‑sweet chocolate chips
- 1 cup Marshmallow creme
Ingredient Spotlight
Unsweetened Cocoa Powder – The dark, rich flavor of the Dutch‑process cocoa gives our brownies their deep chocolate profile. Look for a fine grind for smoothness; if you can’t find it, high‑quality dark chocolate chips cubed will add a different, slightly caramel‑toned depth.
Marshmallow Creme – This is the star that brings a sweet, airy glaze to the top. Choose a brand that stays soft; if you buy a firmer version, briefly warm it to re‑soften before dolloping.
Chocolate Chips – They contribute a pleasant bite and bursts of chocolate. If you cannot find semi‑sweet chips, use a blend of milk and dark chips for a balanced sweetness and a richer texture.
| Original Ingredient | Best Substitution | Flavor / Texture Impact |
|---|---|---|
| Unsweetened cocoa powder | Diced dark chocolate (70%) | Adds slight bittersweet notes and a creamy melt |
| Marshmallow creme | Whipped vanilla marshmallow fluff | Same sweetness, lighter texture |
| Semi‑sweet chocolate chips | Milk chocolate chips | Softer bite, sweeter profile |
How to Make Marshmallow Brownies — Step-by-Step
Let’s make this batter together – I’ll keep things simple and intuitive.
Step 1: Preheat and Grease
Preheat your oven to 325°F. Spray a 9×9‑inch baking pan with non‑stick spray, line the bottom and two sides with parchment paper, and spray again. This double‑layer protects the batter from sticking and allows for a clean lift.
💡 emy’s Pro Tip: Use parchment that’s already cut to the pan size – slack paper makes scraping the brownies a chore.
Step 2: Sift Dry
In a medium bowl, sift together flour, cocoa powder, cornstarch, and salt. Sifting removes clumps, ensuring a silky crumb.
⚠️ Common Mistake to Avoid: Sifting too lightly can leave lumps. Give it a good shake and run a whisk through before you add the flour.
Step 3: Whisk Sugar & Eggs
Using a mixer with a whisk attachment, beat white sugar, eggs, and the egg yolk on high speed for 5 minutes until pale and fluffy. This incorporates air, giving the brownies thickness.
💡 emy’s Pro Tip: Keep the beat fast; a beaten mixture that is light looks like a cloud and will hold to the batter.
Step 4: Mix Fat
In a separate bowl, whisk together melted butter, oil, and vanilla until fully blended. Lower the mixer speed until the mixture is smooth and integrated.
⚠️ Common Mistake to Avoid: Forgetting to cool the melted butter. A too‑hot butter can curdle, giving a gritty texture.
Step 5: Combine Moist & Dry
Add the wet butter mixture to the whisked eggs slowly, stirring on low until just blended. Fold in the sifted dry ingredients likewise, being careful not to over‑mix. Once combined, fold in the chocolate chips with a rubber spatula.
💡 emy’s Pro Tip: When folding, use a gentle, scraping motion. This keeps the batter airy and avoids turning it into a dense fruit cake.
Step 6: Extend Batter
Serve the batter in one smooth pour into the pan. Smooth the top with an offset spatula. Let it sit for 30 seconds; this allows the chocolate chips to settle and prevents cracking when you swirl.
⚠️ Common Mistake to Avoid: Pouring the batter straight from the bowl – the uneven top creates an uneven bake.
Step 7: Add Chocolate
Melt the marshmallow creme in a microwave at 20‑30 second intervals. Once soft, scoop it in 1‑teaspoon dollops across the surface. Lightly swirl a butter knife in a gentle “O” motion, spreading but preserving pockets of gooeyness.
💡 emy’s Pro Tip: Flip the pan halfway through baking to ensure even browning on both sides.
Step 8: Move Batter
Remove the pan from the oven, gently lift it, rotate 90°, and place back on a baking sheet. Return to the oven.
⚠️ Common Mistake to Avoid: Moving the pan too quickly; it can cause the batter to spread and thin.
Step 9: Melt Marshmallow
If remnants of marshmallow are still dry, simply re‑warm them in 10‑second bursts until they achieve a silky texture.
💡 emy’s Pro Tip: Use a small saucepan on low heat for even warm‑up, preserving the marshmallow’s leaf‑tender consistency.
Step 10: Swirl
Give the brown sugar a last gentle swirl to ensure the gloss is even and that the marshmallow beads float on top.
⚠️ Common Mistake to Avoid: Swirling too hard; you risk mixing the marshmallow into the batter, losing the distinct pocket.
Step 11: Bake
Bake for 45–55 minutes. A toothpick inserted should come out clean or with a moist crumb. If you see a lot of batter escaping the edges, bake an extra five minutes.
💡 emy’s Pro Tip: Use a lower rack in the oven; this ensures even drying without the tops burning.
Step 12: Cool
Cool on a wire rack until completely cooled—at least 30 minutes. Only then cut into squares; cutting too early releases batter and yields a sticky result.
⚠️ Common Mistake to Avoid: Cutting straight from a hot pan; the batter will stick and smear, ruining presentation.
| Step | Action | Duration | Key Visual Cue |
|---|---|---|---|
| 1 | Preheat & line pan | 5 mins prep | Parchment-lining finished |
| 2 | Sift dry ingredients | 3 mins | Fine, lump‑free mix |
| 3 | Whisk eggs & sugar | 5 mins | Pale, fluffy batter |
| 4 | Mix fat & vanilla | 2 mins | Uniform sauce |
| 5 | Combine wet & dry | 3 mins | Smooth, no lumps |
| 6 | Pour into pan | 10 secs | Smooth top |
| 7 | Add marshmallow | 15 secs | Glassy topper |
| 8 | Rotate pan | 30 secs | Even color |
| 9 | Re‑warm marshmallow | 10 secs | Soft, luscious |
| 10 | Final swirl | 30 secs | Marshmallow stars |
| 11 | Bake | 45‑55 mins | Test toothpick |
| 12 | Cool & slice | ≥30 mins 1.5 hrs | Crumb free cut |
Serving & Presentation
Once cooled, pick up each square with a butter knife, letting the swirl of marshmallow gleam under the kitchen lights. Serve on a rustic slate plate that echoes my Moroccan tiles, or on a sleek Manhattan glass for a modern look. Drizzle a little dark chocolate ganache for a professional finish.
When pairing, I recommend a cup of strong French café or a bold Turkish coffee – the bitterness cuts the sweetness beautifully. For side dishes in a modern taquería, add a slice of avocado or a sprinkle of sea salt to add contrast. If you crave something light, a fresh peach salsa offers a lovely burst of summer.
| Pairing Type | Suggestions | Why It Works |
|---|---|---|
| Side Dish | Avocado slices, sea‑salted pumpkin, or a sheaf of romaine with citrus vinaigrette | Brightens the rich browns and sharpens flavor |
| Sauce / Dip | Dark chocolate ganache, caramel sauce, or a drizzle of tangy coffee caramel | Mirrors the chocolate notes and adds a silky finish |
| Beverage | French café, Turkish kahve, or a classic espresso martini | Contrast the sweetness and provide aromatic lift |
| Garnish | Edible gold leaf, crushed pistachios, or a dusting of sea salt | Adds visual flair and textural pop |
Make-Ahead, Storage & Reheating
I love to prep these brownies ahead of a Friday night in New York. I’ll butter a baking sheet, lay the batter, and bake. They’re crystal in a tightly sealed tin for up to three days in the refrigerator, or I freeze them for up to two months. When I need a quick treat, a quick 350°F bake for 5–7 minutes is all I need.
| Method | Container | Duration | Reheating Tip |
|---|---|---|---|
| Refrigerator | Sealed airtight plastic wrap or thin reusable tub | 3 days | Reheat 5‑7 mins at 350°F |
| Freezer | Vacuum‑sealed bag or freezer-safe tin | 2 months | Defrost 30 mins, bake 5‑7 mins at 350°F |
| Make-Ahead | Bottom-lined tin, individual ramekins, or silicone squares | Up to 4 days in fridge before baking | Transfer to oven 5‑10 mins at 350°F for crisp edges |
A quick trick when reheating: cover the top with a loose foil sheet to keep moisture locked in. I’ve found that this creates a soft, almost melted crumb perfect for on‑the‑go mornings.
Variations & Easy Swaps
| Variation | Key Change | Best For | Difficulty Impact |
|---|---|---|---|
| Chocolate Chunk Variation | Add 1/2 cup of pre‑melted dark chocolate chunks | Rich chocolate lovers | None |
| Gluten‑Free / Dairy‑Free Swap | Use gluten‑free flour blend and oat milk + replace butter with dairy‑free margarine | Dietary restrictions | Moderate – extra mix‑run control |
| Seasonal Orange Zest Twist | Add 1 tsp orange zest and a splash of orange liqueur | Spring/Fall | None |
Chocolate Chunk Variation
For those who crave an extra chocolate punch, melt a few ounces of dark chocolate until silky and fold it into the batter right after the chocolate chips. The chunks soften as they bake, creating gooey pockets that pair wonderfully with the marshmallow swirl, bringing an indulgent layer reminiscent of a Parisian chocolate shop.
Gluten‑Free / Dairy‑Free Swap
Swap the all‑purpose flour for a gluten‑free blend (e.g., rice‑starch mix) and replace butter with an equal amount of dairy‑free margarine. Use oat milk instead of water or a splash of coconut milk to keep moisture. The batter remains fudgy, and the chocolate flavor stays bold, succeeding in a truly inclusive kitchen.
Seasonal Orange Zest Twist
When citrus is in season, add a tablespoon of freshly grated orange zest and a splash of Cointreau or triple sec to awaken the batter’s profile. The bright citrus counters the richness, giving each bite a silky finish that would resonate with the Mediterranean tang of my Moroccan mornings.
How long do marshmallow brownies take to bake?
Because marshmallow brownies have a higher moisture level due to the marshmallow creme, the bake time is a touch longer than a standard brownie. You’ll want to set your oven to 325°F and bake this batter for 45–55 minutes. The perfect indicator is a toothpick inserted into the center: it should come out clean or with a few moist crumbs. If you notice a high batter level bubbling around the edges, add five extra minutes and keep an eye on the top. After the bake, let the brownies cool for at least 30 minutes before slicing, which ensures the marshmallow glaze sets.
Can I use regular marshmallow fluff instead of marshmallow creme?
Absolutely! Marshmallow fluff is a twin of marshmallow creme; it has the same sweetness and texture. In a pinch, you can substitute an equal quantity. Just be mindful that fluff tends to be slightly firmer when cooled, so warm it for 10‑15 seconds in the microwave or use a small saucepan on low heat. Once it softens, dollop onto the batter and swirl. The resulting soft, silky top will look and taste just as delightful.
Will the brownies be sticky if I add too much marshmallow?
You might be worried about stickiness, but the recipe’s design counters that. The marshmallow is dolloped in a thin swirl, not layered or scattered across the surface. The butter in the batter and the 1/2 cup of oil create a barrier that prevents sticking. If you do find a sticky edge, bake an extra five minutes; the moisture will evaporate. Cutting the brownies only after full cooling also prevents a tacky crumb. If you prefer a firmer texture, reserve half of the marshmallow to reserve for a separate napkin or a little topping at the end.
How do I store leftover marshmallow brownies?
Store in the refrigerator in a tightly sealed container or wrap tightly in parchment and foil. They’ll keep up to three days with a firm texture and unchanged sweetness. For longer storage, freeze them in an airtight bag or reusable freezer tin for up to two months; prior to eating, take them out and let them rise at room temperature for a few minutes or reheat at 350°F for 5–7 minutes to refresh the marshmallow corners. Let them cool completely before reheating to avoid condensation that can make them soggy.
Can I freeze marshmallow brownies for later?
Yes, freezing works perfectly. Allow the brownies to cool completely, then slice if you want individual portions or keep whole. Wrap each piece tightly in plastic wrap or place them in airtight freezer bags or containers. For best texture, freeze for no more than two months. When you’re ready to enjoy, remove one at a time and let them thaw at room temperature for about 30 minutes. If you prefer a warmer bite, pop the browned squares into a 350°F oven for 5–7 minutes, and the marshmallow will soften just enough for a luscious texture.
What is the best way to get the marshmallow swirl on top?
For the perfect swirl effect, combine these steps: first, heat the marshmallow lightly until translucent but still pliable; drizzle spoonfuls onto the batter; and then use a butter knife or a waxed paint brush to lift and pour each dollop in a circular motion. Keep the swirl gentle; you’re looking for fluffy bursts rather than a dense layer. Finish by rotating the pan halfway through baking so the sugar of the marshmallow caramelizes without burning, leaving a glossy, slightly golden finish that contrasts beautifully with the dark brownie crust.
Are these brownies vegan?
The original recipe incorporates butter and whole eggs, making it a classic indulgence. To make a vegan version, swap butter for a dairy‑free margarine or coconut oil, use egg substitutes such as flaxseed meal or mashed banana for the two whole eggs, and ensure the marshmallow creme is vegan‑friendly (often labeled “vegan”). The texture will stay fudgy, though the flavor profile may shift slightly due to the plant‑based fat, but this version still delivers a sweet, gooey experience without animal products.
How many calories are in a marshmallow brownie (per serving)?
Each brownie square, when divided into 12 servings, averages about 336 kcal. This figure comes from the combination of sugar, butter, oil, chocolate chips, marshmallow creme, and flour. While rich, the brownies also contain 46 g of carbohydrates, 18 g of fat (mostly from butter and oil), and 34 g of sugar. If you’re watching heart health, you might adjust the butter to half‑fat or add a teaspoon of cocoa powder to reduce overall calories slightly, but the indulgence remains intact.
Share Your Version!
I’d love to see how you tweak this recipe for your own taste buds. Drop a star rating and leave a comment below with your thoughts or variations. Share a photo on Instagram or Pinterest with @cookingwithemi and tag me – I’m always excited to see your creations. If you’re curious about how swapping olive oil for canola might affect this recipe, let me know the results! I thrive on your culinary experiments.
From my NYC kitchen to yours — I hope this recipe brings as much warmth to your table as it does to mine. — emy 🧡
Love This Recipe? Save It to Pinterest!
If you enjoyed this Marshmallow Brownies recipe, don’t let it get lost in your browser tabs! 😄 Pin it now so you can find it again anytime — and explore hundreds more tried‑and‑tested recipes waiting for you on my Pinterest boards.
👉 Follow emy on Pinterest @exorecipe
📌 Pin this recipe · 🔁 Re‑pin your favorites · 💬 Tag me when you make it — I love seeing your creations!
Keep the brownies coming! If you tried this recipe, rate it on the site, and share your taste‑test photos in the comment section or on Instagram. I am always eager for your feedback and will consider your suggestions for my next post. Thank you for baking with me!

Marshmallow Brownies
Description
These marshmallow brownies are super fudgy chocolate brownie with chocolate chips. It has marshmallow fluff swirled on top.
Ingredients
- 2 cups White granulated sugar
- 3 Large eggs
- 1 Egg yplk
- 1/2 cup Unsalted butter (melted)
- 2 tsp Pure vanilla extract
- 1/2 cup Oil (canola or vegetable)
- 3/4 cup All-purpose flour
- 1 cup Unsweetened cocoa powder (Use dutch process cocoa powder)
- 1 1/2 TBSP Cornstarch
- 1/2 tsp Salt
- 1 cup Semi-sweet chocolate chips
- 1 cup Marshmallow creme
Instructions
- Preheat the oven to 325°F. Spray a 9X9-inch baking pan with baking nonstick spray. Line the bottom and 2 sides of the pan with parchment paper and spray again.
- In a medium bowl, sift the flour, cocoa powder, and cornstarch together. Add in the salt and set aside.
- Using a mixer with a whisk attachment, beat the sugar, eggs, and egg yolk on high speed for 5 minutes. It will become pale in color. While that mixes, melt the butter in the microwave and let it cool.
- Add the oil, melted butter, and vanilla and mix on low until combined. Add in the dry ingredients and mix on low until just combined. Pour in the chocolate chips and use a rubber spatula to fold it in.
- Pour the brownie batter into the pan. Melt the marshmallow fluff in the microwave for 20-30 seconds and mix. Use a 1 teaspoon to dollop the marshmallow fluff on top of the brownie batter. Use a butter knife to very light swirl the marshmallow fluff.
- Bake for 45-55 minutes. It is done baking when you stick in a toothpick, and it is slightly wet. If a lot of batter comes out, then bake for another 5 minutes.
- Cool on a cooling rack completely before cutting into them and serving.
