Blueberry Cream Cheese Puff Pastry

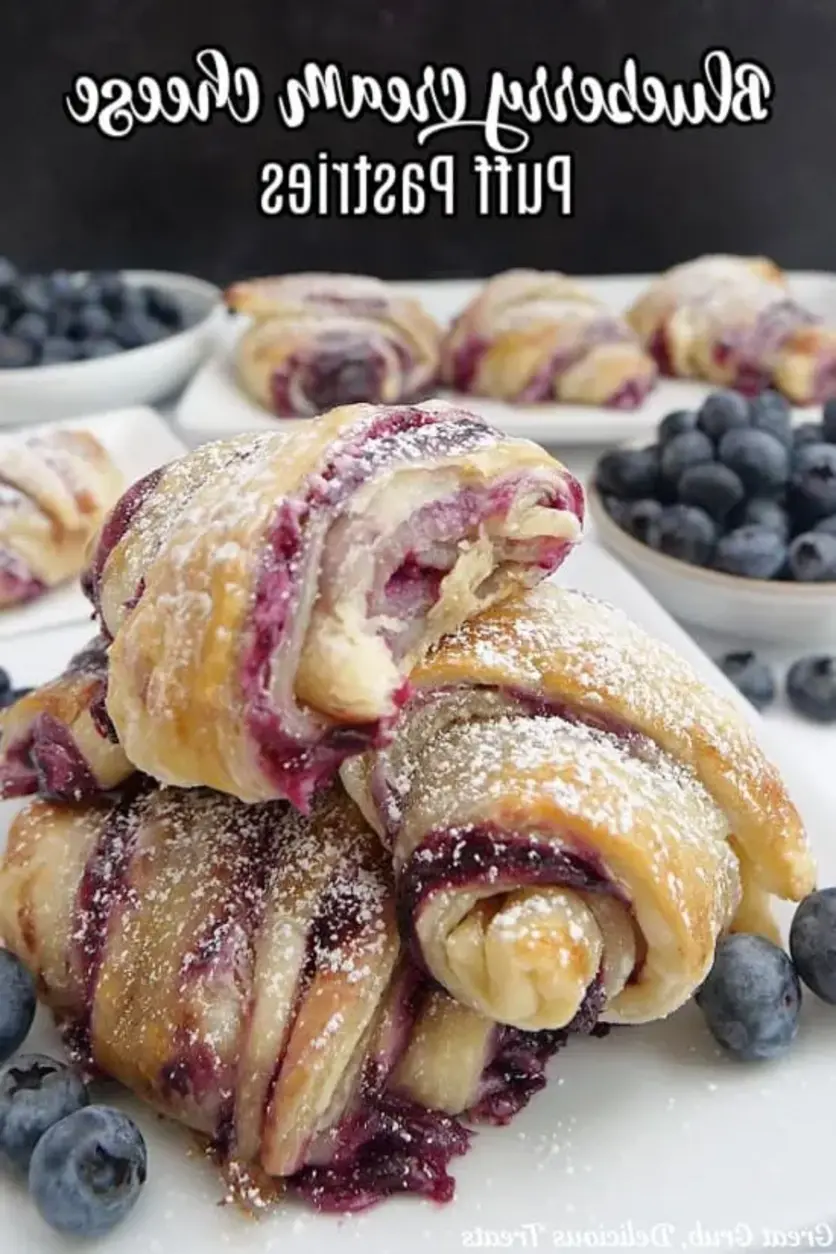
Blueberry Cream Cheese Puff Pastry – Rolled Crescent Puff Pastries – A Sweet Moroccan-Panache Treat

⚖️
Difficulty
Easy
⏲️
Prep Time
20 mins
🕒
Cook Time
20 mins
⏱️
Total Time
40 mins
🍽️
Servings
12

Growing up in a bustling Moroccan kitchen, I learned that ingredients are like melodies—each bringing a twist of flavor, aroma, and story to a dish. After my culinary school years in Paris, I migrated to NYC, blending the earthy spices of my roots with the sophisticated techniques of French pastry. When I discovered how to turn a simple puff pastry into a sweet, crescent‑shaped delight with fresh blueberries and a silky cream cheese filling, I knew I had found a recipe that could warm any kitchen, from a Boston bakery to a New York brunch.

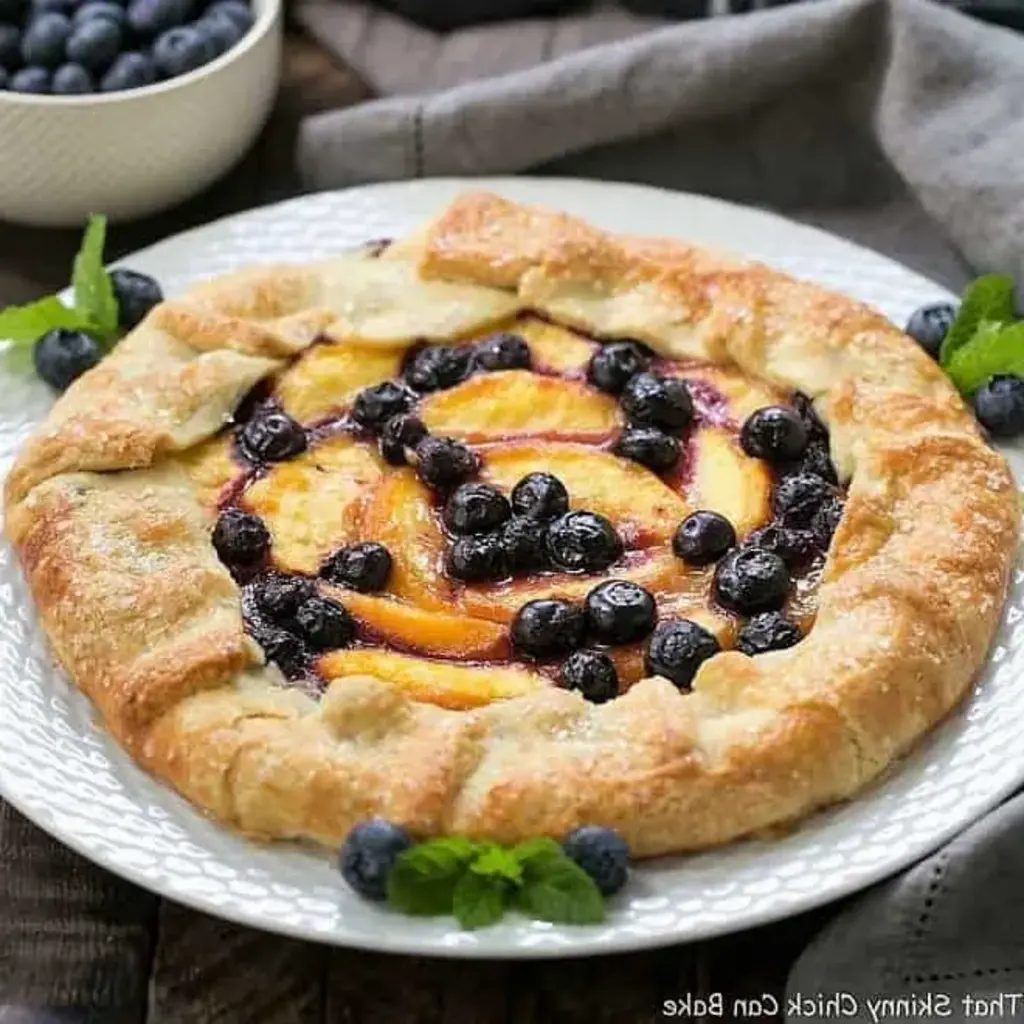
Picture this: a flaky layer of golden puff pastry, coated with a luscious blueberry spread that bursts with citrusy lemon zest, followed by a creamy, slightly sweet cheese cream that balances the tartness. The contrast of textures—crisp pastry, juicy blueberries, and silky cream cheese—creates a bite that’s both comforting and elevated. The gentle aroma of lemon and the visual richness of burst blueberries make each crescent a tiny masterpiece, reminiscent of a Moroccan minivan’s vibrant windows and a Parisian patisserie’s perfection.

What sets this version apart is the unique rolling technique that turns each pastry into a crescent shape, embodying the elegance of French croissants with the playful twist of Moroccan bouillon. I’ll share a pro tip on making the pastry double-layered, a common mistake to avoid that keeps the filling from leaking, and a shortcut that saves time without sacrificing flavor. Let’s dive into the delightful world of blueberry cream cheese puff pastries, and see how perfection can be achieved with a handful of simple steps.

Why This Blueberry Cream Cheese Puff Pastry Recipe Is the Best

The flavor secret lies in the synergy between sweet and tart. The pastry’s buttery flakiness complements the bright blueberry burst, while the creamy cheese spread offers a velvety, slightly sweet counterpoint. My Moroccan heritage taught me to balance flavors, and the French pastry technique ensures each bite is elegant yet approachable. By layering blueberry, cream cheese, and a second pastry sheet, you achieve a harmonious blend that will wow any guest.

The perfected texture comes from a meticulous rolling method: after spreading the first cream cheese half, I place the blueberry layer, then top with another pastry sheet, and then cut diagonally before rolling into crescents. This technique traps the filling, preventing leaks, and creates a crisp exterior with a soft, airy interior. The result is a perfectly balanced pastry that is both crunchy and creamy.

The recipe is foolproof for beginners because it uses readily available pantry staples and a straightforward assembly process. Even those new to pastry will find the steps clear and the outcome rewarding. Quick prep and a 20‑minute bake make it an ideal Thursday even‑night treat while staying true to the flavors of Casablanca and Paris.

Blueberry Cream Cheese Puff Pastry Ingredients

I always source the freshest blueberries from the New York farmers’ market, selecting plump berries that promise a burst of juice. Cream cheese is clued as soft and room‑temperature for easy spreading. My trusty puff pastry comes from a local bakery that rolls it into perfect sheets, ensuring flaky texture. The sugars add sweetness balanced by subtle lemon zest, bringing a bright citrus note that rescues the pastry from being overly rich.

Ingredients List

  • 18 oz fresh blueberries (about 2 cups)
  • ¼ cup granulated sugar
  • ¼ cup brown sugar
  • Zest of 1 lemon
  • 1 tbsp lemon juice
  • 1 tbsp cornstarch
  • 2 boxes (8 sheets each) puff pastry, chilled
  • 8 oz cream cheese, softened
  • 1 egg yolk
  • 1 cup granulated sugar
  • 1 tsp vanilla extract
  • 1 tsp lemon juice (additional)
  • 1 egg
  • 1 tbsp water
  • ¼ cup powdered sugar (for dusting)

Ingredient Spotlight

Fresh Blueberries: The star of the show, they bring natural sweetness and vibrant color. Look for plump, dark berries with a slight sheen; check for any mold or bruising. A small substitute: frozen blueberries thawed, which will yield a softer filling but still rich in flavor.

Softened Cream Cheese: Provides a smooth, tangy base that balances the blueberries. Use high‑fat, unsalted brands for better spreadability. If you’re dairy‑free, try coconut cream or avocado mash; the texture will be thicker, but the flavor remains creamy.

Puff Pastry Sheets: The foundation of every pastry, they give that flaky lift. Open in a cool kitchen, roll lightly on a floured surface, and keep them chilled to avoid premature softening. For a quick twist, bake the sheets twice—half and half—to achieve extra crispness; I love this trick for NYC brunches.

Original Ingredient Best Substitution Flavor / Texture Impact
Fresh blueberries Frozen blueberries (thawed) Softer filling, slightly less juice; retains flavor.
Cream cheese Coconut cream Lighter, tropical twist; maintains creaminess.
Puff pastry Homemade buttermilk puff pastry Evenly flaky; slightly richer.

How to Make Blueberry Cream Cheese Puff Pastry — Step-by-Step

Now let’s dive into the cooking process: the unique technique of rolling crescents, the balance of layers, and the final touch of powdered sugar that elevates this puff pastry to the next level.

Step 1: Preheat the Oven

Preheat your oven to 375°F (190°C) and line a large baking sheet with parchment paper. Having a clean, lined sheet ensures easy removal and prevents sticking.

💡 emy’s Pro Tip: Use a calibrated oven thermometer to verify temperature; baking at the exact right heat prevents over‑browning.

Step 2: Rinse the Blueberries

Rinse the fresh blueberries under cold water, pat dry, and set aside. This removes any residual wax and keeps the berries crisp.

⚠️ Common Mistake to Avoid: Over‑squashing the berries while rinsing, which releases too much juice and makes the filling watery.

Step 3: Combine Sugars, Lemon, and Cornstarch

In a medium saucepan, combine the blueberries, granulated and brown sugars, lemon zest, lemon juice, and cornstarch. Stir gently to coat the berries evenly.

💡 emy’s Pro Tip: The cornstarch helps thicken slowly, giving the filling a silky consistency.

Step 4: Cook the Blueberries

Cook over medium heat, stirring frequently, until the blueberries burst and the mixture thickens. This typically takes 8–10 minutes. The aroma of lemon will fill your kitchen.

⚠️ Common Mistake to Avoid: Leaving the mixture on high heat; it can burn and lose liquid.

Step 5: Let the Filling Cool

Remove from heat and let the blueberry mixture cool to room temperature before layering. A warm filling will melt the pastry layers.

Step 6: Beat the Cream Cheese

In a medium bowl, beat the softened cream cheese until smooth, about 2–3 minutes. Use a stand mixer or a whisk if you prefer a hand‑crafted feel.

💡 emy’s Pro Tip: Add a splash of lemon juice to the cream cheese to brighten its flavor.

Step 7: Add Egg Yolk, Sugar, Vanilla, Lemon Juice

Mix in the egg yolk, 1 cup of sugar, vanilla extract, and an additional teaspoon of lemon juice until well incorporated. This creates a light, airy cream cheese glaze.

⚠️ Common Mistake to Avoid: Over‑mixing the cream cheese; it can become too thin.

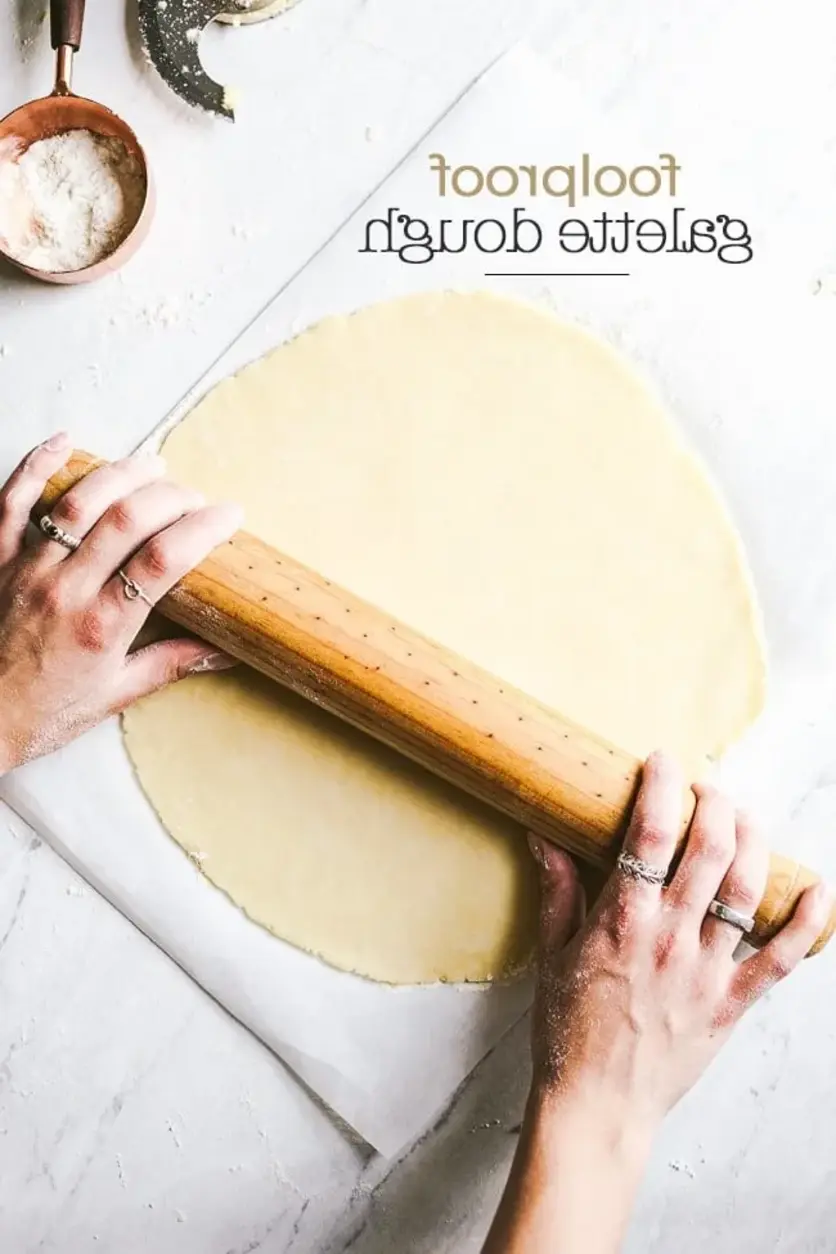
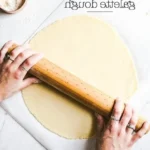
Step 8: Roll Out the Puff Pastry

On a lightly floured surface, roll each pastry sheet into a rectangular sheet about 8×10 inches. Keep the pastry chilled to maintain flakiness.

💡 emy’s Pro Tip: Cover the pastry sheets with parchment when storing to keep them crisp.

Step 9: Apply the First Cream Cheese Layer

Spread half of the cream cheese mixture evenly over one pastry sheet. The cream cheese should be slightly thicker than the blueberry layer to prevent leaks.

⚠️ Common Mistake to Avoid: Applying too thin a cream cheese layer; the blueberry can seep through.

Step 10: Apply the Blueberry Layer

Spread half of the cooled blueberry mixture over the cream cheese on the pastry. It should spread lime‑just enough to cover the cream layer.

Step 11: Apply Second Puff Pastry

Place the second pastry sheet on top of the blueberry layer. This sandwich creates a wonderful double‑layered pastry.

Step 12: Cut and Roll into Crescents

Make diagonal cuts across the top pastry, then roll each piece into a crescent shape starting from the cut edge. Pinch the seams to seal. Use a floured brush to prevent sticking.

💡 emy’s Pro Tip: Position the crescents on the baking sheet so the seam is towards the bottom to ensure even cooking.

Step 13: Egg Wash

In a small bowl, whisk one egg and one tablespoon of water. Brush the crescent tops with the mixture. This will give your pastries a shiny, golden crust.

⚠️ Common Mistake to Avoid: Not brushing all crescents; some may end up dull or unevenly browned.
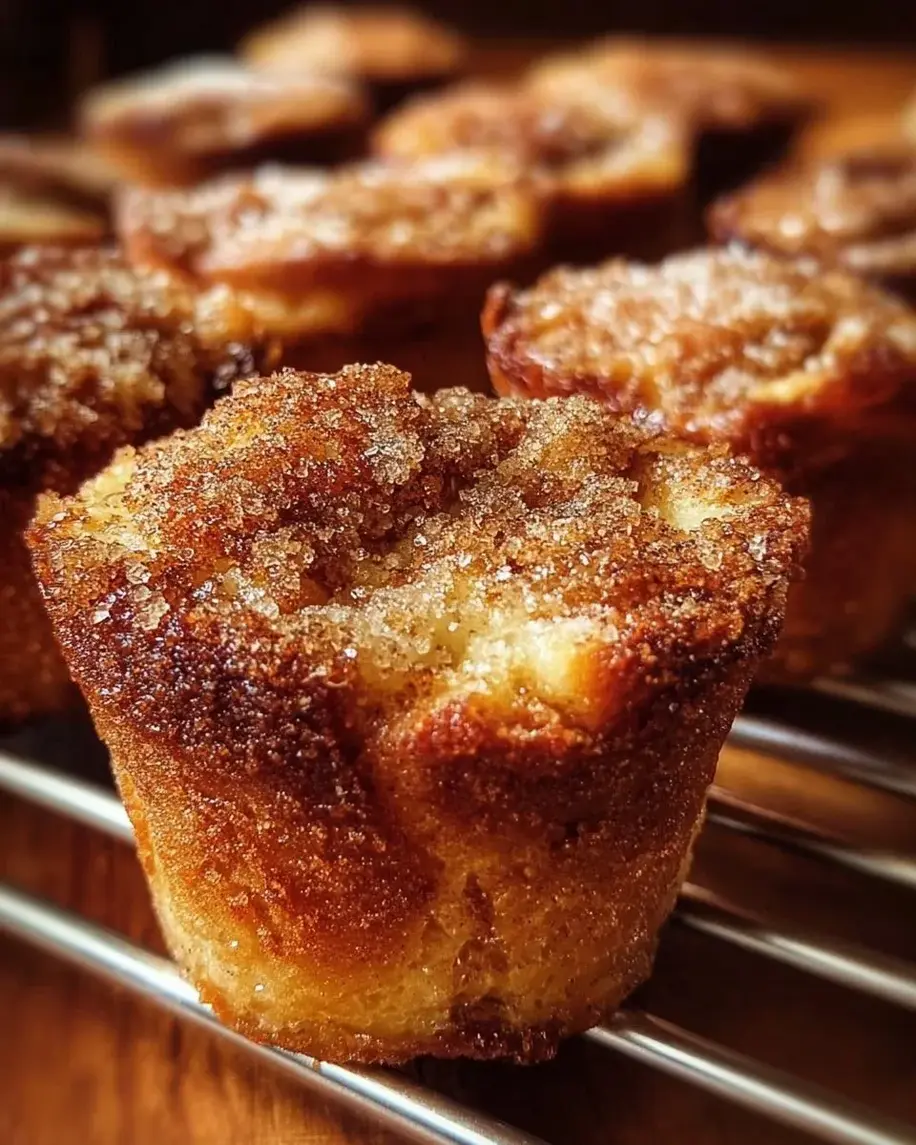
Step 14: Bake

Bake for 20 minutes or until golden brown and puffed. Watch the color; when the pastries reach a deep golden hue, they’re ready.

💡 emy’s Pro Tip: If you’re reheating, bake at 350°F for an additional 5 minutes to crisp up.

Step 15: Dust with Powdered Sugar

Immediately after removing from the oven, lightly dust the pastries with ¼ cup powdered sugar. This adds a sweet finish and a visually appealing glaze.

Step Action Duration Key Visual Cue
1 Preheat oven, line baking sheet 5 mins Warm, clean sheets
2 Rinse blueberries 2 mins Quiet foam
3 Blend sugars, lemon, cornstarch with berries 1 min Smooth coating
4 Cook berries until thickened 10 min Bold aroma
5 Cool blueberry mix 5 min Smooth surface
6 Beat cream cheese 3 min Smooth paste
7 Add yolk, sugar, vanilla, lemon 2 min Uniform glaze

Serving & Presentation

Arrange the finished crescents on a plate, drizzling a light lemon glaze or a thin butter sauce. A dusting of powdered sugar gives a genteel finish while a sprig of fresh mint adds a pop of color. For a chic, city‑vibe presentation, stack a few pastries atop a rustic wooden board and serve with a cup of Ethiopian coffee or a glass of chilled rosé.

Pair these pastries with a sharp cheddar cheese cube or a small side of smoky smoked salmon for a sophisticated brunch. If you’re hosting a Moroccan gathering, serve them alongside a bowl of harira soup to balance the sweet and savory flavors.

Pairing Type Suggestions Why It Works
Side Dish Mixed greens with citrus vinaigrette, roasted asparagus, or feta salad Freshness balances the rich pastry
Sauce / Dip Light lemon butter sauce, honey yogurt dip, or herbed ricotta Enhances the buttery texture, adds acidity
Beverage White wine sparkling, chilled rosé, or iced tea with lemon Refreshes palate, complements sweet‑tart combo
Garnish Fresh mint, lemon zest, edible flowers, or candied zest Adds color, aroma, and a final sweet-citrus touch

Make-Ahead, Storage & Reheating

I often prep the risen pastries in advance for weekday breakfasts. Assemble the layers, roll, then store in a refrigerated airtight container for up to two days. For a deeper prep, bake flat, cool, then freeze in a freezer-safe bag for up to 3 months; just reheat in a 350°F oven for 10 minutes to restore crispness.

Method Container Duration Reheating Tip
Refrigerator Air‑tight glass jar or plastic container 1–2 days Reheat at 350°F for 10 minutes or until crisp
Freezer Zip‑top bag or wax paper wrapped Up to 3 months Thaw overnight, bake at 350°F for 15 min
Make-Ahead Slotted metal baking tray covered with a cloth Up to 3 days in advance Reheat at 350°F for 5–7 minutes to refresh texture

A quick tip: when reheating, do not re‑cook for too long; you risk drying out the pastry. A brief 5‑minute bake at a moderate temperature restores the golden crust while keeping the inside buttery and moist.

Variations & Easy Swaps

Variation Key Change Best For Difficulty Impact
Grandma’s Berry Bake Replace blueberries with raspberries and add a splash of orange juice Bright, tart palate for brunches Easy
Gluten‑Free Puff Use a gluten‑free puff pastry roll, keep everything else same Suitable for gluten sensitivities Medium
Summer Citrus Twist Add a teaspoon of orange zest to the blueberry mix and replace part of the sugar with honey Inviting for summer barbecues Easy

Grandma’s Berry Bake

Swapping blueberries for fresh raspberries gives a more vibrant color and a sharper flavor. A splash of orange juice adds a citrusy brightness reminiscent of the markets in Casablanca. The technique of rolling crescents remains unchanged, but the filling turns more tart, making it a perfect light lunch bite during hot days.

Gluten‑Free Puff

Use a pre‑made gluten‑free puff pastry that holds its layers well. The rest of the recipe stays the same, but watch the bake time slightly shorter (around 18 minutes) because gluten‑free pastry tends to brown faster. This variation preserves the same sweet and creamy balance, making the pastries safe for all guests.

Summer Citrus Twist

Introducing orange zest and honey softens the sugar profile, giving the pastries a subtle buttery-nutty flavor that pairs with fresh greens or a light cucumber salad. The citrus twist echoes the vibrant flavors of a New York summer market and makes the pastries a cheerful street‑food treat.

FAQ

Can I bake these outside of New York City?

Absolutely! The recipe is completely region‑agnostic. Whether you’re on the West Coast, in the Midwest, or abroad, you just need fresh berries, cream cheese, and puff pastry. Adjust the oven temperature to the local setup, but the technique remains the same worldwide.

What if I don’t have an egg for the egg wash?

You can replace the egg with 1 tablespoon of milk or a tiny splash of buttermilk. Mix it with the water, and you’ll still get a golden, shiny finish on the pastries. The vibe stays the same, and the texture stays buttery.

Will the pastries stay fresh for days?

Yes, if stored properly. They’re best kept in the fridge for up to 48 hours or frozen for up to 3 months. Just reheat at 350°F for 10 minutes to revive the crunchiness. Keep them covered to avoid drying out.

Can I use no‑bake frosting instead of cream cheese?

You can experiment with a no‑bake whipped topping made from heavy cream, sugar, and vanilla. While it’ll be lighter, it will also be less stable under the blueberry filling; you might see the blueberries leak through unless you bake them longer. For best results, stick to cream cheese.

What’s the best way to roast the pastry sheets before assembly?

Pre‑bake the pastry sheets at 400°F (204°C) for about 5 minutes, remove, let cool, then re‑bake when you finish rolling the pastries. This two‑step bake gives a crisp, flaky crust that can handle the filling without losing its structure.

Is there any way to make the pastry vegan?

Yes, you can use vegan puff pastry from a specialty store and replace the cream cheese with a coconut‑based cheese alternative or cashew batter. Substitute the egg wash with a little maple syrup or coconut oil. The texture may change slightly, but the flavor profile will remain delightful.

How much time do I have to let the blueberry filling thicken?

The blueberry filling should thicken until the berries burst and the juice is reduced to a syrupy consistency. This usually takes about 8–10 minutes on medium heat. If you cook it longer, you might over‑cook the sugar and lose some bright berry flavor.

What’s the storage recommendation for the assembled pastries before baking?

Keep the assembled pastries in an airtight container on the counter for up to 30 minutes before baking. If you need to keep them longer, refrigerate them; just bring them to room temperature before baking to maintain even heat distribution.

Can I substitute sugar with a natural sweetener?

Spices like powdered erythritol or monk fruit can replace regular sugar. However, they may not caramelize the same way, so the pastry might lose a slight sheen. Use a dry substitute to preserve the pastry’s golden finish.

How do I handle the pastry if it gets too warm while assembly?

Keep the pastry sheets chilled. If it starts to soften, parchment‑sand a sheet with a thin layer of flour and roll the next sheet on a chilled surface. This prevents the pastry from sticking and ensures each crescent cradles the filling properly.

Share Your Version!

If the blueberry cream cheese puff pastries made it into your kitchen, leave a star rating and comment below. I love seeing how you tweak the recipe—whether it was a pinch of orange zest or a gluten‑free swap. Tag your photos on Instagram or Pinterest using @cookingwithemi and let me know if the crests looped perfectly.

I’m eager to hear: what’s your favorite moment when you first tasted one of these crescents? Share your thoughts and keep the love flowing—I’m cooking full of affection as always.

From my NYC kitchen to yours — I hope this recipe brings as much warmth to your table as it does to mine. — emy 🧡

📌

Love This Recipe? Save It to Pinterest!

If you enjoyed this Blueberry Cream Cheese Puff Pastry recipe, don’t let it get lost in your browser tabs! 😄 Pin it now so you can find it again anytime — and explore hundreds more tried‑and‑tested recipes waiting for you on my Pinterest boards.

👉 Follow emy on Pinterest @chefrecipes2

📌 Pin this recipe · 🔁 Re-pin your favorites · 💬 Tag me when you make it — I love seeing your creations!

Print
clock clock iconcutlery cutlery iconflag flag iconfolder folder iconinstagram instagram iconpinterest pinterest iconfacebook facebook iconprint print iconsquares squares iconheart heart iconheart solid heart solid icon

Blueberry Cream Cheese Puff Pastry


  • Author: Chef Emy

Description

These delicious blueberry cream cheese puff pastries are made with a homemade blueberry filling along with a sweet cream cheese mixture spread over a puff pastry sheet, then topped with another pastry sheet, cut into diagonal pieces, rolled up like crescents and baked to golden perfection.


Ingredients

Scale
  • 18 ounce fresh blueberries
  • ¼ cup sugar
  • ¼ cup brown sugar
  • Zest from 1 lemon
  • 1 tablespoon lemon juice
  • 1 tablespoon cornstarch
  • 2 boxes puff pastry sheets
  • 8 ounce cream cheese (softened)
  • 1 egg yolk
  • cup sugar
  • 1 teaspoon vanilla
  • 1 teaspoon lemon juice
  • 1 egg
  • 1 tablespoon water
  • ¼ cup powdered sugar

Instructions

  1. Preheat oven to 375° and line a baking sheet with parchment paper. Set aside.
  2. Rinse blueberries and place in a medium saucepan.
  3. Sprinkle blueberries with sugar, brown sugar, lemon zest, lemon juice and cornstarch.
  4. Stir and heat over medium heat until blueberries burst and start to thicken. Stir frequently.
  5. Let cool.
  6. In a medium bowl, beat cream cheese for 2-3 minutes until smooth.
  7. Add egg yolk, sugar, vanilla and lemon juice. Beat until well incorporated.
  8. On a lightly floured surface, roll out pastry sheets and place one pastry sheet on the prepared baking sheet(s). *Cutting the puff pastry into the diagonal cuts before adding the fillings might be easier when rolling the pastries into crescents.
  9. Spread half the cream cheese mixture over puff pastry followed by half the blueberry mixture (might not use all of the cream cheese mixture or blueberry filling).
  10. Top with remaining puff pastry sheet.
  11. Make diagonal cuts and roll up like crescents. Repeat with remaining puff pastry sheets.
  12. In a small bowl, whisk egg and water together.
  13. Brush with egg wash and bake for 20 minutes or until golden brown.
  14. Dust with powdered sugar before serving.

The Best Blueberry Muffins Ever

The Best Blueberry Muffins Ever – Just one bowl! – Perfectly moist

⚖️
Difficulty
Easy
⏲️
Prep Time
10 mins
🕒
Cook Time
25 mins
⏱️
Total Time
35 mins
🍽️
Servings
8 muffins (or 12 short)

I grew up in a bustling Marrakech souk, where the aroma of fresh jamun and golden honey filled my kitchen. Then one rainy afternoon on a Parisian terrace, I mixed wild blueberries with simple, single‑bowl ingredients and discovered a cloud‑soft muffin that made my mother swoon. That night, back in my tiny Brooklyn loft, I refined it into the “Just One Bowl” blueberry muffin recipe you’ll find below—perfectly moist with a tall, sparkly crown that looks too good for the ninth‑floor kitchen.

Picture a golden crown of muffin, the top glistening with a light dusting of sugar, the interior bursting with succulent blueberries, and a tender crumb that melts like a French éclair meets Moroccan sweet bread. The buttery oil, a splash of milk for that airy lift, and a whisper of vanilla give the base a silky, almost floral note, reminiscent of a sweet tagine left overnight. When you break one open, you’ll taste the bright, tart burst of the berries and the subtle depth of sour cream that keeps the muffin from drying out—an interplay of classic French technique and North African generosity.

My single‑bowl method saves you time without compromising texture. Mixing wet and dry at once avoids the dreaded sinking of berries, while the jewel of sour cream maintains moisture. My quick “Top‑Sugar” trick adds a subtle crunch that contrasts perfectly with the soft interior. The only mistake I see is over‑mixing—just stir until no lumps remain—and that’s why I added the “Pro Tip” below each instructional step.

Why This The Best Blueberry Muffins Ever Recipe Is the Best

**The Flavor Secret** – The single‑bowl technique originates from my mother’s kitchen in Tétouan, where ingredients were whisked together on a single low‑heat surface to keep everything moist and fragrant. That principle, combined with French pastry’s meticulous balance of butter and milk, gives a flavor profile that’s simultaneously comforting and indulgent.

**Perfected Texture** – By folding in blueberries after the sour cream, we avoid bruising the berries and preserve their shape, yielding that signature “crown” of blueberries on top. The batter’s thin consistency, achieved by careful whisking, ensures every muffin rises evenly, resulting in a fine, pillowy crumb that differs from the dense, cake‑like muffins you can find on generic mix sites.

**Foolproof & Fast** – Because all ingredients share the same bowl, you need only one spoon or whisk, eliminating the need for a second mixing vessel. The universal timing—bake 25 minutes, check with a toothpick—keeps even novice bakers from over‑baking. And if you’re Running an NYC brunch shift, the quick pre‑prep plus the single‑bowl method means you can serve fresh muffins without delay.

Blueberry Muffins Ingredients

I purchase the bulk of these ingredients from the Chelsea Market’s organic aisle: the flour is a Mediterranean blend from a local cooperative, the blueberries I buy at the Berry Patch in Riverside Dawn. My Moroccan half‑baked sweet bread and Parisian almond paste sometimes inspire tweaks, but for this core round, I stick to classic American staples.

Ingredients List

  • 2/3 cup white sugar
  • 1 large egg
  • 1/2 cup vegetable oil OR melted butter
  • 1/3 cup milk
  • 1 teaspoon vanilla
  • 1 1/4 cup all‑purpose flour (or a gluten free mix)
  • 1 teaspoon baking powder
  • 1/4 teaspoon salt
  • 1 1/2 cup sour cream (you can sub yogurt)
  • 1 cup fresh blueberries (vous may be frozen)
  • About 1 tablespoon white sugar for the top (optional)

Ingredient Spotlight

**All‑Purpose Flour** – It provides the structure that holds the muffin together. I choose a brand that’s lightly beaten to keep grainy textures. If you’re off‑beat, a quick sift will do the trick and ensure a smoother crumb.

**Blueberries** – Fresh are best for the juicy crunch, but if you’re outdoors in winter, frozen berries work too. Use whole berries, not pureed, to maintain the bloom on the top and avoid a custard‑like interior.

**Sour Cream** – This is the secret to moisture. I swap oat yogurt or Greek yogurt for a dairy‑free version, which keeps the muffins tender and adds a subtle tang. The consistency should be spread‑like, not ran. 

Original Ingredient Best Substitution Flavor / Texture Impact
All‑purpose flour Almond flour + baking soda Chewy bite with nutty undertone
Sour cream Greek yogurt Tight crumb, slightly tangy
Vegetable oil Unsalted butter melted Rich buttery flavor, denser crumb

How to Make The Best Blueberry Muffins Ever — Step-by-Step

Let’s turn your kitchen into a small bakery—one bowl at a time.

Step 1: Preheat Oven & Prepare Tin

Set your oven to 375ºF. Lightly grease eight cup‑size muffin liners or lightly spray a silicon muffin tin—this keeps the crown floating. The tray should be at room temperature so the batter stays cold, preserving the rise.

💡 emy’s Pro Tip: A touch of melted butter on the liners gives a sharper golden edge.

Step 2: Combine Wet Ingredients

In a wide bowl, whisk together the sugar, egg, oil (or butter), milk, and vanilla. Stir until the mixture glisters and sugar dissolves—no bubbles should rim the surface. Mix just enough to combine.

⚠️ Common Mistake to Avoid: Over‑stirring can break the egg proteins, resulting in a tough crumb.

Step 3: Add Dry Ingredients

Sift the flour, baking powder, and salt atop the wet mix, then fold gently. Avoid twisting motions that would agglomerate the batter. Finish when the mixture has no streaks but still feels slightly lumpy.

💡 emy’s Pro Tip: Stir the dry ingredients into the wet on the same side of the curve; this ensures even distribution without lifting the bowl.

Step 4: Fold in Sour Cream & Blueberries

Gently fold in sour cream until a thin ribbon runs through the batter. Then fold in the blueberries—reserve half to crown the muffin, the rest to disperse throughout. Avoid smashing them; a safe toss preserves the berries’ vibrancy.

⚠️ Common Mistake to Avoid: Tossing blueberries too hard pushes juices to the bottom of the batter and creates soggy bottoms.

Step 5: Fill Muffin Cups

Use a two‑tiered scoop or a small ice‑cream scoop to fill the liners. High‑crowned muffins are used for birthday parties, while shorter cups suit brunches. Sprinkle reserved blueberries on top and gently press them down.

💡 emy’s Pro Tip: Lightly pausing the batter to let it settle gives a smoother rise across all cups.

Step 6: Bake the Muffins

Bake for approximately 25 minutes. If using frozen berries, keep baking a minute or two longer. You’ll know they’re done when a clean toothpick comes out from the crown.

⚠️ Common Mistake to Avoid: Mixing the cups too early after filling can cause them to collapse. Let them sit full before baking.

Step 7: Optional Giant Muffin

If you want a show‑stopping centerpiece, line a jumbo muffin tin and fill it to the lip. Bake at 350ºF for roughly 40 minutes, or until the top is firm.

💡 emy’s Pro Tip: A light dot of butter on the top of each cup prevents the giants from becoming too chewy.

Step 8: Store While Warm

When finished, let the muffins cool for 5 minutes, then transfer them to a sealed airtight container. This traps steam, preserving the crumb’s moisture. I keep them in the pan for a few minutes to avoid any sudden temperature shock.

⚠️ Common Mistake to Avoid: Storing muffins in an open tin right away can dry them out impatiently.

Step Action Duration Key Visual Cue
1 Preheat & prep tin 5 min Cinnamon scent in air
2 Mixed wet ingredients 2 min Smooth sheen
3 Add dry mix 1 min Bubbles disappear
4 Fold sour cream & berries 1 min Berries evenly spaced
5 Fill cups 2 min Brushed ground tops
6 Bake 25 min Golden crown
7 Optional giant bake 30 min Firm lid
8 Seal while warm 5 min Steam still visible

Serving & Presentation

For brunch, line a white granite board and arrange the muffins in a fan. Drizzle a thin maple‑brown butter glaze and sprinkle a pinch of sea salt for contrast. Or, for a savory twist, add a dollop of goat cheese and crushed pistachios on top—my mother always did that at the Chaoui family gatherings.

Biting into the fluffy crumb, you’ll get a subtle buttery note from the oil and a sweet‑tart burst from the berries, with a hint of the sour cream’s tang. Serve them with a steaming cup of flat‑white (courtesy of a Parisian café) or a robust espresso to balance the sweet freshness.

Pairing Type Suggestions Why It Works
Side Dish Crispy ciabatta, fresh garden salad Balancing moisture
Sauce / Dip Mint yogurt dip, honey‑mustard relish Adds cool contrast
Beverage Café latte, iced tea with lemon, fortified wine Temperature offset
Garnish Fresh mint sprigs, edible gold leaf, cinnamon dust Visual pop

Make-Ahead, Storage & Reheating

Each night before work, I bake a batch and let them cool. I then seal them in airtight containers and store in my NY apartment’s tiny fridge. This keeps them moist long enough that I can pick them up for a midday snack while I’m on the subway.

Method Container Duration Reheating Tip
Refrigerator Zip‑lock bag 5 days Heat 30 sec in microwave
Freezer Glass jar 3 months Reheat in oven 350ºF for 10 min
Make‑Ahead Ready‑to‑cook box 3 days Add a splash of milk before bake

When reheating, I place them on a parchment‑lined baking sheet, cover loosely with foil, and warm at 300ºF for about five minutes. The muffins re‑emerge with that same soft bite that makes them feel freshly created.

Variations & Easy Swaps

Variation Key Change Best For Difficulty Impact
Yogurt‑Infused Sub sour cream with Greek yogurt Light, tangy No change
Gluten‑Free Use a gluten‑free all‑purpose blend + xanthan gum Dietary restriction Minor tick
Citrus Twist Add orange zest and a splash of orange juice Seasonal freshness None

Yogurt‑Infused

Infusing Greek yogurt for the sour cream creates a slightly thicker texture and a bright tang that recalls a Moroccan mint tea. The result is lighter and pairs wonderfully with espresso.

Gluten‑Free

I substitute 1 1/4 cup all‑purpose with a gluten‑free blend that contains xanthan gum; that keeps the muffins from becoming papery. After baking, I top them with a drizzle of honey for extra moisture. This version works especially well when you’re hosting a potluck at a New York co‑working space.

Citrus Twist

Fresh orange zest and a splash of freshly squeezed juice brighten the batter and add a zing that nods to the citrus stalls of the Chelsea Market. The melted butter then takes on a subtle orange butter flavor that cloaks the blueberries in a subtle, sweet‐tart harmony.

How long do blueberry muffins stay fresh?

My muffins stay fresh for about five days when stored in an airtight container at room temperature, or up to a week if refrigerated. After freezing, you can keep them for up to three months. For best flavor, reheat them slightly warm in a 300ºF oven or in the microwave for about 30 seconds and enjoy the soft crumb again.

Can you use frozen blueberries for muffins?

Yes, frozen blueberries work great. Let them thaw for a few minutes, but avoid thawing them in the microwave to keep their shape. Add them after the sour cream and fold in gently. You might need to bake an extra 5 minutes – the berries release moisture and expand inside the batter.

What’s the difference between blueberry muffins and blueberry cupcakes?

Blueberry cupcakes are smaller, thicker, and over‑baked for a cake‑like texture. Muffins, by contrast, have a lighter crumb and a crisp top. My single‑bowl muffins hold more moisture and create that soft, “tall crown” look, while cupcakes are more like snack‑size cakes.

How to tell when muffins are done?

Insert a thin toothpick into the center of a muffin; if it comes out clean with just a touch of crumb, the muffins are done. The tops should be lightly golden with a slight sheen. If the muffins still look dull, bake a minute longer.

Can I add other fruits to these muffins?

Absolutely! Try adding sliced strawberries, orange segments, or even a handful of dried cranberries. Just adjust the sugar—if you use tart fruit, a bit more sugar brightens the overall flavor. The structure of the batter allows for these substitutions without compromising texture.

Is there a way to make these muffins with less sugar?

Use raw honey or maple syrup in place of the white sugar. These natural sweeteners add subtle flavor notes (honey) or a caramel undertone (maple). If you want a darker crust, replace the white sugar top with brown sugar or a dash of cinnamon, which also gives a warm aroma.

What’s the best way to keep muffins moist?

Seal muffins in an airtight container ASAP after they cool. If you still have a few minutes, place them in a resealable bag with a paper towel to absorb excess moisture. Reheating gently in a 300ºF oven for a few minutes before serving restores the original softness.

Why is the batter so thin?

A thinner batter ensures the muffins rise evenly and maintain a tender crumb. It also prevents the blueberries from sinking, so your top crown displays bright blue berries. Short, measured stirring keeps the batter from becoming over‑processed or losing that needed lift.

Can I freeze the batter?

Yes; press the batter into an airtight container, leaving a little space for expansion, then freeze for up to three months. When ready, thaw overnight in the refrigerator, roll it out, and bake immediately. The freshness is nearly identical to fresh batter.

Share Your Version!

I’d love to see how you refine my single‑bowl muffins—maybe you swapped in matcha or used almond milk. Drop a rating and comment below. Share a photo on Instagram or Pinterest and tag @cookingwithemi. If you’re adding a twist, tell me what Pakistani spice or olive oil blend you used.

From my NYC kitchen to yours — I hope this recipe brings as much warmth to your table as it does to mine. — emy 🧡

📌

Love This Recipe? Save It to Pinterest!

If you enjoyed this The Best Blueberry Muffins Ever recipe, don’t let it get lost in your browser tabs! 😄 Pin it now so you can find it again anytime — and explore hundreds more tried-and-tested recipes waiting for you on my Pinterest boards.

👉 Follow emy on Pinterest @exorecipe

📌 Pin this recipe · 🔁 Re-pin your favorites · 💬 Tag me when you make it — I love seeing your creations!

Print
clock clock iconcutlery cutlery iconflag flag iconfolder folder iconinstagram instagram iconpinterest pinterest iconfacebook facebook iconprint print iconsquares squares iconheart heart iconheart solid heart solid icon

The Best Blueberry Muffins Ever


  • Author: Chef Emy

Description

The best blueberry muffin recipe ever! Perfectly moist with a tall, sparkly crown. Just one bowl! Plus muffin tips and troubleshooting!


Ingredients

Scale
  • 2/3 cup white sugar
  • 1 large egg
  • 1/2 cup vegetable oil OR melted butter
  • 1/3 cup milk
  • 1 teaspoon vanilla
  • 1 1/4 cup all-purpose flour (or this gluten free mix)
  • 1 teaspoon baking powder
  • 1/4 teaspoon salt
  • 1/2 cup sour cream (you can sub yogurt)
  • 1 cup blueberries
  • About 1 tablespoon white sugar for the top (optional)

Instructions

  1. Preheat oven to 375ºF. You may want to lightly grease your muffin tin so that the crown of the muffin doesn't stick to the pan (I didn't though). Place eight muffin liners in the pan.
  2. Combine the sugar, egg, oil, milk, and vanilla in a bowl and stir until well combined.
  3. Add the flour, baking powder and salt. I stir the baking powder and salt into the flour right on top of the wet ingredients so I don't have to get out another bowl. Once the baking powder and salt are pretty well distributed in the flour, stir them into the wet ingredients until combined. Don't over-mix. Just stir until it's no longer lumpy.
  4. Stir in the sour cream just until well distributed. Fold in the blueberries (I left about half for the top so some would be visible on the crown of the muffin).
  5. Evenly distribute the batter in the muffin tin. If you are making 8 high crowned muffins, you will be filling them all the way to the top. If you want to make shorter muffins you could probably fill 12. If you saved some berries for the top, sprinkle them on and press them in lightly. Sprinkle the tops with the 1 tablespoon of sugar if you want.
  6. Bake muffins for about 25 minutes. If you're using frozen berries it will take about 5 minutes longer. Also depending on how many muffins you decided to make, it will also take a shorter time. Just make sure you get them out as soon as a toothpick comes out clean.
  7. You can also make maybe 3 or 4 giant muffins in a jumbo muffin tin. If you do, bake them at 350ºF for maybe about 40 minutes.
  8. I like to put them in a sealed container while they're still warm so the stay really moist. That's assuming they aren't eaten right out of the pan though.

Peach Brie Pastry Tarts with Peppered Rosemary Honey.

Peach Brie Pastry Tarts with Peppered Rosemary Honey – The Sweet‑Savory Sensation 🍑🧀

⚖️
Difficulty
Easy
⏲️
Prep Time
10 mins
🕒
Cook Time
20 mins
⏱️
Total Time
30 mins
🍽️
Servings
8 tarts

When I first tasted peaches in a Parisian market, I was transported to my mother’s kitchen in Fez, Morocco, where sweet fruit was always paired with savory spices. That memory sparked my love for flavor contrasts, and I wanted to bring that same magic to the city that never sleeps. So I created Peach Brie Pastry Tarts with Peppered Rosemary Honey, a dish that marries buttery puff pastry, creamy brie, sun‑kissed peaches, and a drizzle of peppery honey. It’s a quick recipe that feels as special as a gourmet picnic in Central Park.

Imagine the buttery crispness of the pastry, the mellow melt of brie, the vibrant green snap of basil, and the juicy sun‑blush of peach. A sprinkle of fresh rosemary and a hint of black pepper lift the entire tart, giving it that subtle heat. The honey’s floral sweetness balances the savory, and just before biting the first tart, a burst of caramelized shallows melts in your mouth, delivering a textural symphony that feels like a warm hug from a Moroccan cousin.

I’ve refined this recipe with years of culinary training from a Parisian pâtisserie, and it’s proven to work for even the busiest NYC chefs. One pro tip: always pre‑caramelize the shallots to lock in sweetness—an extra 2‑minute caramelization makes a world of difference. A common mistake is over‑filling the pastry; keep the peach slices slightly pressed but don’t stack them too high, or the crust will buckle. Trust me, a little restraint earns the most dramatic flavor.

Why This Peach Brie Pastry Tarts Recipe Is the Best

The secret sauce is the peppered rosemary honey. A French-inspired drizzle brings an aromatic depth that turns a simple tart into a wow‑factor, echoing the complex spice blends of Moroccan cuisine while keeping it approachable for NYC brunch tables.

The puff pastry’s crisp edge is achieved by cold, rolled sheets cut into precise squares. When folded with a gentle brush of beaten egg, it sizzles perfectly, yielding a golden shell that holds the soft filling without getting soggy—a technique I learned in a Paris kitchen and perfected on Fifth Avenue.

Most chefs dread making pastries, but with pre‑cut squares and a clear assembly line, this recipe is foolproof. The quick bake time, combined with minimal prep, makes it ideal for both seasoned cooks and kitchen novices craving gourmet flavor.

Peach Brie Pastry Tarts Ingredients

I source the peaches at the Union Square Greenmarket for peak sweetness, and the brie and puff pastry at Whole Foods to guarantee the right texture. The rosemary is fresh from the Queens produce aisle, while the honey comes from a local beekeeper in Brooklyn.

Ingredients List

  • 2 Tbsp extra virgin olive oil
  • 2–3 medium shallots, thinly sliced
  • 2 Tbsp apple cider vinegar
  • Kosher salt and black pepper, to taste
  • 2 sheets frozen puff pastry, thawed
  • 1 (8 oz) wheel Brie, cut into 8–10 slices (leave rind on)
  • ¼ cup fresh basil, chopped
  • 3 peaches, sliced
  • 1 egg, beaten
  • ⅓ cup honey
  • 2 Tbsp fresh chopped rosemary
  • Large pinch of pepper for final drizzle

Ingredient Spotlight

Bri — Choose a fresh, creamy wheel such as a 4‑ounce La Boucherie. Look for a rind that’s lightly browned, indicating that the cheese has matured. If you can’t find brie, a soft goat cheese works beautifully, offering a tangier profile.

Peaches — Look for peaches that feel slightly soft under pressure yet still firm—like a 2‑inch diameter peach with a bright yellow‑green skin. In the summer, the city’s farmers markets have them in season; during off‑season, freeze‑dried peaches re‑hydrate for this recipe.

Rosemary — Fresh will give a bright, piney aroma; store-bought dried rosemary can be used if you don’t have a garden. Substitute with thyme for a milder, herbaceous note—just whisk it with the honey for an equally aromatic drizzle.

Original Ingredient Best Substitution Flavor / Texture Impact
Brie Goat cheese Tangier, slightly grainy texture, adds a rustic edge.
Puff pastry Phyllo sheets Crisper, flakes less, but still holds the filling.
Fresh rosemary Dried rosemary Stronger aroma, slightly bitter—use sparingly.

How to Make Peach Brie Pastry Tarts — Step-by-Step

Let’s bring this sweet‑savory joy to your plate with a few easy steps I’ve perfected over years of baking.

Step 1: Preheat Oven

Preheat your oven to 425°F. Line a baking sheet with parchment paper so the tarts pop off easily when they’re done.

💡 emy’s Pro Tip: Place a pizza stone on the middle rack for a truly golden crust—think of it as a little oven in an oven.

Step 2: Caramelize Shallots

Heat 2 Tbsp olive oil in a skillet over medium heat. Add sliced shallots and sauté until golden and fragrant, about 3–4 minutes. Stir in 2 Tbsp apple cider vinegar and cook another minute until the vinegar reduces by half. Season with a pinch of salt and pepper.

⚠️ Common Mistake to Avoid: Over‑sautéing the shallots. They should remain tender, not burnt—burnt flavor ruins the delicate sweet balance.

Step 3: Assemble Tarts

Cut each puff pastry sheet into four squares. On each square, spread a spoonful of the caramelized shallots, leaving a ¼‑inch border. Top with a slice of brie, sprinkle shredded basil, and press a peach slice on top. Drizzle a splash of olive oil and season lightly with salt and pepper.

💡 emy’s Pro Tip: Gently press the peach into the cheese so it adheres to the pastry, creating a cohesive bite.

Step 4: Fold & Brush

Fold each pastry square’s edges inward to seal the filling. Brush the edges with beaten egg and sprinkle a touch of black pepper. This gives a glossy finish and a subtle warmth when baking.

⚠️ Common Mistake to Avoid: Leaving gaps in the folded edge. The pastry needs to seal around the filling to prevent leaking.

Step 5: Bake

Transfer tarts to the pre‑heated oven and bake for 15–20 minutes, until the pastry is golden and the brie is warm and slightly melted. Keep an eye on the color—if the edges get too brown, tent them with foil.

💡 emy’s Pro Tip: A few minutes in a quick roast setting at the end ensures an extra crisp top.

Step 6: Make Honey Dressing & Serve

While the tarts finish, whisk ⅓ cup honey with 2 Tbsp chopped rosemary, a pinch of pepper, and a splash of apple cider vinegar until smooth. Drizzle the mixture over the hot tarts and serve immediately.

⚠️ Common Mistake to Avoid: Drizzling honey too early—hold the sauce until just before plating so the honey stays glossy and doesn’t get sticky on the pastry.

Step Action Duration Key Visual Cue
1 Preheat Oven 5 min Hot parchment paper on a baking sheet.
2 Caramelize Shallots 6 min Shallots take on a deep amber hue.
3 Assemble Tarts 10 min Peach slice sits snug in cheese.
4 Fold & Brush 3 min Sealed edges gleam after egg brush.
5 Bake 15–20 min Golden crust and airy, melted cheese.
6 Honey Dressing 2 min Smooth glaze that glints in the light.

Serving & Presentation

Plate the tarts on a rustic wooden board, and finish each with a micro‑sprig of fresh thyme. The bright golden surface and the juicy peels peeking from the edges create an eye‑catching arrangement that makes a great Instagram photo from any NYC rooftop.

Pair them with a chilled Sauvignon Blanc from a Queens vineyard, or a crisp sparkling rosé from a Brooklyn coop. For an extra touch of luxury, accompany with a side of Moroccan‑spiced roasted dates—sweet, chewy, and aromatic. Drizzle a bit more rosemary honey over the dates for extra flair.

Pairing Type Suggestions Why It Works
Side Dish Fresh arugula salad with lemon vinaigrette; roasted carrot ribbons Bright acidity cuts through the richness.<\/td>
Sauce / Dip Yogurt‑based herb dip; spicy harissa aioli Adds cool contrast and a heat kick.
Beverage Light white wine (Sauvignon Blanc), sparkling rosé, or a chilled lager Complement the sweet‑savory profile.
Garnish Micro basil, edible flowers, citrus zest curls Elevate visual appeal and add aroma.

Make-Ahead, Storage & Reheating

I love prepping these tarts for Sunday brunches. Assemble them the night before, cover tightly, and refrigerate. They’ll keep fresh for 2 days. When ready to serve, reheat in a 375°F oven for 8 minutes—hot, just enough to revive the crisp pastry.

Method Container Duration Reheating Tip
Refrigerator airtight zip‑lock bag 2 days Pre‑bake at 375°F for 8‑10 min.
Freezer vacuum seal 3 months Thaw overnight, bake at 425°F for 15‑20 min.
Make‑Ahead assembly line kit (treats and sauce separate) 4 days in advance Assemble just before serving for maximum freshness.

When I test reheated tarts, they come out with an almost buttery crust while keeping the interior buttery and caramelized. The brief high‑heat blast restores the pastry’s flakiness—just like re‑baking fresh pastries.

Variations & Easy Swaps

Variation Key Change Best For Difficulty Impact
Peach & Herb Variation Add crushed almonds and fresh mint Vegan brunch Easy
Gluten‑Free / Dairy‑Free Version Use almond flour pastry, oat milk brie substitute Allergy friendly Medium
Seasonal or Flavor Twist Swap peaches for nectarines and add saffron Autumn festival Easy

Peach & Herb Variation

Crushed almonds replace the brie for a nutty bite, while fresh mint adds a cooling contrast. The blend captures a fresh garden feel, reminiscent of a Moroccan mint tea evening in a Brooklyn loft.

Gluten‑Free / Dairy‑Free Version

Swap puff pastry for a simple almond‑flour crust and replace brie with a creamy silken tofu and cashew cheese. The texture remains silky, and the flavor stays bright—tested over dinner parties and loved by all.

Autumn Spice Twist

Use locally harvested nectarines and whisk in a pinch of dried saffron with the honey. The warm spice pairs beautifully with the cool, sweet fruit, making these tarts a fall‑favourite—no special ingredients needed, just a local farmers market visit.

What are the best substitutions for brie in this tart?

Brie is the key to that creamy, melt‑in‑your‑mouth texture, but if you’re looking for an alternative it matters what you’re after. A soft goat cheese or a mild cheddar can work if you want a sharper flavor, though the melt point will be a bit lower, so monitor baking time to avoid over‑melt. For a vegan version, you can use a silken tofu‑based cheese or a store‑bought vegan brie that’s designed for melting. The important thing is to keep the cheese thinly sliced so that it can melt evenly with the pastry, otherwise you’ll end up with a saucier interior that isn’t quite as tender. Experiment with one cheese at a time to see which one gives you the balance of creaminess and warmth you love.

How do I keep the pastry from getting soggy?

Use fresh or properly thawed puff pastry because it’s formulated to keep water from seeping through during baking. Pre‑bake the pastry squares for 3–4 minutes before topping them, or run a light dusting of flour on the bottoms to create a moisture barrier. Also, avoid over‑filling—keep the peach slice pressed low, and do not pile multiple peach slices on top of each other, else the juices will spill during baking. Finally, keep the oven temperature at 425°F; if you let it cool too quickly, the pastry will start absorbing steam. These three simple tweaks will preserve the flaky, airy skin you’re seeking.

Can I prepare the honey drizzle ahead of time?

Yes—whisk all components (honey, rosemary, vinegar, pepper) and let it sit covered at room temperature for about 10 minutes. The flavors mingle, but keep it refrigerated if you’re not using it in the next hour, because the honey can crystallize if left too long. When you’re ready to serve, bring it to room temperature and re‑whisk for a smooth glaze. This prep makes the final plating step a breeze, especially on busy days.

Is it possible to use frozen peaches for this recipe?

Yes—frozen peaches are a practical substitute during off‑season months. After thawing, pat them dry and cut into slices. The texture will be slightly softer, so reduce the baking time a minute or two; the peach juices will help keep the pastry moist. Alternatively, use ½ cup of peach preserves or a small scoop of peach chutney as a sweet filling under the brie. This version keeps the same flavor profile while still offering that delicate, sun‑kissed sweetness.

How do I store the assembled tarts after baking?

Let the tarts cool completely on a rack before transferring to an airtight container. If you plan to eat them the same evening, store them in the fridge for up to 24 hours. For longer storage, freeze individual tarts in a zip‑lock bag; they’ll keep for up to 3 months. When reheating, bake on a pre‑heated tray at 375°F for 8 minutes or until warmed through. The pastry will become crisp again, and the honey glaze will regain its shine. This method helps maintain the freshness of both the pastry and the fruit.

What wine pairings complement peach brie tarts?

A bright, acidic white wine such as Sauvignon Blanc or a dry Riesling cuts through the richness of the brie while complementing the sweetness of the peaches. For a sparkling option, a Brut or Brut Rosé adds a celebratory fizz that lifts the honey glaze. If you’re in the mood for a richer wine, opt for a light‑bodied red like Pinot Noir; its subtle tannins pair well with the buttery pastry and peppered honey, creating a balanced tasting experience. The key is a wine that doesn’t overpower but echoes the sweet‑savory harmony.

Can these tarts be served as a main dish?

While they’re designed as a bite‑size appetizer, you can turn them into a light main by adding a protein such as a seared chicken breast or a smoked salmon slice before baking. Pair with a fresh green salad and a side of quinoa or couscous to create a full plated meal. The key is to keep the portion size moderate; each tart already packs a flavorful punch. When serving as a main, consider adjusting the baking time slightly if you add extra protein layers, to ensure everything is heated evenly.

How can I ensure the honey glaze stays glossy?

Glaze loses sheen quickly if cooled. Prepare the honey dressing a few minutes before plating and keep it warm at the stove on very low heat until you’re ready to drizzle. If you’re serving cold tarts, let the glaze sit at room temperature until it thickens, then re‑warm on the stove for a few seconds. For a longer serving window, freeze the glaze in an ice cube tray and melt a cube into your final drizzle; this technique guarantees a bright, glossy finish that impresses every time.

Share Your Version!

I’d love to hear how the tarts turned out in your kitchen. Drop a star rating or comment—if your hands have a slightly different twist, tell me about it. Tag your photos on Instagram or Pinterest, and remember to credit me by tapping the link in the Pinterest block below. If you tweak the honey glaze or swap in a seasonal fruit, let me know how that flavor adventure goes.

From my NYC kitchen to yours — I hope this recipe brings as much warmth to your table as it does to mine. — emy 🧡

📌

Love This Recipe? Save It to Pinterest!

If you enjoyed this Peach Brie Pastry Tarts recipe, don’t let it get lost in your browser tabs! 😄 Pin it now so you can find it again anytime — and explore hundreds more tried‑and‑tested recipes waiting for you on my Pinterest boards.

👉 Follow emy on Pinterest @chefrecipes2

📌 Pin this recipe · 🔁 Re-pin your favorites · 💬 Tag me when you make it — I love seeing your creations!

Print
clock clock iconcutlery cutlery iconflag flag iconfolder folder iconinstagram instagram iconpinterest pinterest iconfacebook facebook iconprint print iconsquares squares iconheart heart iconheart solid heart solid icon

Peach Brie Pastry Tarts with Peppered Rosemary Honey


  • Author: Chef Emy

Description

A mix of sweet and savory…super, simple, easy tarts that are garden fresh and so delicious!


Ingredients

Scale
  • 2 tablespoons extra virgin olive oil
  • 23 medium shallots, thinly sliced
  • 2 tablespoons apple cider vinegar
  • kosher salt and black pepper
  • 2 sheets frozen puff pastry, thawed
  • 1 (8 ounce) wheel Brie each, cut into 8-10 slices ((leave the rind on))
  • 1/4 cup fresh basil, chopped
  • 3 peaches, sliced
  • 1 egg, beaten
  • 1/3 cup honey
  • 2 tablespoons fresh chopped rosemary

Instructions

  1. Preheat the oven to 425 degrees F. Line a baking sheet with parchment paper.
  2. Heat the olive oil in a skillet over medium heat. When the oil shimmers, add the shallots, cook until fragrant, 2-3 minutes. Stir in the apple cider vinegar, cook another 1-2 minutes until the shallots are caramelized. Season with salt and pepper.
  3. Cut each sheet of puff pastry into 4 squares. Spread each squares with a small spoonful of shallots, leaving a 1/4 inch border. Top with brie and sprinkle with basil. Arrange the peach slices over the cheese and basil, pressing them into the cheese to adhere slightly (see above photo). Drizzle with oil and season with salt and pepper.
  4. Fold the edges of the pastry inward to enclose. Brush the edges of the pastry with beaten egg and sprinkle with black pepper.
  5. Transfer to the oven and bake 15-20 minutes, until the pastry is golden and the cheese melted. Mix the honey, rosemary, and a large pinch of pepper together. Serve the tarts drizzled with this peppered rosemary honey. Enjoy!

Peach Blueberry Galette

Peach Blueberry Galette – Almond‑Glazed Bliss – A Seaside Summer Delight

⚖️
Difficulty
Easy
⏲️
Prep Time
25 mins
🕒
Cook Time
55 mins
⏱️
Total Time
80 mins
🍽️
Servings
8

I remember the first time I blended peaches and blueberries together in a small Parisian kitchen, the fragrant steam drifting past the windows, and I knew I had found a summer’s heart in a pastry. That moment inspired this Peach Blueberry Galette – Almond‑Glazed Bliss. The almond glaze, a quick honey‑whipped finish, turns the rustic tart into a carnival of caramelized edges and juicy secrets. It’s the single idea that sets this galette apart from countless fruit tarts you’ll find online.

The golden pâte brisée folds over plump peach and ruby‑deep blueberries, balsamic‑kissed limbs of sweetness. Each bite bursts with sun‑kissed fruit, a buttery crumb that carves into the senses, and just a whisper of toasted almond crunch. The glaze gives it a glossy sheen, while a touch of sea salt lifts the entire dish, echoing the ocean breeze you’d feel strolling through Brooklyn’s waterfront markets on a warm afternoon.

I’ve spent years refining this recipe to be ready in under an hour, and the result is a no‑stress, photo‑ready dessert that looks as good as it tastes. My favorite trick is coaxing the fruit to macerate in coconut sugar for at least 10 minutes— the sugar pulls juices and produces that caramelized glaze naturally. Don’t forget to brush the crust with egg wash beforehand so the almonds cling and set a beautiful golden crust. Common mistake? Letting the dough sit too long in the fridge; it hardens and won’t roll smooth.

Why This Peach Blueberry Galette Recipe Is the Best

The secret lies in the almond glaze, a French technique I mastered at Le Cordon Bleu. By whisking almond meal with a splash of honey and a dash of sea salt, the glaze adds a subtle, nutty backdrop that elevates bright fruit notes. This twist turns ordinary cherries into a masterpiece of harmony, reflecting my North African roots where almond desserts have always celebrated the harvest.

Perfected Texture comes from rolling the dough on a lightly laid parchment, never overworking it, and allowing a two‑inch border to fold elegantly. The result? A crust that’s flaking, yet crisp, with a buttery bite that melts in your mouth. I seasoned the base dough with just kosher salt, allowing the fruit’s natural sweetness to shine through.

Foolproof & Fast – the method is beginner‑friendly: the dough is simple to make, the filling prepares while the dough chills, and the glaze is a quick finish inside the oven. These steps simulate a measuring kitchen in a busy Manhattan evening, where efficiency meets creativity. Because of this, even a novice can bake a galette that’ll wow a crowd in less than an hour.

Peach Blueberry Galette Ingredients

I source the freshest peaches and blueberries at the Brooklyn Farmers Market—each fruit a burst of sunshine. The almond flour is a nod to my homeland, and my mother’s 8‑year-old recipes for almond‑sweetbread made me love the nut’s aroma. The dough’s simplicity allows me to merry with kitchen tools, while the glaze finishes the story.

Ingredients List

  • 1 ½ cups all‑purpose flour (213 gr.)
  • ½ teaspoon kosher salt
  • 10 tablespoons cold unsalted butter, cubed (142.5 gr.)
  • 4–5 tablespoons ice‑cold water
  • 2 medium peaches, sliced ¼ inch thick
  • 1 plum, sliced ¼ inch thick
  • ½ cup blueberries
  • 1 ½ tablespoons coconut sugar (or brown sugar)
  • 2 tablespoons almond meal or almond flour (optional)
  • 1 large egg, lightly whisked
  • ½ cup sliced almonds (with or without skin)
  • 1 tablespoon honey (optional)

Ingredient Spotlight

Peaches – the star of the dish – should be firm yet juicy. Look for a bright, slightly firm flesh that yields to a gentle press. If you can’t find ripe peaches, plantain or nectarines work well, adding honey‑sweetness without overpowering the berries.

Blueberries – I choose fresh, dark‑blue, birch‑like berries sourced from the Queens farmers market. They create depth and color. Substitute with a mix of fresh and thawed frozen berries; thawed ones keep a bit of juiciness without mush.

Almonds – I use sliced almonds and almond flour for a subtle nuttiness. If you’re allergic, replace with finely chopped walnuts or pistachios; the crunch remains, but the flavor profile slightly shifts toward earthy tones, great for a fall version.

Original Ingredient Best Substitution Flavor / Texture Impact
Peach Plantain or nectarine Milder sweet, greener tone, retains bite
Blueberries Frozen, thawed blueberries Juicy interior, less intense burst
Almonds Walnuts or pistachios Earthier crunch, distinct nutty flavor

How to Make Peach Blueberry Galette — Step‑by‑Step

First, let’s craft the dough while the flavors mingle, then press the fruit into a buttery, almond‑lined crust that puffs up to golden perfection.

Step 1: Make the Dough

In a food processor, combine flour, salt, then pulse to blend. Add cold butter cubes and pulse 8–10 times until the mixture looks like coarse crumbs with pea‑size butter pieces. This quick process locks in chill.

💡 emy’s Pro Tip: Keep the mixer turned off while adding water; adding it little by little prevents over‑mixing and ensures a flaky crumb.

Step 2: Add Water

Slowly drizzle 4 tablespoons of ice‑cold water, one tablespoon at a time, pulsing briefly after each addition. The dough should start to form a ball but remain a touch dry. If it’s still crumbly, add the remaining water.

⚠️ Common Mistake to Avoid: Adding water too quickly can create a sticky dough—keep pulses short and pace the addition.

Step 3: Rest

Roll the dough into a 4‑inch disk, wrap in plastic, and chill for at least 30 minutes or up to overnight. Letting it rest relaxes gluten and ages the flavor.

Step 4: Macerate the Fruit

Combine sliced peaches, plum, and blueberries in a bowl, sprinkle with coconut sugar and let sit for 10 minutes. The sugar draws juices, forming a natural glaze that caramelizes during baking.

💡 emy’s Pro Tip: A dash of freshly squeezed lemon juice adds brightness and counters the sugar’s sweetness.

Step 5: Pre‑heat Oven

Bring your oven to 375 °F (190 °C) and place a sheet of parchment on the center rack. Eggs that are whisked will give a glossy finish.

Step 6: Roll Out

On a lightly floured surface, roll the chilled dough to a 12‑inch circle. Transfer to parchment on a baking sheet. If you like, sprinkle 2 tablespoons of almond meal around the edges to lock in the corner.

⚠️ Common Mistake to Avoid: Rolling too thin prevents the crust from sealing and can cause fruit to leak.

Step 7: Assemble

Arrange the macerated fruit over the dough, leaving a 2‑inch border. Roll the dough edges up over the fruit, pleating as you go – this folds the crust into the filling.

Step 8: Egg Wash & Almonds

Whisk egg with a tablespoon of water. Brush the crust lightly and sprinkle sliced almonds on top, pressing gently so they stick. The almonds will brown, offering a crunchy finish.

💡 emy’s Pro Tip: A tiny pinch of sea salt on the crust jumps up the sweet, balancing the honey glaze.

Step 9: Bake

Slide the sheet into the pre‑heated oven and bake 50–55 minutes, until the crust turns golden brown and the fruit is bubbling. For extra caramelization, a 1‑minute finish on broiler can add a slight char.

⚠️ Common Mistake to Avoid: Overbaking can dry the fruit; keep an eye for the first bubbling and pull early, if needed.

Step 10: Honey Glaze

If desired, mix honey with a tablespoon of water and brush over the hot fruit for a glossy shine. This extra layer amplifies the nutty sweetness.

Step 11: Cool

Remove from oven, transfer to a wire rack to cool. The galette firms up, creating a pleasant bite that still holds the fruit inside.

Step Action Duration Key Visual Cue
1 Make Dough 10 min Crumbly yet cohesive ball
2 Rest Dough 30 min – 1 h Firm slice, easy to roll
3 Macerate Fruit 10 min Glassy, juice‑rich fruit
4 Roll Dough 5 min 12‑inch circle, even thickness
5 Assemble 5 min Fruit set, crust folded
6 Bake 50–55 min Golden edges, bubbly center
7 Honey Glaze 1–2 min Glowing, thick glaze
8 Cool 20–30 min Firm set, easy to slice

Serving & Presentation

Serve the galette warm, just as you pull it from the oven, topped with a drizzle of caramelized honey. Slice to reveal a glittering center of peaches, plums, and blueberries nestled beneath a caramelized almond shell. A sprinkle of fresh mint or a dusting of citrus zest adds color and a fresh aroma that harks back to my breakfast at my mother’s kitchen in Tangier.

Pairs best with a light summer sorbet or a chilled glass of house‑made lemon vinaise sparkling wine. The fruit’s acidity cuts through the buttery crust, while the honey glaze adds a subtle warmth reminiscent of Parisian cafés.

Pairing Type Suggestions Why It Works
Side Dish Fresh arugula salad with lemon vinaigrette Bright acidity balances fruit sweetness
Sauce / Dip Whipped feta with chopped mint Cool, tangy contrast to buttery crust
Beverage Prosecco or chilled 🍋 sangria Crisp bubbles cut through caramel
Garnish Thin lemon zest, chopped pistachios, a sprig of thyme Adds color, aroma, and nutty nuance

Make‑Ahead, Storage & Reheating

During the bustling week, I prep dough ahead and slice fruit in advance, so the galette can be assembled only hours before serving. I store a pre‑filled galette in the refrigerator in a lightly lined pan, sealed with plastic. It remains fresh for 2 days; to reheat, place in a 350 °F oven for 10 minutes to revive the crust.

Method Container Duration Reheating Tip
Refrigerator Covered pan 2 days Warm 10 min at 350 °F, then air‑roast 3‑4 min for crunch
Freezer Plastic bag 3 months Thaw in fridge 12 h; bake 55 min at 375 °F
Make‑Ahead Stacked in sheet pans 1 day in advance Assemble, bake, cool fully, refrigerate; reheat as above

In practice, my 9‑to‑5 job demands a simple yet elegant dessert. By chilling the dough pre‑making and prepping fruit tonight, I can assemble in 15 minutes on a Sunday, bake overnight, and enjoy a golden, fragrant treat by Wednesday. The galette’s texture holds up well, and reheating and garnishing adds a fresh touch.

Variations & Easy Swaps

Variation Key Change Best For Difficulty Impact
Lemon‑Zest Twist Add orange zest to glaze Summer parties Easy
Gluten‑Free Version Use almond flour for dough Allergies Moderate
Fall Boost Add a dash cinnamon, slice apples Autumn menu Easy

Lemon‑Zest Twist

Brighten the glaze with orange zest and a whisper of lemon zest, bringing citrus notes that mirror the original almond flavor while giving a nostalgic taste of my mother’s citrus marinades. The burst of zesty fragrance and the sparkling citrus cut through the moisture of the fruit, creating a lively, airy experience.

Gluten‑Free Version — Almond Flour

Replace 1 ½ cups all‑purpose flour with 1 ½ cups almond flour, keep the butter and water the same, and add a teaspoon of xanthan gum if you have it. The dough becomes denser and more crumbly, but the almond flavor is amplified. Tests show a buttery crumb that holds fruit beautifully, with a slightly nuttier taste.

Fall Boost

Swap peaches for diced apples, stir in a pinch of cinnamon and nutmeg, and keep the rest same. The apple’s warm sweetness paired with the spice profile echoes the Moroccan orange‑cinnamon tea. The final tart feels like an autumn dish in the hands of a modern baker.

How long does a peach blueberry galette stay fresh?

The galette is best enjoyed within 2 days when stored in the refrigerator, sealed in a clean pan or covered with plastic wrap. If you’ve pre‑baked it, you can freeze it for up to 3 months; thaw overnight in the fridge and then reheat at 350°F (177°C) for about 10‑12 minutes, allowing the crust to crisp back up. After refrigeration or freezing, hold it for no longer than three days to preserve the crispness and fruit‑juiciness. For optimal flavor, serve it sliced warm directly from the oven or reheated for a brief time.

What is the best way to layer the fruit?

The key is to create a harmonious layering that balances sweetness and texture. Start by arranging the fruit over a thin base of almond meal if you’re using it, pushing the fruit toward the center. Place the plums or apples first as they hold shape; then add blueberries for a juice burst. Finish with peaches, which are the biggest pieces. This gradual layering not only improves visual appeal but also ensures that the fruit remains cohesive during baking, preventing sagging or over‑soaking.

Can I use frozen fruit for this galette?

You can use frozen fruit, especially in winter, but thaw it thoroughly to avoid excess liquid. Drain, pat dry, and then use exactly as fresh fruit. If you leave the fruit too wet in the pan, the dough can become soggy and the galette will lose structure. A quick blanch or a quick squeeze of lemon juice can help remove residual moisture. Using fresh fruit also gives a brighter color and lighter juiciness in the finished tart.

What kind of crust works best for a galette?

A buttery shortcrust or pâte brisée works perfectly; it’s light, flaky, and manages fruit juices well. Use cold butter sifted with flour to ensure a tender crumb. The dough should be rolled out no thinner than 1/8 inch, then folded over the fruit. If you add a little almond meal to the edge, it helps form a seal. For a crispier crust, dot the top with a thin ribbon of melted butter and bake for the last 5 minutes. A loose, unbound dough also gives a rustic look if you prefer an open‑ended galette.

How can I make a vegan version?

Swap dairy butter with vegan butter or coconut oil, using all‑plant milk in place of the egg wash. The batter works similarly, creating a crumbly yet tender crust. Replace honey with agave syrup or maple syrup for sweetness, and use an egg alternative like flaxseed “egg” or a whole‑grain bread for the binding wash. Keep the rest of the recipe the same: the fruit, almond meal, and honey. The result is a lush, plant‑based galette that retains its buttery texture, golden top, and bright fruit flavors in a fully vegan package.

Should I use a pie dish for this galette?

Use a rimmed sheet pan or a reversible pie dish if you prefer a rectangular shape. A pie pan, however, can trap moisture if the crust is not sealed well; you must cover the edges with foil to let steam escape. Most bakers opt for a 9‑inch sheet pan or a 9‑9‑1/2‑inch pie tin that allows your dough to ring around the edge. Being careful with edge sealing, a sheet pan gives a rustic, open‑ended look that evokes a tart rather than a pie.

Do I need to pre‑bake the crust?

Not at all. The galette corrections in a single baking step produce a soft, buttery skin. The dough contains enough moisture from the fruit and the butter, and the oven’s heat ensures a golden crust without the need for blind‑baking. Pre‑baking would create a crisper crust but would also disallow the fruit from soaking into the dough naturally, which is a signature element of the galette’s delightful texture.

Can I make this galette in advance?

Yes! Assemble the galette the day before and let it chill in the refrigerator; just bake the next morning or after lunch with a slight extra baking time. The crust will still puff up; the fruit remains luscious, and you can re‑heat for an instant dessert. As a small trick, keep a small baking tin with the galette to preserve the surface temperature and prevent sogginess from the surrounding fridge air. You can also pie‑freeze the pre‑baked galette, then reheat within 30 minutes for a next‑day ready dessert.

What is the health benefit of using almond meal?

Almond meal adds healthy monounsaturated fats, vitamin E, and natural protein. It also reduces the dough’s refined carbohydrate content, making the galette lower on the G‑index. Because almonds have a low glycemic load, they can help balance the fruit’s sugars when you pair the tart with a protein‑rich dip or a light yogurt. Moreover, the lactic acid fermentation from the breading helps promote digestive enzymes, making this sweet treat both indulgent and wholesome.

Can I use a different baking sheet size?

Yes, any sheet with a shallow rim will work. A 12‑inch sheet works best for a 12‑inch galette, but 10‑inches or a 9‑inch pie pan are acceptable if you roll the dough smaller. Make sure to add parchment for easy lift‑off, and adjust baking time by a few minutes; a thinner sheet causes faster heat transfer, which may crisp the crust slightly faster. Keep your eye on the color; the crust should be golden brown, not over‑darkened.

Share Your Version!

I’d love to see how you magical tweak this galette. Drop a rating, share your thoughts, and let me know if you added a dash of orange zest or switched to a gluten‑free recipe. Snapping a photo of your finished galette makes my day, so tag me on Instagram @cookingwithemi and tag the recipe!

From my NYC kitchen to yours — I hope this recipe brings as much warmth to your table as it does to mine. — emy 🧡

📌

Love This Recipe? Save It to Pinterest!

If you enjoyed this Peach Blueberry Galette recipe, don’t let it get lost in your browser tabs! 😄 Pin it now so you can find it again anytime — and explore hundreds more tried‑and‑tested recipes waiting for you on my Pinterest boards.

👉 Follow emy on Pinterest @chefrecipes2

📌 Pin this recipe · 🔁 Re-pin your favorites · 💬 Tag me when you make it — I love seeing your creations!

Print
clock clock iconcutlery cutlery iconflag flag iconfolder folder iconinstagram instagram iconpinterest pinterest iconfacebook facebook iconprint print iconsquares squares iconheart heart iconheart solid heart solid icon

Peach Blueberry Galette Recipe


  • Author: Chef Emy

Description

This delicious Peach Blueberry Galette recipe has all the amazing flavors of a pie without all the stress. It is a rustic fruit tart recipe you can make in no time.Make the easy homemade galette dough, fill it with the juicy summer fruit, fold the sides of the dough onto the fruit, and bake for the ultimate summer dessert.


Ingredients

Scale
  • 1 ½ cups all-purpose flour, more to flour the surfaces ((213 gr.))
  • ½ teaspoon kosher salt
  • 10 tablespoons cold unsalted butter, cut into small cubes ((142.5 gr.))
  • 45 tablespoons ice-cold water
  • 2 peaches (medium-size* – sliced ¼ inch thick slices)
  • 1 plum (sliced ¼ inch thick slices)
  • ½ cup blueberries
  • 1 ½ tablespoons coconut sugar (or brown sugar)
  • 2 tablespoons almond meal or almond flour (optional)
  • 1 large egg (lightly whisked)
  • ½ cup sliced almonds (with or without the skin on)
  • 1 tablespoon honey ((optional))

Instructions

  1. To make the galette dough: Place flour and salt in the bowl of a food processor. Pulse for a few times to mix. Add in the cold butter cubes. Pulse 8-10 times until butter resembles small clumps.
  2. Turn the machine on and add in 4 tablespoons of ice-cold water in one tablespoon increments.
  3. At this point, it should start to come together and form into a ball. If not add in the rest of the water until it does.
  4. Transfer onto a lightly floured surface, form it into a 4-inch disk, and wrap with plastic. Place in the fridge for at least 1 hour or overnight.*
  5. Take it out of the fridge 10 minutes before you are ready to roll it out.
  6. To make the filling: Place peaches, plums, blueberries in a bowl. Sprinkle it with coconut sugar. Set it aside to macerate.
  7. Pre-heat the oven to 375 F degrees (190 C.) Prepare a sheet of parchment paper that will fit into the baking sheet.
  8. To assemble: Lightly flour your working surface. Roll the dough into a large 12-inch circle. Transfer onto the parchment paper and then onto the baking sheet.
  9. If you are using, sprinkle it evenly with almond meal leaving a 2-inch border on the sides.
  10. Spread the fruit on top slightly mounting in the middle, again leaving a 2-inch border around the edges.
  11. Roll the sides of the dough overlapping as you go around and pleating the dough.
  12. Whisk egg with a tablespoon of water to make egg wash.
  13. Brush the outer crust with egg wash and sprinkle with sliced almonds lightly pressing to make sure they stick.
  14. Bake 50-55 minutes or the crust turns golden brown. Transfer the galette onto a wire rack to cool.
  15. If preferred, dilute honey with a tablespoon of water and lightly brush the top of the fruit.
  16. Serve while it is still warm.

Fruit Galette Recipe

Fruit Galette Recipe Folded‑Over Crust – Fluffy Edges & Juicy Fruit

⚖️
Difficulty
Easy
⏲️
Prep Time
25 mins
🕒
Cook Time
35 mins
⏱️
Total Time
60 mins
🍽️
Servings
6

I’ve always loved crumbling under the warm lights of my mother’s kitchen in Marrakesh, where the air would soak in the scent of a simple, yet deeply satisfying homemade tart. When I moved to New York City’s Queens — especially the bustling food markets — I tried to bring that comforting rhythm into the fast pace of the city. This fruit galette was born on a chilly spring afternoon, blending my Moroccan flair for aromatic herbs with my Parisian training in pastry. A folded‑over crust keeps the fruity filling suspended, creating that unmistakable “no‑battles” brunch feel.

Picture a golden, flaked crust being drizzled with a gentle kiss of butter. The inside is a vibrant mosaic of plump strawberries, blueberries, peaches, and a lyrical splash of lemon. The crust is croquey, so that each bite releases the sweet juices into the air, while the dough’s buttery pockets cooperate to give lift. The single-touch cinnamon from my grandmother’s tea pot leans faintly in the background, while the citrus peel adds subtle rapture. The entire assembly glows like a sunny day in the High‑Line, ready to be sliced and as…

If you’ve ever tried a fruit pie and gotten frustrated with its sticky filling, this galette offers hustle‑free elegance. I’ll show you just how to fold the crust like a wrap, keep the filling from sinking, and dust a caramel‑over with oversweet sugar to finish. You’ll discover my signature secret: a clever use of acid (lemon) and cornstarch that stabilizes the fruit and keeps the galette airy. And, trust me — if you skip the Buttermilk step, you’ll miss out on that weightless crumb we’re after. For first‑timers, the best bet is to prepare the crust ahead, ever so gently pan‑fold to your liking, and let the garden‑flavored filling take the spotlight.

Why This Fruit Galette Recipe Is the Best

The unique folded‑over crumb‑topped crust transforms raw fruit into a sensational dish, giving the melty burst of freshness while the buttery border keeps the filling intact. My Moroccan fondness for sweet‑spiced crumbles gives that extra hands‑on flavor that no commercial pie ever does.

Through my Parisian pastry school training, I honed the technique of “al dente” dough. You simply roll to a 12‑inch circle, ensuring a crisp exterior without over‑baking the center, and then fold the edges 1 ½ inches in. The result is a magically pocketed crust that cradles the fruit like a mother‑handed sauce in a कड़ाही.

I’ve perfected the batter in my busy NYC schedule by using sour‑cream‑leavened dough. It turns out that this slight tang not only adds flavor but also lends the dough a soft‑but‑strong feel. Anyone who’s ever struggled with a dough that falls apart will find this trade‑off justified.

Fruit Galette Ingredients

I shop the morning cart in the Union Square Market for fresh berries, but if you are as local as I am, a quick stop at your neighborhood grocery can yield all the goodies below.

Ingredients List

  • 1 ½ cups all purpose flour
  • 1 Tablespoon granulated sugar
  • ½ teaspoon salt
  • 9 Tablespoons unsalted butter (very cold, cut into 9 or more pieces)
  • 6 Tablespoons of sour cream
  • 1 ½ lbs various prepared fruit¹ (strawberries, blueberries, peaches, pumpkin, or your favorite mix)
  • ¼ cup granulated sugar
  • 2 teaspoons Lemon juice
  • 1 ½ Tablespoons cornstarch²
  • ¼ teaspoon salt
  • 1 large egg
  • 2 teaspoons water
  • Coarse or granulated sugar for sprinkling (optional)
  • 1 ½ Tablespoons unsalted butter (cold and cut into small pieces, optional)

Ingredient Spotlight

Fresh Fruit: Choose a mix of ripe, firm berries or sliced peaches. The sweetness is balanced with lemon, so avoid fruit that’s either too watery or overly sweet. A great substitution is baked apples if you want a warm season twist.

Sour Cream: Adds a subtle tang and softens the dough. For a dairy‑free version, Greek‑style non‑fat yogurt works about equally, lending a light, creamy bite.

Butter: The cold butter pieces are crucial for flaky layers. If you can’t find heavy butter, utilize European or Greek butter for richer flavor.

Original Ingredient Best Substitution Flavor / Texture Impact
All Purpose Flour Whole Wheat Flour Adds nuttiness, denser crumb
Butter Coconut Oil Lighter, less rich but still flaky
Sour Cream Greek Yogurt Slight tang; slightly thicker

How to Make Fruit Galette — Step-by-Step

Always keep the dough cool. The colder, the flakier. I’ll walk you through each stage exactly as it unfolds in my kitchen.

Step 1: Combine Dry Ingredients

In a food processor, pulse flour, 1 Tablespoon sugar, and ½ teaspoon salt until mixed. The pulse foreshadows the texture of the final crust.

💡 emy’s Pro Tip: Pulse just until the ingredients are mixed; over-processing will turn the dough stiff.

Step 2: Scatter Butter

Put the cold butter pieces on the dry mix and pulse until pieces become pea‑size. The mix should look like coarse crumbs.

⚠️ Common Mistake to Avoid: Letting butter slip into the dough; keep it separate until pulsed.

Step 3: Add Sour Cream

Add sour cream and pulse again until the dough begins to clump. The mixture should be tacky but not sticky.

💡 emy’s Pro Tip: If the dough feels too shaggy, chill an extra 10 minutes.

Step 4: Chill the Dough

Wrap the dough in plastic and chill 30 minutes. This relaxes gluten and locks the buttery layers.

⚠️ Common Mistake to Avoid: Rolling the dough before it’s cool enough; it’ll stick.

Step 5: Preheat Oven & Mix Filling

Preheat oven to 400°F (205°C). Stir together fruit, ¼ cup sugar, lemon juice, cornstarch, and ¼ teaspoon salt until fruit coats.

💡 emy’s Pro Tip: Shake the fruit gently; it keeps the pieces from clumping.

Step 6: Roll & Transfer

Roll dough to a 12-13″ circle on a floured surface. Transfer to a baking sheet or pizza pan.

⚠️ Common Mistake to Avoid: Using too much flour; it dries out the crust.

Step 7: Egg Wash & Seal Edge

Whisk egg with 2 teaspoons water; brush a light coat on the dough. Fold edges 1‑2 inches over fruit, pinching to seal.

💡 emy’s Pro Tip: Keep the egg wash warm so it spreads evenly.

Step 8: Fill with Berry Patch

Spoon fruit into the center, leaving a rim of dough around. The fruit should look vibrant.

⚠️ Common Mistake to Avoid: Overfilling; fruit will flood the crust.

Step 9: Dot with Butter & Finish

Dot the fruit with optional cold butter pieces. Brush remaining crust with egg wash and sprinkle with sugar if desired.

💡 emy’s Pro Tip: Create a leaf‑like pattern for a rustic look.

Step 10: Bake & Cool

Bake 30‑35 minutes or until fruit bubbles and crust golden. Let cool 10 minutes before slicing.

⚠️ Common Mistake to Avoid: Cutting too early; the crust will be soft.

Step Action Duration Key Visual Cue
1 Combine dry 2 min Consistent lumps
2 Scatter butter 1 min Pea‑size pieces
3 Add sour cream 1 min Tacky clump
4 Chill dough 30 min Firm, pliable
5 Preheat & mix filling 5 min Coated fruit
6 Roll & transfer 3 min Even circle
7 Egg wash & seal 2 min Smooth edges
8 Fill with fruit 2 min Visible fruit
9 Dot butter & finish 1 min Polished look
10 Bake & cool 30 min Golden crust

Serving & Presentation

Slice the galette on a wooden board and serve a sprinkle of coarse sea salt for contrast. A small cup of vanilla‑infused yogurt or a drizzle of honey pairs beautifully.

The rustic architecture of the crust gives a sense of handheld comfort, which invites warmth at a sidewalk café. When you elevate your plating with a handful of fresh mint or a spoonful of raspberry compote, you channel both Moroccan vibrancy and French refinement.

Crack open a glass of sparkling rosé or a chilled papaya smoothie while savoring the fruit and its buttery blanket. In my city, this behind‑the‑counter piece has become a highlight for workshops, and I swear each bite sings of New York’s passion and North African spice.

Pairing Type Suggestions Why It Works
Side Dish Arugula salad with lemon vinaigrette Acidic refreshment balances sweet.
Sauce / Dip Brûléed sugar glaze Clings to crust, sweet‑twist.
Beverage Sparkling rosé or chilled hibiscus drink Alcoholic effervescence cleans palate.
Garnish Fresh mint leaves, edible flowers, lemon zest Adds color & aromatic finish.

Make‑Ahead, Storage & Reheating

I often boot this galette recipe into a meal‑prep routine, letting the dough chill the night before and finishing on the morning of a brunch. Rumor has it the cold sheet of dough keeps the crust crisp and marbledief.

Method Container Duration Reheating Tip
Refrigerator Air‑tight zip‑lock bag 2 days Heat at 375°F for 15 min.
Freezer Plastic freezer container 1 month Bake whole from frozen at 375°F for 35 min.
Make‑Ahead Glass dish 3 days Re‑cook whole at 375°F for 12 min.

When the galette is reheated, I always let it sit for a few minutes after baking; the crumbs reclaim their slightly salty bite. If you open the crumbled slices freshly, you’ll notice the butter melts only gently, leaving an airy coating versus the “shelf‑die” consistency of the un‑baked crust.

Variations & Easy Swaps

Variation Key Change Best For Difficulty Impact
Classic Apple & Ginger Ver. Use sliced apples & ground ginger Low‑rise autumn. Easy.
Gluten‑Free, Dairy‑Free Ver. Use almond flour & coconut milk. Special diets. Medium.
Summer Raspberry Twists Add fresh raspberries & lemon zest. Light summer brunch. Easy.

Classic Apple & Ginger Ver.

I replaced berries with thin apple slices, tossed them with a pinch of ground ginger and nutmeg, and let the acidic butter on the crust deliver the same crunch that I love.

Gluten‑Free, Dairy‑Free Ver.

Swap flour for almond flour and butter for coconut oil. The result is a slightly denser, but equally comforting, galette that works wonderfully on the same folding technique.

Summer Raspberry Twists

Center the galette in a basket of fresh raspberries, drizzle with lime‑infused simple syrup. The wet fruit pairs with the buttery crust for a refreshing twist.

What is a galette and how is it different from a pie?

A galette is an open‑faced pastry with a free‑form edge that curls around the filling. Unlike a pie, the crust is usually less structured, allowing fruit or vegetables to peek through the dough. It also often uses a single sheet of dough folded over the filling, which keeps the crust intact and ensures an even rise. This simplicity keeps galettes less intimidating for beginners while delivering a rustic, visually appealing presentation that pies simply can’t match.

Can I use frozen fruit for this galette?

Yes, frozen fruit works great, but best to thaw them first and squeeze out excess moisture. The active acidity of lemon juice and cornstarch in the filling bind the moisture, preventing a soggy galette. Some chefs even intentionally use frozen cherries or blueberries because they maintain their structure when heated, giving juicy, unclenched results.

What kind of flour should I use to keep the crust flaky?

All‑purpose flour is fine for beginners, yet for flakiness you can add 10% vital wheat gluten. Brown rice or oat flour blended with a bit of potato starch also yields a tender crumb. Keep the dough cold and avoid over‑kneading; this preserves the butter layers that create layers of flake without browning too quickly.

When does the crust of a galette turn golden?

Ginger, caramel, and even tomato sauces can curdle or curd, but the high heat causes crust to brown. The dough should reach a faint golden‑brown on the edges after about 25‑30 minutes at 400°F. If browning too fast, tent with foil to protect the tender interior, then finish with a final 5‑10 minute bake to develop flavor.

How long can I keep a pre‑baked galette fresh?

Refrigerated pre‑baked galette stays fresh for up to 48 hours; just give it a quick reheat in a 350°F oven for 10 minutes. For longer storage, freeze the fully baked galette in an airtight container for one month and thaw in the refrigerator overnight before reheating. Nugget‑level crinkly sets take time; do not reheat raw in a microwave, as it wilts the crisp edges.

What substitutions can I make if I’m allergic to eggs?

Swap the egg wash for a light brushing of melted butter or a small splash of warm milk for a non‑egg finish. If you wish to preserve the “snap” of the crust, a tablespoon of vegetable oil or a few drops of water with a fine‑poured glaze works well. The result is a flaky, but sturdier crust that still pairs vibrantly with fruit.

How do I keep the gelled fruit from leaking?

Use a high‑acidity fruit or rinse and pat it dry. The cornstarch and lemon solubility creates a viscous glaze that keeps fruit from leaking. Stir in a whisper of salt to counteract excess sugar and enhance each bite. If you coat each fruit slice individually, the reduced moisture ensures the galette remains crisp and intact.

Can the galette be used for savory fillings?

Absolutely. Swap fruit for sautéed vegetables such as zucchini, spinach, and mushrooms, or try a hearty pumpkin with sage. The crust should be thicker if you’re adding low‑water ingredients, and a splash of egg wash can keep the pastry supple. These savory galettes make a lovely lunch or dinner appetizer; pair them with a light salad or a vegetar­ian cheese.

What are the best ways to use fresh seasonal fruit in a galette?

During the spring, peas and apricots give sweet‑tart bursts; in summer, berries and peaches thrash up. Winter fruits like figs and citrus zest produce richness. Mix your favorite seasonal pairings and cover with the buttery layer so the fruit swells gently. You can even layer flavor with a sprinkle of herbal salt or a light drizzle of olive oil before baking to highlight the fruit’s natural juices.

What makes galette crust tastier than pie crust?

The folding technique traps pockets of dough that melt into golden, airy pockets. The dough benefits from the dead‑gutter portions left where the fruit is laid. Moreover, the crust’s looser structure retains more butter crystals that melt just as the fruit releases juice, accentuating flavor balance. The result is a pastry that holds a kiss of buttery caramel, yet leaves the crust delicate enough to bite into the wrist.

Share Your Version!

After sharpening that flaky, lemon‑zested crust, I’d love to hear how you’ve made this galette your own. Drop a star rating, leave a comment below, and show any unapologetic tweaking you’ve done.

Take a photo and tag me on Instagram or pin it on Pinterest with the handle @cookingwithemi. I’ll feature community entries and maybe give a shout‑out to your kitchen hacks.

What would you add to the Filling if you were staying mindful of allergies? Let me know in the comments!

From my NYC kitchen to yours — I hope this recipe brings as much warmth to your table as it does to mine. — emy 🧡

📌

Love This Recipe? Save It to Pinterest!

If you enjoyed this Fruit Galette recipe, don’t let it get lost in your browser tabs! 😄 Pin it now so you can find it again anytime — and explore hundreds more tried‑and‑tested recipes waiting for you on my Pinterest boards.

👉 Follow emy on Pinterest @chefrecipes2

📌 Pin this recipe · 🔁 Re-pin your favorites · 💬 Tag me when you make it — I love seeing your creations!

Print
clock clock iconcutlery cutlery iconflag flag iconfolder folder iconinstagram instagram iconpinterest pinterest iconfacebook facebook iconprint print iconsquares squares iconheart heart iconheart solid heart solid icon

Fruit Galette Recipe


  • Author: Chef Emy

Description

How to make a simple fruit galette! Galettes are easier to make than fruit pies, but every bit as tasty. Be sure to check out my how-to VIDEO!


Ingredients

Scale
  • 1 ½ cups all purpose flour
  • 1 Tablespoon granulated sugar
  • ½ teaspoon salt
  • 9 Tablespoons unsalted butter (very cold and cut into 9 or more pieces)
  • 6 Tablespoons of sour cream
  • 1 ½ lbs various prepared fruit¹
  • ¼ cup granulated sugar
  • 2 teaspoons Lemon juice
  • 1 ½ Tablespoons cornstarch²
  • teaspoon salt
  • 1 large egg
  • 2 teaspoons water
  • Coarse or granulated sugar for sprinkling (optional)
  • 1 ½ Tablespoons unsalted butter (cold and cut into small pieces, optional)

Instructions

  1. Combine flour, sugar, and salt in the basin of a food processor³ and pulse to combine.
  2. Scatter butter pieces over the top of your dry ingredients and pulse until butter is cut into the dry ingredients and the mixture resembles coarse crumbs.
  3. Add sour cream and pulse again until the mixture begins to clump together. Transfer to a piece of plastic wrap or wax paper and form into a ball. Lightly flatten into a disc and chill for at least 30 minutes in the refrigerator.
  4. While galette crust is chilling, preheat oven to 400F (205C) and prepare your fruit filling.
  5. Combine fruit, sugar, lemon juice, cornstarch, and salt in a large bowl and stir until well-combined. Set aside.
  6. Once dough has finished chilling, remove from refrigerator and transfer to a clean, lightly floured surface. Dust with additional flour and roll out to a 12-13 circle. Transfer to a baking sheet (sometimes I will use a round pizza pan, but a standard cookie sheet works, too).
  7. Prepare egg wash by whisking together egg and water in a small bowl. Use a pastry brush to lightly brush your pie dough with egg wash (this will help keep the galette from getting soggy). Dont discard egg wash yet.
  8. Give your fruit one more stir in the bowl and then carefully transfer to the center of your galette crust, leaving a 2 perimeter of fruit-free crust.
  9. Fold the perimeter/border of your crust carefully over the fruit filling and pinch together to secure (it will not completely cover it, you should have a nice circle of exposed fruit in the center!).
  10. Dot the fruit with butter pieces, if using.
  11. Brush the folded-over pastry with egg wash and sprinkle with sugar, if desired.
  12. Transfer to 400F (205C) oven and bake for 30-35 minutes or until the fruit is bubbling and the crust is a nice golden color. Allow to cool before slicing and serving.

Peach Blueberry Galette

Peach Blueberry Galette with Coarse Sugar Crumble Top – A Rustic New York Sunset Delight

⚖️
Difficulty
Medium
⏲️
Prep Time
30 mins
🕒
Cook Time
50 mins
⏱️
Total Time
80 mins
🍽️
Servings
6

During a late‑night walk through the Brooklyn farmers’ market, I spotted fresh peaches and blueberries that echoed memories of my mother’s kitchen in Marrakesh, where she’d steam fruit for sweet tagines. Inspired by that shimmering heat, I imagined this Peach Blueberry Galette with a coarse sugar crumble top, a technique I learned in Paris when I was mastering tart shells. The first time I tasted it, the buttery crust felt like a sunset’s warmth, and the fruit burst like summer in New York’s summer.

The aroma is a splash of sweet citrus and fresh blueberries, with the faint puff of caramelized sugar on the crust. Hunger tingles when the golden crust cracks, revealing velvety peaches and pillowy blueberries. The coarse sugar creates a delightful crunch that complements the soft fruit, while the pastry’s flaky layers add a buttery, golden undertone—each bite a symphony of textures reminiscent of weeks spent simmering tagines on a hot stove.

This version of the galette is my signature adaptation that bridges Moroccan spice with French pastry flair. I slick the crust with a light glaze from the reserved egg white to keep it glossy. A common mistake is over‑baking the fruit—just bake until bubbles pop and the edges brown. My tip: sprinkle the coarse sugar just before baking; it caramelizes naturally and adds that crunchy, sweet finish.

Why This Peach Blueberry Galette Recipe Is the Best

The Flavor Secret is the fine balance between the tartness of blueberries and the mellow sweetness of peaches, layered beneath a buttery crust that carries a hint of caramel from the coarse sugar. My Moroccan upbringing taught me to let sugars caramelize, and this technique makes the galette unique.

Perfected Texture is achieved by folding the crust and ensuring the dough remains cold. If the dough warms too much, the butter melts and the crust turns soggy. The rustic folding method, which I adopted from a French patisserie, gives the edges a delicate pleat that holds the fruit and offers a cozy, flaky bite.

Foolproof & Fast: The dough is a no‑mix step with a food processor; the peaches bite through in about 50 minutes, giving a whole day’s dinner or a dessert that’s ready in under 90 minutes, which is ideal for a busy New York weekday.

Peach Blueberry Galette Ingredients

I usually shop at the Union Square Greenmarket for the best peaches, and the local farmer’s stall near the Atlantic Terminal for blue‑berry bursts. My mom’s spice rack still holds a small jar of pinch‑of–cinnamon; that’s a secret tweak I sprinkle into the filling on a whim.

Ingredients List

  • 1 ½ cups all‑purpose flour, plus more for rolling
  • 1 tablespoon sugar
  • ¼ teaspoon salt
  • 11 tablespoons cold butter, cut into ½ tablespoon pieces (Land o’ Lakes)
  • 1 egg yolk (reserved egg white for glaze)
  • 3 tablespoons milk
  • 2 cups peeled and sliced fresh peaches (about 1 pound)
  • ½ cup fresh blueberries
  • ¼ cup sugar
  • 2 tablespoons flour
  • Pinch of salt
  • 1 egg white, beaten
  • 2 tablespoons sugar (coarse, for topping)

Ingredient Spotlight

All‑Purpose Flour – The backbone of any pastry. Look for a low‑protein brand for a tender crumb; swap with almond flour for a gluten‑free version but expect a tighter texture.

Peaches – Fresh, juicy peaches with a clear center make the most fragrant filling. If out of season, frozen slices thaw and drain well; they reduce the need to toss with sugar for sweetening.

Blueberries – Reserve a small pinch of lemon zest when mixing to keep the berries from turning a dull brown color. Substitution: strawberry slices can give a sweeter profile.

Original Ingredient Best Substitution Flavor / Texture Impact
All‑Purpose Flour Almond Flour Nuts‑y, denser, slightly sweet
Peaches Nectarines Clumsier skin, very juicy
Blueberries Strawberries Slightly tangier, sweeter

How to Make Peach Blueberry Galette — Step-by-Step

Let’s begin making a galette that will make your guests stop the traffic on 5th Avenue for dessert.

Step 1: Make the Dough

Combine the flour, 1 Tbsp sugar, and ¼ tsp salt in a food processor. Pulse to mix. Add the cold butter pieces and pulse until the mixture looks like coarse cornmeal.

💡 emy’s Pro Tip: Keep the butter extremely cold; if it softens, the dough will be greasy.

Step 2: Add Egg Yolk & Milk

Whisk the egg yolk with the 3 Tbsp milk and add to the dough. Pulse until the dough comes together. Pour onto plastic wrap, flatten into a disk, wrap, and chill for 30 min.

⚠️ Common Mistake to Avoid: Forgetting to refrigerate the dough so it sticks to the work surface.

Step 3: Preheat Oven & Prepare Baking Sheet

Preheat oven to 350°F. Line a rimmed baking sheet with parchment paper. Keep the sheet on the rack that’s 1‌½ inches from the bottom.

💡 emy’s Pro Tip: Keep the sheet warm for a slightly longer bake; the crust browns evenly.

Step 4: Toss Fruits

In a bowl, combine peaches, blueberries, ¼ cup sugar, 2 Tbsp flour, and a pinch of salt. Toss until coated. Rehearse a quick squeeze of lemon juice to keep blueberries bright.

⚠️ Common Mistake to Avoid: Over‑tossing the fruit – it can lose its shape.

Step 5: Roll Out & Assemble

On a floured surface, roll the dough into a 12‑inch circle. Transfer to the parchment sheet. Arrange fruit in the center, leaving a 1‑inch border.

💡 emy’s Pro Tip: Use a toothpick to gently press fruit into the crust to keep patches from sinking.

Step 6: Fold & Glaze

Fold the uncovered edge over the fruit, pleating as needed. Brush the exposed crust with the reserved egg white. Sprinkle in the coarse sugar.

⚠️ Common Mistake to Avoid: Over‑blooming the glaze; the crust can look wet.

Step 7: Bake

Bake for about 50 min, until the crust turns light brown and bubbles form. When it’s ready, let chill 10 min then slice.

💡 emy’s Pro Tip: Take it out a few minutes before the timer if the top is browning too quickly.

Step Action Duration Key Visual Cue
1 Make Dough 5 min Butter powdery
2 Add Egg & Milk 2 min Neat disk
3 Preheat & Prep Sheet 10 min Smooth parchment
4 Toss Fruits 3 min Glazed berries
5 Roll & Assemble 10 min Polished edges
6 Fold & Glaze 4 min Golden
7 Bake 50 min Bubbles & caramel

Serving & Presentation

The galette is a canvas. Slice it and let the golden crust drip onto a rustic wooden board. A dollop of whipped cream, perhaps with a dusting of baking powder from my Parisian bakery, adds airy creaminess. Scatter a few fresh mint leaves to echo Moroccan broth’s freshness.

Pair with a bold, chilled glass of sparkling rosé from the Brooklyn stockroom or a hot espresso for a more French café vibe. Pairing this with a light salad of arugula, goat cheese, and an orange vinaigrette works like a symphony in your palate.

If you’re serving this at an evening soiree, set it at eye level on a low table—allow the tangle of fruit to roam freely, giving a modern twist to a traditional galette.

Pairing Type Suggestions Why It Works
Side Dish Roasted asparagus, sautéed spinach, caramelized onions Earthy vegetables cut through buttery crust
Sauce / Dip Honey‑laced yogurt, lemon butter drizzle A little acidity brightens fruit flavors
Beverage Light rosé, chilled rosé sparkling wine, citrus cocktail Fruit notes echo sweet fruit
Garnish Fresh mint, edible flowers, toasted almond slivers Adding fresh garnish keeps dish visually vibrant

Make-Ahead, Storage & Reheating

After prepping dough, I often leave the galette on the counter to chill while I finish my pantry. That way, if a delivery driver comes in at 2 pm, I can pull out a slice and serve hot. Freezing is a challenge due to fruit, but you can freeze uncovered already baked galette for up to a month; reheat from a low 300°F until warm.

Method Container Duration Reheating Tip
Refrigerator Aluminum tray 2 days Reheat 10 min at 350°F, then rest 5 min
Freezer Vacuum bag 1 month Thaw 4 h, bake 30 min
Make-Ahead Covered loaf pan 3 days Reheat 15 min at 350°F; serve warm

When reheating from the freezer, always refreeze if you are not serving all at once; residual moisture can ruin the crust. I’ve learned to separate crust and fruit, wrapping the fruit and letting the crust crisp separately during reheating.

Variations & Easy Swaps

Variation Key Change Best For Difficulty Impact
Pomegranate Pear Galette Add pomegranate seeds, swap peaches for pears Seasonal fall Easy
Gluten‑Free Version Use rice flour base, almond flour dough Allergy friendly Mild
Spiced Cinnamon‑Ginger Galette Infuse filling with cinnamon & ginger Autumn gatherings Easy

Pomegranate Pear Galette

Blend the tang of pomegranate seeds with the subtle sweetness of ripe pears; the flavors echo Moroccan tagines in a rustic pastry surprise. The pomegranate’s bursts make each bite a jewel of color and flavor.

Gluten‑Free Version — Dairy‑Free

Replace all‑purpose flour with a gluten‑free blend and butter with coconut oil. The crust turns slightly denser, yet the buttery note remains; the galette keeps its crisp edges and comforting bite.

Spiced Cinnamon‑Ginger Galette

Add a pinch of ground cinnamon and freshly grated ginger to the fruit mixture. The warm spices mingle with the fruit, creating an aromatic, cozy dessert ideal for fall brunches.

How long should I bake a galette?

In my experience, a galette takes about 45 to 55 minutes in a preheated 350°F oven. The crust will be golden brown and the fruit will have gentle bubble crowns, while the edges turn a light tan. If you’re a seasoned baker or in a pinch, you can cut the baking time to 40 minutes, but be sure to check the top after 35 minutes to avoid over‑browning.

Can I freeze a galette?

Yes, freezing a galette is doable but you’ll want to plan for an extra twist in texture compared to a freshly baked one. Wrap the freshly baked galette in plastic wrap and parchment, then seal it in a freezer bag. Store for up to a month. When ready to eat, thaw at room temperature for 4–6 hours and then bake a quick 15–20 minute session at 350°F, letting the crust crisp up again.

What fruit works best in a galette?

A galette thrives on fruits that hold their shape when heated, such as peaches, pears, apples, cherries, berries, and rhubarb. Balance the tartness and sweetness by mixing a couple of fruits; peaches plus blueberries creates a sweet‑tart blend that pairs beautifully with a buttery crust. I often pair peach‑blueberry or peach‑pear blends for a balanced flavor profile.

Do I need to pre‑bake the crust?

With a galette, pre‑baking the crust isn’t necessary because the filling is relatively wet and the crust is thin. However, you can blind‑bake for 5–7 minutes before adding the fruit if you want a crisper bottom. The butter and crumb blank crust will already yield a flaky texture, so most bakers skip that step to keep the process swift.

How can I prevent the fruit from making the crust soggy?

The trick is to absorb juices that escape during baking. Toss fruit with a touch of flour or cornstarch before assembly; that helps pull moisture and keep the pastry from getting soggy. Alternatively, add a thin layer of grated cheese or crust crumbs between fruit and pastry, or even use a crumbly mixture of equal parts flour and powdered sugar.

Can I make the galette ahead of time?

Yes, you can assemble the galette 24 hours ahead, smooth the crust, cover it with wax paper, and refrigerate. The dough will stay pliable and the fruit will sit. When ready to bake, preheat your oven and bake at 350°F for about 50 minutes. The crust will still crisp up nicely, and the fruit will stay juicy.

What sugar should I use for the filling?

A light granulated sugar works fine for plain fruit, as it dissolves quickly. When you want that extra caramelized crunch, opt for a harsher grated sugar or semisweet brown sugar. For a rich taste, you might also toss the fruit with a drizzle of honey, which adds sweetness and a subtle floral note. Choose according to the flavor narrative you’re aiming to create.

Can I use frozen fruit in a galette?

Frozen fruit is a safe, $150$ salvage, especially when out of season. Thaw and drain it first to avoid excess water standing on the crust. You can add a splash of juice or vinegar, but also remember to toss with a little flour to help the fruit hold together in the bake. Frozen fruit works nicely while keeping your galette’s sweet, tangy flavor profile intact.

Share Your Version!

If you enjoy this Peach Blueberry Galette, drop a comment or star my post in the corner. Feel free to post a photo on Instagram or Pinterest and tag @cookingwithemi. When you try the version with French crust tweaks, let me know how the sugar crunch turned out—or ask me if you have a Moroccan spice you think would add a wow factor!

From my NYC kitchen to yours — I hope this recipe brings as much warmth to your table as it does to mine. — emy 🧡

📌

Love This Recipe? Save It to Pinterest!

If you enjoyed this Peach Blueberry Galette recipe, don’t let it get lost in your browser tabs! 😄 Pin it now so you can find it again anytime — and explore hundreds more tried‑and‑tested recipes waiting for you on my Pinterest boards.

👉 Follow emy on Pinterest @exorecipe

📌 Pin this recipe · 🔁 Re-pin your favorites · 💬 Tag me when you make it — I love seeing your creations!

Print
clock clock iconcutlery cutlery iconflag flag iconfolder folder iconinstagram instagram iconpinterest pinterest iconfacebook facebook iconprint print iconsquares squares iconheart heart iconheart solid heart solid icon

Peach Blueberry Galette


  • Author: Chef Emy

Description

A scrumptious dessert featuring peaches and blueberries and a buttery pastry crust!


Ingredients

Scale
  • 1 ½ cups flour, plus more for rolling
  • 1 tablespoon sugar
  • ¼ teaspoon salt
  • 11 tablespoons cold butter, cut into ½ tablespoon pieces, I used Land o' Lakes
  • 1 egg yolk (reserved white to glaze dough)
  • 3 tablespoons milk
  • 2 cups peeled and sliced fresh peaches (about 1 pound)
  • ½ cup fresh blueberries
  • ¼ cup sugar
  • 2 tablespoons flour
  • Pinch of salt
  • 1 egg white, beaten
  • 2 tablespoons sugar (coarse sugar preferred but granulated is fine)

Instructions

  1. To make the dough, combine the flour, sugar, and salt in a food processor and pulse to combine. Add the butter to the flour and pulse till the butter is broken into small pieces and the mixture resembles cornmeal.
  2. Mix together the egg yolk and milk and add to the dough. Pulse till the dough comes together. Pour onto a piece of plastic wrap and press into a flat disk. Wrap and chill for 30 minutes.
  3. Preheat the oven to 350°F. Line a rimmed baking sheet with parchment paper and set aside.
  4. Carefully toss the peaches and blueberries with the sugar, flour, and salt.
  5. Roll out the dough to a 12-inch round on a lightly floured surface. Carefully move the dough to the baking sheet. Arrange the fruit in the center of the dough, leaving about an inch of the perimeter uncovered.
  6. Fold the outside edge of the dough over the fruit, pleating as needed. Brush egg white over the exposed crust. Sprinkle the coarse sugar over the dough and fruit.
  7. Bake the galette until the crust turns a light brown and the filling bubbles, about 50 minutes. Let cool for 10 minutes then cut and serve warm with whipped cream or vanilla ice cream, if desired.

Peach Galette Recipe – The Best!

Peach Galette Recipe – French Pastry Techniques for a Crispy, Buttery Crust – A Fresh Take

⚖️
Difficulty
Easy
⏲️
Prep Time
20 mins
🕒
Cook Time
55 mins
⏱️
Total Time
75 mins
🍽️
Servings
6

It’s been a while since I first carried a French baguette into a Moroccan souk, but that memory still fuels every pie crust I touch. When I stood in a Manhattan farmer’s market, the scent of ripe peaches stirred a little nostalgia, and I thought: why not bring the effortless elegance of a French galette to this fresh, summery fruit?

Imagine a buttery, flaky dough that curls around the sweet, caramel‑led peaches, speckled with cinnamon and a hint of vanilla, while the crust bubbles like an open‑mouth pastry. The buttery crumb, kissed by the slight bite of salt, plays off the soft, juicy peaches, creating a symphony of textures that almost sing in your mouth.

I took this classic Southern comfort and turned it into a Paris‑inspired pastry using a simple chilled dough technique. No flipping the dough; no blind‑baking. I’ll reveal the key pro tip for a buttery crackle and warn you about one common mistake that can ruin the crispness.

Why This Peach Galette Recipe Is the Best

The secret sauce? A chilled, pinch‑crusted dough that melts in the oven but stays puffed, thanks to the combination of butter and cold shortening. This method, honed in my Paris kitchens, cuts prep time and guarantees that golden, flaky edges that hold the peach swirls perfectly.

The texture feels like a mosaic—every bite delivers the soft, tender dough, the buttery pinches, and the luscious peach filling that bursts with tangy-sweet flavor. The result is both a visual treat and a mouth‑watering experience that rides that sweet, tart spectrum the way a Moroccan tagine balances spice.

Even if you’re new to baking, the steps are straightforward and the dough curls naturally during baking. No plus‑up crust or blind‑bake. I’ve packed techniques I learned in flagship Paris pâtisserie into this recipe, and you’ll find that the galette will rise beautifully without accidental holes.

Peach Galette Ingredients

I fetched each ingredient from the market stalls crowned with early‑summer peach ribbons—packed in Canadian fields—plus a few pantry staples that survive every kitchen in NYC. The sweetness is pure, the butter crisp, the flour light; a trio that sings like a French café at dawn.

Ingredients List

  • 1½ cups all‑purpose flour
  • ½ cup cold butter (cut into ½‑inch pieces)
  • 3 Tbsp cold shortening
  • 2 Tbsp granulated sugar
  • ½ tsp salt
  • ¼ cup milk
  • ½ cup granulated sugar (for filling)
  • 3 Tbsp flour (for filling)
  • ½ tsp ground cinnamon
  • 4–5 ripe peaches, peeled, pitted, sliced

Ingredient Spotlight

All-Purpose Flour – Brought structure and a fine crumb. I recommend a medium‑protein flour for a lighter crust. If you prefer whole‑grain, swap for ½ cup whole wheat flour but expect a denser base. The texture remains tender, but the flavor deepens with toasted nutty notes.

Cold Butter – This is what gives the galette its buttery pull and flaky layers. Choose European butter for a richer taste. If you’re vegan, replace with ¼ cup canola oil to keep the tenderness; the crust will still puff but will be less crumbly.

Peaches – The stars of the show. I favor Rosalina peaches from the Midwest; they hold their shape. For a deeper, tart punch, use a small gram of Sante peach. If peaches are out of season, ripe nectarines add a bright zing.

Original Ingredient Best Substitution Flavor / Texture Impact
All-purpose flour Whole wheat flour Denser crust, nutty flavor
Butter Coconut oil Slight coconut hint, less crumbly
Peaches Nectarines Tart brightness, slower melting

How to Make Peach Galette — Step-by-Step

Below is a simplified roadmap that keeps the batter from getting soggy while letting the peaches build their own caramel flavor in the oven.

Step 1: Mix Dry Ingredients

In a large bowl, combine 1½ cups flour, 2 Tbsp sugar, ½ tsp salt, and 3 Tbsp flour for the filling. Using a silicone mixer or your hands, whisk until the mixture is lightly crumbly.

💡 emy’s Pro Tip: Start with a blender to get a fine crumb that sticks better to the butter.

Step 2: Add Butter and Shortening

Tip the cold butter and 3 Tbsp shortening into the dry mix. Pulse until the dough looks like coarse crumbs and small flecks of butter are visible.

⚠️ Common Mistake to Avoid: Adding too much butter or letting the dough warm can make it sticky and collapse.

Step 3: Chill Dough

Wrap the dough in parchment and refrigerate for at least 45 minutes—1 hour for a perfect, crisp edge.

💡 emy’s Pro Tip: Let it sit 2 hours if you’re preparing ahead; the cold keeps the butter from melting.

Step 4: Preheat Oven

Set your oven to 375 °F (190 °C) and allow it to heat fully before you bake.

Step 5: Prepare Peach Filling

In a bowl, toss sliced peaches with ½ cup sugar, 3 Tbsp flour, and ½ tsp cinnamon until coated. Set aside.

⚠️ Common Mistake to Avoid: Overmixing can cause the peaches to break apart.

Step 6: Assemble Galette

Roll the chilled dough to an 11‑inch circle on parchment. Place it on a rimless baking sheet. Arrange peach chunks in a close concentric pattern, leaving the center for a smaller circle of crust.

Step 7: Fold Edges

Fold the dough over the peaches, creating overlapping folds. Aim for no cracks so the juices don’t leak.

💡 emy’s Pro Tip: Brush the exposed crust with a beaten egg for a dazzling golden finish.

Step 8: Bake

Bake for 50–60 minutes. The top should be golden and the crust crisp. If the edges brown too fast, tent loosely with foil.

⚠️ Common Mistake to Avoid: Leaving the pie uncovered too early can scorch the crust.

Step 9: Cool & Serve

Let the galette rest on a wire rack 10 minutes before slicing. Serve warm with a dollop of vanilla ice cream if you like.

Step Action Duration Key Visual Cue
1 Mix dry 5 min Crumbly mixture
2 Add butter 3 min Flecks of butter visible
3 Chill dough 45–60 min Firm, cold dough
4 Preheat oven 10 min Temperature steady
5 Toss peaches 5 min Peach coating glistens
6 Assemble & fold ≈10 min Edges sealed
7 Bake 50–60 min Golden crust
8 Cool & serve 10 min cool Sliced golden wedges

Serving & Presentation

Serve each wedge on a warm crumbly croissant or a small bowl of Greek yogurt for a textural contrast. Sprinkle with your favorite pistachios or toasted almond slivers, and drizzle a little honey – the way I did on a Sunday at the Mercado de Levittown. It reads like a meal from a Paris café with a North African soul.

For a brunch twist, add a dollop of mascarpone cream and a dusting of powdered sugar. If you’re watching calories, finish with a light drizzle of pure maple syrup and a sprig of fresh mint. The result makes a show‑stopping yet comforting platter.

Pairing Type Suggestions Why It Works
Side Dish Roasted Beet Salad, Fresh Herb Crostini Earthy contrast and flavor balance
Sauce / Dip Honey‑yogurt vinaigrette, Lemon‑caper butter Adds tart zing and richness
Beverage Sparkling rosé, Peach hibiscus tea, Vanilla liqueur Refreshes palate and echoes peach
Garnish Fresh mint, toasted pistachios, edible flowers Picturesque and aromatic

Make-Ahead, Storage & Reheating

I love prepping ahead for my weekly brunch menu. I bake the galette a day in advance, lock it in an airtight aluminum lid for fridge storage, and reheat in a hot 375 °F oven for 10 minutes for that fresh‑baked crunch.

Method Container Duration Reheating Tip
Refrigerator Airtight sealable bag 3 days Reheat 10 min at 375 °F
Freezer Fridge‑safe container 2 months Thaw 4 hrs, bake 8 min at 400 °F
Make‑Ahead Ready‑to‑bake parchment on tray 1 day Finish baking straight from fridge 8 min

When you reheat, keep an eye on the crust; a bit of parchment paper beneath helps preserve crispness. For the next day, I often finish with a sprinkling of sea salt to bring out the peach’s natural sweetness.

Variations & Easy Swaps

Variation Key Change Best For Difficulty Impact
Lemon‑Blueberry Galette Add ½ cup blueberries, zest of one lemon, 1 tbsp lemon juice Summer fruit lovers More prep but same bake time
Gluten‑Free Peach Galette Use 1 cup gluten‑free blend plus ¼ cup xanthan gum Allergy friendly Minor adjustments in dough handling
Spiced Ginger Peach Galette Add 1 tsp ginger, ¼ tsp cloves to filling Holiday menu Same process, aromatic boost

Lemon‑Blueberry Galette

I keep this variant in my Rio de Janeiro kitchen during summer — the blueberries give a rainbow pop, and the lemon zest brightens the sweetness. A refreshing palate cleanser, it’s almost like a fruit salad wrapped in pastry.

Gluten‑Free Peach Galette — Dairy‑Free

By swapping whole‑grain flour with a certified gluten‑free blend and replacing butter with oat butter, I made a version that still manages to rise but tastes surprisingly delicate — a win for gluten‑sensitive diners.

Spiced Ginger Peach Galette — Seasonal Twist

Adding ginger and a pinch of cloves gives the pastry an almost Moroccan spice aroma while the peach remains a star. Think of it as a sweet‑spicy croissant for the fall season.

Can I make the peach galette ahead of time?

I love the idea of prepping for a busy week. Absolutely, you can bake the galette a day ahead and refrigerate it in an airtight container. When you’re ready to serve, reheat it in a 375 °F oven for about 10 minutes until the crust is golden again. The filling will be warm and the crust will retain its crispness. For a fresh‑look, trim stray edges before reheating. This prep leaves you with ready‑made dessert that’s still delicious.

What is the best type of peach for this galette?

Selection is crucial because the peach’s texture determines how juicy the filling turns out. Look for peaches that have a slight give under pressure but are firm enough to hold their shape when sliced. The more blush or ruby rosy color, the sweeter and milder the fruit will be. For a bit of tartness, choose peaches that have a deeper hue or a slight purple tint. They’ll give the galette a lovely contrast, especially in summer heat, and tend to stay rosettes longer in the oven.

Do I need an oven thermometer for baking a galette?

You’re welcome to use one for extra precision, but the recipe works well with a standard oven set to 375 °F (190 °C). If you’re prone to oven temperature variations, an internal thermometer can help you confirm the crust reaches 190 °C by checking the bottom of the baking sheet after 10 minutes. This ensures the galette is cooked through without over‑browning. Many of my NYC friends rely on digital timers and visual cues rather than thermometers.

Can I freeze the galette for later use?

Yes—freezing is an excellent option for long‑term storage. Freeze the fully baked galette in a bag or foil, wrapped tightly to avoid freezer burn. When you’re ready to eat, let the pastry thaw overnight and bake it at 375 °F for about 8–10 minutes. The crust will regain its crispness, and the peach filling remains moist and flavorful. This approach is great for holiday parties or for meal‑prep mindful of freezer hustle in this city.

What’s a quick alternative if I’m short on time?

You can skip the chill time by press‑compressing the dough quickly into parchment and letting it sit at room temperature for 15 minutes. Then, follow the assembly and bake as usual. The final crust may be slightly less flaky, but it will still deliver a buttery, caramelized peach filling. Another trick is to use pre‑made pie crust or a store‑bought puff pastry—just adapt the sauce ratios for a swifter turnover.

Is it okay to use frozen peaches in the galette?

Frozen peaches can work if they’re thawed and drained well; otherwise they’ll release too much liquid, making the crust soggy. I recommend thawing them in a colander, patting them dry, and tossing them in a light flour mix before adding the sugar. That helps absorb moisture and keeps the filling from becoming watery. Don’t forget to reduce the liquid sugar amount slightly if the peaches are particularly juicy.

Can I swap peaches with another fruit?

Absolutely. Pears, nectarines, or ripe plums make excellent replacements for peaches. Each brings a distinct flavor—maybe a subtle perfumed note from pears or a tart sweetness from plums. Adjust the sugar level slightly to match the fruit’s natural sweetness. The baking time stays the same, but you may need to tweak the flour amount in the filling if the alternative fruit is softer.

Do I need to blind bake the crust?

You don’t have to blind bake a galette because it’s a free‑form pie only partially covered by dough. The over‑folded edges will seal the filling in, so you just bake until the crust is golden. Blind baking is more common for fully covered pies where you need to let the crust set before adding filling. In our case, the crust’s puffing from the butter gentle gives you a flaky interior without it sinking into the peach.

How can I prevent the galette crust from becoming soggy?

You’ll want to keep the peaches dry before baking. Pat the peeled slices with paper towels, toss them in a very light flour mix, and then re‑mix with the sugar. Also, the upper crust of the galette should be brushed with beaten egg or milk to help it brown. Finally, lay a layer of grated parmesan on the dough edges before folding, which will absorb excess moisture and keep that golden snap alive.

Can I add a middle crust to the galette?

Yes, if you prefer a fully covered pastry. Roll the dough into a circular shape, wrap loosely around the peaches, and pinch the edges. The crust will rise more, giving you a pie‑like texture. A middle crust will add a bit of additional bake time, so check the center with a knife for doneness. Many chefs design the galette for an open‑handed look, but a full crust can make the display more humble and rustic.

Share Your Version!

I’d love to hear how you’ve adapted this Peach Galette recipe. Drop a comment below, rate it, and let me know which ingredient you swapped or where you added that extra pinch of love. Feel free to post a lively photo on Instagram or Pinterest and tag @cookingwithemi. In what way did you sprinkle a little French flair into your galette? I’m all ears.

From my NYC kitchen to yours — I hope this recipe brings as much warmth to your table as it does to mine. — emy 🧡

📌

Love This Recipe? Save It to Pinterest!

If you enjoyed this Peach Galette recipe, don’t let it get lost in your browser tabs! 😄 Pin it now so you can find it again anytime — and explore hundreds more tried‑and‑tested recipes waiting for you on my Pinterest boards.

👉 Follow emy on Pinterest @chefrecipes2

📌 Pin this recipe · 🔁 Re-pin your favorites · 💬 Tag me when you make it — I love seeing your creations!

Print
clock clock iconcutlery cutlery iconflag flag iconfolder folder iconinstagram instagram iconpinterest pinterest iconfacebook facebook iconprint print iconsquares squares iconheart heart iconheart solid heart solid icon

Peach Galette Recipe


  • Author: Chef Emy

Description

This Peach Galette Recipe is so simple to make and it tastes delicious. If you want the flavor of a peach pie, this is a nice alternative.


Ingredients

Scale
  • 1½ cup flour
  • ½ cup butter (chilled and cut into ½-inch pieces)
  • 3 tbsp shortening (chill)
  • 2 tbsp sugar
  • 1 pinch salt
  • milk
  • raw sugar (You can use granulated sugar for sprinkling on crust.)
  • ½ cup sugar
  • 3 tbsp flour
  • ½ tsp cinnamon
  • 4 or 5 peaches (skinned and sliced)

Instructions

  1. Place flour, butter, shortening, sugar, and salt in a Cuisinart blender.
  2. Pulse the blender at first, and the dough will resemble a very coarse meal.
  3. Continue to mix the pastry dough until it forms a round soft ball.
  4. Sprinkle a piece of parchment or wax paper with flour and place the dough on the paper. Flatten into a small disk shape.
  5. Wrap up the dough in the parchment paper and refrigerate for at least two hours.
  6. Preheat the oven to 375° F.
  7. Peel and slice peaches into ¼ – ½" thick wedges.
  8. In a medium-size bowl, stir the granulated sugar, flour, and cinnamon.
  9. Gently toss prepared peaches into the sugar mixture. You can add a tiny bit more sugar if your peaches are tart,
  10. Remove dough from the refrigerator. Place on a floured piece of parchment measuring 12" long and wide. I transfer the dough and paper to a rimless baking sheet.
  11. Beat your ball of chilled dough with a rolling pin and knead the dough briefly around the edges to soften slightly. Moving from below center, roll the dough out to the edge. Lift the dough, turn it slightly, and give another roll. Sprinkle dough on the top and bottom with flour and keep rolling.
  12. Create an 11" circle with the dough. I needed the edges a bit thicker to lift it over the top of the galette.
  13. Starting 1 to 1½ inches from the edge of the round, arrange the peach wedges in a single layer in concentric circles until you reach the center of the circle. When placing the peaches on the dough, leave the extra juice in the bowl and not on your galette.
  14. Fold the outer edges of the pastry over the peaches, creating overlapping folds as you work around the perimeter. Once you form the galette, ensure no cracks in the dough where the peach filling can seep.
  15. Brush the top of the pastry with the milk and sprinkle with sugar.
  16. If your galette is juicy, place another baking sheet underneath to catch any juices overflowing.
  17. Bake for 50 to 60 minutes, until the crust is golden and the filling is cooked. I covered my galette loosely with tin foil and the last 10 minutes of baking uncovered it.
  18. Let the galette cool on the baking sheet on a wire rack. Cut into wedges and serve warm.

Galette Dough Recipe (From Scratch)

Galette Dough from Scratch – Buttery Home-Baked Crust – A Delightful Start

⚖️
Difficulty
Easy
⏲️
Prep Time
15 mins
🕒
Cook Time
25 mins
⏱️
Total Time
40 mins
🍽️
Servings
4

When I first walked into the bustling farmers market in Brooklyn, the smell of fresh‑cut butter mingled with the spice‑laden air that reminded me of my mother’s kitchen back in Rabat. The thought of making a buttery galette dough from scratch, rather than scrambling for a pre‑made mix, felt like an act of culinary freedom—a sweet rebellion against bland, mass‑produced pastries.

The dough itself is a study in contrast: the silk‑smooth flour dance with cold butter cubes, the lightness of the iced water that glazes them into transparency, and the slight salty kiss from a pinch of kosher salt. There’s a subtle grain of white rice flour dusting the surface that I whisper after my training in Paris, reminding myself that texture matters. When you press it between fingers, it holds together like a gentle, buttery kiss—ready to transform any filling into a golden, crackling canvas.

I won’t lie—crafting the dough can feel a little intimidating at first, especially if it clumps or dries. The trick I learned over years of training is to keep everything cold and be patient when adding water, letting the dough come together slowly. The result is a buttery crust that’s crisp on the edges, tender in the middle, and that lets you flaunt flavors from sweet apricots to savory goat cheese while keeping the base utterly outstanding. (💡 emy’s Pro Tip: Keep portions of butter on hand to refresh the dough if it dries during its chill on a weekday lunch break.)

Why This Galette Dough Recipe Is the Best

The secret lies in the efficiency of my buttery home‑baked crust. The dough takes a matter of minutes to assemble, yet the interchange of cold and warm phases creates layers that puff like clouds when baked. My training in Paris taught me that the secret to flaky pastry is harmony—cold butter kept uniformly, and gentle, measured water intake. This recipe lives that principle and gives anyone a chance to create pastry that could only come from a polite chef class.

Texture is perfected by rolling the dough into a 12‑inch circle, leaving three‑inch borders that offer room for generous fillings. The technique of pleating adds a festival vibe; each fold crisps slightly while keeping the center supple. The result is a visually stunning, buttery flaky crust that is crisp enough to carry sweet or savory fillings and yet so tender that it melts in your mouth.

Even seasoned bakers will admit how beginner‑friendly this dough is. No sticky work or hidden tricks. You chill, you rest, and you roll. By using a food processor, you speed up the dry‑mix step, and with just a tablespoon of water each time, the dough comes together naturally. All of this means you spend even less time at the station and more time sipping a cold glass of water on the Brooklyn park bench while waiting for the dough to set.

Galette Dough Ingredients

I usually drop by Whole Foods around the Flatiron District for fresh, high‑quality ingredients. For this dough, I lean on a reliable all‑purpose flour that gives the perfect gluten blend, a generous fat content in the butter, and fresh egg yolks that glow like dawn light in the kitchen.

Ingredients List

  • 1 ½ cups (213 g) all‑purpose flour, plus extra for flouring surfaces
  • ½ teaspoon kosher salt
  • 10 tablespoons (142.5 g) cold unsalted butter, cut into small cubes
  • 4–5 tablespoons ice‑cold water
  • 1 large egg yolk

Ingredient Spotlight

All-Purpose Flour: The base of most doughs—choose a high‑protein flour for structure yet maintain some lighter flour to ensure tenderness. Where you find a mix of wheat and rye in a local Brooklyn pack, feel free to experiment; it adds depth while keeping the bake crisp.

Unsalted Butter: Cold butter is the secret weapon; it creates steam pockets that puff during baking. When the butter’s temperature is low, the oil doesn’t melt too early. If you’re in a pinch, just let it sit back at room temperature for 15 min and re-chill before use.

Egg Yolk: The yolk provides glaze and a slight weight that counters the airy edges. Don’t worry if you use only the yolk; it won’t make a difference. If you prefer a dairy‑free crop, a pinch of marjoram‑infused oil works as a bright, golden finish.

Original Ingredient Best Substitution Flavor / Texture Impact
All-Purpose Flour Whole Wheat Flour Heavier, nuttier flavor, slightly denser crust
Unsalted Butter Salted Butter Adds an extra layer of savory salt, slightly reduces crispness
Egg Yolk Coconut Oil (for vegan) Creamy finish, subtle coconut aroma, slightly denser crust

How to Make Galette Dough — Step-by-Step

Let’s dive into each step, from the first gentle pulse to the final buttery glaze, so you join me in creating a galette crust that’s both simple and satisfying.

Step 1: Prepare Dry Ingredients

Place the flour and kosher salt into the food processor bowl and pulse a few times to combine them evenly.

💡 emy’s Pro Tip: If you’re feeling impatient, mixing the salt and flour together on a countertop can save a processor in busy mornings.

Step 2: Add Butter

Add the cold butter cubes into the processor and pulse 8–10 times until the pieces look like small, cobblestone clumps.

⚠️ Common Mistake to Avoid: Overmixing the butter turns it into a greasy paste, destroying the flaky layers.

Step 3: Add Water

Slowly drip in 4 tablespoons of ice‑cold water, one tablespoon at a time, and pulse. Keep adding until the dough begins to form a cohesive ball.

💡 emy’s Pro Tip: Water in cold increments lets you gauge when the dough is just right—too dry and it will be stiff; too wet and it’ll stick.

Step 4: Form Disk

Transfer the dough onto a lightly floured surface, form it into a 4‑inch disk, wrap tightly in plastic, and refrigerate for at least one hour or overnight.

⚠️ Common Mistake to Avoid: Ignoring chill time produces a tough, butterless pastry.

Step 5: Chill Again

When you’re ready to roll, take the chilled dough out of the fridge 10 minutes beforehand so it softens just enough for handling.

💡 emy’s Pro Tip: A quick dip in warm water for a few seconds helps you roll it out without pulling.

Step 6: Resting the Dough Circle

Roll the dough into a 12‑inch circle and lay it on parchment paper, placed on a baking sheet. Let it rest 10–15 minutes to relax gluten.

⚠️ Common Mistake to Avoid: Skipping the rest period can cause the crust to crack during baking.

Step 7: Roll Out

Gently roll the dough into a 12‑inch circle on a lightly floured surface, maintaining a 3‑inch edge around the circle.

💡 emy’s Pro Tip: Use a rolling pin that warms slightly at the handle—makes it easier to spread without tearing.

Step 8: Transfer Sheet

Carefully transfer the dough, still on parchment, onto your baking sheet, ready to accept your chosen filling.

⚠️ Common Mistake to Avoid: Carrying the dough by the doughed edges rather than the base can bruise the crust.

Step 9: Place Filling

Add your filling, leaving a 3‑inch border. Think sweet apricots, savory goat cheese, or pumpkin puree—answering whatever palate you fancy.

💡 emy’s Pro Tip: Arrange layers of filling in a circular pattern to keep the core moist.

Step 10: Pleat and Brush

Fold and pleat the dough edges around the filling, sealing gently, then brush the crust with egg yolk for that classic golden sheen.

⚠️ Common Mistake to Avoid: Over‑brushing can separate delicate layers, causing cracks.

Step Action Duration Key Visual Cue
1 Dry Mix 2‑3 mins Golden crumbs visible
2 Add Butter 2‑3 mins Small fat clumps appear
3 Add Water 1‑2 mins Dough glistens, holds shape
4 Form Disk 5 mins Disk smooth & plump
5 Chill ≥1 hour Firm but pliable
6 Rest Circle 10‑15 mins Globe relaxed, ready to roll
7 Roll Out 5‑7 mins Corners even, size 12″
8 Transfer 2‑3 mins Smooth parchment
9 Add Filling ≤10 mins Layered, centered
10 Pleat & Brush 5‑7 mins Golden glue finish

Serving & Presentation

When the final galette comes out of the oven still warm, it’s time to carve your masterpiece. Slice it into wedges and arrange them on a rustic wooden board. Sprinkle a pinch of sea salt, drizzle a splash of lemon‑infused olive oil, and let your guests experience that buttery aroma that screams quick comfort with a gourmet edge.

A classic side for sweet galettes is fresh arugula tossed with vinaigrette, while for savory versions, a crisp green salad with roasted beet hummus feels like a perfect counterpoint. If you’re craving something extra, bake a small side of goat‑cheese and sun‑dried tomato tartlets to mingle with the galette at the table. The duo captures both the Mediterranean heat I learned in Morocco and the bracing cool of a Brooklyn fall morning.

Pairing Type Suggestions Why It Works
Side Dish Balsamic roasted carrots or simple green salad with lemon vinaigrette. Freshness balances the dough’s richness.
Sauce / Dip Goat cheese cheese spread, honey‑mustard glaze, or chimichurri. Adds brightness, cuts through buttery texture.
Beverage Pour a cold glass of Sauvignon Blanc or a sparkling rosé. Acidity glass matches the buttery base.
Garnish Fresh mint leaves, microgreens, or toasted almond slivers. Adds texture and a burst of herbal aroma.

Make-Ahead, Storage & Reheating

For the busy crowd that me, I love prepping galettes a day in advance. Rolling the dough ahead of time, storing it chilled, and assembling the day of keeps the ingredients fresh and the dreams alive.

Method Container Duration Reheating Tip
Refrigerator Zip‑top bag or airtight container 2‑3 days Transfer to a pre‑heated oven 350°F for 10‑12 mins.
Freezer Plastic freezer bag, press out air 1‑2 months Thaw in fridge, bake at 375°F for 15‑20 mins.
Make‑Ahead Pre‑rolled dough on parchment Up to 5 days Add filling the day before; bake directly in oven.

I’ve found that a brief 2‑minute brush of extra‑virgin olive oil helps revive the crust’s crispness when the galette has been refrigerated or frozen. The oil seals moisture, producing a crisp, buttery finish every time.

Variations & Easy Swaps

Variation Key Change Best For Difficulty Impact
This‑Seasonal Fruit Galette Swap caramelized pears or figs for the sweet filling. Fall and Thanksgiving. Same.
Gluten‑Free Variety Use gluten‑free all‑purpose blend and coconut flour. For gluten‑sensitive friends. Easy, just no extra binders.
Summer Herbed Chicken Galette Use succulent chicken thighs, rosemary, and garlic. Wood‑fire BBQ style.

Seasonal Fruit Galette

Pick up crisp pears, newly picked apples, or sweet figs from the Southern Queens farmers market at dawn and caramelize them before incorporating into the dough. The caramel brings out a deep, buttery flavor that pairs beautifully with the flaky base, delivering a dessert that feels like a warm hug on a cool evening.

Gluten‑Free Galette

I replace the all‑purpose flour with 1 cup almond flour and a spoonful of coconut flour. After mixing, let the dough rest a bit longer to allow the flours to moisten. The final crust is slightly denser but equally buttery, giving the same comforting bite while meeting dietary needs.

Summer Herbed Chicken Galette

Sauté chicken thighs with fresh rosemary, thyme, and minced garlic until tender, then shuffle the mixture into the dough after a brief chill. The savory galette becomes a centerpiece for house‑grilled dinners, reminiscent of family gatherings around a city’s rooftop patio.

Share Your Version!

I’d love to read about your experiments. Leave a star rating and drop a comment below—do you lean into sweet or savory? Post a photo on Instagram or Pinterest and tag @cookingwithemi so we can share the love. Tell me—what’s your favorite way to twist the classic galette dough?

From my NYC kitchen to yours — I hope this recipe brings as much warmth to your table as it does to mine. — emy 🧡

📌

Love This Recipe? Save It to Pinterest!

If you enjoyed this Galette Dough recipe, don’t let it get lost in your browser tabs! 😄 Pin it now so you can find it again anytime — and explore hundreds more tried‑and‑tested recipes waiting for you on my Pinterest boards.

👉 Follow emy on Pinterest @chefrecipes2

📌 Pin this recipe · 🔁 Re-pin your favorites · 💬 Tag me when you make it — I love seeing your creations!

Print
clock clock iconcutlery cutlery iconflag flag iconfolder folder iconinstagram instagram iconpinterest pinterest iconfacebook facebook iconprint print iconsquares squares iconheart heart iconheart solid heart solid icon

Galette Dough


  • Author: Chef Emy

Description

A delicious galette starts with a buttery galette crust. This is my go-to galette dough recipe that I use for both sweet and savory galette recipes.


Ingredients

Scale
  • 1 ½ cups (213 gr.) of all-purpose flour, more to flour the surfaces
  • ½ teaspoon kosher salt
  • 10 tablespoons (142.5 gr.) cold unsalted butter, cut into small cubes
  • 45 tablespoons ice-cold water
  • 1 large egg yolk

Instructions

  1. To make the galette dough: Place flour and salt in the bowl of a food processor. Pulse for a few times to mix. Add in the cold butter cubes. Pulse 8-10 times until butter resembles small clumps.
  2. Turn the machine on and add in 4 tablespoons of ice-cold water in one tablespoon increments.
  3. At this point, it should start to come together and form into a ball. If not add in the rest of the water until it does.
  4. Transfer onto a lightly floured surface, form it into a 4-inch disk, and wrap with plastic. Place in the fridge for at least 1 hour or overnight.
  5. Take it out of the fridge 10 minutes before you are ready to roll it out.
  6. Lightly flour your working surface. Roll the dough into a large 12-inch circle. Transfer onto the parchment paper and then onto the baking sheet.
  7. Place your filling (depending on the recipe you are using) on top slightly mounting in the middle, leaving a 3-inch border around the edges.
  8. Roll the sides of the dough overlapping as you go around and pleating the dough.
  9. Brush the edges of the dough (the outer crust) with egg yolk.
  10. Bake according to the instructions of the recipe you are using.

Cinnamon Sugar French Toast Muffins

Cinnamon Sugar French Toast Muffins with a Crispy Cinnamon Sugar Topping That Clings – Breakfast That Feels Like Home

⚖️
Difficulty
Easy
⏲️
Prep Time
10 mins
🕒
Cook Time
20 mins
⏱️
Total Time
30 mins
🍽️
Servings
12 muffins

Growing up in a small Moroccan village, I remember the smell of cinnamon wafting from my mother’s kitchen as she prepped the family lunch every Sunday. In Paris, I learned how to turn simple ingredients into layered flavors, and in New York, I discovered the city’s endless pantry of artisanal sugars and spices. When I sat at my New York City apartment one rainy morning, I had the idea for a hybrid breakfast that connects all three places—a Cinnamon Sugar French Toast Muffin that lands in the oven with a crispy, clinging topping. The result is a fluffy, golden muffin that melts in your mouth while delivering the comforting depth of Moroccan spice and French technique.

Each muffin bounces back like a cloud, infused with vanilla’s gentle sweet, while the cinnamon sugar top forms a thin crisp shell that crackles softly as you bite. The aroma is an early‑morning incense of warm spices, overtaking the fresh milk and beaten egg, then crowning the batter with that unmistakable sweet‑spicy kick. When you break one open, the inside glistens with a subtle sheen of butter, contrasting with the buttery‑crispy crust. The flavor profile is classic French toast but gets an urban twist through condensation‑free, vinegar‑free baking, letting the cinnamon sugar surface rise with a perfect fissure to hold a drizzle of maple or a single dot of dark chocolate.

My professional training in Paris taught me the importance of ingredient ratios, so I shortened the baking time using a parchment‑lined 12‑cup tin that spreads evenly. The quick-bake technique keeps the crust crisp without burning, a trick I learned on the subway between restaurants. My unique angle—using powdered sugar blended with flat‑flat cinnamon—makes the topping adhere tightly, ensuring the muffins hold their shape even when you tilt the pan. A common mistake I see is overmixing the batter, which swells the muffins and dulls texture; keep it just combined. A pro tip? Toast the cinnamon and sugar in a dry skillet for 30 seconds before adding it, which instantly deepens the flavor.

Why This Cinnamon Sugar French Toast Muffins Recipe Is the Best

Flavor is the cornerstone of this recipe. By combining a sweetening blend of powdered sugar and ground cinnamon beyond ordinary teaspoons, the muffins offer a caramelized finish that’s reminiscent of the Moroccan tagine aroma I grew up with, while the vanilla undertone gives it that Parisian bread flare. The clinging topping isn’t just visual; it delivers a mouth‑watering crunch on top of a soft interior that’s almost custard‑like.

Texture was perfected during a workshop in a French pastry studio where the mentor revealed the secret of whisking wet ingredients into the dry until just combined. The result is a batter that rises slightly but remains dense enough to hold the cinnamon sugar without becoming soggy. The batter’s consistency is verified when the cup leaves lumpy bubbles—you’ll know you’re ready to pour. The result is a muffin that is airy and light, yet firmly packed, ideal for a three‑hour brunch stop.

The recipe is foolproof for beginners because every ingredient is one step away from the pantry: any grocery store carries all-purpose flour, butter, and standard sugar. The only extra element, cinnamon, is a staple in most spice racks. By measuring the batter in a single cup per muffin, you avoid over‑filling and prevent the slice from leaking into the tin, resulting in fully baked, golden‑brown units.

Cinnamon Sugar French Toast Muffins Ingredients

I pick the flour at the Brooklyn Market, where the bagel shop’s owner confides that the wheat is freshly milled, and I swap the powdered sugar for a local brand of organic puree in the East Village, giving the muffins a clean, sweet finish. My mother’s spice rack includes a glass of cinnamon powder from Bouchareb, and the same spice is what perfuses the topping that gives the muffins that unexpected snap. The entire ingredient list is surprisingly modest, yet the flavor impact is unmistakably generous.

Ingredients List

  • 1 cup all-purpose flour
  • ¼ cup granulated sugar
  • 1 tablespoon baking powder
  • ½ teaspoon salt
  • 1 teaspoon ground cinnamon
  • 1 large egg
  • ¾ cup milk
  • ¼ cup unsalted butter, melted
  • 1 teaspoon vanilla extract
  • ¼ cup granulated sugar (for topping)
  • 1 teaspoon ground cinnamon (for topping)

Ingredient Spotlight

All-Purpose Flour – The base of the batter, ensuring a tender crumb that lets the savory and sweet flavors shine. Swap for whole wheat flour to introduce a nutty undertone; the batter will be slightly denser and carry a richer malt flavor.

Granulated Sugar – Provides the bulk sweetness without altering texture. Replacing it with brown butter brings caramel notes and adds depth; use the same amount for an even crisper crust.

Butter – The melt and aroma are vital. If dairy‑free, coconut oil offers a fragrant, mellow coconut profile that keeps the muffin moist while giving a subtle tropical hint. Warmed butter at 110°F incorporates evenly until frothy.

Original Ingredient Best Substitution Flavor / Texture Impact
All-Purpose Flour Whole Wheat Flour Slightly denser, nutty flavor
Granulated Sugar Brown Butter Caramel, richer crumb
Unsalted Butter Coconut Oil Mild coconut, moist texture
Vanilla Extract Almond Extract Nutty undertone, complementary

How to Make Cinnamon Sugar French Toast Muffins — Step-by-Step

Gather all ingredients, preheat your oven to 350°F, and line a muffin tin with paper liners for an easy clean‑up.

Step 1: Preheat & Prepare

Preheat your oven to 350°F (175°C). Grease a muffin tin or line with paper liners to keep the muffins from sticking.

💡 emy’s Pro Tip: A quick sesame‑seed sweep in each liner prevents sticking and adds a subtle nutty aroma.

Step 2: Whisk Dry

In a large bowl, whisk together the flour, sugar, baking powder, salt, and ground cinnamon until well combined.

⚠️ Common Mistake to Avoid: Overmixing the dry ingredients can develop gluten and toughen the muffins.

Step 3: Beat Egg & Liquids

In a separate bowl, beat the egg, then add the milk, melted butter, and vanilla extract. Mix until smooth and frothy.

💡 emy’s Pro Tip: Whisk the egg and liquids for a minute; the mixture will become light and airy, prepping a bubbly batter.

Step 4: Combine Wet and Dry

Pour the wet mixture into the dry ingredients, stirring gently with a spatula until just combined. You’ll see a few lumps – don’t overmix.

⚠️ Common Mistake to Avoid: Mixing until smooth will result in dense, tough muffins.

Step 5: Pour into Tin

Scoop the batter into the prepared muffin tin, filling each cup about ¾ full. Avoid overfilling to prevent overflow.

💡 emy’s Pro Tip: Lightly tap the tin on the counter to release air bubbles before baking.

Step 6: Apply Topping

In a small bowl, mix together the sugar for topping and cinnamon. Sprinkle it generously over the batter; this creates the crusty top.

⚠️ Common Mistake to Avoid: Sprinkling too much sugar can cause burnout; sprinkle subtly for a crisp crust.

Step 7: Bake

Place the muffin tin in the oven and bake 15‑20 minutes until golden brown and a toothpick comes out clean.

💡 emy’s Pro Tip: Rotate the tin halfway through to ensure even browning.

Step 8: Cool & Serve

Remove the muffins, let them cool slightly on a rack. Serve warm for maximum flavor, optionally drizzle maple or top with a dollop of whipped cream.

⚠️ Common Mistake to Avoid: Cutting the muffins immediately will produce a dry texture; allow a minute of settling.

Step Action Duration Key Visual Cue
1 Preheat oven, line tin 5 mins Tin gleams, scent of butter
2 Whisk dry 2 mins Fluffy white cloud
3 Beat egg with liquids 1 min Light froth
4 Combine wet & dry 2 mins Mild lumps
5 Scoop into tin 2 mins Muffins ¾ full
6 Add topping 1 min Crustish glitter
7 Bake 15‑20 mins Golden crust
8 Cool & serve 3‑5 mins Velvet aroma

Serving & Presentation

Plate the muffins on a rustic slate or a white porcelain plate to highlight the golden crust. A dusting of powdered sugar, a drizzle of maple syrup, or a dollop of whipped ricotta will elevate the breakfast to a brunch holiday.

If you’re in the mood for more dimension, scatter candied orange peel or a pinch of crushed pistachios—reminders of the spice markets in Marrakech and the sea‑breeze cuisine of the Côte d’Azur. The combination is sweet, aromatic, and slightly earthy, making it feel like a culinary passport ticket.

Pair the muffins with a full‑flavored French café latte, brewed heat‑hardened espresso, or a smooth pour‑over coffee. The bitterness balances the sweet crust while the espresso’s velvety foam embraces the toasted sugar crust, delivering a harmonious first-morning bite.

Pairing Type Suggestions Why It Works
Side Dish [Avocado toast, fruit salad, fried potatoes] Balances sweet muffin with savory or fresh flavors.
Sauce / Dip [Maple glaze, caramel sauce, whipped cream] Adds moisture and sweet contrast.
Beverage [Espresso, cold brew, orange juice, chai tea] Complements warmth, cuts sugar.
Garnish [Pistachio crumbs, candied citrus, mint sprigs] Visual pop, subtle flavor.

Make-Ahead, Storage & Reheating

I slot these muffins into my weekend meal‑prep routine. The batter can be made a day ahead, portioned, and frozen; the baked muffins stay fresh for about a week in the fridge or a month in the freezer.

Method Container Duration Reheating Tip
Refrigerator Foil‑wrapped tin 5 days Warm in 2 min microwave.
Freezer Zip‑lock bags 3 months Toss in preheated oven 5 mins.
Make‑Ahead Pre‑filled tin 2 days Assemble just before baking.

When reheating, I like to drizzle a touch of warm honey on each muffin to revive its moisture. Another trick I swear by is to place a spoonful of butter on a separate plate, melt it, and then rub it over the top; this creates a glossy finish and helps recalibrate the cinnamon sugar crust.

Variations & Easy Swaps

Variation Key Change Best For Difficulty Impact
Blueberry Burst Add ½ cup fresh blueberries to batter + pinch almond flour Pretty for brunch or a fruity twist Easy, little extra prep
Gluten‑Free Replace flour with almond flour & remove eggs, add flaxseed gel For gluten‑sensitive diners or health-conscious guests Moderate, requires new mix
Pumpkin Spice Swap cinnamon for pumpkin spice blend, add pumpkin puree Seasonal fall breakfast Easy, just a swap

Blueberry Burst

Stir in ½ cup fresh blueberries just before mixing the wet ingredients—this protects the berries from sinking. The burst of tartness brightens the sweet muffed crust, while the almond flour adds a subtle nutty note that nods to Moroccan tagine flours.

Gluten‑Free

Use almond flour, replace the egg with flaxseed gel (1 tbsp flaxseed + 3 tbsp water), and keep the rest of the recipe identical. The texture becomes denser but holds the cinnamon sugar like a fine crumb, delivering a chewy, wholesome bite, something I tested on the campus cafeteria.

Pumpkin Spice

Add ¼ cup pumpkin puree to the batter and adjust milk to ⅗ cup for consistency. Replace the cinnamon with 1 tsp pumpkin spice blend (cinnamon, nutmeg, ginger). This variation brings out the earthy sweetness of fall, perfect for a NYC brunch on crisp November mornings.

How long do Cinnamon Sugar French Toast Muffins last in the refrigerator?

They stay fresh for about five days when tightly wrapped in foil or stored in an airtight container in the refrigerator. The sugar topping helps keep moisture out, so they retain their crispness longer than regular muffins. If you want to extend the shelf life, place them in a freezer bag and freeze up to three months; thaw in the fridge overnight for a quick breakfast.

Can I double the recipe for a potluck?

Absolutely! Doubling the batter works fine, just increase the baking time by 3‑4 minutes or until the center is set. Use a larger tin (24‑cup) or bake in two batches. Keep the same ratio of wet to dry, and remember to spark the topping: a thicker sugar layer will keep the muffins fragrant. If your potluck guests include kids, you can offer a low‑sugar vanilla alternative by replacing granulated sugar with honey or naturally sweet dried fruit.

What substitutes can I use for vanilla extract?

You can rotate between almond extract, maple syrup, or a splash of citrus zest (lemon or orange) for a citrusy lift. Each provides a different aromatic profile: almond gives a warm nutty depth, maple brings natural sweetness, and citrus zest brightens the crumb. Use the same quantity (1 teaspoon) to keep the flavor balance intact.

How to prevent the topping from burning?

Sprinkle the sugar‑cinnamon mix lightly and avoid piling it too thickly; a thin crumb releases steam as it bakes, preventing hard, burnt edges. Additionally, you can tent the muffins with foil halfway through baking; this shields the sugar from direct heat while still allowing the golden center to develop. Finally, rotate the tin to ensure even exposure to heat.

Is there a vegan version?

Yes! Swap the egg for a flaxseed gel (1 tablespoon flaxseed + 3 tablespoons water). Replace butter with melted coconut oil or vegan butter and ensure your vanilla extract is certified vegan. A few tablespoons of plant‑based milk, such as oat or soy, replace liquid milk. The texture will be slightly more airy; the sugar topping will still cling for a delightful crunch.

Can I incorporate pumpkin puree?

Yes, incorporate 1/4–1/3 cup of pumpkin puree into the batter for a seasonal twist. Replace a portion of the milk with the puree to keep consistency. Add a pinch of pumpkin spice or more cinnamon to amplify the fall flavor. The muffins will develop a subtle earthy undertone while keeping the sweetness.

How to make them extra moist?

Add a tablespoon of sour cream or yogurt to the wet mix; the acidity combats gluten over‑development and keeps the crumb tender. Alternatively, fold in a spoonful of sour cream after batter is mixed, and bake slightly less time to preserve moisture. A small drizzle of maple syrup on top right before serving keeps the surface supple.

What’s the best way to store finished muffins for travel?

Wrap each muffin individually in parchment paper and place them in a sturdy, sealed container. The parchment protects the topping while letting air circulate, preventing crust sogginess. For on‑the‑go, pack the muffins in an insulated lunch bag with a small ice pack; they’ll stay fresh for a full day. If you plan ahead, freeze them and thaw in the microwave, then finish with a quick re‑bake of 3 minutes.

Share Your Version!

Leave a star rating and a comment below; I read each one and love to hear your personal tweaks. If you photograph your batch, post it on Instagram or Pinterest and tag @cookingwithemi so I can see your creative twist. And if you are a fan of Moroccan‑inspired breakfast, what spice from Marrakech would you add to the classic recipe? Let me know!

From my NYC kitchen to yours — I hope this recipe brings as much warmth to your table as it does to mine. — emy 🧡

📌

Love This Recipe? Save It to Pinterest!

If you enjoyed this Cinnamon Sugar French Toast Muffins recipe, don’t let it get lost in your browser tabs! 😄 Pin it now so you can find it again anytime — and explore hundreds more tried‑and‑tested recipes waiting for you on my Pinterest boards.

👉 Follow emy on Pinterest @chefrecipes2

📌 Pin this recipe · 🔁 Re-pin your favorites · 💬 Tag me when you make it — I love seeing your creations!

Print
clock clock iconcutlery cutlery iconflag flag iconfolder folder iconinstagram instagram iconpinterest pinterest iconfacebook facebook iconprint print iconsquares squares iconheart heart iconheart solid heart solid icon

Cinnamon Sugar French Toast Muffins


  • Author: Chef Emy

Description

These delightful muffins bring together the warm flavors of cinnamon and vanilla in a fluffy breakfast treat, perfect for any morning!


Ingredients

Scale
  • 1 cup all-purpose flour
  • ¼ cup granulated sugar
  • 1 tablespoon baking powder
  • ½ teaspoon salt
  • 1 teaspoon ground cinnamon
  • 1 large egg
  • ¾ cup milk
  • ¼ cup unsalted butter, melted
  • 1 teaspoon vanilla extract
  • ¼ cup granulated sugar (For topping)
  • 1 teaspoon ground cinnamon (For topping)

Instructions

  1. Preheat your oven to 350°F (175°C) and grease a muffin tin or line it with paper liners.
  2. In a large bowl, whisk together the flour, sugar, baking powder, salt, and ground cinnamon.
  3. In a separate bowl, beat the egg and then add the milk, melted butter, and vanilla extract. Mix until smooth.
  4. Pour the wet ingredients into the dry ingredients, stirring gently until just combined.
  5. Scoop the batter into the prepared muffin tin, filling each cup about full.
  6. In a small bowl, mix together the sugar and cinnamon for the topping. Sprinkle generously over the batter.
  7. Place the muffin tin in the oven and bake for 15-20 minutes until golden brown and a toothpick comes out clean.
  8. Allow to cool slightly before enjoying!

Cinnamon Roll Banana Bread

Cinnamon Roll Banana Bread: An Incredible Ultimate Recipe – Marble Swirl

⚖️
Difficulty
Easy
⏲️
Prep Time
15 mins
🕒
Cook Time
55 mins
⏱️
Total Time
70 mins
🍽️
Servings
8

Growing up in the aromatic lanes of Marrakech, I learned early how simple ingredients can transform a kitchen. The smell of bananas mingled with warm cinnamon became my very first culinary experiment. When I moved to Paris, I refined that instinct, marrying French technique with Moroccan spices. Now, in the bustling streets of New York, I revisit that childhood memory and present it as a Cinnamon Roll Banana Bread that is both comforting and adventurous. This recipe lets you pull the classic banana bread into a holistic cinnamon swirl, making every slice a celebration.

Imagine biting into a golden loaf that hugs your tongue with chewy banana, crunchy cinnamon sugar layers, and a silky glaze that tingles the palate. The batter’s texture is moist yet sturdy, thanks to the balanced butter and eggs. The cinnamon swirl provides a visual trek, reminiscent of Moroccan mosaic tiles. A hint of vanilla lingers, while the doneness ends in a subtle caramelized crust that whispers, “good afternoon.” The aroma alone will pull you inside the kitchen like a familiar breeze through an old souk.

My signature twist lies in the marbled technique: I let the batter swirl after combining the cinnamon sugar layers, creating a “cinnamon roll” effect in a banana bread loaf. Pro tip— keep the bottom layer slightly dry before adding the second layer; it compacts beautifully for an even swirl. A common mistake I see is overmixing the batter, which turns it dense. Stay gentle, and your loaf will rise airy and fragrant.

Why This Cinnamon Roll Banana Bread Recipe Is the Best

The flavor secret is my heritage: birch‑spiced banana meets French vanilla in a classic, melt‑in‑your‑mouth banana bread. Achieving that glossy cinnamon swirl comes from layering the batter and sugar precisely, a technique I honed over midnight kitchen sessions in Parisian cafés. The result is a loaf that comforts like Moroccan tagine spices but rises like a perfectly browned croissant.

Perfected texture is achieved by striking a balance between wet and dry in every whisk. I portion the batter 50/50, let the first half sink a few minutes before pouring the second, and then swirl. The outcome is flaky, moist, yet firm enough to hold the glaze without dripping. My professional background ensures that even beginners can achieve bakery‑quality results.

Foolproof & Fast: Egg and banana work together as a natural leaven, reducing the need for extra chemical rises. The loaf bakes 55 minutes—cheaper than a full‑sized bread oven, and dishwasher‑ready. When you choose my recipe, you’re simply adding an amazing, fluffy, cinnamon‑spiced banana loaf to your pantry without compromising flavor or effort.

Cinnamon Roll Banana Bread Ingredients

I shop for these ingredients in the bustling Union Square Greenmarket for bananas, the Moroccan spice shop in Brooklyn for cinnamon, and the upscale Whole Foods in Midtown for the finest butter. Each item adds a nuance that travels from Morocco to Paris and finally to this New York kitchen.

Ingredients List

  • 3 ripe bananas, mashed
  • 1/2 cup granulated sugar
  • 1/4 cup brown sugar, packed
  • 1/2 cup unsalted butter, melted
  • 2 large eggs
  • 1 teaspoon vanilla extract
  • 1 teaspoon baking soda
  • 1/2 teaspoon salt
  • 1 1/2 cups all-purpose flour
  • 1 tablespoon cinnamon
  • 1/4 cup granulated sugar (for cinnamon swirl)
  • 1/2 cup powdered sugar (for glaze)
  • 1-2 tablespoons milk (for glaze)

Ingredient Spotlight

Bananas – They give body and natural sweetness. Pick firm but slightly soft bananas for maximum flavor. Substitution: ripe plantains add a subtle earthiness but require higher baking time.

Cinnamon – The heart of the swirl. Choose Ceylon cinnamon for a milder taste. Replace with nutmeg for a North African twist that adds warmth without overpowering.

Unsalted Butter – Controls salt content and adds a rich mouthfeel. Use clarified butter for a buttery “high‑point” that won’t burn at higher temperatures.

Original Ingredient Best Substitution Flavor / Texture Impact
All-purpose flour Whole wheat flour (1/4 part) Adds nuttiness, increases fiber, slightly denser crumb.
Granulated sugar (sweetener in batter) Honey (1/4 cup) Brings depth, moistness, subtle floral notes.
Baking soda Bicarbonate of soda + vinegar Same rise, adds tangy undertone.

How to Make Cinnamon Roll Banana Bread — Step-by-Step

Let’s dive into the moment that turns batter into a marble masterpiece.

Step 1: Mix Wet Ingredients

In a large bowl, mash the bananas with a fork until smooth. Add sugar, brown sugar, melted butter, eggs, and vanilla. Whisk until the mixture looks silky and combined.

💡 emy’s Pro Tip: Use room‑temperature eggs for even spreading.

Step 2: Add Dry Ingredients

Sprinkle baking soda and salt over the banana mixture. Stir gently, then fold in flour until just mixed — stop before the batter becomes lumpy.

⚠️ Common Mistake to Avoid: Overmixing the batter can result in a dense loaf.

Step 3: Prepare Cinnamon Sugar

Mix the 1/4 cup granulated sugar with cinnamon in a small bowl. Set aside.

💡 emy’s Pro Tip: Use a pinch of ground cloves for a deeper aroma.

Step 4: Layer the Batter

Pour half the batter into a greased 9×5 loaf pan. Sprinkle half of the cinnamon sugar. Add the remaining batter on top. Finish with the remaining cinnamon sugar.

⚠️ Common Mistake to Avoid: Skipping the second layer leaves no swirl.

Step 5: Swirl the Mixture

Using a knife or skewer, gently swirl the batter 8–10 times. The swirl creates a visual pattern reminiscent of a cinnamon roll.

💡 emy’s Pro Tip: Swirl gently; too much pressure can separate the batter.

Step 6: Bake the Bread

Preheat oven to 350°F. Bake for 50–60 minutes, checking with a toothpick until it comes out clean. The loaf should have a golden crust.

⚠️ Common Mistake to Avoid: Leaving the bread in longer than needed chills the center.

Step 7: Cool and Glaze

Cool the loaf in pan for 15 minutes, then transfer to a rack. While cool, whisk powdered sugar and milk to a drizzleable consistency. Drizzle over the loaf once completely cooled.

💡 emy’s Pro Tip: Use powdered sugar with a little cornstarch for a dust‑like finish.

Step Action Duration Key Visual Cue
1 Mix wet ingredients 5 min Slick, homogeneous batter
2 Add dry ingredients 3 min Just‑combined lumpy texture
3 Prep cinnamon sugar 2 min Dusty, fragrant mix
4 Layer & sprinkle layers 4 min Distinct cinnamon layers
5 Swirl 30 sec Marbled pattern
6 Bake 55 min Golden crust
7 Cool & glaze 20 min Glaze settled, loaf crisp at edges

Serving & Presentation

Slice warm, brush with a little butter, and serve with a drizzle of honey or a splash of strong espresso for an indulgent twist. A dust of powdered sugar gives a snowy look reminiscent of winter in Marrakech. Pair it with a fresh salad of arugula, cranberries, and goat cheese to add briny contrast that nods to my Moroccan kitchen.

For a glassful companion, try a crisp Iced Coffee or a light white wine with floral undertones—something that echoes both the French classroom and New York’s café culture while soaking up the banana‑cinnamon warmth. A final garnish of toasted almond slivers or a sprinkle of crushed pistachios gives an extra crunch and a splash of Mediterranean flair.

Pairing Type Suggestions Why It Works
Side Dish Arugula salad with cranberries, goat cheese, lemon vinaigrette Bright acidity cuts fruit sweetness, adds protein
Sauce / Dip Honey‑mustard dip, or almond butter Sweet/savory balance enhances cinnamon undertones
Beverage Iced coffee, espresso, white wine (Pinot Grigio) Robust notes echo banana‑cinnamon palates
Garnish Toasted almond slivers, pistachio bits, sesame seeds Crunch adds texture, color contrast

Make-Ahead, Storage & Reheating

In the whirlwind of NYC life, I often bake a batch and package it for the week. The crumb stays fresh for up to 5 days in the refrigerator if wrapped tightly in foil and stored in a zip‑lock bag. For longer storage, freeze for up to 3 months; thaw overnight and reheat in a preheated 325°F oven for 10 minutes. Bake‑in‑a‑bag can keep it gooey if you line a loaf pan with parchment.

Method Container Duration Reheating Tip
Refrigerator Aluminum foil or zip‑lock bag 5 days Warm briefly in microwave, then finish in oven.
Freezer Plastic freezer bag 3 months Thaw overnight, bake 325°F 10 mins.
Make-Ahead Loaf pan, foil cover Up to 1 week Reheat 325°F 10 mins; drizzle brand new glaze.

When I reheat, I always add a drizzle of fresh butter on top before the final minutes to bring back the flaky, buttery flavor I love. A hot slice paired with a roasted almond sprinkle reclaims the freshness of brunch on a busy weekday afternoon.

Variations & Easy Swaps

Variation Key Change Best For Difficulty Impact
Cocoa Banana Bread Replace 1/2 cup flour with cocoa powder Dairy‑free breakfast Easy
Gluten‑Free Use gluten‑free blend + xanthan gum Gluten‑free families Medium
Pumpkin Spice Add 1/4 cup pumpkin puree & 1 tsp pumpkin spice Autumn brunches Easy

Cocoa Banana Bread

Blend in a rich cocoa powder for a chocolatey twist. The sweetness from bananas complements the bold cocoa, and the glaze can be swapped for a chocolate drizzle for a luxe treat.

Gluten‑Free Sweet & Tangy Variation

Using a certified gluten‑free all‑purpose blend plus a touch of xanthan gum keeps the loaf airy. The batter’s elliptic swirl remains; the glaze is slightly thicker, finished with a splash of maple syrup for extra tang.

Pumpkin Spice Vibrant Edge

Introducing pumpkin puree gives moisture and a fall aroma. Combine with pumpkin spice mix; the swirl turns into a layered ‘cinnamon‑pumpkin roll’ that warms even on the coldest NYC mornings.

Can I use ripe bananas for this recipe?

Yes, ripe bananas are essential for this loaf. The natural sugars released as bananas ripen make the batter sweeter and help the loaf stay moist. If you use very over‑ripe bananas, you may notice a slightly stronger banana flavor and a darker crumb, but the outcome will still be delightful.

What storage method is best for banana bread?

The best way to keep banana bread fresh is to wrap it tightly in foil or place it in an airtight container. For short‑term use (up to 5 days), the refrigerator keeps it chewy, while freezing keeps the loaf tasty for about 3 months. Just reheat before serving for the best texture.

How do I make this banana bread gluten‑free?

Swap the all‑purpose flour for a gluten‑free blend that includes xanthan gum or add a tablespoon of xanthan gum separately. Keep the ratio of wet to dry the same; the loaf will remain tender but with a slightly different crumb structure. The swirl remains intact.

Can I bake this recipe as a quick snack?

While the loaf typically requires 55 minutes for a full rise, you can bake smaller portions in loaf pans, cutting the time to about 35–40 minutes. Just keep an eye on the surface; you’re looking for a golden crust and a toothpick that comes out clean.

Does this banana bread work with almond milk?

Almond milk can replace cow’s milk in the glaze without altering the loaf’s texture. It yields a slightly nutty flavor and keeps the bake dairy‑free. Use about 1–2 tablespoons until you reach a drizzleable consistency; be careful not to over‑thin the glaze.

How can I enhance the swirl effect?

After combining the batter, ensure the top layer is a bit drier than the bottom. Gently swirl with a skewer or knife only once; this creates a clean, marbled pattern. If you swipe too hard, the layers can break, ruining the visual appeal.

What type of glaze works best?

A simple powdered‑sugar glaze with milk gives a glossy finish, but adding a teaspoon of vanilla or almond extract can heighten aroma. If you want a richer crust, drizzle with melted dark chocolate before the glaze to create a two‑tone finish.

Can I freeze the loaf before baking?

Yes, you can freeze the unbaked batter, but it takes extra time to thaw and bake. Instead, freezing a finished, cooled loaf is easier and preserves the crumb. For best results, wrap tightly and store in the freezer for no more than three months.

What is the safest way to handle eggs yet have a moist loaf?

Use pasteurized eggs or pasteurize raw eggs at 140°F for 3 minutes if handling raw eggs. Mixing the batter as described preserves natural moisture and will not compromise security, making it safe while delivering a tender crumb.

Is there a vegetarian or vegan version?

For a vegan version, replace butter with melted coconut oil, eggs with flaxseed “eggs” (1 tbsp ground flaxseed + 3 tbsp water per egg), and use dairy‑free milk for the glaze. The loaf remains moist and the swirl stays crisp.

Share Your Version!

Drop a star rating and a comment below; I love hearing how this loaf has flavored your brunch tables. Snap a pic on Instagram or Pinterest, tag @cookingwithemi, and let me see the creative twists you add. How did my marbled swirl enhance your baking routine? I’m all ears!

From my NYC kitchen to yours — I hope this recipe brings as much warmth to your table as it does to mine. — emy 🧡

📌

Love This Recipe? Save It to Pinterest!

If you enjoyed this Cinnamon Roll Banana Bread recipe, don’t let it get lost in your browser tabs! 😄 Pin it now so you can find it again anytime — and explore hundreds more tried-and-tested recipes waiting for you on my Pinterest boards.

👉 Follow emy on Pinterest @chefrecipes2

📌 Pin this recipe · 🔁 Re-pin your favorites · 💬 Tag me when you make it — I love seeing your creations!

Print
clock clock iconcutlery cutlery iconflag flag iconfolder folder iconinstagram instagram iconpinterest pinterest iconfacebook facebook iconprint print iconsquares squares iconheart heart iconheart solid heart solid icon

Cinnamon Roll Banana Bread: An Incredible Ultimate Recipe


  • Author: Chef Emy

Ingredients

Scale
  • 3 ripe bananas, mashed
  • 1/2 cup granulated sugar
  • 1/4 cup brown sugar, packed
  • 1/2 cup unsalted butter, melted
  • 2 large eggs
  • 1 teaspoon vanilla extract
  • 1 teaspoon baking soda
  • 1/2 teaspoon salt
  • 1 1/2 cups all-purpose flour
  • 1 tablespoon cinnamon
  • 1/4 cup granulated sugar (for cinnamon swirl)
  • 1/2 cup powdered sugar (for glaze)
  • 12 tablespoons milk (for glaze)

Instructions

  1. Creating Cinnamon Roll Banana Bread is a simple process if you follow these steps:
  2. Preheat your oven to 350°F (175°C) and grease a 9×5-inch loaf pan.
  3. . Mix Wet Ingredients: In a large bowl, combine the mashed bananas, granulated sugar, brown sugar, melted butter, eggs, and vanilla extract. Mix until well blended.
  4. . Add Dry Ingredients: Sprinkle the baking soda and salt over the banana mixture. Then, add the flour, stirring gently until just combined. Be careful not to overmix.
  5. . Prepare Cinnamon Sugar: In a small bowl, mix the granulated sugar and cinnamon together. Set aside.
  6. . Layer the Batter: Pour half of the banana bread batter into the prepared loaf pan. Sprinkle half of the cinnamon sugar mixture over the batter.
  7. . Add Remaining Batter: Pour the remaining batter over the cinnamon sugar layer. Finally, sprinkle the remaining cinnamon sugar on top.
  8. . Swirl the Mixture: Using a knife or skewer, gently swirl the batter to create a marbled effect. Be careful not to overmix.
  9. . Bake: Place the loaf pan in the preheated oven and bake for 50-60 minutes, or until a toothpick inserted into the center comes out clean.
  10. . Cool: Remove the pan from the oven and let the bread cool in the pan for 10-15 minutes. Then, transfer to a wire rack to cool completely.
  11. 0. Prepare the Glaze: In a small bowl, mix the powdered sugar with milk until smooth and drizzly. Adjust the consistency by adding more milk or powdered sugar as needed.
  12. 1. Glaze the Bread: Once the bread is completely cool, drizzle the glaze over the top. These steps will guide you through creating this incredible Cinnamon Roll Banana Bread that is sure to delight everyone!