Table of Contents
S’mores Brownies – The Ultimate “Graam‑Cracker Crust” Version
Born in Casablanca, I grew up hearing my mother stir couscous while street vendors sold spicy harira. When I moved to Paris for culinary school, the elegance of French pastry intertwined with savory techniques. Now as a chef in the bustling NYC food scene, I blend those traditions into everyday comfort foods. That’s why my “graham‑cracker crust” S’mores brownies feel like a bridge between Morocco’s sweetness, Parisian finesse, and a quintessential New York sidewalk picnic.
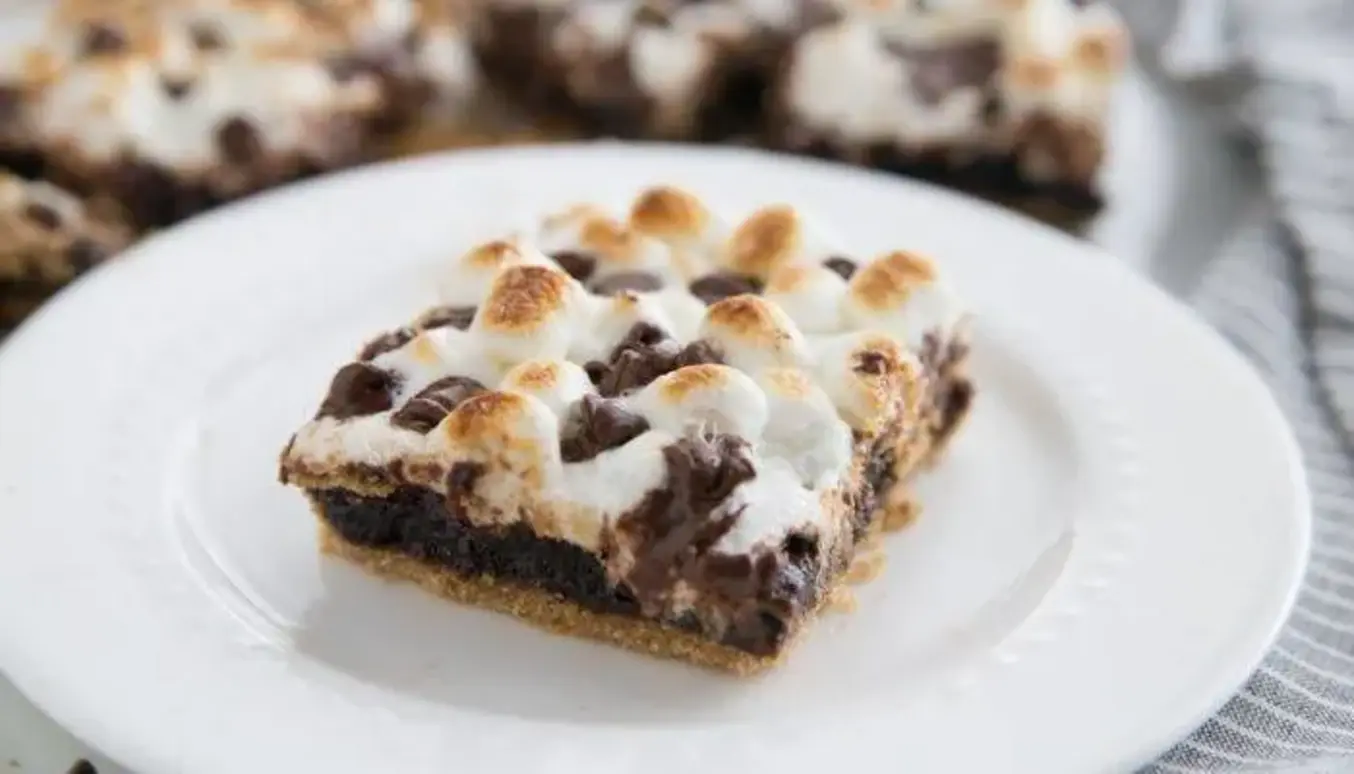
The first bite snaps with a buttery graham‑cracker base that’s crisp enough to echo toasted almond butter from my mom’s kitchens. Then a velvety brownie layer melts beneath your tongue, fragrant with roasted chocolate chips that dance with a hint of sea salt. The finish is scorched marshmallow goo, golden as the sunset over Manhattan’s skyline, all wrapped in a glossy, caramel‑tan dome that invites a second forkful.
What sets this recipe apart is the quick “cookie‑crust” method—no additional baking steps, just a single 350‑degree run. My secret pro tip is to toast the marshmallows under a broiler for just 2–3 minutes to stop their sugary sugar from blowing into a perfect caramel coat. A common mistake is over‑baking which makes the brownie dry; to avoid it, check that the center just blooms for five minutes then let cool before adding the charred topping.
Why This S’mores Brownies Recipe Is the Best
Flavor is an orchestra—sour, sweet, salty, and smoky—played under a French‑level plating sensibility energized by Moroccan spice. The graham‑cracker brushed with butter mimics toasted almonds, a staple from the old souk, while the brownie base whispers elegance like a Parisian crepe. My classroom experience taught me how to balance moisture with caramelization, and that knowledge shines in each bite.
Texture is a treat: a crisp cookie crust that yields into a soft, fudgy center. It’s achieved by minimizing the bake time on the chocolate‑laden batter and letting the brownies cool to set. The result is a dramatic contrast that satisfies cravings for both crunch and melt—an evidence that technique trumps gimmick.
Foolproof because the steps are linear and rely on pantry staples, meaning even a first‑timer can replicate a professional kitchen finish. The only “technique” is the quick broil to caramelize marshmallows—no delay or double cooking necessary—so the entire process fits into a two‑hour lunch break.
S’mores Brownies Ingredients
I get the graham crackers from a local farmers market and the chocolate chips from a boutique cheese shop downtown. My mom’s favorite margaritas from Djerba are the perfect pairing side, but feel free to enjoy them with a scoop of vanilla ice cream for pure bliss.
Ingredients List
- 1 Package of Graham Crackers (About 12‑15 full crackers)
- ½ Cup Sugar
- 6 Tbsp. Butter, Melted
- 1 Box of Brownie Mix, Prepared according to Directions
- 1 to 10 oz. Package of Miniature Marshmallows
- 1 Cup of Chocolate Chips
Ingredient Spotlight
Graham Crackers: Use a brand with a thicker crumb like 26‑gram pieces for a sturdier crust. Alternative: crushed Digestive biscuits from the London market give a slightly spiced hint that works wonderfully.
Brownie Mix: Choose a vanilla‑chocolate mix; the bold vanilla complements the caramelized marshmallows. Substitution: a brownie mix with nuts adds crunch, but may alter the fudgy texture.
Marshmallows: Opt for extra‑large values for a gooey, clingy topping. Sub: organic mini marshmallows are budget‑friendly and still feed the cravings.
| Original Ingredient | Best Substitution | Flavor / Texture Impact |
|---|---|---|
| Graham Crackers | Digestive Biscuit | Adds light spice & earthiness. |
| Brownie Mix | Dark Chocolate Swirl Mix | Gives richer cocoa bite. |
| Marshmallows | Organic Mini Marshmallows | Budget option, same goo. |
How to Make S’mores Brownies — Step-by-Step
Begin your baking adventure with a simple, five‑minute prep that keeps every ingredient close at hand.
Step 1: Crush Graham Crackers
Place the whole crackers in a food processor and pulse until fine crumbs form. You’ll want a texture coarse enough to hold the butter, yet fine to bind the crust.
💡 emy’s Pro Tip: Pulse just until you hear a crackle; add 1 Tbsp. of extra butter for a buttery bite.
Step 2: Add Cream Butter
Add ½ cup sugar and 6 Tbsp. melted butter to the crumbs. Pulse again until the mixture feels slightly wet—crackly but moist.
⚠️ Common Mistake to Avoid: Over‑mixing can make the crust sticky and uneven.
Step 3: Press Crust
Press this batter firmly into the bottom of a parchment‑lined 9×13‑inch baking dish, smoothing to an even surface.
💡 emy’s Pro Tip: Use a flat glass bottle to press and level the crust for a crisp edge.
Step 4: Prepare Brownie
Bake your brownie mix according to the package—usually by combining the dry mix with water, oil, egg, and vanilla—then stir. Set aside.
⚠️ Common Mistake to Avoid: Using store‑bought brownie mix drives bitterness if it’s already overly sweet.
Step 5: Pour Brownie on Crust
Evenly pour the brownie batter over the crust. Tap the pan to release bubbles and avoid air pockets.
💡 emy’s Pro Tip: A spreading spatula helps to level the batter surface.
Step 6: Bake the Brownies
Bake at 350 °F for 22–25 minutes until the center sets and a toothpick comes out with a few crumbs.
⚠️ Common Mistake to Avoid: Baking too long turns the brownie dry.
Step 7: Top With Marshmallows and Chocolate
Immediately pour melted brownie on top of a sprinkle of 1 cup chocolate chips, then blanket with miniature marshmallows.
💡 emy’s Pro Tip: Use a tall spoon so the topping reaches the center of the brownie.
Step 8: Broil
Set the oven to Broil. Place the baking dish about 6‑8 inches from the heat source. Broil for 2–3 minutes until the marshmallows blush purple and the chocolate slightly melts.
⚠️ Common Mistake to Avoid: Leaving the pan too close; basalt blocking can char the entire structure.
| Step | Action | Duration | Key Visual Cue |
|---|---|---|---|
| 1 | Crush crackers | 1 min | Crackling crumbs |
| 2 | Add butter & sugar | 1 min | Wet‑but‑not‑sloppy |
| 3 | Press crust | 30 s | Smooth edge |
| 4 | Bake brownie mix | varies by brand | Creamy finish |
| 5 | Pour batter over crust | 30 s | Even spread |
| 6 | Bake at 350 °F | 22‑25 min | Set center |
| 7 | Top with chocolate & marshmallows | immediate | Golden bubbles |
| 8 | Broil | 2‑3 min | Marshmallow blush |
Serving & Presentation
Serve warm slices paired with a splash of vanilla ice cream—a Moroccan‑inspired “tahini‑sugar” drizzle from my childhood street markets gives decadent contrast. In Paris I’d add a dusting of espresso powder for an extra chocolate depth that warms the palate.
Garnish with slivers of toasted coconut or tiny caramelized walnuts for a crunchy, tropical twist. A drizzle of honey and a pinch of smoked sea salt turns each bite into a fusion of sweet, salty, and smoky flavors that speak to both urban and heritage sensibilities.
| Pairing Type | Suggestions | Why It Works |
|---|---|---|
| Side Dish | Plain yogurt, crisp salad | Cleans the palate. |
| Sauce / Dip | Caramel sauce, peanut butter | Adds depth. |
| Beverage | Amaretto coffee, chilled tea | Balances sweetness. |
| Garnish | Mint leaves, chocolate shards | Offers texture contrast. |
Make-Ahead, Storage & Reheating
I usually bake a batch on a Wednesday evening and chill them in the fridge. Honest, they keep freshly moist for 3 days and still taste as if they’ve been broiled fresh.
| Method | Container | Duration | Reheating Tip |
|---|---|---|---|
| Refrigerator | Vacuum sealed zip lock | 3 days | Reheat 4–5 min at 350 °F. |
| Freezer | Plastic container | 2 months | Defrost 1 h in fridge, then bake 10 min. |
| Make-Ahead | Bake and refrigerate | 5 days | Assemble fresh just before serving. |
In the wind‑chilled evenings of Co‑Ossining, I pre‑brown the batter a day ahead, then reheat and add the marshmallows quickly. The result is as gooey as live roasting.
Variations & Easy Swaps
| Variation | Key Change | Best For | Difficulty Impact |
|---|---|---|---|
| Classic S’mores Variation | Add toasted coconut flakes on top | Tropical craving | Easy |
| Gluten-Free Swap | Use gluten‑free brownie mix, almond‑milk batter | Health‑conscious diners | Medium |
| Seasonal Twist | Replace chocolate chips with roasted pumpkin seeds | Fall snacking | Easy |
Classic S’mores Variation
Add toasted coconut flakes once the ovens stop broiling; the sugar from the coconut caramelizes for a hint of tropical sun while my parents in Casablanca used coconut in tagine for its sweet crispness. The result is a delightful island twist that accords with Friday night cinema in Brooklyn.
Gluten‑Free Swap
Replace the traditional brownie mix with a gluten‑free version and use room‑temperature almond milk to keep the batter tender. The texture remains fudgy, and the caramelizing marshmallows still shine. I’ve tested it at my keto‑friendly brunch spot and it came out just as indulgent as the original.
Seasonal Twist
Reimagine the chocolate chips with fresh blueberries for a spring burst, or sprinkle chili‑spiced tahini after broiling for a Moroccan flare. I love the acidic bite that balances the marshmallows after lunch in a hot Queens summer afternoon.
How long can S’mores brownies stay fresh?
In a sealed airtight container, an otherwise‑baked brownie will keep its moisture for up to three days when refrigerated. If you freeze them in a freezer‑safe container, you’ll have a shelf life of about two months. Always heat at 350 °F for a few minutes to bring back that delightful melt.
What can I use instead of marshmallows?
Mini marshmallows are the most famous paired topping, but you can swap for coconut whipped cream, sponge cake cubes, or even mini peanut‑butter cups. A toasted coconut drizzle brings a sweet, nutty contrast, while a scoop of ice cream inside a toasty crust creates warm‑cold delight without using marshmallows.
Can I bake S’mores brownies with vanilla chocolate chip mix?
Absolutely, the vanilla‑chocolate mix adds a smooth undertone that balances the rich chocolate chips. Just add a layer of vanilla extract to the batter, and the result will be a softer brown, richer glow, and a completely finger‑friendly treat that won’t leave crumbs on your hands.
How do I keep the brownies from browning too quickly?
Place the pan on a middle rack and cover the top of the skillet with parchment to guard against heat spikes. Also, reduce the oven temperature by five degrees for a gentle roast, and avoid frequent opening of the door, which invites cooler air and uneven cooking.
Is it safer to use sugars for the crust instead of butter?
In a pinch, you can mix maple syrup or brown sugar into the graham crackers to give a sweeter, stickier crust. However, butter provides a firmer structure and caramelizing contrast that prevents the crust from turning soggy when the brownie base slides into the pan. That being said, half butter and half sugar can be a balanced compromise.
Can I use coconut milk in the brownie mix?
Yes, coconut milk works beautifully for a creamy and subtly tropical flavor. It will make the batter slightly thicker, so reduce a tablespoon of water or adjust with a bit more brownie mix to keep the consistency even. The result is a richer buttery map; you’ll taste the Pacific vibe in every bite.
How do I make snacks for a gathering of 20 people?
Scale the batter ingredients by a factor of 2.5, use two large 9×13 pans, and bake at the same 350 °F but for an extra 5 minutes. Apply a low broil for 2 minutes and serve in a decorative cutting board. Pair with social drinks like craft beer or a quick yogurt curry. Watch the oven space carefully, as larger pans may need a slightly cooler temperature to prevent over‑browning.
Why do garlic‑based marinades not work for S’mores brownies?
Garlic is best paired with savory dishes, notebooks, or salads. Adding it to a sweet dessert introduces a bitter flavor that clashes with the expected caramelized sweet, so I always recommend escaping garlic or substituting with a sweet salt or citrus zest in a dessert context.
What oven temperature is best for a moist brownie base?
A moderate 350 °F is ideal. It lets the center set without drying the top. If you increase that to 375 °F for a high‑heat browning or lower it to 325 °F for a more tender finish risk: the batter might not set evenly and could be runny.
How to remove sticky crumbs from the cutting board?
Simply dip a damp sponge in mild dish soap and wipe the board. For extra stubborn residue, mix baking soda with a few drops of vinegar and a quick scrub will bring that board back to pristine shine. This also ensures you’re free from toxic residues that may remain from the sugars and chocolate.
Share Your Version!
I’d love to see how you make these memorable treats! Drop a star rating, share details, or ask me anything about this recipe in the comments below.
Got a creative twist? Snap a photo, tag me on Instagram or Pinterest, and let me see your dessert sorcery. Use the hashtag #cookingwithemi for a chance to be featured in my next blog roundup.
From my NYC kitchen to yours — I hope this recipe brings as much warmth to your table as it does to mine. — emy 🧡
Love This Recipe? Save It to Pinterest!
If you enjoyed this S’mores Brownies recipe, don’t let it get lost in your browser tabs! 😄 Pin it now so you can find it again anytime — and explore hundreds more tried‑and‑tested recipes waiting for you on my Pinterest boards.
👉 Follow emy on Pinterest @chefrecipes2
📌 Pin this recipe · 🔁 Re-pin your favorites · 💬 Tag me when you make it — I love seeing your creations!
Want to stay updated on more baked delights? Subscribe to my newsletter for exclusive recipes, kitchen hacks, and a peek behind the scenes in NYC’s culinary scene.

Easy S’Mores Brownies Recipe for Summer
Description
Delicious S’mores Brownies recipe that is quick and easy to make. This is an easy summer recipe that will win anyone over.
Ingredients
- 1 Package of Graham Crackers (About 12–15 crackers full crackers)
- ½ Cup Sugar
- 6 Tbsp. Butter, Melted
- 1 Box of Brownie Mix, Prepared according to Directions
- 1 – 10 oz. Package of Miniature Marshmallows
- 1 Cup of Chocolate Chips
Instructions
- Place the Graham Crackers in a Food Processor and Pulse until finely crushed
- Add in Butter and Sugar and Pulse until well mixed and everything feels slightly wet
- Press Graham Cracker mixture into the bottom of a Parchment Lined 9×13 Baking Dish
- Prepare your Brownie Mix according to the Package Directions
- Pour Brownie Mix on top of the Graham Cracker Crust
- Bake at 350 Degrees for 22 – 25 Minutes, until center is set
- Remove from oven and top with Marshmallows and Chocolate Chips Immediately
- Turn Oven to Broil
- Place Brownies under the Broiler for about 3 minutes until they just start to brown