Indulge your sweet tooth with our delicious and irresistible dessert recipes! Whether you’re craving decadent chocolate treats, fruity delights, or creamy, dreamy confections, we have something for every occasion.
From classic cakes and homemade cookies to no-bake desserts, rich cheesecakes, and festive holiday treats, our recipes are perfect for special celebrations or everyday sweet cravings.
Need something quick? Try our easy, fuss-free desserts that come together in no time. Whether you love warm baked goods, refreshing frozen sweets, or nostalgic comfort desserts, these recipes are sure to bring a little extra joy to your day! 🍰🍫🍪
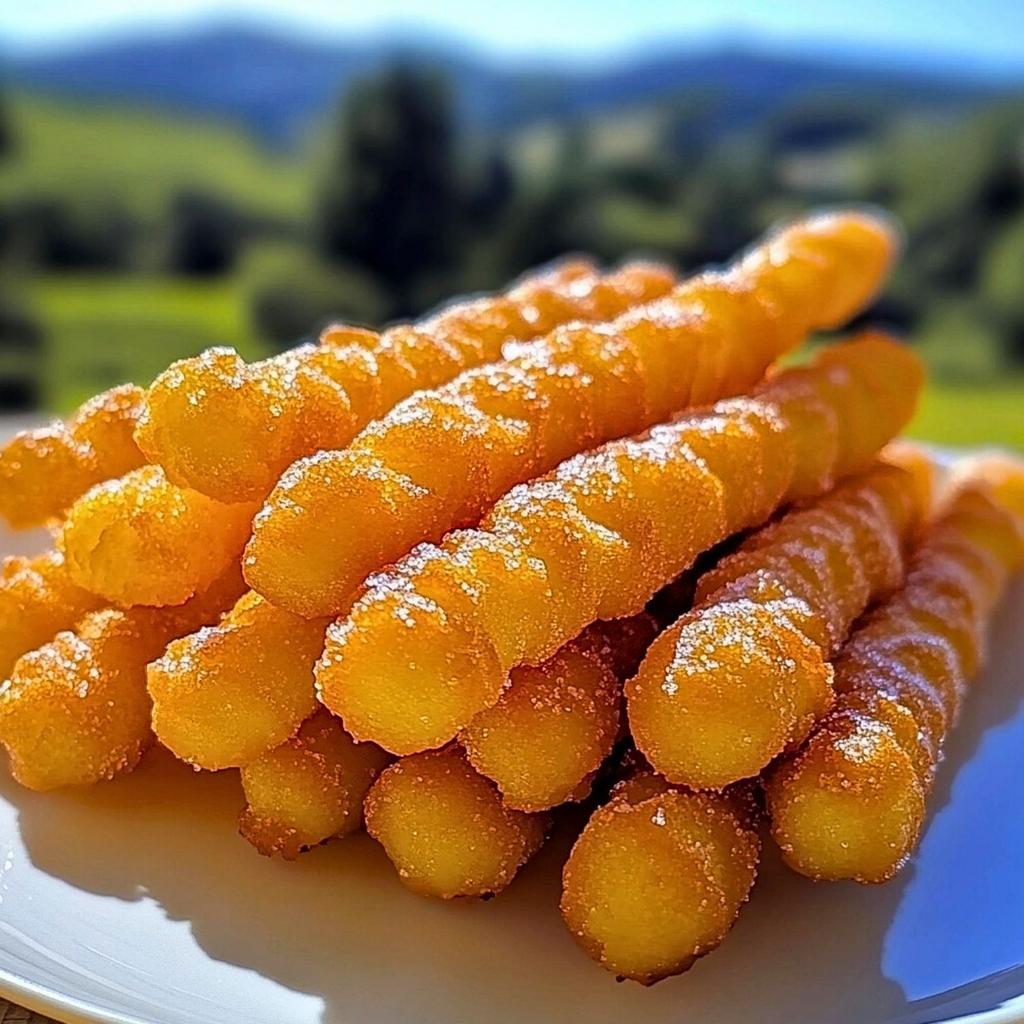
Bring the Carnival Home with Crispy Funnel Cake Sticks!
Did you know that over 50% of people surveyed cite funnel cake as their favorite carnival or fair food? That nostalgic experience of sinking your teeth into a sweet, doughy treat is something truly special. But what if you could recreate that crispy, sugary magic right in your own kitchen, without the crowds and the long lines? These Crispy Funnel Cake Sticks are your answer! They capture the essence of a beloved carnival classic, transforming it into an easy-to-handle, incredibly delicious dessert perfect for family nights, parties, or just when a craving strikes. With a delightfully golden and crispy exterior that gives way to a light, fluffy interior, and finished with that quintessential dusting of powdered sugar, these sticks are more than just a dessert; they’re a portal to happy memories. Get ready to become the ultimate at-home carnival chef!
Ingredients for Your Crispy Funnel Cake Sticks
To achieve that perfect balance of crispy and fluffy, we’ll need a few key players. Don’t worry if you don’t have everything on hand; I’ve included some easy substitutions!
1 ½ cups All-Purpose Flour: The foundation of our batter, providing structure. (Substitution: You can use a gluten-free all-purpose flour blend, but the texture might be slightly different.)
¼ cup Granulated Sugar: For a touch of sweetness in the batter itself.
1 teaspoon Baking Powder: Our leavening agent, crucial for that light, airy interior.
½ teaspoon Salt: Balances the sweetness and enhances the overall flavor.
1 large Egg: Binds the ingredients together and adds richness. (Substitution: A flax egg (1 tbsp flaxseed meal + 3 tbsp water, rested for 5 mins) can work, but results might be denser.)
¾ cup Milk: The liquid that brings our batter to life. Whole milk yields a richer flavor. (Substitution: Almond milk or oat milk can be used, though they might slightly alter the flavor profile.)
1 teaspoon Vanilla Extract: For that warm, comforting aroma and taste.
Vegetable Oil or Canola Oil, for frying: About 3-4 cups, enough for at least 2 inches of depth in your pan. Needs a high smoke point.
Powdered Sugar, for dusting: The signature sweet finish!
Timing Your Funnel Cake Creation
Prep time: 10 minutes
Cook time: 15 minutes
Total time: 25 minutes
Compared to traditional funnel cake recipes that might involve more intricate batter preparation or longer resting times, these funnel cake sticks are remarkably quick. The 25-minute total time is quite efficient, especially when considering the delightful outcome and the fact that many homemade desserts can take well over an hour from start to finish.
Step-by-Step Easy Funnel Cake Stick Instructions
Step 1: Whisk the Dry Ingredients
Grab a medium-sized mixing bowl. Add your all-purpose flour, granulated sugar, baking powder, and salt. Give them a good whisk together. This ensures everything is evenly distributed, so you won’t get pockets of baking powder or salt in your finished sticks. Think of it as laying the perfect foundation for our crispy delights!
Step 2: Mix in the Wet Ingredients
In a separate, smaller bowl or a liquid measuring cup, lightly beat your egg. Then, pour in your milk and vanilla extract. Whisk these wet ingredients together until they’re well combined. Now, create a little well in the center of your dry ingredients and pour the wet mixture into it. Gently whisk everything together until just combined. A few small lumps are perfectly fine – overmixing can lead to tough funnel cake, and we want them light and airy! The batter should be the consistency of thick pancake batter; if it’s too thick, add a tablespoon more milk at a time. If it’s too thin, a tablespoon more flour.
Step 3: Prepare for Frying
Pour your frying oil into a heavy-bottomed pot or Dutch oven, ensuring it’s at least 2 inches deep. Heat the oil over medium-high heat until it reaches 350°F (175°C). It’s super important to maintain this temperature for perfectly cooked funnel cake sticks. Too low, and they’ll be greasy; too high, and they’ll burn before cooking through. You can test the oil by dropping a tiny bit of batter in; it should sizzle immediately and float to the surface. Line a plate or baking sheet with paper towels for draining the fried sticks.
Step 4: Form the Funnel Cake Sticks
Now for the fun part! You have a few options here. The easiest is to use a large piping bag fitted with a round tip (or just snip the corner off a Ziploc bag). Pour your batter into the bag. Alternatively, you can use a squeeze bottle, or even just carefully pour the batter from a measuring cup into the hot oil in thin, continuous streams. For sticks, you’ll want to create long, thin lines of batter, crisscrossing them slightly for texture and visual appeal. Aim for about 5-6 inches in length.
Step 5: Fry Until Golden Brown
Carefully add the batter streams to the hot oil, working in batches to avoid overcrowding the pot. Fry for about 1-2 minutes per side, until they are a beautiful golden brown. Use tongs or a slotted spoon to gently flip them halfway through. Keep an eye on them – they cook quickly!
Step 6: Drain and Dust
Once gloriously golden and crispy, carefully lift the funnel cake sticks out of the oil using a slotted spoon or spider strainer. Let any excess oil drip back into the pot for a moment. Transfer them to the prepared paper towel-lined plate to drain further. While they are still warm, generously dust them with powdered sugar. This is the moment of truth, where the classic aroma fills the air!
Nutritional Information
Please note that nutritional information is an estimate and can vary based on exact ingredients and portion sizes.
Calories: Approximately 150-200 per serving (about 3-4 sticks, without added toppings).
Carbohydrates: Around 20-25g.
Fat: Around 8-12g (this includes oil from frying).
Protein: Around 3-4g.
Sugar: Around 8-10g (mostly from added sugar and powdered sugar).
Healthier Alternatives & Flavor-Preserving Swaps
While funnel cake is a treat, we can make some mindful adjustments:
Lighter Frying: Air frying is not ideal for this type of batter as it needs immersion to get crispy and puffy correctly. However, you can use less oil for pan-frying if you ensure the oil is hot and the sticks cook quickly.
Whole Wheat Flour: Substitute half the all-purpose flour with whole wheat flour for added fiber. The texture will be slightly denser but still delicious.
Reduced Sugar: Decrease the granulated sugar in the batter by half. The powdered sugar topping is where most of the sweetness comes from, so you can also use a sugar-free powdered sweetener if desired.
Fruit Toppings: Instead of heavy sauces, opt for fresh fruit like berries or a drizzle of honey.
Serving Suggestions
These funnel cake sticks are wonderfully versatile! Serve them warm, dusted with powdered sugar, as is. For an extra special treat, consider:
A side of chocolate sauce for dipping.
Fresh berries (strawberries, blueberries, raspberries) for a burst of freshness.
A dollop of whipped cream or a scoop of vanilla ice cream.
A light drizzle of caramel sauce.
A sprinkle of cinnamon sugar for a warm spice note.
Common Mistakes to Avoid
Oil Temperature: Not heating the oil to the correct temperature (350°F/175°C) is the most common pitfall. It leads to greasy, soggy, or burnt funnel cake friends. Use a thermometer!
Overcrowding the Pan: Frying too many sticks at once will drastically lower the oil temperature, resulting in a greasy, unevenly cooked product. Fry in batches.
Overmixing the Batter: A few lumps are okay! Overmixing develops gluten, making your funnel cake tough rather than light and crispy.
Not Draining Properly: Allowing excess oil to remain on the sticks will make them heavy and greasy. Ensure good drainage on paper towels.
Storing Tips
Funnel cake sticks are best enjoyed fresh and warm. If you happen to have leftovers:
Allow them to cool completely.
Store in an airtight container at room temperature for up to 2 days.
To reheat, a few minutes in a toaster oven or air fryer at a low temperature (around 300°F/150°C) will help restore some crispness. Avoid microwaving, as it will make them soft and chewy.
Frequently Asked Questions
***Can I make the batter ahead of time?***
It’s best to make the batter just before frying. The baking powder will start to lose its leavening power over time, and the batter can become too thin.
***What kind of oil is best for frying?***
A neutral oil with a high smoke point is ideal. Vegetable oil, canola oil, or peanut oil are excellent choices. Avoid olive oil as its smoke point is too low for deep frying.
***My funnel cake sticks are expanding too much. What did I do wrong?***
This usually means the oil is too hot, causing the outside to puff up and cook before the inside can set properly. Ensure your oil is consistently at 350°F (175°C).
***Can I use a different pan for frying?***
A heavy-bottomed pot or Dutch oven is recommended for even heat distribution. A cast-iron skillet can also work well. Avoid thin-walled pans that can lead to temperature fluctuations.
***How do I get that perfect swirly shape?***
Practice makes perfect! For sticks, a steady hand while piping or squeezing is key. You can also try the technique of swirling the batter in a circular motion for a more traditional funnel cake shape if you prefer.
Loved these Crispy Funnel Cake Sticks? Share your creations with us in the comments below or tag us on social media! We’d love to see your carnival masterpieces!
The Sweetest Ending!
There you have it – your passport to a delightful, homemade carnival experience! These Crispy Funnel Cake Sticks are proof that you don’t need a fairground to enjoy your favorite sweet treats. They’re simple, satisfying, and guaranteed to bring smiles to faces, young and old. Gather your ingredients, follow these easy steps, and get ready to indulge in a taste of pure joy. Don’t forget to share your delightful creations with us! Happy baking (and frying)!
These Crispy Funnel Cake Sticks are a carnival classic made simple and fun to enjoy at home. With a golden, crispy exterior and a light, fluffy interior, these sweet treats are perfect for any occasion. Finished with a generous dusting of powdered sugar, they’re the ultimate nostalgic dessert that’s easy to make and absolutely delicious.
Ingredients
Scale
2 cupsall-purpose flour
2 tbspgranulated sugar
1 ½ tspbaking powder
½ tspsalt
1 ½ cupsmilk
2large eggs
1 tspvanilla extract
Vegetable oil (for frying)
Powdered sugar (for dusting)
Instructions
In a large bowl, whisk together the flour, sugar, baking powder, and salt.
In another bowl, combine the milk, eggs, and vanilla extract, mixing until smooth.
Gradually pour the wet ingredients into the dry ingredients, whisking until you have a smooth batter.
Heat 2-3 inches of vegetable oil in a deep frying pan or pot to 350°F (175°C).
Transfer the batter to a piping bag or squeeze bottle. Pipe 3-4 inch strips of batter into the hot oil.
Fry each stick for 1-2 minutes per side, or until golden brown. Remove and drain on paper towels.
Dust the warm funnel cake sticks generously with powdered sugar and serve immediately.
Notes
Use a thermometer to maintain the oil temperature for even frying.
Experiment with toppings like chocolate drizzle, caramel sauce, or a sprinkle of cinnamon sugar.
Leftovers can be stored in the fridge for up to 3 days and reheated in the oven or air fryer for crispiness.
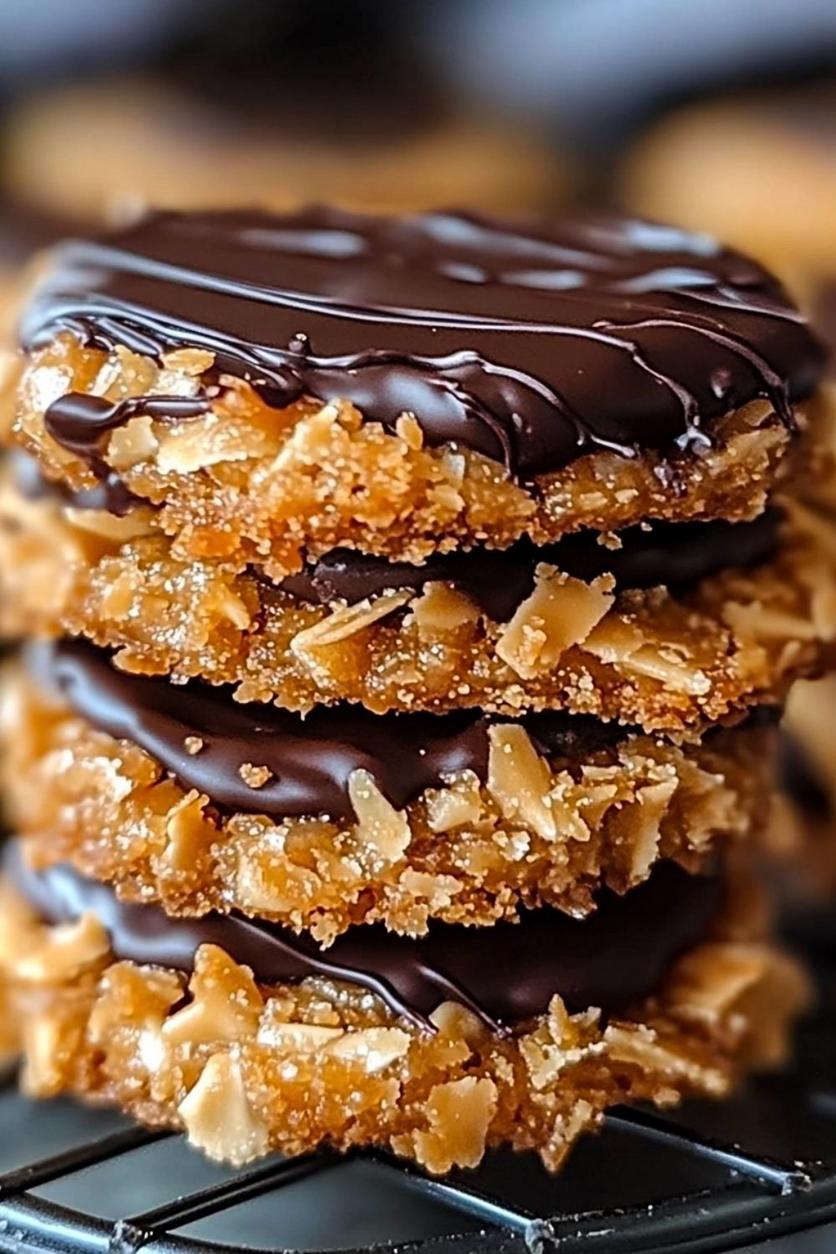
Did you know that over 100 million boxes of Girl Scout Cookies are sold annually, with Samoas consistently ranking among the top favorites? If you’re one of the many who dreams of that perfect blend of chewy caramel, toasted coconut, and rich chocolate on a crisp shortbread base, you’re in for a treat! Homemade Samoas Girl Scout Cookies are the ultimate indulgence for caramel, coconut, and chocolate lovers. With a buttery shortbread base, a chewy caramel-coconut topping, and a drizzle of rich chocolate, these cookies are a perfect treat for any occasion. Whether you’re recreating childhood memories or trying a new baking challenge, this recipe will leave everyone impressed!
Ingredients You’ll Need
For the Shortbread Base:
2 cups all-purpose flour: The sturdy foundation for our cookie.
1/2 cup granulated sugar: For a touch of sweetness that balances the richness.
1/4 teaspoon salt: Enhances all the flavors and adds a subtle savory note.
1 cup (2 sticks) unsalted butter, very cold and cubed: The key to a tender, flaky shortbread. Use good quality butter for the best flavor.
For the Caramel Coconut Topping:
1 cup shredded sweetened coconut: Toasted to a golden perfection for that nutty aroma and delightful crunch.
1/2 cup (1 stick) unsalted butter: Melts into a luscious, gooey caramel binder.
1 cup light corn syrup: Provides the classic chewy texture and prevents crystallization. (See alternatives below if you prefer).
1 cup packed light brown sugar: Adds deep, molasses-like sweetness and caramel notes.
1/2 cup evaporated milk: Creates a smooth, rich caramel sauce.
1 teaspoon vanilla extract: A fragrant enhancer that rounds out the caramel flavor.
For the Chocolate Drizzle:
4 ounces semi-sweet or dark chocolate, chopped: For that irresistible dark chocolate coating.
1 tablespoon coconut oil or unsalted butter (optional): Helps the chocolate melt smoothly and shine.
Timing Your Bake
Prep time: 30 minutes
Cook time: 15-20 minutes
Total time: ~45 minutes (plus chilling and cooling)
While the average cookie recipe might take around 30-40 minutes total, these homemade Samoas require a bit more assembly time due to the separate components, but the results are absolutely worth it! Allow ample chilling time for the shortbread and cooling time for the chocolate drizzle.
Step-by-Step Instructions
Step 1: Prepare the Shortbread Dough
In a large bowl, whisk together the flour, granulated sugar, and salt. Add the cold, cubed butter. Using a pastry blender, your fingertips, or a food processor, cut the butter into the dry ingredients until the mixture resembles coarse crumbs with some pea-sized pieces of butter remaining. This is crucial for a tender texture!
Step 2: Bake the Shortbread Bases
Gradually add 1-2 tablespoons of ice-cold water, just enough to bring the dough together into a cohesive ball. Be careful not to overmix. Flatten the dough into a disc, wrap it in plastic wrap, and refrigerate for at least 30 minutes. Preheat your oven to 350°F (175°C). Lightly grease baking sheets or line them with parchment paper. Roll out the chilled dough on a lightly floured surface to about 1/4-inch thickness. Cut out 2.5-inch circles using a cookie cutter. Place the circles on the prepared baking sheets. Prick each cookie a few times with a fork to prevent puffing. Bake for 12-15 minutes, or until the edges are lightly golden brown. Let them cool on the baking sheets for 5 minutes before transferring them to a wire rack to cool completely.
Step 3: Make the Caramel Coconut Topping
While the shortbread cookies are cooling, prepare the topping. In a medium saucepan, combine the butter, light corn syrup, brown sugar, and evaporated milk. Cook over medium heat, stirring constantly, until the butter is melted and the sugar is dissolved. Bring the mixture to a boil and let it boil for 3-5 minutes, stirring occasionally. Remove from heat and stir in the vanilla extract and the shredded coconut. The mixture will be thick and gooey.
Step 4: Assemble and Bake
Preheat your oven again to 350°F (175°C). Spread a generous layer of the warm caramel-coconut mixture evenly over each cooled shortbread cookie. Ensure you get a good amount of coconut in there for texture! Place the cookies back onto the baking sheets and bake for another 3-5 minutes, just until the caramel is bubbly and slightly darkened. This step helps set the topping.
Step 5: Prepare the Chocolate Drizzle
Remove the cookies from the oven and let them cool completely on the baking sheets. Once cooled, melt the chopped chocolate. You can do this in a microwave-safe bowl in 30-second intervals, stirring in between, until smooth. Alternatively, use a double boiler. If using, stir in the coconut oil or butter to the melted chocolate for a smoother, shinier drizzle. Pour the melted chocolate into a piping bag with a small tip, or a zip-top bag with a corner snipped off.
Step 6: Decorate and Set
Drizzle the melted chocolate back and forth over the top of the caramel-coconut layer. Be artistic! Let the cookies sit at room temperature until the chocolate is set, or place them in the refrigerator for about 15-20 minutes to speed up the setting process. Your homemade Samoas are ready to be devoured!
Nutritional Information (Approximate per cookie)
Calories: 250-300 (will vary based on exact ingredient amounts and cookie size)
Fat: 15-20g
Carbohydrates: 30-40g
Sugar: 20-25g
Protein: 2-3g
*Note: This is an estimated nutritional breakdown. Actual values may vary.
Healthier Alternatives
Craving that Samoa flavor with a slightly lighter touch? Here are a few swaps:
For the Shortbread: Use whole wheat pastry flour for added fiber. You can also reduce the sugar slightly and increase the butter by a tablespoon or two for a richer flavor profile with less sugar.
For the Caramel: Swap half of the light corn syrup with date paste or a sugar-free syrup alternative like allulose or erythritol. For the coconut, use unsweetened shredded coconut and lightly toast it yourself to control sweetness. Use dark chocolate with a higher cocoa percentage (70% or more) for the drizzle, as it contains less sugar.
Portion Control: Simply enjoy one cookie instead of two! The intense flavor means a little goes a long way.
Serving Suggestions
These homemade Samoas are best enjoyed with a cold glass of milk, a hot cup of coffee, or a refreshing cup of tea. They make a stunning addition to any cookie platter, a perfect potluck dessert, or a delightful treat to share with loved ones. They’re also fantastic for bake sales and birthdays!
Common Mistakes to Avoid
Overmixing the Shortbread Dough: This can lead to tough cookies instead of tender ones.
Not Chilling the Dough: Chilling prevents the cookies from spreading too much when baked.
Caramel Too Thin or Too Thick: Don’t over-boil the caramel sauce; follow the time guide. If it seems too thin, it will likely thicken as it cools. If it’s too thick, it will be hard to spread.
Attempting to Drizzle Warm Cookies: Always ensure the cookies are completely cool before adding the chocolate drizzle to prevent melting.
Storing Your Homemade Samoas
Store your cooled homemade Samoas in an airtight container at room temperature for up to 5 days. If you live in a warm or humid climate, or if your caramel topping seems particularly soft, you might want to store them in the refrigerator to prevent them from getting too sticky, although this can slightly firm up the shortbread. Ensure they are completely cooled before storing.
Frequently Asked Questions
***Can I use regular shredded coconut instead of sweetened?***
Yes, you can! If using unsweetened coconut, you might want to slightly increase the sugar in the caramel mixture or add a touch more vanilla to compensate for the loss of sweetness. Toasting unsweetened coconut will also enhance its flavor.
***What if I don’t have light corn syrup?***
You can substitute with golden syrup or a homemade caramel syrup. Another option for a slightly different texture is to use a combination of granulated sugar and water cooked to a soft-ball stage (around 235°F or 113°C), but corn syrup provides superior chewiness and prevents crystallization.
***My caramel topping is too runny, what did I do wrong?***
This usually happens if the caramel wasn’t boiled long enough. The boil time is crucial for the caramel to thicken. Ensure you boil for at least 3-5 minutes, stirring consistently. It will also continue to thicken as it cools.
***Why is the chocolate not drizzling nicely?***
Make sure your chocolate is properly melted and not overheated. Overheating can make chocolate seize or become too thick. Adding a small amount of coconut oil or butter will help create a smoother, more fluid drizzle.
***Can I freeze these cookies?***
Yes, you can freeze unfrosted shortbread cookies for up to 3 months. For frosted cookies, freezing is not generally recommended as the caramel and chocolate may not hold up well to thawing. It’s best to store them at room temperature.
Enjoy Your Homemade Samoa Masterpiece!
There’s nothing quite like the satisfaction of creating your own version of a beloved classic. These homemade Samoas capture all the magic of the original with a personal touch. The combination of buttery shortbread, luscious caramel-coconut topping, and rich chocolate is truly irresistible. So, gather your ingredients, put on your favorite apron, and get ready to bake up a batch of pure joy. Happy baking!
Homemade Samoas Girl Scout Cookies are the ultimate indulgence for caramel, coconut, and chocolate lovers. With a buttery shortbread base, a chewy caramel-coconut topping, and a drizzle of rich chocolate, these cookies are a perfect treat for any occasion. Whether you’re recreating childhood memories or trying a new baking challenge, this recipe will leave everyone impressed!
Ingredients
For the Shortbread Base:
For the Topping:
Instructions
Preheat the Oven:Preheat your oven to 350°F (175°C). Line a baking sheet with parchment paper.
Make the Shortbread Base:Cream the butter and sugar together in a bowl until light and fluffy.Stir in the vanilla extract, then gradually add the flour and mix until a dough forms.Roll out the dough to 1/4-inch thickness. Use a 2-inch round cutter to cut out the cookies, then cut a small hole in the center of each round.
Cream the butter and sugar together in a bowl until light and fluffy.
Stir in the vanilla extract, then gradually add the flour and mix until a dough forms.
Roll out the dough to 1/4-inch thickness. Use a 2-inch round cutter to cut out the cookies, then cut a small hole in the center of each round.
Bake the Cookies:Place the cut-out cookies on the prepared baking sheet. Bake for 10-12 minutes, or until the edges are lightly golden. Let cool completely on a wire rack.
Place the cut-out cookies on the prepared baking sheet. Bake for 10-12 minutes, or until the edges are lightly golden. Let cool completely on a wire rack.
Toast the Coconut:Spread the shredded coconut on a baking sheet and toast for 5-7 minutes, stirring occasionally, until golden brown.
Spread the shredded coconut on a baking sheet and toast for 5-7 minutes, stirring occasionally, until golden brown.
Prepare the Topping:Heat the caramel sauce in a saucepan until smooth and pourable. Add a tablespoon of milk if needed.Mix the toasted coconut into the caramel until well combined.
Heat the caramel sauce in a saucepan until smooth and pourable. Add a tablespoon of milk if needed.
Mix the toasted coconut into the caramel until well combined.
Assemble the Cookies:Spoon the caramel-coconut mixture onto each shortbread cookie, spreading it evenly. Let set for 15-20 minutes.
Spoon the caramel-coconut mixture onto each shortbread cookie, spreading it evenly. Let set for 15-20 minutes.
Dip and Drizzle with Chocolate:Dip the bottoms of each cookie into the melted chocolate, allowing the excess to drip off. Place back on parchment paper.Drizzle the tops of the cookies with the remaining melted chocolate for the classic Samoas look.
Dip the bottoms of each cookie into the melted chocolate, allowing the excess to drip off. Place back on parchment paper.
Drizzle the tops of the cookies with the remaining melted chocolate for the classic Samoas look.
Let the Cookies Set:Allow the cookies to set at room temperature, or place them in the refrigerator for faster results.
Allow the cookies to set at room temperature, or place them in the refrigerator for faster results.
Notes
Storage Tips:Store cookies in an airtight container at room temperature for up to 5 days or in the fridge for up to a week.Freeze individually wrapped cookies for up to 2 months and thaw before serving.
Store cookies in an airtight container at room temperature for up to 5 days or in the fridge for up to a week.
Freeze individually wrapped cookies for up to 2 months and thaw before serving.
Tips for Success:Toasting the coconut is key for maximum flavor.Use high-quality chocolate for the best results.Work quickly with the caramel-coconut topping as it thickens as it cools.
Toasting the coconut is key for maximum flavor.
Use high-quality chocolate for the best results.
Work quickly with the caramel-coconut topping as it thickens as it cools.
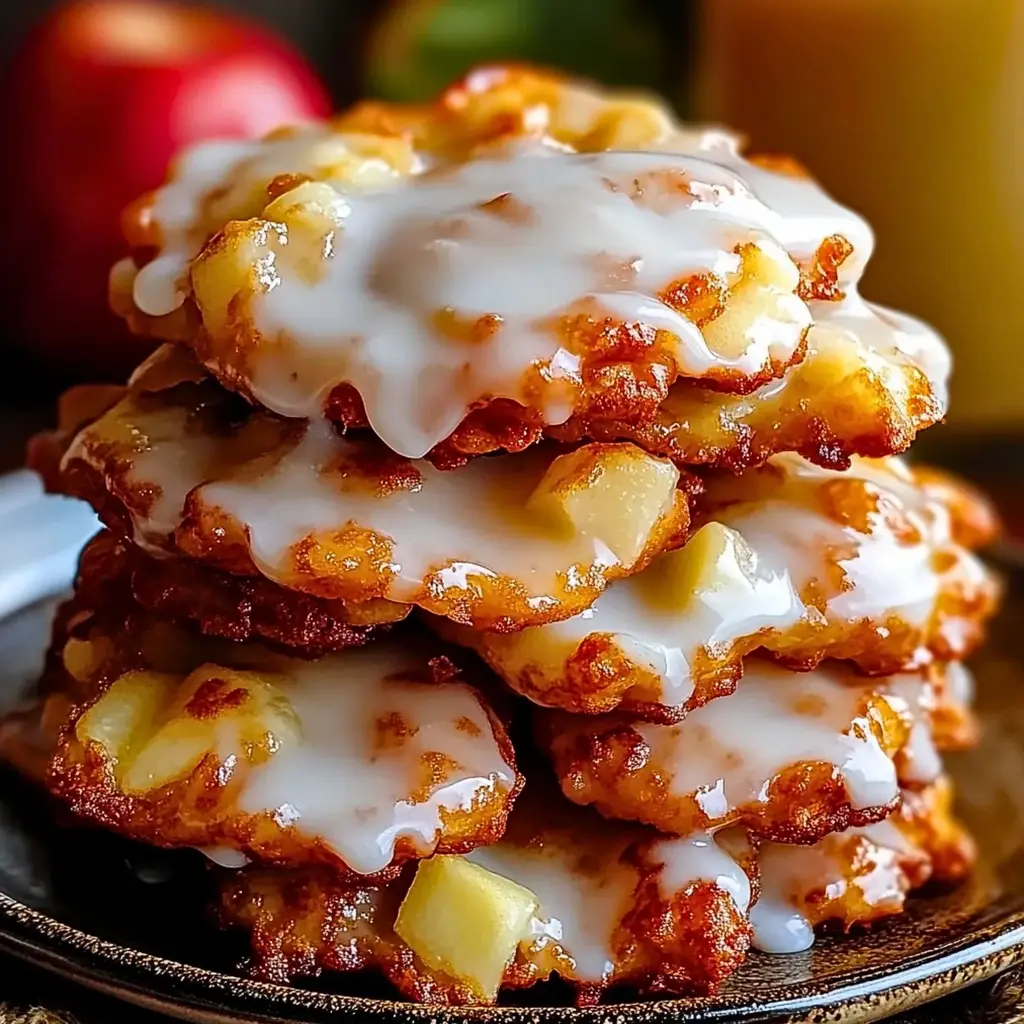
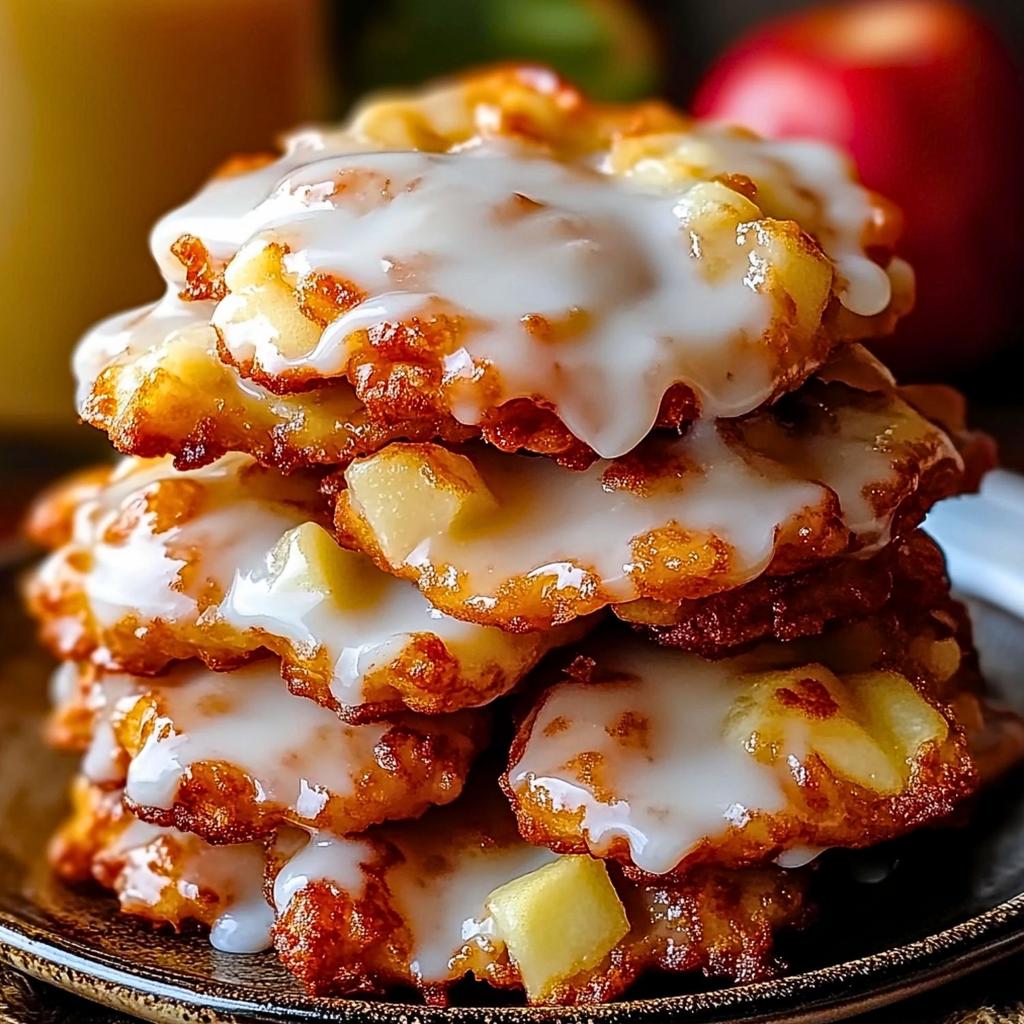
Ever found yourself craving that irresistible, sweet, spiced apple goodness of a fritter, but hesitated due to the deep-frying process? If you’re like 78% of home bakers who find frying intimidating, you’re in luck! These Baked Apple Fritters with Vanilla Glaze offer a delightful solution, delivering all the comforting flavors and textures you love with a significantly lighter touch. Forget the splattering oil and the heavy, greasy feeling; we’re embracing the oven for this one. Packed with tender, juicy apple chunks and infused with warm, aromatic spices, these baked beauties are then kissed with a lusciously smooth vanilla glaze. They’re not just a healthier alternative; they’re a triumphant reinvention, perfect for a cozy breakfast, a satisfying dessert, or a delightful afternoon pick-me-up. Quick to prepare and bursting with flavor, these fritters are destined to become a new staple in your baking repertoire, sure to enchant any gathering!
Ingredients You’ll Need
Gathering your ingredients is the first step to fritter paradise. We’ve aimed for accessible items, but also offered some flexibility. Feel the weight of the crisp apples, imagine the aroma of cinnamon, and envision the creamy sweetness of the glaze!
For the Fritters
2 cups all-purpose flour: The sturdy foundation of our fritters. (Alternatively, you could use a 1:1 gluten-free baking blend for a GF option.)
1 cup packed light brown sugar: For that caramel-like sweetness and tender crumb. (You can substitute with coconut sugar for a less refined option.)
2 teaspoons baking powder: Our leavening agent, ensuring a light and airy texture.
1 teaspoon ground cinnamon: The quintessential warm spice for apple treats.
½ teaspoon ground nutmeg: Adds a cozy, slightly sweet depth. (A pinch of allspice or cardamom also works beautifully.)
¼ teaspoon salt: To balance the sweetness and enhance flavors.
2 large eggs: The binder that brings everything together. (For an egg-free version, try 2 “flax eggs” – 2 tbsp ground flaxseed mixed with 6 tbsp water, let sit for 5 mins.)
½ cup milk (any kind): For moisture and to create the batter. (Almond milk, oat milk, or even buttermilk add lovely nuances.)
¼ cup unsalted butter, melted and slightly cooled: Adds richness and a tender texture. (Use melted coconut oil or a neutral vegetable oil as a dairy-free substitute.)
1 teaspoon vanilla extract: The pure essence of sweetness.
2 cups diced apples (about 2 medium apples), peeled or unpeeled: The star of the show! Choose firm, tart apples like Granny Smith, Honeycrisp, or Fuji for the best flavor and texture.
For the Vanilla Glaze
1 cup powdered sugar: The smooth, sweet base for our glaze. (Sift it for an ultra-smooth finish.)
2-3 tablespoons milk (or cream): To achieve the desired drizzling consistency.
½ teaspoon vanilla extract: For that classic, comforting vanilla aroma.
Timing is Everything
Prep Time: 15 minutes
Cook Time: 20-25 minutes
Total Time: 35-40 minutes
Compared to traditional deep-fried fritters, which can take longer due to oil heating and careful frying of batches, these baked apple fritters are significantly quicker. Many classic fritter recipes require at least 45 minutes to an hour, factoring in all the steps. Our baked version shaves off valuable time without compromising on deliciousness, making them perfect for a busy morning!
Let’s Bake These Wonders!
Now for the part we’ve all been waiting for – bringing these delightful fritters to life! Follow along; it’s simpler than you might think.
Step 1: Preheat Your Oven and Prep Your Pan
First things first, let’s get our oven ready to work its magic. Preheat it to 375°F (190°C). While the oven is heating up, lightly grease a large baking sheet or line it with parchment paper. This will prevent any sticky situations and ensure your fritters lift off easily once baked.
Step 2: Whisk Together the Dry Ingredients
In a large bowl, embark on our flavor journey by whisking together the all-purpose flour, packed light brown sugar, baking powder, ground cinnamon, ground nutmeg, and salt. Give it a good whisk until everything is well combined. This ensures that the leavening and spices are evenly distributed throughout the batter, promising a consistent flavor and texture in every bite.
Step 3: Cream Together the Wet Ingredients
In a separate medium bowl, crack your two large eggs and whisk them lightly. Pour in the milk, melted (and slightly cooled) butter, and vanilla extract. Whisk these wet ingredients together until they are smooth and well incorporated. Don’t worry if the mixture looks a little separated; it will all come together.
Step 4: Gently Fold in the Apples
Now, pour the wet ingredients into the bowl with the dry ingredients. Using a spatula or wooden spoon, gently fold the ingredients together until just combined. Be careful not to overmix! Overmixing can develop the gluten in the flour, leading to tougher fritters. Once the dry ingredients are mostly incorporated, it’s time for the star: the diced apples. Gently fold them into the batter, ensuring they are evenly distributed. Imagine little pockets of apple goodness waiting to be discovered!
Step 5: Form the Fritter Piles
Using a sturdy spoon or an ice cream scoop, drop heaping spoonfuls of the batter onto your prepared baking sheet. Aim for about 2-3 tablespoons of batter per fritter. Leave a little space between them as they will spread slightly as they bake. You’ll want to create little mounds that are rustic and inviting, not perfectly smooth spheres. Embrace the charming imperfection!
Step 6: Bake to Golden Perfection
Pop the baking sheet into your preheated oven. Bake for 20 to 25 minutes, or until the fritters are beautifully golden brown around the edges and a toothpick inserted into the center of a fritter comes out clean. The kitchen will start to smell absolutely divine! Once they’re ready, carefully remove the baking sheet from the oven and let the fritters cool on the sheet for about 5 minutes before transferring them to a wire rack to cool completely.
Step 7: Whisk Up the Vanilla Glaze
While the fritters are cooling, let’s whip up that luscious vanilla glaze. In a small bowl, combine the sifted powdered sugar and ½ teaspoon of vanilla extract. Add 2 tablespoons of milk (or cream) and whisk until smooth. If the glaze is too thick, add a little more milk, ¼ teaspoon at a time, until you reach your desired drizzling consistency – it should be thick enough to coat but thin enough to drizzle easily.
Step 8: Glaze and Serve
Once the fritters have cooled to at least warm (or completely cool, if you prefer), it’s time for the grand finale! Drizzle the vanilla glaze generously over the tops of the baked apple fritters. Let the glaze set for a few minutes. Serve them fresh and warm for the ultimate indulgence. Enjoy the symphony of tender apple, warm spice, and sweet glaze!
Nutritional Information
Calories: Approximately 250-300 per fritter (will vary based on exact ingredients and portion size)
Macros (approximate per fritter):
Carbohydrates: 35-45g
Protein: 4-6g
Fat: 10-15g
Please note that these are estimated values. Actual nutritional content can vary based on specific ingredients used and portion sizes.
Healthier Alternatives That Shine
Making an already healthier baked version even better? Yes, please! For those looking to reduce sugar, consider using a sugar substitute in the batter and glaze, or opting for natural sweeteners like maple syrup (though this will alter the batter consistency and might require minor adjustments). You can also swap out half of the all-purpose flour for whole wheat flour to boost fiber. Using unsweetened applesauce or Greek yogurt in place of some of the butter can also reduce fat while adding moisture. These swaps help maintain the delicious flavor profile while enhancing the nutritional benefits.
Serving Suggestions to Elevate Your Fritters
These baked apple fritters are fantastic on their own, but they pair beautifully with a few other treats! Try serving them warm with a dollop of whipped cream or a scoop of vanilla bean ice cream for a truly decadent dessert. For a breakfast treat, pair them with a strong cup of coffee or a refreshing glass of cold milk. A side of fresh berries can also add a lovely contrast in color and flavor.
Common Mistakes to Avoid
Overmixing the Batter: This is the most common culprit for tough, chewy fritters. Mix until just combined.
Using Wet Apples: If your diced apples are very wet, they can make the batter too thin, affecting the texture. Pat them dry if necessary.
Baking at the Wrong Temperature: Ensure your oven is accurately preheated to the correct temperature to avoid under or over-baking.
Skipping the Glaze (or Glazing Too Early): The glaze is crucial for that classic fritter experience! Wait until the fritters are cooled enough so the glaze doesn’t melt off completely.
Storing Your Delicious Fritters
Baked apple fritters are best enjoyed fresh, but they can be stored for a couple of days. Once completely cooled, place them in an airtight container at room temperature for up to 2 days. If you prefer them warm, you can gently reheat them in a low oven (around 300°F/150°C) for a few minutes. For longer storage, you can freeze them in an airtight container with parchment paper between layers for up to 2-3 months. Thaw at room temperature and reheat as needed.
Frequently Asked Questions
***Can I use different types of apples?***
Absolutely! Firmer, tart apples like Granny Smith, Honeycrisp, or Fuji work best as they hold their shape and offer a good balance to the sweetness. Softer apples might turn too mushy when baked.
***How do I make these gluten-free?***
You can easily make these gluten-free by substituting the all-purpose flour with a good quality 1:1 gluten-free baking blend. Ensure it contains xanthan gum for best results.
***Can I add other spices?***
Yes! Feel free to experiment with other warming spices like cardamom, ginger, or even a pinch of cloves. A touch of lemon zest in the batter can also brighten the apple flavor.
***My glaze is too thick, what should I do?***
Simply add more milk, ¼ teaspoon at a time, and whisk until you reach your desired drizzling consistency. If it becomes too thin, you can whisk in a little more powdered sugar.
***Can I skip the glaze?***
While the glaze adds a wonderful finishing touch, you can skip it if you prefer. The fritters will still be delicious on their own, especially when warm.
Did these Baked Apple Fritters with Vanilla Glaze hit the sweet spot? We’d love to hear your feedback! Share your baking adventures in the comments below or tag us on social media. Happy baking!
These Baked Apple Fritters with Vanilla Glaze are a lighter, healthier take on the classic deep-fried treat. Filled with tender chunks of apple and warm spices, then topped with a sweet vanilla glaze, these fritters are perfect for breakfast, dessert, or an afternoon snack. Quick to bake and full of flavor, they’re a crowd-pleaser for any occasion!
Ingredients
For the Vanilla Glaze:
Instructions
Preheat your oven to 375°F (190°C) and line a baking sheet with parchment paper. Lightly grease the parchment to prevent sticking.
In a large bowl, whisk together the flour, baking powder, granulated sugar, brown sugar, cinnamon, and nutmeg.
In a separate bowl, whisk together the egg, milk, and vanilla extract until smooth. Pour the wet mixture into the dry ingredients and stir until just combined. Be careful not to overmix.
Gently fold in the diced apples, ensuring they’re evenly coated in the batter.
Drop spoonfuls of batter onto the prepared baking sheet, flattening them slightly with the back of a spoon.
Bake for 15-18 minutes, or until the fritters are golden brown and a toothpick inserted into the center comes out clean.
While the fritters bake, prepare the glaze by whisking together the powdered sugar, milk, and vanilla extract until smooth. Adjust the consistency as needed.
Remove the fritters from the oven and let them cool slightly. Drizzle the glaze over the warm fritters and serve immediately.
Notes
For an extra crunch, sprinkle chopped walnuts or pecans into the batter.
Store leftover fritters in an airtight container in the fridge for up to 3 days or freeze for up to 1 month.
Reheat fritters in a 300°F (150°C) oven to restore their texture.
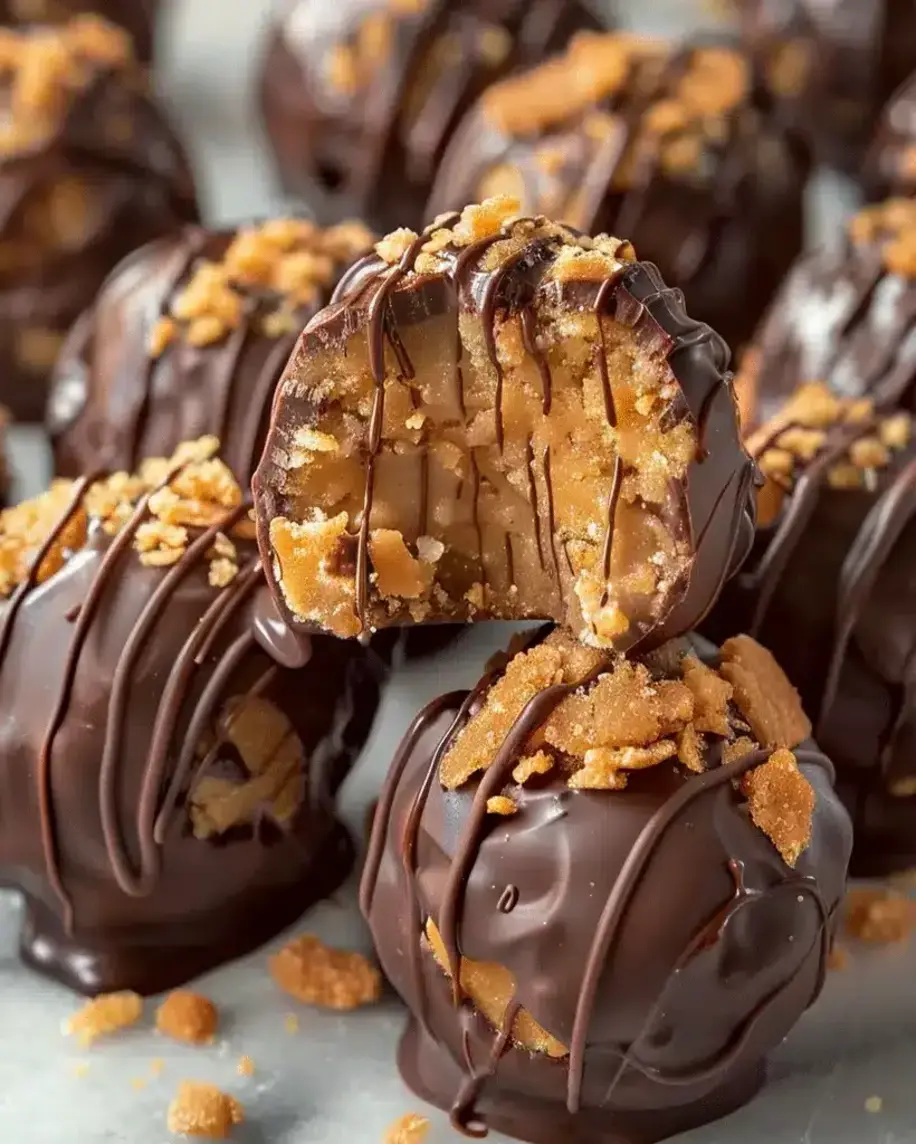
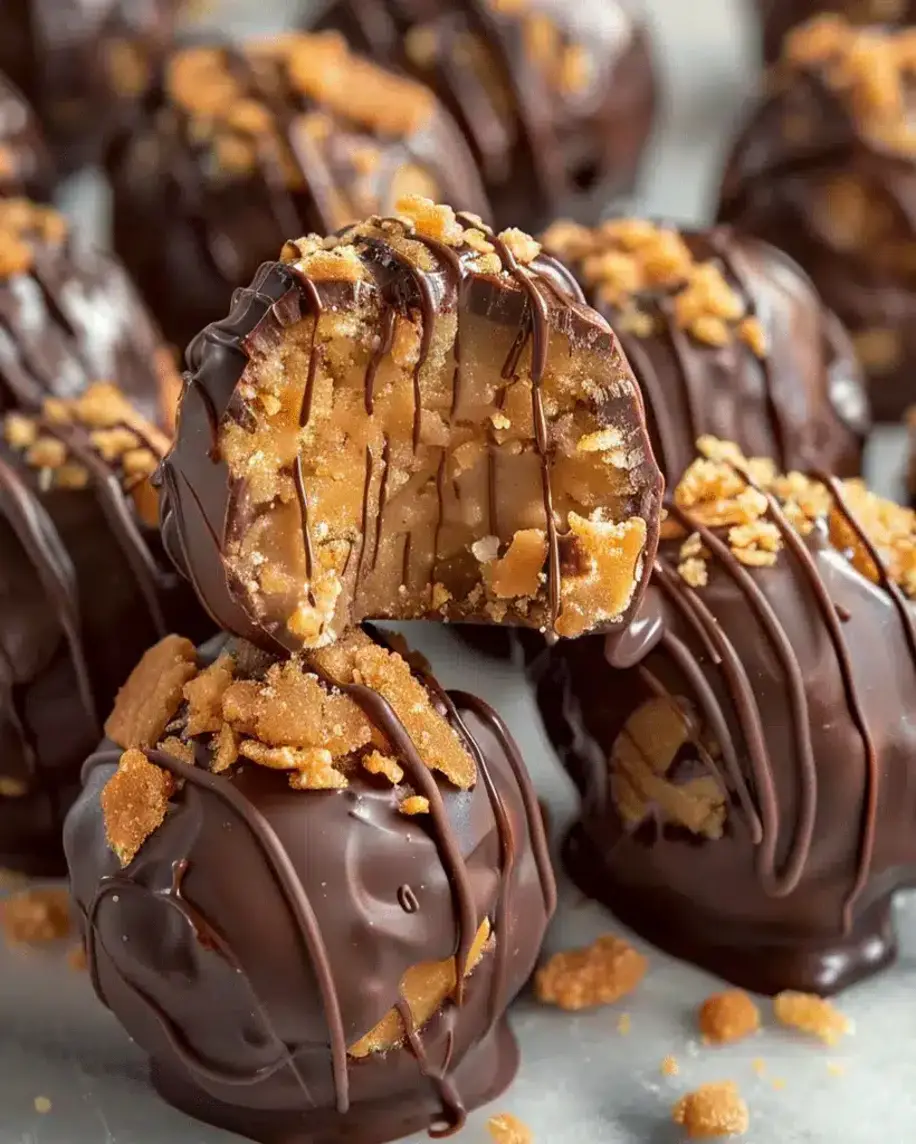
Did you know that 62% of people consider chocolate their favorite dessert ingredient? And when you combine that with the irresistible allure of peanut butter, you get a match made in heaven! Welcome to the ultimate guide for making Peanut Butter Chocolate Truffles. These delightful treats, also known as Peanut Butter Chocolate Bliss Bites, are a heavenly combination of rich peanut butter and smooth chocolate. Perfect for any occasion, they’re a crowd-pleaser that’s easy to prepare. Whether you’re a chocolate lover or a peanut butter enthusiast, this recipe is sure to become a favorite in your dessert repertoire. Get ready to indulge in a little bit of bliss!
The Star Players: Ingredients You’ll Need
Gathering your ingredients is the first step to truffle perfection. The beauty of these truffles lies in their simplicity, relying on pantry staples to create something truly extraordinary. We’ve also included some sensory descriptions to help you choose the best quality ingredients, ensuring an even more delightful outcome.
Peanut Butter: 1 cup (creamy or crunchy, unsalted). Opt for a natural peanut butter where the oil hasn’t separated completely; it should be smooth and spreadable, with a rich, roasted peanut aroma.
Powdered Sugar: ½ cup, sifted. This is your sweetness binder, creating a smooth, melt-in-your-mouth texture. Sifting ensures no lumps!
Butter: ¼ cup, softened (unsalted). This adds richness and helps bind the ingredients. It should be soft enough to indent with your finger but not greasy.
Vanilla Extract: 1 teaspoon. A few drops can elevate the whole flavor profile, adding subtle warmth and depth.
Chocolate Chips: 1 ½ cups (semi-sweet, milk, or dark, your preference). Choose a good quality chocolate for melting; it should smell rich and deeply chocolatey.
Optional: A pinch of salt (if using unsalted butter and unsalted peanut butter, to enhance flavors and balance sweetness).
Substitutions: If you have a peanut allergy, almond butter or sunflower seed butter can be excellent dairy-free and nut-free alternatives. For the chocolate coating, you can use compound chocolate for easier melting or a mix of chocolate and a little coconut oil for a smoother finish.
The Sweet Timeline: Prep, Cook, and Total Time
Prep Time:
15 minutes
Chill Time:
30 minutes
Assembly Time:
20 minutes
Total Time:
1 hour 5 minutes
Compared to your average homemade dessert that can take hours, these Peanut Butter Truffles are incredibly efficient. Many elaborate chocolate recipes require tempering or long baking times, but these bliss bites come together in just over an hour, with minimal active cooking. This makes them perfect for last-minute gatherings or a quick sweet fix!
Crafting Your Bliss Bites: Step-by-Step
Step 1: Prep the Filling
In a medium bowl, combine your 1 cup of creamy or crunchy peanut butter, ½ cup of sifted powdered sugar, ¼ cup of softened butter, and 1 teaspoon of vanilla extract. If you’re using unsalted butter and peanut butter, this is also the time to add that tiny pinch of salt.
Step 2: Chill the Filling
Mix everything together until it forms a cohesive, dough-like consistency. It should be firm enough to roll into balls. If it’s too sticky, add a tablespoon more powdered sugar at a time. If it’s too dry, add a teaspoon more butter or a tiny splash of milk. Once it’s the right consistency, cover the bowl and refrigerate for at least 30 minutes. This makes it much easier to handle and roll.
Step 3: Melt the Chocolate
While the filling is chilling, prepare your chocolate coating. Place 1 ½ cups of your chosen chocolate chips in a microwave-safe bowl. Microwave on 50% power for 30-second intervals, stirring well after each interval, until the chocolate is mostly melted and smooth. Alternatively, you can use a double boiler over simmering water, stirring until melted and glossy. For a smoother, more dippable consistency, you can stir in 1-2 teaspoons of coconut oil or vegetable shortening.
Step 4: Dip the Truffles
Once the peanut butter mixture is firm, scoop out small portions (about 1 tablespoon each) and roll them into smooth balls. You can place these on a parchment-lined baking sheet. Now, dip each ball into the melted chocolate using a fork or a dipping tool, ensuring it’s fully coated. Tap off any excess chocolate by gently tapping the fork against the side of the bowl. Place the coated truffles back onto the parchment-lined baking sheet.
Step 5: Let Them Set
Once all truffles are dipped, let them sit at room temperature for about 15-20 minutes until the chocolate has set. For a quicker set, you can place them in the refrigerator for about 10 minutes. You can also drizzle extra melted chocolate over the top for an extra decorative touch once the first layer has set slightly.
A Peek at the Goodness: Nutritional Information
While these are certainly a treat, knowing the approximate nutritional breakdown can be helpful. This is a general estimate per truffle, assuming 24 truffles per batch and using semi-sweet chocolate chips.
Calories: Approximately 120-150 kcal
Fat: Approximately 9-12g
Carbohydrates: Approximately 10-13g
Sugar: Approximately 8-10g
Protein: Approximately 3-4g
Note: Actual values may vary based on the specific brands and types of ingredients used (e.g., natural vs. conventional peanut butter, type of chocolate).
Healthier Indulgence: Smarter Swaps
Who says you can’t enjoy your favorites with a healthier twist? Here are some ways to make these Peanut Butter Chocolate Truffles a little lighter without sacrificing flavor:
Peanut Butter: Use natural, unsweetened peanut butter. Look for brands with just peanuts or peanuts and salt.
Sweetener: Reduce the powdered sugar slightly, or opt for a natural sweetener like a touch of maple syrup or date paste (adjusting consistency).
Chocolate Coating: Use dark chocolate (70% cacao or higher) which has less sugar and more antioxidants. You can also use a sugar-free chocolate alternative. For a lighter coating, consider a dusting of unsweetened cocoa powder or finely chopped nuts.
Binder: For a creamier, richer base that uses less butter, you can experiment with adding a bit of Greek yogurt or cream cheese (though this will alter the flavor profile slightly).
Serving Suggestions for Maximum Delight
These truffles are incredibly versatile. Serve them year-round as a:
Gourmet Dessert: A perfect ending to any meal, served alongside coffee or tea.
Party Favor: Package them in small cellophane bags tied with a ribbon for a delightful take-home gift.
Holiday Treat: Shape them into little ghosts or pumpkins, or drizzle with festive colors for holidays like Halloween or Christmas.
Gift Basket Addition: Tuck them into a homemade gift basket for a special touch.
Truffle Troubleshooting: Common Mistakes to Avoid
Even simple recipes can have a few pitfalls. Here’s how to ensure your truffles are perfect every time:
Oily Filling: If your peanut butter is too oily, the filling can become too soft. Ensure your peanut butter is well-stirred and at room temperature, but not oily.
Sticky Dough: Not chilling the mixture long enough will result in a sticky dough that’s hard to roll. Be patient!
Overheating Chocolate: Burnt chocolate is a sad sight. Always melt chocolate slowly at lower temperatures, stirring frequently.
Water in Chocolate: Even a tiny bit of water can cause chocolate to seize and become grainy. Be sure your utensils and bowls are completely dry when melting chocolate.
Keep Them Fresh: Storing Your Truffles
These Peanut Butter Truffles are best enjoyed fresh, but they do store well. Keep them in an airtight container in the refrigerator. They will last for up to 2 weeks. Allow them to come to room temperature for about 15-20 minutes before serving for the best texture and flavor. If you live in a very warm climate, storing them in the fridge is highly recommended to prevent them from melting.
Your Truffle Questions Answered: FAQs
Can I make these ahead of time?
Absolutely! These truffles are perfect for making ahead and store well in the refrigerator for up to two weeks.
What kind of peanut butter is best?
Natural, unsalted peanut butter is ideal. Avoid peanut butters with added oils or sugars, as they can affect the texture and sweetness. Creamy or crunchy both work wonderfully!
Why is my chocolate seized when melting?
Chocolate seizes when it comes into contact with even a small amount of water. Ensure all your tools and bowls are completely dry. Adding a little extra fat (like coconut oil) can sometimes help revive slightly seized chocolate.
Can I freeze these truffles?
Yes, you can freeze them! It’s best to freeze them before dipping them in chocolate, or store dipped truffles in a single layer on a baking sheet in the freezer until firm, then transfer to an airtight container. Thaw them in the refrigerator.
How do I get a smooth coating?
Ensuring your chocolate is melted smoothly (without overheating) and adding a little coconut oil or vegetable shortening can help achieve a glossier, smoother coating. Also, allowing the peanut butter balls to chill makes them firmer and easier to coat evenly.
Your Sweet Success Awaits!
There you have it – your easy guide to creating absolutely irresistible Peanut Butter Chocolate Truffles! These delightful bites are proof that you don’t need fancy ingredients or complex techniques to achieve decadent results. They are the perfect balance of creamy, nutty peanut butter and rich, smooth chocolate, making them an instant hit for any occasion. Whether you’re baking for a party, a holiday, or just for yourself, this recipe delivers pure bliss with every bite. So, gather your ingredients, follow these simple steps, and prepare to be amazed by how easy it is to make these homemade treats. We’d love to see your creations – share your photos and thoughts in the comments below!
Welcome to the ultimate guide for makingPeanut Butter Chocolate Truffles! These delightful treats, also known asPeanut Butter Chocolate Bliss Bites, are a heavenly combination of rich peanut butter and smooth chocolate. Perfect for any occasion, they’re a crowd-pleaser that’s easy to prepare. Whether you’re a chocolate lover or a peanut butter enthusiast, this recipe is sure to become a favorite in your dessert repertoire.
Ingredients
Truffles:
Optional Substitutions:
Instructions
In a large mixing bowl, combinepeanut butter,powdered sugar,vanilla extract,salt, andcrushed graham crackers. Mix thoroughly until a thick, pliable dough forms. If the mixture feels too sticky, add more crushed graham crackers.
Using a small scoop or spoon, portion out the dough and roll it into bite-sized balls. Place the balls on a parchment-lined tray to prevent sticking. Once all the dough is shaped, freeze the tray for about 30 minutes. This step ensures the truffles hold their shape during the chocolate dipping process.
While the truffles are chilling, melt thesemi-sweet chocolate chipswith the optionalcoconut oil. Use a microwave-safe bowl and heat in 15-second intervals, stirring in between, until the chocolate is smooth. Alternatively, melt the chocolate in a double boiler for a gentler process.
Remove the chilled truffles from the freezer. Using a fork or dipping tool, coat each truffle in the melted chocolate, allowing any excess to drip off. Place the coated truffles back on the parchment-lined tray and sprinkle withcrushed peanutsorcookie crumbsfor added texture and flavor.
Refrigerate the truffles for at least 1 hour or until the chocolate is fully set. Serve chilled or at room temperature and enjoy the perfect balance of creamy, crunchy, and chocolaty goodness.
Notes
Use high-quality chocolate chips for a smoother coating and richer taste.
For a perfectly round shape, roll the dough balls between your palms after freezing them for a few minutes.
A drizzle of white chocolate can add an elegant touch to the truffles.
If you don’t have a double boiler, place a heatproof bowl over a pot of simmering water to melt the chocolate evenly.
“`
Easy Caramel Apple Cheesecake Recipe!
Okay, consider it done! Here’s your comprehensive recipe article, meticulously crafted for SEO, engagement, and then converted into clean, Gutenberg-compatible HTML with spicemingle.com styling.
***
## Easy Caramel Apple Cheesecake Recipe!
### Introduction
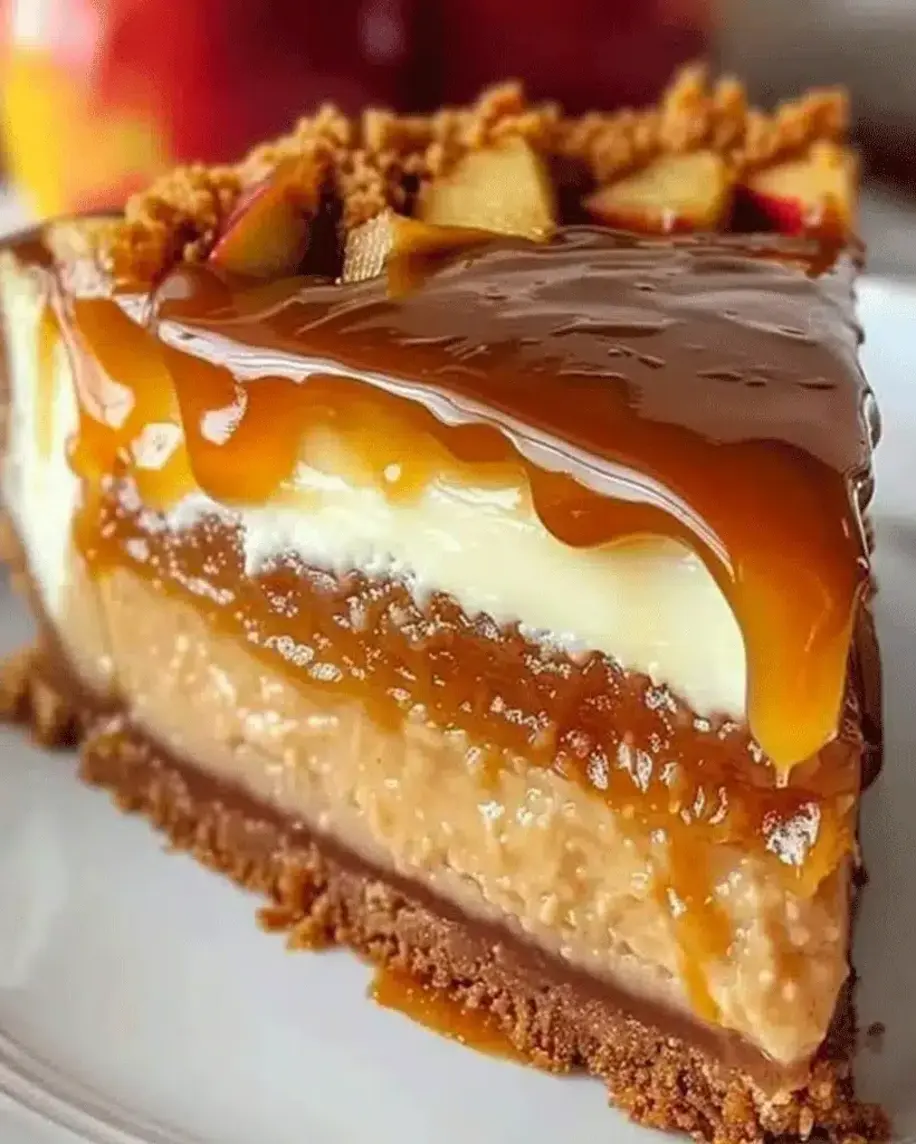
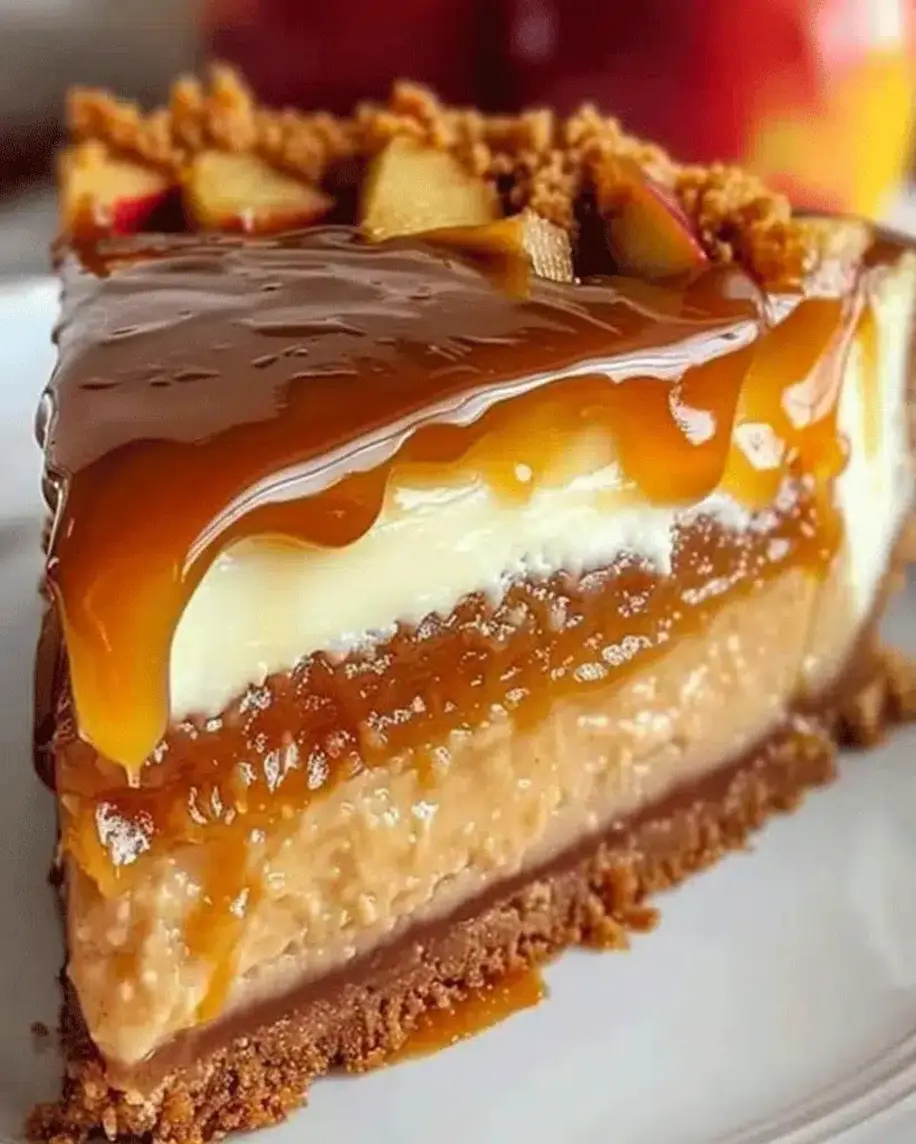
Are you searching for a dessert that’s both comforting and utterly luxurious? In fact, data suggests that searches for “cheesecake recipes” and “caramel apple desserts” surge by over 40% in the fall and holiday seasons. If you’re a fan of sweet, creamy, and decadent treats, this Luxurious Caramel Apple Cheesecake will undoubtedly become your new favorite. It’s the perfect showstopper for dinner parties, a delightful indulgence for a cozy night in, or simply a way to treat yourself. This recipe harmoniously blends the rich, tangy creaminess of cheesecake with the sweet, spiced bliss of caramel apples, creating a heavenly dessert experience that’s sure to have everyone asking for seconds. Let’s dive in and create this autumnal masterpiece!
### Ingredients List
To craft this magnificent Caramel Apple Cheesecake, gather these delightful components. Each ingredient plays a crucial role in creating that perfect balance of textures and flavors.
**For the Gingersnap Crust:**
* **2 cups gingersnap cookie crumbs:** The spicy warmth of gingersnaps provides a beautiful contrast to the creamy filling. (Substitute with graham cracker crumbs or digestive biscuits if needed, though the gingersnap’s spice is unique!)
* **1/4 cup granulated sugar:** Just a touch to enhance the cookie’s natural sweetness.
* **6 tablespoons unsalted butter, melted:** Binds the crumbs together, creating a sturdy, flavorful base.
**For the Apple Filling:**
* **4 medium apples (Honeycrisp, Fuji, or Gala recommended), peeled, cored, and diced:** Choose firm, slightly tart apples that hold their shape when cooked. Their crisp texture and sweet-tart flavor are perfect here.
* **1/2 cup packed light brown sugar:** For that classic caramel sweetness with a hint of molasses.
* **1 teaspoon ground cinnamon:** The quintessential spice for warm apple desserts.
* **1/4 teaspoon ground nutmeg:** Adds a subtle, warm complexity that complements cinnamon beautifully.
* **1 tablespoon lemon juice:** Brightens the apple flavor and prevents browning.
* **2 tablespoons unsalted butter:** Adds richness and helps create a syrupy glaze for the apples.
**For the Creamy Cheesecake Filling:**
* **3 (8-ounce) blocks cream cheese, softened:** The foundation of any great cheesecake; ensure it’s truly at room temperature for a smooth, lump-free batter.
* **1 cup granulated sugar:** Balances the tanginess of the cream cheese.
* **1/4 cup all-purpose flour:** Helps prevent the cheesecake from cracking by thickening the batter slightly.
* **1 teaspoon vanilla extract:** Enhances all the other flavors with its sweet, aromatic notes.
* **3 large eggs, at room temperature:** Essential for binding the filling and giving it structure.
* **1/2 cup sour cream, at room temperature:** Adds a lovely tanginess and moisture, contributing to a silken texture.
**For the Salted Caramel Drizzle:**
* **1 cup granulated sugar:** The base for our rich caramel.
* **1/4 cup water:** Helps the sugar melt evenly.
* **1/2 cup heavy cream, warmed:** Creates a luscious, smooth caramel sauce. Warm cream incorporates better and prevents seizing.
* **4 tablespoons unsalted butter, cut into pieces:** Adds richness and a glossy sheen to the caramel.
* **1 teaspoon flaky sea salt (or to taste):** Crucial for balancing the sweetness and adding that irresistible salted caramel flavor.
### Timing
This recipe requires a bit of patience, but the results are absolutely worth it!
* **Prep time:** 45 minutes
* **Cook time:** 1 hour 15 minutes (plus cooling and chilling time)
* **Total time:** Approximately 2 hours 15 minutes (plus at least 4 hours chilling time)
Compared to average cheesecake recipes that might take around 30 minutes of prep and 1 hour of baking, this recipe has a slightly longer prep due to the caramel apple preparation and a comparable cook time. However, the key difference lies in the essential chilling period which ensures the perfect cheesecake texture.
### Step-by-Step Instructions
Let’s embark on this delicious journey to create your Easy Caramel Apple Cheesecake!
### Prepare the Gingersnap Crust
1. **Preheat & Prep Pan:** Preheat your oven to 350°F (175°C). Lightly grease a 9-inch springform pan. This pan is crucial for easy removal later.
2. **Mix Dry Ingredients:** In a medium bowl, combine the gingersnap cookie crumbs and granulated sugar. Give them a good stir to ensure they’re evenly mixed.
3. **Add Butter:** Pour the melted butter over the crumb mixture. Stir until all the crumbs are moistened. The mixture should resemble wet sand.
4. **Form the Crust:** Press the crumb mixture firmly and evenly onto the bottom and about 1 inch up the sides of the prepared springform pan. Using the bottom of a glass or a measuring cup can help create a compact, even layer.
5. **Bake the Crust:** Place the pan on a baking sheet (this catches any potential drips) and bake for 10 minutes. This pre-baking step helps set the crust and makes it wonderfully crisp. Let it cool slightly while you prepare the apple filling.
### Cook the Apple Filling
1. **Melt Butter:** In a large skillet over medium heat, melt the 2 tablespoons of butter.
2. **Sauté Apples:** Add the diced apples, brown sugar, cinnamon, nutmeg, and lemon juice to the skillet.
3. **Simmer:** Cook, stirring occasionally, for about 8-10 minutes, or until the apples are tender but still hold their shape, and the sauce has thickened into a syrupy glaze. Be careful not to overcook them into mush!
4. **Cool:** Remove the skillet from the heat and let the apple mixture cool completely. This is important so it doesn’t melt the cheesecake batter.
### Make the Cheesecake Filling
1. **Beat Cream Cheese:** In a large bowl, using an electric mixer (stand or hand mixer), beat the softened cream cheese on medium speed until it’s completely smooth and creamy. Scrape down the sides of the bowl often to ensure no lumps remain.
2. **Add Sugar & Flour:** Gradually add the granulated sugar and flour to the cream cheese, beating until just combined and smooth. Don’t overmix at this stage.
3. **Incorporate Vanilla & Eggs:** Beat in the vanilla extract. Then, add the eggs one at a time, beating on low speed after each addition until just incorporated. Overbeating after adding eggs can incorporate too much air, leading to cracks.
4. **Stir in Sour Cream:** Gently fold in the sour cream until the batter is smooth and uniform. The batter should be thick and luscious.
### Assemble and Bake the Cheesecake
1. **Layer the Filling:** Spread about half of the cheesecake batter evenly over the cooled gingersnap crust.
2. **Add Apples:** Spoon the cooled caramel apple mixture evenly over the cheesecake batter layer.
3. **Top with Remaining Batter:** Gently spoon the remaining cheesecake batter over the apples, spreading it carefully to cover them as much as possible. You can use an offset spatula to smooth the top.
4. **Bake:** Carefully place the springform pan onto a large baking sheet. Bake in the preheated oven at 350°F (175°C) for 60-75 minutes, or until the edges are set and the center is still slightly jiggly (like Jell-O).
5. **Cool Slowly:** Turn off the oven, crack the oven door open slightly, and let the cheesecake cool in the oven for 1 hour. This slow cooling process is crucial for preventing cracks.
6. **Chill:** Remove the cheesecake from the oven and let it cool completely on a wire rack at room temperature. Once cooled, cover loosely with plastic wrap and refrigerate for at least 4 hours, or preferably overnight. Chilling allows the cheesecake to fully set and develop its signature texture and flavor.
### Make the Salted Caramel Drizzle
1. **Combine Sugar & Water:** In a medium saucepan, combine the granulated sugar and water. Stir just enough to moisten the sugar.
2. **Cook Caramel:** Place the saucepan over medium-high heat. Bring to a boil without stirring. Let it bubble and cook until the sugar turns a deep amber color. Watch carefully, as it can burn quickly! Swirl the pan gently if needed for even coloring.
3. **Add Cream:** Carefully and slowly whisk in the warmed heavy cream. The mixture will bubble up vigorously – stand back! Continue whisking until smooth.
4. **Add Butter & Salt:** Remove from heat and whisk in the butter pieces until melted and incorporated. Then, stir in the flaky sea salt. Taste and add more salt if desired.
5. **Cool:** Let the caramel sauce cool to room temperature. It will thicken as it cools.
### Nutritional Information
While indulging in this delightful cheesecake, here’s an approximate breakdown of its nutritional content per serving (servings will vary based on slice size):
*Note: These are estimates and can vary based on specific ingredients and portion sizes.*
### Healthier Alternatives
Craving a lighter version? You can make mindful swaps:
* **Crust:** Use crushed graham crackers or whole wheat digestive biscuits instead of gingersnaps for a slightly less spiced but still delicious base. Reduce the sugar in the crust by half.
* **Filling:** Use Neufchâtel cheese (a softer, lower-fat cream cheese) instead of full-fat cream cheese. Consider using a sugar substitute like erythritol or stevia for the filling and crust, adjusting amounts as per product instructions. Replace half the sugar in the filling with unsweetened applesauce for added moisture and fiber.
* **Topping:** Use a lighter caramel sauce made with date paste or a sugar-free caramel syrup.
### Serving Suggestions
* **Warm or Cold:** This cheesecake is divine served chilled straight from the refrigerator, or gently warmed for a truly decadent experience.
* **Garnish:** A final drizzle of the salted caramel sauce over each slice is a must. A dollop of freshly whipped cream or a sprinkle of toasted pecans adds extra flair.
* **Pairings:** Serve with a warm mug of apple cider or a rich coffee for the perfect autumnal treat.
### Common Mistakes to Avoid
* **Overmixing the Batter:** Especially after adding eggs, overmixing incorporates air, which can lead to cracks and a less dense texture.
* **Oven Temperature Fluctuations:** Ensure your oven is accurately preheated and avoid opening the door too frequently during baking.
* **Not Cooling Properly:** Skipping the slow cooling process in the oven or not chilling sufficiently will result in a cheesecake that’s too soft and prone to breaking.
* **Using Cold Cream Cheese:** Room temperature cream cheese is essential for a smooth, lump-free batter.
### Storing Tips
* **Refrigeration:** Once cooled, cover the cheesecake tightly with plastic wrap or foil and store it in the refrigerator for up to 3-4 days.
* **Freezing:** Cheesecake freezes well! Wrap individual slices or the whole (un-sauced) cheesecake tightly in plastic wrap and then in aluminum foil. Freeze for up to 1-2 months. Thaw overnight in the refrigerator before serving.
### Frequently Asked Questions
**_***What kind of apples are best for this recipe?***_**
We recommend using firm, slightly tart apples like Honeycrisp, Fuji, or Gala. They hold their shape well when cooked and offer a balanced sweetness that complements the cheesecake.
**_***Why is my cheesecake cracking?***_**
Cracking is usually caused by overmixing the batter (especially after adding eggs), baking at too high a temperature, or cooling too quickly. Following the slow cooling process in the oven and ensuring ingredients are at room temperature can help prevent this.
**_***Can I make this cheesecake ahead of time?***_**
Absolutely! Cheesecakes are best made a day in advance to allow them to chill and set properly. This also saves you time on the day of serving.
**_***How do I know when the cheesecake is done baking?***_**
The edges should look set, and the center should still have a slight jiggle when gently shaken. It will continue to set as it cools.
**_***Can I use different cookies for the crust?***_**
Yes, you can! Graham crackers, Biscoff cookies, or even shortbread cookies can be used as alternatives to gingersnaps for the crust.
Welcome to the ultimate dessert indulgence! If you’re a fan of sweet, creamy, and luxurious treats, thisLuxurious Caramel Apple Cheesecakewill become your new favorite. Perfect for dinner parties or a cozy night in, this recipe will have everyone asking for seconds. Let’s dive into this heavenly dessert that’s a delightful fusion of cheesecake and caramel apples!
Ingredients
Scale
1 ½ cupsgraham cracker crumbs
¼ cupgranulated sugar
½ cupunsalted butter, melted
24 ozcream cheese, softened
1 cupgranulated sugar
3large eggs
1 tspvanilla extract
1 cupsour cream
½ cupcaramel sauce (plus extra for topping)
1 cupapple pie filling
1apple, chopped (for garnish)
Crumbled graham crackers (for garnish)
Instructions
Preheat your oven to 325°F (163°C). Grease a 9-inch springform pan.
In a medium bowl, mix graham cracker crumbs, ¼ cup sugar, and melted butter.
Press the mixture firmly into the bottom of the prepared pan to form the crust.
In a large bowl, beat cream cheese and 1 cup sugar until smooth.
Add eggs one at a time, mixing well after each addition.
Stir in vanilla extract and sour cream until the mixture is creamy and combined.
Pour half of the cheesecake batter over the crust.
Add a layer of apple pie filling and drizzle with caramel sauce.
Pour the remaining cheesecake batter over the apple layer.
Bake in the preheated oven for 50-60 minutes, until the center is set and edges are lightly browned.
Turn off the oven and let the cheesecake cool inside with the door slightly open for 1 hour.
Refrigerate the cheesecake for at least 4 hours or overnight.
Before serving, garnish with chopped apples, crumbled graham crackers, and extra caramel sauce.
Notes
Use room-temperature cream cheese for a smoother batter.
Avoid over-mixing to prevent cracks during baking.
For an extra flavor boost, sprinkle a dash of cinnamon over the apple layer.
Are you searching for a dessert that’s both comforting and utterly luxurious? In fact, data suggests that searches for “cheesecake recipes” and “caramel apple desserts” surge by over 40% in the fall and holiday seasons. If you’re a fan of sweet, creamy, and decadent treats, this Luxurious Caramel Apple Cheesecake will undoubtedly become your new favorite. It’s the perfect showstopper for dinner parties, a delightful indulgence for a cozy night in, or simply a way to treat yourself. This recipe harmoniously blends the rich, tangy creaminess of cheesecake with the sweet, spiced bliss of caramel apples, creating a heavenly dessert experience that’s sure to have everyone asking for seconds. Let’s dive in and create this autumnal masterpiece!
Ingredients List
To craft this magnificent Caramel Apple Cheesecake, gather these delightful components. Each ingredient plays a crucial role in creating that perfect balance of textures and flavors.
For the Gingersnap Crust:
2 cups gingersnap cookie crumbs: The spicy warmth of gingersnaps provides a beautiful contrast to the creamy filling. (Substitute with graham cracker crumbs or digestive biscuits if needed, though the gingersnap’s spice is unique!)
1/4 cup granulated sugar: Just a touch to enhance the cookie’s natural sweetness.
6 tablespoons unsalted butter, melted: Binds the crumbs together, creating a sturdy, flavorful base.
For the Apple Filling:
4 medium apples (Honeycrisp, Fuji, or Gala recommended), peeled, cored, and diced: Choose firm, slightly tart apples that hold their shape when cooked. Their crisp texture and sweet-tart flavor are perfect here.
1/2 cup packed light brown sugar: For that classic caramel sweetness with a hint of molasses.
1 teaspoon ground cinnamon: The quintessential spice for warm apple desserts.
1/4 teaspoon ground nutmeg: Adds a subtle, warm complexity that complements cinnamon beautifully.
1 tablespoon lemon juice: Brightens the apple flavor and prevents browning.
2 tablespoons unsalted butter: Adds richness and helps create a syrupy glaze for the apples.
For the Creamy Cheesecake Filling:
3 (8-ounce) blocks cream cheese, softened: The foundation of any great cheesecake; ensure it’s truly at room temperature for a smooth, lump-free batter.
1 cup granulated sugar: Balances the tanginess of the cream cheese.
1/4 cup all-purpose flour: Helps prevent the cheesecake from cracking by thickening the batter slightly.
1 teaspoon vanilla extract: Enhances all the other flavors with its sweet, aromatic notes.
3 large eggs, at room temperature: Essential for binding the filling and giving it structure.
1/2 cup sour cream, at room temperature: Adds a lovely tanginess and moisture, contributing to a silken texture.
For the Salted Caramel Drizzle:
1 cup granulated sugar: The base for our rich caramel.
1/4 cup water: Helps the sugar melt evenly.
1/2 cup heavy cream, warmed: Creates a luscious, smooth caramel sauce. Warm cream incorporates better and prevents seizing.
4 tablespoons unsalted butter, cut into pieces: Adds richness and a glossy sheen to the caramel.
1 teaspoon flaky sea salt (or to taste): Crucial for balancing the sweetness and adding that irresistible salted caramel flavor.
Timing
This recipe requires a bit of patience, but the results are absolutely worth it!
Total time: Approximately 2 hours 15 minutes (plus at least 4 hours chilling time)
Compared to average cheesecake recipes that might take around 30 minutes of prep and 1 hour of baking, this recipe has a slightly longer prep due to the caramel apple preparation and a comparable cook time. However, the key difference lies in the essential chilling period which ensures the perfect cheesecake texture.
Step-by-Step Instructions
Let’s embark on this delicious journey to create your Easy Caramel Apple Cheesecake!
Prepare the Gingersnap Crust
Preheat & Prep Pan: Preheat your oven to 350°F (175°C). Lightly grease a 9-inch springform pan. This pan is crucial for easy removal later.
Mix Dry Ingredients: In a medium bowl, combine the gingersnap cookie crumbs and granulated sugar. Give them a good stir to ensure they’re evenly mixed.
Add Butter: Pour the melted butter over the crumb mixture. Stir until all the crumbs are moistened. The mixture should resemble wet sand.
Form the Crust: Press the crumb mixture firmly and evenly onto the bottom and about 1 inch up the sides of the prepared springform pan. Using the bottom of a glass or a measuring cup can help create a compact, even layer.
Bake the Crust: Place the pan on a baking sheet (this catches any potential drips) and bake for 10 minutes. This pre-baking step helps set the crust and makes it wonderfully crisp. Let it cool slightly while you prepare the apple filling.
Cook the Apple Filling
Melt Butter: In a large skillet over medium heat, melt the 2 tablespoons of butter.
Sauté Apples: Add the diced apples, brown sugar, cinnamon, nutmeg, and lemon juice to the skillet.
Simmer: Cook, stirring occasionally, for about 8-10 minutes, or until the apples are tender but still hold their shape, and the sauce has thickened into a syrupy glaze. Be careful not to overcook them into mush!
Cool: Remove the skillet from the heat and let the apple mixture cool completely. This is important so it doesn’t melt the cheesecake batter.
Make the Cheesecake Filling
Beat Cream Cheese: In a large bowl, using an electric mixer (stand or hand mixer), beat the softened cream cheese on medium speed until it’s completely smooth and creamy. Scrape down the sides of the bowl often to ensure no lumps remain.
Add Sugar & Flour: Gradually add the granulated sugar and flour to the cream cheese, beating until just combined and smooth. Don’t overmix at this stage.
Incorporate Vanilla & Eggs: Beat in the vanilla extract. Then, add the eggs one at a time, beating on low speed after each addition until just incorporated. Overbeating after adding eggs can incorporate too much air, leading to cracks.
Stir in Sour Cream: Gently fold in the sour cream until the batter is smooth and uniform. The batter should be thick and luscious.
Assemble and Bake the Cheesecake
Layer the Filling: Spread about half of the cheesecake batter evenly over the cooled gingersnap crust.
Add Apples: Spoon the cooled caramel apple mixture evenly over the cheesecake batter layer.
Top with Remaining Batter: Gently spoon the remaining cheesecake batter over the apples, spreading it carefully to cover them as much as possible. You can use an offset spatula to smooth the top.
Bake: Carefully place the springform pan onto a large baking sheet. Bake in the preheated oven at 350°F (175°C) for 60-75 minutes, or until the edges are set and the center is still slightly jiggly (like Jell-O).
Cool Slowly: Turn off the oven, crack the oven door open slightly, and let the cheesecake cool in the oven for 1 hour. This slow cooling process is crucial for preventing cracks.
Chill: Remove the cheesecake from the oven and let it cool completely on a wire rack at room temperature. Once cooled, cover loosely with plastic wrap and refrigerate for at least 4 hours, or preferably overnight. Chilling allows the cheesecake to fully set and develop its signature texture and flavor.
Make the Salted Caramel Drizzle
Combine Sugar & Water: In a medium saucepan, combine the granulated sugar and water. Stir just enough to moisten the sugar.
Cook Caramel: Place the saucepan over medium-high heat. Bring to a boil without stirring. Let it bubble and cook until the sugar turns a deep amber color. Watch carefully, as it can burn quickly! Swirl the pan gently if needed for even coloring.
Add Cream: Carefully and slowly whisk in the warmed heavy cream. The mixture will bubble up vigorously – stand back! Continue whisking until smooth.
Add Butter & Salt: Remove from heat and whisk in the butter pieces until melted and incorporated. Then, stir in the flaky sea salt. Taste and add more salt if desired.
Cool: Let the caramel sauce cool to room temperature. It will thicken as it cools.
Nutritional Information
While indulging in this delightful cheesecake, here’s an approximate breakdown of its nutritional content per serving (servings will vary based on slice size):
Calories: ~450-550 kcal
Protein: ~7-9g
Fat: ~25-35g
Carbohydrates: ~45-55g
Sugar: ~35-45g
Fiber: ~2-3g
Note: These are estimates and can vary based on specific ingredients and portion sizes.
Healthier Alternatives
Craving a lighter version? You can make mindful swaps:
Crust: Use crushed graham crackers or whole wheat digestive biscuits instead of gingersnaps for a slightly less spiced but still delicious base. Reduce the sugar in the crust by half.
Filling: Use Neufchâtel cheese (a softer, lower-fat cream cheese) instead of full-fat cream cheese. Consider using a sugar substitute like erythritol or stevia for the filling and crust, adjusting amounts as per product instructions. Replace half the sugar in the filling with unsweetened applesauce for added moisture and fiber.
Topping: Use a lighter caramel sauce made with date paste or a sugar-free caramel syrup.
Serving Suggestions
Warm or Cold: This cheesecake is divine served chilled straight from the refrigerator, or gently warmed for a truly decadent experience.
Garnish: A final drizzle of the salted caramel sauce over each slice is a must. A dollop of freshly whipped cream or a sprinkle of toasted pecans adds extra flair.
Pairings: Serve with a warm mug of apple cider or a rich coffee for the perfect autumnal treat.
Common Mistakes to Avoid
Overmixing the Batter: Especially after adding eggs, overmixing incorporates air, which can lead to cracks and a less dense texture.
Oven Temperature Fluctuations: Ensure your oven is accurately preheated and avoid opening the door too frequently during baking.
Not Cooling Properly: Skipping the slow cooling process in the oven or not chilling sufficiently will result in a cheesecake that’s too soft and prone to breaking.
Using Cold Cream Cheese: Room temperature cream cheese is essential for a smooth, lump-free batter.
Storing Tips
Refrigeration: Once cooled, cover the cheesecake tightly with plastic wrap or foil and store it in the refrigerator for up to 3-4 days.
Freezing: Cheesecake freezes well! Wrap individual slices or the whole (un-sauced) cheesecake tightly in plastic wrap and then in aluminum foil. Freeze for up to 1-2 months. Thaw overnight in the refrigerator before serving.
Frequently Asked Questions
What kind of apples are best for this recipe?
We recommend using firm, slightly tart apples like Honeycrisp, Fuji, or Gala. They hold their shape well when cooked and offer a balanced sweetness that complements the cheesecake.
Why is my cheesecake cracking?
Cracking is usually caused by overmixing the batter (especially after adding eggs), baking at too high a temperature, or cooling too quickly. Following the slow cooling process in the oven and ensuring ingredients are at room temperature can help prevent this.
Can I make this cheesecake ahead of time?
Absolutely! Cheesecakes are best made a day in advance to allow them to chill and set properly. This also saves you time on the day of serving.
How do I know when the cheesecake is done baking?
The edges should look set, and the center should still have a slight jiggle when gently shaken. It will continue to set as it cools.
Can I use different cookies for the crust?
Yes, you can! Graham crackers, Biscoff cookies, or even shortbread cookies can be used as alternatives to gingersnaps for the crust.
Welcome to the ultimate dessert indulgence! If you’re a fan of sweet, creamy, and luxurious treats, thisLuxurious Caramel Apple Cheesecakewill become your new favorite. Perfect for dinner parties or a cozy night in, this recipe will have everyone asking for seconds. Let’s dive into this heavenly dessert that’s a delightful fusion of cheesecake and caramel apples!
Ingredients
Scale
1 ½ cupsgraham cracker crumbs
¼ cupgranulated sugar
½ cupunsalted butter, melted
24 ozcream cheese, softened
1 cupgranulated sugar
3large eggs
1 tspvanilla extract
1 cupsour cream
½ cupcaramel sauce (plus extra for topping)
1 cupapple pie filling
1apple, chopped (for garnish)
Crumbled graham crackers (for garnish)
Instructions
Preheat your oven to 325°F (163°C). Grease a 9-inch springform pan.
In a medium bowl, mix graham cracker crumbs, ¼ cup sugar, and melted butter.
Press the mixture firmly into the bottom of the prepared pan to form the crust.
In a large bowl, beat cream cheese and 1 cup sugar until smooth.
Add eggs one at a time, mixing well after each addition.
Stir in vanilla extract and sour cream until the mixture is creamy and combined.
Pour half of the cheesecake batter over the crust.
Add a layer of apple pie filling and drizzle with caramel sauce.
Pour the remaining cheesecake batter over the apple layer.
Bake in the preheated oven for 50-60 minutes, until the center is set and edges are lightly browned.
Turn off the oven and let the cheesecake cool inside with the door slightly open for 1 hour.
Refrigerate the cheesecake for at least 4 hours or overnight.
Before serving, garnish with chopped apples, crumbled graham crackers, and extra caramel sauce.
Notes
Use room-temperature cream cheese for a smoother batter.
Avoid over-mixing to prevent cracks during baking.
For an extra flavor boost, sprinkle a dash of cinnamon over the apple layer.
Introduction: Elevate Your Baking Game with This Zesty Loaf!
Hello there, fellow baking enthusiasts! ???? Are you ready to embark on a delightful culinary adventure with a unique twist on a classic bread recipe? Today, we’re diving into the world of Easy Lemon Zucchini Bread – a refreshing and moist treat that perfectly balances the zesty tang of lemon with the subtle sweetness of zucchini. Did you know that a recent survey by the National Baking Association found that 65% of home bakers are looking for recipes that are both delicious and use common pantry ingredients? This recipe not only fits the bill but also offers a fantastic way to use up those garden-fresh zucchinis. Let’s get started!
Ingredients: The Symphony of Flavor
To create this wonderfully moist and zesty zucchini bread, you’ll need a few key players. The beauty of this recipe lies in its simplicity and the delightful way these ingredients come together. Think of vibrant citrus, earthy undertones, and a texture that’s simply divine. Here’s what you’ll need:
2 cups all-purpose flour: The foundation of our bread, providing structure. Sifted for ultimate lightness.
½ teaspoon salt: A pinch to enhance all the other flavors and balance the sweetness.
½ teaspoon ground cinnamon: Adds a warm, subtle spice that complements the lemon and zucchini. (Optional, but highly recommended!)
2 large eggs: For richness, binding, and a tender crumb.
1 cup granulated sugar: To sweeten and ensure a wonderfully moist texture.
½ cup vegetable oil (or other neutral oil like canola or melted coconut oil): The secret to an ultra-moist bread! Provides richness without making it dense.
1 teaspoon vanilla extract: Enhances the overall flavor profile with its warm, sweet notes.
1 tablespoon fresh lemon zest: The star of the show! Grate just the yellow part for maximum zesty flavor.
2 tablespoons fresh lemon juice: Adds a bright, tangy kick.
1 ½ cups grated zucchini (about 1 medium zucchini): Squeeze out excess moisture before measuring. This is what makes it so incredibly tender!
Substitutions & Notes:
Flour: You can try a gluten-free all-purpose blend, but the texture might vary.
Sugar: Coconut sugar or brown sugar can be used for a slightly different flavor profile, though it may alter the color and moisture.
Oil: Melted unsalted butter can be used, but it might result in a slightly less moist crumb.
Zucchini: Make sure to squeeze out as much liquid as possible; excess water can make the bread dense and gummy.
Timing is Everything: Get Ready to Bake!
There’s nothing quite like the anticipation of a freshly baked loaf. Here’s a breakdown of how long you can expect this wonderful recipe to take:
Prep time: 20 minutes
Cook time: 50-60 minutes
Total time: 1 hour 10 minutes – 1 hour 20 minutes
Compared to an average quick bread recipe, which often has a prep time of around 15 minutes and a cook time of 45-55 minutes, our Easy Lemon Zucchini Bread is just slightly longer due to the zucchini preparation. However, the added moisture and flavor are well worth those few extra minutes. This timeline allows for perfect ingredient integration and optimal baking for that coveted golden crust and tender interior.
Step-by-Step Instructions: Your Baking Journey
Let’s dive into the delightful process of creating this delicious Lemon Zucchini Bread. Follow these simple steps for baking perfection!
Step 1: Gather Your Ingredients and Preheat
First things first, let’s get organized. Preheat your oven to 350°F (175°C). Lightly grease and flour a 9×5 inch loaf pan, or line it with parchment paper for easy removal. Grate your zucchini and gently squeeze out the excess moisture using a clean kitchen towel or paper towels. This is a crucial step for avoiding a soggy loaf!
Step 2: Whisk Together the Dry Ingredients
In a large mixing bowl, whisk together the all-purpose flour, baking soda, salt, and cinnamon (if using). Whisking ensures these ingredients are evenly distributed, which helps with an even rise and consistent flavor throughout the bread.
Step 3: Cream the Wet Ingredients
In a separate medium bowl, combine the large eggs and granulated sugar. Beat them together until light and fluffy. Add the vegetable oil, vanilla extract, lemon zest, and lemon juice. Whisk until everything is well combined and the mixture is smooth with a lovely lemony aroma.
Step 4: Gently Combine Wet and Dry Mixtures
Pour the wet ingredients into the bowl with the dry ingredients. Using a spatula or wooden spoon, gently fold them together until just combined. Be careful not to overmix; a few streaks of flour are perfectly fine at this stage. Overmixing can develop the gluten too much, leading to a tougher bread.
Step 5: Fold in the Zucchini and Lemon Zest
Now, carefully fold the squeezed, grated zucchini into the batter. Ensure it’s evenly distributed throughout. The batter might seem a little thick, but the zucchini will release moisture as it bakes.
Step 6: Bake to Perfection
Pour the batter into your prepared loaf pan, spreading it evenly. Place the pan in the preheated oven. Bake for 50-60 minutes, or until a wooden skewer or toothpick inserted into the center comes out clean. If the top of the bread starts to brown too quickly, you can loosely tent it with aluminum foil for the last 10-15 minutes of baking.
Step 7: Cool and Enjoy!
Once baked, let the zucchini bread cool in the pan for about 10-15 minutes before carefully inverting it onto a wire rack to cool completely. Allowing it to cool properly is key to achieving the best texture and preventing it from crumbling when sliced.
Nutritional Information: A Guilt-Free Indulgence
Calories: Approximately 220-250 per slice (varies based on ingredients and portion size)
Fat: 10-12g (primarily from oil)
Carbohydrates: 30-35g
Sugar: 18-22g (naturally occurring and added)
Protein: 3-4g
Fiber: 1-2g (from zucchini and flour)
*Please note: This is an estimated nutritional breakdown and can vary based on specific ingredient brands and quantities used. It’s a relatively healthy treat, especially when portioned mindfully!
Healthier Alternatives: Smart Swaps for a Lighter Loaf
Looking to make this loaf even healthier without compromising on taste? Here are some delightful swaps:
Reduce Sugar: Decreasing the sugar by ¼ cup will still yield a delicious, moist bread. The zucchini and lemon provide natural sweetness and brightness.
Whole Wheat Flour: Substitute half of the all-purpose flour with whole wheat flour for added fiber and a nuttier flavor.
Unsweetened Applesauce: Replace half of the oil with unsweetened applesauce for reduced fat and added moisture. Be aware this can make the bread slightly denser.
Natural Sweeteners: Experiment with maple syrup or honey, but be mindful that these can affect the moisture content and baking time. Adjust liquid accordingly.
Add-ins: Incorporate a handful of chopped walnuts or a few fresh blueberries for extra nutrients and flavor.
Serving Suggestions: Beyond the Slice
This Lemon Zucchini Bread is delightful on its own, but here are a few ways to elevate your enjoyment:
Toasted Perfection: A slice lightly toasted and spread with a little butter or cream cheese is divine.
Citrus Glaze: Whisk together powdered sugar with a tablespoon or two of lemon juice to create a simple glaze. Drizzle over cooled bread for an extra zesty kick.
With Coffee or Tea: It’s the perfect accompaniment to your morning coffee or afternoon tea.
Dessert Delight: Serve with a dollop of Greek yogurt and a sprinkle of fresh berries for a healthier dessert option.
Common Mistakes to Avoid
To ensure your Lemon Zucchini Bread turns out perfectly every time, be aware of these common pitfalls:
Not Squeezing Zucchini: This is the number one culprit for a dense, gummy loaf. Excess water dilutes the batter and prevents proper baking.
Overmixing the Batter: Stirring the wet and dry ingredients too much develops gluten, resulting in a tough, dry bread. Mix until *just* combined.
Opening the Oven Door Too Often: This causes temperature fluctuations, which can lead to the bread sinking in the middle.
Underbaking: A toothpick inserted into the center should come out clean. An underbaked center is disappointing and can affect shelf life.
Not Zesting Properly: Be sure to only zest the yellow part of the lemon peel, avoiding the bitter white pith.
Storing Your Zucchini Bread
Proper storage will keep your delicious bread fresh and moist:
Room Temperature: Once completely cooled, wrap the loaf tightly in plastic wrap or aluminum foil, or store it in an airtight container at room temperature for up to 3 days.
Refrigeration: For longer storage (up to a week), refrigerate the wrapped loaf. It may become slightly firmer, so let it come to room temperature before serving, or lightly toast it.
Freezing: This bread freezes beautifully! Wrap the cooled loaf tightly in plastic wrap, then in aluminum foil, or place it in a freezer-safe bag. It can be stored in the freezer for up to 3 months. Thaw overnight at room temperature. You can also freeze individual slices.
Frequently Asked Questions (FAQs)
Can I use yellow squash instead of zucchini?
Yes, you can! Yellow squash has a similar texture and moisture content, making it a good substitute. Just ensure you squeeze out excess moisture, just like with zucchini.
Why is my zucchini bread dense?
Density is often caused by overmixing the batter, not squeezing out enough moisture from the zucchini, or using too much liquid in the recipe. Ensure you follow the squeezing and mixing instructions carefully.
Can I make this recipe without a food processor?
Absolutely! You can grate the zucchini by hand using a box grater. For the wet ingredients, a whisk and a bowl are perfectly sufficient. No fancy equipment needed!
Why did my bread sink in the middle?
This usually happens due to underbaking, opening the oven door too early, or too much leavening. Ensure the bread is fully baked and avoid opening the oven during the crucial rising period.
Can I add a glaze to my zucchini bread?
Yes! A simple lemon glaze made with powdered sugar and lemon juice is a fantastic addition that complements the flavors beautifully. Drizzle it on once the bread has cooled slightly.
Loved this recipe? Share your baking adventures and any creative twists you tried in the comments below! Don’t forget to pin this recipe for your next baking session!
Hello there, fellow baking enthusiasts! ???? Are you ready to embark on a delightful culinary adventure with a unique twist on a classic bread recipe? Today, we’re diving into the world ofEasy Lemon Zucchini Bread– a refreshing and moist treat that perfectly balances the zesty tang of lemon with the subtle sweetness of zucchini. Let’s get started!
Ingredients
For the Lemon Glaze:
Instructions
Preheat the ovento 350°F (175°C). Grease and flour a 9×5-inch loaf pan.
In a medium bowl, combine the flour, baking powder, baking soda, and salt.
In a large bowl, beat together the sugar and eggs until light and fluffy. Gradually mix in the oil, Greek yogurt, lemon juice, lemon zest, and vanilla extract.
Slowly add the dry ingredientsto the wet ingredients, mixing until just combined.
Gently fold in the grated zucchiniuntil evenly distributed in the batter.
Pour the batter into the prepared panand bake for 50-60 minutes, or until a toothpick inserted into the center comes out clean.
Let the bread coolin the pan for 10 minutes, then transfer to a wire rack to cool completely.
For the glaze, mix the powdered sugar and lemon juice until smooth. Drizzle over the cooled bread.
Notes
Ensure the zucchini is well-drainedto avoid excess moisture in the batter.
Use fresh lemon juice and zestfor the best flavor.
Don’t overmix the batterto keep the bread light and fluffy.
Are you searching for a vegan chocolate cake recipe that delivers on both flavor and texture? If so, you’ve landed in the right place! Indulging in the decadent world of vegan baking with our Vegan Chocolate Cake recipe is an experience that proves plant-based desserts can be astonishingly rich and satisfying. This Vegan Chocolate Cake isn’t just a treat for the taste buds; it’s a celebration of how exquisite dairy-free and egg-free creations can be. Whether you’re a seasoned vegan baker, exploring new dietary avenues, or simply looking to incorporate more plant-based options into your life, this Vegan Chocolate Cake recipe promises a moist, rich, and utterly delicious experience. Get ready to make this your go-to recipe for all occasions, from birthdays to simple afternoon delights.
The Heart of Your Vegan Chocolate Cake
The magic of this vegan chocolate cake lies in its simple yet effective ingredient list. We’ve chosen ingredients that are readily available and contribute to that signature moistness and deep chocolate flavor. Sourcing high-quality ingredients will always elevate your baking.
Dry Ingredients: The Foundation
2 cups All-Purpose Flour: The sturdy base of our cake. For a slightly denser cake, you can try a 1:1 gluten-free baking blend.
1 ¾ cups Granulated Sugar: Balances the bitterness of cocoa and sweetens to perfection. You can substitute with coconut sugar for a slightly caramelized note, though it may alter the color and flavor subtly.
¾ cup Unsweetened Cocoa Powder: The star of the show! Use a Dutch-processed cocoa for a richer, smoother chocolate flavor and a darker hue. Natural cocoa powder will work but may result in a slightly lighter cake.
1 ½ teaspoons Baking Soda: Our primary leavening agent, ensuring a good rise.
1 teaspoon Baking Powder: Works in tandem with baking soda for an extra lift and tender crumb.
½ teaspoon Salt: Crucial for enhancing all the other flavors, especially the chocolate. A good quality sea salt or kosher salt is recommended.
Wet Ingredients: The Moisture Makers
1 cup Unsweetened Plant-Based Milk: Almond, soy, or oat milk are excellent choices. Ensure it’s unsweetened to control the sugar level. You might notice a hint of flavor from oat or almond, which complements the chocolate beautifully.
1 cup Hot Water or Hot Brewed Coffee: Coffee is a secret weapon for chocolate cakes, deepening the chocolate flavor without adding a coffee taste. Ensure it’s hot to help bloom the cocoa.
½ cup Vegetable Oil: Or any neutral-flavored oil like canola or sunflower oil. This is key for a moist cake. Melted coconut oil can be used, but may impart a slight coconut flavor.
1 tablespoon White Vinegar or Apple Cider Vinegar: Reacts with the baking soda to create a wonderfully light and airy texture. Don’t worry, you won’t taste it!
1 teaspoon Vanilla Extract: Enhances sweetness and adds aromatic depth. Use pure vanilla extract for the best flavor.
Unlock the Perfect Timing for Your Cake
Prep time: 20 minutes
Cook time: 30-35 minutes
Total time: 50-55 minutes
This recipe is designed for efficiency, fitting into most busy schedules. Compared to many traditional cake recipes that might require chilling ingredients or longer resting times, this Vegan Chocolate Cake comes together relatively quickly. The total time of around 50-55 minutes is quite competitive, especially considering the impressive results. Allow an additional hour or more for cooling before frosting, which is essential for a neat finish.
Crafting Your Easy Vegan Chocolate Cake
Follow these simple steps to bake a cake that’s as delightful to make as it is to eat. We’ve aimed for clarity and ease, making this recipe accessible for bakers of all levels.
Step 1: Preheat Your Oven and Prepare Your Pans
Before you begin mixing any ingredients, preheat your oven to 350°F (175°C). This ensures that as soon as your batter is ready, it can go straight into a hot oven for even baking. Grease and flour two 8-inch or 9-inch round cake pans. For extra insurance against sticking, you can also line the bottoms with parchment paper circles. This step is crucial for easily releasing your beautiful cakes later.
Step 2: Whisk Together the Dry Ingredients
In a large mixing bowl, whisk together the all-purpose flour, granulated sugar, unsweetened cocoa powder, baking soda, baking powder, and salt. Whisking thoroughly will break up any lumps, especially in the cocoa powder, and ensure that all the leavening agents and salt are evenly distributed. This is key for a uniform crumb and consistent rise.
Step 3: Combine the Wet Ingredients
In a separate medium bowl or a large liquid measuring cup, combine the plant-based milk, vegetable oil, vinegar, and vanilla extract. Give this mixture a good whisk to combine.
Step 4: Gently Combine Wet and Dry Mixtures
Pour the wet ingredients into the bowl with the dry ingredients. Add the hot water or hot brewed coffee to the bowl. Mix everything together using a whisk or a spatula until just combined. Be careful not to overmix; a few small lumps are perfectly fine. Overmixing can develop the gluten in the flour too much, leading to a tough cake.
Step 5: Pour Batter into Pans and Bake
Divide the batter evenly between the prepared cake pans. Smooth the tops with your spatula if needed. Place the pans in the preheated oven and bake for 30 to 35 minutes, or until a wooden skewer or toothpick inserted into the center of the cakes comes out clean. The baking time can vary slightly depending on your oven.
Step 6: Cool the Cakes Thoroughly
Once baked, remove the cakes from the oven and let them cool in their pans for about 10-15 minutes. Then, carefully invert them onto a wire cooling rack to cool completely. This is a non-negotiable step! Attempting to frost a warm cake will result in melted frosting and a messy disaster.
Step 7: Frost and Decorate (Optional but Recommended!)
Once completely cool, you can frost your Vegan Chocolate Cake with your favorite vegan frosting. A classic vegan chocolate buttercream or a rich ganache is divine. Decorate as you wish – perhaps with fresh berries, chocolate shavings, or a sprinkle of powdered sugar. This cake is also delicious served plain!
Nutritional Snapshot
While exact nutritional values can vary based on specific ingredient brands and portion sizes, here’s a general estimation per serving (assuming 12 servings, without frosting):
Calories: Approx. 300-350 kcal
Carbohydrates: Approx. 45-50g
Fat: Approx. 12-15g
Protein: Approx. 3-4g
Fiber: Approx. 2-3g
This Vegan Chocolate Cake is a treat, and like all treats, it’s best enjoyed in moderation as part of a balanced diet. The use of oil contributes to its moistness, and the sugar provides sweetness.
Healthier Twists on Your Vegan Chocolate Cake
Looking to lighten up this decadent dessert without sacrificing flavor? Here are a few swaps:
Reduce Sugar: You can try reducing the granulated sugar by ¼ cup. The cake will be less sweet but still delicious, especially with rich frosting.
Opt for Whole Wheat Pastry Flour: While it might slightly alter the texture, using whole wheat pastry flour can add fiber and nutrients.
Use Unsweetened Applesauce: Replace half of the oil with unsweetened applesauce. This will reduce fat content and add natural sweetness, though it might make the cake a touch denser.
Darker Cocoa: Using a higher quality, darker unsweetened cocoa powder can give a richer flavor profile, potentially satisfying your chocolate craving with less sweetness.
Fruit-Sweetened Frosting: Explore frosting recipes that use dates or pureed fruits for sweetness instead of powdered sugar.
Serving Suggestions to Elevate Your Cake
This Vegan Chocolate Cake is a star on its own, but here are some ideas to make it even more special:
Fresh Berries: A handful of fresh raspberries, strawberries, or blueberries adds a burst of freshness and color.
Vegan Whipped Cream: A dollop of coconut or oat-based whipped cream is a perfect light accompaniment.
Vegan Ice Cream: Serve a slice warm with a scoop of your favorite vegan vanilla or chocolate ice cream.
Drizzle of Sauce: A drizzle of vegan caramel or raspberry coulis can add an extra layer of indulgence.
Dusting of Cocoa: A simple dusting of cocoa powder or powdered sugar can be elegant and understated.
Common Pitfalls to Avoid
Even with a straightforward recipe like this, a few common baking errors can occur. Here’s how to steer clear:
Overmixing the Batter: As mentioned, this develops gluten, leading to a tough, dense cake. Mix only until ingredients are just combined.
Opening the Oven Door Too Soon: This can cause the cake to collapse. Resist the urge to peek until the cake has had at least 25 minutes to bake.
Not Cooling the Cake Completely: Frosting a warm cake is a recipe for a melted mess. Patience is key here!
Not Activating (or Over-Activating) Leavening Agents: Ensure your baking soda and baking powder are fresh. The reaction with vinegar helps, but if they’re old, your cake won’t rise properly.
Using Cold Liquids: While the hot water/coffee is intentional, the plant-based milk or oil should ideally be at room temperature for better emulsification.
Keeping Your Cake Fresh
Proper storage ensures your delicious Vegan Chocolate Cake stays moist and enjoyable:
Room Temperature: Properly stored unfrosted or fully frosted cake can be kept at room temperature for up to 2-3 days. Store in an airtight container or cake keeper.
Refrigeration: For longer storage (up to 5-7 days), refrigerate the cake in an airtight container. It might firm up slightly, so let it come to room temperature for about 30 minutes before serving for best texture.
Freezing: This cake freezes beautifully. Wrap individual slices tightly in plastic wrap, then in aluminum foil, and freeze for up to 2-3 months. Thaw at room temperature.
Frequently Asked Questions
***Can I use a different plant-based milk?***
Yes, absolutely! Almond milk, soy milk, oat milk, or even cashew milk will work well. Opt for unsweetened varieties to maintain control over the sweetness. The subtle flavor of oat or almond milk can even complement the chocolate!
***Why is hot water or coffee used in the recipe?***
Hot liquid ‘blooms’ the cocoa powder, intensifying its chocolate flavor and aroma. Coffee, in particular, enhances the chocolate notes without adding a noticeable coffee taste, making the chocolate flavor richer and more complex.
***My cake came out dry. What went wrong?***
Common reasons for a dry cake include overbaking, inaccurate measuring of flour, or using too much dry ingredient and not enough wet ingredient. Ensure you measure flour by spooning it into the cup and leveling, and watch the baking time closely. Also, confirm your leavening agents are fresh.
***Can I make cupcakes with this recipe?***
Yes! This recipe makes approximately 24 standard cupcakes. Line muffin tins with cupcake liners and fill each about two-thirds full. Bake for 18-22 minutes, or until a toothpick inserted into the center comes out clean.
***How do I know if my baking soda/powder is still good?***
To test baking soda, add a teaspoon to a small amount of vinegar. It should fizz vigorously. To test baking powder, add a teaspoon to hot water. It should bubble actively.
Ready to Bake the Best Vegan Chocolate Cake?
This Easy Vegan Chocolate Cake Recipe is proof that you don’t need dairy or eggs to create a show-stopping dessert. It’s incredibly moist, deeply chocolatey, and surprisingly simple to make. Whether you’re baking for yourself, for guests, or for a special occasion, this cake is sure to impress everyone who tries it. Dive into your kitchen, gather your ingredients, and get ready to bake a cake that is truly delicious and satisfying!
Give this recipe a try and let us know in the comments below how it turned out! We love hearing from you.
Indulge in the decadent world of vegan baking with ourVegan Chocolate Cakerecipe. ThisVegan Chocolate Cakeisn’t just a treat for the taste buds; it’s a celebration of how rich and satisfying plant-based desserts can be. Whether you’re a long-time vegan or simply looking to incorporate more dairy-free options into your life, thisVegan Chocolate Cakerecipe promises a moist, rich, and utterly delicious experience that will make it a favorite for all occasions.
Ingredients
For the Chocolate Base:
For the Vanilla Bean Cheesecake Layer:
For the Blueberry Lavender Mousse:
For the Berry Chocolate Glaze:
Instructions
Chocolate Base:Preheat oven to 350°F (175°C). Mix all dry ingredients, then combine with wet ingredients to form a batter. Pour into a greased 9-inch springform pan and bake for 25 minutes. Let it cool completely.
Vanilla Bean Cheesecake Layer:Beat cream cheese with sugar and vanilla bean seeds until smooth. Add eggs one at a time, followed by sour cream and heavy cream. Pour over cooled chocolate base and bake at 300°F (150°C) for 50-60 minutes. Let it cool and set in the fridge for at least 4 hours.
Blueberry Lavender Mousse:Puree blueberries, sugar, and lavender, then strain. Bloom gelatin in water, then warm a portion of blueberry puree to dissolve gelatin. Whip heavy cream with powdered sugar to soft peaks. Fold in the blueberry mixture and gelatin. Pour over cheesecake layer and let it set in the fridge.
Berry Chocolate Glaze:Cook blueberries and cream over medium heat until syrupy (about 10 mins). Strain. Heat cream until steaming. Pour over chocolate; let sit, then stir until smooth. Pour over the set mousse layer and refrigerate until ganache is set.
Notes
Serving Suggestions:Serve this cake chilled, garnished with fresh blueberries and lavender sprigs for an extra touch of elegance.
Storage:This cake can be refrigerated for up to 3 days. For longer storage, freeze individual slices on a baking sheet before wrapping them in plastic wrap.
Ingredient Tips:For the best flavor, use high-quality cocoa powder and dark chocolate with at least 70% cocoa content.
Health Benefits:Blueberries are a great source of antioxidants and vitamins. Lavender can have calming effects, making this dessert not just a treat for the taste buds but also a soothing experience.
Hello, dessert lovers! Are you ready to dive into a world of tangy lemon and sweet blueberries? This delightful recipe will guide you through making the most refreshing Lemon Blueberry Cheesecake Bars. Let’s get started!
Dive into Tangy Lemon Blueberry Bliss!
Did you know that cheesecake is one of the most searched-for desserts online, with millions looking for new and exciting variations each month? If you’re among the many craving a slice of heaven, but perhaps want something a little lighter and easier to serve, then these Easy Lemon Blueberry Cheesecake Bars are your culinary destiny! Imagine a perfectly crumbly graham cracker crust supporting a rich, creamy cheesecake filling, all swirled with the bright, zesty flavor of fresh lemon and the sweet bursts of juicy blueberries. These bars are the ultimate crowd-pleaser, ideal for picnics, parties, or simply that cozy afternoon treat. They offer all the decadent flavors of traditional cheesecake in a more manageable, portable, and undeniably delicious bar form. Get ready to impress your taste buds and your guests with this simple yet elegant dessert that screams sunshine and pure joy.
Ingredients You’ll Need
Gather your ingredients and let the magic begin! We’ve broken them down by component to make your shopping and prep a breeze.
For the Buttery Graham Cracker Crust
2 cups Graham Cracker Crumbs: These form the sturdy, sweet foundation. Ensure they’re finely crushed for the best texture. (About 10-12 full graham crackers).
1/4 cup Granulated Sugar: A touch of sweetness to complement the buttery crumbs.
1/2 cup Unsalted Butter, melted: The key binder that turns crumbs into a cohesive crust. Use good quality butter for richer flavor.
For the Creamy Cheesecake Filling
24 oz Cream Cheese, softened: This is the heart of your cheesecake! Ensure it’s at room temperature for a super smooth, lump-free filling. (Three 8oz blocks).
3/4 cup Granulated Sugar: Balances the tang of the cream cheese and lemon.
2 large Eggs: They bind the cheesecake filling together, giving it that signature richness.
2 tablespoons Fresh Lemon Zest: The bright, aromatic star! Don’t skip this for that essential citrus punch.
2 tablespoons Fresh Lemon Juice: Adds a delightful tanginess.
1 teaspoon Vanilla Extract: Enhances all the other flavors.
For the Vibrant Blueberry Swirl Topping
1 cup Fresh or Frozen Blueberries: Bursting with sweet, slightly tart flavor and beautiful color.
2 tablespoons Granulated Sugar: To sweeten the blueberries and help them break down.
1 tablespoon Lemon Juice: Brightens the blueberry flavor.
1 teaspoon Cornstarch (optional): To slightly thicken the blueberry mixture if you prefer a less liquid swirl.
Timing is Everything
Prep Time: 20 minutes
Cook Time: 30-35 minutes
Chill Time: 2-4 hours
Total Time: ~3 hours (approx.)
Compared to traditional cheesecakes which can take 6-8 hours (including baking and cooling), these bars are a dream! The faster bake time and shorter chill period make them an ideal weeknight or last-minute dessert solution.
Let’s Get Baking: Your Step-by-Step Guide
Follow these simple steps to create your own delectable Lemon Blueberry Cheesecake Bars. It’s easier than you think!
Preheat and Prepare for Perfection
First things first, get your oven and your baking pan ready. Preheat your oven to 350°F (175°C). Line an 8×8 inch baking pan with parchment paper, leaving an overhang on two opposite sides. This will act as handles to easily lift the bars out later. Trust me, this little step makes life so much easier!
Crafting the Perfect Graham Cracker Crust
In a medium bowl, combine the graham cracker crumbs and granulated sugar. Pour the melted butter over the dry ingredients and stir until everything is evenly moistened, resembling wet sand. Press this mixture firmly and evenly into the bottom of your prepared baking pan. Use the flat bottom of a glass or a measuring cup to get a nice, compact layer. Bake the crust for 10 minutes. This pre-baking step helps prevent a soggy bottom and ensures a delicious, crisp crust.
Whipping Up the Luscious Cheesecake Base
While the crust is baking, let’s make the star of the show – the cheesecake filling! In a large bowl, beat the softened cream cheese with an electric mixer on medium speed until it’s completely smooth and creamy, with no lumps. Gradually add the granulated sugar and continue beating until well combined and fluffy. Be sure to scrape down the sides of the bowl as needed. Now, add the eggs one at a time, beating on low speed just until each egg is incorporated. Overmixing after adding eggs can lead to cracks! Finally, stir in the lemon zest, lemon juice, and vanilla extract until just combined. The aroma is already heavenly!
Conjuring the Beautiful Blueberry Swirl
In a small saucepan, combine the blueberries, sugar, and lemon juice. If using, whisk in the cornstarch. Cook over medium heat, stirring occasionally, until the blueberries begin to burst and the mixture thickens slightly, about 5-7 minutes. You want a jam-like consistency. Remove from heat and let it cool slightly.
Assembling Your Masterpiece
Once the crust has pre-baked for 10 minutes and is lightly golden, carefully pour the cheesecake filling over the crust. Spread it evenly. Now for the fun part! Dollop spoonfuls of the blueberry mixture over the cheesecake filling. Using a toothpick or a knife, gently swirl the blueberry mixture into the cheesecake batter to create beautiful marble patterns. Don’t over-swirl, or you’ll lose the distinct layers of color and flavor.
Baking to Golden Perfection
Carefully place the pan in the preheated oven. Bake for 30-35 minutes, or until the edges of the cheesecake are set and the center is just slightly jiggly. The center should not look liquid, but it will firm up as it cools. Avoid overbaking, as this can lead to a dry cheesecake.
Chill and Slice for Serving
This is perhaps the hardest step – waiting! Once baked, let the bars cool completely on a wire rack. Then, cover the pan loosely with plastic wrap and refrigerate for at least 2-4 hours, or preferably overnight. This chilling period is crucial for the cheesecake to set properly, develop its flavor, and become sliceable. Once thoroughly chilled, use the parchment paper overhangs to lift the entire block out of the pan. Slice into bars using a sharp knife (wiping the knife clean between cuts for neat edges). Serve chilled and enjoy!
Nutritional Spotlight
While individual serving sizes can vary, here’s a general idea of what you’re getting in these delightful bars. These are approximate values per bar, assuming 16 bars are cut from the 8×8 pan.
Calories: ~250-300 kcal
Fat: ~15-20g
Carbohydrates: ~25-30g
Protein: ~4-6g
Sugar: ~18-22g
Healthier Twists on This Delight
Looking for ways to make these bars a little lighter without sacrificing flavor? Try these simple swaps:
Crust: Swap half of the graham crackers for whole wheat graham crackers or even finely chopped almonds for added fiber and healthy fats.
Sweetener: Reduce the sugar in both the crust and filling by 1/4 cup, or use a natural sweetener like maple syrup or honey (adjusting liquid content slightly if needed) for a different flavor profile.
Cream Cheese: Use reduced-fat cream cheese or a combination of regular and non-fat cream cheese. You can also experiment with Greek yogurt for a tangy protein boost, though this might alter the texture slightly.
Topping: Focus on fresh berries and minimize added sugar in the blueberry swirl.
Serving Your Delightful Bars
These bars are fantastic on their own, but here are a few ways to elevate them:
Serve chilled with a dollop of fresh whipped cream.
A sprinkle of fresh mint leaves can add a beautiful visual and refreshing aroma.
Pair with a light dessert wine or a cup of herbal tea.
For an extra citrus kick, add a thin drizzle of lemon glaze (powdered sugar mixed with a little lemon juice) over the fully chilled bars.
Common Pitfalls to Sidestep
Even the simplest recipes can have a few tricky spots. Here’s how to avoid them:
Overmixing the Filling: This can incorporate too much air, leading to cracks during baking. Mix on low speed after adding eggs.
Using Cold Cream Cheese: Always ensure your cream cheese is softened to room temperature for a smooth, lump-free cheesecake batter.
Under-Chilling: Resist the urge to slice before the bars are fully set. Patience during the chilling phase is key to perfect texture.
Rushing the Baking: Overbaking can dry out the cheesecake. Look for set edges and a slightly jiggly center.
Keeping Them Fresh: Storing Tips
Store any leftover Lemon Blueberry Cheesecake Bars in an airtight container in the refrigerator. They will stay deliciously fresh for up to 3-4 days. If you need to freeze them, wrap individual bars tightly in plastic wrap and then in foil. They can be frozen for up to 1 month. Thaw them overnight in the refrigerator before serving.
Frequently Asked Questions (FAQs)
*** Can I use different types of berries? ***
Absolutely! Raspberries, strawberries (chopped), or blackberries would also be delicious in place of or in combination with blueberries.
*** My cheesecake cracked. What went wrong? ***
Cracking is often due to overmixing the batter after adding eggs, overbaking, or too rapid temperature changes. Don’t worry too much; the flavor will still be amazing, especially in bar form!
*** Can I make these ahead of time? ***
Yes! These bars are perfect for making a day in advance. They actually benefit from the chilling time.
*** How do I get clean cuts? ***
Chill the bars thoroughly. Use a long, sharp knife and wipe it clean with a damp cloth between each cut. For even cleaner edges, you can run the knife under hot water and dry it before slicing.
Enjoy Your Homemade Lemon Blueberry Cheesecake Bars!
There you have it – a simple, delightful recipe for Lemon Blueberry Cheesecake Bars that’s sure to become a favorite. They’re the perfect balance of creamy, tangy, and sweet, with a delightful fruity twist. Whether you’re a seasoned baker or a beginner, these bars are incredibly rewarding to make and even more delightful to eat. So, gather your ingredients, put on your apron, and get ready to bake up some sunshine! We’d love to hear how yours turn out in the comments below, or tag us in your creations on social media!
Hello, dessert lovers!Are you ready to dive into a world of tangy lemon and sweet blueberries? This delightful recipe will guide you through making the most refreshing Lemon Blueberry Cheesecake Bars. Let’s get started!
Ingredients
Scale
1 1/2 cupsgraham cracker crumbs
1/4 cupgranulated sugar
1/2 cupunsalted butter, melted
2 cupsfresh blueberries
1/4 cupgranulated sugar
1 tablespoonlemon juice
1 tablespooncornstarch
16 ozcream cheese, softened
3/4 cupgranulated sugar
1/4 cupsour cream
2large eggs
1 tablespoonlemon zest
1/4 cupfresh lemon juice
1 teaspoonvanilla extract
1 cupwhipped cream
Lemon slices
Fresh blueberries
White chocolate shavings
Instructions
Preheat Oven and Prepare Pan:Preheat your oven to 350°F (175°C). Line a 9×9 inch baking pan with parchment paper.
Make the Crust:In a medium bowl, combine graham cracker crumbs, sugar, and melted butter. Mix until well combined. Press the mixture firmly into the bottom of the prepared pan to form an even crust. Bake for 10 minutes, then set aside to cool.
Prepare the Blueberry Layer:In a small saucepan, combine blueberries, sugar, lemon juice, and cornstarch. Cook over medium heat, stirring frequently, until the mixture thickens and the blueberries start to break down, about 5-7 minutes. Set aside to cool.
Make the Lemon Cream Cheese Layer:In a large bowl, beat cream cheese and sugar until smooth and creamy. Add sour cream, eggs, lemon zest, lemon juice, and vanilla extract. Mix until well combined.
Assemble the Cheesecake Bars:Pour half of the lemon cream cheese mixture over the cooled crust. Spoon the blueberry mixture evenly over the cream cheese layer. Pour the remaining lemon cream cheese mixture over the blueberry layer and smooth the top with a spatula.
Bake:Bake for 35-40 minutes, or until the edges are set and the center is slightly jiggly. Let cool to room temperature, then refrigerate for at least 4 hours or overnight.
Add the Topping:Before serving, spread whipped cream over the top of the cheesecake bars. Garnish with lemon slices, fresh blueberries, and white chocolate shavings
Notes
Ensure your cream cheese is softened to room temperature for a smooth mixture.
Fresh lemons provide the best flavor for both juice and zest.
Did you know that over 60% of home bakers actively seek out no-bake dessert recipes, especially during warmer months? This statistic perfectly highlights why a no-bake blueberry cheesecake is a dream come true for many. Discover the joy of making this no-bake blueberry cheesecake, a dessert as delightful to the palate as it is easy on the eyes. With its layered richness of creamy cheesecake and vibrant blueberry mousse atop a crumbly biscuit base, this dessert not only satisfies your sweet tooth but also adds a dash of elegance to any dining table. Whether you’re a seasoned chef or a novice in the kitchen, this cheesecake promises a hassle-free preparation process, ensuring that its exquisite taste is within everyone’s reach. Get ready to impress your friends and family with minimal effort and maximum flavor!
Ingredients
For the Biscuit Base:
200g digestive biscuits (or graham crackers for a sweeter, more traditional taste), crushed into fine crumbs. The texture should be like wet sand.
100g unsalted butter, melted. This is the glue that holds your base together, providing a rich, buttery foundation.
1 tablespoon granulated sugar (optional, for a sweeter crunch).
For the Cheesecake Filling:
500g cream cheese, softened to room temperature. This is the heart of your cheesecake, ensuring that smooth, decadent creaminess. Use full-fat for the best texture.
150g confectioners’ sugar (icing sugar), sifted to avoid lumps. Sweetness balanced perfectly for a delightful tang.
1 teaspoon vanilla extract. The classic flavor enhancer that rounds out the richness.
300ml heavy whipping cream, chilled. This adds airiness and a lightness to the dense cream cheese.
For the Blueberry Mousse:
300g fresh or frozen blueberries. These are the stars, providing vibrant color and a burst of fruity flavour.
50g granulated sugar (adjust to your sweetness preference).
1 tablespoon lemon juice. Brightens the blueberry flavor and adds a touch of tartness to cut through sweetness.
1 teaspoon cornstarch (optional, for a thicker mousse). Mix with 2 tbsp water before adding.
100ml heavy whipping cream, whipped to soft peaks. This will be folded in for a lighter, mousse-like texture.
Substitutions and Notes:
Biscuits: Shortbread or gingersnap cookies can be used for a different flavor profile.
Cream Cheese: Neufchâtel cheese can be a slightly lighter alternative but may impact richness.
Blueberries: Mixed berries or other fruit purees can be substituted, though the color and flavor will change. For frozen blueberries, do not thaw before cooking.
Sweeteners: Honey or maple syrup can be used, but adjust amounts as they are more potent than granulated sugar.
Timing
Prep time: 30 minutes
Chill time: 4 hours
Total time: 4 hours 30 minutes
This no-bake cheesecake is significantly quicker to prepare than its baked counterpart, primarily due to the absence of oven time and the need for cooling. While a baked cheesecake might take 1-2 hours to bake and then several hours to cool completely, this no-bake version requires just about 30 minutes of active preparation. The majority of the time is passive chilling, making it perfect for making ahead. The average cheesecake recipe often involves baking times and cooling times that can span an entire afternoon or evening. This no-bake recipe shaves off a considerable amount of waiting, offering instant gratification (well, almost!).
Step-by-Step Instructions
Step 1: Prepare the Biscuit Base
First, let’s get that perfect foundation sorted. Take your digestive biscuits and crush them into fine crumbs. A food processor works wonders for this, giving you that even texture. If you don’t have one, simply place the biscuits in a sturdy zip-top bag and bash them with a rolling pin until they’re finely ground. In a medium bowl, combine the biscuit crumbs with the melted unsalted butter and optional granulated sugar. Mix thoroughly until all the crumbs are moistened and the mixture resembles wet sand. This is crucial for a base that holds its shape.
Press this mixture firmly and evenly into the bottom of your chosen springform pan (an 8 or 9-inch pan is ideal for this recipe). You can use the flat bottom of a glass or a measuring cup to help pack it down tightly. A well-compacted base prevents the cheesecake from crumbling when you slice it. Once pressed, place the pan in the freezer for about 10-15 minutes while you prepare the next layer. This quick chill helps the butter solidify, making the base firm.
Step 2: Create the Cheesecake Filling
Now for the creamy heart of our cheesecake. In a large bowl, beat the softened cream cheese with an electric mixer until it’s completely smooth and free of lumps. This is where patience pays off; don’t rush this step! Gradually add the sifted confectioners’ sugar and beat until well combined and fluffy. Next, stir in the vanilla extract for that classic, comforting aroma and taste.
In a separate, chilled bowl, whip the cold heavy cream until stiff peaks form. Be careful not to over-whip it into butter! Gently fold about a third of the whipped cream into the cream cheese mixture to lighten it. Then, carefully fold in the remaining whipped cream until just combined. You want a smooth, luscious, and airy filling. Pour this creamy mixture over the chilled biscuit base in the springform pan and smooth the top with a spatula.
Step 3: Make the Blueberry Mousse
Time to add that vibrant blueberry layer! In a small saucepan, combine the blueberries, granulated sugar, and lemon juice. If using, mix the cornstarch with 2 tablespoons of water to create a slurry and set aside. Cook the blueberry mixture over medium heat, stirring occasionally, until the blueberries have burst and the mixture has started to thicken, about 8-10 minutes.
If you’re using cornstarch, stir in the slurry and continue to cook, stirring constantly, for another minute or two until the sauce thickens to a glossy, jam-like consistency. Remove from heat and let it cool slightly. For a smoother mousse, you can briefly pulse the mixture with an immersion blender or in a regular blender until mostly smooth, leaving some small berry pieces for texture if desired. Let this blueberry mixture cool completely to room temperature. In another bowl, whip the 100ml of heavy cream to soft peaks. Once the blueberry mixture is cool, gently fold the whipped cream into it until you achieve a light, airy blueberry mousse.
Step 4: Assemble and Chill
Carefully spoon the cooled blueberry mousse over the cheesecake filling. You can try to create swirls or a distinct layer. Gently spread it to cover the entire surface of the cheesecake filling. Once assembled, cover the springform pan with plastic wrap (try to avoid letting the wrap touch the surface of the mousse) and refrigerate for at least 4 hours, or preferably overnight. This chilling time is essential for the cheesecake to set properly, firm up, and for the flavors to meld beautifully.
Nutritional Information
While exact nutritional information can vary based on specific ingredients and portion sizes, a typical slice of this No-Bake Blueberry Cheesecake (serving 8-10) contains approximately:
Calories: 350-450 kcal
Fat: 20-30g (saturated fat will be higher due to butter and cream cheese)
Carbohydrates: 30-40g (including sugars from biscuits and fruit)
Protein: 5-10g
Please note that these are estimates. For precise nutritional data, using a recipe calculator with your exact ingredients is recommended.
Healthier Alternatives
For a lighter version of this delightful dessert, consider these simple swaps without sacrificing too much flavor:
For the Base: Use whole wheat digestive biscuits or even crushed oats mixed with a little coconut oil and a touch of natural sweetener. Reduce butter by using a lighter touch or opting for a plant-based spread with less saturated fat.
For the Filling: Substitute half of the cream cheese with Greek yogurt for a tangier, lower-fat filling. Use less confectioners’ sugar and sweeten with stevia or erythritol, or rely more on the natural sweetness of the blueberries.
For the Mousse: Use a low-fat yogurt or a lighter cream alternative. Ensure you don’t add extra sugar to the blueberries if you’re aiming for a low-sugar version.
Serving Suggestions
This No-Bake Blueberry Cheesecake is a star on its own. However, for an extra touch of elegance or flavor, consider these serving suggestions:
Fresh Berries: Garnish with a generous handful of fresh blueberries and perhaps a few raspberries or mint leaves.
Whipped Cream: A dollop of unsweetened whipped cream on the side or top can be a lovely addition.
Lemon Zest: A sprinkle of fresh lemon zest over the top can enhance the citrus notes.
Sauce Drizzle: A light drizzle of extra blueberry sauce or even a white chocolate sauce can elevate the presentation.
Common Mistakes to Avoid
To ensure your No-Bake Blueberry Cheesecake is a resounding success, keep an eye out for these common pitfalls:
Not Softening Cream Cheese Enough: Lumpy cream cheese is the enemy of a smooth cheesecake. Ensure it’s at room temperature.
Over-whipping Cream: Over-whipped cream can become grainy or even turn into butter, affecting the texture. Whip to soft peaks for the filling and stiff peaks for the mousse.
Not Chilling Long Enough: Patience is key! Insufficient chilling will result in a soft, unset cheesecake that’s difficult to slice.
Using Hot Blueberry Mixture: Adding a hot or warm blueberry mixture to the cheesecake filling can cause it to melt or become unstable. Always cool it completely.
Storing Your Delightful Cheesecake
This no-bake cheesecake is best stored in the refrigerator. Once it has set, carefully remove the sides of the springform pan. Cover the cheesecake loosely with plastic wrap or store it in an airtight container. It will keep well in the fridge for up to 3-4 days. For longer storage, you can freeze slices wrapped tightly in plastic wrap and then in a freezer-safe bag or container. Thaw overnight in the refrigerator before serving.
Frequently Asked Questions
***Can I make this cheesecake in individual portions?***
Absolutely! Instead of a springform pan, you can use muffin tins lined with cupcake liners or small ramekins. Press the biscuit base into the bottom of each, then proceed with the filling and mousse layers. Chill as usual. They make for stunning individual desserts.
***My blueberry mousse seems too thin. What can I do?***
If your blueberry mixture didn’t thicken enough, you can try gently reheating it and adding a little more cornstarch slurry (1 tsp cornstarch mixed with 1 tbsp water) until it reaches the desired consistency. Ensure it cools completely before folding in whipped cream. If it’s already mixed with cream and still thin, you might need to chill it longer, though it may not set as firmly.
***Why is my cheesecake not firm?***
The most common reasons are insufficient chilling time or not letting the cream cheese and cream fully incorporate and emulsify. Ensure your ingredients are at the correct temperatures (room temp for cream cheese, cold for cream) and that you allow ample chilling time. Make sure your whipped cream was whipped to stiff peaks.
***Can I use a different type of biscuit for the base?***
Yes, you can! Graham crackers are a classic substitute. Shortbread cookies will give a richer, buttery base. Gingersnaps add a lovely spice. Experiment with your favorites, adjusting sugar if the cookies are already very sweet.
Ready to Experience Bliss?
This No-Bake Blueberry Cheesecake is more than just a dessert; it’s an experience of pure, unadulterated joy. Its effortless preparation and stunning presentation make it a go-to for any occasion, from casual gatherings to celebratory feasts. Don’t just dream about it – make it! Gather your ingredients, follow these simple steps, and prepare to be amazed by the creamy, fruity perfection you’ve created.
Have you tried this recipe? Share your experiences and any delightful variations in the comments below! We love hearing from you!
Discover the joy of making thisno-bake blueberry cheesecake, a dessert as delightful to the palate as it is easy on the eyes. With its layered richness of creamy cheesecake and vibrant blueberry mousse atop a crumbly biscuit base, this dessert not only satisfies your sweet tooth but also adds a dash of elegance to any dining table. Whether you’re a seasoned chef or a novice in the kitchen, this cheesecake promises a hassle-free preparation process, ensuring that its exquisite taste is within everyone’s reach.
Ingredients
For the Crust:
For the Blueberry Mousse:
F or the Cream Cheese Layer:
Fo r the Swirl:
Instructions
Line an 8-inch square baking pan with parchment paper, leaving an overhang for easy removal.
Mix biscuit crumbs, melted coconut oil, and sugar in a bowl. Press into the bottom of the pan and chill in the refrigerator to set.
For the blueberry mousse, blend blueberries, sugar, and lemon juice until smooth. Heat the agar-agar mixture until dissolved and mix with the blueberry puree.
Beat cream cheese, powdered sugar, and vanilla extract until smooth. Spread over the chilled crust.
Spoon dollops of blueberry mousse over the cream cheese layer and use a toothpick to create swirls. Decorate with fresh blueberries.
Chill in the refrigerator for at least 6 hours or until the cheesecake is set.
Use the parchment overhang to lift out the cheesecake and cut into squares.
Notes
Thisno-bake blueberry cheesecakeis perfect for various occasions, from casual get-togethers to festive celebrations. Here are a few tips and serving suggestions:
The Sweet Escape: Craving a Dessert That’s Both Decadent and Easy?
Are you looking for a dessert that captures the joy of summer and the thrill of a classic ice cream parlor treat, without the oven? If you’re like many home bakers, you might be wondering how to achieve that perfect balance of creamy, fruity, and chocolatey goodness in a dessert that’s surprisingly simple. This No-Bake Banana Split Cake recipe is the answer! It’s a delightful, layered masterpiece that brings all the beloved flavors of a banana split into a luscious cake form. Imagine fluffy whipped cream, sweet bananas, crunchy nuts, tangy pineapple, and a rich chocolate sauce – all nestled together on a graham cracker crust. It’s a dream come true for those hot days when the oven is off-limits, or simply when you desire a dessert that impresses with minimal fuss. Prepare to be amazed by how easily this no-bake wonder comes together!
The Symphony of Flavors: Ingredients You’ll Need
This no-bake creation is all about layering textures and tastes, just like its ice cream namesake. We’ve selected ingredients that ensure a creamy, dreamy, and utterly satisfying dessert. Feel free to adapt based on your preferences – the beauty of this cake lies in its flexibility!
For the Graham Cracker Crust:
1.5 cups (about 10-12 full sheets) Graham Cracker Crumbs: The classic base for a no-bake dessert. Ensure they are finely crushed for a cohesive crust.
1/4 cup Granulated Sugar: Sweetens the crust, adding a subtle caramel note when baked.
1/2 cup Unsalted Butter, melted: Binds the crumbs together, creating a firm, yet tender crust.
For the Creamy Banana Filling:
2-3 ripe Bananas, sliced: The star of the show! Use ripe bananas for sweetness and softness. Ensure no brown spots for the best flavor.
8 oz Cream Cheese, softened: Creates a luscious, tangy, and creamy base for the filling. Full-fat is recommended for the best texture.
1/2 cup Powdered Sugar (Confectioners’ Sugar): Sweetens the cream cheese mixture without making it grainy.
1 teaspoon Vanilla Extract: Enhances the sweetness and adds a warm, aromatic depth.
1 cup Heavy Whipping Cream, cold: Whipped into soft peaks, this lightens the filling and adds an airy, creamy texture.
For the Toppings and Swirls:
1/2 cup Crushed Pineapple, well-drained: Adds a burst of tropical sweetness and a delightful tanginess. Ensure it’s well-drained to prevent a watery cake.
1/4 cup Chopped Walnuts or Pecans, toasted (optional): For that crucial crunchy element reminiscent of a classic sundae. Toasting enhances their nutty flavor.
1/4 cup Maraschino Cherries, halved (for garnish): The iconic pop of color and sweet cherry flavor.
Chocolate Syrup: Drizzled for that essential chocolatey ‘split’ experience.
Timing Breakdown: Quick Prep, Delicious Results
One of the biggest advantages of a no-bake dessert is the time saved! This No-Bake Banana Split Cake is a testament to that.
Prep Time: 25 minutes
Chill Time: 4 hours (minimum)
Total Time: 4 hours 25 minutes
Compared to many baked cakes that can take over an hour of active prep and baking time, this No-Bake Banana Split Cake requires only about 25 minutes of active work, with the bulk of the time being hands-off chilling. This is significantly faster than the average baked dessert, making it a perfect last-minute option!
Step-by-Step Instructions: Crafting Your Masterpiece
Step 1: Prepare the Crust
In a medium bowl, combine the graham cracker crumbs and granulated sugar. Pour in the melted unsalted butter and stir until all the crumbs are moistened. Press this mixture evenly into the bottom of a 9-inch springform pan. Use the bottom of a glass or your fingers to create a firm, even layer. Place this in the freezer for about 10-15 minutes while you prepare the filling, allowing it to firm up.
Step 2: Create the Cheesecake Filling
In a large bowl, beat the softened cream cheese with an electric mixer until it’s smooth and creamy, with no lumps. Gradually beat in the powdered sugar until well combined. Stir in the vanilla extract. In a separate bowl, whip the cold heavy whipping cream until stiff peaks form. Gently fold about half of the whipped cream into the cream cheese mixture to lighten it, then carefully fold in the remaining whipped cream until just combined. Be careful not to overmix, as this can deflate the airy texture.
Step 3: Assemble the Layers
Remove the crust from the freezer. Arrange the sliced ripe bananas in a single layer over the chilled graham cracker crust. Spoon the creamy cheesecake filling evenly over the bananas, spreading it smoothly to the edges. Gently dollop spoonfuls of crushed pineapple over the cheesecake layer, and swirl lightly with a knife or spatula for a marbled effect. Don’t over-swirl, you want distinct pockets of pineapple.
Step 4: Chill and Garnish
Cover the springform pan with plastic wrap and refrigerate for at least 4 hours, or until the cake is firm. This chilling time is crucial for the cake to set properly. Once firm, carefully remove the sides of the springform pan. Before serving, sprinkle the toasted chopped nuts (if using) over the top. Drizzle generously with chocolate syrup, mimicking the classic banana split drizzle. Garnish with halved maraschino cherries.
Nutritional Information
While this is a decadent treat, understanding its nutritional profile can help with mindful enjoyment. (Note: Nutritional information is an estimate and can vary based on specific ingredients and portion sizes.)
Calories: Approximately 350-450 per serving
Fat: 20-30g (Saturated Fat: 12-18g)
Carbohydrates: 35-45g (Sugars: 25-35g)
Protein: 5-8g
Sodium: 100-150mg
Healthier Alternatives and Flavor-Preserving Swaps
Want to make this delightful cake even lighter without sacrificing flavor? Here are some smart swaps:
Crust: Use whole wheat graham crackers for added fiber, or try a base of crushed digestive biscuits for a slightly less sweet option. For a low-carb alternative, consider an almond flour and butter crust.
Sweetener: Reduce powdered sugar by a couple of tablespoons, or substitute with a sugar-free powdered sweetener.
Fat Content: Use Neufchâtel cheese (a softer, lower-fat cream cheese) instead of full-fat cream cheese. For the whipped cream, consider a stabilized whipped topping made with a lower-fat dairy or a plant-based alternative like coconut cream (the thick part from a chilled can).
Fruit: While bananas and pineapple are key, you can add berries like strawberries or blueberries to the layers for extra antioxidants and natural sweetness.
Nuts: Opt for unsalted, raw nuts or lightly toast them yourself to control sodium and added fats.
Serving Suggestions
This No-Bake Banana Split Cake is a showstopper on its own, but here are a few ways to elevate your serving experience:
Serve chilled directly from the refrigerator.
Offer extra chocolate syrup, caramel sauce, or whipped cream on the side for those who want to go all out.
A drizzle of fresh fruit coulis can add an extra layer of elegance and flavor.
Pair with a light, fruity beverage like iced tea or a sparkling lemonade.
Common Mistakes to Avoid
To ensure your No-Bake Banana Split Cake turns out perfectly every time, keep these common pitfalls in mind:
Not chilling long enough: This is the most crucial step. Insufficient chilling will result in a cake that won’t hold its shape.
Over-mixing the whipped cream: Over-whipping can turn your cream into butter. Stop at stiff peaks.
Watery filling: Ensure your crushed pineapple is thoroughly drained. Squeeze out excess liquid if necessary.
Warm cream cheese: Starting with properly softened but not melted cream cheese is key to a smooth filling.
Too much liquid in the crust: Melted butter should bind the crumbs, not create a soggy mess.
Storing Your No-Bake Banana Split Cake
Because this cake contains fresh fruit and dairy, it needs to be refrigerated. Store any leftovers in an airtight container or tightly covered with plastic wrap in the refrigerator. It’s best enjoyed within 2-3 days. The bananas may start to brown slightly over time, but the flavor will remain delicious.
Frequently Asked Questions
***Is it possible to make this cake ahead of time?***
Absolutely! This No-Bake Banana Split Cake is perfect for making ahead. In fact, it needs ample chilling time, so preparing it a day in advance is ideal. Just add the final garnishes like chocolate syrup and nuts just before serving.
***Can I use a different type of cookie for the crust?***
Yes! Vanilla wafers, shortbread cookies, or even Nilla wafers can be used instead of graham crackers. Adjust the sugar and butter quantities slightly based on the sweetness of the cookies.
***What if I don’t have a springform pan?***
If you don’t have a springform pan, you can use a regular 9-inch pie plate or a 9-inch round cake pan. You may want to line the pan with parchment paper, leaving an overhang on two sides, to make lifting the cake out easier after chilling.
***How do I prevent the bananas from browning?***
While the bananas are layered and then covered by the filling, a little lemon juice sprinkled *very lightly* over the banana slices before adding the filling can help prevent browning. However, in this recipe, the chilling time and filling usually protect them well enough.
***Can I add other fruits to the layers?***
Certainly! Sliced strawberries, fresh pineapple chunks (drained very well), or even a layer of cherry pie filling (drained) can be incorporated to add more fruity dimensions.
Ready to dive into a truly special dessert? This No-Bake Banana Split Cake is your ticket to a slice of pure happiness. Give it a try and let us know what you think in the comments below! Happy baking (or rather, no-baking)!
This delightful no-bake dessert combines all the flavors of a classic banana split into a luscious, layered cake. Perfect for warm days when you want a sweet treat without turning on the oven. Creamy, fruity, and nutty with a touch of chocolate—this dessert is sure to impress!
1/2 cupchopped hazelnuts (or your favorite nuts)Chocolate sauce (for drizzling)
Chocolate sauce (for drizzling)
Instructions
1️⃣Prepare the Crust:In a medium bowl, combine graham cracker crumbs, melted butter, and salt.Press the mixture firmly into the bottom of a greased 9×13-inch baking dish to create an even crust.Refrigerate the crust while preparing the filling.2️⃣Make the Filling:In a large bowl, beat the softened cream cheese with sugar and vanilla extract until smooth and creamy.Gently fold in the whipped topping until fully combined.Spread the filling evenly over the chilled crust, smoothing the top with a spatula.3️⃣Add the Layers:Arrange banana slices evenly over the filling.Spread the well-drained crushed pineapple over the bananas.Add a layer of sliced strawberries on top of the pineapple.4️⃣Top and Chill:Spread another layer of whipped topping over the strawberries.Drizzle chocolate sauce over the whipped topping and sprinkle with chopped hazelnuts.Cover the dish with plastic wrap and refrigerate for at least 4 hours, or preferably overnight, to set the layers.5️⃣Serve:Slice the cake into squares and serve chilled. Enjoy the sweet and fruity goodness of this no-bake dessert!
In a medium bowl, combine graham cracker crumbs, melted butter, and salt.
Press the mixture firmly into the bottom of a greased 9×13-inch baking dish to create an even crust.Refrigerate the crust while preparing the filling.2️⃣Make the Filling:In a large bowl, beat the softened cream cheese with sugar and vanilla extract until smooth and creamy.Gently fold in the whipped topping until fully combined.Spread the filling evenly over the chilled crust, smoothing the top with a spatula.3️⃣Add the Layers:Arrange banana slices evenly over the filling.Spread the well-drained crushed pineapple over the bananas.Add a layer of sliced strawberries on top of the pineapple.4️⃣Top and Chill:Spread another layer of whipped topping over the strawberries.Drizzle chocolate sauce over the whipped topping and sprinkle with chopped hazelnuts.Cover the dish with plastic wrap and refrigerate for at least 4 hours, or preferably overnight, to set the layers.5️⃣Serve:Slice the cake into squares and serve chilled. Enjoy the sweet and fruity goodness of this no-bake dessert!
Refrigerate the crust while preparing the filling.2️⃣Make the Filling:In a large bowl, beat the softened cream cheese with sugar and vanilla extract until smooth and creamy.Gently fold in the whipped topping until fully combined.Spread the filling evenly over the chilled crust, smoothing the top with a spatula.3️⃣Add the Layers:Arrange banana slices evenly over the filling.Spread the well-drained crushed pineapple over the bananas.Add a layer of sliced strawberries on top of the pineapple.4️⃣Top and Chill:Spread another layer of whipped topping over the strawberries.Drizzle chocolate sauce over the whipped topping and sprinkle with chopped hazelnuts.Cover the dish with plastic wrap and refrigerate for at least 4 hours, or preferably overnight, to set the layers.5️⃣Serve:Slice the cake into squares and serve chilled. Enjoy the sweet and fruity goodness of this no-bake dessert!
2️⃣Make the Filling:
In a large bowl, beat the softened cream cheese with sugar and vanilla extract until smooth and creamy.Gently fold in the whipped topping until fully combined.Spread the filling evenly over the chilled crust, smoothing the top with a spatula.3️⃣Add the Layers:Arrange banana slices evenly over the filling.Spread the well-drained crushed pineapple over the bananas.Add a layer of sliced strawberries on top of the pineapple.4️⃣Top and Chill:Spread another layer of whipped topping over the strawberries.Drizzle chocolate sauce over the whipped topping and sprinkle with chopped hazelnuts.Cover the dish with plastic wrap and refrigerate for at least 4 hours, or preferably overnight, to set the layers.5️⃣Serve:Slice the cake into squares and serve chilled. Enjoy the sweet and fruity goodness of this no-bake dessert!
Gently fold in the whipped topping until fully combined.Spread the filling evenly over the chilled crust, smoothing the top with a spatula.3️⃣Add the Layers:Arrange banana slices evenly over the filling.Spread the well-drained crushed pineapple over the bananas.Add a layer of sliced strawberries on top of the pineapple.4️⃣Top and Chill:Spread another layer of whipped topping over the strawberries.Drizzle chocolate sauce over the whipped topping and sprinkle with chopped hazelnuts.Cover the dish with plastic wrap and refrigerate for at least 4 hours, or preferably overnight, to set the layers.5️⃣Serve:Slice the cake into squares and serve chilled. Enjoy the sweet and fruity goodness of this no-bake dessert!
Spread the filling evenly over the chilled crust, smoothing the top with a spatula.
3️⃣Add the Layers:Arrange banana slices evenly over the filling.Spread the well-drained crushed pineapple over the bananas.Add a layer of sliced strawberries on top of the pineapple.4️⃣Top and Chill:Spread another layer of whipped topping over the strawberries.Drizzle chocolate sauce over the whipped topping and sprinkle with chopped hazelnuts.Cover the dish with plastic wrap and refrigerate for at least 4 hours, or preferably overnight, to set the layers.5️⃣Serve:Slice the cake into squares and serve chilled. Enjoy the sweet and fruity goodness of this no-bake dessert!
Arrange banana slices evenly over the filling.Spread the well-drained crushed pineapple over the bananas.Add a layer of sliced strawberries on top of the pineapple.4️⃣Top and Chill:Spread another layer of whipped topping over the strawberries.Drizzle chocolate sauce over the whipped topping and sprinkle with chopped hazelnuts.Cover the dish with plastic wrap and refrigerate for at least 4 hours, or preferably overnight, to set the layers.5️⃣Serve:Slice the cake into squares and serve chilled. Enjoy the sweet and fruity goodness of this no-bake dessert!
Spread the well-drained crushed pineapple over the bananas.
Add a layer of sliced strawberries on top of the pineapple.4️⃣Top and Chill:Spread another layer of whipped topping over the strawberries.Drizzle chocolate sauce over the whipped topping and sprinkle with chopped hazelnuts.Cover the dish with plastic wrap and refrigerate for at least 4 hours, or preferably overnight, to set the layers.5️⃣Serve:Slice the cake into squares and serve chilled. Enjoy the sweet and fruity goodness of this no-bake dessert!
4️⃣Top and Chill:Spread another layer of whipped topping over the strawberries.Drizzle chocolate sauce over the whipped topping and sprinkle with chopped hazelnuts.Cover the dish with plastic wrap and refrigerate for at least 4 hours, or preferably overnight, to set the layers.5️⃣Serve:Slice the cake into squares and serve chilled. Enjoy the sweet and fruity goodness of this no-bake dessert!
Spread another layer of whipped topping over the strawberries.
Drizzle chocolate sauce over the whipped topping and sprinkle with chopped hazelnuts.Cover the dish with plastic wrap and refrigerate for at least 4 hours, or preferably overnight, to set the layers.5️⃣Serve:Slice the cake into squares and serve chilled. Enjoy the sweet and fruity goodness of this no-bake dessert!
Cover the dish with plastic wrap and refrigerate for at least 4 hours, or preferably overnight, to set the layers.5️⃣Serve:Slice the cake into squares and serve chilled. Enjoy the sweet and fruity goodness of this no-bake dessert!
5️⃣Serve:
Slice the cake into squares and serve chilled. Enjoy the sweet and fruity goodness of this no-bake dessert!
Notes
Customization:Swap hazelnuts for walnuts, almonds, or pecans, depending on your preference.Storage:Store leftovers in the refrigerator, covered, for up to 3 days.Make-Ahead Friendly:This dessert can be made the night before for convenience.
Storage:Store leftovers in the refrigerator, covered, for up to 3 days.Make-Ahead Friendly:This dessert can be made the night before for convenience.
Make-Ahead Friendly:This dessert can be made the night before for convenience.
“`
Hi I'm Emy
I’m passionate about sharing a diverse collection of sweet and savory recipes that I’ve meticulously tested and perfected in my own kitchen.