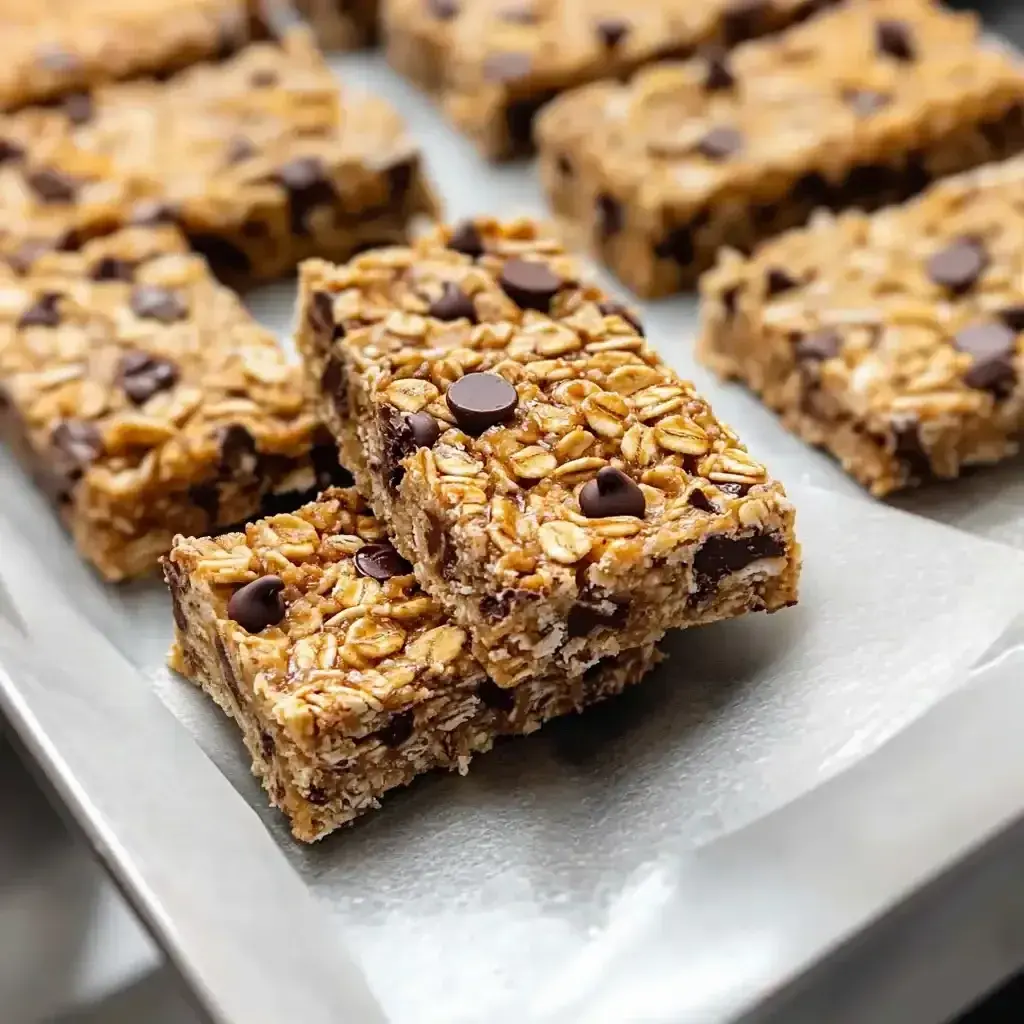
The Ultimate Cozy Snack: Fall Treats Granola Clusters
Is there anything more quintessentially autumn than the smell of cinnamon, toasted nuts, and honey wafting through your kitchen? Welcome to your new favorite seasonal ritual: making Fall Treats Granola Clusters. This recipe is more than just a snack; it’s a jar full of cozy, a handful of comfort, and the perfect edible embodiment of a crisp fall day. At Cooking With Emy, we believe the best recipes are the ones that fill your home with warmth and your pantry with delicious, wholesome options. These granola clusters are exactly that—a simple, forgiving, and incredibly satisfying project that yields a treat you can enjoy in a dozen different ways.
Forget the store-bought bags filled with excess sugar and underwhelming clusters. This homemade version puts you in control, allowing you to pack in your favorite nuts, adjust the sweetness, and create those big, crunchy clusters everyone fights over. Whether you’re packing lunchboxes, looking for a quick breakfast topping, or need a hostess gift that screams “thoughtful,” these Fall Treats Granola Clusters are your answer. Let’s dive in and create some autumn magic.
Why You’ll Fall in Love with This Recipe
You might be wondering what sets this granola cluster recipe apart from the countless others out there. The secret is in the technique and intention. We’ve crafted this recipe specifically to maximize cluster formation—that delightful, chunky texture that makes homemade granola so special. The combination of pressing the mixture firmly onto the baking sheet and allowing it to cool completely is non-negotiable for achieving those perfect, snackable pieces.
Furthermore, this recipe is a celebration of flexibility. It’s a fantastic template. Are you allergic to nuts? Use seeds. Don’t have cranberries? Chopped dried figs or apricots are sublime. This adaptability makes it a staple you can return to all season long, never making the same batch twice. It’s also incredibly cost-effective. Making a large batch of this granola is significantly cheaper than buying premium clusters from the grocery store, and you get the unbeatable satisfaction of creating something nourishing with your own hands.
💡 The Kitchen Team’s Pro Tip: For the absolute best clusters, use a good, thick, sticky sweetener like raw honey or pure maple syrup. Avoid runny or imitation syrups, as they won’t bind the oats and nuts together as effectively. The viscosity is key to clump formation!
Gathering Your Autumn Ingredients
The beauty of this recipe lies in its simple, whole-food ingredients. Each component plays a specific role in creating the final flavor and texture. Here’s exactly what you’ll need and why it matters.
| Ingredient | Quantity | Notes & Purpose |
|---|---|---|
| Old-Fashioned Rolled Oats | 2 cups | The hearty base. Do not use quick-cooking or steel-cut oats, as they won’t provide the right texture. |
| Mixed Nuts (Walnuts, Pecans, Almonds) | 1 cup | Provides crunch, healthy fats, and protein. Chop them roughly for better cluster cohesion. |
| Honey or Pure Maple Syrup | 1/2 cup | The natural sweetener and binder. Honey gives a classic flavor, while maple syrup offers a distinct, earthy sweetness. |
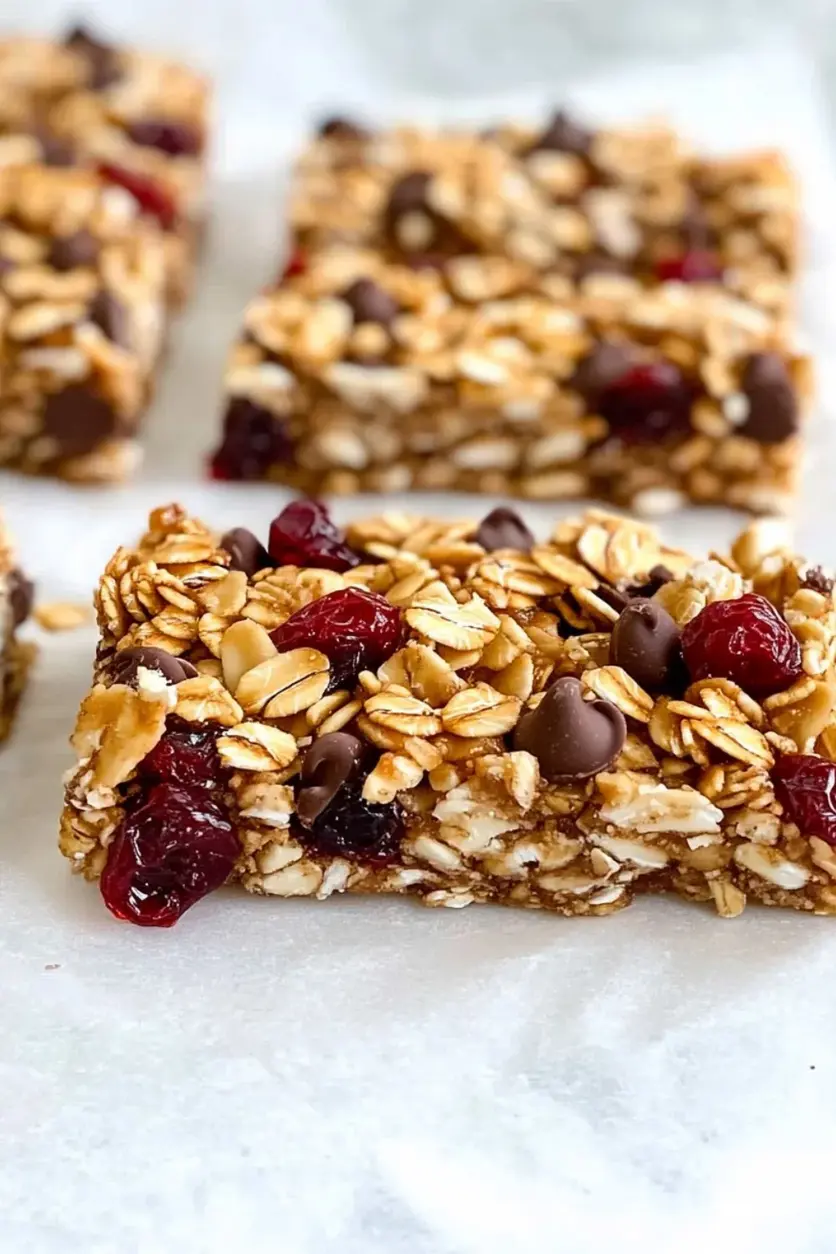
| Dried Cranberries or Dried Apple Bits | 1/2 cup | Adds chewy sweetness and a tart pop of flavor. Add after baking! |
| Ground Cinnamon | 1 teaspoon | The essential warm spice that screams “fall.” |
| Salt | 1/4 teaspoon | Enhances all the other flavors. A little salt makes the sweet and nutty notes shine. |
💡 The Kitchen Team’s Pro Tip: For an extra layer of flavor, toast your nuts on a dry skillet for 3-5 minutes before chopping and adding them to the mix. This deepens their nutty flavor and makes your entire kitchen smell amazing.
Step-by-Step to Perfect Clusters
Follow these steps closely for foolproof, clumpy granola every single time. We’re breaking down the “why” behind each step so you can become a granola master.
Step 1: Prep & Preheat
Preheat your oven to 350°F (175°C). This is the ideal temperature for toasting the oats and nuts without burning the sweetener. Line a standard baking sheet with parchment paper. Do not skip the parchment. It prevents sticking and makes cleanup a breeze. A silicone baking mat also works wonderfully here.
Step 2: Combine the Dry Goods
In a large mixing bowl, combine the 2 cups of rolled oats, 1 cup of roughly chopped mixed nuts, 1 teaspoon of cinnamon, and 1/4 teaspoon of salt. Use your hands or a spoon to mix everything thoroughly, ensuring the cinnamon and salt are evenly distributed. This step ensures every bite is perfectly seasoned.
Step 3: Warm & Whisk the Sweetener
In a separate, microwave-safe bowl or a small saucepan, gently warm the 1/2 cup of honey or maple syrup for about 15-20 seconds. You don’t want it hot, just slightly warmed to make it less viscous and easier to mix. Whisk it briefly until it’s smooth. Pour the warmed sweetener over the dry ingredients.
Step 4: The Crucial Mix
Using a sturdy spatula or your hands (we recommend hands for the best feel!), mix and fold the ingredients until every single oat and nut piece is thoroughly coated with the sweetener. The mixture should look glossy and feel slightly sticky. This uniform coating is what will caramelize in the oven and bind everything together.
Step 5: Press, Don’t Spread
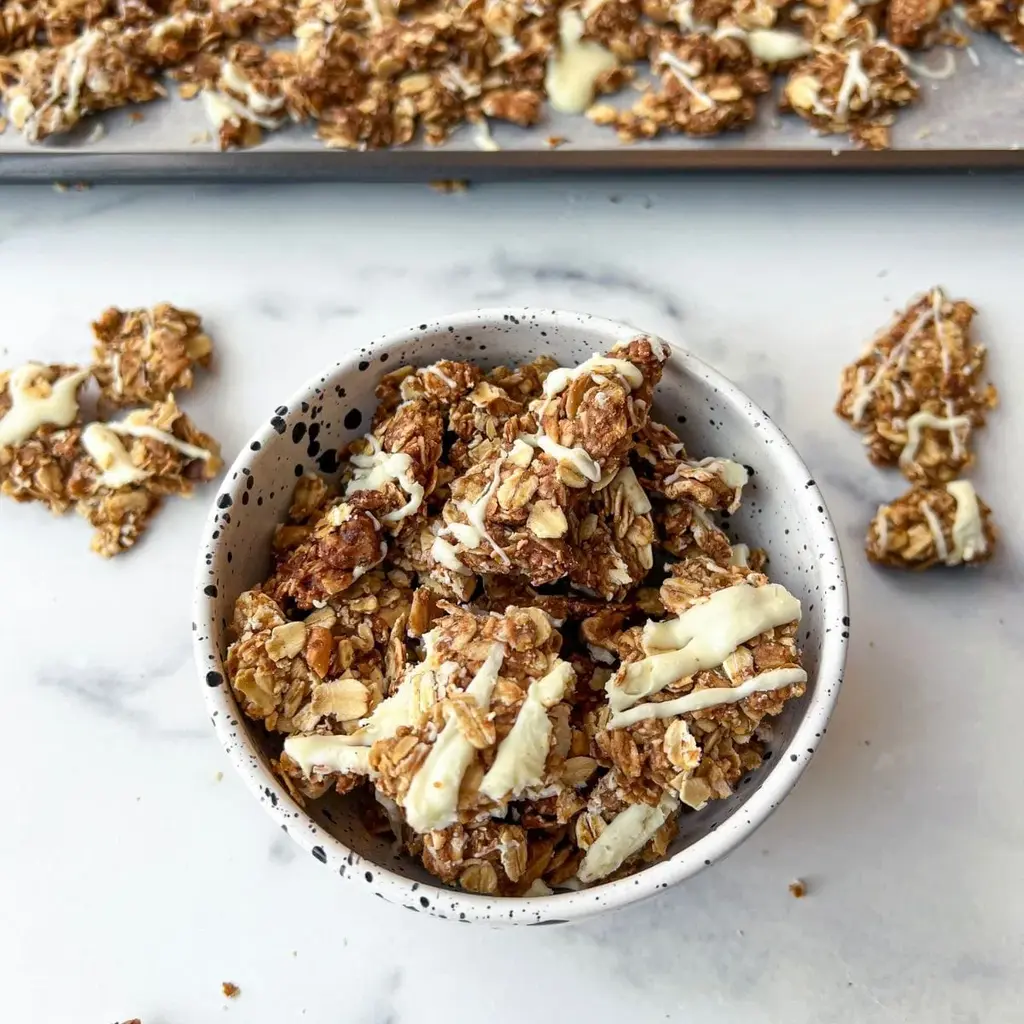
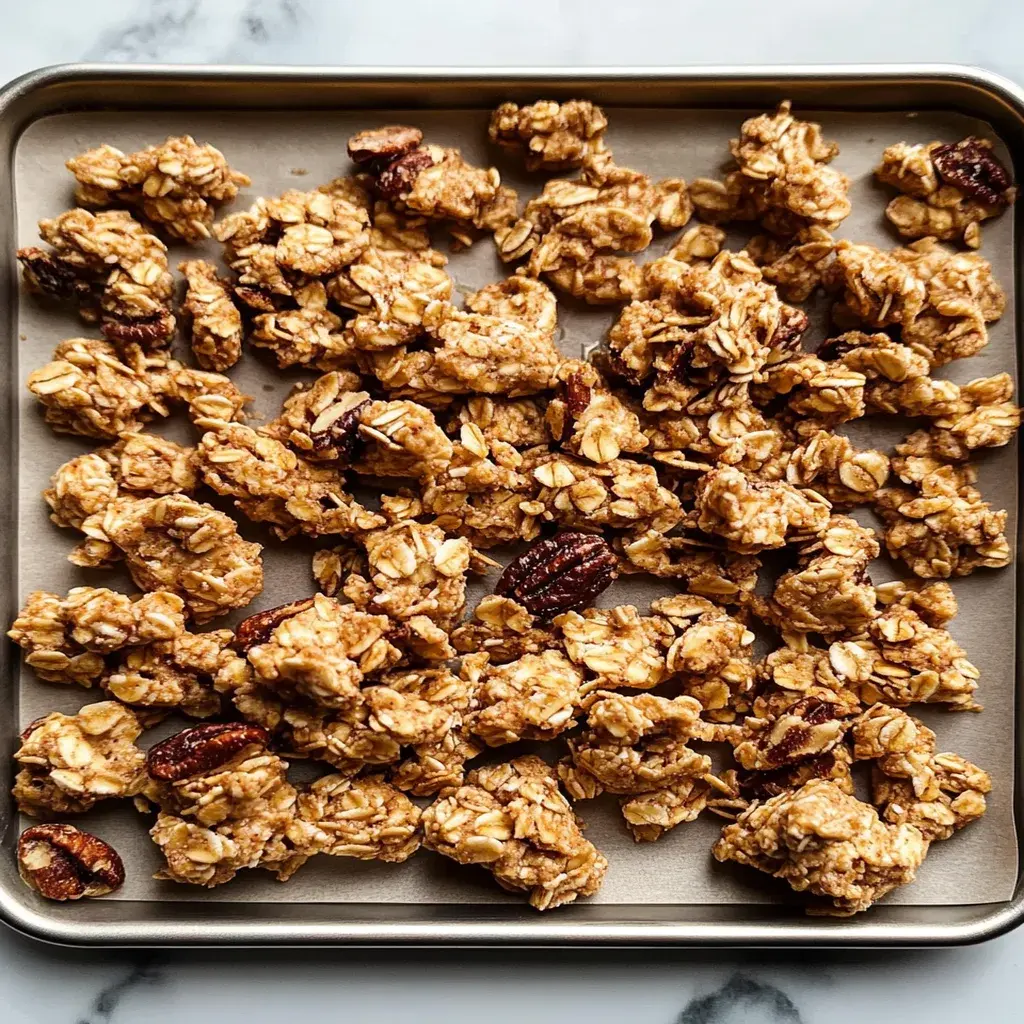
This is the most important step for clusters! Dump the mixture onto your prepared baking sheet. Using the back of your spatula or your hands, press the mixture down firmly into a compact, even layer, about 1/2-inch thick. Press hard! You’re essentially creating one giant granola bar that you’ll break later. The more compact it is, the bigger your clusters will be.
Step 6: Bake to Golden Perfection
Place the baking sheet in the center of your preheated oven. Bake for 20-25 minutes. You’re looking for a deep, golden brown color around the edges and a wonderfully fragrant smell. Avoid stirring during baking—this would break up your future clusters! The center may look slightly soft; it will crisp up as it cools.
Step 7: The Patient Cool-Down
Remove the baking sheet from the oven and place it on a wire cooling rack. Let it cool completely, without touching it, for at least 1 hour. This is when the magic happens. The granola hardens and sets into that perfect, crunchy texture as it cools. Rushing this step will result in crumbly granola, not clusters.
Step 8: Add Fruit & Break Apart
Once the granola slab is completely cool to the touch, sprinkle the 1/2 cup of dried cranberries or apple bits evenly over the top. Now, use your hands to break the slab into beautiful, irregular clusters. Some will be big, some small—that’s part of the charm!
Serving & Enjoying Your Granola
Your jar of Fall Treats Granola Clusters is a treasure trove of possibilities. Of course, they are utterly addictive eaten by the handful straight from the jar. But let’s explore the many ways to enjoy your creation:
- Breakfast Bowls: Spoon a generous handful over Greek yogurt, skyr, or cottage cheese. Add a drizzle of extra honey or maple syrup and some fresh apple slices or pear for the ultimate fall breakfast.
- Ice Cream Topping: Take your vanilla bean or pumpkin ice cream to the next level with a crunchy, spiced topping.
- On-the-Go Snack: Portion them into small reusable bags or containers for a healthy, energizing snack during hikes, road trips, or busy afternoons.
- Salad Sprinkler: Add a surprising crunch to autumn salads, like a spinach salad with roasted butternut squash and goat cheese.
- Gift from the Kitchen: Fill a decorative mason jar, tie it with twine and a cinnamon stick, and you have a heartfelt, homemade gift for neighbors, teachers, or friends.
Storing Your Fall Bounty
Proper storage is key to maintaining that delightful crunch. Once completely cooled and broken into clusters, transfer your granola to an airtight container. A glass jar with a sealable lid or a large container with a tight-fitting lid works perfectly.
Store the container at room temperature in a cool, dry pantry away from direct sunlight or heat sources. Properly stored, your Fall Treats Granola Clusters will stay fresh and crunchy for up to 2 weeks. For longer storage, you can freeze them! Place the clusters in a freezer-safe bag or container for up to 3 months. They thaw quickly at room temperature.
💡 The Kitchen Team’s Pro Tip: If you live in a humid climate and your granola loses a bit of its crunch after a few days, simply spread it on a baking sheet and re-toast it in a 300°F oven for 5-10 minutes. Let it cool again, and the crunch will be restored.
Creative Variations to Try
Once you’ve mastered the basic recipe, the autumn flavor playground is open! Here are some of our favorite twists:
- Pumpkin Spice Everything: Add 1/2 teaspoon of ground ginger, 1/4 teaspoon of ground nutmeg, and a pinch of ground cloves to the cinnamon. For a real treat, stir in 2 tablespoons of pumpkin puree into the wet sweetener (note: this may require a slightly longer bake time).
- Maple Pecan Delight: Use only pecans for the nuts and pure maple syrup for the sweetener. Add 1/2 teaspoon of vanilla extract to the syrup before mixing.
- Seedy & Nut-Free: Replace the mixed nuts with a cup of seeds! A combination of pumpkin seeds (pepitas) and sunflower seeds is fantastic.
- Chocolate Drizzled: After the granola is completely cool and clustered, drizzle melted dark chocolate over the top. Let the chocolate set before storing.
- Gingerbread Inspired: Add 1 teaspoon of ground ginger and 1/4 teaspoon of ground allspice. Use molasses for half of the sweetener (e.g., 1/4 cup honey + 1/4 cup molasses).
Your Granola Clusters Questions, Answered
Frequently Asked Questions
1. Can I make this recipe gluten-free?
Absolutely! Simply ensure you are using certified gluten-free rolled oats. All other ingredients are naturally gluten-free.
2. My granola didn’t clump! What did I do wrong?
The two most common reasons are not pressing the mixture firmly enough before baking or stirring/moving it while it’s still warm. Ensure a tight, compact layer and let it cool completely without disturbance.
3. Can I use quick oats instead of old-fashioned rolled oats?
We don’t recommend it. Quick oats are cut smaller and will result in a denser, less clumpy texture that can easily become mushy.
4. Is there a way to make this recipe vegan?
Yes! Choose pure maple syrup as your sweetener instead of honey. Ensure any chocolate or other add-ins are also vegan-friendly.
5. Why do I add the dried fruit after baking?
Adding dried fruit after baking prevents it from becoming hard, burnt, or overly chewy. The residual heat from the granola will soften it just enough.
6. Can I double this recipe?
Yes, you can easily double it. Use two baking sheets and swap their positions in the oven halfway through baking to ensure even browning. Don’t pile the mixture too high on one sheet.
7. What’s the best nut combination?
Our classic trio of walnuts, pecans, and almonds is perfect. Walnuts for earthiness, pecans for buttery sweetness, and almonds for a firm crunch. Feel free to use your favorites!
8. Can I reduce the amount of sweetener?
You can reduce it slightly, but keep in mind the sweetener is a primary binding agent. Reducing it by more than a tablespoon or two may result in less clumping and a drier final product.
9. How do I know when it’s done baking?
Look for a uniform golden-brown color, especially at the edges. Your kitchen will smell incredible. The center may still look a tad soft—it will crisp up as it cools.
10. Can I add other spices?
Please do! Cardamom, allspice, or a tiny pinch of ground cloves are wonderful additions. Start with 1/4 teaspoon of any new spice and adjust to your taste.
We hope this guide inspires you to fill your home with the warm, spiced aroma of homemade Fall Treats Granola Clusters. It’s a simple joy that pays off in delicious dividends for days. Happy baking from all of us at The Kitchen Team!
If you tried this recipe and loved it, please share your creations with us online! Tag @cookingwithemy on social media—we love seeing your kitchen triumphs.

Follow us on Pinterest for more cozy fall recipes!