Table of Contents
- Introduction
- Why This Is The Best
- Ingredients
- Step-by-Step Instructions
- Serving Suggestions
- Storage Tips
- Delicious Variations
- FAQ
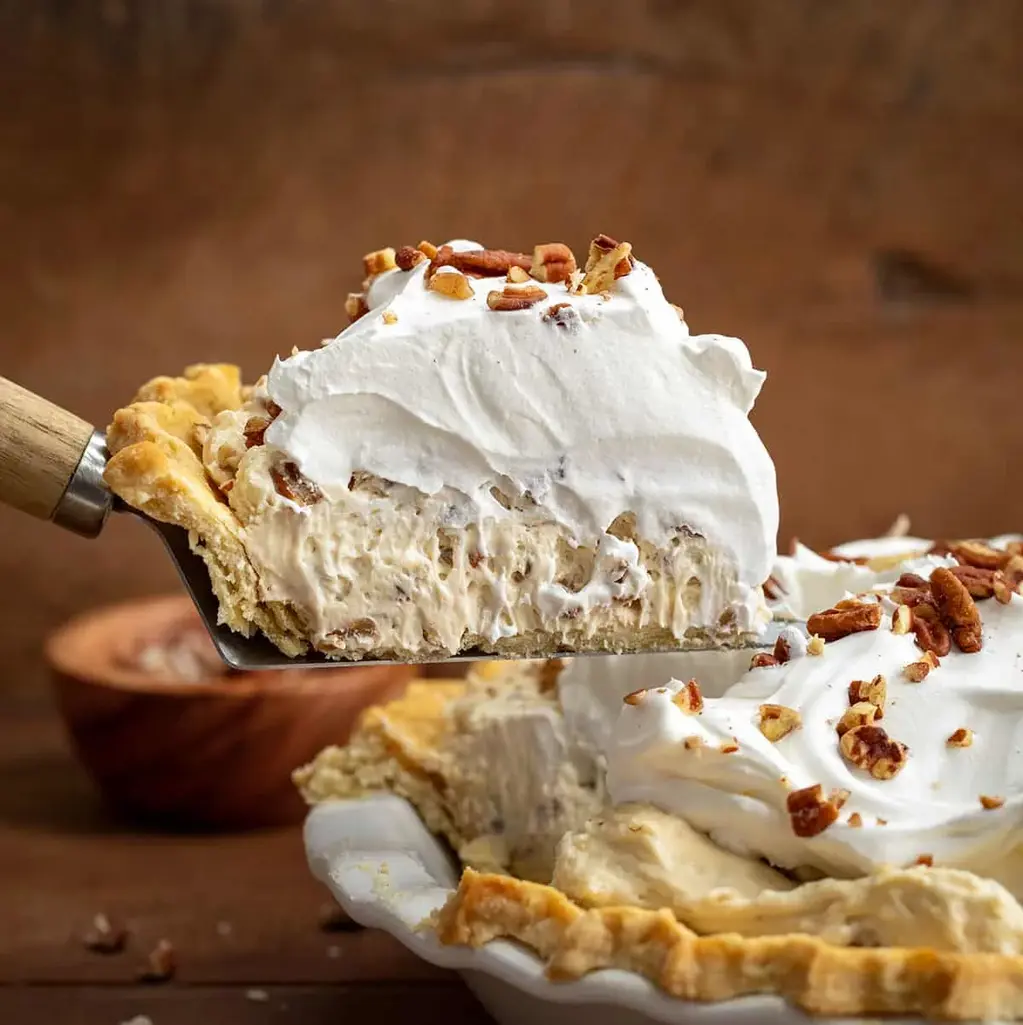
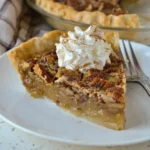
Pecan Cream Pie: The No-Bake Southern Dream Dessert
Welcome to The Kitchen Team, where we bring you desserts that taste as spectacular as they look. Today, we’re diving into a recipe that has become a family favorite across the South and beyond: Pecan Cream Pie. This isn’t your ordinary pecan pie—there’s no corn syrup, no baking required, and the texture is pure cloud-like bliss.

Imagine a buttery, flaky homemade pie crust filled with a luscious cream cheese and maple mixture, studded with crunchy toasted pecans, all topped with billowy whipped cream and a final shower of nutty goodness. That’s this pie in a nutshell—or should we say, in a pecan shell!
This Pecan Cream Pie is the perfect make-ahead dessert for Thanksgiving, Christmas, Easter, or any time you want to impress without spending hours in the kitchen. It’s no-bake (aside from the crust), requires simple ingredients, and delivers a showstopping presentation every single time.
Whether you’re a seasoned baker or a newbie looking for a foolproof dessert, this recipe is for you. Let’s get started!
Why This Pecan Cream Pie Is The Best
There are countless pie recipes out there, but here’s why our Pecan Cream Pie stands head and shoulders above the rest:
| Feature | Why It Matters |
|---|---|
| No-Bake Filling | No oven required! Perfect for hot days or when your oven is busy with other dishes. |
| Cream Cheese Base | Adds richness, tanginess, and the most velvety smooth texture you’ll ever experience in a pie. |
| Real Maple Syrup | Pure maple syrup brings depth and complexity that corn syrup simply can’t match. |
| Toasted Pecans | Toasting the pecans before chopping releases their natural oils and amplifies their nutty flavor. |
| Make-Ahead Friendly | Chill overnight for best results—this pie actually tastes better the next day! |
| Customizable | Swap crusts, add chocolate, or go gluten-free—this recipe adapts beautifully. |
Ingredients
Here’s everything you’ll need for this glorious Pecan Cream Pie. All ingredients are at room temperature unless noted.
For The Crust
- 1 9-inch pie crust, homemade or store-bought, baked and cooled completely
For The Cream Cheese Filling
- 1 cup (238 g) heavy whipping cream, cold
- ¼ cup (31 g) confectioner’s sugar
- 2 packages (8 ounces each) cream cheese, softened to room temperature
- ½ cup (100 g) light brown sugar, packed
- ¼ cup (79 g) pure maple syrup (not pancake syrup)
- 1 ½ cups (163.5 g) pecans, finely chopped and divided
For The Topping
- 8 ounces whipped cream (store-bought or homemade)
- Remaining ½ cup chopped pecans
Step-by-Step Instructions
Follow these simple steps for a flawless Pecan Cream Pie every time.
- Prepare the whipped cream: In a large mixing bowl, combine 1 cup cold heavy whipping cream and ¼ cup confectioner’s sugar. Using a hand mixer or stand mixer fitted with the whisk attachment, beat on medium-high speed until stiff peaks form. This should take about 3-4 minutes. Set aside in the refrigerator.
- Make the cream cheese base: In another large bowl, add the softened cream cheese, packed brown sugar, and pure maple syrup. Beat with a hand mixer on medium speed until the mixture is completely smooth, scraping down the sides as needed. This should take about 2 minutes.
- Fold it together: Gently fold the whipped cream into the cream cheese mixture using a rubber spatula. Use a cutting motion and turn the bowl as you go, being careful not to deflate the whipped cream. Fold until just combined—no white streaks should remain.
- Add the pecans: Reserve ½ cup of the chopped pecans for the topping. Fold the remaining 1 cup of chopped pecans into the filling mixture until evenly distributed.
- Fill the crust: Spoon the filling into your pre-baked and cooled 9-inch pie crust. Use an offset spatula or the back of a spoon to spread it evenly and smooth the top.
- Chill: Place the pie in the refrigerator and chill for at least 4 hours, but overnight is best. This allows the filling to set completely and the flavors to meld beautifully.
- Top and serve: Before serving, spread the 8 ounces of whipped cream over the chilled pie in an even layer. Sprinkle the remaining ½ cup of chopped pecans on top. Slice, serve, and watch it disappear!
Serving Suggestions
This Pecan Cream Pie is absolutely divine on its own, but here are some ways to take it over the top:
- Drizzle with caramel sauce: A warm salted caramel sauce poured over each slice adds a luxurious touch.
- Add a sprinkle of sea salt: Flaky sea salt on top of the whipped cream balances the sweetness and enhances the pecans.
- Serve with coffee: This pie pairs beautifully with a hot cup of black coffee or an espresso.
- Garnish with fresh mint: A few fresh mint leaves add a pop of color and a refreshing contrast.
- Warm it slightly: If you prefer, let slices sit at room temperature for 10 minutes before serving for a softer, creamier texture.
This pie is perfect for holiday gatherings, potlucks, Sunday dinners, or any occasion that calls for something special. It’s elegant enough for a dinner party yet simple enough for a weekday treat.
Storage Tips
Proper storage ensures your Pecan Cream Pie stays fresh and delicious for days.
| Storage Method | Duration | Tips |
|---|---|---|
| Refrigerator (covered) | Up to 4 days | Cover loosely with plastic wrap or foil. The crust may soften slightly over time. |
| Freezer (whole pie) | Up to 2 months | Wrap tightly in plastic wrap, then foil. Thaw overnight in the refrigerator before serving. |
| Freezer (individual slices) | Up to 1 month | Wrap each slice in plastic wrap and store in a freezer bag. Thaw in the fridge for 2-3 hours. |
Delicious Variations
One of the best things about this Pecan Cream Pie is how versatile it is. Try these creative twists:
- Chocolate Pecan Cream Pie: Add ¼ cup melted dark chocolate to the cream cheese mixture for a chocolatey twist. Top with chocolate shavings.
- Bourbon Pecan Pie: Add 2 tablespoons of good quality bourbon to the filling along with the maple syrup. The warmth of bourbon pairs perfectly with pecans.
- Gluten-Free Version: Use a gluten-free pie crust (store-bought or homemade). The filling is naturally gluten-free!
- Vegan Adaptation: Use dairy-free cream cheese, coconut cream (chilled and whipped), and a vegan pie crust. Use maple syrup as is—it’s already vegan!
- Pumpkin Pecan Cream Pie: Reduce cream cheese to 1 package and add ½ cup pumpkin puree and 1 teaspoon pumpkin pie spice to the filling.
- Caramel Pecan Delight: Swirl ¼ cup of caramel sauce into the filling before chilling, then drizzle more on top.
Don’t be afraid to experiment! This recipe is a fantastic canvas for your creativity.
Frequently Asked Questions
Can I use store-bought whipped cream instead of making my own?
Absolutely! While homemade whipped cream has a superior flavor and texture, store-bought works perfectly fine. Just make sure it’s thawed if frozen, and give it a gentle stir before using.
Can I use a graham cracker crust instead of a traditional pie crust?
Yes, a graham cracker crust is a wonderful alternative! It adds a sweet, buttery crunch that complements the creamy filling beautifully. Use a 9-inch store-bought or homemade graham cracker crust, pre-baked according to package directions.
How do I know when my whipped cream has stiff peaks?
Stiff peaks are achieved when you lift the beaters and the cream stands straight up without drooping. The cream should look thick and billowy, and when you tilt the bowl, it shouldn’t move. Be careful not to over-beat, or you’ll end up with butter!
Can I make this pie without a hand mixer?
Yes, but it will take more effort. You can whip the cream by hand using a whisk and a lot of elbow grease (about 5-8 minutes). For the cream cheese mixture, a sturdy whisk and some muscle will do the job. A stand mixer is ideal if you have one.
My filling turned out lumpy. What went wrong?
Lumpy filling usually means the cream cheese wasn’t soft enough. Always bring cream cheese to room temperature before beating. If lumps do form, try beating the mixture for an additional minute on high speed, or press it through a fine-mesh sieve.
Can I use maple-flavored syrup instead of pure maple syrup?
We strongly recommend using pure maple syrup for the best flavor. Maple-flavored pancake syrup is typically made from corn syrup and artificial flavoring, which will make the pie overly sweet and give it an artificial taste. Pure maple syrup is worth the investment here.
How far in advance can I make this pie?
You can make the entire pie (minus the whipped cream topping) up to 2 days in advance. Keep it covered in the refrigerator. Add the whipped cream and pecan garnish no more than 4 hours before serving for the best presentation.
Can I toast the pecans for this recipe?
Absolutely! Toasting pecans enhances their flavor significantly. Spread them on a baking sheet and toast at 350°F for 5-7 minutes, watching carefully to prevent burning. Let them cool completely before chopping and adding to the filling.
Why did my pie crust get soggy?
A soggy crust can happen if the filling is too warm when added, or if the crust wasn’t fully baked. Make sure your crust is completely cool before filling. For extra protection, brush the inside of the baked crust with a thin layer of melted white chocolate or egg wash before filling.
Can I double this recipe for a larger crowd?
Yes! This recipe doubles beautifully. Use a 10-inch deep-dish pie pan or divide the filling between two 9-inch pie crusts. You may need to increase the chilling time by about an hour to ensure everything sets properly.
Is this pie suitable for people with nut allergies?
Unfortunately, no. Pecans are tree nuts, and this recipe contains a significant amount of them. For a nut-free version, you could try substituting toasted sunflower seeds or pumpkin seeds, though the flavor will be quite different.
How many calories are in a slice of Pecan Cream Pie?
Based on our recipe, one slice (1/8 of the pie) contains approximately 743 calories. This can vary depending on the specific brands and types of ingredients you use. For lighter options, try using reduced-fat cream cheese and light whipped cream.
📌 Love This Recipe? Pin It For Later!
Save this Pecan Cream Pie recipe to your favorite dessert board on Pinterest. Share the love with fellow bakers!
Follow Cooking With Emy on Pinterest
Tag @cookingwithemy when you make this recipe—we’d love to see your creation!
Thank you for trusting The Kitchen Team with your dessert-making adventures. Happy baking, and even happier eating!
Pecan Cream Pie Recipe
Description
This Pecan Cream Pie Recipe starts with a homemade pie crust then is filled with a creamy blend of cream cheese, maple syrup, and whipped cream with a nutty crunch from pecans. Whipped cream is spread on top, finished with more chopped pecans!
Ingredients
Scale
- 1 9-inch pie crust, homemade or storebought, baked and cooled
- 1 cup (238 g) heavy whipping cream
- ¼ cup (31 g) confectioner’s sugar
- 2 packages (8 ounces each) cream cheese, softened
- ½ cup (100 g) light brown sugar, packed
- ¼ cup (79 g) pure maple syrup
- 1 ½ cups (163.5 g) pecans, finely chopped, divided
- 8 ounces whipped cream, for topping
Instructions
- To a large mixing bowl, add heavy whipping cream and confectioners’ sugar. Using a hand mixer, mix on medium speed until stiff peaks form. Set aside.
- To another large bowl, add cream cheese, brown sugar, and maple syrup. Using a hand mixer, beat at medium speed until fully combined and smooth.
- Gently fold the whipped heavy cream mixture into the cream cheese mixture until fully incorporated.
- Fold in 1 cup of the chopped pecans.
- Scoop the mixture into the cooled pie crust, smoothing the top with a spatula.
- Place the pie in the refrigerator to chill for at least 4 hours, or overnight for best results.
- Spread the whipped cream over the chilled cheesecake in a smooth layer.
- Evenly sprinkle the remaining ½ cup of pecans on top of the pie before serving.
Nutrition
- Calories: 743kcal