🍪 The Ultimate Mint Chocolate Chip Cookies (Soft, Chewy & Perfectly Minty)
💚 Why You’ll Love These Mint Chocolate Chip Cookies
Life can get so hectic, can’t it? Between juggling work, kids, and everything in between, it’s nice to have a little joy in the form of a sweet treat. That’s where my Mint Chocolate Chip Cookies come in! These delightful cookies are the perfect way to brighten any day. They’re not just delicious, but also quick to whip up, making them an ideal solution for busy moms like me. Whether you’re surprising your kids after school or impressing your friends at a gathering, these cookies will surely steal the show!

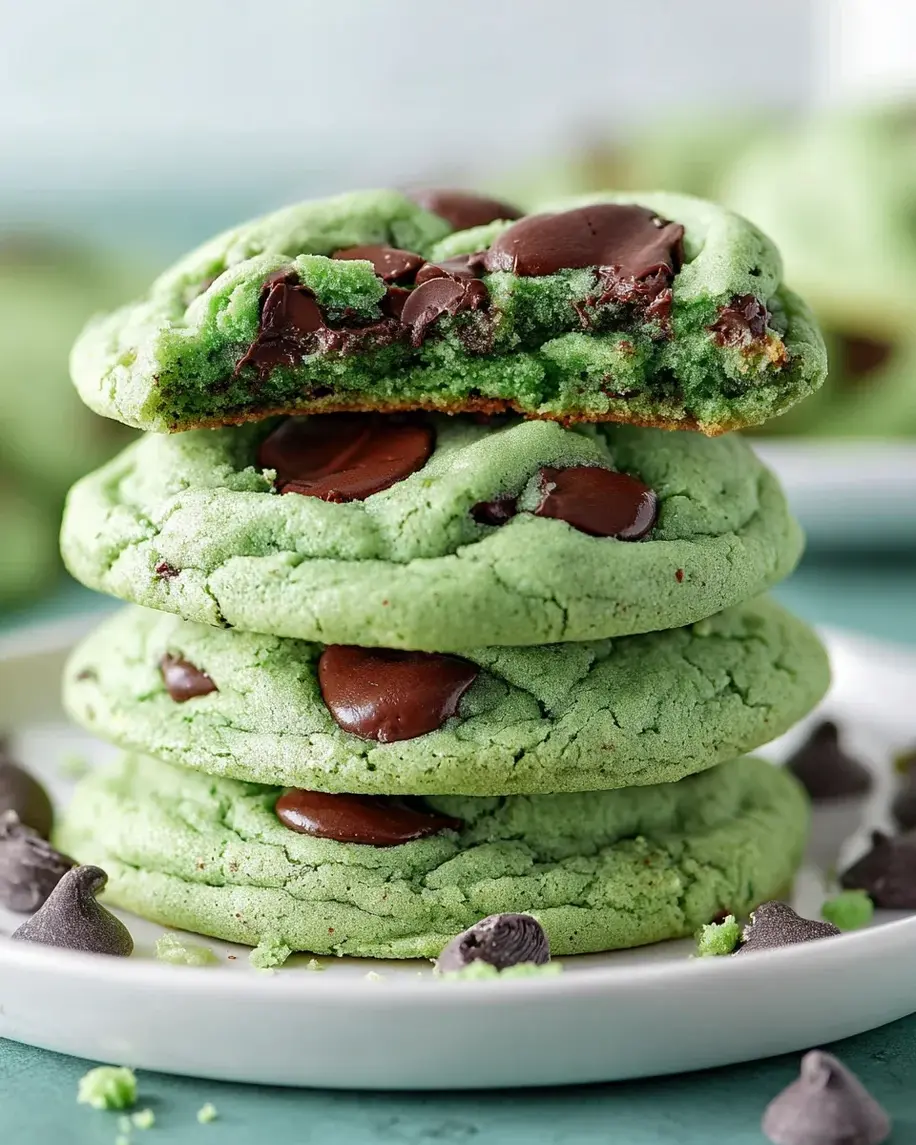
Imagine biting into a soft, chewy cookie with the perfect balance of cool mint and rich, melty chocolate. The vibrant green color makes them festive for holidays like St. Patrick’s Day or Christmas, but honestly, they’re perfect any time of year. This recipe has been tested and perfected by The Kitchen Team at cookingwithemy.com, and we guarantee it will become your new favorite.
🌟 Why These Are the Best Mint Chocolate Chip Cookies
There are hundreds of mint cookie recipes out there, but here’s why this one stands out from the rest:
- Perfect Texture: Thanks to the combination of cornstarch and an extra egg yolk, these cookies stay soft and chewy for days.
- Balanced Mint Flavor: We use pure mint extract (not just peppermint) for a refreshing, authentic taste that isn’t overpowering.
- Double Chocolate Goodness: Semi-sweet chips plus chopped bittersweet chocolate create pockets of gooey chocolate in every bite.
- No Chilling Required: Unlike many cookie recipes, you can bake these immediately – perfect for last-minute cravings!
- Customizable Color: Add green gel food coloring (and a drop of blue for that perfect spearmint hue) to make them visually stunning.
💡 The Kitchen Team’s Pro Tip: For the most vibrant green color, use gel food coloring instead of liquid. Liquid coloring can alter the dough’s consistency, while gel gives you bright, beautiful color without adding extra moisture.
🛒 Ingredients
Dry Ingredients
- 2 cups all-purpose flour (280g)
- 2 teaspoons cornstarch
- 1½ teaspoons baking powder
- ½ teaspoon baking soda
- ½ teaspoon fine sea salt
Wet Ingredients
- ¾ cup unsalted butter, room temperature
- 1 cup granulated sugar
- ½ cup light brown sugar, packed
- 1 large egg, room temperature
- 1 large egg yolk, room temperature
- 1 to 1½ teaspoons mint extract (or peppermint extract)
- 5 to 10 drops green gel food coloring (plus 1-2 drops blue if desired)
Mix-Ins
- 1 cup semi-sweet chocolate chips
- 2 ounces bittersweet chocolate, chopped (or use mini chocolate chips)
💡 The Kitchen Team’s Pro Tip: Room temperature ingredients are crucial! Cold butter won’t cream properly, and cold eggs can seize the dough. Take everything out of the fridge 30 minutes before starting.
👩🍳 Step-by-Step Instructions
- Preheat & Prep: Preheat your oven to 350°F (175°C). Line two baking sheets with parchment paper or silicone baking mats.
- Whisk Dry Ingredients: In a medium bowl, combine 2 cups all-purpose flour, 2 teaspoons cornstarch, 1½ teaspoons baking powder, ½ teaspoon baking soda, and ½ teaspoon fine sea salt. Whisk until well combined. Set aside.
- Cream Butter & Sugars: In a large mixing bowl (or the bowl of a stand mixer fitted with the paddle attachment), add ¾ cup room-temperature unsalted butter, 1 cup granulated sugar, and ½ cup light brown sugar. Beat on medium speed for 3-4 minutes until light, fluffy, and pale in color. Scrape down the sides as needed.
- Add Wet Ingredients: Beat in 1 large egg and 1 egg yolk (both room temperature), 1 to 1½ teaspoons mint extract, and 5-10 drops green gel food coloring (plus a drop of blue if you want a deeper green). Continue beating until the mixture is light, creamy, and uniformly colored – about 1-2 minutes.
- Combine Dry & Wet: Gradually add the flour mixture to the butter mixture, mixing on low speed just until combined. Be careful not to overmix – stop as soon as no streaks of flour remain.
- Fold in Chocolate: Gently fold in 1 cup semi-sweet chocolate chips and 2 ounces chopped bittersweet chocolate using a rubber spatula. Ensure the chocolate is evenly distributed throughout the dough.
- Scoop & Bake: Using a 1.5-tablespoon cookie scoop (or two spoons), drop rounded balls of dough onto the prepared baking sheets, spacing them about 2 inches apart. Bake for 10-12 minutes, or until the edges are set and lightly golden. The centers will look slightly underbaked – that’s perfect!
- Cool: Allow the cookies to cool on the baking sheet for 5 minutes, then transfer to a wire rack to cool completely. The cookies will continue to set as they cool.
💡 The Kitchen Team’s Pro Tip: For bakery-style cookies, sprinkle a few extra chocolate chips on top of each dough ball right before baking. This makes them look gorgeous and ensures every bite has visible chocolate!
🍽️ Serving Suggestions
These Mint Chocolate Chip Cookies are incredible on their own, but here are some fun ways to serve them:
- With a tall glass of cold milk – a classic pairing for a reason!
- Crumbled over vanilla ice cream for a mint-chocolate sundae.
- Sandwiched with mint chip ice cream to make ice cream sandwiches.
- Dipped in dark chocolate for an extra-decadent treat.
- Served warm with a drizzle of chocolate sauce for dessert.
These cookies are perfect for birthday parties, cookie exchanges, holiday gatherings, or just because it’s Tuesday. They also make wonderful homemade gifts – pack them in a pretty tin with a ribbon!
📦 Storage Tips
Proper storage keeps these cookies fresh and delicious:
- Room Temperature: Store in an airtight container at room temperature for up to 5 days. Add a slice of bread to the container to keep them extra soft.
- Refrigerator: Baked cookies can be refrigerated for up to 1 week. Let them come to room temperature before serving.
- Freezer (baked): Freeze cooled cookies in a single layer on a baking sheet, then transfer to a freezer-safe bag for up to 3 months. Thaw at room temperature.
- Freezer (dough): Scoop dough balls onto a baking sheet and freeze until solid. Transfer to a freezer bag. Bake from frozen, adding 2-3 minutes to the bake time.
💡 The Kitchen Team’s Pro Tip: To refresh day-old cookies, pop them in a 300°F oven for 3-4 minutes. They’ll taste just-baked again!
🎨 Delicious Variations
Once you’ve mastered the classic, try these fun twists:
| Variation |
What to Change |
Best For |
| Dark Chocolate Mint |
Use dark chocolate chips (60-70% cacao) and add 2 tbsp cocoa powder to the flour |
Intense chocolate lovers |
| White Chocolate Mint |
Replace semi-sweet chips with white chocolate chips and add ½ cup chopped macadamia nuts |
Buttery, sweet flavor |
| Gluten-Free Mint |
Substitute 1:1 gluten-free flour blend (with xanthan gum) for all-purpose flour |
Gluten-sensitive guests |
| Vegan Mint |
Use vegan butter, flax eggs (1 tbsp flax + 3 tbsp water per egg), and dairy-free chocolate |
Plant-based diets |
| Mint Oreo Crunch |
Reduce chocolate chips to ½ cup and add 1 cup crushed Mint Oreos |
Extra texture & flavor |
| Peppermint Patty |
Press a mini peppermint patty into the center of each dough ball before baking |
Gooey center surprise |
❓ Frequently Asked Questions
Can I use peppermint extract instead of mint extract?
Yes! Peppermint extract is stronger, so use ¾ to 1 teaspoon instead of 1½. Mint extract has a more balanced, sweet mint flavor, while peppermint is more intense.
Why did my cookies spread too much?
This usually happens if the butter was too soft (almost melted) or if the dough wasn’t measured correctly. Make sure your butter is room temperature (not melted) and measure your flour properly by spooning it into the cup and leveling it off.
Can I make these cookies without food coloring?
Absolutely! The cookies will be a pale beige color, but they’ll taste just as delicious. You can also use natural green coloring from spinach powder or matcha for a more natural hue.
How do I get that perfect chewy texture?
The cornstarch and extra egg yolk are the secrets! Cornstarch tenderizes the gluten, while the egg yolk adds richness and chewiness. Also, don’t overbake – pull them out when the edges are set but centers still look soft.
Can I freeze the cookie dough?
Yes! Scoop the dough into balls, freeze on a baking sheet, then transfer to a freezer bag. Bake from frozen, adding 2-3 minutes to the bake time. No need to thaw!
What’s the best chocolate to use?
We recommend a combination of semi-sweet chocolate chips (for classic flavor) and chopped bittersweet chocolate (for melty pockets). Ghirardelli, Guittard, or Lindt are excellent brands.
How long do these cookies stay fresh?
Stored in an airtight container at room temperature, they stay soft and fresh for up to 5 days. They rarely last that long in our house!
Can I double this recipe?
Yes! This recipe doubles beautifully. Just make sure your mixing bowl is large enough, and bake in batches to avoid overcrowding the oven.
Why add cornstarch to cookies?
Cornstarch is a tenderizer – it inhibits gluten formation, resulting in softer, more tender cookies. It also helps them hold their shape better.
Can I use butter substitutes?
You can use margarine or plant-based butter sticks, but the texture may vary slightly. Avoid tub margarine as it has too much water content.
📌 Share the Love
We hope you love these Mint Chocolate Chip Cookies as much as we do! If you make them, please tag us on social media – we love seeing your creations. Don’t forget to save this recipe for later and share it with your friends and family.
For more delicious recipes, visit us at cookingwithemy.com and follow us on Pinterest for daily inspiration!
📌 Save This Recipe for Later!
Pin this image to your favorite cookie board on Pinterest so you never lose this recipe!
📌 Pin This Recipe
Follow us on Pinterest for more amazing recipes!
Recipe by The Kitchen Team at cookingwithemy.com | © 2025 All Rights Reserved