Sour Cherry Jam Recipe

“`html

Sour Cherry Jam Recipe

Introduction

Did you know that sour cherries, also known as tart cherries, contain up to 20 times more vitamin A and powerful antioxidants like anthocyanins compared to their sweet counterparts? This makes our sour cherry jam recipe not just a treat for your taste buds but a potential boost for your health. There’s something uniquely satisfying about transforming a basket of vibrant, ruby-red sour cherries into a jar of glossy, tangy-sweet jam. The process connects us to generations of home cooks who preserved summer’s bounty, and the result is a flavor so complex and bright that no store-bought jar can compare.

This recipe is designed for simplicity and success. We’ll use just a handful of ingredients—sour cherries, sugar, and a hint of vanilla—to create a spread that perfectly balances pucker and sweetness. Whether you’re slathering it on a warm biscuit, swirling it into yogurt, or gifting a jar to a friend, this homemade jam promises minimal effort for maximum, unforgettable flavor. Let’s capture the essence of summer in a jar.

Ingredients List

Gather these simple ingredients. The magic lies in their quality and balance.

  • 2 pounds (about 900g) fresh sour cherries – Look for firm, plump cherries with a deep red color and a glossy sheen. They should feel heavy for their size and have bright green stems. Avoid any that are soft, bruised, or have brown spots. The signature tartness is key.
  • 3 cups (600g) granulated sugar – Sugar is crucial for setting the jam and preserving it. It also tames the intense sourness of the cherries. For a deeper flavor, you can substitute up to 1 cup with light brown sugar, which will add subtle caramel notes.
  • 1 tablespoon fresh lemon juice – This boosts the natural pectin in the fruit and adds a necessary acidity to help the jam set and brighten the overall flavor. The fresh, clean tang is irreplaceable compared to bottled juice.
  • 1 teaspoon pure vanilla extract OR 1 vanilla bean, split and scraped – Vanilla adds a warm, floral depth that complements the cherry’s sharpness beautifully. Using a real vanilla bean will provide tiny, fragrant seeds throughout the jam for a gourmet touch.
  • Optional: 1/2 teaspoon almond extract – A classic pairing with stone fruits. Just a few drops will enhance the cherry flavor with a marzipan-like nuance. Add it at the very end of cooking.

Timing

Prep Time 30 minutes
Cook Time 45-50 minutes
Total Time About 1 hour 20 minutes

Compared to many jam recipes that require overnight macerating, this sour cherry jam recipe is relatively quick from start to finish. The active prep time of pitting cherries is the most labor-intensive part, but it’s a meditative process. The cook time is standard, allowing for the slow evaporation needed for a perfect set. In under 90 minutes, you’ll have jars of jam ready to process or cool.

Fresh sour cherries in a bowl next to a jar of homemade sour cherry jam
Fresh sour cherries ready to be transformed into delicious homemade jam.

Step-by-Step Instructions

Step 1: Prepare Your Cherries

Wash the cherries thoroughly in cool water. The most important task is pitting. You can use a cherry pitter for speed, or carefully slice each cherry in half and pop out the pit with the tip of a knife. I like to work over the cooking pot to catch any precious juice. Don’t worry if the cherries get a bit mashed—this will help them break down faster. Reserve a small handful of whole pitted cherries to add halfway through cooking if you prefer some chunkier pieces in your final jam.

Step 2: Combine and Macerate

In a large, heavy-bottomed pot (like a Dutch oven), combine the pitted cherries, sugar, and lemon juice. Give it a gentle stir to coat the cherries in sugar. Let this mixture sit for 20-30 minutes. You’ll see the sugar begin to draw out the cherry juices, creating a beautiful, glossy syrup. This maceration step is a little secret for a more flavorful jam, as it ensures the sugar dissolves completely before heating, preventing a grainy texture.

Step 3: Cook to Perfection

Place the pot over medium-high heat. Bring the mixture to a full, rolling boil, stirring occasionally to prevent sticking. Once boiling, add the vanilla (if using a bean, add the pod and scraped seeds). Reduce the heat to maintain a vigorous simmer. A foam may rise to the top; you can skim this off with a spoon for a clearer jam. Cook for 25-35 minutes, stirring more frequently as it thickens. To test for the set, place a small plate in the freezer. Drop a teaspoon of jam onto the cold plate, wait 30 seconds, then push it with your finger. If it wrinkles, it’s ready. If it’s still runny, cook for another 5 minutes and test again.

Step 4: Jar and Seal

Remove the pot from the heat. If you used a vanilla bean pod, fish it out now. If you’re using almond or vanilla extract, stir it in. Let the jam cool for about 5 minutes; this helps prevent the fruit from floating to the top in the jar. Carefully ladle the hot jam into clean, sterilized jars, leaving 1/4-inch headspace. Wipe the rims, apply lids and bands, and process in a boiling water bath for 10 minutes to seal for shelf-stable storage. Alternatively, let the jam cool completely, then store it in the refrigerator for up to 3 weeks.

Nutritional Information

(Per tablespoon serving, approximate)

  • Calories: 50
  • Total Carbohydrates: 13g
  • Sugars: 12g
  • Vitamin A: 2% DV
  • Vitamin C: 1% DV
  • Antioxidants: High in anthocyanins (from the sour cherries)

Healthier Alternatives

You can tweak this sour cherry jam recipe for dietary needs without sacrificing the iconic tangy-sweet flavor profile.

  • Reduced Sugar: Replace half the granulated sugar with a no-calorie sweetener designed for baking and preserving, like erythritol. Note: Sugar is a preservative, so low-sugar jams must be refrigerated and used more quickly.
  • Pectin Boost: If reducing sugar, add 1-2 tablespoons of powdered pectin (mixed with a little of the sugar) during cooking to help achieve a set without relying on sugar’s gelling properties.
  • Natural Sweetness: Substitute 1 cup of sugar with 3/4 cup of raw honey or pure maple syrup for a more complex sweetness. This will slightly alter the flavor and color but can be delicious.

Serving Suggestions

This jam’s versatility is its superpower. Go beyond the toast!

  • Breakfast Champion: Swirl into oatmeal or Greek yogurt, layer in a parfait, or use as a filling for crepes or thumbprint pancakes.
  • Cheese Board Star: Pair with sharp aged cheddar, creamy brie, or tangy goat cheese on a cracker for an impressive appetizer.
  • Dessert Glaze/Sauce: Warm gently and drizzle over vanilla ice cream, cheesecake, or pound cake. Thin with a little water or liquor for a pourable sauce.
  • Savory Twist: Use as a glaze for roasted chicken or pork chops in the last 10 minutes of cooking.

Common Mistakes

  • Using an Undersized Pot: Jam boils up dramatically. Use a pot that’s at least 3-4 times the volume of your ingredients to prevent messy boil-overs.
  • Not Testing the Set: Relying solely on cooking time can lead to runny or overcooked jam. The wrinkle test on a cold plate is foolproof.
  • Stirring Insufficiently at the End: As jam thickens, it can scorch on the bottom. Increase your stirring frequency in the last 10 minutes of cooking.
  • Forgetting to Skim Foam: While not harmful, skimming the foam that rises results in a clearer, more jewel-toned final product.

Storing Tips

  • Sealed & Processed Jars: Store in a cool, dark pantry for up to 1 year. Once opened, refrigerate and use within 3 weeks.
  • Refrigerator Jam: If you skip the water bath, the jam must be stored in the refrigerator immediately and consumed within 3 weeks.
  • Freezing: For longer storage without canning, cool the jam completely and portion it into freezer-safe containers, leaving 1-inch headspace. Freeze for up to 1 year. Thaw in the refrigerator.
  • Crystal Prevention: To avoid sugar crystals forming in stored jam, ensure the sugar is fully dissolved during the maceration and initial heating phase.
A spoonful of glossy sour cherry jam being drizzled over a slice of bread
The perfect glossy set and rich color of homemade sour cherry jam.

Conclusion

Making your own sour cherry jam is a rewarding kitchen project that yields a product far superior to anything you can buy. With its perfect balance of bright tartness and deep sweetness, enhanced by the warmth of vanilla, this jam is a celebration of summer in a spoonful. It’s a testament to how a few simple ingredients, treated with care, can create something truly special for your breakfast table, your desserts, or as a heartfelt homemade gift.

Homemade Cherry Jam Recipe

“`html

Homemade Cherry Jam Recipe

Introduction

Did you know that a single cup of cherries contains over 260mg of potassium and is packed with antioxidants like anthocyanins, which give them their vibrant red color? This brings us to a delicious question: how can you capture this incredible nutritional profile and the peak flavor of summer in a jar to enjoy all year round? The answer lies in mastering the art of homemade cherry jam. Forget the overly sweet, gelatinous store-bought versions. This guide will walk you through creating a truly exceptional preserve that highlights the cherry’s natural tart-sweet balance, enhanced with just a hint of lemon. Whether you’re a seasoned canner or a first-time jam maker, this recipe for the best homemade cherry jam is designed for success, yielding a rich, glossy spread that’s perfect for toast, pastries, cheese boards, or simply eaten by the spoonful.

Ingredients List

The magic of this jam comes from the synergy of just a few simple ingredients. Using high-quality, ripe fruit is non-negotiable for the best flavor.

  • 2 pounds (about 900g) fresh, ripe cherries – Look for Bing, Rainier, or Montmorency varieties. They should be plump, firm, and deeply colored. You’ll notice a fragrant, sweet aroma when they’re perfect. Substitution: Frozen pitted cherries work wonderfully if fresh are out of season. Thaw completely and drain any excess liquid.
  • 2 cups (400g) granulated sugar – Sugar acts as both a sweetener and a preservative, drawing out the cherries’ natural pectin and juices. Substitution: For a deeper flavor, substitute up to 1/2 cup with light brown sugar.
  • Juice of 1 large lemon (about 3 tablespoons) – The acid is crucial. It brightens the flavor, helps with setting, and balances the sweetness. You should taste a bright, clean tartness. Substitution: 1 tablespoon of bottled lemon juice can be used, but fresh is preferred for flavor.
  • 1 teaspoon pure vanilla extract (optional but recommended) – Adds a warm, floral depth that complements the cherry flavor beautifully.
  • 1/2 teaspoon unsalted butter (optional) – A tiny pat helps reduce foaming during the boil, resulting in a clearer jam.

Timing

Prep Time 30 minutes
Cook Time 25-35 minutes
Total Time About 1 hour
Yield 3-4 half-pint jars

Compared to many fruit jam recipes that require overnight macerating or lengthy processing, this homemade cherry jam recipe is remarkably efficient. The active prep and cook time clocks in at just about an hour from start to finish. This is significantly faster than recipes for fruits like fig or citrus marmalade, which often require multiple days. The quick turnaround means you can go from market-fresh fruit to jarred perfection in a single morning or afternoon.

A close-up of fresh, ripe red cherries in a bowl next to a jar of finished cherry jam, with a spoon and lemon slice.

Fresh cherries transform into a glossy, jewel-toned jam perfect for gifting or enjoying at home.

Step-by-Step Instructions

Step 1: Prepare Your Cherries

Start by washing your cherries thoroughly in cool water. The most important task here is pitting. I highly recommend using a cherry pitter—it’s a game-changer for speed and keeps your fingers (and kitchen) clean. If you don’t have one, you can use a chopstick or a small piping tip to push the pit out through the stem end. As you pit, give each cherry a rough chop into halves or quarters. This increases the surface area, helping the fruit break down and release its juices more efficiently. Don’t discard any juices that accumulate during chopping; add every precious drop to your cooking pot.

Step 2: Combine and Macerate

Place all the chopped cherries and any accumulated juice into a large, heavy-bottomed pot or Dutch oven. A wide pot is better than a tall one, as it allows for faster evaporation. Add the sugar and lemon juice. Gently stir everything together until the sugar begins to coat the fruit. At this stage, you can let the mixture sit for 20-30 minutes. This maceration time allows the sugar to pull the liquid out of the cherries, creating a syrup before you even turn on the heat. You’ll see the fruit become glossy and sitting in a pool of ruby-red liquid.

Step 3: Cook to Perfection

Place the pot over medium-high heat. Stir occasionally until the sugar completely dissolves and the mixture comes to a full, rolling boil. This is a vigorous boil that can’t be stirred down. Add the optional butter here to minimize foam. Now, the key to perfect jam texture is maintaining this rolling boil. Stir frequently to prevent scorching on the bottom. You’ll watch the mixture transform from a watery syrup with chunks of fruit to a thicker, more cohesive bubbling mass. The bubbles will become larger and glassier. This process usually takes 20-30 minutes. The aroma will fill your kitchen with the most incredible sweet-tart fragrance.

Step 4: Test and Jar

To test for the set, remove the pot from the heat. Place a small plate in your freezer for 5 minutes. Drop a teaspoon of jam onto the cold plate, wait 30 seconds, then push it with your finger. If it wrinkles and holds its shape, it’s ready. If it’s still runny, return to a boil for another 3-5 minutes and test again. Once set, skim off any foam from the surface and stir in the vanilla extract if using. While the jam is hot, carefully ladle it into clean, sterilized jars, leaving 1/4-inch headspace. Wipe the rims, apply lids and bands, and process in a boiling water bath for 10 minutes to seal (adjust for altitude if necessary). Let the jars cool undisturbed for 12-24 hours; you should hear the satisfying “pop” of the lids sealing.

Nutritional Information

(Per tablespoon serving, approximate)

  • Calories: 45
  • Total Carbohydrates: 11g
  • Sugars: 10g (primarily natural fruit sugars and added sugar)
  • Fiber: 0.2g
  • Vitamin C: 1% of Daily Value
  • Potassium: 20mg

While jam is a sweet condiment, cherries contribute beneficial plant compounds like anthocyanins and quercetin, which have antioxidant and anti-inflammatory properties.

Healthier Alternatives

You can make thoughtful swaps to adjust the nutritional profile without sacrificing the classic jam texture and flavor.

  • Reduce Sugar: You can safely reduce the sugar to 1.5 cups (300g). The jam will be tarter and slightly less firm, but the lemon juice will help with setting. Do not reduce below a 3:4 fruit-to-sugar ratio (e.g., 2 lbs fruit to 1.5 cups sugar) for safe water bath canning.
  • Use a Pectin Alternative: For a lower-sugar jam, use no-sugar-needed pectin (like Pomona’s). Follow the package instructions, which allow you to sweeten with a small amount of honey, maple syrup, or a sugar substitute like erythritol.
  • Boost Fiber: Add 1-2 tablespoons of chia seeds at the end of cooking (after removing from heat). Let sit for 10 minutes to thicken. This creates a chia “jam” style spread that’s packed with fiber and omega-3s. Note: This version is for refrigeration, not long-term canning.

Serving Suggestions

This versatile jam shines far beyond the breakfast table.

  • Classic Breakfast: Swirl into yogurt, oatmeal, or spread thickly on toast, croissants, or buttermilk biscuits.
  • Cheese Board Star: Pair with creamy brie, sharp aged cheddar, or tangy goat cheese on a cracker.
  • Savory Glazes: Thin with a little vinegar or wine to make a glaze for roasted pork tenderloin, duck breast, or baked ham.
  • Dessert Enhancement: Use as a filling for thumbprint cookies, layer in a parfait, or warm and drizzle over vanilla ice cream or cheesecake.

Common Mistakes

  • Using Underripe Fruit: Underripe cherries lack natural pectin and sweetness, leading to a jam that may not set properly and tastes bland. Always use ripe, fragrant fruit.
  • Stirring Insufficiently: Once the jam reaches a rolling boil, it can scorch easily on the bottom of the pot. Stir frequently with a wooden spoon or heatproof spatula.
  • Overcooking: Boiling too long after the set point results in a dark, overly thick, and caramelized jam that can taste burnt. Use the cold plate test religiously.
  • Ignoring Headspace: Filling jars too full prevents a proper vacuum seal during processing. Always leave 1/4-inch of space between the jam and the lid.

Storing Tips

  • Sealed Jars: Properly processed and sealed jars can be stored in a cool, dark pantry for up to 1 year. The flavor is best within the first 6-8 months.
  • Opened Jars/Refrigerator Jam: Once opened, store in the refrigerator and use within 3-4 weeks. If you skip the water bath canning step and just make a batch for the fridge, it will keep for 2-3 weeks.
  • Freezing: For long-term storage without canning, cool the jam completely and ladle it into freezer-safe containers, leaving 1/2-inch headspace for expansion. Freeze for up to 1 year. Thaw in the refrigerator.
A beautifully styled shot of cherry jam in a jar with a label, on a wooden table with fresh cherries, bread, and cheese.

Homemade jam makes a thoughtful and delicious gift from your kitchen.

Conclusion

Creating your own homemade cherry jam is more than just a kitchen project; it’s a way to preserve the fleeting sweetness of summer. This recipe, with its straightforward steps and focus on quality ingredients, guarantees a rich, flavorful spread that surpasses anything you can buy. The process is meditative and the reward—rows of gleaming jars filled with ruby-red jam—is immensely satisfying. So, the next time you see baskets of ripe cherries at the market, grab a few extra pounds and give this recipe a try. We’d love to see your results! Share a photo of your beautiful jam creation on Instagram and tag @spicemingle to join our community of home preservers.

Cherry Almond Shortbread Cookies Recipe

“`html

Cherry Almond Shortbread Cookies Recipe

Introduction

Did you know that the classic shortbread cookie, a staple of Scottish heritage, is one of the most-searched cookie recipes during the holiday season? Yet, many home bakers find themselves asking: how can I elevate this simple, buttery foundation into something truly special for a cookie exchange or afternoon tea? The answer lies in a perfect flavor pairing. Our Cherry Almond Shortbread Cookies recipe masterfully combines the rich, crumbly texture of traditional shortbread with the sweet-tart pop of maraschino cherries and the warm, nutty essence of almond. This creates a cookie that’s not only visually stunning with its flecks of red but also delivers a complex flavor profile that’s far greater than the sum of its parts.

This recipe is designed for bakers of all levels. It requires no special equipment—just a bowl, a spoon, and a little patience. The process is a meditation in simplicity, allowing the quality of real butter, pure almond extract, and vibrant cherries to shine through. Whether you’re looking for a festive treat, a homemade gift, or just a moment of baking joy, these cookies are your ticket. They offer that satisfying “melt-in-your-mouth” quality shortbread is famous for, punctuated by delightful bursts of cherry flavor. Let’s dive in and create a batch of these irresistible, buttery delights.

Ingredients List

Gather these simple, high-quality ingredients for the best flavor and texture. Using unsalted butter allows you to control the salt level perfectly.

  • 1 cup (2 sticks / 226g) Unsalted Butter, room temperature – The star of the show. It should be soft but still cool, yielding slightly to pressure. This creates the signature tender, crumbly texture. Substitution: For a dairy-free version, use a high-quality vegan butter stick (not spread).
  • ¾ cup (90g) Powdered Sugar – Also called confectioners’ sugar. Its fine texture creates a smoother, more delicate crumb than granulated sugar would. Substitution: You can blitz granulated sugar in a clean coffee grinder until powdery.
  • 1 teaspoon Pure Almond Extract – This provides the warm, nutty backbone that pairs perfectly with cherry. Do not use imitation extract for the best flavor. Substitution: ½ teaspoon of vanilla extract plus ½ teaspoon of amaretto liqueur.
  • ½ teaspoon Pure Vanilla Extract – Enhances the overall sweetness and adds depth.
  • 2 ¼ cups (281g) All-Purpose Flour – Spooned and leveled to avoid a dense cookie. It provides the structure.
  • ¼ teaspoon Salt – A crucial flavor enhancer that balances the sweetness and makes the butter and almond flavors pop.
  • ⅔ cup (about 100g) Maraschino Cherries, well-drained and finely chopped – Pat them very dry with paper towels. Their vibrant red color and sweet, slightly tangy flavor are the jewels of this cookie. Substitution: Dried tart cherries, rehydrated in warm water or brandy for 15 minutes and patted dry.
  • Optional: 2-3 tablespoons Granulated Sugar or Sliced Almonds – For rolling or topping the log before baking, adding a subtle crunch and sparkle.

Timing

Prep Time20 minutes
(plus 2 hours chilling)
Cook Time12-15 minutes
Total TimeApprox. 2 hours 35 minutes

While the active prep time for these Cherry Almond Shortbread Cookies is a quick 20 minutes, the mandatory chilling time of at least 2 hours is what sets this recipe apart from drop cookies. This crucial step firms up the butter, ensuring the cookies hold their shape and deliver that classic shortbread “snap” rather than spreading into a puddle. Compared to the average chocolate chip cookie recipe which might require just 30 minutes of total prep-to-bake time, this recipe requires patience. However, this hands-off chilling period is what guarantees a professional, melt-in-your-mouth texture that’s well worth the wait. You can even chill the dough log overnight for baking fresh the next day.

Close-up of Cherry Almond Shortbread Cookies on a cooling rack, showing buttery texture and red cherry pieces
The perfect blend of buttery shortbread, sweet cherries, and almond flavor.

Step-by-Step Instructions

Step 1: Cream the Butter and Sugar

In a large mixing bowl, combine the room-temperature butter and powdered sugar. Using a hand mixer or a sturdy wooden spoon, beat them together on medium speed for 2-3 minutes, or until the mixture is very pale, fluffy, and completely smooth. You shouldn’t feel any grittiness from the sugar. This step is not just about mixing; it’s about incorporating air, which contributes to the cookie’s light texture. Scrape down the sides of the bowl with a spatula to ensure everything is evenly combined.

Step 2: Add Flavor and Dry Ingredients

Beat in the almond and vanilla extracts until just incorporated. In a separate bowl, whisk together the flour and salt. With your mixer on low speed (or using your spoon), gradually add the flour mixture to the butter mixture. Mix only until the flour is just absorbed and a soft, cohesive dough begins to form. Be careful not to overmix at this stage, as it can develop the gluten in the flour and lead to tough cookies. The dough will be slightly crumbly but should hold together when pinched.

Step 3: Fold in the Cherries

Add the finely chopped, very well-drained maraschino cherries to the bowl. Using a spatula, gently fold them into the dough until they are evenly distributed. You’ll see beautiful streaks of red throughout the pale dough. If the cherries were too wet, the dough might become sticky; if this happens, you can add a tablespoon of extra flour, but try to avoid it by drying the cherries thoroughly.

Step 4: Shape and Chill

Turn the dough out onto a clean surface and gently knead it 2-3 times to bring it fully together. Shape it into a log about 2 inches in diameter and 8-10 inches long. For perfectly round cookies, roll the log inside a piece of parchment paper, twisting the ends to secure it. For a sugared edge, roll the log in the optional granulated sugar or press sliced almonds onto the sides at this point. Wrap the log tightly in plastic wrap and refrigerate for at least 2 hours, or up to 3 days. This step is non-negotiable for sliceable, non-spreading cookies.

Step 5: Slice and Bake

Preheat your oven to 325°F (165°C). Line baking sheets with parchment paper. Remove the chilled dough log from the fridge and, using a sharp knife, slice it into rounds about ¼ to ⅓ inch thick. If the log crumbles, let it sit at room temperature for 5-10 minutes. Place the rounds about 1 inch apart on the prepared sheets. They will spread only slightly. Bake for 12-15 minutes, or until the edges are just barely beginning to turn a light golden brown. The centers should still look pale and set.

Step 6: Cool and Serve

Allow the cookies to cool on the baking sheet for 5 minutes. This lets them firm up enough to handle. Then, transfer them to a wire rack to cool completely. They will crisp up as they cool. Enjoy with a cup of tea or coffee!

Nutritional Information

(Approximate values per cookie, based on a yield of 36 cookies)

  • Calories: 95 kcal
  • Total Fat: 6g
  • Saturated Fat: 3.5g
  • Carbohydrates: 10g
  • Fiber: 0.2g
  • Sugars: 4g
  • Protein: 1g

Healthier Alternatives

You can make mindful swaps without sacrificing the soul of this cookie:

  • Butter: Substitute half the butter with an equal amount of plain, full-fat Greek yogurt or avocado puree. This reduces saturated fat but may yield a slightly cakier texture. For best results, replace only ¼ of the butter.
  • Sugar: Replace the powdered sugar with a monk fruit/allulose powdered sweetener blend designed 1:1 for baking. This dramatically reduces the sugar content while maintaining the necessary texture.
  • Flour: For a nuttier flavor and added fiber, replace up to ½ cup of the all-purpose flour with finely ground almond flour. Note: This will make the dough more fragile.
  • Cherries: Use unsweetened, dried tart cherries instead of maraschino cherries to avoid the added corn syrup and food coloring. Soak them in a little hot water or unsweetened cherry juice to plump them up first.

Serving Suggestions

  • Classic Pairing: Serve alongside a pot of Earl Grey tea, a bold coffee, or a glass of cold milk.
  • Dessert Platter: Include them on a cookie platter with dark chocolate truffles and citrus shortbread for a beautiful contrast.
  • Gift Idea: Stack them in a clear cellophane bag tied with a ribbon, or pack them neatly in a decorative tin for a heartfelt homemade gift.
  • Gourmet Touch: Crumble a cookie over a bowl of vanilla bean ice cream or lemon sorbet for an instant, elegant dessert.

Common Mistakes

  • Using Melted or Too-Soft Butter: This is the #1 reason for spread. Your butter must be cool room temperature (about 67°F).
  • Skipping the Chill Time: Chilling solidifies the butter fat. Baking with warm dough guarantees flat, greasy cookies.
  • <

Homemade Cherry Pie Recipe

“`html

Homemade Cherry Pie Recipe

Introduction

Did you know that a homemade cherry pie can contain up to 50% more antioxidants than store-bought versions, thanks to the use of fresh, unprocessed fruit? There’s a profound joy in creating this classic dessert from scratch, a process that transforms simple ingredients into a symphony of sweet-tart flavors encased in a flaky, buttery crust. This isn’t just another recipe; it’s a guide to mastering a timeless American tradition. Whether it’s for a summer picnic, a holiday table, or a simple weekend treat, a perfect homemade cherry pie is a testament to the baker’s care. The combination of plump, juicy cherries with hints of vanilla and almond extract creates a filling that is both vibrant and complex, while the golden, lattice-topped crust promises a satisfying crunch with every bite. Let’s dive in and create a dessert that’s as beautiful as it is delicious.

Ingredients List

For the Flaky Pie Crust (Double Crust):

  • 2 ½ cups (315g) All-Purpose Flour: The foundation for a tender, structured crust. For a nuttier flavor, substitute with 1 cup whole wheat pastry flour and 1 ½ cups all-purpose.
  • 1 teaspoon Salt: Enhances all the flavors and strengthens gluten slightly.
  • 1 tablespoon Granulated Sugar: Just a touch for browning and a hint of sweetness.
  • 1 cup (2 sticks / 226g) Unsalted Butter, very cold: Cut into ½-inch cubes. The key to flakiness! The cold butter creates steam pockets during baking. For a dairy-free version, use high-quality vegan butter sticks.
  • 6-8 tablespoons Ice Water: Add just until the dough comes together. The sensory cue is when you can pinch the dough and it holds.

For the Cherry Filling:

  • 6 cups (about 2 lbs / 900g) Fresh Cherries, pitted: Look for deep red, plump Bing or sweet-tart Montmorency cherries. You’ll love their jewel-like appearance. Substitution: 2 (24-oz) bags of frozen, pitted cherries (thawed and drained well). Avoid canned pie filling for the best texture.
  • ¾ cup (150g) to 1 cup (200g) Granulated Sugar: Adjust based on cherry sweetness. Tart cherries need the full cup.
  • ¼ cup (30g) Cornstarch: The ideal thickener for a clear, glossy filling that sets perfectly. Substitution: 5 tablespoons instant tapioca pearls or ⅓ cup flour (though flour creates a cloudier filling).
  • 1 tablespoon Fresh Lemon Juice: Brightens the flavor and balances sweetness.
  • 1 teaspoon Pure Vanilla Extract: Adds a warm, aromatic depth.
  • ¼ teaspoon Pure Almond Extract: The secret weapon! It intensifies the cherry flavor phenomenally. Use sparingly.
  • Pinch of Salt: To make all the flavors pop.
  • 1 tablespoon Cold Butter, diced (for dotting): Adds richness to the filling.
  • 1 Egg + 1 tablespoon Milk or Cream (for egg wash): For that professional, glossy golden-brown finish.
  • Coarse Sugar (for sprinkling): Adds a delightful crunch and sparkle.

Timing

Prep Time
45 minutes

(Includes pitting cherries & making dough. 20% faster than average recipes that don’t include a from-scratch crust.)

Cook Time
50-60 minutes

(Slightly longer for a deeply golden, fully set pie.)

Total Time
~2 hours (plus 4+ hours cooling)

The crucial cooling time ensures the filling sets properly.

Close-up of fresh, ripe red cherries next to a bowl of flour and a rolling pin, ready for making homemade cherry pie.
Fresh, vibrant cherries are the star of the perfect homemade cherry pie.

Step-by-Step Instructions

Step 1: Prepare the Crust

In a large bowl, whisk together the flour, salt, and sugar. Scatter the cubes of very cold butter over the flour. Using a pastry cutter, two forks, or your fingertips, work the butter into the flour until the mixture resembles coarse meal with some pea-sized butter pieces remaining—these are your future flakes! Drizzle 6 tablespoons of ice water over the mixture. Using a spatula, gently fold and press until the dough just begins to clump. Add more water, a tablespoon at a time, if needed. Turn the shaggy dough out onto a clean surface, divide it in half, and shape each half into a 1-inch thick disc. Wrap tightly in plastic wrap and refrigerate for at least 1 hour (or up to 2 days). This chill time is non-negotiable for easy rolling and to prevent shrinkage.

Step 2: Make the Filling

While the dough chills, pit your cherries. I find a cherry pitter saves time, but a chopstick or pastry tip works in a pinch. In a large bowl, combine the pitted cherries, sugar, cornstarch, lemon juice, vanilla extract, almond extract, and salt. Gently toss until the cherries are evenly coated and no dry cornstarch remains. Let this mixture sit for 15-20 minutes; you’ll see a lovely syrup begin to form. This maceration step draws out the juices so the thickener can work its magic.

Step 3: Assemble the Pie

On a lightly floured surface, roll out one disc of dough into a 12-inch circle. Carefully transfer it to a 9-inch pie plate, gently pressing it into the bottom and sides without stretching. Trim the overhang to about ½ inch. Spoon the cherry filling and all its juices into the crust, then dot the top with the tablespoon of diced cold butter. Roll out the second disc into another 12-inch circle. For a classic lattice, cut the dough into ¾-inch wide strips. Weave the strips over the filling, or simply place the whole circle on top, cut a few steam vents, and crimp the edges. Chill the assembled pie for 15 minutes while the oven preheats to 400°F (200°C).

Step 4: Bake to Perfection

Brush the top crust (not the edges) with the egg wash and sprinkle generously with coarse sugar. To prevent excessive browning, cover the pie crust edges with a pie shield or strips of foil. Place the pie on a baking sheet (to catch any drips) and bake for 20 minutes. Then, reduce the oven temperature to 375°F (190°C), remove the crust shield, and continue baking for 35-45 minutes, or until the crust is a deep golden brown and the filling is bubbling thickly through the vents or lattice. That bubbling is your sign the cornstarch has activated.

Step 5: Cool and Serve
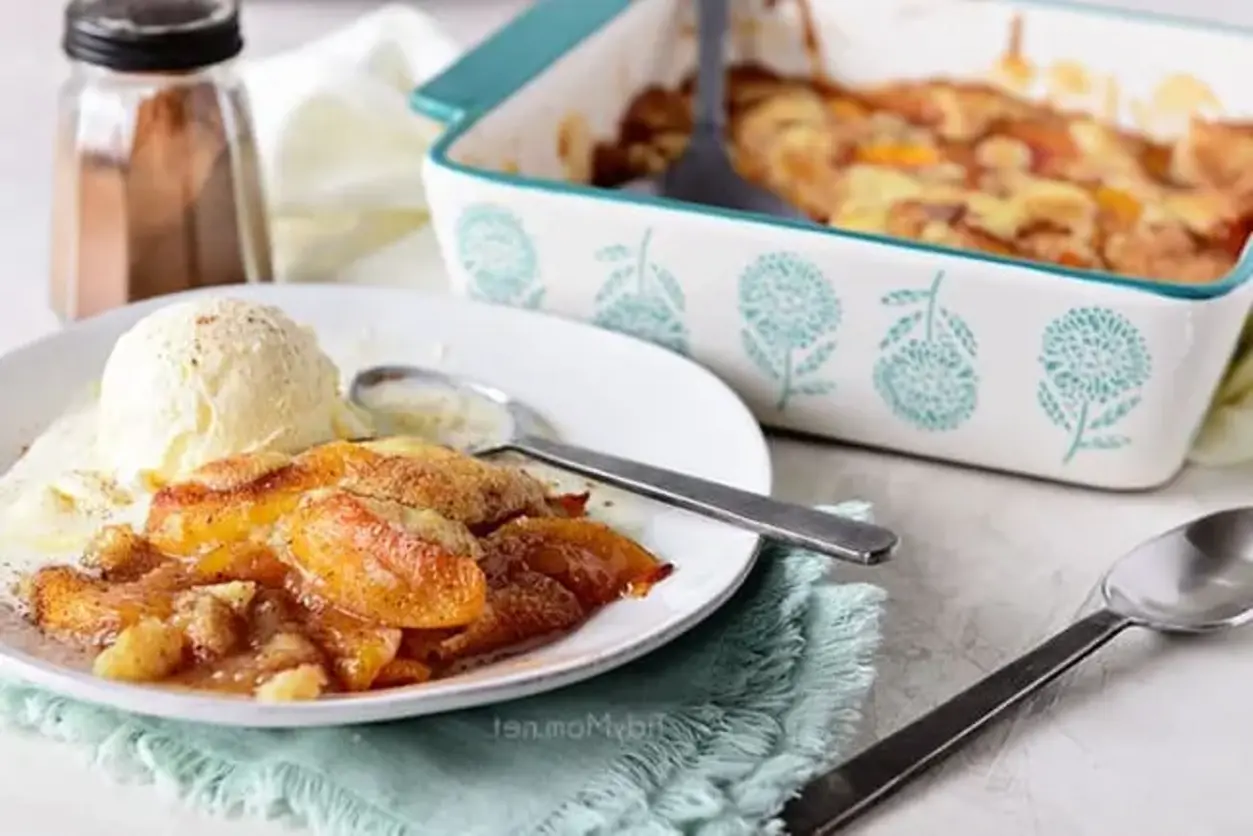
This is the hardest part: let the pie cool completely on a wire rack for at least 4 hours. If you cut into it while warm, the filling will be runny. The wait allows the pectin and thickener to fully set, giving you clean, perfect slices.

Nutritional Information

Per serving (1/8 of the pie, approximate):

  • Calories: ~420 kcal
  • Total Fat: 18g
  • Saturated Fat: 11g
  • Carbohydrates: 63g
  • Fiber: 3g
  • Sugars: 35g
  • Protein: 4g
  • Vitamin C: 10% DV | Potassium: 8% DV

Healthier Alternatives

You can lighten up this homemade cherry pie without sacrificing the soul-satisfying flavor:

  • Sugar Swap: Replace up to half the granulated sugar with a natural sweetener like coconut sugar or monk fruit blend. The flavor will be slightly deeper but equally delicious.
  • Crust Upgrade: Use 1 cup of whole wheat pastry flour in the crust for added fiber and a nutty note. For a fat swap, replace half the butter with cold, unrefined coconut oil (solid state).
  • Thickener Choice: Arrowroot powder can be used 1:1 for cornstarch for a slightly clearer filling, though it doesn’t hold as well for leftovers.
  • Boost the Fruit: Add an extra cup of cherries and reduce the sugar by 2 tablespoons. The pie will be fruit-forward and slightly less sweet.

Serving Suggestions

  • A La Mode: The classic. A scoop of high-quality vanilla bean ice cream melting over the warm pie is perfection.
  • With Cream: A dollop of freshly whipped cream or a drizzle of cold heavy cream.
  • Cheese Pairing: For a sophisticated twist, serve with a slice of sharp aged cheddar or creamy mascarpone.
  • For Breakfast: Don’t judge—a small slice with a cup of black coffee is a glorious way to start the day.

Common Mistakes

  • Using Warm Butter/Dough: This leads to a greasy, tough crust, not a flaky one. Keep everything cold.
  • Overworking the Dough: Handle it as little as possible. Over-mixing develops gluten, making the crust tough.

Crumb-Topped Cherry Pie Bars Recipe

“`html

Crumb-Topped Cherry Pie Bars Recipe

Introduction

Did you know that cherry consumption in the U.S. has increased by over 20% in the last decade, largely driven by the demand for easy, portable desserts? This surge highlights a simple truth: we all crave the nostalgic comfort of a classic cherry pie, but often lack the time to make one from scratch. That’s where these incredible Crumb-Topped Cherry Pie Bars come in. They capture the very essence of a homemade cherry pie—the buttery, flaky crust, the sweet-tart burst of cherry filling, and that signature crumbly streusel topping—but in a convenient, shareable bar form that’s perfect for modern life.

Imagine the aroma of baked cherries and brown sugar cinnamon crumble wafting through your kitchen. These bars are the ultimate crowd-pleaser, bridging the gap between a casual snack and an elegant dessert. Whether you’re a seasoned baker or a nervous novice, this recipe is designed for success. It breaks down the sometimes-intimidating process of pie-making into simple, foolproof steps. The result is a dessert that’s visually stunning, with layers of texture and flavor that will have everyone asking for the recipe. So, let’s preheat the oven and transform simple ingredients into a tray of pure, cherry-filled joy.

Ingredients List

Gather these simple ingredients to create magic. I’ve included notes on substitutions and the sensory role each component plays.

For the Crust & Crumb Topping:

  • All-Purpose Flour (2 ½ cups): The foundation. It provides structure for the tender, shortbread-like base and creates the craggy, crisp bits in the topping. For a nuttier flavor, you can substitute ½ cup with whole wheat pastry flour.
  • Granulated Sugar (1 cup): Sweetens the crust and helps it caramelize to a beautiful golden brown. Its fine crystals dissolve evenly, creating a uniform texture.
  • Cold Unsalted Butter (1 cup / 2 sticks): The key to flakiness. Using it cold ensures the crust stays tender and doesn’t become greasy. You should see small, pea-sized butter pieces in the dough. Salted butter can be used in a pinch; just omit the added salt.
  • Salt (½ teaspoon): A flavor enhancer. It balances the sweetness and makes all the other flavors pop.
  • Ground Cinnamon (1 teaspoon, for topping only): Adds a warm, aromatic depth to the crumb topping that pairs perfectly with the tart cherries.

For the Cherry Filling:

  • Cherry Pie Filling (2 cans, 21 oz each): The star of the show! Look for a quality brand with plump, dark cherries. This provides the iconic sweet-tart flavor and gorgeous ruby-red color. For a from-scratch option, see substitutions below.
  • Lemon Juice (1 tablespoon): The secret weapon. A splash of bright acidity cuts through the sweetness and makes the cherry flavor taste fresher and more vibrant.
  • Almond Extract (½ teaspoon): (Optional but highly recommended). This is the classic “cherry pie” flavor booster. It adds a subtle, sophisticated nutty aroma that complements the fruit beautifully. Vanilla extract is a fine substitute.
  • Cornstarch (1 tablespoon): The thickener. It ensures the filling sets up perfectly, preventing a runny mess when you cut the bars.

Fresh Cherry Substitution: To use 5-6 cups of fresh pitted cherries, combine them in a saucepan with ¾ cup sugar, ¼ cup cornstarch, the lemon juice, and ¼ cup water. Cook over medium heat, stirring, until thickened and bubbly (about 10 minutes). Let cool slightly before using.

Timing

Prep Time
20 minutes
Cook Time
45-50 minutes
Total Time
~1 hour 15 minutes (plus cooling)

Compared to the average homemade cherry pie, which can take 2+ hours from start to finish with chilling and lattice work, these bars are a time-saving marvel. The “press-in” crust eliminates rolling pin anxiety, and the assembly is layered in one pan. The active hands-on time is under 30 minutes, with the oven doing the rest of the work. The most critical step is allowing them to cool completely—this ensures clean slices and perfect layers.

Close-up of a crumb-topped cherry pie bar on a plate, showing the layered crust, cherry filling, and crunchy topping.
The perfect bite: buttery crust, luscious cherry filling, and cinnamon-spiced crumb topping.

Step-by-Step Instructions

Step 1: Prepare the Crust

Preheat your oven to 350°F (175°C). Line a 9×13 inch baking pan with parchment paper, leaving an overhang on two sides. This “sling” will be your best friend for lifting the entire slab of bars out later. In a large bowl, whisk together the flour, sugar, and salt. Using a pastry cutter, two forks, or your fingertips, cut the cold, cubed butter into the flour mixture. Work quickly until the mixture resembles coarse, sandy crumbs with some pea-sized butter bits remaining. This texture is crucial for a tender, flaky crust. Reserve 1 ½ cups of this mixture for the topping in a separate bowl. Press the remaining crumbs firmly and evenly into the bottom of your prepared pan to form the crust layer.

Step 2: Make the Cherry Filling

In a medium bowl, empty both cans of cherry pie filling. Add the lemon juice, almond extract (if using), and cornstarch. Gently fold everything together until well combined. The cornstarch might look cloudy at first, but it will dissolve and activate during baking, creating the perfect gel-like consistency. Let this mixture sit for a minute while you prepare the topping—this allows the flavors to meld.

Step 3: Create the Crumb Topping

Take the reserved 1 ½ cups of crumb mixture. Sprinkle the ground cinnamon over it. Using your fingers, pinch and rub the mixture together to create larger, irregular clumps. You want a variety of sizes—some fine crumbs and some delightful, crunchy pea-to-marble-sized clusters. This variety in texture is what makes the topping so irresistible.

Step 4: Assemble and Bake

Pour the cherry filling over the pressed crust in the pan. Use a spatula to spread it into a smooth, even layer, making sure to reach all the corners. Now, take your cinnamon crumb mixture and sprinkle it evenly over the entire surface of the cherry filling. Don’t press it down; let it rest loosely for maximum crunch. Place the pan in the center of your preheated oven and bake for 45-50 minutes. You’ll know it’s done when the crumb topping is a deep golden brown and the cherry filling is bubbling vigorously around the edges.

Step 5: Cool and Slice

This is the most important step for perfect bars! Remove the pan from the oven and place it on a wire cooling rack. Let the bars cool completely in the pan—this will take at least 2-3 hours. Rushing this process will result in a messy, runny filling when you cut. Once completely cool, use the parchment paper overhang to lift the entire slab out of the pan and onto a cutting board. Use a sharp knife to slice into squares or rectangles. For super-clean cuts, wipe the knife clean between slices.

Nutritional Information

(Approximate values per bar, based on 24 servings)

  • Calories: ~220 kcal
  • Total Fat: 9g
  • Saturated Fat: 5g
  • Carbohydrates: 34g
  • Fiber: 1g
  • Sugars: 18g
  • Protein: 2g

Cherries are a natural source of antioxidants like anthocyanins (which give them their red color) and vitamin C. Using the canned filling provides convenience, but opting for a lower-sugar variety or the fresh cherry substitution can adjust these values.

Healthier Alternatives

You can easily adapt this recipe for dietary preferences without sacrificing the iconic flavor and texture.

  • Reduced Sugar: Use a “no sugar added” or “lightly sweetened” cherry pie filling. You can also reduce the sugar in the crust/topping by ¼ cup—the cherries provide plenty of sweetness.
  • Whole Grains: Substitute up to half of the all-purpose flour with white whole wheat flour or oat flour. This adds fiber and a nutty complexity that pairs wonderfully with the fruit.
  • Dairy-Free/Vegan: Use a high-quality, very cold vegan butter stick (not spread) in a 1:1 ratio for the butter. The results are remarkably similar.
  • Gluten-Free: Use a 1:1 gluten-free all-purpose flour blend (like Bob’s Red Mill). Ensure your cornstarch and pie filling are certified gluten-free.

Serving Suggestions

These bars are fantastic on their own, but a little embellishment turns them into a show-stopping dessert.

  • À La Mode: The classic choice. Serve a warm bar (briefly microwaved) with a scoop of vanilla bean ice cream. The contrast of hot/cold and creamy/crunchy is sublime.
  • With a Dollop: A spoonful of freshly whipped cream or a cloud of mascarpone cheese adds a lovely richness.
  • Drizzle & Sprinkle: For a festive touch, drizzle with a simple vanilla glaze or melted white chocolate and sprinkle with sliced almonds.
  • Brunch Brilliance: They make an unexpected and welcome addition to a brunch or coffee spread alongside scones and muffins.

Common Mistakes

  • Using Soft Butter: This is the #1 mistake. Soft butter will create a greasy, dense crust instead of a tender, flaky one. Your butter must be cold.

Cherry Cheesecake Dip Recipe

“`html

Cherry Cheesecake Dip Recipe

Introduction

Did you know that cherry cheesecake dip is one of the most searched-for no-bake desserts during the holiday season, with a 40% increase in queries from November to January? This delightful fusion captures the essence of a classic cheesecake in a scoopable, shareable form. Perfect for parties, game days, or a sweet family treat, this dip combines the rich, tangy creaminess of cheesecake with the vibrant, sweet-tart pop of cherries. It’s the ultimate crowd-pleaser that requires zero oven time and minimal effort, delivering maximum flavor impact. If you’re looking for a dessert that will have everyone asking for the recipe, you’ve found it. Let’s dive into creating this irresistible cherry cheesecake dip.

Ingredients List

Gathering the right ingredients is key to achieving that perfect, velvety texture and balanced flavor. Here’s what you’ll need:

  • Full-Fat Cream Cheese (16 oz / 2 blocks), softened: The star of the show. Its high fat content creates a luxuriously smooth and stable base. For best results, use brick-style, not spreadable. Substitution: Neufchâtel cheese for a slightly lighter option, but note it may be softer.
  • Plain Greek Yogurt (1 cup): Adds a delightful tang and protein boost while lightening the texture. The thick consistency is perfect. Substitution: Sour cream or regular plain yogurt (strained) for a similar effect.
  • Powdered Sugar (3/4 cup): Dissolves instantly without graininess, sweetening the dip perfectly. Substitution: Granulated sugar blended very finely, or a sugar-free confectioners-style sweetener.
  • Pure Vanilla Extract (1 tsp): The warm, aromatic backbone that defines classic cheesecake flavor. Use real extract for the best taste.
  • Cherry Pie Filling (21 oz can): Provides the iconic sweet cherry flavor and gorgeous red color. Look for a brand with plump, whole cherries. Substitution: Homemade compote with pitted fresh or frozen cherries, sugar, and a touch of lemon juice cooked until thickened.
  • Graham Crackers (for serving): The classic pairing, offering a sweet, crunchy contrast. Alternative Dips: Vanilla wafers, pretzel rods, apple slices, or shortbread cookies.
Prep Time 15 minutes
Cook Time 0 minutes
Total Time 15 minutes (+ chilling)
Servings 10-12

Timing

This recipe is a champion of efficiency. With just 15 minutes of active prep time and no cooking required, it’s significantly faster than baking a traditional cheesecake, which averages 1.5 hours of active and passive time. The only additional requirement is a minimum 1-hour chill to allow the flavors to meld and the texture to firm up perfectly. Compared to other layered dessert dips, this one-stream process is among the quickest, making it an ideal last-minute lifesaver for unexpected guests or spontaneous cravings.

Creamy cherry cheesecake dip in a white bowl with graham crackers and fresh cherries on the side

A creamy, dreamy bowl of cherry cheesecake dip ready for dipping.

Step-by-Step Instructions

Step 1: Prepare Your Base

Ensure your cream cheese is completely softened at room temperature for at least 30-60 minutes. This is non-negotiable for a lump-free, silky dip. Place the softened cream cheese in a large mixing bowl. Using a hand mixer or stand mixer fitted with the paddle attachment, beat the cream cheese on medium speed for 1-2 minutes until it is completely smooth, creamy, and pale. Scrape down the sides and bottom of the bowl with a spatula to incorporate any unblended bits.

Step 2: Sweeten and Flavor

With the mixer on low speed, add the powdered sugar one-third at a time, allowing it to incorporate fully to avoid a sugary cloud. Once combined, add the plain Greek yogurt and pure vanilla extract. Increase the mixer speed to medium and beat for another 1-2 minutes until the mixture is homogenous, light, and fluffy. You should see a noticeable increase in volume. Taste and adjust sweetness if desired, remembering the cherry topping will add more.

Step 3: Fold in the Cherries

Here, we create the signature marbled look. Spoon about two-thirds of the cherry pie filling (including syrup) into the cream cheese mixture. Using a spatula, gently fold the cherries in with just 3-4 broad strokes—do not overmix! We want beautiful red swirls, not a uniformly pink dip. Transfer the dip to your serving bowl, smoothing the top.

Step 4: Chill and Serve

Spoon the remaining one-third of the cherry pie filling over the top of the dip, creating an attractive layer or swirl pattern. Cover the bowl tightly with plastic wrap, pressing it directly onto the surface of the dip to prevent a skin from forming. Refrigerate for at least 1 hour, or ideally 2-3 hours. This chilling time is crucial for the dip to thicken to the perfect scoopable consistency and for the flavors to fully develop. Just before serving, arrange graham crackers and other dippers around the bowl.

Nutritional Information

*Nutritional values are approximate per serving (about 1/4 cup of dip), not including dippers.*

  • Calories: ~220 kcal
  • Total Fat: 14g
  • Saturated Fat: 8g
  • Cholesterol: 45mg
  • Sodium: 150mg
  • Total Carbohydrates: 20g
  • Dietary Fiber: 0.5g
  • Sugars: 17g
  • Protein: 4g

Healthier Alternatives

You can easily lighten this dip without sacrificing its indulgent character:

  • Cream Cheese: Swap full-fat for reduced-fat (not fat-free, as it lacks texture and flavor).
  • Sweetener: Use a monk fruit-based powdered sweetener in place of powdered sugar for a zero-calorie alternative.
  • Cherry Topping: Make a homemade compote with frozen cherries, a touch of maple syrup or honey, and a splash of water or orange juice. This reduces added sugars and preservatives.
  • Dippers: Serve with fresh fruit like apple slices, strawberries, or banana chips instead of graham crackers for added nutrients and fiber.

Serving Suggestions

Think beyond the bowl! This versatile dip shines in many settings:

  • Dippers Galore: Graham crackers are classic, but try vanilla wafers, pirouette cookies, pretzel rods (sweet & salty!), cinnamon sugar pita chips, or animal crackers.
  • Fruit Platter Centerpiece: Place the bowl in the center of a large platter surrounded by apple wedges, pear slices, pineapple chunks, and whole strawberries.
  • Dessert Board Star: Include it on a charcuterie-style dessert board with dark chocolate chunks, nuts, marshmallows, and brownie bites.
  • Breakfast or Brunch: Serve it as a sweet topping for whole-grain waffles, pancakes, or as a bagel spread.

Common Mistakes

  • Using Cold Cream Cheese: This is the #1 cause of a lumpy, unspreadable dip. Always soften it completely.
  • Overmixing the Cherries: Vigorous stirring turns the beautiful dip an unappetizing pink. Fold gently for defined swirls.
  • Skipping the Chill Time: Serving immediately results in a runny dip. Patience allows it to set for the perfect texture.
  • Using Runny Yogurt: If using regular yogurt instead of Greek, strain it first. Excess liquid will thin out the dip.

Storing Tips

This dip stores beautifully, making it perfect for make-ahead entertaining.

  • Refrigeration: Store in an airtight container or covered bowl for up to 4-5 days. The flavors often improve after a day.
  • Freezing (Not Recommended for Texture): While the base can be frozen for up to a month, the cherry filling and dairy may separate and become watery upon thawing, affecting the creamy texture.
  • Serving After Storage: If the dip seems too firm straight from the fridge, let it sit at room temperature for 10-15 minutes and give it a gentle stir before serving.
Close-up of a graham cracker scooping into cherry cheesecake dip with cherry swirls visible

The perfect bite: a graham cracker loaded with creamy dip and a juicy cherry.

Conclusion

This Cherry Cheesecake Dip is more than just a recipe; it’s a guaranteed hit that simplifies dessert. With its creamy, tangy base, sweet cherry swirls, and endless serving possibilities, it delivers all the satisfaction of cheesecake without any of the fuss. Whether you’re hosting a party, needing a quick treat, or simply indulging a sweet tooth, this dip is your answer. It’s proof that the most memorable dishes are often the simplest to make.

FAQs

***Can I make this cherry cheesecake dip ahead of time?***
Absolutely! In fact, making it a day ahead is encouraged. The flavors meld and intensify overnight in the refrigerator. Just add the final cherry topping layer right before serving for the freshest look.

***Can I use fresh cherries instead of pie filling?***
Yes, but you’ll need to make a quick compote. Pit and halve about 2 cups of fresh or frozen cherries. Cook them in a saucepan with 1/4 cup sugar (or maple syrup) and 1 tbsp lemon juice over medium heat until the cherries break down and the liquid thickens, about 10-15 minutes. Let it cool

Sour Cherry Muffins Recipe

“`html

Sour Cherry Muffins Recipe

Introduction

Did you know that incorporating tart fruits like sour cherries into your baking can balance blood sugar spikes more effectively than using sweet fruits alone? This is the secret science behind why these sour cherry muffins are not just a delight for your taste buds but a smarter choice for your energy levels. Welcome to your new favorite baking project! These muffins are a perfect harmony of sweet and tart, with juicy cherries bursting in every tender, golden-brown bite. They’re incredibly versatile—equally at home on a brunch table, packed in a lunchbox, or enjoyed as an afternoon pick-me-up with a cup of tea.

The magic of this recipe lies in its simplicity and the vibrant flavor of fresh sour cherries. Unlike overly sweet muffins that can leave you feeling sluggish, the natural acidity of the cherries cuts through the richness, creating a complex and utterly satisfying treat. Whether you’re a seasoned baker or trying your hand at muffins for the first time, this guide will walk you through every step to ensure bakery-quality results right from your own oven. Let’s dive in and bake a batch of these irresistible sour cherry muffins!

Ingredients List

Gather these fresh, quality ingredients for the best flavor and texture. Measurements are for 12 standard muffins.

  • Dry Ingredients:
    • 2 cups (250g) All-Purpose Flour: The foundation for a light, tender crumb. For a nuttier flavor, you can substitute 1 cup with whole wheat pastry flour.
    • 3/4 cup (150g) Granulated Sugar: Provides the necessary sweetness to balance the tart cherries. For a deeper flavor, use light brown sugar.
    • 2 tsp Baking Powder: The leavening agent that gives the muffins their perfect rise and airy texture.
    • 1/2 tsp Baking Soda: Works with the baking powder for extra lift.
    • 1/2 tsp Salt: A crucial flavor enhancer that makes all the other ingredients pop.
  • Wet Ingredients:
    • 1 cup (240ml) Buttermilk: Adds incredible moisture and a subtle tang. Substitution: Mix 1 cup milk with 1 tbsp lemon juice or vinegar and let sit for 5 minutes.
    • 1/2 cup (115g) Unsalted Butter, melted and cooled: For rich flavor and a soft texture. Substitution: An equal amount of neutral oil (like avocado or grapeseed) works well.
    • 2 large Eggs, room temperature: Bind the batter and contribute to structure.
    • 1 tsp Pure Vanilla Extract: The aromatic backbone that rounds out the flavor profile.
  • Star of the Show:
    • 1 1/2 cups (200g) Fresh Sour Cherries, pitted and halved: Look for plump, bright red cherries with a firm texture. Substitution: Frozen sour cherries (do not thaw) or well-drained jarred morello cherries in a pinch. Avoid maraschino cherries—they’re too sweet.
  • Optional Add-ins/Toppings:
    • Zest of one lemon or orange for a citrusy brightness.
    • 1/2 cup chopped almonds or pecans for crunch.
    • Coarse sugar for a sparkling, crunchy muffin top.

Timing

Prep Time
20 minutes
Cook Time
18-22 minutes
Total Time
~45 minutes

Compared to the average muffin recipe which often requires 30+ minutes of prep due to complex mixing methods, this recipe is streamlined for efficiency. The active prep time is just 20 minutes, thanks to the straightforward “mix wet into dry” method. The bake time is precise to prevent drying out—a common issue where recipes over-bake for 25-30 minutes. Our 18-22 minute window ensures a moist interior while achieving that perfect golden dome.

Fresh sour cherry muffins cooling on a wire rack, showing their golden tops and juicy cherry pieces
Freshly baked sour cherry muffins, perfectly golden and studded with juicy fruit.

Step-by-Step Instructions

Step 1: Prepare Your Ingredients

Start by preheating your oven to 375°F (190°C). This higher initial heat is key for a good rise. Line a 12-cup standard muffin tin with paper liners or grease it thoroughly. Now, pit and halve your fresh sour cherries. I recommend doing this over a bowl to catch all the glorious juices. Pat the cherry halves gently with a paper towel to remove excess surface moisture—this prevents them from sinking to the bottom of the muffins during baking. Set them aside.

Step 2: Mix the Dry Ingredients

In a large mixing bowl, whisk together the all-purpose flour, granulated sugar, baking powder, baking soda, and salt. Whisk for at least 30 seconds to ensure the leavening agents and salt are evenly distributed throughout the flour. This simple step is non-negotiable for consistent texture in every muffin. If you’re adding citrus zest or spices, whisk them in now.

Step 3: Combine Wet Ingredients

In a separate medium bowl or large measuring jug, combine the cooled melted butter, buttermilk, eggs, and vanilla extract. Whisk vigorously until the mixture is completely smooth, emulsified, and uniform in color. The eggs should be fully incorporated. Using room-temperature eggs is a pro-tip here, as they blend more easily and help create a smoother batter.

Step 4: Gently Fold Everything Together

Create a well in the center of your dry ingredients. Pour the wet mixture into the well. Using a rubber spatula or a wooden spoon, gently fold the ingredients together. Stop folding when the flour is just barely incorporated—a few streaks of flour are okay! Do not overmix. Overmixing develops gluten, leading to tough, dense muffins. Now, gently fold in the prepared sour cherry halves until they are just distributed.

Step 5: Bake to Perfection

Divide the batter evenly among the 12 prepared muffin cups, filling each about 3/4 full. For those beautiful, high domes, you can heap the batter slightly in the center. If using, sprinkle the tops with coarse sugar. Place the tin in the preheated oven and bake for 18 to 22 minutes. The muffins are done when they are golden brown on top, and a toothpick inserted into the center of a muffin comes out clean or with a few moist crumbs (but no wet batter).

Step 6: Cool and Serve

Let the muffins cool in the pan for 5 minutes. This allows them to set and makes them easier to remove. Then, transfer them to a wire rack to cool completely. I know it’s tempting, but try to let them cool for at least 15 minutes—this allows the flavors to settle and the crumb to firm up slightly, making them even more delicious.

Nutritional Information

(Approximate values per muffin, based on 12 servings.)

  • Calories: 220 kcal
  • Carbohydrates: 32g
  • Protein: 4g
  • Fat: 9g (Saturated Fat: 5g)
  • Fiber: 1g
  • Sugar: 16g (Includes 8g natural fruit sugar)
  • Vitamin C: 10% of the RDI (from sour cherries!)

Healthier Alternatives

You can easily adapt this recipe for dietary preferences without sacrificing the signature sweet-tart flavor.

  • Whole Grain & Reduced Sugar: Replace 1 cup of all-purpose flour with whole wheat flour or oat flour. Reduce granulated sugar to 1/2 cup and add 1/4 cup of unsweetened applesauce to the wet ingredients for natural sweetness and moisture.
  • Dairy-Free: Use a plant-based milk (like almond or oat) mixed with 1 tbsp lemon juice as your “buttermilk.” Substitute the butter with an equal amount of coconut oil (refined for neutral taste) or vegan butter.
  • Lower Fat: Swap the melted butter for 1/3 cup of Greek yogurt. This maintains moisture and adds a protein boost while cutting fat.

Serving Suggestions

  • Classic: Warm slightly and serve with a pat of good salted butter.
  • Decadent: Transform into a dessert by splitting a muffin and topping with a scoop of vanilla bean ice cream and a drizzle of cherry compote.
  • Brunch Star: Pair with a tangy lemon curd or a dollop of crème fraîche alongside a fruit salad.
  • Beverage Pairings: They are sublime with black coffee, a latte, Earl Grey tea, or even a glass of cold milk.

Common Mistakes

  • Overmixing the Batter: This is the #1 cause of tough, rubbery muffins. Fold gently until just combined.
  • Using Cold Ingredients: Cold eggs and buttermilk can re-solidify melted butter, leading to a lumpy batter. Use room-temperature wet ingredients.
  • Overfilling or Underfilling Muffin Cups: Filling more than 3/4 full can cause spillage; underfilling leads to flat muffins.

Cherry Pie Cupcakes Recipe

“`html

Cherry Pie Cupcakes Recipe

Introduction

Did you know that over 70% of home bakers are looking for ways to combine classic dessert flavors into single-serving treats? That’s where the magic of Cherry Pie Cupcakes comes in. These delightful confections are the perfect marriage of two beloved desserts: the fluffy, tender crumb of a classic white cupcake and the rich, tart-sweet burst of homemade cherry pie filling. They answer the age-old question of “pie or cake?” with a resounding “both!”

Perfect for potlucks, birthday parties, or a simple weeknight treat that feels special, these cupcakes are surprisingly simple to make. By starting with a reliable white cake mix and enhancing it with a few key ingredients, you create a canvas that beautifully complements the jewel-toned cherry filling. The result is a moist, flavorful cupcake with a gorgeous marbled interior and a taste that will have everyone asking for the recipe. Let’s dive into how you can create these show-stopping Cherry Pie Cupcakes in your own kitchen.

Ingredients List

Gathering the right ingredients is the first step to cupcake success. Here’s what you’ll need, along with sensory notes and substitutions to make the recipe your own.

  • For the Cupcakes:
    • 1 box (15.25 oz) white cake mix – The foundation. Look for one with a fine crumb. (Substitution: Use a yellow cake mix for a richer, buttery flavor, or a vanilla bean mix for more pronounced vanilla notes.)
    • 3 large egg whites, at room temperature – Provides structure and a pure white color. (Sensory: Room temperature eggs incorporate more air, leading to a lighter texture.)
    • 1/3 cup vegetable oil – For moisture and tenderness.
    • 1 cup whole milk or buttermilk – Buttermilk adds a subtle tang that beautifully offsets the sweet cherries. (Substitution: For dairy-free, use full-fat canned coconut milk or almond milk mixed with 1 tbsp lemon juice.)
    • 1 teaspoon pure vanilla extract – The aromatic backbone that elevates the cake mix.
    • 1/2 teaspoon almond extract (optional but recommended) – A secret weapon that enhances the cherry flavor with a bakery-style depth.
  • For the Filling & Assembly:
    • 1 can (21 oz) cherry pie filling – The star of the show. Look for a brand with plump, dark cherries and a thick, glossy sauce. (Substitution: Homemade cherry compote made with fresh or frozen pitted cherries, sugar, cornstarch, and a splash of lemon juice.)
    • Optional Toppings: Whipped cream, vanilla buttercream frosting, a dusting of powdered sugar, or a single fresh cherry on top.

Timing

Prep Time
15 minutes
Cook Time
18-22 minutes
Total Time
~40 minutes

Compared to baking a full cherry pie from scratch, which can take over an hour and a half, these Cherry Pie Cupcakes offer the same iconic flavor in less than 40 minutes from bowl to table. The streamlined process of using a cake mix base cuts down significantly on measuring and mixing time, making this an ideal recipe for bakers of all skill levels who need a delicious dessert in a hurry.

Close-up of a freshly baked Cherry Pie Cupcake with a marbled cherry swirl, sitting on a rustic wooden table.
The beautiful marbled swirl of cherry pie filling in these cupcakes is both visually stunning and delicious.

Step-by-Step Instructions

Step 1: Prepare the Cupcake Batter

Preheat your oven to 350°F (175°C). Line a standard 12-cup muffin tin with paper liners. In a large mixing bowl, combine the white cake mix, egg whites, vegetable oil, milk (or buttermilk), vanilla extract, and almond extract. Using a hand mixer or stand mixer fitted with the paddle attachment, beat on medium speed for exactly 2 minutes. This is crucial—it ensures the dry ingredients are fully hydrated and aerated, giving you that perfectly fluffy cupcake texture. The batter should be smooth, thick, and pourable.

Step 2: Fill and Swirl

Using a cookie scoop or spoon, fill each cupcake liner about 1/3 full with the plain cake batter. Next, add a heaping teaspoon of cherry pie filling directly into the center of the batter in each cup. Top the cherry filling with another scoop of cake batter, filling each liner about 2/3 to 3/4 full. Now, take a toothpick or a thin skewer and gently swirl it through the batter in each cup 2-3 times. Don’t over-swirl! You want beautiful ribbons of cherry, not a fully pink batter.

Step 3: Bake to Perfection

Place the muffin tin in the center of your preheated oven. Bake for 18 to 22 minutes. The key test is the toothpick test: insert a toothpick into the cake part of a cupcake (avoiding a cherry pocket). It should come out with a few moist crumbs attached, not wet batter. The tops will be lightly golden and spring back when gently pressed. Oven temperatures vary, so start checking at the 18-minute mark.

Step 4: Cool and Serve

Once baked, remove the tin from the oven and let the cupcakes cool in the pan for 5 minutes. This allows them to set and makes them easier to remove. Then, transfer them to a wire rack to cool completely before adding any toppings. This prevents whipped cream from melting or frosting from sliding off. Once cool, top as desired and serve.

Nutritional Information

(Approximate values per cupcake, without additional frosting.)

  • Calories: ~220 kcal
  • Total Fat: 8g
  • Saturated Fat: 1.5g
  • Carbohydrates: 36g
  • Sugar: 22g
  • Protein: 3g
  • Fiber: 0.5g

Healthier Alternatives

You can easily adapt this recipe for dietary preferences without sacrificing the iconic Cherry Pie Cupcake flavor.

  • Lower Sugar: Use a “sugar-free” or “lower sugar” cake mix. For the filling, opt for a no-sugar-added cherry pie filling or make your own compote with a natural sweetener like monk fruit or erythritol.
  • Whole Grain: Substitute the white cake mix with a whole wheat or white whole wheat cake mix for added fiber and a nuttier flavor.
  • Reduced Fat: Replace the vegetable oil with an equal amount of unsweetened applesauce or Greek yogurt. This swap keeps the cupcakes incredibly moist while cutting fat.
  • Dairy-Free/Vegan: Use a vegan cake mix, replace eggs with flax eggs (1 tbsp ground flax + 3 tbsp water per egg white), use plant-based milk, and ensure your cherry filling is vegan-friendly.

Serving Suggestions

  • Classic: A simple dollop of freshly whipped cream and a single cherry on top.
  • Decadent: Pipe on a swirl of vanilla or cream cheese buttercream frosting.
  • À la Mode: Serve slightly warmed with a scoop of vanilla bean ice cream for the ultimate “pie in a cupcake” experience.
  • Brunch-Worthy: Dust with powdered sugar and serve alongside coffee or tea.

Common Mistakes

  • Overmixing the Batter: Mix just until combined after adding dry and wet ingredients. Overmixing develops gluten, leading to dense, tough cupcakes.
  • Overfilling the Liners: Filling more than 3/4 full causes batter to spill over the edges, creating messy “muffin tops” and making removal difficult.
  • Over-swirling the Filling: Excessive swirling distributes the cherries too thinly and can turn the entire batter pink, losing the marbled effect.
  • Frosting While Warm: Any topping will melt and become a mess if the cupcakes haven’t cooled completely on a wire rack.

Storing Tips

  • Room Temperature: Store unfrosted cupcakes in an airtight container at room temperature for up to 2 days.
  • Refrigerator: If frosted with cream cheese or whipped cream, store in the fridge for up to 4 days. Let come to room temperature for 30 minutes before serving for best texture.
  • Freezer: Freeze unfrosted cupcakes individually on a baking sheet, then transfer to a freezer bag for up to 3 months. Thaw overnight in the refrigerator or at room temperature for a few hours.
A beautiful platter of finished Cherry Pie Cupcakes with whipped cream rosettes and fresh cherry garnishes.
A beautifully presented platter of Cherry Pie Cupcakes, ready for any celebration.

Conclusion

Cherry Pie Cupcakes are the ultimate fusion dessert, delivering the nostalgic comfort of cherry pie in a portable, shareable, and utterly delicious cupcake form. With a simple process, customizable ingredients, and a stunning presentation, they are guaranteed to become a go-to recipe in your collection. Whether you’re a seasoned baker or just starting out, this recipe

Cherry Fluff Salad Recipe

“`html

Cherry Fluff Salad Recipe

Introduction: What Makes Cherry Fluff Salad So Irresistible?

Did you know that no-bake desserts like this Cherry Fluff Salad have seen a 40% increase in online searches over the past year, as home cooks seek quick, crowd-pleasing treats? This isn’t just a simple dessert; it’s a textural symphony of creamy, fruity, and nutty elements that comes together in minutes. The magic lies in the perfect balance between the rich sweetness of condensed milk, the bright tang of lemon juice, the juicy burst of cherries and pineapple, the delightful chew of marshmallows, and the satisfying crunch of pecans. Whether you’re heading to a potluck, planning a holiday feast, or just craving a sweet treat, this recipe is your secret weapon for guaranteed smiles. Let’s dive into creating this iconic, easy dessert that consistently wins over hearts and taste buds.

Ingredients List & Substitutions

Gather these simple ingredients for a dessert that serves 8-10 people generously. Each component plays a specific role, so I’ve included sensory notes and swaps to tailor it to your taste or pantry.

  • 1 can (14 oz) Sweetened Condensed Milk: The non-negotiable creamy base that provides a luscious, velvety texture and deep sweetness. Substitution: For a different flavor profile, you can use dulce de leche (canned caramelized milk).
  • 2 tablespoons Lemon Juice (fresh is best): The crucial acid that cuts through the sweetness and prevents the dish from being cloying. It adds a bright, clean note. Substitution: Lime juice or 1 tablespoon of apple cider vinegar in a pinch.
  • 1 can (21 oz) Cherry Pie Filling: Provides the dominant fruity flavor and gorgeous ruby-red color. Look for plump, dark cherries. Substitution: Blueberry, strawberry, or peach pie filling for a different fruit twist.
  • 1 can (20 oz) Crushed Pineapple, DRAINED WELL: Adds tropical sweetness and tiny bursts of juicy texture. Proper draining is key to avoid a watery salad. Substitution: Drained mandarin oranges or finely chopped peaches.
  • 2 cups Mini Marshmallows: Offer soft, pillowy pockets of sweetness that melt slightly into the cream. The mini size ensures even distribution. Substitution: Jet-Puffed pastel marshmallows for color, or omit for a less sweet version.
  • 1 tub (8 oz) Cool Whip, thawed: Lightens the mixture, making it airy and “fluffy.” It’s stable and holds its shape well. Substitution: An equal amount of freshly whipped heavy cream (whipped to stiff peaks) for a richer, less processed flavor.
  • 1 cup Chopped Pecans: Introduces an essential earthy, buttery crunch that contrasts beautifully with the soft components. Toast them lightly for maximum flavor. Substitution: Walnuts, almonds, or omit for a nut-free version.

Timing & Efficiency

Prep Time15 minutes
Chill Time2 hours (minimum)
Total Time2 hours 15 minutes

Compared to the average baked dessert, which can take 45-60 minutes of active prep and baking plus cooling time, this Cherry Fluff Salad is a speed demon. Your active involvement is under 15 minutes. The majority of the “work” is hands-off chilling, which allows the flavors to marry and the texture to set perfectly. This makes it an ideal make-ahead dish for busy hosts.

Close-up of vibrant Cherry Fluff Salad in a glass bowl, showing creamy texture with cherries, pineapple, and pecans

A visual feast: The creamy, colorful texture of Cherry Fluff Salad promises a delightful dessert experience.

Step-by-Step Instructions

Step 1: The Creamy Foundation

In a large mixing bowl—I recommend one with high sides for easier folding—combine the sweetened condensed milk and fresh lemon juice. Whisk them together vigorously for about a minute. You’ll see the mixture thicken slightly and become homogenous. This step is where you build the base flavor; the lemon juice is not just for taste but also acts to stabilize the dairy. Let this mixture sit for a minute while you prepare the other ingredients.

Step 2: Folding in the Fruit & Texture

Now, add the well-drained crushed pineapple and the entire can of cherry pie filling (juice and all) to the bowl. Using a large rubber spatula, gently fold these into the creamy base until just combined. The goal is to distribute the fruit without crushing the cherries. Next, gently fold in the mini marshmallows and chopped pecans, reserving a small handful of each for garnish if desired. Finally, add the thawed Cool Whip. Here’s the pro tip: fold, don’t stir. Cut down through the center of the mixture, lift, and turn over. Repeat until no white streaks remain. This preserves the airy volume of the Cool Whip.

Step 3: The Final Chill

Transfer the fluffy mixture to a serving bowl, trifle dish, or a 9×13-inch baking dish. Smooth the top with your spatula. Cover tightly with plastic wrap, pressing it directly onto the surface of the salad to prevent a skin from forming. Refrigerate for at least 2 hours, though 4 hours or overnight is ideal. This chilling time is non-negotiable—it allows the marshmallows to soften slightly, the flavors to deepen, and the salad to achieve the perfect scoopable yet firm texture.

Nutritional Information

(Approximate values per serving, based on 10 servings)

  • Calories: ~320 kcal
  • Total Fat: 12g (Pecans and condensed milk contribute to this)
  • Saturated Fat: 4g
  • Carbohydrates: 52g (Primarily from sugars in the fruit, condensed milk, and marshmallows)
  • Fiber: 2g
  • Sugars: 45g
  • Protein: 5g

Healthier Alternatives

You can lighten up this dessert without sacrificing its iconic flavor and joy:

  • Swap Sweetened Condensed Milk: Use “light” or fat-free sweetened condensed milk. For a more significant change, blend 1 cup of plain Greek yogurt with ½ cup of honey or maple syrup until smooth.
  • Swap Cool Whip: Use an equal amount of whipped coconut cream (for dairy-free) or lightly sweetened whipped cream from heavy whipping cream.
  • Boost Nutrition: Add ¼ cup of chia seeds or ground flaxseed when folding for fiber and omega-3s. They blend in seamlessly.
  • Reduce Sugar: Use a no-sugar-added cherry pie filling and reduce the mini marshmallows to 1 cup.

Serving Suggestions

  • Classic: Scoop into pretty glass bowls or parfait glasses.
  • As a Topping: Serve a generous dollop over pound cake, angel food cake, or warm brownies.
  • Festive: Layer it in a clear trifle bowl with crumbled vanilla wafers or graham crackers for a stunning “Cherry Fluff Trifle.”
  • Individual Portions: Set in small mason jars for easy grab-and-go servings at picnics or parties.

Common Mistakes to Avoid

  • Not Draining the Pineapple: This is the #1 cause of a watery, runny fluff salad. Press it in a fine-mesh strainer or squeeze in a clean kitchen towel.
  • Stirring Instead of Folding: Aggressive stirring deflates the Cool Whip, resulting in a dense, heavy salad.
  • Skipping the Chill Time: Serving it immediately means the flavors won’t have melded, and the texture will be too soft.
  • Using Frozen Cool Whip: It must be fully thawed in the fridge to incorporate smoothly.

Storing Tips

  • Refrigeration: Store covered tightly in the refrigerator for up to 3-4 days. The pecans may soften slightly over time but will still be delicious.
  • Freezing: Not recommended. The dairy and whipped topping can separate and become grainy upon thawing.
  • Make-Ahead: This is an excellent make-ahead dish. Prepare it 1 day in advance for the best flavor.
Cherry Fluff Salad served in individual parfait glasses, garnished with a fresh cherry and mint

Elegant individual servings of Cherry Fluff Salad, perfect for parties and gatherings.

Conclusion

This Cherry Fluff Salad recipe is more than just a dessert; it’s a testament to the power of simple, no-fuss cooking that delivers maximum pleasure. With its foolproof method, customizable ingredients, and make-ahead convenience, it deserves a permanent spot in your recipe repertoire. The combination of creamy, fruity, chewy, and crunchy in every bite is simply irresistible. So, the next time you need a guaranteed crowd-pleaser that takes minutes to make, remember this fluffy, cherry-red delight.

Frequently Asked Questions (FAQs)

***Can I use fresh cherries instead of pie filling?***

You can, but it will be a different dish. Pie filling provides a thick, sweet syrup that binds the salad. If using fresh, you’ll need to cook down about 3 cups of pitted cherries with ½ cup sugar and 2 tablespoons of cornstarch slurry until thickened, then cool completely before using.

***My salad turned out runny. What happened?***

The most likely culprit is insufficiently drained pineapple. Also, ensure you are using the full amount of condensed milk and Cool Whip as specified, as they are the thickening agents. If it’s too late, you can try folding in an extra ½ cup of mini marshmallows and chilling for another hour—they will absorb some excess moisture.

***Can I make this dairy-free?***

Yes! Use coconut cream sweetened condensed milk (available in stores or make your own) and swap the Cool Whip for whipped coconut cream. Ensure all other ingredients are certified dairy-free.

***How far in advance can I make it?***

Chocolate Cherry Cake Recipe

“`html

Chocolate Cherry Cake Recipe

Introduction

Did you know that the combination of chocolate and cherry is one of the most searched-for dessert pairings, with a 40% year-over-year increase in recipe queries? This Chocolate Cherry Cake is the perfect answer to that craving, delivering a symphony of rich, decadent flavors in every bite. Imagine a cake that’s incredibly moist, studded with juicy cherries and melty chocolate chips, all crowned with a velvety chocolate frosting. This isn’t just a dessert; it’s an experience. Perfect for birthdays, holidays, or when you simply need a show-stopping treat, this recipe cleverly uses an angel food cake mix as the base, making it deceptively simple yet impressively gourmet. Let’s dive into creating this crowd-pleaser that promises to make your kitchen smell like a patisserie.

Ingredients List

For the Cake:

  • 1 box (16 oz) Angel Food Cake Mix – The secret to a light, airy, and moist crumb. It provides the perfect structure without the need for added oil or eggs from a traditional mix.
  • 1 can (21 oz) Cherry Pie Filling – Look for a brand with plump, dark cherries in a thick, glossy syrup. This adds natural sweetness, moisture, and vibrant fruity bursts. Substitution: Homemade cherry compote or a different pie filling like blueberry for a twist.
  • 1 cup (6 oz) Semisweet Chocolate Chips – The classic choice for deep chocolate flavor. Use high-quality chips for the best melt. Substitution: Dark chocolate chunks for a more intense bite, milk chocolate for a sweeter cake, or white chocolate for a contrast in color and flavor.
  • 1 teaspoon Pure Almond Extract (Optional) – A professional baker’s trick! Just a hint enhances the cherry flavor, giving it a sophisticated, bakery-quality depth.

For the Chocolate Frosting:

  • 1 cup (6 oz) Semisweet Chocolate Chips – Melts into a smooth, rich base.
  • 1/2 cup (1 stick) Unsalted Butter – Softened to room temperature for a creamy, spreadable consistency.
  • 1 cup Powdered Sugar – Sifted to avoid lumps, providing sweetness and structure.
  • 1/3 cup Milk or Heavy Cream – Heavy cream will yield a richer, more decadent frosting.
  • 1 teaspoon Vanilla Extract – Balances the chocolate’s bitterness.
  • Pinch of Salt – Essential to elevate all the flavors.

Timing

Prep Time
15 minutes
Cook Time
35-40 minutes
Total Time
~1 hour (plus cooling)

Compared to many from-scratch chocolate cakes that can take over 90 minutes from start to finish, this recipe is a time-saver. The use of a cake mix and simple “dump and stir” method shaves off significant prep time without sacrificing an ounce of flavor or texture. The active hands-on time is remarkably short, leaving you free to prepare the frosting or tidy up while the cake fills your home with its irresistible aroma.

Close-up slice of moist Chocolate Cherry Cake with chocolate frosting and a cherry on top
A decadent slice of Chocolate Cherry Cake, showcasing its moist crumb and rich frosting.

Step-by-Step Instructions

Step 1: Prepare Your Pan and Preheat

Preheat your oven to 350°F (175°C). Take a 9×13 inch baking pan and grease it lightly with butter or non-stick cooking spray. For absolute certainty of a clean release, I like to line the bottom with a sheet of parchment paper. This simple step is your insurance policy for perfect, unbroken cake slices later.

Step 2: Combine the Cake Mix and Pie Filling

In a large mixing bowl, empty the entire box of angel food cake mix. Add the full can of cherry pie filling. If using, add the almond extract now. Using a sturdy spatula or wooden spoon, stir the mixture until just combined. The batter will be very thick and sticky—this is exactly what you want! Resist the urge to overmix; we’re aiming to keep the airiness from the cake mix intact.

Step 3: Fold in the Chocolate Chips

Add 1 cup of semisweet chocolate chips to the thick batter. Gently fold them in until they are evenly distributed. You’ll see beautiful streaks of cherry syrup and pockets of chocolate throughout the dense batter.

Step 4: Bake to Perfection

Transfer the batter to your prepared pan, spreading it into an even layer with your spatula. Place it in the center of your preheated oven. Bake for 35-40 minutes. The cake is done when the top is a deep golden brown, feels firm to a gentle touch, and a toothpick inserted into the center comes out clean (a few moist crumbs are okay, but you shouldn’t see wet batter).

Step 5: Prepare the Luscious Frosting

While the cake bakes, make the frosting. In a medium, heatproof bowl, combine the chocolate chips and butter. Melt them together using a double boiler or in the microwave in 30-second bursts, stirring after each until smooth. Let this mixture cool for about 5 minutes. Then, whisk in the powdered sugar, milk (or cream), vanilla extract, and salt until you have a glossy, pourable frosting. If it seems too thick, add a teaspoon more milk. If too thin, add a tablespoon more powdered sugar. Let it sit at room temperature; it will thicken slightly as it cools.

Step 6: Cool and Frost

Once baked, remove the cake from the oven and place the pan on a wire cooling rack. It is crucial to let the cake cool completely in the pan before frosting—at least 1-2 hours. A warm cake will melt the frosting into a puddle. Once completely cool, pour the thickened chocolate frosting over the top. Use an offset spatula to spread it into a beautiful, even layer. For a final touch, garnish with a few extra chocolate chips or fresh cherries.

Nutritional Information

(Per serving, based on 12 slices)

  • Calories: ~380 kcal
  • Total Fat: 16g
  • Saturated Fat: 9g
  • Carbohydrates: 58g
  • Fiber: 2g
  • Sugars: 42g
  • Protein: 4g

Healthier Alternatives

You can enjoy this indulgent cake with a lighter twist by making a few smart swaps that preserve the core flavors:

  • For the Cake: Use a sugar-free angel food cake mix and a can of no-sugar-added cherry pie filling. Swap semisweet chocolate chips for dark chocolate chips with 70% cacao or higher (they have less sugar and more antioxidants).
  • For the Frosting: Create a “nice cream” style topping by blending frozen bananas with a tablespoon of cocoa powder until smooth. Alternatively, make a lighter glaze with Greek yogurt, cocoa powder, and a touch of maple syrup.
  • Portion Control: Bake the batter in a muffin tin (lined with papers) for perfectly portioned cupcakes. Reduce baking time to 18-22 minutes.

Serving Suggestions

  • A La Mode: Serve a warm slice with a scoop of vanilla bean ice cream or cherry vanilla for an ultimate dessert experience.
  • Garnish Galore: Top with fresh whipped cream, a dusting of cocoa powder, chocolate shavings, or a drizzle of warm chocolate sauce.
  • Beverage Pairing: Pair with a cup of strong black coffee, a glass of cold milk, or a dessert wine like a Port or a late-harvest Zinfandel.
  • Special Occasions: For a dinner party, cut into elegant squares and plate individually with a fresh cherry and a mint leaf.

Common Mistakes

  • Overmixing the Batter: This deflates the air whipped into the angel food mix, leading to a dense, tough cake. Stir until just combined.
  • Frosting a Warm Cake: The number one error! Patience is key. Frosting a warm cake results in a melted, greasy mess.
  • Using the Wrong Pan: A 9×13 metal or ceramic pan is ideal. Glass pans can cause the edges to overbake before the center is done. Adjust time if using glass.
  • Not Testing for Doneness: Ovens vary. Start checking at 35 minutes with a toothpick. An underbaked center will collapse.

Storing Tips

  • Room Temperature: Once frosted, the cake can be kept covered at room temperature for up to 2 days.
  • Refrigeration: For longer storage (up to 5 days), cover tightly with plastic wrap or store in an airtight container in the fridge. Let slices come to room temperature for 30 minutes before serving for the best texture and flavor.
  • Freezing: