📖 Table of Contents
- 1. Title & Info
- 2. Introduction
- 3. Why This Recipe Works
- 4. Ingredients
- 5. Instructions
- 6. Serving Suggestions
- 7. Storage Tips
- 8. Variations
- 9. FAQ
- 10. Share the Love
- 11. Pin for Later
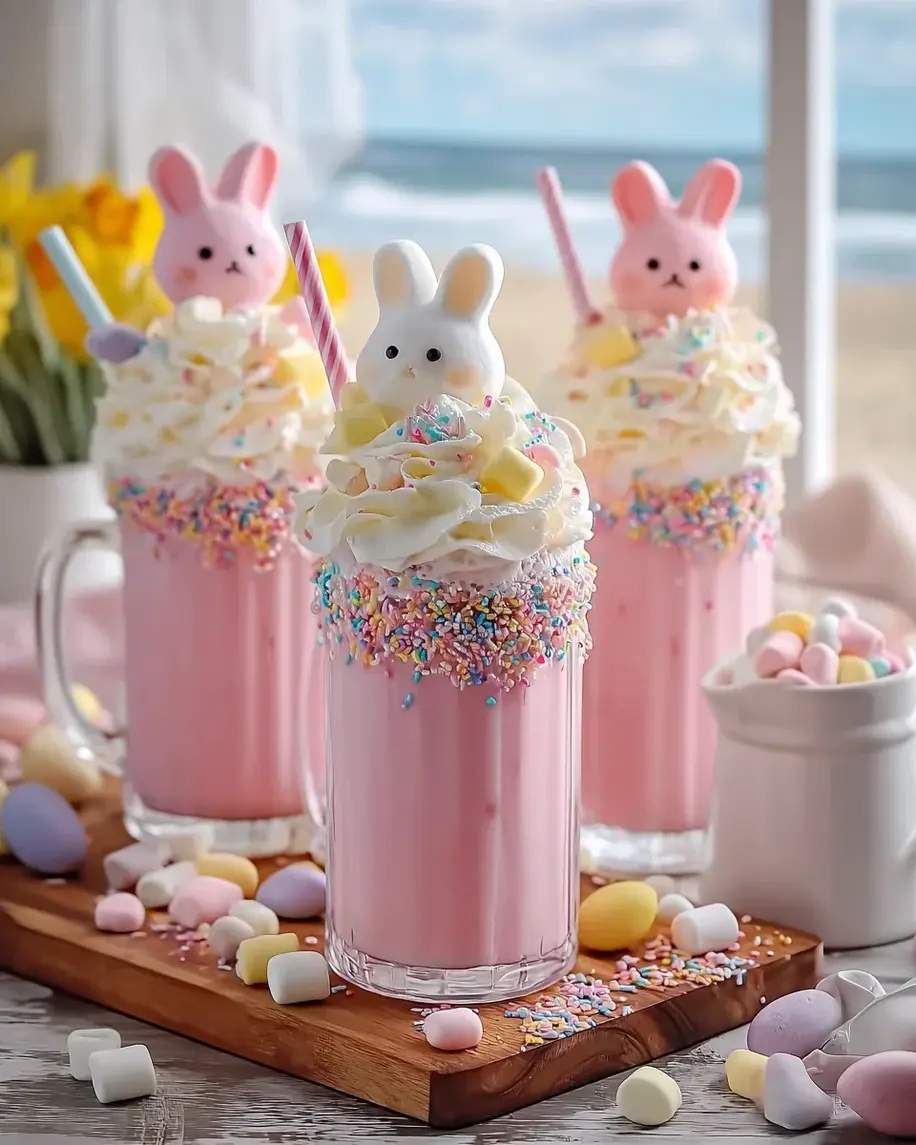
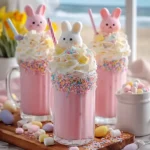
🌸 The Ultimate Easter Bunny Punch: A Creamy Pink Party Drink That Steals the Show
Author: Chef Emy | Site: cookingwithemy.com
🎀 Introduction
If you want a drink that instantly makes your Easter celebration feel festive, Easter Bunny Punch is the perfect choice. This creamy pink punch combines strawberry milk, vanilla ice cream, pineapple juice, and fizzy soda to create a delightful drink that tastes like a strawberry float. It’s the kind of beverage that makes both kids and adults light up — and it takes literally five minutes to prepare.
At The Kitchen Team, we believe Easter deserves a signature drink that’s as joyful as the holiday itself. Whether you’re hosting a brunch, an egg hunt, or a family dinner, this punch brings the wow factor without stress. The best part? You can customize it endlessly, and it’s completely no-cook — just blend, pour, and garnish.
This recipe was developed by Chef Emy, who wanted a punch that captures the whimsy of spring. The pastel pink color, the creamy texture, and the playful toppings make it irresistible. Let’s dive into why this recipe works and how you can make it perfectly every time.
✨ Why This Easter Bunny Punch Recipe Works
- 5-Minute Prep: No cooking, no complicated steps. Just blend and serve.
- Kid-Friendly & Adult-Approved: It’s a float-style punch that everyone adores.
- Perfectly Balanced Sweetness: The pineapple juice cuts through the creamy richness, while the lemon-lime soda adds fizz.
- Instantly Festive: The pink color and sprinkles scream “Easter celebration!”
- Make-Ahead Friendly: Prep the base and add soda just before serving.
- Customizable: Swap milks, add booze for adults, or change up the garnishes.
🛒 Ingredients for Easter Bunny Punch
Makes 12 servings (about 1 cup each)
- 3 cups very cold strawberry milk (store-bought or homemade)
- 1 cup full-fat vanilla ice cream (softened slightly)
- ½ cup heavy cream (for extra creaminess)
- ½ cup chilled pineapple juice
- 12 tablespoons sugar (optional, adjust to taste — see note)
- 12 cups lemon-lime soda (chilled, add last)
- Whipped cream (fresh or canned, for topping)
- Pastel Easter sprinkles
- Mini marshmallows (optional)
- Bunny Peeps (for garnish)
- Paper straws (optional, but fun!)
Note on sugar: Strawberry milk and ice cream already contain sugar. Taste the base before adding extra sugar. We usually skip it.
👩🍳 How to Make Easter Bunny Punch
- Blend the creamy base: In a large blender, combine the strawberry milk, vanilla ice cream, heavy cream, and pineapple juice. Blend on low until smooth — about 20 seconds.
- Adjust sweetness: Taste the mixture. If you’d like it sweeter, add sugar 1 tablespoon at a time, blending after each addition. Remember, the soda will add sweetness too.
- Transfer to a punch bowl: Pour the creamy base into a large punch bowl or pitcher.
- Add the fizz: Just before serving, slowly pour in the lemon-lime soda. Stir gently with a ladle to combine — don’t overmix or you’ll lose the carbonation.
- Troubleshoot texture: If the punch is too thick, add a splash of strawberry milk and blend briefly. If it’s too thin, add a small scoop of vanilla ice cream and blend again.
- Garnish like a pro: Top with a generous swirl of whipped cream. Sprinkle pastel Easter sprinkles and mini marshmallows over the top. Place a few Bunny Peeps on the surface or on the rim of the punch bowl.
- Serve immediately: Ladle into cups with paper straws. Encourage guests to stir before drinking — the toppings are part of the fun!
🎉 Serving Suggestions
This Easter Bunny Punch is a showstopper on any brunch or dessert table. Here are our favorite ways to serve it:
- Easter Brunch: Pair with quiche, fruit salad, and hot cross buns.
- Egg Hunt Party: Serve in clear plastic cups with bunny straws for easy outdoor sipping.
- Dessert Bar: Offer alongside carrot cake, chocolate nests, and sugar cookies.
- Adult Version: Add 1 cup of vodka or coconut rum to the base before blending. Omit for kids.
- Individual Servings: Make mini floats by layering strawberry milk, a scoop of ice cream, and soda in tall glasses.
🧊 Storage Tips
This punch is best enjoyed fresh, but you can prep components ahead:
- Base (without soda): Blend the milk, ice cream, cream, and pineapple juice. Store in a sealed pitcher in the fridge for up to 24 hours. Stir well before using.
- Soda: Keep separate and add just before serving to maintain fizz.
- Leftovers: If you have leftover punch (unlikely!), pour into popsicle molds for creamy Easter popsicles.
- Do not freeze: The carbonation and creamy texture won’t survive freezing as a drink.
🌈 Delicious Variations
🍓 Strawberry Shortcake Punch
Replace strawberry milk with vanilla milk and add 1 cup of crushed fresh strawberries. Top with shortcake crumbles.
🍍 Tropical Bunny Punch
Use coconut milk instead of strawberry milk, and add ½ cup cream of coconut. Garnish with toasted coconut flakes.
☕ Coffee Lover’s Punch
Add 1 cup of cold brew coffee to the base. The coffee and chocolate sprinkles make it a mocha dream.
🍑 Peachy Easter Punch
Substitute peach nectar for pineapple juice and use peach ice cream. Garnish with gummy bunnies.
🌈 Rainbow Sherbet Punch
Use rainbow sherbet instead of vanilla ice cream and add ½ cup orange juice. Top with sour gummy worms.
❓ Frequently Asked Questions
Can I make Easter Bunny Punch ahead of time?
Yes! Prepare the creamy base (without soda) up to 24 hours in advance. Store in the fridge. Add soda and garnishes just before serving for maximum fizz and freshness.
What can I use instead of strawberry milk?
You can use regular milk with 3 tablespoons of strawberry syrup or ½ cup of pureed fresh strawberries. Pink milk is also a great substitute.
Can I make this punch dairy-free?
Absolutely! Use oat milk strawberry milk, coconut cream, and dairy-free vanilla ice cream. The taste will be slightly different but still delicious.
How do I make this punch alcoholic?
Add 1-1½ cups of vodka, white rum, or coconut rum to the base before blending. For a fun twist, use strawberry-flavored vodka. Label clearly for guests.
My punch is too thick — how do I fix it?
Add a splash of cold strawberry milk or a little extra lemon-lime soda and stir gently. If it’s too thin, add a small scoop of vanilla ice cream and blend again.
Can I use a different soda?
Yes! Lemon-lime soda is classic, but ginger ale, cream soda, or even sparkling water work well. For a pinker punch, use strawberry soda.
How many servings does this recipe make?
This recipe yields about 12 cups of punch, which serves 12 people (1 cup each). For a larger crowd, double the recipe and use a bigger punch bowl.
Can I add fresh fruit to the punch?
Absolutely! Sliced strawberries, raspberries, or even pineapple chunks make beautiful additions. Add them just before serving so they don’t sink.
What if I don’t have a blender?
No problem! Whisk the milk, cream, and pineapple juice together in a large bowl. Soften the ice cream slightly and stir it in until mostly smooth. Add soda and garnish.
How do I keep the punch cold without diluting it?
Freeze some strawberry milk in ice cube trays and use those instead of regular ice. You can also freeze pineapple juice cubes. They add flavor and keep the punch cold.
📌 Save This Recipe for Later
Pin this Easter Bunny Punch to your favorite Easter board on Pinterest!
🌸 Follow Cooking With Emy on Pinterest
Click above to visit our Pinterest profile and discover more festive recipes.
📌 Pin Recipe
📱 Share on Instagram
Easter Bunny Punch
Ingredients
Scale
- 3 cups very cold strawberry milk
- 1 cup full-fat vanilla ice cream
- 1/2 cup heavy cream
- 1/2 cup chilled pineapple juice
- 12 tablespoons sugar (optional, adjust to taste)
- 12 cups lemon-lime soda (add last)
- Whipped cream (fresh or canned)
- Pastel Easter sprinkles
- Mini marshmallows (optional)
- Bunny Peeps
- Paper straws (optional)
Instructions
- If too thick add a splash of strawberry milk and blend briefly.
- If too thin add a small scoop of vanilla ice cream and blend again.
- A swirl of whipped cream
- Pastel Easter sprinkles
- A few mini marshmallows