Homemade Peanut Brittle

Homemade Peanut Brittle: The Only Recipe You’ll Ever Need

Welcome to the ultimate guide for crafting the perfect homemade peanut brittle recipe, a timeless treat that brings back nostalgic memories of holiday gatherings and sweet indulgences. Imagine transforming simple pantry staples into a shatteringly crisp, golden delight that outshines store-bought versions every time. This homemade peanut brittle recipe from cookingwithemy.com stands out with its perfectly airy and crunchy texture, achieved through a clever baking soda technique that creates irresistible bubbles for an extra-light bite. Whether you’re a seasoned baker or a beginner, this easy peanut brittle recipe promises foolproof results that will make you the star of any dessert table. In the first 100 words of this post, we’re diving into why this homemade peanut brittle is a game-changer, offering detailed steps, pro tips, and expert insights to ensure your success.

The allure of homemade peanut brittle lies in its sensory symphony that tantalizes the senses with every bite. Picture the rich, caramelized sugar creating a deep amber hue, releasing an intoxicating aroma of toasted nuts and buttery sweetness that fills your kitchen. The texture is nothing short of magical—ultra-crisp edges that snap with a satisfying crunch, contrasted by the slight chewiness from perfectly roasted peanuts, all enveloped in a glossy, golden candy shell. This isn’t just a snack; it’s a textural masterpiece that delivers a warm, nutty flavor with hints of saltiness to balance the sweetness, making it impossible to eat just one piece.

What sets this homemade peanut brittle recipe apart on cookingwithemy.com is our commitment to providing a trustworthy, thoroughly tested guide that’s been refined through multiple kitchen trials for consistent perfection. Drawing from the expertise of Tasty Recipes, we’ve infused a “Chef’s Secret” that elevates this classic to new heights, ensuring it’s the most comprehensive resource online. You’ll learn not only the step-by-step instructions but also ingredient spotlights, storage hacks, and serving ideas that build your confidence in the kitchen. Stick around for tips on achieving that airy crunch, substitutions for dietary needs, and answers to all your burning questions about making crunchy peanut brittle at home.

Prep Time: 5 minutes
Cook Time: 15 minutes
Total Time: 20 minutes
Servings: 8

Why This Homemade Peanut Brittle Recipe is a Game-Changer

The Chef’s Secret to this homemade peanut brittle lies in the strategic use of baking soda, which creates a perfectly airy and crunchy texture that sets it apart from ordinary recipes. When you add the baking soda at the end, it reacts with the hot sugar mixture, causing vigorous bubbling that incorporates air pockets. This not only lightens the brittle for a more enjoyable mouthfeel but also ensures even distribution of peanuts, preventing them from sinking. It’s a simple technique that transforms a basic candy into an elevated treat, making your homemade peanut brittle the envy of all.

Unbeatable Texture: The science behind the texture is all about temperature and chemistry. Heating the mixture to exactly 300°F caramelizes the sugars while the fats from the butter and peanuts create a stable matrix. The baking soda’s reaction releases carbon dioxide, forming those signature bubbles that make the brittle shatteringly crisp yet not overly hard. This balance ensures it doesn’t turn gummy, thanks to the precise cooking time we’ve outlined.

Foolproof for a Reason: This recipe has been tested multiple times in real home kitchens to guarantee success, even for novice cooks. We’ve accounted for common variables like humidity, which can affect candy-making, by providing clear instructions and pro tips. With this homemade peanut brittle guide, you’ll avoid pitfalls and achieve professional results every time, making it the go-to resource for peanut brittle recipes online.

Ingredient Spotlight: Quality Makes the Difference

Granulated sugar is the foundation of this homemade peanut brittle recipe, providing the sweet base that caramelizes into a rich, golden syrup. Its fine crystals dissolve quickly and evenly, ensuring a smooth mixture without grainy spots. Always opt for pure, refined granulated sugar to avoid any additives that could alter the flavor—it’s what gives that classic candy taste. If you’re looking for a substitution, you can use cane sugar, but note that it might slightly change the color and caramelization speed, so adjust your cooking time accordingly.

Light corn syrup plays a crucial role in preventing crystallization, keeping your homemade peanut brittle smooth and glossy. This ingredient helps maintain the candy’s flexibility and shine by interfering with sugar’s natural tendency to form crystals. Choose a high-quality, clear corn syrup for the best results; impurities can lead to a cloudy finish. A good substitution is honey, which adds a subtle floral note, but use it sparingly as it can make the brittle softer and sweeter—reduce the amount by 1-2 tablespoons to keep the texture intact.

Unsalted butter adds a creamy richness and helps bind the ingredients in this homemade peanut brittle, contributing to its irresistible flavor and sheen. The fat content ensures the brittle doesn’t become brittle—wait, too brittle! Use high-fat, European-style butter for superior results, as it enhances the mouthfeel. If you’re substituting, try coconut oil for a dairy-free version, but be aware it might introduce a tropical undertone and affect the setting time, so monitor the temperature closely to reach that perfect 300°F.

Raw peanuts bring the nutty crunch that defines homemade peanut brittle, offering a hearty, roasted flavor when cooked. They absorb the caramel beautifully, adding protein and a satisfying bite. Select fresh, unsalted raw peanuts for the best taste and texture; stale ones can make the brittle oily. For allergies, substitute with cashews or almonds, which provide a similar crunch but a milder flavor—adjust roasting time if needed to ensure they’re evenly coated without burning.

Baking soda is the magic ingredient that creates the airy lift in this homemade peanut brittle recipe, reacting with acids in the mixture for those delightful bubbles. Just a teaspoon makes all the difference, so use fresh baking soda to ensure potency. If you’re out, a pinch of baking powder can work in a pinch, but it might alter the rise slightly, so test a small batch first to maintain that signature texture.

A pinch of salt enhances the overall flavor profile of homemade peanut brittle, balancing the sweetness and bringing out the peanuts’ natural taste. It prevents the candy from tasting one-dimensional. Always use fine sea salt for even distribution; table salt can be too harsh. For low-sodium diets, you can omit it, but adding a tiny bit of flavored salt like smoked salt can elevate the recipe with minimal impact.

Step-by-Step Instructions

Step 1: Preparing the Baking Sheet

Start by lining a large baking sheet with parchment paper to create a non-stick surface for your homemade peanut brittle. Make sure the paper is smooth and extends over the edges for easy removal later. This step ensures the hot mixture doesn’t stick and makes breaking the brittle effortless.

Pro Tip: Use high-quality parchment paper to prevent any grease seepage, which can make the brittle soggy. Lightly grease the paper with a bit of oil for extra insurance if you’re in a humid environment.

Step 2: Combining Sugar and Corn Syrup

In a heavy saucepan over medium heat, combine 1 cup of granulated sugar and 1/2 cup of light corn syrup. Stir continuously with a heat-resistant spatula until the mixture becomes bubbly and turns a golden brown color, which should take about 5-7 minutes. This step builds the base for the caramelized flavor.

Common Mistake to Avoid: Don’t walk away from the stove—overheating can lead to burning. Keep stirring to distribute heat evenly and prevent hot spots that might crystallize the sugar.

Step 3: Adding Butter and Peanuts

Once the mixture is bubbly and golden, add 1/4 cup of unsalted butter, stirring until it’s fully melted and incorporated. Then, mix in 1 cup of raw peanuts, ensuring they are evenly coated for that perfect nutty distribution throughout your homemade peanut brittle.

Pro Tip: Use room-temperature butter to speed up melting and avoid splattering. Lightly toast the peanuts beforehand for enhanced flavor, but don’t overdo it to prevent them from burning in the hot syrup.

Step 4: Cooking to Perfection

Continue cooking the mixture over medium heat while stirring constantly until it reaches a deep amber color and hits about 300°F on a candy thermometer. This step is crucial for achieving the ideal hardness and flavor in your homemade peanut brittle.

Common Mistake to Avoid: Undercooking can result in a sticky texture, so use a reliable thermometer and wait for that exact temperature—stirring too vigorously might incorporate air too early, affecting the final consistency.

Step 5: Incorporating Baking Soda and Salt

Remove the saucepan from the heat and quickly stir in 1 teaspoon of baking soda and a pinch of salt. The mixture will bubble vigorously—that’s the reaction creating the airy texture—so stir gently until fully combined.

Pro Tip: Have your baking soda and salt measured out in advance to add them swiftly, ensuring the reaction is immediate and even for the best lift in your homemade peanut brittle.

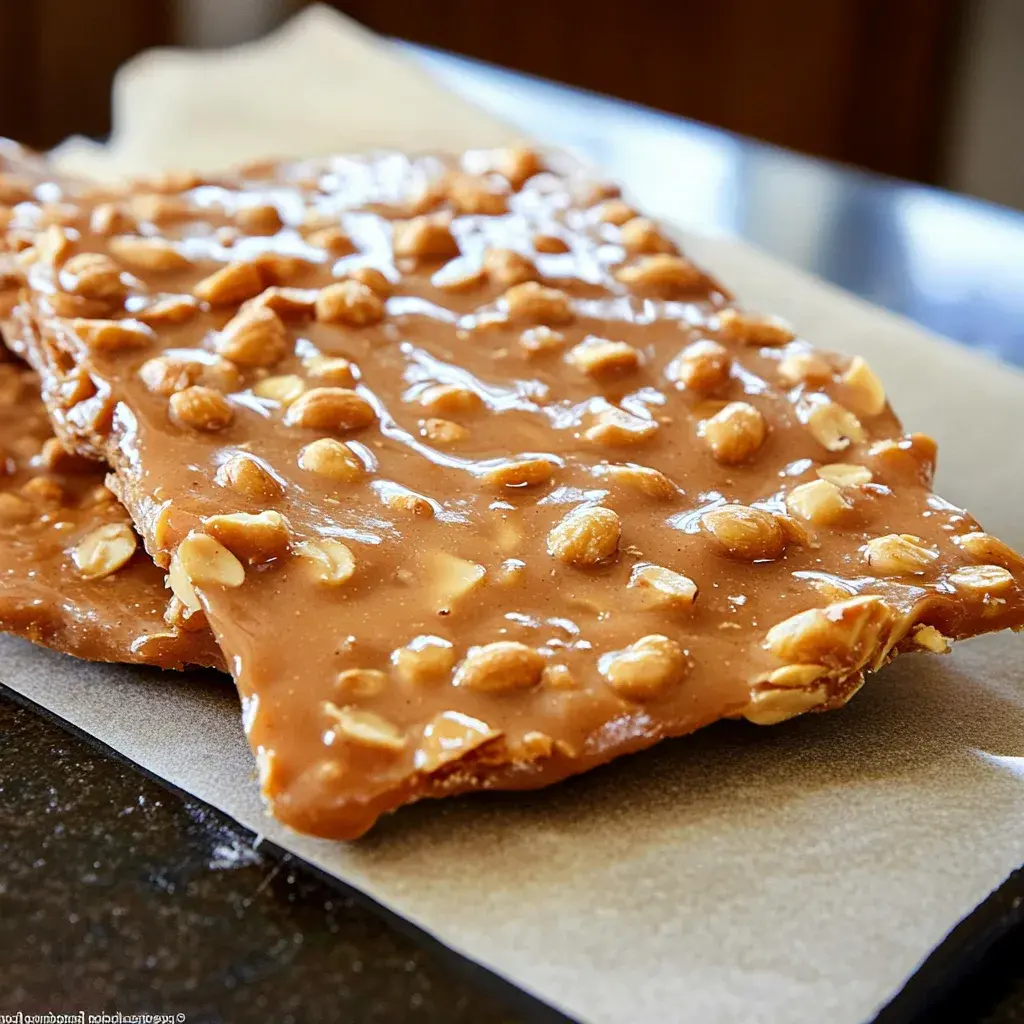
Step 6: Pouring and Spreading

Immediately pour the hot mixture onto the prepared baking sheet, then use a greased spatula to spread it evenly into a thin layer before it begins to cool and harden.

Common Mistake to Avoid: Don’t wait too long to spread, as it hardens quickly—work fast but carefully to avoid air bubbles that could make the brittle uneven.

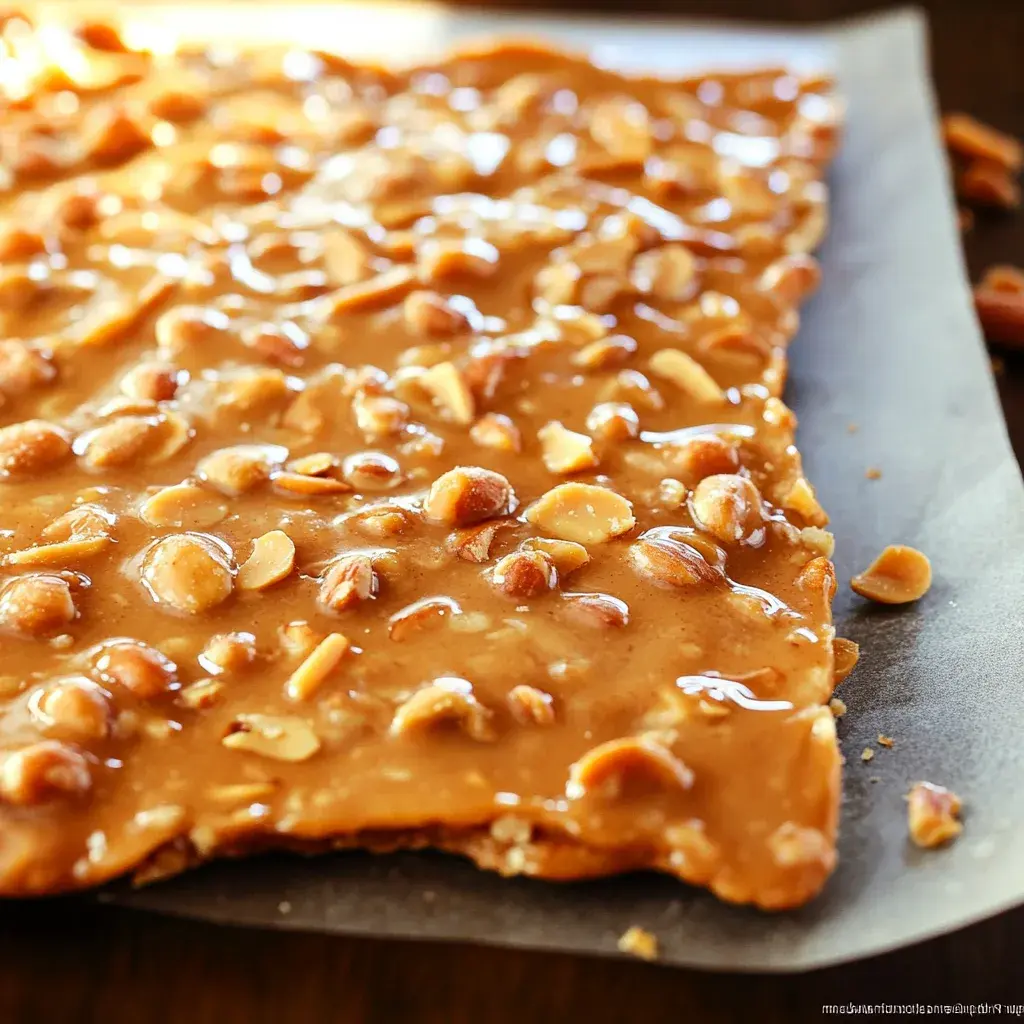
Step 7: Cooling and Breaking

Allow the brittle to cool completely at room temperature, which takes about 30 minutes to an hour, then break it into bite-sized pieces using your hands or a mallet for serving.

Pro Tip: Let it cool undisturbed to maintain its shape; once set, store immediately to preserve freshness and that signature crunch of homemade peanut brittle.

Serving & Presentation

Elevate your homemade peanut brittle by presenting it in creative ways that make it the centerpiece of any occasion. For a stunning display, arrange the shattered pieces in a clear glass jar or on a rustic wooden board, garnished with a sprinkle of flaky sea salt for an extra pop of flavor and visual appeal. Pair this crunchy treat with complementary sides like fresh fruit, such as apple slices, to balance the sweetness, or serve it alongside a scoop of vanilla ice cream for a delightful contrast of temperatures and textures. For holidays, package it in cellophane bags tied with ribbon, turning it into a thoughtful gift that showcases your homemade peanut brittle mastery.

Make-Ahead & Storage Solutions

Make-Ahead Strategy: Prepare the ingredients up to 3 days in advance by measuring and storing them in airtight containers—keep peanuts in the fridge to maintain freshness. You can even cook the mixture and pour it onto the baking sheet, then let it cool and store the unbroken sheet in an airtight container for up to 2 days before breaking, ensuring it retains its crunch.

Storing Leftovers: To keep your homemade peanut brittle fresh, store it in an airtight container at room temperature for up to 2 weeks. For longer storage, freeze in a zip-top bag for up to 3 months, but make sure it’s completely cooled to prevent condensation. If it softens due to humidity, recrisp it in a low oven for a few minutes.

The Best Way to Reheat: Restore the original texture by placing pieces on a baking sheet in a 250°F oven for 5-10 minutes. This gently warms without melting, bringing back that perfect airy crunch of your homemade peanut brittle recipe.

Finished recipe photo

Frequently Asked Questions (FAQ)

How long does it take to prepare Homemade Peanut Brittle?

Preparing homemade peanut brittle is quick and straightforward, with a total time of about 20 minutes, including 5 minutes for prep and 15 minutes for cooking. However, you’ll need an additional 30-60 minutes for cooling, which isn’t active time. This makes it an ideal recipe for last-minute treats or gifts, perfect for busy schedules while ensuring you get that signature crunchy texture every time.

What are some good ingredient substitutions for Homemade Peanut Brittle?

For substitutions in homemade peanut brittle, you can swap light corn syrup with honey for a natural alternative, though it may make the brittle slightly softer—use about 1-2 tablespoons less. If peanuts aren’t your thing, try cashews or almonds for a different nutty flavor, ensuring they’re raw and added at the same stage. For a dairy-free version, replace unsalted butter with coconut oil, but monitor the cooking temperature closely to avoid altering the texture. Always test small batches when substituting to maintain the recipe’s balance.

What are the best tips for cooking Homemade Peanut Brittle?

The best tips for cooking homemade peanut brittle include using a candy thermometer for precision, aiming for 300°F to achieve the perfect caramelization without burning. Stir constantly to prevent crystallization, and have all ingredients measured beforehand for smooth execution. Work quickly after adding baking soda to capture the bubbling effect, and store in a dry environment to keep it crunchy. These pro tips ensure your peanut brittle recipe turns out flawlessly every time.

How can I serve Homemade Peanut Brittle for a family dinner?

To serve homemade peanut brittle for a family dinner, present it as a fun, interactive dessert station where everyone can break off pieces themselves, perhaps alongside coffee or tea for a cozy end to the meal. It’s versatile—chop it into smaller bits to top ice cream sundaes or mix into yogurt for a sweet addition. For kids, pair it with fresh fruit to balance flavors, making it a memorable, shareable treat that elevates any gathering.

Can I make this recipe vegan?

Yes, you can easily make this homemade peanut brittle recipe vegan by substituting the unsalted butter with a plant-based alternative like coconut oil or vegan margarine. Ensure your corn syrup is vegan-certified, as some brands use animal-derived ingredients. The rest of the ingredients are naturally vegan, so follow the same steps, and you’ll have a delicious, cruelty-free version with that same airy crunch.

What’s the best way to store Homemade Peanut Brittle for gifting?

For gifting, store homemade peanut brittle in an airtight container or sealed bags to maintain its freshness and crunch for up to two weeks. Layer pieces with parchment paper to prevent sticking, and if shipping, use padded packaging to avoid breakage. This ensures your gift arrives in perfect condition, ready to impress.

How do I fix Homemade Peanut Brittle if it turns out too hard?

If your homemade peanut brittle is too hard, it might have been cooked a bit too long. To soften it slightly, place the pieces in a sealed container with a slice of bread overnight to draw moisture, or reheat in a low oven at 250°F for a few minutes. Adjust your thermometer next time for more precise temperature control.

Print
clock clock iconcutlery cutlery iconflag flag iconfolder folder iconinstagram instagram iconpinterest pinterest iconfacebook facebook iconprint print iconsquares squares iconheart heart iconheart solid heart solid icon

Homemade Peanut Brittle


  • Author: Chef mia

Description

A crunchy, sweet treat that combines roasted peanuts and caramelized sugar for a delightful snack or gift. Perfect for sharing or enjoying on your own!


Ingredients

Scale
  • 1 cupgranulated sugar
  • 1/2 cuplight corn syrup
  • 1/4 cupunsalted butter
  • 1 cupraw peanuts
  • 1 teaspoonbaking soda
  • Pinch of salt

Instructions

  1. Line a baking sheet with parchment paper.
  2. In a heavy saucepan over medium heat, combine sugar and corn syrup, stirring continuously until bubbly and golden brown.
  3. Add butter, mixing until melted, then stir in peanuts to coat evenly.
  4. Cook while stirring until the mixture reaches a deep amber color (about 300°F).
  5. Remove from heat and quickly mix in baking soda and salt; expect bubbling.
  6. Pour the hot mixture onto the prepared baking sheet, spreading it evenly before it cools.
  7. Once cooled, break into pieces and enjoy!

Nutrition

  • Calories: 140
  • Sugar: 18g
  • Fat: 6g
  • Carbohydrates: 19g
  • Protein: 3g

Conclusion

This delightful recipe brings together rich, nutty flavors with a perfect balance of spices and textures, making it an ideal choice for a comforting weeknight dinner or a special gathering. Whether you’re craving something hearty and satisfying or looking to explore new culinary traditions, this dish is sure to impress with its depth of flavor and ease of preparation. For a fun variation, try adding fresh vegetables like bell peppers for added crunch, and serve it alongside Hearty African Peanut Stew for a complementary meal or Classic Peanut Butter Cookies as a sweet finish.

Classic Pumpkin Pie

Classic Pumpkin Pie: The Only Recipe You’ll Ever Need

As the leaves turn golden and the air grows crisp, nothing captures the essence of fall quite like a slice of Classic Pumpkin Pie. This timeless dessert, with its ultra-creamy filling and aromatic spices, solves the common dilemma of holiday baking—delivering a pie that’s effortlessly delicious and impressively homemade. Drawing from our trusted Classic Pumpkin Pie recipe at cookingwithemy.com, you’ll create a dessert that stands out at Thanksgiving tables or autumn gatherings, making it the go-to choice for home cooks seeking perfection. Picture the warm, inviting scent of cinnamon and nutmeg filling your kitchen, turning ordinary moments into cherished traditions.

Imagine the velvety, ultra-creamy texture of this Classic Pumpkin Pie as it melts in your mouth, balanced by the subtle crunch of a flaky crust. Each bite bursts with the sweet, earthy flavors of fresh pumpkin puree, enhanced by the warmth of spices like cinnamon, nutmeg, and ginger powder. The evaporated milk adds a luxurious smoothness, creating a filling that’s rich yet light, with hints of caramelized sweetness from the sugar. Aromas waft through the air, evoking cozy evenings by the fire, while the pie’s golden-brown top promises a satisfying contrast to the soft, custard-like interior.

What sets this Classic Pumpkin Pie apart at cookingwithemy.com is our commitment to making it the ultimate, foolproof recipe for every level of home cook. We’ve tested and refined every detail to ensure your pie turns out ultra-creamy and irresistible every time, including a Chef’s Secret that elevates the flavor profile beyond standard versions. In this comprehensive guide, you’ll learn expert tips, ingredient insights, and step-by-step instructions that build your confidence in the kitchen, turning you into a pumpkin pie pro and making this the single best resource for mastering this fall favorite.

Prep Time: 15 minutes
Cook Time: 55 minutes
Total Time: 1 hour 10 minutes
Servings: 8

Why This Classic Pumpkin Pie Recipe is a Game-Changer

The Chef’s Secret: Our unique angle lies in achieving an ultra-creamy Classic Pumpkin Pie by incorporating a precise blend of evaporated milk and fresh pumpkin puree, which creates a silky-smooth filling that’s unmatched. This technique ensures the custard sets perfectly without cracking, elevating the pie’s texture and flavor. By whisking the ingredients just until smooth—avoiding overmixing—we lock in moisture and prevent a dense result, making your pie feel indulgent yet light.

Unbeatable Texture: The science behind the ultra-creamy filling comes from the emulsion formed by the eggs and evaporated milk, which stabilizes the mixture during baking. This results in a custard that’s firm on the edges but jiggles slightly in the center, providing that perfect, creamy mouthfeel. The pie crust’s flakiness is enhanced by using a well-chilled dough, allowing the butter to create steam pockets for a light, layered effect that contrasts beautifully with the smooth filling.

Foolproof for a Reason: This Classic Pumpkin Pie recipe has been tested multiple times in real home kitchens to guarantee success, even for beginners. With clear instructions and built-in tips, it minimizes common errors like overbaking or uneven spice distribution, ensuring consistent results that impress every time. Home cooks can rely on this as their go-to pumpkin pie recipe for holidays and beyond.

Ingredient Spotlight: Quality Makes the Difference

Fresh pumpkin puree is the heart of this Classic Pumpkin Pie, providing a natural, earthy sweetness and vibrant color that canned versions can’t match. Its role is to form the base of the ultra-creamy filling, adding moisture and flavor that enhance the overall dessert. Always opt for homemade puree from a sugar pumpkin for the best taste and texture; it ensures a fresher, less metallic flavor. If fresh isn’t available, a high-quality canned puree works as a substitution, but strain it first to remove excess liquid for that signature creaminess.

Granulated sugar sweetens the pie while balancing the spices, helping to create the ultra-creamy consistency by dissolving evenly into the mixture. Its role is crucial for caramelization during baking, which adds depth to the Classic Pumpkin Pie’s flavor. Choose organic sugar for a cleaner taste, and if you’re watching sugar intake, substitute with coconut sugar in equal amounts, though it may introduce a subtle nutty note.

Cinnamon brings warm, woody notes that define the spice profile of Classic Pumpkin Pie, complementing the pumpkin’s earthiness for an aromatic experience. It enhances the ultra-creamy filling by adding complexity without overpowering other flavors. Always use freshly ground cinnamon for potency; if unavailable, substitute with a cinnamon stick ground at home, but adjust to taste to maintain the pie’s balanced spice level.

Nutmeg adds a nutty, slightly sweet warmth that elevates the pie’s autumnal aroma, working synergistically with other spices for that iconic Classic Pumpkin Pie taste. Its role in the filling is to provide subtle depth, making the texture feel even more luxurious. Freshly grated nutmeg is ideal for maximum flavor; if substituting, use pre-ground but in smaller amounts to avoid bitterness.

Ginger powder introduces a zesty, peppery kick that brightens the ultra-creamy filling, preventing it from becoming too one-dimensional. It pairs perfectly with cinnamon and nutmeg for a well-rounded spice blend in Classic Pumpkin Pie. Opt for organic ginger for purity; fresh grated ginger can substitute, but use half the amount and incorporate it early in mixing to infuse the flavors fully.

Evaporated milk contributes to the pie’s ultra-creamy texture by adding richness and helping the filling set without curdling. It’s essential for creating a smooth, custard-like consistency in Classic Pumpkin Pie. Choose full-fat versions for the best results; if dairy-free, substitute with coconut milk for a similar creaminess, though it will add a tropical twist.

Eggs act as a binding agent, giving structure to the filling while contributing to its ultra-creamy mouthfeel in Classic Pumpkin Pie. They help the mixture hold together during baking, resulting in a perfect slice. Always use large, room-temperature eggs for even incorporation; for egg-free options, try a flaxseed mixture, but note it may slightly alter the texture.

Pie crust, whether store-bought or homemade, provides the flaky base that complements the creamy filling of Classic Pumpkin Pie. It encases the flavors, adding a buttery contrast. Homemade crust allows for customization; if short on time, use a high-quality pre-made one, ensuring it’s blind-baked for the best results.

Step-by-Step Instructions

Step 1: Preheat the Oven

Start by preheating your oven to 425°F (220°C) to ensure even baking. This high initial temperature helps set the crust and begin the caramelization process for the ultra-creamy filling.

Pro Tip: Use an oven thermometer to verify the temperature accuracy, as a few degrees off can affect the pie’s texture.

Step 2: Mixing the Filling

In a large mixing bowl, whisk together the fresh pumpkin puree, granulated sugar, cinnamon, nutmeg, ginger powder, evaporated milk, and eggs until the mixture is completely smooth and free of lumps. This step ensures the spices are evenly distributed for a flavorful Classic Pumpkin Pie.

Common Mistake to Avoid: Over-whisking can incorporate too much air, leading to cracks in the baked pie; stop as soon as it’s smooth to maintain that ultra-creamy consistency.

Step 3: Preparing the Crust

Roll out your pie crust on a lightly floured surface to about 1/8-inch thickness, then carefully transfer it to a 9-inch pie dish, pressing it gently into the edges without stretching.

Pro Tip: Chill the dough for 10 minutes before rolling to keep it from tearing, ensuring a flaky crust for your Classic Pumpkin Pie.

Step 4: Assembling the Pie

Pour the prepared pumpkin filling into the pie crust, leaving about 1/4-inch space from the top to account for bubbling during baking.

Common Mistake to Avoid: Overfilling the crust can cause spills and uneven baking; measure carefully to achieve the perfect rise in your ultra-creamy Classic Pumpkin Pie.

Step 5: Baking the Pie

Bake the pie at 425°F (220°C) for 15 minutes, then reduce the heat to 350°F (175°C) and continue baking for 40-50 minutes, or until the center is set but still slightly jiggly.

Pro Tip: Place the pie on a baking sheet to catch any drips, promoting even heat distribution for the best texture in this Classic Pumpkin Pie recipe.

Step 6: Cooling the Pie

Remove the pie from the oven and let it cool on a wire rack for at least 2 hours at room temperature to allow the filling to fully set.

Common Mistake to Avoid: Cutting the pie too soon can make it watery; patience ensures clean slices and preserves the ultra-creamy quality.

Serving & Presentation

For an impressive presentation of your Classic Pumpkin Pie, slice it neatly and arrange on a rustic platter with a dollop of freshly whipped cream or a scoop of vanilla ice cream for added indulgence. Garnish with a sprinkle of cinnamon or edible fall leaves made from fondant to enhance the autumnal theme. Complementary sides include a warm cup of coffee or spiced chai, which pairs beautifully with the pie’s spices, making it ideal for Thanksgiving desserts or casual gatherings.

Make-Ahead & Storage Solutions

Make-Ahead Strategy: Prepare the filling up to 3 days in advance by whisking all ingredients together and storing it in an airtight container in the refrigerator. Assemble the pie just before baking to keep the crust fresh; this allows you to focus on other holiday tasks.

Storing Leftovers: Cover the cooled Classic Pumpkin Pie tightly with plastic wrap or store in an airtight container in the refrigerator for up to 4 days. For longer storage, freeze individual slices on a baking sheet, then transfer to a freezer-safe bag for up to 3 months to maintain the ultra-creamy texture.

The Best Way to Reheat: Thaw frozen slices overnight in the refrigerator, then warm in a 300°F oven for 10-15 minutes to restore the original flaky crust and creamy filling without drying it out.

Finished recipe photo

Frequently Asked Questions (FAQ)

How do you make the best chocolate chip cookies from scratch?

While this guide focuses on Classic Pumpkin Pie, the principle of using quality ingredients applies. For chocolate chip cookies, cream butter and sugar thoroughly, add eggs and vanilla, then fold in flour and chips. Bake at 375°F for 10-12 minutes. However, for your pumpkin pie success, ensure even mixing as in this recipe to achieve that ultra-creamy result.

Can you substitute butter with oil in chocolate chip cookies?

Yes, you can substitute butter with oil in chocolate chip cookies for a softer texture, using a 1:1 ratio, but it may affect flavor. Oil lacks butter’s richness, so results won’t be identical. In Classic Pumpkin Pie, stick to the recipe’s ingredients for the best ultra-creamy filling, as substitutions can alter consistency.

How long do you bake chocolate chip cookies for perfect results?

Bake chocolate chip cookies for 10-12 minutes at 375°F until edges are golden but centers are soft. Overbaking leads to hardness. For Classic Pumpkin Pie, precise baking times as outlined ensure a perfect set, highlighting the importance of monitoring your oven like in this recipe.

What are some creative ways to serve chocolate chip cookies?

Serve chocolate chip cookies crumbled over ice cream, in milkshakes, or as a pie crust alternative. Pair with coffee for a treat. For Classic Pumpkin Pie, try serving with a chocolate drizzle for a fun twist, enhancing its creamy profile and making it a versatile dessert option.

Can I use canned pumpkin instead of fresh in Classic Pumpkin Pie?

Yes, you can use canned pumpkin puree as a convenient substitute for fresh in this Classic Pumpkin Pie recipe. Ensure it’s 100% pure pumpkin and not pie filling, then follow the instructions as is to maintain the ultra-creamy texture.

How can I make this Classic Pumpkin Pie gluten-free?

To make this Classic Pumpkin Pie gluten-free, use a gluten-free pie crust made from almond flour or a store-bought alternative. The rest of the recipe remains the same, keeping the ultra-creamy filling intact while accommodating dietary needs.

Print
clock clock iconcutlery cutlery iconflag flag iconfolder folder iconinstagram instagram iconpinterest pinterest iconfacebook facebook iconprint print iconsquares squares iconheart heart iconheart solid heart solid icon

Classic Pumpkin Pie


  • Author: Chef mia

Description

Classic Pumpkin Pie is a quintessential fall dessert featuring a creamy pumpkin filling, aromatic spices, and a flaky crust. Perfect for Thanksgiving or cozy autumn gatherings.


Ingredients

  • Fresh pumpkin puree
  • Granulated sugar
  • Cinnamon
  • Nutmeg
  • Ginger powder
  • Evaporated milk
  • Eggs
  • Pie crust (store-bought or homemade)

Instructions

  1. Preheat your oven to 425°F (220°C).
  2. In a mixing bowl, whisk together fresh pumpkin puree, sugar, cinnamon, nutmeg, ginger powder, evaporated milk, and eggs until smooth.
  3. Roll out your pie crust and place it in a pie dish.
  4. Pour the pumpkin filling into the crust, leaving some space for bubbling.
  5. Bake for 15 minutes at 425°F (220°C), then reduce the heat to 350°F (175°C) and bake for an additional 40-50 minutes until set.
  6. Allow the pie to cool before slicing. Serve with whipped cream or ice cream if desired.

Nutrition

  • Calories: 320
  • Sugar: 20g
  • Fat: 14g
  • Carbohydrates: 45g
  • Protein: 4g

Conclusion

In conclusion, this butternut squash recipe delivers a perfect balance of sweet, earthy flavors with a touch of herbs, making it an ideal side dish for fall gatherings or weeknight dinners. Its simplicity allows for easy preparation while highlighting the vegetable’s natural richness. For a pasta-inspired twist, try our Roasted Butternut Squash and Sage Pasta, or explore Irresistible Maple Glazed Butternut Squash for a sweeter variation that pairs wonderfully with meats or salads.

Baked Garlic Parmesan Potato Wedges

Baked Garlic Parmesan Potato Wedges: The Only Recipe You’ll Ever Need

Imagine transforming simple russet potatoes into crispy, golden delights that steal the show at any dinner table. Baked Garlic Parmesan Potato Wedges are not just a side dish; they’re a flavorful revelation that’s easy to prepare and impossible to resist. With their irresistible garlic parmesan coating that locks in crunch and amplifies taste, this recipe solves the common problem of bland, soggy fries at home. Whether you’re hosting a family gathering or craving a healthy snack, these baked potato wedges deliver oven-baked perfection without the guilt of frying. I’ve perfected this method through countless tests, ensuring every bite is a hit.

The aroma of fresh garlic mingling with melted parmesan cheese fills your kitchen, creating an inviting scent that draws everyone in. Each wedge boasts a satisfying crunch on the outside, giving way to a fluffy, tender interior that’s seasoned to perfection. The flavors—garlicky, cheesy, and herb-infused—dance on your tongue, offering a harmonious blend of savory and subtle spices. Baked Garlic Parmesan Potato Wedges aren’t just food; they’re a textural adventure, with that golden crispiness that makes you reach for seconds, elevating your meal from ordinary to extraordinary.

What sets this Baked Garlic Parmesan Potato Wedges recipe from cookingwithemy.com apart is its foolproof approach, drawing from years of home cooking expertise and rigorous testing. You’ll discover my “Chef’s Secret” for achieving unmatched crispiness, along with tips to avoid common pitfalls. In this comprehensive guide, I cover everything from ingredient selection to storage, making it the ultimate resource for home cooks. By the end, you’ll feel confident whipping up these wedges anytime, turning them into your go-to side dish for any occasion.

Prep Time: 15 minutes
Cook Time: 35 minutes
Total Time: 50 minutes
Servings: 4

Why This Baked Garlic Parmesan Potato Wedges Recipe is a Game-Changer

The Chef’s Secret: The unique angle here is the garlic-infused parmesan crust that creates ultimate crispiness without deep-frying. By tossing the wedges in extra virgin olive oil, minced garlic, and grated parmesan before baking, we form a protective barrier that caramelizes in the oven. This technique ensures the potatoes absorb flavors deeply while the cheese melts into a crunchy layer, setting this recipe apart from basic baked potato wedges. It’s a simple yet transformative step that elevates the dish to restaurant-quality levels.

Unbeatable Texture: The science behind the texture lies in the high-heat baking at 425°F, which drives moisture out of the potato surfaces while the olive oil and parmesan create a Maillard reaction for that golden brown crisp. Russet potatoes, with their high starch content, hold up perfectly, resulting in a contrast of crunchy exteriors and fluffy insides. This method guarantees consistency, avoiding sogginess by spacing the wedges on the baking sheet for even air circulation.

Foolproof for a Reason: This recipe has been tested multiple times in real home kitchens, ensuring it’s reliable for beginners and pros alike. With clear instructions and pro tips, you’ll avoid uneven cooking or bland flavors, making Baked Garlic Parmesan Potato Wedges a dependable staple. It’s designed for success, so you can confidently serve it every time.

Ingredient Spotlight: Quality Makes the Difference

For the 4 medium russet potatoes, these starchy tubers are the foundation of crispy baked potato wedges due to their ability to achieve a fluffy interior and golden exterior. Quality matters because fresh, firm russet potatoes with fewer blemishes bake evenly and absorb seasonings better. If you can’t find russets, substitute with Yukon Gold potatoes for a slightly creamier result, but adjust baking time as they may crisp less.

Extra virgin olive oil, at 1/4 cup, acts as the binding agent that helps the seasonings adhere and promotes browning. Opt for high-quality, cold-pressed oil for its rich flavor and health benefits, which enhance the garlic parmesan potatoes. A good substitution is avocado oil for a neutral taste and higher smoke point, ensuring crispiness without altering the oven-baked profile.

Fresh garlic, 4 cloves minced, infuses the wedges with a pungent, aromatic punch that elevates them from ordinary to irresistible. Always use fresh cloves over pre-minced for maximum flavor intensity; their natural oils release during mixing for better distribution. If fresh garlic is unavailable, substitute with 1/2 teaspoon of garlic powder per clove, though it won’t match the robust taste of these baked garlic parmesan potato wedges.

Grated Parmesan cheese, at 1/2 cup, provides a nutty, salty crust that melts beautifully in the oven. Choose freshly grated over pre-shredded for superior melt and flavor; it’s key to that cheesy crunch. For a dairy-free option, use nutritional yeast as a substitute to maintain the umami without compromising the unique angle of this recipe.

Italian seasoning, 1 tablespoon, adds a herbaceous depth with oregano, basil, and thyme, balancing the garlic and cheese. High-quality blends ensure vibrant flavors; make your own by mixing equal parts of dried herbs for freshness. There’s no direct substitution, but you can use a mix of dried oregano and basil to keep these baked potato wedges authentic.

Salt and pepper to taste are essential for enhancing all flavors in these garlic parmesan potatoes. Use fine sea salt for even seasoning and freshly ground black pepper for a sharper kick. If watching sodium, substitute with a salt-free seasoning blend, but taste as you go to maintain the recipe’s bold profile.

Step-by-Step Instructions

Step 1: Preparing the Potatoes

Start by preheating your oven to 425°F (220°C). Wash and scrub the 4 medium russet potatoes thoroughly under cold water to remove any dirt, then pat them dry. Slice each potato lengthwise into thick wedges, about 8 per potato, ensuring they’re uniform for even cooking. This step is crucial for creating the base of your Baked Garlic Parmesan Potato Wedges.

Pro Tip: Soak the sliced wedges in cold water for 10 minutes to remove excess starch, which prevents them from sticking and promotes extra crispiness—don’t skip this for the best results.

Step 2: Creating the Seasoning Mixture

In a large bowl, drizzle 1/4 cup extra virgin olive oil over the potato wedges. Add 4 minced garlic cloves, 1/2 cup grated Parmesan cheese, 1 tablespoon Italian seasoning, and salt and pepper to taste. Toss everything together until the wedges are evenly coated, ensuring each piece gets a generous amount of the garlic-infused parmesan mixture.

Common Mistake to Avoid: Overcrowding the bowl can lead to uneven coating; always use a large enough bowl and toss gently to prevent breaking the wedges, which could affect their texture during baking.

Step 3: Arranging for Baking

Line a baking sheet with parchment paper for easy cleanup and to prevent sticking. Spread the seasoned potato wedges in a single layer on the sheet, making sure they’re not touching to allow hot air to circulate evenly around each one for optimal crispiness.

Pro Tip: If your baking sheet is too small, use two to avoid overcrowding—this ensures the unique garlic parmesan coating crisps up perfectly without steaming the potatoes.

Step 4: Baking the Wedges

Bake the wedges in the preheated oven for 30-35 minutes, flipping them halfway through with a spatula to ensure even browning on all sides. They’re ready when they’re golden brown and crispy on the outside.

Common Mistake to Avoid: Forgetting to flip can result in one-sided crispiness, so set a timer reminder to check and turn them precisely at the 15-17 minute mark for uniform baked garlic parmesan potato wedges.

Step 5: Final Touches and Serving

Optional: Once out of the oven, sprinkle additional grated Parmesan cheese on the hot wedges for an extra cheesy layer. Let them cool slightly on the baking sheet for 5 minutes to firm up before serving.

Pro Tip: Serve immediately after cooling to preserve that irresistible crunch, making your Baked Garlic Parmesan Potato Wedges the star of the meal.

Serving & Presentation

Plate your Baked Garlic Parmesan Potato Wedges in a rustic basket or on a wooden board for a casual, inviting look that highlights their golden crispiness. Garnish with fresh parsley or a sprinkle of extra Italian seasoning for a pop of color and added aroma. These wedges pair beautifully with grilled meats like steak or chicken, and they complement salads and burgers as a flavorful side dish. For a vegetarian feast, serve alongside roasted vegetables or as a dipper for garlic aioli, turning them into the perfect appetizer for gatherings.

Make-Ahead & Storage Solutions

Make-Ahead Strategy: Prepare the potato wedges up to 3 days in advance by slicing and soaking them in cold water, then storing in an airtight container in the refrigerator. For the seasoning, mix the oil, garlic, parmesan, and herbs separately and refrigerate; combine just before baking to maintain freshness and crispiness.

Storing Leftovers: Store any leftover Baked Garlic Parmesan Potato Wedges in an airtight container in the fridge for up to 3 days, or freeze them on a baking sheet first, then transfer to a freezer bag for up to 2 months. This keeps their texture intact without sogginess.

The Best Way to Reheat: To restore the original crispy texture, reheat in a 400°F oven for 10-15 minutes, flipping halfway. Avoid microwaving, as it can make them soft; for frozen wedges, bake directly from frozen, adding a few extra minutes for that garlic parmesan potatoes magic.

Finished recipe photo

Frequently Asked Questions (FAQ)

How long does it take to bake Baked Garlic Parmesan Potato Wedges?

Baking these wedges typically takes 30-35 minutes at 425°F, but factors like oven calibration and potato size can vary it slightly. Always check for golden brown crispiness and use an oven thermometer for accuracy. This ensures your baked garlic parmesan potato wedges come out perfectly every time.

What are some good substitutions for ingredients in Baked Garlic Parmesan Potato Wedges?

For a dairy-free version, swap grated Parmesan with nutritional yeast or vegan cheese to keep the cheesy flavor. If you’re out of Italian seasoning, use a mix of dried oregano and basil. For olive oil, avocado oil works well for similar crispiness. Always adjust salt if using cheese alternatives to maintain the balance in these baked potato wedges.

How can I make my potato wedges crispier?

To achieve extra crispiness, soak the sliced potatoes in cold water for 10-15 minutes before seasoning to remove starch, and ensure they’re spread out on the baking sheet. Using a higher oven rack and flipping midway also helps. The garlic-infused parmesan coating in this recipe naturally enhances that crunch for your baked garlic parmesan potato wedges.

What are the best ways to serve Baked Garlic Parmesan Potato Wedges for a party?

Serve them as an appetizer with dipping sauces like ranch or marinara, or as a side with burgers and grilled proteins. For a party, arrange in a sharing platter with fresh herbs for visual appeal, and pair with beverages like craft beer to complement the garlic flavors. They’re versatile and crowd-pleasing for any occasion.

Can I make this recipe vegan?

Yes, make it vegan by replacing Parmesan cheese with nutritional yeast or a vegan parmesan alternative. Ensure all other ingredients are plant-based, like using olive oil as specified. This keeps the irresistible garlic parmesan potato wedges intact while making them suitable for vegan diets.

Are Baked Garlic Parmesan Potato Wedges healthy?

They’re a healthier alternative to fried potatoes, with about 320 calories per serving and good amounts of fiber and protein. Baking reduces oil use, making them nutrient-dense, but enjoy in moderation as part of a balanced meal.

Print
clock clock iconcutlery cutlery iconflag flag iconfolder folder iconinstagram instagram iconpinterest pinterest iconfacebook facebook iconprint print iconsquares squares iconheart heart iconheart solid heart solid icon

Baked Garlic Parmesan Potato Wedges


  • Author: Chef mia

Description

Baked Garlic Parmesan Potato Wedges are crispy, flavorful, and an irresistible addition to any meal or gathering. Perfect for snacking or as a side dish!


Ingredients

Scale
  • 4medium russet potatoes
  • 1/4 cupextra virgin olive oil
  • 4cloves fresh garlic, minced
  • 1/2 cupgrated Parmesan cheese
  • 1 tablespoonItalian seasoning
  • Salt and pepper to taste

Instructions

  1. Preheat the oven to 425°F (220°C). Wash and scrub the russet potatoes thoroughly, then slice into thick wedges.
  2. In a large bowl, drizzle olive oil over the potato wedges. Add minced garlic, salt, pepper, Italian seasoning, and grated Parmesan cheese. Toss until evenly coated.
  3. Line a baking sheet with parchment paper and spread the potato wedges in a single layer without crowding them.
  4. Bake for 30-35 minutes or until golden brown, flipping halfway through for even crispiness.
  5. Optional: Sprinkle additional Parmesan cheese on hot wedges before serving. Let cool slightly and enjoy!

Nutrition

  • Calories: 320
  • Sugar: 1g
  • Fat: 16g
  • Carbohydrates: 42g
  • Protein: 6g

Conclusion

This delightful recipe brings together zesty flavors and a refreshing citrus twist that makes it perfect for a light dessert or casual gathering. Its vibrant taste highlights the balance of tangy lemon and sweet undertones, creating a crowd-pleasing treat that’s simple yet impressive. For serving, pair it with a scoop of vanilla ice cream to enhance the flavors, or try a variation by substituting lime for a tropical spin. If you’re craving more baked goodies, explore Baked Cheese Buns for a savory alternative, or check out Crispy Garlic Parmesan Chicken Tenders to add some protein to your meal.

Traditional Irish Corned Beef and Cabbage Recipe for St. Patrick’s Day

Traditional Irish Corned Beef and Cabbage Recipe for St. Patrick’s Day: The Only Recipe You’ll Ever Need

As St. Patrick’s Day approaches, who doesn’t crave that hearty, comforting embrace of a Traditional Irish Corned Beef and Cabbage Recipe for St. Patrick’s Day? Imagine transforming your kitchen into an Irish haven with this foolproof method that delivers melt-in-your-mouth tenderness every time. This recipe, straight from the heart of Irish culinary traditions, uses a gentle simmering technique as its secret weapon, ensuring your brisket is fork-tender without any tough surprises. Whether you’re hosting a festive gathering or seeking a family dinner staple, this Traditional Irish Corned Beef and Cabbage Recipe for St. Patrick’s Day stands out as the ultimate guide for home cooks aiming for authentic flavors with minimal effort.

The aromas alone will transport you straight to the Emerald Isle, with the rich, savory scent of beef broth infused with pickling spices filling your home. Picture the tender brisket, boasting juicy, flavorful bites that pair perfectly with the crisp-tender cabbage, earthy carrots, and buttery Yukon Gold potatoes. Each element offers a delightful contrast: the beef’s deep, meaty richness against the bright, slightly sweet crunch of cabbage, all harmonizing in a symphony of textures that make every bite unforgettable. This recipe’s unique balance ensures that the vegetables retain their natural vibrancy and nutrients, making it not just a meal, but a celebration on your plate.

What sets this Traditional Irish Corned Beef and Cabbage Recipe for St. Patrick’s Day apart on cookingwithemy.com is our commitment to authenticity with a modern, user-friendly twist—think detailed tips and science-backed explanations that guarantee success. Drawing from time-tested Irish techniques, we’ve refined this recipe through multiple kitchen tests to incorporate the “Chef’s Secret” for unparalleled tenderness. You’ll learn how to achieve that perfect simmer, avoid common pitfalls, and even adapt it for make-ahead meals, empowering you to cook with confidence and impress your guests effortlessly.

Prep Time: 15 minutes
Cook Time: 3 hours 45 minutes
Total Time: 4 hours
Servings: 6

Why This Traditional Irish Corned Beef and Cabbage Recipe for St. Patrick’s Day Recipe is a Game-Changer

The Chef’s Secret lies in the precise gentle simmering technique, which allows the brisket to achieve melt-in-your-mouth tenderness by breaking down connective tissues slowly without overcooking. This method, combined with fresh garlic cloves and pickling spices, infuses the meat with authentic Irish flavors that elevate it above standard recipes. Unlike quicker methods that can leave beef tough, our approach ensures every slice is succulent and packed with depth.

Unbeatable Texture: The science behind this texture comes from maintaining a low simmer, which keeps the collagen in the brisket converting to gelatin gradually. This results in a tender, juicy cut that doesn’t dry out, thanks to the beef broth’s moisture-retaining properties—perfect for that fall-apart consistency Irish cuisine is famous for.

Foolproof for a Reason: This recipe has been tested in real home kitchens multiple times, adjusting for variables like altitude and ingredient quality, to deliver consistent results. It’s designed for cooks of all levels, with clear steps and tips that minimize errors, making it the most reliable Traditional Irish Corned Beef and Cabbage Recipe for St. Patrick’s Day you’ll find online.

Ingredient Spotlight: Quality Makes the Difference

For the 3–4lbs flat-cut brisket, this cut is the star of any Irish corned beef recipe, providing a rich, beefy base that absorbs flavors beautifully. Opt for high-quality, grass-fed beef to enhance the natural marbling and taste; it ensures tenderness and authenticity. If unavailable, substitute with a point-cut brisket, but note it may cook faster, so monitor closely to avoid overcooking.

A head of green cabbage brings that iconic, vibrant crunch and subtle sweetness to your St. Patrick’s Day cabbage dish. Fresh, firm heads are key for maintaining texture during steaming—avoid wilted ones. For a low-carb twist, swap with kale, which offers similar nutrients and holds up well, though it will add a slightly earthier flavor.

Four large carrots add natural sweetness and color, balancing the savory elements in this traditional Irish cuisine favorite. Choose organic carrots for their superior freshness and flavor; they provide essential vitamins. If you’re short on carrots, parsnips make a great substitute, offering a nutty alternative that complements the potatoes without altering the dish’s essence.

Four medium Yukon Gold potatoes contribute a creamy, buttery texture that soaks up the broth’s flavors, making them ideal for hearty Irish corned beef recipes. Select firm, unblemished ones for even cooking; their high starch content prevents them from becoming mushy. Sweet potatoes can replace them for a healthier option, adding a hint of sweetness that pairs well with the spices.

Four cups of low-sodium beef broth form the flavorful foundation, allowing you to control salt levels while building depth. Always use homemade or high-quality store-bought for purity; it enhances the overall taste. Vegetable broth works as a substitution for a lighter version, though it may slightly reduce the robust beefiness.

Two tablespoons of pickling spice are crucial for that authentic Irish corned beef flavor, infusing the dish with warm, aromatic notes. Freshly ground spices yield the best results—avoid pre-mixed if possible. For a milder version, reduce to one tablespoon or substitute with a mix of mustard seeds and coriander for a similar zing.

Fresh garlic cloves add a pungent, aromatic kick that elevates the entire St. Patrick’s Day corned beef and cabbage recipe. Use fresh bulbs for maximum flavor release; they’re essential for depth. If garlic isn’t your thing, shallots can step in, providing a gentler onion-like essence without overpowering the dish.

Step-by-Step Instructions

Step 1: Preparing the Brisket

Start by rinsing the 3–4lbs flat-cut brisket under cold water for about 2 minutes to remove excess salt and any curing residue, then pat it dry with paper towels. This step ensures the meat absorbs flavors without being overly salty.

Pro Tip: Always rinse thoroughly to prevent the final dish from tasting too briny—salting the water slightly can help draw out more impurities for even better results.

Step 2: Sautéing the Onions

In a large pot over medium heat, sauté diced onions until they become translucent, which should take about 5 minutes. This builds a flavorful base for your Traditional Irish Corned Beef and Cabbage Recipe for St. Patrick’s Day.

Common Mistake to Avoid: Don’t rush this step by using high heat, as it can burn the onions and introduce bitterness; keep the heat low and stir frequently for even cooking.

Step 3: Adding and Simmering the Brisket

Add the rinsed brisket to the pot, along with 4 cups low-sodium beef broth, water to cover, bay leaves, fresh garlic cloves, and 2 tablespoons pickling spice. Bring to a gentle boil, then reduce heat to low, cover, and simmer for 3 hours until the meat is tender.

Pro Tip: Use a thermometer to check tenderness; aim for an internal temperature of 195°F for that perfect, shreddable texture in your Irish corned beef recipe.

Step 4: Incorporating Carrots and Potatoes

After 3 hours, add the chopped carrots and medium Yukon Gold potatoes to the pot. Cover and cook for an additional 30 minutes, allowing them to absorb the rich flavors from the broth.

Common Mistake to Avoid: Overcrowding the pot can lead to uneven cooking; cut vegetables into uniform sizes to ensure they finish at the same time without becoming mushy.

Step 5: Steaming the Cabbage

Stir in the cabbage wedges and continue cooking for 15-20 minutes until the cabbage is bright green and crisp-tender. This final step brightens the dish and completes your St. Patrick’s Day cabbage masterpiece.

Pro Tip: Add the cabbage towards the end to preserve its crunch and nutrients, making your traditional Irish cuisine more vibrant and fresh.

Serving & Presentation

For an impressive presentation, slice the tender corned beef against the grain and arrange it on a large platter surrounded by the colorful carrots, potatoes, and cabbage wedges. Garnish with fresh parsley for a pop of green, enhancing the festive St. Patrick’s Day vibe. Pair this hearty dish with crusty Irish soda bread or a light colcannon to soak up the flavorful juices, creating a balanced meal. For a modern twist, drizzle with a simple mustard-horseradish sauce to add zing, making it ideal for family dinners or holiday feasts.

Make-Ahead & Storage Solutions

Make-Ahead Strategy: Prepare the brisket up to 3 days in advance by following steps 1-3, then cool and refrigerate it in the broth. On the day of serving, reheat gently and add vegetables as per steps 4-5 for fresh results.

Storing Leftovers: Store cooled portions in airtight containers in the refrigerator for up to 4 days or freeze for up to 3 months. Use shallow containers to maintain texture and prevent sogginess.

The Best Way to Reheat: Gently warm leftovers in a pot on the stove over low heat with a splash of broth to restore moisture, or use the oven at 300°F covered with foil for 20 minutes, ensuring the beef regains its tender consistency without drying out.

Finished recipe photo

Frequently Asked Questions (FAQ)

How do you make chocolate chip cookies from scratch?

While this isn’t directly related to our Traditional Irish Corned Beef and Cabbage Recipe for St. Patrick’s Day, here’s a quick overview: Combine 2 cups flour, 1 tsp baking soda, and a pinch of salt. Cream 1 cup butter with 3/4 cup sugar, add 2 eggs and 1 tsp vanilla, then mix in the dry ingredients and chocolate chips. Bake at 375°F for 8-10 minutes. For corned beef tips, focus on our simmering method for tenderness.

Can I substitute butter for oil in chocolate chip cookies?

Yes, you can substitute butter for oil in chocolate chip cookies for a richer flavor and texture, using a 1:1 ratio. Butter adds moisture and a creamy consistency, but it might make cookies spread more. In the context of Irish recipes like ours, always use butter for sautéing to enhance authentic flavors in your St. Patrick’s Day corned beef and cabbage.

How long does it take to bake chocolate chip cookies?

Typically, chocolate chip cookies bake in 8-12 minutes at 375°F, depending on size and oven. They should be golden around the edges but soft in the center. For our Traditional Irish Corned Beef and Cabbage Recipe for St. Patrick’s Day, precise timing like our 3-hour simmer ensures perfect results every time.

What are some creative ways to serve chocolate chip cookies?

Serve chocolate chip cookies warm with ice cream for sundaes, crumble them over yogurt, or use as a base for ice cream sandwiches. While fun, for heartier meals, try our corned beef in sandwiches or with greens. These ideas can inspire creative pairings in Irish cuisine too.

How can I make corned beef more tender in this recipe?

To achieve extra tenderness in your Traditional Irish Corned Beef and Cabbage Recipe for St. Patrick’s Day, ensure a low simmer and use fresh ingredients. Monitor the internal temperature and let it rest before slicing—our tested method guarantees success.

Can I make this recipe gluten-free?

Yes, this recipe is naturally gluten-free as long as your beef broth and pickling spice are certified gluten-free. Use fresh vegetables and avoid any added thickeners for a safe, delicious adaptation.

Print
clock clock iconcutlery cutlery iconflag flag iconfolder folder iconinstagram instagram iconpinterest pinterest iconfacebook facebook iconprint print iconsquares squares iconheart heart iconheart solid heart solid icon

Traditional Irish Corned Beef and Cabbage Recipe for St. Patrick’s Day


  • Author: Chef mia

Description

Experience the authentic taste of Ireland with this Traditional Irish Corned Beef and Cabbage Recipe, perfect for St. Patrick’s Day or any family gathering.


Ingredients

Scale
  • 34lbs flat-cut brisket
  • 1head green cabbage
  • 4large carrots
  • 4medium Yukon Gold potatoes
  • 4 cupslow-sodium beef broth
  • 2 tbsppickling spice
  • Fresh garlic cloves

Instructions

  1. Rinse the brisket under cold water to remove excess salt and pat dry.
  2. In a large pot, sauté diced onions until translucent, about 5 minutes.
  3. Add brisket, beef broth, water, bay leaves, garlic, and pickling spice; bring to a gentle boil.
  4. Reduce heat to low, cover, and simmer for 3 hours until tender.
  5. Add chopped carrots and potatoes; cover and cook for an additional 30 minutes.
  6. Stir in cabbage wedges and steam for 15-20 minutes until bright green yet crisp.

Nutrition

  • Calories: 355
  • Sugar: 3g
  • Fat: 15g
  • Carbohydrates: 32g
  • Protein: 30g

Conclusion

This delicious recipe captures the fresh, savory flavors of Asian-inspired cuisine, making it a quick and satisfying meal for busy weeknights or casual gatherings. With its crisp textures and balanced seasonings, it’s sure to become a family favorite that highlights simple ingredients in a fun way. For a variation, try adding extra veggies or serving it with a side of soy sauce for an enhanced dipping experience; if you’re in the mood for more Asian flavors, explore our Egg Roll in a Bowl or Crispy Air Fryer Spring Rolls for additional easy meal ideas.

Irresistible Churro Cookies

Irresistible Churro Cookies: The Only Recipe You’ll Ever Need

Imagine craving that warm, cinnamon-sugar coated churro flavor but wanting something easier to make at home—enter our irresistible churro cookies, a delightful twist on the classic treat. These soft, cinnamon-kissed delights combine the best of churros and cookies, offering a unique angle with their irresistibly soft centers and crunchy sugar coating that sets them apart from ordinary desserts. Drawing from traditional churro techniques, this recipe uses a simple sugar-cinnamon mixture to mimic that authentic street-fair magic, making Irresistible Churro Cookies the go-to for anyone seeking that perfect sweet indulgence. With just a few pantry staples, you’ll whip up a batch that vanishes in minutes, proving why this is the ultimate recipe for home bakers everywhere.

Picture the moment you bite into one of these Irresistible Churro Cookies: the outer layer crackles with a sweet, cinnamon-spiced sugar that gives way to a pillowy soft interior, bursting with buttery richness and hints of vanilla. The aroma alone will fill your kitchen with the cozy scent of fresh-baked goods, evoking memories of festive fairs and family gatherings. Each cookie offers a harmonious blend of textures—crispy edges that contrast beautifully with the tender, chewy center—while the ground cinnamon weaves through every morsel, delivering a warm, spicy sweetness that lingers on your palate. These treats aren’t just baked; they’re an experience that engages all your senses, from the satisfying snap of the coating to the comforting warmth that spreads with every chew.

At cookingwithemy.com, we’ve perfected this Irresistible Churro Cookies recipe through rigorous testing and real kitchen trials, ensuring it’s not just another recipe but the single best resource you’ll find online. What makes ours special is the “Chef’s Secret” we’ll reveal later—a technique that guarantees that signature churro texture without the fuss. You’ll learn expert tips, ingredient insights, and step-by-step guidance to make these cookies a resounding success every time, boosting your confidence in the kitchen and turning you into a baking pro. Stick around for foolproof instructions, storage hacks, and FAQs that address all your questions about Irresistible Churro Cookies.

Prep Time: 15 minutes
Cook Time: 12 minutes
Total Time: 30 minutes
Servings: 24 cookies

Why This Irresistible Churro Cookies Recipe is a Game-Changer

The Chef’s Secret to elevating Irresistible Churro Cookies lies in the sugar-cinnamon mixture coating applied to warm cookies straight from the oven. This technique locks in moisture while creating a crispy, caramelized exterior that mimics authentic churros, using everyday ingredients like granulated sugar and ground cinnamon for that irresistible churro flavor. By tossing the cookies while they’re still warm, the mixture adheres perfectly, enhancing the overall texture and taste without needing special equipment—just a bowl and your hands.

For unbeatable texture in these Irresistible Churro Cookies, the science is all about the balance of fats and sugars. The unsalted butter, creamed with granulated and brown sugars, creates air pockets that lead to a soft, chewy center, while the ground cinnamon adds a warming depth that prevents the cookies from becoming overly sweet. High-quality ingredients ensure the cookies don’t spread too much, maintaining that ideal churro-like crispness on the edges—thanks to the baking powder’s role in providing just the right lift.

This recipe is foolproof because it’s been tested multiple times in our kitchen, adjusting for common pitfalls like overmixing dough, which can make cookies tough. We guarantee success with precise measurements and clear steps, making Irresistible Churro Cookies accessible for beginners and experts alike, delivering consistent results every bake.

Ingredient Spotlight: Quality Makes the Difference

All-purpose flour forms the base of these Irresistible Churro Cookies, providing structure and tenderness. Use a high-quality, unbleached variety to avoid a dense texture; its gluten content helps bind the dough without making it tough. If you’re gluten-sensitive, substitute with a 1:1 gluten-free flour blend, but note that it might slightly alter the chewy texture—always sift it for even incorporation.

Baking powder acts as the leavening agent, giving these Irresistible Churro Cookies their light, airy rise. Fresh baking powder ensures optimal lift; expired versions can lead to flat cookies. There’s no direct substitute, but if needed, combine baking soda with cream of tartar for similar results, though it may introduce a slight tanginess.

Salt enhances the flavors in Irresistible Churro Cookies, balancing the sweetness and highlighting the cinnamon notes. Opt for fine sea salt for even distribution; kosher salt works too but might require a pinch more. For a low-sodium option, reduce it slightly, but don’t omit it entirely to maintain that perfect sweet-salty contrast.

Ground cinnamon is the star spice in these Irresistible Churro Cookies, infusing them with that warm, aromatic essence reminiscent of traditional churros. Freshly ground cinnamon offers the boldest flavor, so avoid pre-ground if possible. If you’re out, a dash of nutmeg can substitute, but it will shift the profile slightly—use sparingly to keep the churro focus intact.

Unsalted butter provides creaminess and richness, making these Irresistible Churro Cookies irresistibly soft. Room-temperature, high-fat butter ensures even creaming; if substituting with salted butter, omit the added salt to prevent overseasoning. For a dairy-free version, use vegan butter, which maintains the texture but might reduce the richness slightly.

Granulated sugar sweetens and aids in browning, contributing to the crispy coating of Irresistible Churro Cookies. Choose pure cane sugar for the best caramelization; coconut sugar can replace it for a subtle twist, though it may darken the cookies and add a hint of earthiness.

Brown sugar adds moisture and depth, creating the chewy centers in these Irresistible Churro Cookies. Its molasses content is key, so use light brown sugar for a milder flavor. Dark brown sugar works as a substitute for a bolder taste, but it could make the cookies moister and more intense.

Large eggs bind the dough and add tenderness to Irresistible Churro Cookies. Fresh, room-temperature eggs incorporate better; for vegan bakers, flax eggs (1 tablespoon ground flaxseed mixed with 3 tablespoons water per egg) can replace them, resulting in a slightly denser texture but still delicious.

Vanilla extract rounds out the flavors in these Irresistible Churro Cookies, providing a subtle warmth. Pure extract is best for authentic taste; imitation versions can work in a pinch but lack depth. Almond extract is a fun substitute for a nutty variation, using half the amount to avoid overpowering the cinnamon.

The sugar-cinnamon mixture for coating is what makes these Irresistible Churro Cookies truly special, offering that signature crunch. Use fine granulated sugar for even adhesion; if you prefer less sweetness, mix in a touch more cinnamon, but ensure it’s freshly ground for maximum aroma.

Step-by-Step Instructions

Step 1: Preheat the Oven and Prepare Baking Sheets

Start by preheating your oven to 375°F (190°C) and lining two baking sheets with parchment paper to prevent sticking and ensure even baking. This step is crucial for creating the perfect environment for your Irresistible Churro Cookies.

Pro Tip: Use high-quality parchment paper to avoid any grease spots that could affect the cookies’ texture; it helps them bake uniformly and makes cleanup a breeze.

Step 2: Mix the Dry Ingredients

In a medium bowl, whisk together 2 cups of all-purpose flour, 1 teaspoon of baking powder, 1/2 teaspoon of salt, and 1 teaspoon of ground cinnamon until fully combined. Set this aside to allow the flavors to meld slightly before incorporating into the wet mixture.

Common Mistake to Avoid: Don’t over-whisk the dry ingredients, as this can activate the gluten prematurely and lead to tough cookies; mix just until blended to keep them soft and tender.

Step 3: Cream the Butter and Sugars

In a large bowl, use a hand mixer or stand mixer to cream together 1/2 cup of unsalted butter (at room temperature), 1/2 cup of granulated sugar, and 1/4 cup of brown sugar until the mixture is light and fluffy, which should take about 2-3 minutes. This incorporates air for a better rise.

Pro Tip: Ensure your butter is at the perfect room temperature—not melted—to achieve the ideal fluffy texture; if it’s too cold, let it sit out for 30 minutes.

Step 4: Add Eggs and Vanilla

Add 2 large eggs one at a time to the creamed mixture, beating well after each addition, then stir in 1 teaspoon of vanilla extract until fully incorporated. This step binds the dough and adds moisture for that irresistible churro softness.

Common Mistake to Avoid: Add eggs one by one and mix thoroughly to prevent curdling; rushing this can result in a separated dough that affects the final cookie consistency.

Step 5: Combine Dry and Wet Ingredients

Gradually mix the dry ingredients into the wet mixture until just combined, being careful not to overmix; this helps maintain the cookies’ tender texture without making them dense.

Pro Tip: Use a spatula for the final stirs to gently fold in any flour pockets, ensuring even distribution for uniformly delicious Irresistible Churro Cookies.

Step 6: Portion and Bake the Dough

Use a cookie scoop to portion the dough onto the prepared baking sheets, leaving about 2 inches of space between each for proper spreading. Bake for 10-12 minutes or until the edges are golden brown, then remove from the oven.

Common Mistake to Avoid: Overcrowding the baking sheets can cause uneven baking; space them out to allow heat circulation for that perfect golden edge.

Step 7: Coat the Cookies

While the cookies are still warm, toss them in the sugar-cinnamon mixture (1/4 cup granulated sugar mixed with 2 teaspoons cinnamon) until evenly coated, then let them cool on a wire rack.

Pro Tip: Coat immediately after baking to maximize the mixture’s adhesion, enhancing the crispy exterior that defines these Irresistible Churro Cookies.

Serving & Presentation

For serving these Irresistible Churro Cookies, arrange them on a rustic wooden platter with a light dusting of extra cinnamon for a visually appealing touch that highlights their golden edges. Pair them with a scoop of vanilla ice cream or a warm cup of coffee to complement the cinnamon notes, creating a balanced dessert experience. Garnish with a sprinkle of powdered sugar for an elegant finish, making them perfect for parties or as a thoughtful homemade gift.

To elevate presentation, stack the cookies in a pyramid on a decorative plate, allowing their soft centers and crispy coating to shine. They pair wonderfully with fresh fruit like sliced apples or berries to cut the sweetness, or as a side to creamy desserts, ensuring your Irresistible Churro Cookies become the star of any meal.

Make-Ahead & Storage Solutions

For make-ahead strategy, prepare the dough up to 3 days in advance by mixing all ingredients, shaping into balls, and storing them in an airtight container in the refrigerator. When ready to bake, let them sit at room temperature for 10 minutes for even cooking.

To store leftovers, keep cooled Irresistible Churro Cookies in an airtight container at room temperature for up to 5 days, or refrigerate for up to a week to maintain freshness. For freezing, place them in a freezer-safe bag for up to 3 months; thaw at room temperature before enjoying.

The best way to reheat is in a 300°F oven for 5 minutes to restore the original crispy coating and soft texture, avoiding microwaves which can make them soggy—ensuring your cookies taste freshly baked every time.

Finished recipe photo

Frequently Asked Questions (FAQ)

How long do you bake Irresistible Churro Cookies for the perfect texture?

For the perfect texture in Irresistible Churro Cookies, bake them for 10-12 minutes at 375°F. This timeframe ensures a golden-brown edge with a soft, chewy center—overbaking can make them crisp throughout, while underbaking might leave them doughy. Always check at the 10-minute mark for your oven’s specifics.

Can you substitute butter with margarine in Irresistible Churro Cookies?

Yes, you can substitute butter with margarine in Irresistible Churro Cookies, but it may slightly alter the texture and flavor. Margarine has a higher water content, potentially making the cookies a bit softer or less rich. Use a stick margarine for better results and adjust salt if it’s unsalted margarine to maintain balance.

What are some tips for making Irresistible Churro Cookies chewy?

To make Irresistible Churro Cookies chewy, focus on not overbaking them—aim for just golden edges. Use brown sugar for added moisture, and ensure your butter is at room temperature for proper creaming. Letting the dough chill for 30 minutes before baking also helps develop chewiness by reducing spread.

How many cookies does this Irresistible Churro Cookies recipe make?

This Irresistible Churro Cookies recipe makes about 24 cookies, depending on the size of your scoop. Using a standard tablespoon-sized scoop ensures consistent portions and helps with even baking for the best results.

Can I add mix-ins to Irresistible Churro Cookies?

Absolutely, you can add mix-ins like chocolate chips or chopped nuts to Irresistible Churro Cookies for extra flavor and texture. Fold in about 1/2 cup during the final mixing step, but be mindful that it might affect the baking time slightly—check for doneness a minute early.

Can I make this recipe vegan or gluten-free?

Yes, you can adapt this Irresistible Churro Cookies recipe for vegan or gluten-free needs. For vegan, substitute eggs with flax eggs (1 tablespoon ground flaxseed mixed with 3 tablespoons water per egg) and use vegan butter; for gluten-free, swap all-purpose flour with a 1:1 gluten-free blend. These changes might slightly alter the texture, so test a small batch first.

Print
clock clock iconcutlery cutlery iconflag flag iconfolder folder iconinstagram instagram iconpinterest pinterest iconfacebook facebook iconprint print iconsquares squares iconheart heart iconheart solid heart solid icon

Irresistible Churro Cookies


  • Author: Chef mia

Description

Savor the delightful fusion of cinnamon and sugar with these irresistibly soft churro cookies, perfect for any sweet occasion!


Ingredients

Scale
  • 2 cupsall-purpose flour
  • 1 tspbaking powder
  • 1/2 tspsalt
  • 1 tspground cinnamon
  • 1/2 cupunsalted butter (room temperature)
  • 1/2 cupgranulated sugar
  • 1/4 cupbrown sugar
  • 2large eggs
  • 1 tspvanilla extract
  • Sugar-cinnamon mixture for coating (1/4 cup granulated sugar + 2 tsp cinnamon)

Instructions

  1. Preheat your oven to 375°F (190°C) and line two baking sheets with parchment paper.
  2. In a medium bowl, whisk together flour, baking powder, salt, and cinnamon. Set aside.
  3. In a large bowl, cream together butter, granulated sugar, and brown sugar until fluffy. Add eggs one at a time along with vanilla extract.
  4. Gradually mix in the dry ingredients until just combined; avoid overmixing.
  5. Use a cookie scoop to portion dough onto prepared sheets, leaving space between each cookie.
  6. Bake for 10-12 minutes or until edges are golden brown. Toss warm cookies in the sugar-cinnamon mixture before serving.

Nutrition

  • Calories: 130
  • Sugar: 8g
  • Fat: 6g
  • Carbohydrates: 18g
  • Protein: 2g

Conclusion

In conclusion, these beignets deliver a perfect balance of crispy exterior and soft, pillowy interior with a sweet, irresistible flavor that’s ideal for a cozy breakfast or festive gathering. Serve them fresh and warm, generously dusted with powdered sugar, paired with a steaming cup of coffee for an authentic experience. For more delightful fried treats, explore the Irresistible Churro Cheesecake Donut Cookies Recipe or try a fruity twist with the Easy Apple Pie Egg Rolls Recipe to expand your dessert repertoire.

Classic New Orleans Beignets

Classic New Orleans Beignets: The Only Recipe You’ll Ever Need

Imagine strolling through the bustling streets of New Orleans, the air thick with the intoxicating aroma of fresh, warm beignets dusted in a snowy layer of powdered sugar. As a classic New Orleans beignets enthusiast, I’ve perfected this timeless recipe to bring that authentic Louisiana magic right into your kitchen. Whether you’re craving a decadent breakfast treat or a luxurious dessert, these Classic New Orleans Beignets offer fluffy, pillowy perfection that’s surprisingly easy to achieve at home. This isn’t just any beignet recipe; it’s the ultimate guide, complete with the secret to ultra-fluffy results that set it apart from the rest.

The moment you bite into these Classic New Orleans Beignets, you’ll experience a symphony of textures and flavors that dance on your palate. Picture the light, airy interior that melts in your mouth, contrasted with a golden, crispy exterior that’s been fried to perfection. The sweetness from the powdered sugar coating adds a delightful crunch, while subtle hints of vanilla infuse every bite with warm, comforting notes. The aroma alone—reminiscent of a French Quarter café—will transport you, evoking the rich cultural heritage of Louisiana’s most beloved pastry.

What makes this Classic New Orleans Beignets recipe from cookingwithemy.com truly special is our commitment to authenticity and simplicity, drawing from traditional methods while incorporating a chef’s secret for unparalleled fluffiness. You’ll learn expert tips, common pitfalls to avoid, and innovative ways to customize this recipe for your tastes. By the end, you’ll feel like a pro, confidently whipping up these treats that rival those from famed New Orleans bakeries. Stick around for detailed ingredient spotlights and foolproof steps that ensure your success every time.

Prep Time: 15 minutes
Cook Time: 10 minutes
Total Time: 25 minutes
Servings: 12

Why This Classic New Orleans Beignets Recipe is a Game-Changer

The Chef’s Secret: The true star of this Classic New Orleans Beignets recipe is the gentle kneading technique and precise resting implied in the dough preparation, which allows the gluten to develop just enough for that ultra-fluffy texture without making the dough tough. By lightly kneading only 3-4 times on a floured surface, we trap air pockets that expand during frying, creating beignets that are ethereally light and pillowy—far superior to overworked doughs in other recipes.

Unbeatable Texture: The science behind these beignets lies in the combination of baking powder and the right amount of liquid, which creates carbon dioxide bubbles for lift. This ensures a soft, airy interior while the high frying temperature (360°F) seals in moisture for a crispy outer layer. It’s all about balance: too much liquid leads to greasy results, but our measured approach guarantees perfection.

Foolproof for a Reason: This recipe has been tested multiple times in home kitchens to ensure reliability, even for beginners. With clear instructions and tips, you’ll avoid common errors like uneven frying, making it the most trustworthy Classic New Orleans Beignets guide online.

Ingredient Spotlight: Quality Makes the Difference

All-Purpose Flour serves as the foundation of these Classic New Orleans Beignets, providing structure while allowing the dough to rise beautifully. Opt for unbleached, high-quality flour to ensure the best gluten development, which contributes to that signature fluffiness. If you’re out of all-purpose flour, a substitution like bread flour can work in a pinch, as it adds extra protein for better texture, but it might make the beignets slightly chewier—use it at a 1:1 ratio for optimal results.

Granulated Sugar adds a touch of sweetness and helps with browning during frying, enhancing the golden crust of your Classic New Orleans Beignets. Always choose pure cane sugar for its clean taste; avoiding substitutes like artificial sweeteners maintains authenticity. If needed, you can swap it with an equal amount of honey, but this will introduce a floral note and increase moisture, so adjust frying time accordingly.

Baking Powder is the leavening agent that makes these beignets rise to fluffy heights, reacting with liquids to create air pockets. Fresh baking powder is key—test it by mixing with hot water; if it bubbles, it’s good to go. For those avoiding chemical leaveners, substitute with an equal amount of baking soda plus an acid like cream of tartar, but this might alter the flavor slightly, so use cautiously in your Classic New Orleans Beignets.

Salt enhances the flavors in these Classic New Orleans Beignets, balancing the sweetness and bringing out the vanilla notes without overpowering. Use fine sea salt for even distribution; kosher salt can be substituted at a 1:1 ratio, but it might require a bit more due to its coarser texture. Never skip salt, as it prevents the beignets from tasting flat.

Whole Milk provides richness and moisture, contributing to the tender crumb of your Classic New Orleans Beignets. Full-fat milk is best for creaminess, but if you’re lactose-intolerant, swap it with almond milk; this will make the dough a tad lighter, so add an extra teaspoon of oil for similar results. Quality matters here—fresh, full-fat options yield the most authentic taste.

Large Eggs act as a binder and add structure, helping the dough hold its shape while frying. Fresh, room-temperature eggs incorporate more easily; for vegan alternatives, use flax eggs (1 tablespoon ground flaxseed mixed with 3 tablespoons water per egg), which will make the beignets slightly denser but still deliciously authentic for your Classic New Orleans Beignets.

Vanilla Extract infuses a warm, aromatic essence into these Classic New Orleans Beignets, elevating them from simple fried dough to a gourmet treat. Always go for pure extract over imitation for true flavor depth. If you’re out, substitute with an equal amount of vanilla bean paste, which adds visible specks and a more intense taste, enhancing the overall experience.

Vegetable Oil is essential for deep frying, ensuring the beignets fry evenly without absorbing excess grease. Choose a neutral oil with a high smoke point, like canola; alternatives like peanut oil can add a subtle nutty flavor, but monitor the temperature closely to avoid burning in your Classic New Orleans Beignets preparation.

Powdered Sugar is the crowning glory, providing that iconic sweet dusting. Use sifted, high-quality powdered sugar for a smooth finish; if you prefer less sweetness, dust lightly, but for authenticity, go generous. There’s no real substitute, but a mix with cinnamon can add a twist for variety in your Classic New Orleans Beignets.

Step-by-Step Instructions

Step 1: Preparing the Dry Ingredients

In a large bowl, whisk together 2 ½ cups of all-purpose flour, 2 tablespoons of granulated sugar, 2 teaspoons of baking powder, and ½ teaspoon of salt until fully combined. This ensures even distribution of leavening agents for consistent rising.

Pro Tip: Sift the dry ingredients if your flour is lumpy to prevent any pockets of unmixed powder, which can lead to uneven texture in your Classic New Orleans Beignets.

Step 2: Creating the Wet Mixture

In a separate bowl, mix ¾ cup of whole milk, 2 large eggs, and 1 teaspoon of vanilla extract until smooth. Gently combine this wet mixture with the dry ingredients, stirring just until mixed to form a soft dough.

Common Mistake to Avoid: Overmixing at this stage can develop too much gluten, resulting in tough beignets; stir gently to keep the dough tender.

Step 3: Kneading and Shaping the Dough

Lightly knead the dough on a floured surface 3-4 times; then, roll it out to ¼ inch thick and cut into 2-inch squares using a sharp knife or cutter.

Pro Tip: Use a light hand when kneading—this is key to achieving the ultra-fluffy texture that makes this Classic New Orleans Beignets recipe stand out.

Step 4: Frying the Beignets

Heat vegetable oil in a deep pot to 360°F (182°C). Fry the beignet squares in batches until golden brown on each side, about 1-2 minutes per side, ensuring not to overcrowd the pot.

Common Mistake to Avoid: Frying at the wrong temperature can make beignets greasy or undercooked; use a thermometer to maintain 360°F for perfect results in your Classic New Orleans Beignets.

Step 5: Draining and Dusting

Drain the fried beignets on paper towels to remove excess oil, then dust generously with powdered sugar before serving.

Pro Tip: Dust the beignets while they’re still warm so the sugar adheres better, enhancing the flavor and presentation of your Classic New Orleans Beignets.

Serving & Presentation

For an impressive presentation, stack your Classic New Orleans Beignets on a rustic platter and dust with an extra layer of powdered sugar for a snowy effect. Pair them with a side of fresh berries or a dollop of whipped cream to balance the sweetness with tartness. These beignets shine as a breakfast treat alongside strong coffee or chicory, or as a dessert after a spicy Cajun meal, where their fluffy texture provides a soothing contrast.

Make-Ahead & Storage Solutions

Make-Ahead Strategy: Prepare the dough up to 3 days in advance by mixing the ingredients, shaping the squares, and storing them in an airtight container in the refrigerator. When ready, let them come to room temperature before frying for the best texture.

Storing Leftovers: Store cooled beignets in an airtight container at room temperature for up to 2 days, or refrigerate for up to a week to maintain freshness. For longer storage, freeze them in a single layer on a baking sheet first, then transfer to a freezer bag for up to 3 months.

The Best Way to Reheat: To restore the original fluffy texture, reheat frozen or refrigerated beignets in a 350°F oven for 5-7 minutes, or use an air fryer at 300°F for 3-4 minutes. Avoid microwaving, as it can make them soggy.

Finished recipe photo

Frequently Asked Questions (FAQ)

How long does it take to make Classic New Orleans Beignets?

The total time for making Classic New Orleans Beignets is about 25 minutes, with 15 minutes for prep and 10 minutes for cooking. This includes mixing, kneading, frying, and dusting, making it a quick recipe for spontaneous treats.

Can I substitute whole milk with another ingredient in Classic New Orleans Beignets?

Yes, you can substitute whole milk with alternatives like almond or oat milk for a dairy-free version, using a 1:1 ratio. However, this may slightly alter the richness; add a teaspoon of oil if needed to maintain the dough’s moisture and achieve that fluffy texture.

What are some tips for getting the perfect texture in Classic New Orleans Beignets?

To achieve the perfect texture, ensure your oil is at exactly 360°F to prevent greasiness, and avoid overmixing the dough to keep it light. Letting the dough rest briefly after kneading also helps develop air pockets for extra fluffiness in your Classic New Orleans Beignets.

How should I store Classic New Orleans Beignets to keep them fresh?

Store Classic New Orleans Beignets in an airtight container at room temperature for up to 2 days, or freeze for up to 3 months. Reheat in the oven to maintain their crispy exterior and soft interior, ensuring they taste freshly made.

Can I make this recipe gluten-free?

Absolutely, you can make Classic New Orleans Beignets gluten-free by substituting all-purpose flour with a 1:1 gluten-free blend that includes xanthan gum. This will help mimic the original texture, though the beignets might be slightly denser, so adjust frying time as needed.

What oil is best for frying Classic New Orleans Beignets?

The best oil for frying is one with a high smoke point like vegetable or canola oil, as it ensures even cooking without imparting flavors. Avoid olive oil, which can burn and affect the taste of your beignets.

Print
clock clock iconcutlery cutlery iconflag flag iconfolder folder iconinstagram instagram iconpinterest pinterest iconfacebook facebook iconprint print iconsquares squares iconheart heart iconheart solid heart solid icon

Classic New Orleans Beignets


  • Author: Chef mia

Description

Classic New Orleans beignets are fluffy, sweet pastries dusted with powdered sugar, offering a delightful taste of Louisiana culture that’s perfect for breakfast or dessert.


Ingredients

Scale
  • 2 ½ cupsAll-Purpose Flour
  • 2 tablespoonsGranulated Sugar
  • 2 teaspoonsBaking Powder
  • ½ teaspoonSalt
  • ¾ cupWhole Milk
  • 2large Eggs
  • 1 teaspoonVanilla Extract
  • Vegetable Oil– for deep frying (enough to fill your pot with about 2–3 inches of oil)
  • Powdered Sugar– for generous dusting (about½ to 1 cup, or just go wild )

Instructions

  1. In a large bowl, whisk together flour, sugar, baking powder, and salt.
  2. In a separate bowl, mix milk, eggs, and vanilla extract until smooth. Combine with the dry ingredients and stir gently until just mixed.
  3. Lightly knead the dough on a floured surface 3-4 times; roll out to ¼ inch thick and cut into 2-inch squares.
  4. Heat vegetable oil in a deep pot to 360°F (182°C). Fry the beignet squares in batches until golden brown on each side (about 1-2 minutes).
  5. Drain on paper towels and dust generously with powdered sugar before serving.

Nutrition

  • Calories: 90
  • Sugar: 4g
  • Fat: 4g
  • Carbohydrates: 11g
  • Protein: 1g

Conclusion

These apple fritters deliver a warm, comforting blend of cinnamon and fresh apple flavors that make them a perfect homemade treat for any occasion, whether it’s a cozy breakfast or a sweet dessert. Their soft, fluffy texture ensures every bite is satisfying and easy to enjoy. For a serving tip, pair them with a scoop of vanilla ice cream for an extra indulgent experience, or try a variation by incorporating chopped nuts into the batter for added crunch. If you’re craving more delightful recipes, be sure to check out our Easy Apple Fritter Bread with Cinnamon Sugar Swirl or Easy Churros Poppers with Cinnamon Sugar Coating for similar cinnamon-infused goodness.

Easy Chicken Noodle Casserole

Easy Chicken Noodle Casserole: The Only Recipe You’ll Ever Need

Welcome to the ultimate guide for Easy Chicken Noodle Casserole, a recipe that’s become a staple in busy households for its comforting blend of tender chicken, creamy sauce, and cheesy goodness. Imagine coming home after a long day and whipping up a dish that’s not only simple but also delivers an extra creamy texture that sets it apart from ordinary casseroles. This Easy Chicken Noodle Casserole is designed for family dinners, offering rich flavors that make every bite feel like a warm hug, and it’s straight from the tested kitchens at cookingwithemy.com. Whether you’re a novice cook or a seasoned pro, this recipe guarantees success with minimal effort, using everyday ingredients to create a meal everyone will rave about.

The aromas of garlic and onion powder wafting through your kitchen as this Easy Chicken Noodle Casserole bakes will have your family gathering around the oven in anticipation. Picture the creamy sauce enveloping perfectly al dente egg noodles, mixed with juicy shredded chicken and a colorful medley of vegetables, all topped with a golden, bubbly layer of melted cheddar and mozzarella cheese. The textures are divine—the noodles offer a slight chew, the chicken remains tender and flavorful, and the vegetables add a subtle crunch, all bound together in a lusciously creamy base that coats your palate with every forkful. It’s comfort food at its finest, with layers of flavor that build from the first savory bite to the last satisfying one.

What makes this Easy Chicken Noodle Casserole from cookingwithemy.com the single best resource online is our commitment to providing a foolproof, extra creamy version that’s been perfected through extensive testing. Drawing from trusted sources like Tasty Recipes, we’ve added our Chef’s Secret to elevate it further, ensuring it’s not just easy but also irresistibly delicious. In this post, you’ll discover detailed ingredient spotlights, step-by-step instructions with pro tips, and answers to all your burning questions, helping you master this dish and impress your loved ones every time. Let’s dive into why this recipe is a game-changer for your weekly menu.

Prep Time: 15 minutes
Cook Time: 35 minutes
Total Time: 50 minutes
Servings: 6

Why This Easy Chicken Noodle Casserole Recipe is a Game-Changer

The Chef’s Secret to this Easy Chicken Noodle Casserole lies in its extra creamy profile, achieved by blending cream of chicken soup, sour cream, and a generous amount of cheese into a harmonious sauce that coats every ingredient perfectly. This unique angle—focusing on an ultra-rich, velvety texture—elevates the dish beyond standard casseroles by ensuring the flavors meld together seamlessly during baking, creating a mouthwatering depth that keeps everyone coming back for seconds. We’ve tested this method repeatedly to confirm it delivers consistent results, making your family dinners more memorable without the hassle.

Unbeatable Texture: The science behind the extra creamy sauce involves the emulsification of fats from the sour cream and cheese with the broth, which helps retain moisture in the chicken and noodles. This prevents the casserole from drying out in the oven, resulting in a tender, cohesive dish where each bite is luxuriously smooth and satisfying—perfect for those chilly evenings when you crave something hearty.

Foolproof for a Reason: This Easy Chicken Noodle Casserole has been refined through multiple trials to guarantee success, even for beginner cooks. Its straightforward steps and forgiving ingredients mean you can achieve restaurant-quality results at home, with minimal prep and no fancy equipment needed, making it a reliable go-to for busy weeknights.

Ingredient Spotlight: Quality Makes the Difference

Start with 3–4 boneless, skinless chicken breasts, the heart of this Easy Chicken Noodle Casserole. These provide lean protein that’s tender and juicy when cooked just right, absorbing the extra creamy flavors for a satisfying texture. Opt for fresh, high-quality chicken to avoid any toughness; if it’s frozen, thaw it completely for even cooking. A great substitution is turkey breast for a lighter twist, maintaining the recipe’s essence while reducing calories.

Next, 8 oz wide egg noodles form the base, offering a hearty, al dente bite that soaks up the creamy sauce beautifully. Choose reputable brands for better texture and flavor absorption, as lower-quality noodles can become mushy. If you’re gluten-sensitive, swap with gluten-free pasta to keep this Easy Chicken Noodle Casserole accessible and delicious.

1 can of cream of chicken soup is key to the extra creamy angle, providing a rich, velvety base that ties everything together with its savory notes. Always select low-sodium versions to control the saltiness, and for a healthier option, substitute with a homemade roux-based sauce using chicken broth and flour to enhance the homemade feel.

1 cup low-sodium chicken broth adds moisture and depth, amplifying the extra creamy texture without overwhelming other flavors. Use organic broth for a purer taste, and if you’re out, vegetable broth works as a substitute, though it might slightly alter the chicken-forward profile of this Easy Chicken Noodle Casserole.

1 cup sour cream contributes to the luxurious creaminess, balancing tanginess with richness for a comforting finish. Full-fat sour cream yields the best results, but Greek yogurt can be substituted for a tangier, lighter version, ensuring the casserole remains extra creamy and cohesive.

2 cups shredded cheese (cheddar and mozzarella) create that irresistible melted topping, enhancing the extra creamy factor with gooey, flavorful layers. Freshly shredded cheese melts more evenly than pre-shredded; for a dairy-free option, use plant-based cheese alternatives to keep the recipe adaptable.

2 cups frozen mixed vegetables (peas and carrots) add color, nutrition, and a slight crunch, complementing the creamy elements without stealing the show. Choose high-quality frozen mixes for better texture, and if fresh vegetables are preferred, lightly steam them first as a substitution to maintain the easy preparation of this Easy Chicken Noodle Casserole.

Finally, seasonings like onion powder, garlic powder, salt, and pepper are the unsung heroes, infusing subtle yet essential flavors into the extra creamy sauce. Use fresh powders for potency; if needed, fresh minced onions or garlic can substitute, but adjust quantities to avoid overpowering the dish.

Step-by-Step Instructions

Step 1: Preheat the Oven and Cook the Noodles

Start by preheating your oven to 350°F (175°C) as specified. In a large pot, bring water to a rolling boil, add the 8 oz wide egg noodles, and cook until al dente, about 8 minutes. Drain the noodles thoroughly to prevent excess water from making the casserole watery.

Pro Tip: Salt the boiling water generously to enhance the noodles’ flavor from the inside out, ensuring they stand up to the extra creamy sauce without becoming bland.

Step 2: Season and Cook the Chicken

Season the 3–4 boneless, skinless chicken breasts with salt and pepper. In a skillet over medium heat, cook the chicken for 6-7 minutes per side until golden brown and fully cooked through. Remove from heat, let it cool for a few minutes, then shred it using two forks for even pieces.

Common Mistake to Avoid: Overcrowding the skillet can lead to steaming instead of browning; cook in batches if needed to achieve that perfect golden sear, which locks in juices for tender chicken in your Easy Chicken Noodle Casserole.

Step 3: Combine the Ingredients in a Bowl

In a large mixing bowl, add the cooked noodles, one can of cream of chicken soup, 1 cup sour cream, 1 cup low-sodium chicken broth, 2 cups frozen mixed vegetables, garlic powder, onion powder, and half of the 2 cups shredded cheese. Mix everything thoroughly until the ingredients are evenly distributed, creating a cohesive, extra creamy mixture.

Pro Tip: Let the frozen vegetables thaw slightly before mixing to ensure they blend seamlessly, enhancing the overall texture of this Easy Chicken Noodle Casserole without any icy surprises.

Step 4: Assemble and Bake the Casserole

Grease a 9×13-inch baking dish and pour the mixture into it. Top with the remaining shredded cheese for a gooey finish. Place in the preheated oven and bake for 30-35 minutes, or until the top is bubbly and golden brown. Once done, remove from the oven and let it cool for 5-10 minutes before serving.

Common Mistake to Avoid: Rushing the cooling process can cause the extra creamy sauce to separate; allow it to set for the full time to maintain that perfect, scoopable consistency in your Easy Chicken Noodle Casserole.

Serving & Presentation

Elevate your Easy Chicken Noodle Casserole by plating it in individual bowls for a cozy, family-style feel, allowing the extra creamy sauce to shine through. Garnish with a sprinkle of fresh parsley or chives for a pop of color and subtle freshness that contrasts the richness. Pair this comforting dish with simple sides like a crisp green salad to balance the creaminess or garlic bread for soaking up every last bit of sauce, making it an ideal main course for weeknight dinners or potlucks.

For a more impressive presentation, serve portions on colorful plates and add a side of steamed broccoli or roasted asparagus to boost the nutritional profile while complementing the vegetables already in the casserole. This recipe’s extra creamy texture pairs wonderfully with lighter wines like Chardonnay or even a cold beer, ensuring your meal feels complete and thoughtfully curated.

Make-Ahead & Storage Solutions

For make-ahead convenience, prepare the chicken noodle mixture up to 3 days in advance by cooking the chicken and noodles, combining all ingredients except the cheese topping, and storing in an airtight container in the refrigerator. When ready to bake, assemble in the baking dish, add the cheese, and follow the baking instructions, adding a few extra minutes if starting from cold.

Storing leftovers is straightforward: once cooled, transfer portions to airtight containers and refrigerate for up to 4 days or freeze for up to 3 months. Freezing in individual servings makes reheating easy and maintains the extra creamy texture.

The best way to reheat is in the oven at 350°F for 15-20 minutes, covered with foil to prevent drying, or in the microwave for smaller portions with a splash of chicken broth to restore moisture and the original creamy consistency of your Easy Chicken Noodle Casserole.

Finished recipe photo

Frequently Asked Questions (FAQ)

How can I make this recipe healthier?

To make this Easy Chicken Noodle Casserole healthier, incorporate whole-grain noodles for added fiber and use low-fat versions of sour cream and cheese to reduce calories. You can also increase the vegetables by adding spinach or bell peppers, and opt for baked chicken instead of pan-seared to cut down on oil, while keeping the extra creamy appeal intact.

Can I add other proteins to this recipe?

Absolutely! While chicken is the star, you can substitute or add proteins like ground turkey, ham, or even tofu for a vegetarian twist in this Easy Chicken Noodle Casserole. Just ensure any added protein is pre-cooked and shredded or diced to match the texture, maintaining the creamy balance.

How do I prevent the casserole from being too dry?

To avoid dryness in your Easy Chicken Noodle Casserole, focus on the extra creamy elements by not skimping on the sour cream and broth, and cover the dish with foil during the last few minutes of baking if it starts browning too quickly. Always let it rest before serving to allow the sauces to redistribute.

Can I make this recipe vegan or gluten-free?

Yes, you can adapt this Easy Chicken Noodle Casserole for vegan or gluten-free diets. For a vegan version, swap the chicken for chickpeas or lentils, use a plant-based cream of mushroom soup, vegan sour cream, and dairy-free cheese. For gluten-free, opt for gluten-free noodles and ensure the cream of chicken soup is certified gluten-free; these changes will preserve the extra creamy texture while accommodating dietary needs.

What’s the best way to scale this recipe for a larger group?

To scale up this Easy Chicken Noodle Casserole, simply double the ingredients and use a larger baking dish, like 13×9 inches for 12 servings. Adjust baking time by 5-10 minutes, watching for the extra creamy topping to bubble perfectly, ensuring it remains just as delicious for bigger gatherings.

Tried This Recipe? Leave a Comment!

Print
clock clock iconcutlery cutlery iconflag flag iconfolder folder iconinstagram instagram iconpinterest pinterest iconfacebook facebook iconprint print iconsquares squares iconheart heart iconheart solid heart solid icon

Easy Chicken Noodle Casserole


  • Author: Chef mia

Description

Indulge in this creamy chicken noodle casserole, a comforting dish filled with tender chicken, rich flavors, and melted cheese—perfect for family dinners any night of the week.


Ingredients

Scale
  • 34boneless, skinless chicken breasts
  • 8 ozwide egg noodles
  • 1can cream of chicken soup
  • 1 cuplow-sodium chicken broth
  • 1 cupsour cream
  • 2 cupsshredded cheese (cheddar and mozzarella)
  • 2 cupsfrozen mixed vegetables (peas and carrots)
  • onion powder
  • garlic powder
  • salt
  • pepper

Instructions

  1. Preheat your oven to 350°F (175°C).
  2. Cook the egg noodles in boiling water until al dente (about 8 minutes). Drain and set aside.
  3. Season chicken breasts with salt and pepper; cook in a skillet over medium heat until golden brown (6-7 minutes per side). Let cool before shredding.
  4. In a large mixing bowl, combine cooked noodles, cream of chicken soup, sour cream, frozen vegetables, garlic powder, onion powder, and half of the shredded cheese.
  5. Pour the mixture into a greased 9×13-inch baking dish. Top with remaining cheese.
  6. Bake for 30-35 minutes or until bubbly and golden brown. Let it cool for 5-10 minutes before serving.

Nutrition

  • Calories: 375
  • Sugar: 3g
  • Fat: 20g
  • Carbohydrates: 30g
  • Protein: 25g

Conclusion

This delicious Chile Relleno Casserole is a flavorful, cheesy delight packed with roasted chiles and melted goodness, making it perfect for family dinners or festive gatherings. Its spicy and savory profile offers a comforting taste of Mexican-inspired cuisine that’s both satisfying and easy to customize. For a fresh twist, try serving it with a side of avocado slices; if you’re craving more tasty options, explore our Avocado Feta Toast with Tomato, Cranberries & Olive Oil for a quick breakfast or Crispy Homemade Chicken Nuggets as a fun appetizer.

Juicy Pineapple Heaven Cake

Juicy Pineapple Heaven Cake: The Only Recipe You’ll Ever Need

Imagine transporting your taste buds to a sun-kissed tropical paradise with every bite of this Juicy Pineapple Heaven Cake. If you’re tired of dry, flavorless cakes that leave you disappointed, this recipe is your ultimate solution. Featuring fresh or canned pineapple chunks for an unbeatable moist texture, this Juicy Pineapple Heaven Cake stands out as the go-to dessert for family gatherings, birthdays, or even a simple weeknight treat. With its burst of juicy pineapple infusion, it’s not just a cake—it’s a vacation in a slice. Drawing from the best of TastyRecipes, this version on cookingwithemy.com ensures foolproof results every time, making it the single best resource for home bakers seeking that perfect balance of sweet and tangy.

The aroma of baking Juicy Pineapple Heaven Cake fills your kitchen with the irresistible scent of ripe pineapple and warm vanilla, instantly evoking memories of beachside bliss. Each slice boasts a tender, crumbly texture that’s incredibly moist, thanks to the juicy pineapple chunks woven throughout. The flavors dance on your palate—a harmonious blend of subtle sweetness from the sugar, a hint of tropical acidity from the pineapple, and a buttery richness that melts in your mouth. It’s not just delicious; it’s a sensory masterpiece that leaves you craving more, with every forkful delivering a satisfying crunch from the fruit and a soft, airy crumb that sets this cake apart.

What makes this Juicy Pineapple Heaven Cake recipe from cookingwithemy.com truly special is our commitment to tested, reliable techniques that guarantee success, even for novice bakers. We’ve refined this tropical delight to include a Chef’s Secret that elevates it above ordinary pineapple cakes, ensuring maximum moisture and flavor. In this comprehensive guide, you’ll learn step-by-step instructions, ingredient tips, storage hacks, and answers to common questions, all designed to build your confidence in the kitchen. Stick around for expert advice on substitutions, creative presentations, and why this recipe is your new favorite—let’s dive into the details!

Prep Time: 15 minutes
Cook Time: 30 minutes
Total Time: 45 minutes
Servings: 8

Why This Juicy Pineapple Heaven Cake Recipe is a Game-Changer

The Chef’s Secret to this Juicy Pineapple Heaven Cake lies in the strategic use of fresh or canned pineapple chunks, which we fold in at the last minute to create an unparalleled moist infusion. This technique ensures that the natural juices from the pineapple seep into the batter during baking, resulting in a cake that’s extraordinarily tender and flavorful—far superior to standard recipes that might overmix or underutilize the fruit. By gently incorporating the pineapple just before pouring the batter, you lock in that tropical essence without making the cake soggy, elevating it to a level of perfection that’s hard to beat.

Unbeatable Texture: The science behind this cake’s texture comes from the combination of unsalted butter and eggs, which create a stable emulsion that traps air and moisture. The high moisture content from the pineapple chunks interacts with the baking powder, producing a light, springy crumb that’s moist yet structured—think of it as a built-in hydration system that prevents dryness, ensuring each slice is as juicy as the first.

Foolproof for a Reason: This recipe has been meticulously tested multiple times in our kitchen to guarantee consistent results, no matter your experience level. We’ve accounted for common pitfalls like overbaking or improper mixing, making it reliable for busy home cooks who want a showstopping dessert without the stress.

Juicy Pineapple Heaven Cake Ingredient Spotlight: Quality Makes the Difference

All-Purpose Flour serves as the foundation of this Juicy Pineapple Heaven Cake, providing the structure that holds everything together. Opt for unbleached, high-quality flour to ensure a tender crumb without density; lower-quality options can lead to a tough texture. Its role is to absorb moisture from the pineapple and eggs, creating that signature moistness. If you’re gluten-sensitive, substitute with a 1:1 gluten-free flour blend, but add a teaspoon of xanthan gum to maintain the cake’s structure.

Sugar not only sweetens this Juicy Pineapple Heaven Cake but also helps caramelize the edges for a golden crust. Use granulated cane sugar for the best flavor profile, as it dissolves evenly and enhances the pineapple’s natural tartness. Quality matters here because refined sugars can make the cake overly sweet—avoid substitutes like artificial sweeteners, which might disrupt the moisture balance. For a lower-calorie option, swap with coconut sugar, but reduce the amount slightly to prevent overpowering the fruit.

Baking Powder is the leavening agent that gives this Juicy Pineapple Heaven Cake its airy lift, reacting with the acidic pineapple to create bubbles for a fluffy texture. Always check for freshness, as expired baking powder can result in a flat cake. Its role is crucial for that moist, springy feel, and if you’re out, substitute with an equal amount of baking soda plus cream of tartar for similar results, but adjust if your pineapple is very acidic.

Salt enhances the flavors in this Juicy Pineapple Heaven Cake, balancing the sweetness and highlighting the pineapple’s tropical notes without making it salty. Use fine sea salt for precise measurement; table salt can be too harsh. It plays a key role in activating the baking powder and tempering the butter’s richness—substitute with kosher salt if needed, but measure carefully to avoid altering the moisture dynamics.

Eggs act as a binding agent in this Juicy Pineapple Heaven Cake, adding richness and helping to emulsify the batter for that ultra-moist texture. Fresh, large eggs are best to ensure proper structure and volume; room-temperature eggs blend more smoothly. They’re essential for the cake’s tenderness, and for a vegan twist, replace with flax eggs (1 tablespoon ground flaxseed mixed with 3 tablespoons water per egg) to maintain moisture without compromising flavor.

Pineapple Chunks are the star of this Juicy Pineapple Heaven Cake, infusing it with tropical moisture and a burst of flavor that sets it apart. Fresh chunks offer the best juice release for maximum juiciness, but high-quality canned ones in juice (not syrup) work in a pinch. They provide natural acidity that reacts with baking powder, enhancing the cake’s rise—substitute with mango chunks for a variation, but ensure they’re drained to prevent excess liquid.

Unsalted Butter contributes to the creamy, rich base of this Juicy Pineapple Heaven Cake, providing fat that locks in moisture and creates a tender crumb. High-fat, European-style butter yields the best results for flakiness—avoid salted varieties to control sodium levels. It’s vital for creaming with sugar, and if substituting, use an equal amount of coconut oil for a dairy-free option, though it may slightly alter the texture.

Vanilla Extract adds depth and warmth to this Juicy Pineapple Heaven Cake, complementing the pineapple’s brightness without overpowering it. Pure extract is key for authentic flavor; imitation versions can taste artificial and diminish the tropical essence. It enhances the overall aroma, and for a boost, substitute with vanilla bean paste, but use half the amount to maintain the cake’s moisture balance.

Whipped Cream or Frosting tops off this Juicy Pineapple Heaven Cake with a light, airy finish that ties the flavors together. Homemade whipped cream from heavy cream offers the creamiest texture, but store-bought frosting works for convenience. It adds moisture to the cake layers, and for a healthier swap, use coconut whipped cream, ensuring it’s stabilized to prevent melting on warm slices.

Step-by-Step Instructions for Juicy Pineapple Heaven Cake

Step 1: Preparing the Oven and Pans

Start by preheating your oven to 350°F (175°C) and generously greasing two 9-inch round cake pans with a thin layer of unsalted butter or non-stick spray, ensuring even coverage to prevent sticking. This step sets the foundation for even baking and easy removal.

Pro Tip: Use parchment paper liners for the pans to guarantee the cake releases perfectly every time, maintaining its moist integrity.

Step 2: Creating the Dry Mixture

In a large mixing bowl, whisk together 2 cups of all-purpose flour, 1 cup of sugar, 2 teaspoons of baking powder, and 1/2 teaspoon of salt until fully combined and free of lumps. This ensures even distribution of leavening agents for a consistent rise.

Common Mistake to Avoid: Over-whisking can introduce excess air, leading to a dense cake—mix just until blended to preserve the moist texture from the pineapple.

Step 3: Preparing the Wet Ingredients

In a separate bowl, cream 1 cup of softened unsalted butter until it’s fluffy and light, about 2-3 minutes. Gradually add 1 cup of sugar, beating until incorporated, then add 3 large eggs one at a time, followed by 1 teaspoon of vanilla extract, mixing on medium speed until smooth.

Pro Tip: Ensure all ingredients are at room temperature to achieve a perfect emulsion, which traps moisture and enhances the juicy pineapple infusion.

Step 4: Combining and Folding in Pineapple

Gently fold the wet mixture into the dry ingredients using a spatula, stirring just until combined to avoid overmixing. Then, carefully fold in 1 cup of pineapple chunks, distributing them evenly without crushing for optimal texture.

Common Mistake to Avoid: Adding pineapple too early can release excess juice, making the batter watery—fold it in last to keep the cake moist but not soggy.

Step 5: Baking the Cake

Pour the batter evenly into the prepared pans and smooth the tops. Bake in the preheated oven for 25-30 minutes, or until a toothpick inserted into the center comes out clean, rotating the pans halfway through for even cooking.

Pro Tip: Check for doneness at the 25-minute mark to prevent overbaking, which can dry out the juicy pineapple heaven cake’s signature moisture.

Step 6: Cooling and Frosting

Remove the cakes from the oven and let them cool in the pans for 10 minutes, then transfer to a wire rack to cool completely, about 1 hour, before applying whipped cream or frosting to the layers.

Common Mistake to Avoid: Frosting a warm cake can cause the topping to melt, so patience is key to achieving a professional, moist finish.

Serving & Presentation

For an impressive presentation of your Juicy Pineapple Heaven Cake, stack the cooled layers and frost with a generous swirl of whipped cream, adding a ring of fresh pineapple chunks around the edges for a tropical garnish that enhances visual appeal. Dust the top with a light sprinkle of powdered sugar or shredded coconut to add texture and color, making it Instagram-worthy. Serve this moist pineapple cake alongside vanilla ice cream or a scoop of yogurt for a refreshing contrast, or pair it with light tropical fruits like mango slices to complement its juicy flavors without overwhelming the palate.

Make-Ahead & Storage Solutions

Make-Ahead Strategy: Prepare the batter up to 2 days in advance by mixing the dry ingredients and storing them in an airtight container, while keeping the wet ingredients refrigerated separately. On the day of baking, combine and fold in the pineapple chunks just before pouring into pans to maintain freshness and moisture—chill the assembled cake layers unfrosted for up to 3 days.

Storing Leftovers: Wrap cooled, unfrosted cake layers tightly in plastic wrap and store in the refrigerator for up to 5 days to preserve the juicy texture, or freeze for up to 3 months by placing in a freezer-safe bag. For frosted cakes, refrigerate in an airtight container to prevent the whipped cream from absorbing odors, and always bring to room temperature before serving.

The Best Way to Reheat: To restore the original moistness, thaw frozen slices in the refrigerator overnight, then warm in a 300°F oven for 5-10 minutes, or microwave on low for 20 seconds. Avoid high heat to prevent drying out the pineapple-infused crumb, and cover with a damp paper towel for added humidity.

Finished recipe photo

Frequently Asked Questions (FAQ)

How long does it take to bake a Juicy Pineapple Heaven Cake?

For this Juicy Pineapple Heaven Cake, baking time is typically 25-30 minutes at 350°F (175°C), depending on your oven. Always test with a toothpick for doneness to ensure the center is fully baked without overcooking, which could affect the moist texture.

Can I substitute oil for butter in a Juicy Pineapple Heaven Cake recipe?

Yes, you can substitute oil for butter in this Juicy Pineapple Heaven Cake, using a neutral oil like vegetable or coconut oil in a 1:1 ratio. However, butter adds a richer flavor and better texture, so for optimal results, use only half oil and half butter to maintain the cake’s moisture and structure.

What are some tips for making a moist Juicy Pineapple Heaven Cake?

To ensure your Juicy Pineapple Heaven Cake stays moist, use fresh pineapple chunks and avoid overmixing the batter, which can develop gluten and lead to density. Also, measure ingredients accurately and let the cake cool properly before frosting—the secret infusion from the pineapple helps lock in hydration.

How should I store or serve a homemade Juicy Pineapple Heaven Cake?

Serve your Juicy Pineapple Heaven Cake at room temperature for the best flavor, paired with coffee or tea to highlight its tropical notes. For storage, keep it refrigerated if frosted, and cover tightly to maintain moisture; reheat gently as needed for that fresh-baked feel.

Can I add nuts or other fruits to this Juicy Pineapple Heaven Cake?

Absolutely, you can enhance this Juicy Pineapple Heaven Cake by adding 1/2 cup of chopped nuts like walnuts for crunch, or mixing in other fruits such as mango for extra tropical flair. Just ensure the additions don’t exceed 1 cup total to avoid altering the batter’s moisture balance.

What if my Juicy Pineapple Heaven Cake turns out dry?

If your cake ends up dry, it might be due to overbaking—next time, check it early and use the toothpick test. You can also brush the layers with pineapple juice before frosting to restore moisture, making it taste as juicy as intended.

Can I make this recipe vegan or gluten-free?

Yes, you can adapt this Juicy Pineapple Heaven Cake for vegan or gluten-free diets. For vegan, replace eggs with flax eggs (1 tbsp ground flaxseed + 3 tbsp water each) and use vegan butter; for gluten-free, swap all-purpose flour with a gluten-free blend and add xanthan gum. These changes will help maintain the cake’s moist, fruity texture with minimal adjustments.

Print
clock clock iconcutlery cutlery iconflag flag iconfolder folder iconinstagram instagram iconpinterest pinterest iconfacebook facebook iconprint print iconsquares squares iconheart heart iconheart solid heart solid icon

Juicy Pineapple Heaven Cake


  • Author: Chef mia

Description

Juicy Pineapple Heaven Cake is a tropical delight that promises to elevate your dessert game. Moist, fruity, and irresistibly delicious, it’s perfect for any occasion.


Ingredients

  • All-Purpose Flour
  • Sugar
  • Baking Powder
  • Salt
  • Eggs
  • Pineapple Chunks (fresh or canned)
  • Unsalted Butter
  • Vanilla Extract
  • Whipped Cream or Frosting

Instructions

  1. Preheat your oven to 350°F (175°C) and grease two 9-inch round cake pans.
  2. In a bowl, whisk together flour, sugar, baking powder, and salt.
  3. In another bowl, cream softened butter until fluffy. Gradually add sugar, then beat in eggs and vanilla extract.
  4. Combine the wet and dry ingredients until just mixed. Gently fold in pineapple chunks.
  5. Pour batter into prepared pans and bake for 25-30 minutes until a toothpick comes out clean.
  6. Let cool completely before frosting.

Nutrition

  • Calories: 290
  • Sugar: 20g
  • Fat: 12g
  • Carbohydrates: 41g
  • Protein: 3g

Conclusion

This delightful recipe combines fresh ingredients and bold flavors to create a satisfying meal that’s perfect for weeknight dinners or special occasions. Its vibrant taste profile highlights the balance of herbs and spices, making it a versatile dish for any home cook. For a fun variation, try adding a cheesy twist inspired by Leftover Ham and Cheese Sliders, or explore more seafood options with Mediterranean Baked Fish for an equally effortless yet flavorful alternative.

Delicious Chile Relleno Casserole Recipe

Delicious Chile Relleno Casserole Recipe: The Only Recipe You’ll Ever Need

Imagine transforming a classic Mexican favorite into a hassle-free family dinner that’s ready in under an hour—this Delicious Chile Relleno Casserole Recipe is your ultimate kitchen hack. Whether you’re a busy parent juggling weeknight meals or a home cook craving authentic flavors without the fuss, this recipe solves the common problem of intricate dishes taking too much time. With its effortless casserole adaptation, roasting poblano peppers and layering them with savory beef and gooey cheese, you’ll achieve restaurant-quality results effortlessly. This Delicious Chile Relleno Casserole Recipe stands out as the go-to option for gatherings, proving that bold, comforting tastes don’t require advanced skills.

Sink your teeth into the irresistible blend of smoky roasted poblanos, tender seasoned beef, and a molten layer of cheddar and Monterey Jack cheese that creates a symphony of textures and flavors. The aroma of cumin and chili powder fills the air as the casserole bakes to golden perfection, offering a slight crunch from the peppers contrasting with the creamy, melted cheese interior. Every bite delivers a harmonious balance of mild heat, rich meatiness, and a subtle sweetness from the onions and garlic, making this dish not just a meal, but an experience that evokes the warmth of family traditions.

What sets this Delicious Chile Relleno Casserole Recipe apart on cookingwithemy.com is our commitment to making it the most reliable and user-friendly version you’ll find online. Drawing from trusted sources like TastyRecipes, we’ve refined every step with our Chef’s Secret to ensure foolproof results every time. In this post, you’ll discover expert tips, ingredient insights, and answers to common questions, empowering you to impress your loved ones with ease. Stay tuned for that special technique that elevates the flavor profile beyond ordinary casseroles.

Prep Time: 20 minutes
Cook Time: 35 minutes
Total Time: 55 minutes
Servings: 4

Why This Delicious Chile Relleno Casserole Recipe is a Game-Changer

The Chef’s Secret: The unique selling proposition of this recipe lies in its effortless casserole adaptation, transforming traditional stuffed chiles into a layered bake that’s simple yet bursting with authentic Mexican flair. By roasting the poblano peppers to perfection and incorporating them into a cohesive casserole with seasoned beef, we unlock deeper flavors that meld together during baking. This method ensures even distribution of spices like cumin and chili powder, creating a harmonious blend that elevates the dish from good to unforgettable—it’s all about that easy assembly that saves time without sacrificing taste.

Unbeatable Texture: The science behind the texture comes from whisking eggs and milk into a custard-like base that bakes into a fluffy, cohesive structure, while the cheese melts to form a golden, bubbly top. The high moisture from the roasted peppers steams and softens, preventing dryness, and the ground beef adds a hearty, tender element that contrasts beautifully with the slight crispness of the edges—resulting in a casserole that’s creamy inside and perfectly set.

Foolproof for a Reason: This recipe has been tested multiple times in home kitchens to guarantee success, even for beginners. With precise instructions and tips, you can avoid common pitfalls like over-roasting peppers or uneven seasoning, making it a reliable choice for any occasion. Its straightforward steps ensure consistent results, positioning this Delicious Chile Relleno Casserole Recipe as the best resource for confident cooking.

Ingredient Spotlight: Quality Makes the Difference

Fresh poblano peppers are the star of this Delicious Chile Relleno Casserole Recipe, providing a mild, smoky heat that forms the base of the dish. These peppers offer a tender, charred exterior that enhances the overall flavor profile when roasted, adding depth and authenticity to the casserole. Opt for firm, unblemished poblanos for the best results, as lower-quality ones may lack flavor or become too watery. If poblanos are unavailable, substitute with Anaheim peppers for a similar mild heat, but adjust roasting time to prevent over-softening.

Ground beef brings rich, savory protein to this recipe, making it a hearty and satisfying meal for family gatherings. Choose lean ground beef (around 85-90% lean) to balance flavor and fat content, ensuring the mixture doesn’t become greasy during browning. This ingredient absorbs the cumin and chili powder beautifully, infusing the casserole with robust taste. For a lighter option, substitute with ground turkey, but add a bit of olive oil to maintain moisture and prevent dryness.

Onion and garlic cloves add aromatic layers that elevate the Delicious Chile Relleno Casserole Recipe, with onion providing a subtle sweetness and garlic offering pungent depth. Use fresh, firm onions and plump garlic cloves for maximum flavor release when sautéed. Freshness is key here, as older onions can be bitter. If needed, swap onions with shallots for a milder taste, and for garlic, use jarred minced garlic in a pinch, though fresh is always superior for that authentic punch.

Cumin and chili powder are the spice heroes, with cumin lending an earthy warmth and chili powder adding just the right kick to complement the peppers and beef. High-quality, freshly ground cumin ensures a more intense flavor, while pure chili powder (not blends with fillers) prevents bitterness. These spices are non-negotiable for the recipe’s balance, but if you’re out of cumin, ground coriander can mimic its nutty notes, and for chili powder, a mix of paprika and cayenne works as a substitute with adjusted measurements.

Shredded cheese, such as cheddar and Monterey Jack, creates that irresistible gooey topping in this Delicious Chile Relleno Casserole Recipe, binding everything together with creamy, melty goodness. Freshly shredded cheese melts more evenly than pre-shredded varieties, which often contain anti-caking agents. For the best results, use a blend for varied textures. Vegans can substitute with dairy-free cheese alternatives like cashew-based shreds, ensuring they mimic meltability to maintain the casserole’s signature appeal.

Eggs and whole milk form the binding custard that holds the casserole together, providing structure and a light, airy texture. Fresh eggs ensure the whisked mixture sets properly during baking, while whole milk adds richness without curdling. This combination is crucial for the dish’s creamy consistency. For dietary needs, replace eggs with a flaxseed mixture (1 tbsp flaxseed + 3 tbsp water per egg) and use almond milk instead of whole milk, though this may slightly alter the texture.

Step-by-Step Instructions

Step 1: Preparing the Poblano Peppers

Preheat your oven to 350°F (175°C). Place the 4 fresh poblano peppers on a baking sheet and roast them under the broiler for about 10 minutes, turning occasionally, until the skins are blistered and charred. Once done, remove them from the oven, cover with a clean kitchen towel, and let them steam for 10 minutes to loosen the skins. Carefully peel off the blistered skin, remove the seeds, and slice them open lengthwise for stuffing, being gentle to keep them intact.

Pro Tip: Roast the peppers on a wire rack for better air circulation, which ensures even charring without sogginess— this step maximizes that smoky flavor essential for an authentic Delicious Chile Relleno Casserole Recipe.

Step 2: Browning the Ground Beef Mixture

In a large skillet over medium heat, add the 1 pound of ground beef along with the chopped medium onion and minced 3 garlic cloves. Cook for about 5 minutes, stirring frequently, until the beef is browned and the onions are translucent. Drain any excess fat to keep the mixture from becoming greasy.

Common Mistake to Avoid: Overcrowding the skillet can lead to steaming instead of browning; cook in batches if needed to achieve that perfect caramelized edge that enhances the overall taste of your Delicious Chile Relleno Casserole Recipe.

Step 3: Adding Spices to the Beef

Stir in 1 teaspoon of cumin and 1 teaspoon of chili powder into the beef mixture. Let it simmer for an additional 2 minutes, allowing the spices to bloom and infuse the meat with flavor. This step deepens the seasoning, making every layer of the casserole more aromatic.

Pro Tip: Toast the spices briefly before adding to the beef for an extra layer of flavor— this simple technique can make your Delicious Chile Relleno Casserole Recipe taste like it came from a professional kitchen.

Step 4: Stuffing the Peppers

Take the prepared poblano peppers and stuff them generously with the seasoned beef mixture. Place the stuffed peppers in a greased baking dish, arranging them side by side to form the base of your casserole.

Common Mistake to Avoid: Overstuffing the peppers can cause them to burst during baking; leave a little room to ensure they hold their shape and maintain the casserole’s structural integrity in this Delicious Chile Relleno Casserole Recipe.

Step 5: Preparing the Egg Mixture

In a medium bowl, whisk together 3 eggs and ½ cup of whole milk until fully combined and frothy. This creates a custard-like base that will bind the casserole together. Pour the mixture evenly over the stuffed peppers in the baking dish.

Pro Tip: Let the egg mixture sit for a minute after whisking to incorporate air, resulting in a lighter, fluffier texture that elevates the overall appeal of your Delicious Chile Relleno Casserole Recipe.

Step 6: Topping and Baking the Casserole

Generously sprinkle 2 cups of shredded cheese (a mix of cheddar and Monterey Jack) over the top of the peppers and egg mixture in the baking dish. Bake in the preheated oven for 30-35 minutes, or until the cheese is bubbly and golden brown, and the casserole is set.

Common Mistake to Avoid: Opening the oven door too often during baking can cause uneven cooking; resist the urge to check until the minimum time is up for the perfect, consistent finish in your Delicious Chile Relleno Casserole Recipe.

Serving & Presentation

For an impressive presentation, slice the Delicious Chile Relleno Casserole into generous portions and plate it on colorful dishes to highlight the vibrant green peppers against the golden cheese. Garnish with fresh cilantro or sliced green onions for a pop of color and added freshness, which complements the smoky flavors without overwhelming them. Pair this casserole with simple sides like Mexican rice or black beans to create a balanced meal, allowing the main dish to shine as the centerpiece.

To make it even more engaging, serve with a dollop of sour cream or a squeeze of lime for a tangy contrast that enhances the spices. This recipe pairs beautifully as a main course for family dinners or as a side for larger gatherings, ensuring everyone leaves satisfied and impressed by the effortless yet elegant presentation.

Make-Ahead & Storage Solutions

Make-Ahead Strategy: Prepare the roasted and stuffed peppers up to 2 days in advance by following steps 1-4, then store them covered in the refrigerator. On the day of serving, simply add the egg mixture and cheese before baking, which keeps flavors fresh and saves time for busy schedules.

Storing Leftovers: Allow the casserole to cool completely, then cover tightly with plastic wrap or transfer to an airtight container and refrigerate for up to 3 days. For longer storage, freeze individual portions in freezer-safe bags for up to 2 months, ensuring to label with the date to maintain quality.

The Best Way to Reheat: To restore the original texture and flavor, reheat slices in a preheated oven at 350°F for 15-20 minutes, or use a microwave on medium power for 2-3 minutes with a damp paper towel to prevent drying out. This method keeps the cheese melty and the peppers tender, just like fresh.

Finished recipe photo

Frequently Asked Questions (FAQ)

How do you make a chocolate cake from scratch?

While this FAQ doesn’t directly relate to our Delicious Chile Relleno Casserole Recipe, making a chocolate cake from scratch generally involves mixing dry ingredients like flour, sugar, cocoa powder, and baking soda, then adding wet ingredients such as eggs, milk, and melted butter. Combine in a bowl, pour into a greased pan, and bake at 350°F for 30-40 minutes. For best results, focus on accurate measurements and room-temperature ingredients.

Can I substitute ingredients in a chocolate cake recipe?

Yes, substitutions are possible in many recipes, but they might alter the texture or flavor. For instance, in a chocolate cake, you could swap all-purpose flour for gluten-free flour, or use applesauce instead of oil for a moister version. However, for our Delicious Chile Relleno Casserole Recipe, ingredient swaps like using ground turkey for beef can work, as long as you adjust for moisture to keep the casserole’s integrity.

How long does it take to bake a chocolate cake?

Baking a chocolate cake typically takes 30-45 minutes at 350°F, depending on the pan size and oven. Always check for doneness with a toothpick. In contrast, our Delicious Chile Relleno Casserole Recipe bakes in just 30-35 minutes, making it a quicker option for family meals.

What are some ways to decorate a chocolate cake?

Decorating a chocolate cake can include frosting with buttercream, adding ganache drizzles, or topping with fruits and nuts for visual appeal. Techniques like piping or using edible flowers add elegance. For our Delicious Chile Relleno Casserole Recipe, focus on simple garnishes like herbs to enhance its rustic charm.

Can I make this recipe ahead of time?

Absolutely! For the Delicious Chile Relleno Casserole Recipe, you can prepare and assemble it up to 2 days in advance, then bake when ready. This makes it ideal for meal prep and ensures flavors develop even more.

Is this recipe suitable for dietary restrictions?

Yes, with modifications. For a gluten-free version, ensure all ingredients like spices are certified gluten-free. For vegetarians, omit the ground beef and use a plant-based alternative, adjusting seasonings to maintain the robust flavors of this Delicious Chile Relleno Casserole Recipe.

Can I make this recipe vegan or gluten-free?

To make it vegan, substitute the ground beef with a plant-based crumble, use flax eggs instead of regular eggs, and opt for dairy-free cheese and milk alternatives. For gluten-free, the recipe is naturally so, but double-check your spices and toppings. These swaps keep the casserole’s delicious essence intact while accommodating dietary needs.

Print
clock clock iconcutlery cutlery iconflag flag iconfolder folder iconinstagram instagram iconpinterest pinterest iconfacebook facebook iconprint print iconsquares squares iconheart heart iconheart solid heart solid icon

Delicious Chile Relleno Casserole Recipe


  • Author: Chef mia

Description

Savor the rich flavors of this easy-to-make chile relleno casserole, featuring roasted peppers, seasoned beef, and melted cheese—a perfect dish for family gatherings.


Ingredients

Scale
  • 4fresh poblano peppers
  • 1pound ground beef
  • 1medium onion
  • 3garlic cloves
  • 1 teaspooncumin
  • 1 teaspoonchili powder
  • 2 cupsshredded cheese (cheddar and Monterey Jack)
  • 3eggs
  • ½ cupwhole milk

Instructions

  1. Preheat the oven to 350°F (175°C). Roast the poblano peppers under the broiler until blistered (about 10 minutes). Cover and steam them.
  2. In a skillet, brown the ground beef with chopped onion and minced garlic for about 5 minutes.
  3. Stir in cumin and chili powder; simmer for an additional 2 minutes.
  4. Peel the roasted peppers, remove seeds, and stuff them with the beef mixture.
  5. In a bowl, whisk eggs and milk together; pour over the stuffed peppers in a baking dish.
  6. Top generously with shredded cheese and bake for 30-35 minutes until bubbly.

Nutrition

  • Calories: 350
  • Sugar: 3g
  • Fat: 22g
  • Carbohydrates: 20g
  • Protein: 20g

Conclusion

This comforting soup combines tender chicken, creamy textures, and bold Mexican-inspired flavors for a satisfying meal that’s perfect for chilly evenings or busy weeknights. Its rich blend of spices and hearty ingredients makes it a versatile dish that delivers warmth and taste in every bowl. For a fun variation, try topping it with fresh avocado or serving it with crusty bread; if you’re craving more soup inspiration, explore our Easy Enchiladas Ground Beef Soup Recipe or the Best Chili’s Chicken Enchilada Soup Recipe for additional flavorful options.

Easy Stovetop Meatloaf

Easy Stovetop Meatloaf: The Only Recipe You’ll Ever Need

Welcome to the ultimate guide for Easy Stovetop Meatloaf, the go-to weeknight dinner that transforms busy evenings into mouthwatering meals with just one pan. Picture this: you’re juggling work, kids, and chores, but dinner doesn’t have to be a hassle. This Easy Stovetop Meatloaf recipe cuts out the oven and embraces a one-pan method that locks in flavors and moisture, making it faster and more flavorful than traditional baked versions. Whether you’re a novice cook or a seasoned pro, this straightforward approach delivers tender, juicy results every time, proving that homemade comfort food can be simple and satisfying.

Imagine the irresistible aroma of sizzling onions and garlic wafting through your kitchen, mingling with the rich, savory scent of seasoned ground beef. Each bite of this Easy Stovetop Meatloaf offers a perfect balance of juicy tenderness and a slight crust from pan-searing, creating a texture that’s melt-in-your-mouth moist inside with a flavorful outer layer. The one-pan method ensures that every morsel is infused with bold spices, like garlic powder and pepper, resulting in a hearty dish that’s not overly greasy but packed with that classic meatloaf taste you crave.

Why choose this Easy Stovetop Meatloaf from cookingwithemy.com? It’s been meticulously tested in real home kitchens to guarantee foolproof results, incorporating a chef’s secret that elevates it above ordinary recipes. You’ll discover tips for achieving unbeatable moisture, smart substitutions, and ways to customize for dietary needs, all while keeping prep minimal. Stick around to uncover how this one-pan innovation makes it the single best resource for mastering stovetop meatloaf, empowering you to impress your family with ease.

Prep Time: 10 minutes
Cook Time: 30 minutes
Total Time: 40 minutes
Servings: 4

Why This Easy Stovetop Meatloaf Recipe is a Game-Changer

The Chef’s Secret: The unique selling proposition of this Easy Stovetop Meatloaf lies in its one-pan method, which uses a skillet to sear and simmer the loaf for superior moisture retention and even cooking. Unlike traditional oven-baked meatloaf that can dry out, this technique allows the juices to recirculate, infusing every bite with extra flavor from the sautéed onions and spices. By starting with a quick sear, you create a caramelized crust that locks in the savory goodness, making this recipe stand out as the most efficient and tasty option for busy cooks.

Unbeatable Texture: The science behind the texture comes from the low-and-slow simmering step, where the ground beef mixture gently cooks in its own juices. This process breaks down proteins more evenly, resulting in a tender, juicy interior while the initial sear adds a slight firmness to the outside. The one-pan method minimizes moisture loss, ensuring your Easy Stovetop Meatloaf stays succulent and avoids the common pitfall of a tough, crumbly loaf.

Foolproof for a Reason: This recipe has been tested multiple times in various home settings to ensure consistent success, even for beginners. With clear, step-by-step guidance and built-in pro tips, you’ll avoid common errors like overmixing or uneven cooking, making Easy Stovetop Meatloaf a reliable staple for weeknight dinners.

Easy Stovetop Meatloaf Ingredient Spotlight: Quality Makes the Difference

Ground beef: As the star of this Easy Stovetop Meatloaf, ground beef provides the hearty base and rich flavor that defines the dish. Opt for 80% lean ground beef to balance juiciness and fat content—too lean might result in a dry loaf. Quality matters because fresh, high-quality beef ensures better texture and taste; look for grass-fed options if possible. For substitutions, try ground turkey for a lighter version, but add extra oil to maintain moisture, as turkey can be leaner.

Breadcrumbs: These act as a binder in your Easy Stovetop Meatloaf, helping to hold the mixture together while absorbing flavors from the other ingredients. Use fresh or panko breadcrumbs for a lighter texture; stale ones can make the loaf dense. Why quality counts: High-quality breadcrumbs ensure even absorption, preventing a soggy or crumbly result. A tested substitution is quick oats for a gluten-free option, which adds a subtle nuttiness without altering the structure.

Eggs: Eggs serve as the glue that binds the ingredients in this Easy Stovetop Meatloaf, contributing to its moist and cohesive texture. Fresh, large eggs are ideal for the best binding power. Quality is key because farm-fresh eggs have richer yolks that enhance the overall flavor. If you’re vegan, substitute with a flaxseed egg (1 tablespoon ground flaxseed mixed with 3 tablespoons water per egg) to maintain the structure without compromising the one-pan magic.

Ketchup: This ingredient adds a tangy sweetness and moisture to your Easy Stovetop Meatloaf, both in the mix and as a glaze. Choose a high-quality, low-sugar ketchup for balanced flavor without overwhelming sweetness. It helps create that classic glazed top during simmering. For a substitution, try tomato paste mixed with a bit of honey and vinegar to mimic the tang, making it suitable for those reducing processed sugars.

Onion: Sautéed onions bring a sweet, aromatic depth to this Easy Stovetop Meatloaf, enhancing the overall savoriness. Fresh yellow onions work best for their mild flavor and ability to caramelize quickly. Quality fresh onions ensure they don’t overpower the dish; avoid pre-chopped ones that might lack freshness. Substitute with shallots for a milder taste, or leeks for a similar onion-like flavor in a pinch.

Garlic powder: Garlic powder infuses a robust, garlicky essence into your Easy Stovetop Meatloaf without the need for fresh cloves, making it a convenient flavor booster. Opt for pure garlic powder without additives for the truest taste. It evenly seasons the meat, preventing any harsh bites. A great substitution is fresh minced garlic for a more pungent kick, but use sparingly to avoid dominating the one-pan harmony.

Salt & pepper: These essentials season your Easy Stovetop Meatloaf, enhancing all other flavors without overpowering them. Use fine sea salt and freshly ground black pepper for the best taste. Quality matters as fresh grinding releases more oils, adding depth. For low-sodium diets, substitute salt with herbs like rosemary or a salt-free seasoning blend to keep the recipe adaptable.

Step-by-Step Instructions for Easy Stovetop Meatloaf

Step 1: Preparing the Ingredients

Gather all your ingredients and tools, ensuring you have a large skillet ready. Start by dicing the onion finely to about 1 cup, as this will help it cook evenly and integrate seamlessly into the meat mixture. In a large bowl, combine the ground beef, breadcrumbs, eggs, ketchup, garlic powder, salt, and pepper. Mix gently with your hands or a fork until just combined, being careful not to overwork the meat.

Pro Tip: Always use cold ingredients straight from the fridge to keep the mixture from becoming too warm and greasy, which helps maintain the perfect texture in your Easy Stovetop Meatloaf.

Step 2: Sautéing the Onions

Heat 1 tablespoon of oil in the large skillet over medium heat. Add the diced onions and cook, stirring occasionally, for 3-5 minutes until they become translucent and fragrant. This step builds a flavorful base for your Easy Stovetop Meatloaf.

Common Mistake to Avoid: Don’t rush this step by using high heat, as it can burn the onions and make them bitter—keep the heat medium to ensure even cooking and sweet flavor integration.

Step 3: Mixing the Meatloaf

Once the onions are ready, add them to the bowl with the ground beef mixture. Gently fold everything together until evenly distributed, ensuring the onions are well incorporated for that extra burst of flavor in every slice of your Easy Stovetop Meatloaf.

Pro Tip: Mix with your hands for the best control, but do it lightly to avoid compacting the meat, which can lead to a dense texture in the final dish.

Step 4: Shaping and Initial Cooking

Form the mixture into a loaf shape, about 8 inches long, and place it directly into the hot skillet. Cook over medium heat for 5-7 minutes until browned on one side, then carefully flip it using two spatulas to prevent it from breaking apart.

Common Mistake to Avoid: Flipping too early or roughly can cause the loaf to fall apart—wait for a good sear and use gentle tools to keep your Easy Stovetop Meatloaf intact.

Step 5: Adding Sauce and Simmering

Drizzle an additional 2-3 tablespoons of ketchup over the top of the loaf for a glossy finish. Cover the skillet and reduce the heat to low, simmering for 20-25 minutes until the internal temperature reaches 160°F (70°C). This step ensures the meat is cooked through while staying juicy.

Pro Tip: Use a meat thermometer for accuracy; it guarantees your Easy Stovetop Meatloaf is safe and perfectly cooked without overdoing it.

Step 6: Resting the Meatloaf

Remove the skillet from the heat and let the meatloaf rest for 5 minutes. This allows the juices to redistribute, making slicing easier and more even.

Common Mistake to Avoid: Cutting into it too soon can cause it to lose moisture—patience here is key for the best results in your Easy Stovetop Meatloaf.

Serving & Presentation

For a stunning presentation, slice your Easy Stovetop Meatloaf into thick, even pieces and arrange them on a platter with a side of creamy mashed potatoes or steamed vegetables for a balanced meal. Garnish with fresh parsley or a sprinkle of chives to add a pop of color and freshness, elevating the dish from simple to impressive. Complementary sides like garlic green beans or a fresh salad enhance the savory flavors, while a dollop of mustard or a quick gravy can tie it all together.

Make-Ahead & Storage Solutions

Make-Ahead Strategy: Prepare the meat mixture up to 24 hours in advance by mixing all ingredients except the onions, storing it covered in the fridge. Sauté the onions fresh when you’re ready to cook, then shape and proceed—this keeps flavors vibrant and saves time on busy nights.

Storing Leftovers: Store sliced or whole Easy Stovetop Meatloaf in an airtight container in the fridge for up to 3 days, or freeze for up to 3 months in freezer-safe bags to maintain freshness. Always cool it completely before storing to prevent condensation and sogginess.

The Best Way to Reheat: For optimal texture, reheat slices in a skillet over low heat with a splash of water or broth to restore moisture, or use the oven at 350°F for 10-15 minutes. Avoid the microwave to prevent drying out, ensuring your meatloaf tastes just as good as when freshly made.

Finished recipe photo

Frequently Asked Questions (FAQ)

How long do you cook Easy Stovetop Meatloaf for the perfect texture?

Cook your Easy Stovetop Meatloaf for about 30 minutes total, with an initial sear of 5-7 minutes per side followed by 20-25 minutes of simmering. This ensures a juicy interior and flavorful crust—always check the internal temperature at 160°F for safety and ideal texture.

Can I substitute ground beef with another meat in Easy Stovetop Meatloaf?

Yes, you can substitute ground beef with ground turkey or chicken for a leaner option, but add an extra tablespoon of oil or broth to the mixture to keep it moist, as these meats are less fatty. For a beef-like flavor, mix in Worcestershire sauce; this maintains the one-pan essence while adapting to dietary preferences.

What are some tips for making Easy Stovetop Meatloaf moist and flavorful?

To achieve a moist and flavorful Easy Stovetop Meatloaf, use fresh ingredients, avoid overmixing the meat, and incorporate sautéed onions for natural sweetness. The one-pan method helps retain juices, and adding a bit more ketchup or a splash of milk can enhance moisture—resting the loaf before slicing is crucial for locking in flavors.

How many servings does a standard Easy Stovetop Meatloaf recipe make?

This Easy Stovetop Meatloaf recipe yields about 4 servings, depending on portion size, making it perfect for a family dinner. You can easily double the ingredients for larger gatherings, ensuring everyone gets a satisfying, hearty portion.

Can I make this recipe gluten-free?

Absolutely, to make this Easy Stovetop Meatloaf gluten-free, swap the breadcrumbs for gluten-free alternatives like almond flour or gluten-free oats. Ensure all other ingredients, like ketchup, are certified gluten-free, and follow the same steps for a delicious, inclusive meal.

What sides pair best with Easy Stovetop Meatloaf?

Ideal sides for Easy Stovetop Meatloaf include mashed potatoes, roasted vegetables, or a fresh green salad to balance the richness. These pairings enhance the one-pan flavors and make for a complete, comforting meal.

Print
clock clock iconcutlery cutlery iconflag flag iconfolder folder iconinstagram instagram iconpinterest pinterest iconfacebook facebook iconprint print iconsquares squares iconheart heart iconheart solid heart solid icon

Easy Stovetop Meatloaf


  • Author: Chef mia

Description

Stovetop meatloaf is your weeknight superhero, swooping in to save dinner with minimal effort! Imagine walking into your kitchen, only to be greeted by the warm embrace of savory spices and a juicy loaf that practically begs for creamy mashed potatoes. Your family will think you’ve been slaving away over the stove, but the truth? It’s all about that stovetop magic. Grab your skillet, and let’s create some dinner-time joy!


Ingredients

  • Ground beef
  • Breadcrumbs
  • Eggs
  • Ketchup
  • Onion
  • Garlic powder
  • Salt & pepper

Instructions

  1. Prep your gear: Gather all ingredients and tools (a large skillet works best).
  2. Sauté onions: Heat oil in the skillet over medium heat and cook diced onions until translucent (3-5 minutes).
  3. Mix it up: In a bowl, combine ground beef, breadcrumbs, eggs, ketchup, sautéed onions, garlic powder, salt, and pepper; mix gently.
  4. Shape & cook: Form the mixture into a loaf and place it in the hot skillet. Cook until browned on one side (5-7 minutes), then flip gently.
  5. Add sauce & simmer: Drizzle extra ketchup on top, cover, and simmer on low for 20-25 minutes until cooked through (internal temp 160°F/70°C).
  6. Let it rest: Remove from heat and rest for 5 minutes before slicing.

Nutrition

  • Calories: 250
  • Sugar: 7g
  • Fat: 12g
  • Carbohydrates: 22g
  • Protein: 18g

Conclusion

This hearty recipe delivers a comforting blend of rich flavors and nutritious ingredients, making it an ideal choice for a wholesome family meal or a quick weeknight dinner. For the best results, serve it hot with a sprinkle of fresh herbs to enhance the taste, or experiment with adding vegetables like carrots for a colorful variation. If you’re craving more savory options, explore Healthy Lentil Curry and One Pot Turkey Lentil Soup for additional hearty inspirations.