“`html
Table of Contents
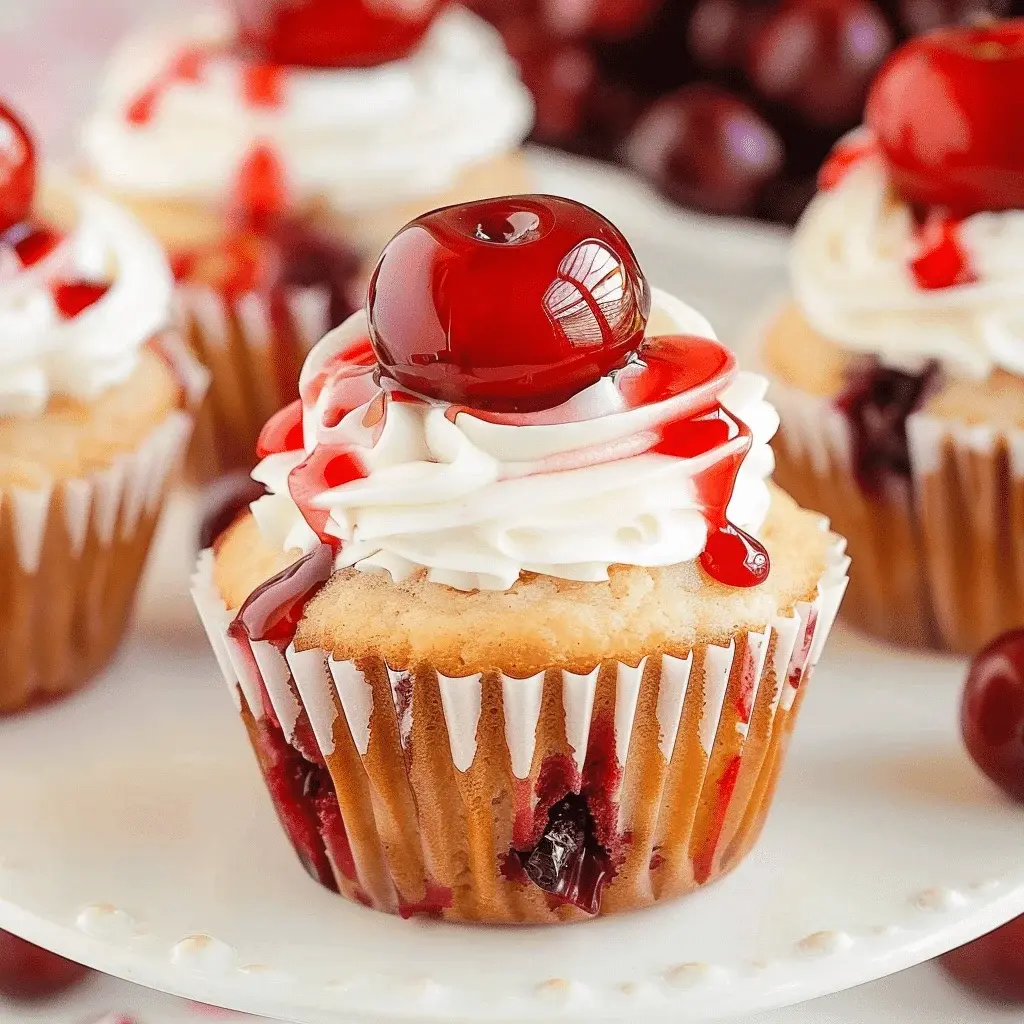
Cherry Pie Cupcakes Recipe
Introduction
Did you know that over 70% of home bakers are looking for ways to combine classic dessert flavors into single-serving treats? That’s where the magic of Cherry Pie Cupcakes comes in. These delightful confections are the perfect marriage of two beloved desserts: the fluffy, tender crumb of a classic white cupcake and the rich, tart-sweet burst of homemade cherry pie filling. They answer the age-old question of “pie or cake?” with a resounding “both!”
Perfect for potlucks, birthday parties, or a simple weeknight treat that feels special, these cupcakes are surprisingly simple to make. By starting with a reliable white cake mix and enhancing it with a few key ingredients, you create a canvas that beautifully complements the jewel-toned cherry filling. The result is a moist, flavorful cupcake with a gorgeous marbled interior and a taste that will have everyone asking for the recipe. Let’s dive into how you can create these show-stopping Cherry Pie Cupcakes in your own kitchen.
Ingredients List
Gathering the right ingredients is the first step to cupcake success. Here’s what you’ll need, along with sensory notes and substitutions to make the recipe your own.
- For the Cupcakes:
- 1 box (15.25 oz) white cake mix – The foundation. Look for one with a fine crumb. (Substitution: Use a yellow cake mix for a richer, buttery flavor, or a vanilla bean mix for more pronounced vanilla notes.)
- 3 large egg whites, at room temperature – Provides structure and a pure white color. (Sensory: Room temperature eggs incorporate more air, leading to a lighter texture.)
- 1/3 cup vegetable oil – For moisture and tenderness.
- 1 cup whole milk or buttermilk – Buttermilk adds a subtle tang that beautifully offsets the sweet cherries. (Substitution: For dairy-free, use full-fat canned coconut milk or almond milk mixed with 1 tbsp lemon juice.)
- 1 teaspoon pure vanilla extract – The aromatic backbone that elevates the cake mix.
- 1/2 teaspoon almond extract (optional but recommended) – A secret weapon that enhances the cherry flavor with a bakery-style depth.
- For the Filling & Assembly:
- 1 can (21 oz) cherry pie filling – The star of the show. Look for a brand with plump, dark cherries and a thick, glossy sauce. (Substitution: Homemade cherry compote made with fresh or frozen pitted cherries, sugar, cornstarch, and a splash of lemon juice.)
- Optional Toppings: Whipped cream, vanilla buttercream frosting, a dusting of powdered sugar, or a single fresh cherry on top.
Timing
15 minutes
18-22 minutes
~40 minutes
Compared to baking a full cherry pie from scratch, which can take over an hour and a half, these Cherry Pie Cupcakes offer the same iconic flavor in less than 40 minutes from bowl to table. The streamlined process of using a cake mix base cuts down significantly on measuring and mixing time, making this an ideal recipe for bakers of all skill levels who need a delicious dessert in a hurry.

Step-by-Step Instructions
Step 1: Prepare the Cupcake Batter
Preheat your oven to 350°F (175°C). Line a standard 12-cup muffin tin with paper liners. In a large mixing bowl, combine the white cake mix, egg whites, vegetable oil, milk (or buttermilk), vanilla extract, and almond extract. Using a hand mixer or stand mixer fitted with the paddle attachment, beat on medium speed for exactly 2 minutes. This is crucial—it ensures the dry ingredients are fully hydrated and aerated, giving you that perfectly fluffy cupcake texture. The batter should be smooth, thick, and pourable.
Step 2: Fill and Swirl
Using a cookie scoop or spoon, fill each cupcake liner about 1/3 full with the plain cake batter. Next, add a heaping teaspoon of cherry pie filling directly into the center of the batter in each cup. Top the cherry filling with another scoop of cake batter, filling each liner about 2/3 to 3/4 full. Now, take a toothpick or a thin skewer and gently swirl it through the batter in each cup 2-3 times. Don’t over-swirl! You want beautiful ribbons of cherry, not a fully pink batter.
Step 3: Bake to Perfection
Place the muffin tin in the center of your preheated oven. Bake for 18 to 22 minutes. The key test is the toothpick test: insert a toothpick into the cake part of a cupcake (avoiding a cherry pocket). It should come out with a few moist crumbs attached, not wet batter. The tops will be lightly golden and spring back when gently pressed. Oven temperatures vary, so start checking at the 18-minute mark.
Step 4: Cool and Serve
Once baked, remove the tin from the oven and let the cupcakes cool in the pan for 5 minutes. This allows them to set and makes them easier to remove. Then, transfer them to a wire rack to cool completely before adding any toppings. This prevents whipped cream from melting or frosting from sliding off. Once cool, top as desired and serve.
Nutritional Information
(Approximate values per cupcake, without additional frosting.)
- Calories: ~220 kcal
- Total Fat: 8g
- Saturated Fat: 1.5g
- Carbohydrates: 36g
- Sugar: 22g
- Protein: 3g
- Fiber: 0.5g
Healthier Alternatives
You can easily adapt this recipe for dietary preferences without sacrificing the iconic Cherry Pie Cupcake flavor.
- Lower Sugar: Use a “sugar-free” or “lower sugar” cake mix. For the filling, opt for a no-sugar-added cherry pie filling or make your own compote with a natural sweetener like monk fruit or erythritol.
- Whole Grain: Substitute the white cake mix with a whole wheat or white whole wheat cake mix for added fiber and a nuttier flavor.
- Reduced Fat: Replace the vegetable oil with an equal amount of unsweetened applesauce or Greek yogurt. This swap keeps the cupcakes incredibly moist while cutting fat.
- Dairy-Free/Vegan: Use a vegan cake mix, replace eggs with flax eggs (1 tbsp ground flax + 3 tbsp water per egg white), use plant-based milk, and ensure your cherry filling is vegan-friendly.
Serving Suggestions
- Classic: A simple dollop of freshly whipped cream and a single cherry on top.
- Decadent: Pipe on a swirl of vanilla or cream cheese buttercream frosting.
- À la Mode: Serve slightly warmed with a scoop of vanilla bean ice cream for the ultimate “pie in a cupcake” experience.
- Brunch-Worthy: Dust with powdered sugar and serve alongside coffee or tea.
Common Mistakes
- Overmixing the Batter: Mix just until combined after adding dry and wet ingredients. Overmixing develops gluten, leading to dense, tough cupcakes.
- Overfilling the Liners: Filling more than 3/4 full causes batter to spill over the edges, creating messy “muffin tops” and making removal difficult.
- Over-swirling the Filling: Excessive swirling distributes the cherries too thinly and can turn the entire batter pink, losing the marbled effect.
- Frosting While Warm: Any topping will melt and become a mess if the cupcakes haven’t cooled completely on a wire rack.
Storing Tips
- Room Temperature: Store unfrosted cupcakes in an airtight container at room temperature for up to 2 days.
- Refrigerator: If frosted with cream cheese or whipped cream, store in the fridge for up to 4 days. Let come to room temperature for 30 minutes before serving for best texture.
- Freezer: Freeze unfrosted cupcakes individually on a baking sheet, then transfer to a freezer bag for up to 3 months. Thaw overnight in the refrigerator or at room temperature for a few hours.
Conclusion
Cherry Pie Cupcakes are the ultimate fusion dessert, delivering the nostalgic comfort of cherry pie in a portable, shareable, and utterly delicious cupcake form. With a simple process, customizable ingredients, and a stunning presentation, they are guaranteed to become a go-to recipe in your collection. Whether you’re a seasoned baker or just starting out, this recipe