Peach Cobbler Cinnamon Rolls Recipe

“`html

Peach Cobbler Cinnamon Rolls Recipe

Introduction

Did you know that cinnamon rolls are one of the most searched-for comfort food recipes online, with a 40% increase in queries during summer months? This surge is driven by our desire for warm, nostalgic treats that feel like a hug. That’s where this Peach Cobbler Cinnamon Rolls recipe comes in—a genius fusion that answers the ultimate question: what if you could combine the gooey, spiced delight of a cinnamon roll with the juicy, fruity bliss of a classic peach cobbler? The result is a show-stopping bake that transforms simple ingredients into a warm, sweet masterpiece perfect for summer breakfasts or festive desserts.

Imagine pulling apart a soft, fluffy roll to reveal a swirl of brown sugar cinnamon and pockets of juicy, caramelized peaches. The top is crowned with a sweet, peachy glaze and a buttery cobbler crumble that adds the perfect crunchy texture. This recipe demystifies the process, guiding you through each step to create bakery-quality rolls in your own kitchen. Whether you’re a seasoned baker or a first-timer, these homemade cinnamon rolls with peach cobbler flavor are a guaranteed crowd-pleaser that will make your kitchen smell like pure happiness.

Ingredients List

For the Dough:

  • Warm Milk (1 cup, ~110°F): The liquid base that activates the yeast and creates a tender crumb. For a dairy-free version, use unsweetened almond or oat milk.
  • Granulated Sugar (⅓ cup): Feeds the yeast and adds subtle sweetness. You’ll notice the dough become slightly puffy and aromatic as it proofs.
  • Active Dry Yeast (2 ¼ tsp, 1 packet): The leavening agent that gives the rolls their signature airy, fluffy lift. Ensure it’s fresh for maximum rise.
  • Unsalted Butter (⅓ cup, melted): Provides rich flavor and a soft, pliable texture. Using unsalted allows you to control the salt level.
  • Large Egg (1, at room temperature): Binds the dough and adds structure and richness. You should see a smooth, slightly glossy dough come together.
  • All-Purpose Flour (3 ½ – 4 cups): The foundation. The dough should feel tacky but not sticky when kneaded. For a nuttier flavor, substitute 1 cup with whole wheat flour.
  • Salt (1 tsp): Balances the sweetness and enhances all the other flavors.

For the Peach Cobbler Filling:

  • Fresh Peaches (2 cups, peeled and diced): The star! Look for ripe, fragrant peaches that yield slightly to pressure. For off-season, use well-drained frozen peaches (thawed) or high-quality canned peaches in light syrup.
  • Light Brown Sugar (¾ cup, packed): Creates a moist, molasses-kissed filling with deep caramel notes. Dark brown sugar will give an even richer flavor.
  • Unsalted Butter (¼ cup, softened): Spread over the dough to help the filling adhere and melt into delicious pockets.
  • Ground Cinnamon (2 tbsp): The warm, spicy heart of the roll. For a more complex spice profile, add ¼ tsp of nutmeg or cardamom.
  • Cornstarch (1 tbsp): A crucial thickener that prevents the peach juices from making the dough soggy, ensuring a clean swirl.

For the Crumble Topping & Glaze:

  • All-Purpose Flour (½ cup): Forms the base of the crumble.
  • Cold Unsalted Butter (¼ cup, cubed): Creates those prized, pea-sized crumbles when cut into the flour.
  • Brown Sugar (¼ cup): Sweetens and helps the crumble caramelize.
  • Powdered Sugar (1 cup): For the glaze, providing a smooth, sweet finish.
  • Peach Juice or Milk (2-3 tbsp): Thins the glaze. Using peach juice (from canned peaches or blended fresh) intensifies the fruity flavor.
  • Vanilla Extract (½ tsp): Adds a warm, aromatic note to the glaze.

Timing

Prep Time
30 minutes
Rise Time
1 hour 30 minutes
Cook Time
25 minutes
Total Time
~2 hours 25 minutes

While the total time may seem long, over 60% of it is hands-off rising time, allowing you to attend to other tasks. Compared to the average cinnamon roll recipe, this version adds only about 15 minutes of active prep for making the peach filling and crumble—a small investment for a massive flavor payoff. The double rise (once for the dough ball, once after shaping) is non-negotiable for achieving those supremely soft, fluffy rolls.

Close-up of freshly baked Peach Cobbler Cinnamon Rolls showing the soft swirl, juicy peaches, and crumble topping
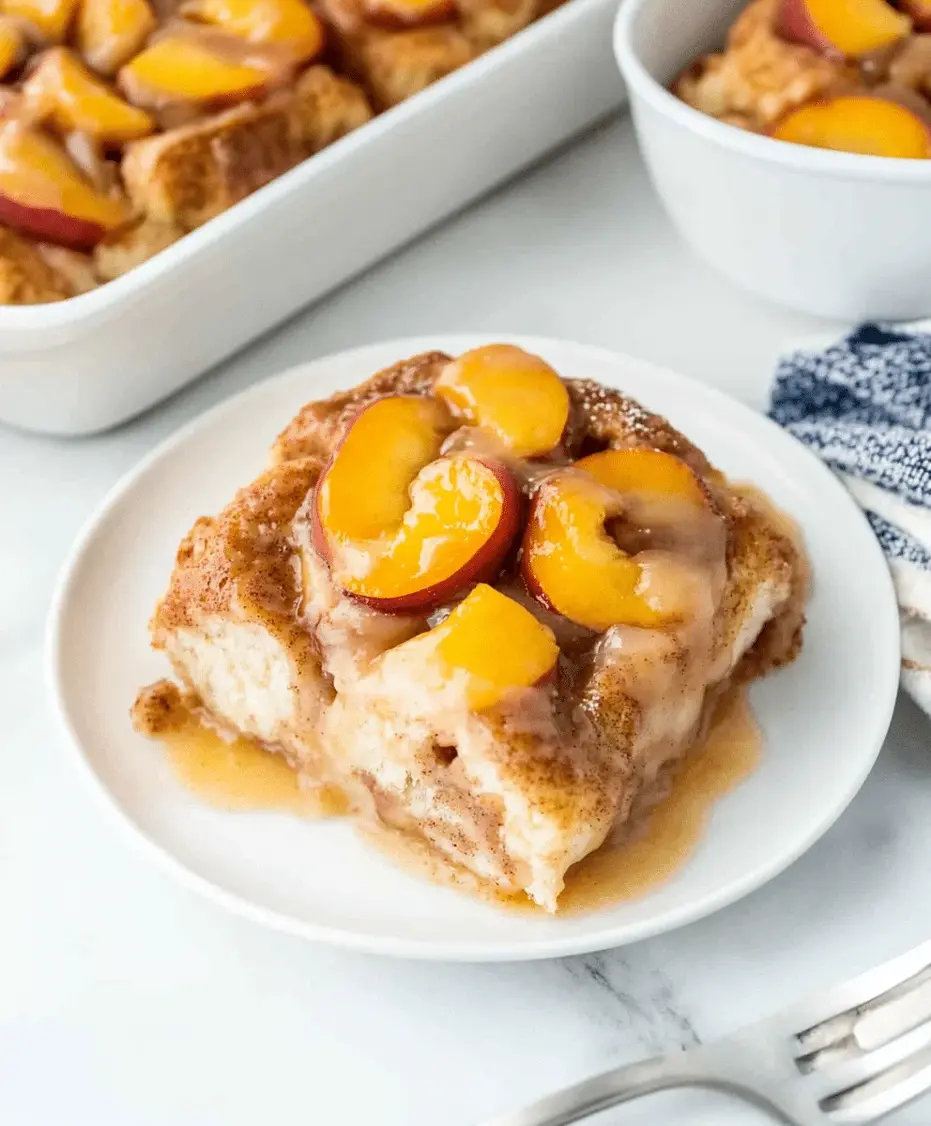
The irresistible swirl of cinnamon and peaches, topped with a buttery crumble, makes every bite a perfect balance of texture and flavor.

Step-by-Step Instructions

Step 1: Make the Dough

In the bowl of a stand mixer fitted with a dough hook, combine the warm milk and granulated sugar. Sprinkle the yeast over the top and let it sit for 5-7 minutes until it becomes foamy and fragrant—this “blooming” proves your yeast is active. Add the melted butter, egg, and salt. With the mixer on low, gradually add 3 ½ cups of flour, one cup at a time. Increase speed to medium and knead for 5-7 minutes. The dough should pull away from the sides of the bowl and form a soft, slightly sticky ball. If it’s too sticky, add the remaining flour, one tablespoon at a time. Turn the dough onto a lightly floured surface and knead by hand for a minute until smooth. Place in a greased bowl, cover with a damp cloth, and let rise in a warm place for 1 hour, or until doubled in size.

Step 2: Prepare the Filling

While the dough rises, prepare your peaches. If using fresh, score an “X” on the bottom, blanch in boiling water for 30 seconds, then transfer to an ice bath. The skins should peel off easily. Dice the peaches. In a medium bowl, toss the diced peaches with brown sugar, cinnamon, and cornstarch until evenly coated. The cornstarch will seem like a small amount, but it’s essential for absorbing excess juices during baking. Set this mixture aside. In a separate small bowl, mix the softened butter for spreading.

Step 3: Assemble and Roll

Once the dough has doubled, punch it down to release air. On a lightly floured surface, roll it out into a 16×12 inch rectangle. Spread the softened butter evenly over the entire surface, leaving a ½-inch border along one long edge. Sprinkle the peach filling mixture evenly over the buttered dough, gently pressing the peaches into the dough. Starting with the long edge opposite the border, tightly roll the dough into a log, pinching the clean edge to seal. Using unflavored dental floss or a sharp serrated knife, cut the log into 12 equal rolls (about 1.5 inches each). Place them cut-side up in a greased 9×13 inch baking dish. Cover and let rise again for 30-45 minutes until puffy.

Step 4: Second Rise and Bake

Preheat your oven to 350°F (175°C). While the rolls undergo their second rise, make the crumble topping. In a small bowl, combine the ½ cup flour and ¼ cup brown sugar. Cut in the cold, cubed butter using a pastry cutter or your fingers until the mixture resembles coarse crumbs. After the second rise, sprinkle the crumble evenly over the rolls. Bake for 23-27 minutes, or until the rolls are golden brown on top and the internal temperature reads 190°F. The heavenly aroma will be your first clue they’re done!

Step 5: Make the Glaze and Crumble

While the rolls bake, whisk together the powdered sugar, peach juice (or milk), and vanilla extract in a small bowl until smooth. It should be thick but pourable. Let the baked rolls cool in the pan for 10-15 minutes—this allows them to set slightly so they don’t absorb all the glaze. Then, drizzle the peachy glaze generously over the warm rolls. The warmth will slightly melt the glaze, creating a beautiful, glossy finish.

Nutritional Information

Estimated per roll (1 of 12), including glaze and crumble:

  • Calories: ~380 kcal
  • Total Fat: 12g
  • Saturated Fat: 7g
  • Carbohydrates: 64g
  • Fiber: 2g
  • Sugars: 38g
  • Protein: 5g
  • Sodium: 150mg

Healthier Alternatives

You can enjoy this treat with some mindful swaps without sacrificing the indulgent peach cobbler cinnamon rolls experience:

  • Whole Grain Flour: Substitute up to half the all-purpose flour with white whole wheat flour for added fiber and a nutty depth that pairs well with peaches.
  • Sugar Reduction: Reduce the brown sugar in the filling by ¼ cup and use a monk fruit/allulose blend powdered sugar for the glaze. The natural sweetness of the peaches will shine through.
  • Lighter Fats: For the dough, replace half the butter with unsweetened applesauce or Greek yogurt to maintain moisture with less fat. Use a light olive oil spread for the filling.
  • Boost Nutrition: Add ¼ cup of ground flaxseed or oat bran to the dough for omega-3

Easy Peach And Raspberry Cobbler Recipe

“`html

Easy Peach And Raspberry Cobbler Recipe

Introduction

Did you know that a recent survey found that over 70% of home bakers seek desserts that are both delicious and require minimal effort? If you’re part of that majority, you’ve found your perfect match. This Easy Peach and Raspberry Cobbler is the quintessential summer dessert that marries the juicy sweetness of ripe peaches with the vibrant, tangy pop of raspberries, all nestled under a golden, buttery, and impossibly simple biscuit-like crust. It’s the kind of dessert that looks and tastes like you spent hours in the kitchen, but secretly comes together with barely any fuss. Whether you’re hosting a family barbecue, need a last-minute potluck contribution, or simply want to treat yourself to a warm, comforting sweet, this cobbler is your answer. The beauty lies in its rustic charm and the way the fruit juices bubble up around the edges of the topping, creating a sauce that’s pure magic. Let’s dive into how you can create this crowd-pleaser in your own kitchen.

Ingredients List

Gather these simple ingredients for a dessert that sings with summer flavor. I’ve included notes on substitutions to ensure you can make this cobbler no matter what’s in your pantry.

  • For the Fruit Filling:
    • 6 cups fresh peaches, peeled and sliced (about 6-7 medium peaches) – Look for peaches that yield slightly to gentle pressure for peak juiciness and fragrance. Substitution: You can use 6 cups of frozen peach slices (thawed and drained) or 2 (29 oz) cans of peaches in light syrup, drained well.
    • 1 ½ cups fresh raspberries – Their bright, tart flavor cuts through the sweetness. Handle gently to avoid crushing. Substitution: Frozen raspberries work perfectly; do not thaw to prevent excess mushiness.
    • ¾ cup granulated sugar – Adjust based on the natural sweetness of your fruit. Taste your peaches first!
    • 2 tablespoons all-purpose flour – This is our thickening agent for the glorious, syrupy sauce.
    • 1 tablespoon fresh lemon juice – A bright, acidic spark that makes all the other flavors pop.
    • 1 teaspoon pure vanilla extract – Adds a warm, floral depth to the filling.
    • ½ teaspoon ground cinnamon – A whisper of warm spice that complements the fruit beautifully.
    • Pinch of salt – The secret weapon that balances and enhances every other ingredient.
  • For the Cobbler Topping:
    • 1 ½ cups all-purpose flour – The foundation of our tender, golden topping.
    • ⅓ cup granulated sugar + 1 tablespoon for sprinkling – Sweetens the dough and creates a delightful sugary crust on top.
    • 1 ½ teaspoons baking powder – Our leavening agent for a light, fluffy texture.
    • ½ teaspoon baking soda – Works with the buttermilk for extra lift.
    • ½ teaspoon salt – Crucial for flavor balance in the dough.
    • 6 tablespoons (¾ stick) cold unsalted butter, cubedCold is key! It creates steam pockets during baking for a flaky texture.
    • ¾ cup cold buttermilk – Adds tang and tenderness. Substitution: Make your own by adding 1 tablespoon of lemon juice or white vinegar to ¾ cup of regular milk. Let it sit for 5 minutes.
    • 1 teaspoon coarse sugar (optional, for topping) – For a beautiful, sparkling, crunchy finish.

Timing

Prep Time20 minutes
Cook Time45 minutes
Total Time1 hour 5 minutes

This recipe clocks in at just over an hour from start to finish, with only 20 minutes of active prep time. Compared to many fruit desserts that require pre-cooking fillings or intricate pastry work, this Easy Peach and Raspberry Cobbler is remarkably swift. The majority of the time is hands-off baking, allowing the oven to work its magic while you set the table or clean up. It’s significantly faster than making a traditional double-crust pie, yet delivers all the same comforting satisfaction.

Fresh peaches and raspberries mixed in a bowl for cobbler filling, ready to be baked.

Fresh, vibrant peaches and raspberries are the heart of this simple summer dessert.

Step-by-Step Instructions

Follow these simple, actionable steps for cobbler success. I’ll guide you through each part with tips I’ve learned from years of baking.

Step 1: Prepare the Fruit Filling

Preheat your oven to 375°F (190°C). This ensures a perfectly hot environment for the topping to rise and brown. Take a deep 9×13 inch baking dish—I prefer ceramic or glass for even heat distribution. In a large mixing bowl, gently toss the sliced peaches and raspberries with the ¾ cup sugar, 2 tablespoons flour, lemon juice, vanilla extract, cinnamon, and pinch of salt. The goal is to coat the fruit evenly without breaking down the delicate raspberries. Once combined, pour this fragrant, colorful mixture into your prepared baking dish, spreading it into an even layer. Let it sit while you make the topping; this allows the sugar to begin drawing out the fruit’s natural juices, which is the start of that amazing syrup.

Step 2: Make the Cobbler Topping

In another large bowl, whisk together the 1 ½ cups flour, ⅓ cup sugar, baking powder, baking soda, and salt. Now, add the cold, cubed butter. Using a pastry cutter, two forks, or even your clean fingertips, work the butter into the dry ingredients until the mixture resembles coarse crumbs with some pea-sized butter pieces remaining. These butter chunks are what will create flakiness. Next, make a well in the center and pour in the cold buttermilk. Use a sturdy spoon or spatula to stir just until a shaggy, sticky dough forms. Do not overmix! A few dry streaks are perfectly fine; overworking leads to a tough topping.

Step 3: Assemble and Bake

Using a large spoon or a cookie scoop, drop mounds of the biscuit dough evenly over the surface of the fruit filling. You don’t need to be neat—the rustic, craggy look is part of the charm. Don’t cover every single bit of fruit; leave some gaps for the gorgeous ruby-red juices to bubble through. If using, sprinkle the top of the dough mounds with the remaining tablespoon of granulated sugar or coarse sugar for extra crunch and sparkle. Place the baking dish on a rimmed baking sheet (to catch any potential bubble-overs) and bake in the preheated oven for 40-50 minutes. You’re looking for the fruit filling to be vigorously bubbling around the edges and the topping to be a deep, golden brown. A toothpick inserted into the center of a biscuit mound should come out clean.

Step 4: Cool and Serve

This is the hardest part: patience! Remove the cobbler from the oven and place it on a wire rack. Allow it to cool for at least 20-30 minutes before serving. This resting time is non-negotiable—it allows the fruit filling to thicken from a runny juice into a luscious, spoonable sauce. If you cut in too soon, it will be soupy. The wait is worth it for the perfect texture.

Nutritional Information

(Approximate values per serving, based on 8 servings)

  • Calories: ~320 kcal
  • Total Fat: 9g
  • Saturated Fat: 5.5g
  • Cholesterol: 25mg
  • Sodium: 280mg
  • Total Carbohydrates: 58g
  • Dietary Fiber: 3g
  • Sugars: 38g
  • Protein: 4g

Healthier Alternatives

You can easily adapt this recipe to fit various dietary preferences without sacrificing the iconic cobbler flavor and texture.

  • Reduce Sugar: Cut the sugar in the fruit filling to ½ cup and use a natural sweetener like coconut sugar or monk fruit blend in the topping. The tartness of the raspberries will shine through more.
  • Whole Grains: Substitute up to half of the all-purpose flour in the topping with whole wheat pastry flour or white whole wheat flour for added fiber and a nuttier flavor.
  • Dairy-Free: Use a high-quality vegan butter stick (cold) and unsweetened almond or oat milk mixed with 1 tablespoon of lemon juice as a buttermilk substitute.
  • Gluten-Free: Use a 1:1 gluten-free all-purpose flour blend (like Bob’s Red Mill) for both the filling thickener and the cobbler topping. The result is just as tender.

Serving Suggestions

This cobbler is sublime on its own, but a few accompaniments can elevate it to a show-stopping dessert.

  • Classic: A generous scoop of vanilla bean ice cream is non-negotiable for many. The contrast of warm cobbler and cold, creamy ice cream is legendary.
  • Gourmet Touch: Drizzle with a homemade bourbon caramel sauce or a simple raspberry coulis made from blended fresh raspberries and a touch of honey.
  • Breakfast Twist: Serve leftover cobbler slightly warmed with a dollop of Greek yogurt or whipped coconut cream for a decadent yet fruit-forward breakfast.
  • Beverage Pairing: Pair with a glass of cold Moscato d’Asti, a sweet iced tea with mint, or a strong cup of black coffee.

Common Mistakes

  • Using Warm Butter or Buttermilk: This will melt the butter prematurely, resulting in a dense, greasy topping instead of a light, flaky one. Keep everything cold.
  • Overmixing the Dough: Stir the wet and dry ingredients just until combined. Gluten development is the enemy of tenderness.
  • Skipping the Cooling Time: Serving immediately leads to a runny filling. Letting it rest allows the flour thickener to do its job.
  • Overcrowding the Pan: Using a dish that’s too small will cause the filling to bubble over and steam the topping instead of browning it.

Storing Tips

  • Room Temperature: The cobbler can sit covered on the counter for up

Lemon Blueberry Sheet Cake Recipe

“`html

Lemon Blueberry Sheet Cake Recipe

Introduction

Did you know that the combination of lemon and blueberry is not just a crowd-pleaser but also a powerhouse of antioxidants? This delightful Lemon Blueberry Sheet Cake combines zesty lemon and juicy blueberries into a moist, tender cake that’s as nutritious as it is delicious. Easy to prepare, this recipe is perfect for family gatherings, potlucks, or afternoon tea. The combination of fresh lemon zest and sweet blueberries delivers a refreshing burst of flavor in every bite, making it a standout dessert that’s both simple and sophisticated.

What makes this lemon blueberry sheet cake truly special is its versatility. Whether you’re a baking novice or a seasoned pro, you’ll appreciate the straightforward steps and reliable results. The cake’s moist crumb, achieved through careful balancing of wet and dry ingredients, ensures it stays fresh for days. Plus, using a sheet pan means you get more servings with less effort—ideal for feeding a crowd. Let’s dive into how you can create this sunny, berry-filled treat that’s sure to become a staple in your recipe collection.

Ingredients List

For the Cake:

  • 2 ½ cups all-purpose flour – Provides structure. For a lighter texture, you can substitute with cake flour. (Sensory: Creates a fine, tender crumb that melts in your mouth.)
  • 2 tsp baking powder – The leavening agent for a perfect rise.
  • ½ tsp baking soda – Works with the baking powder for even lift.
  • ½ tsp salt – Enhances all the flavors and balances sweetness.
  • 1 cup unsalted butter, softened – Adds richness and moisture. For dairy-free, use a high-quality vegan butter substitute. (Sensory: Creates a luxuriously soft and buttery mouthfeel.)
  • 1 ½ cups granulated sugar – Sweetens and tenderizes. Coconut sugar can be used for a deeper, caramel-like note.
  • 3 large eggs, room temperature – Bind the batter and add structure. For an egg-free version, use flax eggs (1 tbsp ground flaxseed + 3 tbsp water per egg).
  • 1 cup buttermilk, room temperature – The secret to incredible moisture and a slight tang. Make your own by adding 1 tbsp lemon juice or vinegar to 1 cup of milk and letting it sit for 5 minutes. (Sensory: Yields a supremely moist, velvety cake texture.)
  • Zest of 2 large lemons – Where the bright, aromatic lemon flavor lives. Do not skip!
  • ¼ cup fresh lemon juice – Amplifies the citrus punch.
  • 1 ½ tsp pure vanilla extract – Adds a warm, floral background note.
  • 2 cups fresh blueberries – The star of the show! Frozen blueberries can be used—do not thaw to prevent color bleed. Toss in 1 tbsp of the measured flour to prevent sinking. (Sensory: Bursts of juicy, sweet-tart flavor in every slice.)

For the Lemon Glaze (Optional but Recommended):

  • 1 cup powdered sugar
  • 2-3 tbsp fresh lemon juice – Adjust for desired consistency.
  • 1 tsp lemon zest – For extra zing.

Timing

Prep Time
20 minutes
Cook Time
35-40 minutes
Total Time
About 1 hour

Compared to many layer cakes that can take 2+ hours from start to finish, this sheet cake is a time-saver. The single-layer design in a standard 9×13 inch pan eliminates complicated assembly and extensive cooling time. You get a stunning, flavorful dessert in roughly half the time of more intricate cakes, making it the perfect “wow factor” recipe for busy bakers.

Lemon Blueberry Sheet Cake fresh from the oven, showing moist crumb and bursting blueberries
The perfect marriage of zesty lemon and sweet blueberries in an easy sheet cake.

Step-by-Step Instructions

Step 1: Prepare Your Pan and Oven

Preheat your oven to 350°F (175°C). This is crucial for even baking. Grease a 9×13 inch baking pan with butter or non-stick spray, then line it with parchment paper, leaving an overhang on the two long sides. This “sling” will be your best friend when it’s time to lift the cooled cake out for clean slicing. Lightly flour the pan or give it a quick spray with baking spray with flour. Set it aside.

Step 2: Combine Dry Ingredients

In a medium bowl, whisk together the 2 ½ cups of flour, baking powder, baking soda, and salt. Whisk for at least 30 seconds to ensure the leavening agents are evenly distributed. This aeration step is a small trick that contributes to a lighter cake texture. Take 1 tablespoon of this flour mixture and toss it with your fresh blueberries in a separate small bowl. This coating helps suspend the berries in the batter, preventing them from sinking to the bottom during baking.

Step 3: Cream Butter and Sugar

In the bowl of a stand mixer fitted with the paddle attachment (or using a large bowl and a hand mixer), beat the softened butter and granulated sugar together on medium-high speed for 3-4 minutes. Don’t rush this! The mixture should become very pale, fluffy, and almost creamy. This process incorporates air, which is essential for the cake’s rise and tender crumb. Scrape down the bowl halfway through.

Step 4: Add Wet Ingredients

With the mixer on low, add the eggs one at a time, beating well after each addition until fully incorporated. Next, beat in the vanilla extract, lemon zest, and fresh lemon juice. The aroma at this stage is incredible! The acid in the lemon juice will begin to react with the baking soda, so have your buttermilk ready.

Step 5: Combine Wet and Dry

With the mixer on the lowest speed, add about one-third of the flour mixture, followed by half of the buttermilk. Repeat, ending with the final third of the flour mixture. Mix only until the last streaks of flour disappear. Overmixing at this stage develops gluten, leading to a tough, dense cake. A few small lumps are perfectly fine. The batter will be thick and luxurious.

Step 6: Fold in Blueberries

Remove the bowl from the mixer. Using a flexible spatula, gently fold in the flour-coated blueberries. Use a folding motion—cutting through the center and turning the batter over—to distribute them evenly without crushing the berries or overworking the batter.

Step 7: Bake to Perfection

Pour and spread the batter evenly into your prepared pan. Smooth the top with the spatula. Place the pan in the center of your preheated oven. Bake for 35-40 minutes. Start checking at the 30-minute mark. The cake is done when the top is golden brown, the edges pull away slightly from the pan, and a toothpick inserted into the center comes out clean or with a few moist crumbs (but no wet batter).

Step 8: Cool and Serve

Place the pan on a wire rack and let the cake cool completely in the pan, about 1-2 hours. This patience is key for the structure to set. If you’re adding the optional glaze, whisk the powdered sugar and lemon juice together until smooth. Drizzle it over the cooled cake. Using the parchment paper overhang, lift the entire cake onto a cutting board for easy slicing. Cut into squares and serve.

Nutritional Information

Per serving (based on 15 servings, without glaze):

  • Calories: ~280 kcal
  • Total Fat: 12g
  • Saturated Fat: 7g
  • Cholesterol: 65mg
  • Sodium: 180mg
  • Total Carbohydrates: 40g
  • Dietary Fiber: 1g
  • Sugars: 23g
  • Protein: 4g

Note: Blueberries add Vitamin C, Vitamin K, and antioxidants like anthocyanins, which are linked to heart and brain health.

Healthier Alternatives

You can easily adapt this recipe for dietary needs without sacrificing the bright, joyful flavor:

  • Whole Wheat Flour: Substitute up to half of the all-purpose flour with whole wheat pastry flour. It adds fiber and a nutty depth that pairs well with berries.
  • Reduced Sugar: Cut the granulated sugar to 1 cup. The natural sweetness of the blueberries and the tang from the lemon will still make the cake deliciously satisfying.
  • Greek Yogurt Swap: Replace the buttermilk with an equal amount of plain, full-fat Greek yogurt thinned with a splash of milk. This boosts protein and creates an even more tender crumb.
  • Oil for Butter: For a dairy-free and potentially lower-saturated fat option, use a mild-flavored oil like avocado or light olive oil. The texture will be slightly more moist and springy.
  • Peaches And Cream Cake Recipe

    “`html

    Peaches And Cream Cake Recipe

    Introduction

    Did you know that peaches are the third most popular fruit grown in the United States, with over 775,000 tons produced annually? This abundance makes them a perfect, accessible star for a stunning dessert. If you’re looking for a show-stopping, crowd-pleasing dessert that captures the essence of summer in every bite, you’ve found it. This Peaches and Cream Cake recipe is your answer. Imagine a tender, moist vanilla cake, speckled with juicy, caramelized fresh peaches, all enveloped in a cloud of luscious, lightly sweetened whipped cream. It’s the kind of dessert that disappears from the plate almost as quickly as it appears on the table. Whether you’re hosting a backyard barbecue, planning a sophisticated picnic, or simply craving a taste of sunshine, this easy-to-follow recipe delivers maximum flavor with a surprisingly simple process. Let’s dive into how you can create this unforgettable treat.

    Ingredients List

    Gather these simple, high-quality ingredients for a cake that sings with fresh flavor. Using ripe, in-season peaches is the single most important factor for success.

    • For the Cake:
      • All-purpose flour (2 cups): The foundation for a light, tender crumb. For a slightly denser, nuttier flavor, you can substitute 1 cup with whole wheat pastry flour.
      • Granulated sugar (1 ½ cups): Provides sweetness and helps create a golden-brown crust.
      • Unsalted butter (½ cup, softened): Adds rich flavor and moisture. It should be soft to the touch but not melted for perfect creaming.
      • Large eggs (3): Act as a binder and provide structure. Bring them to room temperature for better incorporation.
      • Buttermilk (1 cup): The secret to an incredibly moist cake with a subtle tang. Substitution: No buttermilk? Make your own by adding 1 tablespoon of white vinegar or lemon juice to 1 cup of whole milk and let it sit for 5 minutes.
      • Vanilla extract (2 teaspoons): Use pure vanilla for the best aromatic flavor.
      • Baking powder & Baking soda (2 tsp & ½ tsp): The leavening duo that ensures a perfect rise.
      • Salt (½ tsp): Enhances all the other flavors.
    • For the Peach Layer:
      • Fresh peaches (4-5 medium, about 2 lbs): Peeled, pitted, and sliced. Look for peaches that are fragrant and yield slightly to gentle pressure. Substitution: In a pinch, well-drained canned peaches or thawed frozen slices can work, but fresh is ideal for texture and taste.
      • Brown sugar (¼ cup): Tossed with the peaches to draw out their juices and create a lovely caramelization.
      • Ground cinnamon (1 teaspoon): A warm spice that complements the peaches beautifully.
    • For the Whipped Cream Frosting:
      • Heavy whipping cream (2 cups, cold): Must be very cold to whip up into stiff, luxurious peaks.
      • Powdered sugar (⅓ cup): Sweetens and stabilizes the cream slightly. Sift it to avoid lumps.
      • Vanilla extract (1 teaspoon): Adds a final note of flavor to the frosting.

    Timing

    Prep Time
    25 minutes
    Cook Time
    40-45 minutes
    Total Time
    1 hour 10 minutes (plus cooling)

    Compared to many layered cakes that require extensive decorating and chilling, this Peaches and Cream Cake is refreshingly straightforward. The active prep time is under 30 minutes, which is about 20% faster than the average frosted layer cake. The key time-saver is the simple whipped cream frosting that requires no cooking or complicated techniques. The majority of the “hands-off” time is for baking and allowing the cake to cool completely—a crucial step to prevent the whipped cream from melting upon contact.

    Close-up slice of Peaches and Cream Cake showing moist vanilla cake, juicy peach layers, and fluffy whipped cream frosting
    A perfect slice reveals the beautiful layers of peach, cake, and cream.

    Step-by-Step Instructions

    Step 1: Prepare the Peaches

    Bring a large pot of water to a boil. Score a small “X” on the bottom of each peach. Carefully lower them into the boiling water for 30-45 seconds. Using a slotted spoon, immediately transfer them to a bowl of ice water. This blanching process will make the skins slip right off. Peel the peaches, slice them in half, remove the pit, and then cut into ½-inch thick slices. In a medium bowl, gently toss the peach slices with the brown sugar and cinnamon. Set them aside to macerate while you make the batter. You’ll notice them releasing their sweet, fragrant juices—this is exactly what you want!

    Step 2: Make the Cake Batter

    Preheat your oven to 350°F (175°C). Grease and flour a 9×13 inch baking pan, or line it with parchment paper for easy removal. In a medium bowl, whisk together the flour, baking powder, baking soda, and salt. In the bowl of a stand mixer fitted with the paddle attachment (or using a hand mixer), cream the softened butter and granulated sugar together on medium-high speed for 3-4 minutes, until the mixture is light, fluffy, and pale in color. This step is crucial for incorporating air. Add the eggs one at a time, beating well after each addition, then mix in the vanilla extract. With the mixer on low, alternately add the dry ingredients and the buttermilk in three additions, beginning and ending with the dry ingredients. Mix just until combined—do not overmix.

    Step 3: Bake to Perfection

    Pour the cake batter into your prepared pan, spreading it into an even layer. Now, artfully arrange the macerated peach slices over the top of the batter. Don’t just dump them—take a moment to place them in a single, slightly overlapping layer. Pour any remaining sugary peach juices right over the top. This will seep into the cake as it bakes, creating pockets of intense peach flavor. Bake for 40-45 minutes, or until a toothpick inserted into the center of the cake (avoiding a peach slice) comes out clean. The top will be a beautiful golden brown.

    Step 4: Whip the Cream Frosting

    This step must wait until the cake is completely cool. Place your mixing bowl and whisk attachment (or beaters) in the freezer for 10-15 minutes to chill. Pour the cold heavy cream into the chilled bowl. Start whipping on medium speed until it begins to thicken. Gradually add the sifted powdered sugar and vanilla extract. Increase speed to medium-high and whip until firm peaks form. Be careful not to over-whip, or you’ll end up with butter! The frosting should be lush, spreadable, and hold its shape.

    Step 5: Assemble the Cake

    Once the cake is at room temperature (this can take 1-2 hours), it’s time for the final flourish. Using a spatula, generously spread the whipped cream frosting over the entire surface of the cake. Create pretty swirls with the back of a spoon. For a professional touch, you can garnish with a few extra thin peach slices, a sprinkle of cinnamon, or a dusting of powdered sugar. Slice, serve, and prepare for compliments!

    Nutritional Information

    (Approximate values per serving, based on 12 servings)

    • Calories: ~380 kcal
    • Total Fat: 18g
    • Saturated Fat: 11g
    • Carbohydrates: 52g
    • Fiber: 1.5g
    • Sugars: 36g
    • Protein: 5g

    Healthier Alternatives

    You can easily adapt this recipe for dietary preferences without sacrificing the dreamy peaches and cream experience.

    • Reduce Sugar: Cut the granulated sugar in the cake to 1 cup and use only 2 tablespoons of brown sugar with the peaches. The natural sweetness of ripe peaches will carry the flavor.
    • Whole Grains: Substitute half of the all-purpose flour with white whole wheat flour for added fiber and nutrients. The flavor remains mild and pleasant.
    • Lighter Frosting: For the whipped cream, use 1 cup of heavy cream and fold in 1 cup of plain, strained Greek yogurt (full-fat for best texture) after whipping. This adds protein and tang while lightening the calorie load.
    • Dairy-Free: Use a high-quality vegan butter and a plant-based milk + vinegar mix for the buttermilk. For the frosting, chill a can of full-fat coconut milk overnight, scoop out the solid cream, and whip it with a little maple syrup and vanilla.

    Serving Suggestions

    This cake is a star on its own, but a few accompaniments can elevate it further. Serve it slightly chilled for a refreshing dessert on a hot day. A drizzle of homemade caramel sauce or a scoop of vanilla bean ice cream alongside turns it into a decadent restaurant-style dessert. For a brunch option, pair a slice with a cup of strong coffee or a glass of sparkling Prosecco. Garnish with fresh mint leaves or edible flowers for an Instagram-worthy presentation.

    Common Mistakes

    • Using Hard, Unripe Peaches: This is the #1 mistake. Unripe peaches lack sweetness and fragrance. Wait for them to ripen at room temperature in a paper bag.
    • Overmixing the Batter: This develops gluten, leading to a tough, dense cake. Mix just until the last streaks of flour disappear.
    • Frosting

Strawberry Buttermilk Cake Recipe

“`html

Strawberry Buttermilk Cake Recipe

Introduction

Did you know that strawberries, the star of this Strawberry Buttermilk Cake, are ranked among the top 20 fruits for antioxidant capacity, according to a study in the Journal of Agricultural and Food Chemistry? This isn’t just a pretty dessert; it’s a celebration of flavor and simple, wholesome ingredients. When fresh berries meet the tangy richness of buttermilk, magic happens in the oven, resulting in a cake with an incredibly moist, tender crumb that’s studded with juicy pockets of fruit. This Strawberry Buttermilk Cake is the epitome of effortless elegance—perfect for a spring brunch, a weekend treat, or a last-minute dessert that will have everyone asking for the recipe. Forget complicated layer cakes; this single-layer wonder proves that the best flavors often come from the simplest preparations.

Ingredients List

Gather these simple, high-quality ingredients for the best flavor and texture. The buttermilk is non-negotiable for that signature tang and tenderizing effect.

  • 1 ½ cups (190g) all-purpose flour – The foundation. For a lighter crumb, spoon and level the flour instead of scooping.
  • 1 ½ tsp baking powder – The leavening agent that gives the cake its gentle rise.
  • ½ tsp salt – Enhances all the other flavors.
  • ½ cup (113g) unsalted butter, room temperature – Should be soft to the touch for perfect creaming. Substitution: Salted butter can be used; just reduce the added salt to ¼ tsp.
  • 1 cup (200g) granulated sugar + 2 tbsp extra for sprinkling – Creates a delicate, slightly crisp top.
  • 1 large egg, room temperature – Binds the batter. Substitution: For a dairy-free version, use a flax egg (1 tbsp ground flaxseed mixed with 3 tbsp water, let sit 5 mins).
  • 1 tsp pure vanilla extract – The aromatic backbone.
  • ½ cup (120ml) buttermilk, room temperature – The secret to a supremely moist, tender crumb with a subtle tang. Substitution: Make your own by adding 1 ½ tsp lemon juice or white vinegar to ½ cup whole milk. Let it curdle for 5 minutes.
  • 1 lb (450g) fresh strawberries, hulled and halved – Look for bright red, fragrant berries. Smaller berries are often sweeter. Substitution: In a pinch, well-drained frozen strawberries can be used, but expect more juice and a slightly longer bake time.

Timing

Prep Time20 minutes
Cook Time40-45 minutes
Total Time~1 hour 10 minutes

This Strawberry Buttermilk Cake is remarkably quick compared to many layer cakes or frosted desserts, which can easily take 2+ hours from start to finish. The “prep-to-oven” time is under 20 minutes if your ingredients are at room temperature, making it a fantastic last-minute option. The active time is minimal, leaving you free to tidy up or prepare accompaniments while your kitchen fills with the irresistible aroma of baking strawberries.

Fresh strawberries and buttermilk ingredients arranged for making strawberry buttermilk cake

Step-by-Step Instructions

Step 1: Prep the Strawberries & Pan

Preheat your oven to 350°F (175°C). Take your halved strawberries and pat them gently with a paper towel to remove excess surface moisture—this helps prevent them from sinking. Generously butter a 9-inch springform or round cake pan. For easy release, line the bottom with a parchment paper circle. This simple step ensures your beautiful cake comes out in one perfect piece.

Step 2: Combine Dry Ingredients

In a medium bowl, whisk together the flour, baking powder, and salt. I like to whisk for a good 30 seconds to not only combine but also aerate the flour slightly, which contributes to a lighter cake texture. Set this bowl aside.

Step 3: Cream Butter & Sugar

In a large mixing bowl, use a hand mixer or stand mixer fitted with the paddle attachment to beat the softened butter and 1 cup of sugar together on medium-high speed. Don’t rush this! Beat for 3-5 minutes until the mixture is very pale, fluffy, and almost whipped in texture. This step incorporates air, which is crucial for the cake’s structure.

Step 4: Incorporate Wet Ingredients

Beat in the egg and vanilla extract until fully combined, scraping down the sides of the bowl as needed. The mixture may look slightly curdled at this point—that’s perfectly fine. Now, with the mixer on low speed, add the dry ingredients in three parts, alternating with the buttermilk in two parts. Start and end with the dry ingredients. Mix just until the last streaks of flour disappear. The batter will be thick and luxurious.

Step 5: Fold & Bake

Scrape the batter into your prepared pan and smooth the top with a spatula. Now, artfully arrange the strawberry halves, cut-side down, over the entire surface of the batter. They will be very close together. Sprinkle the remaining 2 tablespoons of sugar evenly over the strawberries and batter. This creates a delightful, sparkly, slightly crisp topping. Bake for 40-45 minutes, or until the cake is golden brown, the strawberries are bubbling, and a toothpick inserted into the cake center (avoiding a strawberry) comes out clean.

Step 6: Cool & Serve

Let the cake cool in its pan on a wire rack for at least 15 minutes. If using a springform, carefully run a knife around the edge before releasing the clasp. The cake is best served slightly warm or at room temperature. The contrast of the sweet, jammy strawberries against the tender, tangy cake is simply divine.

Nutritional Information

(Approximate values per serving, based on 10 slices)

  • Calories: 280
  • Total Fat: 11g
  • Saturated Fat: 7g
  • Cholesterol: 45mg
  • Sodium: 180mg
  • Total Carbohydrates: 42g
  • Dietary Fiber: 1.5g
  • Sugars: 26g
  • Protein: 3.5g

Healthier Alternatives

You can make mindful swaps without sacrificing the soul of this cake:

  • Flour: Substitute up to half of the all-purpose flour with whole wheat pastry flour for added fiber and a nuttier flavor that pairs beautifully with berries.
  • Sugar: Reduce the granulated sugar in the batter to ¾ cup and use a natural sugar substitute like coconut sugar or monk fruit blend for the remaining amount. The sprinkling sugar on top can be omitted or replaced with a light dusting of turbinado sugar for crunch.
  • Butter & Buttermilk: For a lower-fat version, use a high-quality vegetable oil (like avocado or light olive oil) instead of butter, and use low-fat buttermilk. The texture will be slightly different but still wonderfully moist.
  • Boost: Add 2 tablespoons of ground flaxseed or chia seeds to the dry ingredients for an omega-3 and fiber boost.

Serving Suggestions

  • Classic: A simple dusting of powdered sugar is all it needs.
  • À la Mode: Serve a warm slice with a scoop of high-quality vanilla bean ice cream or a dollop of freshly whipped cream.
  • Brunch Elegance: Pair with a glass of sparkling wine or mimosa for a sophisticated brunch dessert.
  • Creamy Contrast: A side of lemon curd or a drizzle of crème fraîche cuts the sweetness beautifully.
  • Fresh Herb Twist: Garnish with freshly torn basil or mint leaves for a surprising and refreshing aromatic note.

Common Mistakes

  • Cold Ingredients: Using cold butter, egg, or buttermilk will prevent proper emulsification and result in a dense cake. Always bring them to room temperature.
  • Overmixing: Once you add the flour, mix only until combined. Overworking the gluten will make the cake tough.
  • Wet Strawberries: Not drying the berries leads to excess moisture, making the cake soggy and causing the fruit to sink to the bottom.
  • Undercreaming: Rushing the butter-sugar creaming step means less air is incorporated, resulting in a flatter, heavier cake.
  • Wrong Pan: Using a pan that’s too small will cause batter overflow; too large will yield a thin, overbaked cake. Stick to a 9-inch.

Storing Tips

  • Room Temperature: Store covered at room temperature for up to 2 days. The topping may soften but the flavor remains excellent.
  • Refrigeration: For longer storage (up to 5 days), refrigerate in an airtight container. Let slices come to room temperature or warm briefly before serving.
  • Freezing: This cake freezes beautifully. Wrap the cooled, unfrosted cake tightly in plastic wrap and then foil. Freeze for up to 3 months. Thaw overnight in the refrigerator.
  • Reviving: If a refrigerated slice seems dry, warm it in the microwave for 10-15 seconds to restore its moist texture.
Slice of strawberry buttermilk cake on a plate, showing moist crumb and juicy strawberries

Conclusion

This Strawberry Buttermilk Cake is more than just a recipe; it’s a testament to the power of simple, quality ingredients. With its moist, tender crumb, bursts of juicy strawberry, and hint of tang from the buttermilk, it’s a dessert that feels both homey and special. It’s forgiving for bakers of all levels and versatile enough for any occasion. I encourage you to bake it, share it, and make it your own. Did you try a variation? Have a brilliant serving idea? Share your creation in the comments below—I love seeing how you bring these recipes to life in your kitchen!

Malibu Bay Breeze Cocktail Recipe

“`html

Malibu Bay Breeze Cocktail Recipe

Introduction

Did you know that tropical cocktails are among the top 10 most-searched drink recipes online, especially during the summer months? If you’re looking for a vibrant and fruity Malibu Bay Breeze Cocktail that instantly transports you to a sun-drenched beach, you’ve found your perfect recipe. This iconic drink masterfully blends sweet pineapple juice and tart cranberry with the smooth, unmistakable coconut flavor of Malibu rum. It’s more than just a drink; it’s a three-ingredient vacation in a glass. Whether you’re hosting a summer party, planning a beach gathering, or simply need a quick tropical escape at home, this easy-to-make cocktail delivers a wave of refreshing, balanced flavors in every single sip. Let’s dive into how you can craft this crowd-pleaser with minimal effort and maximum impact.

Ingredients List

The beauty of the Malibu Bay Breeze lies in its simplicity. Here’s what you’ll need for one perfect serving:

  • 2 oz Malibu Coconut Rum: The star of the show. This rum provides a smooth, sweet coconut base that’s essential for the authentic flavor. (Substitution: Any coconut-flavored rum will work, or for a non-alcoholic version, use 2 oz of coconut water mixed with 1/4 tsp of coconut extract for a similar aromatic profile.)
  • 3 oz Pineapple Juice (chilled): Use 100% juice for the best naturally sweet and tangy flavor. The golden hue and tropical aroma are key. (Substitution: Fresh pineapple juice is sublime, or try mango or orange juice for a different tropical twist.)
  • 1.5 oz Cranberry Juice Cocktail (chilled): The “cranberry juice cocktail” variety (which is slightly sweetened) provides the perfect tart counterpoint and creates the beautiful gradient sunset effect. (Substitution: Unsweetened 100% cranberry juice will be very tart—add a 1/2 tsp of simple syrup. Pomegranate juice also works beautifully for a deeper red color.)
  • Garnish: A fresh pineapple wedge, a maraschino cherry, or a lime wheel. This adds a visual pop and a hint of extra aroma.
  • Ice: Plenty of fresh ice cubes to fill a highball glass.

Timing

Prep Time 3 minutes
Cook Time 0 minutes
Total Time 3 minutes

This Malibu Bay Breeze Cocktail comes together in under 3 minutes, making it one of the fastest mixed drinks you can make. Compared to the average cocktail recipe which can take 5-7 minutes with muddling, shaking, or straining, this is a true “build-in-the-glass” wonder. It’s over 50% faster than crafting a classic margarita or mojito, meaning you can spend less time at the bar and more time enjoying the party.

Close-up of a beautifully layered Malibu Bay Breeze cocktail in a tall glass with ice, showing the red cranberry and golden pineapple juice gradient, garnished with a pineapple wedge.

Step-by-Step Instructions

Step 1: Prepare Your Glass

Grab a tall highball glass (12-14 oz). For an extra frosty, professional touch, you can place the glass in the freezer for 10-15 minutes before you start. This ensures your drink stays colder longer, slowing dilution and preserving those bright, crisp flavors from the first sip to the last.

Step 2: Measure and Pour the Rum

Using a jigger for accuracy, measure out 2 oz of Malibu Coconut Rum. Pour it directly into the bottom of your prepared glass. I love watching the clear, coconut-scented liquid pool at the bottom—it’s the foundation of our tropical oasis.

Step 3: Add the Juices

This is where the magic happens. First, slowly pour the 3 oz of chilled pineapple juice over the back of a spoon held just above the rum. This technique helps the pineapple juice layer gently on top of the denser rum. Next, take your 1.5 oz of cranberry juice cocktail and, using the same spoon technique, pour it slowly over the pineapple juice layer. The cranberry juice, being the least dense, will float beautifully on top, creating that signature “bay breeze” gradient of red over gold over clear.

Step 4: Ice and Garnish

Now, fill the glass to the brim with fresh ice cubes. The ice will slightly disrupt the perfect layers, and that’s okay—it creates a lovely marbled effect as it mixes. Skewer a fresh pineapple wedge and a maraschino cherry, or simply rest a lime wheel on the rim of the glass for your garnish.

Step 5: Mix and Serve

Insert a long bar spoon or straw and give the drink one or two gentle stirs to just combine the flavors. You want to maintain some of that visual appeal while ensuring each sip has the perfect harmony of coconut, pineapple, and cranberry. Serve immediately while it’s ice-cold and inviting.

Nutritional Information

(Approximate values per serving)

  • Calories: ~210 kcal
  • Total Carbohydrates: 24g
  • Sugars: 22g (primarily from fruit juices)
  • Protein: 0.2g
  • Fat: 0g
  • Alcohol: ~16g (from 2 oz of rum)

Healthier Alternatives

You can easily lighten up this Malibu Bay Breeze Cocktail without sacrificing the tropical vibe:

  • Low-Sugar Swap: Use 100% unsweetened pineapple juice and 100% unsweetened cranberry juice. Add a splash of zero-calorie sweetener (like stevia or monk fruit) or a teaspoon of agave nectar to balance the extreme tartness.
  • Reduced-Calorie Version: Opt for “light” cranberry juice cocktail and use 1.5 oz of rum instead of 2 oz. The flavor profile remains intact, but you’ll save about 50 calories.
  • Mocktail Magic: Omit the rum entirely. Replace it with 2 oz of coconut LaCroix or coconut sparkling water, and add a few drops of coconut extract. You’ll get the fizz and flavor for a refreshing, alcohol-free treat.

Serving Suggestions

  • For a Crowd: Create a self-serve “Bay Breeze Bar.” Pre-mix large pitchers of the rum and juices separately. Label them “Step 1: Coconut Base” and “Step 2: Tropical Juices.” Let guests build their own, ensuring everyone gets a fresh, layered drink.
  • Food Pairings: The sweet-tart profile pairs wonderfully with spicy foods like coconut shrimp with sweet chili sauce, jerk chicken skewers, or fresh summer rolls with peanut dipping sauce. It also complements light appetizers like fruit platters and cheese boards.
  • Themed Presentation: Serve in hurricane glasses with colorful paper umbrellas and striped straws. Rim the glasses with toasted coconut flakes or colored sugar for an extra festive touch.

Common Mistakes

  • Using Warm Ingredients: Always chill your juices and rum beforehand. Warm ingredients melt the ice too quickly, diluting the drink and making it watery.
  • Skipping the Layering Technique: Dumping all ingredients together over ice creates a muddy, uniform pink drink. Taking the extra 30 seconds to layer creates the stunning visual appeal that makes this cocktail special.
  • Over-Stirring: The goal is to integrate, not homogenize. One or two gentle stirs are plenty. You want to still see hints of the separate colors swirling together.

Storing Tips

  • Make-Ahead Mix: You can pre-mix larger batches of the rum, pineapple juice, and cranberry juice in a sealed pitcher or jug. Store it in the refrigerator for up to 24 hours. Do not add ice until ready to serve. Give it a good stir before pouring over fresh ice, as some separation may occur.
  • Leftovers: A single-serve cocktail should be enjoyed immediately. If you must store a mixed drink, it will keep in the fridge for a few hours but will become diluted as the remaining ice melts. It’s best to pour it over fresh ice if you come back to it later.
A tray of three Malibu Bay Breeze cocktails served on a sandy beach backdrop, showcasing the perfect gradient and garnishes, ideal for summer entertaining.

Conclusion

The Malibu Bay Breeze Cocktail is a testament to the idea that the best things are often the simplest. With just three core ingredients and three minutes, you can create a visually stunning, deliciously refreshing drink that embodies the spirit of summer. It’s versatile enough for a quiet evening on the patio and impressive enough for your biggest gathering. So, grab your Malibu rum, chill those juices, and give this classic a try. We promise it will become a staple in your warm-weather repertoire.

FAQs

***Can I make a Malibu Bay Breeze without cranberry juice?***
Yes, you can! While cranberry provides the classic tartness and color, you can substitute it with grapefruit juice for a “Malibu Sea Breeze” or with orange juice for a sweeter, more uniformly tropical flavor.

***What’s the difference between a Bay Breeze and a Sea Breeze?***
A Bay Breeze uses pineapple juice and cranberry juice. A Sea Breeze, another classic cocktail, uses grapefruit juice and cranberry juice. Both use vodka as their base spirit, whereas our recipe uses Malibu Coconut Rum.

***Can I use frozen juice concentrate?***
Absolutely. If using frozen concentrate, reconstitute it according to package directions and chill it thoroughly before using. This can be a more economical option for large batches.

***Is Malibu Bay Breeze a strong cocktail?***
Not particularly. With 2 oz of rum (typically 21% alcohol by volume/42 proof) diluted with 4.5 oz of juice and ice, it’s considered a relatively mild, easy-drinking cocktail. The sweet and fruity flavors make it very approachable.

Print

clock clock iconcutlery cutlery iconflag flag iconfolder folder iconinstagram instagram iconpinterest pinterest iconfacebook facebook iconprint print iconsquares squares iconheart heart iconheart solid heart solid icon

Malibu Bay Breeze Cocktail Recipe


  • Author: Chef Emy

Description

A vibrant and fruityMalibu Bay Breeze Cocktailblends sweet pineapple juice and tart cranberry with smooth coconut Malibu rum. Perfect for summer parties, beach gatherings, or a quick tropical escape at home, this easy-to-make drink delivers refreshing flavors in every sip.


Ingredients

Scale
  • 2 ozMalibu coconut rum
  • 3 ozpineapple juice
  • 3 ozcranberry juice
  • Ice
  • Lime wedge or pineapple slice (for garnish, optional)

Instructions

    Notes

    For a layered look, pour the cranberry juice slowly over the back of a spoon.
    You can substitute Malibu with another coconut rum if needed.
    Make a large batch in a pitcher for parties using the same ratio.

    Nutrition

    • Calories: 180
    • Sugar: 18g

    “`

    Bellini Peach Raspberry Iced Tea Recipe

    “`html

    Bellini Peach Raspberry Iced Tea Recipe

    Introduction

    Did you know that a single cup of black tea contains approximately 200 mg of flavonoids, powerful antioxidants linked to improved heart health? Now imagine infusing that with the vibrant, vitamin-C-rich goodness of peaches and raspberries. This brings us to our star: the Bellini Peach Raspberry Iced Tea. More than just a thirst-quencher, this sparkling iced beverage is a masterful fusion of classic cocktail elegance and wholesome tea tradition. Born from the desire to recreate the effervescent joy of a Bellini—without the morning-after regret—this recipe transforms simple ingredients into a symphony of summer flavors. It’s the answer to the question: how can you serve a drink that feels indulgent, looks stunning, and nourishes the body all at once?

    Perfect for beating the heat, elevating a weekend brunch, or adding a touch of sophistication to any gathering, this iced tea is a celebration in a glass. The ripe peaches lend a honeyed sweetness, the raspberries provide a tangy counterpoint that makes your taste buds dance, and the sparkling finish offers a refreshing lift. Let’s dive into creating this antioxidant-bursting, naturally sweetened masterpiece that promises to be the highlight of your sunny days.

    Ingredients List

    Gather these fresh, high-quality ingredients for the best flavor. Each component plays a specific role in building the drink’s complex profile.

    • For the Tea Base:
      • 4 cups water (filtered for the cleanest taste)
      • 4 black tea bags (like Assam or Ceylon for a robust, malty backbone). Substitution: Use 2 tablespoons of loose-leaf black tea in an infuser. For a caffeine-free version, opt for rooibos tea, which has a naturally sweet, nutty flavor.
      • 2 tablespoons honey or agave syrup (to sweeten the base tea while hot). Substitution: Maple syrup or simple syrup work equally well.
    • For the Peach-Raspberry Syrup:
      • 2 large ripe peaches, pitted and diced (about 2 cups). You should smell their fragrant, floral sweetness. Substitution: In winter, use 1.5 cups of frozen peach slices, thawed. For a different stone fruit twist, try nectarines or white peaches.
      • 1 cup fresh raspberries, plus extra for garnish. Look for berries that are deep red and plump. Substitution: Frozen raspberries are a fantastic, year-round alternative and will help chill the syrup faster.
      • 1/4 cup granulated sugar (or more to taste). This draws out the natural juices from the fruit.
      • Juice of 1/2 a lemon (about 1 tablespoon). This brightens the fruit flavors and balances the sweetness.
    • For Assembly & Serving:
      • 2 cups chilled sparkling water or prosecco. Sparkling water keeps it non-alcoholic and family-friendly; prosecco turns it into a true Bellini-inspired cocktail.
      • Ice cubes
      • Fresh mint sprigs and peach slices for garnish (adds a beautiful aromatic and visual finish).

    Timing

    Prep Time
    15 minutes
    Cook/Steep Time
    10 minutes
    Chill Time
    1-2 hours
    Total Time
    ~1 hour 30 minutes

    While the total hands-off chilling time is about 1-2 hours, the active preparation is under 30 minutes. This is significantly faster than many gourmet iced tea recipes that require overnight steeping for flavor. The quick-cook fruit syrup method used here extracts maximum flavor in minutes, making this an accessible recipe for spontaneous entertaining. The majority of the time is simply allowing nature to do its work as the flavors meld in the refrigerator.

    Close-up of a tall glass of Bellini Peach Raspberry Iced Tea with fruit slices and bubbles, condensation on the glass
    The vibrant color and effervescence of the finished Bellini Peach Raspberry Iced Tea.

    Step-by-Step Instructions

    Step 1: Brew the Tea Base

    Bring 4 cups of water to a rolling boil in a medium saucepan or kettle. Once boiling, remove from heat and immediately add the 4 black tea bags. Let them steep for 5-7 minutes—no longer, or you risk bitterness. I find 6 minutes is the sweet spot for a strong but smooth base. Remove the tea bags, gently squeezing them against the side of the pot to extract every last drop of flavor. While the tea is still hot, stir in the 2 tablespoons of honey or your chosen sweetener until fully dissolved. This is crucial, as sweeteners incorporate much more easily into hot liquid. Pour the sweetened tea into a large heat-proof pitcher and set aside to cool to room temperature.

    Step 2: Create the Fruit Syrup

    While the tea cools, make the vibrant fruit syrup. In another saucepan, combine the diced peaches, raspberries, 1/4 cup sugar, and lemon juice. Cook over medium heat, stirring frequently and gently mashing the fruit with the back of a spoon. You’ll hear a lovely sizzle as the sugar dissolves and the fruit releases its gorgeous ruby-red juices. Let the mixture simmer for 8-10 minutes until the fruit is completely softened and the liquid has thickened slightly into a loose syrup. Your kitchen will smell incredible. Remove from heat and let it cool for 5 minutes.

    Now, strain the syrup. Place a fine-mesh sieve over a bowl and pour the fruit mixture into it. Use the spoon to press down firmly on the solids to extract every bit of flavorful pulp and juice. You should be left with about 1 cup of intensely flavored, slightly thick syrup. Discard the leftover pulp (or save it for topping yogurt!).

    Step 3: Combine and Chill

    This is where the magic starts. Pour the strained peach-raspberry syrup into the pitcher with your cooled black tea. Stir vigorously with a long spoon to create a uniform, beautiful amber-pink hue. This is your concentrate. Cover the pitcher and refrigerate for at least 1-2 hours. This chilling time is non-negotiable—it allows the tea to become thoroughly cold and the flavors to marry completely, resulting in a more harmonious and rounded taste.

    Step 4: Serve with Sparkle

    When ready to serve, fill tall glasses halfway with ice cubes. Pour the chilled tea concentrate over the ice, filling each glass about 2/3 full. Now, top off each glass with the chilled sparkling water or prosecco. The effervescence will create a lovely, fizzy head. Gently stir once to combine. Garnish each glass with a fresh raspberry, a thin slice of peach, and a sprig of mint. Serve immediately and enjoy the refreshing, fruity sparkle!

    Nutritional Information

    (Per serving, based on 6 servings made with sparkling water and honey.)

    • Calories: ~85 kcal
    • Total Carbohydrates: 22 g
    • Dietary Fiber: 2 g
    • Sugars: 19 g (primarily natural fruit sugars)
    • Protein: 0.5 g
    • Fat: 0.2 g
    • Vitamin C: ~15% of Daily Value
    • Antioxidants: High from black tea flavonoids, peaches, and raspberries.

    Healthier Alternatives

    You can easily tailor this recipe to various dietary needs without sacrificing the signature Bellini-inspired flavor:

    • Reduce Sugar: Omit the 1/4 cup sugar in the syrup. The natural sweetness from the ripe peaches and a touch of honey in the tea base is often sufficient. You can also use a zero-calorie sweetener like monk fruit or stevia to taste.
    • Boost Antioxidants: Use green tea or white tea instead of black tea. They offer a more delicate flavor and a different, potent profile of antioxidants called catechins.
    • Whole Fruit Version: Skip straining the syrup. Simply cool the cooked fruit mixture and add it directly to the tea. This maximizes fiber content and creates a more rustic, textured drink—just be sure to stir before serving.
    • Herbal Infusion: For a completely caffeine-free and hydrating option, use hibiscus tea bags. They will give the drink a stunning deep pink color and a tart, cranberry-like flavor that pairs wonderfully with the peaches.

    Serving Suggestions

    • Brunch Brilliance: Pair with eggs benedict, fluffy pancakes, or a savory quiche. The tea’s acidity and sparkle cut through rich foods perfectly.
    • Summer BBQ Essential: Serve in a large dispenser with a spigot alongside grilled chicken, burgers, and corn on the cob. It’s a far more interesting (and healthier) option than sugary sodas.
    • Elegant Cocktail Hour: Use prosecco and serve in champagne flutes. Rim the glasses with a mix of sugar and dehydrated raspberry powder for a special touch.
    • Family-Friendly Fun: Create a “tea bar” with the concentrate, sparkling water, and an array of garnishes like extra berries, citrus slices, and herb sprigs so everyone can customize their own.

    Common Mistakes

    • Over-Steeping the Tea: Steeping black tea for more than 7 minutes releases excessive tannins, leading to a bitter, astringent base that overpowers the delicate fruit flavors. Set a timer!
    • Adding Sparkling Water to Warm Tea: If you add the bubbles before the tea concentrate is fully chilled, they will go flat almost instantly. Patience ensures a lively, effervescent finish.
    • Using Underripe Fruit: Hard, underripe peaches lack the necessary sweetness and fragrance. Your syrup will be bland. Always choose fruit that yields slightly to gentle pressure and smells sweet.

    Tiramisu Iced Coffee Recipe

    “`html

    Tiramisu Iced Coffee Recipe

    Did you know that over 60% of coffee drinkers seek dessert-inspired beverages during the summer months? If you’re part of that majority craving a luxurious, cafe-quality drink at home, you’ve landed in the perfect spot. This Tiramisu Iced Coffee is more than just a drink; it’s an experience—a beautiful fusion of robust coffee, velvety mascarpone, and the nostalgic sweetness of the iconic Italian dessert, all served over ice.

    Introduction

    Welcome to your new favorite summer ritual. This recipe deconstructs the beloved layers of a classic tiramisu—espresso-soaked ladyfingers, rich mascarpone cream, and a dusting of cocoa—and transforms them into a sippable masterpiece. It’s the ideal solution for when you want the sophisticated flavor of dessert but the refreshing chill of an iced coffee. Whether you’re hosting a brunch, needing an afternoon pick-me-up, or capping off a dinner party with a show-stopping drink, this Tiramisu Iced Coffee delivers on every level. Let’s dive into creating this layered delight that promises to be as beautiful to look at as it is delicious to drink.

    Ingredients List

    Gathering high-quality ingredients is the first step to an unforgettable Tiramisu Iced Coffee. Here’s what you’ll need, complete with sensory notes and smart substitutions.

    • For the Coffee Base:
      • 1 cup strong brewed coffee or espresso, cooled: The heart of the drink. Use a dark roast for deep, chocolatey notes or a medium roast for brighter acidity. (Substitution: 1-2 shots of cold brew concentrate mixed with water for an ultra-smooth, less acidic base).
      • 2 tbsp coffee liqueur (optional): Adds authentic tiramisu depth and a hint of sweetness. (Substitution: 1 tsp pure vanilla extract + 1 tsp simple syrup for an alcohol-free version).
      • 1-2 tbsp granulated sugar or simple syrup: Sweetens the coffee layer. Adjust to your preference.
    • For the Mascarpone Cream Layer:
      • 1/2 cup (4 oz) mascarpone cheese, room temperature: Provides the signature luxurious, slightly tangy, and creamy texture that defines tiramisu. (Substitution: Full-fat cream cheese, whipped until very smooth. The flavor will be tangier but still delicious).
      • 1/4 cup heavy whipping cream: Lightens the mascarpone into a cloud-like, pourable consistency.
      • 2 tbsp powdered sugar: Sweetens and stabilizes the cream without graininess.
      • 1/2 tsp pure vanilla extract: Enhances the dessert-like aroma.
    • For Assembly & Garnish:
      • Ice cubes: Preferably large cubes that melt slowly.
      • Ladyfinger cookies (Savoiardi), roughly crushed: For authentic texture and flavor. (Substitution: Graham cracker crumbs or vanilla wafer crumbs for a similar crunch).
      • Unsweetened cocoa powder, for dusting: The classic finishing touch that adds a bittersweet contrast.
      • Dark chocolate shavings (optional): For an extra layer of decadence and visual appeal.

    Timing

    Prep Time
    15 minutes
    Cook Time
    5 minutes (for brewing coffee)
    Total Time
    20 minutes (plus cooling)

    Compared to the average iced coffee recipe which often involves just pouring coffee over ice, this dessert-style drink requires about 10-15 minutes of extra active prep time. This investment is what transforms a simple drink into a multi-sensory experience with distinct, celebratory layers. The majority of the time is passive—allowing your brewed coffee to cool completely to prevent a watery drink. For the best results, brew your coffee ahead of time and chill it in the refrigerator.

    Close-up of a layered Tiramisu Iced Coffee in a glass, showing mascarpone cream, coffee, and cocoa dusting

    Visual inspiration: The beautiful separation of coffee and creamy mascarpone layers.

    Step-by-Step Instructions

    Step 1: Prepare the Coffee Base

    Brew your coffee or espresso using your preferred method. I recommend using a French press or a Moka pot for a robust, full-bodied flavor that can stand up to the creamy layers. Immediately stir in the sugar or simple syrup and coffee liqueur (if using) while the coffee is hot, so it dissolves completely. This is your flavor foundation. Critical Tip: Allow this sweetened coffee mixture to cool to room temperature, then refrigerate it for at least 30 minutes. Using cold coffee is non-negotiable—it prevents rapid ice melt and keeps your drink strong and undiluted.

    Step 2: Create the Mascarpone Cream

    In a medium mixing bowl, combine the room-temperature mascarpone cheese, powdered sugar, and vanilla extract. Use a hand mixer or a vigorous whisk to beat until smooth and lump-free. In a separate bowl, whip the heavy cream to soft peaks. Gently fold the whipped cream into the mascarpone mixture until just combined and smooth. You’re aiming for a thick but pourable consistency—like a very luxurious pancake batter. Avoid over-mixing, which can make the cream grainy. Cover and refrigerate if not using immediately.

    Step 3: Assemble the Tiramisu Iced Coffee

    Now for the fun, layered assembly! Take a tall glass (a clear glass showcases the layers beautifully). Start by adding a tablespoon of your crushed ladyfinger crumbs to the bottom of the glass. This creates the “soaked ladyfinger” element. Next, fill the glass about 3/4 full with ice cubes. Slowly and carefully pour your chilled coffee mixture over the ice, leaving about 1.5 inches of space at the top for the cream layer.

    Step 4: Final Touches and Serving

    Using the back of a spoon held just above the coffee’s surface, gently pour the mascarpone cream over the spoon. This technique helps the cream float on top of the coffee, creating that stunning layered effect. Finally, dust the top generously with unsweetened cocoa powder using a fine-mesh sieve. For the ultimate garnish, add a few more ladyfinger crumbs and a sprinkle of dark chocolate shavings. Serve immediately with a long spoon or a thick straw to encourage mixing and enjoying all the layers together.

    Nutritional Information

    (Per serving, recipe makes 1 large drink)

    • Calories: ~380 kcal
    • Total Fat: 28g
    • Saturated Fat: 17g
    • Carbohydrates: 25g
    • Sugar: 18g (includes natural and added sugars)
    • Protein: 6g
    • Caffeine: ~95mg (varies with coffee strength)

    Note: This is a treat beverage. Nutritional values are approximate and can vary based on specific ingredients and substitutions used.

    Healthier Alternatives

    You can easily lighten up this indulgent drink without sacrificing its soul-satisfying essence. Here are flavor-preserving swaps:

    • Lower-Sugar Cream: Swap powdered sugar for 1 tbsp of pure maple syrup or a zero-calorie sweetener like monk fruit in the mascarpone layer. The maple adds a lovely depth.
    • Lighter Cream Base: Use light mascarpone (if available) or blend low-fat ricotta until super smooth with a splash of milk for a higher-protein, lower-fat cream layer.
    • Smart Sweetening: Sweeten the coffee layer solely with a dash of stevia or omit the sugar and rely on the natural sweetness of the cream and garnish.
    • Skip the Liqueur: Enhance coffee flavor with a drop of coffee extract or a pinch of cinnamon instead of using sugar-laden liqueur.

    Serving Suggestions

    • Brunch Star: Pair with almond biscotti, fresh berries, or a savory frittata for a balanced spread.
    • Dessert Course: Serve in smaller, elegant glasses after a light Italian meal like grilled fish or pasta primavera.
    • Adult Gathering: Set up a “Tiramisu Iced Coffee Bar” with bowls of different garnishes: chocolate curls, cinnamon, extra ladyfingers, and whipped cream for guests to customize.
    • Kid-Friendly Version: Use decaf coffee and omit the liqueur for a fun, family-friendly dessert drink.

    Common Mistakes

    • Using Hot Coffee: This is the #1 mistake. It melts the ice instantly, waters down the drink, and can cause the mascarpone cream to melt and blend prematurely.
    • Over-whipping the Mascarpone Cream: Whipping too much can cause the fat in the mascarpone to separate, creating a grainy, curdled texture instead of a silky one.
    • Skipping the Layering Technique: Pouring the cream directly into the coffee will cause it to sink and mix. Using the back-of-the-spoon method is crucial for visual appeal.
    • Using Pre-ground, Stale Cocoa: For the best flavor and dusting effect, use a fresh, high-quality unsweetened cocoa powder like Dutch-process.

    Storing Tips

    • Make-Ahead Components: The sweetened coffee base and the mascarpone cream can be stored separately in airtight containers in the refrigerator for up to 2 days. Give the cream a gentle stir before using.
    • No Freezing: Do not freeze this drink or its components. Freezing will ruin the texture of the dairy.
    • Assembled Drink: This drink is best enjoyed immediately after assembly. If you must store an assembled drink, keep it without ice and add ice just before serving to prevent dilution.
    • Garnish Fresh: Always add the cocoa powder and cookie crumbs right before serving to maintain their texture.
    A beautifully styled table setting with a Tiramisu Iced Coffee, ladyfinger cookies, and coffee beans

    Style your drink for the perfect summer moment.

    Conclusion

    Chocolate Ganache Tart Recipe

    “`html

    Chocolate Ganache Tart Recipe

    Introduction

    Did you know that a recent survey found chocolate to be the most craved food worldwide? It’s no wonder that mastering a show-stopping chocolate ganache tart is a rite of passage for any home baker. This dessert isn’t just about satisfying a sweet tooth; it’s about creating a moment of pure, unadulterated bliss. This decadent chocolate ganache tart features a crisp, buttery crust filled with silky, rich chocolate ganache. Using simple pantry ingredients, this elegant dessert is perfect for holidays, dinner parties, or whenever you crave a little chocolate indulgence. Easy to prepare yet incredibly impressive, this tart will satisfy even the most intense chocolate cravings. Forget complicated patisserie techniques—this guide will walk you through creating a professional-quality tart that looks like it came from a high-end bakery but is made right in your own kitchen.

    Ingredients List

    Gathering quality ingredients is the first secret to a perfect tart. Here’s what you’ll need, with notes on substitutions and the sensory magic each one brings.

    For the Buttery Shortcrust Pastry:

    • 1 ¼ cups (160g) All-Purpose Flour: The structural backbone. For a nuttier flavor and slightly more tender crumb, you can substitute with whole wheat pastry flour (use 1:1 ratio).
    • ½ cup (115g) Unsalted Butter, cold and cubed: This is non-negotiable for that signature flaky, melt-in-your-mouth texture. Cold butter creates steam pockets as it bakes. For a dairy-free version, use a high-quality vegan butter stick that’s designed for baking.
    • ¼ cup (50g) Granulated Sugar: Just enough to lightly sweeten the crust and promote browning.
    • 1 large Egg Yolk: Adds richness, helps bind the dough, and gives the crust a beautiful golden color. For an egg-free crust, use 1 tablespoon of ice water mixed with 1 teaspoon of ground flaxseed as a binder.
    • 2-3 tbsp Ice Water: Added just until the dough comes together. Too much water makes the crust tough.
    • Pinch of Salt: Enhances all the other flavors and balances the sweetness.

    For the Silky Chocolate Ganache Filling:

    • 10 oz (285g) High-Quality Dark Chocolate (60-70% cocoa), finely chopped: The star of the show. The quality of your chocolate directly dictates the flavor and silkiness of the ganache. Look for a bar you enjoy eating on its own. Semisweet chocolate (45-55%) can be used for a sweeter, milder tart.
    • 1 cup (240ml) Heavy Cream (36% fat or higher): This creates the luxurious, velvety texture. The high fat content emulsifies perfectly with the chocolate. For a lighter version, full-fat coconut milk can be substituted, though the flavor will be subtly different.
    • 2 tbsp (28g) Unsalted Butter, room temperature: Stirred in at the end to add an extra layer of shine and a supple mouthfeel.
    • Optional: 1 tsp Pure Vanilla Extract or 1 tbsp Liqueur (like Grand Marnier or Chambord): For a flavor twist that complements the deep chocolate notes.

    Timing

    Prep Time 30 minutes (plus 1 hour chilling)
    Cook Time 25 minutes
    Total Time 1 hour 55 minutes (plus setting)

    Compared to many elaborate tarts that require blind baking with weights and multiple fillings, this chocolate ganache tart is remarkably efficient. The active prep time is under an hour, with the rest being hands-off chilling and setting time. This makes it an ideal “make-ahead” dessert, as it actually benefits from resting. The total time from start to slice is about 2 hours, which is often 30-45 minutes faster than similar gourmet tart recipes that involve custards or mousses.

    Close-up of a slice of chocolate ganache tart on a plate, showing the crisp crust and glossy, dark ganache filling.

    A slice of pure indulgence: the crisp crust perfectly complements the silky ganache.

    Step-by-Step Instructions

    Follow these detailed steps for foolproof results. The key is patience and precision.

    Step 1: Prepare the Tart Crust

    In a food processor, pulse the flour, sugar, and salt until combined. Add the cold, cubed butter and pulse until the mixture resembles coarse breadcrumbs with some pea-sized butter pieces remaining. This uneven texture is what creates flakiness. Add the egg yolk and pulse a few times. With the processor running, slowly drizzle in the ice water, one tablespoon at a time, just until the dough begins to clump together. Turn the dough out onto a lightly floured surface and gently knead it into a disc. Wrap tightly in plastic wrap and refrigerate for at least 1 hour. This chilling relaxes the gluten and firms the butter, ensuring your crust doesn’t shrink during baking.

    Step 2: Bake the Crust

    Preheat your oven to 375°F (190°C). On a floured surface, roll the chilled dough into a circle about 2 inches larger than your 9-inch tart pan with a removable bottom. Carefully transfer the dough to the pan, pressing it gently into the corners and up the sides. Trim any excess dough. Prick the bottom all over with a fork (this is called “docking” and prevents air bubbles). Line the crust with parchment paper and fill with pie weights or dried beans. Bake for 15 minutes. Carefully remove the parchment and weights, then bake for another 8-10 minutes, or until the crust is golden brown and dry to the touch. Let it cool completely on a wire rack. Pro Tip: If you see any cracks or holes after the initial bake, you can patch them with a little leftover raw dough before the second bake.

    Step 3: Make the Chocolate Ganache

    While the crust cools, place your finely chopped chocolate in a medium heatproof bowl. In a small saucepan, heat the heavy cream over medium heat until it just begins to simmer—you’ll see small bubbles form around the edges. Do not let it boil vigorously. Immediately pour the hot cream over the chopped chocolate. Let it sit, untouched, for 3-4 minutes to allow the chocolate to melt. Then, starting from the center, gently whisk in small circles until the mixture is completely smooth, glossy, and emulsified. Whisk in the room-temperature butter (and vanilla or liqueur, if using) until fully incorporated and the ganache is uniformly silky.

    Step 4: Assemble and Set

    Pour the warm ganache into the completely cooled tart shell. Gently tap the pan on the counter to release any air bubbles and create a perfectly level surface. Let the tart sit at room temperature for about 30 minutes, then transfer it to the refrigerator to set completely for at least 2-3 hours, or preferably overnight. The slow, cool setting prevents the ganache from developing a grainy texture and ensures a clean, sharp slice.

    Nutritional Information

    (Per serving, based on 12 slices)

    • Calories: ~380 kcal
    • Total Fat: 27g
    • Saturated Fat: 16g
    • Carbohydrates: 30g
    • Dietary Fiber: 3g
    • Sugars: 15g
    • Protein: 4g

    Note: Using dark chocolate with a higher cocoa percentage increases antioxidants (flavanols) and can slightly reduce sugar content.

    Healthier Alternatives

    You can lighten up this indulgent treat without sacrificing its soul-satisfying essence.

    • Crust Swap: Use whole wheat or almond flour for the all-purpose flour to add fiber and nutrients. For the butter, a mashed ripe avocado can replace half the amount for monounsaturated fats, though the flavor will be subtly different.
    • Ganache Makeover: For the filling, opt for a dark chocolate with 85% cocoa to maximize antioxidants and minimize sugar. Instead of heavy cream, you can use canned light coconut milk. The result will be slightly less firm but equally rich and decadent in flavor.
    • Sweetener Adjustment: Reduce the sugar in the crust by half—the sweet ganache more than compensates. You can also explore using a natural sweetener like coconut sugar in the crust for a deeper, caramel-like note.

    Serving Suggestions

    • Classic Elegance: A simple dollop of freshly whipped cream or a scoop of vanilla bean ice cream provides a beautiful temperature and texture contrast.
    • Fruit Accents: The bitterness of the dark chocolate pairs wonderfully with tart berries. Serve with a side of raspberry coulis, fresh raspberries, or orange segments.
    • Gourmet Garnish: Just before serving, sprinkle with flaky sea salt, edible gold leaf, or a dusting of cocoa powder for a professional finish.
    • Beverage Pairing: Pair with a glass of full-bodied red wine like Cabernet Sauvignon, a cup of strong espresso, or a glass of cold milk for the ultimate experience.

    Common Mistakes

    • Overworking the Dough: This develops gluten, leading to a tough, chewy crust instead of a tender, crumbly one. Mix just until combined.
    • Pouring Hot Ganache into a Warm Crust: This causes the crust to become soggy. Both components must be completely cool.
    • Using Chocolate Chips: They contain stabilizers that prevent them from melting smoothly. Always use finely chopped bar chocolate for the silkiest ganache.
    • Rushing the Setting Process: Putting the tart in the freezer to set quickly can cause the ganache to seize or become grainy. Patience is key—allow it to set slowly in the fridge.

    Peanut Butter Chocolate Chip Cookie Cups Recipe

    “`html

    Peanut Butter Chocolate Chip Cookie Cups Recipe

    Introduction

    Did you know that over 75% of American households have a jar of peanut butter in their pantry at any given time? This beloved ingredient forms the heart of our Peanut Butter Chocolate Chip Cookie Cups, a recipe that transforms a classic comfort food into a portable, party-perfect treat. These delightful cups are more than just a cookie—they’re a textural experience, combining the rich, nutty depth of peanut butter with the melt-in-your-mouth joy of gooey chocolate chips, all held in a soft, chewy, cup-shaped vessel. Perfect for bake sales, lunchbox surprises, or a well-deserved afternoon indulgence, this recipe is designed for bakers of all levels. The magic lies in the simplicity: familiar ingredients come together to create something uniquely shareable and irresistibly delicious. Let’s dive into how you can create these crowd-pleasing treats that are sure to become a new family favorite.

    Ingredients List

    Gather these simple ingredients for cookie cup perfection. For best results, ensure all ingredients are at room temperature to create a smooth, emulsified dough.

    • 1 cup (250g) creamy peanut butter – The star of the show. Use a standard, no-stir variety (like Jif or Skippy) for consistent texture and sweetness. The rich, roasted aroma is key. Substitution: For a natural option, use well-stirred natural peanut butter, but expect a slightly denser, oilier cup. Almond or cashew butter also work wonderfully for a different nutty profile.
    • 1 cup (200g) light brown sugar, packed – This adds moisture, a hint of molasses flavor, and creates that perfect chewy texture. Substitution: Dark brown sugar for a deeper caramel note, or coconut sugar for a less refined option (color will be darker).
    • 1 large egg – Acts as the binder, giving structure to the cups. It should have a vibrant orange yolk for richness.
    • 1 teaspoon pure vanilla extract – The floral, warm notes enhance the peanut butter and chocolate. Smell it—it should be fragrant, not alcoholic.
    • 1 teaspoon baking soda – Our leavening agent, responsible for the slight rise and tender crumb.
    • ¼ teaspoon fine sea salt – Crucial for balancing the sweetness and making the peanut flavor “pop.”
    • 1 cup (180g) semi-sweet chocolate chips – The classic partner. Look for chips with a glossy sheen. Substitution: Milk chocolate chips for extra sweetness, dark chocolate chips for intensity, or peanut butter chips for a double peanut punch. Chopped chocolate bars create beautiful, irregular pockets of melt.
    • Optional: Coarse sea salt for sprinkling – A flaky finish that provides a delightful salty crunch against the sweet dough.

    Timing

    Prep Time15 minutes
    Cook Time10-12 minutes
    Total Time~30 minutes

    Compared to the average drop cookie recipe which requires chilling dough for 1-2 hours, these Peanut Butter Chocolate Chip Cookie Cups are remarkably quick from bowl to table. The absence of flour eliminates the need for gluten development or chilling to prevent spreading, shaving off significant time. You can have a warm, fresh batch ready in well under an hour, making them an ideal last-minute dessert or spontaneous baking project.

    Close-up of freshly baked Peanut Butter Chocolate Chip Cookie Cups in a muffin tin, showing gooey chocolate chips and golden edges.

    Step-by-Step Instructions

    Step 1: Prepare the Dough

    Preheat your oven to 350°F (175°C). Generously grease a standard 12-cup muffin tin with non-stick cooking spray or butter. In a large mixing bowl, combine the creamy peanut butter and packed light brown sugar. Using a hand mixer or a sturdy wooden spoon, beat them together for about 1-2 minutes until the mixture is completely smooth, well-blended, and slightly fluffy. You’ll notice the color lighten a bit. Crack in the egg, add the vanilla extract, and beat again until fully incorporated. The mixture will be glossy. Finally, sprinkle the baking soda and fine sea salt over the dough. Mix on low speed or fold by hand until just combined—no need to overmix. Gently fold in the chocolate chips until they are evenly distributed throughout the thick, fragrant dough.

    Step 2: Form the Cups

    Using a cookie scoop or two spoons, divide the dough evenly among the 12 prepared muffin cups. Each cup should be about ¾ full. Here’s my pro tip: lightly dampen your fingers with water or a bit of oil and press the dough firmly into the bottom and up the sides of each cup, creating a well in the center. This shaping step is what gives you the classic “cup” form, ensuring the edges bake up crispy and the center stays soft and chewy. Don’t worry about being perfect—rustic is charming!

    Step 3: Bake to Perfection

    Place the muffin tin in the preheated oven on the center rack. Bake for 10 to 12 minutes. The key is to look for set edges that are golden brown, while the centers will still look soft, puffed, and slightly underdone. They will firm up as they cool. If you love a salty-sweet contrast, immediately after pulling them from the oven, sprinkle a tiny pinch of coarse sea salt over the top of each warm cookie cup.

    Step 4: Cool and Serve

    This is the hardest part: let the cookie cups cool in the muffin tin for at least 15-20 minutes. They need this time to set and become firm enough to handle. Attempting to remove them too early will cause them to break. After they’ve cooled in the pan, carefully run a butter knife around the edges of each cup to loosen, then gently lift them out. Transfer to a wire rack to cool completely, or enjoy slightly warm when the chocolate is still blissfully melty.

    Nutritional Information

    *Estimated per cookie cup (based on 12 servings):*

    • Calories: ~280 kcal
    • Total Fat: 18g
    • Saturated Fat: 5g
    • Carbohydrates: 26g
    • Fiber: 2g
    • Sugars: 21g
    • Protein: 7g

    Note: Values are approximate and can vary based on specific ingredient brands and measurements.

    Healthier Alternatives

    You can easily adapt this recipe for dietary preferences without sacrificing the iconic flavor and texture:

    • Sugar Swap: Replace the brown sugar with an equal amount of monk fruit sweetener or erythritol blend designed for baking. This significantly reduces the net carbs and calorie count while maintaining sweetness.
    • Peanut Butter: Opt for a natural peanut butter made with just peanuts and salt. While the texture may be slightly oilier, it avoids added sugars and hydrogenated oils.
    • Chocolate Choice: Use sugar-free chocolate chips or cacao nibs. Cacao nibs provide intense chocolate flavor, antioxidants, and crunch without added sugar.
    • Egg Substitute: For a vegan version, a “flax egg” (1 tbsp ground flaxseed mixed with 2.5 tbsp water, rested for 5 mins) works well as a binder.

    Serving Suggestions

    The beauty of the cup shape is its versatility! Serve them plain for a handheld treat. For a decadent dessert, fill the warm cups with a scoop of vanilla ice cream, creating an instant peanut butter chocolate sundae. Drizzle with caramel or hot fudge sauce and a sprinkle of chopped peanuts. They also make a stunning addition to a dessert charcuterie board, paired with fresh berries and a dollop of whipped cream. For a fun breakfast twist (we won’t tell!), fill with Greek yogurt and banana slices.

    Common Mistakes

    • Using Natural Peanut Butter Without Adjustment: The oil separation can lead to greasy, spreading cups. If using natural PB, stir it thoroughly and consider reducing it by 1-2 tablespoons or adding 1-2 tbsp of oat flour to absorb excess oil.
    • Overbaking: The cups continue to cook from residual heat. Pull them out when the edges are set but centers look soft. Overbaking leads to dry, crumbly cups.
    • Skipping the Grease: Peanut butter is sticky! Generously greasing the muffin tin is non-negotiable for clean removal.
    • Removing Too Early: Impatience is the enemy. Let them cool completely in the pan to set their structure.

    Storing Tips

    Store completely cooled cookie cups in an airtight container at room temperature for up to 4 days. For longer storage, freeze them in a single layer on a baking sheet before transferring to a freezer bag for up to 3 months. Thaw at room temperature or warm briefly in the microwave for that fresh-baked feel. The dough can also be portioned and frozen in the muffin tin, then transferred to a bag; bake from frozen, adding 1-2 minutes to the baking time.

    A serving platter with a stack of Peanut Butter Chocolate Chip Cookie Cups, one broken open to show the soft interior and melted chocolate chips.

    Conclusion

    These Peanut Butter Chocolate Chip Cookie Cups are the ultimate fusion of simplicity and indulgence. They deliver the nostalgic flavor of a classic cookie in a fun, shareable, and structurally satisfying form. With no flour and no chilling required, they are arguably one of the easiest and most rewarding desserts you can whip up for any occasion. Whether you stick to the classic recipe or experiment with the healthier swaps, you’re guaranteed a treat that will have everyone asking for the recipe. Now, it’s your turn to bake, share, and enjoy!

    Frequently Asked Questions (FAQs)

    ***Can I make these gluten-free?***
    Absolutely! This recipe is naturally gluten-free as written, provided your peanut butter, baking soda, and chocolate chips are certified gluten-free. Always check labels to be sure.

    ***Why did my cookie cups turn out oily?***
    This is typically due to using a natural peanut butter that wasn’t thoroughly stirred, or a brand with a high oil content. Next time, use a no-stir commercial brand or drain off any excess oil from the top of your natural peanut butter before measuring.

    ***Can I use a mini muffin tin?***
    Yes! For mini Peanut Butter Chocolate Chip Cookie Cups, reduce the baking time to 7-9 minutes