Table of Contents
Vegan Flan – Creamy No-Bake Crème Caramel with a Silky Coconut Twist
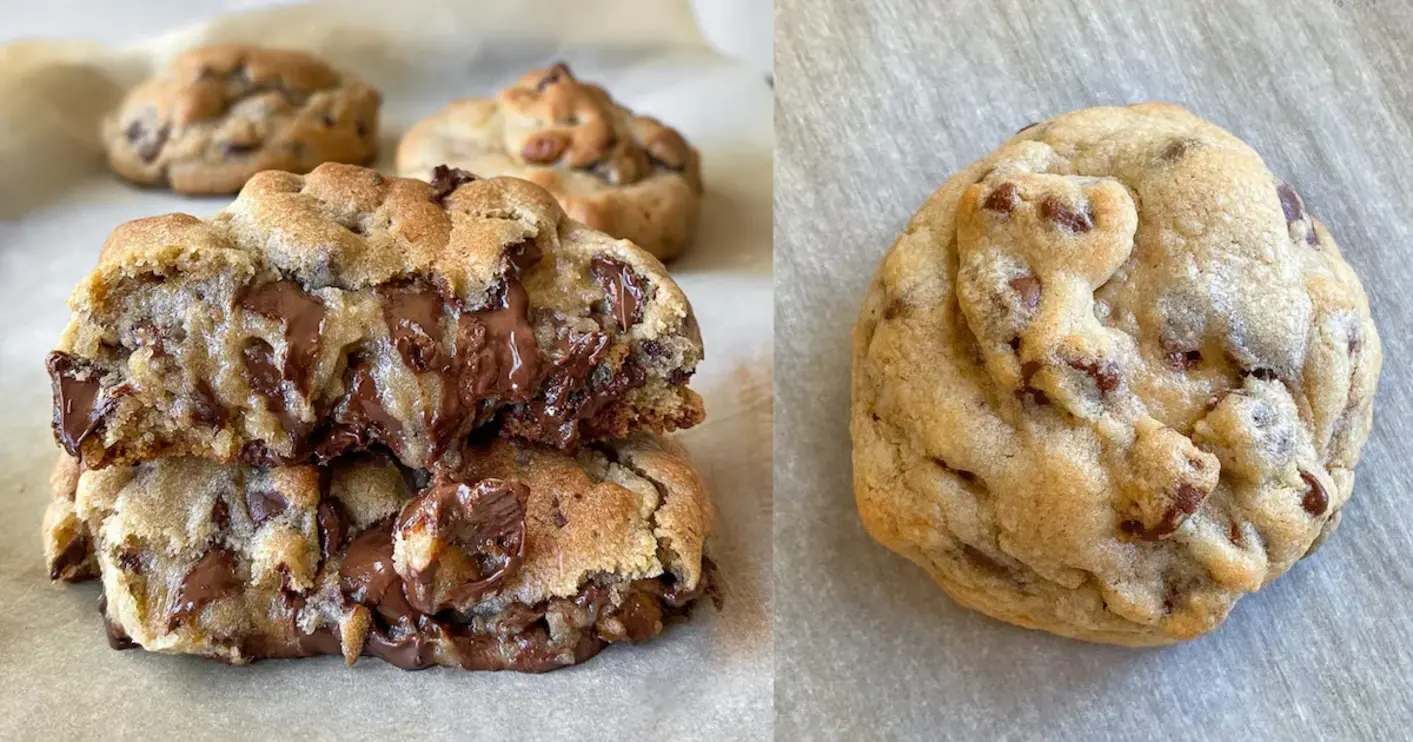
I’ll never forget the first time I tasted flan. I was a little girl in my mother’s kitchen in Marrakech, and she had just pulled a silky, caramel-glazed custard from the oven. That creamy, melt-in-your-mouth texture was pure magic. Now, as a professional cook living in New York City, I’ve reimagined that classic into a vegan flan that is just as luxurious — but completely egg-free and dairy-free. This no-bake crème caramel uses coconut milk and agar agar to achieve that signature velvety set, all with only 15 minutes of prep. It’s the vegan dessert I turn to when I want something elegant yet effortless, and I know you’ll love it too.
Picture this: a golden caramel that glistens like amber, pooling around a luscious, pale custard that trembles delicately on the plate. The first bite is sweet and slightly nutty from the coconut milk, with a whisper of vanilla that lingers. The texture is so smooth, so creamy, it feels like it’s dissolving on your tongue. There’s no eggy flavor, no heaviness — just pure, silky bliss. I learned the importance of perfectly set custards during my pastry training in Paris, and that precision is what makes this vegan flan truly special. The aroma of caramel simmering on the stove takes me right back to my childhood, but the bright, clean finish is entirely my own.
What I love most about this recipe is its simplicity. Classic flan can be tricky — water baths, egg curdling, long baking times. But my version bypasses all that. I use agar agar, a plant-based gelling agent I picked up from French pastry kitchens, which sets the custard beautifully without any eggs. The caramel is straightforward, too: just sugar and water, cooked to a deep amber. In this post, I’ll share my favorite pro tip for avoiding a grainy caramel and a common mistake to avoid when working with agar. Trust me — this is the easiest, most foolproof vegan flan you’ll ever make. Let’s dive in!
Why This Vegan Flan Recipe Is the Best
The Flavor Secret: Growing up in Morocco, I was surrounded by the warm, floral notes of orange blossom and rose. While this flan stays classic with vanilla, I add a pinch of sea salt to the coconut custard — a trick I learned from a pastry chef in Paris. It doesn’t make the flan salty; it brightens the sweetness and rounds out the coconut flavor. It’s that tiny, unexpected detail that makes every spoonful taste more complex. This vegan flan doesn’t fade into the background — it shines.
Perfected Texture: Getting the texture right in a vegan flan is non-negotiable for me. Too much agar, and it’s rubbery. Too little, and it won’t set at all. I spent weeks testing the exact ratio of coconut milk, cornstarch, and agar powder, and I’ve landed on a formula that delivers a smooth, tender custard that slices cleanly but still feels indulgent. No chalky texture, no weeping liquid — just a perfect, wobble-free set every time.
Foolproof & Fast: I know you’re busy, and I am too — between my NYC food blog and chasing farmers markets, I need desserts that work on the first try. This vegan flan is completely no-bake: no oven, no water bath, no temperature checks. You just simmer the custard on the stove, pour it into ramekins, and let the fridge do the work. It’s a crowd-pleaser that even beginner cooks can master. Plus, it’s soy-free and gluten-free, so almost everyone at your table can enjoy it.
Vegan Flan Ingredients
I love picking up my ingredients at the Union Square Greenmarket here in NYC, where I find the freshest coconut milk and pure maple syrup. The quality of these simple components really matters. For the caramel, I use regular granulated sugar — no specialty items needed. Here’s everything you’ll need, from my kitchen to yours.
Ingredients List
- 1/3 cup sugar (for caramel — *see notes)
- 1-2 tbsp water (for caramel)
- 2 cups canned coconut milk (shake the can well — *see notes)
- 3-4 tbsp maple syrup (*see notes for sweetness level)
- 2 tbsp cornstarch (*see notes for substitution)
- 2/3 tsp agar powder (*see notes for important brand notes)
- Pinch of sea salt
- 2 1/2 tsp vanilla extract
Ingredient Spotlight
Canned Coconut Milk: This is the backbone of your custard. Full-fat canned coconut milk is non-negotiable here — it provides the richness and creamy texture that mimics dairy. Look for brands like Thai Kitchen or Chaokoh at your local grocery store. Do not use light coconut milk, as the flan will be thin and icy. If you want a less coconut-forward flavor, you can substitute with a high-quality oat milk (barista blend) combined with 2 tbsp of unrefined coconut oil, but the texture will be slightly softer.
Agar Powder: This is the vegan magic that replaces eggs. Agar powder is derived from seaweed and is much more potent than agar flakes — always use powder for this recipe. I prefer the brand “Now Foods” or any Japanese brand like Kanten. The ratio is critical: too little and the flan won’t set; too much and it becomes rubbery. For best results, simmer the agar for exactly 2 minutes after the mixture boils to fully activate its gelling power.
Maple Syrup: Pure maple syrup adds a deep, slightly woody sweetness that complements the coconut beautifully. I use Grade A Dark or Amber for a robust flavor. You can substitute with agave nectar or brown rice syrup, but the flavor will be milder. Avoid artificially flavored pancake syrups — they contain corn syrup and will ruin the taste. I tested this with 3 tbsp for a lightly sweet flan, but if you prefer a sweeter dessert (like classic flan), go with 4 tbsp.
Vanilla Extract: Use pure vanilla extract, not imitation vanilla. The difference in flavor is night and day. I often buy vanilla beans from a spice shop in NYC’s Chelsea Market and make my own extract, but store-bought works perfectly. A high-quality vanilla adds floral notes that lift the entire dessert. If you really want to go luxe, scrape half a vanilla bean pod into the custard instead.
| Original Ingredient | Best Substitution | Flavor / Texture Impact |
|---|---|---|
| Canned Coconut Milk | Barista oat milk + 2 tbsp coconut oil | Less coconut flavor, slightly softer set |
| Agar Powder | Agar flakes (use 2 tbsp, simmer longer) | Different texture: firmer, harder to dissolve evenly |
| Maple Syrup | Agave nectar or brown rice syrup | Milder flavor, less complex sweetness |
| Cornstarch | Arrowroot powder (use same amount) | Slightly less creamy, still sets well |
How to Make Vegan Flan — Step-by-Step
Trust me, this is easier than you think. Just follow each step, and you’ll have a stunning vegan flan that rivals any traditional version. I’m right here with you!
Step 1: Make the Caramel
In a small saucepan, combine 1/3 cup sugar and 1-2 tablespoons of water. Stir frequently over medium heat until the sugar dissolves. Once it starts boiling, reduce the heat to low and let it simmer undisturbed until the mixture turns a dark golden brown — think of the color of an amber beer. Don’t walk away; caramel can burn in seconds. When it’s ready, immediately turn off the heat. Working quickly, pour the hot caramel evenly into four ramekins. Tilt each ramekin to spread the caramel across the bottom. Set aside to cool while you prepare the custard.
💡 emy’s Pro Tip: To prevent the sugar from crystallizing (which makes caramel grainy), brush down the sides of the pan with a wet pastry brush once the sugar starts simmering. This dissolves any stray crystals. Also, use a light-colored pan so you can see the color change clearly.
Step 2: Make the Custard
In a medium-sized saucepan, whisk together the coconut milk (shake the can first!), maple syrup, cornstarch, agar powder, vanilla extract, and a pinch of sea salt. Whisk until completely smooth — no lumps allowed. Place the pan over medium-high heat and bring the mixture to a boil, stirring constantly to prevent sticking on the bottom. As soon as you see bubbles breaking the surface, reduce the heat to low and let it simmer for exactly 2 minutes. This step is essential to activate the agar powder; without it, the flan won’t set. Remove from heat.
⚠️ Common Mistake to Avoid: Do not skip the 2-minute simmer or stop earlier. Agar powder needs time at a full simmer to fully dissolve and thicken. If you under-simmer, the custard will remain liquid even after hours in the fridge. I learned this the hard way in a pastry class in Paris — exact timing matters!
Step 3: Pour and Chill
Pour the hot custard evenly into the four ramekins, on top of the caramel. Let them cool to room temperature on the counter (about 20 minutes), then carefully transfer to the refrigerator. Chill for at least 3-4 hours, but overnight is even better. The flan will be perfectly set and cold.
💡 emy’s Pro Tip: Run a knife under hot water and wipe it dry before slicing. This helps you cut clean edges later. For unmolding, warm the outside of the ramekin slightly by holding it in your hands for 20 seconds before inverting.
Step 4: Unmold and Serve
To unmold, gently slide a thin knife around the edges of each ramekin. Place a serving plate (or small platter) upside down on top of the ramekin. Holding the ramekin and plate together firmly, flip them over in one swift motion. Give the ramekin a gentle tap on the countertop to release the flan. Slowly lift the ramekin — the caramel will cascade down the sides of the custard. Serve immediately, or keep chilled until ready.
⚠️ Common Mistake to Avoid: If the flan sticks and won’t release, don’t force it. Dip the bottom of the ramekin in warm water for 10 seconds to loosen the caramel. Also, ensure your knife cuts fully around the edge — a missed spot can cause a tear.
| Step | Action | Duration | Key Visual Cue |
|---|---|---|---|
| 1 | Make Caramel | 5-7 minutes | Dark golden brown color, thickens |
| 2 | Make Custard | 5-6 minutes | Mixture boils, then simmer 2 minutes |
| 3 | Pour & Chill | 3-4 hours or overnight | Custard is firm, not jiggly when tilted |
| 4 | Unmold & Serve | 2 minutes | Caramel flows over custard, clean release |
Serving & Presentation
Unmolding the flan is always a dramatic and satisfying moment — the caramel flows like a glossy river. I love to serve it on a simple white plate to let the golden color stand out. For a touch of elegance, I sometimes top each flan with a delicate sprinkle of flaky sea salt (like fleur de sel) and a few fresh berries. The salt cuts the sweetness and adds a professional touch. Growing up in Morocco, my mother would serve flan with a drizzle of orange blossom water syrup — you can try that too!
In my NYC kitchen, I often pair this vegan flan with a dollop of coconut whipped cream (from the top of a chilled coconut can) and a dusting of cinnamon. It’s also lovely with a side of fresh orange segments or a mint sprig for color. For a more decadent version, serve it with a scoop of vegan vanilla ice cream. This is a dessert that feels equally at home at a summer barbecue or a winter dinner party.
| Pairing Type | Suggestions | Why It Works |
|---|---|---|
| Side Dish | Fresh berries, orange segments | Adds brightness and acidity to balance sweetness |
| Sauce / Dip | Coconut whipped cream, caramel drizzle | Enhances richness and creaminess |
| Beverage | Espresso, mint tea, sparkling water | Cuts sweetness; mint tea is my Moroccan favorite |
| Garnish | Mint sprig, cinnamon, flaky sea salt | Adds aroma, color, and a flavor pop |
Make-Ahead, Storage & Reheating
This vegan flan is a dream for meal prep — which I rely on for my busy NYC food blog schedule. You can make it up to 2 days in advance, and it actually improves as the flavors meld. The coconut and vanilla deepen overnight in the fridge. Just keep the ramekins covered tightly with plastic wrap to prevent the flan from absorbing fridge odors.
<
Print
Vegan Flan
Description
Creamy, sweet, and delicious vegan flan that literally melts in your mouth. This crème caramel is a no-bake dessert that requires only 15 minutes of prep time. The recipe is egg-free, dairy-free, soy-free, and very easy to make.
Ingredients
- 1/3 cup sugar ((*see notes))
- 1–2 tbsp water
- 2 cups canned coconut milk (can shaken (*see notes))
- 3–4 tbsp maple syrup ((*see notes))
- 2 tbsp cornstarch ((*see notes))
- 2/3 tsp agar powder ((*see notes))
- Pinch of sea salt
- 2 1/2 tsp vanilla extract
Instructions
- You can watch the video in the post for visual instructions.
- For the caramel, add sugar and water to a small saucepan. Bring to a simmer, stirring frequently. Once it starts boiling, turn down the heat, let simmer until it's dark golden brown and thickens, then turn off the heat.
- Quickly pour the caramel into 4 small ramekins and spread the caramel around the bottom with a spoon or simply by tilting the ramekins. Set aside while you make the custard.
- For the custard, add coconut milk, maple syrup, cornstarch, agar powder, vanilla extract, and sea salt to a medium-sized saucepan and stir with a whisk.
- Once combined, bring to a boil over medium-high heat, stirring frequently. As soon as it starts boiling, turn the heat to low and let simmer for 2 minutes to activate the agar, then remove from heat.
- Pour the custard into the 4 ramekins and refrigerate for at least 3-4 hours or overnight.
- To unmold the flan, gently slide a knife around the edges of each ramekin. Invert a platter on top of the ramekin and turn the ramekin and platter over (shake it carefully). Check the step-by-step photos in the blog post above.
- Enjoy! Store leftovers covered in the refrigerator for up to 3 days.
Brigadeirao (Brazilian Chocolate Fudge Flan)
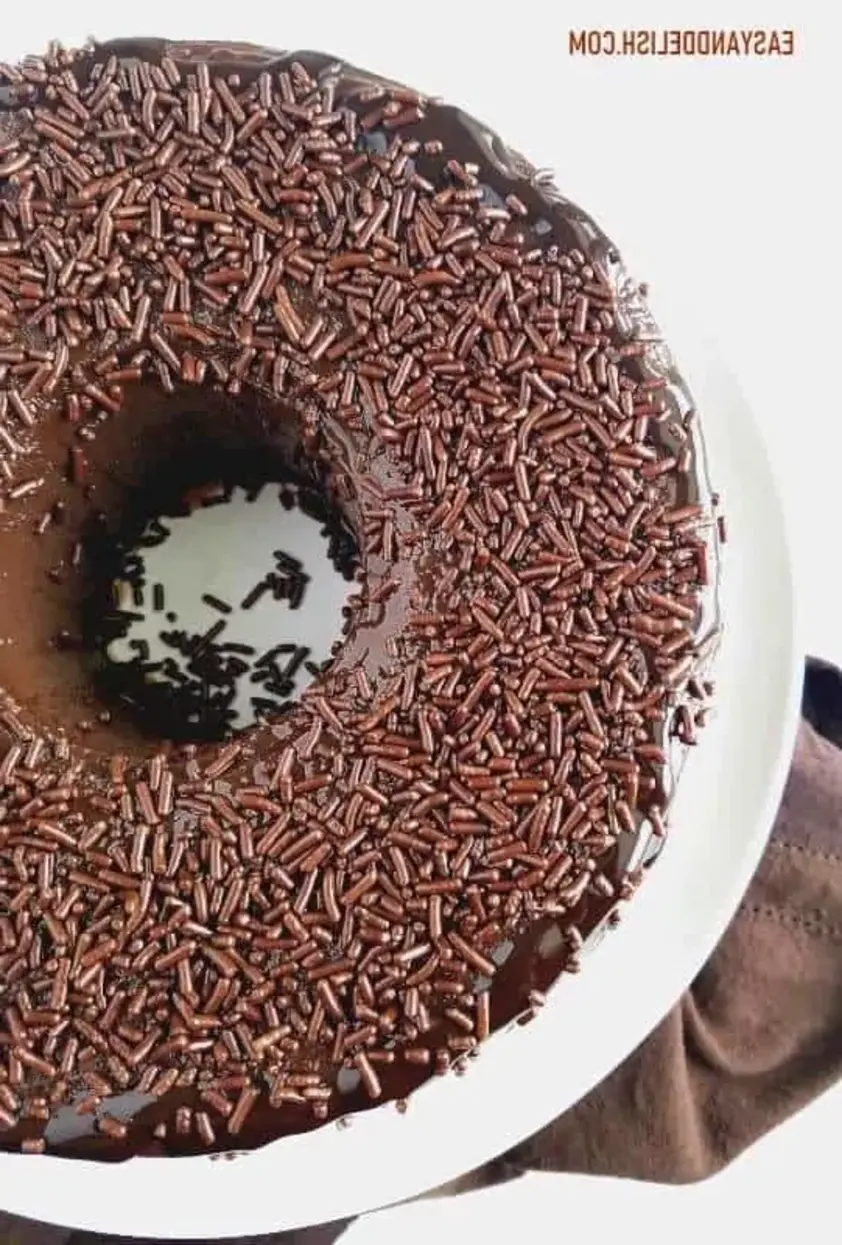
Table of Contents
Brigadeirao (Brazilian Chocolate Fudge Flan) – A Decadent Blender Dessert
I still remember the first time I tasted brigadeirao at a tiny Brazilian café in the East Village, right after I moved to New York City from Paris. The rich, fudgy chocolate center, the silky texture — it was love at first bite. This brigadeirao, or Brazilian chocolate fudge flan, brings together the best of two worlds: a creamy flan base and an intense chocolate punch that’s pure indulgence. Making it in a blender is the secret — no stand mixer, no fuss. It’s a dessert that feels elegant but comes together in ten minutes flat.
When you slice into this chilled flan, the texture is incredibly smooth, almost like a dense chocolate mousse but with a tender, creamy tenderness that melts on your tongue. The deep cocoa flavor is perfectly balanced by the sweetened condensed milk — a staple in Brazilian desserts — and just a hint of vanilla. The chocolate sprinkles on top add a playful crunch that I love. It’s the kind of dessert that whispers “I love you” on a weeknight but shouts “party” at a celebration.
My version is inspired by the technique I learned in Paris: a bain-marie (water bath) that ensures gentle, even cooking and a silky texture without water spots. The key is not to overbake — when the center still jiggles slightly, it’s perfect. A common mistake is baking it until a knife comes out clean, which makes the flan dense. Stick with me, and I’ll show you the foolproof method to get a fudgy, luscious brigadeirao every time. This is comfort food with a touch of chef-level polish.
Why This Brigadeirao Recipe Is the Best
The Flavor Secret: The combination of sweetened condensed milk, whole milk, and high-quality cocoa powder creates a base that’s both deeply chocolatey and luxuriously creamy. I always use a Dutch-process cocoa powder — it gives a darker, richer color and a less sharp flavor — a trick I picked up in Paris. A splash of milk adds just enough thinness to blend perfectly, so the flan isn’t too thick or eggy.
Perfected Texture: Unlike many flan recipes that call for separate egg whites, this entire flan is blended together — eggs, milk, sugar, and cocoa — until smooth. The bain-marie does the heavy lifting: the water bath surrounds the pan with moist heat, preventing curdling and cracking. The result? A slice that cuts cleanly yet holds a soft, melt-in-the-mouth texture that’s borderline addictive.
Foolproof & Fast: This brigadeirao is beginner-friendly because everything goes into a blender. No tempering eggs, no hot caramel, no complex steps. Just blend, pour, and bake. And while it chills in the fridge (overnight is best), you can get on with your day. It’s a make-ahead dream for busy New Yorkers like me — perfect for a fancy dinner or a lazy Sunday treat.
Brigadeirao Ingredients
I find these ingredients at almost any supermarket in NYC, but when I can, I grab the sweetened condensed milk and cocoa from a local Brazilian market in Astoria — it just feels more authentic. The rest is standard pantry stuff, so this is incredibly easy to pull together.
Ingredients List
- 28 oz sweetened condensed milk ((or two 14-oz cans))
- 1 cup whole milk
- 1 cup unsweetened cocoa powder
- ½ cup sugar (plus extra to sprinkle the pan)
- ½ tbsp cornstarch
- 1 tsp pure vanilla extract
- 4 large eggs (at room temperature)
- 1/4 cup chocolate sprinkles (good quality)
Ingredient Spotlight
Sweetened condensed milk: This is the heart of brigadeirao. It gives that dense, creamy sweetness that makes Brazilian desserts so iconic. I prefer a full-fat version like Borden or Nestlé for best texture. Avoid using evaporated milk as a substitute — it’s not sweet enough and the texture will be off. If you can’t find sweetened condensed milk, you can make a quick version by simmering 1½ cups whole milk with 1¼ cups sugar until reduced by half, but it won’t be quite the same.
Unsweetened cocoa powder: Use a dark, high-quality cocoa for the deepest chocolate flavor. I love Valrhona or even a good store brand (Trader Joe’s is surprisingly solid). Dutch-process cocoa works best because it has a neutral pH — it won’t react with the eggs to create a cake-like rise. If you only have natural cocoa, that works too, but the flan will be less fudgy and more delicate. Always sift your cocoa powder — lumps will blend out, but sifting prevents any gritty surprises.
Eggs: Room temperature eggs are crucial here. Cold eggs can shock the blender mixture and prevent it from emulsifying properly, leading to a curdled texture. Take your eggs out 30 minutes before starting. If you’re in a hurry, place them in a bowl of warm water for 5 minutes. I’ve also used pasteurized liquid egg whites (a 1:1 substitution works in this recipe, using 1 cup for the 4 eggs) without any texture change.
Whole milk: Whole milk gives the flan body. I’ve tested it with 2% milk, and it works, but the texture is slightly less creamy. Avoid skim milk — the flan will be more watery. For a dairy-free version, I’ve used oat milk with great success — it has a similar mouthfeel to whole milk and doesn’t separate as much as almond milk during baking.
| Method | Container | Duration |
|---|
| Original Ingredient | Best Substitution | Flavor / Texture Impact |
|---|---|---|
| Sweetened condensed milk | Homemade version (milk + sugar reduced) | Slightly less dense, sweeter if not careful |
| Whole milk | Oat milk (barista blend best) | Creamier, slightly less rich than whole milk |
| Unsweetened cocoa powder (Dutch-process) | Natural cocoa powder (sift and add 1/8 tsp baking soda) | Less dark, more acidic flavor; fudgy texture maintained |
| 4 large eggs | 1 cup pasteurized liquid egg whites | Same texture; slightly less richness from yolk |
How to Make Brigadeirao — Step-by-Step
I promise, this is the easiest fudge flan you’ll ever make. Just follow these simple steps, and you’ll have a restaurant-quality dessert at home.
Step 1: Prepare the Pan
Preheat your oven to 350°F (180°C). Grease an 8-inch ring pan (or a 9-inch round cake pan) with butter or nonstick spray. Then sprinkle a thin layer of granulated sugar all over the greased surface — this helps the flan release easily and adds a subtle caramel note to the edges. Tap out any excess sugar.
💡 emy’s Pro Tip: I always use a ring pan (also called a tube pan) because the center tube conducts heat more evenly, helping the flan set faster and more uniformly. If you don’t have one, a 9-inch round cake pan works fine — just add 5 to 10 minutes to the baking time.
Step 2: Blend the Batter
In your blender, combine the sweetened condensed milk, whole milk, cocoa powder, sugar, cornstarch, vanilla, and eggs. Blend on low speed for 30 seconds, then increase to medium and blend for another 30 seconds until completely smooth and no lumps remain. The batter will be thin — that’s exactly right.
⚠️ Common Mistake to Avoid: Don’t over-blend! If you blend on high for more than a minute, you’ll incorporate too much air into the batter. That air will create bubbles during baking, making the flan porous rather than silky. Just 30 seconds on medium is perfect.
Step 3: Pour and Bake
Pour the batter into your prepared pan. Place the pan into a larger roasting pan or baking dish. Pour hot tap water into the larger pan until it reaches halfway up the sides of the ring pan — this is your bain-marie. Bake for 40 minutes, or until the top is set and the center is still slightly jiggly when you gently shake the pan. Don’t be tempted to bake it longer — carry-over cooking will finish the job as it cools.
💡 emy’s Pro Tip: Every oven is different, so start checking at 35 minutes. The flan should look like a cheesecake that hasn’t fully set — a gentle wobble in the center is perfect. If the knife comes out clean before 40 minutes, you’ve overbaked it. Trust the jiggle!
Step 4: Cool and Chill
Remove the ring pan from the water bath and place it on a wire rack to cool completely at room temperature (about 1 hour). Once cool, run a thin knife around the edge of the pan to loosen the flan. Cover the pan with plastic wrap and refrigerate for at least 4 hours, but overnight is ideal. The longer it chills, the better the texture.
⚠️ Common Mistake to Avoid: Don’t skip the cooling step before refrigerating! A hot flan straight from the oven placed in the fridge will cause condensation, watering down the surface and making it sticky. Let it cool on the counter first — patience pays off.
Step 5: Unmold and Serve
To unmold, run a knife around the edge of the pan again (especially if you used a cake pan). Place a serving plate upside down over the pan, then quickly invert both together. If the flan sticks, tap the bottom of the pan firmly with a spoon — it should release gently. If you used a ring pan, carefully lift the pan off. Top with chocolate sprinkles and, if you’re feeling fancy, drizzle a little chocolate fudge sauce on the edges.
| Step | Action | Duration | Key Visual Cue |
|---|---|---|---|
| 1 | Grease and sugar the pan | 2 mins | Even thin sugar coating |
| 2 | Blend ingredients | 1 min | Smooth, no lumps |
| 3 | Bake in bain-marie | 35–45 mins | Set edges, jiggly center |
| 4 | Cool and refrigerate | 4 hrs to overnight | Firm, no longer jiggly |
| 5 | Unmold and top with sprinkles | 5 mins | Clean release, even sprinkle coat |
Serving & Presentation
This brigadeirao is stunning on its own — a glossy chocolate dome studded with sprinkles. I love serving it at dinner parties because it looks so impressive, yet I made it the day before. Place the whole flan on a cake stand and let everyone admire it before slicing. For individual plates, add a dollop of lightly sweetened whipped cream on the side — the contrast between the dense flan and the airy cream is heavenly.
A drizzle of chocolate fudge sauce is my go-to for extra decadence, but sometimes I swirl in a little salted caramel (a trick I learned from a pastry chef in Paris). Fresh raspberries also work beautifully, cutting through the richness with their tartness. If you’re feeling Moroccan-inspired, add a sprinkle of toasted sesame seeds on top — trust me, it works.
| Pairing Type | Suggestions | Why It Works |
|---|---|---|
| Side Dish | Whipped cream, fresh berries | Lightens the rich chocolate |
| Sauce / Dip | Chocolate fudge, salted caramel | Enhances decadence |
| Beverage | Espresso, port wine, cold brew | Cuts sweetness, complements cocoa |
| Garnish | Chocolate sprinkles, toasted sesame | Adds texture and visual pop |
Make-Ahead, Storage & Reheating
In my busy NYC life, make-ahead desserts are a lifesaver. This brigadeirao is perfect for that — it actually gets better after 24 hours in the fridge, as the flavors meld. I often make it on a Saturday for a Sunday dinner party. Here’s how to store it for perfect results every time.
| Method |
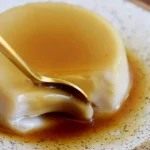
French Antilles Coconut Flan (Flan Coco)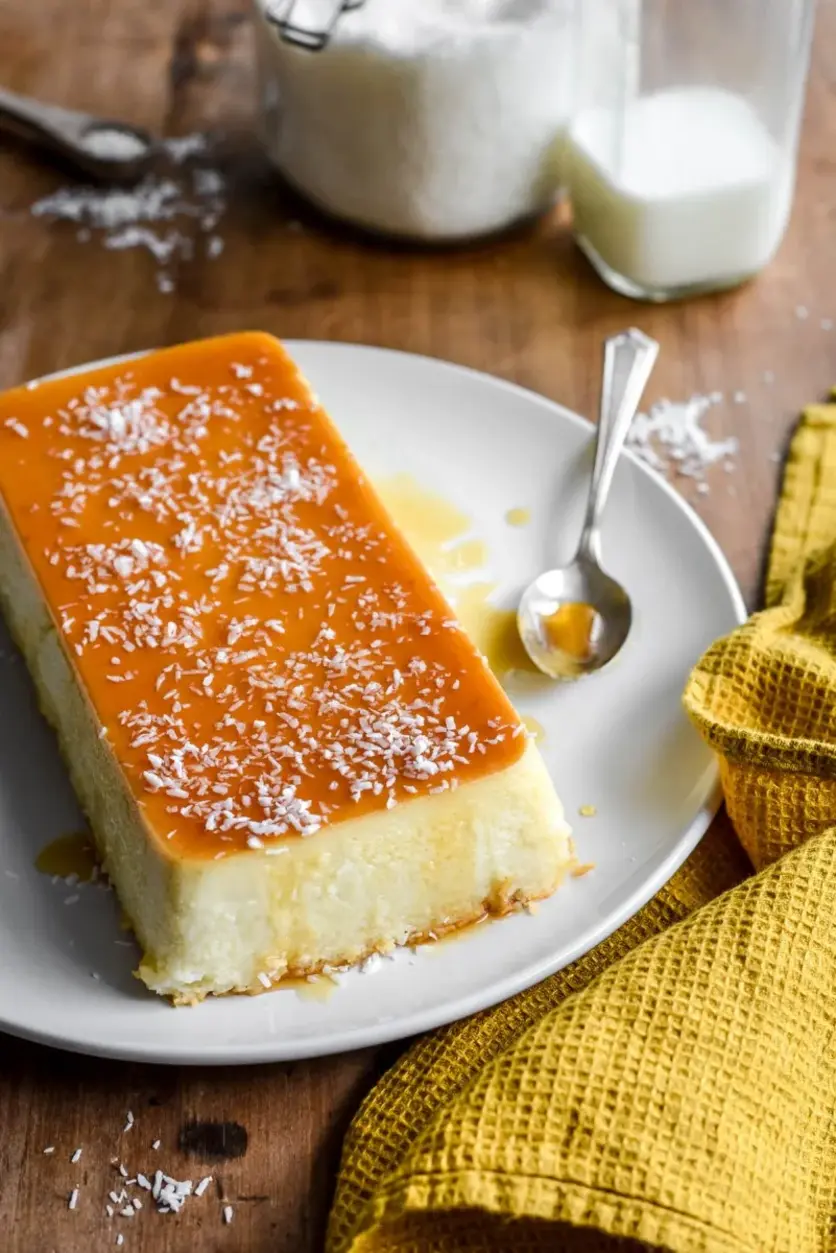 Table of ContentsFrench Antilles Coconut Flan – Creamy Caribbean Dessert Made SimpleI first tasted French Antilles Coconut Flan on a rainy afternoon in a tiny bistro in Martinique, where the owner—a woman with laughter as rich as her caramel—served it with a slice of lime and a story. That moment stayed with me: the creamy coconut flan, silky and fragrant, with a layer of deep amber caramel that cracked under my spoon. Back in my NYC kitchen, I knew I had to recreate it. The key? Sweetened condensed milk and full-fat coconut milk, cooked low and slow in a water bath until the texture is just right. This French Antilles Coconut Flan (Flan Coco) is a tropical treasure, and I’m about to show you how to make it at home with ease. Imagine cutting into a slice—the custard is so tender it almost melts on your tongue, with a whisper of vanilla and the gentle chew of shredded coconut. The caramel flows like liquid gold, pooling on the plate. Each bite is a balance of creamy sweetness and subtle saltiness, with a faint nuttiness from the coconut. The aroma is pure vacation: warm, sweet, and tropical. In my Paris cooking school, we spent days perfecting crème caramel, but this version—with its coconut twist—feels like a happy vacation from classic French technique. It’s the kind of dessert that makes you close your eyes and sigh. I’ve tested this French Antilles Coconut Flan recipe dozens of times to get the perfect texture—not too firm, not too runny. The trick is a gentle water bath and no stirring while the caramel cooks. My version avoids the common mistake of over-baking, which can make the flan rubbery. With a few pro tips from my years in the kitchen, you’ll get a flawless flan every time. Whether you’re new to custard or a seasoned baker, this recipe is forgiving and absolutely delicious. Ready to dive into a taste of the Caribbean? Let’s go! Why This French Antilles Coconut Flan Recipe Is the BestThe flavor secret lies in the combination of sweetened condensed milk and rich coconut milk—a duo that creates a luscious, almost milky sweetness without being cloying. From my Moroccan kitchen background, I learned that coconut is a natural partner for caramel, and the shredded coconut adds texture that sets this flan apart. In Paris, my chef taught me that patience with caramel—no stirring—pays off with a deep, bitter-sweet amber that balances the custard perfectly. This isn’t just any flan; it’s a French Antilles Coconut Flan with soul. Perfected texture comes from a low oven temperature and a water bath that insulates the custard, preventing curdling. I always tell my students: the flan should be just set with a gentle jiggle in the center—like a happy little wobble. Over-baking is the enemy. I also use a trick from my Paris days: letting the flan chill for at least 3 hours, which allows the flavors to meld and the texture to become velvety. This foolproof method works for beginners because it rewards patience and simple ingredients. Foolproof and fast—well, relatively! While the flan bakes for 55 minutes, the actual active prep is under 20 minutes. You don’t need a candy thermometer for the caramel if you watch color carefully, and you can make the flan a day ahead for stress-free entertaining. I’ve taught this recipe to friends in NYC who had never made custard before, and they wowed their dinner parties. That’s the magic: a dessert that looks complex but is secretly simple. Coconut Flan IngredientsI pick up my coconut milk and shredded coconut at the Union Square farmers market when I can, but a good-quality canned coconut milk from the grocery store works beautifully. The sweetened condensed milk reminds me of my mother’s pantry in Morocco—she used it in everything from pastries to tea. The key is finding unsweetened shredded coconut; sweetened will make the flan too sugary. Here’s what you need: Ingredients List
Ingredient SpotlightSweetened condensed milk is the backbone of this flan, providing sweetness and a thick, creamy texture. Look for a brand without added stabilizers—I prefer Eagle Brand. In a pinch, you can use full-fat coconut cream from a can, though the texture will be slightly less dense. Expect a richer, more coconut-forward flavor. Coconut milk (not cream) gives the flan its signature tropical taste and silky mouthfeel. Use full-fat for best results; light coconut milk will yield a thinner custard with less body. I always buy BPA-free cans for peace of mind. No substitution here if you want the real deal. Unsweetened shredded coconut adds texture and a rustic chew. If you only have sweetened, reduce the condensed milk by 2 tablespoons to balance the sugar. For a finer texture, pulse the shredded coconut in a food processor briefly. Freshly grated coconut (from a mature nut) works wonderfully—just make sure it’s dry before using.
How to Make French Antilles Coconut Flan — Step-by-StepLet’s make this Caribbean-style dessert together. I’ll guide you through each step with clear instructions and visual cues so you can nail it on your first try. Step 1: Make the CaramelPlace the ½ cup sugar in a small, heavy-bottomed saucepan over medium heat. Do not stir! Just let it melt, swirling the pan occasionally. Watch the color change from clear to amber—when it’s a deep golden brown, remove from heat immediately and pour into your loaf pan, tilting to coat the bottom evenly. Work fast because it hardens quickly. Set aside to cool. 💡 emy’s Pro Tip: If the caramel starts to seize or form lumps, don’t panic—just add 1 tablespoon of water and return to low heat, stirring gently until smooth again. Also, use a light-colored pan to easily see the color change. Step 2: Mix the CustardIn a large mixing bowl, whisk together the sweetened condensed milk, coconut milk, eggs, vanilla extract, and unsweetened shredded coconut. Whisk gently to avoid creating too many air bubbles. Pour the mixture into the loaf pan over the hardened caramel. ⚠️ Common Mistake to Avoid: Whisking too vigorously can incorporate air, which creates foam and bubbles on the surface of the flan. Use a gentle, slow whisking motion. Also, be sure to scrape the bottom of the bowl to incorporate all the shredded coconut. Step 3: Bake in a Water BathPlace the loaf pan into a larger baking dish. Carefully pour boiling water into the larger dish until it comes at least 1/4 up the sides of the loaf pan. This water bath (bain-marie) prevents the flan from curdling. Bake at 350°F for 50–55 minutes. The flan is done when the top is lightly golden and firm to the touch but still jiggles slightly in the center. 💡 emy’s Pro Tip: For even cooking, place the baking dish on the middle rack. If the flan is browning too fast on top, tent it loosely with foil after 30 minutes. Let it cool in the water bath for 10 minutes before removing. Step 4: Chill and UnmoldTransfer the flan to a cooling rack and let come to room temperature (about 1 hour). Then, refrigerate for at least 3 hours—overnight is even better. When ready to serve, place the pan in 2 inches of warm water for 1–2 minutes to loosen the caramel. Run a knife around the edges, invert a plate over the pan, and flip quickly. The flan should slide out with a cascade of caramel. ⚠️ Common Mistake to Avoid: Skipping the warm water bath before unmolding—cold caramel is hard and will stick, causing the flan to break. Also, use a plate with a slight lip to catch the caramel sauce. If the flan sticks, try warming the pan bottom for another 30 seconds with a kitchen torch or hot water.
Serving & PresentationThe magic of French Antilles Coconut Flan is in its simplicity. I like to serve it on a white plate so the golden caramel and pale flan stand out. Sprinkle generously with extra shredded coconut—toasted if you have time—for a beautiful finish. A tiny pinch of sea salt on top before serving brings out the sweetness. In my NYC apartment, I pair it with fresh mango slices or a dollop of coconut whipped cream for extra indulgence. For a touch of Moroccan flair, I sometimes add a sprinkle of orange flower water to the flan before serving, or serve it alongside small glasses of mint tea. In Paris, we’d serve it with a simple raspberry coulis—the tartness balances the sweet caramel. For a party, pour the caramel sauce from the pan over the flan for a dramatic presentation. Let the flan sit at room temperature for 10 minutes before slicing for the cleanest cuts.
Make-Ahead, Storage & ReheatingThis flan is a meal-prepper’s dream! I often make it on Sunday for a stress-free dinner party during the week. Because it needs to chill for hours, it’s perfect for making a day ahead. In my busy NYC life, that means one less thing to do the day of—just unmold and serve. Here’s how to store it:
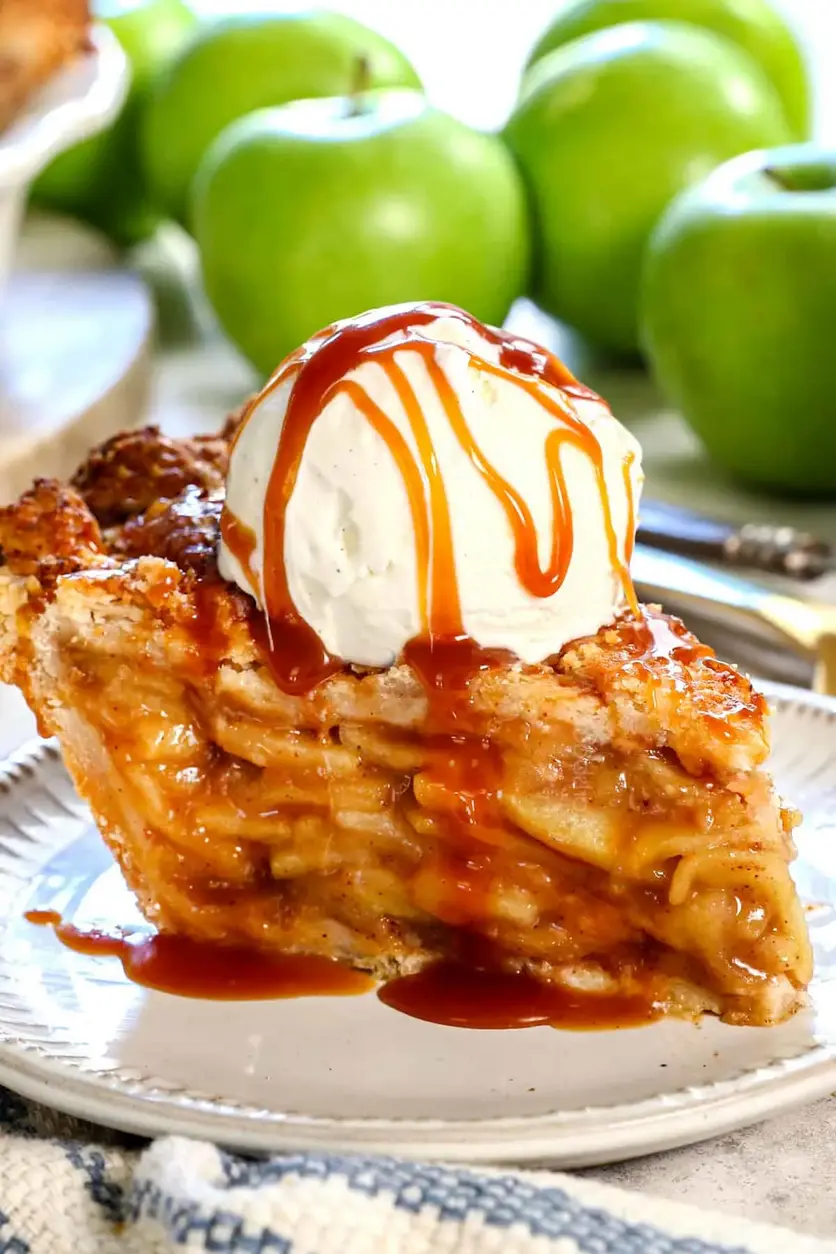
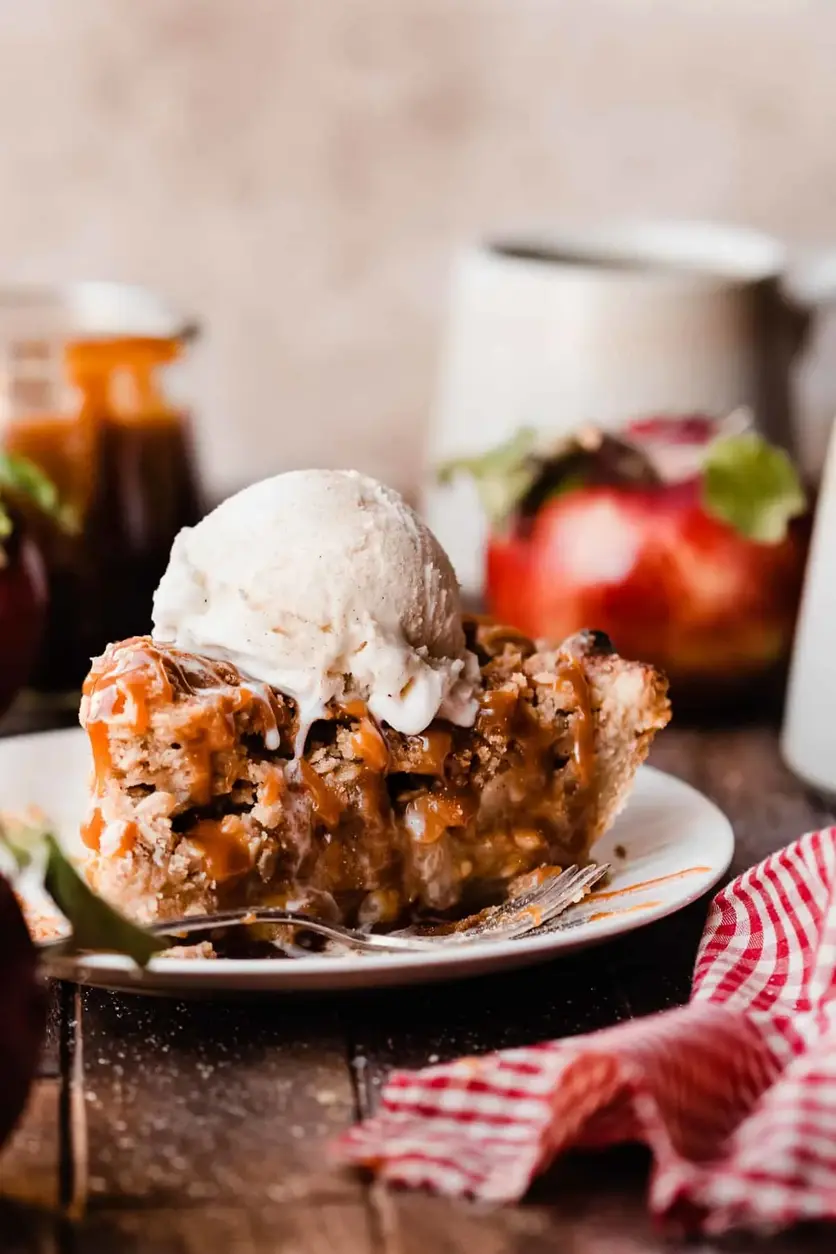
Granny Smith Apple Pie Recipe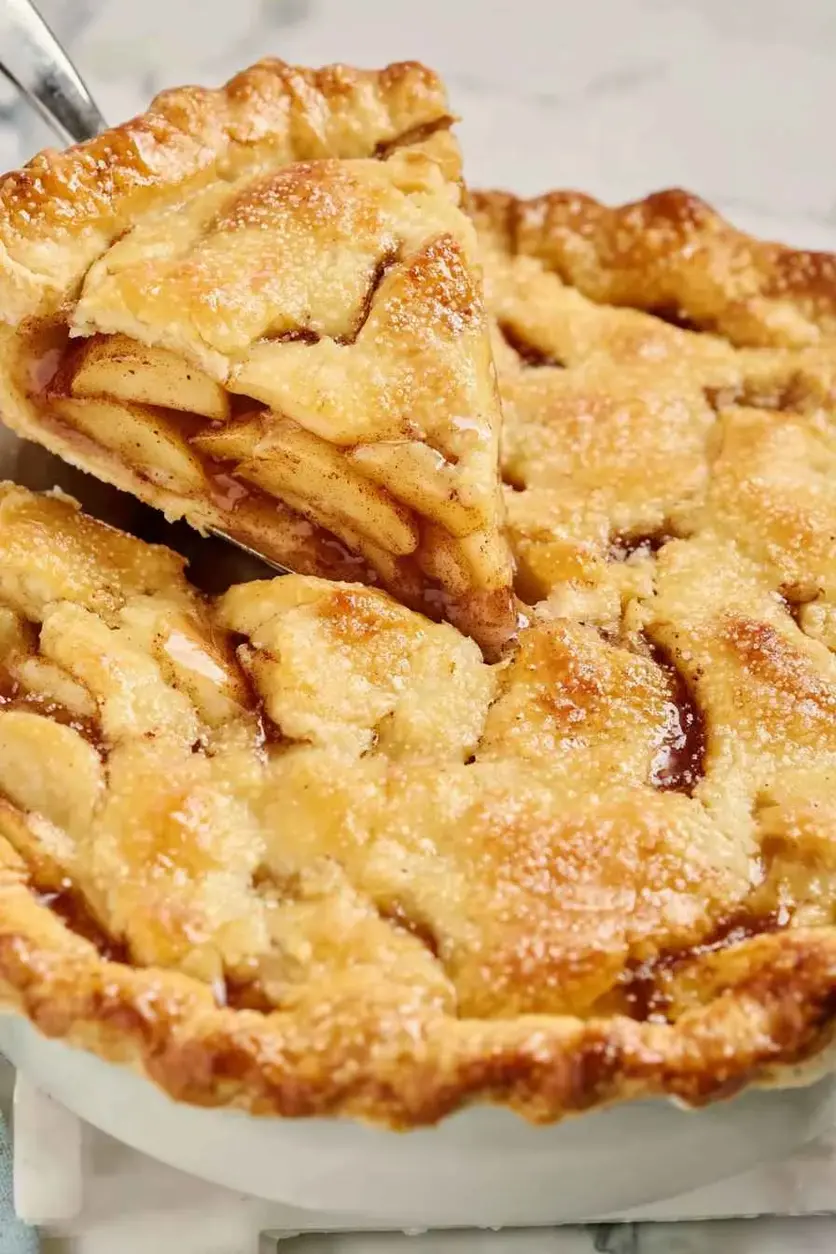 Table of ContentsGranny Smith Apple Pie Recipe with French Tart Technique – The Key to a Perfectly Golden CrustI thought I knew how to make apple pie until I tried my neighbor’s recipe last fall. Mine always turned out with a soggy bottom crust, while hers was a perfect golden sheet that shattered into buttery layers. I had to learn her secret — and it all came down to a French technique I’d nearly forgotten from my Paris pastry school days. This Granny Smith Apple Pie Recipe combines the bold tartness of Granny Smith apples with a crisp, flaky crust that never gets mushy. The key? A simple par-bake step and a little cornstarch in the filling — it’s the trick that made every difference for my New York kitchen. Imagine slicing into a pie where the filling is beautifully set — not runny — and each apple slice still holds its shape, tender but not mushy. The aroma of cinnamon and nutmeg fills your kitchen, mingling with the deeply caramelized sugar from the Granny Smith apples. The crust is a beautiful amber color, lightly brushed with egg wash and sprinkled with sanding sugar for that perfect crunch. Every bite brings a balance of sweet and tart, with a buttery crust that shatters just slightly as you bite through it. That, right there, is what a great apple pie should be. As a professional cook trained in both Moroccan home cooking and French patisserie, I’ve brought the best of both worlds into this Granny Smith apple pie. The lemon zest lifts the fruit, while the cornstarch gives structure without a gummy texture — a chef’s trick from Paris. What I love most is that this recipe is approachable for beginners: you just need patience for the par-bake and a good eye for the filling’s consistency. I’ll also show you one common mistake that ruins many home bakers’ pies — and exactly how to avoid it. From my NYC kitchen to yours — I hope this recipe brings as much warmth to your table as it does to mine. Why This Granny Smith Apple Pie Recipe Is the BestThe flavor secret here is balance. Granny Smith apples bring a natural tartness that stands up beautifully to sugar and warm spices. I use just enough white and brown sugar to coax out their sweetness without masking their character. The pinch of nutmeg is my nod to the spice markets of Morocco, where I watched my mother balance flavors with precision. Combined with fresh lemon zest and cinnamon, this filling has layers that sing — not just sugar and spice, but real fruit personality. Perfected texture is where my French training shines. The par-bake technique ensures the bottom crust stays crispy, while a blend of flour and cornstarch in the filling creates a luscious, thickened syrup that never turns runny. In a Paris pastry kitchen, I learned that patience in pre-baking the bottom shell is the single most important step for a crisp, golden crust — and for this Granny Smith apple pie, it’s non-negotiable. That step alone turned my soggy pies into bakery-level workhorses. This Granny Smith apple pie recipe is also foolproof and fast once you know the rhythm. The prep takes about 40 minutes — much of that is just peeling apples — and the oven does the rest. The filling doesn’t require any pre-cooking, which saves time and keeps the apple slices from turning into applesauce. Whether you’re a novice or a seasoned baker, this method delivers a professional result every time. Granny Smith Apple Pie Recipe IngredientsI typically buy my Granny Smiths from the Union Square Greenmarket in Manhattan, where the apples are just in from upstate New York farms in the fall. They’re super crisp and tart — exactly what this recipe needs. For the pie shells, I prefer a good all-butter brand from the frozen section; it gives that French-style flakiness with minimal effort. And the cinnamon I use is from a spice shop in Brooklyn — it’s fragrant and not too dusty. Here’s everything you’ll need. Ingredients List
Ingredient SpotlightGranny Smith apples are the star here — their tartness holds its own even with the sugar and spices. When shopping, choose firm, bright green apples without any soft spots or bruises; they should feel heavy for their size. A good substitute is Honeycrisp, but you’ll want to reduce the sugar slightly since they’re sweeter. Contrarily, a sweeter apple like Fuji will produce a less complex pie. The all-purpose flour in the filling is a classic thickener, but I also like to add a little cornstarch for extra stability — not in this recipe directly, but I’ll show you a variation later. The brown sugar brings molasses notes that deepen the apple flavor, while the white sugar keeps the sweetness clean. Always use fresh spices — stale cinnamon can make the pie taste flat. The lemon zest brightens everything, just like I learned to do with fruit fillings in Paris.
How to Make Granny Smith Apple Pie — Step-by-StepI’ll walk you through each step of this Granny Smith apple pie recipe with the same care I use in my professional kitchen. Don’t worry — it’s easier than you think, especially with these pro tips. Step 1: Prepare the ApplesPeel, core, and slice 7 large Granny Smith apples into 1/2-inch thick slices. Place them in a large bowl. Toss the slices with 1 tablespoon lemon juice immediately to prevent browning. Add the white sugar, brown sugar, 2 tablespoons all-purpose flour, 1 teaspoon cinnamon, 1/8 teaspoon nutmeg, and lemon zest. Toss well until every slice is evenly coated. 💡 emy’s Pro Tip: Let the apples sit for 10 minutes after tossing. This allows the sugar to draw out some juice, which you’ll then drain off — trust me, this prevents a watery pie! Step 2: Par-Bake the Bottom CrustPreheat your oven to 400°F (200°C). Place one pie shell in a 9-inch pie dish. Line it with parchment paper and fill with pie weights or dried beans. Bake for 12 minutes, then remove the weights and parchment. Prick the bottom with a fork and bake for another 5 minutes until it’s set but not deeply golden. This step is the secret to a crispy bottom crust. ⚠️ Common Mistake to Avoid: Don’t skip the pricking step! If air bubbles form under the crust, they can push the filling up and cause spills. Prick generously. Step 3: Fill and Top the PieDrain any accumulated liquid from the apple mixture. Spoon the filling into the par-baked shell, mounding it slightly in the center. Place the second pie shell on top. Crimp the edges together to seal, then cut 4–5 slits in the top crust for steam to escape. Brush the entire top crust with the beaten egg wash, then sprinkle with sanding sugar if using. 💡 emy’s Pro Tip: For an even shinier crust, brush with the egg wash twice — once before chilling, once more right before putting it in the oven. That double layer creates a gorgeous, deep golden finish. Step 4: Bake and CoolPlace the pie on a baking sheet lined with parchment to catch any drips. Bake at 400°F for 15 minutes, then reduce the oven temperature to 375°F (190°C) and bake for an additional 35–40 minutes. The pie is done when the crust is deeply golden and you see the filling bubbling through the slits. Let the pie cool on a wire rack for at least 2 hours before slicing — this allows the filling to set properly. ⚠️ Common Mistake to Avoid: Cutting the pie too early is the #1 mistake! The filling will be runny if you slice while it’s still hot. Patience pays off — I speak from ruined pie experience.
Serving & PresentationThis Granny Smith apple pie is a showstopper on any table. I love serving it slightly warm — just a few minutes out of the oven — with a generous scoop of good-quality vanilla ice cream. The contrast between the warm, spiced apple filling and the cold, creamy ice cream is pure comfort. You could also serve it with a dollop of lightly sweetened whipped cream or a drizzle of homemade caramel sauce for extra indulgence. For presentation, I like to let the pie shine naturally. Place it on a pretty cake stand or a wooden cutting board. I’ll often arrange a few fresh apple slices around the plate and dust the plate with a little cinnamon sugar. The golden, sanded crust is already beautiful, so keep it simple. If you want a touch of elegance, add a few fresh mint leaves or a lemon twist — it’s a little Parisian flair I picked up in the pastry shops of the 6th arrondissement. In New York City, I love serving this at Thanksgiving alongside roasted turkey and green beans, but it’s also wonderful for a cozy Sunday dinner. In Morocco, we’d often serve fruit pies with mint tea — try it, you’ll be surprised how the bright mint cuts through the sweetness. For leftovers (if there are any!), a slice reheated in a 300°F oven for 10 minutes tastes just like fresh.
Make-Ahead, Storage & ReheatingIn my busy NYC schedule, I often make this Granny Smith apple pie a day ahead for holidays or gatherings. It actually tastes better the next day as the flavors meld together. Here’s how I store and handle it — including the best way to reheat leftovers so they taste freshly baked. Apple Fritters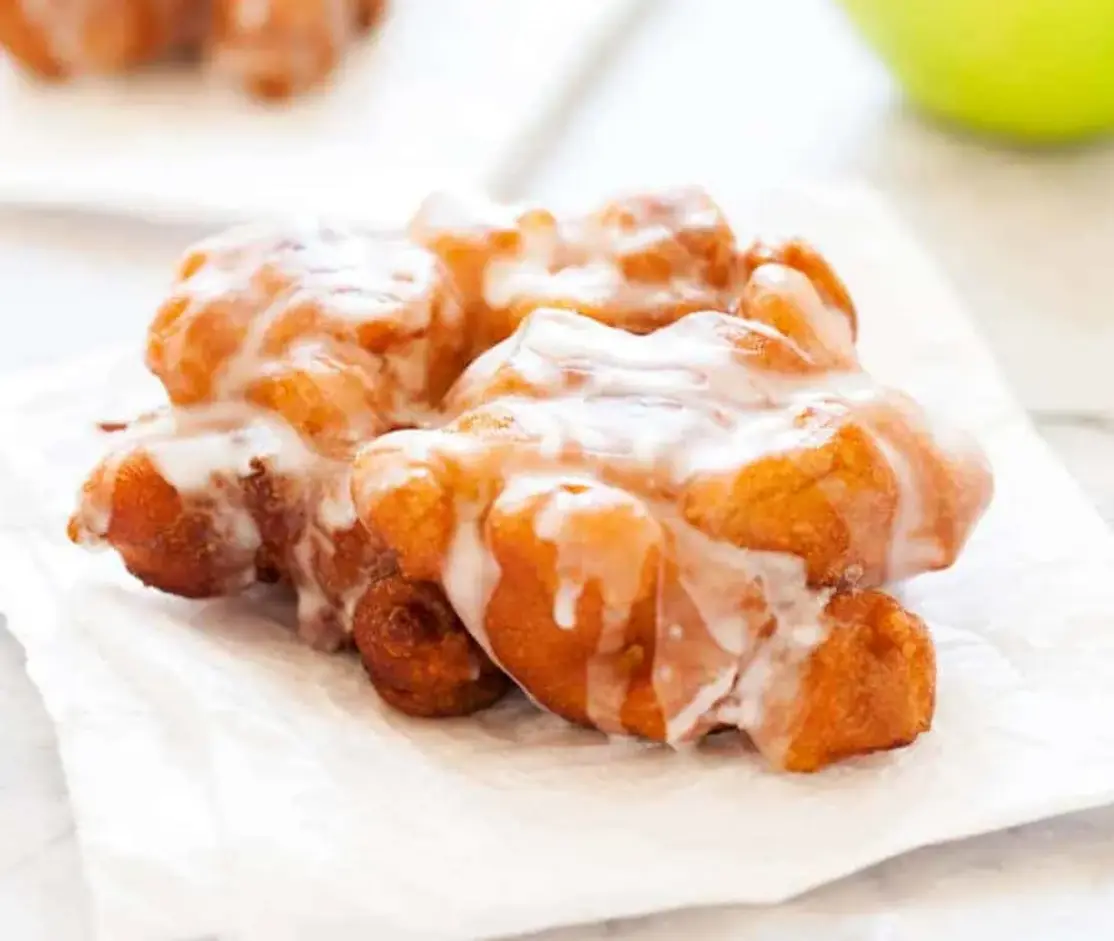 Table of ContentsApple Fritters – The Ultimate Homemade TreatI still remember the first time I made apple fritters in my tiny Parisian apartment. I had just graduated from culinary school and I wanted to combine the rustic apple fritters of my childhood in Morocco with the finesse of a French beignet. The result was a revelation — a cakey, golden-brown fritter with juicy apple pockets and a luscious glaze. These apple fritters are the ultimate homemade treat for a cozy morning or a weekend brunch with friends. The batter is soft and cakey, not dense. Each bite gives way to tender, tangy Granny Smith apples that burst with juice, while the glaze adds a sweet, crackly layer on top. The cinnamon and lemon juice balance the sweetness perfectly. I love the way the kitchen fills with the warm, nutty aroma of frying batter — it reminds me of my mother’s kitchen in Morocco, where she would fry small pastries for our afternoon tea. This recipe is simple but yields incredibly satisfying results. In this version, I take a classic American apple fritter and give it a little French twist: I use a whisked batter rather than a yeast dough, which makes it quicker and still wonderfully airy. I also add fresh lemon juice to the apples to keep them from browning and to add brightness. In the instructions below, I’ll share my pro tip for maintaining the perfect frying temperature and how to tell when the fritters are cooked through. One common mistake is adding the glaze too early — let the fritters cool completely or the glaze will melt right off! Why This Apple Fritters Recipe Is the BestThe Flavor Secret: My apple fritters rely on a simple trick from my Paris training — I use fresh lemon juice to macerate the apples. This not only prevents discoloration but also brightens the apple flavor without making the fritter sour. The cinnamon is just enough to warm up the spices, but not so much that it overpowers the apples. Growing up in Morocco, we always added a pinch of salt to sweets to deepen the flavor, and I do the same here. Perfected Texture: The key to a cakey yet tender fritter is not overmixing the batter. I gently fold the apples into the batter just until combined. This technique keeps the fritters light and fluffy. The high heat of frying at 375°F for 2 to 3 minutes per side ensures a crisp exterior while the inside stays soft and cakelike. My mother always said, “Trust the sizzle,” and that’s exactly what I do. Foolproof & Fast: Unlike many fritter recipes that require yeast or resting time, this one comes together in under 35 minutes. No stand mixer is strictly needed — a whisk and spatula work beautifully. I’ve also tested it with a simple skillet and a candy thermometer, which is the most reliable way to get a golden-brown result every time. Beginners love how quickly they can deliver a restaurant-quality treat. Apple Fritters IngredientsWhen I shop for ingredients in New York City, I always head to the Union Square Greenmarket for fresh Granny Smith apples in the fall. They hold their shape beautifully and offer that perfect tangy-sweet balance. For the flour, I like unbleached all-purpose from King Arthur, which gives a consistent crumb regardless of weather. The rest of the ingredients are pantry staples — I’ll walk you through each one here. Ingredients List
Ingredient SpotlightGranny Smith Apples: These are my go-to for fritters because they stay firm when fried and their tartness cuts through the sweet glaze. In a US grocery store, look for apples that are firm and heavy for their size. If you want a sweeter fritter, try Honeycrisp or Braeburn, but the batter might brown faster because of the extra sugar. Fresh Lemon Juice: This is the secret from my Parisian pastry days. The acid keeps the apples vibrant and adds a subtle brightness that lifts the entire fritter. Do not use bottled juice — it tastes flat. A fresh lemon is essential here. Cinnamon: I prefer Vietnamese cinnamon (Saigon cinnamon) for its warm, bold flavor. Regular supermarket cinnamon works fine, but I find that it needs a little extra time to bloom in the batter. So I whisk it with the dry ingredients to release its oils. Vegetable or Canola Oil: For deep frying at 375°F, use an oil with a high smoke point. Canola is neutral-flavored and affordable. Do not use olive oil — it will burn and impart a bitter taste.
How to Make Apple Fritters – Step-by-StepTrust me — this is the easiest deep-fried treat you’ll ever make. As long as you keep an eye on your oil temperature, you’ll get beautifully golden, fluffy apple fritters every time. Let’s do this together. Step 1: Prepare Dry IngredientsIn a medium bowl, whisk together the flour, baking powder, cinnamon, and salt. Set aside. This step is important because it ensures the cinnamon is evenly distributed so every bite has that warm spice. ⚠️ Common Mistake to Avoid: Skipping the whisk Step 2: Macerate the ApplesIn a separate bowl, combine the lemon juice and diced apples. Toss gently to coat. The lemon juice will prevent the apples from turning brown and also adds a subtle tang that balances the sweetness. Let them sit while you prepare the batter. 💡 emy’s Pro Tip: Dice the apples evenly — about ¼-inch cubes. Step 3: Make the BatterIn the bowl of a stand mixer fitted with the paddle attachment, mix together the sugar and eggs on medium speed until fully combined — about 1 minute. The mixture should be pale and slightly thickened. Reduce the speed to low and add the flour mixture in two additions. Mix until just combined. Then pour in the milk and continue to stir until incorporated. Do not overmix. ⚠️ Common Mistake to Avoid: Overmixing the batter Step 4: Fold in the ApplesUsing a rubber spatula, gently fold the macerated apples into the batter. Fold just until they are evenly distributed. You want the apples to be suspended in the batter, not swimming in excess liquid. If there’s any leftover lemon juice in the bowl, do not add it — that would thin the batter. Step 5: Heat the OilFill a frying pan halfway with oil. Heat over medium heat until the oil reaches 375°F with a candy thermometer. Maintaining this temperature is critical. If the oil is too cool, the fritters will absorb oil and become greasy. If too hot, the outside will burn while the inside stays raw. 💡 emy’s Pro Tip: Use a candy thermometer for accuracy. Step 6: Fry the FrittersDrop ¼ cup of batter into the oil — do not flatten it; let it spread naturally. Fry until golden brown on one side, about 2–3 minutes. Flip carefully with a slotted spoon and fry the opposite side until golden brown. To test for doneness, insert a small knife into the center. If there’s still uncooked batter, fry for another minute. Transfer to a paper towel-lined cooling rack and let cool. Repeat with the remaining batter. Step 7: Make the GlazeIn a small bowl, combine the sifted confectioners sugar, vanilla, and 3 teaspoons of water. Whisk until smooth. Add more water, 1 teaspoon at a time, until a pourable consistency is reached. The glaze should be thick enough to coat the back of a spoon but still flow off it. Step 8: Glaze and ServeDrizzle the glaze over the cooled fritters. Let it set for 5–10 minutes before serving. This allows the glaze to harden slightly so it doesn’t slide off when you bite into the fritter. ⚠️ Common Mistake to Avoid: Glazing hot fritters
Serving & PresentationI love serving apple fritters on a simple wooden platter, with the glaze drizzled over in ribbons and a light dusting of extra cinnamon on top. For a touch of Moroccan flair, I sometimes add a sprinkle of toasted sesame seeds — a trick my mother used on sweet pastries. The nuttiness of the seeds complements the apple and cinnamon beautifully. Pair these fritters with a warm mug of chai, a strong black coffee, or even a cold glass of apple cider — the flavors sing together. If you’re serving them for brunch, place them next to a bowl of Greek yogurt or fresh apple slices. They stay crisp for about an hour after glazing, so they’re perfect for a leisurely weekend morning or as a surprise dessert for guests.
|
|---|